Showing 8182 items
matching mark-doner
-
 Whitehorse Historical Society Inc.
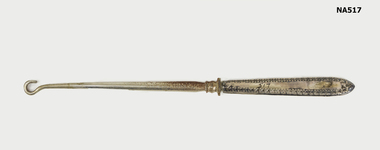
Button Hook
Silver button hook with decorated handle. Silver markcostume accessories, clothes accessories -
 Ballarat RSL Sub-Branch Inc.
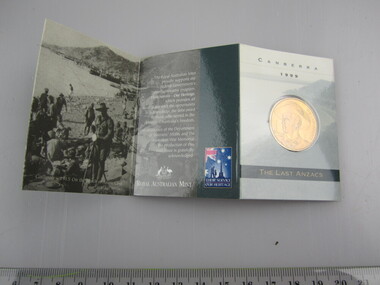
$1 Coin - Commemorative The Last ANZACS 1999
Uncirculated 'C' Mint Mark Coin in presentation foldercollectables, ballarat rsl, ballarat -
 Bendigo Historical Society Inc.
Domestic Object - FLAT IRON
Metal flat iron with handle, makers marks unreadable.domestic equipment, laundering, iron -
 Melbourne Tram Museum
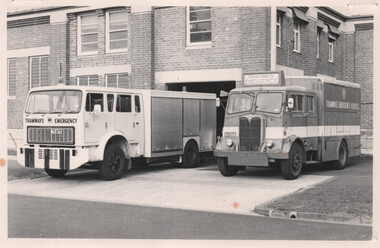
Photograph - Tramways Emergency Vehicles - R10, Melbourne & Metropolitan Tramways Board (MMTB), 1979
Black and white photograph of the "new" and "old" tramway emergency vehicles side by side at South Melbourne depot - when the new vehicle was being fitted out and equipment Shows the registration numbers of the vehicle. These are known by their radio call signs R10. See 1004 and 2528 for other photos.Yields information about the Tramway Emergency vehicle R10.Black and white photograph with staple marks around border.tramways, trams, emergency, mmtb, r10 vehicle, recovery, aec, south melbourne depot -
 Lakes Entrance Historical Society
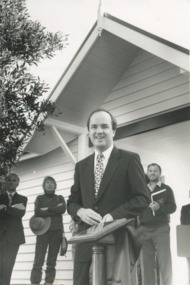
Photograph, Lakes Post Newspaper, Nyerimilang Park Kalimna West Victori, 1/04/1995 12:00:00 AM
opening Gatehouse Shop at Nyerimilang Park Kalimna West Victoria. Nyerimilang Park under management of Parks Victoria, shop built and operated by Friends of Nyerimilang volunteersBlack and white photograph of Minister of Environment Mark Birrell parks, social history -
 Bendigo Historical Society Inc.
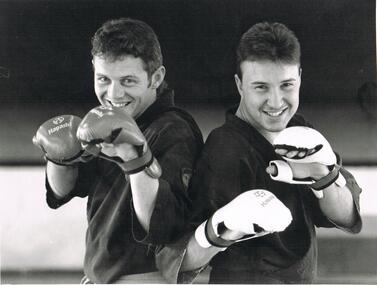
Photograph - BENDIGO ADVERTISER COLLECTION: BOXING
Black and white photograph, boxing, Advertiser pose photograph of Kickboxers Mark Logan and sensei Wayne Polglaise, 24.11.94. Bendigo Advertiser description on back of photo: Kickboxing Kate 24.11.94 L - R Mark Logan (SNV Student) Wayne Polglaise (Sensei) (Absent Mark Verity)Katerecreations, sports, boxing -
 Anglesea and District Historical Society
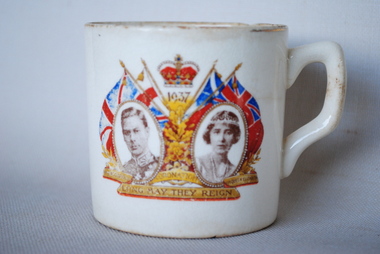
Souvenir Cup, Estimated 1937
Coronation cup, souvenir of George 6th and Queen Elizabeth. White china cup with picture of George 6th and Queen Elizabeth under Crown and date 1937 with flags - Coronation and "Long May they Reign" written below. Crown and flags pictured on back of cup.Mark: Urn. Made in England - plus artisan mark.coronation 1937 souvenir cup -
 Mont De Lancey
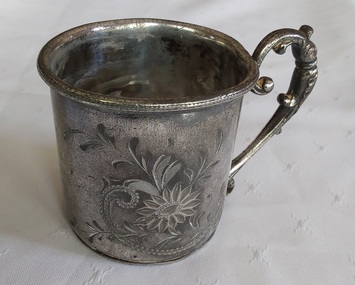
Functional object - Child's Silver Mug, Derby Silver Company, Unknown
In 1872 the Derby Silver Company began production in Derby, Connecticut U.S.A. The company made bathroom-related items, clocks, tableware, flatware, candlesticks and more objects made of silver, silver plate and more. In 1898 the company became a division of the International Silver Company with headquarters in Meriden.CT. It closed down in 1933.A small child's silver plated antique Derby Silver Company cup with a large embossed floral pattern on one side. At the top of the rim is a fine dotted pattern all around it. It has an ornate decorative handle. Underneath is the Makers Mark in a circle with an anchor and crown. Above this circle is stamped: Made in U.S. America.A floral pattern is embossed on one side. On the bootom us stamped : ' Made in U.S America' above a circle Makers Mark 'Derby Silver Company with an anchor and a crown. 1 1/2'silverware, silver plate, mugs, christening mugs -
 Geoffrey Kaye Museum of Anaesthetic History
Container - Bottle, Glass
The bottle was probably used for holding ether as part of a doctors medical kit. The bottle has visible side mould seams on the shoulder which discontinues or fades at the lip, a tooled finish and the glass has bubbles. There is no pontil-scar or mark on the base of the bottle, but there is a circular mould seam on the base.Small square based glass bottle with round neck, possibly used to hold ether. Found inside carry box with other unrelated objects including brown stopper which does not fit in bottle. Appropriate stopper for glass bottle is not present.Small amount of brown residue inside bottle. Bubbles in side of glass. Brown marks on outer bottle. Scratches inside bottle neck. Glass stopper missing.dr [e.s.] holloway, bottle, glass -
 Flagstaff Hill Maritime Museum and Village
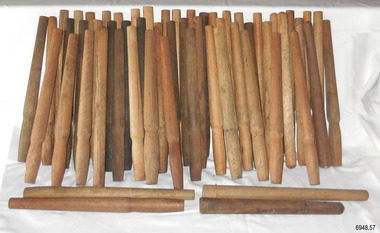
Equipment - Belaying Pins, Late 19th Century
The pins in this collection vary in the timber used and the design. They were found in a warehouse beside Crown Casino in Melbourne, located along the Yarra River, close to the sailing ship "Polly Woodside" and not far from the docks of Port Melbourne. Some of the pins have the mark of a 'Broad Arrow' with 'D ↑ D, which signifies that they were the property of the Australian Government's Department of Defence. Belaying pins are essential equipment on a traditional sailing ship of the 19th and early 20th centuries. They are usually made of wood but some are metal. A belaying pin is used to secure the running ropes of the rigging to the ship's rails using holes drilled onto the rails for that purpose. The belaying pins are inserted into holes in the ship’s rail, drilled for that purpose. When the sail has been raised, the ropes are wrapped around the upper and lower sections of the pins in a figure-eight pattern. The shapes of these belaying pins taper from the rounded end of the handle inwards towards the bottom, which allows them to have a firm fit into the holes in the rails. The rigging rope is wound around the pins in such a way that a tug on the pin's handle pulls it out of the hole and quickly frees the rope and the sail.These belaying pins are significant for their association with sailing vessels, particularly vessels of the late 19th and early 20th centuries. They are also significant for their association with the Port of Melbourne where sailing ships docked to and from the Port of Melbourne. Some of the pins have additional significance for being connected with the Australian Government's Department of Defence.Belaying pin, wooden, simple design, wooden shaft with a wider rounded end on top third, tapering to the centre third, which is wider than a lower third. The bottom has a blunt base. Some of the pins have the three sections divided by a line around their circumferences. This collection of fifty-seven pins of varying shapes, colours and timber. Some of the pins are stained with colour, and some have been left natural Stored in a wooden crate. Some have inscriptions.Marks: (Government Defence Department Broad Arrow) "D ↑ D"sailiing equipment, nautical equipment, rigging, yards, flagstaff hill, maritime museum, maritime village, belaying pin, broad arrow, australian government, australian department of defence, sailing ship, sail -
 8th/13th Victorian Mounted Rifles Regimental Collection
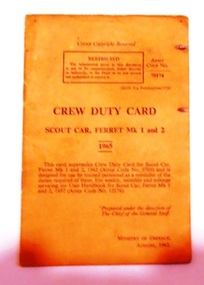
Booklet - Crew Duty Card, August 1965
8th/13th Victorian Mounted Rifles along with other Royal Australian Armoured Corps units were equipped with the British made Ferret Scout Car from late 1950s to 1970s.A representative example of a check list used by Ferret Scout Car crewmen to operate and maintain an armoured fighting vehicle. It is well provenanced, complete and in good condition.Soft covered booklet of 10 pages, saddle-stitched with two metal staples. Allocates duties of crew members of Ferret Scout Car Mark 1 and Mark 2.On back cover "3/455 526 / 455 527"scout car, ferret -
 Federation University Historical Collection
Pamphlet, Eureka 160 1854 - 2014 The Ballarat Reform League Inc
The Eureka Rebellion is a significant part of Ballarat's History. The University curator Clare Gervasoni is a member of the Ballarat Reform League.Small pamphlet done by the Ballarat Reform League, assisted by The Vera Moore Foundation for the 160 year celebration of the Eureka Rebellion eureka rebellion, ballarat reform league, vera moore foundation, monument trail -
Federation University Historical Collection
Booklet, J. Ewins, Bookseller and Stationer, Wood-work Drawing Book, 1920
Brown soft covered book used for woodwork drawings. The drawings were done by Keith Rash of the Ballarat School of Mines.woodwork, exercise book, j. ewins, keith rash -
 Bendigo Historical Society Inc.
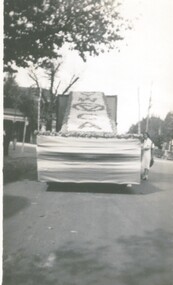
Photograph - YWCA FLOAT
Black and White photo of a YWCA Float for the Easter Fair, Float is centred in the image with YWCA and the logo done in decoration upon itorganization, club/society, ywca, easter fair, ywca -
 Inverloch Historical Society
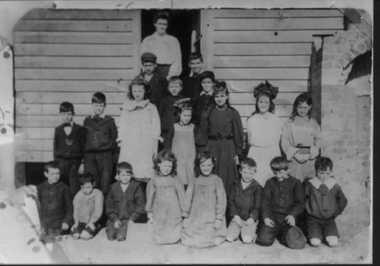
000832 - Photograph - Inverloch Primary School - 1906 - Bertie Ruttle, J Martin, Thyer twins - from Olive Wilson
Photograph missing at time of scanning - March 2018 The copy in this record, as of March 2018 is from a scan done in approximately 2002. -
Stawell Historical Society Inc
Archive, A. V. Cornish Account Book & loose leaves, approx 1918 - 1952
Grey Cover. Repairs have been done on bound side 1918 - 1952. Loose Leaves bound with white tapestawell, business -
 Port Melbourne Historical & Preservation Society
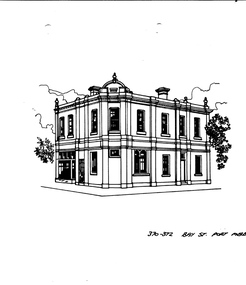
Drawing - Property sketch - 370-372 Bay Street, Formerly "Quinns" hotel, 1990s
Property sketches done for Frank Gordon Real Estate in the 1990s. 370-372 Bay Street, Formerly "Quinns" hotelbuilt environment - commercial, frank gordon & co, bay street, quinns hotel, business and traders - hotels -
 Flagstaff Hill Maritime Museum and Village
Domestic object - Plate, Johnson Bros
The Process of Making Pottery Decorating, Firing, Glazing, Making, Technical There is a rhythm and flow to clay. It can’t be done all at once! Even the making process! It can take weeks to get everything done, especially if you can only work on your pottery once a week! Even though we have three hour classes, it’s often just not enough time! Here is an overview of some of the processes so you have a bit more grasp on some of the technical stuff! Step One – Design There are SO many ideas out there for making stuff in clay! From delicate porcelain jewellery, through to heavy sculptural work and everything in between. Deciding your direction is sometimes not that easy – when you first start, try everything, you will naturally gravitate to the style that you enjoy! The options and variations are endless and can get a wee bit overwhelming too! Check in with me before you start to ensure your ideas will work, what order you might do things, how you could achieve the look you are seeking and any other technical data required! Step Two – Making Clay is thixotropic. This means that as you work with it, the clay first gets sloppier and wetter, before is begins to dry in the atmosphere. For most things, you simply can’t do all parts of the project at once. An example of work order might look like: Get last weeks work out from the shelves Prepare clay for today’s work – roll your clay, prepare balls for throwing, make the first stage of a pinch pot) Clean up last week’s work and put it on the shelf for bisque firing Check that you have any glazing to do – and do enough of it that you will have time to finish your main project Do the next step of your next project – there might be a further step that can’t be complete immediately, in that case, wrap your work well and put onto the shelves. Letting your work rest for a while can really help keep your work clean and professional looking. Many things require bagging under plastic to keep it ready for work the next week – put your name on the outside of the bag so you can find your work easily. We have stickers and markers. Consider how you want to decorate your work – coloured slip can be applied at a fairly wet stage (remembering that it will make your work even wetter!). Trying to apply slip to dry clay won’t work! If you want to do sgraffito – you will need to keep the work leather hard (a state of dryness where you can still work the clay with a little effort and a little water and care). Step Three – Drying Most of the time your work can go into the rack uncovered to let it dry out for the following week. If you want to continue forming or shaping you will need to double bag your work – put your work on a suitable sized bat and put the bat in a bag so the base of the bag is under the bat, then put another bag over the top of the work and tuck the top of the bag under the bat. If you want to trim (or turn) your thrown work the following week, it should also be double bagged. If your work is large, delicate, or of uneven thicknesses, you should lightly cover your work for drying. When considering the drying process, bare in mind the weather, humidity and wind! The hotter and dryer, the faster things dry and work can dry unevenly in the shelves – this can lead to cracking – another time to lightly cover your work for drying. Step Four – Trimming and Cleaning Up Your work is dry! It is called greenware now and it is at it’s most fragile! Handle everything with two hands. I often refer to soft hands – keep everything gentle and with your fingers spread as much as possible. Try to not pick up things like plates too much, and always with both hands! Before your work can be bisque fired it should be “cleaned up”. You work won’t go into the kiln if it has sharp edges – when glazed, sharp edges turn into razor blades! Use a piece of fly wire to rub the work all over – this will scratch a little so be light handed. Use a knife or metal kidney to scrape any areas that require a bit more dynamic treatment than the fly wire offers! Finally, a very light wipe over with a slightly damp sponge can help soften and soothe all of your edges and dags! Trimming thrown work: If you are planning to trim (or turn) your thrown work (and you should be), make sure you bag it well – your work should be leather hard to almost dry for easiest trimming. Use this step to finish the work completely – use a metal kidney to polish the surface, or a slightly damp sponge to give a freshly thrown look. Wipe the sponge around the rim after trimming, and check the inside of the pot for dags! Trimming slip cast work: Usually I will trim the rims of your work on the wheel the following day to make that stage easier, however you will still need to check your work for lumps and bumps. Last but not least – check that your name is still clearly on the bottom of your work. Step Five – Bisque Firing When the work is completely dry it can go into the bisque kiln. The bisque kiln is fired to 1000°C. This process burns off the water in the clay as well as some of the chemically bound water. The structure of the clay is not altered that much at this temperature. Inside the bisque kiln, the work is stacked a little, small bowl inside a larger bowl and onto a heavy plate. Smaller items like decorations or drink coasters might get stacked several high. Consideration is paid to the weight of the stack and shape of the work. A bisque kiln can fire about one and a half times the amount of work that the glaze kiln can fire. The firing takes about 10 hours to complete the cycle and about two days to cool down. Once it has been emptied the work is placed in the glaze room ready for you to decorate! Step Six – Glazing Decorating your work with colour can be a lot of fun – and time consuming! There are three main options for surface treatment at this stage: Oxide Washes Underglazes Glazes Washes and underglazes do not “glaze” the work – It will still need a layer of glaze to fully seal the clay (washes don’t need glaze on surfaces not designed for food or liquid as they can gloss up a little on their own). Underglazes are stable colourants that turn out pretty much how they look in the jar. They can be mixed with each other to form other colours and can be used like water colours to paint onto your work. Mostly they should have a clear glaze on top to seal them. Oxides are a different species – the pink oxide (cobalt) wash turns out bright blue for instance. They don’t always need a glaze on top, and some glazes can change the colour of the wash! The glazes need no other “glaze” on top! Be careful of unknown glaze interactions – you can put any combination of glaze in a bowl or on a plate, but only a single glaze on the outside of any vertical surface! Glazes are a chemical reaction under heat. We don’t know the exact chemicals in the Mayco glazes we use. I can guess by the way they interact with each other, however, on the whole, you need to test every idea you have, and not run the test on a vertical surface! Simply put, glaze is a layer of glass like substance that bonds with the clay underneath. Clay is made of silica, alumina and water. Glaze is made of mostly silica. Silica has a melting point of 1700°C and we fire to 1240°C. The silica requires a “flux” to help it melt at the lower temperature. Fluxes can be all sorts of chemicals – a common one is calcium – calcium has a melting point of 2500°C, however, together they both melt at a much lower temperature! Colourants are metal oxides like cobalt (blue), chrome (green through black), copper (green, blue, even red!), manganese (black, purple and pink) iron (red brown), etc. Different chemicals in the glaze can have dramatic effects. for example, barium carbonate (which we don’t use) turns manganese bright pink! Other elements can turn manganese dioxide brown, blue, purple and reddish brown. Manganese dioxide is a flux in and of itself as well. So, glazes that get their black and purple colours, often interact with other glazes and RUN! Our mirror black is a good example – it mixes really well with many glazes because it fluxes them – causes them to melt faster. It will also bring out many beautiful colours in the glazes because it’s black colouring most definitely comes from manganese dioxide! Glaze chemistry is a whole subject on it’s own! We use commercial Mayco glazes on purpose – for their huge range of colour possibilities, stability, cool interactions, artistic freedom with the ability to easily brush the glazes on and ease of use. We currently have almost 50 glazes on hand! A major project is to test the interactions of all glazes with each other. That is 2,500 test tiles!!!! I’m going to make the wall behind the wheels the feature wall of pretty colours! Step Seven – Glaze (Gloss or sometimes called “Glost”) Firing Most of the time this is the final stage of making your creation (but not always!) The glaze kiln goes to 1240°C. This is called cone 6, or midrange. It is the low end of stoneware temperatures. Stoneware clays and glazes are typically fired at cone 8 – 10, that is 1260 – 1290°C. The energy requirement to go from 1240°C to 1280°C is almost a 30% more! Our clay is formulated to vitrify (mature, turn “glass-like”) at 1240°, as are our glazes. A glaze kiln take around 12 hours to reach temperature and two to three days to cool down. Sometimes a third firing process is required – this is for decoration that is added to work after the glaze firing. For example – adding precious metals and lustres. this firing temperature is usually around 600 – 800°C depending upon the techniques being used. There are many students interested in gold and silver trims – we will be doing this third type of firing soon! After firing your work will be in the student finished work shelves. Remember to pay for it before you head out the door! There is a small extra charge for using porcelain clay (it’s more than twice the price of regular clay), and for any third firing process! Once your work has been fired it can not turn back into clay for millennia – so don’t fire it if you don’t like it! Put it in the bucket for recycling. https://firebirdstudios.com.au/the-process-of-making-pottery/Ceramics have evolved over thousands of years.A white earthenware side plate with a gadroon edge. Has water marks and chips on front.‘Johnson Bros England Reg No 15587’flagstaff hill, warrnambool, shipwrecked-coast, flagstaff-hill, flagstaff-hill-maritime-museum, maritime-museum, shipwreck-coast, flagstaff-hill-maritime-village, johnson bros, ceramics, tableware -
 Ballarat Tramway Museum
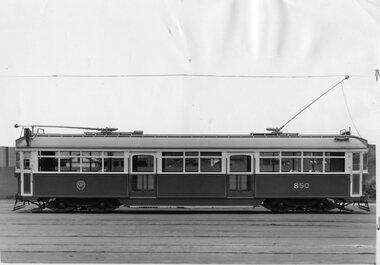
Photograph - Black & White Photograph/s, Sutcliffe Pty Ltd, 1939
Black and white photograph of MMTB SW6 850 probably soon after n. Side on photograph of tram. Destination City gives build date 1939 and notes that car was built with a tail light/s, which is visible at the right end of the tram. Has cropping marks in ink on right side of photograph. On rear is a type note (glued on sheet of paper) specifications of the tramcar and car dimensions. Destination City 5th edition gives a view of the tram - 3/4 front on showing the tail light arrangement - p41. Also on rear is "Sutcliffe Pty Ltd, Commercial Photographers 94 Elizabeth St. Melbourne, Cent 1500" stamp in light blue ink. and date stamp of print - "12 Jan 1946". See Destination City, 4th Edition and 5th edition.On rear in ink is notations "57", and measurement "4 9/16" with cropping mark.trams, tramways, mmtb, sw6 class, tram 850 -
 Kiewa Valley Historical Society
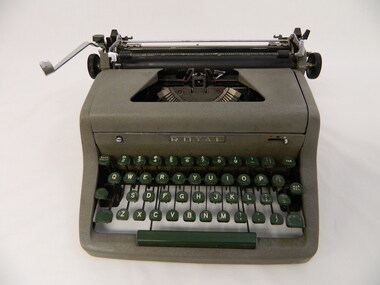
Typewriter - Manual, c1966
Typewriters pre dated computers. This typewriter was possibly used in an office or at home. It was used with an inked tape which may have been only black or had both red and black ink along it. Multiple copies of the material being typed were done using carbon paper inserted between sheets of paper. The original paper was easily identified.Used in the Kiewa Valley.Small grey metal typewriter with deep green key board with gold letters on top.The margin rod is marked in inches and it has keys for pounds, dollars and cents, inches and fractions. The loading of A4 paper is done manually. The keys that hit the paper are stainless steel. The keyboard slopes up to the top which is partially hollow with a gap that exposes the stainless steel keys. The cylinder is at the top and at the back with control knobs on each side. This typewriter has 2 sheets of paper with carbon paper between them to demonstrate how copies were made (but there isn't an inked tape in it so the copies aren't authentic)Centre front: "Royal" Letters of the alphabet on the keys. Centre bottom back: "Royal" and below on a plate: "Built in the British Empire / Protected by American / and Foreign Patents"office. typewriter. royal. carbon paper. decimal currency. office equipment. writing. -
 Learmonth and District Historical Society Inc.
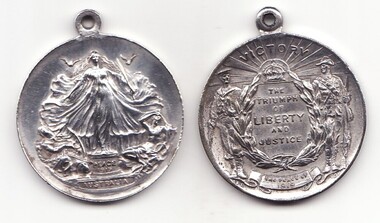
Peace 1919 Medal, Medal Peace 1919, 1919
Awarded to: School Children of the Commonwealth of Australia Other Details: Of the commemorative medals issued to mark the end of the First World War, the most common was the so-called 'Peace' or 'Victory' medal issued to every child in Australia aged 0-14 years (and aged up to 16 if parents were in the armed forces). The medal was designed by Charles Douglas Richardson, better known for his work as a sculptor. Time constraints as well as pressure from the production of other victory medals meant that no single manufacturer could make the 1,670,000 medals. Six were therefore selected: Amor, Stokes, Schlank, Parkes, Angus & Coote (who later withdrew) and Platers. The medals were silvered bronze, with silver issues for special presentations. The Defence Department supplied a red, white and blue striped ribbon and pin. Distribution began in March 1919. Victorian school children received their medals on Friday 18 July and on 'Peace Day' on Saturday 19 July.To commemorate the end of World War 1.Round white metal medals issued to mark the end of WW1. On the front "PEACE 1919", and on the reverse, "VICTORY", middle of the medal "THE TRIUMPH OF LIBERTY AND JUSTICE". on the bottom "THE PEACE OF 1919". With a plain edge.Peace with two flying doves on pedestal inscribed, PEACE / 1919 below AUSTRALIA; figure in chains on left and another entangled in bush to right (obverse) Australian sailor and soldier support wreath; above, VICTORY; within, THE / TRIUMPH / OF / LIBERTY / AND / JUSTICE; below on plaque, THE PEACE OF 1919(reverse)world war 1, peace, victory medal australia -
 Clayton RSL Sub Branch
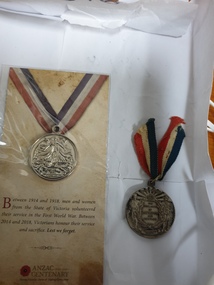
Medal, Peace Medal, 1919
Awarded to: School Children of the Commonwealth of Australia Other Details: Of the commemorative medals issued to mark the end of the First World War, the most common was the so-called 'Peace' or 'Victory' medal issued to every child in Australia aged 0-14 years (and aged up to 16 if parents were in the armed forces). The medal was designed by Charles Douglas Richardson, better known for his work as a sculptor. Time constraints as well as pressure from the production of other victory medals meant that no single manufacturer could make the 1,670,000 medals. Six were therefore selected: Amor, Stokes, Schlank, Parkes, Angus & Coote (who later withdrew) and Platers. The medals were silvered bronze, with silver issues for special presentations. The Defence Department supplied a red, white and blue striped ribbon and pin. Distribution began in March 1919. Victorian school children received their medals on Friday 18 July and on 'Peace Day' on Saturday 19 July.To commemorate the end of World War 1Round white metal medals issued to mark the end of WW1. On the front "PEACE 1919", and on the reverse, "VICTORY", middle of the medal "THE TRIUMPH OF LIBERTY AND JUSTICE". on the bottom "THE PEACE OF 1919". With a plain edge.Peace with two flying doves on pedestal inscribed, PEACE / 1919 below AUSTRALIA; figure in chains on left and another entangled in bush to right (obverse) Australian sailor and soldier support wreath; above, VICTORY; within, THE / TRIUMPH / OF / LIBERTY / AND / JUSTICE; below on plaque, THE PEACE OF 1919(reverse) -
 Waverley RSL Sub Branch
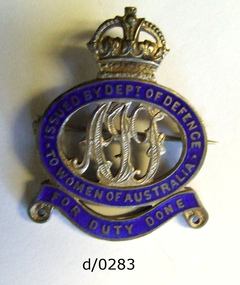
Badge, For Duty Done
Female Relatives Badges were issued to the wife and/or mother (or nearest female relative) of those on active service overseas during the First World War Probably issued to the Mother of Henry Claude RoussacSterling Silver (marked) oval badge with blue enameled oval surrounding stylized letters AIF sumounted by a crownAIF ISSUED BY THE DEPARTMENT OF DEFENCE TO WOMEN OF AUSTRALIA FOR DUTY DONE 28735 STG SIL Nm McLEANroussac henry claude, female relatives badge, for duty done -
 Frankston RSL Sub Branch
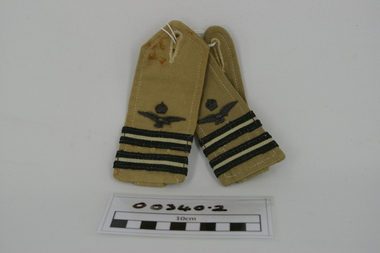
RAAF EPAULETTES, FLIGHT LIEUTENANT, No indication
Epaulettes (2) for Flight Lieutenant, summer use, with florentine bronze crown & eagle badge (known as RAAF Officer Eagle; Small). This pair of summer dress uniform epaulettes. The epaulettes are made up of shoulder straps and a tongue sewn underneath each strap. The straps and tongues both have a button hole with sewn edges for attachment to the summer dress tunics. The epaulettes are secured to the tunic by buttons. They have no physical inscriptions or markings but have a badge comprising crown above and eagle done in florentine bronze. -
 Warrnambool and District Historical Society Inc.
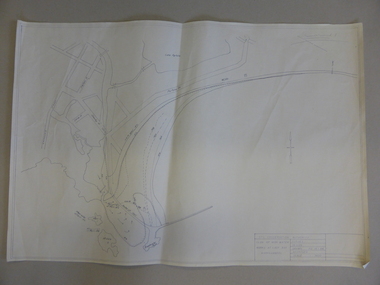
Map, Soil conservation authority:plan of high water marks at Lady Bay Warrnambool, 1984
This map documents the changing state of Lady Bay from around 1870 until 1976. It depicts the changing high water mark over that period and the main outlet of the Merri River in 1872 and 1976.This map provides a useful and significant insight into the ever changing face of Lady Bay from the 1870’s through to 1980’s. Cream paper map drawn with black ink showing Lady Bay and South Warrnambool section of Warrnambool. In lower RH corner Soil conservation AuthorityPlan of High water marks at Lady Bay Warrnambool. Drawn P.D. 19.1/84. Scale 1:3600. Written on back in black pencil: Lady Bay Historical HWM lady bay map, merri river 1872- 1976, merri river 1872- 1976, history of warrnambool -
 Federation University Historical Collection
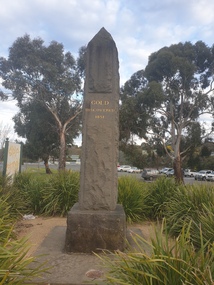
Photograph, Clare Gervasoni, Ballarat Gold Discovery Obelisk, 06/09/2022
The obelisk is not on the original site. Coloured photograph of a basalt obelisk to mark the discovery of gold at Ballarat.ballarat gold discovery obelisk -
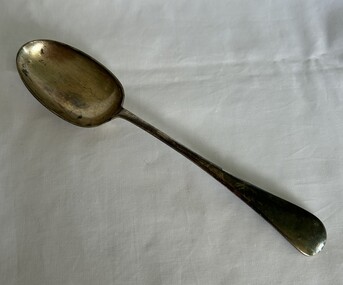 Greensborough Historical Society
Functional object - Cutlery, Serving spoon, 1950s
Silver or silver plate serving spoonServing spoon, possibly silver or silver plate. No manufacturers marks.cutlery, spoons -
Running Rabbits Military Museum operated by the Upwey Belgrave RSL Sub Branch
Rifle
Lee Enfield No 1 Mark 3 .303 SN 70043weapon, 1941, army -
Bendigo Historical Society Inc.
Archive - MICHAEL GROUNDS, 30.9.2006
DVD. Michael Grounds interview on Mark Twain. ABC 30.9.2006. -
 Robin Boyd Foundation
Slide, Robin Boyd, 1950
Penleigh Boyd, Robin and Patricia Boyd's son, writes “Prior to 1950 Robin, like most other amateur or hobby photographers, took black and white printed photographs. The oldest slides date from 1950 when Robin and Patricia travelled to Europe on Robin’s Robert Haddon Travelling Scholarship.” In 1948 Robin Boyd was awarded ‘joint first place’ in the Robert Haddon competition for his design of Mildura art gallery. The scholarship helped fund their first overseas trip. Robin and Patricia were passengers on the Greek ship “Cyrenia” departing in May 1950, passing through the Suez Canal and landing in Genoa five weeks later. For six months, they travelled extensively throughout Europe (predominantly driving themselves) - France, Italy, United Kingdom, Sweden, Denmark, Germany, Austria, Switzerland and Spain.Colour slide in a mount. St Marks Square, Venice, Italy11 (Handwritten)haddon travelling scholarship, haddon, robin boyd, slide