Showing 27529 items
matching rd ?
-
 Melbourne Tram Museum
Slide - Set of 9, 17/03/1966 12:00:00 AM
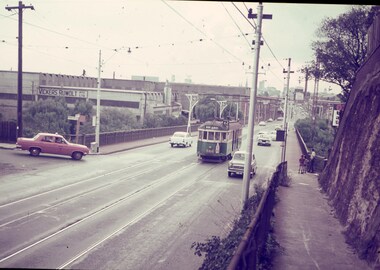
Set of 8 Agfa colour blue white plastic mount slides, photo by Keith Caldwell of trams on the Royal Park line in the vicinity of the Royal Park railway line. .1 - W2 328 (West Coburg Bell St route 55) passing under the railway bridge, with another W2 (362 or 382?) behind. Tram 328 has adverts for Remy Martin and Kleenex tissues. .2 - W2 521, route 55, passing a tram stop. Note the overhead light. .3 -W2 456, route 55 West Coburg via William St, passing under the railway bridge. .4 - not used, .5 - W2 355 with railway bridge in background, Domain Road, Route 56. .6 - W2 506 climbing the hill, Domain Road, route 55. Tram has adverts for White Crow tomato sauce. .7 - W5 812, arriving at stop (Section sign), to Carnegie, route 4. The tram stop has the fares to the city (15d and 7d). In the background is a Perway box. .8 - W2 227 (Domain Road route 56) with the railway station and two other trams in the background. .9 - SW6 (Route 55) outbound with the zoo walls in the background. Tram has advert for Coffey Ford. 17/3/1966In ink "17 iii 66"trams, tramways, royal park, route 55, west coburg, w2 class, domain rd, route 56, w5 class, sw6 class, tram 328, tram 521, tram 456, tram 355, tram 506, tram 812, tram 227, tram 913 -
 Melbourne Tram Museum
Slide - Set of 2, 19/03/1966 12:00:00 AM
Set of 2 Agfa colour blue white plastic mount slides, photo by Keith Caldwell of: .1 - W2 566 climbing the hill in Barkers Road, Kew, running a Mont Albert, route 452. In the background is the Vicker Ruwolt works. The tram has a milk advert. .2 - W2 434, ditto - note the passengers leaning on the barrier rail. Tram has White Crow tomato sauce adverts. 19/3/1966In ink "19 iii 66"trams, tramways, w2 class, barkers rd, mont albert, route 42, tram 566, tram 434 -
 Melbourne Tram Museum
Slide - Set of 3, March 1967?
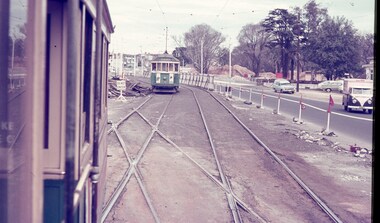
Set of three Agfa colour blue white plastic mount slides, photo by Keith Caldwell of : .1 - W2 651 outbound on route 15 to St Kilda beach negotiating trackwork at the St Kilda Junction. .2 - view from Upton Road overpass looking east at the Queensway road and tram track construction .3 - ditto, looking west shows the St Kilda Road bridge section being constructed c early, possibly March 1967.1 - "BXBU" and on .3, .1 also has "MBR River" in ink.trams, tramways, st kilda rd, st kilda junction, w2 class, route 15, trackwork, queensway, tram 651 -
 Melbourne Tram Museum
Slide, March 1968?
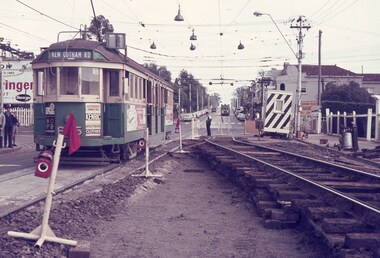
Agfa colour blue white plastic mount slide, photo by Keith Caldwell of W2 605 or 625, southbound in Glenferrie Road, at the Kooyong level crossing. Glenferrie Road is being reconstructed with the north bound track in a temporary location. Tram has advert for Kenric clothes and Exide? batteries. The night watchman is watching the tram. His cabin is behind him.. The tram is showing (incorrectly) Kew Cotham Road destination. This is a Camberwell Depot tram bound for Malvern Town Hall assisting movement of School children in Glenferrie Road in the afternoon. Note the Camberwell Run number in the driver cab window. On the north bound track is possibly a SW6. Slide undated - c1968?trams, tramways, glenferrie rd, kooyong, level crossings, temporary track, w2 class, trackwork, kew- cotham road, tram 605, tram 625 -
 Melbourne Tram Museum
Slide, 19/04/1960 12:00:00 AM
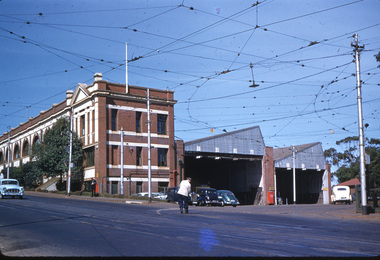
Colour slide, Kodak, white cardboard of the Hawthorn Tram depot from Wallen Road looking into the depot fan and sheds. Has a man in white jacket sweeping? the track. Shows the stairs to the first floor.Hand writing on rear in ink "19-4-60, Depots, Hawthorn Tram Depot"trams, tramways, hawthorn depot, wallen rd -
 Melbourne Tram Museum
Slide, 10/11/1961 12:00:00 AM
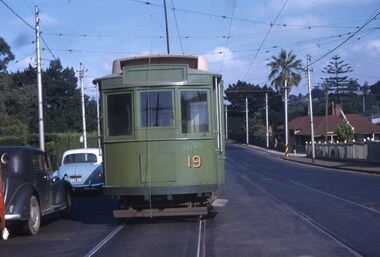
Colour slide, Kodak, white cardboard of MMTB Freight tram No. 19 in Wallen Road, Hawthorn, on the west side of the existing depot. The house in the photo remains. Slide dated 13-2-1961.Hand writing on rear in ink "13-2-61, Tram No. 19"trams, tramways, freight tram, wallen rd, work trams, tram 19 -
 Melbourne Tram Museum
Slide, 28/05/1960 12:00:00 AM
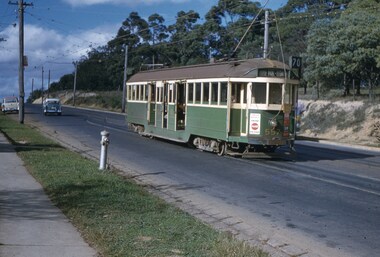
Colour slide, Kodak, white cardboard of Tram 557 waiting on passing loop, Riversdale Road, Wattle Park, outbound to Wattle Park, Elgar Road, route 70/ Has adverts for Coca Cola, 3AW. Also has an Auxiliary board - Football? There is a fire hydrant in the view and the tram stop sign. Slide dated 28-5-1960.Hand writing on rear in ink "28-5-60- Track - Tram 557 waiting on passing loop, Riversdale Road, Wattle Park, Melbourne Vic"trams, tramways, w2 class, wattle park, riversdale rd, route 70, tram 557 -
 Melbourne Tram Museum
Slide, 9/03/1960 12:00:00 AM
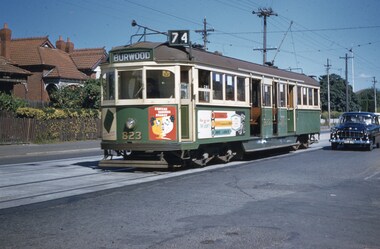
Colour slide, Kodak, white cardboard of Tram 823, in Riversdale Road, Hawthorn with the destination of Burwood Route 74. Tram has adverts for Chateau Taundra Brandy and ? Slide dated 9-3-1960.Hand writing on rear in ink "9-3-60- Track - Tram 823 Riversdale Road Melbourne"trams, tramways, riversdale rd, burwood, route 74, w5 class, tram 823 -
 Melbourne Tram Museum
Slide, 15/03/1960 12:00:00 AM
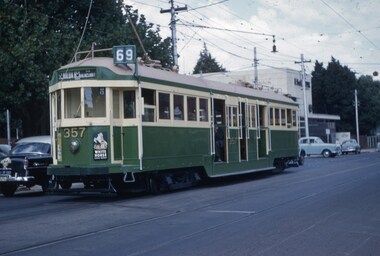
Colour slide, Kodak, white cardboard of Tram W2 357, with the number above the headlight, route 69, St Kilda Beach via Balaclava in Glenferrie Road Malvern. Has advert for White Horse Whiskey. Slide dated 15-3-60.Hand writing on rear in ink "15-3-60 - Tram 357, number raised, Glenferrie Road, Malvern Vic>"trams, tramways, st kilda beach, route 69, w2 class, glenferrie rd, tram 357 -
 Melbourne Tram Museum
Slide, 5/04/1960 12:00:00 AM
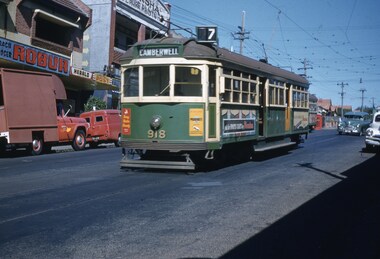
Colour slide, Kodak, white cardboard of tram SW6 918, in Burke Road, Gardiner after turning from Malvern Road, route 7, Camberwell. In the background are the shops since removed advertising Robur tea and the Herald and the Australasian Post. Slide dated 5-4-60.Hand writing on rear in ink "5-4-60 tram 918 Burke Road Gardiner Victoria"trams, tramways, sw6 class, camberwell, burke rd, route 7, gardiner, tram 918 -
 Melbourne Tram Museum
Slide, 14/06/1960 12:00:00 AM
Colour slide, Kodak, white cardboard of trams W5 725 (North Balwyn) and W2 408 (Spencer St), both route 48 at the intersection of Church St, Burwood Road and Bridge Road Hawthorn with the driver? of 725 getting on the roof to retrieve a trolley pole (with wheel) that cant be positioned because of the overhead span wire. Note the street light behind the tram. 725 has an advert for Penfolds Wine. Slide dated 14-6-60. See Reg Items 4361 for the Chairman Robert Risson on the roof of a tram and 3973 for a related newspaper cutting following the death of a driver.Hand writing on rear in ink "14-6-60 - Retrieving a trolley pole Church St Hawthorn."trams, tramways, route 48, north balwyn, trolley poles, church st, burwood rd, w2 class, w5 class, tram 725, tram 408 -
 Melbourne Tram Museum
Slide - Set of 5, 17/10/1959 12:00:00 AM
Set of five Colour slides, Kodak, brown cardboard of the removal of the Elsternwick Level crossing on 17-10-1959 .1 - looking east along Glenhuntly Road, showing the level crossing, concrete truck and road protection signs and the temporary track. .2 - W2 287 traversing the temporary track over the level crossing. Tram has the destination of route 4B, Sth Caulfield via Glenhuntly Road. Also has adverts for APEX and Fitwear socks. .3 - ditto on the crossing. .4 - ditto past the crossing. .5 - W2 551 (Carnegie Route 4) and L 103 (City route 4B) on the level crossing. 551 has adverts for Castle Vintage Sherry and Apex. 103 has adverts for Remy Martin Brandy, Alongside is a Victorian Railways sign advertising trains to the city.Hand writing on rear in ink; .1 - 17-10-59 - KFH1 .2 - KFH 1a .3 - KFH 1b .4 - KFH 1c .5 - KFH 1etrams, tramways, elsternwick, level crossings, railway squares, w2 class, l class, carnegie, south caulfield, glenhuntly rd, tram 287, tram 551, tram 103 -
 Melbourne Tram Museum
Slide - Set of 7, 17/10/1959 12:00:00 AM
Set of seven Colour slides, Kodak, brown cardboard of the removal of the Elsternwick Level crossing on 28-5-1960 .1 - looking down into he cutting through the old goods yard - has the platform being installed. .2 - X2 675 crossing the new bridge with the level crossing in the background. .3 - L103, to the city, route 4, with the conductor watching the trolley pole. Has an advert for white horse whiskey. .4 - W2 269, route 4 to Carnegie, on the level crossing. Has a building in the background, advertising Esquire car sales. .5 - A Tait train on the crossing no gates in operation. .6 - ditto, to Sandringham .7 - W6 965, route 4 to the City on the crossing. Has two railway hoardings in the background advertising BP Benzol petrol and Saunders Pure Malt extract and part of a sign for Penfolds. The tram has an advert for Porsche cars. Note the tram stop sign on the small post alongside the tram.Hand writing on rear in ink; .1 - 28-5-60 - Railway cutting for underpass at Elsternwick Vic. .2 - ditto, tram 675 on temporary tracks in Glenhuntly Road, Elsternwick Vic. .3 - tram 103 on temporary tracks in Glenhuntly Road, Elsternwick Vic. .4 - tram 269 on temporary tracks in Glenhuntly Road, Elsternwick Vic. .5 - Elsternwick station new crossing .6 - Temporary track Elsternwick Vic .7 - Tram 965 at temporary stop at Elsternwick Vic.trams, tramways, elsternwick, level crossings, railway squares, w2 class, l class, carnegie, south caulfield, glenhuntly rd, w6 class, vr -
 Melbourne Tram Museum
Newspaper, "Five Million blocks to pave city streets - Big contracts begin", 17/06/1916 12:00:00 AM
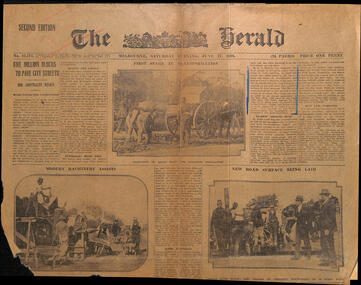
Newspaper clipping, from The Herald, 17/6/1916, 2nd Edition - titled "Five Million blocks to pave city streets - Big contracts begin" about the repaving of St Kilda Road with wood blocks . has three photos of the work, using concrete foundations. Notes the future electric trams in the last paragraph.trams, tramways, cable trams, track, wood blocks, st kilda rd -
 Melbourne Tram Museum
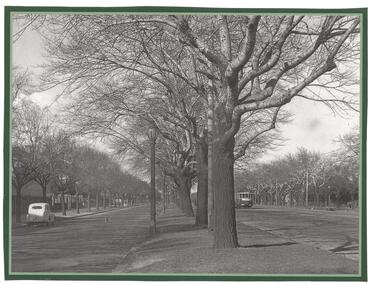
Photograph - Black and White photograph, early 1940
Black and white photograph white a grey and green border of possibly tram W2 class 219, southbound in St Kilda Road with one parked car on the left hand side. Shows the nature of St Kilda Road during the winter. Photo during the early 1940's with the tram having white stripes for war time. The tram has the destination of East Brighton, Route 64.trams, tramways, st kilda rd, route 64, east brighton, tram 219 ?, w2 class, world war 2 -
 Melbourne Tram Museum
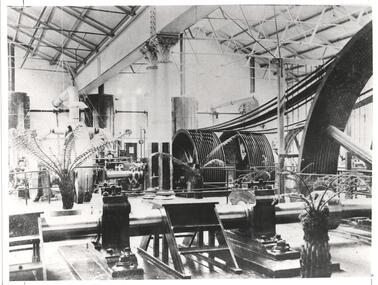
Photograph - Black and White photograph, c1900
Black and white photograph of the interior of the engines and rope drive in the Toorak Engine House - see page 5 of Reg Item 2299, for an article on the engine house and photograph details. State Library of Vic image M5 15304/1, Page 20 Image 1. 2nd copy added 18/3/2021On rear in pencil and ink various dimensions and instructions regarding printing of the image. In the top left hand corner "Latrobe". Stamped on rear "Photofix Photographic 15 Latrobe St Melbourne Phone 662 3904"trams, tramways, cable trams, toorak rd, winding houses, chapel st -
 Melbourne Tram Museum
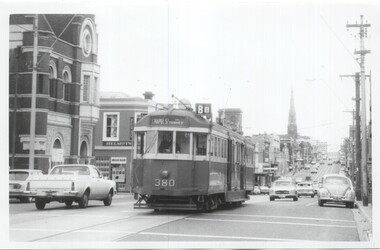
Photograph - Set of 4 Black & White Photograph/s, c1975
Set of four Black and White photographs of W2 380. Photos not dated, c1975. .1 - Toorak Road, just past Osborne St, South Yarra, with the South Yarra Post Office in the view. Also Helmuts Milk Bar? Tram has the destination of Chapel St, route 8B. .2 - Turning from Park St South Yarra into Toorak Road. Tram has the destination of Toorak, route 8. Note the Bundy clock on the left hand pole. .3 - In St Kilda Road, at the Arts Centre, with destination of Elsternwick, Route 4E. .4 - turning from Toorak Road into Park St, route 8. See image i5 for envelope which has the names of Clive Gibson, Dave Menzies and date 1975 which could be the date the photos were sent to Dave Menzies for some reason.trams, tramways, w2 class, bundy clock, route 8b, toorak road, south yarra, park st, route 8, st kilda rd, route 4e, elsternwick, tram 380 -
 Melbourne Tram Museum
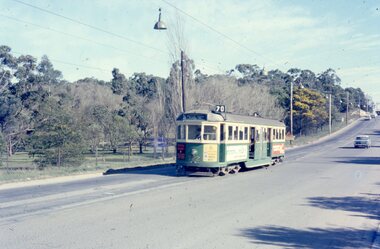
Photograph - Four colour slides - Wattle Park Single Line, Warren Doubleday, 1-8-1970
Set of four photographs taken at the time of the conversion of the Wattle Park route, in Riversdale Road from single line to double track between Warragul Road and the terminus, alongside Wattle Park itself. Yields information on the single line operation of the Wattle Park line prior the conversion to double track operation.Set of four colour Anscochrome slides, of single line operations on the Wattle Park line. .1 - W5 722 on Wattle Park single line, Sat. p.m. .2 - W2 388 meets W2 344 on Wattle park loop - shows the commencement of roadworks. .3 - SW5 853 from the park .4 - W5 738 at Warragul Road - shows the gates to Wattle park and the Caltex Service Station sign.Has photographers slide numbers on each slide.wattle park, route 70, riversdale rd, w2 class, w5 class, sw5 class, trackwork, tram 722, tram 388, tram 853, tram 738, trams, tramways -
 Melbourne Tram Museum
Photograph - Black & White Photograph/s, 20/09/1984 12:00:00 AM
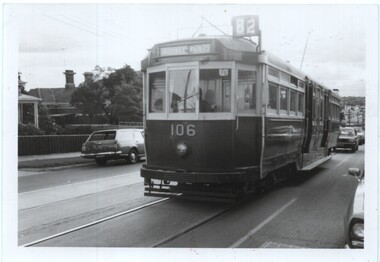
Black and white photograph of L 106 in Maribyrnong Road, Ascot Vale 20-9-1985 during a MTA Maintenance Strike. Photo by Dave Cochrane.On rear in ink "19 - 106 (Moonee Ponds, Route 82) in Revenue service, 20-9-84 (Ascot Vale), Footscray M/Ponds route during MTA Maintenance Strike. Dave Cochrane. Has the ARHS collection stamp on rear.trams, tramways, l class, maribyrnong rd, ascot vale, mta, moonee ponds, route 82, tram 106 -
 Melbourne Tram Museum
Photograph - Colour prints, 1979 to 2005
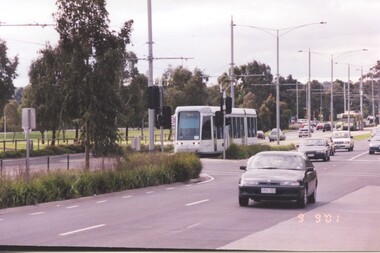
Set of 44 colour prints of photos taken by Roy Mitchell between 1979 and 2005 For a listing of the prints see htd5640list.pdf. Word file and scanning by Mal Rowe For individual photo images see: hawthtramcoll\photo_collections\htd5640-Roy_Mitchell-PartB images 25 to 69 and Roy Mitchell photos.docx Roy Mitchell photos.pdf RoyM25_Citadis-test-run_Plenty Rd_9Sep2001_Roy Mitchell.jpg RoyM26_Citadis-test-run_Plenty Rd_9Sep2001_Roy Mitchell.jpg RoyM27_3536_Glenferrie Rd_14Aug2004_Roy Mitchell.jpg RoyM28_3513_Swanston St_4Aug2004_Roy Mitchell.jpg RoyM29_3028_Brunswick St-siding_14Dec2002_Roy Mitchell.jpg RoyM30_1021_Park St_StKilda_24Dec2002_Roy Mitchell.jpg RoyM31_Berlin3007_Moomba_Swanston St_11Mar2002_Roy Mitchell.jpg RoyM32_Milan1692_Moomba_Swanston St_11Mar2002_Roy Mitchell.jpg RoyM33_3004_LaTrob eSt_11Mar2002_Roy Mitchell.jpg RoyM34_3004-under-test_Spencer St_29Jan2002_Roy Mitchell.jpg RoyM35_862_LaTrobe St_24Dec2002_Roy Mitchell.jpg RoyM36_018_Docklands_20Jan2003_Roy Mitchell.jpg RoyM37_018_Flinders St_20Jan2003_Roy Mitchell.jpg RoyM38_018_Simpson St-shunt_22Jan2003_Roy Mitchell.jpg RoyM39_018_Docklands_22Jan2003_Roy Mitchell.jpg RoyM40_946_Docklands-from-Flinders St_Roy Mitchell.jpg RoyM41_946_Park St_St Kilda 8Feb2003_Roy Mitchell.jpg RoyM42_282_Box Hill_4May2003_Roy Mitchell.jpg RoyM43_282_Box Hill_4May2003_Roy Mitchell.jpg RoyM44_Box Hill_looking west_4May2003_Roy Mitchell.jpg RoyM45_3501_S tKilda_18Jun2003_Roy Mitchell.jpg RoyM46_Box Hill_14Aug2004_Roy Mitchell.jpg RoyM47_3030-arriving-Box Hill_14Aug2004_Roy Mitchell.jpg RoyM48_1027_Dockland sDve_9Jan2005_Roy Mitchell.jpg RoyM49_939-442-937_Flinders St_5Mar2005_Roy Mitchell.jpg RoyM50_1019_LaTRobe St-HarbourEsplanade_3Aug2005_Roy Mitchell.jpg RoyM51_856-1039_Spring St_29Jul2009__Roy Mitchell.jpg RoyM52_209-2119_Carlisle-Acland Sts_30Jul1994__Roy Mitchell.jpg RoyM53_106_Spencer St_1May1994__Roy Mitchell.jpg RoyM54_1000_Bourke St_28April1994_Roy Mitchell.jpg RoyM55_V214_Spring-Flinders St_28Apr1994_Roy Mitchell.jpg RoyM56_231_Carlisle St_30Jul1994_Roy Mitchell.jpg RoyM57_5013_StKilda_LX-safety_29Jul2009_Roy Mitchell.jpg RoyM58_CollinsSt-bridge-from-Docklands_29Jul2009_Roy Mitchell.jpg RoyM59_104 Fitzroy St_1992_Roy Mitchell.jpg RoyM60_431_Spencer-into-Bourke St_28Apr1994_Roy Mitchell.jpg RoyM61_380_Spencer St_1May1994__Roy Mitchell.jpg RoyM62_186-10W_Batman Ave_30Jul1994_Roy Mitchell.jpg RoyM63_64_Nicholson St_11Jan1978_Roy Mitchell.jpg RoyM64_164_Simpson St-shunt_26Jan1981_Roy Mitchell.jpg RoyM65_164_Simpson St-shunt_26Jan1981_Roy Mitchell.jpg RoyM66_676_Batman Ave_1979_Roy Mitchell.jpg RoyM67_603_Batman Ave_Oct1974_Roy Mitchell.jpg RoyM68_2119_Spencer St_23Aug2002_Roy Mitchell.jpg RoyM69_151_Swanston St_23Aug2002_Roy Mitchell.jpgAll have information written on the rear of the photo by the photographer and the donor.trams, tramways, testing, c class, glenferrie rd, swanston st, brunswick st, park st, berlin, milan, moomba, la trobe st, spencer st, flinders st, simpson st, docklands, box hill, carlisle st, restaurant tram, harbour esplanade, spring st, acland st, bourke st, fitzroy st, batman ave, nicholson st, porto, tram 3536, tram 3513, tram 3028, tram 1021, tram 3007, tram 1692, tram 3004, tram 862, tram 018, tram 946, tram 282, tram 3030, tram 1027, tram 442, tram 939, tram 937, tram 1019, tram 856, tram 1039, tram 209, tram 2119, tram 106, tram 1000, tram 214, tram 231, tram 5013, tram 104, tram 431, tram 380, tram 187, tram 10w, tram 64, tram 164, tram 676, tram 603, tram 2119, tram 151 -
 Melbourne Tram Museum
Slide - Set of 2, 5/05/1968 12:00:00 AM
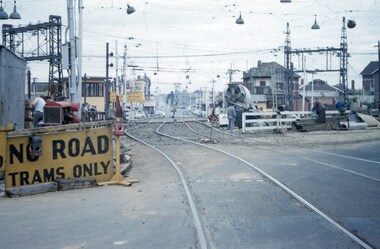
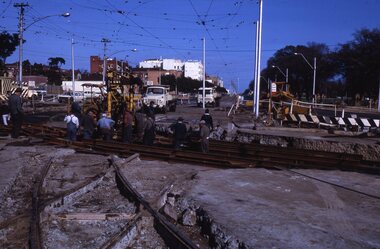
Set of two 35mm Kodak white cardboard colour slide by Keith Kings of 5/5/1968 .1 - construction of new curves from Fitzroy St and High St into St Kilda Road. Shows the old junction trackwork and road height differences. Note the temporary tram stop. .2 - ditto, shows the trackwork for High St behind the hotel and the Junction Hotel with a large Dunlop sign and Rothmans cigarette advert. See Keith's slide notes.Keith Kings stamp and number "23-27 and 23-28", with details of exposure. .1 - St Kilda Jtn by pass work. installing new turnout for Fitzroy St. In new track, New level is lower. Old curves replaced after a day's work to all normal service to resume during weekdays. .2 - St Kilda Bypass work. Installing new turnout for Fitzroy St. In new track looking south. Old Jtn out of photo to the left. New concrete track ready at rear on right. Hotel (which will remain in the middle of everything!!)trams, tramways, st kilda junction, fitzroy st, st kilda rd, trackwork, high st -
 Melbourne Tram Museum
Slide - Set of 11, 28/04/2003 12:00:00 AM
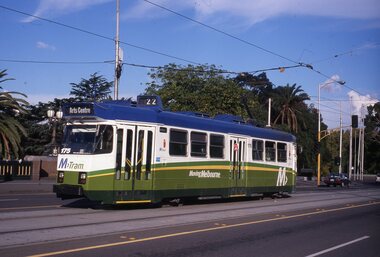
Set of 11, 35mm Tecnodia white plastic mount slides by Colin Rough of trams in St Kilda Road, near the Arts Centre on 28/4/2003. All in M>Tram livery unless noted otherwise. .1 - Z3 175, Route 22, Arts Centre. .2 - Z3 116, Melbourne University, route 72 in all over advertising for Vodaphone. .3 - Z3 190, Camberwell, Route 72 .4 - D1 3508, University, route 5, in in all over advertising for Cold Shot Beer .5 - D1 3501, University, route 6 .6 - Z3 157, University, route 3, in all over advertising for "Make Out" .7 - Z3 204, Toorak Route 8, in all over advertising for Qantas to Broome .8 - Z3 131, University Route 6 .9 - Z3 164, St Kilda Beach, route 16 .10 - D1 3508, University, route 5, in all over advertising for Cold Shot Beer .11 - Z3 175, Route 22, MorelandOn front written on a label "M>Tram, St Kilda Road, Melbourne 28/4/03" and the tram number.trams, tramways, st kilda rd, m>tram, route 22, arts centre, route 72, route 5, route 6, route 3, route 8, route 16, z3 class, tram 175, tram 116, tram 190, tram 3508, tram 3501, tram 157, tram 204, tram 131, tram 164, d1 class -
 Melbourne Tram Museum
Slide - Set of 21, 29/04/2003 12:00:00 AM
Set of 21, 35mm Tecnodia white plastic mount slides by Colin Rough of trams in St Kilda Road, near the Arts Centre on 29/4/2003. All in M>Tram livery unless noted otherwise. (Were the D's doing driver training?) .1 - Z3 116, all over advertising for Vodaphone, with the Arts Centre buildings in the background. .2 - Z3 122, University .3 - Z3 122, ditto .4 - Z3 139, East Brighton .5 - Z3 195. Arts Centre .6 - Z3 195, Moreland .7 - B 2066 East Coburg, Route 1 - in PTC livery. .8 - B 2104 - South Melbourne Beach, Route 1 .9 - D1 3501, Malvern Route 5 .10 - ditto, but not in service. .11 - D1 3503, University .12 - D1 3503, no destination, followed by another D. .13 - D1 3506, not in service .14 - ditto .15 - ditto followed by an Z class .16 - D1 3508 in all over advertising for Cold Shot Beer, followed by Z2 101 .17 - ditto .18 - D1 3511 - not in service .19 - ditto .20 - D1 3519 (written on slide), not in service or in a colour scheme. Noted as being new. .21 - dittoOn front written on a label "M>Tram, St Kilda Road, Melbourne 29/4/03" and the tram number.trams, tramways, st kilda rd, m>tram, route 22, arts centre, z3 class, b class, route 1, route 5, tram 116, tram 122, tram 139, tram 195, tram 2066, tram 2104, tram 3501, tram 3503, tram 3505, tram 3506, tram 3508, tram 3511, tram 3519, tram 101, d1 class, z2 class -
 Melbourne Tram Museum
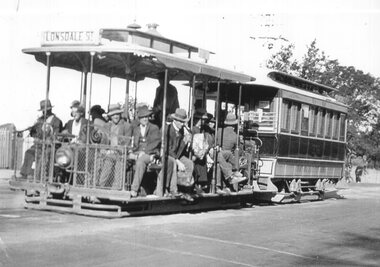
Photograph - Black & White Photograph/s, c1924
Black and White Photograph of a cable set - trailer 336 - at the Toorak Road terminus c1924. Shows an interesting set of workers and the gripman. Printed on Kodak Paper.On rear in ink a description - see image i2 and KSK number "S-A-827"trams, tramways, cable trams, toorak rd, gripmen, passengers, tram 336 -
 Melbourne Tram Museum
Document - Report, Peak traffic counts - city cordon, 1974 - 1976
Set of eight report on traffic counts during the 1970's. All Foolscap except .8, with notes, tables, charts and maps. .1 - "PM Peak traffic counts - March/April 1974 for the City Cordon and beyond the City Cordon" - May 1974 - red tape binding. .2 - "PM Peak Traffic counts - April 1975 - St Kilda Road Cordon" - June 1975 - red comb binding .3 - "AM Peak Traffic counts - October 1974 for the City Cordon and beyond the City Cordon" - December 1974 - red comb binding .4 - "St Kilda Road Cordon 1976 - PM Peak outbound traffic count" - Feb. 1976 - - red comb binding .5 - "St Kilda Road Cordon 1973 - AM Peak Inbound Oct. 1973" - dated Nov 1973 - red tape binding. .6 - "City Cordon Passengers counts AM Peak - Feb & March 1972, PM Peak March 1972 - showing effect of change of State public service and also introduction of late night shopping." - June 1972 - was bound with red tape. .7 - "PM Peak traffic counts - April 1975 for the city cordon and beyond the city cordon" - dated June 1975 - red comb binding .8 - "City Cordon 1977 PN Peak outbound traffic count" - dated June 1977, A4 - red comb bindingIn top left hand corner "Lees" in pencil or ink and some with the report title on the left hand edge for filing purposes.trams, tramways, mmtb, tramways, surveys, passengers, st kilda rd -
 Melbourne Tram Museum
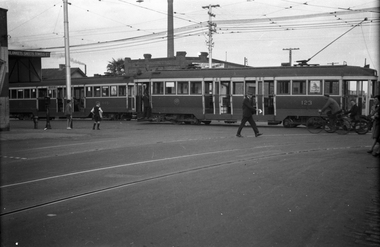
Negative, 24/11/1941 12:00:00 AM
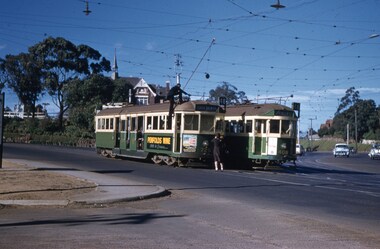
Black and white negative by Wal Jack of Maximum Traction N 123 northbound in Nicholson St at the intersection with Holmes Road and Moreland Road. W2 445 has the destination of Darling Road. The tracks into Moreland Road are in the foreground. A RAAF poster can be seen in one of the windows of both cars. Note the fire alarm pillar, the paper boy, conductor on the step of the N 123. A premise selling blankets, sheets and towels etc can be seen. See also Reg Item 5328 to 5332 for other photos featuring this tram. Photo not in the album, based on the date of others featuring N123, 24/11/1941.trams, tramways, n class, w2 class, coburg, moreland rd, nicholson st, tram 123, tram 445 -
 Melbourne Tram Museum
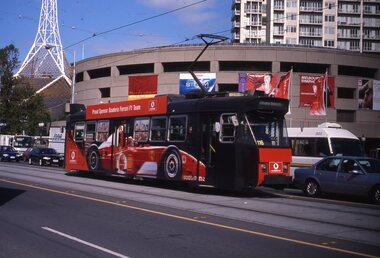
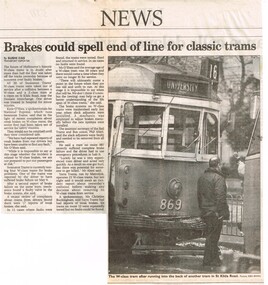
Newspaper, "Brakes could spell the end of line for classic trams", 2/06/2000 12:00:00 AM
Newspaper clipping from The Age, (2/6/2000?), about an accident in St Kilda Road when a W class tram collided with a Z class tram. Article reports on the withdrawal of W class trams by Swanston St tram immediately. Titled "Brakes could spell the end of line for classic trams" Hugh Waldron's Transit Australia notes (Reg Item 5359 for June 2000) reports "After an accident between “SW6” 869 and “Z1” 75 at about 4pm on Thursday 1st June 2000 all Swanston “W” class trams were instructed to shunt at the closest crossover and return special to the Depot. " Article buy Sushi Das and photo by Ken Irwin of the front of Sw5 869 (University route 16). Quotes from Kevin O'Shea of National Express (Swanston Trams), Phil Alteri (RTBU) and Christine Buckingham of Yarra Tramstrams, tramways, w class, sw5 class, accidents, route 16, st kilda rd, tram 869 -
 Melbourne Tram Museum
Negative, c1943
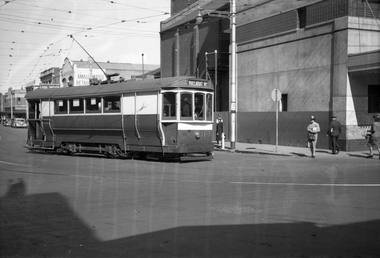
Black and white negative, by Wal Jack, of S169 from Leeds St Footscray in to Barkly St with the destination of Ballarat Road. Has the Amalgamated Cash Drapers store, the Hoyts Trocadero Theatre in the background. Note the tram stop alongside. Photo not dated in Wal Jack album, c1943 - though Could be the same date as Reg Item 5446 - 20-4-1945.trams, tramways, leeds st, footscray, s class, barkly st, ballarat rd, tram 169 -
 Melbourne Tram Museum
Negative - Set of 2, 15/03/1945 12:00:00 AM
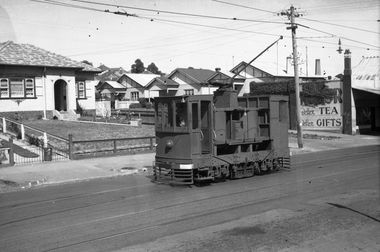
.1 - Black and white negative, by Wal Jack, of scrubber 5 at the Maribyrnong River terminus. The cross over is in front of the tram. In the background is a shop advertising Robur Tea. .2 - ditto, of the tram descending the Maribyrnong Road shortly after passing over the railway line. Possibly a MMTB bus in the foreground on a Munitions service. Photo dated 15-3-1945 in the Wal Jack album along with details of the location and the tramcar. See Also Reg Item 5469 for another photo.trams, tramways, maribyrnong rd, scrubber tram, work trams, tram 5 -
 Melbourne Tram Museum
Negative, 1943-44
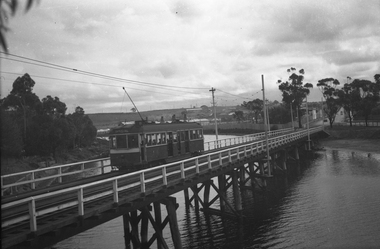
Black and white negative, by Wal Jack, of W5 832, showing Special B, crossing the Maribyrnong River Bridge westbound with a number of passengers. The tram only bridge has been duplicated during September 1943. Photo not dated in the Wal Jack album, c1943 - 44trams, tramways, w5 class, special b, maribyrnong river bridge, maribyrnong rd, world war 2, tram 832