Showing 1366 items
matching railway to ballarat
-
 Ballarat Tramway Museum
Photograph - Digital image Set of 8, 21/08/1971 12:00:00 AM
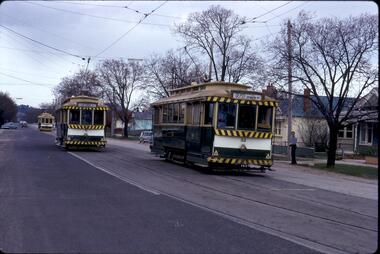
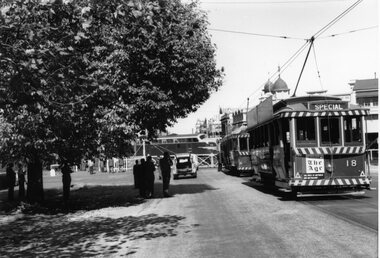
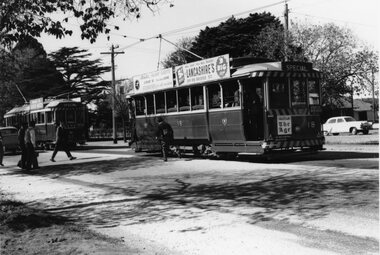
Yields information about the SEC Ballarat trams in the months before the closure of the SEC Tramway system. Yields information about the streetscape. Set of 8 Digital images, scanned from slides by Graeme Cleak, scanning by Peter Winspur 9/2011. .1 - Slide FS14 - No. 31 and 32 crossing at the High St Loop in Macarthur St. Tram 31 has the destination of Victoria St. Geoff Dean and his mini on the right hand side of the photograph. Another depot bound single trucker in the photograph, .2 - Slide FS3 - 31 outbound in Victoria St, with St Alipius church in the background. .3 - Slide FS5 - No. 31, and four other trams, some running special at Sturt and Lydiard Sts during the ARHS tour of that day. Has the ANZ Bank and SEC offices in the background. .4 - Slide FS9 - Nos. 39, 26 and two other trams in Lydiard St for the ARHS tour with Reid's Palace, Macleod & Co and J.J. Collier buildings in the background along with other buildings in Lydiard St North. Taken from the Provincial Hotel. .5 - Slide FS11 - No. 26 northbound showing Special running through the level crossing at Ballarat with the Kennedy Murray General Carrier in the background. Taken from the Provincial Hotel. .6 - Slide FS13 - No. 32 turning from Sturt St into Drummond Street North showing Depot via Drummond North, with the Southern Cross Hotel, Rimmington Bros and J.A, Malpass(?) buildings in the background. .7 - Slide FR35 - night shot of No. 17 (with Twin Lakes sign) and No. 32 in Nos 3 and 4 roads at the depot. .8 - Slide FR34 - night shot of the front of the depot - as above and No. 43 on "0" road. All photos 21-8-1971 trams, tramways, railway station, macarthur st, victoria st, sturt st, lydiard st north, level crossings, depot, tram 31, tram 32, tram 39, tram 26, tram 17, tram 43 -
 Ballarat Tramway Museum
Photograph - Digital image, c1971
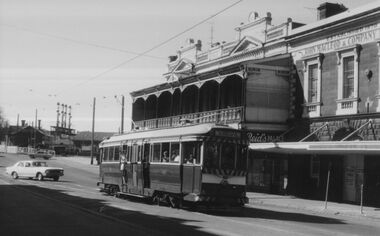
Yields information about Ballarat streetscape and its trams in the closing days of the SEC tramway system.Digital image from a black and white print of tram 40 southbound in Lydiard St North to Sebastopol with Reid's Palace and John Macleod and Company buildings in the background. Railway station signal gantry in the view. Photo by Marc Dahlstrom c1971.On rear is the Marc Dahlstrom stamp.trams, tramways, lydiard st nth, tram 40 -
 Ballarat Tramway Museum
Photograph - Digital image, c1971
Yields information about Ballarat streetscape and its trams in the closing days of the SEC tramway system.Digital image from a black and white print of tram 11 outbound in Lydiard St North, crossing the railway level crossing. Has the Reid's Palace building and the railway station and signal gantry in the background. The tram has a "Bliss Bombs" (Make Bliss not Love) roof advertisement and a Twin Lakes sign. Photo by Marc Dahlstrom c1971. On rear is the Marc Dahlstrom stamp.trams, tramways, lydiard st, railway station, level crossings, tram 11 -
 Ballarat Tramway Museum
Pamphlet, South Pacific Electric Railway, "Trams Return to Sydney", 1961
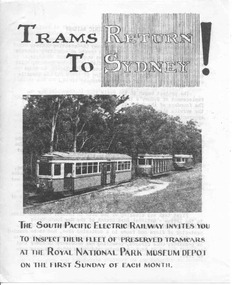
Folded foolscap sheet, printed, titled "Trams Return to Sydney", with a photo of three trams on the Royal Park line at Loftus, c1961, prior to actual operation of the trams. Provides notes on the site, SPER, progress and plans. On rear has a plan of the area relative to Sutherland station.trams, tramways, sper, sydney trams -
 Ballarat Tramway Museum
Photograph - Black & White Photograph/s - set of 3, William. F. Scott, 1989
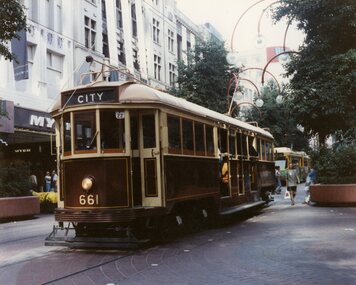
Yields information about the appearance of Geelong's trams and the railway station area and the conversion to a one-man tram.Set of three colour photographs of BTPS owned W3 661 operating in Bourke St Melbourne. Presumed taken at the same time as the front cover of the annual report, 1988-1989 - 29/4/1989. Has Myer building in the background. .2 - ditto - crossing an articulated tram. .3 - westbound in Bourke Street with the Priceline Centrepoint building in the background and Medicare office. Printed on Kodak paper.In pencil on the rear "William F Scott".trams, tramways, btps, bourke st, yapper tours, tram 661 -
 Ballarat Tramway Museum
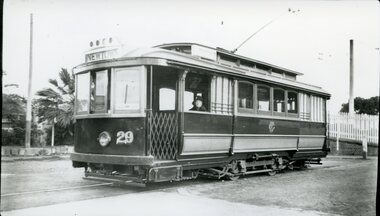
Photograph - Black & White Photograph/s, Geelong No. 29 at the Railway station, c1930
... Ballarat Tramway Museum South Gardens Reserve Wendouree ...Black and White Photograph of Geelong No. 29 at the Railway station, c19?? Has the destination of Newtown, a MESCo logo on the side panel and on the side of the truck, a tow bar.In hand writing on the rear "24)" in top left hand corner. In the body of the photograph "at Railway Station" and along bottom edge a "William Scott" address label and "WFS / Geelong Heritage Centre"trams, tramways, geelong, railway station, mesco, tram 29 -
 Ballarat Tramway Museum
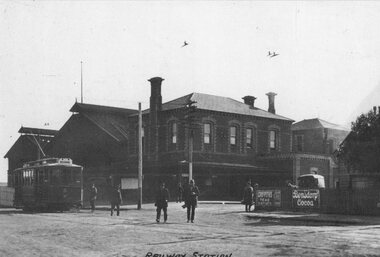
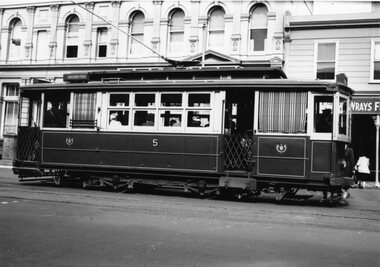
Photograph - Geelong No. 5 at the Railway Station, 1915
Photo of Geelong No.5 at the Railway Station, c 1915, Railway station in the background, prior to the extension and the construction of the awning over No. 1 platform area. Has title "Railway Station" along the bottom edge. In the view are signs for Griffiths teas and Bensdorp Cocoa. On the rear "Geelong Historical Post Card Series No. 9 Railway station with No. 5 Tramcar ready to depart for West Geelong 1915" Publisher not known. See also Reg item 4408 for another reproduction of this photograph. Illustration has been cut from a magazine.Yields information about Geelong Railway Station and tram No. 5 in 1915.Sepia-toned print of a postcard and an illustration of the same photograph.trams, tramways, geelong, railway station, tram 5 -
 Ballarat Tramway Museum
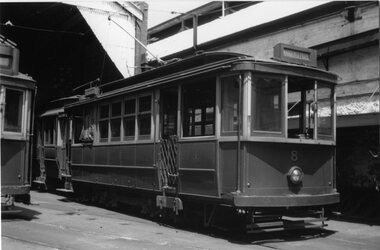
Photograph - Black & White Photograph/s, John Radcliffe, 11/01/1956 12:00:00 AM
Yields information about the appearance of the Geelong Railway station and the tramcar 5 in 1915.Black and White Photograph of Geelong No.8 at the depot, with the destination of Kardinia Park. Shows the tramcar in detail. Photo by John Radcliffe, 11/1/1956.In hand writing on the rear " 41) / Geelong Trmys, depot view 3 days after the fist closures." Along the bottom edge "William Scott" address label and "J.C. Radcliffe 11.1.1956"trams, tramways, geelong, depot, tram 8 -
 Ballarat Tramway Museum
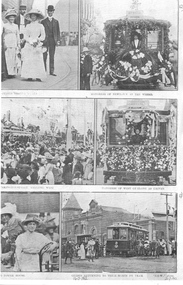
Photograph - Black & White Photograph/s - set of 3, H.L. Potter and NOW Magazine, 14/03/1912 12:00:00 AM
Yields information about the Geelong Railway Station and Geelong's tramcars, c1915.Black and white reproduction photograph of a page from the Now Magazine, 21.3.1912 issue featuring photographs of the opening of the Geelong Tramways on the 14.3.1912. 4407.1 - features 6 photographs: Guests at the Works, Mayoress of Newtown at the wheel; Pakington St Geelong West, Mayoress of West Geelong at Driver, Guests at the Power house, and Guess returning to their homes by Tram (see 4407.3) 4407.2 - Reproduction from page 15, NOW Magazines, News of the Week, of the first car leaving the sheds - Mayoress of Geelong Driving, H.L. Potter photograph. Two copies 4407.3 - separate print bottom photo titled "Guests returning to their homes by Tram" Note each of the trams driven by the respective mayoresses, were decorated differently. Some printed on Hewlett Packard paper.4407.1 - on the front in ink "12) other side of page" "12)", "13)1" and "14.3.1912" and "21.3.1912" along the bottom edge. On rear "12) top rt hand pic only ie Newtown car" and "13)1 Bottom rt hand pic only ie guests going home". Also has a "William Scott" address label. 4407.2 - On the front in ink "NOW Magazine, issue 21.3.1912 (News of the Week magazine Geelong", "14.12.1912" and on rear "11" and a "William Scott" address label. 4407.3 - On the front in ink "News of the Week, a Geelong magazines / opening day 14.3.1912", and "issue 21.3.1912" and "13)2" in top right hand corner. On the rear "13)2 same as 13)1 bottom right hand corner only, Guests going home" and a "William Scott" address label..trams, tramways, geelong, first tram, opening, newtown, tram 4 -
 Ballarat Tramway Museum
Photograph - Geelong No. 5 at the Railway Station, c1915
Yields information about Geelong Railway Station and tram No. 5 in 1915.Black and white reproduction photograph of Geelong No. 5 at the Geelong Railway station, c 1915, Railway station in the background, prior to the extension and the construction of the awning over No. 1 platform area. Has a number of men walking towards the camera. Print made by scanning the photograph and printing two copies on the same sheet. Printed on "Kodak Picture Maker Paper". See also Reg item 4396 for another reproduction of this photograph.In ink on rear "Hugh Ballment Collection"trams, tramways, geelong, railway station, belmont, tram 5 -
 Ballarat Tramway Museum
Photograph - Black & White Photograph/s, Doug Colquhoun, 24/03/1959 12:00:00 AM
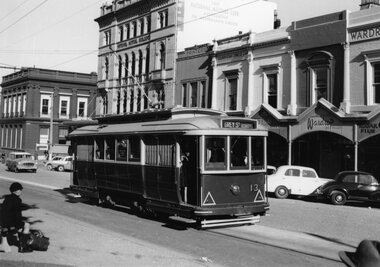
Yields information about Ballarat Trams and streetscapes late 1950's and the details of Sturt St shops.Black and white print of Ballarat 13, at the Sturt St stop, just west of Lydiard St. North, 24/3/1959. Photo by Doug Colquhoun. Has the Commonwealth Bank, National Mutual Building, Golden Star Chinese Cafe, V & L. Leslie Hairdresser and Wardrop Tailor shops in the background. Two copies. A school boy with cap is sitting on the bench opposite the tram. Tram has the destination of Grey St Sebastopol. Photo print courtesy of Port Dock Railway Museum, now the National Railway Museum. See worksheet 4311 for letter and details of prints sent to Bill Scott, 19/10/2001. Any photo credit to mention NRM Collection.On rear of copy 1"SEC Ballarat / 13 / Sturt St/ 24/3/59 / D. A. Colquhoun" Copy 2 "DAC" in ink, bottom right hand corner.trams, tramways, sturt st, schools, commonwealth bank, tram 13 -
 Ballarat Tramway Museum
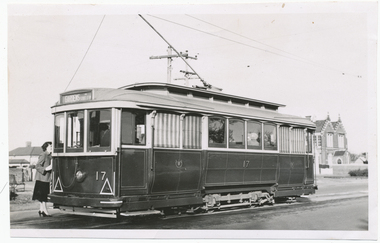
Photograph - Black & White Photograph/s, Digital Image, Wal Jack, 27/06/1957 12:00:00 AM
Yields information about Ballarat Trams and streetscapes early 1960's and the details of the Victoria St terminus, Yields information about Ballarat Trams and streetscapes early 1960's and the details of the Victoria St terminusBlack and white print of Ballarat 17, in Victoria Street, at Otway St photographed by Wal Jack, 27/6/1957. Two copies. A lady is standing at the back of the tram, possibly talking to the conductor. Tram has the destination of Gardens via Sturt St West. Has the Convent building in background. Photo print courtesy of Port Dock Railway Museum, now the National Railway Museum. See worksheet 4311 for letter and details of prints sent to Bill Scott, 19/10/2001. Any photo credit to mention NRM Collection. 4412.1 - Digital image from the Wal Jack Ballarat Album of the same photograph. See i3 for details of the rear of the photograph.On rear of copy 1 "SEC Ballarat / 17 / Victoria / 27/6/57 / Wal Jack" Copy 2 "DAC" in ink, bottom right hand corner. 4412.1 - on rear of photo in ink, "SEC Ballarat, No. 17 Victoria St at Otway St, Ballarat East 25 June '57" and "W. Jack photo Neg. to D. Colquhoun"trams, tramways, victoria st, tram 17 -
 Ballarat Tramway Museum
Photograph - Black & White Photograph/s, Wal Jack, 28/02/1962 12:00:00 AM
Yields information about Ballarat Trams and streetscapes in the early 1960's and the details of the Lydiard St railway gates from the north end.Black and white print of Ballarat 18, in Victoria Street, photographed by Wal Jack, 28/2/1962. Two copies. Tram has advertisements for "The Age", Whites Florists, Lancashire's. Tram has the destination of Gardens via Sturt St. Note the pan at the end of the overhead and "X" in front of the tram. Photo print courtesy of Port Dock Railway Museum, now the National Railway Museum. See worksheet 4311 for letter and details of prints sent to Bill Scott, 19/10/2001. Any photo credit to mention NRM Collection.On rear of copy 1"SEC Ballarat / 18 / Victoria / 28/2/62 2090 / Wal Jack" Copy 2 "DAC" in ink, bottom right hand corner.trams, tramways, victoria st, terminus, tram 18 -
 Ballarat Tramway Museum
Photograph - Black & White Photograph/s, Wal Jack, 21/04/1962 12:00:00 AM
Yields information about Ballarat Trams and streetscapes early 1960's and the details of the Victoria St terminus while running specials for the AETA.Black and white print of Ballarat 18 and 37, at the Lydiard St gates, while B79 crosses the street. Photographed by Wal Jack, 21/4/1962. Two copies. Tram has advertisements for "The Age". Tram is showing Special and has a number of people photographing the scene - AETA tour. Photo print courtesy of Port Dock Railway Museum, now the National Railway Museum. See worksheet 4311 for letter and details of prints sent to Bill Scott, 19/10/2001. Any photo credit to mention NRM Collection.On rear of copy 1" "73)" and "SEC Ballarat / 18 & 37 / Lydiard St North / 21/4/62 2091 / Wal Jack" trams, tramways, lydiard st, railway crossing, aeta, tram 18, tram 37 -
 Ballarat Tramway Museum
Photograph - Black & White Photograph/s, Wal Jack, 21/04/1962 12:00:00 AM
Yields information about Ballarat Trams and streetscapes late 1950's on the Mt Pleasant route and advertising of the period.Black and white print of Ballarat 18 and 37, at the Victoria Street terminus, photographed by Wal Jack, 21/4/1962. Two copies. Tram has advertisements for "The Age", Whites Florists, Lancashire's. Both trams are showing "Special" and have the AETA tour boards on the front of the tram. Photo print courtesy of Port Dock Railway Museum, now the National Railway Museum. See worksheet 4311 for letter and details of prints sent to Bill Scott, 19/10/2001. Any photo credit to mention NRM Collection.On rear of copy 1 "SEC Ballarat / 18 & 37 / Victoria / 21/4/62 2092 / Wal Jack" Copy 2 "DAC" in ink, bottom right hand corner.trams, tramways, victoria st, terminus, tram 18, tram 37 -
 Ballarat Tramway Museum
Photograph - Black & White Photograph/s, Doug Colquhoun, 26/04/1960 12:00:00 AM
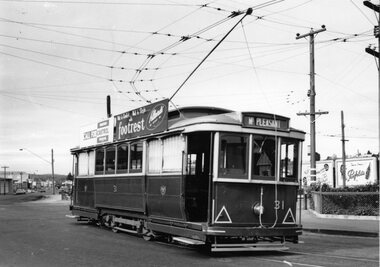
Yields information about Ballarat Trams and streetscapes and Wendouree Parade during the early 1960's.Black and white print of Ballarat of No. 31 enroute to Mount Pleasant, turning from Main St into Barkly St. Tram has the destination of Mt Pleasant. Two copies. Photo taken Doug Colquhoun 26/4/1960. Has roof advertisements for Castrol Oils and Footrest of Sturt St furnishings. In the background is a Penfolds sign. Photo print courtesy of Port Dock Railway Museum, now the National Railway Museum. See worksheet 4311 for letter and details of prints sent to Bill Scott, 19/10/2001. Any photo credit to mention NRM Collection.On rear of copy 1"SEC Ballarat / 31 / Bridge St / 26/4/60 2101 / D. A. Colquhoun" Copy 2 "DAC" in ink, bottom right hand corner.trams, tramways, mt pleasant, main st, barkly st, tram 31 -
 Ballarat Tramway Museum
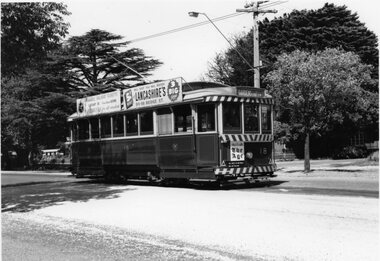
Photograph - Black & White Photograph/s, Wal Jack, 28/02/1962 12:00:00 AM
Yields information about Ballarat Trams and streetscapes and the city terminal area, late 1950's.Black and white print of Ballarat of No. 36 in Wendouree Parade, northern side of the lake. Tram has the destination of Gardens Via Drummond St, a roof advertisement for "Edmonds" Two copies. Photographed by Wal Jack 28/2/1962. Photo print courtesy of Port Dock Railway Museum, now the National Railway Museum. See worksheet 4311 for letter and details of prints sent to Bill Scott, 19/10/2001. Any photo credit to mention NRM Collection.On rear of copy 1"SEC Ballarat / 35 / Wendouree Parade / 28/2/62 2116 / " Copy 2 "Ballarat car 35" in ink, bottom right hand corner.trams, tramways, wendouree parade, tram 35 -
 Ballarat Tramway Museum
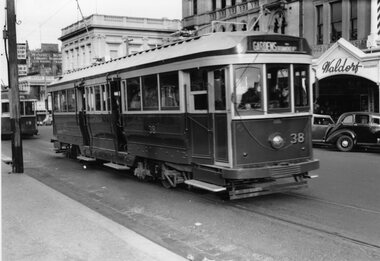
Photograph - Black & White Photograph/s, Doug Colquhoun, 27/04/1954 12:00:00 AM
Yields information about Ballarat Trams and streetscapes, the scrubber tram and the Bell Street loop, early 1960's.Black and white print of Ballarat of No. 38 in Sturt St, just to the west of Lydiard St with No. 19 in the background. Tram has the destination of Gardens via Drummond North, No. 19, Sebastopol. IN the background is the Waldorf shop premises, tram stop signs. Photo by Doug Colquhoun 27/4/1954. Two copies. Photo print courtesy of Port Dock Railway Museum, now the National Railway Museum. See worksheet 4311 for letter and details of prints sent to Bill Scott, 19/10/2001. Any photo credit to mention NRM Collection.On rear of copy 1"SEC Ballarat / 38 / Sturt St / 27/4/54 2118 / D A Colquhoun " Copy 2 "DAC" in ink, bottom right hand corner.trams, tramways, sturt st, city, tram 38, tram 19 -
 Ballarat Tramway Museum
Photograph - Black & White Photograph/s - set of 2, Wal Jack, 28/02/1962 12:00:00 AM
Yields information about Bendigo trams, the Golden Square route in the early 1960's prior to fitting dash canopy lighting.Black and white print of the Ballarat Scrubber tram, at the Bell Street loop, 28/2/1962, Photo by Wal Jack. Two copies. Photo print courtesy of Port Dock Railway Museum, now the National Railway Museum. See worksheet 4311 for letter and details of prints sent to Bill Scott, 19/10/2001. Any photo credit to mention NRM Collection. .1 - same photograph with Doug Colquhoun stamp on rear - see image i2..1 - On rear of copy 1"SEC Ballarat / Scrubber car /Bell St loop / 28/2/62 2125 / Wal Jack " In the top right hand corner "74)" .2 - On rear has Douglas Colquhoun stamp with photograph details - see image i2 trams, tramways, scrubber tram, bell st, tram scrubber -
 Ballarat Tramway Museum
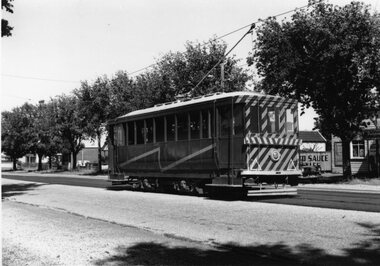
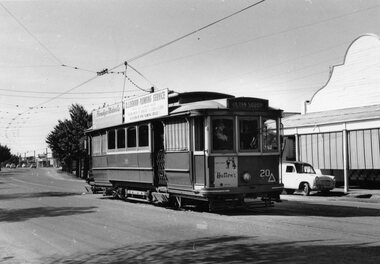
Photograph - Black & White Photograph/s, Doug Colquhoun, 25/04/1960 12:00:00 AM
Yields information about one of Geelong's trams.Black and white print of Bendigo No. 20, enroute to Golden Square. Photo by Doug Colquhoun 25/4/1960. Two copies. Trams has a front dash advertisement for Hutton's hams and roof advertisements for D. J. Osborn Plumbing Service and Bendigo Motor Co. Photo print courtesy of Port Dock Railway Museum, now the National Railway Museum. See worksheet 4311 for letter and details of prints sent to Bill Scott, 19/10/2001. Any photo credit to mention NRM Collection.On rear of copy 1"SEC Bendigo / 20 / Golden Square / 25/5/60 2121 / D A Colquhoun " Copy 2 "DAC" in ink, bottom right hand corner.trams, tramways, bendigo, golden square, tram 20 -
 Ballarat Tramway Museum
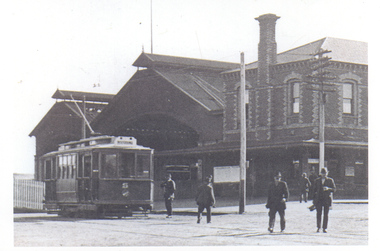
Photograph - Black & White Photograph/s, Doug Colquhoun, 15/04/1955 12:00:00 AM
... at the Ballarat Railway station and level crossing. trams tramways Geelong ...Yields information about Ballarat's trams in the early 1960's and the street scape at the Ballarat Railway station and level crossing.Black and white print of Geelong No. 5 - side view, Ryrie St, 15/4/1955, by Doug Colquhoun. Two copies. Photo print courtesy of Port Dock Railway Museum, now the National Railway Museum. See worksheet 4311 for letter and details of prints sent to Bill Scott, 19/10/2001. Any photo credit to mention NRM Collection.On rear of copy 1 "SEC Geelong / 5 / Ryrie St / 15/4/55 2141 / D A Colquhoun " Copy 2 "Ryrie St? going E / D. Colquhoun" in ink, bottom right hand corner.trams, tramways, geelong, ryrie st, tram 5 -
 Ballarat Tramway Museum
Photograph - Black & White Photograph/s, Wal Jack, 18/11/1961 12:00:00 AM
... Ballarat Railway Station... Lydiard St Ballarat Railway Station Level Crossings tram 35 ...Yields information about Ballarat's trams in the late 1960'ss and the street scape in Victoria St?, Yields information about Ballarat's trams in the late 1960'ss and the street scape in Victoria St?Black and white print of Ballarat 35, northbound to Lydiard St North, crossing the Railway level crossing with Moodys Provincial Hotel and the Ballarat "B" signal box in the background. The tram has a roof advertisement for Ilford film. Note the entry canopy to the hotel. Two copies. Photo by Wal jack, 18/11/1961. Photo print courtesy of Port Dock Railway Museum, now the National Railway Museum. See worksheet 4311 for letter and details of prints sent to Bill Scott, 19/10/2001. Any photo credit to mention NRM Collection.On rear of copy 1 "SEC Ballarat / 35 / Lydiard St North / 18/11/61 2920 / Wal Jack " Copy 2 "DAC" in ink, bottom right hand corner.trams, tramways, lydiard st, ballarat railway station, level crossings, tram 35 -
 Ballarat Tramway Museum
Photograph - Black & White Photograph/s, Doug Colquhoun, May. 1969
Yields information about Ballarat's trams in the early 1970's and the street scape around Lake Wendouree.Black and white print of Ballarat 35, northbound in Drummond St North (check on this ). Tram has the destination of "Gardens via Drummond Nth" and SEC roof advertisement "Everything's under control in my all electric kitchen. Two copies. Photo by Doug Colquhoun, 5/1969. Note the conductor standing on the footstep on the wrong side (for traffic operation) of the tram - could have been a posed photograph. Photo print courtesy of Port Dock Railway Museum, now the National Railway Museum. See worksheet 4311 for letter and details of prints sent to Bill Scott, 19/10/2001. Any photo credit to mention NRM Collection.On rear of copy 1 "SEC Ballarat / 39 /Sturt St East / 5/1969 3743 / D.A. Colquhoun" and "75" in the top right hand corner. Copy 2 "DAC" in ink, bottom right hand corner.trams, tramways, conductors, drummond st nth, tram 39 -
 Ballarat Tramway Museum
Photograph - Black & White Photograph/s, Doug Colquhoun, 15/05/1971 12:00:00 AM
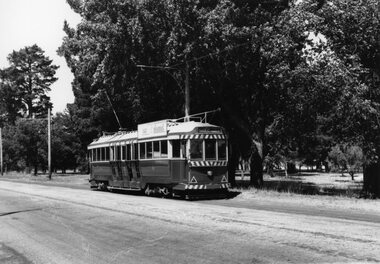
Yields information about Ballarat's trams in the early 1970's and the street scape from Lydiard St to Bridge St.Black and white print of Ballarat 32, in Wendouree Parade, north side of Lake Wendouree, near the depot. Two copies. Photo by Doug Colquhoun, 15/5/1971. Trams has the destination of Gardens via Drummond Nth. Photo print courtesy of Port Dock Railway Museum, now the National Railway Museum. See worksheet 4311 for letter and details of prints sent to Bill Scott, 19/10/2001. Any photo credit to mention NRM Collection.On rear of copy 1 "SEC Ballarat / 32 /Near Depot / 15/5/71 4162 / D.A. Colquhoun" . Copy 2 "DAC" in ink, bottom right hand corner.trams, tramways, wendouree parade, tram 32 -
 Ballarat Tramway Museum
Photograph - Black & White Photograph/s, Doug Colquhoun, 15/05/1971 12:00:00 AM
Yields information about Ballarat's trams in the early 1970's and the Drummond St streetscape near the Mill St loop, Yields information about Ballarat's trams in the early 1970's and the Drummond St streetscape near the Mill St loopBlack and white print of Ballarat 33, in turning from Lydiard St Nth into Sturt St, with the Commonwealth Bank and buildings on the south side of Sturt St.. Two copies. Photo by Doug Colquhoun, 15/5/1971. Trams has the destination of Sebastopol and has a "Twin Lakes" sign on the dash panel. In the photograph is signage for Dickins, Neptune, Commonwealth Bank and Patersons. Has two young ladies walking across the street and the ESCo electrical cabinet. Photo print courtesy of Port Dock Railway Museum, now the National Railway Museum. See worksheet 4311 for letter and details of prints sent to Bill Scott, 19/10/2001. Any photo credit to mention NRM Collection.On rear of copy 1 "SEC Ballarat / 33 / 15/5/71 4164 / Lydiard St @ Sturt St / D.A. Colquhoun" . Copy 2 "DAC" in ink, bottom right hand corner.trams, tramways, sturt st, fashions, lydiard st nth, tram 33 -
 Ballarat Tramway Museum
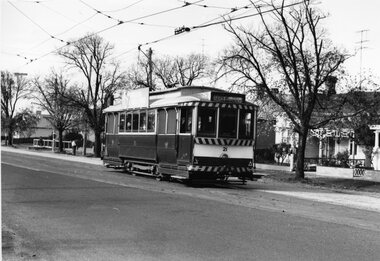
Photograph - Black & White Photograph/s, Doug Colquhoun, 15/05/1971 12:00:00 AM
Yields information about Ballarat's trams in the early 1970's and the Drummond St South streetscape.Black and white print of Ballarat 21 in Macarthur St, leaving the High St loop. Tram has the destination of Gardens via Drummond Nth. Two copies. Photo by Doug Colquhoun, 15/5/1971. Photo print courtesy of Port Dock Railway Museum, now the National Railway Museum. See worksheet 4311 for letter and details of prints sent to Bill Scott, 19/10/2001. Any photo credit to mention NRM Collection.On rear of copy 1 "SEC Ballarat / 21 (Ex MTT A.10)/ Drummond St / 15/5/71 4170 / D.A. Colquhoun" . Copy 2 "DAC" in ink, bottom right hand corner.trams, tramways, macarthur st, high st, tram 21 -
 Ballarat Tramway Museum
Photograph - Black & White Photograph/s, Doug Colquhoun, 15/05/1971 12:00:00 AM
Yields information about Ballarat's trams in the early 1970's and the Sebastopol terminus.Black and white print of Ballarat 37, north bound in Drummond St South at near South St and a Holden motor car alongside. Two copies. Photo by Doug Colquhoun, 17/5/1971. Trams has the destination of Lydiard St Nth. Photo print courtesy of Port Dock Railway Museum, now the National Railway Museum. See worksheet 4311 for letter and details of prints sent to Bill Scott, 19/10/2001. Any photo credit to mention NRM Collection.On rear of copy 1 "SEC Ballarat / 37 / Sebastopol / 17/5/71 4176 / D.A. Colquhoun" . Copy 2 "DAC" in ink, bottom right hand corner.trams, tramways, drummond st sth, tram 37 -
 Ballarat Tramway Museum
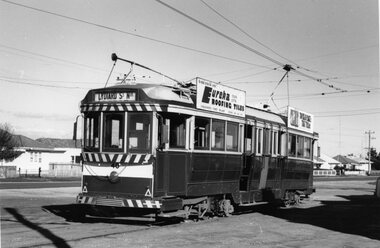
Photograph - Black & White Photograph/s, Doug Colquhoun, Ballarat 40 at the Sebastopol terminus, 15/05/1971 12:00:00 AM
Yields information about Ballarat tram 40 and the Sebastopol terminus.Black and white print of Ballarat 40 at the Sebastopol terminus. Two copies. Photo by Doug Colquhoun, 17/5/1971. Trams has the destination of Lydiard St Nth and roof advertisements for Eureka Tiles and Bliss Bombs (To read pack: Tilt Tram"). Also has the houses in the background and shows the overhead arrangements. Photo print courtesy of Port Dock Railway Museum, now the National Railway Museum. See worksheet 4311 for letter and details of prints sent to Bill Scott, 19/10/2001. Any photo credit to mention NRM Collection.On rear of copy 1 "SEC Ballarat / 40 / Sebastopol terminus / 17/5/71 4179 / D.A. Colquhoun" . Copy 2 "Douglas Colquhoun / 5.1971 National Rly Museum" in ink, bottom right hand corner and in the top left hand corner in ink "Car 40 SEC Tramways Ballarat Vic 3350"trams, tramways, sebastopol, tram 37 -
 Ballarat Tramway Museum
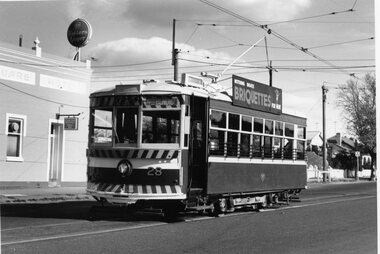
Photograph - Black & White Photograph/s, Doug Colquhoun, 16/05/1971 12:00:00 AM
Yields information about Bendigo's trams in the early 1970's and the Eaglehawk terminus.Black and white print of Bendigo 28 at the Golden Square terminus. Two copies. Photo by Doug Colquhoun, 16/5/1971. Trams has the destination of Nth Bendigo and roof advertisements for Briquettes. Also has the Golden Square hotel in the background. Photo print courtesy of Port Dock Railway Museum, now the National Railway Museum. See worksheet 4311 for letter and details of prints sent to Bill Scott, 19/10/2001. Any photo credit to mention NRM Collection.On rear of copy 1 "SEC Bendigo / 28 /Golden Square / 16/5/71 4187 / D.A. Colquhoun" . Copy 2 "DAC" in ink, bottom right hand corner.trams, tramways, golden square, tram 28 -
 Ballarat Tramway Museum
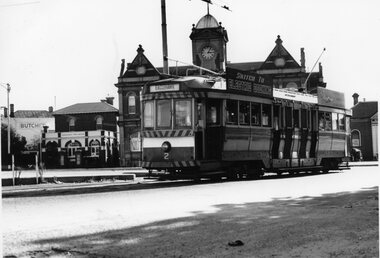
Photograph - Black & White Photograph/s, Doug Colquhoun, 16/05/1971 12:00:00 AM
Yields information about Ballarat's trams during the late 1950's and the Kenney Murray offices.Black and white print of Bendigo 2 at the Eaglehawk terminus. Two copies. Photo by Doug Colquhoun, 16/5/1971. Trams has the destination of Eaglehawk and two roof advertisements for Electric cooking. Also has the Eaglehawk Town Hall, Eaglehawk Post Office in the background. Photo print courtesy of Port Dock Railway Museum, now the National Railway Museum. See worksheet 4311 for letter and details of prints sent to Bill Scott, 19/10/2001. Any photo credit to mention NRM Collection.On rear of copy 1 "SEC Bendigo / 2 /Eaglehawk / 16/5/71 4203 / D.A. Colquhoun" . Copy 2 "DAC" in ink, bottom right hand corner.trams, tramways, eaglehawk, tram 2