Showing 1600 items
matching tram 10
-
 Ballarat Tramway Museum
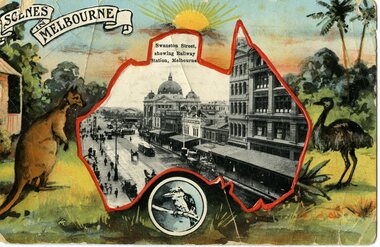
Postcard, Swanston St Melbourne, showing Flinders St station, 1913
Yields information about Swanston St Melbourne and demonstrates German printed colour photo postcards.Black and white view of Swanston St Melbourne, showing Flinders St station, with cable trams, located within a map of main land Australia, with a colour printed background containing a kangaroo, emu and kookaburra. Title "Scenes in Melbourne". On rear of card "Printed in Saxony" Has been sent by a person on the RMS Medina, from Sydney, 29/10/1913 to Miss M Fenton at the "All Nations Hotel", Port Melbourne. Has an Australian 1d one penny stamp.Written on reartrams, tramways, postcards, melbourne, swanston st -
 Ballarat Tramway Museum
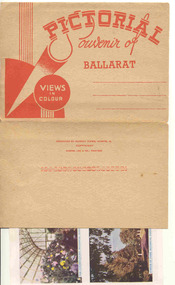
Postcard - Folder set, Murray Views, "Pictorial Souvenir of Ballarat - Views in Colour", 1940's
... Eureka tram 19 Set of 10 small colour and 5 large black and white ...Demonstrates pictorial souvenir strips of photographs of Ballarat, both colour and black and white and yields information about Ballarat c 1940.Set of 10 small colour and 5 large black and white views of Ballarat printed on a folded strip, glued within a light brown colour light weight cardboard folder, titled "Pictorial Souvenir of Ballarat - Views in Colour". Booklet printed with an address area with title in red and kookaburras. Produced by Murray View, Gympie Queensland. The rear has a slit surrounded by red dashes on the rear cover that allowed the folder to be secured. Pictures are: Colour: 1. Statutory Pavilion 2. Sturt St looking west - with a tram in the bottom of the photograph 3. Victory Arch 4. Queen Elizabeth Benevolent home 5. Queen Victoria Memorial Gardens 6. Swans on Lake Wendouree 7. The Conservatory 8. Avenue of Fame (Prime Ministers) 9. Eureka Stockade 10. Cnr Sturt and Lydiard St, with a bus in the view Black and White 1. The State Building 2. Panorama from Black Hill 3. Old Curiosity Shop 4. Reflections - Botanical Gardens 5. Sturt St looking east - has a tram in the view, with 1930's SEC colour scheme. trams, tramways, sturt st, town hall, lake wendouree, memorial arch avenue of honour, memorial, gardens, lydiard st, eureka, tram 19 -
 Ballarat Tramway Museum
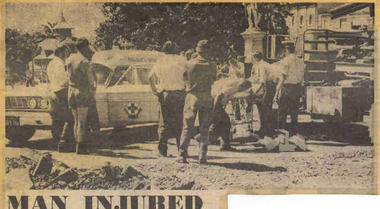
Newspaper, The Courier Ballarat, "Man Injured", 10/02/1972 12:00:00 AM
Newspaper clipping from The Courier, Ballarat, dated Tuesday 10/2/1972, titled "Man injured". Item features a story with a photo of a man injured when a piece of tram rail being removed at the intersection of Sturt and Lydiard Sts fell from the truck. Suffered multiple fractures. Has a photo of the man being lifted onto an ambulance stretcher with the ambulance alongside. One of large group of newspaper cuttings from John Bainbridge, 7/4/02.accidents, track removal, ambulances -
 Ballarat Tramway Museum
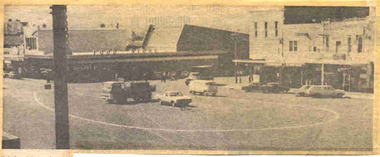
Newspaper, The Courier Ballarat, Traffic works at Grenville, 10/02/1972 12:00:00 AM
Newspaper clipping from The Courier, Ballarat, dated Tuesday 10/2/1972. Item features a story with a photo of about the new traffic patterns at the Sturt St - Grenville St intersection following painting of lines to direct traffic following removal of the tram lines. Photo shows the Dickins Food Store (Supermarket) in the background. One of large group of newspaper cuttings from John Bainbridge, 7/4/02.track removal, traffic control -
 Ballarat Tramway Museum
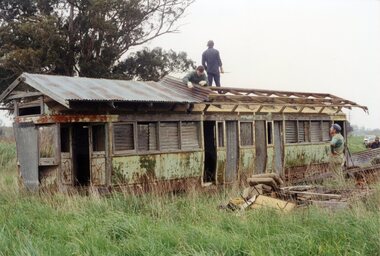
Photograph - Colour Photograph/s, Carolyn Dean, 29/10/1994 12:00:00 AM
Yields information about the preparations for the move of tram body 121 to Newstead and the people involved.Colour print of BTM members removing the roof of tram 121 at Bungaree, 29/10/1994. In the photograph are Len Millar, Garry Wood and John Phillips. Photograph by Carolyn Dean, on Kodak paper. See March 1995 Fares Please!On rear in ink "29.10.94 / C. Dean".btm, bungaree, tramcar bodies, tramcar preservation, tram 121 -
 Ballarat Tramway Museum
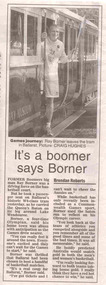
Newspaper, Herald Sun, "its a boomer says Borner", 10/03/2006 12:00:00 AM
Newspaper clipping from The Herald Sun, 10/3/2006, titled "its a boomer says Borner", about Ray Borner carrying the Queens Baton in Ballarat, using BTM tram 671. Has photo by Craig Hughes, text by Brendan Roberts. Two copies held."Herald Sun 10/3/2006"queens baton relay, btm, commonwealth games -
 Ballarat Tramway Museum
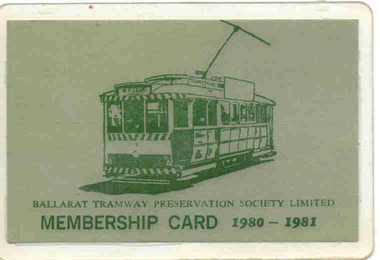
Ephemera - Membership Card/s, John Phillips, 1980
3267.1 Laminated with plastic sheet both sides, printed on light green card for BTPS membership card for years 1980 - 1981. Features sketch of a tram, No. 31. The name of the member "Mrs. C. Dean 42", has been typed on the rear of the card. Details that the person is a financial member, entitled to free travel on BTPS Public services. 3267.2 - 2nd copy added 10/06/2006, copy issued to P.Winspur 76, but unlaminated.trams, tramways, btps, membership cards -
 Ballarat Tramway Museum
Photograph - Black & White Photograph/s - set of 32, Eldon Hogan, 4/06/1965 12:00:00 AM
Yields information about a 1924 Jelbart Engine manufacturing display in Sturt St and the street scene and peoples clothing at the time.Set of 32 black and white photographs of an Association of Railway Enthusiasts tour to Bendigo and trams 4/7/1965. The photos are not necessarily in photographic order. .1 - 30 on the Eaglehawk terminal track, beyond the normal terminus. .2 - 30 & 29 High St Eaglehawk. .3 - ditto with a poppet head in the background. .4 - 30 at one of the crossing loops .5 - 30 at Eaglehawk terminus extension .6 - ditto. .7 - ditto .8 - cleaning out the track .9 - showing the location of the track at Eaglehawk terminus and its extension .10 - cleaning out track .11 - a portable shed adjacent to the track .12 - A view of the two Birneys travelling in the empty country. .13 - ditto .14 - 19 and 18 at Golden Square .15 - Bendigo tram depot - creek crossing .16 - Scrubber at the depot .17 - 28 and 19 at the North Bendigo terminus .18 - 18 and 30 on the Golden Sq line .19 - 28 and 19 at the North Bendigo terminus .20 - ditto. .21 - 28 and 19 near the depot entry. .22 - 28 and 30 Pall Mall .23 - 28 at North Bendigo .24 - 17 and 19 and 6 at Quarry Hill .25 - 28 and 30 Mitchell St .26 - 19, 6 and 21 Quarry Hill .27 - 19 and 6 Quarry Hill .28 - 28 and 6 at the depot entry .29 - ditto .30 - 18 and 30, Golden Sq line .31 - 25 at depot .32 - 6 and 19 Charing Cross. Photographer Eldon Hogan. Printed on Kodak Paper .33 - roll of negatives of some of the above photos - stored in box 83 as well. trams, tramways, are, bendigo, eaglehawk, quarry hill, golden square, north bendigo, tram 30, tram 29, tram 28, tram 6, tram 19, tram 25, tram 17, tram 18 -
 Ballarat Tramway Museum
Photograph - Black & White Photograph/s, Doug Colquhoun, 24/03/1959 12:00:00 AM
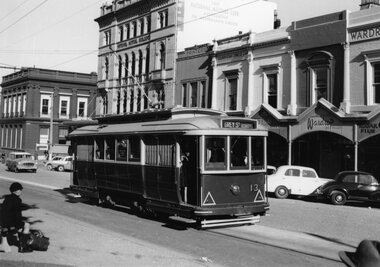
Yields information about Ballarat Trams and streetscapes late 1950's and the details of Sturt St shops.Black and white print of Ballarat 13, at the Sturt St stop, just west of Lydiard St. North, 24/3/1959. Photo by Doug Colquhoun. Has the Commonwealth Bank, National Mutual Building, Golden Star Chinese Cafe, V & L. Leslie Hairdresser and Wardrop Tailor shops in the background. Two copies. A school boy with cap is sitting on the bench opposite the tram. Tram has the destination of Grey St Sebastopol. Photo print courtesy of Port Dock Railway Museum, now the National Railway Museum. See worksheet 4311 for letter and details of prints sent to Bill Scott, 19/10/2001. Any photo credit to mention NRM Collection.On rear of copy 1"SEC Ballarat / 13 / Sturt St/ 24/3/59 / D. A. Colquhoun" Copy 2 "DAC" in ink, bottom right hand corner.trams, tramways, sturt st, schools, commonwealth bank, tram 13 -
 Ballarat Tramway Museum
Photograph - Black & White Photograph/s, Digital Image, Wal Jack, 27/06/1957 12:00:00 AM
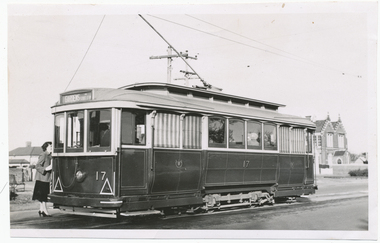
Yields information about Ballarat Trams and streetscapes early 1960's and the details of the Victoria St terminus, Yields information about Ballarat Trams and streetscapes early 1960's and the details of the Victoria St terminusBlack and white print of Ballarat 17, in Victoria Street, at Otway St photographed by Wal Jack, 27/6/1957. Two copies. A lady is standing at the back of the tram, possibly talking to the conductor. Tram has the destination of Gardens via Sturt St West. Has the Convent building in background. Photo print courtesy of Port Dock Railway Museum, now the National Railway Museum. See worksheet 4311 for letter and details of prints sent to Bill Scott, 19/10/2001. Any photo credit to mention NRM Collection. 4412.1 - Digital image from the Wal Jack Ballarat Album of the same photograph. See i3 for details of the rear of the photograph.On rear of copy 1 "SEC Ballarat / 17 / Victoria / 27/6/57 / Wal Jack" Copy 2 "DAC" in ink, bottom right hand corner. 4412.1 - on rear of photo in ink, "SEC Ballarat, No. 17 Victoria St at Otway St, Ballarat East 25 June '57" and "W. Jack photo Neg. to D. Colquhoun"trams, tramways, victoria st, tram 17 -
 Ballarat Tramway Museum
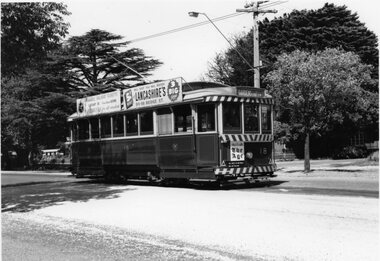
Photograph - Black & White Photograph/s, Wal Jack, 28/02/1962 12:00:00 AM
Yields information about Ballarat Trams and streetscapes in the early 1960's and the details of the Lydiard St railway gates from the north end.Black and white print of Ballarat 18, in Victoria Street, photographed by Wal Jack, 28/2/1962. Two copies. Tram has advertisements for "The Age", Whites Florists, Lancashire's. Tram has the destination of Gardens via Sturt St. Note the pan at the end of the overhead and "X" in front of the tram. Photo print courtesy of Port Dock Railway Museum, now the National Railway Museum. See worksheet 4311 for letter and details of prints sent to Bill Scott, 19/10/2001. Any photo credit to mention NRM Collection.On rear of copy 1"SEC Ballarat / 18 / Victoria / 28/2/62 2090 / Wal Jack" Copy 2 "DAC" in ink, bottom right hand corner.trams, tramways, victoria st, terminus, tram 18 -
 Ballarat Tramway Museum
Photograph - Black & White Photograph/s, Wal Jack, 21/04/1962 12:00:00 AM
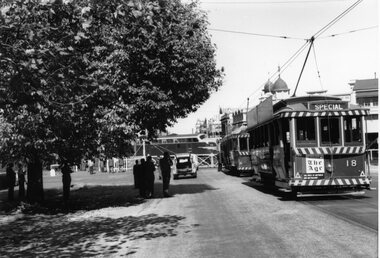
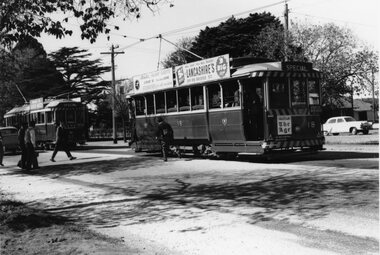
Yields information about Ballarat Trams and streetscapes early 1960's and the details of the Victoria St terminus while running specials for the AETA.Black and white print of Ballarat 18 and 37, at the Lydiard St gates, while B79 crosses the street. Photographed by Wal Jack, 21/4/1962. Two copies. Tram has advertisements for "The Age". Tram is showing Special and has a number of people photographing the scene - AETA tour. Photo print courtesy of Port Dock Railway Museum, now the National Railway Museum. See worksheet 4311 for letter and details of prints sent to Bill Scott, 19/10/2001. Any photo credit to mention NRM Collection.On rear of copy 1" "73)" and "SEC Ballarat / 18 & 37 / Lydiard St North / 21/4/62 2091 / Wal Jack" trams, tramways, lydiard st, railway crossing, aeta, tram 18, tram 37 -
 Ballarat Tramway Museum
Photograph - Black & White Photograph/s, Wal Jack, 21/04/1962 12:00:00 AM
Yields information about Ballarat Trams and streetscapes late 1950's on the Mt Pleasant route and advertising of the period.Black and white print of Ballarat 18 and 37, at the Victoria Street terminus, photographed by Wal Jack, 21/4/1962. Two copies. Tram has advertisements for "The Age", Whites Florists, Lancashire's. Both trams are showing "Special" and have the AETA tour boards on the front of the tram. Photo print courtesy of Port Dock Railway Museum, now the National Railway Museum. See worksheet 4311 for letter and details of prints sent to Bill Scott, 19/10/2001. Any photo credit to mention NRM Collection.On rear of copy 1 "SEC Ballarat / 18 & 37 / Victoria / 21/4/62 2092 / Wal Jack" Copy 2 "DAC" in ink, bottom right hand corner.trams, tramways, victoria st, terminus, tram 18, tram 37 -
 Ballarat Tramway Museum
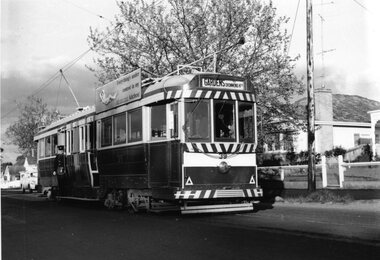
Photograph - Black & White Photograph/s, Doug Colquhoun, 26/04/1960 12:00:00 AM
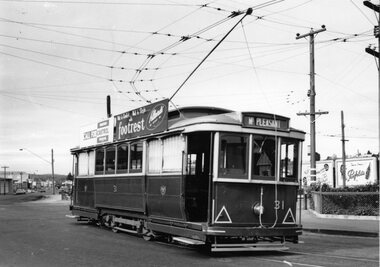
Yields information about Ballarat Trams and streetscapes and Wendouree Parade during the early 1960's.Black and white print of Ballarat of No. 31 enroute to Mount Pleasant, turning from Main St into Barkly St. Tram has the destination of Mt Pleasant. Two copies. Photo taken Doug Colquhoun 26/4/1960. Has roof advertisements for Castrol Oils and Footrest of Sturt St furnishings. In the background is a Penfolds sign. Photo print courtesy of Port Dock Railway Museum, now the National Railway Museum. See worksheet 4311 for letter and details of prints sent to Bill Scott, 19/10/2001. Any photo credit to mention NRM Collection.On rear of copy 1"SEC Ballarat / 31 / Bridge St / 26/4/60 2101 / D. A. Colquhoun" Copy 2 "DAC" in ink, bottom right hand corner.trams, tramways, mt pleasant, main st, barkly st, tram 31 -
 Ballarat Tramway Museum
Photograph - Black & White Photograph/s, Wal Jack, 28/02/1962 12:00:00 AM
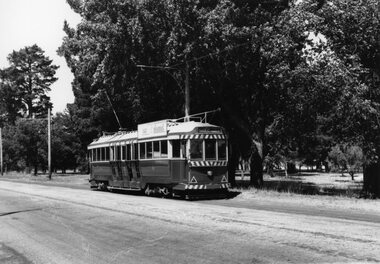
Yields information about Ballarat Trams and streetscapes and the city terminal area, late 1950's.Black and white print of Ballarat of No. 36 in Wendouree Parade, northern side of the lake. Tram has the destination of Gardens Via Drummond St, a roof advertisement for "Edmonds" Two copies. Photographed by Wal Jack 28/2/1962. Photo print courtesy of Port Dock Railway Museum, now the National Railway Museum. See worksheet 4311 for letter and details of prints sent to Bill Scott, 19/10/2001. Any photo credit to mention NRM Collection.On rear of copy 1"SEC Ballarat / 35 / Wendouree Parade / 28/2/62 2116 / " Copy 2 "Ballarat car 35" in ink, bottom right hand corner.trams, tramways, wendouree parade, tram 35 -
 Ballarat Tramway Museum
Photograph - Black & White Photograph/s, Doug Colquhoun, 27/04/1954 12:00:00 AM
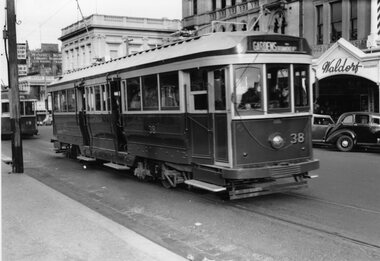
Yields information about Ballarat Trams and streetscapes, the scrubber tram and the Bell Street loop, early 1960's.Black and white print of Ballarat of No. 38 in Sturt St, just to the west of Lydiard St with No. 19 in the background. Tram has the destination of Gardens via Drummond North, No. 19, Sebastopol. IN the background is the Waldorf shop premises, tram stop signs. Photo by Doug Colquhoun 27/4/1954. Two copies. Photo print courtesy of Port Dock Railway Museum, now the National Railway Museum. See worksheet 4311 for letter and details of prints sent to Bill Scott, 19/10/2001. Any photo credit to mention NRM Collection.On rear of copy 1"SEC Ballarat / 38 / Sturt St / 27/4/54 2118 / D A Colquhoun " Copy 2 "DAC" in ink, bottom right hand corner.trams, tramways, sturt st, city, tram 38, tram 19 -
 Ballarat Tramway Museum
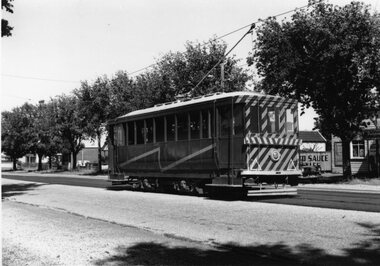
Photograph - Black & White Photograph/s - set of 2, Wal Jack, 28/02/1962 12:00:00 AM
Yields information about Bendigo trams, the Golden Square route in the early 1960's prior to fitting dash canopy lighting.Black and white print of the Ballarat Scrubber tram, at the Bell Street loop, 28/2/1962, Photo by Wal Jack. Two copies. Photo print courtesy of Port Dock Railway Museum, now the National Railway Museum. See worksheet 4311 for letter and details of prints sent to Bill Scott, 19/10/2001. Any photo credit to mention NRM Collection. .1 - same photograph with Doug Colquhoun stamp on rear - see image i2..1 - On rear of copy 1"SEC Ballarat / Scrubber car /Bell St loop / 28/2/62 2125 / Wal Jack " In the top right hand corner "74)" .2 - On rear has Douglas Colquhoun stamp with photograph details - see image i2 trams, tramways, scrubber tram, bell st, tram scrubber -
 Ballarat Tramway Museum
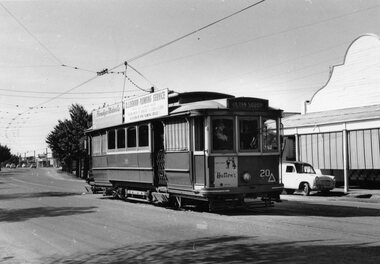
Photograph - Black & White Photograph/s, Doug Colquhoun, 25/04/1960 12:00:00 AM
Yields information about one of Geelong's trams.Black and white print of Bendigo No. 20, enroute to Golden Square. Photo by Doug Colquhoun 25/4/1960. Two copies. Trams has a front dash advertisement for Hutton's hams and roof advertisements for D. J. Osborn Plumbing Service and Bendigo Motor Co. Photo print courtesy of Port Dock Railway Museum, now the National Railway Museum. See worksheet 4311 for letter and details of prints sent to Bill Scott, 19/10/2001. Any photo credit to mention NRM Collection.On rear of copy 1"SEC Bendigo / 20 / Golden Square / 25/5/60 2121 / D A Colquhoun " Copy 2 "DAC" in ink, bottom right hand corner.trams, tramways, bendigo, golden square, tram 20 -
 Ballarat Tramway Museum
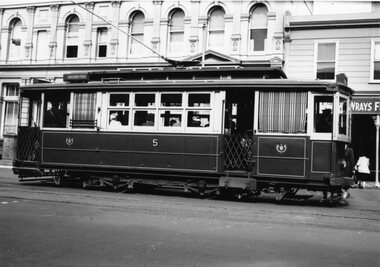
Photograph - Black & White Photograph/s, Doug Colquhoun, 15/04/1955 12:00:00 AM
Yields information about Ballarat's trams in the early 1960's and the street scape at the Ballarat Railway station and level crossing.Black and white print of Geelong No. 5 - side view, Ryrie St, 15/4/1955, by Doug Colquhoun. Two copies. Photo print courtesy of Port Dock Railway Museum, now the National Railway Museum. See worksheet 4311 for letter and details of prints sent to Bill Scott, 19/10/2001. Any photo credit to mention NRM Collection.On rear of copy 1 "SEC Geelong / 5 / Ryrie St / 15/4/55 2141 / D A Colquhoun " Copy 2 "Ryrie St? going E / D. Colquhoun" in ink, bottom right hand corner.trams, tramways, geelong, ryrie st, tram 5 -
 Ballarat Tramway Museum
Photograph - Black & White Photograph/s, Doug Colquhoun, May. 1969
Yields information about Ballarat's trams in the early 1970's and the street scape around Lake Wendouree.Black and white print of Ballarat 35, northbound in Drummond St North (check on this ). Tram has the destination of "Gardens via Drummond Nth" and SEC roof advertisement "Everything's under control in my all electric kitchen. Two copies. Photo by Doug Colquhoun, 5/1969. Note the conductor standing on the footstep on the wrong side (for traffic operation) of the tram - could have been a posed photograph. Photo print courtesy of Port Dock Railway Museum, now the National Railway Museum. See worksheet 4311 for letter and details of prints sent to Bill Scott, 19/10/2001. Any photo credit to mention NRM Collection.On rear of copy 1 "SEC Ballarat / 39 /Sturt St East / 5/1969 3743 / D.A. Colquhoun" and "75" in the top right hand corner. Copy 2 "DAC" in ink, bottom right hand corner.trams, tramways, conductors, drummond st nth, tram 39 -
 Ballarat Tramway Museum
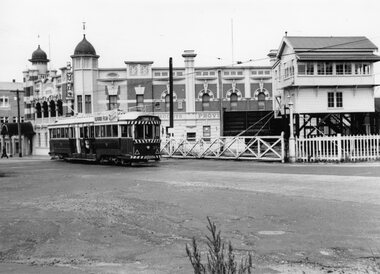
Photograph - Black & White Photograph/s, Wal Jack, 18/11/1961 12:00:00 AM
Yields information about Ballarat's trams in the late 1960'ss and the street scape in Victoria St?, Yields information about Ballarat's trams in the late 1960'ss and the street scape in Victoria St?Black and white print of Ballarat 35, northbound to Lydiard St North, crossing the Railway level crossing with Moodys Provincial Hotel and the Ballarat "B" signal box in the background. The tram has a roof advertisement for Ilford film. Note the entry canopy to the hotel. Two copies. Photo by Wal jack, 18/11/1961. Photo print courtesy of Port Dock Railway Museum, now the National Railway Museum. See worksheet 4311 for letter and details of prints sent to Bill Scott, 19/10/2001. Any photo credit to mention NRM Collection.On rear of copy 1 "SEC Ballarat / 35 / Lydiard St North / 18/11/61 2920 / Wal Jack " Copy 2 "DAC" in ink, bottom right hand corner.trams, tramways, lydiard st, ballarat railway station, level crossings, tram 35 -
 Ballarat Tramway Museum
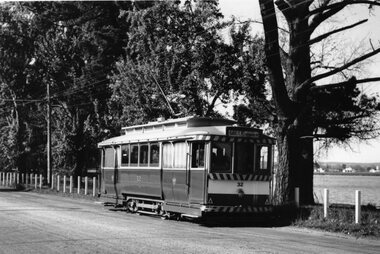
Photograph - Black & White Photograph/s, Doug Colquhoun, 15/05/1971 12:00:00 AM
Yields information about Ballarat's trams in the early 1970's and the street scape from Lydiard St to Bridge St.Black and white print of Ballarat 32, in Wendouree Parade, north side of Lake Wendouree, near the depot. Two copies. Photo by Doug Colquhoun, 15/5/1971. Trams has the destination of Gardens via Drummond Nth. Photo print courtesy of Port Dock Railway Museum, now the National Railway Museum. See worksheet 4311 for letter and details of prints sent to Bill Scott, 19/10/2001. Any photo credit to mention NRM Collection.On rear of copy 1 "SEC Ballarat / 32 /Near Depot / 15/5/71 4162 / D.A. Colquhoun" . Copy 2 "DAC" in ink, bottom right hand corner.trams, tramways, wendouree parade, tram 32 -
 Ballarat Tramway Museum
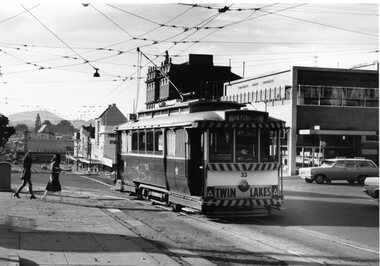
Photograph - Black & White Photograph/s, Doug Colquhoun, 15/05/1971 12:00:00 AM
Yields information about Ballarat's trams in the early 1970's and the Drummond St streetscape near the Mill St loop, Yields information about Ballarat's trams in the early 1970's and the Drummond St streetscape near the Mill St loopBlack and white print of Ballarat 33, in turning from Lydiard St Nth into Sturt St, with the Commonwealth Bank and buildings on the south side of Sturt St.. Two copies. Photo by Doug Colquhoun, 15/5/1971. Trams has the destination of Sebastopol and has a "Twin Lakes" sign on the dash panel. In the photograph is signage for Dickins, Neptune, Commonwealth Bank and Patersons. Has two young ladies walking across the street and the ESCo electrical cabinet. Photo print courtesy of Port Dock Railway Museum, now the National Railway Museum. See worksheet 4311 for letter and details of prints sent to Bill Scott, 19/10/2001. Any photo credit to mention NRM Collection.On rear of copy 1 "SEC Ballarat / 33 / 15/5/71 4164 / Lydiard St @ Sturt St / D.A. Colquhoun" . Copy 2 "DAC" in ink, bottom right hand corner.trams, tramways, sturt st, fashions, lydiard st nth, tram 33 -
 Ballarat Tramway Museum
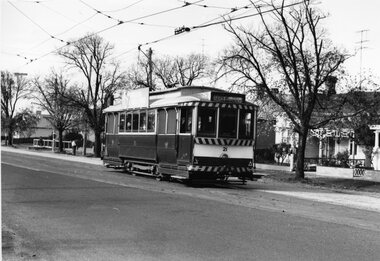
Photograph - Black & White Photograph/s, Doug Colquhoun, 15/05/1971 12:00:00 AM
Yields information about Ballarat's trams in the early 1970's and the Drummond St South streetscape.Black and white print of Ballarat 21 in Macarthur St, leaving the High St loop. Tram has the destination of Gardens via Drummond Nth. Two copies. Photo by Doug Colquhoun, 15/5/1971. Photo print courtesy of Port Dock Railway Museum, now the National Railway Museum. See worksheet 4311 for letter and details of prints sent to Bill Scott, 19/10/2001. Any photo credit to mention NRM Collection.On rear of copy 1 "SEC Ballarat / 21 (Ex MTT A.10)/ Drummond St / 15/5/71 4170 / D.A. Colquhoun" . Copy 2 "DAC" in ink, bottom right hand corner.trams, tramways, macarthur st, high st, tram 21 -
 Ballarat Tramway Museum
Photograph - Black & White Photograph/s, Doug Colquhoun, 15/05/1971 12:00:00 AM
Yields information about Ballarat's trams in the early 1970's and the Sebastopol terminus.Black and white print of Ballarat 37, north bound in Drummond St South at near South St and a Holden motor car alongside. Two copies. Photo by Doug Colquhoun, 17/5/1971. Trams has the destination of Lydiard St Nth. Photo print courtesy of Port Dock Railway Museum, now the National Railway Museum. See worksheet 4311 for letter and details of prints sent to Bill Scott, 19/10/2001. Any photo credit to mention NRM Collection.On rear of copy 1 "SEC Ballarat / 37 / Sebastopol / 17/5/71 4176 / D.A. Colquhoun" . Copy 2 "DAC" in ink, bottom right hand corner.trams, tramways, drummond st sth, tram 37 -
 Ballarat Tramway Museum
Photograph - Black & White Photograph/s, Doug Colquhoun, 16/05/1971 12:00:00 AM
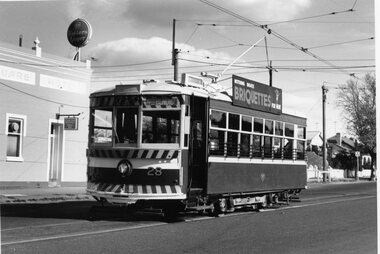
Yields information about Bendigo's trams in the early 1970's and the Eaglehawk terminus.Black and white print of Bendigo 28 at the Golden Square terminus. Two copies. Photo by Doug Colquhoun, 16/5/1971. Trams has the destination of Nth Bendigo and roof advertisements for Briquettes. Also has the Golden Square hotel in the background. Photo print courtesy of Port Dock Railway Museum, now the National Railway Museum. See worksheet 4311 for letter and details of prints sent to Bill Scott, 19/10/2001. Any photo credit to mention NRM Collection.On rear of copy 1 "SEC Bendigo / 28 /Golden Square / 16/5/71 4187 / D.A. Colquhoun" . Copy 2 "DAC" in ink, bottom right hand corner.trams, tramways, golden square, tram 28 -
 Ballarat Tramway Museum
Photograph - Black & White Photograph/s, Doug Colquhoun, 23/05/1959 12:00:00 AM
Yields information about Ballarat's trams during the late 1950's and the Gardens area.Black and white print of Ballarat 34, inbound in Lydiard St Nth, just before the railway level crossing. Two copies. Photo by Doug Colquhoun, 23/3/1959. Tram has the destination of Sebastopol, and has the Kennedy Murray Pty Ltd General Carriers building in the background. Photo print courtesy of Port Dock Railway Museum, now the National Railway Museum. See worksheet 4311 for letter and details of prints sent to Bill Scott, 19/10/2001. Any photo credit to mention NRM Collection.On rear of copy 1 "SEC Ballarat / 34/ /Lydiard St North / 23/3/59 5535 / D.A. Colquhoun" . Copy 2 "DAC" in ink, bottom right hand corner.trams, tramways, lydiard st nth, tram 34 -
 Ballarat Tramway Museum
Photograph - Black & White Photograph/s, Doug Colquhoun, 16/05/1971 12:00:00 AM
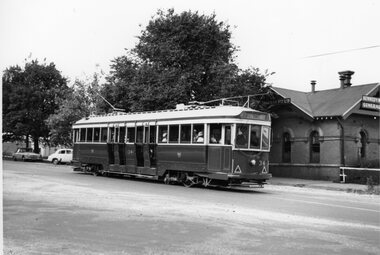
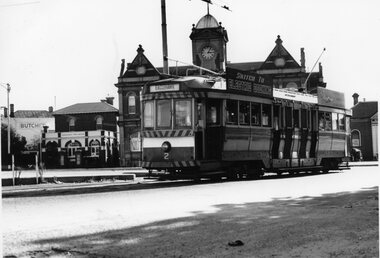
Yields information about Ballarat's trams during the late 1950's and the Kenney Murray offices.Black and white print of Bendigo 2 at the Eaglehawk terminus. Two copies. Photo by Doug Colquhoun, 16/5/1971. Trams has the destination of Eaglehawk and two roof advertisements for Electric cooking. Also has the Eaglehawk Town Hall, Eaglehawk Post Office in the background. Photo print courtesy of Port Dock Railway Museum, now the National Railway Museum. See worksheet 4311 for letter and details of prints sent to Bill Scott, 19/10/2001. Any photo credit to mention NRM Collection.On rear of copy 1 "SEC Bendigo / 2 /Eaglehawk / 16/5/71 4203 / D.A. Colquhoun" . Copy 2 "DAC" in ink, bottom right hand corner.trams, tramways, eaglehawk, tram 2 -
 Ballarat Tramway Museum
Photograph - Black & White Photograph/s, Doug Colquhoun, 25/01/1978 12:00:00 AM
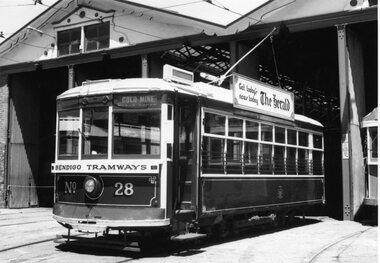
Yields information about Bendigo Trust's trams in the late 1970's and the depot.Black and white print of Bendigo Trust 28 at the depot. Two copies. Photo by Doug Colquhoun, 25/1/1978. The tram is in the Bendigo Trust "Talking Tram" livery, with a The Herald" roof advertisement. It has the destination of Gold Mine. Photo print courtesy of Port Dock Railway Museum, now the National Railway Museum. See worksheet 4311 for letter and details of prints sent to Bill Scott, 19/10/2001. Any photo credit to mention NRM Collection.On rear of copy 1 "Bendigo Tramways / 28 / Depot / 25/1/1978 6526 / D.A. Colquhoun" . Copy 2 in pencil on left hand edge "Bendigo Trust Car 28 depot 26.1.79 Douglas Colquhoun"trams, tramways, bendigo trust, depot, tram 28 -
 Ballarat Tramway Museum
Photograph - Black & White Photograph/s, Doug Colquhoun, 24/05/1959 12:00:00 AM
Yields information about Bendigo Trust's trams in the late 1970's and the depot.Black and white print of Ballarat 39 at the Gardens Loop terminus. Two copies. Photo by Doug Colquhoun, 24/3/1959. In the background are the Trees of the Gardens, and the tram stop. Photo print courtesy of Port Dock Railway Museum, now the National Railway Museum. See worksheet 4311 for letter and details of prints sent to Bill Scott, 19/10/2001. Any photo credit to mention NRM Collection.On rear of copy 1 "SEC Ballarat / 39/ Lake Wendouree / 24/3/59 5536 / D.A. Colquhoun" . Copy 2 "DAC" in ink, bottom right hand corner.trams, tramways, wendouree parade, gardens loop, tram 39