Showing 3402 items matching "routes"
-
 Melbourne Tram Museum
Slide, John Webster, 15/03/1960 12:00:00 AM
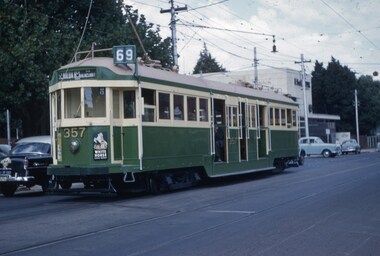
Colour slide, Kodak, white cardboard of Tram W2 357, with the number above the headlight, route 69, St Kilda Beach via Balaclava in Glenferrie Road Malvern. Has advert for White Horse Whiskey. Slide dated 15-3-60.Hand writing on rear in ink "15-3-60 - Tram 357, number raised, Glenferrie Road, Malvern Vic>"trams, tramways, st kilda beach, route 69, w2 class, glenferrie rd, tram 357 -
 Melbourne Tram Museum
Negative, Wal Jack collection, c1930
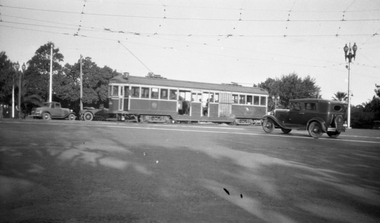
Black and white negative from Wal Jack collection of W2 255 or 355 in St Kilda Road Melbourne at junction with City Road, with route number 7 showing. Photo c1930. Photo may not be by Wal Jack as a size that he did not use.trams, tramways, st kilda road, city road, route 7, w2 class, tram 255?, tram 355? -
 Melbourne Tram Museum
Negative, Wal Jack collection, mid 1920's
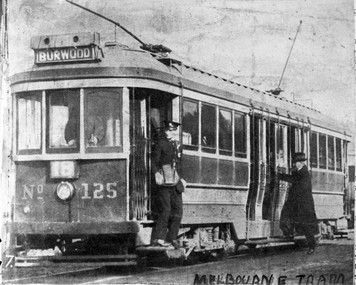
Black and White Copy Photograph of MMTB - No. N class 125, route 18, Burwood destination, with conductor on a footboard. Photo the same as in Reg Item 2499 - from an Australian magazine newspaper or journal titled "Types of Tramcars used in Australian Capital Citiestrams, tramways, n class, burwood, route 18, tram 125 -
 Melbourne Tram Museum
Postcard, Traveller's Notes, 4 panel full colour - by Traveller's Notes, 1997
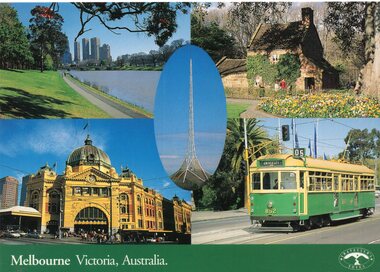
Postcard - 4 panel full colour - by Traveller's Notes, of the Yarra River, Cook's Cottage, Flinders St Station main entrance, and SW6 852, University, route 5. Divided back, published by Traveller's Notes, photos by Neil J Leed, 1997.trams, tramways, flinders st station, yarra river, sw6 class, route 5, tram 852 -
 Melbourne Tram Museum
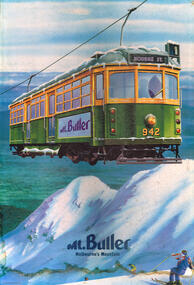
Poster, Mt Buller, Mt Buller Melbourne's Mountain", c1980
Poster, mounted onto a sheet of 12mm chipboard featuring W6 942 on a Ski Lift at Mount Buller, with the caption Mt Buller Melbourne's Mountain". Has the destination of Bourke St, route 1, Has a string hanging strip on the back with two eyelets.trams, tramways, w6 class, bourke st, tourist trips, tram 942 -
 Melbourne Tram Museum
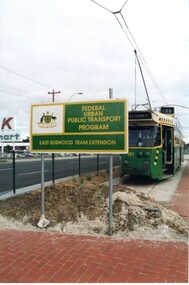
Photograph - Digital Image, Z3 191 at the East Burwood terminus behind a sign about the Federal funding, 1993
Digital Image of Z3 191 at the East Burwood terminus behind a sign about the Federal funding through the Federal Urban Public Transport Program, during 1993. Photo by David Kemp. Tram has the destination of City Exhibition St, Route 75.trams, tramways, route 75, east burwood, transport funding, funding, z3 class, federal grant, tram 191 -
 Melbourne Tram Museum
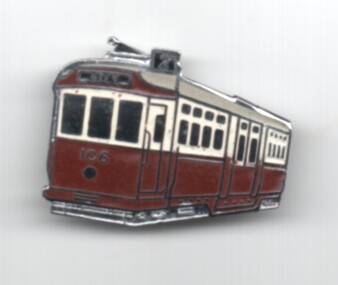
Ephemera - Badge, Tramway Museum Society of Victoria (TMSV), c1990
Metal badges - relief of a Melbourne L class 106. with a chocolate and cream colour scheme and enamel gloss finish with a pin on the rear. No details as to the manufacturer, all with the destination of City and showing route 2. See Reg Item 5905 for a badge of L 104.trams, tramways, badges, l class, route 2, souvenirs -
 Melbourne Tram Museum
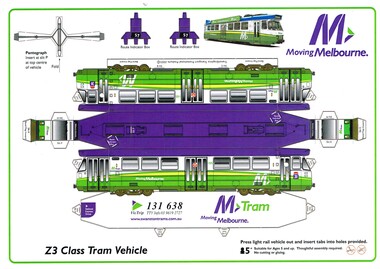
Leisure object - Cardboard Model Tram, Transit Graphics, 2003
Cardboard, punched out, folding model tram - Melbourne Z3 class tram No. 185, in M tram (Moving Melbourne), National Express Group livery. Has separate parts for two route number boxes and pantograph. Produced by Transit Graphics in 2003.trams, tramways, models, z3 class, national express, mtram -
 Melbourne Tram Museum
Photograph - Black & White Photograph/s, Mark Plummer, late 1960's
Black and white photo of W2 562 or 502, leaving a "shoofly" temporary track deviation during road / track reconstruction. Location not known at this time. Photo by Mark Plummer late 1960's. Note the kerosene warning lamps, could be route 69.Has the "Mark Plummer" stamp on the rear.trams, tramways, mmtb, track repairs, trackwork, tram 562? -
 Melbourne Tram Museum
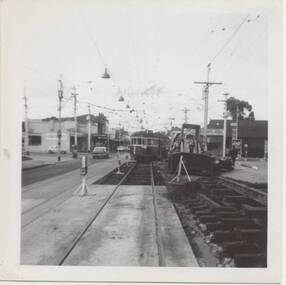
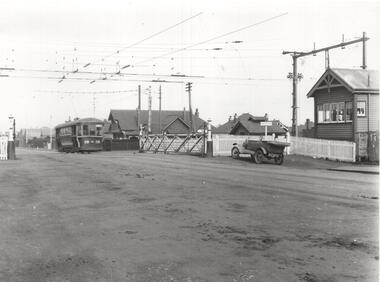
Photograph - Black & White Photograph/s, mid 1921
Photograph, Black and White, of the Level Crossing in Lygon St with the inner Circle Railway North Carlton, with Melbourne Brunswick and Coburg Tram No. 19 crossing with the interlocked gates and signal box in the view. Photo mid 1921. The level crossing was electrified on 5-7-1921, but the wires etc would have been positioned earlier. See Weekly Notice Extracts 1894-1994, published 1996.In ink on the rear: "Melbourne - Ex Coburg Trust route / No. 19 in Lygon St at railway crossing North Carlton / (later No. 166) After 10/8/1920. Has KSK stamp and Number LWR-3 and CEE 13 in to right hand corner.trams, tramways, lygon st, north carlton, level crossings, mbctt, tram 19, s class -
 Melbourne Tram Museum
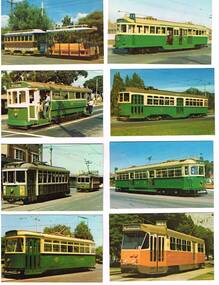
Photograph - Illustration/s, Melbourne & Metropolitan Tramways Board (MMTB), 1978
Set of eight of printed illustrations - postcard size of Melbourne and Metropolitan Tramways Board Tramcars produced in 1978. Separate card for each class of tramcar featured, with notes, statistics, MMTB name. Each card also has printers name and date on back. Not a formal postcard, no place for a stamp. 446.1 - Cable car set (No. 1) - photographed at Preston Workshops 446.2 - T 180 - showing "Special", while on a charter. 446.3 - X1 - 465 with 466 in background. Photographed at Footscray terminus, c1962. 465 has destination of "Ballarat Rd." 446.4 - Y 469 - showing destination of "Wattle Park - Elgar Road", possibly with Wattle Park in background. 446.5 - W2 511, showing destination of "City" and route 11. 446.6 - X2 676, showing "Special". 446.7 - W7 1022 - showing destination "West Preston", route 11, freshly painted. 446.8 - Z1 7 in Victoria Parade, c1975 - has destination of "West Preston - Regent St." and route number "13". 446.9 - L 104 on a route 67 Carnegie. 446.9 added 7/4/15, otherwise two copies of each held. 2nd copy of 446.9 added 28/5/2015. See Reg Item 994 for a packaged set of these photographs..trams, tramways, melbourne, mmtb, tramcars, tram 1, tram 180, tram 465, tram 466, tram 469, tram 511, tram 1022, tram 7, tram 104, z1 class, t class, x1 class, y class, w2 class, w7 class, l class, route 67, route 13, route 11 -
 Melbourne Tram Museum
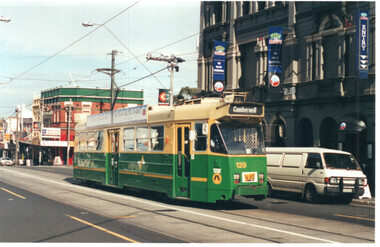
Photograph - Colour Print Z3 129 Burke Road Camberwell, George Bishop, c1999
Colour print of photograph taken by George Bishop c1999, of Z3 129 (Camberwell, Route 72) Burke Road Camberwell near Burwood Ave. Has the Palace Hotel in the background.Yields information about the operation of Melbourne trams during the late 1990s.Colour prints printed on Kodak paperDetails of the photograph and photographer on the rear in ink.trams, tramways, z3 class, tram 129, burke road, camberwell, palace hotel, route 72 -
 Melbourne Tram Museum
Photograph - W5 754 at Beaconsfield Parade terminus, Keith Kings, 3/4/1953
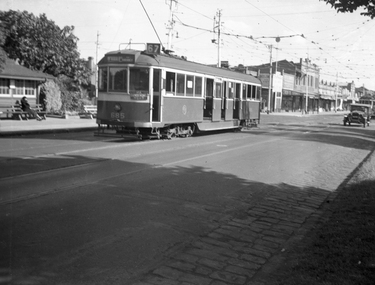
Photograph shows W5 754 (East Coburg Route 1) at the former Beaconsfield Parade terminus at the intersection with Fitzroy St Kilda. The photographer notes the square windscreen windows on the tram.Yields information about tram 754 in 1953 in Beaconsfield Parade.Black and white photograph - W5 754 at Beaconsfield Parade terminus photo number G(y)(7)Has details and date written on the rear.tramways, beaconsfield parade, st kilda, fitzroy st, w5 class, tram 754, route 1 -
 Melbourne Tram Museum
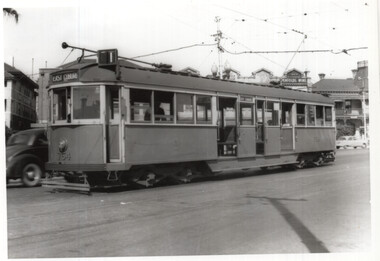
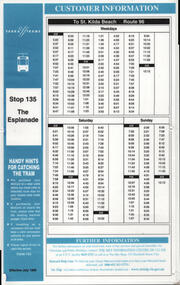
Ephemera - Timetable, Yarra Trams, Stop 135 The Esplanade, July 1999
Timetable dated July 1999, for Stop 135 on The Esplanade - route 96 - Yarra Trams. Has handy hints for catching a tram and where further information could be obtained from.Demonstrates a Yarra Trams timetable for 1999.Laminated sheet with small holes punched into the sheet on the sides.trams, tramways, yarra trams, route 96, the esplanade -
 Melbourne Tram Museum
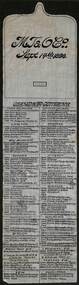
Drawing - List, Melbourne Tramway and Omnibus Co (MTOCo), "MT&OCo Standard lettering', 14/9/1898
Provides a list of the lettering to be painted on the cable trams operated by the Melbourne Tramway and Omnibus Co. (MTOCo) including horse trams and horse omnibus routes. Dated 14/0/1898. Yields information about the signage applied to the Melbourne cable trams by the MTOCo. in 1898.Drawing or list black ink on linen.tramways, cable trams, mtoco, signs, grip car, dummy, trailes, horse buses, horse tram -
 Melbourne Tram Museum
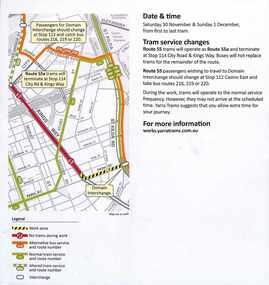
Pamphlet, Public Transport Victoria (PTV), "Route 1 and 6 Buses replace trams", Feb. 2019
Issued for track work in Holmes Road and Nicholson St Brunswick between 23 Feb. and 7 March 2019 impacting routes 1 and 6. Produced by Yarra Trams and the PTV.Yields information about track work in Holmes Rd and Nicholson St Brunswick 2019.Pamphlet - full colour DL 6 fold.trackwork, tramways, nicholson st, holmes road, brunswick, route 1, route 6 -
 Bendigo Military Museum
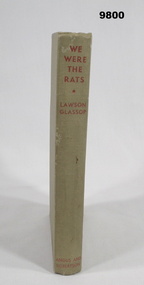
Book - BIOGRAPHY, TOBRUK, Lawson Glassop, "WE WERE THE RATS", 1945
"WE WERE THE RATS" - Biography under the headings "Nervidale" on route to Tobruk "Tobruk", After Tobruk. Part of the "William (Bill) THOMASON Collection. Refer Cat No. 4136P for more items.Hard cover book. Cover - cardboard, light khaki colour buckram, red colour print on spine. 275 pages - cut, plain, off white colour paper. No Illustrations Front end paper - handwritten information. Handwritten information - blue ink pen. "Elsie Broadstock" - grey lead pencil. "A/ R/U/ ??"publications, books, ww2, tobruk, biography -
 Melbourne Tram Museum
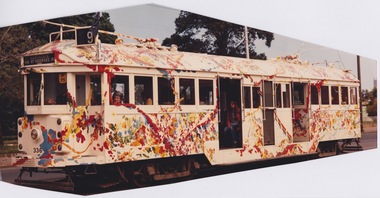
Photograph - W2 class 336 art tram
Photograph shows W2 class tram 336 in Art Tram livery in revenue service, with destination 'Northcote via St Georges Rd, Route 9, Run number P15'. Yields information about Art Tram W2 336.Colour print with no note on the rear. Irregular shaped print.w2 class, art tram, tram 336, revenue service, northcote via st georges rd, route 9 -
 Melbourne Tram Museum
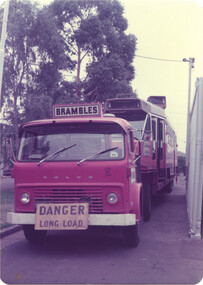
Photograph - Z class trams - new & in service - set of 7, Norm Cross, c1975
Set of 7 colour prints showing Z or Z1 class trams being delivered to Preston and in use. All photos by Norm Cross mid to late 1970s. 1 - Z1, unnumbered, being delivered to Preston on a Brambles truck from Comeng Dandenong. 2 - ditto - rear view 3 - Z 6 at Preston Workshops, possibly soon after completion. The tram entered service on 28/6/1975 4 - Z1 51, running on route 51 to the City. 5 - Z1 100 and 10 at Preston Workshops, both without destination and route numbers. 6 - Z2 101 and Z1 98 at Preston Workshops. 101 is without destination and route numbers. 7 - Z1 60 and Y469 Bourke St. 20/2/1977 - both showing Special with the Southern Cross Hotel and Malcolm Reid store in the background. Yields information about the operation and delivery of Z1 class trams during the mid to late 1970s.Set of 7 colour photos with rounded corners.trams, tramways, z class, tram 6, preston workshops, tram 51, brambles, delivery of tramcars, tram 60, tram 469, tram 101, tram 98, tram 10 -
 Ballarat Tramway Museum
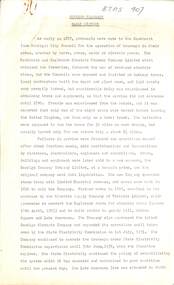
Document - Manuscript, State Electricity Commission of Victoria (SECV), "Bendigo Tramways Early History", 1969
Consists of formation history, track and route dates, operator, SEC takeover and route lengths. One page of statistics - 1935 to 1969, only completed to 1968 and last year filled in by hand. Gives Income, Expenditure, Loss, passengers and car miles. Car miles have been handwritten and pasted over the typed sheet. Probably prepared late 1960's by Les Denmead (assumption here - See Reg item 3289 and 3478 for Geelong Bendigo version), given the hand written notes etc.Yields historical notes and statistics on the Bendigo Tramway system - the statistical information being the most important. Four sets - original and three copies - foolscap typed documents, three pages each, titled "Bendigo Tramways Early History". 'BTPS 407" in top right hand corner.trams, tramways, bendigo, sec, esco, history, statistics -
 Ballarat Tramway Museum
Drawing - Plan and notes, Wal Jack, Auckland NZ tramways, 1945
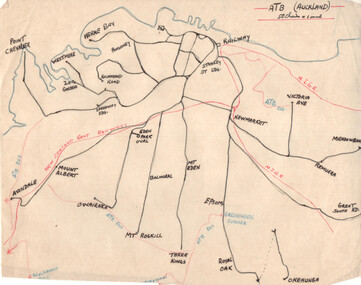
Wal Jack had an extensive range of correspondents throughout Australia and the world who often provided him with detailed drawings and notes on various tramway systems. This set of notes on the Auckland tramway system, both the main city, Auckland Tramway Board and the north shore - Takapuna Tramway and Ferry Co shows the various routes, locations and terminals. The hand written sheets provide opening dates of the various routes and gives the total miles and number of cars as at 31-3-1945. Based on the handwriting, prepared by Wal Jack himself.Yields information about Wal Jack's extensive recording and research work.Set of two drawings - black, red and blue ink on quarto size paper and two sheets of notes on the Auckland tramway system c1945.letters, wal jack, drawings, maps, auckland, takapuna nz -
 Melbourne Tram Museum
Negative - Copy - CW5 685 Hawthorn Road, Balaclava Junction, early to mid 1940s
Black and white photograph of CW5 685 in Hawthorn Road with Caulfield Park in the background, just before Balaclava Junction. Tram has white strips on the bumper and under the cab windows. Photo during the early to mid 1940's. Tram has an Auxiliary board "Via Dandenong Rd" and showing, Route 67. At the time, Route 67 ran from St Kilda ran from Balaclava Junction to St Kilda, Acland St via Dandenong Road. Ceased in 1955. See 3599 for a poor print.Yields information about the use of L class trams.Copy negative of a black and white photographtramcars, tramways, caulfield, hawthorn road, cw5 class, balaclava junction, route 67., tram 685 -
 Melbourne Tram Museum
Map, Victorian Railways (VR), "Melbourne and Suburbs", 1956
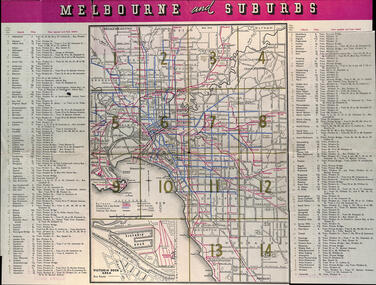
Map printed by the Victorian Railways in 1955 gives places of interest, some facts about Melbourne, and amusements, with the map showing rail, tram, and railway bus routes, suburbs, golf links, sporting grounds, and municipalities. The Bourke St tram route to East Preston is shown but not the Nicholson St East Brunswick line which opened during mid 1956. Provides a detailed list of suburbs, miles from the GPO, and how reached from where. Notes it was published in Jan. 1956 by the VR Public Relations and Betterment Board.Demonstrates a Victorian Railways printed map of MelbourneMap - 8 fold printed in colourmaps, melbourne, tramways, bus routes, railways -
 Melbourne Tram Museum
Document - Notice cable trams, Melbourne & Metropolitan Tramways Board (MMTB), "Traffic Signalling", 1921
Notices to cable tram employees and signalmen about the operation of the intersection of Collins and Swanston Street c1921. Details how Police would signal for the number of trams to cross in either direction and how the signalman would operate the signals and the cable depression lever for Collins St cable cars. The Rules for signalmen dated 1/7/1921 and signed by J G Roberts, Manager Cable system for the MMTB. This intersection was one of the busiest in Melbourne running four separate routes in Collins St and the busy St Kilda Road route.Yields information about the cable tram operation of Swanston and Collins St and signalmen.Two foolscap photocopied sheets, stapled in top left hand corner.tramways, cable trams, swanston st, collins st, signalmen, police -
 Melbourne Tram Museum
Postcard, Rose Stereograph Co, "Swanston Street Melbourne", early 1940s
Rose Series postcard No. P 3288 titled "Swanston Street Melbourne", looking north from just past (or south) of Batman Ave. There are five trams in the view and one private Reo bus. W2 class tram 452 (route 64 - City). The trams have a white strip under the driver's windows indicating the war time black out measure. The sign board advertising tram routes to Wattle Park, Burwood etc can be seen above the footpath leading to Batman Ave.Yields information about Swanston St. at the intersection with Batman Ave.Postcard - printed real photograph with Rose Stereograph Co. name on the rear.Has "K J Magor" stamp on rear.trams, tramways, w2 class, swanston st, bus, batman ave, tram 452, route 64, world war ii -
 Melbourne Tram Museum
Photograph - W5 class 721 High Street, St Kilda, 1970s
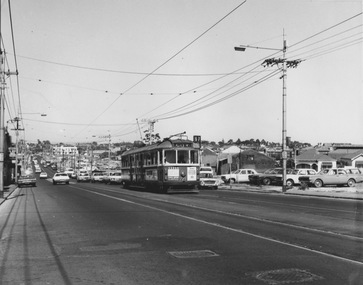
Photograph of W5 class 721 city bound on route 67 ascends an uphill grade on a busy thoroughfare with numerous motor vehicles parked on vacant allotments along the southwest edge of the roadway. This is likely High Street, St Kilda at the commencement of road-widening works in the early 1970s. These works were to widen the narrow High Street between the wider Brighton Road and the newly rebuilt St Kilda Junction. Properties on the northeast edge of High Street remained. In these years the Carnegie route number changed from 4 to 67.Yields information about increase in motor vehicle traffic Black and white photograph with no notetram 721, route 4, route 67, high street st kilda, st kilda junction, road widening, brighton road, w5 class -
 Melbourne Tram Museum
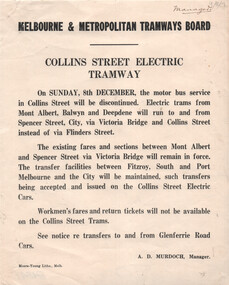
Document, Melbourne & Metropolitan Tramways Board (MMTB), "Collins Street Electric Tramway", Dec. 1929
Set of two Notices to Passengers regarding changes resulting from the opening of the Collins St electric lines to Victoria Bridge as of 8/12/1929. Signed by A D Murdoch, Manager. 1 - Collins St Electric Tramway - noting that the bus service will be discontinued, and electric trams to Victoria Bridge. Existing fares remain applicable but no workmen's fares. 2 - St Kilda Beach - Kew Route - trams will terminate at Glenferrie and Cotham Roads, rather than running to Victoria Bridge. Details fares for the route.Yields information about the opening of the Collins St electric tram service in 1929 and other changes.Set of two Notices printed on quarto paper.Both have "Manager" in top right hand corner.tramways, buses, new tramway, collins st, tram routes, kew -
 Melbourne Tram Museum
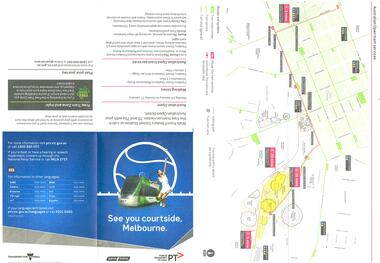
Pamphlet, Public Transport Victoria (PTV), "See you courtside, Melbourne", 2018
... Routes ...Pamphlet, four fold, titled "See you courtside, Melbourne" , giving details of getting to the Australian Open using tram services and walking times. Has a map showing the Melbourne CBD, the Tennis centre, tram lines and railway stations. Has PTV contact details. Has logos of Transport for Victoria, PTV and Yarra Trams. Two copies held.trams, tramways, melbourne, map, routes, events, tennis centre, yarra trams -
 Melbourne Tram Museum
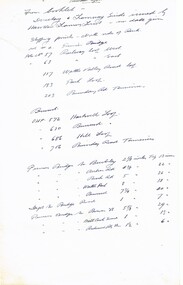
Document - Research Notes, H. S. McComb, details of the Hawthorn system - part 1, 1950's
... Routes ...Set of papers - 12 foolscap and some quarto sheets - hand written in ink and pencil giving details of the Hawthorn system, distances, running times, streets used. Notes on Straun Robertson, depot layout, notes on track mileage, Wattle Park, construction, loop locations, sketches of track, the authorising Act, track lengths and calculations. Items 2037 to 2041 within box 72.3 in a brown folder marked "Hawthorn Tramway Trust" in red pencil.trams, tramways, htt, hawthorn, reports, routes, track, hawthorn depot -
 Halls Gap & Grampians Historical Society
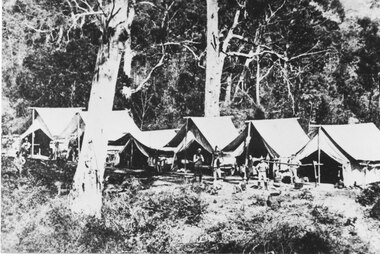
Photograph - B/W
Railway survey camp 1880 After choosing the route, the rail survey was undertaken followed by the construction of the line in less than a year. By Nov 1881 access by rail for Heatherlie to Melbourne was a reality Railway survey camp Heatherlie quarry; 11 men, some standing, some reclining in front of 6 army style tentsstructures, tents