Showing 2731 items
matching state government
-
 The Beechworth Burke Museum
Photograph - Lantern Slide, c1900
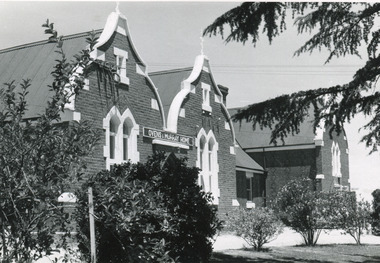
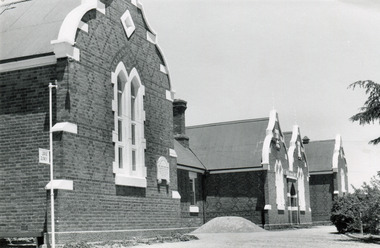
This picture shows an angle of Beechworth Primary School (State School number 1560) which is also pictured in the building's entry in the Victorian Heritage Register (VHR record 1718). The school began as a national school in 1858 as an alternative to Wesleyan and Anglican schools already operating in the area. Its name was changed to Common School number 36 in 1862 and the Beechworth Academy prior to being taken over by the Education department in 1873. The new premises were built in 1875 utilising the skills of architect Henry Bastow though the original design may be attributable to the firm Wharton and Vickers. The design was used with modifications for other schools in Victoria, including the Competition School in Errol Street, North Melbourne. The school moved to the building pictured from its original premises in Loch Street, designed by Thomas Dalziel, which later became the office of the Ovens Advertiser. The school was opened on 2 July 1875 by former Beechworth resident G.B. Kerferd, who was then the Premier of Victoria. The image shows approximately ninety older students at the school in approximately 1900. There are approximately equal numbers of boys and girls pictured, with most of the individuals pictured appearing to be between the ages of twelve and fifteen. Although the school had more than 1000 students enrolled at its height, enrolments had declined to 304 in 1890. Also visible is a fringe of sequoia pines which were planted by the school children as a project lasting through to the late 1930s. Lantern slides, sometimes called 'magic lantern' slides, are glass plates on which an image has been secured for the purpose of projection. Glass slides were etched or hand-painted for this purpose from the Eighteenth Century but the process became more popular and accessible to the public with the development of photographic-emulsion slides used with a 'Magic Lantern' device in the mid-Nineteenth Century. Photographic lantern slides comprise a double-negative emulsion layer (forming a positive image) between thin glass plates that are bound together. A number of processes existed to form and bind the emulsion layer to the base plate, including the albumen, wet plate collodion, gelatine dry plate and woodburytype techniques. Lantern slides and magic lantern technologies are seen as foundational precursors to the development of modern photography and film-making techniques.The image is significant because it sheds light on the educational infrastructure present in Beechworth in the early part of the Twentieth Century, including the prevalence of education for students after current-day primary-school age and the education of girls. It also provides insight into the building and design practices used by Government departments at the time. Thin translucent sheet of glass with a circular image printed on the front and framed in a black backing. It is held together by metals strips to secure the edges of the slide.Obverse: L / burke museum, beechworth, lantern slide, slide, glass slide, plate, burke museum collection, photograph, monochrome, schools, education, high school, primary school, common school, state school, state school 1560, common school 36, beechworth academy, g.b. kerferd, thomas dalziel, henry bastow, victorian heritage register, beechworth primary school, girls education, boys education, public schools, education department, pines, trees, sequoias, competition school -
 Orbost & District Historical Society
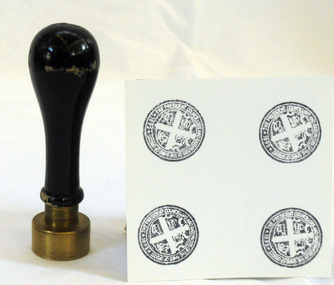
Council Seal
This item was used as a seal (stamp) on official Shire Council documents. The coat of arms of the Shire of Orbost was designed in the form of a cross in which five stars are depicted on a shield. A small crown above the cross indicates the loyalty of the president,councillors and ratepayers to the reigning monarch. The inner section of the shield contains 4 figures, a sheaf of wheat, a factory, a co and a ship - all representing the activities of agriculture, fishing,industry and dairying undertaken in the shire. Originally part of the Bairnsdale district, Orbost split away as part of the Tambo Shire in 1882, and became a shire in its own right as the Shire of Croajingolong on 30th May,1892. The name was changed to the Shire of Orbost on 17th February, 1893. The Orbost Shire Council was abolished on 2nd December, 1994 as part of a state-wide program of local government reform to become part of the newly constituted East Gippsland Shire council.Local governments play an important role in the lives of citizens in Australia. Local government authorities exist to provide services and amenities to local communities, and are also responsible for regulating and providing services for land and property in their district. This item is representative of a time when Orbost had its own Shire Council.The former Orbost Shire Council Seal (stamp) depicting the coat of arms. The circular seal is brass and has a wooden handle with a bulb shaped top.President, Councillors and Ratepayers of the Shire of Orbost-1892orbost orbost-shire-council government history seal -
 Orbost & District Historical Society
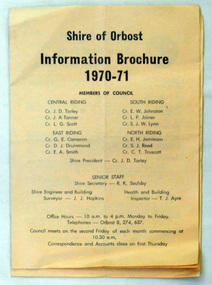
brochures, Snowy River Mail as "Mail" Print, Shire of Orbost Information Brochure, December 1970
The Shire of Orbost was a local government area about 380 kilometres east of Melbourne, the state capital of Victoria, Australia. The shire covered an area of 9,347 square kilometres ), and existed from 1892 until 1994. Originally, Orbost was part of the Bairnsdale Road District which was created on 30 April 1867. Splitting away as part of the Shire of Tambo in 1882, Orbost was first incorporated as a shire in its own right as the Shire of Croajingolong on 30 May 1892. It received its present name on 17 February 1893. On 3 January 1913 part of its western riding was annexed to Tambo as its Cunninghame Riding. On 2 December 1994, the Shire was abolished, and merged with City and Shire of Bairnsdale, Shire of Tambo, most of Shire of Omeo and the Boole Boole Peninsula from Shire of Rosedale into the Shire of East Gippsland This is a useful research tool.Two copies of a triple fold paper brochure. It is titled"Shire of Orbost Information Brochure" in black print. It contains the names of councillors, staff, the work program and budget.shire-of-orbost -
 Orbost & District Historical Society
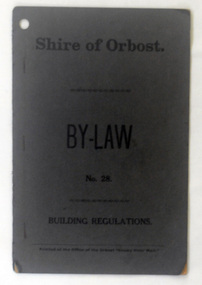
booklet, Snowy River Mail, Shire of Orbost By Laws No 28, 1920's
This booklet contains by law No 28 pertaining to building regulations. The Shire of Orbost was a local government area about 380 kilometres east of Melbourne, the state capital of Victoria, Australia. The shire covered an area of 9,347 square kilometres ), and existed from 1892 until 1994. Originally, Orbost was part of the Bairnsdale Road District which was created on 30 April 1867. Splitting away as part of the Shire of Tambo in 1882, Orbost was first incorporated as a shire in its own right as the Shire of Croajingolong on 30 May 1892. It received its present name on 17 February 1893. On 3 January 1913 part of its western riding was annexed to Tambo as its Cunninghame Riding. On 2 December 1994, the Shire was abolished, and merged with City and Shire of Bairnsdale, Shire of Tambo, most of Shire of Omeo and the Boole Boole Peninsula from Shire of Rosedale into the Shire of East Gippsland. This item is a useful research tool.A dark grey, stapled, paper covered booklet with title "Shire of Orbost By Law No 28" in black print. -
 Orbost & District Historical Society
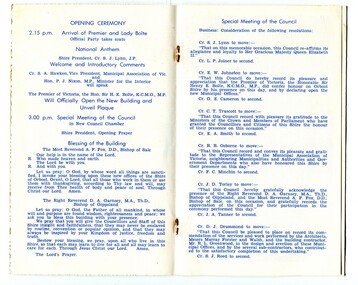
Invitation, 1969
The current building was opened on Friday 28th February 1969 by the Premier of Victoria, The Hon. Sir Henry E. Bolte, K.C.M.G., M.P. The Shire of Orbost was a local government area about 380 kilometres east of Melbourne, the state capital of Victoria, Australia. The shire covered an area of 9,347 square kilometres and existed from 1892 until 1994. Originally, Orbost was part of the Bairnsdale Road District which was created on 30 April 1867. Splitting away as part of the Shire of Tambo in 1882, Orbost was first incorporated as a shire in its own right as the Shire of Croajingolong on 30 May 1892. It received its present name on 17 February 1893. On 3 January 1913 part of its western riding was annexed to Tambo as its Cunninghame Riding. Local governments play an important role in the lives of citizens in Australia. Local government authorities exist to provide services and amenities to local communities, and are also responsible for regulating and providing services for land and property in their district. This item is representative of a time when Orbost had its own Shire Council. A stapled program and invitation to the official opening of the new Orbost Shire Council Municipal Offices. A light blue card with the Orbost Shire Council insignia and gold print on front. The invitation is addressed to the secretary of Orbost Historical Society Judith Walcott.handwritten in blue pen - "Judith G Walcott"orbost-shire-council -
 Orbost & District Historical Society
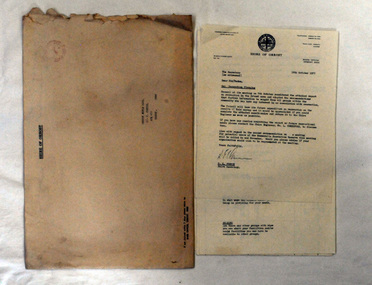
document, 18th October, 1977
This survey had been sent to the Orbost Rifle Club c/- C. Curtis.The Shire of Orbost was a local government area about 380 kilometres (236 mi) east of Melbourne, the state capital of Victoria, Australia. The shire covered an area of 9,347 square kilometres (3,608.9 sq mi), and existed from 1892 until 1994 when it was merged as part of East Gippsland Shire Council.A nine page document stapled in the left-hand corner. It is a recreational survey issued by the Shire of Orbost. It is inside a a large manila envelope which is addressed to the Orbost Rifle club. It contains a covering letter and a form.survey shire-of-orbost orbost-rifle-club -
 Orbost & District Historical Society
black and white photograph, first half 20th century
This photograph shows men working on cutting marble at South Buchan for Australia House in London. In the early 1900s black marble was being mined in the Bruthen district. Some was used for the Shrine of Remembrance in Melbourne and Australia House in London. 900 tonnes were shipped to London to be included in the construction of Australia House. DESCRIPTIONA paper covered booklet which is a pictorial souvenir Of Australia House in London. Pictures show Buchan marble features of the building.SIZE H-266mm W-192mm OBJECT REGISTRATION654KEYWORDSbuchan-marble australia-houseHISTORICAL INFORMATIONAustralia House is the oldest Australian diplomatic mission and it is the longest continuously occupied foreign mission in London. King George V laid the building’s first foundation stone in 1913 but it was not until August 1918 that he officially opened the completed building. The stringencies of World War I – principally shipping difficulties and labour shortages – had delayed construction considerably. Federation of the six Australian states formally took place on 1 January 1901 but it was not until 1906 that the Federal Government sent an Official Secretary to London to represent Australia. In the intervening years Australia was represented by State Agents-General, the first of whom was the Agent-General of Victoria. The building is significant for its unique design, Beaux Arts style and the materials used in its construction.Marble quarrying has been a significant part of the history of Buchan in East Gippsland. Its inclusion in Australia House in London and the shrine of Remembrance in Melbourne is noteworthy.A small black / white photograph of men in the background of a marble quarry. There is also a copy.on back - " Cutting Australian Home Marble at Sth Buchan"buchan-marble geology australia-house -
 Orbost & District Historical Society
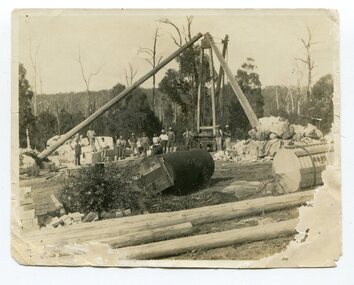
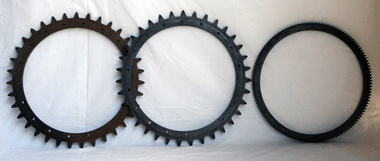
sprockets and ring gear, 1941
... munitions and defence equipment were manufactured by state ...Ron Peck machined the driving sprockets for Bren Gun Carriers which were sent to North Africa. The Rats of Tobruk, the Egypt and Rommell campaign used these munitions. He boarded at Orbost House while doing 12 hour day shifts.During WW11 munitions and defence equipment were manufactured by state government and private engineering firms, co-ordinated by the Commonwealth government. They worked together to meet Australia’s defence needs and create ‘mass production, on a nation-wide scale, of materials and articles of a higher degree of complexity and accuracy than had before been attempted in Australia. These sprockets were manufactured locally.Two metal sprockets for a Bren Gun carrier. One metal ring gear.munitions sprockets bren-gun-carrier peck-james-ronald orbost-motor-works -
 Orbost & District Historical Society
framed photo
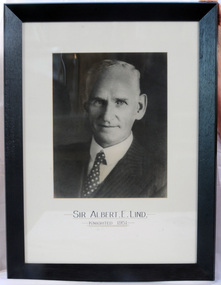
This photo was inherited with the building when the museum was established. Lind was born in 1878 in East Charlton, Victoria, the son of Oliver Nicholas Lind, a farmer from Denmark, and his Welsh wife Mary Ann Clay. In 1882, drought forced the family to move to East Gippsland where Lind was educated at Lucknow, and then to Bairnsdale in 1884 where he attended Bairnsdale state school. In October 1920, he was elected to the Victorian Legislative Assembly for the seat of Gippsland East for the Victorian Farmers' Union. Lind was made Minister of Forests, President of the Board of Land and Works and Commissioner of Crown Lands and Survey in Albert Dunstan's cabinet. He was knighted in 1951. In 1926 two national parks east of Orbost were named the Albert and the Lind national parks after him.A framed photo of Sir Albert Eli Lind. It is a black and white head and shoulders photo in a black wooden frame.Sir Albert E. Lind Knighted !951photograph politician lind-albert government -
 The Beechworth Burke Museum
Photograph, J. Collins, c.1940-1950s
This photograph was captured sometime between an estimated 1940s-1950s. It depicts the Beechworth Benevolent Asylum (later the Ovens and Murray Hospital for the Aged) which was built in 1862. It is located on an elevated site in Beechworth, Victoria because it was believed the height was beneficial to the health of the patients at the Benevolent. Later wings were added to the original building between 1867 and 1890. The building was constructed in an unusual Flemish Gothic Revival style which contrasts with the classical style of the Mayday Hills Hospital in close proximity to the Benevolent. The Hospital was designed in Italianate Revival architecture. The appearance of buildings like the Mayday Hills Hospital and the Ovens Benevolent Asylum are representative of the importance of Beechworth as a town shortly after the goldrush. During the 1850s and 1860s, administration buildings were erected alongside churches, shops and structures of justice. This marks a movement away from the "chaotic" structure of life on the goldfields and towards a more civilised and cultural lifestyle. This social phenomenon is also witnessed in Melbourne with the creation of buildings like the State Library and the University of Melbourne. The Beechworth Benevolent Asylum was renamed the Ovens Benevolent Home in 1935. The Asylum had been set up to provide accommodation and care for permanently injured gold miners, and for women and children who were penniless, homeless, or whose parents were guests of the state. In 1954 it was renamed as The Ovens and Murray Home (as pictured in this photograph). The purpose of this building was to provide a refuge for the poor and destitute, homeless older men, deserted women and children along with providing care for the mentally ill. These buildings were built at the government's expense and are of great historical and architectural significance.This photograph depicts the Ovens and Murray Home (previously the Ovens Benevolent Home) during the 1940s or 1950s. Since this building is of great historic and architectural significance, photographs like this are especially valuable in reconstructing the use history and any changes/additions to the building over a period of time. This building is important for what it can reveal about society in Beechworth and also architectural styles. This building is made in the Flemish Gothic Revival style which is quite unusual for the 1860s. It is important as an early example of a building constructed for a specific purpose, in the case of this particular building: caring for the aged/destitute. This building is important for research into the civic development of Beechworth as an early Gold Rush town located in Victoria's North-East. During this period, Beechworth was developing as the main center of administration in this region which made it a very influential and quickly developed town. Photographs like this one which depict a building during one period in history can reveal important information for the use and alterations of a building and for preferences in architectural style. It can also be studied for what it reveals about society in Beechworth and compared and contrasted to similar institutions across Australia and with additional photographs in the Burke Museum collection.Black and white rectangular photograph printed on gloss photographic paperObverse: OVENS & MURRAY HOME / Reverse: KODAK PAPER / 727 / J. Collins BMM 8689.1 /mayday hills, beechworth benevolent asylum, ovens benevolent home, asylum, refuge, poor and destitute, goldrush, flemish gothic revival, architecture -
 The Beechworth Burke Museum
Photograph, J. Collins
This photograph was captured sometime between an estimated 1940s-1950s. It depicts the Beechworth Benevolent Asylum (later the Ovens and Murray Hospital for the Aged) which was built in 1862. It is located on an elevated site in Beechworth, Victoria because it was believed the height was beneficial to the health of the patients at the Benevolent. Later wings were added to the original building between 1867 and 1890. The building was constructed in an unusual Flemish Gothic Revival style which contrasts with the classical style of the Mayday Hills Hospital in close proximity to the Benevolent. The Hospital was designed in Italianate Revival architecture. The appearance of buildings like the Mayday Hills Hospital and the Ovens Benevolent Asylum are representative of the importance of Beechworth as a town shortly after the goldrush. During the 1850s and 1860s, administration buildings were erected alongside churches, shops and structures of justice. This marks a movement away from the "chaotic" structure of life on the goldfields and towards a more civilised and cultural lifestyle. This social phenomenon is also witnessed in Melbourne with the creation of buildings like the State Library and the University of Melbourne. The Beechworth Benevolent Asylum was renamed the Ovens Benevolent Home in 1935. The Asylum had been set up to provide accommodation and care for permanently injured gold miners, and for women and children who were penniless, homeless, or whose parents were guests of the state. In 1954 it was renamed as The Ovens and Murray Home (as pictured in this photograph). The purpose of this building was to provide a refuge for the poor and destitute, homeless older men, deserted women and children along with providing care for the mentally ill. These buildings were built at the government's expense and are of great historical and architectural significance.This photograph depicts the Ovens and Murray Home (previously the Ovens Benevolent Home) during the 1940s or 1950s. Since this building is of great historic and architectural significance, photographs like this are especially valuable in reconstructing the use history and any changes/additions to the building over a period of time. This building is important for what it can reveal about society in Beechworth and also architectural styles. This building is made in the Flemish Gothic Revival style which is quite unusual for the 1860s. It is important as an early example of a building constructed for a specific purpose, in the case of this particular building: caring for the aged/destitute. This building is important for research into the civic development of Beechworth as an early Gold Rush town located in Victoria's North-East. During this period, Beechworth was developing as the main center of administration in this region which made it a very influential and quickly developed town. Photographs like this one which depict a building during one period in history can reveal important information for the use and alterations of a building and for preferences in architectural style. It can also be studied for what it reveals about society in Beechworth and compared and contrasted to similar institutions across Australia and with additional photographs in the Burke Museum collection.Black and white rectangular photograph printed on gloss photographic paperBack of photograph. Handwriting: "For John Beckingsale"mayday hills, beechworth benevolent asylum, ovens benevolent home, destitute, gold town, beechworth, victoria, north-east vic -
 The Beechworth Burke Museum
Photograph, c1924
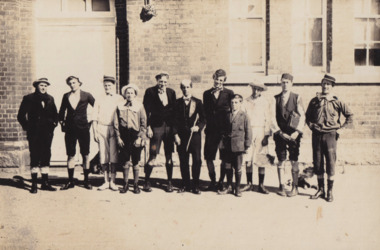
Taken in 1924, depicted are eleven young men dressed in school uniform attire standing in the playground of Beechworth State School. This group of young men were part of a farcical play titled "School Days" as part of Beechworth State School Concert series. Beechworth Primary School (formally known as Beechworth State School) was constructed in 1875 by architect Henry Bastow (1839 - 1920). Bastow was the chief architect and surveyor for the Victorian Government’s Department of Education. During his chiefship, over six-hundred schools were constructed across the state which was in response to the Victoria’s Education Act of 1872 legislating free, compulsory, and secular education. Performances such as this “School Days” play were common forms of entertainment within Beechworth up into the early twentieth century. This stems from the goldrush period in Beechworth (1852-1866) when travelling entertainers would tour the goldfields offering performances in singing, acting and circus tricks. These were usually held in a local pub or designated concert spaces, such as the Star Theatre in Beechworth. Entertainment offerings begun to slow down mid-twentieth century when the population begun to dwindle. Many locals took up this responsibility and put on their own plays and shows across the town. This photograph is historically significant as it provides insight into the types of entertainment activities held at the Beechworth School during the early twentieth century. It also demonstrates how students engaged with their school outside of their regular schoolwork. Black and white rectangular photograph printed on matte photographic paper mounted on board. Obverse: W.Howes / Beechworth Concert Party 1924 / State School / Beechworth Cyril Smith (Squidgy) / Keith Prowse / Bill Howes / J. Warde / J. Heatherly (Jumbo) / Gea Foster / B. Shallard (Shinky) / A. Foster / Ernie Smith / Jerry Burns / Ted Warden / School Master / Geo Foster in a Farscial Play “School Days” / Reverse: A03065 / 1997.2520 / 79.19.1 / school uniform, beechworth school, school days", concert series., henry bastow, beechworth primary school, victorian government’s department of education, education, victoria’s education act of 1872, beechworth state school -
 Flagstaff Hill Maritime Museum and Village
Book, The Works of Alfred Lord Tennyson
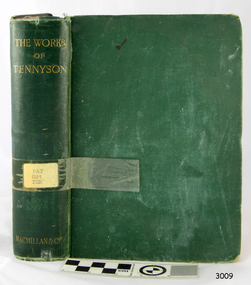
This item is from the ‘Pattison Collection’, a collection of books and records that was originally owned by the Warrnambool Mechanics’ Institute, which was founded in Warrnambool in 1853. By 1886 the Warrnambool Mechanics’ Institute (WMI) had grown to have a Library, Museum and Fine Arts Gallery, with a collection of “… choice productions of art and valuable specimens in almost every branch and many wonderful national curiosities are now to be seen there, including historic relics of the town and district.” It later included a School of Design. Although it was very well patronised, the lack of financial support led the WMI in 1911 to ask the City Council to take it over. In 1935 Ralph Pattison was appointed as City Librarian to establish and organise the Warrnambool Library as it was then called. When the WMI building was pulled down in 1963 a new civic building was erected on the site and the new Warrnambool Library, on behalf of the City Council, took over all the holdings of the WMI. At this time some of the items were separated and identified as the ‘Pattison Collection’, named after Ralph Pattison. Eventually, the components of the WMI were distributed from the Warrnambool Library to various places, including the Art Gallery, Historical Society and Flagstaff Hill. Later some were even distributed to other regional branches of Corangamite Regional Library and passed to and fro. It is difficult now to trace just where all of the items have ended up. The books at Flagstaff Hill Maritime Village generally display stamps and markings from Pattison as well as a variety of other institutions including the Mechanics’ Institute itself. RALPH ERIC PATTISON Ralph Eric Pattison was born in Rockhampton, Queensland, in 1891. He married Maude Swan from Warrnambool in 1920 and they set up home in Warrnambool. In 1935 Pattison accepted a position as City Librarian for the Warrnambool City Council. His huge challenge was to make a functional library within two rooms of the Mechanics’ Institute. He tirelessly cleaned, cleared and sorted a disarrayed collection of old books, jars of preserved specimens and other items reserved for exhibition in the city’s museum. He developed and updated the library with a wide variety of books for all tastes, including reference books for students; a difficult task to fulfil during the years following the Depression. He converted all of the lower areas of the building into a library, reference room and reading room for members and the public. The books were sorted and stored using a cataloguing and card index system that he had developed himself. He also prepared the upper floor of the building and established the Art Gallery and later the Museum, a place to exhibit the many old relics that had been stored for years for this purpose. One of the treasures he found was a beautiful ancient clock, which he repaired, restored and enjoyed using in his office during the years of his service there. Ralph Pattison was described as “a meticulous gentleman whose punctuality, floorless courtesy and distinctive neat dress were hallmarks of his character, and ‘his’ clock controlled his daily routine and his opening and closing of the library’s large heavy doors to the minute.” Pattison took leave from 1942 to 1945 to serve in the Royal Australian Navy, Volunteer Reserve as Lieutenant. A few years later he converted one of the Museum’s rooms into a Children’s Library, stocking it with suitable books for the younger generation. This was an instant success. In the 1950’s he had the honour of being appointed to the Victorian Library Board and received more inspiration from the monthly conferences in Melbourne. He was sadly retired in 1959 after over 23 years of service, due to the fact that he had gone over the working age of council officers. However, he continued to take a very keen interest in the continual development of the Library until his death in 1969. WARRNAMBOOL MECHANICS’ INSTITUTE Warrnambool's Mechanics' Institute (or Institution as it was sometimes called) was one of the earliest in Victoria. On 17th October 1853, a meeting was held where it was resolved to request the Lieutenant Governor of the Colony to grant land for the erection of a Mechanics' Institutes building. A committee was formed at the meeting and Richard Osburne chaired the first meeting of this committee. The land on the North West corner of Banyan and Merri Streets was granted but there were no funds to erect the building. The Formal Rights of the Warrnambool Mechanics' Institute's encompassed its aims and these were officially adopted in1859; "This Institution has for its object the diffusion of literary, scientific, and other useful knowledge amongst its members, excluding all controversial subjects, religious or political. These objects are sought to be obtained by means of a circulating library, a reading room, the establishment of classes, debates, and the occasional delivery of lectures on natural and experimental philosophy, mechanics, astronomy, chemistry, natural history, literature, and the useful and ornamental arts, particularly those which have a more immediate reference to the colony." The Warrnambool Mechanics' Institute opened its first reading room in November 1884 in the National School building at the corner of Banyan and Timor Streets. The Institute was funded by member subscription, payable on a quarterly, half-yearly or yearly basis. Samuel Hannaford, the Manager of the Warrnambool Bank of Australasia, was the first Honorary Secretary of the Mechanics' Institutes, and an early President and Vice-President. He also gave several of the early lectures in the Reading Room. Another early Secretary, Librarian and lecturer was Marmaduke Fisher, the teacher at the National School. Lecture topics included The Poets and Poetry of Ireland', 'The Birth and Development of the Earth', 'The Vertebrae - with Remarks on the pleasures resulting from the study of Natural History' and 'Architecture'. In 1856 the Reading Room was moved to James Hider's shop in Timor Street, and by 1864 it was located in the bookshop of Davies and Read. In the 1860's the Mechanics' Institute struggled as membership waned but in 1866, after a series of fundraising efforts, the committee was able to purchase land in Liebig Street, on a site then called Market Square, between the weighbridge and the fire station. A Mechanics' Institute building was opened at this site in August 1871. The following year four more rooms were added to the main Reading Room and in 1873 the Artisan School of Design was incorporated into the Institute. The same year Joseph Archibald established a Museum; however, it deteriorated when he was transferred to Bendigo in 1877. In 1880, with Archibald's return to Warrnambool, the Museum was re-established, and in 1885 a new building was built at the back of the Institute to accommodate the re-created School of Design, the Art Gallery and the Museum. In 1887 the Museum section was moved to the former courthouse in Timor Street (for some time the walls of the building formed part of the TAFE cafeteria but all is now demolished)). In 1911 the Museum was transferred back to the original building and the management of the Mechanics' Institute was handed over to the Warrnambool City Council. The Museum and Art Gallery became one and housed many fine works of art, and the Library continued to grow. The building was well patronised, with records showing that at the beginning of the 20th century there were between 500 and 800 visitors. During World War One the monthly figures were in the thousands, with 3,400 people visiting in January 1915. The Museum was a much-loved Institution in Warrnambool until the contents of the Museum and Art Gallery were removed to make room for the Warrnambool City Council Engineers' Department. The contents were stored but many of the items were scattered or lost. When the original building was demolished the site became occupied by the Civic Centre, which included the new City Library. (The library was temporarily located in the old Palais building in Koroit Street.) In the process of reorganisation the Collection was distributed amongst the community groups: -The new City Library took some of the historical books and some important documents, historic photographs and newspapers. -The Art Gallery kept the 19th Century art collection and some of the artefacts from the museum. -The Historical Society has some items -The State Museum has some items -Some items were destroyed -Flagstaff Hill Maritime Village has old newspapers, Government Gazettes, most of the Mechanics' Institute Library, ledgers and documents connected to the Mechanics' Institute Library, some framed and unframed artworks and some photographs. The Warrnambool Mechanics' Institute Library book collection is deemed to be of great importance because it is one of the few collections in an almost intact state, and many of the books are now very rare and of great value. The Pattison Collection, along with other items at Flagstaff Hill Maritime Village, was originally part of the Warrnambool Mechanics' Institute’s collection. The Warrnambool Mechanics’ Institute Collection is primarily significant in its totality, rather than for the individual objects it contains. Its contents are highly representative of the development of Mechanics' Institute libraries across Australia, particularly Victoria. A diversity of publications and themes has been amassed, and these provide clues to our understanding of the nature of and changes in the reading habits of Victorians from the 1850s to the middle of the 20th century. The collection also highlights the Warrnambool community’s commitment to the Mechanics’ Institute, reading, literacy and learning in the regions, and proves that access to knowledge was not impeded by distance. These items help to provide a more complete picture of our community’s ideals and aspirations. The Warrnambool Mechanics Institute book collection has historical and social significance for its strong association with the Mechanics Institute movement and the important role it played in the intellectual, cultural and social development of people throughout the latter part of the nineteenth century and the early twentieth century. The collection of books is a rare example of an early lending library and its significance is enhanced by the survival of an original collection of many volumes. The Warrnambool Mechanics' Institute’s publication collection is of both local and state significance. The Works of Alfred Lord Tennyson Author: Alfred, Lord Tennyson - Poet Laureate Publisher: Macmillan And Co Date: 1892The label on spine cover has typed text PAT 821 TEN Pastedown front endpaper has a sticker from Warrnambool Mechanics Institute and Free Library Front loose endpaper has a sticker from Corangamite Regional Library Service Front loose endpaper has a stamp from Corangamite Regional Library Service Flyleaf has a stamp from Warrnambool Public Museumshipwrecked-coast, flagstaff-hill, flagstaff-hill-maritime-museum, warrnambool, maritime-museum, shipwreck-coast, flagstaff-hill-maritime-village, shipwrecked-artefact, book, pattison collection, warrnambool library, warrnambool mechanics’ institute, ralph eric pattison, corangamite regional library service, warrnambool city librarian, mechanics’ institute library, victorian library board, warrnambool books and records, warrnambool children’s library, the works of alfred lord tennyson, alfred, lord tennyson, poet laureate, alfred tennyson -
 Flagstaff Hill Maritime Museum and Village
Photograph
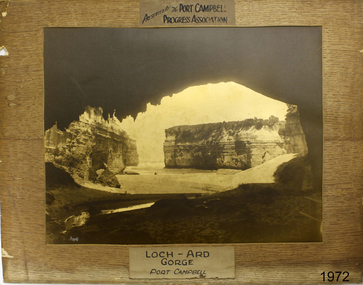
HISTORY OF THE LOCH ARD The LOCH ARD belonged to the famous Loch Line which sailed many ships from England to Australia. Built in Glasgow by Barclay, Curdle and Co. in 1873, the LOCH ARD was a three-masted square rigged iron sailing ship. The ship measured 262ft 7" (79.87m) in length, 38ft (11.58m) in width, 23ft (7m) in depth and had a gross tonnage of 1693 tons. The LOCH ARD's main mast measured a massive 150ft (45.7m) in height. LOCH ARD made three trips to Australia and one trip to Calcutta before its final voyage. LOCH ARD left England on March 2, 1878, under the command of Captain Gibbs, a newly married, 29 year old. She was bound for Melbourne with a crew of 37, plus 17 passengers and a load of cargo. The general cargo reflected the affluence of Melbourne at the time. On board were straw hats, umbrella, perfumes, clay pipes, pianos, clocks, confectionary, linen and candles, as well as a heavier load of railway irons, cement, lead and copper. There were items included that intended for display in the Melbourne International Exhibition in 1880. The voyage to Port Phillip was long but uneventful. At 3am on June 1, 1878, Captain Gibbs was expecting to see land and the passengers were becoming excited as they prepared to view their new homeland in the early morning. But LOCH ARD was running into a fog which greatly reduced visibility. Captain Gibbs was becoming anxious as there was no sign of land or the Cape Otway lighthouse. At 4am the fog lifted. A man aloft announced that he could see breakers. The sheer cliffs of Victoria's west coast came into view, and Captain Gibbs realised that the ship was much closer to them than expected. He ordered as much sail to be set as time would permit and then attempted to steer the vessel out to sea. On coming head on into the wind, the ship lost momentum, the sails fell limp and LOCH ARD's bow swung back. Gibbs then ordered the anchors to be released in an attempt to hold its position. The anchors sank some 50 fathoms - but did not hold. By this time LOCH ARD was among the breakers and the tall cliffs of Mutton Bird Island rose behind the ship. Just half a mile from the coast, the ship's bow was suddenly pulled around by the anchor. The captain tried to tack out to sea, but the ship struck a reef at the base of Mutton Bird Island, near Port Campbell. Waves broke over the ship and the top deck was loosened from the hull. The masts and rigging came crashing down knocking passengers and crew overboard. When a lifeboat was finally launched, it crashed into the side of LOCH ARD and capsized. Tom Pearce, who had launched the boat, managed to cling to its overturned hull and shelter beneath it. He drifted out to sea and then on the flood tide came into what is now known as LOCH ARD Gorge. He swam to shore, bruised and dazed, and found a cave in which to shelter. Some of the crew stayed below deck to shelter from the falling rigging but drowned when the ship slipped off the reef into deeper water. Eva Carmichael had raced onto deck to find out what was happening only to be confronted by towering cliffs looming above the stricken ship. In all the chaos, Captain Gibbs grabbed Eva and said, "If you are saved Eva, let my dear wife know that I died like a sailor". That was the last Eva Carmichael saw of the captain. She was swept off the ship by a huge wave. Eva saw Tom Pearce on a small rocky beach and yelled to attract his attention. He dived in and swam to the exhausted woman and dragged her to shore. He took her to the cave and broke open case of brandy which had washed up on the beach. He opened a bottle to revive the unconscious woman. A few hours later Tom scaled a cliff in search of help. He followed hoof prints and came by chance upon two men from nearby Glenample Station three and a half miles away. In a state of exhaustion, he told the men of the tragedy. Tom returned to the gorge while the two men rode back to the station to get help. By the time they reached LOCH ARD Gorge, it was cold and dark. The two shipwreck survivors were taken to Glenample Station to recover. Eva stayed at the station for six weeks before returning to Ireland, this time by steamship. In Melbourne, Tom Pearce received a hero's welcome. He was presented with the first gold medal of the Royal Humane Society of Victoria and a £1000 cheque from the Victorian Government. Concerts were performed to honour the young man's bravery and to raise money for those who lost family in the LOCH ARD disaster. Of the 54 crew members and passengers on board, only two survived: the apprentice, Tom Pearce and the young woman passenger, Eva Carmichael, who lost all of her family in the tragedy. Ten days after the LOCH ARD tragedy, salvage rights to the wreck were sold at auction for £2,120. Cargo valued at £3,000 was salvaged and placed on the beach, but most washed back into the sea when another storm developed. The wreck of LOCH ARD still lies at the base of Mutton Bird Island. Much of the cargo has now been salvaged and some was washed up into what is now known as LOCH ARD Gorge. Cargo and artefacts have also been illegally salvaged over many years before protective legislation was introduced. One of the most unlikely pieces of cargo to have survived the shipwreck was a Minton porcelain peacock - one of only nine in the world. The peacock was destined for the Melbourne International Exhibition in 1880. It had been well packed, which gave it adequate protection during the violent storm. Today, the Minton peacock can be seen at the Flagstaff Hill Maritime Museum in Warrnambool. From Australia's most dramatic shipwreck it has now become Australia's most valuable shipwreck artefact and is one of very few 'objects' on the Victorian State Heritage Register. Flagstaff Hill’s collection of artefacts from LOCH ARD is significant for being one of the largest collections of artefacts from this shipwreck in Victoria. It is significant for its association with the shipwreck, which is on the Victorian Heritage Register (VHR S417). The collection is significant because of the relationship between the objects, as together they have a high potential to interpret the story of the LOCH ARD. The LOCH ARD collection is archaeologically significant as the remains of a large international passenger and cargo ship. The LOCH ARD collection is historically significant for representing aspects of Victoria’s shipping history and its potential to interpret sub-theme 1.5 of Victoria’s Framework of Historical Themes (living with natural processes). The collection is also historically significant for its association with the LOCH ARD, which was one of the worst and best known shipwrecks in Victoria’s history. Photograph of Loch Ard Gorge. Photograph taken some distance from the Gorge. Three men in the Gorge and outlines of steps can be seen. Right hand side of the photograph is written "Loch Ard Gorge"flagstaff hill, warrnambool, shipwrecked coast, flagstaff hill maritime museum, maritime museum, shipwreck coast, flagstaff hill maritime village, great ocean road, loch line, loch ard, captain gibbs, eva carmichael, tom pearce, glenample station, mutton bird island, loch ard gorge, photograph of loch ard gorge, photograph -
 Flagstaff Hill Maritime Museum and Village
Painting
HISTORY OF THE LOCH ARD The LOCH ARD belonged to the famous Loch Line which sailed many ships from England to Australia. Built in Glasgow by Barclay, Curdle and Co. in 1873, the LOCH ARD was a three-masted square rigged iron sailing ship. The ship measured 262ft 7" (79.87m) in length, 38ft (11.58m) in width, 23ft (7m) in depth and had a gross tonnage of 1693 tons. The LOCH ARD's main mast measured a massive 150ft (45.7m) in height. LOCH ARD made three trips to Australia and one trip to Calcutta before its final voyage. LOCH ARD left England on March 2, 1878, under the command of Captain Gibbs, a newly married, 29 year old. She was bound for Melbourne with a crew of 37, plus 17 passengers and a load of cargo. The general cargo reflected the affluence of Melbourne at the time. On board were straw hats, umbrella, perfumes, clay pipes, pianos, clocks, confectionary, linen and candles, as well as a heavier load of railway irons, cement, lead and copper. There were items included that intended for display in the Melbourne International Exhibition in 1880. The voyage to Port Phillip was long but uneventful. At 3am on June 1, 1878, Captain Gibbs was expecting to see land and the passengers were becoming excited as they prepared to view their new homeland in the early morning. But LOCH ARD was running into a fog which greatly reduced visibility. Captain Gibbs was becoming anxious as there was no sign of land or the Cape Otway lighthouse. At 4am the fog lifted. A man aloft announced that he could see breakers. The sheer cliffs of Victoria's west coast came into view, and Captain Gibbs realised that the ship was much closer to them than expected. He ordered as much sail to be set as time would permit and then attempted to steer the vessel out to sea. On coming head on into the wind, the ship lost momentum, the sails fell limp and LOCH ARD's bow swung back. Gibbs then ordered the anchors to be released in an attempt to hold its position. The anchors sank some 50 fathoms - but did not hold. By this time LOCH ARD was among the breakers and the tall cliffs of Mutton Bird Island rose behind the ship. Just half a mile from the coast, the ship's bow was suddenly pulled around by the anchor. The captain tried to tack out to sea, but the ship struck a reef at the base of Mutton Bird Island, near Port Campbell. Waves broke over the ship and the top deck was loosened from the hull. The masts and rigging came crashing down knocking passengers and crew overboard. When a lifeboat was finally launched, it crashed into the side of LOCH ARD and capsized. Tom Pearce, who had launched the boat, managed to cling to its overturned hull and shelter beneath it. He drifted out to sea and then on the flood tide came into what is now known as LOCH ARD Gorge. He swam to shore, bruised and dazed, and found a cave in which to shelter. Some of the crew stayed below deck to shelter from the falling rigging but drowned when the ship slipped off the reef into deeper water. Eva Carmichael had raced onto deck to find out what was happening only to be confronted by towering cliffs looming above the stricken ship. In all the chaos, Captain Gibbs grabbed Eva and said, "If you are saved Eva, let my dear wife know that I died like a sailor". That was the last Eva Carmichael saw of the captain. She was swept off the ship by a huge wave. Eva saw Tom Pearce on a small rocky beach and yelled to attract his attention. He dived in and swam to the exhausted woman and dragged her to shore. He took her to the cave and broke open case of brandy which had washed up on the beach. He opened a bottle to revive the unconscious woman. A few hours later Tom scaled a cliff in search of help. He followed hoof prints and came by chance upon two men from nearby Glenample Station three and a half miles away. In a state of exhaustion, he told the men of the tragedy. Tom returned to the gorge while the two men rode back to the station to get help. By the time they reached LOCH ARD Gorge, it was cold and dark. The two shipwreck survivors were taken to Glenample Station to recover. Eva stayed at the station for six weeks before returning to Ireland, this time by steamship. In Melbourne, Tom Pearce received a hero's welcome. He was presented with the first gold medal of the Royal Humane Society of Victoria and a £1000 cheque from the Victorian Government. Concerts were performed to honour the young man's bravery and to raise money for those who lost family in the LOCH ARD disaster. Of the 54 crew members and passengers on board, only two survived: the apprentice, Tom Pearce and the young woman passenger, Eva Carmichael, who lost all of her family in the tragedy. Ten days after the LOCH ARD tragedy, salvage rights to the wreck were sold at auction for £2,120. Cargo valued at £3,000 was salvaged and placed on the beach, but most washed back into the sea when another storm developed. The wreck of LOCH ARD still lies at the base of Mutton Bird Island. Much of the cargo has now been salvaged and some was washed up into what is now known as LOCH ARD Gorge. Cargo and artefacts have also been illegally salvaged over many years before protective legislation was introduced. One of the most unlikely pieces of cargo to have survived the shipwreck was a Minton porcelain peacock - one of only nine in the world. The peacock was destined for the Melbourne International Exhibition in 1880. It had been well packed, which gave it adequate protection during the violent storm. Today, the Minton peacock can be seen at the Flagstaff Hill Maritime Museum in Warrnambool. From Australia's most dramatic shipwreck it has now become Australia's most valuable shipwreck artefact and is one of very few 'objects' on the Victorian State Heritage Register. Flagstaff Hill’s collection of artefacts from LOCH ARD is significant for being one of the largest collections of artefacts from this shipwreck in Victoria. It is significant for its association with the shipwreck, which is on the Victorian Heritage Register (VHR S417). The collection is significant because of the relationship between the objects, as together they have a high potential to interpret the story of the LOCH ARD. The LOCH ARD collection is archaeologically significant as the remains of a large international passenger and cargo ship. The LOCH ARD collection is historically significant for representing aspects of Victoria’s shipping history and its potential to interpret sub-theme 1.5 of Victoria’s Framework of Historical Themes (living with natural processes). The collection is also historically significant for its association with the LOCH ARD, which was one of the worst and best known shipwrecks in Victoria’s history. Painting of The Loch Ard oil on board depicting wreck. It shows stormy sea and coastline in background. Ship appears to be capsized.flagstaff hill, warrnambool, shipwrecked coast, flagstaff hill maritime museum, maritime museum, shipwreck coast, flagstaff hill maritime village, great ocean road, loch line, loch ard, captain gibbs, eva carmichael, tom pearce, glenample station, mutton bird island, loch ard gorge, painting -
 Flagstaff Hill Maritime Museum and Village
Equipment - Breeches Buoy and Traveller Block, 1860s to 1950s
... by State and Local Government, and based on the methods ...The breeches buoy and traveller block are part of the beach rescue apparatus used by lifesaving crew overseas and in Australia in the 1860s to 1960s. The breeches buoy (or chair bucket or petticoat breeches) were invented by Lieutenant Kisbee by the 1850s. It looks like a pair of canvas shorts with a cork lifebuoy ring attached around the top. The set-up works similar way to a zip wire and allows for two-way travel. Saving lives in Warrnambool – The coastline of South West Victoria has had over 600 shipwrecks and many lost lives; even in Warrnambool’s Lady Bay there were around 16 known shipwrecks between 1850 and 1905, with eight lives lost. In 1859 the first Government-built lifeboat arrived at Warrnambool Harbour and a shed was soon built to house it, followed in 1864 by a rocket house to safely store the Rocket Rescue equipment. In 1878 the buildings were moved to the Breakwater area, and in 1910 the new Lifeboat Warrnambool arrived with its ‘self-righting’ design. For almost one hundred years the lifeboat and rocket crews, mostly local volunteers, trained regularly to maintain and improve their skills, summoned when needed by alarms, gunshots, ringing bells and foghorns. Some became local heroes but all served an important role. By the end of the 1950s the lifeboat and rescue equipment had become obsolete. Rocket Rescue Method - The first use of a lifesaving rocket rescue system is often credited to Captain Manby and his invention of a life mortar, first used in 1808 to fire a line onto a ship to rescue lives. Henry Trengrouse’s invention of 1820 was the first to use a sky rocket’s power to throw a line, and his invention included a chair for carrying the shipwrecked victims to shore. In 1832 John Dennett invented a rocket specifically for shore to ship rescue. It had an iron case and an 8 foot pole attached and could shoot the line as far as 250 yards (about 230 metres). From the 1860s the rocket rescue apparatus was in use. It comprised a breeches buoy and traveller block that was suspended on a line and manually pulled to and from the distressed vessel carrying passengers and items. Colonel Boxer, who had invented an early line-thrower, designed a rocket in 1865 with a range from 300 to 470 yards. It was the first two-stage rocket, with two rockets placed one in front of the other in a tube that carried the rescue line. The hemp line was faked, or coiled, in a particular way in a faking box to prevent twists and tangles when fired, and the angle of firing the rocket was measured by a quadrant-type instrument on the side of the rocket machine. Schermuly invented the line-throwing pistol around 1920, which used a small cartridge to fire the rocket. Victoria’s Government adopted lifesaving methods based on Her Majesty’s Coast Guard in Great Britain, which used Colonel Boxer’s rocket apparatus rescue method. The British Board of Trade published instructions in 1850 for both the beach rescue crew and ship’s crew. It involved setting up the rocket launcher on shore at a particular angle measured by the quadrant, inserting a rocket that had a light-weight line attached, then firing it across the stranded vessel. A tally board was then sent out with instructions in four languages. The ship’s crew would haul on the line to bring out the continuous whip line and attach the whip block to a mast or sturdy part the ship. The rescue crew on shore then hauled out a heavier hawser line, which the ship’s crew fixed above the whip block. The hawser is then tightened using the block on the shore end of the whip. The breeches buoy and endless whip are then attached to the traveller block on the hawser, allowing the shore crew to haul the buoy to and from the vessel, rescuing the stranded crew one at a time. The rocket system could also be used from one ship to another. This item is significant for its connection with local history, maritime history and marine technology. Lifesaving has been an important part of the services performed from Warrnambool's very early days, supported by State and Local Government, and based on the methods and experience of Great Britain. Hundreds of shipwrecks along the coast are evidence of the rough weather and rugged coastline. Ordinary citizens, the Harbour employees, and the volunteer boat and rescue crew, saved lives in adverse circumstances. Some were recognised as heroes, others went unrecognised. In Lady Bay, Warrnambool, there were around 16 known shipwrecks between 1850 and 1905. Many lives were saved but tragically, eight lives were lost.Breeches buoy and traveller lock; white canvas breeches (shorts) with lifebuoy ring attached to its waistband, with ropes for attaching it to the traveller block. Wooden traveller block has double brass inline sheaves and brass rollers on each cheek of the block, and each shell is scored for the strop. The thimble attached to the strop has a wooden slat for quick release of the breeches buoy. The ropes comprise of two equal lengths of rope that have been bunched together to form two loops, then bound together just below the loops, while the four hanging ends are looped around the lifebuoy, equally spaced, with each end finished in an eye-splice. The apparatus is suspended by the loops at the top and attached to the traveller block, which has a quick release device.flagstaff hill maritime museum & village, flagstaff hill, maritime museum, maritime village, warrnambool, great ocean road, shipwreck, life-saving, lifesaving, rescue crew, rescue, rocket rescue, maritime accidents, shipwreck victim, rocket crew, beach rescue, line rescue, rescue equipment, rocket firing equipment, rocket rescue equipment, rocket apparatus, beach apparatus, petticoat breeches, breeches buoy, rocket house, rocket shed, lifeboat men, rocket equipment, rocket machine, rocket head, rocket launcher, rocket line, marine technology, william schermuly, line-firing pistol, line throwing gun, schermuly pistol, pistol rocket apparatus, beach rescue set, traveller, block, running block, pulley, hawser, faking, faking box, faked line, rescue boat, lifeboat, lady bay, warrnambool harbour, port of warrnambool, tramway jetty, volunteer lifesavers, volunteer crew, breakwater, lifeboat warrnambool, rocket rescue method, rocket rescue apparatus, captain manby, mortar, henry trengrouse, sky rocket, john dennett, shore to ship, colonel boxer, two-stage rocket, italian hemp, quadrant, schermuly, line-throwing pistol, line throwing cartridge, rocket apparatus rescue, stranded vessel, tally board, light line, whip line, endless whip, petticoat buoy, traveller chair, traveller block, her majesty’s coast guard, harbour board, line thrower, line throwing, beach cart, hand barrow, sand anchor, hawser cutter, life jacket, faking board, irish hand barrow, government of victoria -
 Flagstaff Hill Maritime Museum and Village
Photograph
HISTORY OF THE LOCH ARD The LOCH ARD belonged to the famous Loch Line which sailed many ships from England to Australia. Built in Glasgow by Barclay, Curdle and Co. in 1873, the LOCH ARD was a three-masted square rigged iron sailing ship. The ship measured 262ft 7" (79.87m) in length, 38ft (11.58m) in width, 23ft (7m) in depth and had a gross tonnage of 1693 tons. The LOCH ARD's main mast measured a massive 150ft (45.7m) in height. LOCH ARD made three trips to Australia and one trip to Calcutta before its final voyage. LOCH ARD left England on March 2, 1878, under the command of Captain Gibbs, a newly married, 29 year old. She was bound for Melbourne with a crew of 37, plus 17 passengers and a load of cargo. The general cargo reflected the affluence of Melbourne at the time. On board were straw hats, umbrella, perfumes, clay pipes, pianos, clocks, confectionary, linen and candles, as well as a heavier load of railway irons, cement, lead and copper. There were items included that intended for display in the Melbourne International Exhibition in 1880. The voyage to Port Phillip was long but uneventful. At 3am on June 1, 1878, Captain Gibbs was expecting to see land and the passengers were becoming excited as they prepared to view their new homeland in the early morning. But LOCH ARD was running into a fog which greatly reduced visibility. Captain Gibbs was becoming anxious as there was no sign of land or the Cape Otway lighthouse. At 4am the fog lifted. A man aloft announced that he could see breakers. The sheer cliffs of Victoria's west coast came into view, and Captain Gibbs realised that the ship was much closer to them than expected. He ordered as much sail to be set as time would permit and then attempted to steer the vessel out to sea. On coming head on into the wind, the ship lost momentum, the sails fell limp and LOCH ARD's bow swung back. Gibbs then ordered the anchors to be released in an attempt to hold its position. The anchors sank some 50 fathoms - but did not hold. By this time LOCH ARD was among the breakers and the tall cliffs of Mutton Bird Island rose behind the ship. Just half a mile from the coast, the ship's bow was suddenly pulled around by the anchor. The captain tried to tack out to sea, but the ship struck a reef at the base of Mutton Bird Island, near Port Campbell. Waves broke over the ship and the top deck was loosened from the hull. The masts and rigging came crashing down knocking passengers and crew overboard. When a lifeboat was finally launched, it crashed into the side of LOCH ARD and capsized. Tom Pearce, who had launched the boat, managed to cling to its overturned hull and shelter beneath it. He drifted out to sea and then on the flood tide came into what is now known as LOCH ARD Gorge. He swam to shore, bruised and dazed, and found a cave in which to shelter. Some of the crew stayed below deck to shelter from the falling rigging but drowned when the ship slipped off the reef into deeper water. Eva Carmichael had raced onto deck to find out what was happening only to be confronted by towering cliffs looming above the stricken ship. In all the chaos, Captain Gibbs grabbed Eva and said, "If you are saved Eva, let my dear wife know that I died like a sailor". That was the last Eva Carmichael saw of the captain. She was swept off the ship by a huge wave. Eva saw Tom Pearce on a small rocky beach and yelled to attract his attention. He dived in and swam to the exhausted woman and dragged her to shore. He took her to the cave and broke open case of brandy which had washed up on the beach. He opened a bottle to revive the unconscious woman. A few hours later Tom scaled a cliff in search of help. He followed hoof prints and came by chance upon two men from nearby Glenample Station three and a half miles away. In a state of exhaustion, he told the men of the tragedy. Tom returned to the gorge while the two men rode back to the station to get help. By the time they reached LOCH ARD Gorge, it was cold and dark. The two shipwreck survivors were taken to Glenample Station to recover. Eva stayed at the station for six weeks before returning to Ireland, this time by steamship. In Melbourne, Tom Pearce received a hero's welcome. He was presented with the first gold medal of the Royal Humane Society of Victoria and a £1000 cheque from the Victorian Government. Concerts were performed to honour the young man's bravery and to raise money for those who lost family in the LOCH ARD disaster. Of the 54 crew members and passengers on board, only two survived: the apprentice, Tom Pearce and the young woman passenger, Eva Carmichael, who lost all of her family in the tragedy. Ten days after the LOCH ARD tragedy, salvage rights to the wreck were sold at auction for £2,120. Cargo valued at £3,000 was salvaged and placed on the beach, but most washed back into the sea when another storm developed. The wreck of LOCH ARD still lies at the base of Mutton Bird Island. Much of the cargo has now been salvaged and some was washed up into what is now known as LOCH ARD Gorge. Cargo and artefacts have also been illegally salvaged over many years before protective legislation was introduced. One of the most unlikely pieces of cargo to have survived the shipwreck was a Minton porcelain peacock - one of only nine in the world. The peacock was destined for the Melbourne International Exhibition in 1880. It had been well packed, which gave it adequate protection during the violent storm. Today, the Minton peacock can be seen at the Flagstaff Hill Maritime Museum in Warrnambool. From Australia's most dramatic shipwreck it has now become Australia's most valuable shipwreck artefact and is one of very few 'objects' on the Victorian State Heritage Register. Flagstaff Hill’s collection of artefacts from LOCH ARD is significant for being one of the largest collections of artefacts from this shipwreck in Victoria. It is significant for its association with the shipwreck, which is on the Victorian Heritage Register (VHR S417). The collection is significant because of the relationship between the objects, as together they have a high potential to interpret the story of the LOCH ARD. The LOCH ARD collection is archaeologically significant as the remains of a large international passenger and cargo ship. The LOCH ARD collection is historically significant for representing aspects of Victoria’s shipping history and its potential to interpret sub-theme 1.5 of Victoria’s Framework of Historical Themes (living with natural processes). The collection is also historically significant for its association with the LOCH ARD, which was one of the worst and best known shipwrecks in Victoria’s history. Photograph of Loch Ard Gorge c1900flagstaff hill, warrnambool, shipwrecked coast, flagstaff hill maritime museum, maritime museum, shipwreck coast, flagstaff hill maritime village, great ocean road, loch line, loch ard, captain gibbs, eva carmichael, tom pearce, glenample station, mutton bird island, loch ard gorge, photograph of loch ard gorge, photograph -
 Flagstaff Hill Maritime Museum and Village
Calendar
HISTORY OF THE LOCH ARD The LOCH ARD belonged to the famous Loch Line which sailed many ships from England to Australia. Built in Glasgow by Barclay, Curdle and Co. in 1873, the LOCH ARD was a three-masted square rigged iron sailing ship. The ship measured 262ft 7" (79.87m) in length, 38ft (11.58m) in width, 23ft (7m) in depth and had a gross tonnage of 1693 tons. The LOCH ARD's main mast measured a massive 150ft (45.7m) in height. LOCH ARD made three trips to Australia and one trip to Calcutta before its final voyage. LOCH ARD left England on March 2, 1878, under the command of Captain Gibbs, a newly married, 29 year old. She was bound for Melbourne with a crew of 37, plus 17 passengers and a load of cargo. The general cargo reflected the affluence of Melbourne at the time. On board were straw hats, umbrella, perfumes, clay pipes, pianos, clocks, confectionary, linen and candles, as well as a heavier load of railway irons, cement, lead and copper. There were items included that intended for display in the Melbourne International Exhibition in 1880. The voyage to Port Phillip was long but uneventful. At 3am on June 1, 1878, Captain Gibbs was expecting to see land and the passengers were becoming excited as they prepared to view their new homeland in the early morning. But LOCH ARD was running into a fog which greatly reduced visibility. Captain Gibbs was becoming anxious as there was no sign of land or the Cape Otway lighthouse. At 4am the fog lifted. A man aloft announced that he could see breakers. The sheer cliffs of Victoria's west coast came into view, and Captain Gibbs realised that the ship was much closer to them than expected. He ordered as much sail to be set as time would permit and then attempted to steer the vessel out to sea. On coming head on into the wind, the ship lost momentum, the sails fell limp and LOCH ARD's bow swung back. Gibbs then ordered the anchors to be released in an attempt to hold its position. The anchors sank some 50 fathoms - but did not hold. By this time LOCH ARD was among the breakers and the tall cliffs of Mutton Bird Island rose behind the ship. Just half a mile from the coast, the ship's bow was suddenly pulled around by the anchor. The captain tried to tack out to sea, but the ship struck a reef at the base of Mutton Bird Island, near Port Campbell. Waves broke over the ship and the top deck was loosened from the hull. The masts and rigging came crashing down knocking passengers and crew overboard. When a lifeboat was finally launched, it crashed into the side of LOCH ARD and capsized. Tom Pearce, who had launched the boat, managed to cling to its overturned hull and shelter beneath it. He drifted out to sea and then on the flood tide came into what is now known as LOCH ARD Gorge. He swam to shore, bruised and dazed, and found a cave in which to shelter. Some of the crew stayed below deck to shelter from the falling rigging but drowned when the ship slipped off the reef into deeper water. Eva Carmichael had raced onto deck to find out what was happening only to be confronted by towering cliffs looming above the stricken ship. In all the chaos, Captain Gibbs grabbed Eva and said, "If you are saved Eva, let my dear wife know that I died like a sailor". That was the last Eva Carmichael saw of the captain. She was swept off the ship by a huge wave. Eva saw Tom Pearce on a small rocky beach and yelled to attract his attention. He dived in and swam to the exhausted woman and dragged her to shore. He took her to the cave and broke open case of brandy which had washed up on the beach. He opened a bottle to revive the unconscious woman. A few hours later Tom scaled a cliff in search of help. He followed hoof prints and came by chance upon two men from nearby Glenample Station three and a half miles away. In a state of exhaustion, he told the men of the tragedy. Tom returned to the gorge while the two men rode back to the station to get help. By the time they reached LOCH ARD Gorge, it was cold and dark. The two shipwreck survivors were taken to Glenample Station to recover. Eva stayed at the station for six weeks before returning to Ireland, this time by steamship. In Melbourne, Tom Pearce received a hero's welcome. He was presented with the first gold medal of the Royal Humane Society of Victoria and a £1000 cheque from the Victorian Government. Concerts were performed to honour the young man's bravery and to raise money for those who lost family in the LOCH ARD disaster. Of the 54 crew members and passengers on board, only two survived: the apprentice, Tom Pearce and the young woman passenger, Eva Carmichael, who lost all of her family in the tragedy. Ten days after the LOCH ARD tragedy, salvage rights to the wreck were sold at auction for £2,120. Cargo valued at £3,000 was salvaged and placed on the beach, but most washed back into the sea when another storm developed. The wreck of LOCH ARD still lies at the base of Mutton Bird Island. Much of the cargo has now been salvaged and some was washed up into what is now known as LOCH ARD Gorge. Cargo and artefacts have also been illegally salvaged over many years before protective legislation was introduced. One of the most unlikely pieces of cargo to have survived the shipwreck was a Minton porcelain peacock - one of only nine in the world. The peacock was destined for the Melbourne International Exhibition in 1880. It had been well packed, which gave it adequate protection during the violent storm. Today, the Minton peacock can be seen at the Flagstaff Hill Maritime Museum in Warrnambool. From Australia's most dramatic shipwreck it has now become Australia's most valuable shipwreck artefact and is one of very few 'objects' on the Victorian State Heritage Register. Flagstaff Hill’s collection of artefacts from LOCH ARD is significant for being one of the largest collections of artefacts from this shipwreck in Victoria. It is significant for its association with the shipwreck, which is on the Victorian Heritage Register (VHR S417). The collection is significant because of the relationship between the objects, as together they have a high potential to interpret the story of the LOCH ARD. The LOCH ARD collection is archaeologically significant as the remains of a large international passenger and cargo ship. The LOCH ARD collection is historically significant for representing aspects of Victoria’s shipping history and its potential to interpret sub-theme 1.5 of Victoria’s Framework of Historical Themes (living with natural processes). The collection is also historically significant for its association with the LOCH ARD, which was one of the worst and best known shipwrecks in Victoria’s history. Calendar printed by Terang Express for December 1923 with picture of Loch Ard Gorge and survivors of wreck and also story of the episode. Has some large tears in it.flagstaff hill, warrnambool, shipwrecked coast, flagstaff hill maritime museum, maritime museum, shipwreck coast, flagstaff hill maritime village, great ocean road, loch line, loch ard, captain gibbs, eva carmichael, tom pearce, glenample station, mutton bird island, loch ard gorge, calendar, terang express -
 Flagstaff Hill Maritime Museum and Village
Photograph - Coastal Scene, Foyle Photographic Studio, Loch Ard Gorge Port Campbell, 1889-1919
The photograph shows the popular tourist attraction, Loch Ard Gorge, which is located along the Great Ocean Road in Victoria, near Port Campbell. The gorge is named after the famous sailing ship, the LOCH ARD, that was wrecked there in 1878. Only two of the 54 passengers and crew survived. FOYLE “Foyle” written on the photograph is the name of Foyle’s Photographic studio. At the time of the photograph, the studio was owned by both Charles and Lilian Foyle (sometimes known as Lillian or Lily), either of whom could have taken this photograph. They also worked together at a later date on the photographs, sketches and paintings of the famous and historical Pioneers’ Honour Board, which is currently on view in the Warrnambool Library. Foyles Photography was the studio of James Charles Foyle. He owned “Foyle’s Photo Card Studios” in Liebig St, Warrnambool, which operated between 1889 – 1919. A letter to the editor (by Mr Edward Vidler) in the Melbourne Argus, 3rd August 1907, mentions that in that year Warrnambool would celebrate the 60th anniversary of its proclamation as a town, and that talented local artist Miss Lily Foyle would paint 200 portraits in watercolour of the pioneers who settled in the district prior to 1860. The Pioneer Honour Board can still be seen on display in the Warrnambool Library. In the Warrnambool Standard, Dec. 1917, “Mr Foyle’s studio was awarded the contract to decorate rail cars on newly opened Trans-Continental railway, assisted by his sister, Miss Findlay.” HISTORY OF THE LOCH ARD The LOCH ARD belonged to the famous Loch Line which sailed many ships from England to Australia. Built-in Glasgow by Barclay, Curdle and Co. in 1873, the LOCH ARD was a three-masted square-rigged iron sailing ship. The ship measured 262ft 7" (79.87m) in length, 38ft (11.58m) in width, 23ft (7m) in depth and had a gross tonnage of 1693 tons. The LOCH ARD's main mast measured a massive 150ft (45.7m) in height. LOCH ARD made three trips to Australia and one trip to Calcutta before its final voyage. LOCH ARD left England on March 2, 1878, under the command of Captain Gibbs, a newly married, 29-year-old. She was bound for Melbourne with a crew of 37, plus 17 passengers and a load of cargo. The general cargo reflected the affluence of Melbourne at the time. Onboard were straw hats, umbrella, perfumes, clay pipes, pianos, clocks, confectionary, linen and candles, as well as a heavier load of railway irons, cement, lead and copper. There were items included that intended for display in the Melbourne International Exhibition in 1880. The voyage to Port Phillip was long but uneventful. At 3 am on June 1, 1878, Captain Gibbs was expecting to see land and the passengers were becoming excited as they prepared to view their new homeland in the early morning. But LOCH ARD was running into a fog which greatly reduced visibility. Captain Gibbs was becoming anxious as there was no sign of land or the Cape Otway lighthouse. At 4 am the fog lifted. A man aloft announced that he could see breakers. The sheer cliffs of Victoria's west coast came into view, and Captain Gibbs realised that the ship was much closer to them than expected. He ordered as much sail to be set as time would permit and then attempted to steer the vessel out to sea. On coming head-on into the wind, the ship lost momentum, the sails fell limp and LOCH ARD's bow swung back. Gibbs then ordered the anchors to be released in an attempt to hold its position. The anchors sank some 50 fathoms - but did not hold. By this time LOCH ARD was among the breakers and the tall cliffs of Mutton Bird Island rose behind the ship. Just half a mile from the coast, the ship's bow was suddenly pulled around by the anchor. The captain tried to tack out to sea, but the ship struck a reef at the base of Mutton Bird Island, near Port Campbell. Waves broke over the ship and the top deck was loosened from the hull. The masts and rigging came crashing down knocking passengers and crew overboard. When a lifeboat was finally launched, it crashed into the side of LOCH ARD and capsized. Tom Pearce, who had launched the boat, managed to cling to its overturned hull and shelter beneath it. He drifted out to sea and then on the flood tide came into what is now known as LOCH ARD Gorge. He swam to shore, bruised and dazed, and found a cave in which to shelter. Some of the crew stayed below deck to shelter from the falling rigging but drowned when the ship slipped off the reef into deeper water. Eva Carmichael had raced onto the deck to find out what was happening only to be confronted by towering cliffs looming above the stricken ship. In all the chaos, Captain Gibbs grabbed Eva and said, "If you are saved Eva, let my dear wife know that I died like a sailor". That was the last Eva Carmichael saw of the captain. She was swept off the ship by a huge wave. Eva saw Tom Pearce on a small rocky beach and yelled to attract his attention. He dived in and swam to the exhausted woman and dragged her to shore. He took her to the cave and broke and opened the case of brandy, which had washed up on the beach. He opened a bottle to revive the unconscious woman. A few hours later Tom scaled a cliff in search of help. He followed hoof prints and came by chance upon two men from nearby Glenample Station three and a half miles away. In a state of exhaustion, he told the men of the tragedy. Tom returned to the gorge while the two men rode back to the station to get help. By the time they reached LOCH ARD Gorge, it was cold and dark. The two shipwreck survivors were taken to Glenample Station to recover. Eva stayed at the station for six weeks before returning to Ireland, this time by steamship. In Melbourne, Tom Pearce received a hero's welcome. He was presented with the first gold medal of the Royal Humane Society of Victoria and a £1000 cheque from the Victorian Government. Concerts were performed to honour the young man's bravery and to raise money for those who lost family in the LOCH ARD disaster. Of the 54 crew members and passengers on board, only two survived: the apprentice, Tom Pearce and the young woman passenger, Eva Carmichael, who lost all of her family in the tragedy. Ten days after the LOCH ARD tragedy, salvage rights to the wreck were sold at auction for £2,120. Cargo valued at £3,000 was salvaged and placed on the beach, but most washed back into the sea when another storm developed. The wreck of LOCH ARD still lies at the base of Mutton Bird Island. Much of the cargo has now been salvaged, and some of it was washed up into what is now known as LOCH ARD Gorge. Cargo and artefacts have also been illegally salvaged over many years before protective legislation was introduced. One of the most unlikely pieces of cargo to have survived the shipwreck was a Minton porcelain peacock - one of only nine in the world. The peacock was destined for the Melbourne International Exhibition in 1880. It had been well packed, which gave it adequate protection during the violent storm. Today, the Minton peacock can be seen at the Flagstaff Hill Maritime Museum in Warrnambool. From Australia's most dramatic shipwreck it has now become Australia's most valuable shipwreck artefact and is one of very few 'objects' on the Victorian State Heritage Register.Flagstaff Hill’s collection of artefacts from LOCH ARD is significant for being one of the largest collections of artefacts from this shipwreck in Victoria. It is significant for its association with the shipwreck, which is on the Victorian Heritage Register (VHR S417). The collection is significant because of the relationship between the objects, as together they have a high potential to interpret the story of the LOCH ARD. The LOCH ARD collection is archaeologically significant as the remains of a large international passenger and cargo ship. The LOCH ARD collection is historically significant for representing aspects of Victoria’s shipping history and its potential to interpret sub-theme 1.5 of Victoria’s Framework of Historical Themes (living with natural processes). The collection is also historically significant for its association with the LOCH ARD, which was one of the worst and best-known shipwrecks in Victoria’s history. Foyle's photographs date from the late 19th century to the early 20th century, representing a time of growth in the Warrnambool district and a time when the still relatively new technology of photography was more available to the community.Photograph of Loch Ard Gorge. This sepia coloured rectangular photograph is mounted on a brown cardboard backing that has a wood grain pattern. The photograph has an inscription above it, below it, and in the bottom left corner. It was made for the purpose of a presentation by the Port Campbell Progress Association. Printed above the photograph "PRESENTED BY THE PORT CAMPBELL / PROGRESS ASSOCIATION". Printed below the photograph "LOCH ARD GORGE / PORT CAMPBELL". Hand written on bottom left corner "Foyle". flagstaff hill, warrnambool, shipwrecked coast, flagstaff hill maritime museum, maritime museum, shipwreck coast, flagstaff hill maritime village, great ocean road, loch line, loch ard, captain gibbs, eva carmichael, tom pearce, glenample station, mutton bird island, loch ard gorge, photograph, port campbell, port campbell progress association, foyle photograph, foyle photographic studio warrnambool, warrnambool photo studio -
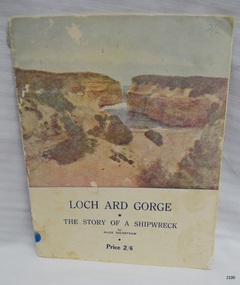 Flagstaff Hill Maritime Museum and Village
Book - Historical maritime, Loch Ard Gorge, 1954
HISTORY OF THE LOCH ARD The LOCH ARD belonged to the famous Loch Line which sailed many ships from England to Australia. Built in Glasgow by Barclay, Curdle and Co. in 1873, the LOCH ARD was a three-masted square rigged iron sailing ship. The ship measured 262ft 7" (79.87m) in length, 38ft (11.58m) in width, 23ft (7m) in depth and had a gross tonnage of 1693 tons. The LOCH ARD's main mast measured a massive 150ft (45.7m) in height. LOCH ARD made three trips to Australia and one trip to Calcutta before its final voyage. LOCH ARD left England on March 2, 1878, under the command of Captain Gibbs, a newly married, 29 year old. She was bound for Melbourne with a crew of 37, plus 17 passengers and a load of cargo. The general cargo reflected the affluence of Melbourne at the time. On board were straw hats, umbrella, perfumes, clay pipes, pianos, clocks, confectionary, linen and candles, as well as a heavier load of railway irons, cement, lead and copper. There were items included that intended for display in the Melbourne International Exhibition in 1880. The voyage to Port Phillip was long but uneventful. At 3am on June 1, 1878, Captain Gibbs was expecting to see land and the passengers were becoming excited as they prepared to view their new homeland in the early morning. But LOCH ARD was running into a fog which greatly reduced visibility. Captain Gibbs was becoming anxious as there was no sign of land or the Cape Otway lighthouse. At 4am the fog lifted. A man aloft announced that he could see breakers. The sheer cliffs of Victoria's west coast came into view, and Captain Gibbs realised that the ship was much closer to them than expected. He ordered as much sail to be set as time would permit and then attempted to steer the vessel out to sea. On coming head on into the wind, the ship lost momentum, the sails fell limp and LOCH ARD's bow swung back. Gibbs then ordered the anchors to be released in an attempt to hold its position. The anchors sank some 50 fathoms - but did not hold. By this time LOCH ARD was among the breakers and the tall cliffs of Mutton Bird Island rose behind the ship. Just half a mile from the coast, the ship's bow was suddenly pulled around by the anchor. The captain tried to tack out to sea, but the ship struck a reef at the base of Mutton Bird Island, near Port Campbell. Waves broke over the ship and the top deck was loosened from the hull. The masts and rigging came crashing down knocking passengers and crew overboard. When a lifeboat was finally launched, it crashed into the side of LOCH ARD and capsized. Tom Pearce, who had launched the boat, managed to cling to its overturned hull and shelter beneath it. He drifted out to sea and then on the flood tide came into what is now known as LOCH ARD Gorge. He swam to shore, bruised and dazed, and found a cave in which to shelter. Some of the crew stayed below deck to shelter from the falling rigging but drowned when the ship slipped off the reef into deeper water. Eva Carmichael had raced onto deck to find out what was happening only to be confronted by towering cliffs looming above the stricken ship. In all the chaos, Captain Gibbs grabbed Eva and said, "If you are saved Eva, let my dear wife know that I died like a sailor". That was the last Eva Carmichael saw of the captain. She was swept off the ship by a huge wave. Eva saw Tom Pearce on a small rocky beach and yelled to attract his attention. He dived in and swam to the exhausted woman and dragged her to shore. He took her to the cave and broke open case of brandy which had washed up on the beach. He opened a bottle to revive the unconscious woman. A few hours later Tom scaled a cliff in search of help. He followed hoof prints and came by chance upon two men from nearby Glenample Station three and a half miles away. In a state of exhaustion, he told the men of the tragedy. Tom returned to the gorge while the two men rode back to the station to get help. By the time they reached LOCH ARD Gorge, it was cold and dark. The two shipwreck survivors were taken to Glenample Station to recover. Eva stayed at the station for six weeks before returning to Ireland, this time by steamship. In Melbourne, Tom Pearce received a hero's welcome. He was presented with the first gold medal of the Royal Humane Society of Victoria and a £1000 cheque from the Victorian Government. Concerts were performed to honour the young man's bravery and to raise money for those who lost family in the LOCH ARD disaster. Of the 54 crew members and passengers on board, only two survived: the apprentice, Tom Pearce and the young woman passenger, Eva Carmichael, who lost all of her family in the tragedy. Ten days after the LOCH ARD tragedy, salvage rights to the wreck were sold at auction for £2,120. Cargo valued at £3,000 was salvaged and placed on the beach, but most washed back into the sea when another storm developed. The wreck of LOCH ARD still lies at the base of Mutton Bird Island. Much of the cargo has now been salvaged and some was washed up into what is now known as LOCH ARD Gorge. Cargo and artefacts have also been illegally salvaged over many years before protective legislation was introduced. One of the most unlikely pieces of cargo to have survived the shipwreck was a Minton porcelain peacock - one of only nine in the world. The peacock was destined for the Melbourne International Exhibition in 1880. It had been well packed, which gave it adequate protection during the violent storm. Today, the Minton peacock can be seen at the Flagstaff Hill Maritime Museum in Warrnambool. From Australia's most dramatic shipwreck it has now become Australia's most valuable shipwreck artefact and is one of very few 'objects' on the Victorian State Heritage Register. Flagstaff Hill’s collection of artefacts from LOCH ARD is significant for being one of the largest collections of artefacts from this shipwreck in Victoria. It is significant for its association with the shipwreck, which is on the Victorian Heritage Register (VHR S417). The collection is significant because of the relationship between the objects, as together they have a high potential to interpret the story of the LOCH ARD. The LOCH ARD collection is archaeologically significant as the remains of a large international passenger and cargo ship. The LOCH ARD collection is historically significant for representing aspects of Victoria’s shipping history and its potential to interpret sub-theme 1.5 of Victoria’s Framework of Historical Themes (living with natural processes). The collection is also historically significant for its association with the LOCH ARD, which was one of the worst and best known shipwrecks in Victoria’s history. Book, Loch Ard Gorge: The Story of a Shipwreck by Alice Goldstraw. First published 1948, Third printing November 1954. Inscription inside front cover in blue pen, signed by the author. Soft covered book containing the story of the wreck of the Loch Ard, written in poetry. Each page has a decorative border. One page has photographs, black and white, of people and the Loch Ard Gorge cavesInside front cover, script in blue ink "To Mrs Slade, with kind regards, from Alice Goldstraw"flagstaff hill, warrnambool, shipwrecked coast, flagstaff hill maritime museum, maritime museum, shipwreck coast, flagstaff hill maritime village, great ocean road, loch line, loch ard, captain gibbs, eva carmichael, tom pearce, glenample station, mutton bird island, loch ard gorge, the story of a shipwreck, book, alice goldstraw, terang express press, loch ard gorge whipwreck, ship loch ard -
 Flagstaff Hill Maritime Museum and Village
Equipment - Flare, Mid-20th century
... by State and Local Government, and based on the methods ...This flare pictured is one of three lighting or signal flares. These are pyrotechnic devices used at sea, mainly as a distress signal. However, they have other meanings when used for naval purposes, such as the executive order to start a particular manoeuvre. These are usually packaged as part of a distress pack containing all necessary rockets or flares for immediate use, in any emergency, by ships and off-shore yachts. The inscribed numbers could possibly be the date packaged or the date of useful life i.e. 27-11-1955.This set of three flares is significant for its connection with local history, maritime history and marine technology. Lifesaving has been an important part of the services performed from Warrnambool's very early days, supported by State and Local Government, and based on the methods and experience of Great Britain. Hundreds of shipwrecks along the coast are evidence of the rough weather and rugged coastline. Ordinary citizens, the Harbour employees, and the volunteer boat and rescue crew, saved lives in adverse circumstances. Some were recognised as heroes, others went unrecognised. In Lady Bay, Warrnambool, there were around 16 known shipwrecks between 1850 and 1905. Many lives were saved but tragically, eight lives were lost.Flare (three), ; metal base, black cylinder, removeable wooden end cap that has a wooden key attached by string at centre. Inscribed "R↑L" on the cap and metal base. Inscribed: "R↑L", "27, 11, 55", "Long Lights"flagstaff hill maritime museum and village, flagstaff hill, maritime museum, maritime village, warrnambool, great ocean road, lady bay, warrnambool harbour, port of warrnambool, shipwreck, life-saving, lifesaving, rescue crew, rescue, rocket rescue, rocket crew, lifeboat men, beach rescue, line rescue, rescue equipment, rocket firing equipment, rocket rescue equipment, maritime accidents, shipwreck victim, rocket equipment, marine technology, rescue boat, lifeboat, life saving rescue crew, lifesaving rescue crew, rocket rescue method, rocket apparatus rescue, stranded vessel, mortar, life jacket, rocket machine, rocket line, rocket set, schermuly, harbour board, government of victoria, harbour master, armband, l.s.r.c., lsrc, flare, light, safety equipment, distress signal, safety at sea, emergency signal, broad arrow, communication signal, vingage, pyrotechnic flare -
 Flagstaff Hill Maritime Museum and Village
Equipment - Flare, Mid-20th century
... Warrnambool's very early days, supported by State and Local Government ...This flare pictured is one of three lighting or signal flares. These are pyrotechnic devices used at sea, mainly as a distress signal. However, they have other meanings when used for naval purposes, such as the executive order to start a particular manoeuvre. These are usually packaged as part of a distress pack containing all necessary rockets or flares for immediate use, in any emergency, by ships and off-shore yachts.This set of three flares is significant for its connection with local history, maritime history and marine technology. Lifesaving has been an important part of the services performed from Warrnambool's very early days, supported by State and Local Government, and based on the methods and experience of Great Britain. Hundreds of shipwrecks along the coast are evidence of the rough weather and rugged coastline. Ordinary citizens, the Harbour employees, and the volunteer boat and rescue crew, saved lives in adverse circumstances. Some were recognised as heroes, others went unrecognised. In Lady Bay, Warrnambool, there were around 16 known shipwrecks between 1850 and 1905. Many lives were saved but tragically, eight lives were lost.Flare; mushroom coloured cylinder, metal base with wooden top joined to it. Base has removable cap with metal encased wooden fuse attached, which holds seven removeable pegs and rings. String threaded through top holes has a wooden peg attached. Top also has holes drilled on opposing sides through which the peg would fit. Inscriptions stamped in black on base, and impressed into cap. Stamped black: "I" Impressed into cap: ""I", "R↑L" (inside oval).flagstaff hill maritime museum and village, flagstaff hill, maritime museum, maritime village, warrnambool, great ocean road, lady bay, warrnambool harbour, port of warrnambool, shipwreck, life-saving, lifesaving, rescue crew, rescue, rocket rescue, rocket crew, lifeboat men, beach rescue, line rescue, rescue equipment, rocket firing equipment, rocket rescue equipment, maritime accidents, shipwreck victim, rocket equipment, marine technology, rescue boat, lifeboat, life saving rescue crew, lifesaving rescue crew, rocket rescue method, rocket apparatus rescue, stranded vessel, mortar, life jacket, rocket machine, rocket line, rocket set, schermuly, harbour board, government of victoria, harbour master, armband, l.s.r.c., lsrc, flare, light, safety equipment, distress signal, safety at sea, emergency signal, broad arrow, communication signal, vingage, pyrotechnic flare -
 Supreme Court of Victoria Library
Blackwood Decagonal Table
The Government Gazette of January 18, 1888 advertised the acceptance of a contract of 149 pounds for a "Table for central library, New Law Courts, Melbourne". The table was purchased four years after the Court had moved to the William Street address.The table is not of state significance in its own right, but it is a high quality piece of Australian furniture. Its significance rests on its importance on the overall decorative scheme of the library and the fact that it was designed for this specific space.Blackwood, decagonal (10 sided) table, with 10 carved scroll and griffin supports, moulding and blue leather inserts. -
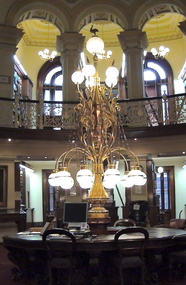 Supreme Court of Victoria Library
Brass Gasalier Pillar, 1888
The Government Gazette of September 28, 1888 advertises the acceptance of a contract of 276 pounds for the purchase of a "Pillar gasalier for Library, New Law Courts". The area under the dome was obviously found to be poorly illuminated and the purchase of the pillar light was approved. A table for the library had been approved in January and these two pieces of furniture were to complement each other.The gasalier pillar is of state significance as a unique survivor of gas light illumination. It is an important part of the interior decoration of the library, contributing to its intact 19th century furnishings.The gasalier has a blackwood base, with an elaborate serpentine brass fit out for the lighting with etched glass shades. The gasalier is topped by a small figure of an emu, on the lower finials are kangaroos. While originally designed for gas the gasalier was converted to electricy in the early 20th century. -
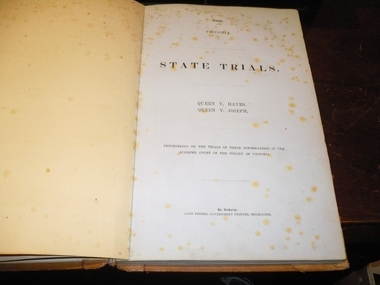 Supreme Court of Victoria Library
Book, State Trials : Queen v Hayes, Queen v Joseph; proceedings of the trials of these informations in the Supreme Court of the Colony of Victoria, 1855
The transcript is of state significance, being one of the very few copies still in existence. Its connection with the Court and its presence in the library's collection enhances its significance.The transcript is of state significance, being one of the very few copies still in existence. Its connection with the Court and its presence in the library's collection enhances its significance.Leather Bound Book, with gold Library stampLibrary stamp reads "Library of the Supreme Court, Colony of Victoria). This volume is a "Copy of Mr Webb's shorthand notes of the proceedings on the trial of this information in the Supreme Court of Victoria, before His Honor Sir William a'Beckett, Chief Justice"eureka rebellion -
 Flagstaff Hill Maritime Museum and Village
Spoon, circa 1878
This tea spoon is from the wreck of the LOCH ARD, a Loch Line ship of 1,693 tons which sailed from Gravesend, London, on 2 March 1878 with 17 passengers and a crew of 36 under Captain George Gibbs. “The intention was to discharge cargo in Melbourne, before returning to London via the Horn with wool and wheat”. Instead, on 1 June 1878, after 90 days at sea, she struck the sandstone cliffs of Mutton Bird Island on the south west coast of Victoria, and sank with the loss of 52 lives and all her cargo. The manifest of the LOCH ARD listed an array of manufactured goods and bulk metals being exported to the Colony of Victoria, with a declared value of £53,700. (202 bills of lading show an actual invoice value of £68, 456, with insurance underwriting to £30,000 of all cargo). Included in the manifest is the item of “Tin hardware & cutlery £7,530”. This teaspoon is one of 482 similar items of electro-plated cutlery from the LOCH ARD site, comprising spoons and forks of various sizes but all sharing the same general shape or design and metallic composition. 49 of these pieces display a legible makers’ mark — the initials “W” and “P” placed within a raised diamond outline, which is in turn contained within a sunken crown shape — identifying the manufacturer as William Page & Co of Birmingham. An electroplater’s makers’ marks, unlike sterling silver hallmarks, are not consistent identifiers of quality or date and place of manufacture. A similar line of five impressions was usually made to impress the consumer with an implication of industry standards, but what each one actually signified was not regulated and so they varied according to the whim of the individual foundry. In this case, the maker’s marks are often obscured by sedimentary accretion or removed by corrosion after a century of submersion in the ocean. However sufficient detail has survived to indicate that these samples of electro-plated cutlery probably originated from the same consignment in the LOCH ARD’s cargo. The following descriptions of maker’s marks are drawn from 255 tea spoons, 125 dessert spoons, and 99 table forks. These marks are clearly visible in 66 instances, while the same sequence of general outlines, or depression shapes, is discernible in another 166 examples. 1. A recessed Crown containing a raised Diamond outline and the initials “W” and “P” (the recognised trademark of William Page & Co) 2. An impressed Ellipse containing a raised, pivoted, Triangle in its lower part and bearing a Resurrection Cross on its upper section (a possible dissenting church symbol reflecting religious affiliation); OR a rounded Square impression containing a raised, ‘lazy’, letter “B” (possibly mimicking sterling silver hallmark signifying city of manufacture i.e. Birmingham) 3. An impressed rounded Square filled with a raised Maltese Cross (the base metal composite of nickel silver was also known as ‘German silver’ after its Berlin inventors in 1823) 4. A recessed Circle containing a Crab or Scarab Beetle image; OR a recessed Circle containing a rotated ‘fleur de lys’ or ‘fasces’ design 5. A depressed Diamond shape enclosing a large raised letter “R” and a small raised letter “D” (mimicking the U.K. Patent Office stamp which abbreviated the term ‘registered’ to “RD”, but also included date and class of patent) Suggested trade names for William Page & Co’s particular blend of brass plating are ‘roman silver’ or ‘silverite’. This copper alloy polishes to a lustrous gold when new, discolouring to a murky grey with greenish hue when neglected. HISTORY OF THE LOCH ARD The LOCH ARD belonged to the famous Loch Line which sailed many ships from England to Australia. Built in Glasgow by Barclay, Curdle and Co. in 1873, the LOCH ARD was a three-masted square rigged iron sailing ship. The ship measured 262ft 7" (79.87m) in length, 38ft (11.58m) in width, 23ft (7m) in depth and had a gross tonnage of 1693 tons. The LOCH ARD's main mast measured a massive 150ft (45.7m) in height. LOCH ARD made three trips to Australia and one trip to Calcutta before its final voyage. LOCH ARD left England on March 2, 1878, under the command of Captain Gibbs, a newly married, 29 year old. She was bound for Melbourne with a crew of 37, plus 17 passengers and a load of cargo. The general cargo reflected the affluence of Melbourne at the time. On board were straw hats, umbrella, perfumes, clay pipes, pianos, clocks, confectionary, linen and candles, as well as a heavier load of railway irons, cement, lead and copper. There were items included that intended for display in the Melbourne International Exhibition in 1880. The voyage to Port Phillip was long but uneventful. At 3am on June 1, 1878, Captain Gibbs was expecting to see land and the passengers were becoming excited as they prepared to view their new homeland in the early morning. But LOCH ARD was running into a fog which greatly reduced visibility. Captain Gibbs was becoming anxious as there was no sign of land or the Cape Otway lighthouse. At 4am the fog lifted. A man aloft announced that he could see breakers. The sheer cliffs of Victoria's west coast came into view, and Captain Gibbs realised that the ship was much closer to them than expected. He ordered as much sail to be set as time would permit and then attempted to steer the vessel out to sea. On coming head on into the wind, the ship lost momentum, the sails fell limp and LOCH ARD's bow swung back. Gibbs then ordered the anchors to be released in an attempt to hold its position. The anchors sank some 50 fathoms - but did not hold. By this time LOCH ARD was among the breakers and the tall cliffs of Mutton Bird Island rose behind the ship. Just half a mile from the coast, the ship's bow was suddenly pulled around by the anchor. The captain tried to tack out to sea, but the ship struck a reef at the base of Mutton Bird Island, near Port Campbell. Waves broke over the ship and the top deck was loosened from the hull. The masts and rigging came crashing down knocking passengers and crew overboard. When a lifeboat was finally launched, it crashed into the side of LOCH ARD and capsized. Tom Pearce, who had launched the boat, managed to cling to its overturned hull and shelter beneath it. He drifted out to sea and then on the flood tide came into what is now known as LOCH ARD Gorge. He swam to shore, bruised and dazed, and found a cave in which to shelter. Some of the crew stayed below deck to shelter from the falling rigging but drowned when the ship slipped off the reef into deeper water. Eva Carmichael had raced onto deck to find out what was happening only to be confronted by towering cliffs looming above the stricken ship. In all the chaos, Captain Gibbs grabbed Eva and said, "If you are saved Eva, let my dear wife know that I died like a sailor". That was the last Eva Carmichael saw of the captain. She was swept off the ship by a huge wave. Eva saw Tom Pearce on a small rocky beach and yelled to attract his attention. He dived in and swam to the exhausted woman and dragged her to shore. He took her to the cave and broke open case of brandy which had washed up on the beach. He opened a bottle to revive the unconscious woman. A few hours later Tom scaled a cliff in search of help. He followed hoof prints and came by chance upon two men from nearby Glenample Station three and a half miles away. In a state of exhaustion, he told the men of the tragedy. Tom returned to the gorge while the two men rode back to the station to get help. By the time they reached LOCH ARD Gorge, it was cold and dark. The two shipwreck survivors were taken to Glenample Station to recover. Eva stayed at the station for six weeks before returning to Ireland, this time by steamship. In Melbourne, Tom Pearce received a hero's welcome. He was presented with the first gold medal of the Royal Humane Society of Victoria and a £1000 cheque from the Victorian Government. Concerts were performed to honour the young man's bravery and to raise money for those who lost family in the LOCH ARD disaster. Of the 54 crew members and passengers on board, only two survived: the apprentice, Tom Pearce and the young woman passenger, Eva Carmichael, who lost all of her family in the tragedy. Ten days after the LOCH ARD tragedy, salvage rights to the wreck were sold at auction for £2,120. Cargo valued at £3,000 was salvaged and placed on the beach, but most washed back into the sea when another storm developed. The wreck of LOCH ARD still lies at the base of Mutton Bird Island. Much of the cargo has now been salvaged and some was washed up into what is now known as LOCH ARD Gorge. Cargo and artefacts have also been illegally salvaged over many years before protective legislation was introduced. One of the most unlikely pieces of cargo to have survived the shipwreck was a Minton porcelain peacock - one of only seven in the world. The peacock was destined for the Melbourne International Exhibition in 1880. It had been well packed, which gave it adequate protection during the violent storm. Today, the Minton peacock can be seen at the Flagstaff Hill Maritime Museum in Warrnambool. From Australia's most dramatic shipwreck it has now become Australia's most valuable shipwreck artefact and is one of very few 'objects' on the Victorian State Heritage Register. The LOCH ARD shipwreck is of State significance – Victorian Heritage Register S 417. Flagstaff Hill’s collection of artefacts from LOCH ARD is significant for being one of the largest collections of artefacts from this shipwreck in Victoria. It is significant for its association with the shipwreck, which is on the Victorian Heritage Register (VHR S417). The collection is significant because of the relationship between the objects, as together they have a high potential to interpret the story of the LOCH ARD. The LOCH ARD collection is archaeologically significant as the remains of a large international passenger and cargo ship. The LOCH ARD collection is historically significant for representing aspects of Victoria’s shipping history and its potential to interpret sub-theme 1.5 of Victoria’s Framework of Historical Themes (living with natural processes). The collection is also historically significant for its association with the LOCH ARD, which was one of the worst and best known shipwrecks in Victoria’s history. Unrestored tea spoon from the wreck of the LOCH ARD. The spoon design has a flattened fiddle-back handle, with a thin stem or shank, flared collar, and elongated bowl. The spoons metallic composition is a thin layer of brass alloy which has partially corroded back to a nickel-silver base metal. Approximately 30%of original electroplating remains. Small amount of concretion on stem.flagstaff hill, warrnambool, shipwrecked coast, flagstaff hill maritime museum, maritime museum, shipwreck coast, flagstaff hill maritime village, great ocean road, loch line, loch ard, captain gibbs, eva carmichael, tom pearce, glenample station, mutton bird island, loch ard gorge, electroplated cutlery, loch ard shipwreck, nickel silver, william page & co, birmingham, brass plating, makers marks -
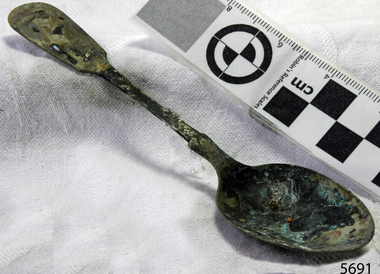 Flagstaff Hill Maritime Museum and Village
Spoon, circa 1878
This tea spoon is from the wreck of the LOCH ARD, a Loch Line ship of 1,693 tons which sailed from Gravesend, London, on 2 March 1878 with 17 passengers and a crew of 36 under Captain George Gibbs. “The intention was to discharge cargo in Melbourne, before returning to London via the Horn with wool and wheat”. Instead, on 1 June 1878, after 90 days at sea, she struck the sandstone cliffs of Mutton Bird Island on the south west coast of Victoria, and sank with the loss of 52 lives and all her cargo. The manifest of the LOCH ARD listed an array of manufactured goods and bulk metals being exported to the Colony of Victoria, with a declared value of £53,700. (202 bills of lading show an actual invoice value of £68, 456, with insurance underwriting to £30,000 of all cargo). Included in the manifest is the item of “Tin hardware & cutlery £7,530”. This teaspoon is one of 482 similar items of electro-plated cutlery from the LOCH ARD site, comprising spoons and forks of various sizes but all sharing the same general shape or design and metallic composition. 49 of these pieces display a legible makers’ mark — the initials “W” and “P” placed within a raised diamond outline, which is in turn contained within a sunken crown shape — identifying the manufacturer as William Page & Co of Birmingham. An electroplater’s makers’ marks, unlike sterling silver hallmarks, are not consistent identifiers of quality or date and place of manufacture. A similar line of five impressions was usually made to impress the consumer with an implication of industry standards, but what each one actually signified was not regulated and so they varied according to the whim of the individual foundry. In this case, the maker’s marks are often obscured by sedimentary accretion or removed by corrosion after a century of submersion in the ocean. However sufficient detail has survived to indicate that these samples of electro-plated cutlery probably originated from the same consignment in the LOCH ARD’s cargo. The following descriptions of maker’s marks are drawn from 255 tea spoons, 125 dessert spoons, and 99 table forks. These marks are clearly visible in 66 instances, while the same sequence of general outlines, or depression shapes, is discernible in another 166 examples. 1. A recessed Crown containing a raised Diamond outline and the initials “W” and “P” (the recognised trademark of William Page & Co) 2. An impressed Ellipse containing a raised, pivoted, Triangle in its lower part and bearing a Resurrection Cross on its upper section (a possible dissenting church symbol reflecting religious affiliation); OR a rounded Square impression containing a raised, ‘lazy’, letter “B” (possibly mimicking sterling silver hallmark signifying city of manufacture i.e. Birmingham) 3. An impressed rounded Square filled with a raised Maltese Cross (the base metal composite of nickel silver was also known as ‘German silver’ after its Berlin inventors in 1823) 4. A recessed Circle containing a Crab or Scarab Beetle image; OR a recessed Circle containing a rotated ‘fleur de lys’ or ‘fasces’ design 5. A depressed Diamond shape enclosing a large raised letter “R” and a small raised letter “D” (mimicking the U.K. Patent Office stamp which abbreviated the term ‘registered’ to “RD”, but also included date and class of patent) Suggested trade names for William Page & Co’s particular blend of brass plating are ‘roman silver’ or ‘silverite’. This copper alloy polishes to a lustrous gold when new, discolouring to a murky grey with greenish hue when neglected. HISTORY OF THE LOCH ARD The LOCH ARD belonged to the famous Loch Line which sailed many ships from England to Australia. Built in Glasgow by Barclay, Curdle and Co. in 1873, the LOCH ARD was a three-masted square rigged iron sailing ship. The ship measured 262ft 7" (79.87m) in length, 38ft (11.58m) in width, 23ft (7m) in depth and had a gross tonnage of 1693 tons. The LOCH ARD's main mast measured a massive 150ft (45.7m) in height. LOCH ARD made three trips to Australia and one trip to Calcutta before its final voyage. LOCH ARD left England on March 2, 1878, under the command of Captain Gibbs, a newly married, 29 year old. She was bound for Melbourne with a crew of 37, plus 17 passengers and a load of cargo. The general cargo reflected the affluence of Melbourne at the time. On board were straw hats, umbrella, perfumes, clay pipes, pianos, clocks, confectionary, linen and candles, as well as a heavier load of railway irons, cement, lead and copper. There were items included that intended for display in the Melbourne International Exhibition in 1880. The voyage to Port Phillip was long but uneventful. At 3am on June 1, 1878, Captain Gibbs was expecting to see land and the passengers were becoming excited as they prepared to view their new homeland in the early morning. But LOCH ARD was running into a fog which greatly reduced visibility. Captain Gibbs was becoming anxious as there was no sign of land or the Cape Otway lighthouse. At 4am the fog lifted. A man aloft announced that he could see breakers. The sheer cliffs of Victoria's west coast came into view, and Captain Gibbs realised that the ship was much closer to them than expected. He ordered as much sail to be set as time would permit and then attempted to steer the vessel out to sea. On coming head on into the wind, the ship lost momentum, the sails fell limp and LOCH ARD's bow swung back. Gibbs then ordered the anchors to be released in an attempt to hold its position. The anchors sank some 50 fathoms - but did not hold. By this time LOCH ARD was among the breakers and the tall cliffs of Mutton Bird Island rose behind the ship. Just half a mile from the coast, the ship's bow was suddenly pulled around by the anchor. The captain tried to tack out to sea, but the ship struck a reef at the base of Mutton Bird Island, near Port Campbell. Waves broke over the ship and the top deck was loosened from the hull. The masts and rigging came crashing down knocking passengers and crew overboard. When a lifeboat was finally launched, it crashed into the side of LOCH ARD and capsized. Tom Pearce, who had launched the boat, managed to cling to its overturned hull and shelter beneath it. He drifted out to sea and then on the flood tide came into what is now known as LOCH ARD Gorge. He swam to shore, bruised and dazed, and found a cave in which to shelter. Some of the crew stayed below deck to shelter from the falling rigging but drowned when the ship slipped off the reef into deeper water. Eva Carmichael had raced onto deck to find out what was happening only to be confronted by towering cliffs looming above the stricken ship. In all the chaos, Captain Gibbs grabbed Eva and said, "If you are saved Eva, let my dear wife know that I died like a sailor". That was the last Eva Carmichael saw of the captain. She was swept off the ship by a huge wave. Eva saw Tom Pearce on a small rocky beach and yelled to attract his attention. He dived in and swam to the exhausted woman and dragged her to shore. He took her to the cave and broke open case of brandy which had washed up on the beach. He opened a bottle to revive the unconscious woman. A few hours later Tom scaled a cliff in search of help. He followed hoof prints and came by chance upon two men from nearby Glenample Station three and a half miles away. In a state of exhaustion, he told the men of the tragedy. Tom returned to the gorge while the two men rode back to the station to get help. By the time they reached LOCH ARD Gorge, it was cold and dark. The two shipwreck survivors were taken to Glenample Station to recover. Eva stayed at the station for six weeks before returning to Ireland, this time by steamship. In Melbourne, Tom Pearce received a hero's welcome. He was presented with the first gold medal of the Royal Humane Society of Victoria and a £1000 cheque from the Victorian Government. Concerts were performed to honour the young man's bravery and to raise money for those who lost family in the LOCH ARD disaster. Of the 54 crew members and passengers on board, only two survived: the apprentice, Tom Pearce and the young woman passenger, Eva Carmichael, who lost all of her family in the tragedy. Ten days after the LOCH ARD tragedy, salvage rights to the wreck were sold at auction for £2,120. Cargo valued at £3,000 was salvaged and placed on the beach, but most washed back into the sea when another storm developed. The wreck of LOCH ARD still lies at the base of Mutton Bird Island. Much of the cargo has now been salvaged and some was washed up into what is now known as LOCH ARD Gorge. Cargo and artefacts have also been illegally salvaged over many years before protective legislation was introduced. One of the most unlikely pieces of cargo to have survived the shipwreck was a Minton porcelain peacock - one of only seven in the world. The peacock was destined for the Melbourne International Exhibition in 1880. It had been well packed, which gave it adequate protection during the violent storm. Today, the Minton peacock can be seen at the Flagstaff Hill Maritime Museum in Warrnambool. From Australia's most dramatic shipwreck it has now become Australia's most valuable shipwreck artefact and is one of very few 'objects' on the Victorian State Heritage Register. The LOCH ARD shipwreck is of State significance – Victorian Heritage Register S 417. Flagstaff Hill’s collection of artefacts from LOCH ARD is significant for being one of the largest collections of artefacts from this shipwreck in Victoria. It is significant for its association with the shipwreck, which is on the Victorian Heritage Register (VHR S417). The collection is significant because of the relationship between the objects, as together they have a high potential to interpret the story of the LOCH ARD. The LOCH ARD collection is archaeologically significant as the remains of a large international passenger and cargo ship. The LOCH ARD collection is historically significant for representing aspects of Victoria’s shipping history and its potential to interpret sub-theme 1.5 of Victoria’s Framework of Historical Themes (living with natural processes). The collection is also historically significant for its association with the LOCH ARD, which was one of the worst and best known shipwrecks in Victoria’s history. Unrestored tea spoon from the wreck of the LOCH ARD. The spoon design has a flattened fiddle-back handle, with a thin stem or shank, flared collar, and elongated bowl. The spoons metallic composition is a thin layer of brass alloy which has partially corroded back to a nickel-silver base metal. Only 10% of original electroplating remains with some verdigris. No marks visible.flagstaff hill, warrnambool, shipwrecked coast, flagstaff hill maritime museum, maritime museum, shipwreck coast, flagstaff hill maritime village, great ocean road, loch line, loch ard, captain gibbs, eva carmichael, tom pearce, glenample station, mutton bird island, loch ard gorge, electroplated cutlery, loch ard shipwreck, nickel silver, william page & co, birmingham, brass plating, makers marks -
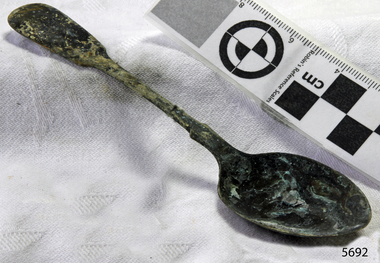 Flagstaff Hill Maritime Museum and Village
Spoon, circa 1878
This tea spoon is from the wreck of the LOCH ARD, a Loch Line ship of 1,693 tons which sailed from Gravesend, London, on 2 March 1878 with 17 passengers and a crew of 36 under Captain George Gibbs. “The intention was to discharge cargo in Melbourne, before returning to London via the Horn with wool and wheat”. Instead, on 1 June 1878, after 90 days at sea, she struck the sandstone cliffs of Mutton Bird Island on the south west coast of Victoria, and sank with the loss of 52 lives and all her cargo. The manifest of the LOCH ARD listed an array of manufactured goods and bulk metals being exported to the Colony of Victoria, with a declared value of £53,700. (202 bills of lading show an actual invoice value of £68, 456, with insurance underwriting to £30,000 of all cargo). Included in the manifest is the item of “Tin hardware & cutlery £7,530”. This teaspoon is one of 482 similar items of electro-plated cutlery from the LOCH ARD site, comprising spoons and forks of various sizes but all sharing the same general shape or design and metallic composition. 49 of these pieces display a legible makers’ mark — the initials “W” and “P” placed within a raised diamond outline, which is in turn contained within a sunken crown shape — identifying the manufacturer as William Page & Co of Birmingham. An electroplater’s makers’ marks, unlike sterling silver hallmarks, are not consistent identifiers of quality or date and place of manufacture. A similar line of five impressions was usually made to impress the consumer with an implication of industry standards, but what each one actually signified was not regulated and so they varied according to the whim of the individual foundry. In this case, the maker’s marks are often obscured by sedimentary accretion or removed by corrosion after a century of submersion in the ocean. However sufficient detail has survived to indicate that these samples of electro-plated cutlery probably originated from the same consignment in the LOCH ARD’s cargo. The following descriptions of maker’s marks are drawn from 255 tea spoons, 125 dessert spoons, and 99 table forks. These marks are clearly visible in 66 instances, while the same sequence of general outlines, or depression shapes, is discernible in another 166 examples. 1. A recessed Crown containing a raised Diamond outline and the initials “W” and “P” (the recognised trademark of William Page & Co) 2. An impressed Ellipse containing a raised, pivoted, Triangle in its lower part and bearing a Resurrection Cross on its upper section (a possible dissenting church symbol reflecting religious affiliation); OR a rounded Square impression containing a raised, ‘lazy’, letter “B” (possibly mimicking sterling silver hallmark signifying city of manufacture i.e. Birmingham) 3. An impressed rounded Square filled with a raised Maltese Cross (the base metal composite of nickel silver was also known as ‘German silver’ after its Berlin inventors in 1823) 4. A recessed Circle containing a Crab or Scarab Beetle image; OR a recessed Circle containing a rotated ‘fleur de lys’ or ‘fasces’ design 5. A depressed Diamond shape enclosing a large raised letter “R” and a small raised letter “D” (mimicking the U.K. Patent Office stamp which abbreviated the term ‘registered’ to “RD”, but also included date and class of patent) Suggested trade names for William Page & Co’s particular blend of brass plating are ‘roman silver’ or ‘silverite’. This copper alloy polishes to a lustrous gold when new, discolouring to a murky grey with greenish hue when neglected. HISTORY OF THE LOCH ARD The LOCH ARD belonged to the famous Loch Line which sailed many ships from England to Australia. Built in Glasgow by Barclay, Curdle and Co. in 1873, the LOCH ARD was a three-masted square rigged iron sailing ship. The ship measured 262ft 7" (79.87m) in length, 38ft (11.58m) in width, 23ft (7m) in depth and had a gross tonnage of 1693 tons. The LOCH ARD's main mast measured a massive 150ft (45.7m) in height. LOCH ARD made three trips to Australia and one trip to Calcutta before its final voyage. LOCH ARD left England on March 2, 1878, under the command of Captain Gibbs, a newly married, 29 year old. She was bound for Melbourne with a crew of 37, plus 17 passengers and a load of cargo. The general cargo reflected the affluence of Melbourne at the time. On board were straw hats, umbrella, perfumes, clay pipes, pianos, clocks, confectionary, linen and candles, as well as a heavier load of railway irons, cement, lead and copper. There were items included that intended for display in the Melbourne International Exhibition in 1880. The voyage to Port Phillip was long but uneventful. At 3am on June 1, 1878, Captain Gibbs was expecting to see land and the passengers were becoming excited as they prepared to view their new homeland in the early morning. But LOCH ARD was running into a fog which greatly reduced visibility. Captain Gibbs was becoming anxious as there was no sign of land or the Cape Otway lighthouse. At 4am the fog lifted. A man aloft announced that he could see breakers. The sheer cliffs of Victoria's west coast came into view, and Captain Gibbs realised that the ship was much closer to them than expected. He ordered as much sail to be set as time would permit and then attempted to steer the vessel out to sea. On coming head on into the wind, the ship lost momentum, the sails fell limp and LOCH ARD's bow swung back. Gibbs then ordered the anchors to be released in an attempt to hold its position. The anchors sank some 50 fathoms - but did not hold. By this time LOCH ARD was among the breakers and the tall cliffs of Mutton Bird Island rose behind the ship. Just half a mile from the coast, the ship's bow was suddenly pulled around by the anchor. The captain tried to tack out to sea, but the ship struck a reef at the base of Mutton Bird Island, near Port Campbell. Waves broke over the ship and the top deck was loosened from the hull. The masts and rigging came crashing down knocking passengers and crew overboard. When a lifeboat was finally launched, it crashed into the side of LOCH ARD and capsized. Tom Pearce, who had launched the boat, managed to cling to its overturned hull and shelter beneath it. He drifted out to sea and then on the flood tide came into what is now known as LOCH ARD Gorge. He swam to shore, bruised and dazed, and found a cave in which to shelter. Some of the crew stayed below deck to shelter from the falling rigging but drowned when the ship slipped off the reef into deeper water. Eva Carmichael had raced onto deck to find out what was happening only to be confronted by towering cliffs looming above the stricken ship. In all the chaos, Captain Gibbs grabbed Eva and said, "If you are saved Eva, let my dear wife know that I died like a sailor". That was the last Eva Carmichael saw of the captain. She was swept off the ship by a huge wave. Eva saw Tom Pearce on a small rocky beach and yelled to attract his attention. He dived in and swam to the exhausted woman and dragged her to shore. He took her to the cave and broke open case of brandy which had washed up on the beach. He opened a bottle to revive the unconscious woman. A few hours later Tom scaled a cliff in search of help. He followed hoof prints and came by chance upon two men from nearby Glenample Station three and a half miles away. In a state of exhaustion, he told the men of the tragedy. Tom returned to the gorge while the two men rode back to the station to get help. By the time they reached LOCH ARD Gorge, it was cold and dark. The two shipwreck survivors were taken to Glenample Station to recover. Eva stayed at the station for six weeks before returning to Ireland, this time by steamship. In Melbourne, Tom Pearce received a hero's welcome. He was presented with the first gold medal of the Royal Humane Society of Victoria and a £1000 cheque from the Victorian Government. Concerts were performed to honour the young man's bravery and to raise money for those who lost family in the LOCH ARD disaster. Of the 54 crew members and passengers on board, only two survived: the apprentice, Tom Pearce and the young woman passenger, Eva Carmichael, who lost all of her family in the tragedy. Ten days after the LOCH ARD tragedy, salvage rights to the wreck were sold at auction for £2,120. Cargo valued at £3,000 was salvaged and placed on the beach, but most washed back into the sea when another storm developed. The wreck of LOCH ARD still lies at the base of Mutton Bird Island. Much of the cargo has now been salvaged and some was washed up into what is now known as LOCH ARD Gorge. Cargo and artefacts have also been illegally salvaged over many years before protective legislation was introduced. One of the most unlikely pieces of cargo to have survived the shipwreck was a Minton porcelain peacock - one of only seven in the world. The peacock was destined for the Melbourne International Exhibition in 1880. It had been well packed, which gave it adequate protection during the violent storm. Today, the Minton peacock can be seen at the Flagstaff Hill Maritime Museum in Warrnambool. From Australia's most dramatic shipwreck it has now become Australia's most valuable shipwreck artefact and is one of very few 'objects' on the Victorian State Heritage Register. The LOCH ARD shipwreck is of State significance – Victorian Heritage Register S 417. Flagstaff Hill’s collection of artefacts from LOCH ARD is significant for being one of the largest collections of artefacts from this shipwreck in Victoria. It is significant for its association with the shipwreck, which is on the Victorian Heritage Register (VHR S417). The collection is significant because of the relationship between the objects, as together they have a high potential to interpret the story of the LOCH ARD. The LOCH ARD collection is archaeologically significant as the remains of a large international passenger and cargo ship. The LOCH ARD collection is historically significant for representing aspects of Victoria’s shipping history and its potential to interpret sub-theme 1.5 of Victoria’s Framework of Historical Themes (living with natural processes). The collection is also historically significant for its association with the LOCH ARD, which was one of the worst and best known shipwrecks in Victoria’s history. Unrestored tea spoon from the wreck of the LOCH ARD. The spoon design has a flattened fiddle-back handle, with a thin stem or shank, flared collar, and elongated bowl. The spoons metallic composition is a thin layer of brass alloy which has partially corroded back to a nickel-silver base metal. Only 10% of original electroplating remains with some verdigris. Makers marks are obscured.flagstaff hill, warrnambool, shipwrecked coast, flagstaff hill maritime museum, maritime museum, shipwreck coast, flagstaff hill maritime village, great ocean road, loch line, loch ard, captain gibbs, eva carmichael, tom pearce, glenample station, mutton bird island, loch ard gorge, electroplated cutlery, loch ard shipwreck, nickel silver, william page & co, birmingham, brass plating, makers marks -
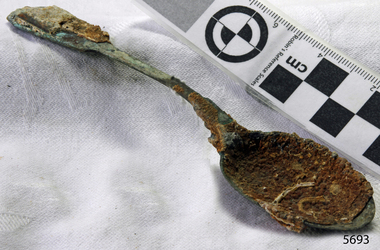 Flagstaff Hill Maritime Museum and Village
Spoon, circa 1878
This tea spoon is from the wreck of the LOCH ARD, a Loch Line ship of 1,693 tons which sailed from Gravesend, London, on 2 March 1878 with 17 passengers and a crew of 36 under Captain George Gibbs. “The intention was to discharge cargo in Melbourne, before returning to London via the Horn with wool and wheat”. Instead, on 1 June 1878, after 90 days at sea, she struck the sandstone cliffs of Mutton Bird Island on the south west coast of Victoria, and sank with the loss of 52 lives and all her cargo. The manifest of the LOCH ARD listed an array of manufactured goods and bulk metals being exported to the Colony of Victoria, with a declared value of £53,700. (202 bills of lading show an actual invoice value of £68, 456, with insurance underwriting to £30,000 of all cargo). Included in the manifest is the item of “Tin hardware & cutlery £7,530”. This teaspoon is one of 482 similar items of electro-plated cutlery from the LOCH ARD site, comprising spoons and forks of various sizes but all sharing the same general shape or design and metallic composition. 49 of these pieces display a legible makers’ mark — the initials “W” and “P” placed within a raised diamond outline, which is in turn contained within a sunken crown shape — identifying the manufacturer as William Page & Co of Birmingham. An electroplater’s makers’ marks, unlike sterling silver hallmarks, are not consistent identifiers of quality or date and place of manufacture. A similar line of five impressions was usually made to impress the consumer with an implication of industry standards, but what each one actually signified was not regulated and so they varied according to the whim of the individual foundry. In this case, the maker’s marks are often obscured by sedimentary accretion or removed by corrosion after a century of submersion in the ocean. However sufficient detail has survived to indicate that these samples of electro-plated cutlery probably originated from the same consignment in the LOCH ARD’s cargo. The following descriptions of maker’s marks are drawn from 255 tea spoons, 125 dessert spoons, and 99 table forks. These marks are clearly visible in 66 instances, while the same sequence of general outlines, or depression shapes, is discernible in another 166 examples. 1. A recessed Crown containing a raised Diamond outline and the initials “W” and “P” (the recognised trademark of William Page & Co) 2. An impressed Ellipse containing a raised, pivoted, Triangle in its lower part and bearing a Resurrection Cross on its upper section (a possible dissenting church symbol reflecting religious affiliation); OR a rounded Square impression containing a raised, ‘lazy’, letter “B” (possibly mimicking sterling silver hallmark signifying city of manufacture i.e. Birmingham) 3. An impressed rounded Square filled with a raised Maltese Cross (the base metal composite of nickel silver was also known as ‘German silver’ after its Berlin inventors in 1823) 4. A recessed Circle containing a Crab or Scarab Beetle image; OR a recessed Circle containing a rotated ‘fleur de lys’ or ‘fasces’ design 5. A depressed Diamond shape enclosing a large raised letter “R” and a small raised letter “D” (mimicking the U.K. Patent Office stamp which abbreviated the term ‘registered’ to “RD”, but also included date and class of patent) Suggested trade names for William Page & Co’s particular blend of brass plating are ‘roman silver’ or ‘silverite’. This copper alloy polishes to a lustrous gold when new, discolouring to a murky grey with greenish hue when neglected. HISTORY OF THE LOCH ARD The LOCH ARD belonged to the famous Loch Line which sailed many ships from England to Australia. Built in Glasgow by Barclay, Curdle and Co. in 1873, the LOCH ARD was a three-masted square rigged iron sailing ship. The ship measured 262ft 7" (79.87m) in length, 38ft (11.58m) in width, 23ft (7m) in depth and had a gross tonnage of 1693 tons. The LOCH ARD's main mast measured a massive 150ft (45.7m) in height. LOCH ARD made three trips to Australia and one trip to Calcutta before its final voyage. LOCH ARD left England on March 2, 1878, under the command of Captain Gibbs, a newly married, 29 year old. She was bound for Melbourne with a crew of 37, plus 17 passengers and a load of cargo. The general cargo reflected the affluence of Melbourne at the time. On board were straw hats, umbrella, perfumes, clay pipes, pianos, clocks, confectionary, linen and candles, as well as a heavier load of railway irons, cement, lead and copper. There were items included that intended for display in the Melbourne International Exhibition in 1880. The voyage to Port Phillip was long but uneventful. At 3am on June 1, 1878, Captain Gibbs was expecting to see land and the passengers were becoming excited as they prepared to view their new homeland in the early morning. But LOCH ARD was running into a fog which greatly reduced visibility. Captain Gibbs was becoming anxious as there was no sign of land or the Cape Otway lighthouse. At 4am the fog lifted. A man aloft announced that he could see breakers. The sheer cliffs of Victoria's west coast came into view, and Captain Gibbs realised that the ship was much closer to them than expected. He ordered as much sail to be set as time would permit and then attempted to steer the vessel out to sea. On coming head on into the wind, the ship lost momentum, the sails fell limp and LOCH ARD's bow swung back. Gibbs then ordered the anchors to be released in an attempt to hold its position. The anchors sank some 50 fathoms - but did not hold. By this time LOCH ARD was among the breakers and the tall cliffs of Mutton Bird Island rose behind the ship. Just half a mile from the coast, the ship's bow was suddenly pulled around by the anchor. The captain tried to tack out to sea, but the ship struck a reef at the base of Mutton Bird Island, near Port Campbell. Waves broke over the ship and the top deck was loosened from the hull. The masts and rigging came crashing down knocking passengers and crew overboard. When a lifeboat was finally launched, it crashed into the side of LOCH ARD and capsized. Tom Pearce, who had launched the boat, managed to cling to its overturned hull and shelter beneath it. He drifted out to sea and then on the flood tide came into what is now known as LOCH ARD Gorge. He swam to shore, bruised and dazed, and found a cave in which to shelter. Some of the crew stayed below deck to shelter from the falling rigging but drowned when the ship slipped off the reef into deeper water. Eva Carmichael had raced onto deck to find out what was happening only to be confronted by towering cliffs looming above the stricken ship. In all the chaos, Captain Gibbs grabbed Eva and said, "If you are saved Eva, let my dear wife know that I died like a sailor". That was the last Eva Carmichael saw of the captain. She was swept off the ship by a huge wave. Eva saw Tom Pearce on a small rocky beach and yelled to attract his attention. He dived in and swam to the exhausted woman and dragged her to shore. He took her to the cave and broke open case of brandy which had washed up on the beach. He opened a bottle to revive the unconscious woman. A few hours later Tom scaled a cliff in search of help. He followed hoof prints and came by chance upon two men from nearby Glenample Station three and a half miles away. In a state of exhaustion, he told the men of the tragedy. Tom returned to the gorge while the two men rode back to the station to get help. By the time they reached LOCH ARD Gorge, it was cold and dark. The two shipwreck survivors were taken to Glenample Station to recover. Eva stayed at the station for six weeks before returning to Ireland, this time by steamship. In Melbourne, Tom Pearce received a hero's welcome. He was presented with the first gold medal of the Royal Humane Society of Victoria and a £1000 cheque from the Victorian Government. Concerts were performed to honour the young man's bravery and to raise money for those who lost family in the LOCH ARD disaster. Of the 54 crew members and passengers on board, only two survived: the apprentice, Tom Pearce and the young woman passenger, Eva Carmichael, who lost all of her family in the tragedy. Ten days after the LOCH ARD tragedy, salvage rights to the wreck were sold at auction for £2,120. Cargo valued at £3,000 was salvaged and placed on the beach, but most washed back into the sea when another storm developed. The wreck of LOCH ARD still lies at the base of Mutton Bird Island. Much of the cargo has now been salvaged and some was washed up into what is now known as LOCH ARD Gorge. Cargo and artefacts have also been illegally salvaged over many years before protective legislation was introduced. One of the most unlikely pieces of cargo to have survived the shipwreck was a Minton porcelain peacock - one of only seven in the world. The peacock was destined for the Melbourne International Exhibition in 1880. It had been well packed, which gave it adequate protection during the violent storm. Today, the Minton peacock can be seen at the Flagstaff Hill Maritime Museum in Warrnambool. From Australia's most dramatic shipwreck it has now become Australia's most valuable shipwreck artefact and is one of very few 'objects' on the Victorian State Heritage Register. The LOCH ARD shipwreck is of State significance – Victorian Heritage Register S 417. Flagstaff Hill’s collection of artefacts from LOCH ARD is significant for being one of the largest collections of artefacts from this shipwreck in Victoria. It is significant for its association with the shipwreck, which is on the Victorian Heritage Register (VHR S417). The collection is significant because of the relationship between the objects, as together they have a high potential to interpret the story of the LOCH ARD. The LOCH ARD collection is archaeologically significant as the remains of a large international passenger and cargo ship. The LOCH ARD collection is historically significant for representing aspects of Victoria’s shipping history and its potential to interpret sub-theme 1.5 of Victoria’s Framework of Historical Themes (living with natural processes). The collection is also historically significant for its association with the LOCH ARD, which was one of the worst and best known shipwrecks in Victoria’s history Unrestored tea spoon from the wreck of the LOCH ARD. The spoon design has a flattened fiddle-back handle, with a thin stem or shank, flared collar, and elongated bowl. The spoons metallic composition is a thin layer of brass alloy which has partially corroded back to a nickel-silver base metal. 40% of spoon surface is encrusted with red and white sediment and 40% shows verdigris. Makers marks are obscured.flagstaff hill, warrnambool, shipwrecked coast, flagstaff hill maritime museum, maritime museum, shipwreck coast, flagstaff hill maritime village, great ocean road, loch line, loch ard, captain gibbs, eva carmichael, tom pearce, glenample station, mutton bird island, loch ard gorge, electroplated cutlery, loch ard shipwreck, nickel silver, william page & co, birmingham, brass plating, makers marks -
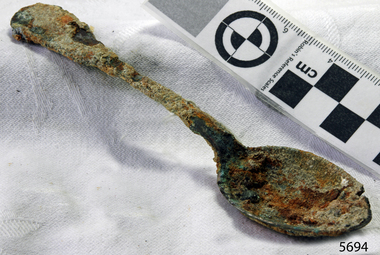 Flagstaff Hill Maritime Museum and Village
Spoon, circa 1878
This tea spoon is from the wreck of the LOCH ARD, a Loch Line ship of 1,693 tons which sailed from Gravesend, London, on 2 March 1878 with 17 passengers and a crew of 36 under Captain George Gibbs. “The intention was to discharge cargo in Melbourne, before returning to London via the Horn with wool and wheat”. Instead, on 1 June 1878, after 90 days at sea, she struck the sandstone cliffs of Mutton Bird Island on the south west coast of Victoria, and sank with the loss of 52 lives and all her cargo. The manifest of the LOCH ARD listed an array of manufactured goods and bulk metals being exported to the Colony of Victoria, with a declared value of £53,700. (202 bills of lading show an actual invoice value of £68, 456, with insurance underwriting to £30,000 of all cargo). Included in the manifest is the item of “Tin hardware & cutlery £7,530”. This teaspoon is one of 482 similar items of electro-plated cutlery from the LOCH ARD site, comprising spoons and forks of various sizes but all sharing the same general shape or design and metallic composition. 49 of these pieces display a legible makers’ mark — the initials “W” and “P” placed within a raised diamond outline, which is in turn contained within a sunken crown shape — identifying the manufacturer as William Page & Co of Birmingham. An electroplater’s makers’ marks, unlike sterling silver hallmarks, are not consistent identifiers of quality or date and place of manufacture. A similar line of five impressions was usually made to impress the consumer with an implication of industry standards, but what each one actually signified was not regulated and so they varied according to the whim of the individual foundry. In this case, the maker’s marks are often obscured by sedimentary accretion or removed by corrosion after a century of submersion in the ocean. However sufficient detail has survived to indicate that these samples of electro-plated cutlery probably originated from the same consignment in the LOCH ARD’s cargo. The following descriptions of maker’s marks are drawn from 255 tea spoons, 125 dessert spoons, and 99 table forks. These marks are clearly visible in 66 instances, while the same sequence of general outlines, or depression shapes, is discernible in another 166 examples. 1. A recessed Crown containing a raised Diamond outline and the initials “W” and “P” (the recognised trademark of William Page & Co) 2. An impressed Ellipse containing a raised, pivoted, Triangle in its lower part and bearing a Resurrection Cross on its upper section (a possible dissenting church symbol reflecting religious affiliation); OR a rounded Square impression containing a raised, ‘lazy’, letter “B” (possibly mimicking sterling silver hallmark signifying city of manufacture i.e. Birmingham) 3. An impressed rounded Square filled with a raised Maltese Cross (the base metal composite of nickel silver was also known as ‘German silver’ after its Berlin inventors in 1823) 4. A recessed Circle containing a Crab or Scarab Beetle image; OR a recessed Circle containing a rotated ‘fleur de lys’ or ‘fasces’ design 5. A depressed Diamond shape enclosing a large raised letter “R” and a small raised letter “D” (mimicking the U.K. Patent Office stamp which abbreviated the term ‘registered’ to “RD”, but also included date and class of patent) Suggested trade names for William Page & Co’s particular blend of brass plating are ‘roman silver’ or ‘silverite’. This copper alloy polishes to a lustrous gold when new, discolouring to a murky grey with greenish hue when neglected. HISTORY OF THE LOCH ARD The LOCH ARD belonged to the famous Loch Line which sailed many ships from England to Australia. Built in Glasgow by Barclay, Curdle and Co. in 1873, the LOCH ARD was a three-masted square rigged iron sailing ship. The ship measured 262ft 7" (79.87m) in length, 38ft (11.58m) in width, 23ft (7m) in depth and had a gross tonnage of 1693 tons. The LOCH ARD's main mast measured a massive 150ft (45.7m) in height. LOCH ARD made three trips to Australia and one trip to Calcutta before its final voyage. LOCH ARD left England on March 2, 1878, under the command of Captain Gibbs, a newly married, 29 year old. She was bound for Melbourne with a crew of 37, plus 17 passengers and a load of cargo. The general cargo reflected the affluence of Melbourne at the time. On board were straw hats, umbrella, perfumes, clay pipes, pianos, clocks, confectionary, linen and candles, as well as a heavier load of railway irons, cement, lead and copper. There were items included that intended for display in the Melbourne International Exhibition in 1880. The voyage to Port Phillip was long but uneventful. At 3am on June 1, 1878, Captain Gibbs was expecting to see land and the passengers were becoming excited as they prepared to view their new homeland in the early morning. But LOCH ARD was running into a fog which greatly reduced visibility. Captain Gibbs was becoming anxious as there was no sign of land or the Cape Otway lighthouse. At 4am the fog lifted. A man aloft announced that he could see breakers. The sheer cliffs of Victoria's west coast came into view, and Captain Gibbs realised that the ship was much closer to them than expected. He ordered as much sail to be set as time would permit and then attempted to steer the vessel out to sea. On coming head on into the wind, the ship lost momentum, the sails fell limp and LOCH ARD's bow swung back. Gibbs then ordered the anchors to be released in an attempt to hold its position. The anchors sank some 50 fathoms - but did not hold. By this time LOCH ARD was among the breakers and the tall cliffs of Mutton Bird Island rose behind the ship. Just half a mile from the coast, the ship's bow was suddenly pulled around by the anchor. The captain tried to tack out to sea, but the ship struck a reef at the base of Mutton Bird Island, near Port Campbell. Waves broke over the ship and the top deck was loosened from the hull. The masts and rigging came crashing down knocking passengers and crew overboard. When a lifeboat was finally launched, it crashed into the side of LOCH ARD and capsized. Tom Pearce, who had launched the boat, managed to cling to its overturned hull and shelter beneath it. He drifted out to sea and then on the flood tide came into what is now known as LOCH ARD Gorge. He swam to shore, bruised and dazed, and found a cave in which to shelter. Some of the crew stayed below deck to shelter from the falling rigging but drowned when the ship slipped off the reef into deeper water. Eva Carmichael had raced onto deck to find out what was happening only to be confronted by towering cliffs looming above the stricken ship. In all the chaos, Captain Gibbs grabbed Eva and said, "If you are saved Eva, let my dear wife know that I died like a sailor". That was the last Eva Carmichael saw of the captain. She was swept off the ship by a huge wave. Eva saw Tom Pearce on a small rocky beach and yelled to attract his attention. He dived in and swam to the exhausted woman and dragged her to shore. He took her to the cave and broke open case of brandy which had washed up on the beach. He opened a bottle to revive the unconscious woman. A few hours later Tom scaled a cliff in search of help. He followed hoof prints and came by chance upon two men from nearby Glenample Station three and a half miles away. In a state of exhaustion, he told the men of the tragedy. Tom returned to the gorge while the two men rode back to the station to get help. By the time they reached LOCH ARD Gorge, it was cold and dark. The two shipwreck survivors were taken to Glenample Station to recover. Eva stayed at the station for six weeks before returning to Ireland, this time by steamship. In Melbourne, Tom Pearce received a hero's welcome. He was presented with the first gold medal of the Royal Humane Society of Victoria and a £1000 cheque from the Victorian Government. Concerts were performed to honour the young man's bravery and to raise money for those who lost family in the LOCH ARD disaster. Of the 54 crew members and passengers on board, only two survived: the apprentice, Tom Pearce and the young woman passenger, Eva Carmichael, who lost all of her family in the tragedy. Ten days after the LOCH ARD tragedy, salvage rights to the wreck were sold at auction for £2,120. Cargo valued at £3,000 was salvaged and placed on the beach, but most washed back into the sea when another storm developed. The wreck of LOCH ARD still lies at the base of Mutton Bird Island. Much of the cargo has now been salvaged and some was washed up into what is now known as LOCH ARD Gorge. Cargo and artefacts have also been illegally salvaged over many years before protective legislation was introduced. One of the most unlikely pieces of cargo to have survived the shipwreck was a Minton porcelain peacock - one of only seven in the world. The peacock was destined for the Melbourne International Exhibition in 1880. It had been well packed, which gave it adequate protection during the violent storm. Today, the Minton peacock can be seen at the Flagstaff Hill Maritime Museum in Warrnambool. From Australia's most dramatic shipwreck it has now become Australia's most valuable shipwreck artefact and is one of very few 'objects' on the Victorian State Heritage Register. The LOCH ARD shipwreck is of State significance – Victorian Heritage Register S 417. Flagstaff Hill’s collection of artefacts from LOCH ARD is significant for being one of the largest collections of artefacts from this shipwreck in Victoria. It is significant for its association with the shipwreck, which is on the Victorian Heritage Register (VHR S417). The collection is significant because of the relationship between the objects, as together they have a high potential to interpret the story of the LOCH ARD. The LOCH ARD collection is archaeologically significant as the remains of a large international passenger and cargo ship. The LOCH ARD collection is historically significant for representing aspects of Victoria’s shipping history and its potential to interpret sub-theme 1.5 of Victoria’s Framework of Historical Themes (living with natural processes). The collection is also historically significant for its association with the LOCH ARD, which was one of the worst and best known shipwrecks in Victoria’s history Unrestored tea spoon from the wreck of the LOCH ARD. The spoon design has a flattened fiddle-back handle, with a thin stem or shank, flared collar, and elongated bowl. The spoons metallic composition is a thin layer of brass alloy which has partially corroded back to a nickel-silver base metal. 80% of the spoon surface is encrusted with red and white sediment. The bowl is corroded and chipped. Makers marks are obscured.flagstaff hill, warrnambool, shipwrecked coast, flagstaff hill maritime museum, maritime museum, shipwreck coast, flagstaff hill maritime village, great ocean road, loch line, loch ard, captain gibbs, eva carmichael, tom pearce, glenample station, mutton bird island, loch ard gorge, electroplated cutlery, loch ard shipwreck, nickel silver, william page & co, birmingham, brass plating, makers marks