Showing 1947 items matching "floods"
-
 Stawell Historical Society Inc
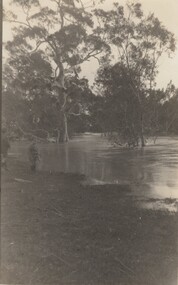
Photograph, Whitehall Property Greens Creek
Hutchings family 1. Wimmera River in flood below Whitehall running a banker c. 1920. Ted & Col Hutchings in foreground. 2. Wimmera River in flood looking downstream. No date but possibly same time as no. 1. from same place. 3. Looking over the Wimmera River to Island paddock towards Greens Creek 4. Wimmera River half a banker at Whitehall 5. Wimmera River in flood upstream from carpenter's shop looking towards engine house at Whitehall 5a. Wimmera River in flood. Left to right - blacksmith shop and carpenters' shop. 5b. Taken from the same spot with Emily & Ada Hole, E G (Ted) & Col Hutchings. Blacksmith shop & carpenters' shop, Whitehall. 5c. Wimmera River upstream from the carpenters' shop. Foreground is possibly Belladonna lilies which were all over the river bank in 1992. Whitehall. 5d. Looking downstream towards the loose boxes, Whitehall. 5e. Blacksmiths' shop and carpenters' shop from the pumping station. Wimmera River, Whitehall. 6. Wimmera River in flood at Whitehall. 7. Wimmera River half a banker in front of old hut at Whitehall. 8. Wimmera River Emily Hayes, Edward G (Ted) Hutchings & Colin J Hutchings. 9. Morrl-Morrl - Greens Creek Road opposite back paddock. Whitehall. Black Ford in distance. c. 1919 10. Whitehall woolshed north east aspect, Drive to the right of photo 11. Whitehall woolshed - north east aspect showing the drive to the right 11a. Whitehall woolshed - north aspect 11b. Same tree near woolshed 11c. Same tree again in centre, other trees came up after the 23 flood. Woolshed to the right out of photo. 12. Whitehall woolshed - south aspect, sheep entrance end 13. Whitehall. left to right, Stackyard, stables in the centre and the Wimmera River behind following the trees. 14. Whitehall horse paddock c. 1920. left to right, Machinery shed, stable in the centre. Homestead to the right in distance. There is no windmill. 15. Load of wool from Whitehall woolshed to right. 16. Whitehall c. 1920 before the windmill. left to right, garage and mens' hut. Wimmera river runs along the tree line. 16a. Stables, garage and mens' hut after the construction of the windmill. River behind. 17. Whitehall c. 1922. Note windmill addition. Garage to left, Mens' Hut to right. Jack Donnelly & Edward G (Ted) Hutchings with pet lambs. River behind trees. 18. Whitehall gardens. Summer house to the right, pine tree lined drive in the centre background. Ted & Col Hutchings on the lawn. C. 1920 19. Edward G. (Ted) & Colin J. Hutchings in Whitehall garden. Wimmera River in the background. The building behind the fence is the carpenters' shop which the family lived in while house was rebuilt after fire 15 Jan 1877 20. Whitehall c. 1920. left to right, cattle yard, killing house, Wimmera river behind the fence, and the loose box on the right. Black Orpington chooks in foreground. 21. Bay window (original blinds) in the master bedroom. Whitehall 20 Sep 1992 22. Master bedroom (original wallpaper) Joyce & Col Hutchings, Moyu, Ben & Rebecca Roe 20 Sep 1992 23. Col & Ted's bedroom (original) Marble mantlepiece had been removed. Whitehall. 20 Sep 1992 24. Whitehall kitchen. Large yellow meat oven to left of stove, bread oven far left, extreme right is oven where milk heated to skim cream. Chimney was a central one shared with meat oven. Bread oven chimney separate. 20 Sep 1992 25. Whitehall dairy, made of natural stone with dried brick corners. Entrance behind creeper which is over trellis. 20 Sep 1992. This building still remains in 1 Jun 2023 26. Inside charcoal lined meat cellar. Bottom right is concrete vat for pickling meat in brine. Top of brickwork slightly above ground level. Whitehall 20 Sep 1992 27. Fire foreground was stable flooring which was to left of photo. Machinery shed (thatch roof). 4 posts far left remains of cowshed. Large post in centre foreground is the gate post of corral. River to right. 20 Sep 1992 28. Whitehall machinery shed. Posts on far right are cow shed. Over the river is the island paddock. Wimmera river runs behind machinery shed. 20 Sep 1992 29. Posts of 10 sided corral. Killing house by side of gum tree in centre of photo on far side of corral. To left is one of the bales of the cowshed. Whitehall. 20 Sep 1992 29a. Similar photo in the 1920's. To the right is horsebreaking corral, then cow shed, loose box, haystacks and stable on left. Whitehall. 30. Dining room fire place put in the open fire of the mens' hut, only the chimney remains. To the left is the drive & river. Rebecca Roe, Col Hutchings granddaughter. 20 Sep 1992 30a. Looking down the Whitehall Drive. Mens' Hut (Jack Donnelly in doorway) and garage far left. 1920's 30b. The Drive, Whitehall taken from in front of the mens' hut. Wimmera River on the left. Gum tree on left still there 20 Sep 1992. 30c. Reverse from 30a. Whitehall drive from the front gate looking towards the mens' hut and garage. c. 1926 30d. Curly Donohue leaving for Warracknabeal. Ex mail contractor Omeo to Bright Victoria. C. 1926 30e. Looking down the drive towards front gate. Mens' hut on the right, river on the left. 31. Whitehall from the side. Building in centre behind David is separater room. 2 roomed hut to left of separater room and remains of mens' hut chimney. Photo 16 taken from similar spot. 20 Sep 1992 32. Benjamin Roe (Col Hutchings grandson) in the Carpenters' shop. The family lived in this building after the fire in the 1870's. Whitehall 20 Sep 1992 33. Ford across the Wimmera River at Whitehall (River abt. 5 feet higher than normal) 20 Sep 1992 33a. Wimmera River, Whitehall 34. Site of old bridge before Col Hutchings time. Tree in foreground to right still has bolt from bridge work protuding. A large post was in the centre of photo to make equal distance. 20 Sep 1992 35. Entrance to the old ford. Colin J Hutchings & his daughter, Moyu Roe. Wimmera River, Whitehall 20 Sep 1992 36. Summer house at Whitehall 20 Sep 1992 looking down to the orchard, dark green trees in distance old fruit trees. 36a. Edward & Colin Hutchings in front of the Summer house, Whitehall c. 1921 36b. Summer house looking towards front gate. Whitehall. 36c. Grey thrush in nest box which can be seen in previous photo with summer house in the background. Whitehall. 36d. Summer house from the orchard side. Whitehall. 37a. South side of Whitehall. First window Edith Sutherland's room, 2nd window, Ted & Col's room, bay window master bedroom 38. Taken in middle of front path looking towards front gate. Edith Sutherland in garden. Date palm in centre, cotton palm to left. Whitehall c. 1920's 38a. Garden at Whitehall taken from near the cotton palm. 39. Whitehall 20 Sep 1992 Bay window-master bed, small window to r. of bay-Colin Hutchings born in, front door, window to right-dining room, round the corner- drawing room, window on right, spare bed, verandah on left is spare bed. 39a. Whitehall c. 1920's Date palm on the right. 39b. Win, Colin T & Colin J Hutchings. Date palm in background. Whitehall 1943 39c. Edward George, Colin Thomas, Elizabeth Ambler & Colin James Hutchings wearing RAAF uniform. Date Palm in background. Whitehall c. 1943 39c. Front garden of Whitehall looking from the front right side of the house towards the drive & Wimmera River. Date palm on right, cotton palm on left 20 Sep 1992 40. Taken from bottom left corner of front garden looking towards the summer house. Cotton palm on right. River to the left. 41. Elizabeth A Hutchings beside master bedroom window. Whitehall c. 1920 42. Whitehall (photo of a painting by Wallace) owned by Colin T Hutchings 1982. 42a. Whitehall painting by Wallace after restoration now owned by Nick Hutchings 2021 42b. Whitehall c. 1923 42c. Taken from the side garden looking towards the right side of house. Front door is to the left out of photo. The cotton palm is to the left. c. 1923 43. Signpost showing Whitehall 20 Sep 1992, All ground up to the tree line behind the signpost was Whitehall property. 44. Colin T. Hutchings age 9 mths. Mar 1943 Whitehall 45. Colin James, Elizabeth Ambler & Edward George Hutchings. Front garden by the date palm, Whitehall c. 1939-40 45a. Colin James, Edward George, Edward Thomas Hutchings & E. Winifred May & Barney (dog) Whitehall. c. 1939-40. 45b. Colin James & Colin Thomas Hutchings during drought & World War ll c. 1944-45 in front of cotton palm, date palm to right. 46. Garden at Whitehall. Jack Donnelly on the hand mower. Cotton palm on left, date palm behind Jack and roof of carpenters shop to right. 47. Colin J Hutchings on tractor, E. Tom Hutchings behind. Whitehall, c. 1933 48. Jack Donnelly (Tad) & Colin J. Hutchings. Cotton palm to right. Whitehall c. 1917-18 49. Edward G (Ted) & Colin J Hutchings with cockatoo outside the dairy in rear garden. Whitehall c. 1923 50. Taken from the windmill looking across the roof of the mens' hut to the garden, orchard and drive in Winter time. House is behind the trees to right, Wimmera River to the left out of picture. Whitehall. 50a. Not labelled by Col Hutchings. It is an aerial shot looking towards the house in the trees & seems to be taken from the top of a tree...on the river side. 51. E. Tom Hutchings & George Chambers dam sinking. Whitehall. 51a. Tom Hutchings & George Chambers dam sinking. Whitehall. 51b. E. Tom Hutchings dam sinking. 52. Emily Hayes & Ada Hole (sisters) with Tom, Col & Ted Hutchings at the woolshed. 53. E T (Tom) Hutchings on reaper & binder. Whitehall. 54. Orchard looking towards the house. Carpenters' shop and river on the right. Whitehall. 54a. Orchard looking from the house, dark trees in background form part of the drive. 55. Grasshopper plague, Christmas Day 1933. Whitehall 56. Frost on the front lawn, Whitehall. 57. Little red hen & chicks with the river in the background 58. Edward (Ted) G. Hutchings muscovy ducks, hay shed and trees along the river in the background. 58a. Edward (Ted) G Hutchings muscovy ducks. 59. Swimming in the Wimmera River, either Ted or Col Hutchings in the foreground. 60. Looking towards the fowl house and pigsty, Whitehall. 61. Snake on the path, Whitehall. c. 1923 61a. E. Tom Hutchings killing a snake, Whitehall. c. 1923 61b. E. Tom Hutchings killing a snake, Whitehall. c. 1923 62. Notice of clearing sale, Stawell News & Pleasant Creek Chronicle on 5 Apr 1916 where the stock & whole of the household furniture was to be sold by James Hutchings widow. 63. Back to Greens Creek 7 Jun 1987 Colin J Hutchings left and Belle Kindred centre looking at photo 64. Back to Greens Creek 7 Jun 1987 Colin J Hutchings centre, Graham Stewart holding photograph on the right. 65. Colin J Hutchings & Bill Walker. Back to Greens Creek 7 Jun 1987 66. Colin J Hutchings delivering a speech before the plaque unveiling. Back to Greens Creek 7 Jun 1987 67. Graeme Williamson & Colin J Hutchings (2 'old boys') Greens Creek School Site 7 Jun 1987 68. Graeme Williamson talking to Moyu Roe (Hutchings) in background is May Williamson. Back to Greens Creek 7 Jun 1987 69. Greens Creek SS, Edward (Ted) & Colin J Hutchings attended. 70. Original students of first Greens Creek School 7 Jun 1987 Back row left 1. Kindred 3. Colin J Hutchings 4,5,6 not known 7. Graeme Williamson Sitting left 1. Not an original 2,3,4, not known 5. Belle Kindred 71. Terrier at Greens Creek State School 72. The new school students Back to Greens Creek 7 Jun 1987. Perry twins standing in centre and the teacher kneeling front left. 73. Will Rees water colour 1925 signature 74. Will Rees water colour 1925 75. Shearing at Kirkellar. Allen Simpson's 76. Back to Greens Creek 7 Jun 1987 Colin J Hutchings left and Belle Kindred centre looking at photo 77. Back to Greens Creek 7 Jun 1987 Colin J Hutchings centre, Graham Stewart holding photograph on the right. 78. Colin J Hutchings & Bill Walker. Back to Greens Creek 7 Jun 1987 79. Colin J Hutchings delivering a speech before the plaque unveiling. Back to Greens Creek 7 Jun 1987 80. Graeme Williamson & Colin J Hutchings (2 'old boys') Greens Creek School Site 7 Jun 1987 81. Graeme Williamson talking to Moyu Roe (Hutchings) in background is May Williamson. Back to Greens Creek 7 Jun 1987 82. Greens Creek SS, Edward (Ted) & Colin J Hutchings attended. 83. Original students of first Greens Creek School 7 Jun 1987 Back row left 1. Kindred 3. Colin J Hutchings 4,5,6 not known 7. Graeme Williamson Sitting left 1. Not an original 2,3,4, not known 5. Belle Kindred 84. Shearing at Kirkellar. Allen Simpson's 85. Terrier at Greens Creek State School 86. The new school students Back to Greens Creek 7 Jun 1987. Perry twins standing in centre and the teacher kneeling front left. Digital Copy of Parish Maps Kara Karahomestead -
 Mission to Seafarers Victoria
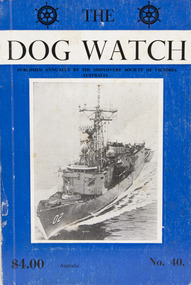
Journal (item) - Periodicals-Annual, Shiplovers' Society of Victoria, The Annual Dog Watch
This journal provides the reader with glimpses of the adventures and hardships of a seaman's life. Many of the stories are of sailing ships.Contributes to our knowledge of the importance of shipping and places on record those stories of the sea which would otherwise be lost.Contents Foreword - His Excellency Rear Admiral Sir Brian Murray, K.C.M.G., A.O., K.St.J. - 5 Editorial - Joyce M. B. Lambert - 7 Thirty Years at Garden Island - Illingworth Mackay - 11 Swedish Christmas in New Guinea Waters - Joyce M. B. Lambert - 26 A Gentlemen's Disagreement - Capt. W. Sheffield-Williamson - 34 Around the Horn in "Falls of Clyde" - Capt. Frederick S. Moody, Jnr. - 37 Off the Beaten Track - Mrs. Mary Mithassel - 46 Greek Determination - W. P. Shemmeld - 51 Wharf Cats and Psychology - J.M.B.L. - 56 The Sailor's Wife - C. E. Bonwick - 57 The Dog Watch -- A Tribute to S. A. E. Strom - C. E. - - 58 Behind the Scenes of Captain's Courageous - Capt. Fred Klebingat - 63 Human Error - R. N. Thiele -66 Pay Up - Alex Duffield - 70 Letters from the Barque "Garthneill" Apprentice Colin Goss - 73 Drake and his Treasure - Captain R. G. Edwards - 82 The Story of Two Dogs - Captain Laurie Gibson - 87 Adventure and Misadventure - K. S. Bull - 93 Moonstruck - Captain P. J. Elsey - 96 Confirmation of the Flood? - Doctor J. C. Anderson - 98 The "Scottish Glens" - Captain W. J. Cowling - 100 'Couta Boats at the "Cliff" - Tim Phillips - 107 "Marco Polo" - Extracts - 111 Sailors at Westminster Abbey - E. Harper - 115 Book Reviewssailing ships, steamships, shipping, seafaring life, shiplovers' society of victoria, dog watch -
 Flagstaff Hill Maritime Museum and Village
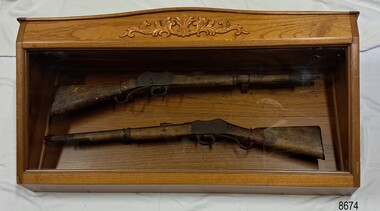
Weapon - Historic Rifles, Royal Small Arms Factory, 1877-1900
Martini-Henry Artillery Carbin rifles were made by the Royal Small Arms Factory at Enfield, Britain, from 1877 until 1900. Many were distributed to the British Colonies, including this pair, which was allocated to the Woodford Police, Victoria Police District of Warrnambool, Southwest Victoria. The Carbine model rifles were shorter than the standard rifles and more suited to mounted police and troopers. It is likely that in the early 20th century, Victoria Police replaced the two carbines with more modern firearms, and the outdated guns were stored in the stables. The rifles were left there and likely forgotten about due to changes in police staff. In 1915, police authorities announced that they would be replacing patrol horses with bicycles and would also close some smaller police stations. This affected Woodford Police Station, which closed in 1917. The forgotten firearms remained in the stables and were noticed by schoolboy Robert Jellie in 1940 and seen again in 1946. In 1995, the property was sold by the Education Department to a private owner. The Woodford Community donated the pair of Martini-Henry Carbines to the Victoria Police Museum in the late 1990s for mounting and display, which was funded by the Victoria Police Historical Society Inc. The decorative wood and glass display case and frame were designed to preserve the significant history of the guns. On November 1st 1999, the display was presented to Warrnambool Police and the local community due to the historical significance of the Woodford Police Station. In 2025, these items were formally deaccessioned by the Victoria Police Museum, and ownership was transferred to the Warrnambool Police Station. On March 10th, 2025, the display was transferred to Flagstaff Hill Maritime Museum and Village, where the historical story of the Martini-Henry Carbines could continue to be preserved and accessed by local families, the community, visitors to the area, and online visitors. WOODFORD POLICE: - The small settlement at Woodford was established in the 1840s around the Merri River where there was a ford across the water and a bridge from 1848 to 1851. The area was settled very early in Victoria’s history, and the river crossing provided travellers with access to the early route between Port Fairy (named Belfast at that time), Warrnambool and Melbourne. Occasionally, a Warrnambool police trooper would ride through Woodford and the district. In December 1854, Woodford Police barracks and stables were built on the hill by the Merri River on Bridge Road east, where Jubilee Park now stands. A local mounted trooper kept law and order in the area. In 1856, a lock-up was installed, and the first Woodford Police Station was in action in 1857. By 1871, the police station had been moved from the hill to land across the Merri River bridge, on the southern side of Bridge Road west, near Mill Street. In 1890, the police residence there was replaced by a stone Edwardian-style building with the stables and lock-up behind it and the old police station at the rear. The police continued to have a presence in Woodford until it was closed by the Police Commissioner in July 1917 for economic reasons. The residence was used for government housing until 1923, when it was taken over by the Education Department for the school teacher’s home. In 1995, it became privately owned. THE MARTINI-HENRY ARTILLERY CARBINE: - The Martini-Henry rifles were made in Britain from 1871 at the Royal Small Arms factory at Enfield and were stamped with the symbol of the Royal Cipher (Crown over VR) over ENFIELD to identify their origin. They were named after two of several people who helped design this method: Swiss Friederich von Martini and Scotsman Alexander Henry. The design was breech-loaded, and the inner barrel was rifled. A thumb rest was incorporated into the top right of the bullet receiver’s chamber. The small teardrop lever on the right side of the rifle showed whether the rifle was ready to be shot. In 1877, the shorter, lighter-weight Carbine version of the firearm was produced for mounted troops and artillery. Its official name was “Carbine, B.L., Rifled, Martini-Henry.” The bullets were slightly lighter in weight than those used for the longer rifle. The sight position was adjusted for the shorter gun, and wings were added to the sight on the tip, making it easier to slide the rifle back into a saddle bag. Some of the later Carbines also had leather sight covers screwed to the stock to prevent them from catching on the saddle bags. The Carbines had accessories available, such as barrel extensions with bayonets and swivels for adding slings. The Martini-Henry Carbine designs were later modified to fire the British .303 ammunition. Eventually, by 1900, the Martini-Henry Carbines were replaced by the Lee Enfield gun design. The pair of Martini-Henry Carbine firearms represents policing in the early pre-1900 days of colonial settlement; Woodford was one of the first townships settled in Victoria, and it had a police presence from 1854 until 1917. The rifles and display provide a historic connection between the location of Woodford and relatives and associates. The carbine rifles show a stage in the evolution of weapon design, adapted to suit mounted troops, and adding features to streamline use and storage. The ammunition was also improved during this progression. The carbines are important for their connection to policing law and order in a remote area. They are significant for their association with the township of Woodford, which was important to travel in the southwest Victoria district, providing access across a river for a road between Port Fairy and Melbourne, and later Warrnambool, and supplying food, goods and accommodation for the travellers. A pair of mounted rifles is mounted behind glass in a timer case, accompanied by a framed display of two photographs and an account of the rifles’ history. The case and display each have a horizontal board with a gently curved edge and carved decorations added. The identical firearms are British-made Martini Henry Carbine breach-loaded rifled guns, supplied by Britain to its Colonial troops from around 1877. The rifles are lever-action, single-shot .500 calibre weapons. They have a teardrop lever on their right side. They were used by Victoria Police mounted troops at the Woodford Police Station, Victoria. The black and white photographs were taken in 1946. The left photograph has a circled area; the right photograph is an enlarged view of the circled area, showing the Woodford Police Station in detail. The printed text is on textured paper with the Victoria Police watermark. It gives a summary of the rifle’s history. There is an inscription on the left photograph. Left photograph, handwritten in white pen: “WOODFORD” Document’s print: “During the late 1840s the small town of Woodford grew around the crossing of the Merri River on the Melbourne/Port Fairy Rad. Woodford was proclaimed a township in 1854 and a police quarters was established there in 1857. The police station remained until 1917 when it was closed and police service from then on was provided from Warrnambool. The building was then used as a school residence and is now privately owned. In !940 Robert JELLIE, then a schoolboy, observed two rifles mounted on the wall of the disused stable at the rear of the old police building. Following the devastating flood of 1946 (see photograph above) the rifles were again seen in the room next to the stable but were not seen again until the building was sold by the Education Department many years later. It was a recognition of the historical value of the rifles which led to their donation to the Warrnambool Police Complex. The rifles have been authenticated by the Victoria Police Armoury as being Victoria Police issue some time before 1900. The rifles are an identical pair of the famous British-made Martini Henry, a .500 inch calibre military weapon widely used by British Colonial troops. Victoria Police and the wider community of Warrnambool are indebted to the members of the Woodford community for their fine gesture in donating the rifles for mounting so that their historical importance can be preserved and they can be displayed for generations to come. This display was funded by the Victoria Police Historical Society Incorporated, and presented on the first day of November, 1999.”flagstaff hill maritime museum and village, great ocean road, shipwreck coast, martini henry, victoria police, woodford police station, rifle, carbine, display case, british, martini henry carbine, breech-loaded, rifled, colonial, single-shot, .500 calibre, weapon, gun, 1877, troops, mounted troops, merri river, victoria police woodford, victoria police warrnambool, victoria police melbourne, police quarters, robert jellie, school residence, stable, 1946 flood, victoria police armoury, identical pair, british colonial troops, victoria police historical society incorporated, woodford, bicycles, found by a schoolboy, edwardian-style building, victoria police museum, warrnambool police station -
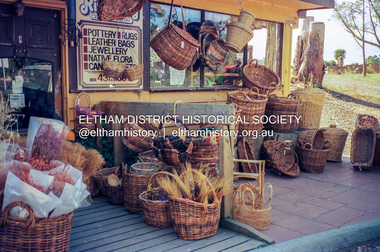
 Eltham District Historical Society Inc
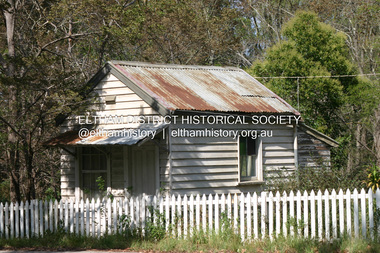
Photograph - Digital Photograph, Alan King, Former bootmaker's shop, Main Road Eltham, 29 January 2008
The former bootmaker's shop is one of only three remaining original shops from the early 20th century in what was once Little Eltham, the others being the present day Cafe Zen-Den at 736 Main Road and the former Burgoyne General Store and Post Office, present-day San Antonio Barbershop at 820 Main Road. Jarrold Cottage or White Cloud is known by many to be associated with the Skipper family, and has been since 1944 when Lena Skipper, wife of Mervyn Skipper purchased the cottage. She purchased it from the Estate of Thekla Jarrold who had died in March of the previous year. By the time Thekla died, she had lived in the Jarrold Cottage for 50 years. Thekla Alvenia Sissilia Ellian married John William Jarrold in 1888 at Clifton Hill. They started their family there but when John’s father William (who was married to Hannah Coleman) died in 1893 the family moved to Eltham. William had married Hannah Coleman in 1856 at his home in Eltham. William had arrived in the colony in 1848 so it is believed the Jarrold Cottage goes back at least to 1856 and possibly early 1850s. For a short period of time the cottage was rented to the Police as a temporary Police Station whilst a new and more permanent station was built further up the hill in 1859. The cottage was originally located closer to the Diamond Creek but was subject to flooding so was relocated to its present position on top a mound of rubble placed there from the nearby quarry next to the Dalton Street school (on Main Road). By 1916, John Henry Clark, a photographer who took many early photos of Eltham relocated from Fitzroy to Eltham and boarded with recently widowed Thekla Jarrold and her family. He changed professions from photographer to boot and harness maker around 1931 and Thekla had a small bootmakers shop built ifor him in the corner of her property next to the family home. J.H. Clark remained living at the property until his death in December 1956. At some stage after Clark's death, Lena Skipper is recorded living at the property having relocated from Montsalvat following the death of her husband Mervyn. The property continues to remain within the Skipper family as of 2023. Covered under Heritage Overlay, Nillumbik Planning Scheme. Published: Nillumbik Now and Then / Marguerite Marshall 2008; photographs Alan King with Marguerite Marshall.; p47This collection of almost 130 photos about places and people within the Shire of Nillumbik, an urban and rural municipality in Melbourne's north, contributes to an understanding of the history of the Shire. Published in 2008 immediately prior to the Black Saturday bushfires of February 7, 2009, it documents sites that were impacted, and in some cases destroyed by the fires. It includes photographs taken especially for the publication, creating a unique time capsule representing the Shire in the early 21st century. It remains the most recent comprehenesive publication devoted to the Shire's history connecting local residents to the past. nillumbik now and then (marshall-king) collection, bootmaker's shop, jarrold cottage, john henry clark, lena skipper, thekla alvenia sissilia jarrold (nee ellian), white cloud cottage, shops -
 Eltham District Historical Society Inc
Photograph, Peter Pidgeon, White Cloud Cottage, 701 Main Road, Eltham, 2 Aug. 2022
Jarrold Cottage built c.1853, also known as 'White Cloud", located at 701 Main Road, Eltham, opposite Dalton Street. The house remains intact and is listed on the Victorian Heritage Database and considered historically significant to the Shire of Nillumbik. The cottage was originally located closer to the Diamond Creek but was subject to flooding. It was dragged by horse to the present site shown, which was chosen for the higher ground that had been created as a result of land fill being deposited here from the quarry further around the bend on Main Road (site of present-day Eltham Primary School carpark) where the stone had been quarried for building the State School in Dalton Street. It had previously been rented for use as a Police Station / residence prior to the building of the permanent police house and station at the corner of Maria and Brougham streets in 1859. The cottage was purchased by Lena Skipper after the death of Thekla Jarrold in 1943 and remains in the family to present day (2022). Comparison photo: SEPP_0749 Part of a presentation by Peter Pidgeon to the Society, 13 August 2022 showcasing a series of photographs taken by John Henry Clark over the period 1895 to 1930. John Henry Clark was the youngest of three boys born to William Henry Clark (1823-1877) and Maria White (1843-1914). He and his brothers, William Charles Clark (1872-1945), Clement Kent Clark (1874-1912) operated a photography business (Clark Bros.) from 25 Thomas Street, Windsor near Prahran during the period c.1894 to 1914. Following death of Clement in September 1912 and their mother in 1914, the Clark Bros business appears to have dissolved, the premises demolished, and a new house was under construction in 1915. John set up business independently in 1914 operating out of 29 Moor Street, Fitzroy where he is registered in the 1914 and 1915 Electoral Rolls. By 1916 John had relocated to Eltham where he continued his practice as a photographer and took many of the early images around the district of Little Eltham. Around 1930 John changed professions and opened a small cobbler's shop in 1931 near the pond opposite Dalton Street adjacent to the Jarrold family cottage. He never married and continued his profession as a bootmaker from this little shop, maintaining a close relationship with Mrs Jarrold for the rest of their lives. His bootmaker shop remains today beside the Whitecloud cottage and is one of only three remaining shops in the area from the early 20th century.Comparative photo taken 2022 with one taken from same location over 100 years earlier by noted local photographer J.H. ClarkBorn Digitaleltham, j.h. clark photo (2022), dalton street, main road, bootmaker's shop, jarrold cottage, white cloud cottage, avenue of honour -
 Melbourne Tram Museum
Document - Folder of Track crossections drawings, Melbourne & Metropolitan Tramways Board (MMTB), c1928
The document provides cross sections of track used from c1920 to 1928. The folder is marked "H Bell" most likely the son of the later Chairman, Mr Hector Bell who was a civil engineer with the MMTB. 1 - P3948 - Camberwell Road - 1926 2 - P2789 - Camberwell Road reconstruction - 1920 3 - P3753 - Chapel St - 1926 4 - P60 - Expansion joints Church St bridge - 1924 5 - P3686 - Commercial Road reconstruction - 1926 6 - P4024 - Cotham Road reconstruction - 1927 7 - P4699 - Droop St duplication - 1927 8 - P2384 - Flemington Road conversion - 1925 9 - P1187 - Flemington Road tramway - undated c1920 10 - P4131 - Flinders St conversion - 1927 11 - P4132 - Flinders St conversion - special track drains where subject to flooding - 1927 12 - P3603 - Glenferrie Road east track - 1926 13 - P2608 - Glenferrie Road reconstruction - 1925 14 - P3577 - Glen Huntly Road extension - 1926 15 - P3745 - Glen Huntly Rd duplication - 1926 16 - P4655 - Gilbert Rd duplication - 1928 17 - P2472 - Hannah St at Crossings 1925 18 - P2459 - Hannah St in plantations - 1925 19 - P2582 - High St Prahran reconstruction - 1926 20 - P1594 - High St Prahran reconstruction - 1925 21 - P3611 - High St Malvern reconstruction - 1926 22 - P3900 - Lygon St - 1926 23 - P3689 - Malvern Road reconstruction - 1926 24 - P3951 - West Coburg Route - sleeper spacing - 1926 25 - P4703 - Nicholson St Coburg - duplication - 1928 26 - P4470 - Norwood Road duplication - 1927 27 - P2473 - Park St tramway - 1925 28 - P3707 - Riversdale Road reconstruction - 1926 29 - P4630 - Riversdale Road extension - 1927 30 - P4497- Riversdale Road duplication - 1927 31 - P1387 - South Melbourne Road - special boxed in Construction for Albert Road (parking loop) - 1924 32 - P4691 - Swan St reconstruction - 1927 33 - P3640 - Victoria St part - 1926 (2 copies) 34 - P4522 - Wallen Road reconstruction - 1927 35 - P3939 - Wallen Road reconstruction in front of depot - 1927 36 - P4702 - Trial types of track - 1928 37 - P4254 - Wattletree Road reconstruction - 1927 38 - P4531 - Wattletree Road connection to Glenferrie Road - 1927 39 - P4708 - Wellington Rd siding - 1928Yields information about the various tramway track cross sections used by the MMTB including cable tram conversions.Folder - heavy card cloth covers fitted with two interscrews containing some 39 plus one duplicate folded blue prints. Covers made by Swinnerton Bros of Melbourne - see image 6 for their logo/trademark.Has "H Bell" in ink on rear cover.tramways, mmtb, tram tracks, rails, civil engineering, cable conversion, new tramways -
 Melbourne Tram Museum
Document - Folder, William Pollock, "The Melbourne Cable Tramway System", c1940
Folder - heavy red covers with two screw sets containing a photocopy of a report by William Pollock, prepared after the closure of the cable tram system titled ""The Melbourne Cable Tramway System". Image numbers listed: Folder – htd4715i1 Inside of folder – htd4715i2.jpg Report –Photocopy of a 14 foolscap sheets, paper titled “The Melbourne Cable Tramway System” by William Pollock, describing the system in detail, listing 26 appendices. Has notes on each Power Station, including a table of opening, closing, power produced and cables, fuel, permanent way (track), cables, underground gear, tunnels, flooding and the grip. Image – htd4714i3.pdf Appendix 1 – Handwritten table “Cost the Melbourne Tramway System” – photocopied special size sheet folded. See image htd4715i4.jpg 2 – Drawing – Typical Power House layout - image htd4715i5.jpg 3 – Drawing – Head of Cable Driver – htd4715i6.jpg 4 – Drawing – Rope Drive – htd4715i7.jpg 5 – Photocopy of a Fuel and Water test sheet for the Esplanade Power House – two sheets – 14/5/1918 – htd4715i8.jpg and htd4715i9.jpg 6 – Section of Cable Tram track – htd4715i10.jpg 7 – Tar Burner used by MTOC 1893 – 1900 - htd4715i11.jpg 8 – Yoke Bracket for line drums – A1 Pulley – htd4715i12.jpg 9 – Tunnel Yoke – htd4715i13.jpg 10 – Elevating Wheel or Pulley with shield plate – htd4715i14.jpg 11 – Curve Pulleys, curve drum and rubbing bar – 2 sheets – htd4715i15.jpg and htd4715i16.jpg 12 – Curve or Conical drum – htd4715i17.jpg 13 – Cable Separating pulley or cone line drum – htd4715i18.jpg 14 – Yoke Pulley or General Pulley – htd4715i19.jpg 15 – Yoke Bracket for Drums – htd4715i20.jpg 16 – Automatic Switch Gear – htd4715i21.jpg 17 – Hand operated switch gear – htd4715i22.jpg 18 – Hand pickup – htd4715i23.jpg 19 & 20 – Photo of bunched strands and damaged cable – htd4715i24 21 – Diagram of Rope – Clarendon St Rope No. 41 – htd4715i25.jpg 22 – Strand Alarm – htd4715i26.jpg 23 – Rope History – two sheets – htd4715i27 and htd4715i28.jpg 24 – Rope Splice – htd4715i29.jpg 25 – Cable Grip – htd4715i30.jpg 26 – Crown Pulley – two sheets – htd4715i30 and htd4715i31trams, tramways, drawings, tramcars, cable trams, trackwork, mto co, reports -
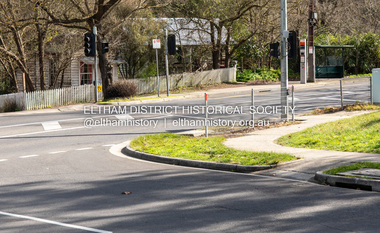
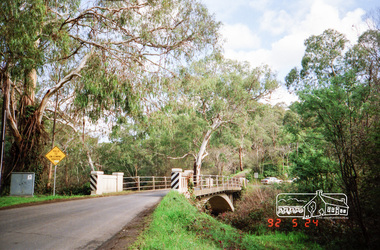
 Eltham District Historical Society Inc
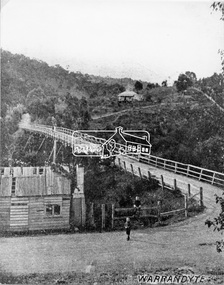
Negative - Photograph, Warrandyte Bridge over River Yarra, c.1910
View of the 1875 timber trestle bridge over the Yarra River reproduced from a newsprint image. Also known as Anderson's Creek (Road) Bridge A contract was accepted for William Elliot to erect a bridge over the Yarra River at Warrandyte on Anderson's Creek Road and other improvements for £1,331.6.2 - Gazette No. 143. Tuesday, November 13th 1860 - http://gazette.slv.vic.gov.au/view.cgi?year=1860&class=general&page_num=2161&state=V&classNum=G143&id=). The bridge was washed away by floods in 1863. It was replaced with a taller timber trestle structure in October 1875, designed and built by C.S. Wingrove, Shire Clerk, Engineer and Surveyor for Eltham Shire Council. A replacement for this bridge was commenced in 1955 to cope with increasing traffic and this structure was widened in 2018 to meet further traffic demands. Argus (Melbourne, Vic. : 1848 - 1957), Thursday 23 September 1875, page 7 ________________________________________ THE WARRANDYTE BRIDGE. The ceremony of formally opening the newly erected bridge over the Yarra at Ander-son's Creek was performed on Monday last, in the presence of the members of the Eltham and Bulleen shire councils whose territories it joins, and a goodly number of the residents of the district. The task was delegated to Mr. Cameron, M.L.A., who, after a few introductory remarks declared the bridge to be opened, and christened it the " Warrandyte Bridge." The party then adjourned to Grant's Hotel, where a cold collation had been prepared. The chair was taken by the president of the Eltham shire (Mr. John Bell) and the vice chair by Mr. Kent, a member of the Bulleen council. Mr Robert Williamson proposed "Success to the bridge," coupling with it the name of Mr. Cameron, to whose exertions was in the main to be attributed the erection of that structure which was an ornament to the district and would prove of great service to both sides of the river. Mr. Cameron, in responding, alluded to the great difficulties, mainly of a pecuniary nature, that had been encountered in carrying out the project, and which had only been got over by their united efforts and by the liberal spirit in which the late Commissioner of Roads had dealt with the case. The healths of the contractor and the engineer were also drunk. The bridge is a trussed timber one, resting on yellow box piles sunk into the solid rock, each pier being weighted with 50 tons of stone. The abutments consist of dry stone walls, 6ft. thick at the base, and tapering to 3ft. on the top, the face of the work having a batter of 1 to 1. The length of the bridge is 308ft., there being four openings in the centre of 66ft. each, and two at the ends of 20ft. each. The width in the clear is 9½ft., and the height from the bed of the river about 33ft. The approaches comprise 1,100 cubic yards of earthwork, and the formation of 48 chains of sideling, the whole cost of the work, which was carried out under the direction of the engineer to the Eltham Shire Council, being £1,413.This photo forms part of a collection of photographs gathered by the Shire of Eltham for their centenary project book,"Pioneers and Painters: 100 years of the Shire of Eltham" by Alan Marshall (1971). The collection of over 500 images is held in partnership between Eltham District Historical Society and Yarra Plenty Regional Library (Eltham Library) and is now formally known as the 'The Shire of Eltham Pioneers Photograph Collection.' It is significant in being the first community sourced collection representing the places and people of the Shire's first one hundred years.Digital image 4 x 5 inch B&W Neg B&W Print 12.5 x 9 cmsepp, shire of eltham pioneers photograph collection, warrandyte, bridge -
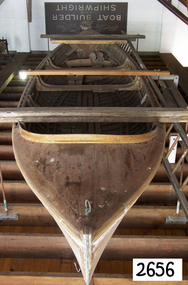 Flagstaff Hill Maritime Museum and Village
Vehicle - Vessel, Surf Boat, 1949
In 1952 the subject surf boat crewed by Geoff Scott, Ron Blackney, Wes McLaren, Jim Tibb, and Stan Stephens, won the Victorian Surf Boat Championships. When the club had finished with the boat Mr. Harold Stephenson paid one shilling and it eventually found its way into a garage where it remained for over 20 years before being donated to Flagstaff Hill. This boat is regarded as a unique example of craftsmanship, closely resembling Bay whaleboats used around the Warrnambool area in the 1800s. This timber caravel surf boat was named “Aeroplane Jelly” and was built by N & E Towns a Newcastle boat builder in 1949 Aeroplane Jellies and David Jones as sponsors of the Sydney Surf Carnival of 1950/1951 donated jointly the vessel. George Towns started his boat-building business in 1869 on Dempsey Island on the Hunter River, NSW. George's sons took over the business as N & E Towns (Norman and Eldrid) and continued until the early 1950s. The business made a variety of small craft including fishing boats, launches, and flood boats. In 1928 they built their first surf boat it took about six weeks to build with cedar planks and hardwood frames. After World War II surf boats became their main focus and they became well known for the lighter and faster designs. Many “Towns built” craft have won events at state and national surf championships. They were renowned Boat Builders producing a much lighter and faster running boat than anything previously made, with a buoyant type bow design giving it the lift necessary to get out and through heavy surf. while its sleek lines from amidships aft provided very fast running qualities. Either side of its bows, it bore the bright silver aircraft transfer of the Aeroplane Jellies Company. After a surf competition at Narrabeen NSW, the competing Warrnambool surf lifesaving team returned home to Warrnambool their club committee decided to purchase the "Aeroplane Jellies" Surf boat if and when it became available as the team had been so impressed with the boat. On 30 October 1951 a cheque for £207-2/6' was raised, £180 for the boat, balance for oars. Transport was arranged and the boat was delivered in November 1951. When the "Aeroplane Jellies" competition days were over in the early 1960's due largely to changing surf boat design, Warrnambool Club's Secretary, Mr. Harold Stephenson, sought permission from the Committee to purchase the boat for the nominal sum of one shilling thus preserving the vessel for posterity. The boat had been stored for many years at the Nullawarre Bakery where it remained until Mr. Stephenson died in 1985. After Mr. Stephenson's passing his family donated the vessel to Flagstaff Hill Maritime Museum in 1986.A very rare example of a surf lifesaving boat that for its time was a unique creation that revolutionised small vessel design in Australia. It was made by a renowned maker that today unfortunately many of his examples of boats he made, especially surf life-saving boats no longer exist making the Flagstaff Hill boat very significant to not only surf lifesaving history but to the part it played in our social life for all those who went to the beaches in 1960s Australia.Surf boat named "Aeroplane Jellies". Timber, double ender carvel, built in 1949 by N & E Towns, Newcastle, NSW. Only a few are in existence. She was a trophy prize at Sydney Surf Carnival 1950/1951, donated by Aeroplane Jellies and David Jones Dept. Store, Sydney. The boat was won by South Narrabeen Surf Club. Warrnambool Surf Club purchased her on 30/10/1951 for £207-2/6, and she was sold to Harold Stephenson in early 1960's for 1 shilling. Donated to Flagstaff Hill by the family of Harold Stephenson around 1985-1986. The name Aeroplane Jellies was lettered in gold across the boat's coaming and there is a remnant of some of the gold lettering still there.warrnambool, flagstaff hillflagstaff hill maritime museum, great ocean road, ememgency, historic boat, surf boat, n & e towns, carvel, vintage boat, double ender boat, lifesaving boat, geoff scott, south narrabeen surf club, warrnambool surf life saving club, lifeboat -
 Wodonga & District Historical Society Inc
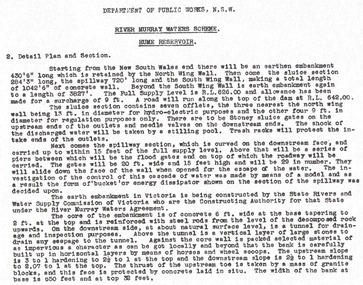
Album - Hume Reservoir Australia Album - Detail plan and explanation, Department of Public Works, N.S.W, 1927
This set of photos is from a leather bound album bearing the inscription "HUME RESERVOIR AUSTRALIA" plus 'The Rt. Hon. L. C. M. S. Amery, P. C., M .P.' all inscribed in gold. It was presented to The Rt. Hon. L. C. M. S. Amery, P. C., M. P, Secretary of State for Dominion Affairs on the occasion of his visit to the Hume Reservoir on 2nd November 1927. This album is of local and national significance as it documents the planning and development of the Hume Reservoir up to 1927. It was the largest water reservoir in the British Empire. The album records the pioneering engineering work that went into its construction.2. Detail Plan and Section. Starting from the New South Wales and there will be an earthen embankment 430 feet 6 inches long which is retained by the North Wing Wall. Then come the sluice section 284 feet 3 inches long, the spillway 720 feet long and the South Wing Wall, making a total length of 1,042 feet 6 inches of concrete wall. Beyond the South Wing Wall is earth embankment again to a length of 3,827 feet. The Full Supply Level is R.L.626.00 and allowance has been made for a surcharge of 9 feet. A road will run along the top of the dam at R.L.642.00. The sluice section contains seven offlets, the three nearest the north wing wall being 13 feet in diameter for hydro-electric purposes and the other four 9 feet in diameter for regulation purposes only. There are to be stony sluice gates on the upstream ends of the outlets and needle valves on the downstream ends. The shock of the discharged water will be taken by a stilling pool. Trash racks will protect the intake ends of the outlets. Next comes the spillway section, which is curved on the downstream face, and carried up to within 15 feet of the full supply level. Above that will be a series of piers between which will be the flood gates and on top of which the roadway will be carried. The gates will be 20 feet wide and 15 feet high and will be 29 in number. They will slide down the face of the wall when opened for the escape of the water. The investigation of the control of this cascade of water was made by means of a model and as a result the form of “bucket” or energy dissipater shown on the section of the spillway was decided upon. The earth embankment in Victoria is being constructed by the State Rivers and Water Supply Commission of Victoria who are the Constructing Authority for that State under the River Murray Waters Agreement. The core of the embankment is of concrete 6 feet wide at the base tapering to 2 feet at the top end and is reinforced with steel rods from the level of the decomposed rock upwards. On the downstream side, at about natural surface level, is a tunnel for drainage and inspection purposes. Above the tunnel is a vertical layer of large stones to drain any seepage to the tunnel. Against the core wall is packed selected material of as impervious a character as can be got locally and beyond that the bank is carefully built up in horizontal layers by means of horses and wheel scoops. The upstream slope is 3-to-1 hardening to 2½-to-1 at the top and the downstream slope is 2½-to-1 hardening to 2.07-to-1 at the top. The thrust of the upstream toe is taken by a mass of granite blocks, and this face is protected by concrete laid in situ. The width of the bank at base is 650 feet and at top 32 feet.hume reservoir australia, river murray waters scheme, hume weir diagrams, hume plan details -
 Eltham District Historical Society Inc
Photograph (Item) - Print, Elizabeth Simkin, Craft Galore, 1988
Riverclay Craft Gallery, 573 Main Road, Eltham Riverclay was loacted along with Ansell and Muirs Chicken shop opposite El;tham Lower Park. The building has since been demolished as it lay within the 1934 flood plain limits. Elizabeth Simkin 1988 Entrant No. 149 Ref: Series 34, Items 39, 111-113 SHIRE OF ELTHAM COMMUNITY PHOTOGRAPHIC SURVEY Photography is an artform which many of us practice, sometimes purely for artistic pursuit, sometimes to record the people and events in our lives. In 1988, as part of a local Bicentennial project, the Shire of Eltham conducted the Eltham Community Photographic Survey. Up to 100 entries were to be selected by a panel of photographers for entry into the Eltham Photographic Survey Exhibition. Entries had to be submitted by May 13, 1988. Entrants whose images were selected for the exhibition were contacted and requested to further submit an entry form providing entrant’s name, area of residence, age, and proposed captions. These details were then used to produce labels for the exhibition mounts. Where negatives had not been supplied, these were requested to support the display of printed enlargements mounted on 10” x 8” cardboard. The mounted prints were made available post exhibition for sale at $8.50 each for colour prints and $7.00 for B&W prints. Residents in the Shire were invited to collect a free roll of film and take a photograph of what they either liked or did not like about the area. A total of 160 entrants submitted multiple entries for the exhibition. Of those selected for exhibition, entrants ranged in age from 9 to 70 years. All custom colour and black and white printing for the exhibition was completed by Wattle Studios of Eltham. The Eltham Photographic Survey was jointly auspiced by the Shire of Eltham and Wattle Studios, of 953 Main Road, Eltham. The project was greatly assisted by: • David McRitchie, Media Studies Lecturer Victoria College, Rusden Campus. • Ian and Annette Toohill of Wattle Studios • Tracy Naughton, Eltham Community Arts Officer • Neville Emerson Pty. Ltd. • Superior Press, Eltham • Kodak Australasia Pty. Ltd. • Agfa Gevaert Ltd. • Townsend Colourtech Pty. Ltd. • The Australian Bicentennial Authority • Eleanor Bowers, Secretary, Eltham Arts Council The exhibition was placed on display in the Woolworths Arcade, Eltham between Monday June 6th and Saturday June 11, 1988. It was also intended to hold the exhibition at a venue in the Shire’s North Riding from Monday, June 20 to Friday June 24. It was then displayed at the Were Street Theatre, Montmorency from Friday, June 24 to Thursday, July 7. Series 34: Eltham Community Photographic Survey 1988 - Prints & Documentation Series consists of 117 photographs of Shire scenes taken by members of the community. Items I - 41 are larger photographs mounted on card, which were exhibited. Items 42 - 117 are unmounted copies, alternative takes and other entries. Corresponding negatives contained in Series 35: Eltham Community Photographic Survey 1988 – Negatives which consists of 267 colour and B&W negatives and one colour slide of Shire scenes taken by members of the community. The negatives are arranged by the entrant number of the photographer. The Eltham Community Photographic Survey collection is significant to the local community as it was curated by the local community - ordinary people of all ages - representing what they liked and did not like in the area where they lived. It represents an unfiltered representation of the Shire of Eltham as it was in 1988. It also represents one of many projects as part of the national programme of events and celebrations to commemorate the bicentenary. It is a time capsule of life in the 1980s of this urban and rural municipality in Melbourne's north. Front: Entrant No. and name on printed label Rear: Entrant No., name and address on printed label; also 'Series 34' and the 'Item No.' in pencilshire of eltham archives, bicentennial project, eltham, eltham community photographic survey, eltham photographic survey exhibition, series 34, series 35, elizabeth simkin, film - kodak ga 100 5095, riverclay craft gallery, scan - 35mm negative -
 Eltham District Historical Society Inc
Photograph, Fay Bridge, Former Glynn's Dairy Farm, Glynns Road, North Warrandyte, 31 August 2018
Glynn’s farm Originally Section 7, Parish of Nillumbik marked Aborigine Reserve in 1866 Crown Allotment 8, Section 7, Parish of Nillumbik, County of Evelyn, Certificate of Title Volume 4095, Folio 818.835, approx. 93 acres purchased by Joseph Panton in 1881 for £1/acre and known as Panton’s Point. By 1924 owned by S.S. Sergeant and called Riverswood. Sergeant commissioned Edna Walling to design the garden. In September 1929 the property was sold at auction by Mortgagee’s sale. Described as well built, brick, tile roof, Attic Villa containing downstairs 7 good rooms, bath, scullery, inside lavatory, etc. Upstairs 2 bedrooms and sleep out. Outbuildings compromising of brick and weatherboard wash house, stables, workshop, feed room, cow bails, large G.I. Hay shed, etc In January 1931 Riverswood property was proclaimed a sanctuary for native game for the entire year. A private swing bridge crossed the river at Pound Bend was known as Pearson’s bridge after C.W.K. Pearson who bought Riverswood in the early 1930s. The bridge was swept away in the December 1934 floods. Riverswood was sold by C.W.K. Pearson at auction on 25 November 1936. Described as a beautiful farm home of 93 acres and over one mile of River Yarra frontage, modern brick residence, lovely garden, rich river flat pastures, model poultry farm. The fine brick home was destroyed on Black Friday (13 Jan.) 1939. It was still a ruin when the Evelyn Evans purchased Waikowhane above Riverswood in 1940. The Glynn family purchased the Riverswood property in 1941 from Robert and Emily Hannon. Their son Kenneth Patrick Glynn inherited the property and he set about clearing the land during WW2 selling wood. Prior to marriage, Kenneth was living alone on the farm in a house he had built from whatever was available. He used the bluestone foundations from the original fine brick home. He met and married Honora Elizabeth Drew in early 1945 and their daughter Anna grew up on the farm. It was compulsorily acquired by the Board of Works in 1976 who then rented the house out in the 1980s. The property was transferred to Melbourne Parks and Waterways in 1996. Waikowhane was a pretty timber house built on top of the hill on 50 acres above Riverswood by retired nurse Jessie MacBeth. (This would be at the intersection of Glynns Road and Overbank Road where the big water tank is now situated on what was once James Orford’s property.) It was also destroyed Black Friday and she rebuilt it from the plans living in a caravan on site supervising the build. It was almost complete when she died May 1939. The property was bought by Evelyn Evans (a city girl) and her estranged husband in 1940. She had two sons, one only 9 months old at the time. It was a timber house with no power or water connected. The Ewen Cameron family bought Waikowhane in 1957. They had to evacuate when the 1961 bushfires swept through. The house was saved by Matcham Skipper. It was demolished by Melbourne Water in the 1990s when they acquired it.fay bridge collection, 2018-08-31, glynn's, glynn's dairy farm, glynns road, north warrandyte, parks victoria, ruins, riverswood, kenneth patrick glynn -
 Eltham District Historical Society Inc
Photograph (Item) - Negative, Elizabeth Simkin, Riverclay Craft Gallery, 573 Main Road, Eltham, 1988
Riverclay was located along with Ansell and Muirs Chicken shop opposite El;tham Lower Park. The building has since been demolished as it lay within the 1934 flood plain limits. Elizabeth Simkin 1988 Entrant No. 149 Ref: Series 34, Items 39, 111-113 The images in this record were not selected for inclusion. SHIRE OF ELTHAM COMMUNITY PHOTOGRAPHIC SURVEY Photography is an artform which many of us practice, sometimes purely for artistic pursuit, sometimes to record the people and events in our lives. In 1988, as part of a local Bicentennial project, the Shire of Eltham conducted the Eltham Community Photographic Survey. Up to 100 entries were to be selected by a panel of photographers for entry into the Eltham Photographic Survey Exhibition. Entries had to be submitted by May 13, 1988. Entrants whose images were selected for the exhibition were contacted and requested to further submit an entry form providing entrant’s name, area of residence, age, and proposed captions. These details were then used to produce labels for the exhibition mounts. Where negatives had not been supplied, these were requested to support the display of printed enlargements mounted on 10” x 8” cardboard. The mounted prints were made available post exhibition for sale at $8.50 each for colour prints and $7.00 for B&W prints. Residents in the Shire were invited to collect a free roll of film and take a photograph of what they either liked or did not like about the area. A total of 160 entrants submitted multiple entries for the exhibition. Of those selected for exhibition, entrants ranged in age from 9 to 70 years. All custom colour and black and white printing for the exhibition was completed by Wattle Studios of Eltham. The Eltham Photographic Survey was jointly auspiced by the Shire of Eltham and Wattle Studios, of 953 Main Road, Eltham. The project was greatly assisted by: • David McRitchie, Media Studies Lecturer Victoria College, Rusden Campus. • Ian and Annette Toohill of Wattle Studios • Tracy Naughton, Eltham Community Arts Officer • Neville Emerson Pty. Ltd. • Superior Press, Eltham • Kodak Australasia Pty. Ltd. • Agfa Gevaert Ltd. • Townsend Colourtech Pty. Ltd. • The Australian Bicentennial Authority • Eleanor Bowers, Secretary, Eltham Arts Council The exhibition was placed on display in the Woolworths Arcade, Eltham between Monday June 6th and Saturday June 11, 1988. It was also intended to hold the exhibition at a venue in the Shire’s North Riding from Monday, June 20 to Friday June 24. It was then displayed at the Were Street Theatre, Montmorency from Friday, June 24 to Thursday, July 7. Series 34: Eltham Community Photographic Survey 1988 - Prints & Documentation Series consists of 117 photographs of Shire scenes taken by members of the community. Items I - 41 are larger photographs mounted on card, which were exhibited. Items 42 - 117 are unmounted copies, alternative takes and other entries. Corresponding negatives contained in Series 35: Eltham Community Photographic Survey 1988 – Negatives which coThe Eltham Community Photographic Survey collection is significant to the local community as it was curated by the local community - ordinary people of all ages - representing what they liked and did not like in the area where they lived. It represents an unfiltered representation of the Shire of Eltham as it was in 1988. It also represents one of many projects as part of the national programme of events and celebrations to commemorate the bicentenary. It is a time capsule of life in the 1980s of this urban and rural municipality in Melbourne's north. shire of eltham archives, bicentennial project, eltham community photographic survey, film - kodak ga 100 5095, elizabeth simkin, eltham, scan - 35mm negative, series 35, cane baskets, riverclay craft gallery -
 Eltham District Historical Society Inc
Photograph, Monash Bridge, Arthurs Creek Road, Hurstbridge, Eltham Heritage Tour, 24 May 1992, 24/05/1992
ELTHAM HERITAGE TOUR The Society excursion on 24th May 1992 was arranged by David Bick, leader of the team carrying out the Shire's heritage study. David selected a number of sites or buildings identified in the study, some of them lesser known components of the Shire's heritage. The tour commenced at the Eltham Shire Office at 10.00 am. Travel was by private car and mini-bus with stops at about twelve locations for commentary by David.It included a short walk in Hurstbridge and lunch at Kinglake. Highlights of the tour included: - 10 am Leave from Shire Offices - 3 Important Trees - A Physical Link to Eltham's First Settlers - Toorak Mansion Gates - A Surviving Farm House - An Intact Circa 1900 Main Street - First Settlers - Gold Miners, and Timber-getters - An Early Hotel - A Pioneering Homestead - Changing Eltham Shire - 20th Century - 4 pm Afternoon Tea and Finish Tour Extract from ELTHAM CULTURAL HERITAGE TOUR (Newsletter No. 85, July 1992, by Bettina Woodburn) "On the Arthurs Creek Road is a bridge designed by Monash, which we admired before walking across the little park with a mud-brick and timber shelter, to the Hurst family graveyard. There are two marked graves, one, Henry who was shot by Burke the bushranger and a cairn has a plaque listing others buried here from 1866 onwards. Burke was captured and tied to the wheel of a dray under the eucalypt near the waterhose/standpipe. Close by the kindergarten, at this place are three trees on the National Trust Register, a Canary Island pine, a Canadian cedar and probably a spruce. Radiata pines and a thick bolled peppercorn surround the little cemetery. Continuing along Main Street we notice elm trees planted as a war memorial, then on the left a 1930 timber house, a 1910 store and residence, resplendent with wrought iron trim, a double fronted Hardware Store and cypresses on the back alignment of a new vacant block. On the right side of the street is a less interesting attempt at an 'in character' shop. Further on are more early homes, one tucked away at the rear with two tall palms by the front steps. Another curiosity is a rounded veranda corner and there are more galvanised iron sheds or garages, before a mud-brick Dentist's Surgery. Beyond the round-a-about is St Peters Church, of mud-brick construction shared by Catholic and Anglican parishioners, overlooking the river flood plain. Leaving Hurstbridge on the Kinglake Road, we ate our picnic lunch beside the communication tower and enjoyed views of Melbourne, Yan Yean Reservoir and the distant Dandenongs beyond the spreading suburbs. Next we drove to the North West boundary of the Shire at Masons Falls Road towards Whittlesea. On the way to the North East Boundary we passed St Peters, a yellow wooden Church with a Tudor Archway; built in the early 1920's in the style of the 1860's. From the Healesville-Kinglake road the rolling hills had European aspects, the hedged fields and chestnut trees. Then it was back down the Hurstbridge Road through 'Aussie' bush of towering gums, with bracken and scrubby understorey, the Kinglake National Park, before more open country with deciduous trees planted in line, and a creek lined with willows."Record of the Society's history and activities and highlighting various aspects of the Heritage Study undertaken by David Bick used to create the future heritage overlay for the Shire of Eltham and later Nillumbik Shire.Roll of 35mm colour negative film, 4 stripsKodak Gold 100 5095shire of eltham historical society, activities, heritage tour, hurstbridge, monash bridge, arthurs creek road -
 Ballarat Heritage Services
Photograph - Photograph - Colour, Clare Gervasoni, Nimon's Bridge, 1999, 04/10/1999
Nimons Bridge was built in 1890, as part of the then Ballarat-Linton railway. The bridge is 17 spans with tall timber piers of four driven piles each, with triple sets of diagonal cross-bracing and walers and a single row of longitudinal horizontal bracing between piers. The spans are of a uniform twenty feet (6.1 metres), originally supported by four 21-inch x 9-inch (535 mm x 230 mm) Kauri timber beams per span, following the standard V.R. design of the period. When the superstructure was rebuilt after the 1953 fire, the timber beams were replaced with two 24-inch (610mm) deep rolled-steel-joists on each span. These are marked 'Lancashire Steel Co., Scotland' and are believed to have been second-hand. The deck of transverse-timber planks is 103.6 metres in length. Overall the bridge has an impressive appearance with its exceptionally tall triple-cross-braced piers creating a 'three-tiered' effect, with the deck 19.2 metres above the Woady Yaloak River. The Ballarat-Skipton line closed in 1985. Nimons Bridge has been recently restored, as part of the Ballarat-Skipton Rail Trail. How is it significant? Nimons Bridge is significant for technical, historic and aesthetic reasons at a State level. Why is it significant? Nimons Bridge is technically significant as Victoria's fourth-tallest timber trestle bridge when built, and as the third-tallest surviving example. It is also the second-largest composite bridge combining traditional timber piers with RSJ spans and a timber deck and falls within a select group of fewer than ten timber railway bridges with horizontal longitudinal bracing between the piers and three sets of double cross-bracing on its tallest piers, creating a visually striking 'three tiered' effect that enhances its viaduct form. Nimons Bridge is historically significant as having served initially the mining community at Linton, then the Western District agricultural area and in later years a kaolin quarry at Pittong. Nimons Bridge is historically significant as a representative of the 'light' branch line methodology that stimulated the explosion of railway construction in Victoria during the 1880s, and provides an interesting contrast with the more solid and vastly more expensive railway viaducts built in similar terrain on Victorian main lines, at Moorabool and Taradale, in the late 1850s. Approached by a deep cutting and high embankment at either end, the bridge represents a very cost-effective late 19th century engineering solution to the characteristic physiography of western Victoria with flat basalt plains intersected by deep wide valleys occasionally subject to severe flooding. Nimons Bridge is aesthetically significant for its visually impressive viaduct form, crossing a deep and steep-sided valley that is part of a rich cultural landscape. Within close proximity of the bridge are mullock dumps, tailings, shaft sites and other relics of the deep-lead alluvial mining era. The bridge is the most visually spectacular timber-trestle rail bridge in Western Victoria and is among the most spectacular timber-trestle rail bridges surviving anywhere in Victoria. It is part of the Ballarat-Skipton Rail Trail. Classified by the National Trust :02/10/2000 (http://vhd.heritagecouncil.vic.gov.au/places/67986)Colour photograph of a log bridge known as Nimon's Bridge.ballarat-linton, nimons bridge, nimon's bridge, log bridge, viaduct, timber-trestle rail bridge -
 Glen Eira Historical Society
Document - GARDENVALE
... Floods ...This file contains two items about Gardenvale, which was previously all part of Caulfield: 1/Photocopied eight page document by M. Stewart, 1961, entitled ‘The Gardenvale Story’. It describes Gardenvale Railway and surrounding roads and land. Lempriere’s Paddock, rail tracks on the main roads for the use of market gardeners’ wagons. Sale of land for O’Neill College Estate and construction of a subway through the railway embankment to Gardenvale Shopping centre, including efforts by local people and the council for work to be completed and costs. Footnote is circa 1977. 2/Map of Glen Eira printed from Council website 20/06/2014 showing Glen Eira’s share of Gardenvale.gardenvale, bent thomas, brighton, caulfield, elsternwick, railway stations, lempriere family, ‘bentville’, lempriere’s paddock, market gardens, nepean highway, nepean road, north road, kooyong road, polo, sheridan family, bluestone houses, bethlehem hospital, land subdivision, begonia street, gardenia road, gardenia street, magnolia street, lantana street, martin street, shops, ‘ben burb’, house names, padua hospital, brighton, o’neill miss, o’neill college, o’neill richard, o’neill estate, elster avenue, o’neill college estate, railway crescent, denver crescent, brentani avenue, college street, rosstown railway, brighton cemetery, ross mr, hawthorn road, ormond, gardenvale progress association, elster creek, parliamentary representatives, landscapes, gardenvale road, railway lines, subways, traders association, drainage, floods -
University of Melbourne, Burnley Campus Archives
Album - Black and white and colour slides, Teaching Horticulture, 1952-1969
Large collection of slides used for teaching Horticulture. Difficult to identify whether they were taken at Burnley. Labelled and numbered 1-2501. Some dated but spread over 1950's to 1960's. Also 57 slides similar to 1-50 labelled but not numbered. Some photographs have been catalogued elsewhere. Missing numbers have been mixed up with other photographs. 1-50 Mostly fungal diseases. 57 slides not numbered - fungal diseases. 1-29 Mostly mosses. 31-41 Mostly liverworts and hornworts. 43-60 Ferns. 61-73 selaginella. 75-84 Ferns 85-114 Gymnosperms 115-1236 Miscellaneous 117-141 Angiosperms 142-294 Biology 296-307 Orchidaceae 311-316 Acacias 796-841 Trees 866-889 Roses 955-984 Eucalyptus 1009-1046 Greenhouse. 1052-1086, 1097-1152 Propagating fruit trees. 1087-1090 Cacti. 1151-1187 Planting and pruning principles. 1196-1218 Orchard, Nursery. 1211 June 1956. 1215 8/3/57. 1228-1258 Orchard Management. 1263-1345 Crafting and reworking. 1346-1373 Bulk handling. 1390-1400 Leaf scorch. 1424-1472 Vegetables.1473-1512 Potatoes, Research farm Toolangi 2/54. 1514-1686 Garden Design. 1688-1695 Cow Paddock, and in flood. 1958, Students. 1795-1798 P.R.I. 1823 Rolling the Surface (New Admin Building)1828-32.1831-1838 Beaumaris Feb 1958.1840-1846 P. Vejjajiva's Farewell 23.2.1958. Pruning Day 2/7/60. 1977-1990 Genetics. 1991-2018 Weeds. 2020-2-50 Erosion. 2023 10/65 and soil conservation. 2072-2136 Fertilizers. 2144-2149 Rhizobia 1950's. 2155-2157 Lime. 2160-2228 Plough, Cultivators, etc. 2246-2296 Tatura 12/59. 2301-2237 Beef and Dairy Cattle. 2338-2354 Sheep. 2355-2372 Crops. 2357-2363 1952. 2364 1958. 2373-2397 Fodder conservation 1952-1956. 2398-2411 Fences. 2398-2406 11/52. 2418-2248 Longerenong Field day 1964. 2451-2455 Boom Sprayer 1960. Glasshouse Wagga Agric College Oct 69. Apr 84 M3 16-18 Cultivator? 2458-2483 Hydraulics,Power Farming Dec 1966-Mar 1967. 2487-2488 Hydraulics Vane Pump Construction. 2491-2500 Mechanics. 2501 Rack Shaker. Extra 13 Pond life. Some slides see B18.0001: 1676, 1684, some between 1711-1792, 1881, some between 1911-1953.Not scanned yet.teaching, horticulture, greenhouse, propagation, pruning, cacti, planting, orchard nursery, orchard management, grafting and reworking, potatoes, toolangi, garden design, lagoon paddock, beaumaris excursion, p.vejjajiva, lagoon paddock in flood, fungal diseases, genetics, weeds, erosion, fertilizers, rhyzobia, lime, cultivation, tatura, cattle, sheep, crops, fodder, fences, hydraulics, mechanics, longerenong, cow paddock, plough, cultivator, boom sprayer, wagga agricultural college, vane pump -
 Melton City Libraries
Photograph, Mrs Knox and Beryl Gillespie at the First Hundred Years Celebration of Melton State School 430, 1970
Beryl Knox speaking about early life in Melton. Page 1 1949 – 64 years ago. We began our married life at Melton Sth. The house on the corner of the Exford Rd and Staughton St-- dusty gravel roads, box thorns and noxious weeds everywhere and a sprinkling of houses and vacant land. It was a friendly community consisting of old family names. McDonalds, Blacks, Dodemaide, Cahill, Coopers, Minns, Tinklers, Nesbitts, Cochranes, Wickhams, Exells. Mavis Butler. The home owned by Mr. Robinson and Miss Robinson had been shifted in two parts transported from Diggers Rest and it is still standing 2013. Bruce’s father purchased the house and two adjoining blocks, the Conways built on one and the Rawlinson family on the other block. Eileen still resides there, she was only a baby in a pram and the family had not long arrived from England. The railway line was close to the house and the contents would rattle when heavy steams trains went through, and on a clear frosty night the 1am paper train would echo roar through very loudly when labouring towards the Exford Bridge. Then the two carriage motor train was introduced, this was great for the workers and schoolies who travelled to Melbourne. The train pulled up at the crossing or riding to pick up or drop off. Melva Gillespie (nee Hirt) Bill Cahill delivered the milk by the billy and then in bottles. Len Kennedy (Paul Kennedy’s father, Norma Murrays son) delivered Jongebloeds bread, he always had a sweep going for the Melbourne Cup and raffles for the footy club. Mr. Woodgate owned an old bus and pick up point was the Post Office when there was a Saturday film on a Melton. There were no doctors or dentists in the district. If we need a Doctor we had to travel to Bacchus Marsh or discuss problems over the phone. In later years a Bacchus Marsh Doctor rented the Bluestone building in McKenzie St a couple of days a week. If we needed the Dentist we had to travel to West Footscray or Footscray. We did our banking at “State Savings” then the Miss Minns had the agency and then Bardsleys Store. We travelled to Bacchus Marsh to the National and Commercial banks. Station Rd to Western Highway, now (High Street) was a narrow stretch of bitumen and gravel farmland either side and a couple of farm houses and large gum trees on the properties. Page 2 North of the Railway line Mrs Bessie Jones, mother of Chas and Betty Jones managed the Post Office, next door to her Chas and Betty had the Shell Centre, and later moved the business to Melton. Hughie Nesbitt and mother owned the grocery and hardware store, and I bought my first set of saucepans there. On the opposite side of Station road Mr Coombe owned the fruit shop, and also provided soft drinks and lollies for children. The Chaff Mill was on the corner of Station Rd and Brooklyn Rd. Mr Lumsden was manager and later years Bernie Trethowan and Jack Butler were partners. It finally burnt down and is a Service Station now. Along Brooklyn Rd there were a few houses and Victoria Hall, not a very big hall, but catered for lots of functions, Balls, Fancy Dress, Bazaars, Square Dancing and meetings. The Bacchus Marsh Baptists held Sunday School in the hall. A group of shops were built south of the railway line Molly and Len Skinner managed the Post Office and handled a few essential groceries. Tom McDonald and Ron Lunsberg were the butchers. Mary and Syd Cooper lived next door to us and often in turn would run out of something when we had a baking spree we would borrow or exchange, sugar flour etc over the fence. Mavis and Jack Butler lived there before the Coopers. Bernie and Iris Trethowan lived two doors up. Neighbours were invited into their home to view the first black and white television in Melton Sth. Bill Exell was one of the first Melton Sth farmers to sell his land to developers, the land was idle for years before housing developed. I joined the Melton Valley Golf Club in 1960. The Gun Club as our Club House, an old tin shed consisting a water tank, trestle table and forms and dirt floor. It was a 9 hole course with sand scraps and landscape putting before greens. The Common or parkland was part of the Golf Course. It was open for every ones recreation. Roy Norton an old identity trained his trotters on the Common and wouldn’t clear the track for the golfers. The golfers had to avoid him to continue to play. We had to keep clear when the young youths came in their paddock cars and motorbikes. Over the years the Toolern Creek flooded its banks, water and debri covered the course on one year our first Club house was flooded out. It took several working bees to clean it up. We lived at Melton Sth for 15 years and moved to Melton on the farm “Croxton Park.” The Nixon family farm “Mowbray” adjoined the farm. Bruce worked the land cropping the farm when Mrs Nixon died. Page 3 (page 4 on the handwritten script) Bruce had the first offer to buy, in those days it wasn’t easy to get good bank loans. Part of the land is the Golf Course now and Mr O’Shea purchased the bulk. Moving to Melton was totally different – I became involved with Committees, Scouts, Guides, Mothers Clubs, CWA, Church Op shop (8 years). Melton Amateurs players produced and tutored by Mabel Rogers exerts from Pyjama Game, South Pacific, Carousel - later years a group of ladies did gentle water exercise at Essendon and Station Road swimming pool. I was 20 or so years in Probus. The local followed the football, there was always a Gymkhana on the long weekend in June. The tennis always created a lot of interest during the finals. It didn’t matter which team played the supporters were treated to a cup of tea and leftovers from their afternoon tea. In 1978 were the first residents to move into the Jennings Estate Kurunjang and lived there 31 years and retired 4 years ago into Unit. The amazing changes I have experienced. Merrimu supplied our water, after depending on tanks. The landscape changed completely when developers came in, no more dusty plains \ typed web Sept 2013 McFarlane, Mrs Knox and Beryl Gillespie at the First Hundred Years Celebration of Melton State School 430. The event was held at Mechanics Hall, Melton.local identities, local significant events, education -
 Wangaratta RSL Sub Branch
Honour Board, South Wangaratta School and District, circa 1919
The original South Wangaratta Primary School served the district for over 110 years and closed in December 1985 before moving to new premises. When the school closed in 1989 and with the demise of the South Wangaratta Hall due to flooding in the 1990's the Honour Board was wrapped in a blanket and stored in a shed for the best part of 10 years before being donated to the Wangaratta RSL for safekeeping and permanent display These listed men were either born, worked or enlisted at Wangaratta prior to serving their country in the First World War. Private William John LAW 1221 - 19 years - Born Murchison in Victoria. Occupation Carpenter Next of Kin - Father John Wilson LAW of Wangaratta Joined 2-3-1916 Enlisted at Wangaratta Unit 37th Battalion. Embarked Melbourne 3-6-1916 HMAT Persic A34 Discharged 21-9-1919. Private Joseph Henry LAW 986 - 21 years Born Euroa in Victoria Occupation Labourer Next of Kin - Mother Mrs Robert (Esther) LAW of Yatte Yattah - 18 NSW Joined 29-3-1915 Enlisted at Wangaratta Unit 24th Battalion. Embarked Melbourne 10-5-1915 HMAT Euripidies A14 Killed in Action 29-7-1916 France. Private Norman William FOSTER 7785 -18 1/2 years - Born Wangaratta Occupation Labourer Next of Kin - Sister Mrs William (Florence) McLean of Wangaratta Joined 15-7-1915 Enlisted at Melbourne Unit 54th Battalion Killed in Action 1-9-1918 France Private James Archibald McCORMICK 3195 - 19 years Born Wangaratta Occupation Engineer Next of Kin Father Samuel McCormick Enlisted Melbourne 27-7-1915 Embarked 26/11/1915 Unit 24th Battalion Killed in Action 5-8-1916 France Private Roland Caractacus HUGHES 3134(3131) - 20 years 5 months Born Wangaratta Occupation Blacksmith Next of Kin Father Roland W Hughes Joined 21-10-1915 Enlisted at Seymour 7th REIN 24th Battalion Embarked 26-11-1915 Wounded - GSW Leg and thigh RTA Discharged 11-10-1917 Private James Kelly O'CALLAGHAN 1250 - 22 years Born Mansfield Occupation Labourer Next of Kin Father John O'Callaghan Swanpool via Benalla Joined 6-3-1916 Enlisted at Wangaratta 37th/59th Battalions Embarked 3-6-1916 Wounded GSW Face and arm. RTA 30-1-1918 Discharged 2-7-1918 Private Samuel William DAVISON 6793 - 22 years 5 months Born Benalla Occupation Baker - Employer A Watson of Wangaratta Next of Kin Mother Mrs Ellen Tutty of South Wangaratta Enlisted Melbourne 3-1-1917 21/24th Battalions Embarked 11-5-1917 Wounded 9-8-1918 GSW Arm RTA 16-4-1920 (with wife) Discharged 26-7-1920 Private William Leslie HUNTER (Depot) 18 years 2 months Born Yan Yean Occupation Farmer/Labourer Next of Kin Father William James Hunter of Wangaratta Joined 18-2-1916 Enlisted Wangaratta 3-4-1916 Discharged at Seymour on 26-5-1916 Medically Unfit due to DiabetesThe honour board was made by John Wilson LAW and presented to the South Wangaratta School and District to honour the men who served in the First World War. John Wilson LAW was the father of two those who served.Timber Honour Board containing 48 names within two side columnsTop "School & District/Roll of Honour/South Wangaratta/For King & Country" Bottom 'The Great War/Presented by JW LAW. ESQ./1914 to 1919"south wangaratta, honour board, ww1 -
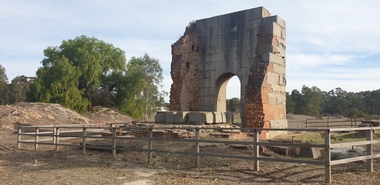 Ballarat Heritage Services
Photograph, Grand Duke Mine, Timor, Victoria, 04/05/2025
Running through this reserve was one of Victoria's richest gold deep leads. From 1869 to 1896 this mine produced 216,000 ounces of gold, valued at over £885,000. The Timor area was mainly mined by the Duke and Timor Gold Mining Company, later known as Duchess of Timor, Duke, and Grand Duke. On 03 May 1869, at a traditional afternoon ceremony, the machinery was started and launched by the old process of 'giving it a name'. A baptismal ceremony was performed, with a Miss Eliza Watson dashing a bottle of champagne over the fly wheel on its first revolution and proclaiming its name to be 'The Galatea'. The mine here was renowned for the massive pumping engine it boasted. Imported from England, the massive Cornish pump was an improvement that was added in 1874. It had a 30 ton iron beam. The mine was the economic centre of this area, employing hundreds of men over its 27 years. At the height of its operation the company's proprietors boasted that nearly all the inhabitants of the nearby towns of Timor and Bowenvale depended on the mine for support. There were some tumultuous times at the mine, with periods of financial strife as well as accidents. When the pumps broke down in 1879 the mine flooded and remained out of action for two years. Mining was a dangerous occupation and a tragic accident in December 1883 claimed the lives of four men. As the ground here was so wet, pumping water out of the mine was crucial to safely reach the gold. It was this pumping engine, reported to be the largest of its kind in Australia, and comparable in size to just two others in the world, that was the key to the success of the Grand Duke mine. Many other smaller nearby mines also had their water pumped out. During the last seven years of the mine's operation it pumped out 2,000 gallons of water every minute, making this the longest and most continuous wet mine in the state. As well as the pump house and engine, there were four main shafts, 12 Cornish flue boilers, eight iron puddling machines and one battery of 20 heads. A massive pumping engine The arch before you is all that remains of the pump house that served to remove water from this mine. When mining started at Timor in the late 1860s the ground here was very wet. If miners were to have any success in reaching the gold they had to remove the water from the ground. To deal with this challenge the company imported a massive Cornish pumping engine from England to pump water out of the mine. It was reputed to be one of the best pumping engines in the world at the time. The engine generated 270 horsepower and its iron beam, weighing 30 tons, was the largest in Victoria. The beam of the large pumping engine see-sawed on this pump house wall to move the plunger or bucket in the pump up and down. The vertical cylinder was 80 inches in diameter with a stroke of 10 feet. The piston itself was eight inches in diameter and 17 feet high and the piston pump had a diameter of 22 inches. For such large engines a massive wall to support the beam was necessary. The piston operated on the downstroke and consequently the cylinder had to be anchored to a considerable foundation to overcome the weight of the pump rods in the shaft. The whole apparatus had to be contained in a tall building because of its vertical configuration. The pumping engine's building has beam walls six feet wide and over 26 feet long which rest on foundations 16 feet deep. The granite used to construct the arch was quarried at Mt Hooghly, some eight or nine kilometres away.Colour photographs of the Grand Duke Mine at Timor near Maryborough, Victoria.grand duke mine, timor, maryborough, mining, duke and timor gold mining company, duchess of timor -
Bendigo Historical Society Inc.
Photograph - AUSTIN COLLECTION: Ray Beer, Central Deborah Gold Mine
Ray Beer was an employee of the Central Deborah Gold Mine. February 15th 2009: Bendigo Advertiser: 'MINING stalwart Raymond Beer has died at the age of 74 after a battle with cancer. He leaves behind an extended family and a legacy in Bendigo’s mining history. Ray was mine manager at the Central Deborah Gold Mine - appointed in 1978 - and led the team that made possible the underground project at the second level. He had a vision to allow visitors to go underground and experience Bendigo’s mining heritage first hand. Ray was responsible for developing the new battery, shaft and poppet head to make this a reality. It took persistence and lots of hard work. Friend and work colleague Bill McNamara said Ray was as good as 10 men. His enthusiasm and work ethic were unprecedented. Ray will be sadly missed by his wife, Thelma, six children, 15 grandchildren, seven brothers, three sisters, his extended family, and friends. He will be remembered for his kindness, tenacity and strength of character. In recognition of his contribution to Bendigo’s mining history, after more than 20 years of service at his retirement, a bronze life-sized statue was unveiled in his honour'. Central Deborah Gold Mine history: At its peak, Central Deborah Gold Mine reached a depth of 412 metres. It has 17 separate levels and 15 kilometres of drives and cross cuts (tunnels). The Central Deborah was very much a hands-on mine and the conditions that the miners worked in would be considered shocking by today's standards – being lowered underground in a cage with only two sides, often working ankle to knee deep in water, filling up to 32 ore trucks a shift by hand which were then pushed a mile or more along rails in the drives, working by carbide lamp, breathing in the fumes and rock dust and communication by bells. Geez, they were ironmen. However, at the time working conditions were considered to be among the best on the goldfields at Central Deborah, after all it was one of the only mines that had hot showers. Following Central Deborah Gold Mine's closure, the Bendigo skyline began to noticeably change. Obvious remnants of mining such as poppet heads, engine rooms, service quarters, battery houses and chimneys were steadily disappearing. After intense lobbying by the local community, the Bendigo City Council purchased the still very much intact Central Deborah Gold Mine in 1970 for a mere $6,000 to ensure that a vital link to Bendigo's historic golden past was maintained. The Bendigo Trust was then formed to oversee the operations of the Central Deborah Gold Mine, which led to the surface of the mine being opened to the public in 1971. Initially the surface was open for just 12 hours a week and as the demand for viewing a part of Bendigo's history increased, so did the opening hours. In 1974 the mine was gazetted as a Public Historical Purposes Reserve and attracted such visitors as H.R.H Prince Charles. By far the greatest shortcoming at this stage was that no one could view the underground workings, as these had become flooded. After what could only be described as a monumental effort by everyone involved, Level 2 of the mine was officially opened to the public by the Premier of Victoria, the Honourable John Cain, on 20 June 1986, which brought to fruition a long standing dream.Black and white photograph. Ray Beer, underground at Central Deborah Gold Mine, standing alongside wooden sign 'Murrell's Corner'. Sign is placed horizontally on timber supports; side of drive visible in background. Ray is wearing bib and brace overalls and hard hat with a belt around his waist. He is giving a 'thumbs up' sign. gold mining, central deborah gold mine, ray beer, mine manager -
Eltham District Historical Society Inc
Newspaper - Newsclipping, Nillumbik Mail, "A Memorial Avenue of Honour", A Journey in Time: A column about Nillumbik's history, Nillumbik Mail, 24 May 2000, p4, 2000
Main Road, Eltham, south from Brougham Street to Dalton Street, c.1911 View looking down Policeman’s Hill on Maria Street (Main Road) from near Brougham Street towards Dalton Street, site of the Avenue of Honour established in 1916-1917 in memory of the soldiers who served in the First World War, 1914-1918. At the bottom of the hill on the right is White Cloud Cottage, home of the Jarrold family, three women standing out front observing the photographer. The road passes over a culvert which runs to the west in front of the cottage. The cottage was originally located closer to the Diamond Creek but was subject to flooding. It was dragged by horse to the present site shown, which was chosen for the higher ground that had been created as a result of land fill being deposited here from the quarry further around the bend on Main Road (site of present-day Eltham Primary School carpark) where the stone had been quarried for building the State School in Dalton Street. Immediately at the end of the straight section of the main road can be seen the gas streetlamp in front of the Jarrold home and the pond at the bottom of Dalton Street. The cottage had previously been rented for use as a Police Station / residence prior to the building of the permanent police house and station at the corner of Maria and Brougham streets in 1859. At the time of collection of photos for the centenary of the Shire of Eltham (1971) the cottage was owned by the Skipper family and remains in the family to present day (2021). On the left is the Grant house on the corner of Main Road and Dalton Street now the present-day site of Eltham Clinic. Photographer: J.H. Clark John Henry Clark was the youngest of three boys born to William Henry Clark (1823-1877) and Maria White (1843-1914). He and his brothers, William Charles Clark (1872-1945), Clement Kent Clark (1874-1912) operated a photography business (Clark Bros.) from 25 Thomas Street, Windsor near Prahran during the period c.1894 to 1914. Following death of Clement in September 1912 and their mother in 1914, the Clark Bros business appears to have dissolved, the premises demolished, and a new house was under construction in 1915. John set up business independently in 1914 operating out of 29 Moor Street, Fitzroy where he is registered in the 1914 and 1915 Electoral Rolls. By 1916 John had relocated to Eltham where he continued his practice as a photographer and took many of the early images around the district of Little Eltham. Around 1930 John changed professions and opened a small cobbler's shop in 1931 near the pond opposite Dalton Street adjacent to the Jarrold family cottage. He never married and continued his profession as a bootmaker from this little shop, maintaining a close relationship with Mrs Jarrold for the rest of their lives. His bootmaker shop remains today beside the Whitecloud cottage and is one of only three remaining shops in the area from the early 20th century. There are a couple of images of Eltham taken by Clark Bros. in the Eltham District Historical Society collection, one such example being Hunniford’s Post Office with Miss Anne Hunniford out front (EDHS_00140 - marked on the back of the print, Clark Bros., 25 Thomas St. Windsor), which would date this image between c.1894 and 1914. Other early images of Eltham taken by John Henry Clark are marked on the face “J. H. Clark Photo” and it is assumed these are dated between 1914 and 1930. It is noted that the Grant of Probate for John H Clark of Eltham South dated 5 April !957 (513/387) records his occupation as "X Photographer".Newsprint pageNillumbik Mail publication details; Edition 4, 24 May 2000, p4dalton street, avenue of honour, eltham clinic, gas lamp, grant house, j.h. clark photo, jarrold cottage, jarrold family, main road, shire of eltham pioneers photograph collection, white cloud cottage -
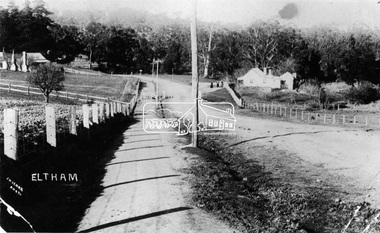 Eltham District Historical Society Inc
Negative - Photograph, J.H. Clark, Main Road, Eltham, south from Brougham Street to Dalton Street, c.1911
Main Road, Eltham, south from Brougham Street to Dalton Street, c.1911 View looking down Policeman’s Hill on Maria Street (Main Road) from near Brougham Street towards Dalton Street, site of the Avenue of Honour established in 1916-1917 in memory of the soldiers who served in the First World War, 1914-1918. At the bottom of the hill on the right is White Cloud Cottage, home of the Jarrold family, three women standing out front observing the photographer. The road passes over a culvert which runs to the west in front of the cottage. The cottage was originally located closer to the Diamond Creek but was subject to flooding. It was dragged by horse to the present site shown, which was chosen for the higher ground that had been created as a result of land fill being deposited here from the quarry further around the bend on Main Road (site of present-day Eltham Primary School carpark) where the stone had been quarried for building the State School in Dalton Street. Immediately at the end of the straight section of the main road can be seen the gas streetlamp in front of the Jarrold home and the pond at the bottom of Dalton Street. The cottage had previously been rented for use as a Police Station / residence prior to the building of the permanent police house and station at the corner of Maria and Brougham streets in 1859. At the time of collection of photos for the centenary of the Shire of Eltham (1971) the cottage was owned by the Skipper family and remains in the family to present day (2021). On the left is the Grant house on the corner of Main Road and Dalton Street now the present-day site of Eltham Clinic. Cross Ref: 0749 for another view of the Jarrold family home Photographer: J.H. Clark John Henry Clark was the youngest of three boys born to William Henry Clark (1823-1877) and Maria White (1843-1914). He and his brothers, William Charles Clark (1872-1945), Clement Kent Clark (1874-1912) operated a photography business (Clark Bros.) from 25 Thomas Street, Windsor near Prahran during the period c.1894 to 1914. Following death of Clement in September 1912 and their mother in 1914, the Clark Bros business appears to have dissolved, the premises demolished, and a new house was under construction in 1915. John set up business independently in 1914 operating out of 29 Moor Street, Fitzroy where he is registered in the 1914 and 1915 Electoral Rolls. By 1916 John had relocated to Eltham where he continued his practice as a photographer and took many of the early images around the district of Little Eltham. Around 1930 John changed professions and opened a small cobbler's shop in 1931 near the pond opposite Dalton Street adjacent to the Jarrold family cottage. He never married and continued his profession as a bootmaker from this little shop, maintaining a close relationship with Mrs Jarrold for the rest of their lives. His bootmaker shop remains today beside the Whitecloud cottage and is one of only three remaining shops in the area from the early 20th century. There are a couple of images of Eltham taken by Clark Bros. in the Eltham District Historical Society collection, one such example being Hunniford’s Post Office with Miss Anne Hunniford out front (EDHS_00140 - marked on the back of the print, Clark Bros., 25 Thomas St. Windsor), which would date this image between c.1894 and 1914. Other early images of Eltham taken by John Henry Clark are marked on the face “J. H. Clark Photo” and it is assumed these are dated between 1914 and 1930. It is noted that the Grant of Probate for John H Clark of Eltham South dated 5 April !957 (513/387) records his occupation as "X Photographer".This photo forms part of a collection of photographs gathered by the Shire of Eltham for their centenary project book,"Pioneers and Painters: 100 years of the Shire of Eltham" by Alan Marshall (1971). The collection of over 500 images is held in partnership between Eltham District Historical Society and Yarra Plenty Regional Library (Eltham Library) and is now formally known as the 'The Shire of Eltham Pioneers Photograph Collection.' It is significant in being the first community sourced collection representing the places and people of the Shire's first one hundred years.Digital image 4 x 5 inch B&W Negshire of eltham pioneers photograph collection, eltham, main road, jarrold family, dalton street, j.h. clark photo, white cloud cottage, avenue of honour, eltham clinic, gas lamp, grant house, jarrold cottage, 1900 -
 Eltham District Historical Society Inc
Photograph - Digital Photograph, Marguerite Marshall, Diamond Valley Railway, Eltham Lower Park, 7 September 2008
Kids of all ages enjoy the Miniature Railway. Published: Nillumbik Now and Then / Marguerite Marshall 2008; photographs Alan King with Marguerite Marshall.; p163 On Sundays in Eltham thousands of children, mums, dads and grandparents can be seen travelling around Lower Eltham Park in tiny trains. They are among the two and half million passengers who have travelled on the Diamond Valley Railway since it officially began in 1961. The miniature railway originally operated from the 1940s at Chelsworth Park, Ivanhoe, until flooding caused it to be moved to the Eltham Lower Park in 1959. The railway is modelled on the 1920s era – the heyday of passenger rail travel – and the trains are built on a scale of two inches to the foot (1/6). Although not exact replicas, trains include models of the Spirit of Progress, Puffing Billy, The Overland, Dog Boxes, Vic Rail S class, G class and a NSW 81 Class. The three and a half kilometres of track is set amongst native plants and picnic areas. A friendly hoot or the clang of a bell occasionally punctuates the tranquillity as a train emerges from a treed bend with passengers excitedly waving to onlookers. For $3 the train takes you on a 13-minute two-kilometre ride. Passengers sit in single file in the narrow train, which clatters along tracks built to the scale of the Australian narrow gauge of three feet six inches (1.1m). These are used in Queensland, South Australia, Tasmania and Western Australia. Safety standards are stringently kept. Even before you buy a ticket notices tell you that you must wear closed shoes. You can even borrow these, and you are given a pair of socks for the ride! Blue-overalled volunteers check tickets, see you aboard, and drive the train. They are mainly retired men who can at last devote their time to what little boys dream of – playing with trains. Passengers are instructed in safe behaviour, then the station master waves a white flag and off we go. The guard sits at the back with his whistle and green flag at the ready. The winding track, fringed by native trees and bushes planted by volunteers, stands on crown land managed by Nillumbik Council. The train clatters along the track and crosses a bridge over a drain elevated by name to The Blow Fly Creek. We pass by Meadmore Junction at a speed of three kilometres an hour. Then on through a tunnel, accompanied by squeals of delight, and after a few moments of blackness, light glimmers at the end. On we go, past the original platform, along another route past busy Main Road through Pine Creek Station, over a bridge and through another tunnel with more screams of delight.Then a signal stops us before the ‘all clear’ to return to our original point of departure. The railway services its passengers – the largest number of any miniature railway in Australia – with a fleet including: six diesel locomotives, three steam locomotives, eight sets of passenger cars and one battery electric Dog Box set. Members also privately own 20 locomotives and powered carriage sets as well as four carriage sets.1 All the trains are stored on-site in workshops, sheds and a tunnel. The railway is entirely run by volunteers, so that all ticket money is used for maintenance and extensions, and some goes to local charities. Since 1991, the entire railway has been rebuilt, including an upgraded signalling system. About half of the 120 volunteer members are active with about 35 working each Sunday, and a dozen or so working every Wednesday. Members are trained to positions of station assistant, booking officer, train guard, train driver or signalman. Members construct new carriages and locomotives as well as maintaining track, signalling and rolling stock.This collection of almost 130 photos about places and people within the Shire of Nillumbik, an urban and rural municipality in Melbourne's north, contributes to an understanding of the history of the Shire. Published in 2008 immediately prior to the Black Saturday bushfires of February 7, 2009, it documents sites that were impacted, and in some cases destroyed by the fires. It includes photographs taken especially for the publication, creating a unique time capsule representing the Shire in the early 21st century. It remains the most recent comprehenesive publication devoted to the Shire's history connecting local residents to the past. nillumbik now and then (marshall-king) collection, diamond valley railway, eltham lower park -
 Eltham District Historical Society Inc
Photograph - Digital Photograph, Alan King, Alistair Knox Park, Eltham, 2008
Alistair Knox Park, an oasis of peace and beauty. Covered under National Trust of Australia (Victoria) Landscape Significance and Heritage Overlay, Nillumbik Planning Scheme. Published: Nillumbik Now and Then / Marguerite Marshall 2008; photographs Alan King with Marguerite Marshall.; p173 It is hard to imagine that the Alistair Knox Park, an oasis of peace and beauty beside busy Main Road, Eltham, was once the township’s rubbish dump. It was only in the 1970s that the tip was transformed into this beautiful six hectare space, which later earned it a National Trust Landscape classification. Before its life as a dump, the area was used for small farms. Thanks largely to the foresight and efforts of local environmental builder Alistair Knox, the park was designed sympathetically with the character of the wider Eltham landscape. Then, appropriately, the park was named after Knox, who was an Eltham Shire Councillor from 1971 to 1975 and Shire President in 1975. The park designers were four major forces in the urban bush landscape garden –Knox, landscape designer Gordon Ford, artist Peter Glass and landscaper Ivan Stranger. The National Trust citation for the park, originally called Eltham Town Park, includes the Eltham railway trestle bridge and the Shillinglaw Cottage. The citation states ‘the semi-natural setting of the parkland provides a landscape which is evocative of the history of the area’. Manna Gums (Eucalyptus viminalis) and Candlebarks (Eucalyptus rubida) are significant features. Most of the park’s construction was directed by Bob Grant, Superintendent of the Parks and Gardens Department for the Eltham Shire Council. First plantings occurred in Arbour Week in 1973, then the lake and botanic area were completed in 1975, with Federal Government funding, and the toilet block in 1978. Bounded by the Eltham railway line, Panther Place, Main Road, Bridge and Susan Streets, the park is in a valley about a kilometre wide overlooked by steep hills at the east and west. The Diamond Creek flows through it and the picturesque historic timber trestle railway bridge edges the north. Informal plantings of Australian indigenous and native species in open and undulating grassed settings blend with the natural landscape of the Diamond Creek to the west. The bush-style plants, particularly around the creek, balance with open lawns, paths and a cascade flowing from a small lake to another below. A footbridge over the creek leads to the park’s west. The park includes an adventure playground and barbecue areas. The park stands on part of the land bought from the Crown in 1851 by Josiah Holloway, who subdivided it into allotments and which he called Little Eltham. Most of the land was subdivided into residential lots, but the creek valley, on which the park stands, was subdivided into farm-size lots, used mainly for orchards and grazing. One of the earliest owners was John Hicks Petty, who in 1874 bought a plot from Holloway. Other families who owned properties in that area, included Rees, Clark, Waterfall, Graham, Hill and Morant. In 1901 the railway was built through the area. Jock Read, an Eltham resident since around 1920, remembers several farms in the 1920s and ’30s that occupied the site of today’s park. A poultry farm, which extended from present day Panther Place, was owned by the Gahan family. Next to that farm was another for grazing cattle owned by Jack Carrucan. Beside this was land owned by John Lyon. A doctor lived beside this, and at the north-west corner of Bridge Street and Main Road stood a memorial to the soldiers who died in World War One, which was later moved to the RSL site. Mr Read also remembers other farms and orchards west of the creek In the early 1960s the Eltham Council began buying these farms and in the late 1960s turned the areas east of the Diamond Creek into a garbage tip. When this was filled above the creek’s flood plain, the tip was moved to the west of the creek.This collection of almost 130 photos about places and people within the Shire of Nillumbik, an urban and rural municipality in Melbourne's north, contributes to an understanding of the history of the Shire. Published in 2008 immediately prior to the Black Saturday bushfires of February 7, 2009, it documents sites that were impacted, and in some cases destroyed by the fires. It includes photographs taken especially for the publication, creating a unique time capsule representing the Shire in the early 21st century. It remains the most recent comprehenesive publication devoted to the Shire's history connecting local residents to the past. nillumbik now and then (marshall-king) collection, alistair knox park, eltham -
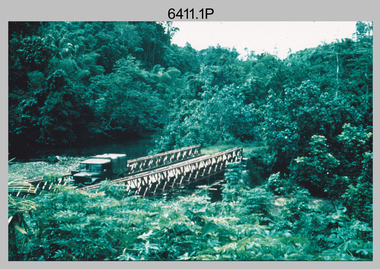 Bendigo Military Museum
Photograph - Royal Australian Survey Corps Surveyors in the Field – Project Cutlass, New Guinea, 1956 – 1957
This is a set of 23 photographs of surveyors and support staff in the field undertaking tasks in New Guinea 1956 – 1957. The surveyors were employed in the establishment of mapping and geodetic control for Project Cutlass, the “Ship-Shore” survey of the New Ireland province. In this survey operation surveyors used theodolites to observe horizontal and vertical angles and chains to measure base line distances between survey stations. Bob Skitch shown in photo .7P was in the 2nd year of his career in the Australian Army. He achieved the rank of Lieutenant-Colonel, and his last appointment was the CO of the Army Survey Regiment from 1976 to 1980.This is a set of 23 photographs of surveyors and support staff in the field undertaking duties during Project Cutlass located in New Ireland, New Guinea 1956 – 1957. The photographs were printed on photographic paper and are part of the Army Survey Regiment’s Collection. The photographs were scanned at 300 dpi. .1) - Photo, colour, 1956. Surveyors travelling main road from Kavieng to Namatanai, New Ireland. .2) - Photo, colour, 1956. Unidentified surveyors assessing recovery of their vehicle after bridge collapsed on west side of New Ireland. .3) - Photo, colour, 1956. Unidentified surveyors assessing recovery of their vehicle after bridge collapsed over flooded creek on west side of New Ireland. .4) - Photo, colour, 1956. Survey personnel L to R: Bev Uwins, John Lambie, Bob Thompson, New Ireland. .5) - Photo, colour, 1956. Survey base camp, New Ireland. .6) - Photo, black & white, 1956-1957. Geoff Helsham with possible human remains, New Ireland. .7) - Photo, black & white, 1956-1957. Bob Skitch undertaking survey observations using Wild T2 theodolite, New Ireland. .8) - Photo, black & white, 1956-1957. Chas Beach undertaking survey observations using Wild T2 theodolite, New Ireland. .9) & .10) - Photo, black & white, 1956-1957. Kev Parker (cook) New Ireland. .11) - Photo, colour, 1957. Brian Berkery taking a break, Top Manor Island, Lihir Island Group off New Ireland. Latitude -2° 46”, Longitude 152° 40”. .12) - Photo, colour, 1957. Survey base camp L to R: Chas Beach, Bev Uwins, Feni Islands, New Ireland. Latitude -4° 05”, Longitude 153° 45”. .13) - Photo, colour, 1957. A Hous Kiap. (Kiaps, known formally as district officers and patrol officers, were travelling representatives of the British and Australian governments), New Ireland. .14) & .15) - Photo, colour, 1957. L to R: Joe Farrington, Tom Royle Bob undertaking survey observations using theodolites from an improvised timber tower, New Ireland. .16) & .17) - Photo, colour, 1957. US Army ship FS216 used for ship-to-shore triangulation docked at Rabaul, New Britain. .18) - Photo, colour, 1957. US Army ship FS216 used for ship-to-shore triangulation docked at Kavieng, New Ireland. Sight target on top of mast. .19) - Photo, colour, 1957. Survey personnel onboard US Army ship FS392, L to R: Peter Frodsham, Bob Thompson, Doc Reid, John Underwood, remainder unidentified, New Ireland. .20) - Photo, colour, 1957. Survey base line party heading ashore, New Ireland. .21) - Photo, colour, 1957. Survey personnel rowing US Army assault boat L to R: Kev Parker, Chas Beach, folded up survey beacons overhanging stern, New Ireland. .22) - Photo, colour, 1957. Les Bailey onboard US Army ship departing Rabaul, New Britain for Brisbane. .23) - Photo, colour, 1957. Ron Newman onboard US Army ship departing Rabaul, New Britain for Brisbane. Active volcano in background..1P to .23P annotated on back – ‘Operation Cutlass’, personnel names, the year and the location. royal australian survey corps, rasvy, army survey regiment, fortuna, a, army svy regt, asr, surveying -
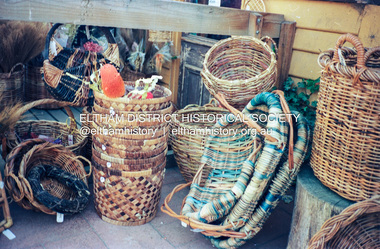 Eltham District Historical Society Inc
Photograph (Item) - Print, Elizabeth Simkin, Untitled (Cane baskets), 1988
Riverclay Craft Gallery, 573 Main Road, Eltham Riverclay was located along with Ansell and Muir's Chicken shop opposite Eltham Lower Park. The building has since been demolished as it lay within the 1934 flood plain limits Elizabeth Simkin 1988 Entrant No. 149 Ref: Series 34, Items 39, 111-113 The photographer noted that in a sad indictment of the local community, this German Shepherd dog and another had been abandoned by their owners to scavenge through the bins and chase the drunks around the lake at dawn. Both dogs were impounded and the owners never claimed them. As a consequence they were eventually both put down. The photographer noted that in a sad indictment of the local community, this German Shepherd dog and another had been abandoned by their owners to scavenge through the bins and chase the drunks around the lake at dawn. Both dogs were impounded and the owners never claimed them. As a consequence they were eventually both put down. SHIRE OF ELTHAM COMMUNITY PHOTOGRAPHIC SURVEY Photography is an artform which many of us practice, sometimes purely for artistic pursuit, sometimes to record the people and events in our lives. In 1988, as part of a local Bicentennial project, the Shire of Eltham conducted the Eltham Community Photographic Survey. Up to 100 entries were to be selected by a panel of photographers for entry into the Eltham Photographic Survey Exhibition. Entries had to be submitted by May 13, 1988. Entrants whose images were selected for the exhibition were contacted and requested to further submit an entry form providing entrant’s name, area of residence, age, and proposed captions. These details were then used to produce labels for the exhibition mounts. Where negatives had not been supplied, these were requested to support the display of printed enlargements mounted on 10” x 8” cardboard. The mounted prints were made available post exhibition for sale at $8.50 each for colour prints and $7.00 for B&W prints. Residents in the Shire were invited to collect a free roll of film and take a photograph of what they either liked or did not like about the area. A total of 160 entrants submitted multiple entries for the exhibition. Of those selected for exhibition, entrants ranged in age from 9 to 70 years. All custom colour and black and white printing for the exhibition was completed by Wattle Studios of Eltham. The Eltham Photographic Survey was jointly auspiced by the Shire of Eltham and Wattle Studios, of 953 Main Road, Eltham. The project was greatly assisted by: • David McRitchie, Media Studies Lecturer Victoria College, Rusden Campus. • Ian and Annette Toohill of Wattle Studios • Tracy Naughton, Eltham Community Arts Officer • Neville Emerson Pty. Ltd. • Superior Press, Eltham • Kodak Australasia Pty. Ltd. • Agfa Gevaert Ltd. • Townsend Colourtech Pty. Ltd. • The Australian Bicentennial Authority • Eleanor Bowers, Secretary, Eltham Arts Council The exhibition was placed on display in the Woolworths Arcade, Eltham between Monday June 6th and Saturday June 11, 1988. It was also intended to hold the exhibition at a venue in the Shire’s North Riding from Monday, June 20 to Friday June 24. It was then displayed at the Were Street Theatre, Montmorency from Friday, June 24 to Thursday, July 7. Series 34: Eltham Community Photographic Survey 1988 - Prints & Documentation Series consists of 117 photographs of Shire scenes taken by members of the community. Items I - 41 are larger photographs mounted on card, which were exhibited. Items 42 - 117 are unmounted copies, alternative takes and other entries. Corresponding negatives contained in Series 35: Eltham Community Photographic Survey 1988 – Negatives which consists of 267 colour and B&W negatives and one colour slide of Shire scenes taken by members of the community. The negatives are arranged by the entrant number of the photographer. The Eltham Community Photographic Survey collection is significant to the local community as it was curated by the local community - ordinary people of all ages - representing what they liked and did not like in the area where they lived. It represents an unfiltered representation of the Shire of Eltham as it was in 1988. It also represents one of many projects as part of the national programme of events and celebrations to commemorate the bicentenary. It is a time capsule of life in the 1980s of this urban and rural municipality in Melbourne's north. Rear: Entrant No., name and address in blue ink; also 'Series 34' and the 'Item No.' in orange inkshire of eltham archives, bicentennial project, eltham, eltham community photographic survey, series 34, series 35, elizabeth simkin, film - kodak ga 100 5095, riverclay craft gallery, scan - 35mm negative -
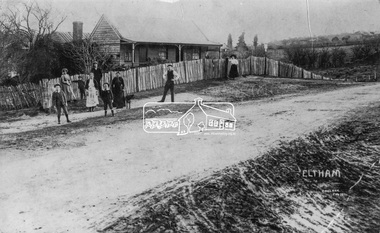 Eltham District Historical Society Inc
Negative - Photograph, J.H. Clark, Jarrold family and cottage, Main Road, Eltham, 1911
Jarrold family and cottage, Main Road, Eltham Members of the Jarrold family and others outside their home in Maria Street (Main Road), Eltham at the bottom of Policeman’s Hill, opposite Dalton Street. The small youth in centre foreground is believed to be George Coleman (see SEPP_0745). John Jarrold (1865-1909) was a local builder and contractor and widely respected resident. Youth in centre is believed to be George Coleman (1906-1953) (See SEPP_0745). Jarrold Cottage built in 1863, also known as 'White Cloud", located at 701 Main Road, Eltham, opposite Dalton Street. The house remains intact and is listed on the Victorian Heritage Database and considered historically significant to the Shire of Nillumbik. The cottage was originally located closer to the Diamond Creek but was subject to flooding. It was dragged by horse to the present site shown, which was chosen for the higher ground that had been created as a result of land fill being deposited here from the quarry further around the bend on Main Road (site of present-day Eltham Primary School carpark) where the stone had been quarried for building the State School in Dalton Street. It had previously been rented for use as a Police Station / residence prior to the building of the permanent police house and station at the corner of Maria and Brougham streets in 1859. At the time of collection of photos for the centenary of the Shire of Eltham (1971) the cottage was owned by the Skipper family and remains in the family to present day (2021). Photo dated as 1911 (by donor?). Photo SEPP_0745 was dated 1905 (by donor?) but is estimated to be c.1909. It is also noted it is thought Jack Coleman is in both photos though it is more likely to be his younger brother George who appears about 5 in this photo and 3 in 745. Cross Reference SEPP_0745 / 748 Photographer: J.H. Clark John Henry Clark was the youngest of three boys born to William Henry Clark (1823-1877) and Maria White (1843-1914). He and his brothers, William Charles Clark (1872-1945), Clement Kent Clark (1874-1912) operated a photography business (Clark Bros.) from 25 Thomas Street, Windsor near Prahran during the period c.1894 to 1914. Following death of Clement in September 1912 and their mother in 1914, the Clark Bros business appears to have dissolved, the premises demolished, and a new house was under construction in 1915. John set up business independently in 1914 operating out of 29 Moor Street, Fitzroy where he is registered in the 1914 and 1915 Electoral Rolls. By 1916 John had relocated to Eltham where he continued his practice as a photographer and took many of the early images around the district of Little Eltham. Around 1930 John changed professions and opened a small cobbler's shop in 1931 near the pond opposite Dalton Street adjacent to the Jarrold family cottage. He never married and continued his profession as a bootmaker from this little shop, maintaining a close relationship with Mrs Jarrold for the rest of their lives. His bootmaker shop remains today beside the Whitecloud cottage and is one of only three remaining shops in the area from the early 20th century. There are a couple of images of Eltham taken by Clark Bros. in the Eltham District Historical Society collection, one such example being Hunniford’s Post Office with Miss Anne Hunniford out front (EDHS_00140 - marked on the back of the print, Clark Bros., 25 Thomas St. Windsor), which would date this image between c.1894 and 1914. Other early images of Eltham taken by John Henry Clark are marked on the face “J. H. Clark Photo” and it is assumed these are dated between 1914 and 1930. It is noted that the Grant of Probate for John H Clark of Eltham South dated 5 April !957 (513/387) records his occupation as "X Photographer".This photo forms part of a collection of photographs gathered by the Shire of Eltham for their centenary project book, "Pioneers and Painters: 100 years of the Shire of Eltham" by Alan Marshall (1971). The collection of over 500 images is held in partnership between Eltham District Historical Society and Yarra Plenty Regional Library (Eltham Library) and is now formally known as 'The Shire of Eltham Pioneers Photograph Collection.' It is significant in being the first community sourced collection representing the places and people of the Shire's first one hundred years.Digital image 4 x 5 inch B&W Negshire of eltham pioneers photograph collection, dalton street, eltham, george coleman, j.h. clark photo, jarrold cottage, jarrold family, main road, maria street, white cloud cottage -
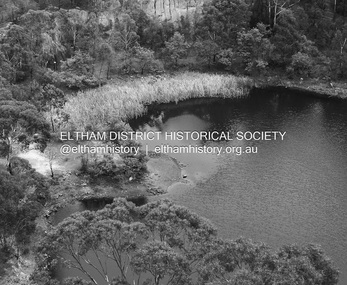 Eltham District Historical Society Inc
Photograph - Digital Photograph, Alan King, Blue Lake, Plenty Gorge Park, 2008
A quarry was transformed into the Blue Lake. Published: Nillumbik Now and Then / Marguerite Marshall 2008; photographs Alan King with Marguerite Marshall.; p179 The dramatic steep-sided Plenty Gorge lies along the divide of two geological areas, and separates the Nillumbik Shire and the City of Whittlesea. On the Nillumbik side are undulating hills and sedimentary rock, and in Whittlesea, lies a basalt plain formed by volcanic action up to two million years ago. This provides the Plenty Gorge Park with diverse vegetation and habitats, making it one of Greater Melbourne’s most important refuges for threatened and significant species. The park, established in 1986, consists of around 1350 hectares, and extends 11 kilometres along the Plenty River, from Greensborough to Mernda. It provides a wildlife corridor for around 500 native plant and 280 animal species. The area’s plentiful food and water attracted the Wurundjeri Aboriginal people and then European settlers. By 1837 squatters had claimed large runs of land for their sheep and cattle. The Plenty Valley was among the first in the Port Phillip District to be settled - mainly in the less heavily timbered west - and was proclaimed a settled district in 1841.But by the late 1880s, the settlers’ extensive land clearing for animal grazing, then agriculture, depleted the Wurundjeri’s traditional food sources, which helped to drive them away. Many Wurundjeri artefacts remain (now government protected), and so far 57 sites have been identified in the park, including scarred trees, burial areas and stone artefacts. Pioneer life could be very hard because of isolation, flooding, bushfires and bushrangers. Following the Black Thursday bushfires of 1851, basalt was quarried to build more fire-resistant homes. Gold discoveries in the early 1850s swelled the population, particularly around Smugglers Gully; but food production made more of an impact. In the late 1850s wheat production supplanted grazing. In the 1860s the government made small holdings available to poorer settlers. These had the greatest effect on the district, particularly in Doreen and Yarrambat, where orchards were established from the 1880s to 1914. Links with a prominent early family are the remains of Stuchbery Farm, by the river’s edge bounded by Smugglers Gully to the north and La Trobe Road, Yarrambat, to the east. The Stuchberys moved to the valley in 1890, and the family still lives in the area. In 1890, Alfred and Ada first lived in a tent where four children were born, then Alfred built the house and outbuildings around 1896. They planted an orchard, then a market garden, and developed a dairy. The family belonged to the local Methodist and tennis communities. Their grandson Walter, opened the Flying Scotsman Model Railway Museum in Yarrambat, which his widow, Vi, continues to run. Wal was also the Yarrambat CFA Captain for 22 years until 1987. Walter sold 24 hectares in 1976 for development - now Vista Court - and in 1990, the remaining 22.6 hectares for the park. Remaining are an early stone dairy and remnants of a stone barn, a pig sty and a well. Until it was destroyed by fire in 2003, a slab hut stood on the Happy Hollow Farm site, at the southern end of the park. The hut is thought to have been built in the Depression around 1893. This was a rare and late example of a slab hut with a domestic orchard close to Melbourne. Emmet Watmough and his family first occupied the hut, followed by a succession of families, until the Bell family bought it around 1948. There they led a subsistence lifestyle for 50 years, despite encroaching Melbourne suburbia. The Yellow Gum Recreation Area includes the Blue Lake, coloured turquoise at certain times of the year. Following the 1957 bushfires, this area was quarried by Reid Quarries Pty Ltd for Melbourne’s first skyscrapers, then by Boral Australia. However in the early 1970s water began seeping into the quarry forming the Blue Lake and the quarry was closed. The State Government bought the site in 1997 and opened it as a park in 1999.This collection of almost 130 photos about places and people within the Shire of Nillumbik, an urban and rural municipality in Melbourne's north, contributes to an understanding of the history of the Shire. Published in 2008 immediately prior to the Black Saturday bushfires of February 7, 2009, it documents sites that were impacted, and in some cases destroyed by the fires. It includes photographs taken especially for the publication, creating a unique time capsule representing the Shire in the early 21st century. It remains the most recent comprehenesive publication devoted to the Shire's history connecting local residents to the past. nillumbik now and then (marshall-king) collection, blue lake, plenty gorge park -
 Eltham District Historical Society Inc
Book, Diamond Creek Basin Study. Part 1, A Compendium of Factors Relevant to Stormwater Flows, 1980
... floods ...Basin Studies are studies to evaluate water supply and demand and help ensure reliable water supplies by identifying strategies to address imbalances in water supply and demand.Spiral Bound. 157 leaves in various foliations (some folded) : illustrated. (some colour.), maps (some colour.)aerial photographs, allendale road, arthurs creek mine, arthurs creek road bridge, arthurs creek, bald spur look-out, bank protection, bolton steet, bridge street bridge, bridge street, bridges, challenger street, chute street, construction, coolaroo drive, culvert, deep creek, diamond creek basin, diamond creek region, diamond creek, diamond street bridge, drainage works, eltham lower park, eltham town park, eltham trestle bridge, eltham west drains, eltham, erosion, flood management, floods, footbridge, glen katherine estate, gold mining, gum glade, hurstbridge, kangaroo ground, kinglake escarpment, kinglake national park, latiners hat factory, main road bridge, main road, masons falls, melbourne metropolitan board of works, monash bridge, mount sugarloaf, nillumbik park, orchards, railway culvert, railway line, ramptons road, real estate advertisement, research creek, st helena east drain, st helena road, st helena, storm sewers, stormwater, sugarloaf-preston transfer main crossing, susan street, union mine, village pond, water flow, watkins street, wattletree road, weidlich road, wingrove park, yarra river, zig zag road, water supply, basin study