Showing 2057 items matching "crossings"
-
 Ballarat Tramway Museum
Photograph - B&W print of donated negative, Ron E. Fluck, 2/01/1959 12:00:00 AM
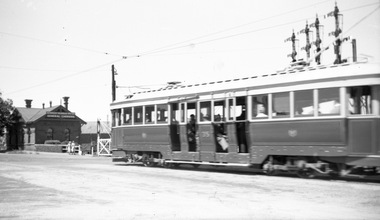
Black and white print of a donated negative. Print made 8/1998. Photo of SEC bogie tram 35, north bound in Lydiard St. North, about to cross the railway level crossing. Has the signal gantry in the background with part of the railway gates and Kennedy Murray Pty Ltd. General Carriers building in the background as well. Photo taken 2-1-1959. High Res scan of copy negative added 17/1/2019tramways, trams, railway station, lydiard st. north, ballarat, tram 35 -
 Ballarat Tramway Museum
Photograph - Colour Photograph/s - set of 6, Carolyn Dean, 19/10/2003 12:00:00 AM
Set of six photographs taken by Carolyn Dean of the BTM services - AGM 2003 on 19.10.2003. 2600.1 - No. 28 arriving at Depot Junction. 2600.2 - No. 28 leaving Depot Junction with No. 27 waiting to cross Wendouree Parade 2660.3 - No. 27 crossing Wendouree Parade on Members Special 2600.4 - No. 27 at Carlton St. terminus 2660.5 - Nos. 661, 27 and 45 on Depot Fan 2660.4 - Tower Truck outside Depot on No. 1 Road, with No. 45 in background.On rear of each print in blue biro "19.10.03" / "Photo by Carolyn Dean".btm, depot, wendouree parade, tram 28, tram 27, tram 45, tram 661 -
 Ballarat Tramway Museum
Slide - 35mm slide/s, Travis Jeffrey, c1962
Agfa plastic mount (blue base, white cover) with a photo of Bendigo No. 5 and No. 24 crossing at Myrtle St. loop. No. 5 has destination of Charing Cross and a Cohns Drinks Advertisement on front panel. No. 24 has destination of Golden Square. On the front dash panel is advertisement for Huttons Hams and a Streets Ice-cream advertisement. Note the empty roof advertisement panel on No. 24 - refer to Reg. Item 2632, which shows the tram at Golden Square."BES 21" in penciltramways, trams, bendigo, golden square, myrtle st, tram 5, tram 24 -
 Ballarat Tramway Museum
Photograph - Digital image, Wal Jack, 11/03/1961 12:00:00 AM
Yields information about the streetscape in the vicinity of the Grey St loop Albert St in the early 1960'sDigital image from the Wal Jack Ballarat Album of a photograph of the No. 12 and 21 crossing at the Grey St loop, 11 March 1961, Photo by Wal Jack. No. 12 in bound to the city has roof and dash panel advertisements, No. 21 to Sebastopol. Shows the nature of Albert St. in 1961. See image i2 for rear of photograph. See image i3 for hi res scan of print. See image i4 for hi res scan of negativeOn rear of photograph in ink "SEC, Ballarat No. 12 city bound, No. 21 southbound to Sebastopol in Albert St, Sebastopol at Grey St loop 11-March 1961" and Wal Jack stamp in top right hand corner with number "T1261" written in.trams, tramways, grey st, albert st, sebastopol, tram 12, tram 21 -
 Ballarat Tramway Museum
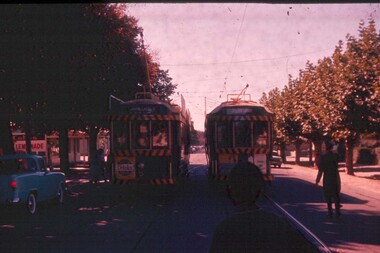
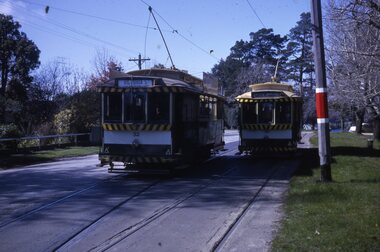
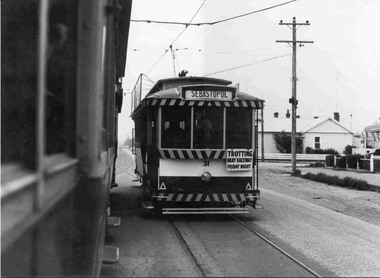
Slide - 27 mm sq slide/s, Andrew Howlett, Nos. 34 and 26 crossing at the Parked St loop in Sturt St west loop, Mar. 1969
Yields information about the Sturt St West Parker St Loop.Colour slide, Kodak white cardboard mount, developed March 1969 of Nos. 34 and 26 crossing at the Parked St loop in Sturt St west loop. No. 34 is heading for Mt Pleasant and has a Trotting at Bray Raceway auxiliary board and No. 26 running a Special. Shows how's the motor vehicle traffic had to veer out past trams. One of a series of tour photos - see Reg item 7667, 7668, 7683 and 7701.Has in red ink "Sturt St Loop"ballarat, tramways, trams, sturt st west, parker st loop, tram 26, tram 34 -
 Ballarat Tramway Museum
Slide - 35mm slide/s, Wal Jack, 26/12/1960 12:00:00 AM
Photo of No. 13 crossing Sturt St. from Lydiard St. with Post Office in background. Tram in transition of fitting dash canopy lights. Has been painted with tiger stripes and white stripe under windows. Tram has an auxiliary board on front, conductor swapping doors over, Has 'The Age' on front panel, number by side of headlight, large reflective tape triangles. Also has 'Georgille' roof ad. Taken on 26-12-1960.'SEC Ballarat Tramways, No. 13 from Lydiard St. turning into Sturt St. 26-12-60' in blue ink and 'W.Jack' stamped in purple inktramways, trams, lydiard st., post office, sturt st, tram 13 -
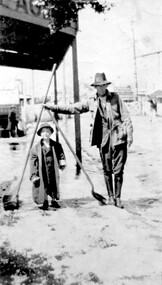 Surrey Hills Historical Society Collection
Photograph, Fred Lyons and his son Arthur after a hail storm, 1924, 1924
Lyons family history: Frederick Adolphus (Fred) Lyons operated a cab / taxi service in Union Road for several decades. Arthur was the only son of Frederick Adolphus Lyons (1891-1980) who was born in Surrey Hills, son of Thomas and Catherine Lyons. He married Elizabeth Ruby Hall in 1918. They lived at 55 Sunbury Crescent. The Lyons’ home was called ‘Knopshambury’ - this was probably a misspelling of Knockshanbally in Co Kilkenny, the birth place of Fred’s father, Thomas Edmund Josias Lyons (1846-1915).Arthur Lyons was born in Surrey Hills on 12 Jun 1920. He became a motor mechanic / welder and lived his whole life at 55 Sunbury Crescent. This is one of a series of photos donated by Arthur Lyons. The donation was made while he was in hospital. He died shortly afterwards (23 Sep 1990). Donation was finalised by a neighbour, Mrs Florence Ann Armitstead, wife of Glen Victor Armitstead. Glen was a local hairdresser. They moved to 11 Sunbury Crescent after their marriage in 1939. Arthur had no relatives to distribute the material to. The hail storm occurred on 2 December 1924.Despite the poor condition, this is significant because of the clear detail of the Union Road buildings and railway crossing in the background in 1924.Black and white photo of cab driver Fred Lyons with his son Arthur taken at the cab rank near the Surrey Hills station, clearing up after a hail storm in 1924. Fred balances 2 large shovels; Arthur has an over-sized jacket on. The railway gates and overhead lines can be clearly seen in the background. Despite the poor condition, it is a relatively significant photo as it details Union Road buildings and the railway crossing clearly behind it.On back of photo is written in pencil "copied 1996" and in blue pen "2/12/24"railway crossings, hail storms, frederick adolphus lyons, fred lyons, arthur frederick lyons, arthur lyons -
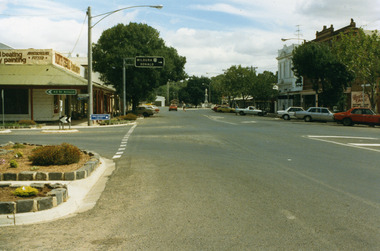 Charlton Golden Grains Museum Inc
Photograph, Pollard, Jenny, High Street Charlton 1989, c.1989
High Street Charlton streetscape. Shows Sweatman's North Central Panel Beaters (formerly Charlton Motors Pty Ltd garage), Heather's Choice Gift Shop (in the former Bilton/Dillon building built 1889), Westpac Bank, War Memorial (built 1923)Colour photograph of High St Charlton taken near the corner of Armstrong Street looking west. Garden beds in lower LH, road signs pointing to St Arnaud and to Mildura and Donald. North Central Panel Beaters on corner. Orange car driving west, person crossing the road, man standing near white ute in front of Westpac bank on RH side of photo. Heather's Choice sign on side of building. War Memorial at the end of the road.sweatmans, north central panel beaters, heather's gift shop, bilton building, westpac, war memorial, charlton, business, industry -
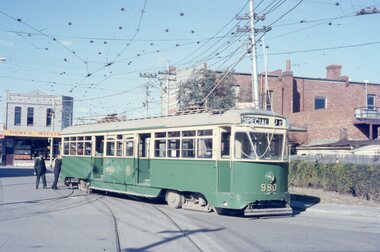 Melbourne Tram Museum
Photograph - Five color slides - tram PCC 980, 9-8-1970
Set of four colour slides taken during the Monash Railway club tour on 9-8-1970 using PCC 980 from Malvern Tram Depot. The route number and destinations are for show only. Photographs by Warren Doubleday.Yields information on Monash Railway club tour, the trams used and the locations.Set of five Anscochrome colour slides, of Melbourne tram PCC 980 on a Monash Railway Club tour - 9-8-1970 .1 - PCC 980 on the depot access tracks for Malvern Tram Depot in Coldblo Road .2 - With the Malvern Tram Depot in the view .3 - In Dandenong Road at Hawthorn Road .4 - Crossing Hawthorn Road - has a tram shelter in the view. .5 - About to use the then new Nolan St (now Southbank Blvd) crossover.Has photographers slide numbers on each slide.monash railway club, tram 980, malvern depot, hawthorn road, dandenong road, nolan st, tramways, trams, pcc class -
 Bendigo Historical Society Inc.
Photograph - BASIL MILLER COLLECTION: TRAM OVER BRIDGE WORKS
BHS CollectionBlack and white photo of bogie tram crossing new bridge works on Charing Cross. 3 men visible on tram, 2 working on bridge and 1 underneath bridge. Note: SEC colour scheme on tram and tram pole behind tram. On back of photo inscription under photo in albums: ''Tram over creek'' in pencil in top right corner. 'Reduce to 5 1/2'' x 5. 66% Page 75' written in black ink.person, individual, basil miller -
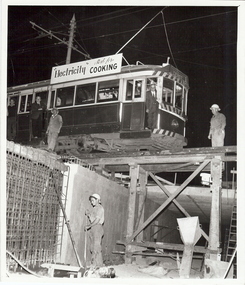
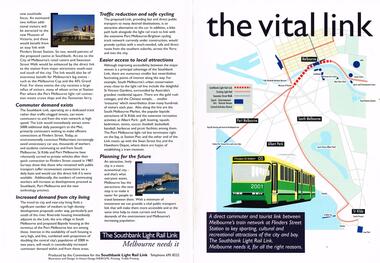 Melbourne Tram Museum
Pamphlet, Committee for the Southbank Light Rail Line, "the vital link", 1993?
Pamphlet - full colour A3 sheet folded to A4, titled "the vital link", outlining a proposal for a tram line connecting Flinders St station to Clarendon St, Port Junction, via the former railway bridge, connecting Batman Ave tram line. Published by the Committee for the Southbank Light Rail Line. Gives reasons and benefits for such a link. Published based on a printing date 1993. Features an image of 2001 on front cover and crossing the Yarra River.trams, tramways, flinders st station, clarendon st, new tramway, batman ave, route 96, light rail, yarra river, tram 2001 -
 Melbourne Tram Museum
Document - Radio Transcript, Melbourne & Metropolitan Tramways Board (MMTB), "Wireless Report -- Mr. J. D. Barton Staff Officer MMTB", late 1920's
Radio Transcript or script, 13 foolscap typed pages, double spaced titled "Wireless Report -- Mr. J. D. Barton Staff Officer MMTB". Looks at the history of public transport in Melbourne, in particular early transport problems, crossing the Yarra, the formation of the Melbourne Omnibus Co, the directors, early horse buses, the formation of the Melbourne Tramway and Omnibus Co and running issues with some stories. Item noted dated, presumed late 1920's.trams, tramways, public transport, radio stations, horse buses, mto co, melbourne, cable trams -
 Melbourne Tram Museum
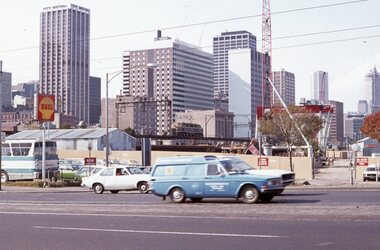
Slide, David Verrier, 22/04/1977 12:00:00 AM
Agfa colour slide, white blue plastic mount. Photograph by David Verrier. View from Spencer St south just before bridge looking back to the city skyline and the Flinders St railway viaduct. An L class is crossing the viaduct. Photo has the City Mutual and SEC Buildings along with some construction work for the new railway viaduct underway. A Shell service station sign is visible. Photos taken 22/4/1977In ink: "Fri 22/4/77 Flinders St Viaduct"trams, tramways, railways, flinders st, melbourne -
 Orbost & District Historical Society
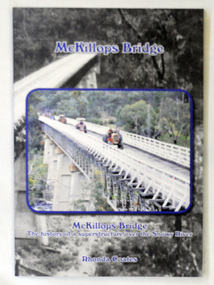
book, McKillops Bridge, 2014
This book was purchased new by Orbost & District Historical Society. Written by Buchan historian, Rhonda Coates, the book was commissioned by Tubbut Neighbourhood House following a commemoration event in 2002 when many people gathered for a special day organised by Sister Helen Barnes and the Tubbut community. (ref. Bombala Times)This book is a useful research item.A paper back book, titled McKillops Bridge, written by Rhonda Coates. On the front cover is a photograph tractors crossing the bridge during the Great Snowy River Tractor Stampede ( The Snowy River Tractor Strampede, a 560-kilometre journey, is organised by the Bega and District Historical Machinery Club every January - the first being held in 2009.) this photograph is inset over an earlier phpotograph by Howard Bulmer c 1936. The book contains the history of the bridge, photographs of the bridge and times before its construction.On front fly-Orbost &District Historical Society Incmckillops-bridge -
 Kiewa Valley Historical Society
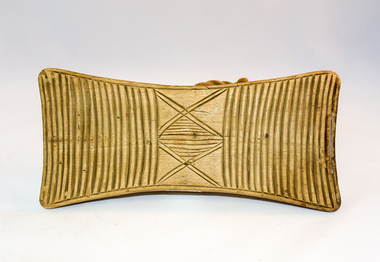
Pat Butter Profiler, Circa 1950s
This butter pat profiler may have been manufactured post 1967(year post codes appeared in Australia) however the post code was only stamped on after it was machined. This type of butter mould was used by rural families to fashion home/farm made butter. This period was in most rural regions a time of self sufficiency where any domestic type implement which could be fashioned by the family would be crafted with skill. Shopping for goods required catalogues from stores located in major rural towns and cities and involved lengthy waiting times. Travelling to and from these specialised stores was not pleasant due to the relatively poor quality of the roads and the lengthy times taken. The small general stores in the Kiewa Valley could not cater for all the needs of the valley. The 1960's was a time when facilities especially goods and services started to improve drastically. The S.E.C. of Victoria with its Kiewa Hydro Electricity Scheme provided not only an improvement of facilities in the valley but also a increase in the population. This increase resulted in a greater demand for local produce.This item is one of many domestic food processing implements used by Kiewa Valley households in the mid 1900s, whether on the farm or in the small towns and hamlets. Self sufficiency was the key to survival during these early times. Where ever possible supplies from within the valley were preferred to that brought in by travelling salesmen or traders. This butter mould and butter pat was commonly used to fashion "home" made butter throughout the valley and in some cases supplied to "outside" regional towns. Although this method of production was phased out by better access to goods from nearby cities the revival of the good organic home grown produce in the 1980s saw a greater demand of this type of farm based produce.This butter Pat/Profiler has on its base two patterns. On each end it has horizontal grooves cut into the wood which produce distinct lines onto the surface of the butter. between these grooves there is a section of two double lines crossing in the middle and separated by eleven horizontal lines The base has an elongated rectangular shape. The upper body has been sanded into a smooth convex shaped form where a wooden circular hand grip has been fashioned.On the top of the hand grip is stamped in black print"T. & W. Davies" and under this"TAWONGA 3697"domestic food preparation, wooden butter pat, butter mould circular, dairy industry -
 Stratford and District Historical Society
Photograph, Framed
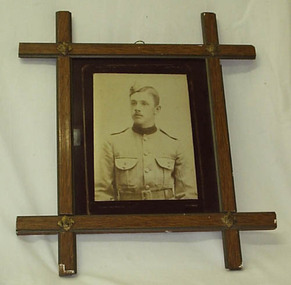
The photograph that appears in this frame is a copy. The original is catalogued at 01314. Sgt David Hamilton Pruden, 404, enlisted from Newry and was killed at Koster River in the Trasnvaal on 21 July 1900, and was buried at Rustenburg cemetery. He is commemorated in a large tablet in the Stratford Mechanics' Institute. This photograph originally hung in the Stratford Mechanics' Institute. A framed sepia copy photographic print of a head and shoulders portrait of a young man in dress uniform of the Victorian Mounted Rifles, labelled Pte D.Pruden and presumed to be David Hamilton Pruden, who died in Africa during the Boer War. The frame, of crossed wooden bars with decorative metal at each crossing, appears to be commercially produced. Backing support for the frame is a section of an 1893 calender for an unknown insurance firm, agent J.B Kelly at Stratford, which has been detached for separate cataloguing.boer war 1899-1902 -
 Whitehorse Historical Society Inc.
Article, Mitcham lights up at last, 1/06/1967 12:00:00 AM
Nunawading Gazette instigated the installation of traffic lights at Mitcham's dangerous Brittania St - Station St crossing.8.Nunawading Gazette instigated the installation of traffic lights at Mitcham's dangerous Brittania St - Station St crossing following an accident last week to a young Mitcham High School girl. There has been a long delay for specifications from the Traffic Commission. An unused subsidy to Council of $2867 would go toward the cost of the Brittania St lights. Nunawading Council has been advised by Country Roads Board that the Blackburn State School overpass would be completed by January 1968.Nunawading Gazette instigated the installation of traffic lights at Mitcham's dangerous Brittania St - Station St crossing.8.local government, nunawading gazette, traffic commission, city of nunawading, victoria. country roads board, traffic signals, britannia street, mitcham, station street, mitcham -
 Whitehorse Historical Society Inc.
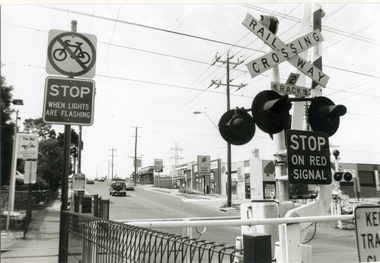
Photograph, Railway Crossing - Heatherdale Road, 2000
Produced as one of a series of 24 prints commissioned by Nunawading & District Historical Society -|Theme: Intersections of Mitcham and Nunawading 2000/2001.|See also Series by P. Simmenauer on the same theme.Black and white photograph - print and negative of Railway Crossing on Heatherdale Road near Heatherdale railway station looking north towards intersection of Whitehorse and Heatherdale Roads, from L - R Station signage 'The Met/Heatherdale Station (sign to be replaced by new owners Connex - see also No. 3 neg). Note Pedestrian & Cyclists signs; strip shops Hungry Jack's fast food; Dyns LPG Service Garage; ACE Auto Services; bus shelter.railway crossing, heatherdale road, mitcham, connex, 'the met', dyns, ace auto services, hungry jack's fast food outlet -
 Whitehorse Historical Society Inc.
Photograph, Railway Station, Heatherdale|Railway Stations, 2000
Produced as one of a series of 24 prints commissioned by Nunawading & District Historical Society -|Theme: Intersections of Mitcham and Nunawading 2000/2001.|See also Series by P. Simmenauer on the same theme.Black and white photograph - print and negative of Heatherdale Railway Station, viewed from the Heatherdale Rail Crossing. L-R West bound station platform for travel to City of Melbourne, next station is Mitcham. Right hand side Eastbound platform - next stop Ringwood, where some trains travel S.E. to Belgrave and some N.E. to Lilydale. Heatherdale is last station in fare Zone 2 and 1st station in Fare Zone 3. Note Telstra Phonebox on platformheatherdale railway station -
 Ballarat Tramway Museum
Slide - 35mm slide/s - set of 3, Les Fordham, Aug. 1967
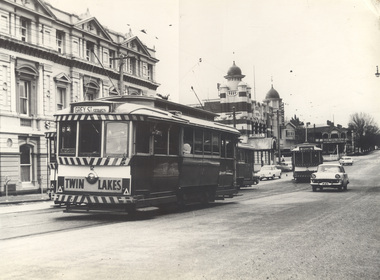
Yields information about tram operations in Wendouree Parade during August 1967.Set of 3 Kodachrome white cardboard mount 35mm slides - dated August 1967 taken by Les Fordham. .1 - trams 32 (Victoria St) and 30 ( (Gardens Via Drummond North) crossing at the depot loop or Barrett Ave loop in Wendouree Parade. .2 - tram in the loop, about to leave - blurry can't read the number. .3 - tram 30 entering the loop, the red signal light is illuminated. The tram stop pole appears to be recently painted.tramways, trams, depot loop, barrett ave, tram stops, signals, tram 30, tram 32 -
 Ballarat Tramway Museum
Slide - 35mm slide/s - set of 4, John Theodore, 1974
Yields information about depot activities of the BTPS in building the depot fan and access track.Set of 4 AGFA blue and white plastic mount 27mm sq slides of various works at the BTPS depot during 1974 after track laying for 1 road has been completed and now in use. .1 - 27 at the level crossing which appears to be completed. .2 - 27 being pushed towards the depot - overhead check? .3 - view looking outwards from inside the depot with 14, 26 and 27 on the depot fan. .4 - working on the roof of 26 etc.Various notations by John as to the slide number and the trams in pencil and ink.tramways, trams, btps, depot, track construction, trams, tram 26, tram 27, tram 14 -
 Ballarat Tramway Museum
Photograph - Black & White Photograph/s, David Endacott, 14/08/1971 12:00:00 AM
Black and white photograph and negative of two bogie trams crossing at the Grey St. Loop, Albert St. Sebastopol. Photo has an Ampol Service station on the right hand side of the photograph. Photo taken some distance away from the trams. Photo probably taken on 14/8/1971. Duplicate print (1267) by John Phillips 12/1999. Large copy print added 5/2001. Original neg scanned at hi res and updated 11/5/2020.trams, tramways, albert st., sebastopol, grey st loop -
 Ballarat Tramway Museum
Negative, Geoff Grant, 16/06/1955 12:00:00 AM
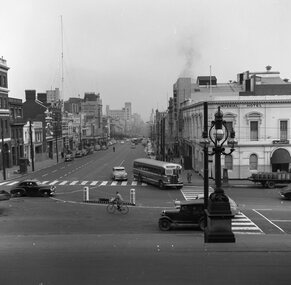
Negative No. N303 and black and white print made by a laser printer (stored in folder ) of a Bourke St Bus turning from Bourke St. into Spring St. on 16/6/1955. Photo by Geoff Grant. Has the Imperial Hotel, Metro Theatre buildings in the background and one of the Parliament house lamps in the foreground. Note the pedestrian crossings which have been marked and the traffic island arrangements. Negative scanned hi res and imaged updated 20/5/2020.trams, tramways, melbourne, bourke st., buses, spring st. -
 Ballarat Tramway Museum
Photograph - Black and White photograph/s - mounted, John Phillips, late 1960's or early 1970's
Yields information about the vicinity of the Drummond St south and the Urquhart St Loop.Black and White photograph mounted on heavy cardboard backing. Photo of Ballarat No. 31 crossing two single truckers in Drummond St. South, at Urquhart St. Loop. (Bell St?)) Tram 31 has destination of Sebastopol and has a "Trotting Bray Raceway Friday Night" auxiliary board on the front of the tram. Taken by John Phillips late 1960's or early 1970's. Note image scanned in two runs through a scanner, resulting in the shading in the image file.trams, tramways, sebastopol, drummond st. sth, urquhart st., tram 31 -
 Ballarat Tramway Museum
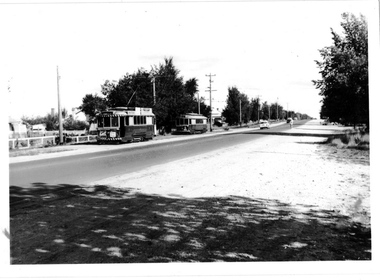
Slide - 35mm slide/s, Peter Moses, Aug. 1971
Colour slide - Photo of SEC Ballarat Tram No. 35 crossing Sturt St. from Lydiard St. North. Photo taken from the north side of Sturt St. Photo shows the tram stop arrangements for east bound trams in Sturt St. with passengers waiting on the seats. Tram has "Everything's under control in my all electric kitchen" SEC roof advertisement panel. Kodak cardboard mount slide, taken by Peter Moses August 1971.On back of slide in red ink "Ballarat / into Sturt St from Lydiard St." and in top left hand corner in black ink "P. Moses".tramways, trams, sturt st, lydiard st north, tram stops, tram 35 -
 Ballarat Tramway Museum
Photograph - Black & White Photograph/s, Jim Seletto, Feb. 1958
Yields information about the appearance of Sturt St at the time of Ballarat Begonia Festival, 1957 - the flowers in the medium strip, the tram and the shoppers in particular the women.Black and white photograph of Ballarat No. 14 west bound in Sturt St during the 1957 Begonia Festival with the Town Hall (with a Begonia Festival sign on it), and other buildings in the background. Has the Australian Mutual Life Building, the Odeon Theatre buildings. In the centre median strip, there is a large arrangement of flower beds and many women shoppers crossing the road, motor vehicles and a lady on a bicycle. No. 14 has the destination of Haddon St via Drummond Nth. Festoon lighting is strung out along the street.On rear in red ink "Ballarat Car 14 Sturt St B'rat Summer '57" and the stamp of Jim Seletto.tramways, trams, sturt st, begonia festival, town hall, shoppers, tram 14 -
 Ballarat Tramway Museum
Photograph - Black & White Photograph/s, Ron Hann, Jan. 1963
Yields information about the California Gully or Thorpe St Loop from the front of an in-bound tramcar and the tramcar it is crossing at the loop.Black and white print on heavy matt photographic paper of the Bendigo 2, crossing another bogie tram at the California Gully or Thorpe St Loop, c1963. Taken from the window of the inbound tramcar. No. 2 has the destination of Eaglehawk, a front dash panel advertisements for Whitehorse Whiskey and another for ice-cream? 2nd copy - laser print - with date etc on rear - added 22/2/2010, copy from Ron Hann. Printed on Fujifilm, Fujicolour Crystal Archive for Frontier".On rear in pencil "Eaglehawk line 1963" 2nd copy has label "Reference 6/214/27" Photo by Ron Hann" and another label "Eaglehawk Route Bendigo 01.63" tramways, trams, bendigo, eaglehawk, california gully, tram 2 -
 Ballarat Tramway Museum
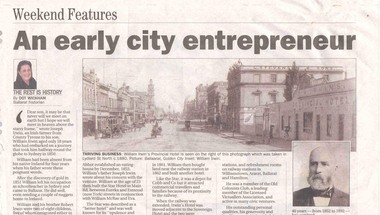
Newspaper, Dot Wickham, "An early city entrepreneur", 5/03/2005 12:00:00 AM
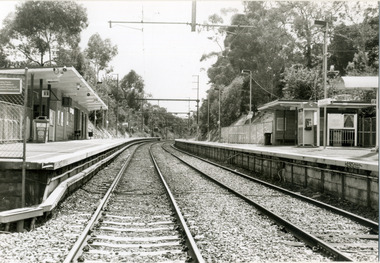
Yields information about William Irwin, Irwins Provincial Hotel and the tram line in Lydiard St Nth.Newspaper clipping from The Courier, 5 March 2005, titled "An early city entrepreneur" written by Dot Wickham about William Irwin, the proprietor of Irwin's Provincial Hotel. Gives a brief history of William Irwin, his Ballarat hotels, his local and other activities. Features a photo of Lydiard St Nth looking south from the railway level crossing with the horse tram lines in the photograph and Irwins Provincial Hotel on the right hand side, before reconstruction to a two story building.hotels, lydiard st nth -
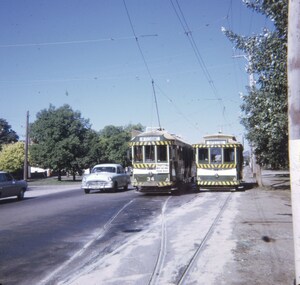
 Ballarat Tramway Museum
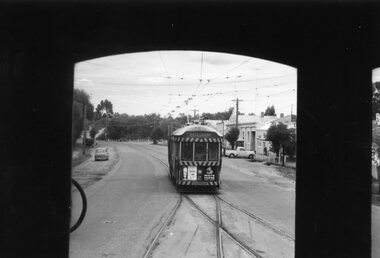
Photograph - Black and White photograph/s - mounted, John Phillips, c1971
Yields information about trams used, services and buildings in Lydiard St North near the railway station c1971.Black and White photograph mounted on heavy cardboard backing. Photo of Ballarat No. 12 with destination of Grey St Sebastopol, with tram behind it, showing "Special" and another two single truckers behind No. 12 in Lydiard St North, just before the Railway level crossing. In the background are Victoria House, Moodys' Provincial Hotel and Ludbrook House. Has parts of old support tape on rear. Note image scanned in two runs through a scanner, resulting in the shading in the image file.trams, tramways, lydiard st, railway crossing, provincial hotel, tram 12, tram 21 -
 Ballarat Tramway Museum
Photograph - Black & White Photograph/s, c1907
Yields information about Sturt and Armstrong Streets with a toast rack tram and Snows Buildings on the left.Black and white historic photograph downloaded from a picture resource website within a decorative frame. Printed with an inkjet printer. Titled "Looking down Lydiard Street North Ballarat, circa:" shows a view looking north along the street from outside the Mining Exchange. Shows the centre poles in the street, the Federal Hotel, Cobb & Co building, blue stone gutters, gutter crossings and telephone wires. Original photo from a postcard - not currently (June 2010) in Museum's collection.trams, tramways, lydiard st north, horse drawn vehicle