Showing 14099 items matching "note"
-
 Ballarat Tramway Museum
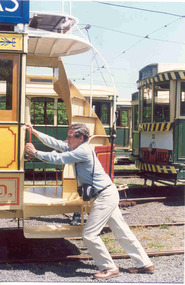
Photograph - Weston Bate launching Horse Tram No. 1, Carolyn Dean, 7/11/1992
Photograph of Horse Tram No. 1 of Professor Weston Bate, 7 November 1992 launching the horse tram. On Agfa paper. Used in the November 1992 issue of Fares Please! Yields information about the launch and the first operation of the horse tram in Wendouree Parade by the BTPS and has a strong association with those involved.Colour photo with Photographer's note on the rear.On rear "14 7.11.92, " in blue ink.horse tram no. 1, tramcars, reconstruction, btps, tram 1 -
 Melbourne Tram Museum
Photograph - Malvern Depot - "New Shed", Ray Pearson, 13-4-1935
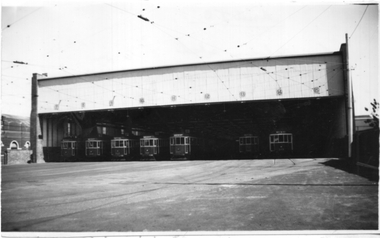
Black and white photograph showing the front of the second or "new" shed at Malvern tram depot. It is not possibly to accurately read the tram numbers. Six W2's and 1 W3 in the view. In the background is the PMTT Built tram depot office building. Photo dated in the Ray Pearson album as 13-4-1935Yields information about Malvern depot in the mid 1930s.Black and White photograph with notes on the rear.In ink - "MMTB New Malvern shed, all "W2" class except No. 665 which is a W3 (On No. 11 road), Ken Magor stamp with "Ray Pearson Photo" written in.trams, tramways, w2 class, w3 class, malvern depot -
 Melbourne Tram Museum
Photograph - Malvern Depot - "New Shed", E G Best, 1930s
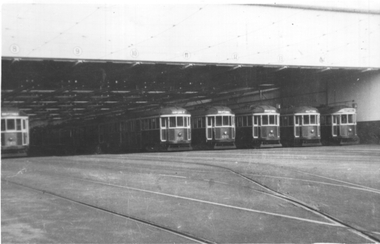
Black and white photograph showing the front of the second or "new" shed at Malvern tram depot. There are 6 W2 class trams in the view - 445?, 379, 650, 514, 380, and 221? Photo by E G Best undate, during the 1930s?Yields information about Malvern depot in the 1930s.Black and White photograph with notes on the rear.Has the stamp of "E G Best photo" on the rear and number "0494"trams, tramways, w2 class, malvern depot -
 Ballarat Tramway Museum
Photograph - ESCo Bendigo tram 9, 1930s
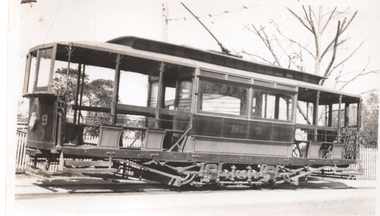
Photograph of Bendigo Tram 9 with the tramcar number on the side in ESCo red and cream livery. Shows the seating arrangement with the outside seating facing inwards. This tram was modified in 1945 to enclose the ends. See item 4342 for further details. One of a series of 7 photos (items 9108 to 9114) possibly taken at the time of the SEC takeover in 1934 to illustrate the type of tram that was being used at Bendigo. Possibly an SEC report photo. Based on the book Destination Eaglehawk, most likely from the Basil Miller collection.Yields information about Bendigo tram 9 during the early 1930s.Photograph, black and white with notes on rear.In ink on rear "No. 9 - Prior to 1934, ie before State Electricty Commission took over" and Ken Magor stamp.tramways, trams, bendigo, esco, tram 9 -
 Ballarat Tramway Museum
Photograph - ESCo Bendigo Sprinkler or scrubber tram, 1930s
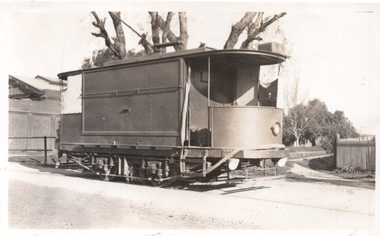
Photograph of Bendigo sprinkler or scrubber tram taken at the depot. Shows the equipment provided on the tram and the lights for night working. The tram was replaced in 1954 by cross bench tram No. 17, converted for this purpose. One of a series of 7 photos (items 9108 to 9114) possibly taken at the time of the SEC takeover in 1934 to illustrate the type of tram that was being used at Bendigo. Possibly an SEC report photo. Based on the book Destination Eaglehawk, most likely from the Basil Miller collection.Yields information about Bendigo scrubber of sprinkler tram during the early 1930s.Photograph, black and white with notes on rear.In ink on rear "Scrubber car and water tank (as at present 1947)", and Ken Magor stamp.tramways, trams, bendigo, esco, scrubber, sprinkler tram -
 Ballarat Tramway Museum
Photograph - ESCo Bendigo tram 11, 1930s
Photograph of Bendigo Tram 11 with the tramcar number on the side in ESCo red and cream livery. Shows the seating arrangement with the outside seating facing inwards. This tram remained in service until 1947. Has a roof advertisement "Drink United Invalid Stout". One of a series of 7 photos (items 9108 to 9114) possibly taken at the time of the SEC takeover in 1934 to illustrate the type of tram that was being used at Bendigo. Possibly an SEC report photo. Based on the book Destination Eaglehawk, most likely from the Basil Miller collection.Yields information about Bendigo tram 11 during the early 1930s.Photograph, black and white with notes on rear.In ink on rear "No. 11 - Prior to 1934, and Ken Magor stamp.tramways, trams, bendigo, esco, tram 11 -
 Ballarat Tramway Museum
Photograph - ESCo Bendigo tram 12, 1930s
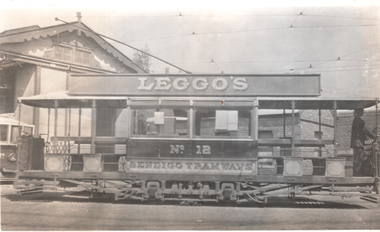
Photograph of Bendigo Tram 12 with the tramcar number on the side in ESCo red and cream livery. Shows the seating arrangement with the outside seating facing inwards. Has a roof advertisement for "Leggo's". One of a series of 7 photos (items 9108 to 9114) possibly taken at the time of the SEC takeover in 1934 to illustrate the type of tram that was being used at Bendigo. Possibly an SEC report photo. Based on the book Destination Eaglehawk, most likely from the Basil Miller collection.Yields information about Bendigo tram 12 during the early 1930s.Photograph, black and white with notes on rear.In ink on rear "No. 12 - Prior to 1934, and Ken Magor stamp.tramways, trams, bendigo, esco, tram 12 -
 Ballarat Tramway Museum
Photograph - SECV Bendigo tram 8, 1930s
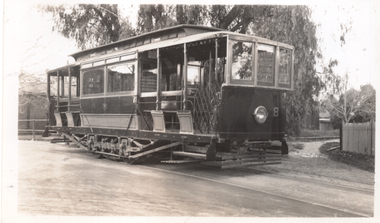
Photograph of Bendigo Tram No 8 at the depot entrance. Originally an ESCo tram and taken over by the SEC in 1934. Painted with an SEC logo and lining. Shows the seating layout. One of a series of 7 photos (items 9108 to 9114) possibly taken at the time of the SEC takeover in 1934 to illustrate the type of tram that was being used at Bendigo. Possibly an SEC report photo. Based on the book Destination Eaglehawk, most likely from the Basil Miller collection.Yields information about Bendigo tram 8 during the mid 1930s.Photograph, black and white with notes on rear.In ink on rear "No. 8 prior to 1934, and Ken Magor stamp.tramways, trams, bendigo, tram 8, secv -
 Ballarat Tramway Museum
Photograph - ESCo Bendigo tram 18, 1930s
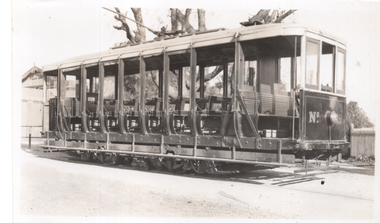
Photograph of Bendigo crossbench or toastrack tram No. 18 at the depot. Demonstrates the layout of seats etc. One of a series of 7 photos (items 9108 to 9114) possibly taken at the time of the SEC takeover in 1934 to illustrate the type of tram that was being used at Bendigo. Possibly an SEC report photo. Based on the book Destination Eaglehawk, most likely from the Basil Miller collection.Yields information about Bendigo tram 18 during the early 1930s.Photograph, black and white with notes on rear.In ink on rear "No. 18 Summer car, as existing at present", and Ken Magor stamp.tramways, trams, bendigo, esco, tram 18 -
 Ballarat Tramway Museum
Photograph - Ballast Motor - Hawthorn Depot, Ray Pearson, 1930's
Black and white photograph of MMTB Ballast Motor No. 11 and trailer at Hawthorn Depot in the 1930's. The tram is loaded with sleepers. Photograph and details of the tramcar are given on pages 70 and 72 of Destination City, 4th Edition. Photograph from Ray Pearson Collection.Yields information about the the MMTB Ballast Motor and the sidings at Hawthorn Depot.Black and white photograph with notes on rear.On rear of both photographs "11 and Ballast Trailer, Hawthorn 1930's" and "B.T.P.S. Sales" in top and bottom left hand corners respectively in red ink.trams, tramways, melbourne, mmtb, hawthorn, ballast motor, work trams, tram 11 -
 Melbourne Tram Museum
Photograph - X 217 Hawthorn Depot, c1925
Shows X class tram No. 217 at Hawthorn Depot with a bow collector. Tram has the destination of "Bridge Rd" (Bridge Road). Yields information about X 217 when it was fitted with a bow collector and Hawthorn Depot.Black and white photograph notes on rearIn ink by Keith Kings: - X217 Hawthorn depot about 1925, courtesy of Mr Stephenson Preston Workshops", has Rev L Marshall Wood stamp and K S Kings stamp - with number S-A 111.tramways, tramcars, tram 217, hawthorn depot, bow collector, x class, mmtb -
 Melbourne Tram Museum
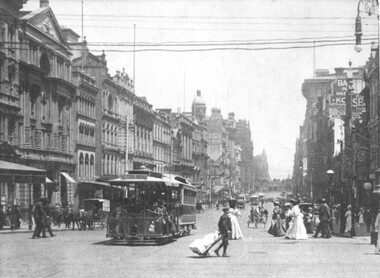
Photograph - Cable trams Collins and Swanston Sts, 1908
Black and white photograph of Collins St near the intersection of Swanston St with a Victoria Bridge cable tram in the view. Shows the buildings on both sides of the street, street lights, horse drawn vehicles and people. Not known how the photo was dated to 1908. Photo possibly from a postcard.Yields information about Collins St from Swanston St, 1908.Black and white print with notes on the rear.In ink "Collins St at Swanston St corner 1908"tramways, collins st, victoria bridge, cable trams, trams -
 Melbourne Tram Museum
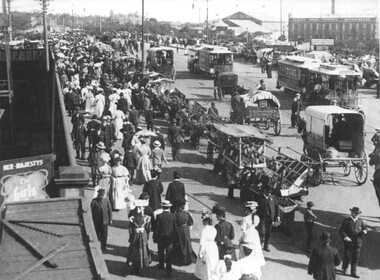
Photograph - Cable trams and stall vendors Princes Bridge, 1908
Black and white photograph of Princes Bridge looking south with produce vendor's carts and many people on both sides of the bridge, generally walking south. In the view are several horse-drawn vehicles, cable trams, one of which is bound for Queensberry St from Toorak. In the view is a poster for Le Girls at Her Majestys Theatre, Worth's Olympic Theatre, and Varley Bros Printer and Bookbinders building. Not known how the photo was dated to 1908. Photo possibly from a postcard.Yields information about Princes Bridge 1908.Black and white print with notes on the rear.In ink "Princes bridge area, crossing over railway lines 1908, City Bound tram - Toorak - Queensberry St route"tramways, tramcars, collins st, victoria bridge, cable trams -
 Melbourne Tram Museum
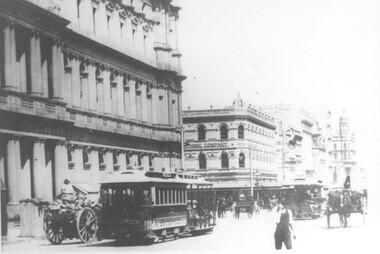
Photograph, Cable Tram 129 Elizabeth St, 1890s
The photograph shows a cable tram set, trailer No. 129, in Elizabeth St at Bourke St. Alf Twentyman has written on the rear "Brunswick car 129 in Elizabeth St, North Melb car approaching, Sometimes 1890s.", with the Post Office alongside. Two heavy horse-drawn drays are also in the view.Yields information about cable trams in Elizabeth St c1890s.Photograph, black and white, with notes on rear.in pencil on the rear - very faded - "Brunswick car 129 in Elizabeth St, North Melb car approaching, Sometimes 1890s."trams, tramways, cable tram, tram 129, elizabeth st, bourke st, alf twentyman -
 Melbourne Tram Museum
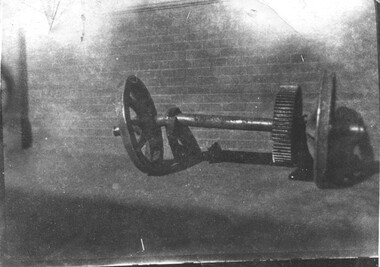
Photograph, Broken Axle tram 65, 1923
The photograph shows the failure of a tramcar axle after being hit by a train (the Deepdene Dasher) at the Deepdene level crossing in 1923 - see pages 6 to 8 of the reference for details of the event and who was to blame. Yields information about the damage to a tramcar axle after a collision with the Deepdene Dasher in 1923.Photograph, black and white, with notes on the rear.On rear in pencil "Car 65 run into by train at Deepdene, axle Hadfield centre" tramways, axles, deepdene, accidents, collisions, tram 65, mmtb, trams, railways -
 Melbourne Tram Museum
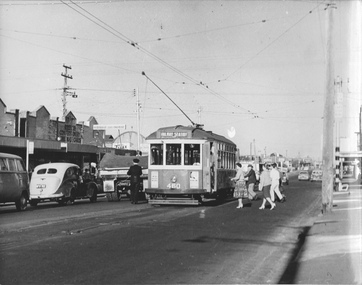
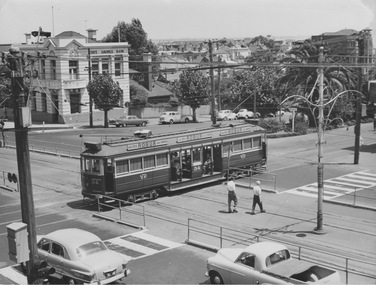
Photograph - X1 460 Ballarat Rd, Jim Seletto, c1960
Photograph shows X1 class tram 460 with destination Railway Station at the corner of Ballarat Rd and Summerhill Rd. The road is busy with cars and trucks and a number of men and women are walking from the curb to board the tram. The single male crew member (driver/conductor) is swinging the single trolley pole to the rear of the tram.Yields information about MMTB X1 and the final years of the short Footscray lines before their closure in 1962Black and white with photograph's note on rearIn biro on rear: '460 Ballarat Rd, J Seletto Photo JSE 11'trams, ballarat rd, footscray, x1 class, tram 460, one man operations, tramways -
 Melbourne Tram Museum
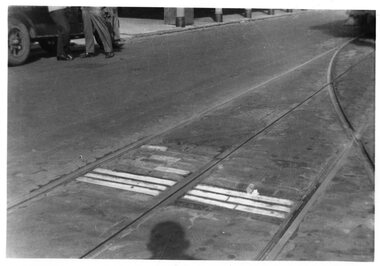
Photograph - Cable Tram road markings, Tramway Museum Society of Victoria (TMSV), 1933
Photo of a set of road markings, three white bars, where the cable grip car had to be stopped by to allow for shunting. Has a set of points and a tram car in the background.Demonstrates a cable tram set of guides for gripman.Black & White Photograph with notes on rear.Has the TMSV Sales stamp on the rear and a date "1933" in pencil.trams, tramways, cable trams, shunting, points -
 Melbourne Tram Museum
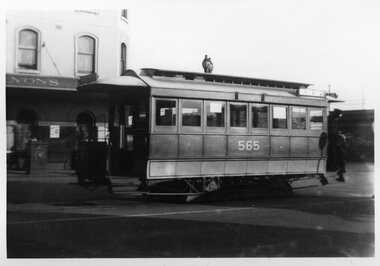
Photograph - Cable tram trailer 565 Bourke St, c1975
Photograph reproduced by the TMSV Sales of trailer 565 at the Spencer St terminus of the Bourke St line. Has Carlyons Hotel in the background. Dated in pencil as 1938. Has the destination of Nicholson St. See also Reg Item 3593 for another photo of trailer 565.Yields information about cable tram trailer 565 at Bourke St.Black & White Photograph with notes on rear.Has the TMSV Sales stamp and "1938" on rear.trams, tramways, cable trams, bourke st, tram 565 -
 Melbourne Tram Museum
Photograph - Batman Ave tram terminus, David Menzies, 21-11-1971
The photograph shows the scissors cross over and signage at the Batman Ave tram terminus - Princes Bridge. Has two W2 class trams at the terminus, with Flinders St station in the background. This terminus was relocated as part of the Federation Square and Tennis Centre developments during 1999 - see reference. Photo by David Menzies, 21/11/1971.Provides information about the Batman Ave tram terminus.Black and white photograph with notes on rear.trams, tramways, mmtb, batman ave, w2 class, flinders st station -
 Melbourne Tram Museum
Photograph - Batman Ave tram W2 470, David Menzies, 21-11-1971
The photograph shows tram W2 470 (Route 71) arriving at the Batman Ave tram terminus with another tram ahead of it. Batman Ave was relocated as part of the Federation Square and Tennis Centre developments during 1999. Photo by David Menzies, 21/11/1971.Provides information about the Batman Ave tram terminus.Black and white photograph with notes on rear.trams, tramways, mmtb, batman ave, w2 class, tram 470, route 71 -
 Melbourne Tram Museum
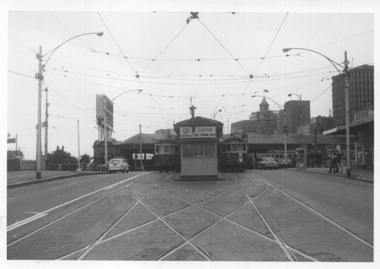
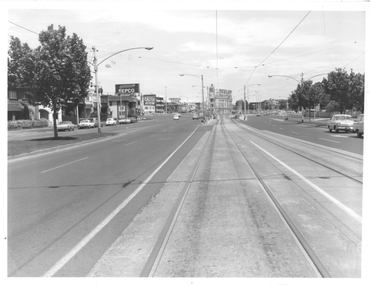
Photograph - St Kilda Road looking south, Melbourne & Metropolitan Tramways Board (MMTB), c1975
Photograph of the south end of St Kilda Road, before the full reconstruction of High Street St Kilda (now St Kilda Road) but after the reconstruction of the Queens Road underpass, photo c1975. Shows the buildings at the junction including the Tower Hotel in the distance. Signs for advertising include Repco, Caltex Astron, UniRoyal Tyres, and Dunlop Tyres. The "Timeline history of Melbourne Tramways etc Barry George et al" gives the date of the opening of the High St section as March 1975.Yields information about the redevelopment of St Kilda Junction.Black and White Photograph with notes on the rear.On rear of photograph in ink "St Kilda Road Junction Stage One complete c1975"trams, tramways, high st, st kilda junction, st kilda rd -
 Melbourne Tram Museum
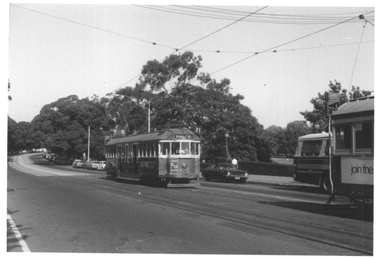
Photograph - VR tram 34 departing St Kilda Station
Photograph taken from a second floor building shows bogie car VR tram 34 crossing Fitzroy St and M&MTB tracks after departing St Kilda Railway Station. All saloon windows are open, all sunshades raised and passengers aboard. A summers day with two male pedestrians and two motor vehicles in foreground. Yields information of Railways tramcar 34 and St Kilda Railway Station Black and white photograph with note on rear.Indistinct blue stamp and 'Summer 1959'victorian railways, vr tram 34, st kilda railway station, fitzroy st, m&mtb -
 Melbourne Tram Museum
Photograph - Shunting cable trailer 8 at Spencer St, H Smith, c1926
Photograph shows John Stephenson trailer car No. 8 being hand shunted by the conductor in Spencer St at the Richmond line city terminus, c1926. The tram has the destination of Spencer St. In the background is a galvanised sheet-clad shed, a horse-drawn cart and a number of pedestrians. The gripman is standing by the dummy to couple the trams. Photo by H Smith.Yields information about the shunting of trams in Spencer St on the Richmond line.Black and white photograph with notes on rear.In ink "6" and "K McC"tramcars, tramways, cable trams, tram 8, spencer st, shunting -
 Melbourne Tram Museum
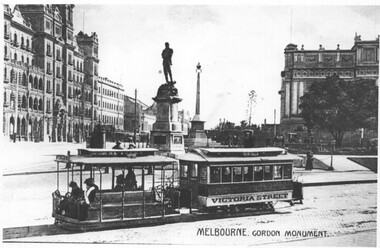
Photograph - Cable tram 78 - Gordon Monument
Photograph shows cable trailer 78 and grip car in Macarthur St Melbourne about to cross Spring St. The tram is lettered for Victoria St line. In the background is the General Gordon Monument (see reference), the Windsor Hotel and the Victorian Parliament buildings. See items 6184 and 8083 for other photos with the monument.Yields information about cable trams and the Gordon Monument.Black and white photograph with notes on rear.In ink "12" and "K McC"tramcars, tramways, cable trams, spring st, macarthur st, tram 78 -
 Melbourne Tram Museum
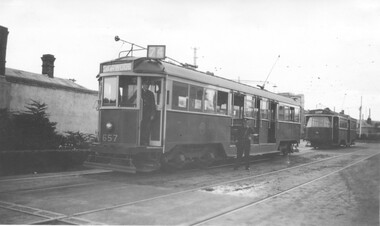
Photograph - Trams 657 and 611 Camberwell Depot, Ray Pearson, 1937
The photograph shows W3 class tram No. 657 (Burwood, Route 74) and Y1 class tram 611 on the depot access tracks at Camberwell Depot. The driver of 657 is standing in the cabin doorway and the conductor is carrying his cash tin. Photo by Ray Pearson, 1937.Yields information about trams 657 and 611 in 1937.Black and White photograph with notes on rear"657 Camberwell - Duplicate copy" and "Ray Pearson"trams, camberwell depot, w3 class, y1 class, tram 657, tram 611, crews -
 Melbourne Tram Museum
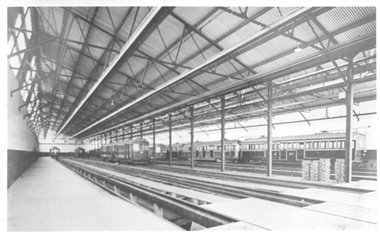
Photograph - Glen Huntly tram depot interior, c1925
The photograph shows the interior of the Glen Huntly tram depot, c1925 with W class trams, and other trams in the depot.Yields information about the Glen Huntly depot, c1925.Black and White photograph with notes on rear"Camberwell" crossed out and "Glenhuntly Duplicate Copy" written in.trams, w class, glen huntly depot -
 Melbourne Tram Museum
Photograph - Tram 510? in Collins St, The Age Newspaper, 16-10-1954
Black and white photograph showing possibly W2 class tram No. 510 (Kew Depot, route 47) east bound in Collins St at Exhibition St. Has the T&G building in the background. The photo appeared in The Age centenary supplement on page 22. Yields information about Collins St and tram 510.Photograph with hand written notes on rear.Page 22 in pencil and "Collins Street East 16-10-54, The Age Centenary paper"trams, tramways, tram 510, collins st, w2 class -
Melbourne Tram Museum
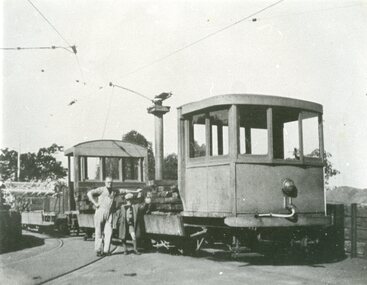
Photograph - Dummy and staff outside Brunswick Car Shed, c1926
Photograph shows Dummy or Grip Car on run-out track outside Brunswick Car Shed in Sydney Road, Brunswick. Lined up in the foreground along the side of the Dummy are approx 20 tram crew and other staff, most in assorted uniforms with unbuttoned jackets. While the photo's reproduction is poor, the destination board reads 'H. B. Railway' (Hobson's Bay Railway) once located at the Flinders and Elizabeth Streets terminus. This early railway became part of the Victorian Railways in 1878, well before the opening of the Brunswick cable line in 1887 and this photograph c1890. Photo from C B Thomas collection.Yields information about Brunswick Car Shed and Sydney RoadBlack and white photograph with notes on rear.In ink "8" and "K McC"tramcars, tramways, cable trams, dummy, grip car, hobsons bay railway, elizabeth street, flinders street, brunswick car shed, sydney road -
 Ballarat Tramway Museum
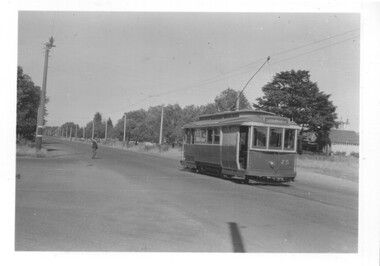
Photograph - Tram No.25 travelling in bound on Victoria St, 1950s
Photograph shows tram 25, inbound to the city in Victoria St. It includes a man walking across street towards the tram. This shows how people would wait on the footpath for their tram, and as the tram approached they would walk out on the street ready to board the tram as it came to a stop.Yields information about Victoria St, tram 25 and passengers.Black and white photograph with notes on the rear."3", "No25", "91", "KEN MAGOR Neg. No 1900"ballarat, ballarat tramways, tram 25, victoria st. -
 Ballarat Tramway Museum
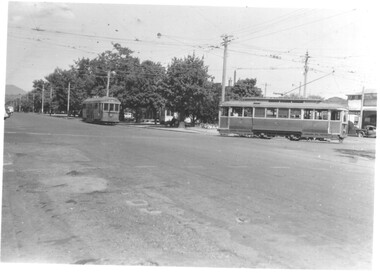
Photograph - Ballarat trams No.31 & No.15 in Sturt St, 1950s
Photograph showing Ballarat tram no.15, travelling away from photographer, going East on Sturt St, and Tram No.31 turning out of Drummond St Sth into Sturt St.Black and white photograph with notes on the rear."No31", "No 91", "No15", "KEN MAGOR Neg. No 1898"ballarat, ballarat tramways, sturt st, drummond st sth, tram 31, tram 15