Showing 19081 items matching "gardeners"
-
 Ballarat Tramway Museum
Photograph - Digital image Set of 16, George Coop, 1968 - 1970
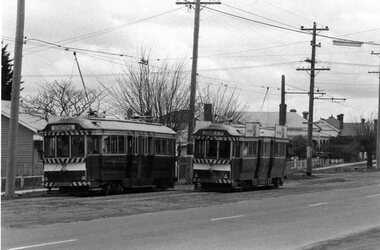
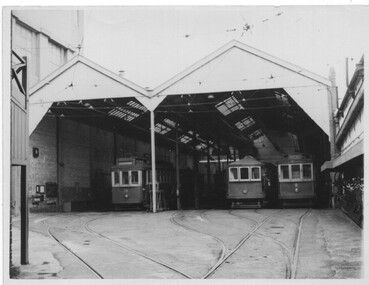
Yields information about the Depot and how equipment was provided in the depot and some of the tramcars.Sixteen Digital images taken by George Coop during the period 1968 - 1970, of SEC trams at the Depot and workshops in Wendouree Parade. .1 - 36 in depot with chain block, chains, jacks and other equipment in the view. .2 - view of the inspection pit on 4 road with the large jack in the pit. .3 - 39 on "0" road - photo has been "framed" with a blue line. .4 - 26 in the paint and wood shop area of the workshops. .5 - 43 in the depot. .6 - 42 and the 1 road pit. .7 - ditto, with a window cleaner - photo has been "framed" with a blue line. .8 - 35 and 36 .9 - roof top view - photo has been "framed" with a blue line. .10 - 27 and many spare wheels in the view, along with jacks. .11 41 and other trams showing the pit, spare parts and equipment - photo has been "framed" with a blue line. .12 18 at the front of the depot. .13 View of a 22E bogie with autumn leaves .14 - as for .4, - photo has been "framed" with a blue line. .15 - Scrubber car on "0" road and lots of autumn leaves. .16 - View of the depot view with 39 on "0" road and 18 on "3" road. trams, tramways, depot, workshops, scrubber tram, tram 36, tram 27, tram 41, tram 18, tram 39, scrubber, tram 39, tram 26, tram 43, tram 42, tram 35, tram 36 -
 Ballarat Tramway Museum
Photograph - Digital image Set of 5, George Coop, 1968 - 1970
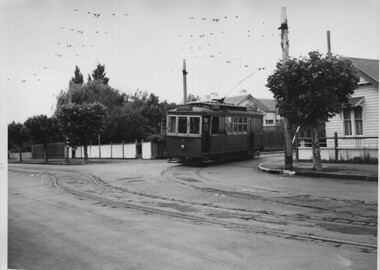
Yields information about the tram operations on the Sebastopol line at Grey St and the terminus.Five (5) Digital images taken by George Coop during the period 1968 - 1970, of SEC trams on the Sebastopol line .1 - Trams 40 (Sebastopol) and 41 (Lydiard St North, with Johnny Walker Whiskey roof adverts) cross at Grey St. .2 - Trams 40 (Lydiard St North) and 35 (Sebastopol) cross at Grey St. Photos has the street signs - Gray St and Bala St in the photo. .3 - ditto, with a male passenger with walking stick boarding 40 - photo shows the loop arrangements. .4 - Tram 40 at the Sebastopol terminus - has destination of Lydiard St North, the Royal Mail Hotel in the background. .5 - ditto with poles being reversed. Tram has roof adverts for Eureka Tiles and a SEC roof advert. trams, tramways, sebastopol, grey st loop, gray st, passengers, crews, tram 40, tram 41, tram 35 -
 Ballarat Tramway Museum
Photograph - Digital image Set of 6, George Coop, 1968 - 1970
Yields information about the tram operations at or near the Ballarat Railway Station.Six (6) Digital images taken by George Coop during the period 1968 - 1970, of SEC trams in Lydiard St North near or at the Railway station/ .1 - Tram 28 northbound with the station building and signal gantry in the background. No. 28 has a White Florist roof advert. .2 - Tram 32 southbound - taken from the signal box, has the gate wheel in the foreground. .3 - Tram 27 south bound, with destination of Sebastopol, with the station building, signal gantry and Reid's Coffee Palace in the background. No. 27 has a Twin Lakes sign and a Bliss Bombs roof advert. .4 - Tram 32, northbound, crossing the railway tracks, taken from the signal box has the railway station goods shed, building and signal gantry in the background. The tram has a Wilkinson Sword Razor blades roof advert. .5 - Tram 28, southbound from signal box. See image .1 for details. .6 - Tram 27, southbound in Lydiard St north with Bliss Bombs advert and destination of Sebastopol. Has the goods yard in the background. Taken through the verandah of Victoria House. trams, tramways, level crossings, railway station, lydiard st north, signals, tram 28, tram 32, tram 27 -
 Ballarat Tramway Museum
Photograph - Digital image Set of 5, George Coop, 1968 - 1970
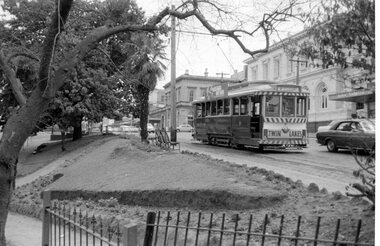
Yields information about the tram operations at or near the Titanic Bandstand in Sturt St.Five (5) Digital images taken by George Coop during the period 1968 - 1970, of SEC trams in Sturt St, between Lydiard and Grenville Streets on the north side of Sturt St. .1 - Tram 11, descending the hill by the Titanic bandstand with the Post Office in the background. Trams has a Twin Lakes advert, Bliss Bombs and the destination of Mt Pleasant. .2 - Tram 31 ditto, except destination of Victoria St. .3 - Tram 13 with bandstand in the view - for Mt Pleasant. .4 - Tram 33, with a lady and man carrying a box descending the footpath. Tram has the destination of Victoria St and a Twin Lakes sign. .5 - Tram 26, at corner of Sturt and Camp Streets, with the Owen Williams store in the background. trams, tramways, sturt st, tram 11, tram 31, tram 13, tram 33, tram 26 -
 Ballarat Tramway Museum
Photograph - Digital image Set of 6, George Coop, 1968 - 1970
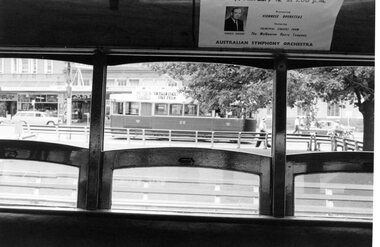
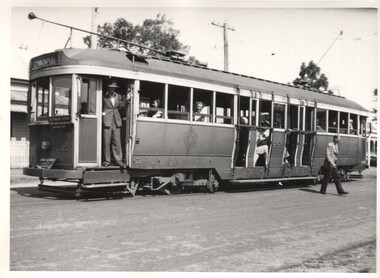
Yields information about the interior views of the Ballarat tramcars and the driver's compartment.Six (6) Digital images taken by George Coop during the period 1968 - 1970, of the interior of trams. .1 - looking out of the open windows of a the saloon of a single trucker to the tram 28, at the City terminus. There is an Australian Symphony Orchestra interior advert. .2 - Looking through the open passenger door, with No. 17 behind. .3 - Looking from the saloon towards to the open end, no car number apparent. .4 - Looking at the driver's bulkhead with the used ticket box and a hand on the controller. .5 - View of the driver's compartment - T1F Controller, PV brake valve and "Pay as you enter" reversed. .6 - Close up of the Westinghouse T1F controller. trams, tramways, interiors, controllers, brake valves, signs, westinghouse, tram 17, tram 28 -
 Ballarat Tramway Museum
Photograph - Colour Print/s, 2015
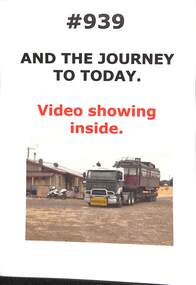
Set of 24 colour A4 (printed on a bubble jet printer) and laminated of ex Melbourne Restaurant Tram 939 and its repair and conversion to Cuthbert's 939 by the BTM during 2013 and 2014. Various photographers. Prepared for display at the launch of the tram. Some have Velcro strips on the rear for display purposes. Scanned with a Scan Snap desk top scanner - they were not flattened, thus some are curved.trams, tramways, cuthberts 939, restaurant tram, conversion, btm -
 Ballarat Tramway Museum
Photograph - Black & White Photograph/s, Charles Craig, mid 1950's
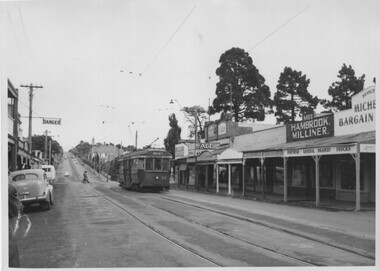
Black and White photograph of Geelong No. 38 (Destination West), in Pakington St Geelong, near Hope St just past the Autumn St loop. Has buildings of the shopping centre in the view. Two copies held - two different sizes.trams, tramways, geelong, pakington st, west, tram 38 -
 Ballarat Tramway Museum
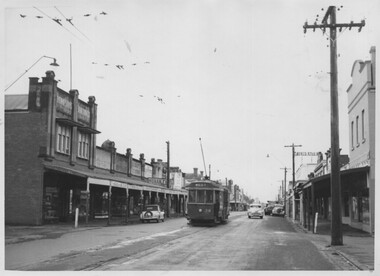
Photograph - Black & White Photograph/s, Charles Craig, mid 1950's
Black and White photograph of Geelong No. 38 (Destination West), in Pakington St Geelong, entering the Autumn St loop. Has buildings of the shopping centre in the view, including Hambrook Milliner. Two copies held - two different sizes.trams, tramways, geelong, pakington st, west, tram 38 -
 Ballarat Tramway Museum
Photograph - Black & White Photograph/s set of 2, Charles Craig, 27/03/1956 12:00:00 AM
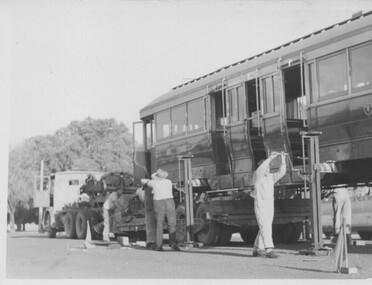
Yields information about the transportation of a bogie tram from Geelong to Ballarat following closure of the Geelong system.Set of two photographs of the loading of an SEC bogie tram in Geelong. Though no number shown, letter from Bob Lilburn to Charles Craig - 7-2-1971 identifies the tram as Geelong 40, being loaded on 27-3-1956 (See Reg Item 6747 and 8527 for other photographs) Would appear the trolley pole bases have been removed. .1 - tram on jacks with semi trailer partly under the tram - maximum traction bogie on the turntable section of the semi trailer. .2 - the bogie being craned on with a Fowler mobile crane. Tram became Ballarat 43. trams, tramways, geelong, transport, loading trams, tram 40 -
 Ballarat Tramway Museum
Photograph - Black & White Photograph/s, Charles Craig, Late 1957
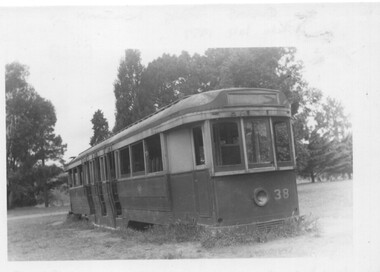
Photograph of ex Geelong (not on bogies) 38 at Queens Park, late 1957, printed on Kodak paper. Has details of tram on the rear, including that it had been "demolished for scrap metal by Newtown Scout Troop 1961" On the rear of the photo in ink. "Queens Park Newtown, Photo late 1957" and "38 demolished for scrap metal by Newtown Scout Troop 1961" trams, tramways, geelong, queens park, tram bodies, tram 38 -
 Ballarat Tramway Museum
Photograph - Black & White Photograph/s set of 2, Charles Craig, c1955
Set of two photographs of trams at the SEC Geelong Depot, mid 1950's. .1 - 19, scrubber and 9 with the depot buildings in the view - two copies of the print - slightly differently framed. .2 - bogie ( fitted with zebra stripes and dash canopy lights), 4, 16, 19, 38 (left to right) Destination Eaglehawk notes that No. 4 was the only single trucker fitted with zebra stripes and dash canopy lighting - see pages 42 and 44 during 1955 trams, tramways, geelong, depot, tram 19, tram 9, scrubber, tram 4, tram 16, tram 19, tram 38 -
 Ballarat Tramway Museum
Photograph - Black & White Photograph/s, Charles Craig, mid 1950's
Photograph of ex Geelong No. 6 with destination of Eastern Park turning from Aphrasia St into Pakington St Geelong. Shows the condition of the trackwork and the road surface. Tram ex Newtown. Two prints held - one large and one small. trams, tramways, geelong, newtown, aphrasia st, pakington st, tram 6 -
 Ballarat Tramway Museum
Photograph - Black & White Photograph/s, Charles Craig, mid 1950's
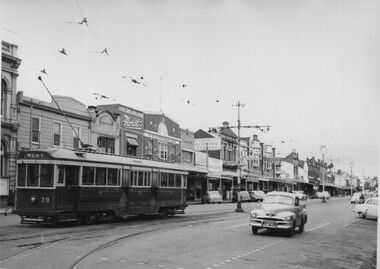
Photograph of ex Geelong No. 39 in Ryrie St at Moorabool St looking west. Tram has the destination of West. Shows the centre poles and the shops in the street. Two prints held - one large and one small. trams, tramways, geelong, ryrie st, moorabool st, tram 39 -
 Ballarat Tramway Museum
Photograph - Black & White Photograph/s, Charles Craig, mid 1950's
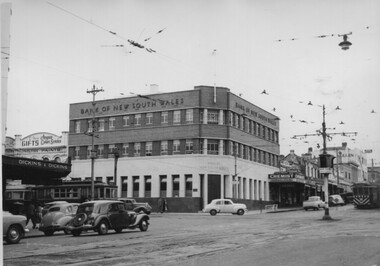
Photograph of the intersection of Ryrie and Moorabool Streets Geelong with the Bank of New South Wales building - three trams can been seen in the view. shows the bar type traffic lights. Also in the view are Dickins and Dickins store and other shops. Two prints held - one large and one small. trams, tramways, geelong, ryrie st, moorabool st, traffic lights -
 Ballarat Tramway Museum
Photograph - Black & White Photograph/s, Charles Craig, mid 1950's
Photograph of the intersection of No. 17 with the destination of Beach in Pakington St at the junction with Aphrasia St. Shows the nature of the layout of the junction and has signs indicating a tram stop and "End of Section". Two large prints held - and one small one, with a vertical frame. trams, tramways, geelong, signs, aphrasia st, pakington st, tram 17 -
 Ballarat Tramway Museum
Photograph - Black & White Photograph/s, Charles Craig, mid 1950's
Photograph of a Geelong single trucker, leaving the loop in Pakington St, outside the Newtown Town Hall, heading north. Two copies held - one large and one small print. (location advised by Dave O'Neil 31-12-2016 by e-mail)trams, tramways, geelong, signs, newtown, pakington st -
 Ballarat Tramway Museum
Photograph - Black & White Photograph/s, Charles Craig, mid 1950's
Photograph of the intersection of Ryrie and Moorabool Streets Geelong looking West along Ryrie St, showing the bar type traffic lights and that right hand turns were done from the left lane. Note the Safety zone sign. Two prints held - one large and one small in a vertical form with the traffic lights featured.. trams, tramways, geelong, ryrie st, moorabool st, traffic lights, safety zone -
 Ballarat Tramway Museum
Photograph - Black & White Photograph/s, Charles Craig, mid 1950's
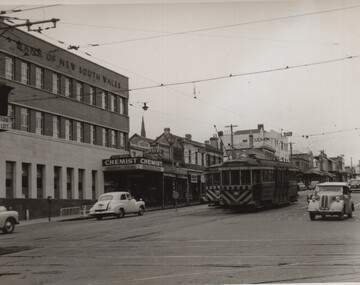
Photograph of the intersection of Ryrie and Moorabool Streets Geelong looking south along Moorabool St, showing the bar type traffic lights and two bogie trams in Ryrie St, one with safety or hazard stripes. Has the Bank of NSW in the view. trams, tramways, geelong, ryrie st, moorabool st, traffic lights -
 Ballarat Tramway Museum
Photograph - Black & White Photograph/s, Charles Craig, mid 1950's
Photograph of the intersection of a bogie tram with destination of East and hazard stripes and dash canopy lighting turning from Pakington St (from West) into Aberdeen St at Pakington St junction. In the background is the Shell service station. Note the metal tram stop sign on the left. Two copies of the print held. trams, tramways, geelong, aberdeen st, east, west, tram stops -
 Ballarat Tramway Museum
Photograph - Black & White Photograph/s, Charles Craig, mid 1950's
Photograph of the intersection of Ryrie and Moorabool Streets Geelong looking south along Moorabool St, with two bogie trams in Ryrie St, both with safety or hazard stripes. Trams have the destination of Belmont and North. Has the Bank of NSW in the view, E. A. O'Meara Chemist advertising Kodak film and the Geelong Nursery Nook. Adjacent to the tram for Belmont is the safety zone sign. trams, tramways, geelong, ryrie st, moorabool st, traffic lights -
 Ballarat Tramway Museum
Drawing - Illustration/s, Geelong 18
Illustration or printed photograph from a newspaper or magazine adhered to a sheet of cardboard of Geelong 18, converted for one man operation with the destination of West. Tram in green and cream colour scheme - late 1930's? trams, tramways, geelong -
 Ballarat Tramway Museum
Photograph - Black & White Photograph/s, Charles Craig, 21/04/1962 12:00:00 AM
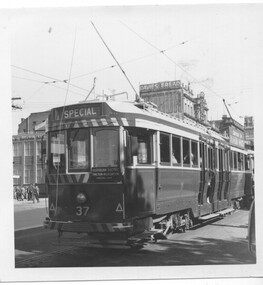
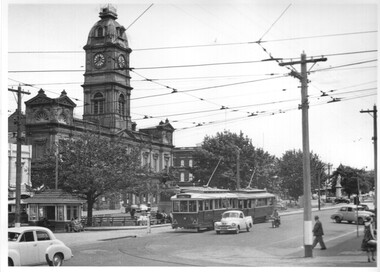
Yields information about tram 37 and an AETA charter.Photograph of the rear of tram 37 in City Loop, Sturt St, on an AETA tour, 21-4-1962 with an AETA auxiliary board. Photo Charles Craig? Has in the background the Mechanics Institute buildings with a Davies Bread and Robur tea advertisement. Has in red ink on rear - "AETA tour 21-4-62".trams, tramways, ballarat, city loop, aeta, sturt st, tram 37 -
 Ballarat Tramway Museum
Photograph - Black & White Photograph/s, Charles Craig, late 1960's early 1970's
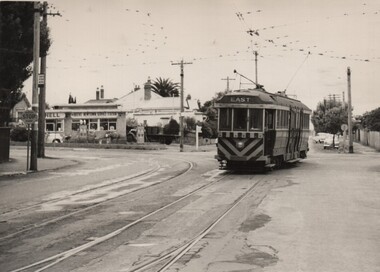
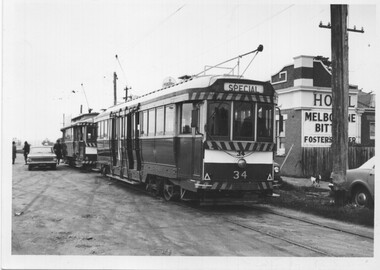
Yields information about tram operations on the Sebastopol line.Photograph of Ballarat trams (from the rear), 30 and 34 at the Sebastopol terminus - undated - late 1960's early 1970's with the Royal Mail hotel in the background. No. 34 running a special. On the hotel is a sign for Melbourne Bitter and Foster's Lager. Photo by Charles Craig? Has in red ink on rear - "34 and 30 Sebastopol"trams, tramways, sebastopol, tram 30, tram 34 -
 Ballarat Tramway Museum
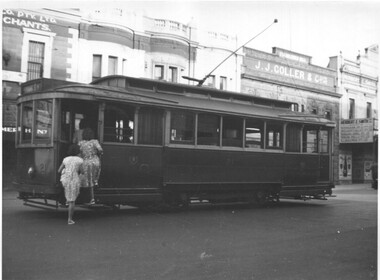
Photograph - Black & White Photograph/s, Charles Craig, early 1950's?
Yields information about the use of the trams and the appearance of Lydiard St North buildings during the early 1950's.Photograph of No. 21, in Lydiard St North, near the Railway Station, boarding two lady passengers. Has J. J. Coller & Co. building and the Hersert E Smith building and sign in the view. Early 1950's? photo by Charles Craig. trams, tramways, lydiard st north, tram 21 -
 Ballarat Tramway Museum
Photograph - Black & White Photograph/s set of 2, Charles Craig, tram No. 27 travelling to Sebastopol in Albert St, early 1950's
Yields information about the traffic and appearance of Albert St Sebastopol during the 1950's and the buildings on either side of the street.Set of two black and white photographs of trams Photo possibly early 1950's of No. 27 travelling to Sebastopol in Albert St. .1 - crossing the roadway near Ophir St with the Trinity Church in the background. .2 - Tram at the Sebastopol Terminus with the new housing on the left side of the roadway and the Royal Mail Hotel. Both photos by Charles Craig trams, tramways, albert st, sebastopol, ophir st, tram 27 -
 Ballarat Tramway Museum
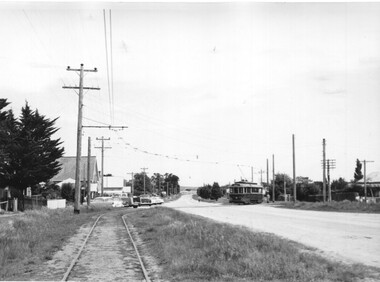
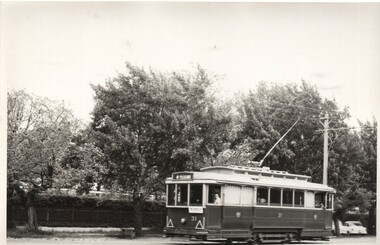
Photograph - Black & White Photograph/s, Charles Craig, late 1950's
Yields information about the tram 31 and Sturt St West during the late 1950's.Black and white photograph of tram No. 31 Sturt St west inbound to the City and then Mt Pleasant. Photo by Charles Craig possibly late 1950's. trams, tramways, sturt st west, mt pleasant, tram 31 -
 Ballarat Tramway Museum
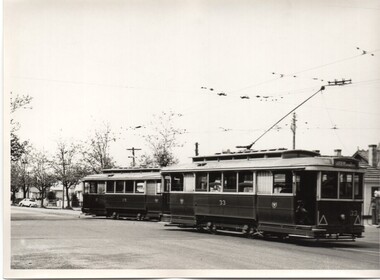
Photograph - Black & White Photograph/s, Charles Craig, late 1950's
Yields information about the trams at Hospital Corner during the late 1950's.Black and white photograph of trams 28 and 33 at the intersection with Sturt and Drummond St North. Tram 33 has destination of Sturt via Drummond North. Tram 28 is inbound. Has the Shell service station bowser in the background. Photo by Charles Craig possibly late 1950's. trams, tramways, sturt st, drummond st nth, hospital corner, tram 33, tram 28 -
 Ballarat Tramway Museum
Photograph - Black & White Photograph/s set of 2, Charles Craig, early 1950's
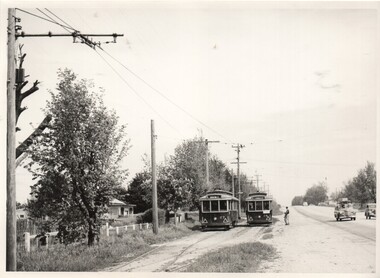
Yields information about the use of the Gray St loop on the Sebastopol line during the early 1950's and its appearance.Black and white photographs of trams 27 and 25 crossing at the Grey St loop in Albert St on the Sebastopol line. Passengers are either waiting or boarding the trams. Tram 27 has the destination of Rubicon St. Note the overgrown area around the loop. Both photos by Charles Craig possibly early 1950's. trams, tramways, sebastopol, albert st, grey st, rubicon st, tram 25, tram 27 -
 Ballarat Tramway Museum
Photograph - Black & White Photograph/s, Charles Craig, 14/03/1949 12:00:00 AM
Yields information about the use of the first bogie tram to be used in Ballarat and its use on an AETA tour.Black and white photograph of Ballarat bogie tram No. 22 (later 37) on an AETA tour. Photo location - possibly Mt Pleasant. See Wal Jack notes btm5533 on this tram. Photo by Charles Craig, dated by G.Cleak - 14.3.1949 - Labour Day. See also Reg item 7591 for a photo of this tram on the same tour at the Sebastopol terminus a md 8513 for a similar photograph. 2 copies held. trams, tramways, bogie trams, aeta, tours, tram 22 -
 Ballarat Tramway Museum
Photograph - Black & White Photograph/s, Charles Craig, 1950's
Yields information about the use of the appearance of City terminus and vehicles during the late 1950's.Black and white photograph of Ballarat tram 11 and another single trucker at the City tram stop, Sturt St, with the Town Hall in the background. Tram 11 has the destination of Mt Pleasant. In the view is the City Shelter and a number of Holden motor cars. Photo by Charles Craig possibly late 1950's. trams, tramways, sturt st, town hall, city, shelters, tram 11