Showing 2079 items matching "gas "
-
 Whitehorse Historical Society Inc.
Equipment - Otiscope, Slide Projector
In one place in records Pat Faggetter is credited with the donation of this item. It would appear that Pat picked it up from Mrs Coldrey so I have credited Mrs Coldrey as the donor. See also page 10 of green folder. (Ted Arrowsmith)OTICISCOPE An early slide projector. Large, black square unit with chrome parts. Bellows to assist in focus can be slid up to 26cm. On the end of the bellows is screwed a further adjustable lens (8.5cm diam by 11cm long). The body of the unit can be tilted to focus on the screen. This lens is endorsed '8 inch (26cm) high focus Aldus UNO Projector Lens'.This lens and a lamp is stored inside the projector. The projection lamp is an Osram (balloon shaped) patent registered 260 volt Gas Filled 500 watt 51. Made in England. Screw fitting .Power supply is by early English type two pin plug with a toggle switch on left side.Ensign Optiscope No. 6 - Made in Britain - Ensign Ltd - London.photography, projectors -
 Ballarat Tramway Museum
Slide - 35mm slide/s, Max Michell, Mar. 1972
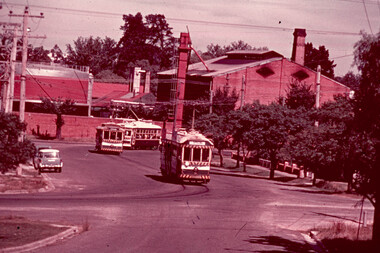
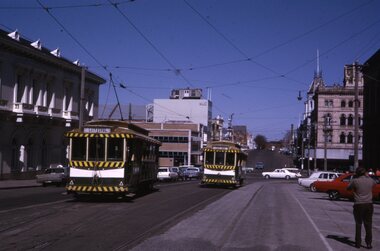
White cardboard mount, 35mm slide, from the Association of Railway Enthusiast's film strip titled "Provincial Tramway Film Strip" of Bendigo No. 5, 6 and 28 in bound in a convoy of Special trams on the North Bendigo route in Caledonia St. Has the Bendigo gas works in the background. Trams showing destination of Special. The film strip notes (Reg. Item 2560), provided the following caption details: "The three types of Bendigo car - Bogie No. 5, Single trucker No. 6 and Birney No. 28 - head away from "NORTH BENDIGO" in a special convoy. - Mar. '72 (Max Michell)" See image btm2590p.tif for high level scan of image. Stamped on base of slide "11800" and written in ink on top edge "No 5, 6 + 28 Nth Bendigo"tramways, trams, are, film strip, caledonia st, gas works, tram 6, tram 5, tram 28 -
 Ballarat Tramway Museum
Photograph - Black and White photograph/s - mounted, c1914
Yields information about trams used, services and buildings in Sturt St near Grenville St in the ESCo era c1914.Black and White photograph mounted on heavy cardboard backing. Photo of Ballarat ESCo trams near the Grenville City terminus - two trams, left hand one has a advertisement for Viceroy tea on the front dash panel. Companies in image are: Mechanics Institute Library, C. Marks, A. E. White, Indian Depot, Peakes and Gas Co. Has the Mechanics Institute building, Town Hall building on both sides of Sturt St. Some early motor vehicles - c1914? From a Railway Photograph? Has marks from old support tape on rear. Note image scanned in two runs through a scanner, resulting in the shading in the image file.trams, tramways, sturt st, town hall, grenville st, esco -
 Falls Creek Historical Society
Journal - Ski-Horizon Vol 6 No 1
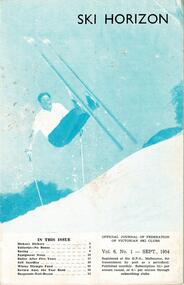
Ski-Horizon is the official journal of the Federation of Victorian Ski Clubs which began publication in 1949. The were 26 original member clubs which included Albury Ski Club, Bogong Ski Club, Myrtleford Ski Club, Tallangatta and District Ski Club and Wangaratta Ski Club. Two pioneers of Falls Creek, Tom Mitchell, M.L.A., and Martin Romuld were Vice-Presidents of the Federation.This Journal is significant because it documents the early development of skiing in Victoria.The journal features stories and events chronicling developments in Victoria and internationally. Items related to the Falls Creek Area in this issue include:- Cover - Rudi Wurth, winner of the National Slalom and Downhill titles at Kosciusko, 1954. Page 2 - Rover Scouts help injured skier on Bogong High Plains Page 3 - Cecil Dobson is a real asset to the village. Apart from provisions he also provides services including ski repairs, carpentering and plumbing. Page 5 - "Wongapussie" - a word for an overboot. Originally found in disposal stores as they were used for anti-gas purposes, but something similar is now being made in Albury and being used extensively at Falls Creek.rudi wurth, cecil dobson, rover scouts rescue, "wongapussie" -
 Bendigo Historical Society Inc.
Magazine - THE SCHOOL PAPER: CLASSES V AND VI, 1912
The School Paper (Classes V and VI); 1912. March, February and May. Copies inside a cardboard cover made from an upside-down old exercise book. Written in red ink on front cover 'R. Davidson G Davidson.' Written on February issue in red ink 'This is Doris Mauger School Paper. This is Doris Book'. Cover is stained with ink, paint and crayon. The back has the original green and white exercise book label. The name Rhyall is written in ink. The lower RHS corner gas been torn off. There are lines and crayon marks inside the cover. Some pages have pencil and crayon marks. Some coloring in on some pages.bendigo, education, school papers -
 Geoffrey Kaye Museum of Anaesthetic History
Equipment - Nitrous oxide gasometer, Buffalo Dental Manufacturing Company, 1876-1901
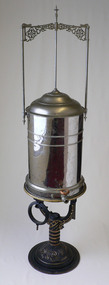
The main component of the nitrous oxide gasometer is a reflective white metal urn-shaped chamber from which an outlet valve and circular moulded tap allows for the flow of gas. A rectangular frame sits atop the chamber and comprises ornately decorated metal flourishes and three white metal anchoring pipes, two attached to each side of the chamber and one attached to the centre of the two-tiered, domed lid. The gasometer sits atop a Y-shaped cast iron stand, ornately decorated with metallic golden brass paint, with a circular base. There is also a black cast iron ring that is attached to the stand. Manufactured by Buffalo Dental Manufacturing Company, Buffalo NY.Inscription on base. "B.D.M. CO, BUFFALO N.Y." Inscription on vertical. "1 2 3" Inscription on upper side of top ring. "J. DEMAREST//PAT.FEB.15.1876." Inscription on lower side of top ring. "15"gasometer, nitrous oxide, storage, anaesthesia, dentistry, chloroform, ether, b.d.m. co -
 Geoffrey Kaye Museum of Anaesthetic History
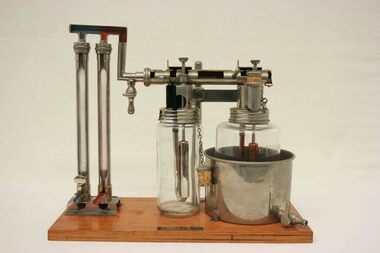
Machine - Boyle's gas anaesthesia apparatus, circa 1937
This is an early example of the Boyle's Anaesthetic Machine which was to become widely used throughout the world. The plaque on the wooden plinth suggests it was a display model from the medical equipment distributor Charles A King of London.The gas anaesthesia apparatus is mounted to a rectangular wooden base. It comprises two long, vertical glass cylinders held in place with metal brackets which are connected to a glass chloroform vaporiser container via metal tubes and associated valves and connections. The bottom of the glass flasks have outlet connections and inscriptions on the glass to measure volume. The chloroform vaporiser and adjacent glass ether vaporiser also have volume measurements etched on the glass, and the latter is the same height as the former but is larger in diameter. Both are connected via metal tubes and include outlet pipes that have associated cork stoppers. The maker's details are provided on a brass plaque attached to thewooden platform.A. Charles King Ltd. London, W1.henry edmund gaskin boyle, vaporiser, rotameter, chloroform, ether, anaesthetic apparatus, charles king ltd, plenum, sectioned, dr geoffrey kaye -
 Flagstaff Hill Maritime Museum and Village
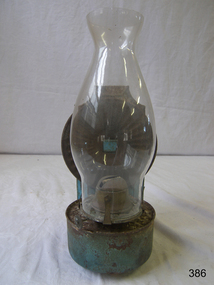
Domestic object - Lamp, Valor Co. Ltd, 1920-1936
This trade mark (V inside a clover) was German. It was used by the lamp makers Veritas Efsca Works in Birmingham, and for a time by Valor Co. Ltd. which took over Veritas. Valor Co. Ltd. was established in Birmingham in 1890 and produced oil containers for the Anglo-American Oil Com. In 1901 the firm advertised themselves as Stampers And Pieces. Later it was named 'The Valor Co. and was associated with the Aston Brass Co., and advertised as makers of oil lamps and stoves. Valor became a maker of oil heaters cookers and many other products that were fueled by oil. Later it sold gas heaters and ovens. In 1936 Valor Co. Ltd. was made a Public Company and operated under the name The Velor Company Ltd. The company changed names over the years and it was still operating under Velor Fires in January 2002.Oil or kerosene lamps were the means of lighting for homes, farms and industry in the late 19th and early-to-mid 20th centuries. Lamps like these were important as Lighthouse Keepers and Assistant Keepers' equipment. They were in common use in until the lighting was powered by gas and electricity. The reflector at the back of the lamp makes it of greater significance as most lamps don't have this feature. The logo is also interesting as it originated in Germany and was used with permission by a British company and the company that brought it out for a short time. Similar lamps are still available today, usually with gas for fuel. Kerosene lamp; blue painted metal fuel can and metal rear reflector support. and a round corrugated reflector at the rear. The mid-section wick is made of brass. The glass cover or chimney is bulbous in shape. Inscriptions include a trademark "V" inside a clover. It is British-made in Birmingham by either Veritas Efsca Works or Veritas Valor.Trademark; "[clover symbol] surrounding a "V" Stamp: "BRITISH MADE" Marked on adjusting device: "English Made 1 in w" Marked on support of deflector shield - "British Made" and symbolwarrnambool, shipwreck coast, flagstaff hill, flagstaff hill maritime museum, flagstaff hill maritime village, oil lamp, table lamp, kerosene lamp, valor co. ltd, v inside a clover, veritas, british made, lamp reflector, lighting, lamp, the valor company ltd -
 City of Moorabbin Historical Society (Operating the Box Cottage Museum)
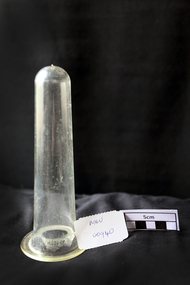
Pharmacy, plastic test tube, 20thC
A test tube, also known as a culture tube or sample tube, is a common piece of laboratory glassware consisting of a finger-like length of glass or clear plastic tubing, open at the top, usually with a rounded U-shaped bottom. Test tubes are widely used by pharmacists to hold, mix, or heat small quantities of solid or liquid chemicals, especially for qualitative experiments and assays. Their round bottom and straight sides minimize mass loss when pouring, make them easier to clean, and allow convenient monitoring of the contents. The long, narrow neck slows down the spreading of vapours and gases to the environment. Test tubes are usually held in special-purpose racks. Culture tubes for biology are usually made of clear plastic (such as polystyrene or polypropylene) by injection moulding and are often discarded after use.A clear plastic test tubepharmacy, test tubes, plastic, culture test tubes, moorabbin, bentleigh, cheltenham, polypropylene, laboratories -
 Uniting Church Archives - Synod of Victoria
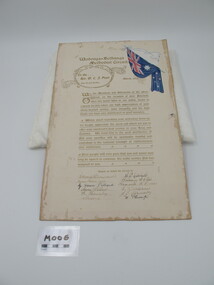
Illuminated Testimonial, Rev W. C. T. Peart
This is a token of appreciation to Rev William Charles J. Peart who was leaving the Wodonga-Bethanga Methodist Circuit to serve King and country. He was minister of the Wodonga-Bethanga circuit in 1914 from where he enlisted in the Light Horse. He afterwards became a gunner in the Field Artillery and was severely gassed, from which he never really recovered. He spent time in hospital and on his return to Australia his circuits were Drouin, Footscray and Merbein. He then had to request leave of absence for six months owing to war disabilities. He was able to return to the ministry. Before enlisting he married Doris Quick who came out of the Daylesford Circuit. The war left a legacy of suffering and limitation with Mr Peart, but he showed a brave face and a steady heart. Paper testimonial mounted on card. The text is gold and there is an image of a draped Australian flag in the top right corner. The testimonial is signed on behalf of the Wodonga-Bethanga Methodist Circuit by 12 people.wodonga-bethanga methodist circuit, rev william charles j. peart 1881-1949, world war 1914 - 1918 -
![Construction of the electric tram line in Cotham Road [Kew]](/media/collectors/550653872162f11fb04854aa/items/662870846214a76cee3aecf0/item-media/662870de6214a76cee3af7de/item-fit-380x285.jpg) Kew Historical Society Inc
Kew Historical Society IncPhotograph - Construction of the electric tram line in Cotham Road [Kew], E.J. Dower, 1913
One of a small album of six photographs of the construction of the Cotham Road tramline in Kew, taken by Edgar James Dower in the second decade of the twentieth century. The reverse of each photo contains notes, written over time by the photographer, which are contained in the 'Inscriptions' field. Born and raised in Olinda, Dower's family later moved to Surrey Hills. He worked as an adult as a clerk in the city office of the Metropolitan Gas Company, and in his role as a 'collector', he was able to photograph scenes including the construction of tram and train lines and associated buildings in Kew, Hawthorn, Camberwell and Surrey Hills. Later he established a real estate agency with his brother - the E.J. Dower Real Estate Agency, Dandenong Office. The album as a whole can be viewed separately as the parent file.The image is an historically significant record of the development of transport infrastructure which was used to connect Victorians in the first two decades of the twentieth century. This development resulted from increases in population and the consequent extension of Melbourne's suburbs. The photographs in the album, as well as Dower's single photos mounted on card, individually and collectively richly detail the labour of workers and the tools and machinery used to create and extend Melbourne's tram and train networks in the years preceding and during World War 1.The first of six annotated photos in an album of photographs of the construction of the St Kilda to Kew electric tram line, taken in Cotham Road, Kew, by the amateur photographer, Edgar James Dower, in 1913. The album contains images detailing the preparation for the laying of the tracks plus work laying the line. The photographer notes on a number of the photos that te metal tracks were collected from the Hawthorn railway siding. The album, together with other phots by E.J. Dower has been made available by the owners for the Kew Historical Society to digitise and publish online and in print.Annotation verso: "1913 / Preparing for electric trams in Cotham Road Kew, looking west / Taken from corner of Burke Road by E.J. Dower / The metal was brought by horse and drays, from Hawthorn rail-way siding".keywords, theme -- connecting victorians by transport and communications, theme -- travelling by tram, photographers -- edgar james dower, cotham road -- kew (vic.) -
![Construction of the electric tram line in Cotham Road [Kew]](/media/collectors/550653872162f11fb04854aa/items/662879f26214a76cee3bcd7e/item-media/66287a4f6214a76cee3bd77d/item-fit-380x285.jpg) Kew Historical Society Inc
Kew Historical Society IncPhotograph - Construction of the electric tram line in Cotham Road [Kew], E.J. Dower, 1913
One of a small album of six photographs of the construction of the Cotham Road tramline in Kew, taken by Edgar James Dower in the second decade of the twentieth century. The reverse of each photo contains notes, written over time by the photographer, which are contained in the 'Inscriptions' field. Born and raised in Olinda, Dower's family later moved to Surrey Hills. He worked as an adult as a clerk in the city office of the Metropolitan Gas Company, and in his role as a 'collector', he was able to photograph scenes including the construction of tram and train lines and associated buildings in Kew, Hawthorn, Camberwell and Surrey Hills. Later he established a real estate agency with his brother - the E.J. Dower Real Estate Agency, Dandenong Office. The album as a whole can be viewed separately as the parent file.The image is an historically significant record of the development of transport infrastructure which was used to connect Victorians in the first two decades of the twentieth century. This development resulted from increases in population and the consequent extension of Melbourne's suburbs. The photographs in the album, as well as Dower's single photos mounted on card, individually and collectively richly detail the labour of workers and the tools and machinery used to create and extend Melbourne's tram and train networks in the years preceding and during World War 1.The second of six annotated photos in an album of photographs of the construction of the St Kilda to Kew electric tram line, taken in Cotham Road, Kew, by the amateur photographer, Edgar James Dower, in 1913. The album contains images detailing the preparation for the laying of the tracks plus work laying the line. The photographer notes on a number of the photos that the metal tracks were collected from the Hawthorn railway siding. The album, together with other phots by E.J. Dower has been made available by the owners for the Kew Historical Society to digitise and publish online and in print.Annotation verso: "Preparing electric tram Cotham Road, Kew, 1913 / The metal was brought by horses and drays, from Hawthorn railway siding".keywords, theme -- connecting victorians by transport and communications, theme -- travelling by tram, photographers -- edgar james dower, cotham road -- kew (vic.) -
![Construction of the electric tram line in Cotham Road [Kew]](/media/collectors/550653872162f11fb04854aa/items/66288e6f6214a76cee3e7dbe/item-media/66288f126214a76cee3e934f/item-fit-380x285.jpg) Kew Historical Society Inc
Kew Historical Society IncPhotograph - Construction of the electric tram line in Cotham Road [Kew], E.J. Dower, 1913
One of a small album of six photographs of the construction of the Cotham Road tramline in Kew, taken by Edgar James Dower in the second decade of the twentieth century. The reverse of each photo contains notes, written over time by the photographer, which are contained in the 'Inscriptions' field. Born and raised in Olinda, Dower's family later moved to Surrey Hills. He worked as an adult as a clerk in the city office of the Metropolitan Gas Company, and in his role as a 'collector', he was able to photograph scenes including the construction of tram and train lines and associated buildings in Kew, Hawthorn, Camberwell and Surrey Hills. Later he established a real estate agency with his brother - the E.J. Dower Real Estate Agency, Dandenong Office. The album as a whole can be viewed separately as the parent file.The image is an historically significant record of the development of transport infrastructure which was used to connect Victorians in the first two decades of the twentieth century. This development resulted from increases in population and the consequent extension of Melbourne's suburbs. The photographs in the album, as well as Dower's single photos mounted on card, individually and collectively richly detail the labour of workers and the tools and machinery used to create and extend Melbourne's tram and train networks in the years preceding and during World War 1.The third of six annotated photos in an album of photographs of the construction of the St Kilda to Kew electric tram line, taken in Cotham Road, Kew, by the amateur photographer, Edgar James Dower, in 1913. The album contains images detailing the preparation for the laying of the tracks plus work laying the line. The photographer notes on a number of the photos that the metal tracks were collected from the Hawthorn railway siding. The album, together with other phots by E.J. Dower has been made available by the owners for the Kew Historical Society to digitise and publish online and in print.Annotation verso: "Preparing Cotham Road Kew for electric trams / The metal was brought by horses and drays, from Hawthorn railway siding / 1913".keywords, theme -- connecting victorians by transport and communications, theme -- travelling by tram, photographers -- edgar james dower, cotham road -- kew (vic.) -
![Construction of the electric tram line in Cotham Road [Kew]](/media/collectors/550653872162f11fb04854aa/items/66288f7f6214a76cee3ea3d8/item-media/66288fe96214a76cee3ead36/item-fit-380x285.jpg) Kew Historical Society Inc
Kew Historical Society IncPhotograph - Construction of the electric tram line in Cotham Road [Kew], E.J. Dower, 1913
One of a small album of six photographs of the construction of the Cotham Road tramline in Kew, taken by Edgar James Dower in the second decade of the twentieth century. The reverse of each photo contains notes, written over time by the photographer, which are contained in the 'Inscriptions' field. Born and raised in Olinda, Dower's family later moved to Surrey Hills. He worked as an adult as a clerk in the city office of the Metropolitan Gas Company, and in his role as a 'collector', he was able to photograph scenes including the construction of tram and train lines and associated buildings in Kew, Hawthorn, Camberwell and Surrey Hills. Later he established a real estate agency with his brother - the E.J. Dower Real Estate Agency, Dandenong Office. The album as a whole can be viewed separately as the parent file.The image is an historically significant record of the development of transport infrastructure which was used to connect Victorians in the first two decades of the twentieth century. This development resulted from increases in population and the consequent extension of Melbourne's suburbs. The photographs in the album, as well as Dower's single photos mounted on card, individually and collectively richly detail the labour of workers and the tools and machinery used to create and extend Melbourne's tram and train networks in the years preceding and during World War 1.The fourth of six annotated photos in an album of photographs of the construction of the St Kilda to Kew electric tram line, taken in Cotham Road, Kew, by the amateur photographer, Edgar James Dower, in 1913. The album contains images detailing the preparation for the laying of the tracks plus work laying the line. The photographer notes on a number of the photos that the metal tracks were collected from the Hawthorn railway siding. The album, together with other phots by E.J. Dower has been made available by the owners for the Kew Historical Society to digitise and publish online and in print.Annotation verso: "Preparing tram line Cotham Road Kew looking east for electric trams / 1913 / The metal was brought by horses and drays, from Hawthorn railway siding / 1913".keywords, theme -- connecting victorians by transport and communications, theme -- travelling by tram, photographers -- edgar james dower, cotham road -- kew (vic.) -
![Construction of the electric tram line in Cotham Road [Kew]](/media/collectors/550653872162f11fb04854aa/items/662890b16214a76cee3ec4c2/item-media/662891076214a76cee3ed17d/item-fit-380x285.jpg) Kew Historical Society Inc
Kew Historical Society IncPhotograph - Construction of the electric tram line in Cotham Road [Kew], E.J. Dower, 1913
One of a small album of six photographs of the construction of the Cotham Road tramline in Kew, taken by Edgar James Dower in the second decade of the twentieth century. The reverse of each photo contains notes, written over time by the photographer, which are contained in the 'Inscriptions' field. Born and raised in Olinda, Dower's family later moved to Surrey Hills. He worked as an adult as a clerk in the city office of the Metropolitan Gas Company, and in his role as a 'collector', he was able to photograph scenes including the construction of tram and train lines and associated buildings in Kew, Hawthorn, Camberwell and Surrey Hills. Later he established a real estate agency with his brother - the E.J. Dower Real Estate Agency, Dandenong Office. The album as a whole can be viewed separately as the parent file.The image is an historically significant record of the development of transport infrastructure which was used to connect Victorians in the first two decades of the twentieth century. This development resulted from increases in population and the consequent extension of Melbourne's suburbs. The photographs in the album, as well as Dower's single photos mounted on card, individually and collectively richly detail the labour of workers and the tools and machinery used to create and extend Melbourne's tram and train networks in the years preceding and during World War 1.The fifth of six annotated photos in an album of photographs of the construction of the St Kilda to Kew electric tram line, taken in Cotham Road, Kew, by the amateur photographer, Edgar James Dower, in 1913. The album contains images detailing the preparation for the laying of the tracks plus work laying the line. The photographer notes on a number of the photos that the metal tracks were collected from the Hawthorn railway siding. The album, together with other phots by E.J. Dower has been made available by the owners for the Kew Historical Society to digitise and publish online and in print.Annotation verso: "Preparing tram line Cotham Road Kew for electric trams, looking west / 1913"keywords, theme -- connecting victorians by transport and communications, theme -- travelling by tram, photographers -- edgar james dower, cotham road -- kew (vic.) -
![Construction of the electric tram line in Cotham Road [Kew]](/media/collectors/550653872162f11fb04854aa/items/6628917c6214a76cee3ee29e/item-media/662891d96214a76cee3eeacb/item-fit-380x285.jpg) Kew Historical Society Inc
Kew Historical Society IncPhotograph - Construction of the electric tram line in Cotham Road [Kew], E.J. Dower, 1913
One of a small album of six photographs of the construction of the Cotham Road tramline in Kew, taken by Edgar James Dower in the second decade of the twentieth century. The reverse of each photo contains notes, written over time by the photographer, which are contained in the 'Inscriptions' field. Born and raised in Olinda, Dower's family later moved to Surrey Hills. He worked as an adult as a clerk in the city office of the Metropolitan Gas Company, and in his role as a 'collector', he was able to photograph scenes including the construction of tram and train lines and associated buildings in Kew, Hawthorn, Camberwell and Surrey Hills. Later he established a real estate agency with his brother - the E.J. Dower Real Estate Agency, Dandenong Office. The album as a whole can be viewed separately as the parent file.The image is an historically significant record of the development of transport infrastructure which was used to connect Victorians in the first two decades of the twentieth century. This development resulted from increases in population and the consequent extension of Melbourne's suburbs. The photographs in the album, as well as Dower's single photos mounted on card, individually and collectively richly detail the labour of workers and the tools and machinery used to create and extend Melbourne's tram and train networks in the years preceding and during World War 1.The sixth of six annotated photos in an album of photographs of the construction of the St Kilda to Kew electric tram line, taken in Cotham Road, Kew, by the amateur photographer, Edgar James Dower, in 1913. The album contains images detailing the preparation for the laying of the tracks plus work laying the line. The photographer notes on a number of the photos that the metal tracks were collected from the Hawthorn railway siding. The album, together with other phots by E.J. Dower has been made available by the owners for the Kew Historical Society to digitise and publish online and in print.Annotation verso: "Preparing tram line Cotham Road Kew for electric trams / 1913 / The metal was brought by horse and drays, from Hawthorn railway siding".keywords, theme -- connecting victorians by transport and communications, theme -- travelling by tram, photographers -- edgar james dower, cotham road -- kew (vic.) -
 Vision Australia
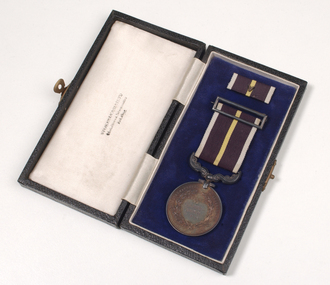
Medal - Object, Royal Humane Society of Australasia medal, 1960s
A Royal Humane Society of Australasia silver medal for bravery was awarded to Mrs Isadore Susannah Smith who, although blind, went to the aid of her husband, Arthur who was also blind, when he fell against a gas fire on July 2nd, 1967. Mrs Smith suffered second degree burns to her hands and wrists when she removed his burning pieces of clothing. On the front shows a woman in Ancient Greek clothing standing at left placing wreath on head of young man kneeling at right below Southern Cross; around edge is ' Virtute Paratum' and on the back is at centre within olive wreath 'Awarded to Isadore Smith 2.7.67'around edge is , Royal humane society of Australasia Instd. A.D. 1874. 1 silver coloured medallion and ribbon bar with ivory, brown and yellow striped ribbon. Women in ancient Greek clothing with 'Virtute Paratum' on front. Back is inscribed with 'Isadore Smith 2.6.67' inside a wreath.medals, isadore smith -
 Ballarat Tramway Museum
Slide - Set of 7, Warren Doubleday, Ballarat - last day of the Mt Pleasant line, 5/9/1971
Photos taken on the last day of the Mt Pleasant tram line 5/9/1971 1 - Trams 26 and 27 shunting in Lydiard St North Xover - has the Post Office, Commonwealth Bank, MLC and National Mutual buildings in the background. 2 - as above 3 - Trams 26 and 27 at the Mt Pleasant terminus in Barkly St - note the bus stop sign. 4 - Trams 26, 27 and 43 at the Grant St loop. 5 - Trams 14 and 43 at the Grant St Loop 6 - Tram 13 arriving at the City stop with the National Mutual Building in the background. 7 - Tram 43 passing 26 and 27 in the Sturt St City Loop with the Dickins Food Store, Patersons, Union Hotel, Brashes, Ballarat Gas Co. Gear Chemist in the background.Yields information about the last day of the Mt Pleasant tram line in Ballarat.Set of 7 Kodachrome colour slides - cardboard mountsHave the photographer's slide numbers written on them.trams, tramways, closure, tram 26, barkly st, level crossing, lydiard st nth, sturt st, tram 27, tram 14, tram 13, tram 43, mt pleasant, grant st. -
 City of Greater Bendigo - Civic Collection
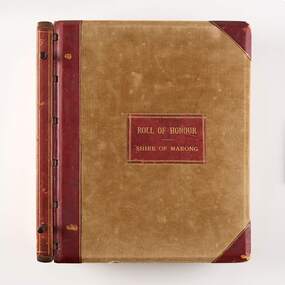
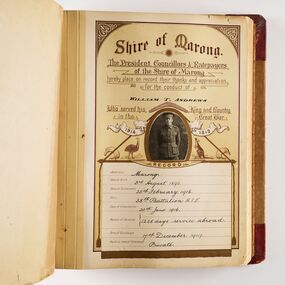
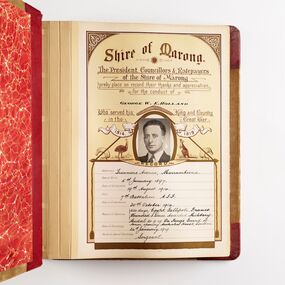
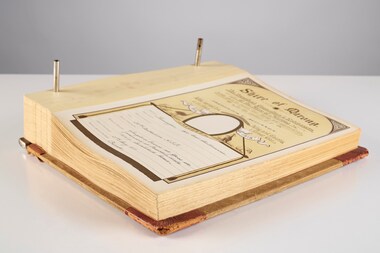
Book - WW1 Commemorative Album, Roll of Honour :: Shire of Marong, Unknown
This album pays tribute to the First World War service men who were born and / or lived in the Shire of Marong and were killed in action. Australia’s involvement in the First World War began when Britain and Germany went to war on 4 August 1914, and both Prime Minister Joseph Cook and Opposition Leader Andrew Fisher, who were in the midst of an election campaign, pledged full support for Britain. The outbreak of war was greeted in Australia, as in many other places, with great enthusiasm. For Australia, the First World War remains the costliest conflict in terms of deaths and casualties. From a population of fewer than five million, 416,809 men enlisted, of whom more than 60,000 were killed and 156,000 wounded, gassed, or taken prisoner. Large volume with screw post binding. Corduroy and leather front and back cover. Leather gold embossed title central front cover. Marbled pasted down end papers. Seventy four individual cream and maroon printed pages with decorative scrolls, illustrations and text. Alphabetised. Each page is dedicated to a service man who died in action, recording his name, address, service record and date of death. Oval central space for photographic portrait with image of an emu on the left, kangaroo on the right and boomerang above. (Not all pages contain photographs). Shire of Marong / The President, Councillors & Ratepayers / of the Shire of Marong / hereby place on record their thanks and appreciation / for the conduct of (soldiers name) / Who served his King and Country / in the Great War / 1914 / 1919shire of marong, world war 1 -
 City of Greater Bendigo - Civic Collection
Book - WW1 Commemorative Album, Roll of Honour :: Shire of Marong, Unknown
This album pays tribute to the First World War service men who were born and / or lived in the Shire of Marong. This volume covers surnames from A to G. Australia’s involvement in the First World War began when Britain and Germany went to war on 4 August 1914, and both Prime Minister Joseph Cook and Opposition Leader Andrew Fisher, who were in the midst of an election campaign, pledged full support for Britain. The outbreak of war was greeted in Australia, as in many other places, with great enthusiasm. For Australia, the First World War remains the costliest conflict in terms of deaths and casualties. From a population of fewer than five million, 416,809 men enlisted, of whom more than 60,000 were killed and 156,000 wounded, gassed, or taken prisoner.Large volume with screw post binding. Corduroy and leather front and back cover. Leather gold embossed title central front cover. Marbled pasted down end papers with extra red end page. This volume covers surnames from A to G. of the men who returned from the war. Seventy six individual cream and maroon and silver printed pages with decorative scrolls, illustrations and text. Each page is dedicated to a service man recording his name, address, service record in alphabetical order. Oval central space for photographic portrait with image of an emu on the left, kangaroo on the right and boomerang above. Not all pages contain photographs. Shire of Marong / The President, Councillors & Ratepayers / of the Shire of Marong / hereby place on record their thanks and appreciation / for the conduct of (soldiers name) / Who served his King and Country / in the Great War / 1914 / 1919shire of marong, world war 1 -
 City of Greater Bendigo - Civic Collection
Book - WW1 Commemorative Album, Roll of Honour :: Shire of Marong, Unknown
This album pays tribute to the First World War service men who were born and / or lived in the Shire of Marong. This volume covers surnames from H - M. Australia’s involvement in the First World War began when Britain and Germany went to war on 4 August 1914, and both Prime Minister Joseph Cook and Opposition Leader Andrew Fisher, who were in the midst of an election campaign, pledged full support for Britain. The outbreak of war was greeted in Australia, as in many other places, with great enthusiasm. For Australia, the First World War remains the costliest conflict in terms of deaths and casualties. From a population of fewer than five million, 416,809 men enlisted, of whom more than 60,000 were killed and 156,000 wounded, gassed, or taken prisoner.Large volume with screw post binding. Corduroy and leather front and back cover. Leather gold embossed title central front cover. Marbled pasted down end papers with extra red end page. This volume covers surnames from H - M. Fifty seven individual cream and maroon and silver printed pages with decorative scrolls, illustrations and text. Each page is dedicated to a service man recording his name, address, service record in alphabetical order. Oval central space for photographic portrait with image of an emu on the left, kangaroo on the right and boomerang above. Not all pages contain photographs. Shire of Marong / The President, Councillors & Ratepayers / of the Shire of Marong / hereby place on record their thanks and appreciation / for the conduct of (soldiers name) / Who served his King and Country / in the Great War / 1914 / 1919shire of marong, world war 1 -
 City of Greater Bendigo - Civic Collection
Book - WW1 Commemorative Album, Roll of Honour :: Shire of Marong, Unknown
This album pays tribute to the First World War service men who were born and / or lived in the Shire of Marong. This volume covers surnames from N - Z. Australia’s involvement in the First World War began when Britain and Germany went to war on 4 August 1914, and both Prime Minister Joseph Cook and Opposition Leader Andrew Fisher, who were in the midst of an election campaign, pledged full support for Britain. The outbreak of war was greeted in Australia, as in many other places, with great enthusiasm. For Australia, the First World War remains the costliest conflict in terms of deaths and casualties. From a population of fewer than five million, 416,809 men enlisted, of whom more than 60,000 were killed and 156,000 wounded, gassed, or taken prisoner. Large volume with screw post binding. Corduroy and leather front and back cover. Leather gold embossed title central front cover. Marbled pasted down end papers with extra red end page. This volume covers surnames from N - Z. Seventy seven individual cream and maroon and silver printed pages with decorative scrolls, illustrations and text. Each page is dedicated to a service man recording his name, address, service record in alphabetical order. Oval central space for photographic portrait with image of an emu on the left, kangaroo on the right and boomerang above. Not all pages contain photographs. Shire of Marong / The President, Councillors & Ratepayers / of the Shire of Marong / hereby place on record their thanks and appreciation / for the conduct of (soldiers name) / Who served his King and Country / in the Great War / 1914 / 1919shire of marong, world war 1 -
 Bendigo Military Museum
Award - MEDAL SETS WW1, WW2, 1) Post 1919, 1945, .2) Post 1919
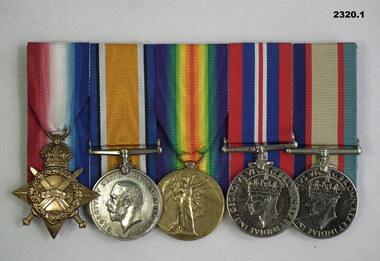
John Preece No 765 enlisted in the AIF on 7.9.1914 in F Coy 12th Batt age 26 years 7 months. Embarked for Eygpt 20.10.1914, embarked for Gallipoli 2.3.1915. Embarked for France 2.4.1916, hospital 4.7.1916 with Fracture of the right hand accident, hospital 9.6.1918 with Influenza, discharged from the AIF 31.1.1919. Enlisted WW11 as No S393 on 12.8.1940, hospital 10.7.1941 with Gastro Enteritis, 23.4.1942 injury to right knee, 27.12.1942 with Pluerisy, 28.5.1943 with Nueritis, discharged from the Army medically unfit 6.9.1943. At the time he was a Sgt in 4 Garrison Batt. A Miner, Alexander John Sundin No 7914 enlisted on 24.7.1917 in 3rd Aust Tunneling Coy age 44 years 8 months. Embarked 21.11.1917, Gassed 10.9.1918, discharged medically unfit 30.1.1919.1.) Medal set, court mounted, set of (5) re J Preece. 1. 1914-15 Star. 2. War Medal 1914-18 3. Victory Medal 1914 - 1919 4. War Medal 1939-45. 5. Australian Service Medal. .2) medal set, court mounted, set of (2) re A.J.Sundin. 1. War Medal 1914-19. 2. Victory Medal..1) "765 DVR J Preece 12 BN AIF. - "S393 J Preece" .2) "7914 SPR A.J.Sundin 3 Tun Coy A.I.F"medals, military, history -
 Flagstaff Hill Maritime Museum and Village
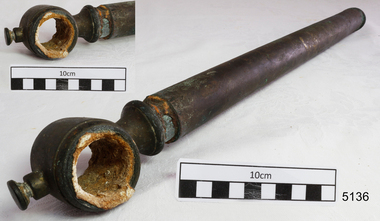
Functional object - Pipe, Before 1878
HISTORY OF THE LOCH ARD: - The Loch Ard got its name from ”Loch Ard” a loch that lies to the west of Aberfoyle, and to the east of Loch Lomond. It means "high lake" in Scottish Gaelic. The vessel belonged to the famous Loch Line which sailed many vessels from England to Australia. The Loch Ard was built in Glasgow by Barclay, Curdle and Co. in 1873, the vessel was a three-masted square-rigged iron sailing ship that measured 79.87 meters in length, 11.58 m in width, and 7 m in depth with a gross tonnage of 1693 tons with a mainmast that measured a massive 45.7 m in height. Loch Ard made three trips to Australia and one trip to Calcutta before its fateful voyage. Loch Ard left England on March 2, 1878, under the command of 29-year-old Captain Gibbs, who was newly married. The ship was bound for Melbourne with a crew of 37, plus 17 passengers. The general cargo reflected the affluence of Melbourne at the time. Onboard were straw hats, umbrellas, perfumes, clay pipes, pianos, clocks, confectionery, linen and candles, as well as a heavier load of railway irons, cement, lead and copper. There were other items included that were intended for display in the Melbourne International Exhibition of 1880. The voyage to Port Phillip was long but uneventful. Then at 3 am on June 1, 1878, Captain Gibbs was expecting to see land. But the Loch Ard was running into a fog which greatly reduced visibility. Captain Gibbs was becoming anxious as there was no sign of land or the Cape Otway lighthouse. At 4 am the fog lifted and a lookout aloft announced that he could see breakers. The sheer cliffs of Victoria's west coast came into view, and Captain Gibbs realised that the ship was much closer to them than expected. He ordered as much sail to be set as time would permit and then attempted to steer the vessel out to sea. On coming head-on into the wind, the ship lost momentum, the sails fell limp and Loch Ard's bow swung back towards land. Gibbs then ordered the anchors to be released in an attempt to hold their position. The anchors sank some 50 fathoms - but did not hold. By this time the ship was among the breakers and the tall cliffs of Mutton Bird Island rose behind. Just half a mile from the coast, the ship's bow was suddenly pulled around by the anchor. The captain tried to tack out to sea, but the ship struck a reef at the base of Mutton Bird Island, near Port Campbell. Waves subsequently broke over the ship and the top deck became loosened from the hull. The masts and rigging came crashing down knocking passengers and crew overboard. When a lifeboat was finally launched, it crashed into the side of Loch Ard and capsized. Tom Pearce, who had launched the boat, managed to cling to its overturned hull and shelter beneath it. He drifted out to sea and then on the flood tide came into what is now known as Loch Ard Gorge. He swam to shore, bruised and dazed, and found a cave in which to shelter. Some of the crew stayed below deck to shelter from the falling rigging but drowned when the ship slipped off the reef into deeper water. Eva Carmichael a passenger had raced onto the deck to find out what was happening only to be confronted by towering cliffs looming above the stricken ship. In all the chaos, Captain Gibbs grabbed Eva and said, "If you are saved Eva, let my dear wife know that I died like a sailor". That was the last Eva Carmichael saw of the captain. She was swept off the ship by a huge wave. Eva saw Tom Pearce on a small rocky beach and yelled to attract his attention. He dived in and swam to the exhausted woman and dragged her to shore. He took her to the cave and broke the open case of brandy which had washed up on the beach. He opened a bottle to revive the unconscious woman. A few hours later Tom scaled a cliff in search of help. He followed hoof prints and came by chance upon two men from nearby Glenample Station three and a half miles away. In a complete state of exhaustion, he told the men of the tragedy. Tom then returned to the gorge while the two men rode back to the station to get help. By the time they reached Loch Ard Gorge, it was cold and dark. The two shipwreck survivors were taken to Glenample Station to recover. Eva stayed at the station for six weeks before returning to Ireland by steamship. In Melbourne, Tom Pearce received a hero's welcome. He was presented with the first gold medal of the Royal Humane Society of Victoria and a £1000 cheque from the Victorian Government. Concerts were performed to honour the young man's bravery and to raise money for those who lost family in the disaster. Of the 54 crew members and passengers on board, only two survived: the apprentice, Tom Pearce and the young woman passenger, Eva Carmichael, who lost her family in the tragedy. Ten days after the Loch Ard tragedy, salvage rights to the wreck were sold at auction for £2,120. Cargo valued at £3,000 was salvaged and placed on the beach, but most washed back into the sea when another storm developed. The wreck of Loch Ard still lies at the base of Mutton Bird Island. Much of the cargo has now been salvaged and some items were washed up into Loch Ard Gorge. Cargo and artefacts have also been illegally salvaged over many years before protective legislation was introduced in March 1982. One of the most unlikely pieces of cargo to have survived the shipwreck was a Minton majolica peacock- one of only nine in the world. The peacock was destined for the Melbourne 1880 International Exhibition. It had been well packed, which gave it adequate protection during the violent storm. Today the Minton peacock can be seen at the Flagstaff Hill Maritime Museum in Warrnambool. From Australia's most dramatic shipwreck, it has now become Australia's most valuable shipwreck artifact and is one of very few 'objects' on the Victorian State Heritage Register.The shipwreck of the Loch Ard is of significance for Victoria and is registered on the Victorian Heritage Register ( S 417). Flagstaff Hill has a varied collection of artefacts from Loch Ard and its collection is significant for being one of the largest accumulation of artefacts from this notable Victorian shipwreck. The collections object is to also give us a snapshot into history so we are able to interpret the story of this tragic event. The collection is also archaeologically significant as it represents aspects of Victoria's shipping history that allows us to interpret Victoria's social and historical themes of the time. The collections historically significance is that it is associated unfortunately with the worst and best-known shipwreck in Victoria's history. Heavy duty brass sleeve retrieved from the wreck of the LOCH ARD. It is pinched and broken off at one end, enclosing an extendable inner sleeve, which is connected to a brass bracket fixed at right angles. The circular enclosing bracket would hold (and fix by an adjustable brass screw) a through or cross pipe of similar diameter to the outer sleeve. The artefact is a structural piece delivering vertical support to a horizontal rail (missing) and not for transporting gas. It is constructed of thick gauge metal suitable for weight/load bearing and its sliding sleeve design is similar to a modern shock absorber, or a telescopic leg supporting a surveying instrument. There is concreting sediment immobilising the sleeves and lining the inner surface of the bracket. flagstaff hill, warrnambool, shipwrecked coast, flagstaff hill maritime museum, maritime museum, shipwreck coast, flagstaff hill maritime village, great ocean road, loch line, loch ard, captain gibbs, eva carmichael, tom pearce, glenample station, mutton bird island, loch ard gorge, brass fitting, brass pipe, 1878 shipwreck -
 Bendigo Historical Society Inc.
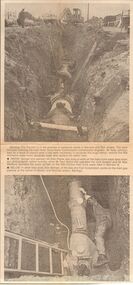
Newspaper - CASTLEMAINE GAS COMPANY COLLECTION: BENDIGO ADVERTISER, 10/06/1986
Bendigo Advertiser, Tuesday June 10, 1986 page 3. Bendigo City Council is in the process of extensive works in Barnard and Don Streets, the work includes lowering the road level. As result of council work it has been necessary to remove the 900 mm water main, excavate lower and replace the water main. In the first photo Ganger one operator Mr. Allen Parker at work on the main trunk water feed while Mr. Paul Somerville operated the rock breaker and Mr. Max Welsford operated the angle grinder. In the second Mr. Bob Bennett works on the main gas pipeline at the corner of Mundy and McCrae Streets. Also on the back an interesting article ''Decay of rural townships''newspaper, bendigo advertiser, roadworks -
 Bendigo Historical Society Inc.
Document - VARIOUS PRINTED ITEMS RELATING TO: THE SHAMROCK HOTEL
VARIOUS PRINTED ITEMS RELATING TO THE SHAMROCK HOTEL. a. Letter from Royal Historical Society of Victoria to BHS in relation to the application to the Historic Building Council (dated 28 Jan 1992); b. cutting from Bendigo Advertiser Sept 9, 1991 re the ''small booklet'' written by Frank Cusack - ''The Shamrock Story'' - has detail taken from the booklet; c. coloured postcard of the hotel (taken from the position of the Lansell monument) - 'Plastichrome' - Murfett Publishers; d. handwritten page with details of Shamrock Hotel incl. reference to: Messrs Heffernan & Crowley; alterations and enlargements (1855, 1859); present building (1897); reference to lighting with gas (1855)- this extract has ''Annals 1855'' appended as a source.buildings, hotel, shamrock hotel. -
 Bendigo Historical Society Inc.
Document - SANDHURST SCHOOL OF MINES COLLECTION: ACQUITTANCE BOOK
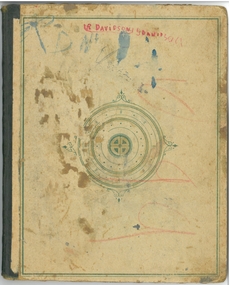
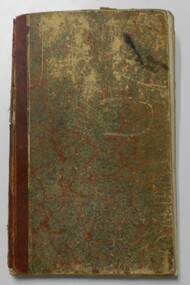
Acquittance Book -t School of Mines/ thick cardboard cover 31x19x2 cm / purple binding / worn front and back covers containing records of the ACQUITTANCE BOOK -of the SCHOOL OF MINES showing entries from January 1887 June 1889 / numbered entries from 1 to 397 showing columns - Number, Name , Service and period , Amount , Acknowledged having received the sum set opposite my name for the services rendered -the latter column in some entries have a green Victoria one penny stamp stuck to the page - stamp duty , some have receipts attached for railway tickets, etc. other receipts include for , /// regular Payments include the Bendigo Gas company .//SANDHURST SCHOOL OF MINESdocument, sandhurst school of mines/the edward's metallurgical works -
 Bendigo Historical Society Inc.
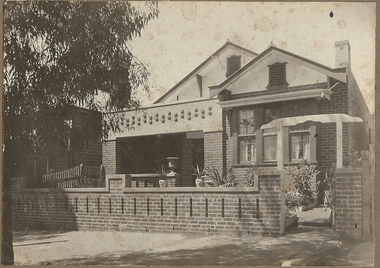
Photograph - T C WATTS & SON COLLECTION: 117 QUEEN STREET,BENDIGO, 1928
BHS CollectionBlack and white photograph mounted on rectangular grey board. House, brick, porch, brick fence, small pane and lead light windows. 1 chimney. Decorative brickwork on verandah lintel and on brick fence. Stained glass windows. Written on back ' tapestry brick fireplace, dining room and kitchen, 117 Queen Street. Brick bungalow, built 1923, 5 rooms, vest, both 2 weatherboard sleep outs, toolshed, woodshed, workshop, garage, sewered. Through to King Street, 33'11 1/4' by 165'. Hot water service, electric copper, 22 points electricity, 8 power points, new gas , stainless ink, crockery cupboards, pedestal basin.t.c. watts & son, 117 queen street bendigo -
 Orbost & District Historical Society
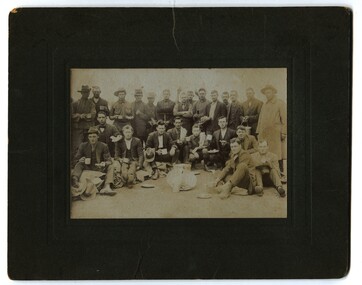
black and white photographs, September 1914
Broadmeadows was home to the major army training camp for the Australian Imperial Force. The land was previously known as Mornington Park. It was a wide field, suitable for military practice, including training for the Light Horse regiments. It is the current location of the Maygar Army Barracks on Camp Road in Broadmeadows. To reach the camp, soldiers marched from Victoria Barracks in St Kilda Road and headed north up Sydney Road, only resting near Fawkner Cemetery. Soldiers slept in tents and food was basic. Training was hard, but it did not prepare soldiers for a modern war with machine guns, gas, shells and aeroplanes – technology that did not exist in previous wars. Some men only completed a few months training before departing on troopships from Port Melbourne. Once overseas, some soldiers received further training in Egypt. It is likely that these men are associated with the Orbost district.This photograph is a reminder of the personal stories of those who were involved in WW1.Two copies of a black / white photograph on dark grey buff cards. The photos show a group of soldiers having a meal. Some are sitting on the ground with others standing behind them.on back of 989.1 - "Sept 14 Broadmeadows"w.w.1 broadmeadows-army-training-camp -
 Melbourne Legacy
Photograph, Legacy Appeal 1989. Ron Barassi abseiling, August 1989
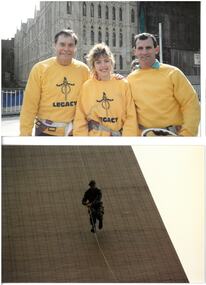
Photos of abseiling down the Gas and Fuel building that were on the corner of Flinders St and Swanston St. It was an event for Legacy Week 1989. See also the training that occurred prior to the event - photos 00486 and 01409. Ron Barassi abseils for Legacy joined by staff member Carol Shaw and Legatee Peter Heeney. A label states it "was a Legacy versus Radio personalities abseiling challenge". Media team was Fox's Wally (Paul) Weissel and Ken Cavanagh and Triple M's Andy McClean. Aided by Williamstown Commando Company with training at Nidrie Quarry. Ron Barassi participated in many events for Legacy over the years, he had been a young Legatee after his father was killed in action at Tobruk in World War II, aged 27. Two photos also featured in the President's Highlights Report in 1989.A record of some important personalities giving their time to promote Legacy in 1989.Colour photo x 13 of a junior legatee and Ron Barassi abseiling.legacy promotion, ron barassi, legacy week