Showing 1366 items
matching railway to ballarat
-
 Ballarat Tramway Museum
Photograph - Black & White Photograph/s, John Alfred, 1960
Yields information about the appearance of BTM tram No. 661 in 1960, W2 349 and how the Carnegie line section of single track was worked.Black and white photograph of trams W3 661 (Route 4 Carnegie) and X2 675 (Point Ormond), Glenhuntly Road, Elsternwick Station, during the lowering of the railway line, 1960. Photo by John Alfred. Two copies held. See also Reg Item 5163 for an Ian Brady photograph prior to the work commencing.trams, tramways, mmtb, elsternwick, point ormond, w class trams, level crossings, tram 661, tram 675 -
 Ballarat Tramway Museum
Photograph - Black & White Photograph/s, Wal Jack, 7/03/1954 12:00:00 AM
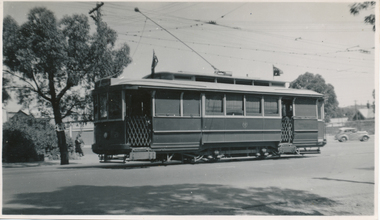
Black and White print contained within the Wal Jack Bendigo and Geelong Album, see Reg Item 5003 for more details. Photo of No. 21 in Mitchell St, near the Railway Station, 7-3-1954. Photo by Wal Jack. Printed on Ilford paper. See image i2 for rear of photograph. See image i3 for hi res scan of negative On the rear in blue ink "SEC Bendigo No 21 in Mitchell St near Rly Stn Sunday morning 7-3-54" with Wal Jack copyright stamp in the top right hand corner and the number "T67PC" written in.trams, tramways, bendigo, mitchell st, tram 21 -
 Ballarat Tramway Museum
Postcard, Rose Stereograph Co, "Looking down Mitchel St Bendigo Vic"
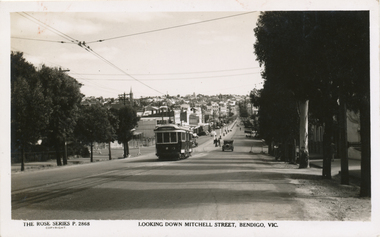
Postcard contained within the Wal Jack Bendigo and Geelong Album, see Reg Item 5003 for more details. Rose Series Postcard No. 2868, titled "Looking down Mitchel St Bendigo Vic", from the railway overbridge. Has bogie tram No. 23 descending the hill, with the destination of Eaglehawk. Would appear the railway station entrance has been barriered off. Published by the Rose Stereograph Co. Armadale Vic, has the rose logo on the rear and a statement "A real photograph produced in Australia". No space for the stamp or address line. On rear in ink "Bogie 23" and in pencil "WJ"trams, tramways, bendigo, rose postcards, mitchell st, tram 28 -
 Ballarat Tramway Museum
Photograph - Black & White Photograph/s, The Bendigonian, Sep. 2005
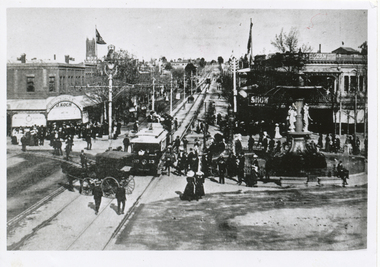
Black and White copy print contained within the Wal Jack Bendigo and Geelong Album, see Reg Item 5003 for more details. Photo of looking east along Mitchell St towards the Railway Station with tram No. 13 and a double deck trailer - has the centre poles along Mitchell St. in the photograph. In the background is a J. Koch and the Bendigo Supply Stores. Has fountain in photograph. Copied by Keith Kings from The Bendigonian 19/9/1905. On rear in ink " SA782, Bendigo, No. 13 - 3 window saloon Charing Cross. Note:- Crossover in Mitchell St.". Copied ex "The Bendigonian 19/9/1905."trams, tramways, bendigo, charing cross, horse trams, mitchell st -
 Ballarat Tramway Museum
Photograph - Black & White Photograph/s, Wal Jack, 27/06/1955 12:00:00 AM
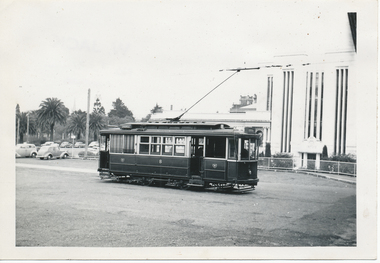
... Ballarat Tramway Museum South Gardens Reserve Wendouree ...Black and White print contained within the Wal Jack Bendigo and Geelong Album, see Reg Item 5003 for more details. Photo of Geelong No. 8 at the Railway Station with the Gordon Institute buildings in the background. The tram has the destination of Chilwell. Photo by Wal Jack 27/6/1955. Printed on Ilford paper. i1 - scan of print in the album i2 - rear of image i3 - scan of negative at 3200dpi added 27/6/2020. On rear in ink "SEC Geelong No. 8 to Chilwell at Geelong Station". Has the Wal Jack copyright stamp in the top right hand corner with the number "T331" written in and the date "27 Jun 1955" stamped with a purple ink hand date stamp.trams, tramways, geelong, railway station, tram 8 -
 Ballarat Tramway Museum
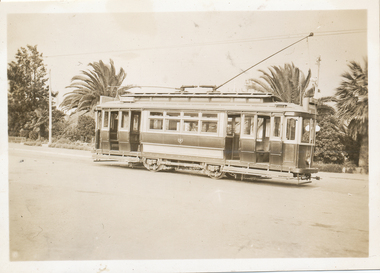
Photograph - Black & White Photograph/s, Wal Jack, Jun. 1939
... Ballarat Tramway Museum South Gardens Reserve Wendouree ...Black and White print contained within the Wal Jack Bendigo and Geelong Album, see Reg Item 5003 for more details. Photo of No. 22 at the Geelong Railway Station. Photographer unknown - possibly Wal Jack - see date on Reg Item 5861. Wal's album notes dates the photo as June 1939. Printed on Kodak Velox paper. The tram has two trolley poles, the destination of Newtown. A conductor is standing in one of the doorways. i1 - scan of print in the album i2 - rear of image i3 - scan of negative at 3200dpi added 6/6/2020. trams, tramways, geelong, railway station, tram 22 -
 Ballarat Tramway Museum
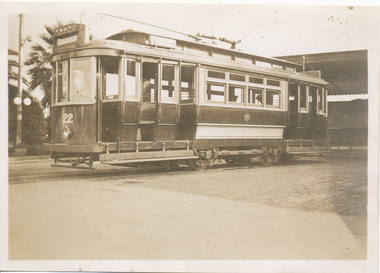
Photograph - Black & White Photograph/s, Wal Jack, Jun. 1939
... Ballarat Tramway Museum South Gardens Reserve Wendouree ...Black and White print contained within the Wal Jack Bendigo and Geelong Album, see Reg Item 5003 for more details. Photo of No. 22 at the Geelong Railway Station. Photographer unknown same as 5859 - possibly Wal Jack - see date on Reg Item 5861. Wal's album notes dates the photo as June 1939. Printed on Kodak Velox paper. The tram has two trolley poles. i1 - scan of print in the album i2 - rear of image i3 - scan of negative at 3200dpi added 6/6/2020. trams, tramways, geelong, railway station, tram 22 -
 Ballarat Tramway Museum
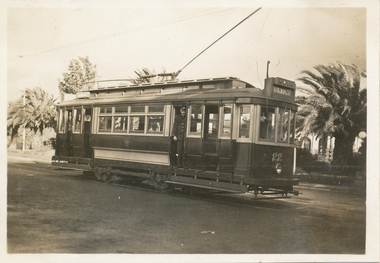
Photograph - Black & White Photograph/s - Geelong 23 at Railway Station, Wal Jack, Jun. 1939
Black and white photo from the Wal Jack album (item 5003) of Geelong tram 23 leaving the railway station with Johnstone park in the background. i1 - scan of print in the album i2 - rear of image i3 - scan of negative at 3200dpi - not exactly the same location given the position of the trees behind. i4 - scan of a print from the Ken Magor collection i5 - scan of rear of print with date 21-6-1939 and Ken Magor number 1805. Yields information about Geelong tram 23Photo of No. 23 at the Geelong Railway Station. Has the Wal Jack copyright stamp on the back.trams, tramways, geelong, railway station, tram 23 -
 Ballarat Tramway Museum
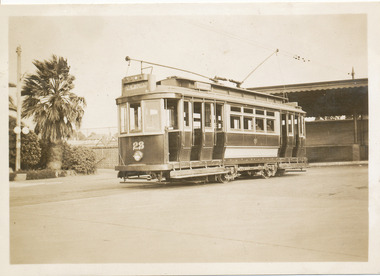
Photograph - Black & White Photograph/s, Wal Jack, Jun. 1939
... Ballarat Tramway Museum South Gardens Reserve Wendouree ...Black and White print contained within the Wal Jack Bendigo and Geelong Album, see Reg Item 5003 for more details. Photo of No. 23 at the Geelong Railway Station with the station buildings in the background. Photographer unknown - handwriting is the same as other photos such as Reg item 5850.. Wal's album notes dates the photo as June 1939. Printed on Kodak Velox paper. The tram has two trolley poles and the destination of Newtown. i1 - scan of print in the album i2 - rear of image i3 - scan of negative at 3200dpi added 6/6/2020. Has the rear in ink "Geelong Tramways, No. 23 "Two man trams", built by A. Pengelley South Australia"trams, tramways, geelong, railway station, tram 23 -
 Ballarat Tramway Museum
Photograph - Black & White Photograph/s, Wal Jack, 3/01/1945 12:00:00 AM
Black and White print contained within the Wal Jack Bendigo and Geelong Album, see Reg Item 5003 for more details. Photo of No. 17 from the Railway Station turning out of Railway Terrace into Mercer St. 3-1-1945. Printed on Ilford Paper. Tram has the destination of West. i1 - scan of print in the album i2 - rear of image i3 - scan of negative at 3200dpi added 30/6/2020.Has the rear in ink "SEC Geelong No. 17 from the Railway Station turning out of Railway Terrace into Mercer St. 3rd January 1945". Has the Wal Jack copyright stamp on the rear with the number T319 written in.trams, tramways, geelong, mercer st, railway station, tram 17 -
 Ballarat Tramway Museum
Photograph - Black & White Photograph/s, 8/01/1956 12:00:00 AM
Black and White print contained within the Wal Jack Bendigo and Geelong Album, see Reg Item 5003 for more details. Photo of Geelong No 31 bound for North Geelong at Railway station junction, Malop and Mercer Streets 8/1/1956. General view of junction in the area with a Olympic tyre / service station No details on photographer. On rear in ink "No.31 bound for North Geelong at Railway Stn Junc Malop and Mercer Streets 8/1/56"trams, tramways, geelong, north, railway station, malop st, mercer st, tram 31 -
 Ballarat Tramway Museum
Photograph - Black & White Photograph/s, 11/07/1950 12:00:00 AM
Black and White print contained within the Wal Jack Bendigo and Geelong Album, see Reg Item 5003 for more details. Photo of an illuminated street sign, lamp, near Geelong Railway Station, at Mercer St corner, 11-7-1950. Photographer not known. Photo is glued into album. Sign has the words "Geelong Electric Tramways / Board tram at Curve" with a hand and finger pointing the direction to walk in.trams, tramways, geelong, signs, railway station -
 Ballarat Tramway Museum
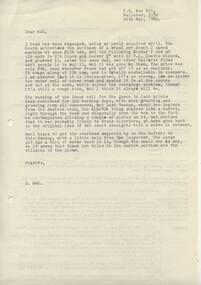
Document - Letter/s, Dave Macartney, 24/05/1980 12:00:00 AM
Yields information about the construction of trackwork and other Museum infrastructure during 1980.Letter from Dave Macartney to Warren Doubleday, typed on the rear of an Association of Railway Enthusiasts foolscap size train tour booking form for the Albury to Culcairn tour for 20/5/1967. Letter dated 20 May 1980 updates Warren on progress of bending rail, track repairs, purchase of a new Second hand drill and building work.trams, tramways, btps, trackwork, museum -
 Ballarat Tramway Museum
Newsletter, Ballarat Tramway Preservation Society (BTPS), "Fares Please!", 1979
Yields information about the operations of the BTPS in 1979 and has a strong association with those involved., Yields information about the operations of the BTPS in 1979 and has a strong association with those involved.Set of 6 "Fares Please!" and other documents printed for distribution to BTPS members as news. All printed by the Gestetner duplication process. Consolidated from other items or holdings from donations into a single year set of newsletters. All produced during 1979 .1 - Fares Please! March 1979 .2 - ditto May 1979 .3 - Appeal sheet .4 - Fares Please! August 1979 .5 - ditto October 1979 .6 - Sales Sheet .7 - Fares Please - November / December 1979 .8 - Two pages sheet with various tramway and railway news cuttings. All documents scanned as pdf images. museums btps, publicity, sales, appeals -
 Otway Districts Historical Society
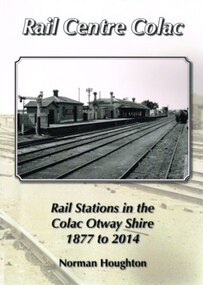
Book, Norman Houghton, Rail Centre Colac, 2014
Colac was the centre of a spidery rail network over which were carted anything and everything by Victorian Railways, the common carrier throughout the area. The main line through the region was the 35 km rail route from Birregurra (and thence to Geelong) though Colac to Pirron Yallock (and thence to Warrnambool and Port Fairy) from March, 1877, to July, 1883. The first branch line ran from Irrewarra to Beeac in 1889, which then extended in stages to Cressy and on the Ballarat. The second branch line was the 31 km long Birregurra to Forrest in 1891. The cost of building railways into mountainous terrain meant the third branch line was a narrow-gauge 2 foot 6 inch line, first of all to Beech Forest in 1902, and then to Crowes in 1911, for a total of 71 km. The final rail connection was the 16 km branch from Colac to Alvie to facilitate the transport of onions, opening in 1923. Each line had its own character and peculiarities derived from its foundation, geography and economic base. As a general rule, the loadings on the branch lines had greater output tonnage than inwards, the reverse of the main line. The lines traversed agricultural and timber areas where inputs like seed, grass, fertiliser and labour were minor, compared with the output, timber, wool, cream, butter, cheese fruit, potatoes, onion, grain and livestock.Rail Centre Colac. Rail stations in the Colac Otway Shire, 1877 to 2014. Norman Houghton. 1st ed. Norman Houghton; Geelong (Vic); 2014. vi, 262 p.; illus., maps, index. Soft cover.colac; cressy; forrest; beech forest; crowes -
 Ballarat Tramway Museum
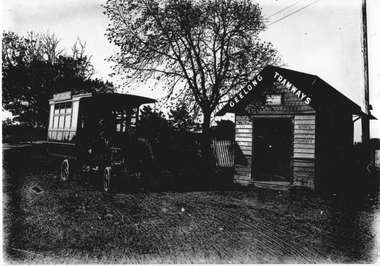
Photograph - Geelong MESCo Bus East Geelong, c1920
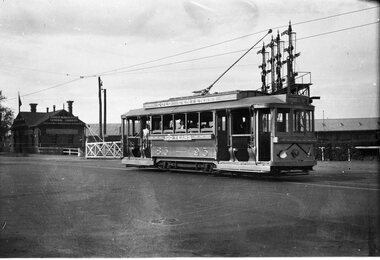
The photo shows the Melbourne Electric Supply Co. (MESCo), bus at the East Geelong terminus. MESCo operated the Geelong tram system from 1912 and opened the tram line to this location "East Geelong" in 1923. The terminus was at the Geelong Cemetery, with a wooden waiting room shelter with signage about the building being used for passengers only and prohibiting the posting of bills. The buses ran from the railway station and Moorabool St wharf from 1912 until they were replaced by trams in 1923. The bus is also seen in item 4315. Yields information about the operation of a bus by MESCo in Geelong.Black and white photograph - plain back.geelong, tramways, mesco, buses, east geelong, shelters -
 Ballarat Tramway Museum
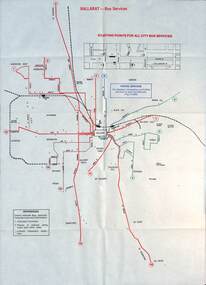
Map - Public Transport Map - Bus, Ministry of Transport, Ballarat, Bendigo & Geelong, 1977
... Ballarat Bendigo Geelong timetables railways On each map "7/77 ...Set of three maps, c1977 show the bus routes for each of Ballarat, Bendigo and Geelong along with railways. Provides information on each route, summary timetables, who operated the route and places of interest. Published by the Ministry of Transport in conjunction with the Transport Regulation Board, Bus Proprietors Association and VicRail. By comparison with the posters issued at the time of tram closure, can see the changes made to the routes in each city. See item 6813 for Ballarat, 6812 for Geelong, and 6814 for Bendigo.Demonstrates a public transport map published by the Ministry of Transport.Set of three 10 fold maps printed in colour to pocket size.On each map "7/77" in ink.buses, maps, ballarat, bendigo, geelong, timetables, railways -
 Ballarat Tramway Museum
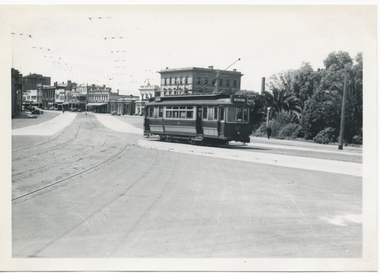
Photograph - Geelong tram No. 2 at T&G Corner Geelong, c1938
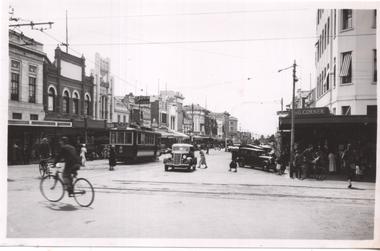
The photo shows Geelong No. 2 in Moorabool St at the intersection with Ryrie St. The tram has the destination of North. The tram is in its modified form that provides for one-man operation. In the photo are Edments, Savoia Cafe, Commercial Bank of Australia, and the T&G building. The photo has been dated between 1935 when the tram was converted and 1939 when the bar neon traffic lights were installed at the intersection. The photograph was taken from a Victorian Railways glass negative held at the State Library of Victoria. See item 8360 for a digital copy of the SLV scan - http://handle.slv.vic.gov.au/10381/97173Yields information about Geelong No.2 and the intersection of Ryrie and Moorabool Streets Geelong.Black and white photograph with a number of rear.In pencil "2171" on rear.tramways, trams, geelong, ryrie st, moorabool st, temperance & general, tram 2 -
 Ballarat Tramway Museum
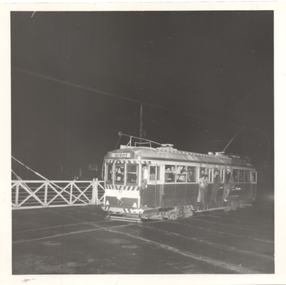
Photograph - Last tram across the Railway level crossing, 19/9/1971
... the Ballarat Railway level crossing. tramways Lydiard St North level ...Photograph - night flash - shows tram 42 crossing the Lydiard St level crossing with a large crowd on board. Tram has the destination of depot. Given the tram number and the crowd, most likely the last tram from Lydiard St North to the depot. Tram 42 was recorded as the last to leave Lydiard St North on 19/9/1971. Not known who took the photograph.Yields information about the last tram to cross the Ballarat Railway level crossing.Black and white photograph on plain paper.tramways, lydiard st north, level crossing, tram 42, last tram -
 Ballarat Tramway Museum
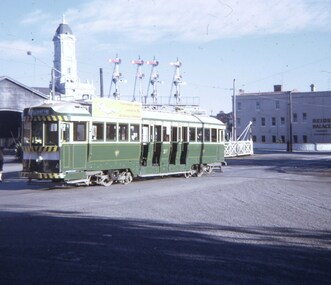
Negative, Wal Jack, 1951
... Ballarat Railway Station... Ballarat Railway Station Gold Tram tram 23 Negative and Digital ...Yields information about the Gold tram of 1951 and of the railway level crossing in Lydiard St North.Negative and Digital image of the Wal Jack Ballarat Negative file of No. 23 as the gold tram crossing the level crossing in Lydiard St North, during 1951 on its way to Lydiard St North. In the background is the signal gantry and the Kennedy Murray Pty Ltd General Carriers. trams, tramways, lydiard st nth, level crossings, ballarat railway station, gold tram, tram 23 -
 Ballarat Tramway Museum
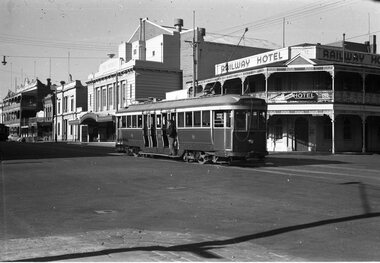
Negative, Wal Jack, late 1940's or early 1950's
Yields information about the intersection of Mair and Lydiard St North.Negative and Digital image of the Wal Jack Ballarat Negative file of No. 35 crossing Mair St in Lydiard St North with a passenger ready to get off - riding on the footboard. In the background is the George Hotel, the Regent Theatre and the Railway Hotel.trams, tramways, mair st, lydiard st nth, tram 35 -
 Ballarat Tramway Museum
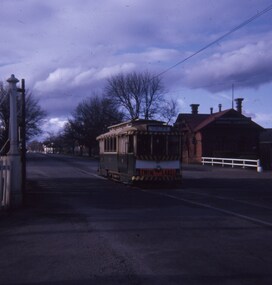
Slide - 27 mm sq slide/s - set of 3, Andrew Howlett, Lydiard St North level crossing, March 1969?
Yields information about the Lydiard St Nth line, the level crossing and the terminus.Set of three Colour slides, Kodak white cardboard mount, developed Mar 1969 of No. 37 .1 - while running a special crossing at the Lydiard St North level crossing at the Railway Station. Has the Reid's Coffee Palace and Railway Station in the background. .2 - No. 37 and a single trucker carrying a "Trotting at Bray Raceway" auxiliary board, at the Lydiard St North terminus. Has the shelter on the right-hand side. .3 - No. 37 waiting at the terminus. See Reg Items 7675, 7678, 7681, 7684, 7686, 7705 and 7713.ballarat, tramways, trams, lydiard st nth, railway station, shelters, level crossings, tram 37 -
 Ballarat Tramway Museum
Slide - 27 mm sq slide/s, Andrew Howlett, Tram No. 27, southbound crossing the Lydiard St level crossing, Sep. 1968
Yields information about the Lydiard St Nth Level crossing.Colour slide, Kodak white cardboard mount, developed September 1968 of No. 27, southbound crossing the Lydiard St level crossing with a destination of Sebastopol. The tram has a Twin Lakes sign. the Kennedy Murrays General Carrier building in the background."Railway Xing Lydiard St Nth" in red ink.ballarat, tramways, trams, lydiard st nth, level crossings, railway station, tram 27 -
 Ballarat Tramway Museum
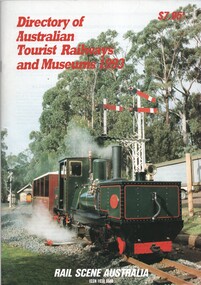
Book, Rail Scene Australia, "Guide to Australian Tourist Railways and Museums 1993", 1993, 1994
... Parade Ballarat Ballarat goldfields Trams tramways Railways Tram ....1 - Book - 64 A4 pages - colour covers, titled "Guide to Australian Tourist Railways and Museums 1993", listing all operational railway and tramway museums in Australia at the time. Gives details for each organisation and details of umbrella organisations in each state. Arranged on a State and regional basis. .2 - as above - 100 pages - "Guide to Australian Tourist Railways and Museums 1994". Published by Rail Scene Australia - ARHS NSW and the LRRSAtrams, tramways, railways, tram preservation, museums, arhs -
 Ballarat Tramway Museum
Document - Report, Henry Smith, "Report on probably cost of construction of the Ballarat and Dunolly Tramway", 23/6/1857
... to the Provincial Committee of the Ballarat and Dunolly Railway" Prepared...Ballarat Tramway Museum South Gardens Reserve Wendouree ...Report - 9 pages- handwritten, dated June 23 1857 to the Provincial Committee of the Ballarat and Dunolly Railway" Prepared by Henry Smith Civil Engineer, looks as various aspects of a prolapsed timber rail / sleepered tramway plated, horse drawn, grades, earthworks. Gives a total cost of 2897 pounds. Last page has a ink and washed sketch of the track structure - plan and cross section. Only the cover, first page and last page imaged.trams, tramways, tramways, costs, dunolly, timber tramways -
 Ballarat Tramway Museum
Negative, Wal Jack, early 1960's
Yields information about Ballarat tram No. 30 about to cross the level crossing in Lydiard St North at the railway station.Negative and Digital images of the Wal Jack Ballarat Negative file of No 30 to Sebastopol about to cross the Lydiard St North Level crossing at the railway station. Tram has a White Horse Whiskey Advert. trams, tramways, lydiard st north, railway station, level crossings, tram 30 -
 Ballarat Tramway Museum
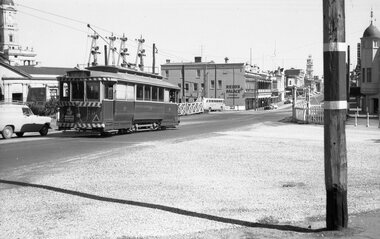
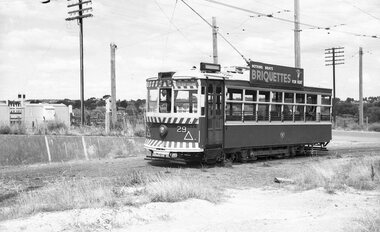
Negative, Wal Jack, 6/01/1963 12:00:00 AM
Negative and Digital images of the Wal Jack Bendigo Negative file of Bendigo Birney No. 29 at the North Bendigo terminus with the railway level crossing in the background. Tram has the destination of Golden Square and a Briquettes roof advertisement. Based on the cars in the photo and Reg Item 452, date could be 6-1-1963trams, tramways, bendigo, north bendigo, level crossings, tram 29 -
 Ballarat Tramway Museum
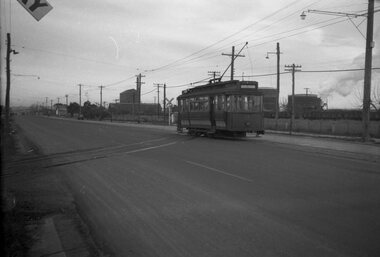
Negative, Wal Jack, late 1940s
Negative and Digital images of the Wal Jack Geelong Negative file of Geelong 17 inbound in Melbourne Road on the North line, near Swinburne St at the level crossing used for goods traffic, opposite North Geelong railway yard. Tram has the destination of Belmont. In the background are various gasholders. Photo late 1940's. trams, tramways, geelong, north, level crossings, tram 17 -
 Queenscliffe Maritime Museum
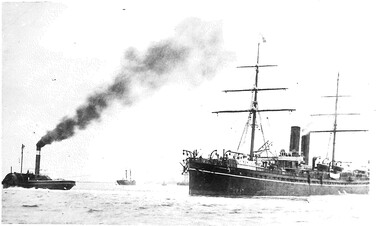
Photograph, Photographer unknown, 1893
... of "SS Ballarat" at Melbourne's Railway Pier 1893... by a submarine's torpedoe. Steel tugboat SS Ballarat Railway Pier Melbourne ...The 'Rescue' was one of the first metal hulled tugboats. The 'Ballarat' became a troop carrier & was sunk by a submarine's torpedoe.RealismBlack & white photograph of the tug "Rescue" moving the bow of "SS Ballarat" at Melbourne's Railway Pier 1893'Rescue' and 'SS Ballarat'steel tugboat, ss ballarat, railway pier melbourne -
Queenscliffe Maritime Museum
Photograph, Photographer unknown, 1893
... of "SS Ballarat" at Melbourne's Railway Pier 1893... by a submarine's torpedoe. Steel tugboat SS Ballarat Railway Pier Melbourne ...The 'Rescue' was one of the first metal hulled tugboats. The 'Ballarat' became a troop carrier & was sunk by a submarine's torpedoe.RealismBlack & white photograph of the tug "Rescue" moving the bow of "SS Ballarat" at Melbourne's Railway Pier 1893'Rescue' and 'SS Ballarat'steel tugboat, ss ballarat, railway pier melbourne