Showing 848 items matching " tram 18"
-
 Ballarat Tramway Museum
Slide - 35mm slide/s, Keith Caldwell, 1963
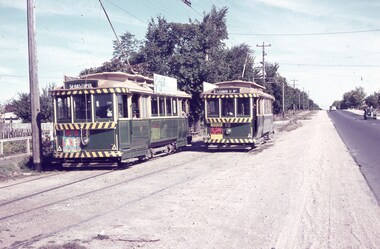
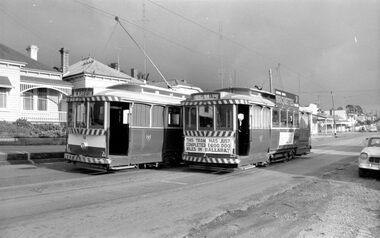
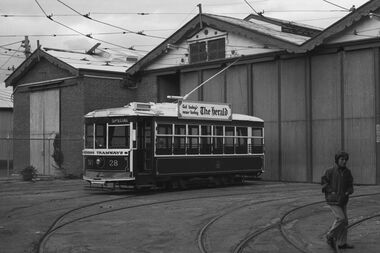
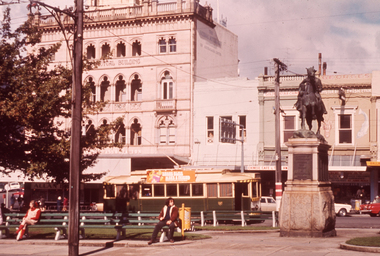
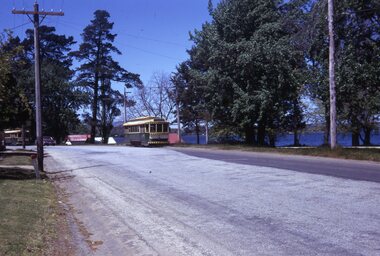
... tram 18... Caldwell during 1963 of: Trams 28 (Sebastopol) and 18 (Lydiard... trams 28 and 18 at the Grey St loop on the Sebastopol line ...Yields information about trams 28 and 18 at the Grey St loop on the Sebastopol line.Agfa colour slide, white cardboard mount, photo by Keith Caldwell during 1963 of: Trams 28 (Sebastopol) and 18 (Lydiard St Nth) crossing at the Grey St Loop, Albert St Sebastopol. No. 28 has a Twin Lakes sign and 18 a dancing at Civic Hall on their dash panels. No. 28 has a Georgette Ladies Salon roof advertisement.In ink "1963"tramways, trams, albert st, sebastopol, grey st loop, gray st, tram 28, tram 18 -
 Ballarat Tramway Museum
Photograph - B&W print of donated negative, Ron E. Fluck, 2/04/1950 12:00:00 AM
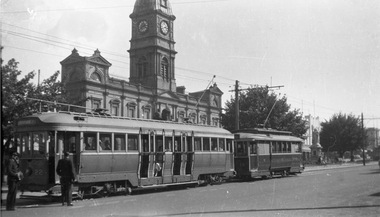
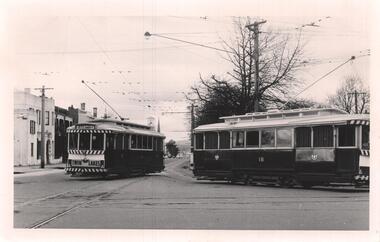
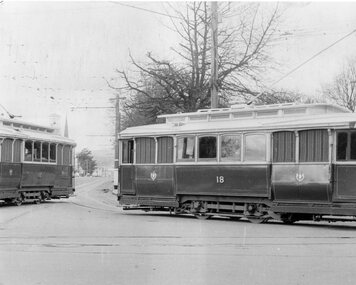
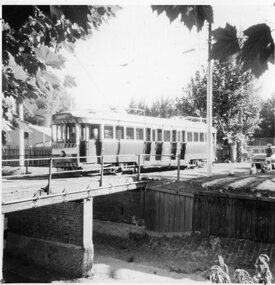
... tram 18.../1998. Photo of SEC bogie tram 22 and SEC 18 at Sturt... Sturt St Ballarat Bogie Trams tram 22 tram 18 Black and white ...Black and white print of a donated negative. Print made 8/1998. Photo of SEC bogie tram 22 and SEC 18 at Sturt and Lydiard St. intersection. Photo taken on 2/4/1950. Has Town Hall in background. See also Reg Item 6991 for a very similar photo. High res scan of negative added 22/1/2020.tramways, trams, town hall, sturt st, ballarat, bogie trams, tram 22, tram 18 -
 Ballarat Tramway Museum
Slide - 27 mm sq slide/s - set of 22 - moving 18 to Sebastopol, Lilian Butler, 30/09/1971
... tram 18... - towing the tram along Victory St, .17 - ditto .18 - moving steel... the transfer of tram 18 to Victory Park Sebastopol. Ballarat Tramways ...Yields information about the transfer of tram 18 to Victory Park Sebastopol.Set of 22 Agfa blue and white plastic mount slides of tram 18 being moved to Victory Park for the Borough of Sebastopol - 30/9/1971. See Reg Item 2909 for the actual Newspaper cutting and 3778 for a photograph of the move. See Reg Item 3929 for list of dates of tram disposal, though this item gives the date as 2/10/71 .1 - No. 18 parked on the depot fan, with E. Davis alongside. .2 - group of 6 men standing alongside 18 - left to right - N. Lorensini, ? W. Trusler, S. Lakey, B.Peart and E. Davis .3 - tram being driven into Wendouree Parade. .4 - ditto .5 - turning from Macarthur St into Drummond St south with a SEC bucket truck following. .6 - ditto - with the Lisette Beauty Salon on the corner. .7 - Drummond St North .8 - Coupling a SEC tractor to the tram with the Ballarat Base Hospital in the background. .9 - Ditto with S. Lakey cleaning out the points. .10 - being towed across Sturt St .11 - being towed along Drummond St South .12 - workmen at Victory Park preparing the section of track. .13 - ditto .14 - being derailed near Vickers St with an Alsco Linen Service van in the background - note the overhead appears to have been removed. .15 - towing the tram across Albert St. .16 - towing the tram along Victory St, .17 - ditto .18 - moving steel channel along the street, with a tram sitting on one already. .19 - moving the tram .20 - ditto .21 - turning the track to align up with the storage track. .22 - Group of 7 men (see slide 2 for some of the names) and three children with the tram in position. Photo from the collection of Lilian Butler. See also Reg Item 6857 for a digital image. ballarat, tramways, trams, sec, depot, tram disposal, sebastopol, victory park, albert st, moving trams, drummond st, macarthur st, tram 18 -
 Ballarat Tramway Museum
Photograph - Digital image Set of 20, 16/04/1972 12:00:00 AM
... tram 18... at Eaglehawk with German circus banner on tram .15 - No. 18... Eaglehawk Long Gully Jobs Gully Manchester Loop tram 24 tram 18 tram ...Set of 22 digital images of Bendigo Tramways, of the last running day of the Eaglehawk to Quarry Hill line 16 April 1972, .1 - No. 3 and 24 crossing at Long Gully .2 - No. 3 turning at the Cricket ground, Barnard and View Sts, inbound to the City and Quarry Hill .3 - No. 3 in bound to the City and Quarry Hill, Long Gully area .4 - No. 18 inbound to the City and Quarry Hill crossing the railway bridge from Eaglehawk. .5 - Manchester Loop .6 - No. 18 inbound to the City and Quarry Hill crossing the railway bridge from Eaglehawk. .7 - No. 18 about to enter Jobs Gully Loop .8 - No. 3 about to turn at the Cricket ground, Barnard and View Sts inbound to the City and Quarry Hill .9 - No. 3 turning at the Cricket ground, Barnard and View Sts, inbound to the City and Quarry Hill .10 - No. 18 at Eaglehawk terminus with the Mechanics Institute in the background. .11 - No. 3 in bound, Ironbark area. .12 - No. 3 at Long Gully Loop .13 - No. 3 outbound to Eaglehawk. .14 - No. 18 at Eaglehawk with German circus banner on tram .15 - No. 18 on the Eaglehawk line at Jobs Gully Loop .16 - No. 24 outbound to Eaglehawk at Taylor St .17 - No. 18 inbound to the City and Quarry Hill crossing the railway bridge from Eaglehawk. .18 - No. 3 at Manchester Loop .19 - No. 18 at Eaglehawk terminus .20 - No. 18 at Eaglehawk with German circus banner on tram .21 - bogie tram at Long Gully Loop. .22 - No. 24 outbound to Eaglehawk at Taylor Sttrams, tramways, bendigo, eaglehawk, long gully, jobs gully, manchester loop, tram 24, tram 18, tram 3 -
 Ballarat Tramway Museum
Photograph - Digital image, Mal Rowe, 29/06/1968 12:00:00 AM
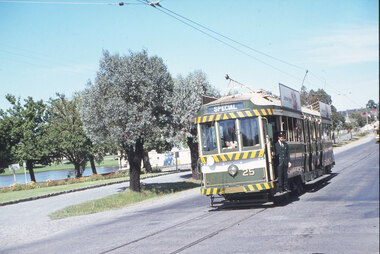
... tram 18...Digital image of a Black and white photograph of Tram 27... tram 27 tram 18 Digital image of a Black and white photograph ...Yields information about the purported achievement of tram 27 reaching 1,000,000 miles and the TMSV Tour.Digital image of a Black and white photograph of Tram 27 and 18 using the Grant St loop, Barkly St Mt Pleasant during the celebrations of the tram completing its "millionth" mile in Ballarat on Saturday 29 June 1968 Tram showing "Special", has banner "This tram has just completed 1,000,000 (million) miles in Ballarat" on the front of the tram during the TMSV Celebratory tour. See also Reg Items 1878 and 7990 to 7995 for other photos of the day by Mal Rowe. Note: A review of the tram car mileages by Dave Macartney, showed that it was actually 900,000, due to a carryover error.trams, tramways, tmsv, million miles, grant st, barkly st, tram 27, tram 18 -
 Ballarat Tramway Museum
Slide - 35mm slide/s - set of 20, Eldon Hogan, 22/05/1971 12:00:00 AM
... tram 18... at the Eaglehawk terminus. .17 - No. 29 and two other trams at ditto .18... 30 tram 29 tram 5 tram 18 tram 19 tram 24 tram 25 Set of 20 ...Set of 20 35mm Agfa colour blue and white plastic mount slide - featuring photos taken during an Association of Railway Enthusiasts Tour by Eldon Hogan. Folder had the date "22/5/1971" on it. Scanned on the Canon scanner at the depot 15/12/2005 at the time of the installation of the scanner. .1 - No. 25 in Nolan St with Lake Weeroona in the background. .2 - Three Birneys at the Depot junction, 30 and 29 with Conoles Hotel, McCrae St in the background. .3 - No. 5 in front of the Shamrock Hotel, Pall Mall .4 - No. 29 in front of the Shamrock Hotel with Stonemasons sign in the background. .5 - No. 18 ditto .6 - No. 30 and another Birney at the Quarry Hill terminus .7 - No. 24 southbound High St at the Violet St intersection with a "Mine Open" sign in the foreground and the Cathedral in the background. .8 - No. 19 at the Golden Square terminus, with the Golden Square Hotel in the background. .9 - No. 29 - side on view, North Bendigo line? Thunder St? .10 - No. 30 crossing the railway overbridge, inbound from Eaglehawk with a number of photographers in the foreground. .11 - No. 29? ditto .12 - No. 5 outbound - side on view, Thunder St, North Bendigo line? .13 - No. 29 and 30 at the intersection of High St and Brazier St with Church or School hall in the background. .14 - ditto .15 - ditto .16 - No. 25 and the two Birneys at the Eaglehawk terminus. .17 - No. 29 and two other trams at ditto .18 - No. 30 and 19 adjacent to the Lake View Hotel, McCrae St .19 - No. 5 and 25 crossing on the Eaglehawk Line, Ironbark? .20 - No. 29 at Quarry Hilltramways, trams, bendigo, lake weeroona, pall mall, golden square, eaglehawk, quarry hill, tram 25, tram 30, tram 29, tram 5, tram 18, tram 19, tram 24, tram 25 -
 Ballarat Tramway Museum
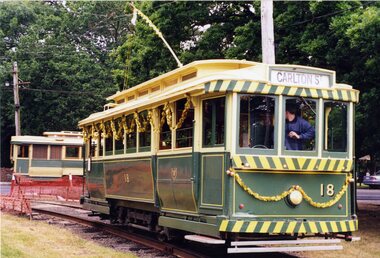
Photograph - Colour Print/s - set of 5, Sturt Keenan, 22/11/2000 12:00:00 AM
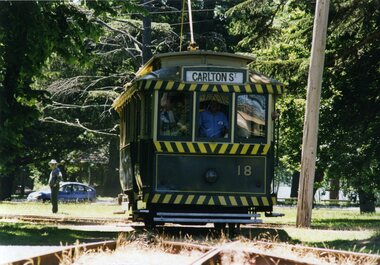
... tram 18...Set of 5 colour prints of the BTM No. 18 at the depot - 22...BTM COTMA Depot Wendouree Parade tram 18 Set of 5 colour ...Set of 5 colour prints of the BTM No. 18 at the depot - 22/11/2000. Taken during the COTMA Conference tram day. .1 - No. 18 crossing level crossing .2 - No. 18 on No. 2 road - Peter Winspur alongside Kevin Taig driving .3 - No 18 - pole being reversed, .4 - Alan Snowball and Richard Gilbert at Wendouree Parade .5 - No. 18 in Wendouree Parade - Alan Snowball and John Phillips Photos taken by Stuart Keenan. Printed on Agfa paper.btm, cotma, depot, wendouree parade, tram 18 -
 Ballarat Tramway Museum
Slide - 35mm slide/s - set of 17, Noel Simons, 20/11/1962 12:00:00 AM
... tram 18... at the tram stop. 1187.15 - No. 18 at the Charing Cross terminus... 2 tram 3 tram 4 tram 7 tram 11 tram 18 tram 19 tram 21 tram ...Set of 17 transparencies taken on 20/11/1962 on Kodak mounts. 1187.1 - Bendigo No. 2 at the Quarry Hill terminus, showing destination of Quarry Hill. Has Cohns Drinks and Streets Ice Cream ads on dash panel, a SEC 'electric cooking' roof ad and another roof ad. Shows the Y terminus at this location, but tram standing just before it. Overhead in position. 1187.2 - as above, but closer up. 1187.3 - as above, but from the north side, showing cemetery in the background. 1187.4 - Bendigo No.3 at Eaglehawk terminus. Tram showing destination of Quarry Hill. Has the various buildings at Eaglehawk in the background including the Foodland store. Has Streets Ice cream and White Horse Whiskey ads on the dash panel. 1187.5 - Bendigo No. 18 at Garden Gully crossing loop, in bound, with destination of Eaglehawk. Passengers waiting for an Eaglehawk tram at the stop. Has a white horse whiskey ad on dash panel and SEC roof ads. Conductor standing in doorway looking out. 1187.6 - Bendigo No. 7 inbound in Nolan St. at cnr of McCrae St. showing destination of Golden Square. Has Streets Ice cream ad on dash panel and a Castrol Roof ad. 1187.7 - Bendigo No. 19 at the North Bendigo terminus with railway level crossing in background. Tram has a Cohns Drinks ad and an SEC 'Electric Cooking' roof ad. 1187.8 - Bendigo No. 2 at the Quarry Hill terminus, looking back into Bendigo, showing destination of Eaglehawk. 1187.9 - Bendigo No. 21 in McCrae St, near Nolan St outbound for North Bendigo. Photo taken after tram has passed photographer. 1187.10 - Bendigo Nos. 4 and 26 at Charing Cross in View St. with fountain alongside and the Beehive, Ezywalkin Buildings in the background. No. 26 has a Sandhurst Milk and SEC 'Electric Cooking' roof ad. 1187.11 - close up of 22E maximum traction truck and folded footstep. 1187.12 - Bendigo No. 19 at Charing Cross terminus, after tram has passed photographer, showing destination of North Bendigo, with the Beehive building in the background and passengers boarding tram. 1187.13 - Bendigo No. 11, turning from View St. into Pall Mall, showing Special with the conductor holding point bar. Has the Beehive and Ezywalkin Buildings in the background. 1187.14 - No. 7 at Charing Cross terminus, in Pall Mall, bound for Golden Square. Has the Beehive and Ezywalkin buildings in the background and passengers waiting at the tram stop. 1187.15 - No. 18 at the Charing Cross terminus, bound for Eaglehawk. Has the Beehive and Ezywalkin buildings in the background and passengers waiting at the tram stop. Also has the 'Safety Zone' sign in the photograph. 1187.16 - No. 2 at Quarry Hill terminus, night or dusk photo. Tram showing destination of Depot. 1187.17 - No. 26 at Charing Cross, night photo. Tram has destination of Quarry Hill, but is on the line for Eaglehawk. Photo looks along Mitchell St. Also shows Safety Zone sign. Information written on in black ink and date stamped on purple ink. 1187.1 - "No. 2 at Quarry Hill terminus Bendigo" 1187.2 - "No. 2 at Quarry Hill terminus Bendigo" 1187.3 - "No. 2 at Quarry Hill terminus Bendigo" 1187.4 - "No. 3 at Eaglehawk terminus" 1187.5 - "No. 18 in Mt Korong Road, Long Gully at cnr of Havilah Road (Eaglehawk Route)" 1187.6 - "No. 7 in Nolan St. Bendigo, at Cnr of McCrae St., near lake Weeroona, (North Bendigo Route)' 1187.7 - "No. 19 at North Bendigo terminus" 1187.8 - "No. 2 at Quarry Hill terminus" 1187.9 - "No. 21 in McCrae St. Bendigo, near Nolan St. (North Bendigo Route) 1187.10 - "4 and 26 at Alexandra Fountain, Charing Cross Bendigo" 1187.11 - "Truck of Bogie Car, Bendigo Tramways" 1187.12 - "No. 19 in Pall Mall at Charing Cross, Bendigo" 1187.13 - "Birney car No. 11 entering Pall Mall from View St. at Charing Cross Bendigo" 1187.14 - "No. 7 in Pall Mall at Charing Cross, Bendigo" 1187.15 - "No. 18 at Alexandra Fountain, Charing Cross, Bendigo" 1187.16 - "No. 2 at Quarry Hill terminus, Bendigo" 1187.17 - "No. 26 at Alexandra Fountain, Charing Cross, Bendigo" tramways, trams, bendigo, quarry hill, eaglehawk, north bendigo, maximum traction, night photo, tram 2, tram 3, tram 4, tram 7, tram 11, tram 18, tram 19, tram 21, tram 26 -
 Ballarat Tramway Museum
Photograph - Digital image Set of 9, Adrian Ponton, 31/07/2021 12:00:00 AM
... tram 18... tram 40 tram 33 tram 18 tram 13 tram 407 Set of 9 digital ...Set of 9 digital images taken by Adrian Ponton on 31 July 2021 - the delayed day (COVID 19) to celebrate the foundation of the BTPS. .1 - 40 on the depot fan .2 - 13 running in on the access track .3 - 40 and 13 on the depot fan with the new building in the background .4 - 40, 33 and 38 on the depot fan .5 - Tramcar signage re Fares and notices .6 - view looking out of the front of the tram 40 on the access track .7 - crossing 407 at Gardens Loop .8 - 40 at St Aidans .9 - dittotrams, tramways, btm, st aidans drive, gardens loop, celebrations, wendouree parade, access track, tram 40, tram 33, tram 18, tram 13, tram 407 -
 Ballarat Tramway Museum
Negative, Bruce Herbert, "Bendigo and Ballarat Trams (AETA Convention) 30 Mar 1975", 30/03/1975 12:00:00 AM
... tram 28 tram 19 tram 30 tram 18 tram 24 tram 3 tram 12... 30 tram 18 tram 24 tram 3 tram 12 tram 17 tram Scrubber ...Negative folder - made by ROW1 International of West Germany containing 40 No. 35 mm negatives of the AETA 1975 Convention visit to Ballarat and Bendigo on 30-3-1975. 17 photos of Ballarat and 23 of Bendigo. Bendigo photos: 1 - No. 28 at the depot 2 - ditto 3 - 24 and another bogie tram in side the depot 4 - No. 3? inside the depot 5 - 12, scrubber - 17 and two bogie trams 6 - scrubber and other bogie trams. 7 - general view with 24 and other bogie trams 8 - ditto 9 - Four trams at the Gold Mine, lead by 28. 10 - 19 at the Gold Mine 11 - single trucker with "tram tours" sign on the front 12 - 28 and two other cars at the Joss House, North Bendigo 13 - 19 and two other cars at the Joss House 14 - 30 at depot junction and loop 15 - 28 and 18 16 - 18 in the loop 17 - 28 and 18 McCrae St 18 - 28, 18 and 30 ditto 19 - 19 20 - No. 18 and 28 in Pall Mall with The Beehive in the background. Outside the building is an American Doughnut Kitchen van. The junction trackwork for the Eaglehawk lines remain in position. 21 - No. 30 northbound, with the City Family Hotel and other shops in the background. 22 - ditto and the cenotaph, 23 - B74 on a train at Spencer St. trams, tramways, btps, ballarat, aeta, bendigo, bendigo trust, depot, mccrae st, tram 28 tram 19 tram 30 tram 18 tram 24 tram 3 tram 12 tram 17 tram scrubber -
 Ballarat Tramway Museum
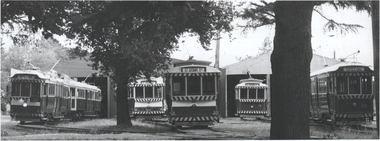
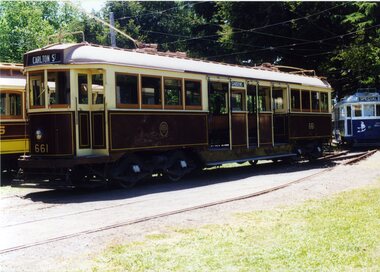
Photograph, Line up of Museum trams, 1990s
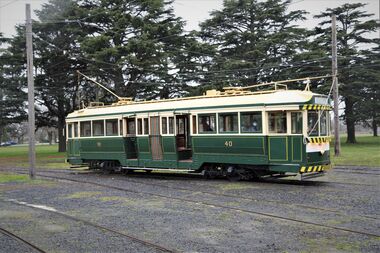
... tram 18... tram 18 tram 38 Photograph - Black & White print Line up ...Photograph showing a lineup of Museum trams in front of the depot, possibly during a tramway enthusiast group tour during the 1990s. Trams included are 40, 661, 33, 14, 18 and 38. Demonstrates a line up of the Museum's tramcars.Photograph - Black & White printtramcars, btm, btm depot, tram 40, tram 661, tram 33, tram 14, tram 18, tram 38 -
 Ballarat Tramway Museum
Photograph - Digital image Set of 16, George Coop, 1968 - 1970
... tram 18... 27 tram 41 tram 18 tram 39 scrubber tram 39 tram 26 tram 43 ...Yields information about the Depot and how equipment was provided in the depot and some of the tramcars.Sixteen Digital images taken by George Coop during the period 1968 - 1970, of SEC trams at the Depot and workshops in Wendouree Parade. .1 - 36 in depot with chain block, chains, jacks and other equipment in the view. .2 - view of the inspection pit on 4 road with the large jack in the pit. .3 - 39 on "0" road - photo has been "framed" with a blue line. .4 - 26 in the paint and wood shop area of the workshops. .5 - 43 in the depot. .6 - 42 and the 1 road pit. .7 - ditto, with a window cleaner - photo has been "framed" with a blue line. .8 - 35 and 36 .9 - roof top view - photo has been "framed" with a blue line. .10 - 27 and many spare wheels in the view, along with jacks. .11 41 and other trams showing the pit, spare parts and equipment - photo has been "framed" with a blue line. .12 18 at the front of the depot. .13 View of a 22E bogie with autumn leaves .14 - as for .4, - photo has been "framed" with a blue line. .15 - Scrubber car on "0" road and lots of autumn leaves. .16 - View of the depot view with 39 on "0" road and 18 on "3" road. trams, tramways, depot, workshops, scrubber tram, tram 36, tram 27, tram 41, tram 18, tram 39, scrubber, tram 39, tram 26, tram 43, tram 42, tram 35, tram 36 -
 Ballarat Tramway Museum
Photograph - Digital image Set of 28, Mal Rowe, 21/09/2019 12:00:00 AM
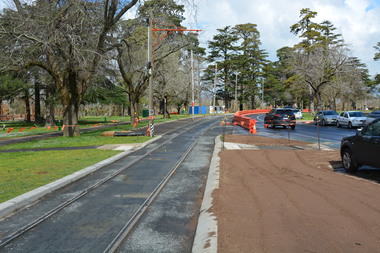
... tram 18... 14 tram 28 tram 18 tram 27 tram 38 tram 40 tram 671 Set of 28 ...Set of 28 digital images of the 2019 Tramcar Showcase by Mal Rowe on 21/9/2019. .1 - View looking south from depot junction showing the track replacement pending the final asphalt layer. .2 - looking north towards depot junction .3 - 27 crossing Wendouree Parade .4 - 14 crossing with John Phillips ex MMTB Mk III Bus in the background. .5 - 13on the access track. .6 - 8 on the depot fan .7 - Cavalcade line up lead by 26 .8 - ditto .9 - group photo being arranged .10 - Cavalcade line up lead by 26 .11 - ditto .12 - 28 returning to the depot. .13 - ditto .14 - 27 returning to the depot on the access track. .15 - 18 ditto .16 - 18 ditto .17 - 13 ditto .18 - 13 ditto .19 - 18 ditto .20 - 40 running in with Mk III bus in the background .21 - 40 on the access track .22 - ditto .23 - 38 on the access track .24 - close up of the 22E truck .25 - depot fan in general. .26 - 14 on the access track .27 - 38 on the access track .28 - 38 dittotrams, tramways, btm, tramcar showcase, events, cavalcade, wendouree parade, trackwork, buses, 22e trucks, depot, tram 13, tram 38, tram 26, tram 14, tram 8, tram 27, tram 14, tram 28, tram 18, tram 27, tram 38, tram 40, tram 671 -
 Ballarat Tramway Museum
Slide - 35mm slide/s - set of 14, Noel Simons, 23/11/1962 12:00:00 AM
... tram 18... Wendouree Parade Depot Junction Lydiard St. North tram 17 tram 18 ...Set of 14 Kodachrome transparencies taken on 23/11/1962. 1162.1 - tram 38 turning into Lydiard St. North from Sturt St. with tram 20 in background. Many motor vehicles in photo. 1162.2 - as above, but a minute of so later. Has Mutual Life building in background as well as Town Hall. 1162.3 - No. 40 entering Albert St. from Skipton St. outbound to Sebastopol. 1162.4 - No. 40 near start of side of the road running in Albert St. heading to Sebastopol. 1162.5 - No. 40 at the City terminus, on the South side of Sturt St. Has Town Hall and other buildings along the south side of Sturt St. in the background. 1162.6 - No. 40 at Sebastopol terminus - shows arrangement of the signs at the terminus. 1162.7 - No. 40 and No. 38 crossing at loop between Sayle and Grey St. No. 40 inbound. 1162.8 - No. 40 turning from Drummond St. South to Sturt St. at Hospital Corner with Southern Cross Hotel in background. 1162.9 - No. 18 in Wendouree Parade near Forest St. heading east with destination of "Victoria St." 1162.10 - Nos 41 and 39 at Depot Junction. Both trams have SEC ads. 1162.11 - No. 39 turning into the depot from Wendouree Parade - showing destination of "Gardens via Drummond Nth" 1162.12- No. 17 at Lydiard St. North terminus, showing destination of "Grey St. Sebas". Has a Twin Lakes sign 1162.13 - ditto, but with trolley pole turned around. Has SEC Briquettes roof ad and Whitehorse whiskey ad on rear dash panel. 1162.14 - No. 40 outbound to Sebastopol crossing Albert St. 1162.1 -"Nos. 38 and 20 in Sturt St. Ballarat at corner of Lydiard St." 1162.2 - "No. 38 turns into Lydiard St. as No. 20 waits at stop in Sturt St. Ballarat" 1162.3 - "No. 40 entering Albert St. from Skipton St. Redan on Sebastopol route." 1162.4 - "No 40 at beginning of reserved track on Sebastopol route, Albert St. Redan." 1162.5 - "No. 40 in Sturt St. Ballarat near cnr. of Armstrong St." 1162.6 - "No. 40 at Sebastopol terminus" 1162.7 - "No. 38 and 40 crossing at Sayle St. Loop on Albert St. reserved track, Sebastopol route" 1162.8 - "No. 40 turning into Sturt St. from Drummond St." 1162.9 - "No. 18 in Wendouree Pde. Ballarat near tramway depot" 1162.10 - "No. 41 and 39 outside Ballarat tramway depot, Lake Wendouree in background" 1162.11 - "No. 39 entering tramway depot from Wendouree Parade, Ballarat" 1162.12 - "No 17 at Lydiard St. North terminus, Ballarat North" 1162.13 - "No 17 at Lydiard St. North terminus, Ballarat North" 1162.14 - "No. 40 crossing Albert St. Sebastopol as reserved track switches from left to right of road" All have date stamp of "23 Nov. 1962" in purple ink. All black ink unless otherwise noted.tramways, trams, ballarat, albert st., sturt st., sebastopol, grey st., hospital corner, wendouree parade, depot junction, lydiard st. north, tram 17, tram 18, tram 20, tram 38, tram 39, tram 40, tram 41 -
 Ballarat Tramway Museum
Slide - 35mm slide/s - set of 2, Noel Simons, 23/12/1967 12:00:00 AM
... tram 18... Trams Drummond St. Nth Wendouree Parade tram 18 tram 32 1164.1 ...Set of two Kodak Ready-mount with slides made from the Association of Railway Enthusiast Provincial Tramways film strip. Both taken by D. Macartney, 23/12/1967. See Reg Item 2560 for details of the slide strip and reference to the other slides within the strip. 1164.1 - No. 18 north bound in Drummond St. North, at Victoria Ave. - side on photo - slide has a red coloured background. 1164.2 - No. 32 decorated for Myer's Christmas tram at Macarthur St. with destination of "Victoria St." See Reg Item 4184 for a black and white photograph.1164.1 - "No. 18 heads up Drummond St. North, bound for "Gardens"" 1164.2 - "No. 32 with Christmas decoration alongside Lake Wendouree" All have date stamp of "Dec 1967" in blue ink. Writing in blue ink.tramways, trams, myer, christmas trams, drummond st. nth, wendouree parade, tram 18, tram 32 -
 Ballarat Tramway Museum
Slide - 35mm slide/s - set of 13, Noel Simons, 28/04/1971 12:00:00 AM
... tram 18.... Titanic Bandstand tram 11 tram 14 tram 18 tram 21 tram 26 tram 30 ...Set of 13 transparencies taken on 28/4/1971 on PAKON mounts. 1168.1 - No. 21 at City terminus - taken from North side of street. Has Boer War statue on right side and National Mutual building in the background. 1168.2 - No. 34 with destination "Sebastopol" in Sturt St., outside Town Hall, with National Mutual building in background. 1168.3 - No. 18 at corner of Sturt and Lydiard Sts with National Mutual building and Craigs Hotel in background. 1168.4 - 18 at intersection of Sturt and Dawson St. 1168.5 - No. 30 at intersection of Armstrong St and Sturt St. with Fletcher Jones building in background. 1168.6 - No. 14 at City Terminus, showing destination of "Victoria St." with Town Hall in the background. 1168.7 - No. 11 bound for Mt Pleasant, opposite Titanic Bandstand in Sturt St. Has a Twin Lakes advertisement on the front dash panel and an unknown roof advertisement. 1168.8 - No. 21 at bottom of Sturt St. approaching the Grenville St. junction, with Dickins Food Store and the Spot Cafe in the background. Tram has destination of "Victoria St". and a roof advertisement for a cigarette? company. 1168.9 - No. 26 and three other trams in City Loop, looking west along Sturt St., just after a heavy hail storm. 1168.10 - No. 21 at the intersection of Sturt St and Dawson St. with Golden City Hotel and the Ritzy Cafe in the background. Can see the Dawson St. crossover track, just after a heavy hail storm. 1168.11 - No. 21 and three other trams at City Loop looking east along the south side of Sturt St. See also image 1168i1a - cleaned up and edited by Peter Waugh April 2024 - used in the April 2024 issue of Fares Please. 1168.12 - No. 14 entering the South side of Sturt St. from Bridge St. with Dickins Store in the background and the Grenville St. shelter alongside the tram. 1168.13 - No. 37 at Sturt and Dawson St., eastbound, showing "Lydiard St. Nth" Has SEC roof advertisement on the side of the tram.1168.1 -"Sturt & Lydiard Sts" 1168.2 - "Town Hall" 1168.3 - "Sturt St & Dawson Sts" 1168.4 - "Sturt and Lydiard Sts" 1168.5 - "Sturt St." 1168.6 - "Sturt and Lydiard Sts" 1168.7 - "Sturt St." 1168.8 - "Bridge St." 1168.9 - "City Loop" 1168.10 -"Dawson & Sturt Sts." 1168.11 - "City Loop" 1168.12 - "Bridge St." All have date stamp of "28 Apr 1971" in purple ink on base. All blue ink unless otherwise noted.tramways, trams, town hall, sturt st., dawson st, armstrong st., grenville st, bridge st., titanic bandstand, tram 11, tram 14, tram 18, tram 21, tram 26, tram 30, tram 34, tram 37 -
 Ballarat Tramway Museum
Slide - 35mm slide/s set of 7, Noel Simons, 29 Feb. 1972
... tram 18... Charing Cross View St. Nolan St. tram 2 tram 7 tram 18 tram 26 ...Set of 7 transparencies taken on 29/2/1972 on Kodak mounts. 1208.1 - Bendigo 18 (en route to Quarry Hill) and 2 (Eaglehawk) in the early morning at Charing cross with the Alexandra fountain and the Fountain Plaza building in the background. 1208.2 - No. 2 descending View St. Photo taken after tram has passed the photographer. 1208.3 - as for 1208.2 at Mackenzie St. intersection 1208.4 - No. 26 ascending View St. with the ANZ bank, T& G in the background. 1208.5 - as for 1208.4, but at Mackenzie St. intersection. Photo taken after tram has passed the photographer. 1208.6 - No. 18 in View St. seen from the lookout tower in Rosalind Park. 1208.7 - No. 7 en route to North Bendigo in Nolan St. Photographed across the Centenary Oval.Information written on in blue ink and date stamped on purple ink. 1208.1 - "Nos. 18 and 2 in the early morning sun at Charing Cross." 1208.2 - "No. 2 descending View St. towards Charing Cross." 1208.3 - "No. 2 in View St. passing Mackenzie St." 1208.4 - "No. 26 in View St. just after leaving Charing Cross." 1208.5 - "No. 26 climbing View St. past Mackenzie St." 1208.6 - "No. 18 climbing View St. seen from lookout tower in Rosalind Park." 1208.7 - "No. 7 in Nolan St. heading towards North Bendigo. / Last picture of a Bendigo tram."tramways, trams, bendigo, charing cross, view st., nolan st., tram 2, tram 7, tram 18, tram 26 -
 Ballarat Tramway Museum
Slide - 35mm slide/s set of 7, Noel Simons, 1972
... tram 18... tram 18 tram 19 tram 25 tram 29 Information typed onto a white ...Set of 7 transparencies undated on PAKON mounts - appear to be early 1970's. 1212.1 - No. 18 about to enter the Long Gully loop with ESSO service station on the right hand side. 1212.2 - No. 6 in Mitchell Street bound for Charing Cross. Tram has destination of "Rly Station". Has buildings on the east side of Mitchell St. in the background. 1212.3 - No. 7 (North Bendigo) and 29 (Golden Square) crossing. Actual location? 1212.4 - "No 6 showing 'SPECIAL' at Eaglehawk terminus. Has the Foodland store and Fruit shop in the background. 1212.5 - No. 19 at Eaglehawk terminus, on the extension to the normal Eaglehawk terminus. Tram has showing 'Eaglehawk'. Tram has two SEC roof ads. 1212.6 - No. 25 and another Bogie car at Quarry Hill terminus on last day. 1212.7 - No. 18 and 29 at Quarry Hill terminus. No.. 18 showing 'Quarry Hill' - has two SEC roof ads 'Electric Cooking - Matchless' and 'Everything's fine in my all electric kitchen' and No. 29 has a briquettes roof ad.Information typed onto a white label stuck on the slide. 1212.1 - "No. 18 at Long Gully" 1212.2 - "No. 6 in Mitchell Street." 1212.3 - "7 and 29 Lake View Hotel" 1212.4 - "No. 6 at Eaglehawk" 1212.5 - "No. 19 at Eaglehawk Term." 1212.6 - "Last cars Quarry Hill." 1212.7 - "18 & 29 Quarry Hill"tramways, trams, bendigo, long gully, mitchell st., eaglehawk, quarry hill, last tram, tram 6, tram 7, tram 18, tram 19, tram 25, tram 29 -
 Ballarat Tramway Museum
Photograph - Black & White Photograph/s, Dave Macartney, 4/08/1968 12:00:00 AM
... tram 18... Corner Sturt St Junction tram 18 tram 12 Black and white ...Black and white photograph of SEC Nos 12 and 18 meeting at the corner of Drummond Street and Sturt St. Taken by Dave Macartney 4/8/1968. Both trams inbound. No. 12 turning from Drummond St. Nth, showing "Depot via Drummond Nth" and No. 18 ex Sebastopol line. Both trams have the blinds drawn. Tram 12 has a "Twin Lakes" sign. Colour photocopy, laminated, of this photograph on display 5/2000 at 02-02-06. See also Reg Item 2139 for another print of this scene, but differently framed. 1412.1 - same photo, differently framed. Added 10/11/2005 - to be 01-01-70. trams, tramways, hospital corner, sturt st, junction, tram 18, tram 12 -
 Ballarat Tramway Museum
Photograph - Black & White Photograph/s, Dave Macartney, 4/08/1968 12:00:00 AM
... tram 18... Corner Sturt St Junction tram 18 tram 12 Black and white ...Black and white photograph of SEC Nos 12 and 18 meeting at the corner of Drummond Street and Sturt St. Taken by Dave Macartney 4/8/1968. Both trams inbound. No. 12 turning from Drummond St. Nth, showing "Depot via Drummond Nth" and No. 18 ex Sebastopol line. Both trams have the blinds drawn. Printed on Agfa paper. See also Reg Item 1412 for another print of this scene, but differently framed. tramways, trams, hospital corner, sturt st, junction, tram 18, tram 12 -
 Ballarat Tramway Museum
Photograph - Black & White Photograph/s, Geoff Grant, 19/06/1955 12:00:00 AM
... tram 18... Chilwell Ballarat East Closure Tram 8 tram 39 tram 4 tram 18 tram 1 ...A set of eight 2 1/4" square photographs mounted onto a sheet of manila cardboard - contact prints of each negative. Numbered from left to right, top to bottom are: 476.1 - SECV Ballarat No. 38, possibly at Victoria St - c1955.; 476.2 - SEC Geelong 8 and 39 at Eastern Park terminus - 2/4/1955 476.3 - SEC Geelong No. 4 out the front of the depot building - 8/1/1956 (Negative No. 368) - See Reg Item 7253 for a large format print. 476.4 - SEC Geelong single trucker and bogie at depot - 8/1/1956 (Negative No. 365) 476.5 - SEC Geelong - No. 18 at East terminus - last day of Chilwell 8/1/56 (Negative No. 366) - See Reg Item 7253 for a large format print. 476.6 - SEC Geelong - No. 1 - at a terminus (see also Reg item No. 485) (Negative 367) (See Reg. Item 2610 for colour slide of this terminus and tram and 5898i6) 476.7 - SEC Geelong - No. 1 - at depot - group of people standing in front. (Negative 364) - See Reg Item 7255 for a large format print. 476.8 - SEC Geelong - No. 1 entering depot portal night shot, 8/1/56 (Negative 369) - See Reg Item 7256 for a large format print. Negative envelope has the typed note "Some six views of Geelong trams on the last day of operations of the Chilwell line and East West line" Re 476.7 - See also Reg Item 5898i2 - photo by Keith Kings for a similar or same photograph. Re 476.8 - See also Reg Item 5899i1 - photo by Keith Kings for a similar or same photograph. hi res scan made and image updated 23/5/2020.Niltrams, tramways, geelong, chilwell, ballarat, east, closure , tram 8, tram 39, tram 4, tram 18, tram 1, tram 38 -
 Ballarat Tramway Museum
Negative - Set of 10, 20/10/1962 12:00:00 AM
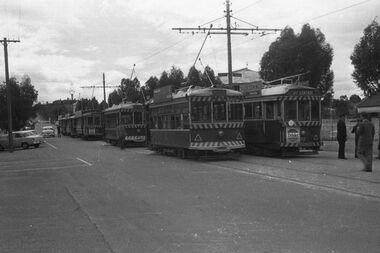
... tram 28 tram 21 tram 18 tram 26 tram 30 tram 25 tram 19... Tours tram 28 tram 21 tram 18 tram 26 tram 30 tram 25 tram 19 ...Set of 10No. 35mm black and white negatives in a negative holder sheet with labels of the ARHS Vic Div. tour or trip to Bendigo, 20/10/1962 for the 100 years celebrations of Bendigo station and an associated tram tour. Strip 1 - negatives 12 to 15 - the tram convoy at Bendigo station area - trams 28, 21, 7 19 and 30. Strip 2 - negatives 18 & 19 - North Bendigo terminus Strip 3 - negative 16 - at Eaglehawk, negative 11 - Convoy at Bendigo station Strip 4 - negative 20 and 21 - Eaglehawk? .1 - Convoy of trams - two rows lined up - 21, 18, 28 .2 - Front of convoy - 28 and 18 - includes Inspectors and crews. .3 - Passengers board - 28, 18 and 26 .4 - Convoy crossing No. 25. .5 - Convoy at North Bendigo Terminus - includes No. 19 .6 - Six trams at North Bendigo - no housing construction by the terminus - vacant blocks. .7 - Convoy at Eaglehawk - 28 and 30 .8 - Pall Mall .9 - North Bendigo - 21 .10 - The depot - 30 Original sheet with negatives with worksheet fileSee sheettrams, tramways, bendigo, arhs, tours, tram 28 tram 21 tram 18 tram 26 tram 30 tram 25 tram 19 -
 Ballarat Tramway Museum
Slide - 35mm slide/s - set of 4, Carolyn Dean, 3/11/1970 12:00:00 AM
... tram 18... Wendouree Parade Depot Loop tram 21 tram 18 tram 30 Each slide date ...Shows trams in Wendouree Parade, using the depot loop, which involved a tram out in the middle of the road, facing traffic.Set of four Kodak slides, white cardboard of Ballarat trams. Taken 3.11.1970 by Carolyn Dean. .1 - "30" - 21 and 18 approaching the depot loop, Wendouree Parade .2 - "31" - 21 in the loop (Destination of Gardens via Drummond Nth ) - running a special with 18 behind. .3 - "32" - 18 in the loop (Destination of Gardens via Drummond Nth ) - with No. 30 leaving the loop. .4 - "33" - 18 in the loop with 21 departing. .Each slide date of "3-11-70" in ink.tramways, trams, ballarat, wendouree parade, depot loop, tram 21, tram 18, tram 30 -
 Ballarat Tramway Museum
Slide - 35mm slide/s, Carolyn Dean, 3/11/1970 12:00:00 AM
... tram 18... Raceway Depot Junction tram 18 tram 39 "3-11-70" in ink on slide ...Shows tram operations at Depot Junction by the SEC, with a bogie tram running out for the evening peak.Kodak slide, white cardboard of No. 18 and 39 at SEC Depot Junction. Taken 3.11.1970 by Carolyn Dean. 18 has the destination of Mt Pleasant. No. 39 has the "Trotting Bray Raceway Friday Night" auxiliary board. . ."3-11-70" in ink on slide.tramways, trams, ballarat, wendouree parade, bray raceway, depot junction, tram 18, tram 39 -
 Ballarat Tramway Museum
Photograph - Black & White Photograph/s - set of 7, 16/04/1972 12:00:00 AM
... tram 18... for Eaglehawk - has Ezywalkin Store in background. .3 - 18 crossing.... tramways trams Bendigo Closure Eaglehawk tram 25 tram 2 tram 18 ...Yields information about the final day of the Bendigo tramways and some of the tramcars used.Set of seven black and white photographs of the day Bendigo Tramways closed 16-4-1972. Taken on Agfa paper. Has printing date of 18.8.72 stamped on rear. All have been used for display purposes. .1 - 25 leaving the depot .2 - 2 at Charing Cross, bound for Eaglehawk - has Ezywalkin Store in background. .3 - 18 crossing another tram at a loop on the Eaglehawk line. .4 - 28 at Charing Cross showing Special .5 - 26 inside depot, with Borough of Eaglehawk sign on the front bumper and bunting around the tram. .6 - 29 leaving the depot .7 - 26 in the final parade, with "Destination Eaglehawk" on a roof mounted advertisement board, with the Beehive building in the background and Coca Cola advertisement on top of the building. Photographer not known.3549.8 - has "photo No. 8" on rear and been marked out for publication. tramways, trams, bendigo, closure, eaglehawk, tram 25, tram 2, tram 18, tram 28, tram 26, tram 29 -
 Ballarat Tramway Museum
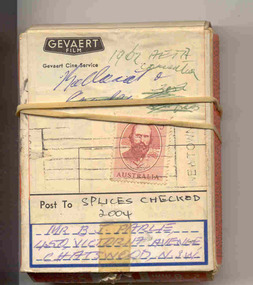
Film - Movie Film & Box, Gevaert, 1962
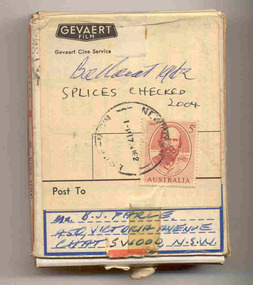
... tram 18... Ballarat Gardens Victoria St Bridge St Sturt St tram 18 tram 37 ...Yields information in movie film format of Ballarat trams in 1962, a enthusiast tour, how the system operated and was used by people., Yields information in movie film format of Ballarat trams in 1962, a enthusiast tour, how the system operated and was used by people.Movie film - 8mm, approx. 4.15mins, with green leader strip on a plastic reel, within a Gevaert film cardboard box, with a Harvin Film Laboratory r, Marrickville NSW label and address to B.J. Parle, Chatswood and a 5d stamp. Titled "Ballarat 1962". Has been transferred to DVD - see Reg item 4100 as Segment No. 6. Filmed and made by Ben Parle. Also transferred to DVD by Rod Cook Oct. 2015, via Roger Greenwood for use in his DVD, "The City of Ballarat Trams, Gardens & Gold" of 2016. See Reg Item 6883. Synopsis: based on time - Black and White film Title "Ballarat 1962" 0:00 37 departing City Centre in Sturt St, east bound, followed by 18 0:23 18 and 37 arriving into City Loop from Bridge St. 0:40 18 and 37 passing through the Gregory St Loop 0:54 18 and 37 arriving and at Lydiard St Nth terminus 1:15 18 and 37 in Lydiard St Nth 1:22 18 and 37 at Railway St gates, with gates closed with B class hauled passenger train, wooden and air-conditioned carriages departing. 1:51 Interior view of passengers in 18 2:10 View from a side window of 18 turning from Lydiard St Nth into Sturt St, heading east, with an inspector getting off No. 18 2:23 View from front window in Victoria St and entering King St loop to cross No. 14. 2:55 18 and 37 departing King St loop, in bound. 3:10 18 in Barkly St, outbound 3:38 42 in bound Drummond St Nth and turning into Sturt St at Hospital corner. 4:16 End Written labels giving title information on outside of box.trams, tramways, ballarat, gardens, victoria st, bridge st, sturt st, tram 18, tram 37, tram 42 -
 Ballarat Tramway Museum
Film - Movie Film & Box, Gevaert, 1962
... tram 18... Ballarat Drummond St Sturt St Sebastopol tram 18 tram 37 tram 40 ...Yields information in movie film format of Ballarat trams in 1962, a enthusiast tour, how the system operated and was used by people., Yields information in movie film format of Ballarat trams in 1962, a enthusiast tour, how the system operated and was used by people.Movie film - 8mm, approx. 2.5mins, with green leader strip on a plastic reel, within a Gevaert film cardboard box, with a Harvin Film Laboratory, Marrickville NSW label and address to B.J. Parle, Chatswood and a 5d stamp. Titled "Ballarat 1962 AETA Convention". Has been transferred to DVD - see Reg item 4100 as Segment No. 5. Filmed and made by Ben Parle. Also transferred to DVD by Rod Cook Oct. 2015, via Roger Greenwood for use in his DVD, "The City of Ballarat Trams, Gardens & Gold" of 2016. See Reg Item 6883. Synopsis: based on time - Black and White film Title "Ballarat 1962 AETA Convention" 0:00 40 Sturt St, outbound 0:27 Bogie tram in Sturt St, inbound 0:39 No. 41, turning from Sturt into Drummond St. Nth 0:58 No. 37, turning from Sturt St, north track back into Drummond St Sth, 18 in the rear. 1:26 No. 18 departing Sebastopol and bouncing along. 1:46 No. 18 and 37 crossing Albert St Sebastopol 2:10 No. 18 and 37 arriving Grey St loop 2:33 endWritten labels giving title information on outside of box.trams, tramways, ballarat, drummond st, sturt st, sebastopol, tram 18, tram 37, tram 40 -
 Ballarat Tramway Museum
Photograph - Colour Photograph/s - set of 2, Simon Jenkins, 12/12/1998 12:00:00 AM
... tram 18... track tram 18 tram 27 tram 11 On rear in blue ink: - .1- "18 ...Set of two colour photograph: .1 - No 18 at the end of the Access track, with Christmas decorations, and No. 27 in background. . .2 - Front of No. 11 on 7 road, with Twin Lakes sign and showing Sturt St. West Photos by Simon Jenkins, 12/12/1998 on Fujifilm paper.On rear in blue ink: - .1- "18 in Christmas attire and 27 in regular service. 12/12/98" .2 -"11 at the depot 12/12/98"btm, depot, christmas, access track, tram 18, tram 27, tram 11 -
 Ballarat Tramway Museum
Photograph - Colour Photograph/s - set of 6, Carolyn Dean, 22/11/2000 12:00:00 AM
... tram 18... Depot tram 40 tram 661 tram 26 tram 38 tram 18 tram 671 On rear ...Set of six colour prints of Ballarat Trams Nos. 40, 661, 26, 38 and 18 and 671 in Wendouree Parade or at the tram depot during the COTMA Conference open day 22/11/2000. Photographs by Carolyn Dean. See also Reg. Item 2699 to 2701 for other photographs as well. .1 - No. 661 on depot fan with 671 in background .2 - No. 26, 38 and 18 on depot fan with Trevor Denhardt walking towards the photographer. .3 - No. 661 in Wendouree Parade .4 - ditto .5 - ditto .6 - No. 40 in Wendouree Parade Printed on Kodak paper.On rear of each print is "263.1 or .2, or .3" and date "22.11.00" in ink.btm, wendouree parade, cotma, depot, tram 40, tram 661, tram 26, tram 38, tram 18, tram 671 -
 Ballarat Tramway Museum
Film - Movie Film & Box, Kodak, 1960 to 1971
... tram 18... tram 13 tram 14 tram 17 tram 18 tram 21 tram 26 tram 33 tram 39 ...Yields information in movie film format of Ballarat trams in 1960 through to 1971, how the system operated and was used by people, including special trams., Yields information in movie film format of Ballarat trams in 1960 through to 1971, how the system operated and was used by people, including special trams.Movie film - 8mm, approx. 15 mins, without leader strip on a plastic reel, within a clear plastic case - Standard 8, titled "Ballarat Trams". See Reg Item 4957 for DVD and Mini DVD. Has been transferred to DVD - see Reg item 4957 Made by Arthur Hill. Also transferred to DVD by Rod Cook Oct. 2015, via Roger Greenwood for use in his DVD, "The City of Ballarat Trams, Gardens & Gold" of 2016. See Reg Item 6883. In Arthur's letter - on file - Made between 1960 and August 1971. Synopsis: based on time. Between 1960 and 1968 0:00 Trams Ahead sign before the Victoria St terminus with 20 at terminus 0.14 - No. 20 leaving Victoria St terminus and being followed along Victoria St by car and then passengers jointing the tram at a tram stop. 00.40 - No. 12 (c1960) in bound along Lydiard St North and arriving in the Gregory St loop. 00.56 - No. 12 and 14 crossing at Gregory St. 01.20 - No. 33 and a bogie car crossing at depot loop. 01.31 - No. 18 travelling along Wendouree Parade with the Lake in the background. 01.42 - No 41 at depot junction and running into the depot No. 2 road with a short sequence of a tramway signal. 02.17 - SEC Sign at the depot gate, shot of 41 in No. 2 road, with the lights other way around, Caution beware of trams sign and a red signal. 02.31- Timetable sign at Gardens Loop 02.36 - No. 30 arriving at Loop and view of a signal with no lights showing. 02.48 - Destination roll being changed through a number of destinations. 03.26 - No. 20 arriving at Carlton St loop with the Olympic monument in the background and the red signal light going out. 03.31 - a lady standing at the front of No. 20, with an ice cream in hand, and No. 17 arriving at the Carlton St loop with a short sped up sequence and No. 20 departing from the loop, followed by No. 17 leaving the loop, heading into the city. 03.41 - No. 13 inbound from Sebastopol crossing Albert St and heading into the city. 04.12 - view of signal and contactor, the light going green and the tram passing underneath. 04.24 - No. 12 at the Sebastopol terminus and departing. 04.51 - No. 12 crossing Albert St Sebastopol. 05.16 - Following No. 12 along Albert St, with Borough Offices in background initially. 05.28 - No. 12 arriving at the Grey St loop with No. 14 arriving at the loop from the city and both trams departing. March 1971 05.58 - No. 30 being followed along Barkly St, Mt Pleasant and the pole being turned at the terminus 06.32 - No. 30 picking up a lady passenger. 06.38 - view from the front of a tram, with the drivers hand and a cigarette, view from the back of the tram, along the Mt Pleasant route and running through the loop and then turning into Main St - has the Ballarat (East) fire station in one sequence, and finally running along Main St. 07.35 - view from tram, with car turning into Bridge St. and then running into Sturt St passed the Parking Loop, and along Sturt St. 08.32 - Points at Drummond St North being changed, doors changed over and the tram running along Drummond St. North, through the Mill St loop and into Macarthur St and in Wendouree Parade, with the Lake Wendouree in view and crossing No. 12 at the Depot Loop, with crews chatting, past the depot, a lady passenger getting off the tram near Forest St., and arriving at Gardens Loop with the same lady passenger who got on in Barkly St, getting off the tram. 11.09 - view of No. 30 at Gardens Loop, departing the loop. August 1971 11.30 - R761 crossing Melton (Exford Wier) on the special train to Ballarat and then the bridge between Ballan and Gordon Stations. 12.16 - View from the front of a tram, following No. 26 along Lydiard St North, crossing at Gregory St and returning to the City. 12.39 - No. 14 and one other tram running along Albert St to Sebastopol, crossing No. 21 at Grey St and then to Sebastopol terminus, crossing Albert St and return and running along Albert St. 13.36 - No. 26, 39 crossing 13 at Gardens Loop. 14.00 - view looking across Lake Wendouree. 14.07 - 26 arriving at Victoria St, running part of Destination roll, passengers getting off with hotel in the background, trolley pole being turned and then with 39 following tram along Victoria St, crossing at the King St Loop. 15.07 - view of a trolley pole tracking through the overhead at curve 15.10 - end. Written labels giving title information on reel.trams, tramways, ballarat, sebastopol, lydiard st north, victoria st, mt pleasant, lake wendouree, depot, tram 12, tram 13, tram 14, tram 17, tram 18, tram 21, tram 26, tram 33, tram 39, tram 41