Showing 1415 items
matching 1st years
-
 Bendigo Military Museum
Photograph - WALLET & PHOTOGRAPHS, C. WW1 wallet, c.WW2 photos
Wilfred Davis Stanley BURNS No 56 enlisted in the AIF in HQ 1st Aust Division Provost Corp on 15.9.1914 age 21 years 9 months. Embark for Egypt 21.10.1914, landed Gallipoli 25.4.1915 and returned to Egypt 27.7.1915, posted to Anzac Police Corp 3.4.1916, promoted Cpl 22.5.1916, embark for England 3.8.1916, hospital 27.9.1916 (unclear), promoted Sgt 1.8.1918, discharged from the AIF 5.11.1919.Australian Comforts Fund Wallet. Bi-fold wallet, black leather, two pockets inside, two sepia photographs. .1) Man standing in garden (in uniform). .2) Two people standing on a dirt road.Photos. .1) "Tom in Garden at Kings Log Cabin, Marysville 1940". .2) "A picture no artist can paint, Marysville DEC 1940". On the wallet. “Australian Comforts Fund 1914 - 1918 Victorian Division No 56 W.D.S.Burns Provost Corps” photography-photographs, military history-army, personal effects-containers -
 Bendigo Military Museum
Certificate - CERTIFICATE, FRAMED, Post 1920
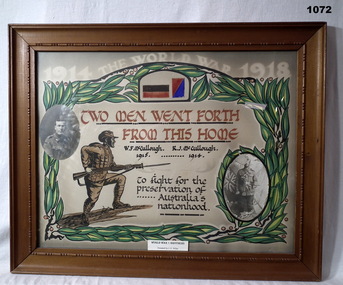
Reginald Joseph McCULLOUGH No 2203 enlisted in the AIF in 15th reinforcements 3rd LHRegt on 15.11.1915 age 28 years 7 months. Embarked for Egypt 16.3.1916, transfers to Artillery Details 15.5.1916, embark for England 28.6.1916, attached to 5th Div Artillery, embark for France 4.9.1916, transfer to 14th FAB 11.10.1917, WIA 2.11.1917, SW to right leg fracture, rejoin unit 19.7.1918, hospital 25.10.1918 with Cellulitis left knee then classified as Synovitis, transfer to AHQ 9.12.1918, hospital 20.12.1919, died Grove Military hospital England classed as Excema and Syncope 30.12.1919. William Francis McCULLOUGH No 2863 enlisted in the AIF in 6th reinforcements 24th Battalion on 12.7.1915 age 21 years. Embark for Egypt 27.10.1915, transfer to 7th Bn 24.2.1916, embark for France 26.3.1916, hospital 18.6.1916 Dental, rejoin unit 25.6.1916, hospital 4.11.1916 with Diarrehoea, rejoin unit 9.11.1916, hospital 22.4.1917 (unclear) rejoin unit 13.5.1917, transfer to 1st Aust Div Signals, discharged from the AIF 28.7.1919.WWI Brothers - W F McCullough & R J McCullough. Frame, tan wooden, glass front, cardboard backing. Certificate, painted, coloured with a photo of each brother inserted.On certificate: TWO MEN WENT FORTH FROM THIS HOME W F McCullough 1915 R J McCullough 1914 On sticker at bottom of glass: WORLD WAR I BROTHERS Donated by J E Wilesdocuments - certificates, frame accessories -
 Bendigo Military Museum
Photograph - PHOTOGRAPH, FRAMED, C.1914 - 17
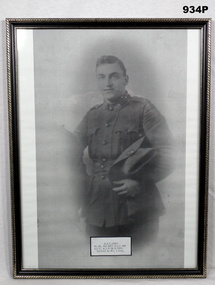
Bertram Avenue Sheir Carey No 49 enlisted in the AIF in A Coy 5th Batt AIF on 17.8.14 age 26 years. Embarked for Egypt 21.10.14, embark for Gallipoli 5.4.15, WIA 26.4.15 GSW to thigh fractured, returns to duty 30.9.15, promoted to CPl 1.3.16, attached to 1st Army Pay Corps 1.9.16, transfers to Australian Flying Corps (AFC) London and posted 30th Training SQD 29.11.17, taken on strength 1st Wing HQ 16.1.18, discharged from the AIF 28.3.19.Framed photo of B.A.S. Carey, No. 49, 5th Battalion AIF and A.F.C. A grainy black and white portrait of an Australian soldier. Bare headed. Hat under his left arm. At least two strips on right sleeve. Frame - stylised black and gold wooden frameTicket on front - B.A.S CAREY NO 49 5 BN AIF and A.F.C. WIA 26 - 4 - 1915.photography-photographs, frame accessories, military history -
 Bendigo Military Museum
Accessory - BROOCH, c.1945
Brooch sent home by Roy Hilton Taylor NX94268, enlisted 2.4.1942, age 29 years. On discharge from the 2nd AIF on 17.1.1946 he was a Gunner in 2/1st Field Regt. Blue heart shaped brooch with pin clasp. Island scene in black.On front of brooch in gold: Edna & below a shining sun On rear of brooch: Love from Roy On pin clasp: New Guinea 1945metalcraft, costume accessories - jewellery -
 4th/19th Prince of Wales's Light Horse Regiment Unit History Room
Photo Albums - set of two, c. 1919
Memorabilia of 908 Dvr Thomas Edward Whyte, 3rd Light Horse Field Ambulance, World War 1 READ THIS. During the last war I sent these pictures home through devious channels. When I lobbed back I found them all pasted in these albums by my young brother Billy. He was only a kid then! Nowadays he is serving up North. Went away with the original 9th Battn. Was in the Blitz on England and served in Libya, Tobruk, Greece, Crete and Palestine and was twice knocked. It's not long since the last upheaval 1914-18 and I wonder if these boys think as we did. This will be the last war? I sincerely hope so. TWSet of two photo albums. Photos pasted into albums with captions in white ink. Photo captions - Vol 1. (? = not legible) 1. Prisoners from ES SALT 2. Dust scene at AUJA FORD. 4th LH BDE 3. ? ? CHEOPS PYRAMID 4. Houses and domain WASSA battle 5 .Pontoon at SERAPELAI 6. SPINX (sic) & PYRAMID 7. The Nile floods occur once yearly and all irrigation centres are alternatively flooded 8. Pontoon bridge over SUEZ Canal at SERAPEUM . Constructed by Aust Engineers 9. The arrival of newspapers and mail 10. Lake IIMSAH-ISMALIA 11. Camp outside Jerusalem. Walls of old city easily discernible 12. Roman walls on beach at MONTAZEH 13. ? ? These boats are used for conveying between steamer & shore 14. Interest shown in the new issue. Through the scarcity of horses Batmen/Grooms and drivers ? allotted donkeys ? ? 15. DAMASCUS GATE JERUSALEM 16. Trumpeter ? 17 Indians making ? for railroad 18. 'SPELLO' Sinai Country 19. Police searching Egyptian labourer 20. Cavalry ?? SHA? 21. Entering ? WADI ? 22. Bedouins at ? 23 No caption 24 No caption 25 Bolar trees EZBEKIEH Gardens CAIRO 26 .Flamingos at NOUZEH Gardens ALEXANDRIA 27 BARAGE 28 KASR-ELNILL Bridge 29 NOUZEH GARDENS 30 AMGS on beach at ? 31 NOUZEH GARDENS - ALEX 32 Mascot of 7th M.V.G. 3RD ALHR 33 Printing on walls inside St Mary's Church. Depicting the Flight from Herod. (Corner torn off photo) 34 Inside Virgin Mary's Church at MATARA 35 ? painting in Church ?? 36 SUEZ Canal. Finish of Arab pony race. ZAL-A-ZIA 37 Admiralty offices at PORT SAID 38 A corner of CHEOP"s PYRAMID 39 The Spinx (sic). Nose was blown off by a shell from one of Napoleon's guns. 40 Monastry on the MT of TEMPTATION 41 Mess orderlies. Foodstuffs in locker given to troops by the AIF 42 Mid day meal on treck 43 Ambulance sand carts for conveying wounded and sick over desert sand 44 3rd ALHB 45 Kaisers Church JERUSALEM. Inside is a large painting figuring the Kaiser & Kaiserine holding a model church. 46 Bedouin women drawing water from well at EL-ARISH 47 2nd ALH BGDE doing route march on JERUSALEM-JERICHO ROAD 48 GEN HODSON GOC Anzac Mounted Divn presenting decorations & investitures on the sands at SHEIKS-ZOWAID 49 Armoured Car 50 Snow at the CEEDERS (sic) on Mt LEBANON 51 Compulsory phenyle bath for all troops in front line area 52 Austrian guns taken at point of bayonet by NZ & 2nd BGDE at GAZA 53 CACHOLETS for carrying wounded 54 The boys found some timber and made a spring board on SUEZ Canal 55 Bedouin wedding. The Bride travels in state amongst rubbish on top of camel. Her father leads conveyance. 56 Australian graves at SHALLAL 57 Camel Transport Company bring rations along beach 58 Billy the mascot holds an offensive & checks advancement 59 Exercising horses at HELMIEH Egypt 60 PONT-DE-QUOBBA Egypt. A suburb of well-to-do Egyptian merchants 61 Demolition stunt at ASLU. Bridge destroyed by Australian Engineers 62 Swimming horses in Great Bitter Lakes Egypt 63 On the move along Wadi 64 On the shores of the Bitter Lakes EL-EGYTE 65 A leave party waiting for the pontoon to swing into position 66 Carting grain 67 Egyptian Brass Band 68 French warboat (sic) in Canal 69 Russian Troops from Mesopotamia passing through SUEZ Canal 70 Prisoners coming in under escort. Turkish & German officers in lead mounted on ponies 71 Turkish prisoners 72 T.B.D in Canal 73 Old trenches on SUEZ CANAL near BITTER LAKES on W Bank 74 Monitor in Canal 75 Block house, trenches & entanglements near Post 62 76 A halt in an Egyptian village EL-MARO' 77 Mobile wireless plant 78 On the road from Canal to Railhead 79 Old Turkish guns in ancient fort at ALEXANDRIA 80 Francenia steaming through Canal 81 After MAGHDABA stunt. Convoy taking wounded form EL-ARISH to railway at 139 82 Indian Camelry 83 Virgin Mary's Church 84 Sluice gate at BARAGE Egypt 85 Hospital at lower W bank of Canal 86 Virgin Mary's tree 87 Sweetwater Canal at ISMAILIA Egypt 88 Halt and Feed. The A.M.C. attached to flying column. 89 Bringing stores ashore at JAFFA 90 H Videon & J Britton astride donks. Horses became scarce through casualties etc and units had donkeys issued to them 91 RAMLEH. The traditional burial place of St John the patron saint of England (sic). 92 Jewish Synagogue at RISHON-COUR-LE-LION (Richard the Lion Hearted) 93 Water tower at HELIOPOLIS 94 Portion of camp on HELIOPOLIS Racecourse 95 Arrival of papers 96 Sand sleigh 97 Boring plant & prisoners taken on the JIFF-JAFFA stunt. Two Austrian officers and party of Turks taken whilst building a concrete gun emplacement 98 The obelisk at MATARIA 99 In an avenue of Australian gums at ZEITOUA 100 Mountain battery gun 101 The 3rd ALH BGDE camped at HELIOPOLIS Racecourse 102 Captured Turkish guns 103 Turkish and Austrian prisoners. JORDAN VALLEY 104 The MT of Temptation Monastery built over spot where Christ spent his 40 days 105 Refugees from ES-SALT at JERICHO 106 3rd LHFA and 8th LH REGT at HELIOPOLIS 107 Fig trees at Roman Wells JIFF JAFFA 108 Inside the Blue Mosque CAIRO 109 Lagoon that was destroyed on JIFF JAFFA stunt 110 Section race at Brigade sports 111 Another tombstone at ALEX 112 Innoculating female date palm 113 Bronze tombstone in a cemetary at ALEXANDRIA 114 Luna Park at HELIOPOLIS 115 Egyptian water buffalo. Used by natives for ploughing etc 116 Russian church. Some call it the "Church of St Mary Magdelene" 117 At pyramids GIZA. Billingsley lost leg & McMullin KIA 118 Pontoon bridge over Suez Canal 119 DURBAN 120 Rescue work 121 Paddy Hanly 122 Motor train for conveying rations between Canal and Railhead. 123 At MUCKSHUBE ? 124 British ??? 125 Bedouins bringing in their harvest from the fields of ABBASSAN-EL-KEBIR Palestine 126 German HD QTRS BEERSHEBA 127 Date ? SINAI 128 Military railroad running through ? at EL-ARISH 129 Street scene at KHAN-YUNIS Palestine. Samson often called at this place to visit his girl. Napoleon narrowly escaped capture here during his ? in 1799 130 Date palms bearing fruit. These do not ? they are ?? 131 Motor ambulance convoy 132 Turkish hospital BEERSHEBA 133 MT CALVARY 134 Town Hall BEERSHEBA 135 Railway station BEERSHEBA 136 ASLUJ 137 Turkish depot MAGDABA 138 DURAN 139 3rd ALAB Hospital 140 Main Street PORT SAID 141 Stock Exchange ALEXANDRIA 142 The "Bull Ring" 14th AGH 143 (Double exposure) 144 Jewish School at DURAN Palestine 145 Damascus Gate JERUSALEM 146 Roller used for grinding clay for making bricks 147 The Harbour at ALEXANDRIA 148 Part of Napoleons Road along sea shore opposite BEELAH 149 Hotel at ALEX. Barred to the troops of course. 150 HELIOPOLIS 151 -153 ALEXANDRIA 154 Ambulance treck 155 Cacholets at the casually clearing station 156 Refugees from ES-SALT entering the Jordan Valley. Mts of MOAB in background 157 Cameliers bring in prisoners 158 The "Niagara". Casualties were from the front line by all descriptions of transport and passed through several field hospitals until they eventually reached the railway. They were sent to KANTARA by train. Despatched from there to PORT SAID by this boat 159 JERICHO 160 Turkish prisoners in JORDAN VALLEY 161 Bedouin nippers of SINAI 162 Bridge destroyed by ALH at ASLUJ 163 Railway sheds at BEERSHEBA. Portion was set afire by retreating Turks 164 ASLUJ Station 165 German Hospice 166 at ASLUJ 167 Suez Canal offices PORT SAID 168 MENA Village from top of Cheops. White lines at left are roads made by Australian troop. First Aust Contingent camped here. 169 A felukeh passing through gate at BARAGE 170 Military railway terminal EL ARISH 171 (No caption) 172 Egyptian family waiting for a train 173 Turkish prisoners and captured material coming in 174 Turkish wounded at BEERSHEBA awaiting removal 175 Two hospital ships at ALEXANDRIA 176 Some of the Bd boys 177 Race meeting 3rd ALHB at TRIPOLI- SYRIA 178 The blacksmith and Rodney Thomas swimming horse in SUEZ CANAL 179 Natives grinding grain 180 Thoroughbred 181 MUKATTAM HILLS 182 Trenches at JIFF JAFFA 183 MacBoyd as a Padre 184 Egyptian Syce having shave by travelling barber 185 The creek outside ALMINA 186 Cameliers 187 Clearing Station on beach at EL-ARISH 188 Wadi at TALLAT-EL-DUMM 189 Motor transport park 190 Some of the boys 191 Pompeys Pillar 192 at MAGHDABA 193 Hospital at JERUSALEM 194 Cheop's Pyramid 195 Golden Gate JERUSALEM 196 Hustling Turks through BEERSHEBA 197 Holy City 198 Mosque of Omar Jerusalem 199 Railway bridge destroyed by ALH at ASLUJ 200 Enemy material captured at SHERIA BEERSHEBA 201-3 These Mosques built with alabaster taken from pyramids at GIZA 204 Pontoon bridge built by our Engineers over RIVER JORDAN 205 3rd Bgde in Koil at MASAID 206 Billy McGhie throwing the weight 207 Nirazeh ? Gardens 208 Motor Ambulance Park 209 Bedouin women in Palestine village 210 ALEXANDRIA 211 Junction Stn 212 Indian Lancers 213 Motor convoy at ESSANI 214 A & B Sections 215 JERUSALEM. Once known as the 'City of Palms' and presented to Cleopatra by Anthony 216 Monastery on the Mount of Temptation. Situated on the Hills of Solomon on E side of Jordan Valley just behind JERICHO 217 DURAN A Jewish village in Palestine 218 One of our planes meets with a mishap on landing 219 Bedouin flocks around NABLUS 220 ES-SALT Road just above Jordan River 221 Halt! Action Front! Getting guns into action from pack 222 Village well 223 Gun inspection 224 WADI GHUZZEE Bridge 225-6 At GIZA Zoo Egypt 227 Syrians gathering olives 228 Smashed plane 229 MacBoyd 230 Bridge across Jordan at GORRONHOER 231 Competitors for Gretna Green. 3rd Bgde sports at TRIPOLIA 232 EL ARISH 233 Main street JAFFA 234 The beach at MARI-KHEB 235 Scene of old Cairo 236 Bedouin market 237 Bridge built over Wadi EL-ARISH. The biblical "River of Egypt". 238 Old water reservoir in native village 239 A "spello" on the track 240 Plane going out on reconnaissance 241 Bomb attached to carrier on a plane 242 Ancient Turkish gun at forts in TRIPOLI - SYRIA 243 Gun inspection 3rd AMGS 244 Old Turkish trenches outside GAZA 245 Wadi KHUZEL Bridge at SHALLA 246 BEERSHEBA 247 Street scene ZAG-A-ZIG 248 Spinx (sic) & Pyramid - GIZA 249 Egyptian Coastguards at ALEXANDRIA 250 A Palestine camp E Troop 3rd MG Sqn 251 B class horses killed in Syria 252 Scene from summit of Pyramid 253 Bert Richmond & an old Turkish Howitzer on MONTAZEH 254 LION'S WELL 255 Australian trenches outside Ferry's Post near Hill 70 256 A street scene in HELIO{PLIS 257 Electric trams at ALEXANDRIA 258 Cleaning harness 259 Swinging pontoon bridge into position at SERAPEUM 260 British Monitor in Suez Canal 261-2 Scenes of Turkish buildings at MAGHDABA. Taken by the ALH The first time in history mounted troops have attacked and taken entrenched positions 263 Aussies at Egypt's ancient monuments 264 Scenes of old CAIRO from MOKATTAM Hils 265 Bridge across canal at BARAGE, 16 miles outside CAIRO 266 Curly and Vic Norton 267 Stumpy McIntyre & Long Pikington 268 In Wadi GHUZZEL near TELL-EL-JEMM 269 Digging post holes for stables 270 Cameliers bring in prisoner. Austrian Officer in black 271 White washing mess shed 272 F Troop 3rd AMGS Sqn 273 Jews at Recruiting Depot at JERUSALEM, forming Jewish Battalion 274 In Jordan Valley, 3rd Machine Gunners have 8 horses killed by an aerial torpedo 275 Turkish prisoners 276 Cocos Island 277 Snow on the Lebanon Ranges 278 Egyptian Hotel 279 Gordon Wake. Note intruders 280 Electric trams at HELIOPOLIS Egypt. Heliopolis built by Belgian firm in 7 years 281 Sweetwater Canal at SERAPEUM 282 The ? wells at JIFF-JAFFA 283 Virgin Mary's well at MATARIA. Boyd, Simpkin & Crowley 284 Cricket for convalescents at MONTAREH 285 Indians working at cutting for military railway 286 Australian Hospital BEERSHEBA 287 Removing wrecked ambulance car from rail road 288 Engineers depot in ? at EL-ARISH 289 Water preservation scheme at SHALLAL 290 German Princes Palace at HELIOPOLOLIS 291 Some of the boys 292 Aussie aerodrome BEELAH 293 EL-JALLAH outside BETHLEHEM 294 Some of the gunners 295 Trying camels in gun carriages. Note sand caterpillar 296 Street outside old city JERUSALEM 297 D.H QRS In EL-ARISH. Hod 298 Cairo Museum 299 Wadi bridge built by Army Engineers 300 A two storied building at GALM used as German HQrs until reached by our guns 301-2 No caption 303 Ambulance with Flying Column 304 Jack Pegg 3 AMGS 305 KHAN YUNIS 306 In the Jewish village of "Rischon le Lion" 307 Wet Canteen BEELAH 308 Motor Transport LATRON 309 Gen Chauvel OC Desert Mounted Column 310 10th LH - Inverness Battery "Railhead" 311 3rd LHFA "SERAPIUM" 312 ESBEKIEN Gardens "LE CAIRE" 313 Camel training and wireless station Hill 60 314 ZAG-A-ZIG Rly Stn 315 One of the Irrigation Canal locks "HELOUAN" 316 Indian Camel Corps 317 Base at Hill 60 318 Aussie transport arriving "ALEXANDRIA" 319 3 ALHB at AL MINA 320 Main entry to city of JAFFA 321 Mosque at DAMASCUS 322 A Turk brought to earth by one of our patrols 323 Brigade boxing contrst 324 Ostrich farm ZEITOUN 325 MATERIA 326 No caption 327 Mail day 328 3rd LHFA entering HELIOPOLIS from MENA 329 M Boyd, L Simpkins, S Crowley 330 Stretcher bearers 331 French Hosp JERUSALEM 332 SERAPIUM 333 Gippo crushing wheel 334 On the move - bully and biscuits 335 V Morton, F Stokes, L Simpkins & Hanley 336 Turkish prisoners - SHERIA 337 Getting used to the mask J Antonio MM 338 Sand carts 339 Model house - MONTAZA Hospital 340 "Abdul" 341 Wood Depot "ESDUD" 342 On troop ship - from Syria 343 Turkish prisoners "JULIUS" 344 TRIPOLI 345 3rd AMGS cook house "BEELAH" 346 Breaking camp "ZEITOUN" 347 Turkish prisoners "GAZA" 348 One of our tanks. About nine were blown out of action at GAZA 349 Camp in HOD-EL-ARISH 350 German HQRS BEERSHEBA 351 Race Course TRIPOLI 352 A Locke & P Leeming 353 Sea planing in Suez Canal 354 MOASCR detail camp 355 KANTARE Suez Canal 356 Four boys of MG Sqn at cards while convalescing . Marked X was a prisoner of war for three days. Got him back with us when we countered. 357 Signal station at CANA 358 H Videon in german rig 359 ROD-EL-FARAC 360 Sweetwater Canal ZAG-A-ZOG 361 Hospital train on beach EL-ARISH 362 Jerusalem Road 363 Bedouin camel and young'un 364 Admiralty Offices, PORT SAID 365 Suez Canal PORT SAID 366 Taking wounded to clearing station 367 Hills of 10-60 MALHA 368 Junction Station 369 EL ARISH 370 Wine Distillery LATRON 371 White figures how entrance to Pyramid 372 RAPC Wireless Station 373 Sports in Canal. ANZAC Day 1916. Prince of Wales is aboard white launch. 374-5 Captured Austrian boat. 40,000 cases of benzine aboard. She was brought into Canal at Port Said. Spies set her afire. She burnt for some considerable time and eventually blew up. 376 Pumping water from Wadi on Muckshabee stunt 377 On trenches 378 Bringing in disabled battle plane 379 Giving a motor transport a lift 380 Old Turkish howitzer. MONTAZZA 381 Jerusalem country 382 Palm Hod in SINAI. Trees do not bear dates until 14 years old. No bees here. Palms innoculated by Bedouin. 383 Camel cacolets for conveying wounded 384 ESKBEKIEL Gardens Cairo 385 LAKE TIMBAH 386 Xmas dinner 1916 387 Gift billies from ACF 388 Section competition 389 In big marquees HELIOPOLIS 390 HM Landships 391 Capt Aberdeen inspecting horses 392 Football. Black vs White 393 The game 394 Old Napoleon fort. 10 mile along coast from ALEX 395 Jewish Cemetery AKRON 396 Ration fatigue 397 Blowing bottom out of Turkish Reservoir to allow soakage 398 Tilley & Farley - 14th AGH 399 At GIZA Zoo. Note height of giraffe 400 On this stunt we destroyed Turkish reservoir of 2 1/2 million gallons 401 Demolition party at wells MUCK-SHUBE 402 3rd ALH Bde HELIOPOLIS Race course 403 HMLS "Lady Wingate" 404 Turks blew out our tanks at GAZA 405 One of our aviators captured by German. Note German wearing Iron Cross. Snapped behind Turkish lines. Original of this snap was dropped at Aust aerodrome to let them know Aussie airman was alright and not killed in capture. Chivalry 406 Sausage observation balloon 407 READY 408 Bomb on carrier 409 Testing 410 B Richmond, Wireless Operator RAFC 411 Loading Bomb 412 Crash in desert 413 Bomb in YMCA at MAZRAR 414 No caption 415 LW Simpkin - Late 3LHFA 416 LEMNOS 417 Shelling the MARSDEN 418 Pontoon across Jordan River 419 Shells on Walkers Ridge 420 Sweetwater Canal 421 LAKE ISMAILIA 422 Indian Lancers on Canal 423 CAIRO Railway Station 424 Destroying Turkish water supplies. Explosives used for breaking clay at bottom of lagoon, help to absorb water 425 Exercising horses at ZEITOUN Egypt 426 In Wadi on MUG-SHUBEE stunt 427 Tractor drawing 60 lb gun towards front line 428 Sultan's mother's place at HELIOPOLIS = City of the Sun 429 Camped on the sands outside RAILHEAD, Jump off for SINAI campaign 430 G Turner & A Lockwood out for a camel ride. 431 GAZA and Nile floods from top of Pyramid 432 Baby refuses to carry his harness and his pal wears an astonished look 433 No caption 434 Turkish Officers 435 Regt HQRS at IBEETA 436 No caption 437 3rd Machine Gun Squadron 3rd ALH Bgde (my unit) 438 Camel Corps at dinner 439 KHEFREN Pyramid snapped from top of Cheops 440 CHEOPS 441 Pyramids 442 MENA from top of Pyramids 443 Snap from Pyramid showing MENA-CAIRO road running through Nile floods 444 MENA village from Pyramid 445 Band of British West Indies Regt 446 Gippo Band 447 Swimming on Med Sea 102 KmA 448 H Maddocks 449 Bedouin and Egyptians utilise any animals for their fields 450 Captured Turkish train - BEERSHEBA 451 Gardens ISMAILIA 452 Gippos used for horse lines etc 453 Canteens at HELIOPOLIS 454 3 ALHB watering in Wadi on ESSANI stunt 454 JAFFA 455 ALEX, Napoleon relics 456 Egyptian water wheel 457 SUEZ 458 WADI GHUZZEE 459 On Reconnaissance at 10-60 460 Goats and sheep captured from hostile Bedouins 461 Pontoon SERAPIUM 462 Aust trenches - Suez Canal. Turks attacked FEB 1916 463 Camel transport 464 3 ALHB Wireless Station. Col Scott 9 LH got DSO on this stunt (MUCK SHUBE) 465 ALEXANDRIA 466 Canal Hospital Ships 467 Ambulance - Sand cart 468 At old Cairo 469 No 1 Casualty Clearing Station 470 3rd Brigade on move 471 3rd LHFB- Making camp SERAPIUM 472 Watering horses 473 Moving up wadi 474 The wells at Wadi GHUZZEE 475 Camel transport SINAI 476 Turkish reservoir destroyed by ALH 477 Wall in a Luxor tomb 478 Entrance to "Temple of Bulls" 479 Bob White 480 Bedouin crops 481 Harem of Montazza, Turkish prince 482 Jack Holmes, Billy McGhee 483 MUDERIA, B Troop post 484 JIFF JAFFA 485 Natives on railroad construction 486 Aust graves SHALLAL 487 The Stumpy Mirror 488 R Nile at MANSUREH 489 Aust graves - BEELAH 490 NOUZEH Gardens - ALEXANDRIA 491 On issue from QMS. Take what comes. Fit does not matter 492 MATARA 493 German Yacht Club - ALEX 494 Old Turkish Howitzer and cannon ball 495 Field hospital 496 Gardens at BARAGE 497 A dispute's ending 498 Snow. MT LEBANON 499 Bedouin sheep 500 Combat in the air 501 no caption 502 Old Napoleon gun 503 Gordon Wake HQ car 504-5 Burying the dead at GAZA 506 Water Polo 507 Brigade boxing comp 508 Field cooker 509 Bridge on Jerusalem road, Blown up by Turks 510 Teaching horses to lay quiet. For protective purposes 511 "Major" and "Bitsy" 512 Bedouin Scarabs 513 Convalescent 514 1. W Billings. Returned to Aust 2. W McMahon KIA 515 Hospital 516 Coming good 517 1st day up - 14th AGH PORT SAID 518 Back again in Regt 519 Billy and Taffy 520 Stew 521 KHAN YUNIS 522 MENA 523 Casualties PORT SAID 524 Washing 525 Mail 526 Gun from the "Emden" mounted in Syney 527 MARSURES 528 Desert bivouac 529 HASSED 530 3RD ALH Bde. Good camp (Extra) All conv's 531 New issue 532 On to another camp (8 LH Regt) 533 Shore - JAFFA on MED SEA Photo Captions Volume 2 (Illegible = ?) 1 The Cedars on Mt Lebanon, according to tradition originated from the staves of the 12 Apostles 2000 years ago. 2 TIBERIUS taken 27th Sept '18 3 NAZARETH taken 20th Sept. German officer and Arab pony 4 TIBERIUS fell on 27th Sep. Von Saunders was the GOC of Turkish Forces in Palestine 5 Jordan Valley & Plains of Jericho run between Mts of Moab & Hills of Solomon. Distance across valley from foot of each range of hills abt 13 miles, looks ? 6 Storm on Sea of Galilee 7 DAMASCUS fell on 1st October. German vehicle park. 8 German funeral near Jerusalem 9 JENIN. German Headquarters. Fell 20th Sept. German field bakery 10 Three pages back will be seen a storm on GALILEE. Note now calm here. This photo taken near spot from which the previous one was taken. German motor launch on Galilee. 11 Captured intact on 20th Sept. German workshops JENIN 12 Turkish aerodrome captured here. Hostile aircraft landed whilst it was in our hands. Aviators greatly surprised and even indignant. Motor smash near EL FULE. 13 German Orderly Room (Ammunition box full of gold), DAMASCUS. All this gold Turkish coin secured by our troops. 14 German artillery on the way to the front near KENETRA. The ALH swooped down on the artillery around this vicinity & captured many field guns. 15 German Despatch Rider on the road to ES SALT. Unsuccessful raids carried out on ES SALT on 30th April & 4th May. This country was hard on men and horses. Goat tracks were used at times but horse were led most of the time. Stunt lasted 14 days in wet weather & horses were only unsaddled for about 2 hours during stunt. 16 Strand, ? , Tiberius, Gallilee 17 German workshop. Captured by ALH 18 One of the dead lying outside GAZA. Killed 19th April 17. We could not bury them before November 19 Some of the boys that fell in the charge at BEERSHEBA. Tibby Cotter 20 Collecting our dead for burial. They were K in A on the 19th April at GAZA. Buried seven months later, 23,000 casualties in one day 21 German U-Boat 22 Page of postage stamps and money - Struck to commemorate Gallipoli victory - Turkish war postage stamps - War duty - Turkish war bank notes 23 Pamphlet. With paper badges affixed These badges were worn by young Egyptian students. Arabic translation means "Egypt for Egyptians Long Live Egypt" This pamphlet was printed under German influence & distributed around ZAG-A-ZIG, the chief centre of hostilities during the recent Egyptian riots. The Young Egyptian Students influenced the Natives to oppose British Administration, what they called Tyranny. They professed to have sufficient competent educated men to govern their own affairs, but our Heads would not hear of it. Consequently the riots. Many ? and soldiers killed. All railways and communications disorganised. It took several months to bring things to their normal ? Pictures of medals 1. In honour of General Falkenhaugh GOC Turkish Forces 2. The Victorious Emperors of Germany, Austria and Turkey 3. Egypt Awakening 24 Those large photographs I sent you were procured for me by a pal who knew the chap that owned the negatives. The owner of these snaps belongs to the 5th Regiment of the 2nd Brigade, and he took the camera from a Turkish Officer. It had only 6 snaps of a spool of 10, and the BIll Jim finished off the spool by taking 4 of the special entry into Jerusalem. The cross indicates those taken by the Australian, the remainder were taken by the Jackos in the vicinity of BEERSHEBA and SHERIA Turkish field bakery 25 Cavalry going up to support their own line. However never had much action against the Turkish horsemen 26 Turkish Electricians in the field. I have an idea that this photo was taken to get the centre figure. He looks dinkum Australian. Note Australian leggings on Turk on the right 27 Turkish machine gunners ready for action. This is very much like the Beersheba country. Turkish officers on the right, and along side him is the range taker with his Barand Stroud. We use these instruments in the Sqn and they cost about 83 (Pound) 28 Turkish General Head Quarters just beyond SHERIA. Note hard rocky country 29 Turkish Cavalry watching a fight and getting ready to go into action. This is at SHERIA, and the heavy fighting lasted several days. Plenty of water and the Jacko's tried their hardest to hold on to this pozzie. Often our chaps met the gamer Turks in the dead of night, because both sides were on the same game, crawling down for water. This stunt is known as the Junction Fight. 30 Official entry Dec 11th. The official entry into Jerusalem. Sir G Allenby in the lead with his staff officers of the French and Italian troops accompanying him. Guard represents New Zealand, Australia, England Wales Scotland Ireland and India entering theJaffa Gate 31 Sir Ronald Storrs made Governor of JERU. Captured 9th Dec 17. Reading the Proclamation, General Allenby wearing white breeches. Troops of other nations were present, and the notables of Jerusalem. It was read from the foot of the Tower of David, a place that has been standing since the time of Christ 32 The first of the British troops entering Jerusalem. A few Turkish officers may b seen walking at the head of the column. Populace in a bad plight, very poor and no tucker, and all were greatly overjoyed at the ?? of the British Hundreds and kiddies ill treated ?? (Part of caption missing) 33 10th LH Regt first to enter JERUSALEM. Mounted officer on the right supposed to be the CO of the first troops to enter Jerusalem. Note mud on the horses. Had very wet and muddy weather 34 Dead Jacko 35 Turkish machine gun and crew 36 Hanging Armenian doctors who refused to join Turkish Army 37 Outside Damascus Gate Jerusalem 38 Turkish patrol lying outside trench at EL BUAJ 39 Burying Aussies at DAMASCUS 40 1. Djemel Pasha 2. General Limon Von Saunders GOC Turkish Forces in Palestine 41 One execution in Egypt. Executing an Egyptian offender 42 Turkish atrocities DAMASCUS 43 Turks occupying trenches outside JERICHO 44 On ASLUJ demolition stunt. Feeding and spelling. Arrived at Rendezvous too early 45 Turkish saw bayonet 46 Captured guns taken at BEERSHEBA & SHERIA 47 Our gunners obtained a direct hit on ammunition train 48 The large and small of the game. At GAZA. 74th CCS in background 49 Around JULIOUS. These Turkish shell dumps were very numerous around this vicinity 50 Captured Turkish Cavalry 51 Cavalry leaders 52 Turkish machine gun & crew 53 Enemy officers. One on left is wearing Iron Cross ribbon 54 Captured Austrian boat afire, Suez Canal Port Said. 40,000 cases of benzine aboard. Fire a mysterious outbreak 55 ? Hotchkiss gunners and enemy aircraft over ? TELL-EL-FARA 56 Types of enemy officers. One of our bikes in their possession. Recaptured later. The five pointed medals worn by these officers is called the Gallipoli Star. Issued to commemorate the Turkish victory at Gallipoli 57 Our batteries put in some good shooting amongst Turkish transport 58 Showing compactness of Turkish trenches 59 Desert homes. The only time we had cover in SINAI was when we camped near a Hod. Then we could use date palm leaves 60 JIFF JAFFA 61 ZAITZOUN 62 10th Regt MGS amongst hills outside JERUSALEM 63 Jews wailing place JERUSALEM 64-5 German post card characters 66 Post Card PHYLAE The Kiosk 67 Post Card Vue du Canal de Suez 68 Post Card No 93 Queen Street, Fort, Colombo 69 Snipers at NALIN Sth Syria. Lousy country for richochets. Nast wounds. (Aust War Memorial Melbourne) 70 Myself on Ginger. This little neddie is boshter jumper 71 Magazine cutting - Lt C H Vautin & German airman G Felmy 72 9th Regt 3rd LHB Judean Hills outside JERUSALEM. (Aust War memorial Melbourne) 73 Sand hills SINAI ? Desert (Aust War Memorial Melbourne) 74 3rd LHB spelling at GALILEE (AWM Melbourne) 75 Jordan Valley outside JERICHO (AWM Melbourne) - lovely Jordan Valley, dust and heat, 1280 ft below sea level 76 Copy of no 69 77 Watering at MATARIA 78 A desert grave - Tpr H R Olver MM 6th LH MGS Beneath this simple cross there lies a comrade true and tried He fought as fights a soldier And like a soldier died 79 B Section. When they first took our Stetsons and issued cumbersome helmets 80 Palestine types of Turkish and German officers 81 Some of the gunners amongst the snows in MT LEBANON 82 The country around JERUSALEM 83 JERUSALEM 84 Fishing ? ? at GALLILEE 85 Jerusalem taken Dec 9th. Official entry on the 11th. Jerusalem (showing) Holy City and Mosque of Omar 86 Turkish shell hits old tomb at ZERNUKAH. Capt Hurley official photographer - AWM Melbourne 87 14th AGH at PORT SAID 88 Human bones at Dead City ABBASSIA 89 3rd ALH Bde at HELIOPOLIS 90 Men wearing gloves 91 Wireless station in course of erection at MATARIA - 28 masts 92 Old slave market at ABBRASSIA. Many excavations performed on projecting wooden frame at corners 93 3rd guns on the move. The beautiful scenery between LATRON & JERUSALEM 94 Bedouin agents 95 Collecting captured enemy material 96 Captured double-engined plane 97 On the march. Country at Eastern SINAI 98 Anzac mosaic found at SHALLAL whilst trench digging now covered with gun etc ready for removal. Was sent to Canberra. 99 A Troop watering. A rotten job at a small well when horses are thirsty 100 The new Jericho road. Running through Hills of Solomon Valley in distance 101 Gun inspection 102 Draining pools at WADI AUJA. Keeping down Malaria carrying mosquitos 103 8th Regt and 3rd AMGS at BEELAH 104 A rendezvous in the Jordan Valley 105 2nd ALHB camped outside JERUSALEM 106 WADI AUJA in the Jordan Valley 107 Hospital train on the beach at EL -ARISH 108 Jacko's 109 Jerries 110 Stables of Turkish Headquarters SHALLAL 111 Early training. Every man to throw and quieten his horse for purpose of taking cover 112 A Troop 3rd Guns at TAALAT-EL-DUMM 113 Watering at WADI GHUZZEE 114 J Rushden KIA at ES-SALT 115 J Carling F Troop 3rd AMGS. Taken prisoner at EL-BURJ. Repatriated after Armistace 116 Captured enemy plane 117 Jacko gun 118 Brig-Gen Galloping Jack Royston. OC 3rd ALH Bde 119 Cleaning ammunition belts in the Hod at MASAID 120 Bringing up the fodder at ABBASSAN-EL-KEBIA 121 Some of the boys amongst the snow on MT LEBANON 122 Turkish barley crops at SHALLAL in Southern Palestine 123 The crops a few weeks after our horses had been in this vicinity 124 Clearing up after a stunt 125 On the move. 5 minute spells for the horses 126 In Jordan Valley. An airial torpedo lobbed amongst 3rd MG Transport horses & killed 28 127 Camel ration convoy coming along beach 128 Field Hospital at ET MALER 129 Desert graves at ROMANI 130 A day on the beach. Wash self, horse and clothing 131 Watering on the beach at BEELAH. Note how close fresh water is to the seashore 132 A patrol caught by a shell 133 Spello 134 Crossing the Wadi 135 Halt! Weights off and feed 136 Gas instruction 137 F Troop at TELL-EL-FARI 138 Xmas Dinner at MASAID 1916-17. Arrived back at this camp Xmas Eve after 5 nights & 4 days in saddle & the capture of MAGHDABA 139 Exercising along the beach at MARA-KHEB 140 Watering at a Bedouin well 141 At Sheikh's ZOWAID 142 3rd Gun Squadron at ABBASSAN-EL-KEBIR 143 Captured plane on its way to Australian Aerodrome 144 One of our planes about to pass over Hod 145 E & F Troop horse lines and horses 146 Sun set on Med Sea 147 Beach scene at EL-ARISH 148 Turkish transport. Small animals but they can pull big loads and they possess large hearts 149 The dressing station JIFF JAFFA ? 150-8 Types of Egyptian women - Nubian - Fellaheen - Sudanese - Low class Gippo - Egyptian - Middle Class -Egyptian Aristocracy - Turkish 159 French girls on beach at PORT SAID 160 Bedouin girls drawing water 161 Egyptian flappers at ALEXANDRIA 162 Post Card- Dame Turque 163 Post Card - Jeunne Fille Arabe 164 Graves of New Zealanders at RISCHON 165 Graves of Australians at DEIR-EL-BELAH 166 Race day. The saddling paddock 167 Bivouacs 168 3rd ALH Brigade at TRIPOLI 169 Advance party putting down horse lines at KHAN YURIS 170 Breaking the desert monotony 171 WADI QUELT. Taken from one of its precipitous banks 172 Turkish stores on N shore of DEAD SEA 173 Watering at Solomon's Pools 174 Waiting for action at - ES DUN (AWM Melbourne) 175 Camel Corps in action SINAI (AWM Melbourne) 176 ALH Time to Camp (part missing) (AWM Melbourne) 177 3rd Machine Gun Squadron IBU-HARITH, Lieut Breed, McLeod, Guppy, Whyte 178 Cartoon sketch - "A Digger" 179 Turkish Cavalry 180 Gun crew of No 2 Sub F Troop, 3rd Gun Sqdn 181 Operating base of JIFF JAFFA stunt 182 One of the British war boats that cooperated with the Land Force 183 Military railway line passing through a Hod in SINAI 184 AL-MINAH The sea port of Tripoli, Syria 185 NAZARETH Taken on 20 Sep 18 186 The Monastery on the Mt of Temptation, Taken from a cave on opposite hill. 187 JAFFA From the beach 188 In Monastery on the Mt of Temptation Rock on which Christ spent his 40 days 189 Cross indicates Garden of Gethsemane. Arrow at Russian Church of St Magdalene. MT of Olives on left 190 The Roman Bath at MONTAZAH. Hewn out of solid rock 191 Mine sweeper ashore near SHEIK'S ZOWAIL 192 Throwing "Chester" for an operation 193 The swimming pozzie at LAKE TIMSAH, ISMAILIA. Half a mile from MOASCAR, the Aust Training Depot 194 The remains of Napoleon's road. Portions can be seen running between BEELAH & GAZA 195 Camels utilised for ambulance work 196 TULKERAM taken on 19th Sep. This stunt started the previous night and this position fell to us the first day. About 60 miles from starting point 197 German officer at mess, JERUSALEM 198 German Headquarters SEMAK 199 TIBERIAS 200 Water preservation scheme at SHALLAL 201 A dip in the Jordan River. Crossed river on night 21-22 April 18 202 Watering and a wash up 203 JERICHO Taken on 21 Feb 18 204 Turkish graves 205 KHAN YUNIS. Southern Palestine, Note how sand ridges from the beach meet vegetation area. Fertile land 20 miles in width. the beginning of PHILISTIA 206 TAUBE-OVER 207 Drawing drinking water in Wadi GHUZZEE 208 The swimming pozzie in JORON 209 Landing stores at EL-ARISH 210 A camp near the wadi 211 Railway line and bridge crossing wadi above SHALLAL 212 The mid-day halt 213 Turks and Aussies at Dressing Station on beach 214 Washing day 215 Bringing supplies ashore 216 Trying mules in a 60 pounder 217 The desert winds have blown away and left this piece standing 218 Pontoons used by the Turks in their attempt to cross Suez Canal Feb 15 219 "HASSEIN" 220 "GIPPO" Mascot of 3rd AMG Sqdn 221 "Biddy" 222 Railhead camp 223 Typical Bedouin 224 Motor Submarine chaser dvr whyte, photos, ww1, light horse field ambulance -
 Flagstaff Hill Maritime Museum and Village
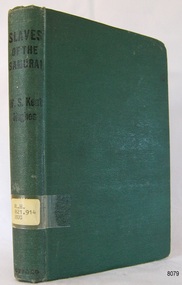
Book, Slaves of the Samurai
The Warrnambool Mechanics’ Institute (WMI) was formed by a voluntary community group in 1863, within six years of Warrnambool’s beginnings, and its Reading Room opened in 1854. The WMI operated until 1963, at which time it was one of the oldest Mechanics’ Institutes in Victoria. Mechanics’ Institutes offered important services to the public including libraries, reading rooms and places to display and store collections of all sorts such as curiosities and local historical relics. In 1886 a Museum and Fine Arts Gallery were added to the WMI and by the beginning of the 20th century there was also a billiards room and a School of Art. By this time all Mechanics’ Institutes in country Victoria had museums attached. Over the years the Warrnambool Mechanics’ Institute Library was also known as the Warrnambool Public Library the Warrnambool Library and the Free Library. Early funding from the government was for the “Free Library”. The inscription in a book “Science of Man” was for the “Warrnambool Public Library”, donated by Joseph Archibald in 1899. Another inscription in the book “Catalogue of Plants Under Cultivation in the Melbourne Botanic Gardens 1 & 2, 1883” was presented to the “Warrnambool Library” and signed by the author W.R. Guilfoyle. In 1903 the Warrnambool Public Library decided to add a Juvenile Department to library and stock it with hundreds of books suitable for youth. In 1905 the Public Library committee decided to update the collection of books and added 100 new novels plus arrangements for the latest novels to be included as soon as they were available in Victoria. In July 1911 the Warrnambool Council took over the management of the Public Library, Art Gallery, Museum and Mechanics’ Institute and planned to double the size of the then-current building. In 1953, when Mr. R. Pattison was Public Librarian, the Warrnambool Public Library’s senior section 10,000 of the 13,000 books were fiction. The children’s section offered an additional 3,400 books. The library had the equivalent of one book per head of population and served around 33 percent of the reading population. The collection of books was made up of around 60 percent reference and 40 percent fiction. The library was lending 400 books per day. In 1963 the Warrnambool City Council allocated the site of the Mechanics’ Institute building, which included the Public Library, Museum and Art Gallery, for the new Municipal Offices and the Collections were dispersed until 1971. The Warrnambool Library took over the Mechanics’ Institute Library’s holdings on behalf of the Warrnambool City Council. Since the closure of the Warrnambool Mechanics’ Institute the exact location and composition of the original WMI books and items has become unclear. Other materials have been added to the collection, including items from Terang MI, Warrnambool Court House and Customs House. Many of the books have been identified as the Pattison Collection, named after the Librarian who catalogued and numbered the books during his time as Warrnambool Public Librarian in the time before the Mechanics’ Institute closed. It seems that when Warrnambool became part of the Corangamite Regional Library some of the books and materials went to its head office in Colac and then back to Warrnambool where they were stored at the Art Gallery for quite some time. Some then went to the Warrnambool Historical Society, some stayed at the Art Gallery and some were moved to Flagstaff Hill Maritime Village. The various stamps and labels on the books held at Flagstaff Hill show the variety of the collection’s distribution and origin. The books in the collection at Flagstaff Hill Maritime Village date from the 1850’s to the late 1950’s and include rare and valuable volumes. Many of the books are part of the “Pattison Collection” after the Warrnambool’s Public Librarian, Mr. R. Pattison. Slaves of the Samurai Author: W S Kent Hughes An Australian Odyssey, which gives an account of the Life and Thoughts of a slave of the Samurai, during his three years and seven months as a Prissioner of War in the hands of the Japanese. Publisher: Geoffery Cumberlege, Oxford University Press Date: 1946Label on spine cover with typed text R.H. 821-914 HUG Pastedown front endpaper has sticker from Warrnambool Public Library with the date 1st Jan, 1947 warrnambool, shipwrecked-coast, flagstaff-hill, flagstaff-hill-maritime-museum, maritime-museum, shipwreck-coast, flagstaff-hill-maritime-village, shipwrecked-artefact, great ocean road, book, warrnambool library, warrnambool mechanics’ institute, mechanics’ institute library, victorian library board, warrnambool books and records, warrnambool children’s library, warrnambool public library, slaves of the samurai, slaves of the samurai, w s kent hughes -
 Flagstaff Hill Maritime Museum and Village
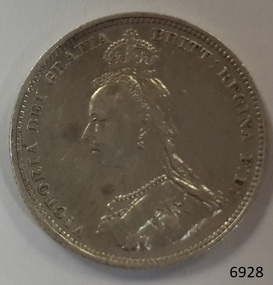
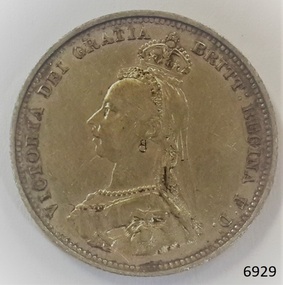
Currency - Coin, 1887
This Great Britain one shilling coin is dated 1887, which is during the reign of Queen Victoria. There were over 4 million of these coins minted. Queen Victoria succeeded King William IV to the British Throne in 1837 – she was only 18 years old at the time – and she ruled until 1901. This 1887 Great Britain shilling was struck as part of new coinage of gold and silver commemorating the Golden Jubilee of Queen Victoria 1837-1887. This design continued until 1893. The obverse image of Queen Victoria, called the ‘Junior Head’, was engraved by Joseph Edgar Boehm and adapted from his engraving for the Jubilee Medal. The design on the reverse is based on the design of the George IV shilling, 1823-1825. Inscription translations: - Obverse side: “Victoria by the Grace of God, Queen of the British territories, Defender of the Faith”. - Reverse side "Evil to him who evil thinks”. British coins such as this one shilling were in circulation in the colony of Australia until 1910, when the Commonwealth of Australia began producing its own coinage. This one shilling coin was minted by the Royal Mint at Royal Mint Court, in Little Tower Hill, London, England. Coins for circulation in the Kingdom of England, Great Britain and most of the British Empire were produced here until the 1960’s when the Royal Mint shifted location to Wales. There are three main groups of shillings produced during Queen Victoria’s reign:- - The Young Head; 1837-1887, in 8 different versions, on the obverse showing the Queen’s maturing face over 50 years. - The Junior Head; 1887-1892, minted when Queen Victoria had been reigning for 50 years. Her head was smaller on the coins minted 1887-1889 than on those shillings minted 1889-1892. - The Old Head; 1893-1901, shows the veiled head of Queen Victoria. AUSTRALIAN CURRENCY The early settlers of Australia brought their own currency with them so a wide variety of coins, tokens and even ‘promissory’ notes (often called IOU’s) were used in the exchange of goods and services. In 1813 40,000 silver Spanish dollars, purchased by the English government, were delivered to Sydney to help resolve the currency problem reported by Governor Macquarie. The coins were converted for use by punching a hole in the centre of the coin. Both the outer ring, called the holey dollar, and the punched out ‘hole’, called the dump, were then used as the official currency. The holey dollars hold the place of being the first distinctively Australian coins. In 1825 the British Government passed the Sterling Silver Currency Act, making the British Pound the only legal form of currency in the Australian colonies. Not enough British currency was imported into the colony so other forms of currency were still used. In the mid 1800’s Australia entered the Gold Rush period when many made their fortunes. Gold was used for trading, often shaped into ingots, stamped with their weight and purity, and one pound tokens. In 1852 the Adelaide Assay Office, without British approval, made Australia’s first gold coin to meet the need for currency in South Australia after the Gold Rush began. In 1855 the official Australian Mint opened in Sydney, operating as a branch of the Royal Mint in London, and the gold was turned into coins called ‘sovereigns’. Other branches also opened in Melbourne and Perth. Up to the time of Australia becoming a federation in 1901 its currency included British copper and silver coins, Australian gold sovereigns, locally minted copper trade tokens, private banknotes, New South Wales and Queensland government treasury notes and Queensland government banknotes. After Federation the Australian government began to overwrite privately issued notes and prepared for the introduction of its own currency. In 1910 a National Australian Currency was formed, based on the British currency of ‘pounds, shillings and pence’ and the first Commonwealth coining was produced. In 1966, on February 14th, Australia changed over to the decimal currency system of dollars and cents. Australia did not have its own currency in the colonial times. Settlers brought money from other countries and they also traded goods such as grain when currency was scarce. For a long time there was no standardised value for the different currencies. In 1825 British currency became the only official currency in the colony of Australia and coins such as this silver shilling were imported into Australia to replace the mixture of foreign currency. Australia became a Federated nation on 1st January 1901. In 1910 National Australian Currency was formed and Australia produced its own currency, based on the British ‘pounds, shillings and pence’. The British currency was no longer valid. This silver shilling is of national significance as it represents the British currency used in Australia from 1825-1910. This silver shilling is also of significance to Australia as part one of the British Colonies ruled by Queen Victoria. It is part of the special silver and gold coins minted 1887-1893 to celebrate the 50 years Jubilee of Queen Victoria’s reign 1837-1887. Coin, Great Britain Shilling, 1887. Silver coin, round. Obverse; Queen Victoria head, ‘Junior Head’, looking left. Reverse; crown on quartered shield within band of text, above year. Shield has 2 quarters with 3 lions on each, one quarter with a lion, one quarter with a harp. Inscriptions on both sides of coin.Obverse “VICTORIA DEI GRATIA BRITT REGINA F : D :” Reverse “HONI . SOIT . QUI . MAL . Y . PENSE” and “1887” flagstaff hill, warrnambool, shipwrecked coast, flagstaff hill maritime museum, maritime museum, shipwreck coast, flagstaff hill maritime village, great ocean road, coin, currency, money, legal tender, australian currency history, royal mint, great britain shilling 1887, queen victoria currency, queen victoria 50 years golden jubilee shilling, colonial australia currency, joseph edgar boehm, numismatics -
 Flagstaff Hill Maritime Museum and Village
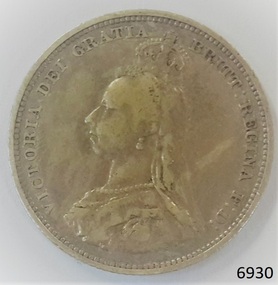
Currency - Coin, 1888
This Great Britain one shilling coin is dated 1888, which is during the reign of Queen Victoria. There were over 4 million of these coins minted. Queen Victoria succeeded King William IV to the British Throne in 1837 – she was only 18 years old at the time – and she ruled until 1901. This 1888 Great Britain shilling was struck as part of new coinage of gold and silver commemorating the Golden Jubilee of Queen Victoria 1837-1887. This design continued until 1893. The obverse image of Queen Victoria, called the ‘Junior Head’, was engraved by Joseph Edgar Boehm and adapted from his engraving for the Jubilee Medal. The design on the reverse is based on the design of the George IV shilling, 1823-1825. Inscription translations: - Obverse side: “Victoria by the Grace of God, Queen of the British territories, Defender of the Faith”. - Reverse side "Evil to him who evil thinks”. British coins such as this one shilling were in circulation in the colony of Australia until 1910, when the Commonwealth of Australia began producing its own coinage. This one shilling coin was minted by the Royal Mint at Royal Mint Court, in Little Tower Hill, London, England. Coins for circulation in the Kingdom of England, Great Britain and most of the British Empire were produced here until the 1960’s when the Royal Mint shifted location to Wales. There are three main groups of shillings produced during Queen Victoria’s reign:- - The Young Head; 1837-1887, in 8 different versions, on the obverse showing the Queen’s maturing face over 50 years. - The Junior Head; 1887-1892, minted when Queen Victoria had been reigning for 50 years. Her head was smaller on the coins minted 1887-1889 than on those shillings minted 1889-1892. - The Old Head; 1893-1901, shows the veiled head of Queen Victoria. AUSTRALIAN CURRENCY The early settlers of Australia brought their own currency with them so a wide variety of coins, tokens and even ‘promissory’ notes (often called IOU’s) were used in the exchange of goods and services. In 1813 40,000 silver Spanish dollars, purchased by the English government, were delivered to Sydney to help resolve the currency problem reported by Governor Macquarie. The coins were converted for use by punching a hole in the centre of the coin. Both the outer ring, called the holey dollar, and the punched out ‘hole’, called the dump, were then used as the official currency. The holey dollars hold the place of being the first distinctively Australian coins. In 1825 the British Government passed the Sterling Silver Currency Act, making the British Pound the only legal form of currency in the Australian colonies. Not enough British currency was imported into the colony so other forms of currency were still used. In the mid 1800’s Australia entered the Gold Rush period when many made their fortunes. Gold was used for trading, often shaped into ingots, stamped with their weight and purity, and one pound tokens. In 1852 the Adelaide Assay Office, without British approval, made Australia’s first gold coin to meet the need for currency in South Australia after the Gold Rush began. In 1855 the official Australian Mint opened in Sydney, operating as a branch of the Royal Mint in London, and the gold was turned into coins called ‘sovereigns’. Other branches also opened in Melbourne and Perth. Up to the time of Australia becoming a federation in 1901 its currency included British copper and silver coins, Australian gold sovereigns, locally minted copper trade tokens, private banknotes, New South Wales and Queensland government treasury notes and Queensland government banknotes. After Federation the Australian government began to overwrite privately issued notes and prepared for the introduction of its own currency. In 1910 a National Australian Currency was formed, based on the British currency of ‘pounds, shillings and pence’ and the first Commonwealth coining was produced. In 1966, on February 14th, Australia changed over to the decimal currency system of dollars and cents. Australia did not have its own currency in the colonial times. Settlers brought money from other countries and they also traded goods such as grain when currency was scarce. For a long time there was no standardised value for the different currencies. In 1825 British currency became the only official currency in the colony of Australia and coins such as this silver shilling were imported into Australia to replace the mixture of foreign currency. Australia became a Federated nation on 1st January 1901. In 1910 National Australian Currency was formed and Australia produced its own currency, based on the British ‘pounds, shillings and pence’. The British currency was no longer valid. This silver shilling is of national significance as it represents the British currency used in Australia from 1825-1910. This silver shilling is also of significance to Australia as part one of the British Colonies ruled by Queen Victoria. It is part of the special silver and gold coins minted 1887-1893 to celebrate the 50 years Jubilee of Queen Victoria’s reign 1837-1887. Coin, Shilling, Great Britain, 1888. Silver coin, round. Obverse; Queen Victoria head, ‘Junior Head’, looking left. Reverse; crown on quartered shield within band of text, above year. Shield has 2 quarters with 3 lions on each, one quarter with a lion, one quarter with a harp. Inscriptions on both sides of coin.Obverse “VICTORIA DEI GRATIA BRITT REGINA F : D :” Reverse “HONI . SOIT . QUI . MAL . Y . PENSE” and “1888” flagstaff hill, warrnambool, shipwrecked coast, flagstaff hill maritime museum, maritime museum, shipwreck coast, flagstaff hill maritime village, great ocean road, coin, currency, money, legal tender, australian currency history, royal mint, great britain shilling 1888, queen victoria currency, queen victoria 50 years golden jubilee shilling, colonial australia currency, joseph edgar boehm, numismatics -
 Flagstaff Hill Maritime Museum and Village
Currency - Coin, 1890
This Great Britain one shilling coin is dated 1890, which is during the reign of Queen Victoria. There were over 4 million of these coins minted. Queen Victoria succeeded King William IV to the British Throne in 1837 – she was only 18 years old at the time – and she ruled until 1901. This 1890 Great Britain shilling was struck as part of new coinage of gold and silver commemorating the Golden Jubilee of Queen Victoria 1837-1887. This design continued until 1893. The obverse image of Queen Victoria, called the ‘Junior Head’, was engraved by Joseph Edgar Boehm and adapted from his engraving for the Jubilee Medal. The design on the reverse is based on the design of the George IV shilling, 1823-1825. Inscription translations: - Obverse side: “Victoria by the Grace of God, Queen of the British territories, Defender of the Faith”. - Reverse side "Evil to him who evil thinks”. British coins such as this one shilling were in circulation in the colony of Australia until 1910, when the Commonwealth of Australia began producing its own coinage. This one shilling coin was minted by the Royal Mint at Royal Mint Court, in Little Tower Hill, London, England. Coins for circulation in the Kingdom of England, Great Britain and most of the British Empire were produced here until the 1960’s when the Royal Mint shifted location to Wales. There are three main groups of shillings produced during Queen Victoria’s reign:- - The Young Head; 1837-1887, in 8 different versions, on the obverse showing the Queen’s maturing face over 50 years. - The Junior Head; 1887-1892, minted when Queen Victoria had been reigning for 50 years. Her head was smaller on the coins minted 1887-1889 than on those shillings minted 1889-1892. - The Old Head; 1893-1901, shows the veiled head of Queen Victoria. AUSTRALIAN CURRENCY The early settlers of Australia brought their own currency with them so a wide variety of coins, tokens and even ‘promissory’ notes (often called IOU’s) were used in the exchange of goods and services. In 1813 40,000 silver Spanish dollars, purchased by the English government, were delivered to Sydney to help resolve the currency problem reported by Governor Macquarie. The coins were converted for use by punching a hole in the centre of the coin. Both the outer ring, called the holey dollar, and the punched out ‘hole’, called the dump, were then used as the official currency. The holey dollars hold the place of being the first distinctively Australian coins. In 1825 the British Government passed the Sterling Silver Currency Act, making the British Pound the only legal form of currency in the Australian colonies. Not enough British currency was imported into the colony so other forms of currency were still used. In the mid 1800’s Australia entered the Gold Rush period when many made their fortunes. Gold was used for trading, often shaped into ingots, stamped with their weight and purity, and one pound tokens. In 1852 the Adelaide Assay Office, without British approval, made Australia’s first gold coin to meet the need for currency in South Australia after the Gold Rush began. In 1855 the official Australian Mint opened in Sydney, operating as a branch of the Royal Mint in London, and the gold was turned into coins called ‘sovereigns’. Other branches also opened in Melbourne and Perth. Up to the time of Australia becoming a federation in 1901 its currency included British copper and silver coins, Australian gold sovereigns, locally minted copper trade tokens, private banknotes, New South Wales and Queensland government treasury notes and Queensland government banknotes. After Federation the Australian government began to overwrite privately issued notes and prepared for the introduction of its own currency. In 1910 a National Australian Currency was formed, based on the British currency of ‘pounds, shillings and pence’ and the first Commonwealth coining was produced. In 1966, on February 14th, Australia changed over to the decimal currency system of dollars and cents. Australia did not have its own currency in the colonial times. Settlers brought money from other countries and they also traded goods such as grain when currency was scarce. For a long time there was no standardised value for the different currencies. In 1825 British currency became the only official currency in the colony of Australia and coins such as this silver shilling were imported into Australia to replace the mixture of foreign currency. Australia became a Federated nation on 1st January 1901. In 1910 National Australian Currency was formed and Australia produced its own currency, based on the British ‘pounds, shillings and pence’. The British currency was no longer valid. This silver shilling is of national significance as it represents the British currency used in Australia from 1825-1910. This silver shilling is also of significance to Australia as part one of the British Colonies ruled by Queen Victoria. It is part of the special silver and gold coins minted 1887-1893 to celebrate the 50 years Jubilee of Queen Victoria’s reign 1837-1887. Coin, Great Britain Shilling, 1890. Silver coin, round. Obverse; Queen Victoria head, ‘Junior Head’, looking left. Reverse; crown on quartered shield within band of text, above year. Shield has 2 quarters with 3 lions on each, one quarter with a lion, one quarter with a harp. Inscriptions on both sides of coin.Obverse “VICTORIA DEI GRATIA BRITT REGINA F : D :” Reverse “HONI . SOIT . QUI . MAL . Y . PENSE” and “1890” flagstaff hill, warrnambool, shipwrecked coast, flagstaff hill maritime museum, maritime museum, shipwreck coast, flagstaff hill maritime village, great ocean road, coin, currency, money, legal tender, australian currency history, royal mint, great britain shilling 1890, queen victoria currency, queen victoria 50 years golden jubilee shilling, colonial australia currency, joseph edgar boehm, numismatics -
 Flagstaff Hill Maritime Museum and Village
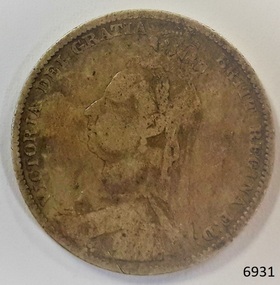
Currency - Coin, 1891
This Great Britain one shilling coin is dated 1891, which is during the reign of Queen Victoria. There were over 4 million of these coins minted. Queen Victoria succeeded King William IV to the British Throne in 1837 – she was only 18 years old at the time – and she ruled until 1901. This 1891 Great Britain shilling was struck as part of new coinage of gold and silver commemorating the Golden Jubilee of Queen Victoria 1837-1887. This design continued until 1893. The obverse image of Queen Victoria, called the ‘Junior Head’, was engraved by Joseph Edgar Boehm and adapted from his engraving for the Jubilee Medal. The design on the reverse is based on the design of the George IV shilling, 1823-1825. Inscription translations: - Obverse side: “Victoria by the Grace of God, Queen of the British territories, Defender of the Faith”. - Reverse side "Evil to him who evil thinks”. British coins such as this one shilling were in circulation in the colony of Australia until 1910, when the Commonwealth of Australia began producing its own coinage. This one shilling coin was minted by the Royal Mint at Royal Mint Court, in Little Tower Hill, London, England. Coins for circulation in the Kingdom of England, Great Britain and most of the British Empire were produced here until the 1960’s when the Royal Mint shifted location to Wales. There are three main groups of shillings produced during Queen Victoria’s reign:- - The Young Head; 1837-1887, in 8 different versions, on the obverse showing the Queen’s maturing face over 50 years. - The Junior Head; 1887-1892, minted when Queen Victoria had been reigning for 50 years. Her head was smaller on the coins minted 1887-1889 than on those shillings minted 1889-1892. - The Old Head; 1893-1901, shows the veiled head of Queen Victoria. AUSTRALIAN CURRENCY The early settlers of Australia brought their own currency with them so a wide variety of coins, tokens and even ‘promissory’ notes (often called IOU’s) were used in the exchange of goods and services. In 1813 40,000 silver Spanish dollars, purchased by the English government, were delivered to Sydney to help resolve the currency problem reported by Governor Macquarie. The coins were converted for use by punching a hole in the centre of the coin. Both the outer ring, called the holey dollar, and the punched out ‘hole’, called the dump, were then used as the official currency. The holey dollars hold the place of being the first distinctively Australian coins. In 1825 the British Government passed the Sterling Silver Currency Act, making the British Pound the only legal form of currency in the Australian colonies. Not enough British currency was imported into the colony so other forms of currency were still used. In the mid 1800’s Australia entered the Gold Rush period when many made their fortunes. Gold was used for trading, often shaped into ingots, stamped with their weight and purity, and one pound tokens. In 1852 the Adelaide Assay Office, without British approval, made Australia’s first gold coin to meet the need for currency in South Australia after the Gold Rush began. In 1855 the official Australian Mint opened in Sydney, operating as a branch of the Royal Mint in London, and the gold was turned into coins called ‘sovereigns’. Other branches also opened in Melbourne and Perth. Up to the time of Australia becoming a federation in 1901 its currency included British copper and silver coins, Australian gold sovereigns, locally minted copper trade tokens, private banknotes, New South Wales and Queensland government treasury notes and Queensland government banknotes. After Federation the Australian government began to overwrite privately issued notes and prepared for the introduction of its own currency. In 1910 a National Australian Currency was formed, based on the British currency of ‘pounds, shillings and pence’ and the first Commonwealth coining was produced. In 1966, on February 14th, Australia changed over to the decimal currency system of dollars and cents. Australia did not have its own currency in the colonial times. Settlers brought money from other countries and they also traded goods such as grain when currency was scarce. For a long time there was no standardised value for the different currencies. In 1825 British currency became the only official currency in the colony of Australia and coins such as this silver shilling were imported into Australia to replace the mixture of foreign currency. Australia became a Federated nation on 1st January 1901. In 1910 National Australian Currency was formed and Australia produced its own currency, based on the British ‘pounds, shillings and pence’. The British currency was no longer valid. This silver shilling is of national significance as it represents the British currency used in Australia from 1825-1910. This silver shilling is also of significance to Australia as part one of the British Colonies ruled by Queen Victoria. It is part of the special silver and gold coins minted 1887-1893 to celebrate the 50 years Jubilee of Queen Victoria’s reign 1837-1887.Coin, Great Britain Shilling, 1891. Silver coin, round. Obverse; Queen Victoria bust, ‘Junior Head’, looking left. Reverse; crown on quartered shield within band of text, above year. Shield has 2 quarters with 3 lions on each, one quarter with a lion, one quarter with a harp. Inscriptions on both sides of coin.Obverse “VICTORIA DEI GRATIA BRITT REGINA F : D :” Reverse “HONI . SOIT . QUI . MAL . Y . PENSE” and “1891” flagstaff hill, warrnambool, shipwrecked coast, flagstaff hill maritime museum, maritime museum, shipwreck coast, flagstaff hill maritime village, great ocean road, coin, currency, money, legal tender, australian currency history, royal mint, great britain shilling 1891, queen victoria currency, queen victoria 50 years golden jubilee shilling, colonial australia currency, joseph edgar boehm, numismatics -
 Flagstaff Hill Maritime Museum and Village
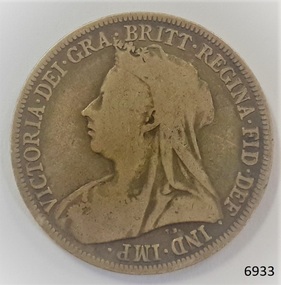
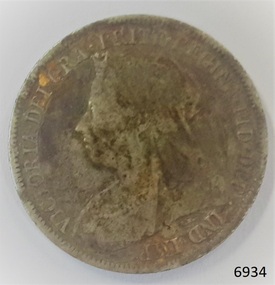
Currency - Coin, 1896
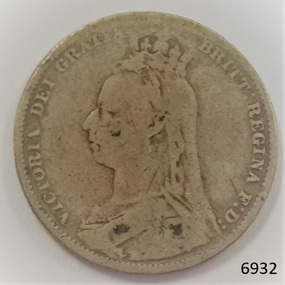
This Great Britain one shilling coin is dated 1896, which is during the reign of Queen Victoria. There were over 9 million of these coins minted. Queen Victoria succeeded King William IV to the British Throne in 1837 – she was only 18 years old at the time – and she ruled until 1901. British coins such as this one shilling were in circulation in the colony of Australia until 1910, when the Commonwealth of Australia began producing its own coinage. This one shilling coin was minted by the Royal Mint at Royal Mint Court, in Little Tower Hill, London, England. Coins for circulation in the Kingdom of England, Great Britain and most of the British Empire were produced here until the 1960’s when the Royal Mint shifted location to Wales. There are three main groups of shillings produced during Queen Victoria’s reign:- - The Young Head; 1837-1887, in 8 different versions, on the obverse showing the Queen’s maturing face over 50 years. - The Junior Head; 1887-1892, minted when Queen Victoria had been reigning for 50 years. Her head was smaller on the coins minted 1887-1889 than on those shillings minted 1889-1892. - The Old Head; 1893-1901, shows the veiled head of Queen Victoria. The obverse side of the coin was designed by Thomas Brock. The inscription’s translation is “Victoria by the Grace of God, Queen of the British territories, Defender of the Faith, Empress of India”. The reverse side of the coin was designed by Edward Paynter. The inscription "HONI SOIT QUI MAL Y PENSE" translates as "Evil be to him who evil thinks". AUSTRALIAN CURRENCY The early settlers of Australia brought their own currency with them so a wide variety of coins, tokens and even ‘promissory’ notes (often called IOU’s) were used in the exchange of goods and services. In 1813 Spanish dollars were imported and converted for use by punching a hole in the centre of the coin. Both the outer ring, called the holey dollar, and the punched out ‘hole’, called the dump, were then used as the official currency. In 1825 the British Government passed the Sterling Silver Currency Act, making the British Pound the only legal form of currency in the Australian colonies. Not enough British currency was imported into the colony so other forms of currency were still used. In the mid 1800’s Australia entered the Gold Rush period when many made their fortunes. Gold was used for trading, often shaped into ingots, stamped with their weight and purity, and one pound tokens. In 1852 the Adelaide Assay Office, without British approval, made Australia’s first gold coin to meet the need for currency in South Australia after the Gold Rush began. In 1855 the official Australian Mint opened in Sydney, operating as a branch of the Royal Mint in London, and the gold was turned into coins called ‘sovereigns’. Other branches also opened in Melbourne and Perth. Up to the time of Australia becoming a federation in 1901 its currency included British copper and silver coins, Australian gold sovereigns, locally minted copper trade tokens, private banknotes, New South Wales and Queensland government treasury notes and Queensland government banknotes. After Federation the Australian government began to overwrite privately issued notes and prepared for the introduction of its own currency. In 1910 a National Australian Currency was formed, based on the British currency of ‘pounds, shillings and pence’ and the first Commonwealth coining was produced. In 1966, on February 14th, Australia changed over to the decimal currency system of dollars and cents. Australia did not have its own currency in the colonial times. Settlers brought money from other countries and they also traded goods such as grain when currency was scarce. For a long time there was no standardised value for the different currencies. In 1825 British currency became the only official currency in the colony of Australia and coins such as this silver shilling were imported into Australia to replace the mixture of foreign currency. Australia became a Federated nation on 1st January 1901. In 1910 National Australian Currency was formed and Australia produced its own currency, based on the British ‘pounds, shillings and pence’. The British currency was no longer valid. This silver shilling is of national significance as it represents the British currency used in Australia from 1825-1910. This silver shilling is also of significance to Australia as part one of the British Colonies ruled by Queen Victoria. It is part of the special silver and gold coins minted 1887-1893 to celebrate the 50 years Jubilee of Queen Victoria’s reign 1837-1887.Coin, Great Britain Shilling, 1896. Silver coin, round. Obverse; Queen Victoria head, ‘Old Head’, looking left. Reverse; 3 shields (each crowned) - 3 passant lions (England), 1 rampant lion (Scotland), golden harp (Northern Ireland) - floral symbols between them – 1 rose, 2 thistles. Inscriptions on both sides of coin.Obverse “VICTORIA . DEI . GRA . BRITT . REGINA . FID . DEF . IND . IMP” Reverse “ONE SHILLING, 1896, Inner band, some letters hidden - HONI SO VI Y PENSE” flagstaff hill, warrnambool, shipwrecked coast, flagstaff hill maritime museum, maritime museum, shipwreck coast, flagstaff hill maritime village, great ocean road, coin, currency, money, legal tender, australian currency history, royal mint, british shilling 1896, thomas brock, edward paynter, great britain shilling, queen victoria currency, queen victoria 50 years golden jubilee shilling, colonial australia currency, numismatics -
 Flagstaff Hill Maritime Museum and Village
Currency - Coin, 1896
This Great Britain one shilling coin is dated 1896, which is during the reign of Queen Victoria. There were over 9 million of these coins minted. Queen Victoria succeeded King William IV to the British Throne in 1837 – she was only 18 years old at the time – and she ruled until 1901. British coins such as this one shilling were in circulation in the colony of Australia until 1910, when the Commonwealth of Australia began producing its own coinage. This one shilling coin was minted by the Royal Mint at Royal Mint Court, in Little Tower Hill, London, England. Coins for circulation in the Kingdom of England, Great Britain and most of the British Empire were produced here until the 1960’s when the Royal Mint shifted location to Wales. There are three main groups of shillings produced during Queen Victoria’s reign:- - The Young Head; 1837-1887, in 8 different versions, on the obverse showing the Queen’s maturing face over 50 years. - The Junior Head; 1887-1892, minted when Queen Victoria had been reigning for 50 years. Her head was smaller on the coins minted 1887-1889 than on those shillings minted 1889-1892. - The Old Head; 1893-1901, shows the veiled head of Queen Victoria. The obverse side of the coin was designed by Thomas Brock. The inscription’s translation is “Victoria by the Grace of God, Queen of the British territories, Defender of the Faith, Empress of India”. The reverse side of the coin was designed by Edward Paynter. The inscription "HONI SOIT QUI MAL Y PENSE" translates as "Evil be to him who evil thinks". AUSTRALIAN CURRENCY The early settlers of Australia brought their own currency with them so a wide variety of coins, tokens and even ‘promissory’ notes (often called IOU’s) were used in the exchange of goods and services. In 1813 Spanish dollars were imported and converted for use by punching a hole in the centre of the coin. Both the outer ring, called the holey dollar, and the punched out ‘hole’, called the dump, were then used as the official currency. In 1825 the British Government passed the Sterling Silver Currency Act, making the British Pound the only legal form of currency in the Australian colonies. Not enough British currency was imported into the colony so other forms of currency were still used. In the mid 1800’s Australia entered the Gold Rush period when many made their fortunes. Gold was used for trading, often shaped into ingots, stamped with their weight and purity, and one pound tokens. In 1852 the Adelaide Assay Office, without British approval, made Australia’s first gold coin to meet the need for currency in South Australia after the Gold Rush began. In 1855 the official Australian Mint opened in Sydney, operating as a branch of the Royal Mint in London, and the gold was turned into coins called ‘sovereigns’. Other branches also opened in Melbourne and Perth. Up to the time of Australia becoming a federation in 1901 its currency included British copper and silver coins, Australian gold sovereigns, locally minted copper trade tokens, private banknotes, New South Wales and Queensland government treasury notes and Queensland government banknotes. After Federation the Australian government began to overwrite privately issued notes and prepared for the introduction of its own currency. In 1910 a National Australian Currency was formed, based on the British currency of ‘pounds, shillings and pence’ and the first Commonwealth coining was produced. In 1966, on February 14th, Australia changed over to the decimal currency system of dollars and cents. Australia did not have its own currency in the colonial times. Settlers brought money from other countries and they also traded goods such as grain when currency was scarce. For a long time there was no standardised value for the different currencies. In 1825 British currency became the only official currency in the colony of Australia and coins such as this silver shilling were imported into Australia to replace the mixture of foreign currency. Australia became a Federated nation on 1st January 1901. In 1910 National Australian Currency was formed and Australia produced its own currency, based on the British ‘pounds, shillings and pence’. The British currency was no longer valid. This silver shilling is of national significance as it represents the British currency used in Australia from 1825-1910. This silver shilling is also of significance to Australia as part one of the British Colonies ruled by Queen Victoria. It is part of the special silver and gold coins minted 1887-1893 to celebrate the 50 years Jubilee of Queen Victoria’s reign 1837-1887. Coin, Great Britain Shilling, 1896. Silver coin, round. Obverse; Queen Victoria head, ‘Old Head’, looking left. Reverse; 3 shields (each crowned) - 3 passant lions (England), 1 rampant lion (Scotland), golden harp (Northern Ireland) - floral symbols between them – 1 rose, 2 thistles. Inscriptions on both sides of coin.Obverse “VICTORIA . DEI . GRA . BRITT . REGINA . FID . DEF . IND . IMP” Reverse “ONE SHILLING, 1896”, Inner band, [some letters hidden] “HONI SO VI Y PENSE” flagstaff hill, warrnambool, shipwrecked coast, flagstaff hill maritime museum, maritime museum, shipwreck coast, flagstaff hill maritime village, great ocean road, coin, currency, money, legal tender, australian currency history, royal mint, british shilling 1896, thomas brock, edward paynter, great britain shilling, queen victoria currency, queen victoria 50 years golden jubilee shilling, colonial australia currency, numismatics -
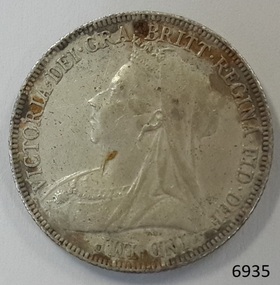 Flagstaff Hill Maritime Museum and Village
Currency - Coin, 1897
This Great Britain one shilling coin is dated 1897, which is during the reign of Queen Victoria. There were over 6 million of these coins minted. Queen Victoria succeeded King William IV to the British Throne in 1837 – she was only 18 years old at the time – and she ruled until 1901. British coins such as this one shilling were in circulation in the colony of Australia until 1910, when the Commonwealth of Australia began producing its own coinage. This one shilling coin was minted by the Royal Mint at Royal Mint Court, in Little Tower Hill, London, England. Coins for circulation in the Kingdom of England, Great Britain and most of the British Empire were produced here until the 1960’s when the Royal Mint shifted location to Wales. There are three main groups of shillings produced during Queen Victoria’s reign:- - The Young Head; 1837-1887, in 8 different versions, on the obverse showing the Queen’s maturing face over 50 years. - The Junior Head; 1887-1892, minted when Queen Victoria had been reigning for 50 years. Her head was smaller on the coins minted 1887-1889 than on those shillings minted 1889-1892. - The Old Head; 1893-1901, shows the veiled head of Queen Victoria. The obverse side of the coin was designed by Thomas Brock. The inscription’s translation is “Victoria by the Grace of God, Queen of the British territories, Defender of the Faith, Empress of India”. The reverse side of the coin was designed by Edward Paynter. The inscription "HONI SOIT QUI MAL Y PENSE" translates as "Evil be to him who evil thinks". AUSTRALIAN CURRENCY The early settlers of Australia brought their own currency with them so a wide variety of coins, tokens and even ‘promissory’ notes (often called IOU’s) were used in the exchange of goods and services. In 1813 Spanish dollars were imported and converted for use by punching a hole in the centre of the coin. Both the outer ring, called the holey dollar, and the punched out ‘hole’, called the dump, were then counter-stamped and used as the official currency. In 1825 the British Government passed the Sterling Silver Currency Act, making the British Pound the only legal form of currency in the Australian colonies. Not enough British currency was imported into the colony so other forms of currency were still used. In the mid 1800’s Australia entered the Gold Rush period when many made their fortunes. Gold was used for trading, often shaped into ingots, stamped with their weight and purity, and one pound tokens. In 1852 the Adelaide Assay Office, without British approval, made Australia’s first gold coin to meet the need for currency in South Australia after the Gold Rush began. In 1855 the official Australian Mint opened in Sydney, operating as a branch of the Royal Mint in London, and the gold was turned into coins called ‘sovereigns’. Other branches also opened in Melbourne and Perth. Up to the time of Australia becoming a federation in 1901 its currency included British copper and silver coins, Australian gold sovereigns, locally minted copper trade tokens, private banknotes, New South Wales and Queensland government treasury notes and Queensland government banknotes. After Federation the Australian government began to overwrite privately issued notes and prepared for the introduction of its own currency. In 1910 a National Australian Currency was formed, based on the British currency of ‘pounds, shillings and pence’ and the first Commonwealth coining was produced, removing the power from the States. In 1966, on February 14th, Australia changed over to the decimal currency system of dollars and cents. Australia did not have its own currency in the colonial times. Settlers brought money from other countries and they also traded goods such as grain when currency was scarce. For a long time there was no standardised value for the different currencies. In 1825 British currency became the only official currency in the colony of Australia and coins such as this silver shilling were imported into Australia to replace the mixture of foreign currency. Australia became a Federated nation on 1st January 1901. In 1910 National Australian Currency was formed and Australia produced its own currency, based on the British ‘pounds, shillings and pence’. The British currency was no longer valid. This silver shilling is of national significance as it represents the British currency used in Australia from 1825-1910. This silver shilling is also of significance to Australia as part one of the British Colonies ruled by Queen Victoria. It is part of the special silver and gold coins minted 1887-1893 to celebrate the 50 years Jubilee of Queen Victoria’s reign 1837-1887. Coin, Great Britain Shilling, 1897. Silver coin, round. Obverse; Queen Victoria head, ‘Old Head’, looking left. Reverse; 3 shields (each crowned) - 3 passant lions (England), 1 rampant lion (Scotland), golden harp (Northern Ireland) - floral symbols between them – 1 open rose, 2 thistles. Inscriptions on both sides of coin.Obverse “VICTORIA . DEI . GRA . BRITT . REGINA . FID . DEF . IND . IMP” Reverse “ONE SHILLING, 1897, Inner band, some letters hidden - HONI SO VI Y PENSE” flagstaff hill, warrnambool, shipwrecked coast, flagstaff hill maritime museum, maritime museum, shipwreck coast, flagstaff hill maritime village, great ocean road, coin, currency, money, legal tender, australian currency history, royal mint, british shilling 1897, thomas brock, edward paynter, great britain shilling, queen victoria currency, queen victoria 50 years golden jubilee shilling, colonial australia currency, numismatics -
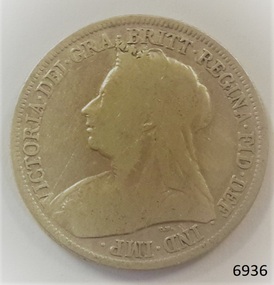 Flagstaff Hill Maritime Museum and Village
Currency - Coin, 1897
This Great Britain one shilling coin is dated 1897, which is during the reign of Queen Victoria. There were over 6 million of these coins minted. Queen Victoria succeeded King William IV to the British Throne in 1837 – she was only 18 years old at the time – and she ruled until 1901. British coins such as this one shilling were in circulation in the colony of Australia until 1910, when the Commonwealth of Australia began producing its own coinage. This one shilling coin was minted by the Royal Mint at Royal Mint Court, in Little Tower Hill, London, England. Coins for circulation in the Kingdom of England, Great Britain and most of the British Empire were produced here until the 1960’s when the Royal Mint shifted location to Wales. There are three main groups of shillings produced during Queen Victoria’s reign:- - The Young Head; 1837-1887, in 8 different versions, on the obverse showing the Queen’s maturing face over 50 years. - The Junior Head; 1887-1892, minted when Queen Victoria had been reigning for 50 years. Her head was smaller on the coins minted 1887-1889 than on those shillings minted 1889-1892. - The Old Head; 1893-1901, shows the veiled head of Queen Victoria. The obverse side of the coin was designed by Thomas Brock. The inscription’s translation is “Victoria by the Grace of God, Queen of the British territories, Defender of the Faith, Empress of India”. The reverse side of the coin was designed by Edward Paynter. The inscription "HONI SOIT QUI MAL Y PENSE" translates as "Evil be to him who evil thinks". AUSTRALIAN CURRENCY The early settlers of Australia brought their own currency with them so a wide variety of coins, tokens and even ‘promissory’ notes (often called IOU’s) were used in the exchange of goods and services. In 1813 Spanish dollars were imported and converted for use by punching a hole in the centre of the coin. Both the outer ring, called the holey dollar, and the punched out ‘hole’, called the dump, were then counter-stamped and used as the official currency. In 1825 the British Government passed the Sterling Silver Currency Act, making the British Pound the only legal form of currency in the Australian colonies. Not enough British currency was imported into the colony so other forms of currency were still used. In the mid 1800’s Australia entered the Gold Rush period when many made their fortunes. Gold was used for trading, often shaped into ingots, stamped with their weight and purity, and one pound tokens. In 1852 the Adelaide Assay Office, without British approval, made Australia’s first gold coin to meet the need for currency in South Australia after the Gold Rush began. In 1855 the official Australian Mint opened in Sydney, operating as a branch of the Royal Mint in London, and the gold was turned into coins called ‘sovereigns’. Other branches also opened in Melbourne and Perth. Up to the time of Australia becoming a federation in 1901 its currency included British copper and silver coins, Australian gold sovereigns, locally minted copper trade tokens, private banknotes, New South Wales and Queensland government treasury notes and Queensland government banknotes. After Federation the Australian government began to overwrite privately issued notes and prepared for the introduction of its own currency. In 1910 a National Australian Currency was formed, based on the British currency of ‘pounds, shillings and pence’ and the first Commonwealth coining was produced, removing the power from the States. In 1966, on February 14th, Australia changed over to the decimal currency system of dollars and cents. Australia did not have its own currency in the colonial times. Settlers brought money from other countries and they also traded goods such as grain when currency was scarce. For a long time there was no standardised value for the different currencies. In 1825 British currency became the only official currency in the colony of Australia and coins such as this silver shilling were imported into Australia to replace the mixture of foreign currency. Australia became a Federated nation on 1st January 1901. In 1910 National Australian Currency was formed and Australia produced its own currency, based on the British ‘pounds, shillings and pence’. The British currency was no longer valid. This silver shilling is of national significance as it represents the British currency used in Australia from 1825-1910. This silver shilling is also of significance to Australia as part one of the British Colonies ruled by Queen Victoria. It is part of the special silver and gold coins minted 1887-1893 to celebrate the 50 years Jubilee of Queen Victoria’s reign 1837-1887. Coin, Great Britain Shilling, 1897. Silver coin, round. Obverse; Queen Victoria head, ‘Old Head’, looking left. Reverse; 3 shields (each crowned) - 3 passant lions (England), 1 rampant lion (Scotland), golden harp (Northern Ireland) - floral symbols between them – 1 rose, 2 thistles. Inscriptions on both sides of coin.Obverse “VICTORIA . DEI . GRA . BRITT . REGINA . FID . DEF . IND . IMP” Reverse “ONE SHILLING, 1897, Inner band, some letters hidden - HONI SO VI Y PENSE” flagstaff hill, warrnambool, shipwrecked coast, flagstaff hill maritime museum, maritime museum, shipwreck coast, flagstaff hill maritime village, great ocean road, coin, currency, money, legal tender, australian currency history, royal mint, british shilling 1897, thomas brock, edward paynter, great britain shilling, queen victoria currency, queen victoria 50 years golden jubilee shilling, colonial australia currency, numismatics -
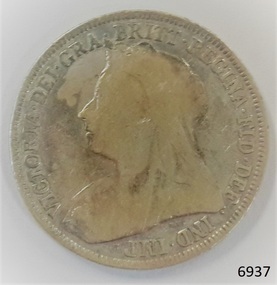 Flagstaff Hill Maritime Museum and Village
Currency - Coin, 1898
This Great Britain one shilling coin is dated 1898, which is during the reign of Queen Victoria. There were over 9 million of these coins minted. Queen Victoria succeeded King William IV to the British Throne in 1837 – she was only 18 years old at the time – and she ruled until 1901. British coins such as this one shilling were in circulation in the colony of Australia until 1910, when the Commonwealth of Australia began producing its own coinage. This one shilling coin was minted by the Royal Mint at Royal Mint Court, in Little Tower Hill, London, England. Coins for circulation in the Kingdom of England, Great Britain and most of the British Empire were produced here until the 1960’s when the Royal Mint shifted location to Wales. There are three main groups of shillings produced during Queen Victoria’s reign:- - The Young Head; 1837-1887, in 8 different versions, on the obverse showing the Queen’s maturing face over 50 years. - The Junior Head; 1887-1892, minted when Queen Victoria had been reigning for 50 years. Her head was smaller on the coins minted 1887-1889 than on those shillings minted 1889-1892. - The Old Head; 1893-1901, shows the veiled head of Queen Victoria. The obverse side of the coin was designed by Thomas Brock. The inscription’s translation is “Victoria by the Grace of God, Queen of the British territories, Defender of the Faith, Empress of India”. The reverse side of the coin was designed by Edward Paynter. The inscription "HONI SOIT QUI MAL Y PENSE" translates as "Evil be to him who evil thinks". AUSTRALIAN CURRENCY The early settlers of Australia brought their own currency with them so a wide variety of coins, tokens and even ‘promissory’ notes (often called IOU’s) were used in the exchange of goods and services. In 1813 Spanish dollars were imported and converted for use by punching a hole in the centre of the coin. Both the outer ring, called the holey dollar, and the punched out ‘hole’, called the dump, were then used as the official currency. In 1825 the British Government passed the Sterling Silver Currency Act, making the British Pound the only legal form of currency in the Australian colonies. Not enough British currency was imported into the colony so other forms of currency were still used. In the mid 1800’s Australia entered the Gold Rush period when many made their fortunes. Gold was used for trading, often shaped into ingots, stamped with their weight and purity, and one pound tokens. In 1852 the Adelaide Assay Office, without British approval, made Australia’s first gold coin to meet the need for currency in South Australia after the Gold Rush began. In 1855 the official Australian Mint opened in Sydney, operating as a branch of the Royal Mint in London, and the gold was turned into coins called ‘sovereigns’. Other branches also opened in Melbourne and Perth. Up to the time of Australia becoming a federation in 1901 its currency included British copper and silver coins, Australian gold sovereigns, locally minted copper trade tokens, private banknotes, New South Wales and Queensland government treasury notes and Queensland government banknotes. After Federation the Australian government began to overwrite privately issued notes and prepared for the introduction of its own currency. In 1910 a National Australian Currency was formed, based on the British currency of ‘pounds, shillings and pence’ and the first Commonwealth coining was produced. In 1966, on February 14th, Australia changed over to the decimal currency system of dollars and cents. Australia did not have its own currency in the colonial times. Settlers brought money from other countries and they also traded goods such as grain when currency was scarce. For a long time there was no standardised value for the different currencies. In 1825 British currency became the only official currency in the colony of Australia and coins such as this silver shilling were imported into Australia to replace the mixture of foreign currency. Australia became a Federated nation on 1st January 1901. In 1910 National Australian Currency was formed and Australia produced its own currency, based on the British ‘pounds, shillings and pence’. The British currency was no longer valid. This silver shilling is of national significance as it represents the British currency used in Australia from 1825-1910. This silver shilling is also of significance to Australia as part one of the British Colonies ruled by Queen Victoria. It is part of the special silver and gold coins minted 1887-1893 to celebrate the 50 years Jubilee of Queen Victoria’s reign 1837-1887. Coin, Great Britain Shilling, 1898. Silver coin, round. Obverse; Queen Victoria head, ‘Old Head’, looking left. Reverse; 3 shields (each crowned) - 3 passant lions (England), 1 rampant lion (Scotland), golden harp (Northern Ireland) - floral symbols between them – 1 rose, 2 thistles. Inscriptions on both sides of coin.Obverse “VICTORIA . DEI . GRA . BRITT . REGINA . FID . DEF . IND . IMP” Reverse “ONE SHILLING, 1898, Inner band, some letters hidden - HONI SO VI Y PENSE” flagstaff hill, warrnambool, shipwrecked coast, flagstaff hill maritime museum, maritime museum, shipwreck coast, flagstaff hill maritime village, great ocean road, coin, currency, money, legal tender, australian currency history, royal mint, british shilling 1898, thomas brock, edward paynter, great britain shilling, queen victoria currency, queen victoria 50 years golden jubilee shilling, colonial australia currency, numismatics -
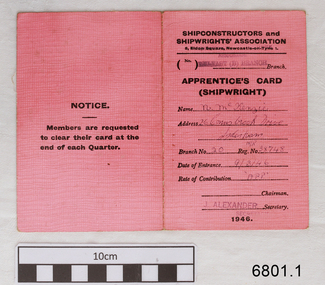 Flagstaff Hill Maritime Museum and Village
Financial record - Membership Card, Shipconstructors’ and Shipwrights’ Association, Shipconstructors' and Shipwrights' Association, 1946
Several items once belonging to shipwright Norman McKenzie were donated to Flagstaff Hill Maritime Museum and Village. They relate to Norman’s apprenticeship and certification as a Shipwright in Belfast, his Union membership and his employment as a shipwright in Melbourne. One of the items, a union Rules Book inscribed with the name H.B. Thomas and dated 1902, had within its pages Norman’s Indenture of Apprenticeship, dated 1941, Norman Desmond McKenzie was born in Belfast in 1925 and lived at 10 Pansy Street Belfast, Northern Ireland. At the age of 16 years, he began a 5-year Shipwright’s apprenticeship with Harland & Wolff Limited, Shipbuilding & Engineering Works, Belfast. He was a member of the Ship Constructors’ and Shipwrights’ Association, Belfast (B) Branch 20. His Registration Number was 38748. He completed his apprenticeship on December 16th, 1946, aged 21 years, his address was 26 Connsbrook Drive, Sydenham, N. Belfast. In October 1949 Norman received Clearance from his Union as a financial member to move to another branch. He had completed his Apprenticeship on December 16th 1946. Two months later he migrated to Australia, arrived in Victoria and became a Financial Member of the Victorian branch of the Federated Shipwrights, Ship Constructors, Naval Architects, Ships’ Draughtsmen and Boat Builders’ Association of Australia, Victoria branch. One of Norman’s donated books is the Rules of the Shipwrights' Provident Union of the Port of London. It is inscribed on several pages with the name H.B. Thomas and includes the year 1902 and the address of 29 Brickwood Street, Gardenvale. This is a location in Victoria, Australia. The Victoria Government Gazette, February 1959, in the section “Removal from Registration on The Architects Registration Board of Victoria, during the year ended 31st December 1956” lists “Deceased – Thomas, H.B., 29 Brickwood Street, Gardenvale”. The Architects Union includes Naval Architects and Shipwrights and other trades that came under the same union. It seems likely that when he was in Melbourne, Norman worked as a Shipwright for H.B. Thomas and was given the Rules book by Thomas, perhaps as a reference book or maybe as a gift. Around that same time, December 1949, Norman met his wife-to-be, Daphne, in Melbourne. Daphne had migrated from London with her family and her father found work with the Melbourne Harbour Trust. They married in Melbourne in 1953 and their family grew to include five children. In 2003 Norman and Daphne moved to Warrnambool and then years later they celebrated their 60th wedding anniversary. Norman passed away on July 28th 2015 at Warrnambool’s South West Healthcare hospital.Norman McKenzie's Rules Book, Union Cards, Indenture of Apprenticeship, and other documents tell the story of a young Irish lad's work and qualifications to become a shipwright and his migration to Australia. The young man found a job and a wife who had also migrated, and they raised a family in Melbourne. He and his wife then retired to Warrnambool to enjoy their later years. The collection of documents relating to Norman McKenzie is significant for its connection with the shipping industry of the early 1900s, the migration of qualified tradesmen to Victoria, and their contribution to the development of Victoria. The collection also shows the role of the Union in the shipping industry. The documents link shipwright Norman McKenzie to the Shipwright's Union in London and in Australia, and to shipbuilder H B Thomas in Melbourne, most likely his employer.- Apprentice's Membership Card, Shipconstructors' and Shipwrights' Association; pink fabric covered card covers with white paper pages that record the member's contributions. for the year 1946 - enclosed within the Card is a printed and signed white paper Certificate of Shipwrights' Clearance Line, Shipconstructors' and Shipwrights' Association, Branch Transfer papers for N.McKenzie, 1st October 1949. ON THE CARD: Stamped "BELFAST (B) branch" "J ALEXANDER" Handwritten "N. McKenzie, 26 Connsbrook Drive, Sydenham," NIR", (Branch Nu.) "20", (Reg No.) "38748" "9/3/46", (Rate) "APP" ON CERTIFICATE: "(99) BELFAST B" "N McKenzie" "NIR" "38748" (Member No.) "221" "24" (years of age) (CLASS OF MEMBER" "Full Benefit" "!st October 1949" (Signature Of) "John Alexander"union card, apprentice shipwright, branch transfer papers, union membership, m mckenzie, 1946, flagstaff hill, warrnambool, maritime village, maritime museum, shipwreck coast, great ocean road, norman mckenzie, norman desmond mckenzie, belfast shipwright, shipwright's apprenticeship, harland & wolff limited, shipbuilding & engineering works, the ship constructors’ and shipwrights’ association, registered shipwright, victorian branch of the federated shipwrights, ship constructors, naval architects, ships’ draughtsmen and boat builders’ association of australia, victoria branch, shipwrights' provident union, h.b. thomas, architects registration board of victoria, naval architect, daphne, norman and daphne mckenzie, indenture of apprenticeship, 1941, 1949 -
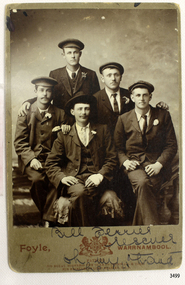 Flagstaff Hill Maritime Museum and Village
Postcard - People, Bill Ferrier - rescuer, 11th November, 1905
The postcard shows a photograph of William Ferrier, the 25-year-old Warrnambool fisherman from South Warrnambool whose rescue of two sailors from the wrecked La Bella made him an overnight National hero, quoted as “one of the most heroic rescues in Victoria’s shipwreck history”. The La Bella was wrecked on 10th November 1905 and the photograph was taken on the next day. In the photograph, William Ferrier is seated in the centre, with four of the five survivors beside him: (from left to right) Leonard Robertson, R. Payne, Oscar Rosenholme and Jack Noake. The photograph was taken by Foyle Photography Studio in Warrnambool, originally owned by James Charles Foyle. He previously had a photographic studio in Melbourne 1882 1887, then opened “Foyle’s Photo Card Studios” in Liebig St, Warrnambool. James Foyle died on 13th July 1905 and his son and daughter, Charles and Lilian Foyle continued on with the business until 1945. This photograph was most likely taken by either Charles or Lilian Foyle. The story of William Ferrier’s brave act follows on below … The ship from which the sailors were rescued was the three-masted, iron and steel barquentine the La Bella, built in Norway in 1893. She was one of two iron and steel ships by Johan Smith, the company was one of the leading shipping families in Tvedestrand, Norway. She was significant to Norwegian shipping, being one of only 27 iron and steel ships ever built in Norway. She was registered in New Zealand and engaged from 1902 in inter-colonial trading of timber in the Pacific, between New Zealand and Australia and was often in Port Phillip Bay, Victoria. On 5th October 1905, the twelve-year-old La Bella left Lyttleton, New Zealand carrying a cargo of timber bound for Warrnambool, Australia. She was manned by a crew of twelve: the Master, (Captain Mylius, previously 1st Mate of La Bella, appointed Captain to La Bella on 6th February 1903) 2 Mates, Cook, six able seamen, one ordinary seaman and a boy. Bad weather en route caused her to shelter at Burnie on Tasmania's North West coast. On November 10th, the 37th day of her journey, La Bella approached Warrnambool. Captain Mylius steered her towards Lady Bay Channel in heavy south-west seas and evening mist. He ordered the helmsman to steer for the light. As the ship came round, a tremendous sea struck her on the port quarter, causing her to breach broadside in a northwesterly direction into breakers. The helm was brought round twice more, but each time heavy seas broke over her, the third time throwing the La Bella on to a submerged reef in Lady Bay now known as La Bella Reef (about 100 yards from the Warrnambool breakwater). The sea was so rough that it even wrenched a one-and-a-half ton anchor from its fastenings and into the sea. As Captain Mylius headed to the steel wheelhouse, intending to send up a rocket flare, a huge sea slammed the steel door into him (resulting in massive bruising front and back) Despite his injuries he still managed to set off a blue light, which he held up in his hands. La Bella’s lifeboats were filled with seawater and broke up on their chocks. The blue light was the first indication to people on the shore that there was a ship in distress. The Harbour Master, Captain Roe (who lived in the Harbour Master’s House opposite Flagstaff Hill), organised a group of volunteers to crew the lifeboat because the trained crew was unavailable; the crewmen were working on a steamer in Port Fairy at the time. He then poured oil onto the water to try and smooth the sea. At around 11 pm three of the crew took shelter in the steel forecastle but the sea crashed into it and broke it up. While the rest of the crew and onlookers watched helplessly in the moonlight the bodies were washed away into the sea, never to be seen again. Some of the crew lashed themselves to the weather rail to keep from being washed away. Watson, the ordinary seaman, became tangled in the rigging lines and was too weak to move, so the 2nd Mate, Robertson, put a line onto him so that he wouldn’t wash off. Around 11 pm three of the crew were unconscious from exhaustion. The situation on La Bella was becoming dangerous. The 2nd Mate moved to the ‘house’ and soon afterwards the ship slipped in the heavy sea. The lashings of the 1st Mate and the ‘boy’ Denham had kept them safe until about 2 am when they were washed overboard; no one was able to help. One by one, the exhausted crew were being washed overboard, too weak to hold on any longer. During the night the La Bella had broken into two and the deckhouse ran out towards the sea. Two more men drowned when trying to reach the lifeboat. By sunrise, the only survivors of the twelve were the Master, 2nd Mate and three seamen. Early in the morning, Captain Roe used the rocket apparatus on shore to try and shoot a line to the ship for a safer rescue but each attempt fell short of the target. Several attempts were made by the lifeboat to rescue the stricken sailors, but the rough conditions made this difficult for the boat to get close enough to the ship and the lifeboat had to return to shore. During a final attempt to reach the ship Captain Mylius ordered his men to jump into the sea. Leonard Robertson, 2nd mate, jumped and swam towards the lifeboat, taking hold of the boat hook offered to him. Oscar Rosenholme managed to reach the boat floating on a piece of timber from the ship’s load and a third survivor, Noake, also made the boat. Along with the lifeboat rescue crew, 25-year-old William Ferrier rowed his small dingy through the heavy seas and managed to rescue the Captain, whom he landed on the breakwater. Ferrier then returned to the ship to attempt a final rescue, losing his oars and rowlocks into the high sea. Using just a spare paddle he skulled towards the La Bella, reaching her stern in time to cut loose the lone surviving sailor, Payne, from the lashing that held him to the ship; the terrified sailor dropped from the ship and into the dingy. Shortly after the last man was rescued, the La Bella was lifted by a huge wave and crashed back down on the reef; she broke up and sank. The ordeal had lasted ten hours. The survivors were taken to the nearby Bay View Hotel and gratefully received warm food and clothing, medical attention and a place to sleep. In the following days, an unidentified body of a young person had washed ashore; it was either Watson or Denham. The body was buried in the Warrnambool cemetery with an appropriate gravestone and inscription. William Ferrier became a national hero as news of the daring rescue spread. In recognition of his bravery in the two daring rescues, he was awarded the Silver Medal for Bravery by the Royal Humane Society and was honoured in the letter from the Prime Minister and the Parliament of the Commonwealth, telegrams and a cheque for £20 from the Governor-General, over £150 subscribed by the public, including Warrnambool and district and readers of The Argus, and a gold medal from the Glenelg Dinghy Club of South Australia. Ferrier’s rescue efforts are one of the most heroic in Victoria’s shipwreck history. (William Ferrier’s son, Frank, received a similar award almost fifty years later when he helped rescue four members of the crew on the yacht Merlan after it ran on to a reef near the Point Lonsdale Lighthouse. ) The wreck of La Bella now lies on her port side in 13 metres of sheltered water inside the reef she struck. The bow section is relatively intact and part of the stern has drifted north-easterly towards the mouth of the Hopkins River. The reef the La Bella struck now bears its name. Those five rescued from the La Bella were Captain George Mylius, Leonard Robertson (2nd Mate, 21 years old), R. Payne, Oscar Rosenholme and Jack Noake. Those seven who lost their lives were Mr Coulson (1st mate), Charles Jackman (cook) Gustave Johnson, Pierre Johann and Robert Gent (all able seamen), Harry Watson (ordinary seaman) and Jack Denham (ship’s boy), Captain Mylius was found guilty of careless navigation; he had sailed into the bay without the services of a pilot. His Master Certificate was suspended for twelve months. Later he was also charged with manslaughter of one of the crew who had died when the La Bella was wrecked but found not guilty. The event’s adverse publicity and damage to his career took a toll on his health and he died of a heart attack six months after the wreck; he was only thirty-seven. His body was buried in the Melbourne General Cemetery. The La Bella was “the best documented of all sailing ships owned in New Zealand”. Her record books, ship logs, correspondence and supporting papers are still available. At the time of the tragedy, she was owned by Messers David C.Turnbull and Co. of Timaru, New Zealand timber merchants and shipping agents, who had purchased her on 13th December 1901. A detailed account of the last journey of La Bella can be read in “Leonard Robertson, the Whangaroa & La Bella” written by Jack Churchouse, published in 1982 by Millwood Press Ltd, Wellington, NZ. As well as this postcard, Flagstaff Hill’s La Bella Collection includes a photograph of the wrecked La Bella, a brass rail holder and the letter from the Prime Minister and other Members of Parliament that was sent to William Ferrier to commend him for his bravery. Some 15 – 17 ships are believed to have sunk in Lady Bay, but only two have been discovered on the seafloor; the “La Bella” and the “Edinburgh Castle”. Both wrecks are popular diving sites and are preserved as significant historical marine and marine archaeological sites. This postcard is part of the La Bella Collection and is significant at both a local and state level. Its connection to the La Bella shipwreck and the rescue of five survivors highlights the dangers of Victoria’s Shipwreck Coast. The photograph of William Ferrier and four of the five survivors demonstrates the bravery of ordinary Australians who risked their lives to save victims of shipwrecks along the coast. The postcard is significant to the history of Warrnambool as it portrays William Ferrier, a local fisherman whose descendants continue to live in the area. It highlights the way of life of people who lived in coastal towns in 19th century Victoria and the effects of shipwrecks upon them. The postcard connects to the congratulatory letter which was sent to William Ferrier by the Prime Minister and Government of Australia and demonstrates the importance they attached to his efforts for Victoria and to Australia. The postcard is also an example of the photography of Foyle Photographers who were in the town of Warrnambool from the late 1800’s. Charles and Lillian Foyle took over the business when their father James died in 1905. Lillian Foyle is significant as the first woman photographer in Warrnambool. It is not known whether Charles of Lillian took this photograph. This postcard is significant because of its association with the sailing ship “La Bella”. The “La Bella” is of local and state and national significance. It is one of the only two shipwrecks discovered in Lady Bay, Warrnambool, out of the 15-17 shipwrecks in the bay. Sepia photograph of William (Bill) Ferrier (seated in the middle), heroic rescuer of two crew members of the La Bella, wrecked at Warrnambool. The photograph is a postcard and shows five men dressed formally in suits and hats. Printed below the photograph are the name and place of the photographer, a royal crest and the details of two patrons of the photographer. Also below the photograph are some handwritten words in black pen. On the back of the postcard is a handwritten message in the same writing as the front.Printed on the front of the card is “Foyle, WARRNAMBOOL” “PATRONS: / HIS ROYAL HIGHNESS THE DUKE OF CORNWALL & YORK. / HIS EXCELLENCY LORD BRAS_ EY, R.O.B.” Handwritten on the front of the card is “Bill Ferrier / rescuer / Oh my hero _ _ _ “ Handwritten on the back of the card is a message. “La Bella” Wrecked off W.Bool Breakwater Nov. 1906 (_ _ _ _ show night) Payne Noake Rosenholme Robertson and Capt Mylius (saved) (moonlight bright) Watson (_ _ _ _ boy) Richwoud [possibly Richmond] drowned” and signed “Desdewoua [possibly Desdemona] Slogos”la bella, foyle, william ferrier, bill ferrier, lady bay, 1905, 10th november 1905, 11th november 1905, parliament of the commonwealth, royal humane society medal, flagstaff hill, warrnambool, shipwrecked coast, flagstaff hill maritime museum, maritime museum, shipwreck coast, flagstaff hill maritime village -
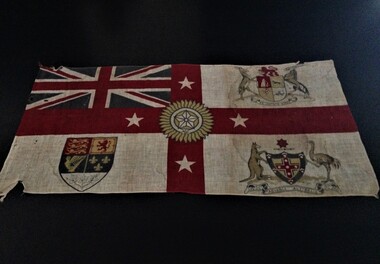 Montmorency–Eltham RSL Sub Branch
Flag - British Empire Exhibition Flag - Wembley 1924-25, British Empire Exhibition Flag - Wembley 1924 -1925, 1924 or 1925
The British Empire Exhibition at Wembley Park ran for two years from 1924 to 1925. It was designed to strengthen the bonds of Empire, stimulate trade and demonstrate British achievements in industry and commerce. The exhibition made Wembley a household name and the 1923 FA cup was held at the newly completed Wembley Stadium. 56 of the 58 'territories' that comprised the Commonwealth attended the exhibition which attracted 27 million visitors and was the largest ever staged.British white ensign with the Union Flag in the top 1st quarter; South African coat of arms in the 2nd quarter; Royal Coat of Arms in bottom 3rd quarter and Australian Coat of Arms (very early) in bottom 4th quarter. In the centre of the flag is the 'Star Of India'.australia, flag, british ensign, south africa, royal coat of arms, australian coat of arms, british empire exhibition, star of india -
 Mission to Seafarers Victoria
Photograph - Photograph, Black and white, Reverend John Reginald Weller, Making the tennis court, January 1926
In the minutes of the 21st meeting of the Victoria Mission to Seamen, held at the Harbour Trust Board Room on Thursday, 8th October 1925 , the Treasurer, Mr Perry reported that he had obtained a fresh lease of land of the Central Institute with an extra piece of land to be used for the future tennis court. The lease started on the 1st of January 1926 and was for 21 years. The tennis court was funded by the Hawtorn branch of Ladies Harbour Lights Guild.The tennis court was a feature of other missions overseas and it seems seamen were asking for one in Melbourne. It was in use until the mid fifties.Small silvertone photograph depicting four men working with horses are preparing the ground of the future tennis court. Behind is the Mission to Seafarers (chapel side) and the docks on the Australian Wharf. The photograph is glued to the photographic album with the caution belowBelow in white ink: Making the tennis courttennis court, weller album, 1926, garden, trees, horses, flinders street -
 Mission to Seafarers Victoria
Booklet - Manual, Sailing directions for Port Phillip, in the colony of Victoria including the ports of Melbourne and Geelong, 1854
Captain Charles Ferguson was born in Scotland in 1813. He was the Master of the "Rajah" from 1838 to 1850 on voyages from England to Australia and vice versa. He became the First Chief Harbour Master for the port of Melbourne in 1852 after being the first Harbour Master and Water Police Officer in Geelong for 12 months. On the 5th of April 1841, the Rajah sailed with James Donovan M.D. as Surgeon Superintendent, and the Rajah sailed from Woolwich with 180 female convicts. The Rajah arrived on the 19th of July in Hobart, with 179 females (one died during the voyage) and 10 children. Miss Kezia Elizabeth Hayter was the matron on board. On page 28 of the "Sailing directions for Port Phillip, in the colony of Victoria including the ports of Melbourne and Geelong", a mention is made of the Mariner's Hospital and Floating Church soon to be established. There were discussions to built the hospital in Williamstown but instead the Government decided to build it in Melbourne. The Harbour Master and a commiittee decided to use the water police hulk, Emily, left unsold in 1856, to create a floating church: the Bethel was open in July 1857 with Reverend Kerr Johnston as Chaplain. Latrobe wrote a letter to Captain Cole in 1869, a few months after learning his death : "To Captain George Ward Cole † [from a draft in another’s hand] Clapham House, Lewes, Sussex, January 28th, 1869. My dear Captain Cole, Last mail will have taken out the sad intelligence of the death of our excellent old friend, Captain Ferguson. This will have been a terrible blow to his children and to his friends in the colony, who may have held reason to expect his early return to his home, with a not unreasonable prospect of ultimate restoration to health and activity. In the course of last October I went up to town with one of my children, mainly with the purpose of finding my way to Pinner, where he and Mrs. Ferguson were staying with an intimate friend. I found him in excellent health and spirits, and enjoying the prospect of a speeding resumption of the service to which he had devoted his best days, and upon the furtherance of which his entire energy was still directed. A week or two later Captain and Mrs. Ferguson went to Dover for change of air, and being still under the impression received from the advisers by whom they had been guided during their residence at a hydropathic establishment at Matlock, felt encouraged to plan almost immediate return to the colony by the Jerusalem early in December. However, certain misgivings in the mind of a medical gentleman, then in England, under whose care Captain Ferguson had at one time placed himself in Williamtown, led them to consider it judicious before departure to take the advice of some surgeon of eminence in London. Accordingly they came up to town at the close of November. The first London practitioners they consulted shook their heads, and advised consultation with Sir Wm. Ferguson. The result was that amputation, without loss of time, was pronounced necessary. The rest is soon told. He received the painful intelligence with calmness and full resignation to God's will, and underwent the operation at King's College Hospital with exemplary firmness and Courage on the 28th of November. Perfect success seemingly attended it, and there seemed, humanly speaking, to be every prospect of a prompt cure and early convalescence; everything seemed in his favour. A few days later, however, all was clouded by symptoms of hospital fever (pyoe æm ia). This resisted all control, and finally carried him off on the 27th of December, just one month after the operation. He had lived a Christian life, and his death was the peaceful and resigned death of a Christian. It was a melancholy satisfaction to me to be able to join a few friends in following his remains to their resting place in one of the outlying London cemeteries on the last day of the year. You know Mrs Ferguson well, and will be prepared to hear me say that her whole conduct and demeanour throughout this period of suspense and bitter trial has been worthy of her high character and steadfast principle. Come what will, and happen what may, I have the fullest conviction that neither the widow nor the children will be forsaken, however doubtful and clouded the future may appear, in consequence of the irreparable loss which, they have sustained. And now, dear Captain Cole, it is possible that you may already have heard all this from other sources, but I have dictated it to you under strong impulse, for I feel assured that there is no member of the community in which you live who will more sincerely deplore the loss of Captain Ferguson on private grounds; at the same time that there is no one who, from long acquaintance with his official character and services, will be in a better position to estimate their real value or the loss which the colony has sustained. The circumstances in which Captain Ferguson's family are left not only demands the utmost display of sympathy and interest on the part of friends, but may call for decided and prompt action; therefore I cannot rest satisfied without discharging what I consider my duty, and seeking to strengthen your hands as far as I may in bringing the character of his long services before the existing colonial authorities. Of his private career previous to his entering the service of the Colonial Government in 1851 nothing need be said. Captain Ferguson was appointed as the Harbour Master at Geelong in April, 1851 – a few months before the separation of the colony from New South Wales. He there did excellent service in a variety of ways calculated to advance the interests of the port, and to introduce www.latrobesociety.org.au 27 order, where, from circumstances, but little order had hitherto prevailed. His was the first appointment of this class in that locality. The separation of the colony from New South Wales took place in the month of July following. Shortly after, the late Captain Bunbury resigned the Harbour Mastership of Port Phillip. Captain Ferguson was at once (February, 1852) appointed to succeed him, and from that time performed all duties of Chief Harbour Master of the colony. The previous year (May 1851) the first gold discoveries in New South Wales had taken place, and in the month of August those of our colony followed. At the time of Captain Ferguson’s taking charge of the Port of Melbourne their influence had begun to be fully felt, and in no department more seriously than in that of the Harbour Master. This is no place for statistical details, but they must bear me out in reminding you of a few facts connected with our late friend’s career. At the time of separation that department comprised only 30 individuals of all ranks, and when he took charge the number was much reduced. There were at that time, according to the returns, no fewer than 54 vessels, registering 26,785 tons, in Hobson’s Bay alone. The crews on arrival numbered 1,235 men. Of this number only 463 remained on board, 500 having deserted, and the rest having been discharged by arrangement or pure necessity. For the first six months after Captain Ferguson’s assumption of office as Harbour Master the duties of Police Magistrate and Chief of the Water Police were superadded, and how much labour they involved may be surmised from the fact that from 1st of April to the 31st July, 1852, four months only, no less than 236 marine cases were brought before the bench at Williamstown - sometimes as many as 30 in a day. A year later (March 1853) the returns show that the number of vessels in the harbour in Hobson’s Bay alone were 91, tonnage 43,754; and passing on to the still later returns of May, 1853, two years after Captain Ferguson’s assumption of office, we find from the records that the number of ships in port had increased to 129; tonnage, 63,292; crew on board on arrival, 2872, and at the date of report, 1628; the amount of desertions at that time having, however, proportionally diminished, in consequence of the abatement of the gold fever, caused by the non-success attendant upon the labours of thousands at the goldfields. The above numbers take no account of the large number of vessels and amount of tonnage lying at the wharves at Melbourne or elsewhere. From these figures alone it may be judged what must have been a struggle in which the Chief Harbour Master was engaged from the very outset to secure order, and answer the innumerable calls on every branch of his department, at the same time that there was for many months an almost complete impossibility of securing subordinate agency, such as boatmen, pilots, and police, at any price. But I may bear witness to the untiring diligence, energy, and self-devotion with which Captain Ferguson grappled with the difficulties of his position, and the seemingly insurmountable obstacles which stood in his way. Ashore and afloat he was always ready, showing the same directness of purpose, intelligence, and forgetfulness of self. He shunned no responsibility, and turned his hand from no work, whether within or beyond the ordinary scope of his duty, which the hard necessity of the times forced the Government to bring under his notice. Already in 1852, when the overflowing of our gaol and stockade rendered the adoption of other methods of restraint absolutely necessary, and addition to the existing buildings could not be thought of, it was Captain Ferguson who first suggested the employment of hulks; and it was with his personal assistance and supervision, and under his unflagging energy, that the three first of these – the Success, the President, and the Sacramento – were purchased, fitted up, and made available for the purpose in view, and the rules and regulations for the employment and safety of the men afloat and ashore prescribed and carried out. He carried the same energy into every branch of his department, and his influence was soon apparent. His subordinates of every class became actuated by his spirit. As time moved on, the range of his duties, both ordinary and extraordinary, increased. In the formation of the quarantine station at the heads, in the management if not the erection of lighthouses, sailing directions, port and wharf regulations, buoys, signal stations, www.latrobesociety.org.au 28 steam dredging &c., he was the main and most active agent. The whole pilot establishment and regulations, men, and vessels, were under his charge; and when I left the colony in May, 1854, the entire range of ports outside Port Phillip Heads from Point Lonsdale to Portland, as well as that of Geelong had felt the influence of his intelligent supervision and care. The entire department of Chief Harbour Master, which I have numbered at the period of separation about thirty individuals, then numbered 230. The character of Captain Ferguson’s unbroken service during the fourteen years which have elapsed since I left the colony must be well known to the Government and the people he has served so long and so faithfully. I confine myself to recalling to mind those earlier, and what must have been the hardest and most difficult, period – none can know how difficult but those who were in that fierce struggle for the maintenance of order under so many disadvantages; and on this subject I have spoken advisedly and with reason, for I may truly say he worked under my own eye. I had sincere regard for the man, and just pride in the qualities of his heart, head, and hand. Whatever mistakes may have been made by the Government of the colony in those hard and difficult times (and I am quite ready to admit that there were many, especially if the past is to be judged by the light of the present), I never have hesitated in believing that, in appointing Captain Ferguson to the office he has so long filled, it was the right man in the right place. I shall be heartily rejoiced to find that the Government and inhabitants of the colony admit that this has been the case, and to learn that they have not forgotten the strong claims of one who has served them so long and so faithfully, and who, removed by God’s providence, so to say, in the maturity of his powers, has left a widow and young family behind him. I have done, I leave you to make use of this communication, or any portion of it, which you may think judicious and called for. There may be among Ferguson’s friends those who may not be sorry to be reminded of facts. By-the-bye, I may mention as a proof how completely Captain Ferguson’s mind was engrossed by devotion to his public duty, that while in Dover, only ten days before the operation, he took an opportunity to drag himself up into the lantern of the S. Foreland Lighthouse, and made a most careful scrutiny of the whole apparatus and arrangement, with a view of the adoption of any hint for the perfection of those under his charge in the colony. And now, goodbye. I trust this will find you in good health, and in comparative vigour. Believe me ever, dear Captain Cole, Yours very truly, C. J. La Trobe"The attempt for a floating church was made as early as 1853 following similar examples in London like the Seamen's Hospital. Captain Ferguson was instrumental in the foundation of the Bethel Church.Digital copies of the 37 pages ; 22 cm.1854, hobsons bay, geelong, melbourne, williamstown, sandridge, mariner's hospital, floating church, seamen's hospital, captain charles ferguson (1813-1868), kezia elizabeth hayter (1818-1885), rajah quilt, prison hulks, water police, harbour master, harbor master, gaols -
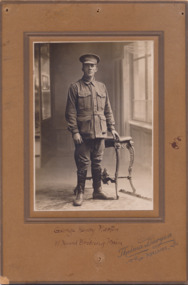 Mission to Seafarers Victoria
Photograph - Mounted photograph, Black and white, Thelma-Duryed, George Henry Martin, 1915
Born: Edmonton, England, 10 January 1888 Home Town: Magill, Campbelltown, South Australia Occupation: Seaman Service Number: 176 Enlisted: 27 March 1915, Melbourne, Victoria Last Rank: Gunner Last Unit: 1st Royal Australian Naval Bridging Train Died: Killed in action, France, 7 August 1916, aged 28 years Cemetery: Gordon Dump Cemetery, Ovillers-la Boisselle Gordon Dump Cemetery, Ovillers la Boisselle, Picardie, France Memorials: Australian War Memorial Roll of Honour, Magill Honour Board, Magill War Memorial 27 Mar 1915: Enlisted AIF WW1, Private, 1st Royal Australian Naval Bridging Train, Melbourne, Victoria 4 Jun 1915: Embarked AIF WW1, Private, SN 176, 1st Royal Australian Naval Bridging Train, --- :embarkation_roll: roll_number: '24' embarkation_place: Melbourne embarkation_ship: HMAT Port Macquarie embarkation_ship_number: A39 public_note: '' 4 Jun 1915: Embarked AIF WW1, SN 176, 1st Royal Australian Naval Bridging Train, HMAT Port Macquarie, Melbourne 7 Aug 1916: Involvement AIF WW1, Gunner, SN 176, Battle for Pozières The portrait has been used in this article : "THE LATE GUNNER G. H. MARTIN. Mrs. G. H. Martin, of Jackson-street, Magill, has been advised that her husband, Gunner G. H. Martin, was killed in action in France on August 7. He sailed from Melbourne for Egypt in June, 1915, and had been at the front in France since April last. He also served ten months in the Naval Bridging Train before joining the artillery. He was born in Edmonton, England, and lived in Magill for about five years. He was in his 28th year." - from the Adelaide Chronicle 30 Sep 1916 (nla.gov.au)As his occupation was seaman, we can assume George Henry Martin visited the Mission. The Senior Chaplain, Alfred Hurney Goldsmith, RANR, was appointed chaplain of the Naval Bridging Train in 1914. (Jottings 31, Midwinter 1914). We can only imagine the two men knew each other and that the portrait was donated by George himself or by his family to the Mission.Portrait of ANZAC soldier in 1915naval bridging train, france, ww1, thelma-duryed, adelaide, george henry martin 1888-1916 -
 Mission to Seafarers Victoria
Furniture - Pews x 18 with kneelers and pew fronts, c. 1917
The pews (18 small and 1 large) with 3 fronts were donated by Mrs E.W. Outhwaite in memory of her father, Nicholas Maine, who died in 1915. Nicholas Maine biography was published in the Australian on 11 September 1915 : "Nicholas Maine, whose paternal grandfather was rector of the Church of England and Ireland, parish of Dunaghy, County Antrim, came of a family of very considerable repute as merchants in Belfast. He was born at Ballymena on New Year's Day, 1826, and received his earlier education at the Diocesan School, Ballymena, and at Dr. Bryce's Academy, Belfast. After a three years' apprenticeship in a merchant's office, in Belfast, he ventured forth into the world as supercargo in a vessel belonging to one of his brothers, and so performing two voyages to Brazil. Ashore once more, he joined a broker's office in Liverpool, and whilst there was specially chosen out of a large staff as the man to take charge of a fleet of ships on a guano quest on the coast of Patagonia. Having determined on a suitable rendezvous for his ships, he sailed for the River Plate in a handy vessel, and from Monte Video south- wards minutely searched and examined the coast, chiefly in boats, as far as Santa Cruz, near the Straits of Magellan. At Sea Bear's Bay, in lat. 48deg. S., he landed his men, and pitched his tents, &c. After 10 months of extreme hardship and risky adventure on the coast in open boats, and loss of many men from scurvy, he loaded up all the ships sent to him, and returned to the River Plate. While there he met Captain Hotham, R.N., of H.M.S. Gordon (afterwards Governor of Victoria), and also saw Garibaldi, who was then making himself famous by his daring adventures against the enemy, though with inadequate means. (There was war going on in the river at the time.) From Monte Video he returned to Brazil, where he opened a direct trade with Russia, by shipping the first cargo, of sugar and cotton from Pernambuco to St. Petersburg. For so doing the Emperor Nicholas allowed his vessel (the Urgent), belonging to his brothers, trading under he name of N. Maine and Sons, to enter Russia free of port charges. Shortly after this Nicholas Maine went ashore, spending three years in a Liverpool brokers office, when, sailing again as super cargo, he went on a trading voyage to Chili and Peru. He was present at Panama for six months during the rush to California, and crossed the isthmus on muleback and by canoe, a severe journey in those days. Thence he went to Jamaica, his ship's company carrying with them the cholera, which decimated the population. Then home again, visiting the United States by the way. After another year in Liverpool, he sailed again for Brazil, at one day's notice, bought a cargo of coffee at Rio Janeiro, took it to San Francisco, and settled there, where he had three years of a most exciting life — 1851-2-3 —also making speculative voyages down the coast to Mexico and Nicaragua, at which latter place he took the fever and so on to the South Sea Islands, where he suffered shipwreck, and thence on to Chili. He arrived in Melbourne from New Zealand in 1854; made one more voyage to Chili (his last venture at sea), and on his return sold his vessel. After refitting a dismasted clipper ship, called the Flying Arrow for his brother Crawford, with what was considered in those days unusual dispatch, when the port had not many conveniences for the purpose, he quietly went again into harness ashore. He managed Mr. T. S. Martin's large business in Melbourne for five years, till he broke down, from excessive work and anxiety. After winding up the business, he sailed for England in 1862, and idled at home, in Italy, and other parts of the Continent till, his health being restored, he returned to Melbourne in 1867, and went to Queensland to buy into a station along with his brother and others; but, not being satisfied, came back to Melbourne, and began to work as a mercantile broker. Soon after this he was induced to apply for the resident secretaryship of the Australian Mutual Provident Society, and got it in 1868, though, at the time, several professionals thought him unfit, and prophesied failure. He retired after a long term of eminently profitable business transactions in 1895, owing to a rule of the society to retire secretaries at the age of seventy. He accordingly left on the 1st January, 1896, after twenty-seven years' service unbroken by a single holiday, save for a trip to Europe in 1891. A letter was written him by Sir Joseph Abbott, chairman of the board, in which he said:- "I need hardly assure you that the board is extremely sorry that the, society is obliged to lose your services, which have been so highly appreciated by us during your long connection with the society," and enclosed a grateful resolution passed by the board." Margaret Isabella Maine was born in 1871 and was the only daughter of Nicholas Maine. In 1897, she married Edward Walter Outhwaite, a layer from New South Wales who had studied at the University of Melbourne. Edward was the brother of Arthur Grenbry Outhwaite, husband of artist Ida Rentoul. Margaret and Edward had three children: a son, Maine Outhwaite and two daughters, Helen Margaret and Jocelyn. The pews on the left side of the nave have been moved to make room to a baby grand piano (date tbc.) therefore 2 of them have to be moved elsewhere in the mission and the pew front has been brought backwards..gifts, st peter chapel, pews, edward walter outhwaite, margaret isabella outhwaite nee maine (1871-1964), arthur grenbry outhwaite (1875-1938), nicholas maine (1826-1915), heritage listed, gifts-1917, kneelers, genuflection, praying -
 Greensborough Historical Society
School Magazine, Kurnaji 1968 Watsonia High School Yearbook WaHIGH, 1968_
Depicts events and attitudes, primarily of students as they go through their adolescent years in the late 1960's. The word Kurnaji is thought to have been derived from the indigenous Aboriginal language with the meaning "Windy Hill" - refer 1971 Kurnaji Editorial page.Annual record of teaching staff, students and events that took place over the year by using both photos and reports. Includes Roll Call section with names of all students.Note: This was the 1st Year of Kurnaji's publication, the last being in 1989 (see Record Item 274).52 Pages, Blue cover, Title "Kurnaji" in Red ink. Cover drawing of students. Headmaster / Principal - Mr. C.K. (Ken) Canty. 2 copies.watsonia high school, yearbook, kurnaji, school magazines -
 Greensborough Historical Society
School Magazine, Watsonia High School Magazine 1962, 1962_
Depicts events and attitudes, primarily of students as they go through their adolescent years in the early 1960's. Watsonia High School has now moved to their own buildings in Nepean Street. Annual record of teaching staff, students and events that took place over the year by using both photos and reports. Includes Roll Call section with names of all students.Note: This was the 1st Year of Watsonia's solo publication.20 Pages, Blue cover, Title in black with Illustration of students. Headmaster / Principal - Mr. L.G.MillerOwner's name on coverwatsonia high school -
Glenelg Shire Council Cultural Collection
Card - New Years Greeting Card, 01/1893
New Year's greeting card, bi-fold, front third scene of houses and trees, edges cut out, to show a flock of swallows, on the back section, middle third has a verse, by S.K. Cowan M.A.Front: 'A New Year of Joy and Peace be yours' Back: 'To Dear Clara from Maretimo January 1st 1893 -
 Glenelg Shire Council Cultural Collection
Photograph - Photograph - Portland's First Postman - Bill Smith, Portland's First Postman - Bill Smith, n.d
Displayed at History HouseBlack and white photograph, showing postman, Bill Smith delivering mail to the shop of Barsby, Seedsman and Florist.Front: Portland's 1st Postman, Bill Smith. Back: Portland's 1st Postman Miss L. Carthew, Portland, Vic. 70 years ago. -
 Blackburn Cricket Club
Blackburn Cricket Club Team of the Century
The team of the Century was selected in 2002.. The Selection Committee comprised Michael Long, Andrew Smith, Terry Dynes and Neville Jacobs. The Team of the Century are: Peter Grant, Darren Croft, Terry Sacristani, Tom Cullen (VC), Terry Dynes, Don Meehan (C), Griag Gislingham, Russell Punton, Neville Jacobs, Neil Robertson, Ivan Meehan and Robert Croft.This is Blackburn Team of the CenturyBlackburn Cricket Club team of the century 1902 - 2002. Selection Committee The selection committee comprised four life members whose experience and knowledge of Blackburn 1st XI cricket covered as many years from 1902 -2002: Michael Long (1966 - 1992) Chair Andrew Smith (1977 - 2003) Terry Dynes (1957 - 1986) Neville Jacobs (1943 - 1978) 1. Peter Grant - Right hand opening batsman. Five premierships in 3 decades of playing (1950s, 1960s and 1970s). 2. Darren Croft - Darren (Crofty) was a right hand opening batsman. He is a dual premiership player and been the clubs captain and coach. He made a century in a gutsy partnership to win the 1993-94 Grand Final. 3. Terry Sacristani - Right hand upper order batsman. Won five batting trophies and four prestigious Neville Jacobs trophies. Playing from 1979 - 1990. 4. Tom Cullen (Vice Captain) - The most talented batsman to represent the club. He was a captain-coach. He scored a triple century to win the Under 16 premiership. Tom played district cricket for Fitzroy and was selected to play Sheffield Shield for Victoria. Tom captained-coached Box Hill in the sub-districts and returned to Blackburn in 1987-88 until 1994-95 where he won one 1st XI premiership. He won four batting trophies and seven Neville Jacobs trophies in eight seasons. team, team of the century, century -
 Greensborough Historical Society
Book, The Mick Evans Story, 1941_
Mick Evans (E.H.) Evans, VX10125, 9th Division, 2nd/1st Field Workshop. This story was transcribed from 9 x 90 minute audio tapes recorded by Mick Evans several years before his death. The book was completed in 2000 just before Mick's death.One man's story of life during World War II, in particular as a "Rat of Tobruk".Spiral bound book, 95 p., illus. (some col.). Clear plastic outer cover. Printed cover has title, Rats of Tobruk Association logo and Australian flag.Inside front cover: "From Betty, Shirley, June and Mary Evans"mick evans, june hall, tobruk, australian army, world war ii. -
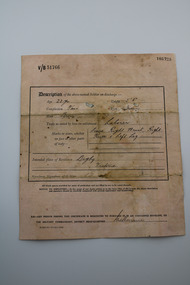 Heidelberg Repatriation Hospital
Administrative record - Certificate of Discharge, WWI, Certificate of Discharge, Private David Lee
Discharge notice from WWIAustralian Imperial Expeditionary Force Certificate of Discharge, double sided card with notes regarding Private David Lee 46th Battalion A.I.F.Service No 4527 Private David Lee 46th Battalion; Town of Digby; State of Victoria; Attested at Casterton; 21st July 1915 at age 18. Termination of enlistment after 1473 days. Service abroad 1229. Signed by Capt E W Wright in Melbourne 1st August 1919. Private Lee aged 22 years.wwi, discharge, a.i.f., casterton, digby, 46th battalion