Showing 352 items
matching bendigo quarry
-
 Bendigo Historical Society Inc.
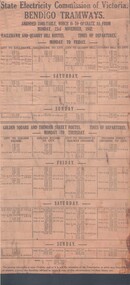
Document - BASIL MILLER COLLECTION: TRAMS, CHRISTMAS SPECIAL ROSTER, c1968
Graph paper. Roster-24 minutes service from 10 am to 11 pm Christmas Day, Wednesday 25th December, 1968, Eaglehawk to Quarry Hill. Labor Day Monday 10th March 1969, News Year Day-Wednesday 1st January 1969. Boxing Day Thursday 26th December 1968. Time tables include Motormen and Conductors names. Markings/Inscriptions: X.MAS. 1968 & NEW YEARS DAY 1969.organization, business, bendigo trams, basil miller -
Bendigo Historical Society Inc.
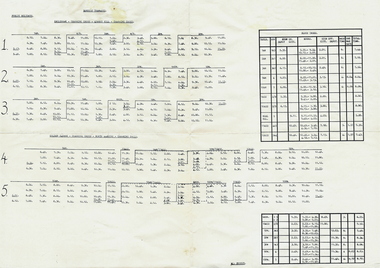
Document - BASIL MILLER COLLECTION: TRAMS - VARIOUS TIMETABLES
1. Monday to Friday - Eaglehawk, Quarry Hill, Golden Square, North Bendigo routes. 2. The Electric Supply Company of Victoria Ltd Bendigo and Eaglehawk Tramways, Sixteen (16) Copies. 3. The Electric Supply company of Victoria Ltd, Northern Branch alteration to fares, 1969. 4. Electricity Supply Department Bendigo - amended timetables - 1955, Six (6) copies. 5. Staff shift timetable - weekdays and Saturday - Two (2) pieces.person, individual, basil miller -
 Bendigo Historical Society Inc.
Document - BASIL MILLER COLLECTION: TRAMS - TIMETABLE POSTER
Amended timetable which is to operate as from Monday 23rd November 1942. Eaglehawk, Quarry Hill, Golden Square and Thunder Street routes. Two(2) copies.person, individual, basil miller -
Bendigo Historical Society Inc.
Document - BASIL MILLER COLLECTION: TRAMS - TIME TABLE - TURN BACKS
Handwritten timetable headed 'Turn Backs Easter Saturday', listing the turnaround times for Eaglehawk/Quarry Hill Line.person, individual, basil miller -
 Bendigo Historical Society Inc.
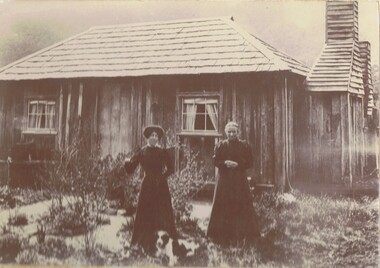
Photograph - PIONEER HOME AND TWO LADIES
Black and white photograph of a wooden house with shingled roof. Two chimneys on right hand side of house. Two ladies dressed in dark dresses and a dog at front of house.E.J. Bayley - Quarry Hillplace, building, rural cottage -
 Bendigo Historical Society Inc.
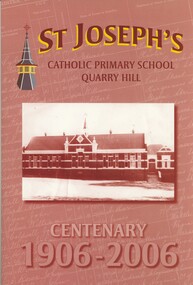
Book - ST JOSEPH'S SCHOOL CENTENARY, 2006
St Joseph's Catholic Primary School Quarry Hill Centenary 1906 - 2006 52 pages compiled by Maureen Connelly with black & white photographs, illustrations and plans. With bookmark.school, centenary, st joseph's, bendigo - schools, st joseph's school, education, catholic schools. -
 Bendigo Historical Society Inc.
Document - BASIL MILLER COLLECTION: TIMETABLE, PUBLIC HOLIDAYS TRANSPORT
Timetable - Eaglehawk, Charing Cross, Quarry Hill, Charing Cross. Golden Square, Charing Cross, North Bendigo, Charing Cross.Bendigo Tramwaysperson, individual, basil miller -
 Bendigo Historical Society Inc.
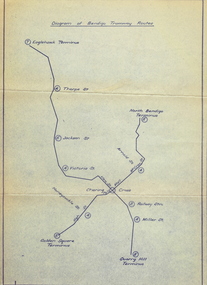
Document - BASIL MILLER COLLECTION: MAP: BENDIGO TRAMWAY ROUTES
Diagram of Bendigo Tramway Routes. Showing Eaglehawk terminus through to Quarry Hill Terminus and North Bendigo Terminus to Golden Square Terminus. Printed on pale bluish paper with dark blue print.person, individual, baby portrait -
 Bendigo Historical Society Inc.
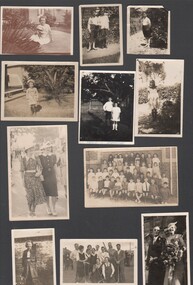
Photograph - Bolton Family photographs
... The Bolton family lived in Rodney Street Quarry Hill. Bendigo early ...The Bolton family lived in Rodney Street Quarry Hill.Bolton Family photographs, eleven B&W photos. Fred E & Eunice M A Bolton photos and family and friends' groups. Includes Quarry Hill school photo undated and a hockey grouping, a child in guide uniform and family photos.bendigo early 1900s family photos., bolton, quarry hill -
Bendigo Historical Society Inc.
Document - Bendigo Tramways Brochure, abt 1950s
In 1890 Bendigo's first tramway battery-electric carriages operated between Sanhurst and Eaglehawk. In 1892 Battery-electrics were replaced by steam tram cars on the Bendigo Railway Station track to Eaglehawk. In 1903 Electric traction overhead was inaugurated extending to Quarry Hill, Golden Square and Lake Weeroona. In 1913 Open cross-seat cars added for the service Quarry Hill to Eaglehawk. In 1945 Traction bogie cars replaced older cars. In 1947 Birney safety cars (dead man controllers) replaced older carsBrochure, a "Welcome to Bendigo, and "Evolution of Bendigo Tramways." 8668.1 Brochure is titled "Welcome to Bendigo," on the front a photo of Charing Cross and Trams, also the Bendigo City Coat of Arms. Inside two pages and descriptions of six tram showing the "Evolution of Bendigo tramways." On the rear is a map of the tramways and places of interest to visit. The brochure was "Printed for the preservation committee in co-operation with the Royal Historical Society of Victoria (Bendigo and District Branch) All donations for a preservation fund."history, bendigo tramways, evolution of bendigo tramways -
Bendigo Historical Society Inc.
Programme - Program and Toast list, 1951
In 1890 Bendigo's first tramway battery-electric carriages operated between Sanhurst and Eaglehawk. In 1892 Battery-electrics were replaced by steam tram cars on the Bendigo Railway Station track to Eaglehawk. In 1903 Electric traction overhead was inaugurated extending to Quarry Hill, Golden Square and Lake Weeroona. In 1913 Open cross-seat cars added for the service Quarry Hill to Eaglehawk. In 1945 Traction bogie cars replaced older cars. In 1947 Birney safety cars (dead man controllers) replaced older carsToast list for a Bendigo Tramways Division Retirement Dinner - A complimentary Dinner tendered to Mr Arthur Douglas on his retirement after 31 years as Secretary of The Australian Tramway and Motor Omnibus Employees' Association. Held at the Shamrock Hotel, Bendigo Saturday 29th September 1951. Inside are two tramways photos, one of the Bendigo Steam trams 1902, and the other of trams passing through Charing Cross in 1951. On the last page is a program and menu for the event.history, bendigo tramways, evolution of bendigo tramways, arthur douglas, australian tramway and motor omnibus employees association -
 Bendigo Historical Society Inc.
Document - KANGAROO FLAT GOLD MINE COLLECTION: MEMO J.H. LALOR TO R. WOODALL
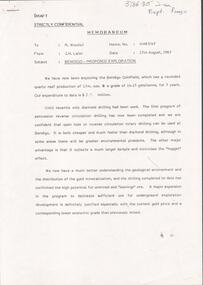
Four page memorandum titled 'Strictly Confidential' between J.H. Lalor and R. Woodall, regarding Bendigo Proposed Exploration. Two options 'for ongoing exploration and development at Bendigo are: an underground exploration development program similar to Stawell and, secondly, limited traverse percussion drilling on traverses 800m and 400m apart prior to underground development'. Three areas are discussed, Spring Gully, Sailors Gully and Quarry Hill.bendigo, gold mining, exploration of bendigo goldfield, bendigo, central deborah gold mine, spring gully, sailors gully, quarry hill, anticline, exploration, western mining corporation, bendigo mining nl -
 Bendigo Historical Society Inc.
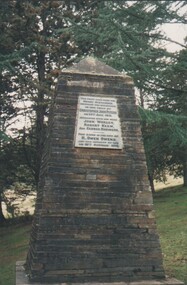
Photograph - EDITH LUNN COLLECTION: GOLDFIELDS CAIRN AND QUARRY AT FOREST CREEK, 19/08/1989
... Bendigo Historical Society Inc. Bendigo Historical Society ...Quarry in the vicinity of Goldfields Cairn, near Forest Creek, taken 19/08/1989 22A Cairn to mark Gold Discovery (the first ) on the Mount Alexander Goldfields at Forest Creek in 1851 22B At the site of the Cairn to mark gold discovery at Forest Creek in July 1951 22C the quarry near Goldfields Cairn 22D quarry in the vicinity of Goldfields Cairn, near Forest Creek 22E Quarry near Cairn to gold discaovery on Mount Alexander , Forest CreekEdith Lunn -
 Bendigo Historical Society Inc.
Map - BENDIGO HISTORICAL SOCIETY COLLECTION: EAGLEHAWK MINE MAP
Base map Australian map grid of Eaglehawk area. Map has letter attached from the Department of Conservation, Forests and Lands, 22 March, 1990, addressed to Felicity Kingerlie, BHS, requesting information regarding the historic mining sites marked on the map. Sites marked are: A. Golden Age Mine, engine mountings present B. Johnson's No. 2 Mine, engine mountings, old boiler foundations C. Johnson's No. 1 Mine, mullock retaining wall made from sandstone, engine mountings, remains of old building demolished? D. Toma's Eucalyptus Factory, old boiler still there, boiler shed, chimney (remnants of) outlet drain, distilling vats, dam, remnant of winch. E. New Argus Mine,mullock heap F. New Moon Mines Dams (1) stone walls G. North Lightning Hill Mine, engine mountings, quartz retainer wall, Pascoe and Simmons open cuts and other open cuts here too H. New Prince of Wales Mine and Poppet Head I. Quarry site for stone, excavation (for miners cottages in Clarke Street) J. Lancashire open cut mine K. Virginia Hill (cynaide vats etc) L. South Prince of Wales mine, now capped and fenced M (possibly ) Catherine United Mine, engine mountings, battery mountings?bendigo, mining, eaglehawk mines -
 Bendigo Historical Society Inc.
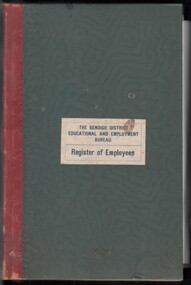
Book - WES HARRY COLLECTION: THE BENDIGO DISTRICT EDUCATION AND EMPLOYMENT BUREAU - REGISTER OF EMPLOYEES
Register of Employees for The Bendigo District Educational and Employment Bureau Dated 01/09/1901 to 1922 Alphabetic list of employees Bound Ledger six loose cards for boys to register at the bureau (loose at rear of the ledger) dated 22 dec 1916. Boys leaving Quarry Hill State School no 1165Bendigo District Educational and Employment Bureau -
 Bendigo Historical Society Inc.
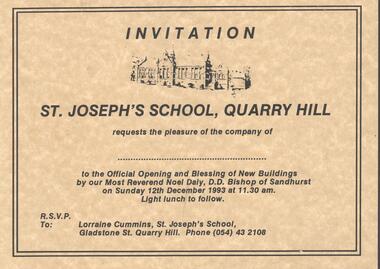
Document - BENDIGO SCHOOLS COLLECTION: ST. JOSEPH SCHOOL, QUARRY HILL
... Bendigo Historical Society Inc. Bendigo Historical Society ...1) Invitation to St. Joseph's School, Quarry Hill. Official opening and blessing of new buildings by our Most Reverend Noel Daly D.D. Bishop of Sandhurst on Sunday 12th December 1993 at 11.30am. 2) Newspaper article from Monday, December 13, 1993 titled: One school chapter opens as another draws to a close, a new era dawns for St Joseph's. 3) Booklet - St. Joseph's School Quarry Hill, blessing and official opening of new buildings by his Lordship Bishop Noel Daly D.D. Bishop of Sandhurst 12th December, 1993. In Unity to Grow. 4) A drawing of St. Joseph's.school, history, quarry hill -
 Bendigo Historical Society Inc.
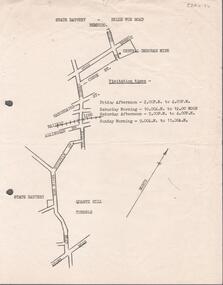
Document - ALBERT RICHARDSON COLLECTION: STATE BATTERY BELLE VUE ROAD, BENDIGO
One page document with map sowing the location of the State Battery Quarry Hill. Visitation times are given, presumably it was a tourist destination.bendigo, mining, state battery -
 Bendigo Historical Society Inc.
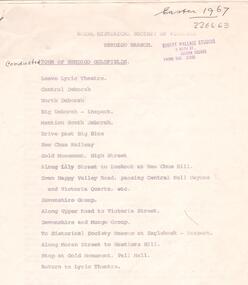
Document - ALBERT RICHARDSON COLLECTION: TOUR OF BENDIGO GOLDFIELD 1967
Seven page printed document. On top 'Royal Historical Society of Victoria, Bendigo Branch. Conducted tour of Bendigo Goldfields.' Easter 1967. Document lists the names and details of mines covered on the tour, including the : Central Deborah, corner Violet and Creek Street North Deborah, Breen Street, Quarry Hill The Deborah, off Adams Street, Quarry Hill The New Chum Railway, Breen Street, Golden Square Eureka Extended South Belle Vue. The Hustlers Hill area history. New Chum Hill history Mines on the New Chum Hill and vicinity: Lansell's 180 New Chum and Victoria The Lazarus New Chum United New Chum consolidated Garibaldi Long Gully mines The Ironbark Carlisle United Hercules Document is signed by A. Richardson.bendigo, mining, mine tour 1967 -
 Bendigo Historical Society Inc.
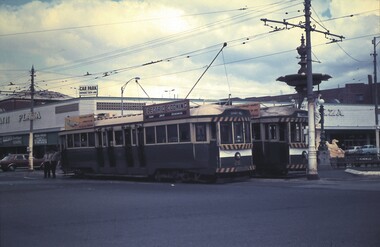
Slide - BENDIGO & EASTER FAIR, 1972
Bendigo tram at Alexandra Fountain, Charring Cross, Bendigo. Fountain Plaza in background. Quarry Hill No.26 and Eaglehawk tram No.2.slide, bendigo, bendigo trams., bendigo trams charring cross tram no 2 and no 26 -
 Bendigo Historical Society Inc.
Document - FAMILY HISTORY ''THE STORY OF THE GAYLARDS''
Family history ''The Story of the Gaylard's'' written (dictated by?) Ella Gaylard, 1967. 16 page typewritten document tracing family's arrival in Australia [Central Victoria - Bendigo (Sailor's Gully), Dunolly, Toolleen] and childhood recollections of the author. Mention of the following: the Lamperd family (original settlers??) and cousins, the Chubb family (the safety lock makers).; Auntie Clark (Eliza Ann); Auntie Bowles (Mary Ann). This is a well written account of life in the region and warrants further study - there is mention of many people by name but surnames may be difficult to determine. Mention of places in addition - e.g. author attended Quarry Hill State School where her father was for some time a teacher. This account is typewritten on both sides of foolscap paper - additional photocopied copy also (but this missing pages 1 & 2).Ella Gaylandperson, family, gaylards, ella gaylard, 1967. sailor's gully, dunolly, toolleen, lamperd family, chubb family, quarry hill state school. -
 Bendigo Historical Society Inc.
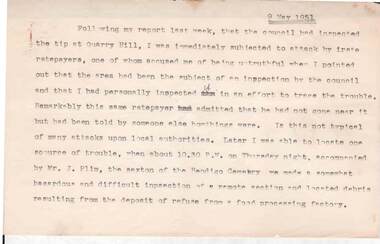
Document - NORMAN OLIVER COLLECTION: SPEECH NOTES 9 MAY 1951
The Norman Oliver collection. Norman Oliver was three times Mayor of Bendigo - 1950-51, 1964-65, 1970-71. Nineteen typed pages dated 9 May 1951 at top of front page. In the format he used for his talks on 3BO 'The Mayor Speaks'. Topics include : complaints regarding the Quarry Hill tip, traffic problems, Bendigo and District Ambulance Service, Public transport, the Beating of the Bounds, Jubilee of the Federal Parliament, the Library, purchase of new plant, land reclamation, and the Mayoress' Appeal.bendigo, council, speech notes, norman joseph oliver , councillor norman oliver. 3bo 'the mayor speaks'. mayor. -
 Bendigo Historical Society Inc.
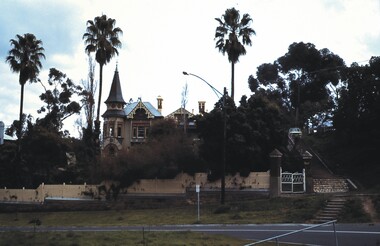
Slide - BENDIGO & EASTER FAIR, 1986
... ', Quarry Hill, 1986. Slide BENDIGO & EASTER FAIR ...'The Eyrie', Quarry Hill, 1986.slide, bendigo, the eyrie, 'the eyrie', quarriy hill 1986 -
 Bendigo Historical Society Inc.
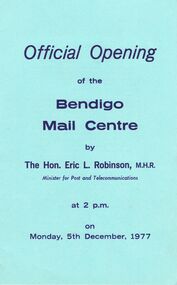
Document - OFFICIAL OPENING OF THE BENDIGO MAIL CENTRE, DEBORAH STREET, 5 December, 1977
Official Opening of the Bendigo Mail Centre, Deborah Street, Quarry Hill. By The Hon. Eric L Robinson, M.H.R. Minister for Post and Telecommunications at 2p.m. on Monday, 5th December, 1977. Historical Notes, details the history of the Bendigo Postal services Commencing in 1852. Proceedings. . . State Manager of Australia Post, Mr R J Page. . . Mayor Cr. R F Turner. . . Senator C G Primmer. . . Federal Member Mr. J W Bourchier. . . Mr Barry Coughlan. . . Inspection of Mail Centre.event, official, bendigo mail centre, official opening of the bendigo mail centre, deborah street, quarry hill. by the hon. eric l robinson, m.h.r. minister for post and telecommunications 5th december, 1977. details the history of the bendigo postal services commencing in 1852. proceedings. . . state manager of australia post, mr r j page. . . mayor cr. r f turner. . . senator c g primmer. . . federal member mr. j w bourchier. . . mr barry coughlan. . . inspection of mail centre. -
 Bendigo Historical Society Inc.
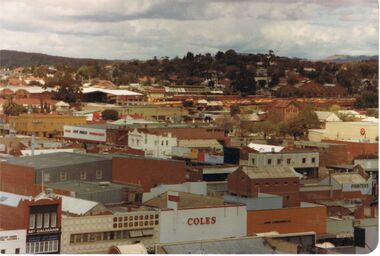
Photograph - VIEW FROM OLD BENDIGO POST OFFICE CLOCK TOWER LOOKING SOUTHWEST TOWARDS QUARRY HILL
View from old Bendigo Post Office Clock Tower South West in the direction of Quarry Hill. Names that appear on buildings are Coles, McCalmans, Bolton printers, New World Supermarket, Hopetoun hotel Target, and above these show buildings on the Bendigo Railway Station site.bendigo, history, buildings/streetscapes, coles, mccalmans, printers (boltons), new world supermarket, target, hopetoun hotel, and railway yards and buildings. -
 Bendigo Historical Society Inc.
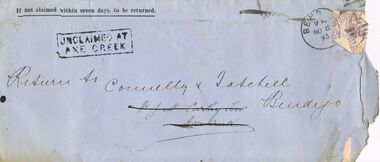
Document - CONNELLY, TATCHELL, DUNLOP COLLECTION: DOCUMENT
Seven unclaimed letters from Connelly & Tatchell, Solicitors, Sandhurst and Connelly, Tatchell & Dunlop, Barristers & Solicitors, Bendigo. Letters in the name of - J. McCarthy Senr., Axe Creek, re fencing land at Axe Creek, dated Sept 26 1891; Mr. Richards, Miner, New Chum, dated 16 Feby 1888, re perusing summons for assault and taking instructions for defence; Mr. James Baker, High Street, Sandhurst, re Attending Mr. Hopkins with respect to contract, dated 3 Nov 1886; Herbert Stokes Fernshaw, re Coffee Palace, St. Kilda, re appearance, letters and advice, dated Sept 11, 14, 16, 28, 30, Oct 5 and 6 1891; Mrs. A. Williams, c/ Mrs. Pinder, Carpenter St. Bendigo re Divorce, dated Dec 1900; Mr. Joseph Metcalf, Mining Manager, Gapsted, re Mortgage, dated 1901, has pink Return to Sender ink stamp; Mr. Gardner, Breen Street, Quarry Hill, re Opie, dated Nov 1901. Four letters have mauve Victoria Two Pence Stamp Duty stamps, one has no stamp, one has a red Victoria One Penny Stamp Duty stamp and one has a lighter red Victoria One Penny Postage stamp.business, legal, connelly & tatchell, connelly & tatchell collection - document, connelly tatchell & dunlop, j mccarthy senr, mr gardner, joseph metcalf, mrs a williams, mrs pinder, herbert stokes fernshaw, james baker, mr hopkins, mr richards -
 Bendigo Historical Society Inc.
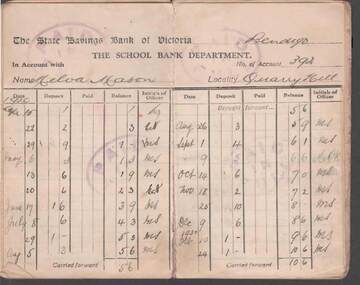
Document - W.D.MASON COLLECTION: PASSBOOK, 15 April 1929
Document/, W.D.Mason Collection, The State Savings Bank of Victoria, The School Bank Department. State School No. 1165, Quarry Hill, Name of Scholar is Melva Mason Locality Quarry Hill.Cream coloured, red tape-bound Savings Passbook - first entry dated 15.4.1929 with one penny deposit.business, retail, w d mason -
 Bendigo Historical Society Inc.
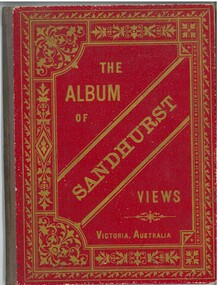
Book - THE ALBUM OF SANDHURST VIEWS, 1898
The Album of Sandhurst Views, red cover with gold lettering and embossed pattern with 20 foldout views of buildings, etc. Views present as artist's drawings of high quality Inscription in back reads L.Charlesworth Olinda Street Quarry Hill Sandhurst March 1898. Research papers re Mr Charlesworth done by Barbara Poustie.book, bendigo, buildings, historic, bendigo-sandhurst-history-architecture -
 Bendigo Historical Society Inc.
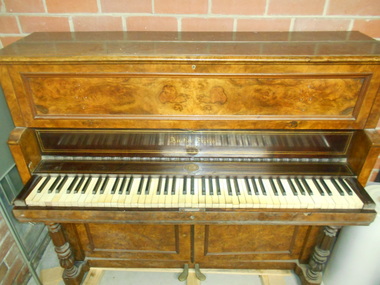
Instrument - ORGAN: OSCAR FLIGHT MEMORIAL ORGAN
Pedal Organ. Possibly belonged to Oscar Flight (Snr). Oscar Flight was a well known and Highly respected Musician in Bendigo. Lived at 44 Carpenter St, Quarry Hill. The father of The Engineer/Surveyor Lt Oscar Thomas Flight. Pedal Organ. This is a “Two Pedal” organ with a 50 Ivory Key, keyboard. The woodwork is relatively good condition. Across the front of the organ and just above the Keyboard are the words “Aucher Freres - Paris'' Lt Oscar Thomas Flight, No 2 Squadron AFC Lt Flight was a 20 year old university student from Bendigo, Victoria when he enlisted in the AIF and embarked for overseas as a Sapper (service number 3018) with the 5th Field Company Engineers (FCE) from Melbourne on 24 November 1915 aboard HMAT Ceramic. After serving in France with the 5th FCE, he transferred to the AFC on 28 August 1917 and graduated as a pilot on 22 January 1918. After being posted to France on 27 February 1918, he was captured on 28 March 1918 and held as a POW in Germany until repatriated to England on 13 December 1918. Lt Flight arrived back in Australia on 7 April 1919. Oscar Flight served as a lieutenant in the Second AIF.person, individual, oscar flight -
 Bendigo Historical Society Inc.
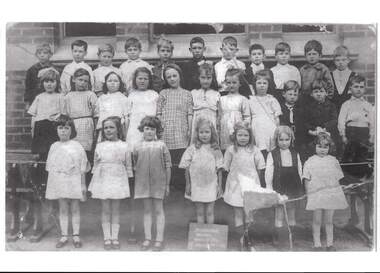
Photograph - ST. JOSEPHS SCHOOL QUARRY HILL
... Bendigo Historical Society Inc. Bendigo Historical Society ...black and white copy: image shows St. Joseph's School ( grade indecipherable ) students, four rows of 14 boys and 15 girls. On back of image : Received 17.11.1999, St. Joseph's Quarry Hill 1922. Back row : 2nd. From left - Gilbert Victor Hornsby age 7, Front row 1st on right. Marion Alma Dunt, age 6 ( nee Hornsby ) 1916 - 1993.person, group, quarry hill school, dunt -
 Tramway Heritage Centre
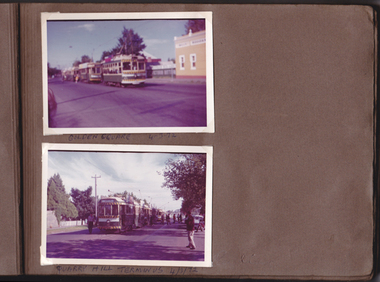
Photograph Album (part of), Ray Pearson's Photo Album - Trams of Victorian Railways, Ballarat, Bendigo, Geelong
Page 9 of Ray Pearson's Photo Album. Brown card page with two photographs (landscape format) placed on page using clear plastic photo corners. Both photographs depict trams around Bendigo. Hand written inscriptions are located beneath each photo. The brown paper has some minor damage to top and bottom right corners from what appears to be the removal of adhesive photo corners.Hand written inscription in biro - Between top and bottom photograph: GOLDEN SQUARE 4/3/72 At base of page: QUARRY HILL TERMINUS 4/3/72