Showing 149 items matching "diving photograph"
-
 Port Fairy Historical Society Museum and Archives
Photograph
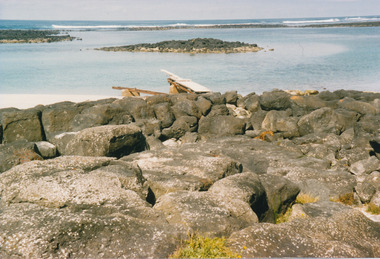
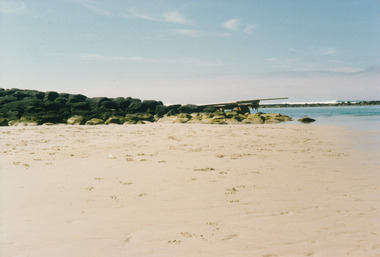
South beach diving boardsouth beach, diving, board, sea, reef, ocean -
 Port Fairy Historical Society Museum and Archives
Photograph
... beach diving board Rocks bluestone Photograph Photograph ...South beach diving boardsouth beach, diving, board, rocks, bluestone -
 Port Fairy Historical Society Museum and Archives
Photograph
... South beach diving board rocks Sea Photograph Photograph ...South Beach diving boardssouth beach, diving, board, rocks, sea -
 Port Fairy Historical Society Museum and Archives
Photograph - Digital copy
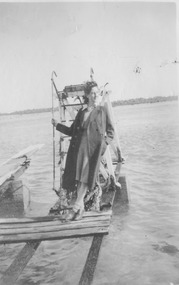
South beach diving board 1944south beach, diving, board, 1944, woman, female, lady -
 Port Fairy Historical Society Museum and Archives
Photograph - Digital copy
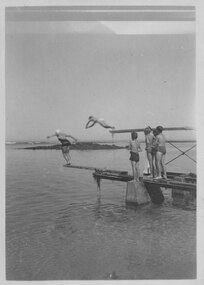
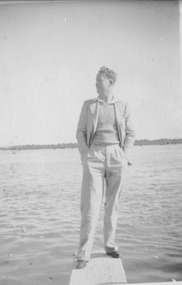
Lex Goldie standing on the diving board at the South beachlex goldie, diving, board, south beach, ocean, sea -
 Port Fairy Historical Society Museum and Archives
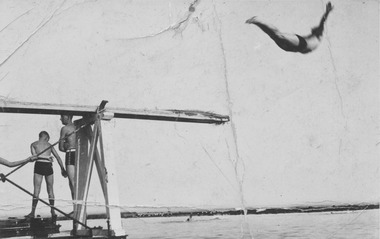
Photograph - Digital copy, 1944
... Black and white photograph of the diving board with 2 males... Black and white photograph of the diving board with 2 males ...Lex Goldie diving from South Beach diving board in 1944Black and white photograph of the diving board with 2 males standing and one divinglex goldie, diving, board, south beach -
 Bendigo Military Museum
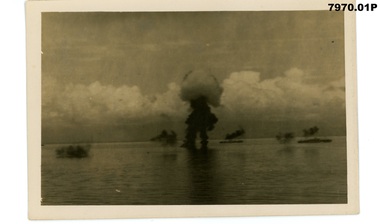
Photograph - ARTHUR GEORGE HOLLEY PHOTOGRAPHIC ALBUM, 10 Photographs HMAS Hobart 1942 Solomons
... Solomons USS Mugford attacked by dive bombers.jpg 10 Photographs ...Items in the collection relating to ARTHUR GEORGE HOLLEY no 13556 RAN Refer cat no 2134 for his service record. The photographs are from his personal album, and are mainly official photographs widely available among the services. The photographs are from Australian , British and American sources. This set coincides with the Hobart's service around the time of the Battle of the Coral Sea, and her involvement in the Solomons and Guadalcanal landings. Whilst not taken personally, these photographs do capture some of the events Holley and his Hobart crewmates would have experienced and witnessed.Each description is preceded by an approximate date e.g.1940 06 is June 1940. 1. 1942 08 Solomons caption torpedo bombers two more on fire.jpg 2. 1942 08 Solomons high level bombers no hits Japs flew one thousand miles for this 054.jpg 3. 1942 08 Solomons caption there is no doubt this one being a Jap note marking.jpg 4. 1942 08 Solomons Dawn entering Guadalcanal Hobart Hoists battle ensign.jpg 5. 1942 08 Solomons fires started by bombing and shell fire.jpg 6. 1942 08 Solomons Fires started by gunfire and dive bombers .jpg 7. 1942 08 Solomons Guadalcanal HMS Exeter evading Japanese bombers February 1942.jpg 8. 1942 08 Solomons US Mugford hit by bomb.jpg 9. 1942 08 Solomons USS Mugford attacked by dive bombers caption shot down one bomber.jpg 10. 1942 08 Solomons USS Mugford attacked by dive bombers.jpg hmas hobart, arthur george holley ran, pacific theatre, solomons campaign, guadalcanal -
 Linton and District Historical Society Inc
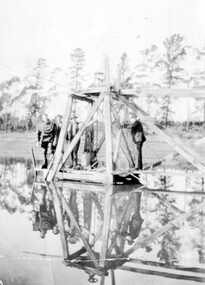
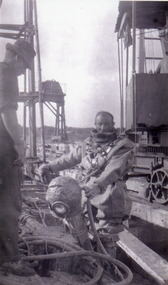
Photograph, Diver at Linton Reservoir, 1927, 1927
Small black and white photograph showing four men on a wooden structure built on a reservoir. One of the four men is dressed in a diving suit."The diver / At Linton reservoir / 1927".linton reservoir, diving platform -
 Lakes Entrance Historical Society
Photograph - Lakes Entrance Secondary School, Lakes Post Newspaper, 1996
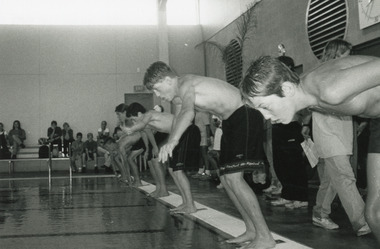
One student from Lakes Entrance Secondary College named as Andrew McDougall.Also other pic of students playing basketballBlack and white photograph of students preparing to dive into swimming pool at Lakes Aquadome during East Gippsland inter schools swimming sports. Lakes Entrance Victoriaschools, sports -
 Ballarat Tramway Museum
Album - Photo Album, Wal Jack, NSWT Sydney System - Album 1 of 2, 1950's
Some 241 black and white photographs of trams in Sydney and Newcastle. Includes works cars, horse trams, some depots and location and coloured postcards. Contains a newspaper clipping titled "Tram Dive in Harbor: Four hurt", from the Sydney Sun newspaper dated 21/7/1952. Almost all of the photographs have been obtained from his correspondents. For details of each photograph and layouts see - WJ Sydney Electrtic part 1.pdf Has a strong association with Wal Jack and his collecting of tramway history / developments until 1964.Black loose folders holding some 49 black coloured sheets of light card on which photos have been mounted using photo corners of various types, captions in white ink. trams, tramways, sydney, newcastle, tramcars, wal jack -
 Lakes Entrance Historical Society
Photograph, 1915c
... Black and white photograph showing man in diving suit... photograph showing man in diving suit, holding diving helmet ...Black and white photograph showing man in diving suit, holding diving helmet, machinery on tram lines, second man on left of photo at Lakes Entrance, Victoria.waterways, jetties, public works, divers -
 Port Fairy Historical Society Museum and Archives
Photograph
South Beach diving board 1939PhotographSouth Beach 1939beach, diving board, south beach, pea soup, diving, ocean, sea, reef -
 Ballarat Heritage Services
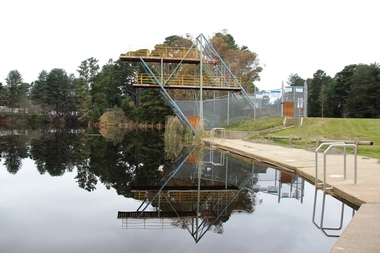
Photograph - digital photographs, Lisa Gervasoni, Creswick pre Olympic swimming pool, c2010-2017
Colour photograph of the Creswick Swimming Pool at Calambeen Park.swimming pool, sport, swimming, pre olympic, natural, calambeen park, diving tower, creswick swimming pool -
 Linton and District Historical Society Inc
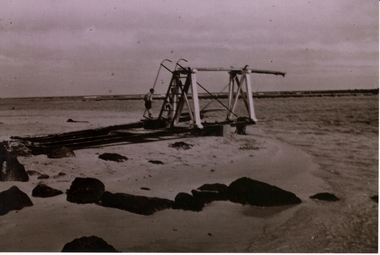
Photograph, Site of Former Linton Swimming Pool, Edinburgh Reserve, Linton, 2014
The photograph was taken by Gary Hunt in 2014.One of three colour photos printed on a single sheet of photographic paper. The photograph shows the section of the Edinburgh Dam which was at one time used as Linton's swimming pool. Remnants of a diving tower can be seen in the dam.edinburgh dam, swimming pool, edinburgh reserve linton -
 Flagstaff Hill Maritime Museum and Village
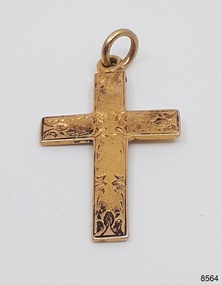
Accessory - Gold Cross, Bef. 01-06-1878
The gold cross was discovered by Victorian scuba diver Julie Wilkins, who had already experienced more than 500 dives in Australia and overseas. She was holidaying in Peterborough, Victoria, and looking forward to discovering more about the famous Loch Ard ship, wrecked in June 1878 at Mutton Bird Island. The fast Glasgow-built clipper ship was only five years old when the tragedy occurred. There were 54 people on board the vessel and only two survived Julie's holiday photograph of Boat Bay reminds her of her most memorable dive. Submerged in the calm, flat sea, she was carefully scanning around the remains of the old wreck when, to her amazement, a gold coin and a small gold cross suddenly came up towards her. She excitedly cupped them in her hands, then stowed the treasures safely in her wetsuit and continued her dive. She soon discovered a group of brass carriage clock parts and some bottles of champagne. It was a day full of surprises. The items were easily recognisable, without any build-up of encrustations or concretion. Julie secretly enjoyed her treasures for twenty-four years then packed them up for the early morning train trip to Warrnambool. After a short walk to Flagstaff Hill Maritime Museum and Village, her photograph was taken as she handed over her precious find. She told her story to a local newspaper reporter, lunched a café in town then took the late afternoon train home. Her generous donation is now part of a vast collection of Loch Ard shipwreck artefacts, including the gold watch and the Minton Majolica model peacock. The small decorative cross dates back to on or before 1878, when the Loch Ard had set sail. The loop and ring have been added, perhaps as a pendant, pocket watch accessory or similar purpose. It may have been worn for ‘good luck’ or a ‘blessing’ on the long journey to Australia, where ships had to carefully navigate the treacherous Bass’s Strait before arriving at their destination of Melbourne. Sadly, many met their fate on that short stretch of ocean aptly named the Shipwreck Coast. The cross is very recognisable even though it was exposed to the wrecking of the ship, its consequent movement, and the sea's turbulence. Its scratched, pitted and worn condition, and the damage near the loop, is part of its story. The red-brown-black discolouration is similar to that found on other gold coins, sometimes called the ‘corrosion phenomena’. Studies suggest the possible cause is contaminants in the minting process reacting to the coins’ environment. Three edges of the cross have slightly raised narrow ridges of gold which could have been cause by the gold being cast liquid gold into a mould.This gold cross pendant is significant as a symbol of Christianity, a sign of hope and safety, and a sample of the religious following on board the Loch Ard, although not everyone wears a cross for this reason. This cross is a sample of jewellery owned by people migrating to Australia in the late 19th century. The cross and the guinea recovered together from the wreck of the Loch Ard are made of gold and help interpret the financial status of some of those on board.Gold cross; yellow gold with decorative hand engraved foliage design on the front, fitted loop and ring on top. The simple Latin or Roman variation of the cross, with an elongated vertical arm, has no figure on it and the reverse has no decoration. The right, left and base edges have sections of narrow, long slightly raised ridges. The top edge has remnants of red-black colour. Victorian era cross, ca. 1878. The cross was recovered from the wreck of the ship Loch Ard.Engraved foliage design. Slightly raised long ridges on sides and base edges. flagstaff hill maritime museum and village, warrnambool, great ocean road, shipwreck coast, gold cross, religious cross, religious trinket, religious jewellery, engraved cross, cross pendant, cross with ring, victorian era, 1878, antique cross, crucifix, religious symbol, christian symbol, christian jewellery, contamination phenomena, gold corrosion, good luck, lucky charm, blessing, pendant, loch ard, wreck of the loch ard, mutton bird island, peterborough, scuba diver, 1980s, shipwreck artefact, relic, latin cross, roman cross, pectoral cross, julie wilkins -
 Flagstaff Hill Maritime Museum and Village
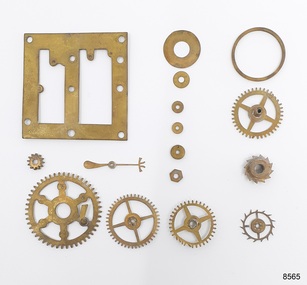
Instrument - Clock Parts, Bef. 01-06-1878
The clock parts were discovered in 1980 by Julie Wilkins, a Victorian scuba diver who had already experienced more than 500 dives in Australia and overseas. She was holidaying in Peterborough, Victoria, and looking forward to discovering more about the famous Loch Ard ship, wrecked in June 1878 at Mutton Bird Island. The fast Glasgow-built clipper ship was only five years old when the tragedy occurred. There were 54 people on board the vessel and only two survived Julie's holiday photograph of Boat Bay reminds her of her most memorable dive. Submerged in the calm, flat sea, she was carefully scanning around the remains of the old wreck when, to her amazement, a gold coin and a small gold cross suddenly came up towards her. She excitedly cupped them in her hands and then stowed the treasures safely in her wetsuit and continued her dive. She soon discovered a group of brass carriage clock parts and some bottles of champagne. It was a day full of surprises. The items were easily recognisable, without any build-up of encrustations or concretion. Julie secretly enjoyed her treasures for twenty-four years then packed them up for the early morning train trip to Warrnambool. After a short walk to Flagstaff Hill Maritime Museum and Village, her photograph was taken as she handed over her precious find. She told her story to a local newspaper reporter, lunched a café in town then took the late afternoon train home. Her generous donation is now part of a vast collection of Loch Ard shipwreck artefacts, including the gold watch and the Minton Majolica model peacock. This group of brass clockwork parts is incomplete. The pieces were in the ocean for over 100 years before Julie recovered them from the Loch Ard wreck. Their size would suit the works of a carriage clock, with a mainspring and weight to power the clock movement, a pendulum to measure the clock's speed, arbours, posts, pillars and at least one other plate. They would have been mounted inside a protective case with a small door to easily access the clock face for setting the time and accessing the key's winding hole. The clock cases were usually made from decorative gilt brass with a glass front and a carrying handle. The parts include a weighted second hand with a decorative four-pronged finish at one end, a rounded weight at the other, and a hole for attaching it to the clock face. The gear teeth profiles are ‘cycloidal’, an arch shape with vertical sides, which is common for antique clocks. Modern clockworks have ‘involute’ teeth with sloping sides and a squared-off top. The brass carriage clock parts are an example of a mechanical clock produced in the 1870s. The clock's design is a part of the chain of technological improvements in methods for timekeeping. Its cycloidal gear teeth were the forerunner of the more modern involute gears. The group of clock parts includes a weighted hand or arm for signifying the seconds. This feature was uncommon in portable Victorian-era clocks. The clock parts are also significant for their association with the ill-fated sailing ship Loch Ard, wrecked in 1878. The travelling clock or officer’s clock may have been part of the cargo destined for the 1880 Melbourne Exhibition, or the personal possession of one of the people on board the vessel. Brass clockwork parts from a mechanical clock, sixteen pieces. Parts comprise a plate, large gears or wheels, small pinions or wheels with fine teeth, wheels with cogs, and a weighted second hand. The parts were from a carriage clock ca. 1878. They were recovered from the wreck of the sailing ship Loch Ard.flagstaff hill maritime museum and village, warrnambool, great ocean road, shipwreck coast, loch ard, wreck of the loch ard, 1878, mutton bird island, peterborough, scuba diver, 1980s, shipwreck artefact, relic, clock, mechanical, clock parts, time, timekeeper, horology, chronometry, cogs, time keeping device, scientific instrument, chronometer, john harrison, longitude, carriage clock, coach clock, portable clock, travelling clock, travel clock, traveller’s clock, officer’s clock, weighted second hand, victorian era, cycloidal gear teeth, brass clock, julie wilkins -
 Port Fairy Historical Society Museum and Archives
Photograph
Men's bathing boxes South Beach with group of men and boysBlack and white panoramic photograph South Beach beach, bathing boxes - men's, diving board, south beach, pea soup -
 Bendigo Historical Society Inc.
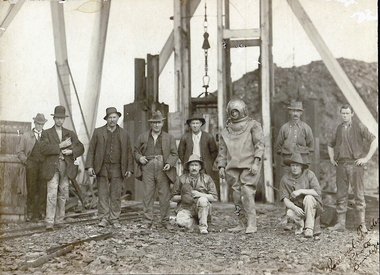
Photograph - TAMBOUR MAJOR MINE AT SPECIMEN HILL, 1920
Black and white photograph mounted on brown board. Ten males in front of mine shaft. One male in divers suit. Male second from L holding small dog. Cage and poppet legs in background. Mullock heap at back. Inscriptions: Hand written on BR corner of photo 'Percival Pinder, Photo, Bendigo' Hand written on board under photo 'Tambour Major GM Coy 846 ft'. On separate card glued to bottom of mount board, printed 'Diver inspecting flooded Tambour Major Mine at Specimen Hill in 1920'. Hand written in ball point pen on back 'Tambour Major' Mine Group photo taken at Tambour Major about 1920. Dad on extreme right, Joe Sheard, Mine Manager in diving suit. A Richardson, 29 Harrison Street' Hand printed in black ink on back 'Diver inspecting flooded Tambour Major Mine in 1920'. On back - circular purple stamp 'Royal Historical Society of Victoria, Bendigo Branch'.Percival Pinder, Bendigomining, surface equipment, tambour major mine, bendigo, mines and mining, miners, mine, specimen hill, flooded mine, diver -
 Warrnambool and District Historical Society Inc.
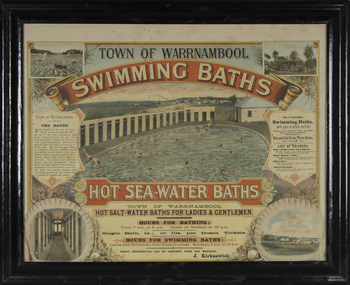
Photograph - Framed photograph of Warrnambool Salt Water Baths, c. 1920
This is a framed photograph of the men's pool at the Warrnambool Salt Water Baths. These Baths were originally built at the end of Gilles Street on the line of the present railway line in 1876 but were rebuilt in 1889 further north in Gilles Street when the railway line was opened. The water was pumped from the sea, initially by a windmill and later by a gas pump. The men's pool was 100 feet by 50 feet and the women's pool was 60 feet by 30 feet with bathing strictly segregated in the 19th century. A building nearby housed marble cubicles with hot spa baths with the water heated on the site and a caretaker's cottage completed the complex. Men's nude bathing was a feature of the early 20th century. Originally built by a local public company the Baths were taken over by the Warrnambool Council. These baths were superseded by the opening in 1961 of an Olympic Pool In Warrnambool. The site and the remaining buildings of the old sea water baths are now heritage-listed and today form part of the headquarters of the Warrnambool and District Historical Society.This photograph is of historical significance as a depiction of the Warrnambool Salt water Baths in the early 20th century. These Baths were the basis for promoting Warrnambool as a health and spa resort town in the late 19th and early 20th centuries.This is a framed black and white photograph of the men's pool at the Warrnambool Salt Water Baths. It depicts men and boys swimming in the circular pool and one male on the diving board. All these men are naked. There are other clothed males and clothed attendants wearing hats and waistcoats. The change rooms are on the right side of the photograph and there is a fence with trees behind. The photograph is mounted on cardboard with a gilt edge and is held in a wooden ridged frame behind glass. warrnambool sea water baths, sea baths, warrnambool pool, gilles street -
 Flagstaff Hill Maritime Museum and Village
Currency - Guinea Coin, The Royal Mint, 1793 George III Spade Guinea, 1793
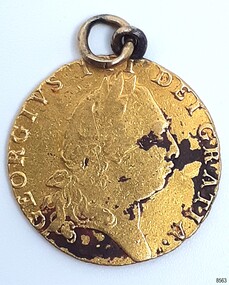
The coin was discovered by Julie Wilkins, a Victorian scuba diver who had already experienced more than 500 dives in Australia and overseas. She was holidaying in Peterborough, Victoria, and looking forward to discovering more about the famous Loch Ard ship, wrecked in June 1878 at Mutton Bird Island. The fast Glasgow-built clipper ship was only five years old when the tragedy occurred. There were 54 people on board the vessel and only two survived Julie's holiday photograph of Boat Bay reminds her of her most memorable dive. Submerged in the calm, flat sea, she was carefully scanning around the remains of the old wreck when, to her amazement, a gold coin and a small gold cross suddenly came up towards her. She excitedly cupped them in her hands, then stowed the treasures safely in her wetsuit and continued her dive. She soon discovered a group of brass carriage clock parts and some bottles of champagne. It was a day full of surprises. The items were easily recognisable, without any build-up of encrustations or concretion. Julie secretly enjoyed her treasures for twenty-four years then packed them up for the early morning train trip to Warrnambool. After a short walk to Flagstaff Hill Maritime Museum and Village, her photograph was taken as she handed over her precious find. She told her story to a local newspaper reporter, lunched a café in town then took the late afternoon train home. Her generous donation is now part of a vast collection of Loch Ard shipwreck artefacts, including the gold watch and the Minton Majolica model peacock. The coin is a British 1793 George III Gold Spade Guinea. It was already 83 years old when the Loch Ard had set sail. The loop and ring have been added, perhaps as a pendant, pocket watch accessory or similar purpose. It may have been worn for ‘good luck’ on the long journey to Australia, where ships had to carefully navigate the treacherous Bass’s Strait before arriving at their destination of Melbourne. Sadly, many met their fate on that short stretch of ocean aptly named the Shipwreck Coast. The coin is very recognisable even though it was exposed to the wrecking of the ship, its consequent movement, and the sea's turbulence. Its bent, scratched, buckled, split, dinted and worn condition is part of its story. The red-brown-black discolouration is similar to that found on other gold coins, sometimes called the ‘corrosion phenomena’. Studies suggest the possible cause is contaminants in the minting process reacting to the coins’ environment. The GEORGE III GOLD SPADE GUINEA: - The British Guinea was introduced in 1663 and was circulated until 1814. It was made of 22 carat gold, was 25 to 26 cm in diameter and weighed 8.35 grams. It had a value of 21 British shillings. The guinea coin ceased circulation after 1816 and was replaced by the one-pound note. However, the term ‘guinea’ continued to represent 21 shillings. King George (1738-1820) had six gold guinea designs minted during his reign from 1760 and 1820. Each of the six had different obverse portraits, all facing the right. There were three different reverse sides. The Spade Guinea was the fifth issue of the coin, introduced in 1787 and produced until 1799. The reverse shows a royal crown over a flat-topped shield with the Royal Arms of Great Britain, used in Scotland between 1714 and 1800. The shield images are, from left to right, top to bottom, the Arms of England and Scotland, the Arms of France, the Arms of Ireland, and the Arms of the House of Hanover. The Gold Guinea is also part of Australia’s history. It was the first coin mentioned in the announcement of Governor King of New South Wales his Australian Proclamation of a limited variety and denomination of coins accepted for use in the Australian Colony. The historic and decorative George III Spade Guinea has been reproduced for special collections of coins. However, replicas and imitations have also been made as souvenirs for tourists, as gaming tokens and chips for gamblers, and as ‘fake’ coins for profit. These coins differ in many ways; they may be only half the weight of the genuine coin. Often have a small stamp on the obverse with “COPY” or the manufacturer’s name or initials. Some have scalloped edges, some have dates that are different to the original dates of issue, and some even have text in Latin that translates as something very different to the original coin.The King George III Guinea was only produced from 1663 to 1814 and was the first English coin to be mechanically minted. The coin is the fifth edition of the King George III Guinea, the Spade Guinea, was only produced between 1787 and 1799. It is the only edition with this portrait of King George and the only one with the Royal Coat of Arms of Great Britain in Scotland on the reverse side. This edition was also the last guinea in circulation, because the sixth edition was reserved as the Military guinea. This edition of the Guinea is unique; This coin is the only guinea in our collection. It was minted in 1793, so it is now over 230 years old. The Gold Guinea is part of Australia’s history; it was the first coin in the list of coins for use in the Australian Colonies, mentioned by Governor King of New South Wales in his Australian Proclamation speech of 1800. The George III Spade Guinea was included in the Limited Edition Sherwood 12 Coin Collection of Notable Coinage of Australia. This coin is the only known guinea coin recovered from the wreck of the Loch Ard. It was already 85 years old when the ship was wrecked.Gold coin; British. 1793, King George III of the United Kingdom of Great Britain and Ireland (1760-1820), Spade Guinea. Yellow gold coin with gold metal loop mount and a gold ring through the loop. The design is the fifth issue of the George III Gold Guinea. The obverse relief is a portrait of George III facing right. Reverse relief is a crown above the Coats of Arms (1801-1816) of flat top spade-shaped shield divided into four quadrants that depict crowned lions, fleur de lies, a harp. These images are identified as, from left to right, top to bottom, England and Scotland, France, Ireland and Hanover. Inscriptions are minted around the rims of each side. The coin is dated 1793. Its surface has dark areas on both sides and the reed edge and surfaces are well worn. The loop mount is bent and the ring is buckled. The coin was recovered from the wreck of the ship Loch Ard.Obverse text; 'GEORGIVS III DEI GRATIA' (translates to George the Third, by the Grace of God) Obverse relief; (King George III bust, facing right, laurel wreath on head) Reverse text; 'M.B.E.ET.H.REX.F. D.B.ET.L.D. S.R.I.A.T.ET.E' '1793' (translates to: King of Great Britain, France and Ireland, Defender of the Faith, Duke of Brunswick and Lüneburg, Arch-Treasurer and Elector of the Holy Roman Empire) Reverse relief; a spade-shaped image i.e. (Crown with fleer de lies, above Shield with crowned lions in different postures, a harp, and other details)flagstaff hill maritime museum and village, warrnambool, great ocean road, shipwreck coast, royal mint, british coin, currency, guinea, military guinea, australian currency, british guinea, gold coin, spade guinea, king george iii, george iii, fifth portrait, arms of england and scotland, arms of france, arms of ireland, arms of the house of hanover, coins, gold coins, gold medallion, georgian era, 1793, numismatics, contamination phenomena, gold corrosion, good luck, lucky charm, pendant, lucky coin, trade, loch ard, wreck of the loch ard, 1878, mutton bird island, peterborough, scuba diver, 1980s, guinea coin, gold guinea, shipwreck artefact, relic, julie wilkins -
 Linton and District Historical Society Inc
Photograph, Aeroplane Landing at Linton Park, 1928, 1928
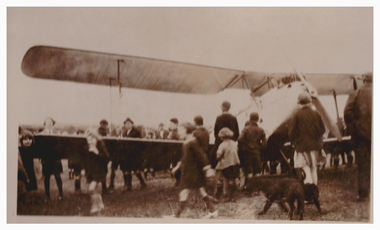
Picture in photograph album donated by Mrs Faull. The plane landed at Linton Park as part of an advertising campaign by Astor Radios in 1928. Information provided by Ron Preston of Linton: "The day the plane landed in Linton Park / late 20s. Fairbanks and Harrison operated a garage in Sussex St opposite Bryant's shop. Fairbanks was married to Carrie Murrell's sister Dorrie and William (Bill) Harrison was married to Dulcie Nicol. Among other things that the garage sold were ASTOR RADIOS. To promote ASTOR RADIO a Gypsy Moth double seater aircraft flew low over towns to advertise. ASTOR RADIO was written under both wings. by Boltes) staying overnight. Both Harrison & Fairbanks were taken up for a ride. The pilot "dive-bombed" the local children, many of them seeking shelter under the bridge, as they were frightened, not having seen a plane up close before." Sepia photograph of a biplane surrounded by a crowd of people. One of three photographs of this occasion, the others are Registration nos. 627.1 & 627.2"1st aeroplane to land in Linton 1928". events, faull collection, aeroplanes, linton park -
 Flagstaff Hill Maritime Museum and Village
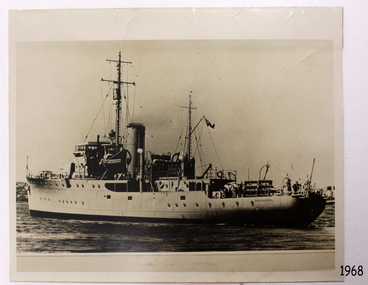
Photograph - Vessel, Steam Ship, H.M.A.S. Warrnambool J202, Between 1941-1947
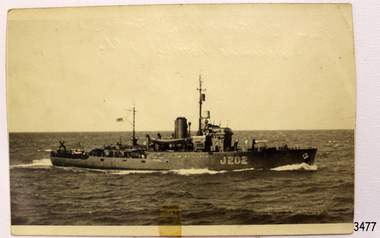
This photograph is connected to the first HMAS Warrnambool (J202), which was one of 60 Bathurst class corvette vessels built during World War II by Mort's Dock & Engineering Co Ltd of Sydney under the commission of the Royal Australian Navy (RAN). It was the namesake of the City of Warrnambool in Victoria. The armed minesweeper was 57 metres long and could had a complement of 85 personnel. Its armament included 1 × 4 inch Mk XIX gun, 1 × 40 mm Bofors AA gun (installed later), 3 × 20 mm Oerlikon guns (1 later removed), machine guns and depth charge chutes and throwers. It was launched in Sydney in May, 1941. The HMAS Warrnambool began service with patrols off Bass Strait in 1941. In December the ship docked in Warrnambool Harbour and the crew marched in a parade along Timor Street. The ship’s crew received a donation of 110 books from the Warrnambool Patriotic Fund, and a plaque of the City of Warrnambool’s Coat of Arms presented by the Mayor, Cr. John R Astbury. In September 1942 a Dutch East Indies family, Samuel and Annie Jacob and seven of their eight children, was rescued by the HMAS Warrnambool and evacuated to Darwin. The family settled in Melbourne, then in 1944 Samuel tragically died. After the war ended the family was threatened with deportation under Australia’s Immigration Restriction Act 1901 (known also as the White Australia policy). Annie married her landlord, John O’Keefe but was still issued a deportation order in 1949. The family appealed to the High Court and the case became famous for being the first successful legal challenge to the Act. The HMAS Warrnambool was in Darwin during the time it was bombed, attacked by the Japanese while rescuing 73 crew from a merchant vessel that had also been attacked. The ship was involved in several other rescues and carried troops to New Guinea. Other events included escort and patrol duties on Australia's east coast, then at Fremantle and back to Darwin. When the Japanese surrendered on September 11, 1945, at the end of World War II, the ship was at Timor. It performed mine clearance work around the Solomon Islands and New Guinea after the war. On 13th September 1947 the ship was sent to lead a flotilla at the Great Barrier Reef, off the Queensland coast. The mission was to clear the defensive British mines that were laid during1941-43 to protect Australia’s boarders. The HMAS Warrnambool hit a mine near Cockburn Reef, exploded and sank shortly afterwards. One of the 70 or so men on board was killed at the time and thirty-two men were badly injured; three of these also lost their lives. The four deceased were Victorian seamen. The wounded men were transferred by boats to the nearby HMAS Swan II, where the Swan’s and the Warrnambool’s doctors cared for them. The HMAS Swan II took the survivors to Cairns, and from there the men were flown by RAAF to either Brisbane or Sydney hospitals. The HMAS Warrnambool was the only RAN ship to be sunk by a mine, and the four who lost their livers were the last naval casualties from World War II. The ship’s wartime service was recognised by three honours. In May 1948 a number of items were recovered by Navy divers from the wreck of HMAS Warrnambool. The items included the ship’s bell (inscribed HMAS Warrnambool 1941) and the round plaque with the Seal of the Warrnambool City Council. In 1949 the plaque was returned to the Council, and the bell was donated to the Australian War Memorial. Further objects were recovered by the new owners of the wreck, Southern Cross Diving and Salvage, in 1972-75. A memorial plaque, honouring the memories of all those who served on the HMAS Warrnambool until is sunk on September 13 1947, was erected in Warrnambool on September 13, 1995. NOTE: (1)- The second HMAS Warrnambool (FCPB204), also the namesake of the City of Warrnambool, was built in 1980 in Cairns, one of fifteen Fremantle Class Patrol Boats ordered by the RAN. It was just over 41 metres long with a compliment of 22 personnel. It patrolled Australia’s northern waters for illegal fishing vessels. This vessel was decommissioned in 2005. (2)- There was also a steam and sail ship named the S.S. Warrnambool, built in 1892 in London and broken up in 1926.This photograph is significant for its association with Royal Australian Navy and its vessel, HMAS Warrnambool (j202). The HMAS Warrnambool played a nationally significant role in overturning Australia’s Immigration Restriction Act 1901 (colloquially known as the White Australia policy). The ship rescued, and brought to Australia, Samuel and Annie Jacob and their family after they evacuated Dutch East India. The family was threatened with deportation and made the first successful appeal to High Court regarding that Act. The HMAS Warrnambool has - Local significance for being the namesake of the City of Warrnambool - Local significance, having docked in Warrnambool Harbour - Local significance, the crew having paraded in Timor Street, Warrnambool - State significance for its first patrol being in Bass Strait. - National significance, being present in Timor at the Japanese surrender - National significance as part of Australia’s defence force history, being one of only four Bathurst class corvettes lost while in Australian service, the only Bathurst class corvette lost after World War II, the only RAN vessel to be sunk by a mine, and associated with the last four Navy deaths of WWIIBlack and white photograph of vessel H.M.A.S. Warrnambool J202 on an open sea. The identifying number is painted on the hull. The ship is flying a white ensign. A lifeboat is suspended near the centre of the ship. Figures can be seen on deck. Hand written inscription on the reverse side. On ship's hull "J202" On reverse of photo "From P.O. FRED MATTHEWS. 23378. R.A.N." "MARIBYRNONG MAIDSTON RSL" "H.M.A.S. WARRNAMBOOL"flagstaff hill, warrnambool, shipwrecked-coast, flagstaff-hill, flagstaff-hill-maritime-museum, maritime-museum, shipwreck-coast, flagstaff-hill-maritime-village, photograph, h.m.a.s. warrnambool, maritime village, maritime museum, shipwreck coast, mort's dock & engineering co ltd, hmas warrnambool, hmas warrnambool i, hmas warrnambool j202, hmas swan ii, j202, world war ii, bathurst class corvette, royal australian navy, ran, sydney built ship, bass strait patrol, sea mine patrol, mine sweeper, mine clearance, navy divers, great barrier reef, cockburn reef, southern cross diving and salvage, warrnambool city council, cr j r astbury, mayor j r astbury, warrnambool patriotic fund, seal, coat of arms, ship’s bell, hmas warrnambool 1941, shipwreck by sea mine 1947, sea rescue, life saving, lifesaving, sinking ship, sunk ship, immigration restrictions act 1901, white australia policy, samuel and annie jacob, john o'keere, minesweeper -
 Flagstaff Hill Maritime Museum and Village
Photograph - Vessel, Steam Ship, HMAS Warrnambool J202, Between 1941-1947
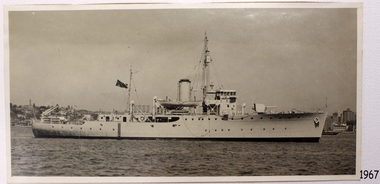
The photograph shows the vessel HMAS Warrnambool J202, which was commissioned by the Royal Australian Navy for use as a minesweeper during World War II. The Bathurst Class Corvette, fitted out with a range of armaments, was launched in Sydney 1941. The ship began service in Bass Strait in 1941. At the end of the year it called into its namesake city, Warrnambool, where the crew paraded for the public marching eastwards along Timor Street. A gift of books for the ship’s personnel and a plaque bearing the City of Warrnambool’s Coat of Arms were presented to the ship. The ship was involved in evacuating a family of nine from the Dutch East Indies that was later successful in its challenge of Australia’s Immigration Restriction Act (White Australia Polity). The ship had many other appointments around Australia. On 13th September 1947 HMAS Warrnambool was leading a flotilla of minesweepers in northern Queensland’s coastal waters, clearing mines previously laid to defend Australia. The ship hit a mine, which exploded and very quickly sunk the ship. Boats from the nearby ships rescued most of the seamen although one was killed at the time. The survivors were taken by the HMAS Swan II to Darwin, and they went from there to hospitals in Brisbane and Sydney. Three of these men later died from their injuries. A number of items were recovered by Navy divers in 1948 including the ship’s bell and a plaque with Warrnambool’s Coat of Arms. In 1972-75 the wreck was sold and other items were salvaged. In 1995 a memorial plaque was erected in Warrnambool near the RSL. NOTE: The RAN built a second HMAS Warrnambool FCPB204, launched in 1981 and decommissioned in 2005. There was also a steam ship SS Warrnambool built in London 1892 and broken up in 1926. [A more detailed history can be found in our Collection Record 3477.] This photograph of HMAS Warrnambool is significant for its association with Royal Australian Navy and its vessel, HMAS Warrnambool (J202). The HMAS Warrnambool played a nationally significant role in overturning Australia’s Immigration Restriction Act 1901 (colloquially known as the White Australia policy). The ship rescued, and brought to Australia, Samuel and Annie Jacob and their family after they evacuated Dutch East India. The family was threatened with deportation and made the first successful appeal to High Court regarding that Act. The HMAS Warrnambool has - Local significance for being the namesake of the City of Warrnambool - Local significance, having docked in Warrnambool Harbour - Local significance, the crew having paraded in Timor Street, Warrnambool - State significance for its first patrol being in Bass Strait. - National significance, being present in Timor at the Japanese surrender - National significance, shown by the significance of the ship’s bell being curated as Military Heritage and Technology at the Australian War Memorial. - National significance as part of Australia’s defence force history, being one of only four Bathurst class corvettes lost while in Australian service, the only Bathurst class corvette lost after World War II, the only RAN vessel to be sunk by a mine, and associated with the last four Navy deaths of WWIIPhotograph of HMAS Warrnambool near land. Black and white photograph shows a steam and sail vessel in calm water beside land. Figures are standing on board. A flag flies on a mast. The ship's name is on the stern. The light coloured funnel has emitted a small amount of smoke.On side of ship "WARRNAMBOOL"flagstaff hill, maritime village, maritime museum, warrnambool, shipwreck coast, mort's dock & engineering co ltd, h.m.a.s. warrnambool, hmas warrnambool, hmas warrnambool i, hmas warrnambool j202, hmas swan ii, j202, world war ii, bathurst class corvette, royal australian navy, ran, sydney built ship, bass strait patrol, sea mine patrol, mine sweeper, mine clearance, navy divers, great barrier reef, cockburn reef, southern cross diving and salvage, warrnambool city council, cr j r astbury, mayor j r astbury, warrnambool patriotic fund, seal, coat of arms, dedicatory plaque, hmas warrnambool 1941, shipwreck by sea mine 1947, sinking ship, sunk ship, minesweeper -
 Flagstaff Hill Maritime Museum and Village
Photograph - Vessel, Steam Ship, H.M.A.S. Warrnambool J202, 1941-1947
This photograph is connected to the first HMAS Warrnambool J202, which was commissioned by the Royal Australian Navy for use as a minesweeper during World War II. The Bathurst Class Corvette, fitted out with a range of armaments, was launched in Sydney 1941. The ship began service in Bass Strait in 1941. At the end of the year it called into its namesake city, Warrnambool, where the crew paraded for the public marching eastwards along Timor Street. A gift of books for the ship’s personnel and a plaque bearing the City of Warrnambool’s Coat of Arms were presented to the ship. The ship was involved in evacuating a family of nine from the Dutch East Indies that was later successful in its challenge of Australia’s Immigration Restriction Act (White Australia Polity). The ship had many other appointments around Australia. On 13th September 1947 HMAS Warrnambool was leading a flotilla of minesweepers in northern Queensland’s coastal waters, clearing mines previously laid to defend Australia. The ship hit a mine, which exploded and very quickly sunk the ship. Boats from the nearby ships rescued most of the seamen although one was killed at the time. The survivors were taken by the HMAS Swan II to Darwin, and they went from there to hospitals in Brisbane and Sydney. Three of these men later died from their injuries. A number of items were recovered by Navy divers in 1948 including the ship’s bell and a plaque with Warrnambool’s Coat of Arms. In 1972-75 the wreck was sold and other items were salvaged. In 1995 a memorial plaque was erected in Warrnambool near the RSL. NOTE: The RAN built a second HMAS Warrnambool FCPB204, launched in 1981 and decommissioned in 2005. There was also a steam ship SS Warrnambool built in London 1892 and broken up in 1926. [A more detailed history can be found in our Collection Record 3477.] This photograph is significant for its association with Royal Australian Navy and its vessel, HMAS Warrnambool (j202). The HMAS Warrnambool played a nationally significant role in overturning Australia’s Immigration Restriction Act 1901 (colloquially known as the White Australia policy). The ship rescued, and brought to Australia, Samuel and Annie Jacob and their family after they evacuated Dutch East India. The family was threatened with deportation and made the first successful appeal to High Court regarding that Act. The HMAS Warrnambool has - Local significance for being the namesake of the City of Warrnambool - Local significance, having docked in Warrnambool Harbour - Local significance, the crew having paraded in Timor Street, Warrnambool - State significance for its first patrol being in Bass Strait. - National significance, being present in Timor at the Japanese surrender - National significance as part of Australia’s defence force history, being one of only four Bathurst class corvettes lost while in Australian service, the only Bathurst class corvette lost after World War II, the only RAN vessel to be sunk by a mine, and associated with the last four Navy deaths of WWIIPhotograph, black and white, HMAS Warrnambool J202 in water with land and buildings in background. Ship is flying a dark flag with Union Jack in corner and star below it. Lifeboat suspended above deck in centre of ship. Top of funnel has a black band. flagstaff hill, warrnambool, shipwrecked-coast, flagstaff-hill, flagstaff-hill-maritime-museum, maritime-museum, shipwreck-coast, flagstaff-hill-maritime-village, maritime village, maritime museum, shipwreck coast, mort's dock & engineering co ltd, h.m.a.s. warrnambool, hmas warrnambool, hmas warrnambool i, hmas warrnambool j202, hmas swan ii, j202, world war ii, bathurst class corvette, royal australian navy, ran, sydney built ship, bass strait patrol, sea mine patrol, mine sweeper, mine clearance, navy divers, great barrier reef, cockburn reef, southern cross diving and salvage, warrnambool city council, cr j r astbury, mayor j r astbury, warrnambool patriotic fund, seal, coat of arms, ship’s bell, hmas warrnambool 1941, shipwreck by sea mine 1947, sinking ship, sunk ship, sea rescue, life saving, lifesaving, minesweeper -
 Ringwood and District Historical Society
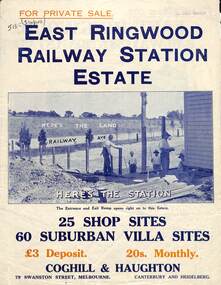
Flyer, Land Sale Brochure, East Ringwood Station Estate - c.1925
Multi-fold double sided sheet with yellow and blue print and blue monotone photographs advertising private sale of retail and residential sites. Brochure includes price list, and details of subdivision features and local facilities, with photographs. Additional clipped map of Estate on cardboard backing with handwritten sales notations and title ref LP11245.Subdivision includes Railway Avenue, Dublin Road, Lawrence Grove, Stanley Avenue. Agents - Coghill & Haughton, 79 Swanston Street, Melbourne, Phone Central 2793. Photographs include construction of East Ringwood Railway Station, "The Dive" where aquatic sports are held, Old East Ringwood Township, Davey's Hill. -
 Flagstaff Hill Maritime Museum and Village
Letter - William Ferrier, 14th November 1905
The letter to William Ferrier of South Warrnambool from the Prime Minister and the Parliament of the Commonwealth recognised the significance of William’s brave and courageous lifesaving act to the people of Australia; “They all feel that your conduct was worthy of the best deeds done by British sailors in the past and they are proud to know that Australia can produce such as you.” The story of that brave rescue follows on below … The ship from which the sailors were rescued was the three-masted, iron and steel barquentine the La Bella, built in Norway in 1893. She was one of two iron and steel ships by Johan Smith, The company was one of the leading shipping families in Tvedestrand, Norway. She was significant to Norwegian shipping, being one of only 27 iron and steel ships ever built in Norway. She was registered in New Zealand and engaged from 1902 in inter-colonial trading of timber in the Pacific, between New Zealand and Australia and was often in Port Phillip Bay, Victoria. On 5th October 1905, the twelve-year-old La Bella left Lyttleton, New Zealand carrying a cargo of timber bound for Warrnambool, Australia. She was manned by a crew of twelve: the Master, (Captain Mylius, previously 1st Mate of La Bella, appointed Captain to La Bella on 6th February 1903) 2 Mates, Cook, six able seamen, one ordinary seaman and a boy. Bad weather en route caused her to shelter at Burnie on Tasmania's North West coast. On November 10th, the 37th day of her journey, La Bella approached Warrnambool. Captain Mylius steered her towards Lady Bay Channel in heavy south-west seas and evening mist. He ordered the helmsman to steer for the light. As the ship came round, a tremendous sea struck her on the port quarter, causing her to breach broadside in a north-westerly direction into breakers. The helm was brought round twice more, but each time heavy seas broke over her, the third time throwing the La Bella on to a submerged reef in Lady Bay now known as La Bella Reef (about 100 yards from the Warrnambool breakwater). The sea was so rough that it even wrenched a one-and-a-half ton anchor from its fastenings and into the sea. As Captain Mylius headed to the steel wheelhouse, intending to send up a rocket flare, a huge sea slammed the steel door into him (resulting in massive bruising front and back) Despite his injuries he still managed to set off a blue light, which he held up in his hands. La Bella’s lifeboats were filled with seawater and broke up on their chocks. The blue light was the first indication to people on the shore that there was a ship in distress. The Harbour Master, Captain Roe (who lived in the Harbour Master’s House opposite Flagstaff Hill), organised a group of volunteers to crew the lifeboat because the trained crew was unavailable; the crewmen were working on a steamer in Port Fairy at the time. He then poured oil onto the water to try and smooth the sea. At around 11 pm three of the crew took shelter in the steel forecastle but the sea crashed into it and broke it up. While the rest of the crew and onlookers watched helplessly in the moonlight the bodies were washed away into the sea, never to be seen again. Some of the crew lashed themselves to the weather rail to keep from being washed away. Watson, the ordinary seaman, became tangled in the rigging lines and was too weak to move, so the 2nd Mate, Robertson, put a line onto him so that he wouldn’t wash off. Around 11 pm three of the crew were unconscious from exhaustion. The situation on La Bella was becoming dangerous. The 2nd Mate moved to the ‘house’ and soon afterwards the ship slipped in the heavy sea. The lashings of the 1st Mate and the ‘boy’ Denham had kept them safe until about 2 am when they were washed overboard; no one was able to help. One by one, the exhausted crew were being washed overboard, too weak to hold on any longer. During the night the La Bella had broken into two and the deckhouse ran out towards the sea. Two more men drowned when trying to reach the lifeboat. By sunrise, the only survivors of the twelve were the Master, 2nd Mate and three seamen. Early in the morning, Captain Roe used the rocket apparatus on shore to try and shoot a line to the ship for a safer rescue but each attempt fell short of the target. Several attempts were made by the lifeboat to rescue the stricken sailors, but the rough conditions made this difficult for the boat to get close enough to the ship and the lifeboat had to return to shore. During a final attempt to reach the ship Captain Mylius ordered his men to jump into the sea. Leonard Robertson, 2nd mate, jumped and swam towards the lifeboat, taking hold of the boat hook offered to him. Oscar Rosenholme managed to reach the boat floating on a piece of timber from the ship’s load and a third survivor, Noake, also made the boat. Along with the lifeboat rescue crew, 25-year-old William Ferrier rowed his small dingy through the heavy seas and managed to rescue the Captain, whom he landed on the breakwater. Ferrier then returned to the ship to attempt a final rescue, losing his oars and rowlocks into the high sea. Using just a spare paddle he skulled towards the La Bella, reaching her stern in time to cut loose the lone surviving sailor, Payne, from the lashing that held him to the ship; the terrified sailor dropped from the ship and into the dingy. Shortly after the last man was rescued, the La Bella was lifted by a huge wave and crashed back down on the reef; she broke up and sank. The ordeal had lasted ten hours. The survivors were taken to the nearby Bay View Hotel and gratefully received warm food and clothing, medical attention and a place to sleep. In the following days, an unidentified body of a young person has washed ashore; it was either Watson or Denham. The body was buried in the Warrnambool cemetery with an appropriate gravestone and inscription. William Ferrier became a national hero as news of the daring rescue spread. In recognition of his bravery in the two daring rescues, he was awarded the Silver Medal for Bravery by the Royal Humane Society and was honoured in the letter from the Prime Minister and the Parliament of the Commonwealth, telegrams and a cheque for £20 from the Governor-General, over £150 subscribed by the public, including Warrnambool and district and readers of The Argus, and a gold medal from the Glenelg Dinghy Club of South Australia. Ferrier’s rescue efforts are one of the most heroic in Victoria’s shipwreck history. (William Ferrier’s son, Frank, received a similar award almost fifty years later when he helped rescue four members of the crew on the yacht Merlan after it ran on to a reef near the Point Lonsdale Lighthouse. ) The wreck of La Bella now lies on her port side in 13 metres of sheltered water inside the reef she struck. The bow section is relatively intact and part of the stern has drifted north-easterly towards the mouth of the Hopkins River. The reef the La Bella struck now bears its name. Those five rescued from the La Bella were Captain George Mylius, Leonard Robertson (2nd Mate, 21 years old), R. Payne, Oscar Rosenholme and Jack Noake. Those seven who lost their lives were Mr Coulson (1st mate), Charles Jackman (cook) Gustave Johnson, Pierre Johann and Robert Gent (all able seamen), Harry Watson (ordinary seaman) and Jack Denham (ship’s boy), Captain Mylius was found guilty of careless navigation; he had sailed into the bay without the services of a pilot. His Master Certificate was suspended for twelve months. Later he was also charged with the manslaughter of one of the crew who had died when the La Bella was wrecked but found not guilty. The event’s adverse publicity and damage to his career took a toll on his health and he died of a heart attack six months after the wreck; he was only thirty-seven. His body was buried in the Melbourne General Cemetery. The La Bella was “the best documented of all sailing ships owned in New Zealand”. Her record books, ship logs, correspondence and supporting papers are still available. At the time of the tragedy, she was owned by Messers David C.Turnbull and Co. of Timaru, New Zealand timber merchants and shipping agents, who had purchased her on 13th December 1901. A detailed account of the last journey of La Bella can be read in “Leonard Robertson, the Whangaroa & La Bella” written by Jack Churchouse, published in 1982 by Millwood Press Ltd, Wellington, NZ. As well as this letter, Flagstaff Hill’s La Bella Collection includes a photograph of the wrecked La Bella, a brass rail holder and a postcard of William Ferrier with four of the survivors. Some 15 – 17 ships are believed to have sunk in Lady Bay, but only two have been discovered on the seafloor; the “La Bella” and the “Edinburgh Castle”. Both wrecks are popular diving sites and are preserved as significant historical marine and marine archaeological sites. This original congratulatory letter sent to William Ferrier by the Prime Minister and Government of Australia demonstrates the importance attached to his efforts for Victoria and to Australia. The letter is part of the La Bella Collection and is significant at both a local and state level. Its connection to the La Bella shipwreck and the rescue of five survivors highlights the dangers of Victoria’s Shipwreck Coast. The letter to William Ferrier from the Australian Government acknowledges the bravery of ordinary Australians who risked their lives to save victims of shipwrecks along the coast. The letter is significant to the history of Warrnambool as it honours William Ferrier, a local fisherman whose descendants continue to live in the area. It highlights the way of life of people who lived in coastal towns in 19th century Victoria and the effects of shipwrecks upon them. The letter connects to the postcard of William Ferrier with four of the five rescued crew, the photograph of the wreck of the La Bella and the artefact from the wreck, the rail holder. This letter is significant because of its association with the sailing ship “La Bella”. The “La Bella” is of local and state and national significance. It is one of the only two shipwrecks discovered in Lady Bay, Warrnambool, out of the 15-17 shipwrecks in the bay. Letter to William Ferrier of South Warrnambool from the Prime Minister and Members of Parliament commending him on his bravery. The printed letterhead includes a coat of arms in the top centre and the official address. The letter is very neatly hand written in black pen and includes 4 signatures of Members of Parliament. The rectangular paper is cream coloured with some yellow/brown discolouring. It has the letterhead on the right hand side of it and the written letter begins below the letterhead. The paper has been folded so that the right side becomes the cover page of the letter. The writing is continued onto the inside right hand page of the folded paper and the writing ends here. There is more recent writing on the bottom right hand corner of the back page. The paper has been officially folded in half a total 3 times and there is heavy discolouration on the sections that form the front and back of the folded letter. There is a 4th fold line that is less pronounced that the other folds and would make the paper the size to fit into a pocket. At several fold creases the paper has worn through. The edges of the paper have minor tears. The printed coat of arms is that of the House of Representatives. Underneath is printed “The Parliament of the Commonwealth, / Parliament House / Melbourne”. The hand written, letter is dated “14th November, 1905” and addressed to “Mr. William Ferrier / South Warrnambool” The letter begins “The Speaker, the Prime Minister and Members of the Ministry and its supporters, the Leader and Members of the Opposition, the Leader and Members of the Labour Party, being all the Members of the House of Representatives of the Federal Parliament of Australia” … It continues “desire to express to you their appreciation of your bravery in skulling out to the wreck of the “La Bella” at Warrnambool on Saturday, 11th November, 1905, and recovering therefrom two of the crew who were in imminent danger of their lives. They all feel that your conduct was worthy of the best deeds done by British sailors in the past and they are proud to know that Australia can produce such as you.” The letter is “Signed on behalf of the Members – Speaker (Frederick Holder ), Deputy Leader of the Opposition (Joseph Cook ), Prime Minister (Alfred Deakin), Leader of the Labour Party ( J.C. Watson)” On the back of the letter is blue ink handwriting “OWNER / G. FERRIER / TO. BE. PHOTOGRAPHED / 27-4-76”la bella, william ferrier, bill ferrier, lady bay, 1905, 10th november 1905, 11th november 1905, parliament of the commonwealth, prime minister, australian government, new zealand, flagstaff hill, warrnambool, shipwrecked coast, flagstaff hill maritime museum, maritime museum, shipwreck coast, flagstaff hill maritime village -
 Lakes Entrance Historical Society
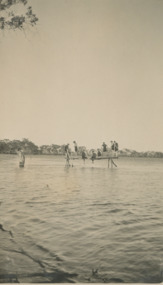
Photograph, Gippsland Lakes Swimming, 1925
Black and white photograph showing eight people in swimming costume on a rustic diving platform in a waterway in the Gippsland Lakes tourism, gippsland lakes, social history, fashion -
 Lakes Entrance Historical Society
Photograph - Dive Club, Lakes Post Newspaper, 1994
... Photograph Dive Club Lakes Post Newspaper ...Event occurred Saturday, children received free entry while $5 entry fee from adults went toward Aquatic CentreBlack and white photograph group of people old and young members of the Dive Club standing in foreshore waters participants in Treasure Hunt in Cunninghame Arm fundraising event for Aquatic Centre. Lakes Entrance Victoriarecreational facilities, fundraising -
 Lakes Entrance Historical Society
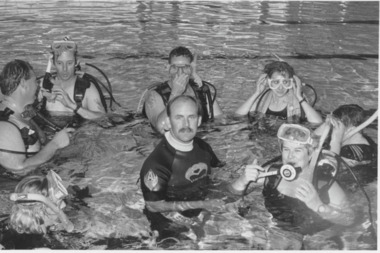
Photograph - Diving, Lakes Post Newspaper, 1996
... in the pool. Lakes Entrance Victoria Photograph Diving Lakes Post ...number in album 03532.01Black and white photograph at Aquadome Expo for older adults showing diver Rob Timmins instructing seven learner divers in the pool. Lakes Entrance Victoriarecreational facilities, training