Showing 232 items
matching railway terminus
-
 Ballarat Tramway Museum
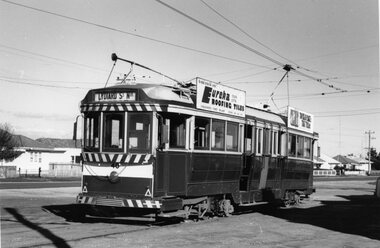
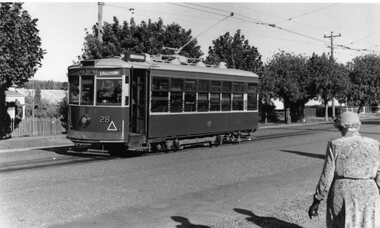
Photograph - Black & White Photograph/s, Doug Colquhoun, Ballarat 40 at the Sebastopol terminus, 15/05/1971 12:00:00 AM
Yields information about Ballarat tram 40 and the Sebastopol terminus.Black and white print of Ballarat 40 at the Sebastopol terminus. Two copies. Photo by Doug Colquhoun, 17/5/1971. Trams has the destination of Lydiard St Nth and roof advertisements for Eureka Tiles and Bliss Bombs (To read pack: Tilt Tram"). Also has the houses in the background and shows the overhead arrangements. Photo print courtesy of Port Dock Railway Museum, now the National Railway Museum. See worksheet 4311 for letter and details of prints sent to Bill Scott, 19/10/2001. Any photo credit to mention NRM Collection.On rear of copy 1 "SEC Ballarat / 40 / Sebastopol terminus / 17/5/71 4179 / D.A. Colquhoun" . Copy 2 "Douglas Colquhoun / 5.1971 National Rly Museum" in ink, bottom right hand corner and in the top left hand corner in ink "Car 40 SEC Tramways Ballarat Vic 3350"trams, tramways, sebastopol, tram 37 -
 Ballarat Tramway Museum
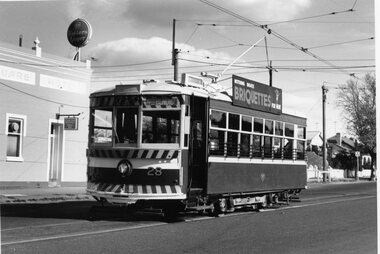
Photograph - Black & White Photograph/s, Doug Colquhoun, 16/05/1971 12:00:00 AM
Yields information about Bendigo's trams in the early 1970's and the Eaglehawk terminus.Black and white print of Bendigo 28 at the Golden Square terminus. Two copies. Photo by Doug Colquhoun, 16/5/1971. Trams has the destination of Nth Bendigo and roof advertisements for Briquettes. Also has the Golden Square hotel in the background. Photo print courtesy of Port Dock Railway Museum, now the National Railway Museum. See worksheet 4311 for letter and details of prints sent to Bill Scott, 19/10/2001. Any photo credit to mention NRM Collection.On rear of copy 1 "SEC Bendigo / 28 /Golden Square / 16/5/71 4187 / D.A. Colquhoun" . Copy 2 "DAC" in ink, bottom right hand corner.trams, tramways, golden square, tram 28 -
 Ballarat Tramway Museum
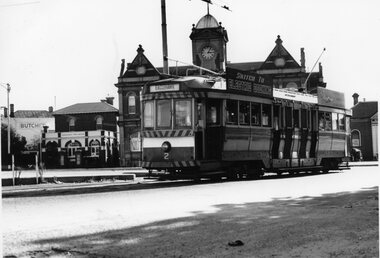
Photograph - Black & White Photograph/s, Doug Colquhoun, 16/05/1971 12:00:00 AM
Yields information about Ballarat's trams during the late 1950's and the Kenney Murray offices.Black and white print of Bendigo 2 at the Eaglehawk terminus. Two copies. Photo by Doug Colquhoun, 16/5/1971. Trams has the destination of Eaglehawk and two roof advertisements for Electric cooking. Also has the Eaglehawk Town Hall, Eaglehawk Post Office in the background. Photo print courtesy of Port Dock Railway Museum, now the National Railway Museum. See worksheet 4311 for letter and details of prints sent to Bill Scott, 19/10/2001. Any photo credit to mention NRM Collection.On rear of copy 1 "SEC Bendigo / 2 /Eaglehawk / 16/5/71 4203 / D.A. Colquhoun" . Copy 2 "DAC" in ink, bottom right hand corner.trams, tramways, eaglehawk, tram 2 -
 Ballarat Tramway Museum
Photograph - Black & White Photograph/s, Doug Colquhoun, 24/05/1959 12:00:00 AM
Yields information about Bendigo Trust's trams in the late 1970's and the depot.Black and white print of Ballarat 39 at the Gardens Loop terminus. Two copies. Photo by Doug Colquhoun, 24/3/1959. In the background are the Trees of the Gardens, and the tram stop. Photo print courtesy of Port Dock Railway Museum, now the National Railway Museum. See worksheet 4311 for letter and details of prints sent to Bill Scott, 19/10/2001. Any photo credit to mention NRM Collection.On rear of copy 1 "SEC Ballarat / 39/ Lake Wendouree / 24/3/59 5536 / D.A. Colquhoun" . Copy 2 "DAC" in ink, bottom right hand corner.trams, tramways, wendouree parade, gardens loop, tram 39 -
 Ballarat Tramway Museum
Photograph - Black & White Photograph/s, Wal Jack, 12/04/1959 12:00:00 AM
Yields information about Ballarat's trams, and the City centre area and motor vehicles late 1950's.Black and white print of Bendigo 28 at the Quarry Hill terminus, 12/4/1959, photo by Wal Jack. Has a lady walking across to the tram - dressed in gloves and hat. Tram has the destination of Eaglehawk. Photo print courtesy of Port Dock Railway Museum, now the National Railway Museum. See worksheet 4311 for letter and details of prints sent to Bill Scott, 19/10/2001. Any photo credit to mention NRM Collection.On rear of copy "SEC Bendigo #28 / Quarry Hill terminus / 12/4/59 / Wal Jack photo / National Railway Museum.trams, tramways, bendigo, quarry hill, tram 28 -
 Ballarat Tramway Museum
Slide - 35mm slide/s - set of 10, Campbell Duncan, Jan. 1971
Set of 10 Ferraniacolor slides - cardboard mounts taken on either 10/1/71 or 16/1/71. .1 - Birney No. 30, Golden Square line, inbound near Cathedral with car yard in background. .2 - ditto, with Cathedral gardens in background. .3 - single trucker, with two SEC roof adverts, entering Nolan St enroute to North Bendigo. Shows the driver sitting in a side on shot. A 4 square store in the background, with a fading advert for "Peeled Tomatoes". .4 - No. 6 turning from Nolan St into McCrae St with 4 square store in background. .5 - No. 26 at Quarry Hill with cemetery in background. .6 - No. 6 at the North Bendigo Terminus .7 - No. 26 outbound to Eaglehawk on the Railway Overbridge, Mt Korong Road. .8 - No. 17 (inbound to City and Quarry Hill) and another bogie crossing at a loop on the Eaglehawk line. Both trams have SEC roof adverts. The driver of the outbound car is boarding the tram. Based on .9, it is No. 3 at Long Gully. .9 - No. 3 waiting at Long Gully Loop . .10 - No. 26 at Quarry Hill terminus, with destination of Eaglehawk.In ink on slide: .1 - "1/2 mile out on Golden Square line - 10/1/71 (Sun)." .2 - "1/2 mile out on Golden Square line - 10/1/71" .3 - "Has just rounded curve near lake Weeroona on North Bendigo line - 10/1/71 (Sun)." .4 - "16/1/71" .5 - " 10/1/71 (Sun)." .6 - "North Bendigo terminus, 16/1/71 (Sat)" .7 - "10/1/71 (Sun) c 3pm" .8 - "Cross Eaglehawk line - 10/1/71 (Sun)." .9 - "Jackson St Loop on E'Hk line awaiting up - 10/1/71 " .10 - "Quarry Hill terminus Bendigo - - 10/1/71"tramways, trams, bendigo, golden square, high st, nolan st, north bendigo, quarry hill, long gully, railway bridge, tram 30, tram 6, tram 26, tram 17, tram 3 -
 Ballarat Tramway Museum
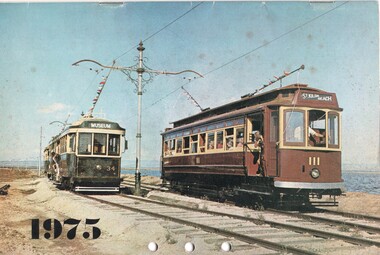
Document - Calendar, Sydney Tramway Museum, 1974
Calendar 1975 - 28 pages - black and white photos except for the front cover. Produced by the Sydney Tramway Museum. Features photographs of various Australasian Tramway Systems: Ballarat 34 and Adelaide 111 at the St Kilda Tramway Museum Dunedin 61 Ballarat 37 at the City terminus Bulimba Power Station electric locomotive Newcastle 383 Darling St Balmain Perth Trolley Bus 21 Perth 55 Melbourne Tait train Launceston 26 Sydney Suburban train Adelaide 365 Brisbane 293 VR 28 Geelong 14 - at Eastern Park Sydney tramway museum tramways, trams, ballarat, adelaide, newcastle, sydney, dunedin tramways, brisbane, perth, trolley buses, melbourne, launceston, victorian railways, geelong, tram 14, tram 37, tram 34 -
 Ballarat Tramway Museum
Photograph - Black and White photograph/s - mounted, c1914
Yields information about trams used, services and buildings in Sturt St near Grenville St in the ESCo era c1914.Black and White photograph mounted on heavy cardboard backing. Photo of Ballarat ESCo trams near the Grenville City terminus - two trams, left hand one has a advertisement for Viceroy tea on the front dash panel. Companies in image are: Mechanics Institute Library, C. Marks, A. E. White, Indian Depot, Peakes and Gas Co. Has the Mechanics Institute building, Town Hall building on both sides of Sturt St. Some early motor vehicles - c1914? From a Railway Photograph? Has marks from old support tape on rear. Note image scanned in two runs through a scanner, resulting in the shading in the image file.trams, tramways, sturt st, town hall, grenville st, esco -
 Ballarat Tramway Museum
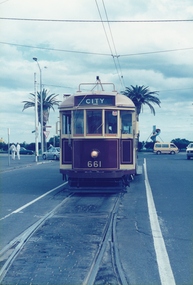
Photograph - Colour Photograph/s - set of 13, Lloyd Rogers, 30/04/1989 12:00:00 AM
Yields information about the appearance of the operation of BTPS tram No. 661 in Melbourne on a tour.Set of 13 colour prints of BTPS / BTM tram No. 661 in Melbourne on a BTPS tour 30-4-1989. All photos by Lloyd Rogers, on AGFA paper. All have a photo number on rear and captions - see images 14 to 19. .1 - At Sth Melbourne Beach terminus. .2 - MMTB Paying fares dated Dec. 1968 in four languages inside tram. .3 - 661 and 878 at Brunswick Depot .4 - Y612 partly derailed at Brunswick .5 - 661, 8789 and 612 at Brunswick .6 - 661 at Batman Avenue .7 - Batman Avenue .8 - from the window looking forwards - reserved track. .9 - at South Melbourne Beach terminus with Bleak House in the background and an Advert for Swan Premium beer. .10 - ditto with Vopas Centre building in the background and an advert advertising Volvo motor cars - Swedish Lifesavers. .11 - ditto .12 - interior view of tram .13 - At Batman Ave with the shop on the railway side in the view.See images i14 to i19 for rear of photos.trams, tramways, melbourne, batman ave, brunswick depot, south melbourne beach, tram 661, tram 612, tram 878 -
 Ballarat Tramway Museum
Photograph - Digital image, Wal Jack, Mar. 1954
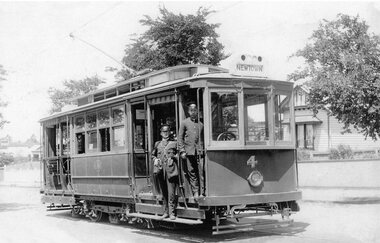
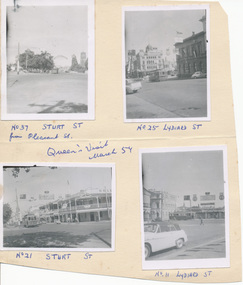
Yields information on the decorations and tramcars and street scenes at the time of the Queens visit to Ballarat.Digital image from the Wal Jack Ballarat Album of a series of four small black and white photographs taken during the Queen Elizabeth II visit to Ballarat, March 1954. Captions under each photograph in ink. 1 - No. 37 at Pleasant St, looking east along Sturt St. - see Neg 993 2 - No. 25 at Lydiard St with the National Mutual Building in the background - see Neg 991. 3 - No. 21 - Sturt St at Dawson St with Golden City Hotel in the background - see Neg 992 4 - No. 17 Lydiard St taken from the railway station car park - see also Reg Item 5300 for a better photograph and Wal's notes on rear which says No. 17, not 11 - see Neg 994 All photographs include some of the decorations for the Royal Visit. Photographer - not stated, but sheet in Wal's handwriting. May not be Wal Jack based on the negative size, smaller than 120 which Wal used at the time. See image i2 for rear of photograph. See image i3 for hi res scan of print. See image i4 for hi res scan of negative N993 See image i5 for hi res scan of negative N994 See image i6 for hi res scan of negative N995 See image i7 for hi res scan of negative N996 On rear of the Manila sheet which has been cut from another sheet are "No. 11 Victoria St terminus 25-6-57".trams, tramways, royal visit, lydiard st, pleasant st, sturt st, tram 37, tram 25, tram 21, tram 17 -
 Ballarat Tramway Museum
Slide - 35mm slide/s - set of 20, Eldon Hogan, 22/05/1971 12:00:00 AM
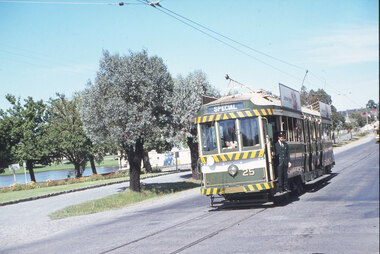
Set of 20 35mm Agfa colour blue and white plastic mount slide - featuring photos taken during an Association of Railway Enthusiasts Tour by Eldon Hogan. Folder had the date "22/5/1971" on it. Scanned on the Canon scanner at the depot 15/12/2005 at the time of the installation of the scanner. .1 - No. 25 in Nolan St with Lake Weeroona in the background. .2 - Three Birneys at the Depot junction, 30 and 29 with Conoles Hotel, McCrae St in the background. .3 - No. 5 in front of the Shamrock Hotel, Pall Mall .4 - No. 29 in front of the Shamrock Hotel with Stonemasons sign in the background. .5 - No. 18 ditto .6 - No. 30 and another Birney at the Quarry Hill terminus .7 - No. 24 southbound High St at the Violet St intersection with a "Mine Open" sign in the foreground and the Cathedral in the background. .8 - No. 19 at the Golden Square terminus, with the Golden Square Hotel in the background. .9 - No. 29 - side on view, North Bendigo line? Thunder St? .10 - No. 30 crossing the railway overbridge, inbound from Eaglehawk with a number of photographers in the foreground. .11 - No. 29? ditto .12 - No. 5 outbound - side on view, Thunder St, North Bendigo line? .13 - No. 29 and 30 at the intersection of High St and Brazier St with Church or School hall in the background. .14 - ditto .15 - ditto .16 - No. 25 and the two Birneys at the Eaglehawk terminus. .17 - No. 29 and two other trams at ditto .18 - No. 30 and 19 adjacent to the Lake View Hotel, McCrae St .19 - No. 5 and 25 crossing on the Eaglehawk Line, Ironbark? .20 - No. 29 at Quarry Hilltramways, trams, bendigo, lake weeroona, pall mall, golden square, eaglehawk, quarry hill, tram 25, tram 30, tram 29, tram 5, tram 18, tram 19, tram 24, tram 25 -
 Ballarat Tramway Museum
Slide - 35mm slide/s - set of 11, Eldon Hogan, mid 1960's to early 1970's
Set of 11 Agfa Plastic mounted slides - from the Eldon Hogan collection - possibly on an ARE Bendigo tours late 1960's or early 1970's with No. 18 Scanned on the Canon scanner at the depot 15/12/1971 at the time of the installation of the scanner. .1 - No 18 at Golden Square terminus with Billy Rodda's Golden Square Hotel in the background. .2 - ditto and the Victoria Bitter fence alongside the hotel. .3 - ditto and another single trucker. .4 - No. 18 at the Fire Station Loop, Golden Square line, with destination of Railway Station. .5 - No. 18 passing the Central Deborah mine, Violet St. Tram has a Briquette advertisement on the roof - the flaming briquettes. .6 - Another bogie tram at ditto. .7 - No. 18 and No. 6 crossing McCrae St loop near the depot junction? .8 - ditto .9 - No. 18 and a single trucker at the North Bendigo terminus. .10 - ditto .11 - with the single trucker leaving.tramways, trams, bendigo, golden square, central deborah, north bendigo, mccrae st, tram 18, tram 6 -
 Ballarat Tramway Museum
Slide - 35mm slide/s - set of 11, Eldon Hogan, mid 1960's to early 1970's
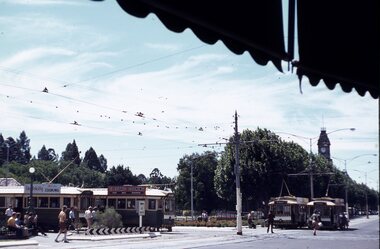
Set of 11 Agfa Plastic mounted slides - from the Eldon Hogan collection - featuring an ARE tour with Nos. 21, 29 and 25 to Bendigo, mid 1960's. Scanned on the Canon scanner at the depot 15/12/1971 at the time of the installation of the scanner. .1 - four trams at Charing Cross - includes 19 and 25. .2 - 21 and 25 at the depot junction. .3 - 21 and 29 Quarry Hill route? .4 - 29 ditto .5 - 24 at Golden Square terminus - photo taken from the city side - note all the little shops and buildings on the left hand side of the photograph. .6 - 29, 21 and 25 at Eaglehawk .7 - 29 - side on view - Eaglehawk line? .8 - ditto with 21 .9 - 29 - North Bendigo line? - side on view .10 - 29 and 21 - vacant paddocks - Eaglehawk line .11 - 29 crossing the railway overbridge, Eaglehawk line, in bound. Trams have SEC roof advertisements. tramways, trams, bendigo, eaglehawk, charing cross, golden square, tram 21, tram 29, tram 25, tram 19 -
 Ballarat Tramway Museum
Album - Photo Album, c1970
Set of 16 photos of Ballarat tram system taken 1970c on a tour by an unknown Qld based person.Photo album containing 16 colour prints. Photo album has heavy card covers, covered in black textured plastic containing 12 clear plastic photo sleeves held with a white comb binder. Photos of Ballarat prior to closure, c1970. Photographer unknown. Donated by Peter Hyde of Brisbane Tramway Museum to BTM 3/2/2010, from a deceased estate. Photos apparently taken on a tram tour. .1 - No. 42 and a single trucker inbound in Sturt St. .2 - taken from tram ascending Bakery St hill in Victoria St. .3 - End of No. 42, with the destination "Haddon St via Drummond Nth" .4 - No. 11 and 42 in Lydiard St Nth, near the railway station. No. 11 showing special. .5 - photo of three people on the tour. .6 - Trams reversing at the Victoria St terminus .7 - ditto .8 - 11, 42 and 12? in Lydiard St North by railway station. .9 - Three trams at Sebastopol terminus. .10 - View in Albert St Sebastopol looking north along the track on the side of the road. .11 - View of the tram crossing in Albert St. .12 - 27 and 42 crossing Albert St Sebastopol. .13 - View of Albert St from the tram, north of the crossing looking at the reserved track 14. - Lydiard St North looking south .15 - 42 at the railway level crossing. .16 - View south of the railway level crossing, three trams, with passengers alighting.trams, tramways, ballarat, albert st, sebastopol, victoria st, sturt st, lydiard st nth, railway crossing -
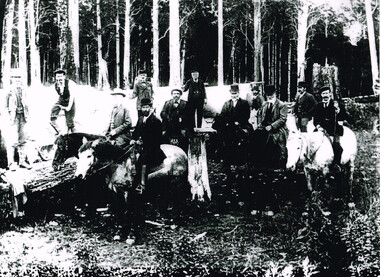 Otway Districts Historical Society
Photograph, Railway Survey Camp, Beech Forest, 4 Apr 1897, 4 April 1897
On the 18th August, 1896, the question of selecting localities for the permanent survey of a narrow-gauge line to Beech Forest from Colac was mooted. Two potential lines were examined. In a memorandum to the Minister for Railways, dated 23rd March, 1897, the Engineer-in-Chief recommended that the eastern and longer route via Lardner's Track be adopted. The second route, while identical from Colac to Gellibrand River, differed. By a more direct route the Beech Forest terminus is reached 5 miles sooner and cost approximately L24,500 less. The direct line would also serve a larger lot of settlers and would obtain a larger lot of traffic than the alternate proposal. The Parlimentary Standing Committee on Railways examined the proposal in situ and recommended that the direct route from Gellibrand to Beech Forest should be adopted and the Lardner's Track route should be abandoned at once.Photograph, Railway Survey Camp, 4 April 1897. Inspection of alternative routes by Parliamentary Committee on Railways.People named in the photograph.beech forest; railway; survey; victorian parliament; calcutt; fraser; e.h. cameron; d. mciville; a. harris; n. mcinnes; j.s. white; j. wood; t. baker; j. gardner; t.g. watson; standing committee; -
 Otway Districts Historical Society
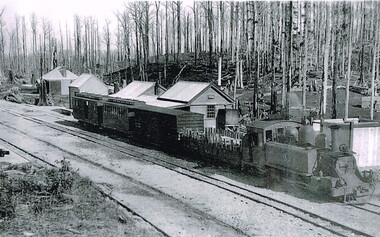
Photograph, Crowes Station, 1912, 1912
... , a goods shed and a toilet at a three-line terminus. Crowes ...Locomotive 8A, two freight cars, a passenger car and a guard's van leave Crowes Station for Beech Forest. Crowes Station consists of a two-layered station building, a goods shed and a toilet at a three-line terminus.Crowes Station soon after opening in 1912 with Locomotive 8A about to depart for Beech Forest and Colac.crowes; station; railway; locomotive; -
 Otway Districts Historical Society
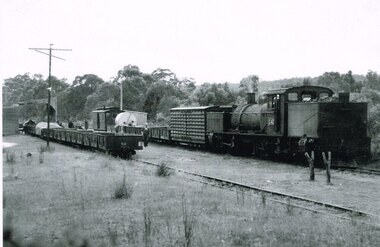
Photograph, R. Preston, Kawarren: Down goods with G42 shunting, 1955, 14 December 1955
Originally known as Loves River it became Kawarren station on 16 June 1902. It consisted of a loop siding and combined office and passenger shelter. Goods loading was sawn timber (brought in on four tramways operating between 1905 and 1939), firewood, charcoal and limestone. In 1920 the limestone company built a store shed and a covered loading area at the terminus to assist operations. The company also requested the siding to be extended by three metres, which Victorian Railways did in the same year. This gave the loop a capacity of 21 trucks. Around 2,000 tonnes per year of limestone traffic kept the station busy until trade ceased in 1957. A postal motor started in October 1938, Kawarren being a point where the postal motor and trains were permitted to cross.B/W. G42 with a Down goods train at Kawarren on 14 December 1955. On No.2 Road empty NQR wagons proceeding to get filled at a covered lime loading operation. A three workmen are checking aspects of the train while a group appear to be clustered at the guard's van around an NKS motor trolley.kawarren; railways; limestone; timber; charcoal; -
 Otway Districts Historical Society
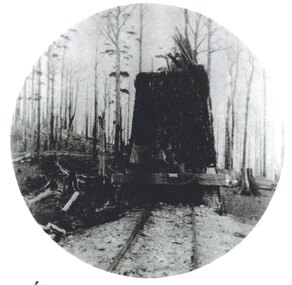
Photograph, Crowes: Terminus of the railway line, 1911
... Crowes: Terminus of the railway line....The terminus of the railway, and the southern-most station... Forest great-ocean-road The terminus of the railway ...The terminus of the railway, and the southern-most station on the Australian mainland, was Crowes, approximately 2 kilometres from Lavers Hill. The line ended at "The Black Stump". Crowes was designed as a fully functioning terminus and received a complete instalment of facilities. The site was laid out with three roads plus a dead end siding for a locomotive shed and ash pit. Goods sheds, a platform and livestock ramps catered for freight loadings, while on the north side was a station office, waiting room, parcels shed and passenger shelter. Three departmental residences were also provided. The resident Station Master was withdrawn in November 1916 and the station closed with the line on 10 December 1954.Photograph. Terminus of the Colac-Crowes at Crowes.crowes; terminus; "the black stump"; -
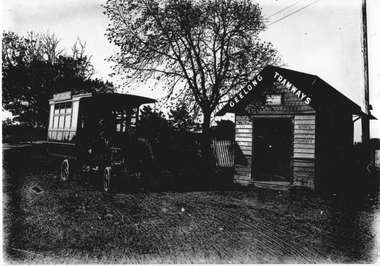 Ballarat Tramway Museum
Photograph - Geelong MESCo Bus East Geelong, c1920
The photo shows the Melbourne Electric Supply Co. (MESCo), bus at the East Geelong terminus. MESCo operated the Geelong tram system from 1912 and opened the tram line to this location "East Geelong" in 1923. The terminus was at the Geelong Cemetery, with a wooden waiting room shelter with signage about the building being used for passengers only and prohibiting the posting of bills. The buses ran from the railway station and Moorabool St wharf from 1912 until they were replaced by trams in 1923. The bus is also seen in item 4315. Yields information about the operation of a bus by MESCo in Geelong.Black and white photograph - plain back.geelong, tramways, mesco, buses, east geelong, shelters -
 Bayside Gallery - Bayside City Council Art & Heritage Collection
Photograph - gelatin silver photograph, Official Opening, St Kilda - Brighton Electric Street Railway, 1906
In 1904, at the initiative of Premier Thomas Bent, Victorian Railways was authorised to build an electric street railway from St Kilda to Brighton. The line opened in early 1906 and was one of Melbourne's first electric tram services. On Saturday 5 May, 1906, Premier Thomas Bent performed the opening ceremony of the St Kilda to Brighton electric tramway at the Brighton Terminus, presided over by Cr. Thomas Wilson, Mayor of Brighton, with refreshments following at the Brighton Yacht Club. About 60 representatives were in attendance including the Railway Commissioners and the mayor and councillors of St Kilda, Brighton and Caulfield. The newspapers of the day commented that the cars were the best yet seen in Australia, possessing a great advantage over the Sydney trams, in that they are easily entered, and the glass windbreak was another improvement in design. The tramway from St Kilda to Brighton terminus took 18 minutes, including stops. thomas bent, premier, cr. thomas wilson, mayor, electric railway, electric tram, st kilda, brighton, official opening, public transport -
 Ballarat Tramway Museum
Slide - 27 mm sq slide/s - set of 3, Andrew Howlett, Lydiard St North level crossing, March 1969?
Yields information about the Lydiard St Nth line, the level crossing and the terminus.Set of three Colour slides, Kodak white cardboard mount, developed Mar 1969 of No. 37 .1 - while running a special crossing at the Lydiard St North level crossing at the Railway Station. Has the Reid's Coffee Palace and Railway Station in the background. .2 - No. 37 and a single trucker carrying a "Trotting at Bray Raceway" auxiliary board, at the Lydiard St North terminus. Has the shelter on the right-hand side. .3 - No. 37 waiting at the terminus. See Reg Items 7675, 7678, 7681, 7684, 7686, 7705 and 7713.ballarat, tramways, trams, lydiard st nth, railway station, shelters, level crossings, tram 37 -
 Ballarat Tramway Museum
Negative, Wal Jack, 6/01/1963 12:00:00 AM
... terminus with the railway level crossing in the background. Tram... at the North Bendigo terminus with the railway level crossing ...Negative and Digital images of the Wal Jack Bendigo Negative file of Bendigo Birney No. 29 at the North Bendigo terminus with the railway level crossing in the background. Tram has the destination of Golden Square and a Briquettes roof advertisement. Based on the cars in the photo and Reg Item 452, date could be 6-1-1963trams, tramways, bendigo, north bendigo, level crossings, tram 29 -
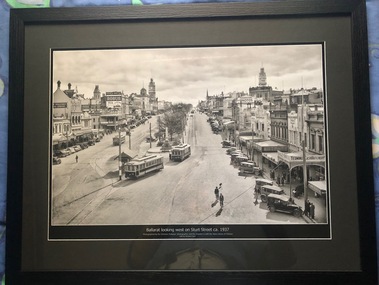
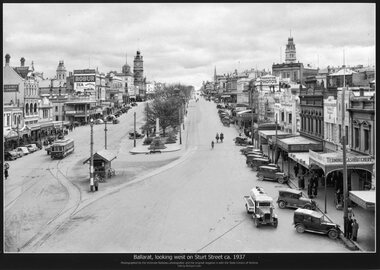 Ballarat Tramway Museum
Photograph - Black & White copy photograph, Victorian Railways, "Ballarat, looking west on Sturt St ca 1937"
Original photograph by Victorian Railways, with the original image held by the State Library of Victoria. Edited by Richard Conn. Purchased by the Museum.Provides information about the appearance of Sturt St from Grenville St looking west. Tram No. 20 is travelling west. Note the many bikes parked on the shelter. Has in the view buildings of Ballaarat Gas Co, the Ballaarat Mechanics Institute with advertisements for Robur Tea and Davies Bread, Thornton for photos, Terminus Cash Butchery and a Vacuum Oil Co vehicle.Black & White copy photograph view A4 size, titled "Ballarat, looking west on Sturt St ca 1937". Original image by the Victorian Railways, c1937-1940. Looking from the top of a building in Grenville St. towards the West. Has a number of parked vehicles in kerbs, two people riding horses, a Vacuum Oil Co. truck in the bottom right hand corner and SEC tram 20 traveling west, just past the City Loop points. See also Reg Items 675, 4284 for other prints, 2981 for a colour postcard. For a similar view see Reg Item 8332. ballarat, vr photos, sturt st, robur tea, thornton, ballarat gas co, vacuum oil co, tram 20, shelters, tramways -
 Ballarat Tramway Museum
Photograph - Black & White copy, Victorian Railways, "Ballarat, looking west on Sturt St ca 1937"
Original photograph by Victorian Railways, with the original image held by the State Library of Victoria. Edited by Richard Conn. Purchased and framed by the Museum. For a similar photo see Reg Item 8329 .Provides information about the appearance of Sturt St from Grenville St looking west. Tram No. 26 has the destination of Mt Pleasant, No. 20 Sturt St West and No. 16 is travellng to the Gardens. Has in the view buildings of Ballaarat Gas Co, the Ballaarat Mechanics Institute with advertisements for Robur Tea and Davies Bread, Thornton for photos, Terminus Cash Butchery, Carlyon's Hotel, 8 hour monument and Malvern Star cycles. Framed, black & White copy photograph view A2 size, titled "Ballarat, looking west on Sturt St ca 1937". Original image by the Victorian Railways, c1937. Looking from the top of a building in Grenville St. towards the West. Has a number of parked vehicles in kerbs, many pedestrians and trams 20, 26 and 16.ballarat, vr photos, sturt st, robur tea, thornton, ballarat gas co, vacuum oil co, tram 20, tram 16, tram 26, davies bread, shelters, tramways -
 Ballarat Tramway Museum
Photograph - Series of 9 black and white photographs of Ballarat trams, Ellen Butland, 1971
.1 - No. 27 in Lydiard St North at Sturt St. .2 - Scene at Railway station in Lydiard St North following arrival of the ARHS tour train. .3 - Nos. 27, 42, 11 at Sebastopol terminus. .4 - No. 42 in Sturt St .5 - Nos. 27, 42, 11 at Sebastopol terminus. .6 - No. 11 in Sturt St .7 - No. 27 crossing Albert St Sebastopol. .8 - No. 42 in Lydiard St North at Sturt St. .9 - Nos. 27, 42, 11 at Lydiard St. North terminus. Note: - some of the captions under the photos have the wrong locations.Has a strong association with a Melbourne tram driver who assembled the scrap book and series of photos of Ballarat trams at the time of closure. Yields information about the tram operations.Set of nine black and white photographs contained with Reg item 5988, a Stamford Kiwi School Scrap Book - prepared by Ellen Butland of Auckland following the closure of the SEC Ballarat Tramway system."Ballarat, Australia 21-9-71" in ink along the top edge of the sheet.trams, tramways, ballarat, sturt st, sebastopol, tram 27, railway station, tram 42, tram 11 -
 Ballarat Tramway Museum
Photograph - Series of 7 black and white photographs of Ballarat trams, Ellen Butland, 1971
.1 - Nos. 27, 42, at Lydiard St. North terminus. .2 - No. 11 at Lydiard St North terminus .3 - Nos. 27, 42, 11 at Lydiard St. North terminus. .4 - Controls of No. 11 with keys in position .5 - Scene at Railway Station after touring the system .6 - Interior photo of No. 11 .7 - Second convoy at Railway Station unloading - includes No. 39 Note: - some of the captions under the photos have the wrong locations.Has a strong association with a Melbourne tram driver who assembled the scrap book and series of photos of Ballarat trams at the time of closure. Yields information about the tram operations.TRAMSet of seven black and white photographs contained with Reg item 5988, a Stamford Kiwi School Scrap Book - prepared by Ellen Butland of Auckland following the closure of the SEC Ballarat Tramway system.closure, arhs, tours, trams, tramways, ballarat, sturt st, lydiard st nth, sebastopol, tram 27, tram 42, tram 11, tram 39, interiors -
 Ballarat Tramway Museum
Slide - Set of 7 - Lydiard Street level crossing and tram terminus, David Verrier, 21-11-2000
Set of seven slides taken during the 2000 COTMA Conference visit to the Ballarat Tramway Museum depot on 21-11-2022 1 - Former Lydiard St North terminus looking south 2 - Ballarat Station with the temporarily closed Lydiard St level crossing. 3 - Ballarat Station with the temporarily closed Lydiard St level crossing. 4 - Ballarat Station good shed looking east 5 - Lydiard St level crossing with G521 on freight leaving 6 - Lydiard St level crossing with G521 on freight leaving 7 - Train on level crossingYields information about the Lydiard St Nth terminus in 2000 and the level crossing.Set of seven Kodak colour slides - white plastic mountEach slide has details written on it.ballarat, specials, cotma, lydiard st north, level crossing, g 521, railways -
 Ballarat Tramway Museum
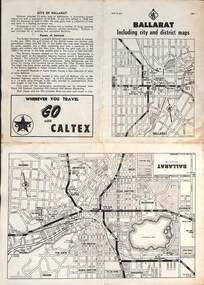
Map, RACV - Royal Automobile Club of Victoria, "Ballarat including city and district maps", 10/1961
Shows the central part of Ballarat, Ballarat Outlets, streets, principal attractions, Ballarat and district maps and information. Has the tram lines shown dotted, does not run out to Sebastopol or the Lydiard St North terminus. Each map in the bottom left-hand corner has the number "1061", possibly indicating the date. Has notes on the City, points of interest, and an advertisement for Caltex. See item 4929 for a larger version dated 1966. Yields information about the extent of Ballarat in the early 1960's shows the tram lines and other rail lines in the district. Four fold map printed on white paper, titled "Ballarat including city and district maps" - Map No. MAP 15.314 and dated 10-61. Produced by the RACVmap, tranways, ballarat, racv, railways -
 Ballarat Tramway Museum
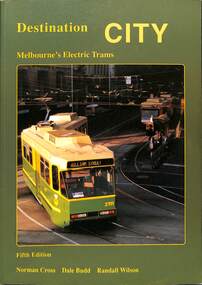
Book, Traction Publications, "Destination City" fifth edition, 1993
Includes brief description of each type, photographs and a summary history, including the Victorian Railway's trams. Has many photographs of the various tramcars associated with relevant text. On front cover is a photo of Z3 at the Burwood terminus. Written by Norm Cross, Dale Budd and Randall Wilson as editors, published by Transit Australia Publishing. Has two maps, north and south of Melbourne, printed on the inside card covers. Published 1993. Yields information up to 1993 about Melbourne's tramcars.Book - "Destination City" with subtitle "Melbourne's Electric Trams" - 128 A4 pages + card card, printed on gloss paper - 7 sections, perfect bound, describes Melbourne's tram car fleet. mmtb, tramways, tramcars, melbourne, vr trams, destination city -
 Ballarat Tramway Museum
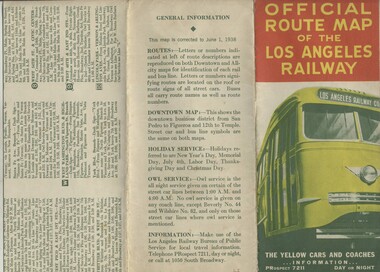
Map, H.P. Noordwal, "Official Route Map of the Los Angeles Railway", Jun. 1938
A (12 section) fold out map of street car (tram) and bus services for Los Angeles, dated June 1, 1938, showing all LAR (Los Angeles Railway) streetcar and coach (tram and bus) services, Pacific Electric lines within area, detailed "downtown" map, route descriptions and points of interest. Record images added 20/8/2013.Three terminus have been marked with pencil "X". On rear car, next to object number is a symbol looking like a "H & S" merged together.trams, tramways, los angeles, street cars, map