Showing 234 items matching "signal box"
-
 Melbourne Tram Museum
Ephemera - Christmas Card, Peter Duckett, c1990
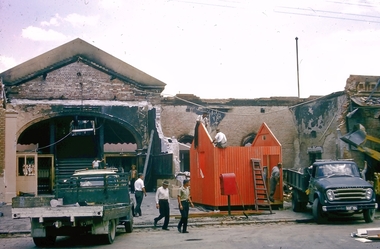
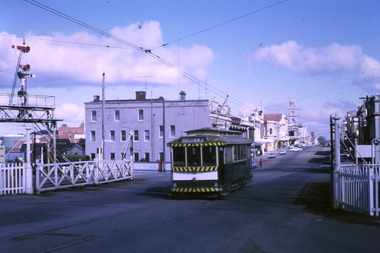
... cars and the signal box... and the signal box Ephemera Christmas Card Peter Duckett Patti Duckett ...Christmas Cards prepared by Peter and Patti Duckett and sent to Keith Kings Printed photo on exterior with red printed ribbons, photo corners on inside with another photo and gold block print and the Duckett's address. Photographs by Peter Duckett or from his collection. Item not dated. Cover photo of St Kilda Junction mid 1960's, prior to the reconstruction of the junction detailed in the notes inside the card. Has the service station with the word "Flash" on the roof. Inside photo shows the junction in the cable tram era, with motor cars and the signal box"To Keith" in ink.trams, tramways, christmas cards, st kilda junction, cable trams -
 B-24 Liberator Memorial Restoration Australia Inc
Radio Control Box, Western Electric, BC-450-a, 1940-1945
... Radio control box/signal corps US Army/s.n. 84472/made...-a western electric Radio control box/signal corps US Army/s.n. 84472 ...Part of the radio equipment in B-24 Liberator aircraft.This is a good example as it is unused and in its original box.Black crackle-finish radio control boxRadio control box/signal corps US Army/s.n. 84472/made by Western Electric New York.radio, control, box, bc-450-a, western, electric -
 Melbourne Tram Museum
Negative - Tram 184 - Epsom Road level crossing, early 1920s
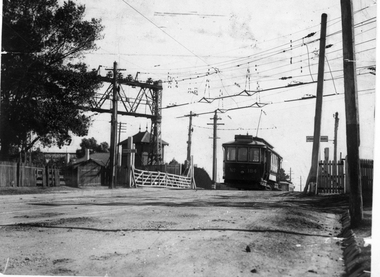
... to either the trams or the trains. The small signal box... to either the trams or the trains. The small signal box ...Black and white photograph of M class tram 184 crossing the Epsom Road, Flemington level crossing. Shows the overhead arrangement and structures on either side of the road to provide power to either the trams or the trains. The small signal box is in the view as well as the hand gates. In the background is the roof of another tram going the other way. The level crossing was electrified on 18-8-1919 and abolished in mid-1925 when the underpass was built. See Weekly Notice Extracts 1894-1994, published 1996. The tram was sold to the SEC in 1935 and became Ballarat No. 31. See item 3433 for a similar photo with an NMETL tram.Yields information about the Epsom Road level crossing and tram 184.Black and white copy negative.trams, tramways, mmtb, level crossings, epsom rd, show grounds, ascot vale, m class, tram 184 -
 Ballarat Tramway Museum
Photograph - Black & White Photograph/s, Wal Jack, 18/11/1961 12:00:00 AM
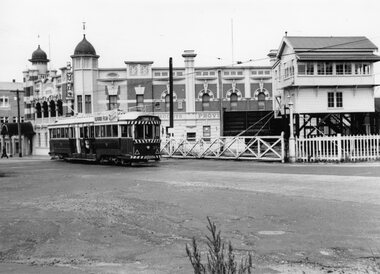
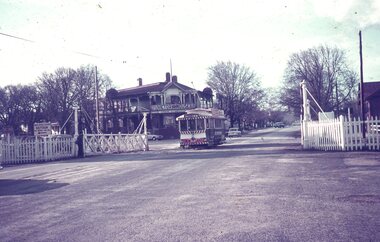
... Provincial Hotel and the Ballarat "B" signal box in the background... Provincial Hotel and the Ballarat "B" signal box in the background ...Yields information about Ballarat's trams in the late 1960'ss and the street scape in Victoria St?, Yields information about Ballarat's trams in the late 1960'ss and the street scape in Victoria St?Black and white print of Ballarat 35, northbound to Lydiard St North, crossing the Railway level crossing with Moodys Provincial Hotel and the Ballarat "B" signal box in the background. The tram has a roof advertisement for Ilford film. Note the entry canopy to the hotel. Two copies. Photo by Wal jack, 18/11/1961. Photo print courtesy of Port Dock Railway Museum, now the National Railway Museum. See worksheet 4311 for letter and details of prints sent to Bill Scott, 19/10/2001. Any photo credit to mention NRM Collection.On rear of copy 1 "SEC Ballarat / 35 / Lydiard St North / 18/11/61 2920 / Wal Jack " Copy 2 "DAC" in ink, bottom right hand corner.trams, tramways, lydiard st, ballarat railway station, level crossings, tram 35 -
 Melbourne Tram Museum
Photograph - Set of 5 Black & White - First AETA tour, 15-2-1947
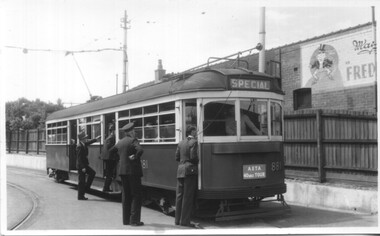
... the railway signal box and gates in view. 4 - Turning into Riversdale... crossing in Glenferrie Road - has the railway signal box and gates ...Set of five photographs of the first Australian Electric Traction Association (AETA) tram tour of Melbourne on 15/2/1947. See page 8 of the March 1947 issue of "Tram Tracks" for details of the tour and the MMTB Crew. 1 - SW6 881 about to leave Glen Huntly Depot 2 - Crossing Balaclava Junction 3 - Crossing the Kooyong railway level crossing in Glenferrie Road - has the railway signal box and gates in view. 4 - Turning into Riversdale Road from Glenferrie Road with the Stotts Business College building in the background. 5 - Just to the east of Yarra River Bridge in Swan Street with the Burnley Gardens on the right.Yields information about the first AETA tram tour in 1947Set of 5 Black and white photograph on paper. Two copies of each held.Each one of the set has a photographers file stamp on the rear, but no details filled in.trams, tramways, aeta, tram tours, tram 881, sw6 class, glen huntly, kooyong level crossing, glenferrie road, riversdale road, burnley, hawthorn, balaclava junction, glen huntly depot, hawthorn road, swan st -
 Melbourne Tram Museum
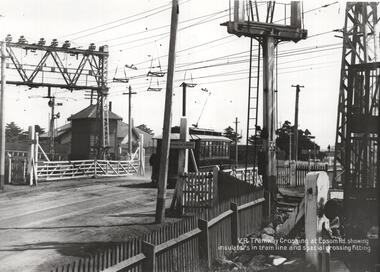
Photograph - NMETL tram 4 Epsom Road level crossing, Victorian Railways, c1919
... or the trains. The small signal box is in the view as well... or the trains. The small signal box is in the view as well ...Photo of the Level Crossing in Epsom Road, Flemington or Ascot Vale showing the overhead arrangement and structures either side of the road to provide power to either the trams or the trains. The small signal box is in the view as well as the interlocked gates. A NMETL saloon tram, No. 4, is crossing the railway lines. Photo late 1919 or 1920. Has the words "VR Tramway Crossing at Epsom Rd showing insulators in tram line and special crossing fitting." The level crossing was electrified on 18-8-1919 and abolished mid 1925 when the underpass was built. See Weekly Notice Extracts 1894-1994, published 1996. See item 8667 for a similar photo with tram 184.Yields information about the Epsom Road level crossing and tram 4.Photograph, Black and White, with notes on the rear.In ink on the rear: "Melbourne - North Melbourne Electric Tramway and Lighting Co. Ltd - No. 4 in Epsom Road on level crossing to Showrooms and Flemington Racecourse. About 1919-1920." Has KSK stamp and Number LWR-4 and CEE 12 in to right-hand corner.trams, tramways, level crossings, nmetl, epsom rd, showgrounds, ascot vale, tram 4 -
 Ballarat Tramway Museum
Negative, Geoff Grant, 19/06/1955 12:00:00 AM
... house and signal box in the background - building used... of photograph 19/6/1955. Has the former cable winding house and signal ...Negative No. N317 and black and white print made by a laser printer (stored in folder ) of W7 1003 turning from Nicholson St. into Gertrude St. Fitzroy. Taken with part of another tram cabin in the foreground - assume 988. Geoff Grant's envelope notes state "1003 swinging round the curve into Gertrude St. This then took over the running honour of being the first tram over the Bourke St. route." Date of photograph 19/6/1955. Has the former cable winding house and signal box in the background - building used as the conductors school at the time? Negative scanned hi res and imaged updated 21/5/2020.trams, tramways, melbourne, nicholson st, bourke st., gertrude st., tram w7 1003 -
 Puffing Billy Railway
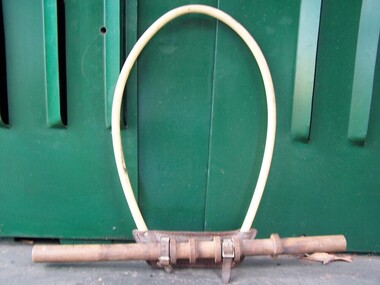
hoop, Staff exchanger
... ’ from the platform or signal box to the locomotive driver... the 'Staff’ from the platform or signal box to the locomotive driver ...Staff exchanger hoop - Leather Bakelite and wooden prop staff. The hoop held the 'Staff’ giving authority for a locomotive or rail vehicle permission to travel over a specified section of track. The display shows the hand held type used from person to person. Hand held staffs were exchanged at low speeds or stationary. Automatic staff exchangers were also in use when a vehicle was not required to travel at low speed to exchange the staffs and were used by express trains. To exchange the 'Staff’ from the platform or signal box to the locomotive driver, the hoop was held up in the air by the person, and collected by the Drivers arm. The reverse occurred when the staff was being given by the Driver. Both exchanges may occur where one section of line ends and another commences.Historic - Railways - Staff exchanger hoop - used for person to person exchanging.Staff exchanger hoop made of Leather Bakelite and wooden prop staffpuffing billy, staff exchanger hoop -
 Ballarat Tramway Museum
Photograph - Digital image, W. J. Llewelyn, late 1960s
... 's. Photos taken from the signal box. .3 - R766...'s. Photos taken from the signal box. .3 - R766 ...Set of three colour digital images taken by W. J. Llewelyn of the Ballarat Railway Station at Lydiard St North. .1 - Possibly a S class loco on the Horsham / Dimboola/Serviceton St, about to leave Ballarat station during the late 1960's or early 1970's. A freight train is on platform 2. Note the Parcels Office and that the clock had not been fitted to the station building. .2 - S305? shunting at Ballarat station, during the late 1960's or early 1970's. Photos taken from the signal box. .3 - R766 on a special train at the station - late 1980's. Has the failed Melbourne - Canberra - Sydney tourism venture carriages at the rear.trams, tramways, railway station, level crossings, lydiard st north, steam locomotive -
 Ballarat Tramway Museum
Slide - 35mm slide/s, Harry Jackson, Sept. 1971
... . Taken from the signal box. The film strip notes (Reg. Item.... Taken from the signal box. The film strip notes (Reg. Item ...White cardboard mount, 35mm slide, from the Association of Railway Enthusiast's film strip titled "Provincial Tramway Film Strip" of No. 40 North bound for Lydiard St. North at the Railway Gates, with the gates closed. Tram carrying a heavy load of passengers. Railway station building and car park in background. Taken from the signal box. The film strip notes (Reg. Item 2560), provided the following caption details: "Principal feature of note on the "LYDIARD St. Nth." line was the level crossing at Ballarat Station. A well loaded No.40 waits patiently at the closed gates for a train.- Sept.'71 (Harry Jackson)" See image btm2566p.tif for high level scan of image. Stamped on base of slide "11776" and written in ink on top edge "No. 40 Lydiard St Ballarat"tramways, trams, are, film strip, lydiard st north, railway crossing, tram 40 -
 Surrey Hills Historical Society Collection
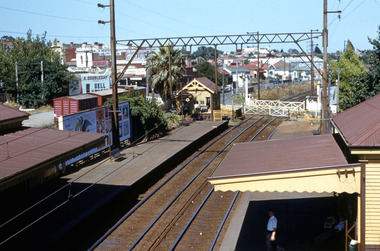
Work on paper - Digital photograph, George L Coop, Surrey Hills railway station c1958, c1958
... and the signal box, beside which is a large palm tree. A section of red... gates in the open position and the signal box, beside which ...The donor George Lister Coop was about 21 years of age when he took this photo. It is one of a small series of photos donated by him that relate to Mont Albert and Surrey Hills stations. He has always had an interest in railways and there are other examples of his documentation of railway history in other collections contributing to this database. R J Mercer was the butcher at 112 Union Road. This property has a long history of being a butcher's shop beginning from c1904. He took over from Edward Lloyd in 1951. Spotless Dry Cleaners were at 104 Union Road.This is an important photo as there are few known colour images of the station prior to the installation of the third line in the early 1970s, which resulted in the demolition of the station built in 1883. It is also significant as a record of the housing along the south side of Stirling Crescent which was later replaced by light industry.A digital colour photo of Surrey Hills railway station taken from the overhead pedestrian footbridge looking towards Canterbury. Both tracks and the verandas on either side of the line can be seen, as can the railway gates in the open position and the signal box, beside which is a large palm tree. A section of red goods vans are positioned in the adjacent goods yard. Some of the businesses and advertising hoardings in Union Road can be seen in the background. These include A Doubleday (real estate agents), R J Mer..., grocer, baker, Spotless Dry Cleaning, Robur tea and Lipton tea (part of only). A number of the Edwardian houses along the south side of Stirling Crescent are also seen.george l coop, surrey hills railway station, goods yard, real estate agent, a doubleday, grocer, baker, union road, stirling crescent, spotless dry cleaning, r j mercer, butcher -
 Puffing Billy Railway
NSWTD Railway Marker Oil lamp, No.1 RA
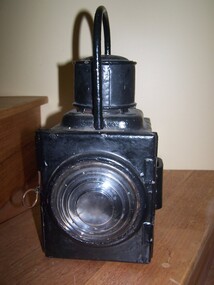
... , signals, signal-boxes and crossings. There were a number..., rolling stock, signals, signal-boxes and crossings. There were ...NSWTD Railway Marker OIl lamp, No.1 RA Oil burning lamps have always been an important part of Australian railway signalling systems and have been used for communication, safety and lighting. It is called a marker lamp and was hung on rolling stock (carriages and wagons) such as the guard’s van to indicate the rear of the train at night. They were also used to indicate the rear of steam locomotive tenders for identification and safety purposes. This type of lamp was introduced to the railways around 1860 and continued to be used for over one hundred years. Oil lamps were phased out on the railways during the late 1960s and early 1970s, when they were replaced by battery lamps. Railway lighting included not only stations but yards, engines, rolling stock, signals, signal-boxes and crossings. There were a number of different types of lamps used for a variety of railway purposes. Historic - New South Wales Transport Department.- Railway Marker Oil Lamp NSWTD Railway Marker lamp, No.1 RA made of metal and Glass Railway lamp, paraffin, metal/glass/fabric, used for attaching to railway rolling stock to mark the end of the train, made by the New South Wales Transport Department, Sydney, New South Wales, Australia, 1870 - 1970 This lamp comprises a hollow cube of metal. One lens at the front transmits light from an interior light source. Fuel was either signal oil or kerosene. The burner inside the lamp used either cotton or felt wicks to create the light source. The lamp has a carry handle for carrying by hand and a bracket with a slot on the back for hanging onto the hook of a locomotive or item of rolling stock. It is marked "NSWTD" which stands for New South Wales Transport Department.NSWTD 1 RApuffing billy railway , pbr, nswtd railway marker oil lamp, no.1 ra -
 Ballarat Tramway Museum
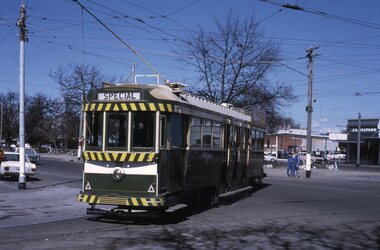
Slide - Set of 6, Warren Doubleday, Ballarat - last day of the Lydiard St Nth to Sebastopol line, 19/9/1971
... shed. Photo taken from the signal box. 3 - Tram 42 in Lydiard... shed. Photo taken from the signal box. 3 - Tram 42 in Lydiard ...Photos taken on the last day of the SECV operated tram services in Ballarat 19/9/1971 1 - Tram 39 running out as Special at corner of Sturt and Drummond St North. Has the Mobil Service station and J A Malpass shop in the background. 2 - Tram 40 waiting at the railway gates. Has the Kennedy Murray Pty Ltd General Carrier office in the background and the railway goods shed. Photo taken from the signal box. 3 - Tram 42 in Lydiard St North with Reids Coffee Palace and the Provincial Hotel in the background. The street is very quiet. 4 - Tram 39 at the Lydiard St North terminus. 5 - Tram 40 at the Lydiard St North terminus. Note the shelter and the tram stop pole. 6 - Tram 40 using the Dawson St Crossover with St Patricks Cathedral behind.Yields information about the last day of SEC public operations in Ballarat.Set of 6 Kodachrome colour slides - cardboard mounts. Sixth one in a green card mount.Have the photographer's slide numbers written on them.trams, tramways, closure, tram 35, tram 34, tram 42, tram 40, lydiard st north, level crossing, dawson st -
 Puffing Billy Railway
Four NSWTD Railway marker Oil lamps
... stations but yards, engines, rolling stock, signals, signal-boxes..., rolling stock, signals, signal-boxes and crossings. There were ...Four NSWTD Railway marker Oil lamps at Nobelius Packing shed Item stamped numbers unknown Oil burning lamps have always been an important part of Australian railway signalling systems and have been used for communication, safety and lighting. It is called a marker lamp and was hung on rolling stock (carriages and wagons) such as the guard’s van to indicate the rear of the train at night. They were also used to indicate the rear of steam locomotive tenders for identification and safety purposes. This type of lamp was introduced to the railways around 1860 and continued to be used for over one hundred years. Oil lamps were phased out on the railways during the late 1960s and early 1970s, when they were replaced by battery lamps. Railway lighting included not only stations but yards, engines, rolling stock, signals, signal-boxes and crossings. There were a number of different types of lamps used for a variety of railway purposes. Historic - New South Wales Transport Department.- Railway Marker Oil LampFour NSWTD Railway marker Oil lamps made of metal and glass Railway lamp, paraffin, metal / glass / fabric, used for attaching to railway rolling stock to mark the end of the train, made by the New South Wales Transport Department, Sydney, New South Wales, Australia, 1870-1970 This lamp comprises a hollow cube of metal. One lens at the front transmits light from an interior light source. Fuel was either signal oil or kerosene. The burner inside the lamp used either cotton or felt wicks to create the light source. The lamp has a carry handle for carrying by hand and a bracket with a slot on the back for hanging onto the hook of a locomotive or item of rolling stock. It is marked "NSWTD" which stands for New South Wales Transport Department.NSWTDpuffing billy railway , pbr, four nswtd railway marker oil lamps -
 Wodonga & District Historical Society Inc
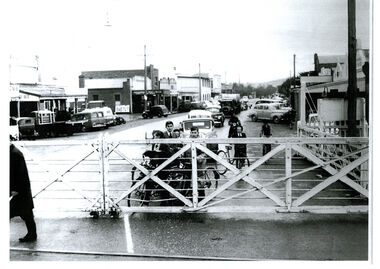
Photograph - High Street, Wodonga Level Crossing, 1954
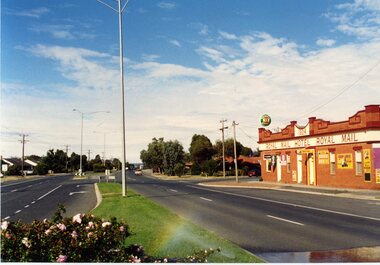
... and pedestrians as trains passed through. Signal Box B stood... as trains passed through. Signal Box B stood on the eastern side ...This image is representative of many photographs illustrating the level crossing in the centre of Wodonga. Since its opening in 1873 the railway line had crossed High Street, originally called Sydney Road. It bisected the city with level crossing gates frequently stopping the flow of traffic and pedestrians as trains passed through. Signal Box B stood on the eastern side of the High Street level crossing and a big wheel closed and opened the gates. On 17th September, 1961, it was replaced by boom gates and flashing lights. The railway crossing was removed from High Street as part of the Wodonga Rail Bypass project. This involved a 5.5 kilometres bypass, the elimination of 11 level crossings and the relocation of the Wodonga station. It was moved from its original central location to a position on a new line on the northern edge of the town. The old station closed on 8 November 2008 and the new station opened on 25 June 2011.This image has local and statewide significance as it captures the former crossing in a major railway system. The railways played a critical role in opening up Victoria and connecting Australia for trade, business, social communication and transport.A black and white photo of the railway level crossing in High Street, Wodonga with gates closed. The Melbourne to Sydney railway line went through the centre of Wodonga and trains frequently held up internal vehicular and pedestrian traffic in the main street. railways wodonga, wodonga railway relocation, high st wodonga rail crossing -
 Bendigo Historical Society Inc.
Slide - Images by Arthur Pulfer, 1957-1970
... the refreshment room was on fire until a signal box attendant gave... the refreshment room was on fire until a signal box attendant gave ...1965 fire at the Bendigo Railway Station A dull explosion in the refreshment room about 1:30 p.m. touched off the blaze, which quickly spread and burnt out the station in less than an hour. Just before the explosion a train carrying more than 200 Melbourne-bound holiday makers pulled out of the station. Scores of railways employees in other parts of the station did not realise the refreshment room was on fire until a signal box attendant gave the alarm. Early estimates place damage at more than £100,000. Quick work by station staff saved many thousands of pounds worth of equipment before flames engulfed the building from end to end. At the height of the blaze, a Bendigo fire brigade Station Officer, Vin Lapsley, fell 18 feet – and miraculously landed on his feet – after being overcome by smoke while directing a hose from a ladder on to the roof. Mr. Lapsley was later treated for a broken bone in his right leg.Many images from by Arthur Pulfer copied to slides. Nineteen Slides of Bendigo images: Bendigo Railway Station after fire 1965 New Bendigo Railway Station after the fire Bendigo Town Hall and Bull Street Bendigo Law Courts and Police Station from the conservatory gardens Gold Panners Monument with the Bendigo Technical school in the background Bendigo Cenotaph - set up for an event - Charing Cross - 1957 New Bendigo Chinese Dragon 'Loong' 1970 Easter Procession 1957 Golden Square High School September 1965 Hattam Street Bendigo Opening of Golden Oaks retirement village September 1965 - Hattam Street Bendigo High Street Golden Square, Bendigo - monument to the founding of gold in the area Bendigo Showgrounds with the Benevolent Home and the Base Hospital in the background Old Base Hospital Lucan Street Bendigo Arnold Street former shop Bendigo Alexandra Fountain Charing Cross Bendigo Banner - Bendigo Training Centre Bendigo House - address unknownhistory, bendigo, james lerk collection, bendigo conservatory, conservatory gardens bendigo, bendigo town hall, bull street bendigo, bendigo railway station fire, golden square high school, golden oaks village bendigo, dragon loong, bendigo cenotaph, alexandra fountain bendigo, bendigo base hospital, bendigo benevolent home, bendigo easter procession -
 Ballarat Tramway Museum
Slide - 35mm slide/s - set of 6, Dave Simpson, late 1960's early 1970's
... with the signal box and Victoria House in the background. .5 - ditto... crossing the crossing with the signal box and Victoria House ...Yields information about Railway Level crossing in Lydiard St North and some of the trains that used it.Set of six 35mm slides - Hanimex light grey white plastic mounts or AGFA dark blue / white plastic mounts of trams and trains crossing the level crossing at Lydiard St North Ballarat. .1 - tram 33 with destination of Lydiard St North, just after crossing the rail tracks - has a Twin Lakes sign with Victoria House in the background. .2 - tram 40 with destination of Lydiard St North, waiting at the level crossing with S303 entering the station. .3 - ditto, but with S304 in the photograph under the signal gantry. .4 - tram 17 crossing the crossing with the signal box and Victoria House in the background. .5 - ditto - tram has a Twin Lakes signs and a "Make Bliss No Love" roof advert for Bliss Bombs. .6 - ditto - with the S. F. Motors Pty Ltd Mercedes Benz dealership in the background.tramways, trams, railway station, lydiard st north, level crossings, victorian railways, tram 33, tram 40, tram 17 -
 Ballarat Tramway Museum
Photograph - Colour Photograph/s - set of 15', Austin Brehaut, 1/04/2000 12:00:00 AM
... Grenville St - 6/4/2000 .13 - Railway Station from Signal box - 27... - Railway Station from Signal box - 27/4/2000 .14 - Lower Sturt St ...Yields information about various locations in Ballarat in March 2000 for comparison with previous photographs.Set of 15 colour photographs taken by Austin Brehaut in April 2000 showing various locations that Ballarat trams once ran in, for use in a BTM presentation, named "Ballarat Past and Present" at the COTMA 2000 Ballarat Conference. All on Fujicolour Crystal Archive Paper. On rear in blue ink is the date, location and where relevant a reference number to photo locations that the author of the presentation had requested. Letter from Austin, filed with this worksheet. 1772.1 - Sebastopol terminus, 4/4/2000 .2 - Albert St. Sebastopol near "crossover" - 4/4/2000 .3 - Old depot site, 5/4/2000 .4 - From depot site at Depot junction - 5/4/2000 .5 - Albert St. Sebastopol, looking south above loop site - 5/4/2000 .6 - Mt. Pleasant line, in Barkly St. towards terminus - 5/4/2000 .7 - Mt. Pleasant terminus, Cobden Cnr. - 5/4/2000 .8 - Wendouree Parade at Macarthur St. - 5/4/2000 .9 - Site of old Power Station Cnr Ripon St. Wendouree Parade .10 - Sturt St. at Dawson St (site of crossover) towards former Golden City Hotel - 6/4/2000 .11 - From Grenville St - up Sturt St. hill - 6/4/2000 .12 - Lower Sturt St. toward Grenville St - 6/4/2000 .13 - Railway Station from Signal box - 27/4/2000 .14 - Lower Sturt St. toward Grenville St - 6/4/2000 .15 - Railway Station from Signal box - 27/4/2000 For 2010 comparisons see 4645 and 4646. See Aboveballarat, sebastopol, albert st, sec depot, railway station, mt pleasant, dawson st, sturt st -
 Glen Eira Historical Society
Article - MURRUMBEENA ROAD RAILWAY CROSSING
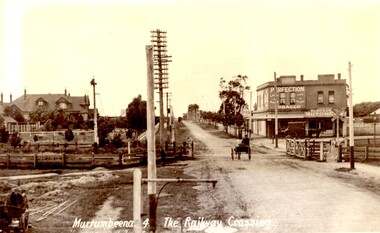
... of the signal box at Murrumbeena Station by R.P Dunbar dated 16/03/1979... with a white border of the signal box at Murrumbeena Station by R.P ...This file contains eleven items: 10 original photographs and 1 newspaper cutting. 1/A black and white photograph titled in the format of the shot ‘Murrumbeena. 4. The Railway Crossing’, date unknown, estimated to be 1905. Donated by the Hermes Studio on 19/11/1980. 2/A black and white photograph with a white border of the signal box at Murrumbeena Station by R.P Dunbar dated 16/03/1979 with a handwritten description on the back. 3/A black and white photograph with a white border of the interior of the Murrumbeena Train Station Signal box with a man identified as Michael sitting, taken by R.P Dunbar dated 17/03/1979 with a handwritten description on the back. 4/A black and white photograph with a white border of the removal the boom gates at Murrumbeena Train Station railway crossing. Taken by R.P Dunbar printed 28/04/1979, which includes a handwritten description on the back. 5/A black and white photograph with a white border of the removal of the boom gates taken by R.P Dunbar dated 29/04/1979, with a handwritten description on the back. 6/A black and white photograph with a white border of Murrumbeena Road Crossing during the removal of the boom gates taken by R.P Dunbar printed 29/04/1979. This includes a hand written description on the back. 7/A black and white photograph with a white border of the Murrumbeena Road Railway Crossing during the removal of the boom games dated 29/04/1979, taken by R.P Dunbar, with a hand written description of the photograph on the back. 8/A black and white photograph with a white border of Murrumbeena Road Crossing during the removal of the boom gates dated 29/04/1979 taken by R.P Dunbar with a handwritten description on the back. 9/A black and white photograph with a white border of Murrumbeena Road Railway Crossing with a new boom barrier replacing the boom gates, taken by R.P Dunbar dated 29/04/1979. Including a handwritten description on the back. 10/A black and white photograph with a white border of Murrumbeena Railway Station, Murrumbeena Road with the replacement boom barriers in place, taken by R.P Dunbar dated 29/04/1979. Including a hand written description on the back. 11/A newspaper article titled ‘Boom gates to create road Chaos’ written by Adam Carey from ‘The Age’ dated 29/11/2011. This includes a coloured photograph of the Murrumbeena Road Level Crossing taken by Michael Clayton Jones, and a map of the train line and level crossing between Carnegie Station and Hughesdale Station. The article makes educated predictions based on VicRoads Studies of future implications on road traffic unless more level crossings are removed. In particular the Dandenong corridor and Murrumbeena Road crossings are identified as high priority on the list of potential crossings which may have to be removed. Additionally the article discusses options the government has in addressing the dilemma, and the opinion of a Carnegie pharmacist Gerald Galatis whose business is near the level crossing on Koornang Road.transport, railway crossing, koornang road, railways, level crossing, gates, trains, road crossing, transport establishments, signal boxes, murrumbeena railway station, dunbar r.p., murrumbeena road, carnegie station, railway lines, railway buildings, road traffic, galatis gerald, construction sites, poath road, neerim road, hermes studio -
 Frankston RSL Sub Branch
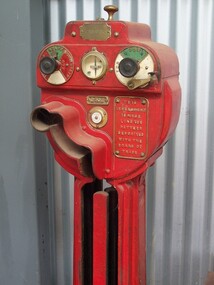
Lamp, Signalling
... Electrical signalling lamp and battery box used by defence... mornington-peninsula Electrical signalling lamp and battery box used ...Electrical signalling lamp and battery box used by defence forces for signalling messages when in the field. These signalling lamps were used to transmit messages by switching the lamps 'on' and 'off' to represent Morse Code characters. -
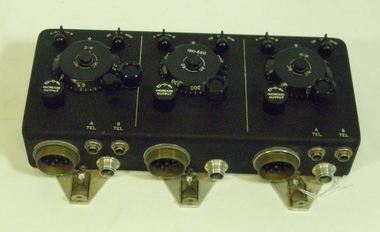
 Puffing Billy Railway
Large Electric Staff Instrument, Webb-Thompson
... is provided with a pair of token instruments, one at the signal box... with a pair of token instruments, one at the signal box at each end ...Electric staff - Electric staff instruments The staff and ticket system was still too inflexible for busy lines, as it did not allow for the situation where the train intended to carry the actual token was cancelled or running very late. To provide for this, the electric train token system was developed. Each single-line section is provided with a pair of token instruments, one at the signal box at each end. A supply of identical tokens is stored in the instruments, which are connected by telegraph lines. A Staff can be removed from one instrument only if both signalmen co-operate in agreeing to the release. Once a Staff has been removed, another cannot be removed until the token which is "out" is replaced in either instrument. (There are variations on this sequence of events.) By this means, it can be ensured that at any one time, only one token is available to be issued to a driver. Staff belonging to adjacent sections have different configurations to prevent them being inserted into the wrong instrument. Nevertheless, in the Abermule train collision in 1921 and lax working procedures allowed the safeguards provided by the electric Staff system to be circumvented; a driver was handed a Staff for the wrong section, and without reading the information listed on the staff, proceeded on the mistaken belief that the Staff was correct. To prevent this, it became a requirement in the UK for the signals controlling entry to the single line section (starting or section signals) to be locked at danger unless a token has been released from the relevant Staff instrument. Historic - Victorian Railways Electric Staff Instrument Electric Staff Instrument made of Iron , Brass and Glasspuffing billy, electric staff instrument, victorian railways -
 Montmorency–Eltham RSL Sub Branch
Equipment - Lamps, Signalling Daylight, Short Range, Box Spare MKII PMG 1942, 1942
... Front of lid LAMPS, SIGNALLING DAYLIGHT BOX SPARE PARTS... lamps spare parts Front of lid LAMPS, SIGNALLING DAYLIGHT BOX ...Tin box, scratched, rusty, black colour in appearance with writing on internal lid. Two bulbs, small tin containing clips, nuts and bolt. Front of lid LAMPS, SIGNALLING DAYLIGHT BOX SPARE PARTS MKII PMG 1942, Internal Lid - IMPORTANT When fitting a new bulb it should be INCLINED as shown, so that washer may be readly inserted between the spring contact and bridge piece. lighting tongue in washer must be in correct position......to the front of the lamp and the stem must be pushed right back in slot. LAMPS SIGNALLING DAYLIGHT.signalling, daylight, short range, lamps, spare parts -
 Ballarat Tramway Museum
Photograph - Digital image Set of 9, Tony Smith, 19/09/1971 12:00:00 AM
... the railway - taken from the signal box (B) with Reids Palace... the railway - taken from the signal box (B) with Reids Palace ...Yields information about Ballarat Tramways and trams prior to the closure of the tramway system.Set of 9 digital images of Ballarat trams prior to closure, scanned from original slides by Tony Smith, 1971 prior to closure of the system. This set of slides appears to be the last day of operations - 19/9/1971 .1 - 40 south bound in Lydiard St Nth, at the Gregory St Loop. .2 - 40 after passing through the loop .3 - 42, north bound in Lydiard St. North at Macarthur St. .4 - 42 southbound at the Railway station level crossing with the Kennedy Murray Pty Ltd General Carriers building at the station yard in the background. .5 - 42 southbound in Lydiard St North after crossing the railway - taken from the signal box (B) with Reids Palace in the background and the Provincial Hotel. .6 - 35 northbound after passing through the level crossing. .7 - bogie tram crossing the tracks with Ballarat Railway Station in the background. .8 - bogie tram entering the double track section in Lydiard St with Reids Palace in the background. Note the new bus stop bay. .9 - 35 and another bogie in Sturt St, with the Town Hall, Golden Star Chinese Cafe and Georges Fish & Chip shop in the background.trams, tramways, lydiard st nth, gregory st, level crossings, ballarat railway station, sturt st, closure, tram 40, tram 42, tram 35 -
 Ballarat Tramway Museum
Slide - 35mm slide/s - set of 3, Dave Simpson, trams in Sturt St near Hospital Corner, late 1960's early 1970's
... box for the Forest City signals in the foreground on a pole... system control box for the Forest City signals in the foreground ....1 -No. 35, outbound to Sebastopol with the Southern Cross Hotel in the background. Has signs for Fosters Larger, Carlton Draught and Victoria Bitter. Has a number of passengers boarding the tram. .2 - at Hospital corner with the signal system control box for the Forest City signals in the foreground on a pole. Has marking for Sebastopol, Sturt St West and Drummond St North? written on the box. Above this is a sign advising passengers that trams depart this point for The Gardens, View Point and Sebastopol. In the background is J. A. Malpass Hairdresser shop. See item 8900 for the actual switch. .3 - No. 35 turning into Drummond St south with the bottle shop on the south east corner in the background.Yields information about Hospital corner and the switch for the Forest City signalling system controls.Set of three 35mm slides - AGFA dark blue / white plastic mounts of trams in Sturt St near Hospital Corner. tramways, trams, sturt st, hotels, hospital corner, forest city signals, signs, tram 35 -
 Ballarat Tramway Museum
Slide - 35mm slide/s - set of 9, Noel Simons, Sept. 1971
... and car park in background. Taken from the signal box. 1174.2.... Taken from the signal box. 1174.2 - Tram 12 bound for Gardens ...Set of 9 Kodak Ready-mount with slides made from the Association of Railway Enthusiast Provincial Tramways film strip. Reference Item 2560 details the ARE Film Strip, and provide references to other slides. See also Reg. item 1164. 1174.9 on plain white mount. 1174.1 - Tram 40 North bound for Lydiard St. North at the Railway Gates, with the gates closed. Tram carrying a heavy load of passengers. Railway station building and car park in background. Taken from the signal box. 1174.2 - Tram 12 bound for Gardens, photographed across the median strip plantation near Dawson St. Image i2a - adjusted 9/2021 to remove colour cast. 1174.3 - Tram 43 in bound along Wendouree Parade near Barrett Ave, passing a former tram stop and with "Warning Oncoming Trams" sign mounted on an adjacent pole. See also Reg. item 1172.1 for a photo taken in May 1971. This photo taken after the closure of the Victoria St. line, as the tram stop has been painted out. 1174.4 - Looking along the track to Sebastopol terminus on the west side of Albert St. - telephoto shot showing bogie tram in the far distance. Shows the nature of the track, poles, tram stop frequency and in the fare distance the terminus. Also show the trees that used to be along this section of the track. 1174.5 - No. 42 showing "Special" in Macarthur St. approaching Drummond St. north. Photo taken from under the verandah of a shop on the south side of the street that were many years later to become the Tramcar Restaurant. Note metal fence to cemetery. 1174.6 - Nos. 21 (Sebastopol) crossing 14 (Lydiard St. Nth) at the loop between Sayle and Grey St. Photo taken looking south. 1174.7 - No. 12 bound for Mt Pleasant, in Bridge St. about to stop at the junction for the two routes. Telephoto photo looking west along Bridge St. with many cars in the photo. Very few people on the street itself. 1174.8 - No. 30 and 17 at the City Terminus, on the north side of Sturt St. Taken from the Post Office corner with the Town Hall in the background. 1174.9 - No. 39 inbound along Sturt St. West. with many cars on the road. Bus stop on a pole on the other side of the road.1174.1 - "No. 40 on Lydiard St. North service waits at the level crossing at Ballarat Railway Station." 1174.2 - "No. 12 bound for 'Gardens' seen across the centre plantation in Sturt St." 1174.3 - "Barrett Ave." 1174.4 - "The Sebastopol route near the terminus" 1174.6 - "Nos. 21 and 14 crossing at Sayle St. Loop on Sebastopol route" 1174.7 - "No. 12 at Eastern end of Bridge St." 1174.8 - "Nos. 30 and 17 in Sturt St. at Cnr of Lydiard St." 1174.9 - "No. 39 City bound from 'Gardens" in Sturt St. West" All have date stamp of "Sep 1971" in black ink. Writing in blue ink.tramways, trams, lydiard st. nth, railway crossing, sturt st, wendouree parade, sebastopol, macarthur st., bridge st., sturt st. west, tram 12, tram 14, tram 17, tram 21, tram 30, tram 39, tram 40, tram 42, tram 43 -
 Bendigo Historical Society Inc.
Negative - Photos of Bendigo - Glass Plate Negatives, Early 1900s
... Collection. Content railway station, locomotives and signal box... Collection. Content railway station, locomotives and signal box ...Three Boxes of Glass Plate Negatives and six black and white photos. 1. Box 1 Eight whole plate negatives of Pall Mall, Bendigo. Copies from original photos, or negatives made by the Army Survey Regiment stationed at Fortuna Villa. The original photos were taken by Alan Fox in 1857 and are in the State library of Victoria - currently being scanned. 2. Box 2 Fourteen half plate glass negatives collected from Bartlett's (Vincent Kelly) studio, Pall Mall, Bendigo by donor. Many other negatives went to the State Library of Victoria - currently being scanned. 11072.1k Group of men and Children, and dog at a cricket match at the side of a sports pavilion. Group of men, maybe a team of runners. Child in clothing with Kentish Flour sew-ons and hat with wheat on the top. Miss Cohn, 6/7/1911 Mr A Robinson, 31/3/1904 Mr Ah Hoy, 19/4/1903 Mr Ah Gay, 19/11/1903 Mr Ah Gay and one other, 19/1/1903 Mr Ah Hoy, 22/12/1902 Mr Ah Hoy, 22/12/1902 Mr Kim Ah Hoy, 22/12/1902 Mr Kim Ah Hoy, 22/12/1904 Mr Deravin, 5/6/1902 3. Box 3 Bendigo Railway Station and Encroachments - Nine Quarter glass lead Plates in a box labelled "Kahland Collection. Content railway station, locomotives and signal box, Bendigo Railway Station. 11072a Bendigo Railway Station from the Mitchell Street Bridge 4. Six black and white photos printed taken by Allan Doney - currently being scanned. 11072.1af Bendigo Arcade Pall Mall next to Myers. 11072.1ag Easter 1955 Junior Fire Brigade pulling fire cart with portrait of Queen Elizabeth 2 on the corner of Park Road and Bridge Street. 11072.1ah School of Mines Float Easter procession 1954. 11072.1ai Hustlers Terrace Bendigo 11072.1aj Limerick Castle Hotel Williamson St Bendigo 11072.1ak Christian Science Society 15 MacKenzie St., Bendigo, on the left at 11 MacKenzie St., formerly "Legacy House", now the Bendigo Historical Society. On the extreme left is the rear of the Princess theatre in View St. photos, bendigo, bendigo railway yards, mike butcher collection -
 Bendigo Military Museum
Book - BOOKS, BOXED SET, Graham R McKenzie - Smith, The Unit Guide, 2018
... .1) Box open, cardboard, dark green buckram, white paper... and Signal Units. Box of 6 books. The Unit Guide / The Australian ....1) Box open, cardboard, dark green buckram, white paper lining, gold print on sides. .2) - .7) Hard cover book, cardboard, dark green buckram with gold print on front cover & spine. Pages are plain, cut, white, black print, black & white illustrations. .2) Volume 1 of 6. Unit & Location Indexes / Bibliography, Orders of Battle. 483 pages. .3) Volume 2 of 6. Headquarters, Infantry, Cavalry / Armoured & Intelligence Units. 605 pages. .4) Volume 3 of 6. Artillery, Air Defence and Engineer Units. 626 pages. .5) Volume 4 of 6. Medical and Signal Units. Box of 6 books. The Unit Guide / The Australian Army / 1939 - 1945. 654 pages .6) Volume 5 of 6. Aust Army Service Corps, Aust Army Ordnance Corps and Aust Electrical & Mechanical Engineer Units. 706 pages. .7) Volume 6 of 6. Womens Services / Volunteer Defence Corps / War Graves, Survey, Labour, Salvage / Military Policing / Recruiting & Training / Dental, Bath & Laundry / Veterinary & Animal / Movements & Transit / Pay, Records & Printing, Postal / Amenities & Canteens Units. 568 pages. books- military history, unit guide -
 Melbourne Tram Museum
Album - Ron Wilson 46 Photographs -1987 to 1999
... . Photo taken from the signal box RWC4 SW5 814 as an advertising.... Photo taken from the signal box RWC4 SW5 814 as an advertising ...Photo - see pdf file for further information. Number Brief Description RWC1 SW6 897 in MTA livery on Rt 5 in Swanston St outside Flinders St Station RWC2 WS6 965 as an advertising car for Next Flight on Rt 15 in Swanston St outside Flinders St Station RWC3 W1 427 on tourist Service in Swanston St at the city shunt. Photo taken from the signal box RWC4 SW5 814 as an advertising car for the RVIB in Park St near St Kilda Rd RWC5 PMTT foundation stone for Kew Depot RWC6 SW5 682 as an arts car in Coldblo Rd in Malvern Depot RWC7 SW5 724 as an arts car on Rt 6 in St Kilda Rd at Domain Rd RWC8 SW6 866 on Rt 6 and a Z 107 in MTA livery in Swanston St outside Flinders St Station RWC9 W5 821 with 2 doors in MTA livery in Victoria Prd at Brunswick St RWC10 782 at Bylands RWC11 SW5 847 in MTA livery turns into Preston Workshops during track repairs RWC12 Scrubber 10W in St Kilda Rd outside the arts centre RWC13 W5 685 on the fan of South Melb Depot RWC14 SW6 880 on Rt 8 in St Kilda Rd outside Flinders St Station RWC15 W6 997 on Rt 15 in St Kilda Rd outside Flinders St Station RWC16 W6 971 in Victoria Prd crossing Nicholson St RWC17 SW5 846 on Rt 6 in Swanston St at Flinders St RWC18 SW6 852 on Rt 72 in Swanston St at Flinders St RWC19 Z 217 on Rt 22 as an advertising car for Qantas in Swanston St outside Flinders St Station RWC20 Z 230 on Rt 1 in Swanston St at Little Lonsdale St RWC21 W7 1011 on Rt 8 as an advertising car for St George Bank in St Kilda Rd outside the Arts Centre RWC22 Z 220 as an advertising car foe Telstra in Swanston St at Flinders Lane RWC23 SW6 854 on RT passes 946 in Swanston St outside Flinders St Station RWC24 Z 56 in MTA livery in Swanston St outside Flinders St Station RWC25 SW6 930 in MTA Livery at the end of the siding in the South Melb per way depot RWC26 SW6 954 on Rt 69 at the St Kilda Terminus RWC27 SW6 948 on a semi-trailer in Preston Workshops RWC28 Z 159 in MTA Livery in Elizabeth St at Victoria St RWC29 B2 2003 on Rt 59 in Elizabeth St at Victoria St RWC30 A1 235 at the Batman Ave Terminus RWC31 Z 191 at the Batman Ave Terminus RWC32 SW6 998 on Rt 15 in MTA livery in Swanston St at Collins St RWC33 SW6 925 on Rt 8 in MTA livery in Swanston St at Collins St RWC34 SW6 993 on Rt 67 in MTA livery in Swanston St at Collins St RWC35 SW5 846 on Rt 6 in MTA livery in Swanston St at Collins St RWC36 W2 643 at Bylands RWC37 A1 233 at the Batman Ave Terminus RWC38 SW6 883 on Rt 64 in MTA livery in Swanston St at Collins St RWC39 SW6 939 in MTA Livery running in to South Melb Depot in Swanston St at Collins St RWC40 SW5 844 in M&MTB on Rt 72 in Swanston St at Collins St RWC41 W7 1024 advertising Buy Australian on Rt 5 in Swanston St at Collins ST RWC42 W7 1007 on RT 64 in M&MTB livery in Swanston St at Collins St RWC43 SW6 880 in MTA livery on Rt 69 at the St Kilda Terminus RWC44 SW6 884 on Rt 16 waits as Z 169 shunts in ST Kilda Rd outside the Arts Centre RWC45 SW5 in M&MTB livery on Rt 8 in ST Kilda Rd outside the Arts Centre RWC46 Z 133 in MTA Livery on Rt 50 in Elizabeth St at the Terminus Demonstrates the work of Ron Wilson in photography and collection of prints. Assembled album in a black presentation folder of 46 photographs from the Ron Wilson Collection - 12 A4 sleeves. All photographs have been scanned and placed on the Museum's G drive. A list of all photographs with details has been compiled. melbourne, tramways, trams, flinders st, mta, advertising trams -
 Ballarat Tramway Museum
Photograph - Digital image Set of 10, Tony Smith, 1971
... of Victoria St. Has the signal control box on the adjacent pole.... the signal control box on the adjacent pole. Photograph Digital image ...Yields information about Ballarat Tramways and trams prior to the closure of the tramway system.Set of 10 digital images of Ballarat trams prior to closure, scanned from original slides by Tony Smith, 1971 prior to closure of the system. .1 - 27 crossing Lydiard St North level crossing, with Reids Coffee Palace in the background. .2 - 11 and 26? crossing at the Bell St loop - 11 has destination of Lydiard St North, Twin Lakes sign and a SEC Briquette advert. 26 - enroute to Lydiard St North. .3 - 13 in Bridge St, at Stones Corner. Tram has a Twin Lakes advertisement. Has the Bank of NSW, ? Hotel, with a JP Howard sign on the building. .4 - 26 and 27 crossing at Bell St loop. 26 has a Briquettes roof advert. .5 - 13 and 12? crossing at the Parker St loop. 13 has a Twin Lakes advert. .6 - 13 at Carlton St loop, Wendouree Parade. Has the Olympic rings in the background. .7 - 17 in Wendouree Parade, with destination of Gardens via Drummond St North, near the depot. Tram has a Twin Lakes advert. .8 - 31 turning from Wendouree Parade into Macarthur St at View point, with a shelter in the background. Tram is showing Special. .9 - 31 in Macarthur St at View Point - has destination of Victoria St. .10 - 21 enroute to Victoria St, about to cross Grenville St. Tram has the destination of Victoria St. Has the signal control box on the adjacent pole.trams, tramways, level crossings, lydiard st gates, lydiard st nth, drummond st sth, bridge st, stones corner, bell st, parker st loop, wendouree parade, carlton st, view point, macarthur st, grenville st, sturt st, tram 27, tram 11, tram 26, tram 13, tram 21, tram 31, tram 12, tram 17 -
 Ballarat Tramway Museum
Magazine, Melbourne and Metropolitan Tramways Board (MMTB), "MMTB News", 1966
... the St Kilda Junction signal box, more trams for Russia... the St Kilda Junction signal box, more trams for Russia ...Eight issues of "MMTB News" - The Magazine of the Melbourne and Metropolitan Tramways Board. Two copies of issues 1 to 6 held. Second copy added 31/8/2004. All issues printed with an cream colour paper cover with the rest of the magazine white gloss paper. 2720.1 - Vol. 3, No. 1 - 16 pages, January 1966, with a photo of the Mark VI bus No. 702 on the front cover, notes on Traffic Congestion, motor cars and supermarkets, depot masters, engineering, bus maintenance, sports and social club news. On rear cover includes a photo of a Christmas function with past senior employees - left to right - H. R. Steains (architect), H. S. McComb (Chief Surveyor), Mr. Aird, Mr. P. M. Ireland (Rolling stock engineer), J Fisher (Civil Engineer) and H. A. Warner (Secretary) 2720.2 - Vol. 3, No. 2 - 16 pages, February 1966, with a photo of counting decimal coins, Tribute to the W2 class tram written by Norm Cross, (with photo), Hawthorn Clothing Depot, retirement of Harry Munroe, introduction of decimal currency, donation of 1B bogies to SPER, tramways band, death of Neil Olsen, sports and social club news. See btm2720i9.jpg for image of the Norm Cross photograph. 2720.3 - Vol. 3, No. 3 - 12 pages, March - April 1966, with a photo of Tramways Bowl Tournament presentation on the front cover, Recent developments in public transport in North America, Vera Cruz Mexico, cable cars at Rushworth, sports and social club news and photo of the Melbourne bogies under Sydney tram. 2720.4 - Vol. 3, No. 4 - 16 pages, May 1966, with a photo of W2 321being overhauled at Preston Workshops, change over to decimal currency for accounting machines, "Tram Driver Salutes the L class tram" - written by A. Bailey, Melbourne's New Trams, retirement of Gordon Wilson, sports and social club news. 2720.5 - Vol. 3, No. 5 - 16 pages, June 1966, with a photo of the track relaying in Camberwell Rd with Camberwell fire station in background, Melbourne cable tram routes, opening and closing dates, retirement of G. H. Box, visit of SPER members to Melbourne, memories of Malvern Depot, sports and social club news. 2720.6 - Vol. 3, No. 6 - 16 pages, July - August 1966 with a photo of the view from the St Kilda Junction signal box, more trams for Russia, retirements of 31 Employees, a contest to win an old W2, St Kilda Road Junction box - and how it works - signalling and interlocking, closure of Port Melbourne bus depot, sports and social club news. 2720.7 - Vol. 3, No. 7 - 16 pages, September - October 1966 with a photo of 610 on the Maribyrnong River Bridge, during the SPER tour, "Public Transport in Big Cities" - R. Risson - with photo - see image i10, MMTB Ambulance division, new trams, trams or buses, death of Harry Hood, Chas Samuels, retirement of Jack Ferguson, Reg Maxwell, manufacture of trackwork, cable tram working, sports and social club news. 2720.8 - Vol. 3, No. 8 - 16 pages, November - December 1966 with a photo of a wedding party on a tram (Richards / Fuller), apprenticeship training, Christmas message from the Chairman, tramway canteens, art of rostering by R. Drummond, Wattle Park Chalet, clock and instrument shop at North Fitzroy, tramways band, sports and social club news.Each issue has stamped on the front cover or inside "The Australian Railway Historical Society (S.A. Branch).trams, tramways, mmtb, sper, wattle park, port melbourne, st kilda junction, decimal currency, w2 class, l class, hawthorn