Showing 370 items
matching use of force
-
 Mission to Seafarers Victoria
Equipment - Lifebuoy, Marra Melbourne, 1955-1984
Marra was a refrigerated cargo ship built by Ardrossan Dry Dock & Ship Building Co. in 1955. The first owner was the Adelaide Steamship Co. Ltd., Melbourne . 1,396 gross tons. Lbd: 233'2" x 37'8" x 14'9". in May 1965 it was sold to the Australian Army and renamed AS3051 (John Monash) and provided a shuttle service from Australia to Vietnam transporting cargo for the Australian Task Force. In September 1974, it was sold to unknown buyers however prior to that sale, she worked the West Australian coast being used on the Ord River Project under 'Stateships' perhaps under lease. The Clydebuilt shipsite states she was renamed Asian Queen in 1976 , Arabian Victory in 1980 and finally Sea Rose in 1981. The ship was scrapped in May 1984 at Gadani Beach, Pakistan. Lifebuoys are an essential piece of equipment on a ship. Because the name of the ships it belongs to is written on it is often the only memorabilia left from the ship when it is sent to scrapyard.Round buoy decorated in red and yellow sections with the word "Marra Melbourne" painted on the front. There is a rope that is strung through sections of the exterior.In black paint on the front of the buoy: "MARRA MELBOURNE"safety wheel, lifebelt, water wheely, ring buoy, lifering, lifesaver, life donut, life preserver, perry buoy, lifebuoy, lifesaving equipment, rescue, drowning, vietnam war, adelaide steamship, john monash, australian army, life buoy -
 Greensborough Historical Society
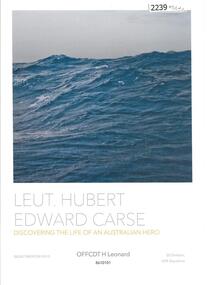
Folder, H. Leonard, Lieutenant Hubert Edward Carse, 1914o
Service records of Lieutenant Hubert Edward Carse, both as officer in the R.A.N. and R.A.N.V.R; with details of his activities in the Z Special Force, which sank many Japanese ships during World War 2 using limpet mines. Compiled by Officer Cadet Harrison Leonard.This compilation made by Harrison Leonard; a student officer at Australian Defence Force Academy Canberra.Text and reproductions of service records in plastic folderworld war 2. malayan campaign, hubert edward carse -
 City of Moorabbin Historical Society (Operating the Box Cottage Museum)
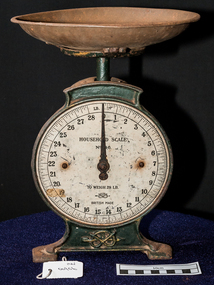
Scales, Imperial, Spring, 'Salter Household Scale’ 28lb, c1920
In the 18th century, spring scales appeared. To produce these scales, a manufacturer would use the resistance of a spring to calculate weights, which could be read automatically on the scale’s face. The ease of use of spring scales over balance scales is what led most post offices to outfit their clerks with spring postal scales. One of the most common types of spring scales was the kitchen scale—also known as a family or dial scale. Designed for horizontal surfaces, these scales used the weight of goods in a pan at the top of the scale to force the spring down. Such scales were common in early-20th-century households and were sold by Sears and Montgomery Ward. Many had flat weighing surfaces but some were topped by shallow pans. Companies such as Salters, Chatillon, and Fairbanks made both. SALTER HOUSEWARES began in the late 1760 in the village of Bilston, England. At this time Richard Salter, a spring maker, began making 'pocket steelyards', a scale similar to the fisherman's scale of today. By 1825 his nephew George had taken over the company, which became known as George Salter & Co. and later established a large, well equipped manufacturing site in the town of West Bromwich. The business thrived throughout the 1900s, and in 1972 the company was purchased by Staveley Industries Plc. In 2002, the management team at Salter Housewares Ltd, backed by Barclays Private Equity, bought the company out from the group, to concentrate on its consumer businesses. In 2004 was sold to the US-based HoMedics company, and in 2006, Salter Housewares USA and Taylor Precision Products Inc (also owned by HoMedics) merged.Salter Brand No. 46 Household Spring Balance Kitchen Scales made of green painted metal with a white large clock face dial marked in 1oz graduations and with a shallow metal bowl placed on the flat top connected to the mechanism. An adjustable screw tightened or loosened the spring to bring the pointer to zero, prior to adding the material to be weighed.. A common piece of kitchen equipment as most families used this type of scale when measuring goods for cooking or storing. HOUSEHOLD SCALE / NO. 46 / SALTER / TO WEIGH 28 LB / ( rope & arrow TM) BRITISH MADE Base rope & anchor S (trade mark) weights, measures, shops, scales. balances, grocery stores, early settlers, moorabbin, bentleigh, cheltenham, salter housewares pty ltd, west bromwich, england, salter george, salter richard, bilston england -
 City of Moorabbin Historical Society (Operating the Box Cottage Museum)
Tools, Trigonomertrical sliding scale rule in box, c1940
W&G 476 "Dual-Face" Trigonometrical (Stadia) Made in Melbourne, Australia by White & Gillespie Record Processing Co. a precision engineering firm. Front Scale LL (or LL3), L, A [ B, Reciprocal (or CI), C ] D, Cu, LL (or LL2) Back Scale Stadia V, H, Chord, A [ B, SIN<6 COS>5, SIN>5 COS <6, C ] D, TAN 30-6, COT 84-90, TAN 5-45, COT 85-45 Conventional Cursor This type of sliding scale was used to design Battleships during WWII. A subsidiary was W&G Records an Australian recording company that operated from the early 1950s to the 1970s. It released many significant recordings by Australian popular artists of the 1960s and also issued recordings of popular American artists, notably releases from ABC-Paramount (Ampar) label, which W&G distributed from 1955 until 1960, when the Australian distribution was taken over by Festival Records. A Trigonometrical sliding scale rule in its original boxW & G / DUALFACE / TRIGONOMETRICAL / SLIDE RULE / MODEL 476 measurements, slide rulers, physics, calculations, ship design, navigation, ww11 1939-45, white & gillespie record, processing company, melbourne, bentleigh, moorabbin, cheltenham, australian defense force -
 City of Moorabbin Historical Society (Operating the Box Cottage Museum)
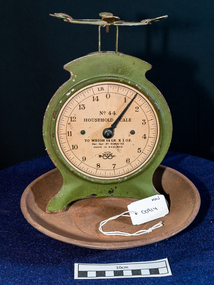
Scales,Spring Balnce Imperial ‘Household’ Salter, 20thC
In the 18th century, spring scales appeared. To produce these scales, a manufacturer would use the resistance of a spring to calculate weights, which could be read automatically on the scale’s face. The ease of use of spring scales over balance scales is what led most post offices to outfit their clerks with spring postal scales. One of the most common types of spring scales was the kitchen scale—also known as a family or dial scale. Designed for horizontal surfaces, these scales used the weight of goods in a pan at the top of the scale to force the spring down. Such scales were common in early-20th-century households and were sold by Sears and Montgomery Ward. Many had flat weighing surfaces but some were topped by shallow pans. Companies such as Salters, Chatillon, and Fairbanks made both. SALTER HOUSEWARES began in the late 1760 in the village of Bilston, England. At this time Richard Salter, a spring maker, began making 'pocket steelyards', a scale similar to the fisherman's scale of today. By 1825 his nephew George had taken over the company, which became known as George Salter & Co. and later established a large, well equipped manufacturing site in the town of West Bromwich. The business thrived throughout the 1900s, and in 1972 the company was purchased by Staveley Industries Plc. In 2002, the management team at Salter Housewares Ltd, backed by Barclays Private Equity, bought the company out from the group, to concentrate on its consumer businesses. In 2004 was sold to the US-based HoMedics company, and in 2006, Salter Housewares USA and Taylor Precision Products Inc (also owned by HoMedics) merged. Salter Brand No. 44 Household Spring Balance Kitchen Scales made of green painted metal with a large clock face dial marked in 1oz graduations and with a shallow metal bowl placed on the flat top connected to the mechanism. An adjustable screw tightened or loosened the spring to bring the pointer to zero, prior to adding the material to be weighed.. A common piece of kitchen equipment as most families used this type of scale when measuring goods for cooking or storing.On Clock face ; NO. 44 / HOUSEHOLD SCALE / TO WEIGH 14LB X 1OZ / Pro. Pat. No. 30819 / 32 / MADE IN ENGLAND / SALTER / S in trademark rope with arrow market gardeners, early settlers, fruit, vegetables, farmers, cooking, recipes, scales, weights, measures, brass, balance beam, moorabbin, cheltenham, bentleigh, kitchen scales, dairy products, cereals, wheat flour, salter housewares pty ltd, west bromwich england -
 City of Moorabbin Historical Society (Operating the Box Cottage Museum)
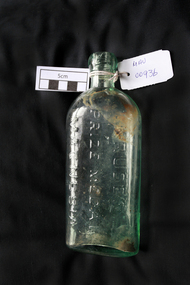
Manufactured Glass, bottle 'Kruse's Magnesia', 20thC
Johann August (John) Kruse was instrumental in the development of the pharmaceutical industry and pharmacy training in Victoria. He was a driving force behind the creation of the Pharmaceutical Society of Victoria and was appointed a founding member of the Society's inaugural council in 1857. He manufactured many pharmaceuticals and health products such as mineral waters and 'Kruse's Fluid Magnesia' (1863) which is still in use today. He later went on to produce insecticides and dynamite, then established his own analytical chemistry service. In 1878 Kruse established Victoria's first pharmacy training facility - the Melbourne School of Pharmacy. There pharmacy apprentices were taught chemistry, botany, materia medica and Latin, while country students could study by correspondence. The School was endorsed and monitored by the Pharmacy Board of Victoria to which Kruse was appointed in 1880. Kruse's pharmacy school was the forerunner of the Victorian College of Pharmacy, Monash University, which remains Victoria's only pharmacy training institute. In 1853, shortly after qualifying as pharmacist at the University of Göttingen, Johann August (John) Kruse, moved to London. The medical practitioner Dr S. Weil sent Kruse to Victoria, Australia to manage a new pharmacy and tobacconist's shop which he was having built at 136 Bridge Rd in Richmond. In 1856 Kruse opened a second pharmacy 'John Kruse and Company Chemists and Druggists' at 207 Bourke Street. 1857 the Richmond shop was destroyed by fire, so all pharmaceutical production was moved to the Bourke St premises and later to his new location at 184 Bourke St.. Kruse was forced to sell his business in 1868 to Felton Grimwade and Company and work for them as manager of their chemical works. By the early 1870s he had regained financial independence so left the company to establish his own businesses again. He opened up a pharmacy at 31 Swanston St and in c1874 leased Victoria's premier natural springs, Clifton Springs, on the northern side of the Bellarine Peninsula, where he established a bottling plant. Suspensions of magnesium hydroxide in water, often called Milk of Magnesia, are used as an antacid to neutralize stomach acid, and as a laxative. Milk of magnesia is sold for medical use as chewable tablets, capsules, and as liquids having various added flavours Kruses Fluid Magnesia 300ml Extralife Kruse’s Fluid Magnesia, Magnesium supplement. Rapidly absorbed, easily digested. Improves general well being, corrects magnesium deficiency. Helps relieve indigestion, when due to acidity. In 1878 Kruse established Victoria's first pharmacy training facility - the Melbourne School of Pharmacy, the forerunner of the Victorian College of Pharmacy, Monash University, which remains Victoria's only pharmacy training institute. A glass bottle containing ‘Kruse’s’ Magnesia’ medicineKRUSE’S / PRIZE MEDAL / MAGNESIA/ K / FELTON-GRIMWADE & CO. MELBOURNE Directions for use ......glass works, pharmaceutical glass, pharmacy, kruse johann august (john), dr weil s, ., victorian college of pharmacy, monash university, university of göttingen, felton grimwade and company, magnesium bicarbonate, magnesium oxide -
 Geelong RSL Sub Branch
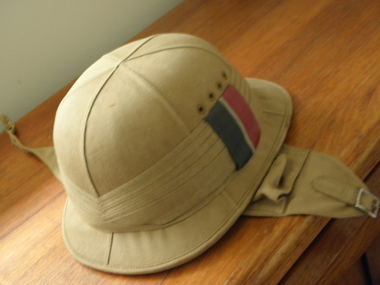
Pith Helmet, Early 20th Century
The helmet was used by Sgt Cane A. E.Royal Australian Air Force Pith Helmet WW2.Khaki pith helmet with khaki puggaree which has 5 pleats. One the pugaree is an oblong colour patch blue white red colours. The Pith Helmet has a cloth khaki band around the brim and 4 ventilation holes on each side of the helmet. This helmet has chin straps that also have ear protection when done up. On the back band of the helmet is a leather loop with a press stud.Inside the helmet handwritten numbers R18098 and 13745 name Cane A. E.khaki pith helmet field sgt a.e.cane -
 Geelong RSL Sub Branch
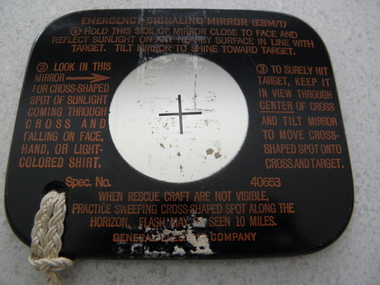
Emergency Signaling Mirror (ESM/1), Mid 20th Century
... for use by Army Air Force (US?) in September 1943 mirror emergency ...This is an Army Air Corp procured signal mirror that dates from September 1943 (Ser No 40653)This mirror was adopted for use by Army Air Force (US?) in September 1943Oblong mirror face one one side, painted instructions on one side, with printed instructions for use. There is a whole on the bottom left corner with a rope for personal attachment.Specification Number 40653 General Electric Companymirror, emergency, signals, us, army air force -
 Geelong RSL Sub Branch
Slide Rule Calculator, 1940
The Slide Rule was made in 1940 and used by the Royal Australian Air Force during WW2.This is an original Slide Rule that was used by RAAF during WW2Wooden Slide Rule CalculatorRule, Slide M.G. Mk III. W.H.H. 1940slide rule ww2 raaf -
 Geelong RSL Sub Branch
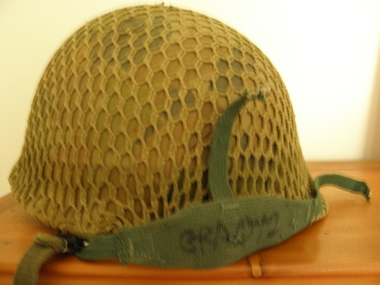
Helmet - US, Mid 20th century
This is a US Military Helmet WW2 vintage.This is a helmet used by a member of US Defence ForceA Helmet - US Military- green, camouflage and net cover, webbing on the inside and chin straps.Graq 2 on the chip strap and head band.us military helmet, -
 Greensborough Historical Society
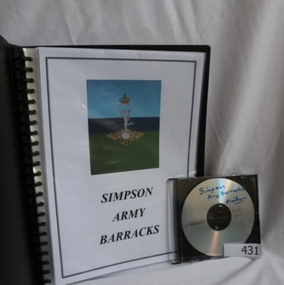
Folder and compact disc, Simpson Army Barracks, 2011_
This document is the result of research into the history of Watsonia Barracks (now Simpson Barracks) by GHS member Marilyn Smith. It details the origin of street names in the surrounding area and includes biographical information on those after whom the streets were named. Updated December 2016.The Watsonia Barracks has been in use since WW2 and is today home to the Defence Force School of Signals. It was built on the property formerly owned by Ainslie Meares. In 1951, surrounding land was purchased for the extension of the barracks. The suburb of Yallambie was formerly part of the Barracks. Black spiral bound folder (approx. 32 pages) with accompanying compact disc. Colour illustrations and maps. Updated 2016 in Word document.simpson army barracks, watsonia barracks, yallambie, marilyn smith, watsonia -
 Kiewa Valley Historical Society
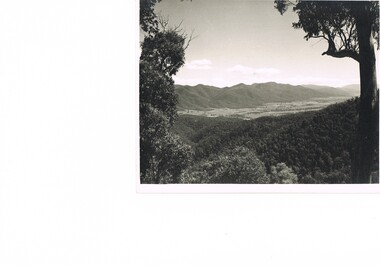
Photograph of Kiewa Valley Panorama, Farming lands within the Kiewa Valley in1950s, Circa 1950
This photograph shows how (early to mid1900s), before the establishment of the Mount Beauty "gated" village, the Kiewa Valley was farmed and the scarce population was spread out over acres of productive land. This photograph catches a time before (what appeared to the local farmers as the invasion by a mass of construction workers) when this remote valley was part of a "lay back" rural landscape,occasionally visited by friends and some wayward tourists. The mountain ranges provided an adequate barrier against the way-would traveller. The immigration numbers coming into Australia was still quite small ( due to the "white" Australia policy) which was in force before World War II. After World War II a mass of displaced European refugees and migrants boosted the Australian population and provided for a greater degree of diverse professions and rural related work force.This photograph depicts the borderline in time between an exclusively rural based population and respective activities(early 1900s)to the present (2000 on wards) integrated village, tourist and retiree/holiday area. The time when land was exclusively used in agriculture is over and the impact of cheaper rural produce from Asian markets will see a shift of land useage and population activities. The Kiewa Valley is loosing its hiding place and is becoming more and more a source of untapped residential land. Black and white photograph of farming/grazing land useage, before the establishment of the Mount Beauty Village. Small pockets of residentual houses can be viewed. Road access (unsealed dirt) was typical of that provided in rural regions in the 1950s. The photo is on 200gms paper and not on photographic paper.kiewa valley in the early1900s, grazing in the kiewa valley, sec victoria -
 Kiewa Valley Historical Society
Photograph of Snow Covered Catchment Area Vic, Snow Covered Catchment Area Victorian Alps - 1950s, Circa 1950
This photograph details (early to mid1950s), the Victorian Alpine region when this remote area was part of a "lay back" rural landscape,occasionally visited by recreational adventurers and some wayward tourists. The mountain ranges had provided an adequate barrier against the way-would traveller, but with the opening up of this region by the provision of improved roadways and accommodation facilities, courtesy of the Kiewa Valley Hydro Electricity Scheme, changes such as tourism and its impact upon the "natural" state started to show its side effects (clearing of the land). The expansion of the European immigration numbers (1950s) coming into Australia was increasing after World War II which not only provided increased construction workers to the region but also immigrants who appreciated alpine regions. Some of these immigrants contributed to the expansion of the region and provided for a greater degree of diverse professions and rural related work force.This photograph depicts the borderline in time between an exclusively rural based population and respective activities(early 1900s)to the present (2000 on wards) integrated village, tourist and retiree/holiday area. The time when land was exclusively used in agriculture and Alpine grazing lands is over. The Kiewa Valley is loosing its hiding place and is becoming more and more a source of untapped residential land and winter time recreational adventure lands. The changes brought about by modern technologies involving recreational activities such as hang gliding, gliding (local airstrip), mountain bikes, car rallies and their associated clubs is providing for an increased short term population boost. These together with the attractions for retirees is changing not only the physical nature of the Kiewa valley but also its "soul".This item is a black and white photograph of a section of snow covered catchment area in the Victorian Alps in the mid 1900. It is on 200 gms paper but not on photographic paper and has a white boarder (3 mm).kiewa valley tourism, victorian alps, alternate energy supplies, alpine population growth -
 Kiewa Valley Historical Society
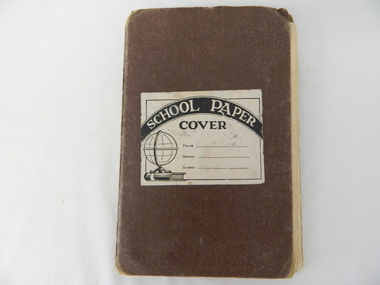
Binder Victorian Education 1947, Circa 1947
These educational publications covering a topical monthly theme and providing a slice "of the era" in general knowledge, was used by schools in Victoria as a basic starting point for a particular level of perceived knowledge. The general articles and extracts contained within, were not targeting a specific gender or socio economic sector but designed for all children at a particular stage of their development. This publication did have a format of: 1st page topical, e.g. ANZAC day scouting (U.N.), one page of regional Victoria, one page of poetry, one page of short stories, one page of world history and the last page of a song, complete with appropriate notes. These publications were produced during the second World War and made special references to it. This publication occurred during a period when the Education Department was highly authoritarian in its approach to State levels of learning. Fragmenting "special" schools like later "New Age" teaching methods and doctrines (home schooling) were repressed with considerable force.This binder full of monthly educational studies was particularly important to "hidden away" rural communities such as in the Kiewa Valley, especially at this point in time (World War II). The teaching methods used by local schools provided the necessary break through required by local school children to stop any adverse knowledge deficiencies due to factors of regional isolation. School children with in the Kiewa Valley would be able to integrate with children from all regions, weather in cities or larger towns. This hard cover (card) binder contains 11 monthly publications produced by the Victorian Department of Education for Grades 7 and 8 in the year 1947. Each issue has 16 pages with the cover page covering the major theme for the month. Each issue is placed within the folder by the folded middle page constrained by a thin cord. This is the only method to contain each monthly edition as they have no clasp or are stapled.The folder"SCHOOL PAPER COVER" underneath and to the left is a sketch of the world (revolving desk top stand) on top of a book and next to this "Name ------------ " underneath "Grade-----------" underneath "School---------" all enclosed by a thin border line.school paper, victorian education curriculum, education news letters, loose leaf educational binders -
 Kiewa Valley Historical Society
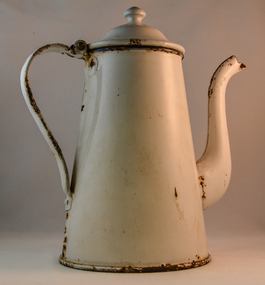
Pot Coffee, Circa 1950
This coffee pot was made for flat heating surfaces and not the open fire. The enamel coating was used as a thermal barrier to keep the contents hot. This could have been used as an all day coffee source for busy farm workers or breakfast and lunch times. When this pot was used at dinner time, it was a time period when dinner was more formal, with the whole family sitting at the dinner table. The white enamel would have been sufficient for the majority of households. When this pot was in use the dinner period was when the whole family was together and communication within the family was considered very important as a cohesive force. This was a time before television intruded into the atmosphere of relaying the day's activities to the whole family.In small rural communities within the Kiewa Valley a good cup of tea or coffee was a time for relaxation from the hard work of the day. This relaxation period was beneficial for not only the mind but also the body. This was particularly for the house bound mother with domestic chores that had, at this time in history not many "time saving" pieces of domestic equipment. A good pot of tea or coffee at "smoko" was a god sent. Although regarded by well groomed city folk that a coffee pot was for coffee only the less social etiquette standards of country folk permitted its use for tea. Versatility even within the household was of great benefit to the folk in the Kiewa Valley. This was even so for the immigrants that joined in and were warmly welcomed within this rural sector of Australia.This coffee pot is in the French style with a goose neck. It is fully coated in white enamel and has a concave bottom. It has a hinged lid and the main body has been rolled fastened to the bottom plate. The sandwiched steel body is approximately 1mm thick. The two piece neck has been welded together similarly the hinged lid and handle. Rivets are installed to the both bases of the handle. country kitchens, well heated coffee, coffee break in rural regions -
 Kiewa Valley Historical Society
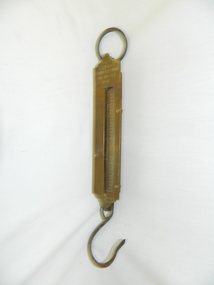
Scales Weighing Spring, mid to late 1900's
This type of mobile spring weighing scales were in high use before legislative Weights and Measure standards where in force throughout Australia. This was in a time when a "mans word and handshake" was his legal document. It was a time, especially in rural areas that the term "she'll be right" was extensively used and these types of scales (the accuracy over time) would produce a near "enough is good enough" measure. These scales are very significant for the rural produce within the Kiewa Valley. Rural produce such as hay milk and butter tubs,tobacco bundles could be easily weighed (in relatively smaller packages) for both markets and for use within the valley.This spring scale (!/2 Once to 4lb) was used as general weight scale. Because it is spring loaded the accuracy would fade over time and by over weighted loads. The spring enclosure is made from cast iron painter black. There is an iron ring at the top (attaching/holding) and an iron hook at the bottom (holding). There is a brass front plate with engraved markings(on the left side) running from top to bottom and a movable pin weight indicator running in the middle indicating the weight of the item being weighed.At the front top"SALTER'S SPRING BALANCE 4LB BY 21/2 OZ" underneath "No 1A" At the bottom in smaller print "MADE IN ENGLAND PATENT"weighing instruments, spring balances -
 Kiewa Valley Historical Society
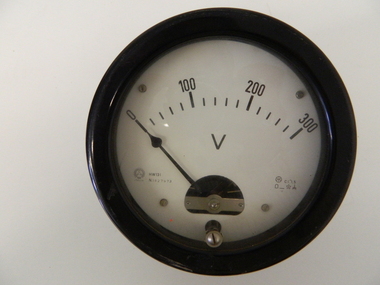
Meter Volt, mid to late 1900's
This analog voltmeter is quite a large (industrial type) apparatus which permits the easy monitoring of electrical variations within the large SEC Victoria Hydro Scheme's electrical generators. These generators are powered by the hydro force of "stored" water at a higher altitude. The establishment of both the NSW and Victorian Hydro schemes was achieved from the mid 1900's to the 1960's. At this point in time the need for additional power sources to quench both an industrial and domestic demand for electricity was purely an economic and not and environmental (carbon reduction) factor. This hydro scheme was instigated by "the Government of the day" as a bold move and was the major force of the World War II refugee and "technical" workforce inclusion of skilled and unskilled migration into the Australian environment. Although this mass "invasion" of workers with families was thought of in some circles as intrusive, the expansion of population post war years and its integration into the Australian rural sector, produced the multi- lingual multi-cultural diversity of later years. This voltmeter is very significant to the Kiewa Valley as its use was introduced during the Kiewa Hydro Scheme. Although only a small apparatus it was part of the explosion of human resources into the valley. This influx of population transformed the region from that of a basically quiet rural region to one which evolved into both an industrial and a larger residential community. This evolution in the valley created a change, not only in the "physical" landscape but also the socio-economic expansion which permitted other "tourist" based industries into the valley. This analog volt meter has two metal rods protruding from the "back" of instrument with screw on points for the negative and the positive leads allowing the "current" to flow across the calibrated resistors to indicate on the "face" side the strength of the voltage "power". The "face" of the instrument has a zero point and then five evenly graduated marks from Zero to the "100, 200 and 300" marked points of measures. A large "V" below these pointers indicates that they represent levels of voltage. Three small screws hold the "face" in place. At the back of the meter is an aluminium "clasp" with three protruding screws (positioning fasteners) and a a screw tightening fixture for the correct fastening of the "clasp" into the correction location on the meter "board".Manufacturer's logo "CSG" underneath "ITALIA"kiewa valley tourism, victorian alps, alternate energy supplies, alpine population growth -
 Kiewa Valley Historical Society
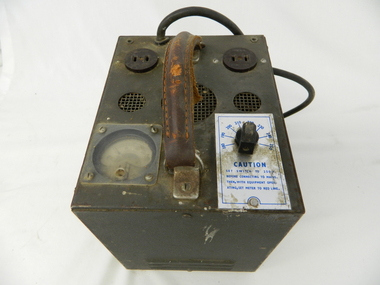
Transformer Lamp System, late 1950's
This transformer lamp system, which has a dial to transform 240 volts to a minimum of 32 volts was used by electrical technicians to inspect internal parts of the large generators (even in small confined spaces). The reason for the reduction of the 240 volts to the 32 volts was for the safety of the inspector. The SEC Victoria Hydro Scheme's electrical generators are powered by the hydro force of "stored" water at a higher altitude. The establishment of both the NSW and Victorian Hydro schemes was achieved from the mid 1900's to the 1960's. At this the point in time the need for additional power sources to quench both an industrial and domestic demand for electricity was purely an economic and not and environmental (carbon reduction) factor. This hydro scheme was instigated by "the Government of the day" as a bold move and was the major force of the World War II refugee and "technical" workforce inclusion of skilled and unskilled migration into the Australian environment. Although this mass "invasion" of workers with families was thought of in some circles as intrusive, the expansion of population post war years and its integration into the Australian rural sector, produced the multi- lingual multi-cultural diversity of later years.This transformer lamp is very significant to the Kiewa Valley as it was introduced as a very small part of the explosion of human resources into the valley. This influx of population transformed the region from that of a basically quiet rural region to one which evolved into both industrial and larger residential community. This evolution in the valley created a change, not only in the "physical" landscape but also the socio-economic expansion which permitted other "tourist" based industries into the valley. This is also a specific electronic item which was manufactured in Melbourne and not sourced from Europe or Asia. This demonstrates the fast evolution of Australian technology to a high standard compatible to that of the rest of the world.This heavy hand held electrical transformer (transforms 240 volts to 32 Volts) an has one leather handle on the top with three small (gauze filtered) air holes. It also has two 2 pin directional cable distribution (clipsal) in/out points 10amps / 240 volts. There is one glassed in volts/ac meter and one variable switch (180 to 150 voltage in settings of 10 volt increments.There are two vents (one on each of the smaller sides). There is also one three pin electrical lead coming out from the top.On one side is a manufacturer's plaque with "ELECTRONIC A & R EQUIPMENT MELBOURNE" and underneath "TYPE 1719, PRI V. 180 250" underneath "V.A. 1250" underneath "CYC 50" underneath "SEC V. 115" underneath "SEC A. 10 . 8". The label on topside "CAUTION SET SWITCH TO 250 v BEFORE CONNECTING TO MAINS THEN, WITH EQUIPMENT OPERATING, SET METER TO RED LINE.kiewa hydro electricity scheme, victorian state electricity commission, transformers -
 Kiewa Valley Historical Society
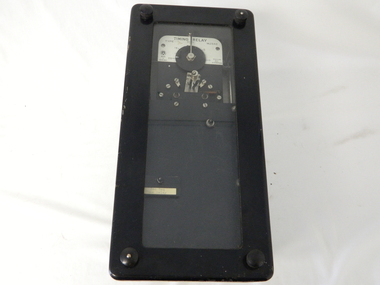
Timer Mechanical, Circa 1950
This Timing Relay is quite a large (industrial type) apparatus. The Timer is started by having a voltage of 250 volts direct current (as supplied by batteries). A DC motor then rotates driving into a clockwork mechanism, the output of which is an arm rotating at the same speed as a minute hand on a clock. Attached to this arm is a mercury switch which tips and makes an electrical circuit operate in a sequence control system. The sequences that use these timers are when starting and stopping Hydro Generators. They check that the machine has connected to the power system grid before 20 minutes duration. Brakes must go on for a set time when shutting down a generator slowing at the right speed as measured by this apparatus. These generators are powered by the hydro force of "stored" water at a higher altitude. The establishment of both the NSW and Victorian Hydro schemes was achieved from the mid 1900's to the 1960's. At this point in time the need for additional power sources to quench both an industrial and domestic demand for electricity was purely an economic and not and environmental (carbon reduction) factor. This Timing Relay apparatus is very significant to the Kiewa Valley as its use was introduced during the Kiewa Hydro Scheme. Although only a relay apparatus, it was however part of the explosion of human resources into the valley. This influx of population transformed the region from that of a basically quiet rural region to one which evolved into both an industrial and a larger residential community. This evolution in the valley created a change, not only in the "physical" landscape but also the socio-economic expansion which permitted other "tourist" based industries into the valley. This Hydro Scheme was instigated by "the Government of the day" as a bold move and was the major force behind the acceptance of World War II refugee and "technical" workforce. Inclusion of skilled and unskilled migration into the Australian environment was of a higher priority than a selective quota system of later years.. Although this mass "invasion" of workers with families was thought of in some circles as intrusive, the expansion of population post war years and its integration into the Australian rural sector, produced the multi- lingual, multi-cultural diversity of later years.sec vic kiewa hydro scheme, alternate energy supplies, alpine population growth -
 Kiewa Valley Historical Society
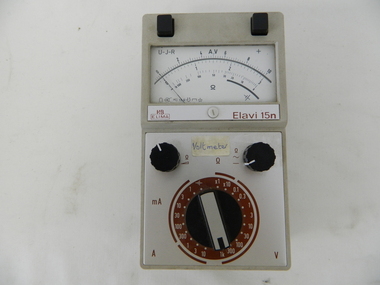
Meter Multi General Purpose, circa mid to late 1900's
This general purpose Multi-meter was manufactured after 1950 and used by the SEC Vic (Kiewa Hydro Electricity Scheme) from that date until late 1900's. It was used to measure very small voltages associated with the operation of the various Hydro Generators. The readings were able to be shown by the resistor in use in the current circuit. During this time period, high quality testing instruments were either sourced from Europe or England. This particular meter was manufactured in the Netherlands. This type of "old" analogue meter was replaced by digital meters whose electronic components are a fraction of the size of the older analogue ones.This analog General Purpose multi-meter is quite a large (for handheld mobile) apparatus which permits the easy monitoring of electrical variations within the large SEC Victoria Hydro Scheme's electrical generators. These generators are powered by the hydro force of "stored" water at a higher altitude. The establishment of both the NSW and Victorian Hydro schemes was achieved from the mid 1900's to the 1960's. At this point in time the need for additional power sources to quench both an industrial and domestic demand for electricity was purely an economic and not and environmental (carbon reduction) factor. This hydro scheme was instigated by "the Government of the day" as a bold move and was the major force of the World War II refugee and "technical" workforce inclusion of skilled and unskilled migration into the Australian environment. Although this mass "invasion" of workers with families was thought of in some circles as intrusive, the expansion of population post war years and its integration into the Australian rural sector, produced the multi- lingual multi-cultural diversity of later years.This General Purpose Multimeter is an analogue meter i.e. it has a needle arm that moves across a scale of divisions. This is a large(hand held) device due to the mechanical movement system within and the large size of its electronic components of its circuitry.There are two black bake-lite push buttons operating the wire inserts Positive/negative leads at the top. The meter (protected with a glass window) has clearly marked graduations (top - volts, bottom amperes). Below this are two bake-lite dials (left "potentiometer the right one measuring range selector). Below this is a "dial" switch to input the desired resistance measuring range "V" Front "H&B ELIMA" and to the right Elavi 15n. 0n the front side is a label "STATE ELECTRICITY COMMISSION OF VICTORIA TRANSMISSION DEPT E.C.No." On the bottom of the base is a stenciled layout of the battery "layout" including the fuse . The information notice is presented in five languages starting with German, English,French, Italian, Spanish and Dutchsec vic kiewa hydro scheme, alternate energy supplies, alpine population growth -
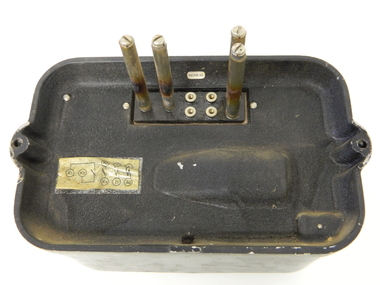
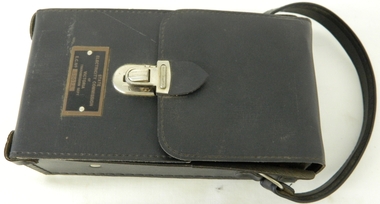 Kiewa Valley Historical Society
Case for G.P. Multimeter, Circa 1950
This leather case holder for a general purpose Multi-meter( KVHS 0307 (A)) was manufactured after 1950 and used by the SEC Vic (Kiewa Hydro Electricity Scheme) from that date until late 1900's. It was used to measure very small voltages associated with the operation of the various Hydro Generators. The readings were able to be shown by the resistor in use in the current circuit. During this time period, high quality testing instruments were either sourced from Europe or England. This particular carry case was manufactured in the Netherlands. This carry case for an analog General Purpose multi-meter which is quite a large (for a handheld mobile) apparatus.The bag however permits the easy monitoring of electrical variations within the large SEC Victoria Hydro Scheme's electrical generators. These generators are powered by the hydro force of "stored" water at a higher altitude. The establishment of both the NSW and Victorian Hydro schemes was achieved from the mid 1900's to the 1960's. At this point in time the need for additional power sources to quench both an industrial and domestic demand for electricity was purely an economic and not and environmental (carbon reduction) factor. This hydro scheme was instigated by "the Government of the day" as a bold move and was the major force of the World War II refugee and "technical" workforce inclusion of skilled and unskilled migration into the Australian environment. Although this mass "invasion" of workers with families was thought of in some circles as intrusive, the expansion of population post war years and its integration into the Australian rural sector, produced the multi- lingual multi-cultural diversity of later years.This leather case is to provide protection for this mobile G.P. Multimeter, therefore it is made from thick leather. It has a carrying strap from a thick "D" chromed link. This link is fastened to the main cover by a looped leather strip with a black coloured rivet. All the fasteners are either chrome or black coloured rivets. The front, which when opened back exposes fully the inside of the case. It is clip fastened to the lower section of the front piece which also can be pushed back allowing the meter to be removed from the frontal position. There is a strip retaining strap slightly higher from the mid point. This is fasted by a black press stud. There are two "L" shaped tin protrusions allowing the meter to slide only down the case until it rests on these shelves. This provides for an empty space for minimal storage,.On the front bottom and below the clasp is a tag "STATE ELECTRICITY COMMISSION OF VICTORIA TRANSMISSION DEPT."sec vic kiewa hydro scheme, alternate energy supplies, alpine population growth -
 Kiewa Valley Historical Society
Relay Protection Instrument, Circa 1950's
This protection relay apparatus (a large electrical fuse), which permits the easy monitoring and disconnection of faulty electrical apparatus connected to the large SEC Victoria Hydro Scheme's electrical power producing generators. These generators are powered by the hydro force of "stored" water at a higher altitude. The establishment of both the NSW and Victorian Hydro Schemes was achieved from the early 1900's to the 1960's. At this point in time the need for additional power sources to quench both an industrial and domestic demand for electricity was purely an economic and not and environmental (carbon reduction) factor. This hydro scheme was instigated by "the Government of the day" as a bold move and was the major force of the World War II refugee and "technical" workforce inclusion of skilled and unskilled migration into the Australian environment. Although this mass "invasion" of workers with families was thought of in some circles as intrusive, the expansion of population post war years and its integration into the Australian rural sector, produced the multi- lingual multi-cultural diversity of later years.This protection relay is very significant to the Kiewa Valley as its use was introduced during the Kiewa Hydro Scheme. Although only a small apparatus it was part of the explosion of human resources into the valley. This influx of population transformed the region from that of a basically quiet rural region to one which evolved into both an industrial and a larger residential community. This evolution in the valley created a change, not only in the "physical" landscape but also the socio-economic expansion which permitted other "tourist" based industries into the valley.This protection relay unit has a black painted metal shell with four copper enclosed "prongs" fastened to the rear of the housing(from a bake-lite plate) . Between these "prongs" are four "empty" points allowing additional "screw on" bases. The front glass enclosed meter and recorder allows for the identification and automatic disconnection of any faulty equipment connected to the main power generator. This equipment acts similarly to a modern day circuit breaker found on the electrical circuit boards of residential homes.On the top section of the front panel "ASEA" to the left "Made in Sweden" and to the right "Frabrique en Suede" below this "RIS" below this a graph and next to it two columns of numbers and a pointer for each setkiewa hydro electricity scheme, victorian state electricity commission, relays, generators -
 Kiewa Valley Historical Society
Timer Favag, Circa 1950
This Favag Timer apparatus was a part of the first electronic control system -(1960's), in Victoria), which worked using telephone stepping selectors to convey a change in voltage providing a regulated pulse from the control centre(Mount Beauty) to the remote Power Stations opening and closing (stop/start) of various devices at the Power Station and a return signal confirmed the action taken. Testing of this unit was carried out using a "dummy" device at the remote Power Station so as not to disrupt the power plant's operation. This timer was one of many electrical apparatus connected to the large SEC Victoria Hydro Scheme's electrical power producing generators. These generators are powered by the hydro force of "stored" water at a higher altitude. The establishment of both the NSW and Victorian Hydro Schemes was achieved from the early 1900's to the 1960's. At this point in time the need for additional power sources to quench both an industrial and domestic demand for electricity was purely an economic and not and environmental (carbon reduction) factor. This hydro scheme was instigated by "the Government of the day" as a bold move and was the major force of the World War II refugee and "technical" workforce,inclusion of skilled and unskilled, migration into the Australian environment. Although this mass "invasion" of workers with families was thought of in some circles as intrusive, the expansion of population post war years and its integration into the Australian rural sector, produced the multi- lingual multi-cultural diversity of later years.This Favag Timer was one of the crucial pieces of equipment that made it possible for the Mount Beauty Terminal Station to control the operations of these Power Stations; McKay, Clover, West Kiewa Power Stations and the Dederang Terminal Station.This aluminium and anodised "FAVAG" (pulse) timer is fastened to a base structure which comes with its own metal cover that is fastened by two metal hooks. From the top of these hooks runs a thick leather "carry" strap.The instrument, itself, a small "micro motor" at one end tape feeding spool on the other. Aluminium metal structures offer a preventative barrier against any electronic spikes from static electricity sources. There are two toggle switches to the bottom right hand side and twelve coloured "pin" connection points.There is a sliding access sleeve which exposes a circuit board.with various leads fastened on each side. In front of one of this slide are two "screw in" fuses, spare fuses are in a small envelope taped above. Circuit diagrams are etched white on black background on the top face of the main structure. At the base of the back section is a two pronged input terminal. There is a fine black rubber layer (cushioning) for the mian top cover.On the cover fastened with two rivets "FAVAG" underneath in small print "Fabrique d'appareils electriques S.A." underneathe "NEUCHATEL-SUISSE". on one end is a "STATE ELECTRICITY COMMISSION OF VICTORIA" metal label screwed on.The back label has manufacturers' type and model number.sec vic kiewa hydro scheme, alternate energy supplies, alpine population growth -
 Kiewa Valley Historical Society
Sign Canteen Painted, Circa 1950
This sign is a part of the "human" factor required for remote and difficult, large impact (both labour and other resources) projects. It is one of the "human" factors which was clearly used in the big 1930's to the 1970's "landscape redevelopment" schemes which started in the early 1900's and is highly regarded as lifting the Australian psyche of only primary producers to an industrial level, equal to any in the world.This "Wet Canteen" sign was installed at the entrance of the Bogong "workers" village "provision's hut" detailing the operational times for the SEC Victorian staff and construction workers, involved in the building of the Kiewa Hydro Electricity Scheme to obtain alcoholic beverages. This facility lasted for over the extensive period (1938 to 1961) of the "Schemes" building phase. This large project was the forerunner when industrial legislation provided for the welfare of workers living in the Bogong Village. The provision of facilities such as a "wet canteen" was of the utmost importance not only to ensure that the long running project was both successful, production wise, but also that its employees were not only physically but also mentally healthy. This sign details that all aspects required for a fit and productive labour force were in place, in this remote and demanding work environment. The majority of heavy equipment and machinery used was either made in England or Europe. A section of the specialised workforce came from local and European expertise in dam construction and water management in alpine terrain. The majority of labour came from migrants and some specialists recruited from England and Europe. At this point in time, the quality of the machines used came from England, Europe and the USA and could not be matched from anywhere else in the developed world. With a specialised workforce came the responsibility of providing all the "comforts of home" including alcoholic beverages. On site accommodation for the workforce is still a requirement for some mining areas but high market returns have produced fly in/out labour.This anodised metal sign has been "block" stenciled on. Black lettering and numbers with the main headings underlined with a red and a yellow line(emphasising the headings)In black stenciled type "BOGONG WET CANTEEN" underneath this "TRADING HOURS" Below this "MONDAY TO THURSDAY 5.15 PM TO 5.50 PM, 7.00 PM TO 9.00 PM" "FRIDAYS SHORT WEEKEND 4.30 PM TO 5.20 PM 7.00 PM TO 9.00 PM" Below this "FRIDAYS LONG WEEKEND 10.00AM TO 11.30 AM" Below this "SATURDAYS PUBLIC HOLIDAYS 4.30 PM TO 5.30 PM 7.00 PM TO 8.30 PM" bELOW THIS "CANTEEN WILL BE CLOSED ON SUNDAYS, GOOD FRIDAY AND UNTIL 4.00 PM ON ANZAC DAY"saucer, plate, secv, state electricity commission of victoria, canteen, bogong mess hall, recreational amenities, socialisation of sec vic kiewa hydro scheme labour force -
 Kiewa Valley Historical Society
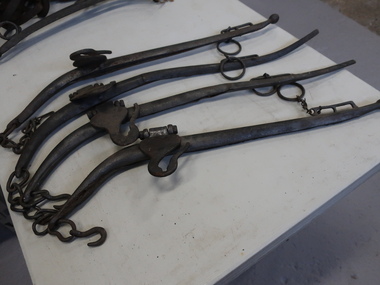
Hames - 2 pairs, Horse Equipment
Horse harness that connects a horse to a horse drawn vehicle 2 types 1. breast collar or breast strap 2. full collar or collar-and-hames. On either side of the collar are wooden or metal bars called hames.Used by farmers in the Kiewa ValleyShort knob top, forged hook, nut and bolt joint, loose rein ring, chain bottom, steel cased. They go on the collar and are made of two metal strips which take the full force of the pull padded by the collar.horse equipment, hames, horse collar -
 Kiewa Valley Historical Society
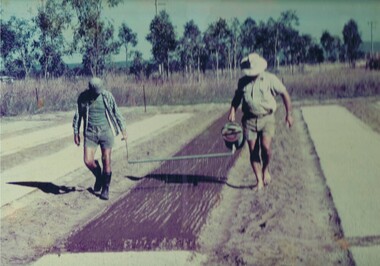
Photograph Tobacco planting, Planting Tobacco seeding, Circa mid to late 1900's
This promotional photograph by the Tobacco Growers Association was in response to a 1935 meeting of tobacco growers from Victoria, South Australia and Queensland which produced four major resolutions for the industry covering the remainder of the 1900s. These four resolutions were: (1) Adequate tariff protection (2) Control of pests and diseases (3) Orderly marketing (4) The formation of an advisory council of growers. History has produced the following results. (1) adequate tariff protection was never achieved,(2) control of disease through benzol vapour (CSIRO) breakthrough, was later identified as carcinogenic, (3) orderly marketing was achieved through (4) the establishment of the Tobacco Growers Association(1984). In October 2006, by way of Government buy back of tobacco leases from growers, resulted in the end of Tobacco farming in Australia (after 136 years of planting the first crop). It was also significant that the major tobacco companies such as Philip Morris and The British American Tobacco Australasia advised the industry that it would source its tobacco requirements overseas by 2009.The remnants of the Tobacco Industry can still be viewed throughout the Kiewa Valley and adjacent regions on the former tobacco farms which still have the tobacco drying sheds and now converted into hay sheds. The problems from the large quantities of carcinogenic infused soil of farmlands in the region, still remains a problem now and for future generations. This particular photograph shows the lack of understanding by farmers and the contracted labour, at that time, and is demonstrated by the bare footed farmer walking next to the seed canister. Some workers did use protective "gum" boots but the majority of farm owners were skeptical of city scientists and their carcinogenic concerns, and it was only after the younger generation of farmers , who had attended Agricultural colleges, encompassed the scientific approach to farm management and began working closely with agricultural scientists. The "she'll be right mate" attitude of the earlier farming/rural community has since mid 1970s, been slowly dissipating. Stricter controls of herbicides and pesticides used in agriculture are now in force. The death of the tobacco industry(2006) resulted in the expansion of the dairy , sheep, beef cattle, venison and lama wool producers in the Kiewa Valley and surrounding regions.Coloured photograph pasted onto a thick wood chip backing. Two galvanised eyelets at the top of the frame, 50mm from each end, with a twine cord stretch from each, for hanging purposes. See also KVHS 0054(B) to KVHS 0054(F)A sign, which has been removed from the picture at some previous point in time is "The Tobacco seed, being so fine, is suspended in water and sown onto the seed base using a watering can [as in the photo] or similar device - August - Sept."tobacco, farming, rural industry, licences, ollie mould, blue mould, benzol vapour -
 Kiewa Valley Historical Society
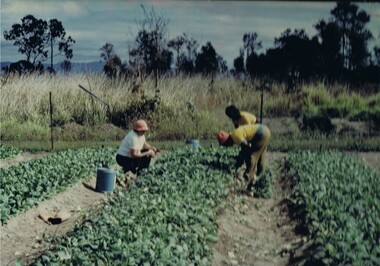
Photograph Tobacco seedlings, Pulling tobacco seedlings for Planting, Circa mid to late 1900s
This promotional photograph by the Tobacco Growers Association was in response to a 1935 meeting of tobacco growers from Victoria, South Australia and Queensland which produced four major resolutions for the industry covering the remainder of the 1900s. These four resolutions were: (1) Adequate tariff protection (2) Control of pests and diseases (3) Orderly marketing (4) The formation of an advisory council of growers. History has produced the following results. (1) adequate tariff protection was never achieved,(2) control of disease through benzol vapour (CSIRO) breakthrough, was later identified as carcinogenic, (3) orderly marketing was achieved through (4) the establishment of the Tobacco Growers Association(19840. In October 2006, by way of Government buy back of tobacco leases from growers, resulted in the end of Tobacco farming in Australia (after 136 years of planting the first crop). It was also significant that the major tobacco companies such as Philip Morris and The British American Tobacco Australasia advised the industry that it would source its tobacco requirements overseas by 2009.The death of the tobacco industry(2006) resulted in the expansion of the dairy , sheep, beef cattle, venison and lama wool producers in the Kiewa Valley and surrounding regions. The remnants of the Tobacco Industry can still be viewed throughout the Kiewa Valley and adjacent regions on the former tobacco farms which still have the tobacco drying sheds and now converted into hay sheds. The problems from the large quantities of carcinogenic infused soil of farmlands in the region, still remains a problem now and for future generations. This particular photograph shows the lack of understanding by farmers and the contracted labour, at that time, and is demonstrated by the lack of protection of hands when handling seedlings and attached soil. Hand and foot protection was rarely used, even when later warnings were issued of the carcinogenic toxicity of the soil. The majority of farm owners, up until Health authorities stepped in the later stages of 1900s, were skeptical of city scientists' "carcinogenic" health warnings and it was only after the younger generation of farmers, who had graduated from Agricultural colleges, encompassed the scientific approach to farm management. The "she'll be right mate" attitude of the farming/rural community has since the 1970s been slowly dissipating. Stricter controls of herbicides and pesticides used in agriculture are now in force.Coloured photograph pasted onto a thick wood chip backing. Two galvanised eyelets at the top of the frame, 50mm from each end, with a twine cord stretch from each, for hanging purposes. See also KVHS 0054A, KVHS0054C to KVHS 0054FA sign, which has been removed from the picture at some previous point in time is "Pulling seedlings for planting"tobacco, farming, rural industry, licences, ollie mould, blue mould, benzol vapour, photograph -
 Kiewa Valley Historical Society
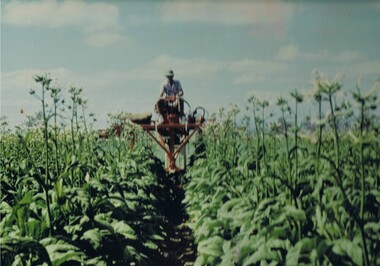
Photograph Topping Tobacco, Tobacco being topped (removal of flower), Circa mid to late 1900's
This promotional photograph by the Tobacco Growers Association was in response to a 1935 meeting of tobacco growers from Victoria, South Australia and Queensland which produced four major resolutions for the industry covering the remainder of the 1900s. These four resolutions were: (1) Adequate tariff protection (2) Control of pests and diseases (3) Orderly marketing (4) The formation of an advisory council of growers. History has produced the following results. (1) adequate tariff protection was never achieved,(2) control of disease through benzol vapour (CSIRO) breakthrough, was later identified as carcinogenic, (3) orderly marketing was achieved through (4) the establishment of the Tobacco Growers Association(1984). In October 2006, by way of Government buy back of tobacco leases from growers, resulted in the end of Tobacco farming in Australia (after 136 years of planting the first crop). It was also significant that the major tobacco companies such as Philip Morris and The British American Tobacco Australasia advised the industry that it would source its tobacco requirements overseas by 2009.The remnants of the Tobacco Industry can still be viewed throughout the Kiewa Valley and adjacent regions on the former tobacco farms which still have the tobacco drying sheds and now converted into hay sheds. The problems from the large quantities of carcinogenic infused soil of farmlands in the region, still remains a problem now and for future generations. This particular photograph shows the lack of understanding by farmers and the contracted labour, at that time, and is demonstrated by the lack of protection of hands when handling seedlings and attached soil. Hand and foot protection was rarely used, even when later warnings were issued of the carcinogenic toxicity of the soil. The majority of farm owners, up until Health authorities stepped in the latter stages of 1900s, were skeptical of city scientists' "carcinogenic" health warnings and it was only after the younger generation of farmers, who had graduated from Agricultural colleges, encompassed the scientific approach to farm management. The "she'll be right mate" attitude of the farming/rural community has since the 1970s been slowly dissipating. Stricter controls of herbicides and pesticides used in agriculture are now in force. The death of the tobacco industry(2006) resulted in the expansion of the dairy , sheep, beef cattle, venison and lama wool producers in the Kiewa Valley and surrounding regions.Coloured photograph pasted onto a thick wood chip backing. Two galvanised eyelets at the top of the frame, 50mm from each end, with a twine cord stretch from each, for hanging purposes. See also KVHS 0054A ,KVHS 0054B and KVHC 0054D to KVHS 0054F A sign, which has been removed from the picture at some previous point in time is "The Tobacco crop being topped (flower removed)". tobacco, farming, rural industry, licences, ollie mould, blue mould, benzol vapour -
 Kiewa Valley Historical Society
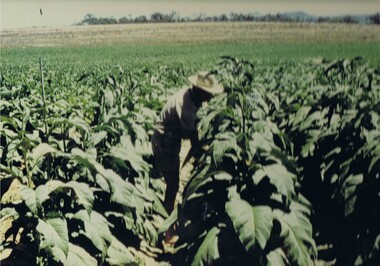
Photograph Tobacco plants, Tobacco fully grown prior to start picking, Circa mid to late 1900's
This promotional photograph by the Tobacco Growers Association was in response to a 1935 meeting of tobacco growers from Victoria, South Australia and Queensland which produced four major resolutions for the industry covering the remainder of the 1900s. These four resolutions were: (1) Adequate tariff protection (2) Control of pests and diseases (3) Orderly marketing (4) The formation of an advisory council of growers. History has produced the following results. (1) adequate tariff protection was never achieved,(2) control of disease through benzol vapour (CSIRO) breakthrough, was later identified as carcinogenic, (3) orderly marketing was achieved through (4) the establishment of the Tobacco Growers Association(1984). In October 2006, by way of Government buy back of tobacco leases from growers, resulted in the end of Tobacco farming in Australia (after 136 years of planting the first crop). It was also significant that the major tobacco companies such as Philip Morris and The British American Tobacco Australasia advised the industry that it would source its tobacco requirements overseas by 2009.The remnants of the Tobacco Industry can still be viewed throughout the Kiewa Valley and adjacent regions on the former tobacco farms which still have the tobacco drying sheds and now converted into hay sheds. The problems from the large quantities of carcinogenic infused soil of farmlands in the region, still remains a problem now and for future generations. This particular photograph shows the lack of understanding by farmers, at that time, and is demonstrated by the lack of protection of hands and no masks over their noses, when handling plants. Hand, nose and foot protection was rarely used, even when later warnings were issued of the carcinogenic toxicity of the soil. The majority of farm owners, up until Health authorities stepped in the latter stages of 1900s, were skeptical of city scientists' "carcinogenic" health warnings and it was only after the younger generation of farmers, who had graduated from Agricultural colleges, encompassed the scientific approach to farm management. The "she'll be right mate" attitude of the farming/rural community has since the 1970s been slowly dissipating. Stricter controls of herbicides and pesticides used in agriculture are now in force. The death of the tobacco industry(2006) resulted in the expansion of the dairy , sheep, beef cattle, venison and lama wool producers in the Kiewa Valley and surrounding regions.Coloured photograph pasted onto a thick wood chip backing. Two galvanised eyelets at the top of the frame, 50mm from each end, with a twine cord stretch from each, for hanging purposes. See also KVHS 0054A to KVHS 0054C and 0054E to KVHS 0054FA sign, which has been removed from the picture at some previous point in time is "The Tobacco fully grown prior to start picking"tobacco, farming, rural industry, licences, ollie mould, blue mould, benzol vapour -
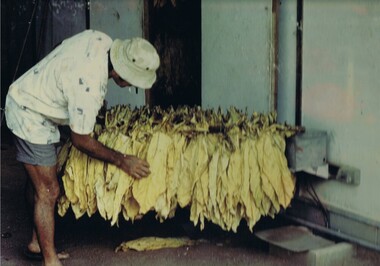 Kiewa Valley Historical Society
Photograph Tobacco drying leaves, Inspecting Drying tobacco leaves, 1950's to 1999
This promotional photograph by the Tobacco Growers Association was in response to a 1935 meeting of tobacco growers from Victoria, South Australia and Queensland which produced four major resolutions for the industry covering the remainder of the 1900s. These four resolutions were: (1) Adequate tariff protection (2) Control of pests and diseases (3) Orderly marketing (4) The formation of an advisory council of growers. History has produced the following results. (1) adequate tariff protection was never achieved,(2) control of disease through benzol vapour (CSIRO) breakthrough, was later identified as carcinogenic, (3) orderly marketing was achieved through (4) the establishment of the Tobacco Growers Association(19840. In October 2006, by way of Government buy back of tobacco leases from growers, resulted in the end of Tobacco farming in Australia (after 136 years of planting the first crop). It was also significant that the major tobacco companies such as Philip Morris and The British American Tobacco Australasia advised the industry that it would source its tobacco requirements overseas by 2009.The remnants of the Tobacco Industry can still be viewed throughout the Kiewa Valley and adjacent regions on the former tobacco farms which still have the tobacco drying sheds and now converted into hay sheds. The problems from the large quantities of carcinogenic infused soil of farmlands in the region, still remains a problem now and for future generations. This particular photograph shows the lack of understanding by farmers and the contracted labour, at that time, and is demonstrated by the lack of protection of hands when handling the tobacco leaves and nose from tobacco dust. Hand and foot protection was rarely used, even when later warnings were issued of the carcinogenic toxicity of the soil. The majority of farm owners, up until Health authorities stepped in the later stages of 1900s, were skeptical of city scientists' "carcinogenic" health warnings and it was only after the younger generation of farmers, who had graduated from Agricultural colleges, encompassed the scientific approach to farm management. The "she'll be right mate" attitude of the farming/rural community has since the 1970s been slowly dissipating. Stricter controls of herbicides and pesticides used in agriculture are now in force. The death of the tobacco industry(2006) resulted in the expansion of the dairy , sheep, beef cattle, venison and lama wool producers in the Kiewa Valley and surrounding regions.Coloured photograph pasted onto a thick wood chip backing. Two galvanised eyelets at the top of the frame, 50mm from each end, with a twine cord stretch from each, for hanging purposes. See also KVHS 0054A to KVHS 0054D and KVHS 0054Ftobacco, farming, rural industry, licences, ollie mould, blue mould, benzol vapour, photograph