Showing 19057 items
matching gardens.
-
 Ballarat Tramway Museum
Slide - 35mm slide/s, Noel Simons, 28/04/1971 12:00:00 AM
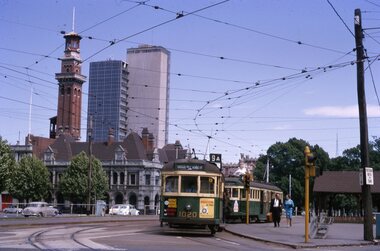
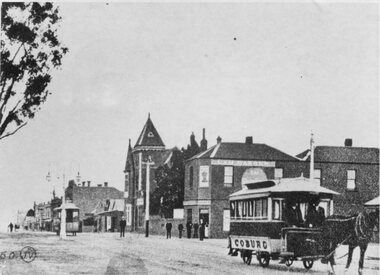
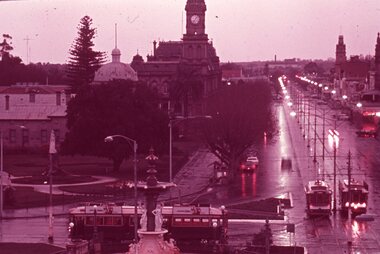
Transparency slide of Ballarat No. 37 at the Lydiard St. North terminus, taken from the north side of Norman St. looking back over the city. Tram has destination of "Sebastopol". Alongside the tram is the tram terminus shelter building. Slide dated 28 April 1971. The slide does not have a manufacturer's name.In blue ink at the top of the slide "No. 37 at Lydiard St. North terminus" and on base "28 April 1971"tramways, trams, lydiard st. north, norman st., tram 37 -
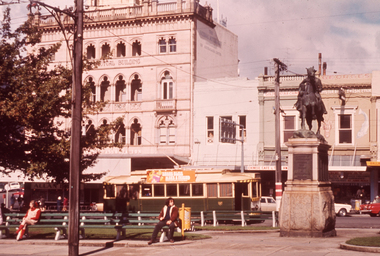 Ballarat Tramway Museum
Slide - 35mm slide/s - set of 13, Noel Simons, 28/04/1971 12:00:00 AM
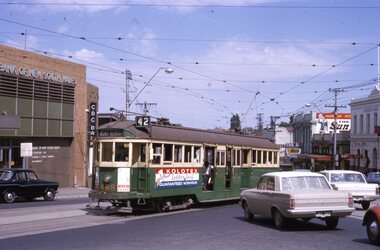
Set of 13 transparencies taken on 28/4/1971 on PAKON mounts. 1168.1 - No. 21 at City terminus - taken from North side of street. Has Boer War statue on right side and National Mutual building in the background. 1168.2 - No. 34 with destination "Sebastopol" in Sturt St., outside Town Hall, with National Mutual building in background. 1168.3 - No. 18 at corner of Sturt and Lydiard Sts with National Mutual building and Craigs Hotel in background. 1168.4 - 18 at intersection of Sturt and Dawson St. 1168.5 - No. 30 at intersection of Armstrong St and Sturt St. with Fletcher Jones building in background. 1168.6 - No. 14 at City Terminus, showing destination of "Victoria St." with Town Hall in the background. 1168.7 - No. 11 bound for Mt Pleasant, opposite Titanic Bandstand in Sturt St. Has a Twin Lakes advertisement on the front dash panel and an unknown roof advertisement. 1168.8 - No. 21 at bottom of Sturt St. approaching the Grenville St. junction, with Dickins Food Store and the Spot Cafe in the background. Tram has destination of "Victoria St". and a roof advertisement for a cigarette? company. 1168.9 - No. 26 and three other trams in City Loop, looking west along Sturt St., just after a heavy hail storm. 1168.10 - No. 21 at the intersection of Sturt St and Dawson St. with Golden City Hotel and the Ritzy Cafe in the background. Can see the Dawson St. crossover track, just after a heavy hail storm. 1168.11 - No. 21 and three other trams at City Loop looking east along the south side of Sturt St. See also image 1168i1a - cleaned up and edited by Peter Waugh April 2024 - used in the April 2024 issue of Fares Please. 1168.12 - No. 14 entering the South side of Sturt St. from Bridge St. with Dickins Store in the background and the Grenville St. shelter alongside the tram. 1168.13 - No. 37 at Sturt and Dawson St., eastbound, showing "Lydiard St. Nth" Has SEC roof advertisement on the side of the tram.1168.1 -"Sturt & Lydiard Sts" 1168.2 - "Town Hall" 1168.3 - "Sturt St & Dawson Sts" 1168.4 - "Sturt and Lydiard Sts" 1168.5 - "Sturt St." 1168.6 - "Sturt and Lydiard Sts" 1168.7 - "Sturt St." 1168.8 - "Bridge St." 1168.9 - "City Loop" 1168.10 -"Dawson & Sturt Sts." 1168.11 - "City Loop" 1168.12 - "Bridge St." All have date stamp of "28 Apr 1971" in purple ink on base. All blue ink unless otherwise noted.tramways, trams, town hall, sturt st., dawson st, armstrong st., grenville st, bridge st., titanic bandstand, tram 11, tram 14, tram 18, tram 21, tram 26, tram 30, tram 34, tram 37 -
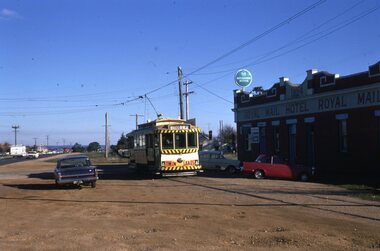 Ballarat Tramway Museum
Slide - 35mm slide/s - set of 6, Noel Simons, 22/05/1971 12:00:00 AM
Set of 6 Kodachrome transparencies taken on 22/5/1971. 1171.1 - Tram 33 at Sebastopol terminus, showing destination of Lydiard St. Nth, with Royal Mail Hotel in the background and three parked cars. Tram has "Twin Lakes" sign on front dash. 1171.2 - as for 1171.1 but taken from other side of tram, has hotel in part of photo. Shows arrangement of tram terminus signs on a pole in the background. 1171.3 - Tram 26 just after arrival at the Lydiard St. terminus, with passengers getting off and driver about to swap ends. Destination has been changed to Sebastopol. Has Lydiard St. shelter in the right edge of the photo. 1171.4 - as for 1171.3 - but with pole turned and looking back along street towards city. Shows the undulating nature of the street. 1171.5 - Tram 26 outbound in Albert St. for Sebastopol, crossing the street near Ophir St. Has a motor cyclist stopped for tram and shows tram stop on the west side of the road. 1171.6 - Tram 26, close up of tram at the Sebastopol terminus with two cars parked along side. Tram has destination of Lydiard St. Nth.1171.1 - "No. 33 at Sebastopol Terminus" and initials "BC" in bottom left hand corner. 1171.2 - "No. 33 at Sebastopol Terminus" and initials "BC" in bottom left hand corner. 1171.3 - "No. 26 at Lydiard St. North terminus" and initials "BC" in bottom left hand corner. 1171.4 - "No. 26 at Lydiard St. North terminus" and initials "BC" in bottom left hand corner. 1171.5 - "No. 26 crossing from left side of Albert St. Sebastopol to right side near Ophir St." and initials "BC" in bottom left hand corner. 1171.6 - No. 26 at Sebastopol Terminus" and initials "BC" in bottom left hand corner. All slides have date stamp of "22 May 1971" in purple ink and Kodak developing date of "Jun 71M7" in red ink. tramways, trams, sebastopol, lydiard st nth, royal mail hotel, tram stops, tram 33, tram 26 -
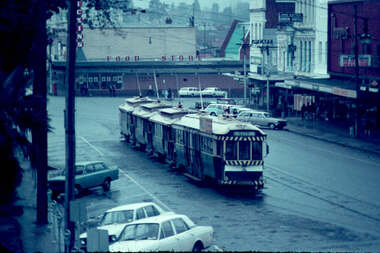 Ballarat Tramway Museum
Slide - 35mm slide/s, Noel Simons, Aug. 1971
Plain white cardboard transparency slide of Ballarat No. bogie tram (No. 34) and three single truckers in the City Loop on a wet Ballarat day. Taken from central median strip, looking south east. Has Dickins Food store and shops along the south side of Sturt St. near Grenville St. in the background, including Thomas Jewellers and the Jack Gaffin? Union Hotel"City Loop" and "Aug 1971" in blue ink.tramways, trams, city loop, sturt st, tram 34 -
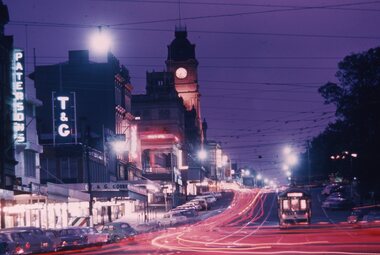 Ballarat Tramway Museum
Slide - 35mm slide/s, Nu-color-vue or Nucolorvue Productions, late 1960's or early 1070's
Plain white cardboard transparency slide of a Ballarat Bogie tram at dusk in Sturt St. - See Reg. Item 960 for details of this item - a postcard print of the same photograph. On slide has printed at top edge "Sturt Street by Night / Ballarat Vic." and in bold print "BT.36" On base of slide "a Nu-colour-vue slide" "copyright"tramways, trams, ballarat, town hall, sturt st -
 Ballarat Tramway Museum
Slide - 35mm slide/s - set of 6, Noel Simons, 27/02/1972 12:00:00 AM
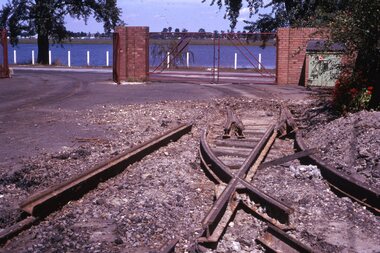
Has a strong association with the early days of the BTPS in preparing to move the tramcars from the depot and working at the former SEC depot itself. Yields information about the work done in the yard to recover materials.Set of 6 transparencies taken on 27/2/1972 on Kodak mounts. 1177.1 - photo of the dismantling of the points leading to "0" road at the SEC depot by the BTPS, looking south to Lake Wendouree. 1177.2 - view across depot front with No. 28 parked slightly outside and No. 40 inside door. Shows trackwork being dismantled and offices at front of depot. 1177.3 - view of No. 40 inside depot. 1177.4 - close up of the point blades leading to "0" road. 1177.5 - view of the front of the depot showing 40 and 28 parked outside, with dismantled point work in the foreground. 1177.6 - view of trackwork at part of Sturt and Drummond Sts. See also Reg Item 3533 for a similar series of photographs.Information written on in blue ink and date stamped on purple ink. 1177.1 - "Depot, Ballarat" 1177.2 - "Depot, Ballarat" 1177.3 - "Depot, Ballarat" 1177.4 - "Depot, Ballarat" 1177.5 - "Depot" 1177.6 - "Sturt and Drummond Sts"tramways, trams, wendouree parade, depot, sturt st, drummond st, pointwork, trackwork, o road, tram 28, tram 40 -
 Ballarat Tramway Museum
Slide - 35mm slide/s - set of 11, Noel Simons, 23/10/1965 12:00:00 AM
Set of 11 Kodachrome transparencies taken on 23/10/1965 in Melbourne. 1178.1 - W7 1020 (on route 9A, Northcote via St Georges Road) with a W2 536 (Deepdene) behind at the corner of Victoria Parade and Brunswick St. East Melbourne or Fitzroy. Has Eastern Hill fire station and ICI building in background. 1020 has front dash panel ads for Queens Bridge Motors and Bridgestone tyres. 1178.2 - W5 759 (route 19, North Coburg) and W5 807 in Elizabeth St. Melbourne at the intersection of Bourke St. with the State Savings Bank building in the background. 759 has side ads, one of which is for CASTROL. 1178.3 -SW6 903 crossing Brunswick St. in Victoria Parade, Fitzroy bound for Deepdene, route 45. Photo taken after tram has passed photographer. 1178.4 - W7 1019 (route 96, East Brunswick Blyth St.) and W7 1010 (route 88 East Preston) in Nicholson St at intersection with Victoria Parade. A Herald newspaper truck is alongside 1019. 1178.5 - W7 1040 (route 96, East Brunswick Blyth St.) in Nicholson St at intersection with Albert St. Has Princess Theatre in the background. (High res scan added 26/10/2008 - copy to FOHTD) .1178.6 - W6 974 (route 89 East Preston Bell St.) in Bourke St. about to turn into Spring St. Has buildings on the south side of Bourke St in background, including Southern Cross Hotel. Note trees in tubs and red phone box by Windsor Hotel. 1178.7 - as for same location as 1178.6 - SW6 967 (route 96) and W6 971 (inbound - route 90 - City Spencer St.) 967 has Lucas ad on front dash. 1178.8 - W7 1013 (route 88 East Preston) photographed from W6 991 in Bourke St at corner of Russell St. Has Normans corner store, Treadways and Foys in background. 1178.9 - W2 553 (route 1 East Coburg) at the corner of Elizabeth St and Bourke St. Has the Leviathan, Roger David and Ezywalkin shops in the background. 1178.10 - W6 991 (route 88) and W7 (route 96) in Bourke St. at corner with Elizabeth St. Photo taken from the GPO steps. 991 has ads for BIC pens and CASTROL. In background are the State Savings Bank, Halls Books and McEwans shops. 1178.11 - Line up of north bound trams (3 +) lead by W2 449and southbound in Elizabeth St at corner of Collins St. Has Flinders St. station building in the background. Hi -res image of .10 added 22-12-2018All have date stamp of "23 Oct 1965" in purple ink. All black ink unless otherwise noted. 1178.1 - "W7 1020 turning into Brunswick St. from Victoria parade, East Melbourne (followed by W2 536) 1178.2 - "W5 799 and 807 in Elizabeth St. Melbourne at cnr. of Bourke St." 1178.3 - "SW6 903 entering reserved track in Victoria Parade, East Melbourne" 1178.4 - "W7 1019 and 1010 in Nicholson St. East Melbourne at Victoria Pde intersection" 1178.5 - "W7 1040 Melbourne's last tram (to date) in Nicholson St. at Albert St. intersection." 1178.6 - "W6 974 in Bourke St. Melbourne, about to turn into Spring St." 1178.7 - "W6 971 entering Bourke St. from Spring St. Melbourne, passes SW6 967 outward bound for East Brunswick" 1178.8 - "W7 1013 (seen from W6 991) in Bourke St. Melbourne crossing Russell St." 1178. 9 -"W2 553 in Elizabeth St. Melbourne at cnr of Bourke St." 1178.10 - "W6 991 and W7 1005 in Bourke St. Melbourne at cnr of Elizabeth St." 1178.11 - "W2 449 leads a line of Peak hour cars along Elizabeth St. Melbourne (at Collins St. corner)"tramways, trams, melbourne, victoria parade, nicholson st., brunswick st., bourke st, elizabeth st, tram 1020, tram 536, tram 799, tram 807, tram 903, tram 1019, tram 1010, tram 1040, tram 974, tram 967, tram 971, tram 1013, tram 553, tram 991, tram 1005, tram 449 -
 Ballarat Tramway Museum
Slide - 35mm slide/s - set of 7, Noel Simons, 23/10/1965 12:00:00 AM
Set of 7 Kodachrome transparencies taken on 23/10/1965 in Melbourne. 1179.1 - W2 488 (route 42, Mont Albert) at the corner of High St. and Cotham Road Kew. Taken from Kew Post Office, has Bank of New South Wales in the background, CBC bank and the Greyhound Hotel. Tram has ads for Kolotex stockings and Ryco oil filters. 1179.2 - SW2 436, in bound (route 45, City) leaving Cotham Road, about to join High St, Kew. Buildings on the south side of Cotham Road in photo. Tram has an ad along with others for Vincent's powders. 1179.3 - W2 545 (route 48, North Balwyn) in High St. Kew. Has Commercial bank in background along with other shops. 1179.4 - W2 648 (route 42, Mont Albert) turning from High St. South into High St at Kew Junction, with Clifton Hotel in background. Tram has an ad for Kenric clothes. Note an MFBB street fire alarm by the tram stop. 1179.5 - W2 566 (inbound route 42, City) at same location as 1179.5. Tram has a Jex and a Remy Martin Brandy ads. on front dash panel. 1179.6 - W2 572 entering Victoria Parade from Brunswick St. Fitzroy. Tram has a Jex and a Remy Martin Brandy ads. on front dash panel. Eastern Hill Fire Station and ICI building in background. 1179.7 - W2 378 (inbound, route 45, City) and W2 572, inbound, in Victoria Parade between Brunswick St and Gismo St. East Melbourne. Otherwise as for 1179.6.All have date stamp of "23 Oct 1965" in purple ink. All black ink unless otherwise noted. 1179.1 - "W2 488 Entering Cotham Rd. from High St. Kew" 1179.2 - "SW2 436 in Cotham Rd., Kew, about to enter High St." 1179.3 - "W2 545 in High Street Kew, nearly opposite Cotham Road" 1179.4 - "W2 648 entering High Street from High Street South, Kew". 1179.5 - "W2 566 entering High St. South from High St. Kew" 1179.6 - "W2 572 entering Victoria Pde from Brunswick St. East Melbourne" 1179.7 - "W2 378 and 572 in Victoria Pde between Brunswick and Gisborne Sts. East Melbourne."tramways, trams, kew, high st kew, cotham road, victoria parade, melbourne, tram 545, tram 488, tram 436, tram 648, tram 566, tram 572, tram 378 -
 Ballarat Tramway Museum
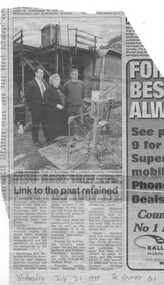
Newspaper, The Courier Ballarat, "Link to the past retained", 21/07/1999 12:00:00 AM
Newspaper Clipping from The Courier, Ballarat 21/7/1999 on the acquisition of the equipment from the Clyde Harding Foundry, Doveton St. Nth, Ballarat by Sovereign Hill. Features a photo of Alan Harding, Jan Penny and Richard Nicholson. Mentions the supply of brake blocks to the SEC., BTM and Puffing Billy.On base in blue ink, "Wednesday July 21 1999 The Courier pg 3"trams, tramways, harding s, foundry, brake blocks, castings -
 Ballarat Tramway Museum
Photograph - Black & White Photograph/s
Black and white print of a horse drawn tram and a second in the background, in Sydney Road Coburg. Has a church and other shops in the background.trams, tramways, horse trams, coburg, melbourne -
 Ballarat Tramway Museum
Certificate, Ballarat and District Model Railway Club, Jun. 1998
"Certificate of Appreciation" issued by the Ballarat and District Model Railway Club for the BTM's participation in the Model Railway Spectacular held during the Queens Birthday Weekend June 1998. Printed by laser printer onto an A4 size off white preprinted paper, with the clubs logo. Signed in blue ink by Club President (Ian Mitaxa) and Secretary (Peter Roberts).tramways, trams, model tramways, btm, displays -
 Ballarat Tramway Museum
Document - Typed Notes, Alan Bradley, "How it all started: Part 2", 1996
Set of notes, ten A4 pages, prepared by Alan Bradley on the founding of the BTPS and the preservation of Ballarat Trams. Notes based on interviews with Richard Gilbert and Neville Gower, along with subsidiary notes on related items from The Courier. Part 1 in Fares Please! - 7/1996. Items looks at the establishment of the BTPS, the construction of the depot, alternative proposals, the six trams the BTPS received, setting up the Co-Op and moving the trams in.btps, preservation, depot, museum -
 Ballarat Tramway Museum
Document - Letterhead, Ballarat Tramway Preservation Society (BTPS), BTPS letterhead, c1974
A4 size paper used by BTPS Ltd. as letterhead for period 1974c to about 1980. Has drawing of tram 27 in top left hand corner, organisational name and address and words "Ballarat Tourist Tramway" on base. Printed in green ink, on white paper, with watermark "Plus Fabric". 296.1 - as above, but with a "Burnie Superfine Bond" watermark.trams, tramways, btps, ballarat tourist tramway, letterhead, letters -
 Ballarat Tramway Museum
Slide - 35mm slide/s - set of 5, Noel Simons, 19/11/1962 12:00:00 AM
Set of 5 transparencies taken on 19/11/1962 on Kodak mounts. 1186.1 - Bendigo 21 bound for Golden Square at Charing Cross with The Beehive buildings and shops in Pall Mall in the background. Trams has an ad for Cohns drinks on front bumper, SEC Best for Cooking roof ad. and Mamouney's furniture roof ad. Two women passengers boarding. 1186.2 - Bendigo 26 crossing Pall Mall from Mitchell St. bound for Eaglehawk with "Ezywalkin" shop in background. Tram has an SEC 'Electric Cooking' roof ad and a 'Streets Ice cream' ad on front dash. 1186.3 - Bendigo 7 arriving at the Charing Cross stop, bound for North Bendigo. Has a Huttons dash panel ad, a Castrol roof ad. Buildings as for 1186.1. Passengers waiting at the stop. 1186.4 - Bendigo 19 leaving Charing Cross for Golden Square with City Club Hotel alongside and other buildings as for 1186.1 in the background. Tram has Briquettes ad on front dash and SEC 'Electric Cooking' roof ad. 1186.5 - Bendigo 21in High St. at corner of Short St. heading for Charing Cross. Destination half way between Depot and Railway Station. Tram has ads for Cohns Drinks on dash panel, SEC 'Cook with Electricity' and a Sandhurst Milk roof ads.Information written on in black ink and date stamped in purple ink. 1186.1 - "No. 21 in Pall Mall at Charing Cross, Bendigo" 1186.2 - "No. 26 arriving at Alexandra Fountain, Charing Cross, Bendigo" 1186.3 - "No. 7 in Pall Mall at Charing Cross, Bendigo" 1186.4 - "No. 19 in High St., Bendigo, leaving Charing Cross for Golden Square" 1186.5 - "No. 21 in High St. Bendigo, at corner of Short St." tramways, trams, bendigo, charing cross, pall mall, high st., tram 7, tram 19, tram 21, tram 26 -
 Ballarat Tramway Museum
Slide - 35mm slide/s, Noel Simons, 21/11/1962 12:00:00 AM
Set of 6 transparencies taken on 21/11/1962 on Kodak mounts. 1189.1 - Bendigo No.11 at Quarry Hill terminus. Photo taken looking in along the route. Tram has destination of North Bendigo. 1189.2 - No. 21 in Pall Mall bound for North Bendigo. Tram has roof ads for Mamouney's furniture and SEC. In the background are the National Bank building, Dad and Dave's Cafe and the Beehive Buildings and the London Pharmacy. 1189.3 - No. 2 in Mitchell St, just after crossing over railway bridge. Photo taken after tram has passed photographer. Has what appears to be an SEC road works crew in the background. Has destination of Quarry Hill. 1189.4 - No. 17 climbing Mitchell St. on the start of the single track section, just before crossing the railway bridge. Has destination of Quarry Hill and the large Maples building sign in the background. 1189.5 - as for 1189.4 but after tram has passed photographer. Has an Ilford film roof ad and an SEC roof ad. Railway bridge in the background. 1189.6 - No. 21 at Charing Cross with passengers boarding. Tram has destination of North Bendigo and roof ads for SEC 'Electric Cooking' and Sandhurst Milk. In background are the buildings on the south side of High St. Also has a SEC worker in white overalls sweeping the track.Information written on in black ink and date stamped on purple ink. 1189.1 - "Birney car No. 11 in High St. Bendigo at Golden Square terminus" 1189.2 - "No. 21 in Pall Mall Bendigo near Charing Cross" 1189.3 - "No. 2 in Mitchell St. Bendigo, just after crossing bridge over railway line (Quarry Hill route)" 1189.4 - "No. 17 in Mitchell St. Bendigo, climbing the hill the bridge over the railway line. (Quarry Hill route)" 1189.5 - "No. 17 in Mitchell St., Bendigo approaching bridge over Railway line (Quarry Hill route)" 1189.6 - "No. 21 at Charing Cross, Bendigo"tramways, trams, bendigo, golden square, pall mall, mitchell st., quarry hill, tram 2, tram 11, tram 17, tram 21 -
 Ballarat Tramway Museum
Slide - 35mm slide/s - set of 3, Noel Simons, 22/11/1962 12:00:00 AM
Set of 3 transparencies taken on 22/11/1962 on Kodak mounts. 1190.1 - No. 7 (bound for North Bendigo) at the Charing Cross stop with No. 19 just left for Quarry Hill. Has the buildings on the south side of High St. in the background, including RACV building. No. 7 has front dash panel ad for Streets ice cream, and roof ads for Ilford Film and an SEC "Cook with Electricity". Passengers are boarding the tram. 1190.2 - Bendigo No. 2 at Charing Cross with fountain in the background and other buildings on the south side of High St. Tram has two SEC roof ads - good side on view - "Electric Cooking - Matchless" and "Switch to Electric Cooking". 1190.3 - Nos. 19, 2 and 7 at Charing cross with a Austin ? motor car. Has buildings on the south side of High St. in the background, along with SEC and Ilford film roof ads.Information written on in black ink and date stamped on purple ink. 1190.1 - "Nos. 19 and 7 at Alexandra Fountain, Charing Cross, Bendigo" 1190.2 - "No. 2 at Alexandra Fountain, Charing Cross, Bendigo" 1190.3 - "Nos. 19, 2 and 7 at Alexandra Fountain, Charing Cross, Bendigo" tramways, trams, bendigo, charing cross, alexandra fountain, tram 2, tram 7, tram 19 -
 Ballarat Tramway Museum
Slide - 35mm slide/s - set of 4, Noel Simons, Apr. 1967
Set of 2 slides made from the Association of Railway Enthusiast Provincial Tramways film strip, possibly during April 1967. 1192.1 and 1192.3 mounted in Kodak Ready Mounts. The others in plain white mounts. Slides dated Dec. 1968. 1192.1 - No. 21 out bound to Golden Square in High St., between Wattle and Vine Streets. Photo taken after tram has passed photographer. Has a sign for "Reid's Furnituorium" in the background. 1192.2 - Bendigo No. 28 dressed up as Myers Christmas tram, passing the Post Office and Courts in Pall Mall. 1192.3 - Bendigo No. 23 at Needle Loop en route to Eaglehawk. Tram has two SEC roof ads, one "Electric Cooking" and the other "Everything fine in my all electric kitchen". 1192.4 - Bendigo scrubber parked at the end of the main depot lead, alongside the depot office buildings.Details in blue ink, date hand stamped in purple ink. 1192.1 - "No. 21 heads along High St for Golden Square between Wattle and Vine Streets." 1192.2 - "Birney No. 28 in Christmas Garb, traverses Pall Mall en route to North Bendigo". 1192.3 - "No. 23 at Needle Loop on its run to Eaglehawk". 1192.4 - "Scrubber car at Bendigo Depot".tramways, trams, north bendigo, bendigo, bridge st loop, depot, tram 21, tram 23, tram 28, tram scrubber -
 Ballarat Tramway Museum
Slide - 35mm slide/s, Noel Simons, Sep. 1971
One slide on a Kodak Ready Mount made from the Association of Railway Enthusiast Provincial Tramways film strip, during September 1971 with a group of three trams at Charing Cross at dusk. Taken from an elevated position (the tower in the City Family Hotel) over looking the Alexandra fountain and looking towards the North on a wet evening. Two single truckers (1 possibly No. 6) and one bogie car waiting to proceed."Rainy evening at Charing Cross" in blue ink and "Sept 1971" in purple ink using a hand stamp.tramways, trams, charing cross, bendigo, tram 6 -
 Ballarat Tramway Museum
Slide - 35mm slide/s, Noel Simons, Dec. 1971
One slide on a Kodak Ready Mount made from the Association of Railway Enthusiast Provincial Tramways film strip, during December 1971 of Bendigo No. 3 at Eaglehawk terminus with its reflection in a shop window looking through a multi post verandah. Has the Eaglehawk Town Hall in the background."No. 3 and its reflection at Eaglehawk terminus" and "Dec 1971" in purple ink using a hand stamp.tramways, trams, eaglehawk, bendigo, tram 3 -
 Ballarat Tramway Museum
Slide - 35mm slide/s - set of 24, Noel Simons, 20/05/1971 12:00:00 AM
Set of 24 transparencies taken on 20/5/1971 on Kodak mounts. 1195.1 - Bendigo 19 arriving at Charing Cross en route to North Bendigo with Fountain Plaza and the City Family Hotel in the background. No. 19 has two roof ads for the SEC. -'Electricity better for cooking' and 'Everything's under control in my all electric kitchen' 1195.2 - as above, but standing at the Charing cross stop, with the Beehive Stores and other buildings along the east side of Pall Mall in the background. 1195.3 - No 21 ex Golden Square crossing View St. trackwork in front of No. 25 waiting to depart for Quarry Hill. No.21 has two roof ads (as for No.19 in 1195.1) and No.25 has one SEC roof ad and another. Ezywalkin sign in the background, and Fountain Plaza. 1195.4 - as for 1195.3, but after 21 has arrived and 25 left for Quarry Hill. Has Ezywalkin store and the Beehive store in the background. 1195.5 - No. 5 at the Eaglehawk terminus. Photo taken with a cannon in foreground looking along High St. Eaglehawk. Has shops on the west side of High St. in the background. 1195.6 - No. 5 at the Eaglehawk terminus, close up of the rear of the tram - note tow bar arrangement. Has destination of Quarry Hill. 1195.7-Nos.25 and 5 crossing at the Thorpe St. Loop, California Gully. No. 25 bound for Eaglehawk (has SEC Briquette and electric cooking roof ads) and 5 en route for Quarry Hill with a SEC and Cinzano roof ad. 1195.8 - as for 1195.7, but after trams have passed each other. Has Borough Auto Service building in the background. 1195.9 - No. 5 in Mt Korong Road, towards Bamard Street, photo taken after tram has passed photographer. 1195.10 - No. 30 at the Golden Square terminus with the Milk Bar on the right hand side of the photograph. 1195.11 - No. 30 inbound at Fire Station Loop, High St. Golden Square. Has old fire station in the background. Passengers are boarding the tramcar. 1195.12 - No. 30 in High St, bound for North Bendigo between Vine and Wattle Streets. 1195.13 - No. 5 bound for Eaglehawk waits at Iron Bark Gully Loop, at Hayes St. 1195.14 - No. 5 and No. 2 crossing at Iron Bark Gully Loop. 1195.15 - No. 5 bound for Eaglehawk leaving the Manchester Loop, Long gully. 1195.16 - No. 5 passing William Street, Long Gully en route to Eaglehawk. 1195.17 - No. 5 just before the California Gully Crossing Loop. 1195.18 - Nos. 5 and 26 crossing at California Gully crossing Loop. No. 5 heading to Eaglehawk, 26, Quarry Hill. 1195.19 - No. 5 in High St. Eaglehawk with Bob Moyle's Victoria Hotel and the TAB in the background. 1195.20 - No. 5 in High St. Eaglehawk approaching the terminus. Photo taken after the tram has passed the photographer. Has Foodland store and J. Best Fruit supply in the background, along with Eaglehawk Town Hall. 1195.21 - No. 5 at the Eaglehawk terminus, photo taken along seldom used track along High St. 1195.22 - as for 1195.22 - but at the very end of the track. 1195.23 - No. 5 en route for Quarry Hill climbs High St. Eaglehawk with the Victoria Hotel and Eaglehawk Town Hall in the background. 1195.24 - No. 5 and 25 crossing at Jobs Gully Loop. Note 25 has a black on white destination roll, while No. 5 has a white on black destination roll. Information written on in black ink and date stamped on purple ink. 1195.1 - "No. 19 arrives at Charing Cross Bendigo from Golden Square" 1195.2 - "No. 19 about to leave Charing Cross for North Bendigo" 1195.3 - "No. 25 awaiting departure for Quarry Hill, watches No. 21 arrive at Charring Cross from Golden Square" 1195.4 - "No. 21 on North Bendigo service and No. 25 on Quarry Hill run await departure at Charing Cross" 1195.5 - "No. 5 at Eaglehawk terminus" 1195.6 - "No. 5 at Eaglehawk terminus" 1195.7 - "Nos. 5 and 25 crossing at Thorpe St. Loop, California". 1195.8 - "Nos. 25 and 5 crossing Thorpe St. Loop, California Gully". 1195.9 - "No. 5 descending Mt Korong Rd. towards Bamard St." 1195.10 - "Birney car No. 30 at Golden Square terminus" 1195.11 - "Birney car No. 30 in High Street near Thistle Street (Fire Station Loop)" 1195.12 - "No. 30 in High St. between vine and Wattle Streets" 1195.13 - "No. 25 at Hayes Street Loop Iron Bark". 1195.14 - "Nos. 2 and 5 crossing at Hayes Street Loop Iron Bark" 1195.15 - "No. 5 at Manchester Loop opposite Havilah Road, Long Gully" 1195.16 - "No. 5 passing William Street, Long Gully". 1195.17 - "No. 5 at California Gully" 1195,18 - "Nos. 26 and 5 at Thorpe St. Loop, California Gully". 1195.19 - "No. 5 in High St. Eaglehawk". 1195.20 - "No. 5 approaching Eaglehawk terminus" 1195.21 - "No. 5 at Eaglehawk terminus" 1195.22 - "No. 5 at Eaglehawk terminus" 1195.23 - "No. 5 in High St. Eaglehawk" tramways, trams, bendigo, charing cross, eaglehawk, california gully, golden square, iron bark gully, jobs gully, tram 2, tram 5, tram 19, tram 21, tram 25, tram 26, tram 30 -
 Ballarat Tramway Museum
Slide - 35mm slide/s - set of 2, Noel Simons, 20/05/1971 12:00:00 AM
Set of 2 slides mounted in Kodak Ready Mounts. Slides dated 20 May 1971. 1196.1 - Bendigo No. 21 arriving at Charing Cross from Golden Square with the Alexandria Fountain in the foreground. In the background is the Fountain Plaza building. Tram has 2 SEC roof ads. 1196.2 - No. 30 at Charing Cross from North Bendigo. On a pole in front of the tram are two signs "All cars stop here" in white printing on a red background and "Cars Stop by Request" in white lettering on a black background.1196.1 - "No. 21 passing Alexandra Fountain on arrival at Charing Cross from Golden Square" 1196.2 - "No. 30 at Charing Cross"tramways, trams, charing cross, bendigo, alexandra fountain, tram stops, tram 21, tram 30 -
 Ballarat Tramway Museum
Slide - 35mm slide/s - set of 20, Noel Simons, 21/05/1971 12:00:00 AM
Set of 20 transparencies taken on 21/5/1971 on Kodak mounts. 1197.1 - Bendigo No. 5 en route to Eaglehawk at Creeth St Long Gully. Tram has a SEC roof ad and Cinzano roof ad. 1197.2 - No 5 approaching Needle Loop between Long Gully and California Gully. On left hand side is the City of Bendigo sign, indicating city boundary. 1197.3 - As for 1197.2 but actually entering loop. Photo taken after tram has passed photographer. 1197.4 - No. 26 bound for Eaglehawk descending the railway bridge near Eaglehawk, at Jobs Gully. 1197.5 - as for 1197.4, but after crossing bridge, now ascending a hill. Photo taken after tram has passed photographer. 1197.6 - No. 26 climbing High St. hill Eaglehawk, nearing end of Double track, bound for Quarry Hill. Shows centre of the road poles. 1197.7 - As for 1197.6, with tram entering single track section. Photo taken after tram has passed photographer. Has a BP service station in the background. 1197.8 - No. 26 (bound for Quarry Hill) crossing No. 17 (Eaglehawk) at Job's Gully Loop. 1197.9 - No. 17 climbing railway bridge at Job's Gully, en route to Eaglehawk. Photo taken after tram has passed photographer. 1197.10 - No.26 bound for Quarry Hill, leaving Long Gully Loop? Has the Creeth St. church in l197.l in the far background. Photo taken after tram has passed photographer. 1197.11 - Tramway Point work at the northern end of Long Gully Loop. 1197.12 - No. 17 en route for Quarry Hill turning into View St. from Bamard St. Tram has SEC roof ads "Everything fine in my all electric Kitchen' and 'Electric Cooking is Matchless'. 1197.13 - as for 1197.12, but tram has turned into View St and about to enter the double line track. Photo taken after tram has passed photographer. 1197.14 - No. 21 enters Nolan St after turning from MacRae St. en route to Bendigo. Note sign on its own post noting tram turns "Beware Tram Turns" and stop sign on adjacent pole "Trams stop on Request". No. 21 has two SEC roof ads. 1197.15 - No. 21 in Nolan St. after turning from Bridge St. (White Hills Road). Note signal light for Bridge St. loop on pole corner of street. Photo taken after tram has passed photographer. 1197.16 - No. 2 bound for Eaglehawk at unknown location. 1197.17 - Tram stop sign on a pole "CARS STOP BY REQUEST" 1197.18 - No. 5 in Carpenter St.? en route to Quarry Hill. 1197.19 - No. 28 has just arrive at Golden Square terminus, passengers are disembarking and the trolley pole is being turned. Golden Square Hotel in the background. 1197.20 - No. 28 at Golden Square terminus. Has a "Nothing beats Briquettes for hear roof ad. Information written on in black ink and date stamped on purple ink. 1197.1 - "No. 5 at Creeth St. Long Gully" 1197.2 - "No. 5 approaching Needle Loop between Long Gully and California Gully" 1197.3 - "No. 5 at Needle Loop between Long Gully and California Gully" 1197.4 - "No. 26 crossing railway bridge at Job's Gully near Eaglehawk" 1197.5 - "No. 26 just after crossing railway bridge at Job's Gully near Eaglehawk/ 1197.6 - "No. 26 in High St. Eaglehawk" 1197.7 - "No. 26 at end of double track in High St. Eaglehawk" 1197.8 - "Nos. 26 and 17 crossing at Job's Gully Loop" 1197.9 - "No. 17 crossing railway bridge at Job's Gully near Eaglehawk". 1197.10 - "No. 26 at Long Gully" 1197.11 - 'Northern end of points at Long Gully Loop". 1197.12 - "No. 17 turning into View St. from Bamard St. Bendigo". 1197.13 -'No. 17 at beginning of double track in View St. after leaving Bamard St. Bendigo. 1197.14 - "No. 21 enters Nolan St. from MacRae St. Bendigo." 1197.15 - "No. 21 in Nolan St. Bendigo just after leaving White Hills Road." 1197.16 - "No. 2" 1197.18 - "No. 5" 1197.19 - "Birney car No. 28 at Golden Square Terminus" 1197.20 "Birney car No. 28 at Golden Square Terminus" tramways, trams, bendigo, long gully, railway bridge, jobs gully, trackwork, nolan st, quarry hill, tram stops, golden square, tram 2, tram 5, tram 17, tram 21, tram 26, tram 28 -
 Ballarat Tramway Museum
Slide - 35mm slide/s - set of 2, Noel Simons, 21/05/1971 12:00:00 AM
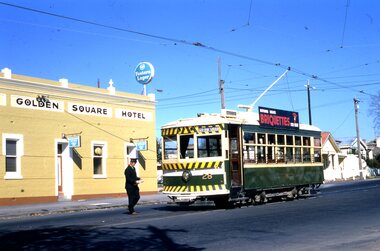
Set of 2 transparencies taken on 21/5/1971 on Kodak mounts. 1198.1 - Bendigo No. 28 at the Golden Square terminus with the Golden Square Hotel in the background. Driver walking across road to join tram. Tram has a SEC briquettes roof ad. 1198.2 - as for 1198.1 - but further back showing nature of the terminus and the Calder Highway or High St. behind the tram. Information written on in black ink and date stamped on purple ink. 1198.1 - "Birney car No. 28 at Golden Square terminus". 1198.2 - "Birney car No. 28 at Golden Square terminus" tramways, trams, bendigo, golden square, high st., tram 28 -
 Ballarat Tramway Museum
Slide - 35mm slide/s - set of 4, Noel Simons, 24/05/1971 12:00:00 AM
Set of 4 transparencies taken on 24/5/1971 on Kodak mounts. 1199.1 - No. 21 in High St. at junction with old High St., near Fire Station Loop. Tram has two SEC roof ads. 1199.2 - No. 21 in High St. between Shamrock and Thistle Sts. Photo taken after the tram has passed the photographer. 1199.3 - Photo of a green box containing timetables for the four Bendigo routes. Located at Charing Cross. 1199.4 - Bendigo No. 23 en route to Eaglehawk at Charing Cross, with two SEC roof ads 'Everything's fine in my all electric kitchen' and "Switch to electric cooking'. Has the Ezywalkin building and the Beehive building in the background. Information written on in black ink and date stamped on purple ink. 1199.1 - "No. 21 in High St. at junction with old High St., near Fire Station Loop." 1199.2 - "No. 21 in High St. between Shamrock and Thistle Sts." 1199.3 - "Bendigo Tramways timetable at Alexandra Fountain Charing Cross." 1199.4 - "No. 23 at Alexandra Fountain Charing Cross, Bendigo." tramways, trams, bendigo, timetables, charing cross, high st., tram 21, tram 23 -
 Ballarat Tramway Museum
Slide - 35mm slide/s - set of 13, Noel Simons, 24/05/1971 12:00:00 AM
Set of 13 transparencies taken on 24/5/1971 on Kodak mounts. 1200.1 - No. 7 en route to Golden Square turning from Bridge St. into Nolan St. Photo taken after tram has passed photographer. Tram has a briquettes roof ad. 1200.2 - No. 21 in McCrae St. just before Nolan St. Photo taken after tram has passed photographer. 1200.3 - No. 7 in Nolan St at corner with McCrae St. Passenger boarding tram at a tram stop. 1200.4 - No 7 turning from Nolan into McCrae St. with Golden Fleece service station in background. 1200.5 - No. 7 in Thunder St en route to North Bendigo. Photo taken after tram has passed photographer. 1200.6 - No. 5 en route to Eaglehawk just after leaving Needle Loop between Long Gully and California Gully. 1200.7 - No. 5 at the start of the double track in High St. Eaglehawk. 1200.8 - No. 5 at Eaglehawk terminus showing "Depot" with Leo A Hughes Photographer advertisement on building in background. 1200.9 - No. 5 at Eaglehawk terminus. Has two SEC roof ads 'Everything's fine in my all electric kitchen' and 'Electricity best for cooking'. 1200.10 - No. 5 at Eaglehawk terminus, with canon, war memorial outside Town Hall and Leo A Hughes Photographer advertisement on building in background. 1200.11 - No. 5 in McCrae St. about to enter Arnold St. and depot. Tram showing depot, has driver changing points. 1200.12 - No. 5 in Arnold St. Photo taken looking up the centre of the access track - shows the overhead at depot junction. 1200.13 - Depot entrance with signage at depot entrance and depot building in background.Information written on in black ink and date stamped on purple ink. 1200.1 - "No. 7 entering Nolan St. from Bridge St." 1200.2 -"No. 21 in McRae St. about to turn into Nolan St." 1200.3 - "No. 7 in Nolan St. at corner of McRae St." 1200.4 - "No. 7 turning from Nolan St. into McRae St." 1200.5 - "No. 7 in Thunder St. just after turning from Caledonia St." 1200.6 - "No. 5 just after leaving Needle Loop between Long Gully and California Gully. 1200.7 - "No. 5 in High St. Eaglehawk at start of double track." 1200.8 - "No. 5 at Eaglehawk terminus" 1200.9 - "No. 5 at Eaglehawk terminus" 1200.10 - "No. 5 at Eaglehawk terminus."\ 1200.11 - "No. 5 in McCrae St. about to enter Arnold St." 1200.12 - "No. 5 in Arnold St." 1200.13 - "Entrance to Bendigo Tram Depot, No. 5 running into shed."tramways, trams, bendigo, mccrae st, north bendigo, california gully, eaglehawk, depot, tram 5, tram 7, tram 21 -
 Ballarat Tramway Museum
Slide - 35mm slide/s - set of 32, Noel Simons, 25/02/1971 12:00:00 AM
Set of 31 transparencies taken on 25/2/1972 on Kodak mounts. 1201.1 - Bendigo No. 26 in Bond St. just after leaving Long Gully en route for Quarry Hill. Has Norris Supermarket in background. Has two SEC roof ads. 1201.2 - No. 26 climbing View St. from Charing Cross en route to Eaglehawk. Has ANZ bank and AMOCO service station in background. 1201.3 - as for 1201.3, but after tram has passed photographer. Has buildings west of Mackenzie St. in photograph. 1201.4 - Tram stop and centre of the road pole with two "CARS STOP BY REQUEST" signs mounted on pole at the corner of Mackenzie St. 1201.5 - same position as for 1201.3, but with No. 5 descending the street. 1201.6 - same position as for 1201.2, but with No. 5 descending the street. Photo taken after tram has passed photographer. 1201.7 - No. 7 in Nolan St. from across the park at Lake Weeroona. 1201.8 - No. 7 entering McCrae St from Nolan St. - distant view. Note "TRAM "sign on left hand side under tree and overhead in McCrae St. from former track that once was in this street. 1201.9 - No. 7 in High St. with Cathedral in background. Tram en route to North Bendigo. Note scaffolding around Cathedral main spire area. 1201.10 - No. 7 crossing Bendigo Creek bridge in High St. near Golden Square. Has a Caltex Service station in the background. 1201.11 - No. 7 at Golden Square terminus with Sunburst Fruit Juices and a Peters Ice cream delivery vans alongside. 1201.12 - as for 1201.11 but photo taken from behind tram, with the end of the rails in the photograph. 1201.13 - No. 7 and 21 in Pall Mall at Charing Cross with No. 5 in the background. Taken some distance away from the location. 1201.14 - No. 7 at Golden Square terminus, taken a short distance from the tram terminus. Shows Milk Bar on right hand side and the hotel on the left hand side. Taken from the south side of the roadway. 1201.15 - as from 1201.14 but taken from the north side of the roadway. 1201.16 - No 5 waiting at California Gully loop. Distant photo showing surrounds 1201.17 - No. 5 en route for Quarry Hill crossing No. 26 at California Gully. 1201.18 - No. 26 at Eaglehawk terminus with Eaglehawk Town Hall and Post Office in background. 1201.19 - No. 21 arriving at Charing Cross en route to North Bendigo. Has Alexandra Fountain in the background, ANZ bank RACV building, and other buildings on the north side of Pall Mall or Nolan St. 1201.20 - No. 26 en route for Quarry Hill at Charing Cross, with crew standing by front door. Has Colonial Mutual life building, Armstrong Tyre Service (Firestone) and a sign for Cohns Drinks in the background. 1201.21 - as for 1201.20 but with No. 5 en route to Eaglehawk now in photograph. 1201.22 - No. 26 at Quarry Hill terminus. 1201.23 - No. 26 at Quarry Hill terminus, view of front portion of tram only from a gate at the Bendigo cemetery. 1201.24 - Track at the end of the Quarry Hill line showing the point blades of the former "Y" terminus and the overhead for this. 1201.25 - No. 2 at the Quarry Hill terminus, looking along the former Trackwork. 1201.26 - as for 1201.25 1201.27 - number not used. 1201.28 - Golden Square terminus from some distance from the actual terminus, showing the Warning sign "TRAM" for motorists from the south. No. 7 at the terminus. 1201.29 - No. 7 passing through the Golden Square shopping centre. Numerous cars and pedestrians. Tram en route for North Bendigo. 1201.30 - No. 7 in High St. Golden Square, en route for North Bendigo. Photo taken after tram has passed photographer. 1201.31 - No. 7 in High St. just past Wattle St. with the Cathedral in the background. Tram has two SEC roof ads good side on photo, 'Everything's fine in my all electric kitchen' and 'Electrical cooking - clean, quick, economical'. 1201.32 - No. 7 in High St. nearing Wattle St. Has Cathedral in the background. Photo taken after tram has passed photographer.Information written on in black ink and date stamped on purple ink. 1201.1 - "No. 26 in Bond St just after leaving Long Gully" 1201.2 - "No. 26 climbing View St. from Charing Cross" 1201.3 - "No. 26 ascending View St. from Charing Cross (At Mackenzie St.)" 1201.4 - "View St. & Mackenzie St." 1201.5 - "No. 5 in View St. near Mackenzie St." 1201.6 - "No. 5 in View St. nearing Charing Cross." 1201.7 - "No. 7 in Nolan St. seen from Lake Weeroona Park." 1201.8 - "No. 7 entering McRae St. from Nolan St. Note "TRAM" warning sign on left. 1201.9 - "No. 7 in High St. passing Short St." 1201.10 - "No. 7 crossing Bendigo Creek bridge in High St. near Golden Square." 1201.11 - "No. 7 at Golden Square terminus" 1201.12 - "No. 7 at Golden Square terminus" 1201.13 - "No 7, 21 and 5 at Charing Cross" 1201.14 - "No. 7 at Golden Square terminus" 1201.15 - "No. 7 at Golden Square terminus" 1201.16 - "No 5 waiting at California Gully loop." 1201.17 - "Nos. 5 and 26 crossing at California Gully loop" 1201.18 - "No. 26 at Eaglehawk terminus" 1201.19 - "No. 21 arriving at Charing Cross from Golden Square" 1201.20 - "No. 26 at Charing Cross" 1201.21 - "Nos. 5 and 26 at Charing Cross." 1201.22 - "No. 26 at Quarry Hill terminus" 1201.23 - "No. 26 at Quarry Hill terminus seen through the gates of the Bendigo Cemetery." 1201.24 - "Quarry Hill terminus showing remains for former double track layout abandoned before 1964." 1201.25 - "No. 2 at Quarry Hill terminus" 1201.26 - "No. 2 at Quarry Hill terminus" 1201.28 - "The Southern approach to Golden Square with No. 7 standing at the terminus, "TRAM" warning sign on the left. 1201.29 - "No. 7 passing through Golden Square Shopping Centre" 1201.30 - "No. 7 in High St. Golden Square" 1201.31 - "No. 7 in High St. passing Wattle St." 1201.32 - "No. 7 in High St. nearing Wattle St."tramways, trams, bendigo, bond st., view st., nolan st., high st., eaglehawk, california gully, charing cross, quarry hill, trackwork, tram 2, tram 5, tram 7, tram 21, tram 26 -
 Ballarat Tramway Museum
Slide - 35mm slide/s - set of 8, Noel Simons, 25/02/1972 12:00:00 AM
Set of 8 transparencies taken on 25/02/72 on Kodak mounts. 1202.1 - Night photo of Bendigo 5 at Charing Cross, waiting to depart to Quarry Hill. Tram has two SEC roof ads. Has Ezywalkin and the Beehive buildings in the background. 1202.2 - as for 1202.1 1202.3 - as for 1202.1 but further back and 7 and 21 waiting for their runs as well in Pall Mall. 1202.4 - 5 and 2 at Charing Cross, night photo, looking along Mitchell St. with Fountain Plaza on right of photo and Ezywalkin store. 1202.5 - No. 2 at Charing cross, bound for Eaglehawk. Tram has two SEC ads. 1202.6 - No. 26 at Quarry Hill terminus with the cemetery in the background. Tram has two SEC roof ads. 1202.7 - No. 26 in Mitchell St. bound for Eaglehawk, at Wills St. with the Hopetoun Hotel in the background. 1202.8 - as for 1202.6Information written on in blue ink and date stamped on purple ink. 1202.1 - "No. 5 at Charing Cross" 1202.2 - "No 5. at Charing Cross" 1202.3 - "Nos. 7, 21 and 5 at Charing Cross" 1202.4 - "Nos. 5 and 2 at Charing Cross" 1202.5 - "No. 2 at Charing Cross" 1202.6 - "No. 26 at Quarry Hill" 1202.7 - "No. 26 in Mitchell St. opposite Wills St." 1202.8 - "No. 26 at Quarry Hill" tramways, trams, bendigo, night photo, charing cross, quarry hill, mitchell st., tram 2, tram 5, tram 7, tram 21, tram 26 -
 Ballarat Tramway Museum
Slide - 35mm slide/s - set of 23, Noel Simons, 26/02/1972 12:00:00 AM
Set of 23 transparencies taken on 26/2/1972 on Kodak mounts. 1205.1 - Bendigo No. 25 on a special tour at Fire Station Loop, en route to Golden Square. 1205.2 - No. 21 and 25 crossing at Fire Station Loop, note photographers on the ground. No. 21 bound for North Bendigo. 1205.3 - as for 1205.3, but with trams departing loop and fire station in the background. 1205.4 - No. 25 at Golden Square Hotel with 'Rodda's Golden Square Hotel' in the background. Tram on a special tour, but showing destination of North Bendigo. 1205.5 - as for 1205.4 - but showing special. Has the end of the track in the photograph. 1205.6 - Nos. 7 and 25 (on a special tour) crossing at Myrtle St. Loop. 1205.7 - No. 7 leaving Myrtle St. loop with the mine poppet head in the background. Photo taken after tram has passed photographer. (Print made of this slide 10/2001 for use in the Gold Gold Gold exhibition of 10/2001 - See Reg. item 1979. 1205.8 - No. 25 entering depot. Tram showing 'special'. Tennis court on right has players. Photo taken after tram has passed photographer. 1205.9 - No. 24 (showing 'special') and No. 20 (showing 'Long Gully') at Bendigo Depot. 1205.10 - No. 24 on a special charter, leaving Bendigo depot. Tram has two 'Johnnie Walker' roof ads. 1205.11 - Bendigo depot with 29, 25 and a bogie car inside the depot doors. 1205.12 - As for 1205.11, but with 28 and 29. 1205.13 - No. 24 standing at front entrance of Bendigo depot with No. 20 in the background. 1205.14 - No. 24 running out into McCrae St showing special, with conductor on front step. 1205.15 - No. 24 in Caledonia St. at corner of Thunder St with the Gasworks in the background. 1205.16 - No. 5 en route for Quarry Hill at Charing cross with No. 26 (en route for Eaglehawk) about to arrive. Has former crossover at this location in the foreground. Has the Ezywalkin building in the background. 1205.17 - No. 5 and 26 at Charing Cross, with the Alexandra Fountain in the foreground and the Beehive and Ezywalkin buildings in the background. No.26 has two SEC roof ads. 1205.18 - Charing Cross looking along Pall Mall with trams 7 and 21 and 26 in the picture. 1205.19 - Charing Cross, with 21 departing for Golden Square and No. 5 heading for Quarry Hill. Has the Ezywalkin and the Beehive buildings in the background. 1205.20 - as for 1205.19, but a few moments later. Adjacent pole has a "NO ROAD" letter in reflectors vertically. 1205.21 - Charing Cross with Nos. 25, 21, 26 and 7, looking south from Pall Mall end. 1205.22 - No. 24 crossing Mitchell St. en route for Golden Square, showing 'special' with the Beehive and Ezywalkin buildings in the background. 1205.23 - Charing Cross with Nos. 24, 21 and 7 in the photo and Fountain Plaza in the background. Print of 1205.7 - stored in box D1.Information written on in blue ink and date stamped on purple ink. 1205.1 - "No. 25 at Fire Station Loop High Street, Golden Square." 1205.2 - "Nos. 25 and 21 crossing at Fire Station Loop, near Golden Square." 1205.3 - "Nos. 25 and 21 crossing at Fire Station Loop, near Golden Square." 1205.4 - "No. 25 at Golden Square terminus." 1205.5 - "No. 25 at Golden Square terminus." 1205.6 - "Nos. 7 and 25 crossing at Myrtle St. Loop." 1205.7 - "No. 7 leaving Myrtle St. Loop." 1205.8 - "No 25, entering Bendigo Depot." 1205.9 - "Nos. 20 and 24 at Bendigo Depot." 1205.10 - "No. 24 at Bendigo Depot." 1205.11 - "Nos. 25 and 29 at Bendigo Depot." 1205.12 - "Birney cars 29 and 28 at Bendigo Depot." 1205.13 - "No. 24 (with 20 beyond) at Bendigo Depot." 1205.14 - "No. 24 entering McCrae St. from Arnold St." 1204.15 - "No. 24 in Caledonia St. at cnr of Thunder St." 1204.16 - "No. 5 waits at Charing Cross as No. 26 arrives from Quarry Hill. Note remains of crossover abandoned on relocation in 1965." 1204.17 - "Nos. 5 and 26 at Charing Cross." 1204.18 - "Nos. 26, 7 and 21 at Charing Cross (No. 5 just visible behind No. 26)." 1204.19 - "No. 21 leaves Charing Cross for Golden Square as No. 5 starts off for Quarry Hill." 1204.20 - "No. 21 swings onto the single track Golden Square line as No. 5 heads into Mitchell St. towards Quarry Hill." 1204.21 - "Nos. 25, 21 and 26 watch No. 7 arrive at Charing Cross from Golden Square." 1204.22 - "No. 24 at Charing Cross crossing Mitchell St." 1204.23 - "Nos. 24, 21 and 7 at Charing Cross."tramways, trams, bendigo, golden square, myrtle st., fire station, depot, charing cross, tram 5, tram 7, tram 20, tram 21, tram 24, tram 25, tram 28, tram 29 -
 Ballarat Tramway Museum
Slide - 35mm slide/s - set of 12, Noel Simons, 28 Feb. 1972
Set of 12 transparencies taken on 28/2/1972 on Kodak mounts. 1207.1 - Bendigo 26 and 2 at Charing Cross. 26 en route for Eaglehawk, 2 for Quarry Hill. Has the Colonial Mutual Life, Armstrong Tyre Service, and Australian Mutual Provident Society buildings and a Cohns Drinks ad. in the background. 1207.2 - as for 1207.1 but with Alexandra fountain in the foreground. 1207.3 - No. 2 in Mitchell St. heading for Quarry Hill. Photo taken after tram has passed photographer. Has buildings on either side of Mitchell St. in the background, including the Plaza Theatre. 1207.4 - No. 6 en route for Golden Square departing Charing Cross. Has the RACV and ANZ bank in the background. 1207.5 - No. 2 crossing Pall Mall to enter Charing Cross ex Quarry Hill, with the Fountain Plaza in the background. 1207.6 - No. 6 arriving Charing Cross ex Golden Square with No. 21 alongside. No. 21 has the SEC ad. 'Everything's fine in my all electric kitchen.' Has the City Family Hotel and the Fountain Plaza shopping centre in the background. 1207.7 - No. 5 at Charing Cross en route for Quarry Hill with No. 2 behind. No. 2 has two SEC roof ads, 'Everything s fine in my all electric kitchen' and 'Electricity best for cooking'. RACV building in the background. Tram crews are discussing the day in the front of the tram. 1207. 8 - No. 21 in High St. Bendigo with the Cathedral in the background. No. 21 has two SEC roof ads, 'Everything's fine in my all electric kitchen' and 'Electricity best for cooking'. 1207.9 - No. 6 in High St. Bendigo with the Cathedral in the background. 1207.10 - No. 6 in High St. Bendigo, just past Wattle St. Photo taken after the tram has passed the photographer from within the Highway Car Sales yard. 1207.11 - No. 26 bound for Eaglehawk at the end of the double track in View St., note signal contactors, tram stop and section signs mounted on pole. 1207.12 - No. 26 turning from View St. into Barnard St.Information written on in blue ink and date stamped on purple ink. 1207. 1- "Nos. 26 and 2 at Charing Cross." 1207.2 - "Nos. 26 and 2 at Charing Cross." 1207.3 - "No. 2 in Mitchell St. just after leaving Charing Cross." 1207.4 - "No.6 leaving Charing Cross for Golden Square." 1207.5 - "No. 2 arriving at Charing Cross from Quarry Hill." 1207.6 - "No. 21 waits at Charing Cross as No. 6 arrives from Golden Square." 1207.7 - "No 5 at Charing Cross with No. 2 lurking behind." 1207.8 - "No. 21 in High St. at cnr of Wattle St." 1207.9 - "No. 6 in High St. at cnr of Wattle St." 1207.10 - "No. 6 in High St. between Wattle and Vine Sts." 1207.11 - "No. 26 at end of double track in View St. near Barnard. St. 1207.12 - "No. 26 seen at dusk turning from View St. into Barnard St."tramways, trams, bendigo, charing cross, high st, view st., tram 2, tram 5, tram 6, tram 21, tram 26 -
 Ballarat Tramway Museum
Slide - 35mm slide/s set of 7, Noel Simons, 29 Feb. 1972
Set of 7 transparencies taken on 29/2/1972 on Kodak mounts. 1208.1 - Bendigo 18 (en route to Quarry Hill) and 2 (Eaglehawk) in the early morning at Charing cross with the Alexandra fountain and the Fountain Plaza building in the background. 1208.2 - No. 2 descending View St. Photo taken after tram has passed the photographer. 1208.3 - as for 1208.2 at Mackenzie St. intersection 1208.4 - No. 26 ascending View St. with the ANZ bank, T& G in the background. 1208.5 - as for 1208.4, but at Mackenzie St. intersection. Photo taken after tram has passed the photographer. 1208.6 - No. 18 in View St. seen from the lookout tower in Rosalind Park. 1208.7 - No. 7 en route to North Bendigo in Nolan St. Photographed across the Centenary Oval.Information written on in blue ink and date stamped on purple ink. 1208.1 - "Nos. 18 and 2 in the early morning sun at Charing Cross." 1208.2 - "No. 2 descending View St. towards Charing Cross." 1208.3 - "No. 2 in View St. passing Mackenzie St." 1208.4 - "No. 26 in View St. just after leaving Charing Cross." 1208.5 - "No. 26 climbing View St. past Mackenzie St." 1208.6 - "No. 18 climbing View St. seen from lookout tower in Rosalind Park." 1208.7 - "No. 7 in Nolan St. heading towards North Bendigo. / Last picture of a Bendigo tram."tramways, trams, bendigo, charing cross, view st., nolan st., tram 2, tram 7, tram 18, tram 26