Showing 2441 items
matching goldfields north
-
 Ballarat Tramway Museum
Photograph - Black & White Photograph/s, Wal Jack, 12/04/1950 12:00:00 AM
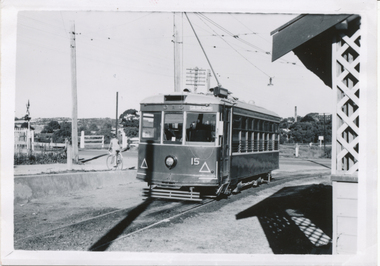
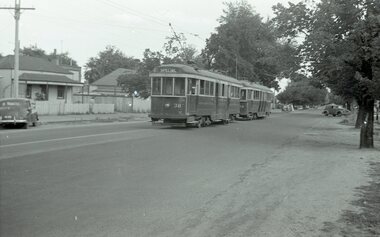
Black and White print contained within the Wal Jack Bendigo and Geelong Album, see Reg Item 5003 for more details. Photo of Bendigo Birney No.15 at North Bendigo, Photo Wal Jack, with the destination of Golden Square - 12-4-1959. Has the level crossing and rail line in the background and part of the tram stop shelter. i1 - scan of print in the album i2 - rear of image i3 - scan of negative at 3200dpi added 6/6/2020. On the rear in black ink "SEC Bendigo, No. 15 at Nth Bendigo 12-4-1959. Has the Wal Jack copyright stamp in the top right corner with the number "T219" written in.trams, tramways, bendigo, north bendigo, level crossings, birney, tram 15 -
 Ballarat Tramway Museum
Photograph - Black & White Photograph/s, Wal Jack, 12/04/1959 12:00:00 AM
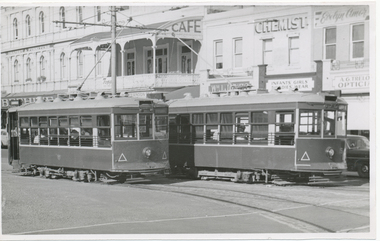
Black and White print contained within the Wal Jack Bendigo and Geelong Album, see Reg Item 5003 for more details. Photo of Bendigo Birney No. 29 and 15 in Pall Mall, near Charing Cross, 12-4-1959, Photo by Wal Jack. Has in the background, The Beehive buildings, Jopp? Cafe, Wm Jones building, Chemist, and A.G. Trello? Opticians. i1 - scan of print in the album i2 - rear of image i3 - scan of negative at 3200dpi added 6/6/2020. On the rear in black ink "SEC Bendigo #29 (left) for North Bendigo, and 15 (right) for Golden Square, photographed from #28, at Pall Mall 3.40pm, Sun 12th April 1959", in bottom left hand corner "Wal Jack Photo"trams, tramways, bendigo, pall mall, charing cross, birney, tram 15, tram 29 -
 Ballarat Tramway Museum
Photograph - Black & White Photograph/s, Leon Marshall Wood, 29/12/1947 12:00:00 AM
Black and White print contained within the Wal Jack Bendigo and Geelong Album, see Reg Item 5003 for more details. Photo of Bendigo Birney No.30 at North Bendigo, Photo Leon Marshall Wood, with the destination of Golden Square - 29-12-1947. Has the level crossing and rail line in the background and part of the tram stop shelter. On the rear in black ink "SEC of Victoria Bendigo, ex Geelong "Birney" car No. 30 Nth Bendigo terminus. In the bottom left hand corner "29.12.1947" The Leon Marshall Wood stamp in green ink and the number "SEC 15" written in.trams, tramways, bendigo, north bendigo, level crossings, birney, tram 30 -
 Ballarat Tramway Museum
Photograph - Black & White Photograph/s, c1950
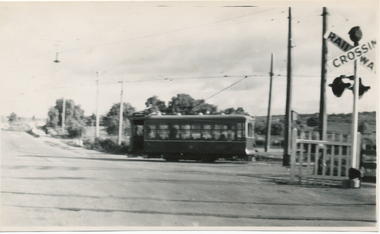
Black and White print contained within the Wal Jack Bendigo and Geelong Album, see Reg Item 5003 for more details. Photo of Bendigo Birney No. 30 leaving North Bendigo terminus, crossing Thunder St with the level crossing in the foreground. Photo c1950. On rear in ink "SEC B"trams, tramways, bendigo, birney, north bendigo, level crossings, tram 30 -
 Ballarat Tramway Museum
Photograph - Black & White Photograph/s, Wal Jack, 3/01/1954 12:00:00 AM
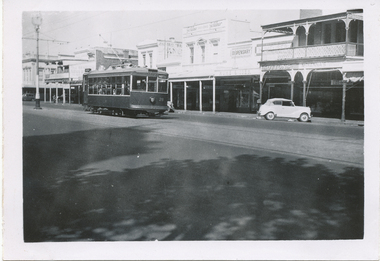
Black and White print contained within the Wal Jack Bendigo and Geelong Album, see Reg Item 5003 for more details. Photo of Bendigo Birney No. 28 in Pall Mall opposite near Post Office, Photo by Wal Jack, 3-1-54. In the background are shops for: Suttons Furniture, McKenna's, Hume & Iser Dispensary, and Gestetner Sales and Service. On the rear in blue ink "SEC Bendigo Birney No. 28 Birney ex North opposite Post Office 3-1-54" with Wal Jack copyright stamp in the top right hand corner and the number "T214" written in.trams, tramways, bendigo, pall mall, birney, tram 28 -
 Ballarat Tramway Museum
Photograph - Black & White Photograph/s, State Electricity Commission of Victoria (SECV), late 1940's
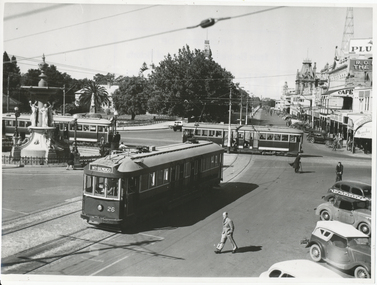
Black and White print contained within the Wal Jack Bendigo and Geelong Album, see Reg Item 5003 for more details. Photo of the Charing Cross with three bogie trams at the intersection, SEC publicity photo c1950. Two of the bogies crossing on the Eaglehawk - Quarry Hill line have white or cream strips on the lower edge of the body. No 26 has the destination of North Bendigo, though it is on Golden Square line with the driver standing just inside the doorway. In the background is the fountain, the Gardens and Pall Mall. SEC Publicity Photo, see Inscriptions for notes re photo. On the rear is the SEC Publicity Photo stamp, with negative number 21.1 written in, "Yallourn" in pencil and a typed piece of paper taped to the rear of the photo noting the Provincial tramways owned by the SEC, but that it is loss making.trams, tramways, bendigo, charing cross, secv, pall mall, tram 26 -
 Ballarat Tramway Museum
Photograph - Black & White Photograph/s - set of 7, Keith Kings, 20/10/1962 12:00:00 AM
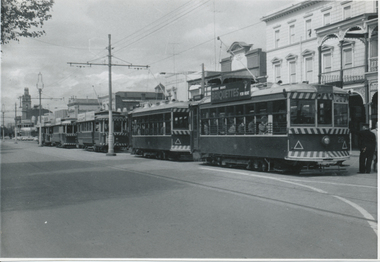
Black and White print contained within the Wal Jack Bendigo and Geelong Album, see Reg Item 5003 for more details. Set of seven images of the ARHS Special tour of Bendigo on 20-10-1962. .1 - Trams 28, 30, 21, 7 and 19 in Pall Mall .2 - 18, 26, 29, 11 and 5 at the Bridge St loop on the North Bendigo line. .3 - 28, 30, 21, 7, 19 on "down" line and 18, 26, 29, 11, 5 and service car 3 on "up" line, View St Opposite Oval .4 - 28, 30, 21, 7, and 19 at Eaglehawk .5 - 28, 30, 21 in North Bendigo siding and 7 and 9 in Thunder St - photo taken in Thunder St. .6 - ditto photo taking from vacant land on the south side of the terminus, along with No. 6 the service tram. .7 - 28, 30, 21, 7, 19 in View St with Goodyear and Caltex signs in the photo and the Commercial Banking Company of Australia building in the background. Most printed on Ilford paper.On rear in ink. .1 - "28, 30, 21, 7, 19 Pall Mall 20-10-62" .2 - "Bendigo ARHS Convoy "A" on Bridge St loop, Nos. 18, 26, 29, 11, 5 20/10/62" with Keith Kings copy right stamp printed in top right hand corner and number "N(y)(12)" written in. .3 - "18, 26, 29, 11, 5 and service car 3 on "up" line, 28, 30, 21, 7, 19 on "down" View St 20-8-62" .4 - "28, 30, 21, 7, and 19 Eaglehawk 20-10-62" .5 - "19, 7 in, 28, 30, 21 in spur siding Nth Bendigo 20/10/62" .6 - "28, 30, 21, 7, 19 plus No. 6 service car Nth B/go 20/10/62" .7 - "Bendigo ARHS Convoy "B" - 28, 30, 21, 7, 19 Charing Cross, 20/10/62" with Keith Kings copy right stamp printed in top right hand corner and number "N(y)(14)" written in.trams, tramways, bendigo, arhs, tours, eaglehawk, north bendigo, view st, tram 28, tram 30, tram 21, tram 7, tram 19, tram 6, tram 18, tram 26, tram 29, tram 11, tram 3 -
 Ballarat Tramway Museum
Photograph - Black & White Photograph/s, c1928
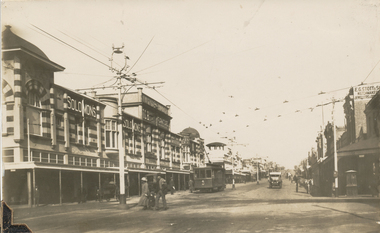
Black and White copy print contained within the Wal Jack Bendigo and Geelong Album, see Reg Item 5003 for more details. View of the intersection of Moorabool St and Malop St, photo from the North East corner. No. 4 MESCo, about 1928, heading south. Tram has the destination of Newtown. Solomons and E.G. Stott Jewellers and watchmakers buildings in the photo. Note the fire alarm, and letter box on the corner (right hand side of photo) Not known who made print. on rear in pencil "Newtown destination"trams, tramways, geelong, mesco, malop st, moorabool st, tram 4 -
 Ballarat Tramway Museum
Photograph - Black & White Photograph/s, Wal Jack, 1940
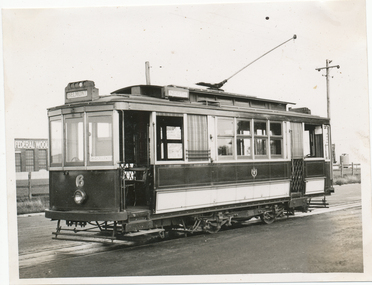
Black and White print contained within the Wal Jack Bendigo and Geelong Album, see Reg Item 5003 for more details. Photo of Geelong No. 6 at the North terminus. The tram has the destination of Belmont. In the background are the Federal Wool stores. Wal's album notes provides the date of 1940. i1 - scan of print in the album i2 - rear of image i3 - scan of negative at 3200dpi added 6/6/2020. trams, tramways, geelong, north, tram 6 -
 Ballarat Tramway Museum
Photograph - Black & White Photograph/s, Keith Kings, 31/07/1955 12:00:00 AM
Black and White print contained within the Wal Jack Bendigo and Geelong Album, see Reg Item 5003 for more details. Photo of Geelong No. 4 painted with zebra stripes north bound in Moorabool St. Keith notes it has been fitted with dash canopy lights. 31/7/1955. Photo by Keith Kings. On rear in ink - in top right hand corner, the Keith Kings copyright stamp with number P(b)(2) written in. "Geelong No. 4 "Zebra" painted ends, with canopy. On single truck car thus. 31/7/55".trams, tramways, geelong, moorabool st, tram 4 -
 Ballarat Tramway Museum
Postcard, Moorabool St, Geelong with Birney No. 14
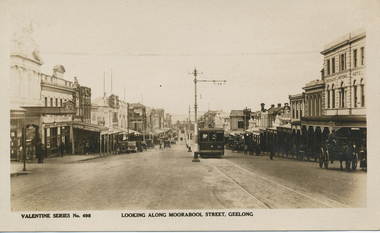
Postcard contained within the Wal Jack Bendigo and Geelong Album, see Reg Item 5003 for more details. Valentine Series Postcard, No. 498 looking north along Moorabool St, Geelong with Birney No. 14 approaching the camera on the single line section. The tram has the destination of South (prior to extension from the Barwon River to Belmont in 1927) and is fitted with two trolley poles. There are two other trams in the photograph along with many motor vehicles and horse drawn vehicles - mid 1920's. Moorabool St has centre poles. In the photo are Sully's National Hotel, White Hart Hotel, Leitch Cycles and sports goods and a T&G building (prior to the new one being built?). Published by Valentines Publishing Co of Queen St Melbourne. See related documents for a email from Richard Gilbert providing further documents.trams, tramways, south, belmont, geelong, moorabool, tram 37, tram 36 -
 Ballarat Tramway Museum
Photograph - Black & White Photograph/s, Wal Jack, 29/07/1943 12:00:00 AM
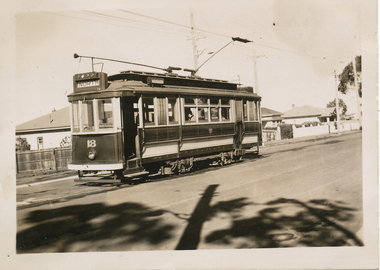
Black and White print contained within the Wal Jack Bendigo and Geelong Album, see Reg Item 5003 for more details. Photo of No. 18 at the Belmont terminus 29 July 1943. Tram has the destination of North. i1 - scan of print in the album i2 - rear of image i3 - scan of negative at 3200dpi added 18/6/2020. Has written in ink on the rear "SEC Geelong Tramways, No. 18. Belmont terminus 29-7-1943"trams, tramways, geelong, belmont, tram 18 -
 Ballarat Tramway Museum
Photograph - Black & White Photograph/s, Wal Jack, c1940
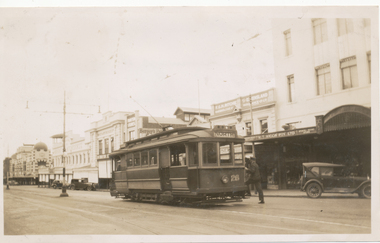
Black and White print contained within the Wal Jack Bendigo and Geelong Album, see Reg Item 5003 for more details. Photo of 26 in Moorabool St, Geelong. Tram has the destination of North. Printed on Kodak Velox paper. No date given, but c1940. In the background is building for W. T. Wiggs Pty Ltd sports store, F. G. H Ritchie Queensland Insurance and Berger's Paints On rear in ink "Geelong Tramways No. 26, Ex M&MTB made into 1 man car, 3 in service 24, 25, 26"trams, tramways, geelong, moorabool st, tram 26 -
 Ballarat Tramway Museum
Photograph - Black & White Photograph/s, Wal Jack, May. 1949
Black and White print contained within the Wal Jack Bendigo and Geelong Album, see Reg Item 5003 for more details. Photo of Car No. 32 and single trucker 22, Moorabool St. No. 32 has the destination of North, No. 22 Belmont. In the background is the Bank of New South Wales, Geelong Nursery Nook, McGills, Hotel Cullen. Photo May 1949. No details on photographer though there is an initial on the photograph. i1 - scan of print in the album i2 - rear of image i3 - scan of negative at 3200dpi added 27/6/2020.On rear in pencil "Geelong May 1949, 32 and 22 new and old, 8 wheeler and 4 wheeler, North & Belmont, Coming and Going / Moorabool St / Ryrie St in the foreground."trams, tramways, geelong, ryrie st, moorabool st, bogie trams, tram 32, tram 22 -
 Ballarat Tramway Museum
Photograph - Black & White Photograph/s, 8/01/1956 12:00:00 AM
Black and White print contained within the Wal Jack Bendigo and Geelong Album, see Reg Item 5003 for more details. Photo of Geelong No 31 bound for North Geelong at Railway station junction, Malop and Mercer Streets 8/1/1956. General view of junction in the area with a Olympic tyre / service station No details on photographer. On rear in ink "No.31 bound for North Geelong at Railway Stn Junc Malop and Mercer Streets 8/1/56"trams, tramways, geelong, north, railway station, malop st, mercer st, tram 31 -
 Ballarat Tramway Museum
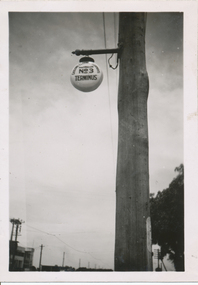
Photograph - Black & White Photograph/s, c1950
Black and White print contained within the Wal Jack Bendigo and Geelong Album, see Reg Item 5003 for more details. Photo of an illuminated street sign, lamp, at the North Geelong terminus. Photographer not known, c 1950. Sign has the words "Geelong Electric Tramways / Destination? / No. 3 Terminus"On the rear in ink "Illuminated terminal sign"trams, tramways, geelong, signs, north -
 Ballarat Tramway Museum
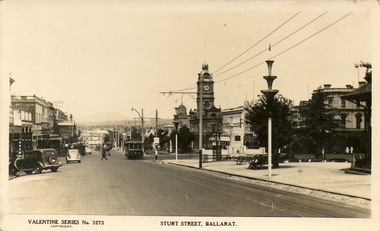
Photograph - Digital Image and Black & White Photograph/s, Valentine & Sons Publishing Co, 1938
Digital image provided by David Critchley of a postcard looking east along Sturt, north side towards Grenville St, at Doveton St. Has a detailed image of the tram. Tram has the destination of Lydiard St North. Note the decorations along the roadside for the centenary of settlement in the Ballarat district in 1938. Valentine Postcard No. 3273. .1 - large format print of the above image without the lower label. Has "Sturt St, Ballarat c1940's" along bottom edge. Print has "J75" in red ink in the top left hand corner on rear - the tram's Melbourne number.trams, tramways, sturt st, postcards, centenary, tram 14 -
 Ballarat Tramway Museum
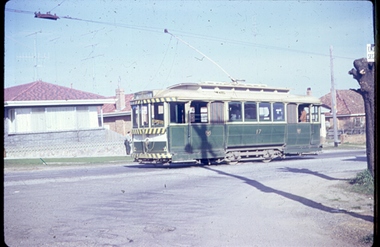
Photograph - Digital image, Joy Waller, 19/09/1971 12:00:00 AM
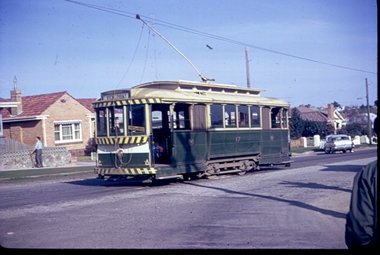
Copy of a colour slide showing Tram 17 in Lydiard Street North, at the terminus. From the direction of the trolley pole and the sign on the destination board, it is preparing to return to Sebastopol. One of the crew can be seen leaning on a fence in the background. Three brick veneer homes can be seen. The photographer says this was taken on the last day of trams in Lydiard Street in 1971. (More likely 17/9/1991 based on A Cook notes, 17 was not used on the last day, all bogie trams)trams, tramways, ballarat trams, crews, houses, last day, lydiard st nth, secv tramways, street scene, terminus, tramway closure, tram 17 -
 Ballarat Tramway Museum
Photograph - Digital image, Joy Waller, 19/09/1971 12:00:00 AM
Copy of a colour slide showing Tram 17 in Lydiard Street North, at the terminus. This photo is taken from further north than 6013. From the direction of the trolley pole it is preparing to head back into the city, however the destination board is reading View Point.. One of the crew can be seen standing near a fence in the background, with a point bar in his hand. Several homes and motor cars can be seen. The photographer says this was taken on the last day of trams in Lydiard Street in 1971. There are shadows of other photographers at the location.trams, tramways, ballarat trams, crews, houses, last day, lydiard st nth, secv tramways, street scene, terminus, tramway closure, tram 17 -
 Ballarat Tramway Museum
Photograph - Digital image, Joy Waller, 19/09/1971 12:00:00 AM
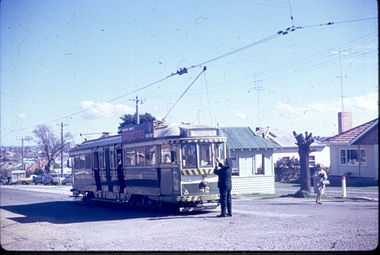
Copy of a colour slide showing Tram 42 in Lydiard Street North, at the terminus. This photo is taken from the north east looking down Lydiard Street. The conductor is adjusting the trolley pole it is preparing to head back into the city, and the destination board is reading Sebastopol. The shelter at the terminus can be seen, and there is a female passenger in hat and coat walking away from the tram. The photographer says this was taken on the last of the last tram to run in Lydiard Street in 1971. There is another photographer further down the street.trams, tramways, ballarat trams, crews, houses, last day, lydiard st nth, secv tramways, street scene, terminus, tramway closure, maximum traction, tram 42 -
 Ballarat Tramway Museum
Photograph - Digital image, Joy Waller, 19/09/1971 12:00:00 AM
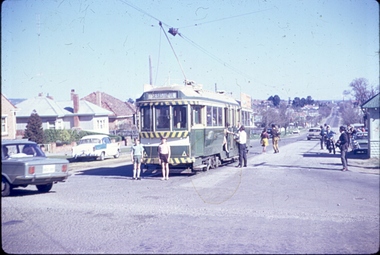
Copy of a colour slide showing Tram 42 in Lydiard Street North, at the terminus. This photo is taken from the north east looking down Lydiard Street. Two boys are standing at the rear of the tram. Has a number of people boarding the tram or standing around taking photographs.trams, tramways, ballarat trams, crews, houses, last day, lydiard st nth, secv tramways, street scene, terminus, tramway closure, maximum traction, tram 42 -
 Ballarat Tramway Museum
Photograph - Digital image, Joy Waller, 19/09/1971 12:00:00 AM
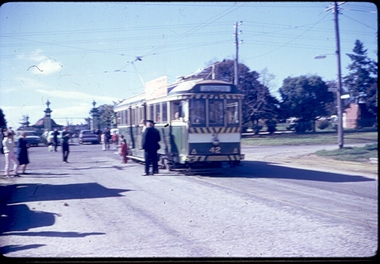
Copy of a colour slide showing Tram 42 in Lydiard Street North, at the terminus. This photo is taken from the south west looking up Lydiard Street. The cemetery gates can be seen in the background. The trolley pole it is ready to head back into the city, and the destination board is reading Sebastopol. There are children and the crew posing beside the tram for the photograph. There is a crowd of people, standing on the road near the tram, and others waiting to take photos. The photographer says this was taken of the last of the last tram to run in Lydiard Street in 1971. Photo quality is poor as the original image was blurred.trams, tramways, ballarat trams, crews, houses, last day, lydiard st nth, secv tramways, street scene, terminus, tramway closure, maximum traction, cemetery, tram 42 -
 Ballarat Tramway Museum
Photograph - Digital image, Peter Waugh, 11/06/2104 12:00:00 AM
Track repairs in Wendouree Parade, June 2014. Distant view of concrete being poured, Wendouree Parade looking north. Photo by Peter Waugh, collected for reference purposestrams, tramways, road works, btm, track repairs, wendouree parade -
 Ballarat Tramway Museum
Slide - 27 mm sq slide/s, Andrew Howlett, Sep. 1968
Yields information about tram services in Barkly St and passengers.Colour slide, Kodak white cardboard mount, developed Sept 1968, of No. 38 in Barkly St Mt Pleasant with a lady walking over to board the tram. Tram has the destination of Gardens via Drummond North."Mt Pleasant" in red ink.ballarat, tramways, trams, mt pleasant, barkly st, passengers, tram 38 -
 Ballarat Tramway Museum
Negative, Wal Jack, early 1950's
Yields information about three bogie trams possibly stored in Ripon St awaiting their use for an event.Negative and Digital images of the Wal Jack Ballarat Negative file of No. 36 and two other bogie trams parked in Ripon St North, just to the north of Sturt St. The house in the background is No. 3 Ripon St North and is still there (27-4-2020),. The spire of the St Peters Anglican Church can be seen. Tram is showing Special, possibly parked in Ripon St for a special event and waiting use. Perhaps for the Royal Visit. Photo may be related to Reg Item 7728.trams, tramways, ripon st, events, bogie trams, tram 36 -
 Ballarat Tramway Museum
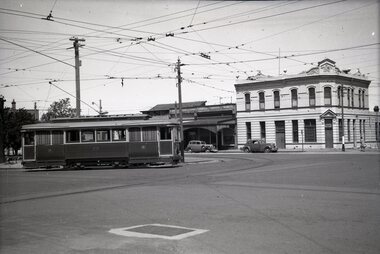
Negative, Wal Jack, early 1950's
Yields information about tram services at the corner of Sturt and Lydiard Sts and the appearance of the buildings.Negative and Digital images of the Wal Jack Ballarat Negative file of tram No. 30 turning from the south side of Sturt St into Lydiard St North with a bogie tram 3? on the south side. IN the background is Craig's Hotel, ANZ bank, the National Mutual and the C Marks & Co building. There is a sign for Stonyfell wines.trams, tramways, sturt st, lydiard st, tram 30 -
 Ballarat Tramway Museum
Negative, Wal Jack, early 1950's
Yields information about tram services possibly for a special event.Negative and Digital images of the Wal Jack Ballarat Negative file of trams 38 and 39 in Drummond St North, at Duncan St. Tram 38 showing Special. May be related to the Reg Item 7724.trams, tramways, drummond st nth, tram 38 tram 39 -
 Ballarat Tramway Museum
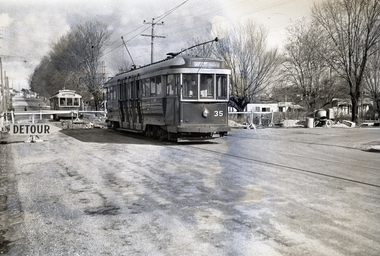
Negative, Wal Jack, Jul. 1955
Yields information about tram services during the reconstruction of the Canadian Creek bridge on the Mt Pleasant line during 1955.Negative and Digital images of the Wal Jack Ballarat Negative file of No. 35 at the Barkly St bridge work at Canadian Creek bridge in Barkly St, Mt Pleasant during the reconstruction of the bridge, during June-July 1955, Has No. 35 providing the connecting service to the City and Drummond St North. No. 32 waits on the other side of the bridge. See Reg items 5157 and 5305 for other associated photos.trams, tramways, mt pleasant, canadian creek, barkly st, bridges, tram 32 tram 35 -
 Ballarat Tramway Museum
Negative, Wal Jack, mid 1950's
Yields information about the unusual move to shunt trams at the Hospital corner.Negative and Digital images of the Wal Jack Ballarat Negative file of No 28 running from the north side of Sturt St into Drummond St south (the wrong way to normal services) at Hospital corner. Shunting for some reason. There are no passengers on the tram. mid1950's.trams, tramways, sturt st, hospital corner, drummond st, tram 28 -
 Ballarat Tramway Museum
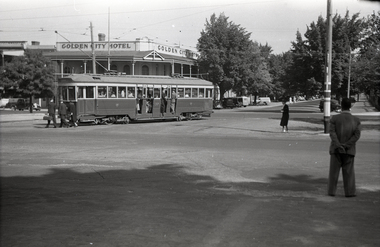
Negative, Wal Jack, early 1950's
Yields information about the use of the Dawson St crossover with loaded passenger cars and from the north side to the south side.Negative and Digital images of the Wal Jack Ballarat Negative file of No. 37 using the Dawson St cross over from the north side to the south side, with a large load of passengers. Destination appears to be Gardens via Sturt St West. In the background is the Golden City Hotel. Possibly the early 1950's.trams, tramways, sturt st, dawson st, tram services, tram 37