Showing 1446 items matching "royal three"
-
 Federation University Art Collection
work on paper - Artwork, Celia Rosser, 'Banksia Ornata' by Celia Rosser, 1974
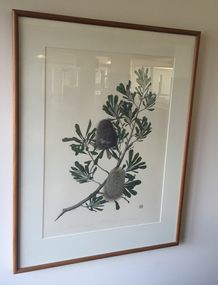
Celia ROSSER (1930- ) Born Melbourne, Victoria Celia Elizabeth Rosser is a renowned Australian botanical artist, best known for having published The Banksias, a three-volume series of monographs containing watercolour paintings of every Banksia species. She trained in Art at the Melbourne Institute of Technology In 1970, Celia was appointed Science Faculty Artist at Monash University. Four years later she was appointed University Botanical Artist, and began the project of painting every Banksia species. The project took over 25 years to complete, and resulted in the publication of a three volume monograph entitled The Banksias, with accompanying text by Alex George. Publication of the final volume in 2000 represented the first time that such a large genus has been entirely painted. In 1977 Celia Rosser was awarded the Linnaean Society of London's Jill Smythies Award for botanical illustration, and in 1995 was awarded a Medal of the Order of Australia. Monash University awarded her an honorary Master of Science degree in 1981, and an honorary PhD in 1999. Banksia Rosserae is the last banksia species discovered and was named after the artist. Since 2002, the Friends of the Royal Botanic Gardens Melbourne have awarded the "Celia Rosser Medal for Botanical Art" to outstanding exhibitors at their "The Art of Botanical Illustration" exhibition. This item is part of the Federation University Art Collection. The Art Collection features over 1000 works and was listed as a 'Ballarat Treasure' in 2007..1) Framed photolithograph of Banksia ornata (Desert Banksia) by Celia Rosser. .2) Unframed photolithograph of Banksia ornata (Desert Banksia) by Celia Rosser.art, artwork, celia rosser, rosser, botanical, banksia, gippsland campus -
 Melbourne Tram Museum
Drawing, Melbourne & Metropolitan Tramways Board (MMTB), "Royal Park Messroom", "Swanston St shunt", "Signal Box, St Kilda Junction", c1938
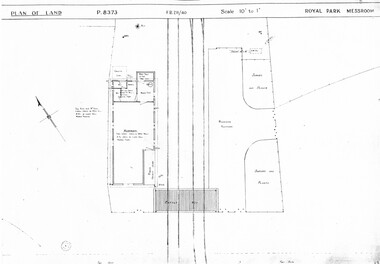
Set of three photocopied plans or drawings on A3 sheet of the "Royal Park Messroom" .1 - P8373 - Royal Park Messroom - corner Flemington Road and Abbotsford St - Route 55, shows passenger platform and fencing. .2 - P8447 - Swanston St shunt - signal box - shows detail of the building at the junction of Swanston St and Victoria Streets. .3 - P8484 - "Signal Box, St Kilda Junction" - show location of the signal box, adjacent streets and details of the building itself.trams, tramways, drawings, depots, property, route 55, royal park, signal box, victoria st, swanston st, st kilda junction, wellington st -
 Melbourne Tram Museum
Document - Photocopy, Valentine J. Crowley Consulting Engineer, "Report on Proposed Tramway for The Melbourne, Brunswick and Coburg Tramway Conference", Original 1915
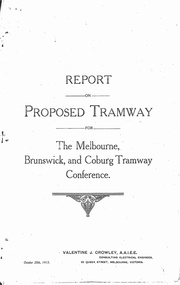
Photocopy - Report - 12 pages - titled "Report on Proposed Tramway for The Melbourne, Brunswick and Coburg Tramway Conference", prepared by Valentine J. Crowley Consulting Engineer Oct. 25, 1915. Looks at the construction of a tramway Flinders St along Queen St, to Royal Park, to Sussex St and Gaffney Road, West Coburg for the Melbourne Brunswick and Coburg Tramways Trust. Looks at the route and length of track in detail, route, administration, population, construction, permanent way, overhead lines, feeders, rolling stock, timetable, capital cost, alterations to services, expenditure for year and conclusion. Has a map of the proposed route. Included with the document is a plan of the MBCTT lines, overwritten in ball point pen with street names dated Dec. 1919. Photocopy made from original documents - has been stapled along the side in three places.trams, tramways, mbctt, maps, new tramway, west coburg, queen st, royal park -
 Melbourne Tram Museum
Sign, Melbourne & Metropolitan Tramways Board (MMTB), "Notice to Passengers - Royal Tour - Tramway Arrangements", Mar. 1977
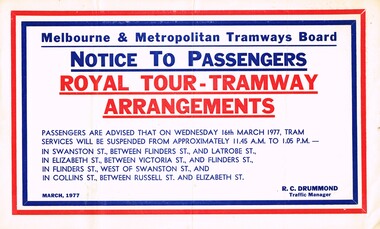
Set of three signs that could be affixed to the inside of tramcar windows advising of "Notice to Passengers - Royal Tour - Tramway Arrangements", printed in red and blue on off white semi gloss paper, for the March 1977 Royal Tour - Queen Elizabeth on her silver jubilee tour of Australia. All signed by R. C. Drummond as Traffic Manager. Advised of the time and locations of Suspension of services on 16 March 1977. .1 - Bus services - Bullen to Garden City .2 - Swanston St, Elizabeth St, Flinders St and Collins St. .3 - Bourke and Collins St.trams, tramways, mmtb, royal visit, services -
 Melbourne Tram Museum
Document - Research Notes, H. S. McComb, "Tramways in the Borough of Northcote", 1940's
Original and five carbon copies of the three pages extracted from the Victorian Government Gazette - 14/9/1888 authorising the construction of a tramway in the City of Northcote, giving details of routes, railway crossing of the proposed Clifton Hill and Royal Park lines, depot, motive power, speed, time, passengers only, safety, tolls and charges and governance. Each of the three page sets have been clipped together using a paper clip. Items 2053 to 2057 within box 72.3 in a brown folder marked "Northcote CC" in red pencil.trams, tramways, northcote, cable trams, electric traction, horse trams, railways -
 Melbourne Tram Museum
Photograph - Black & White Photograph/s, 1954
Set of three Black and white photographs of floats for the 1954 Royal Visit floral parade - 8 March 1954. Date from The Age 6/3/1954 - see trove references below. .1 - MMTB float featuring the title - "The Bag of Service" with MMTB name on the side. .2 - the SEC float - featuring a house and power lines .3 - RAAF float with a crown and a jet (sabre?) aircraft. Trove references found by Noelle Jones 27/6/2019 are: https://trove.nla.gov.au/newspaper/page/26680643 https://trove.nla.gov.au/newspaper/article/205702896 https://trove.nla.gov.au/newspaper/article/26595420 https://trove.nla.gov.au/newspaper/article/26595420 https://trove.nla.gov.au/newspaper/page/26680653On each photo in pencil: .1 - "MMTB floral float royal visit 1954" .2 - "SEC(?) floral float royal visit 1954" .3 - "Air force (?) - float royal visit 1954"trams, tramways, events, royal visit, parades, mmtb, secv, raaf, parades, conductors -
 Melbourne Tram Museum
Photograph - Set of 3 Colour Print/s, Jeff Bounds, 11/03/1991 12:00:00 AM
Set of three colour prints of TMSV operating the motorised cable tram set and Royal Park tram 256 11/3/1991. The rear of each photograph gives the details. Photos by Jeff Bounds. 1 - "Cable tram dummy 593 being pushed along Kingsway along Kingsway, side South Melbourne Depot after breaking chain drive in Park St when turning from St Kilda Road." SW 5, 777, route 64 following along with another tram. 2 - "Cable tram set 593 and 171 in Swanston St, looking north to Franklin St, as TMSV Exhibit in Moomba Parade in conjunction with the Villa Maria Society." 3 - "Horse tram 256 waiting alongside tracks in Swanston St (north) for Met Tram service to allow for it to enter The Moomba Parade as part of The Met exhibit." 256 is alongside W6 964, running a South Melbourne Beach route 1, followed by a W7 St Kilda Beach, route 15. Has the Royal Women's Hospital in the background.All have above details written in ink, along with "TMSV" and "11/3/91".trams, tramways, tmsv, moomba, events, swanston st, kingsway, w6 class, cable trams, w7 class, sw5 class, route 1, route 15, route 64, w6 class, tram 593, tram 171, tram 593, tram 777, tram 964 -
 Flagstaff Hill Maritime Museum and Village
Currency - Guinea Coin, The Royal Mint, 1793 George III Spade Guinea, 1793
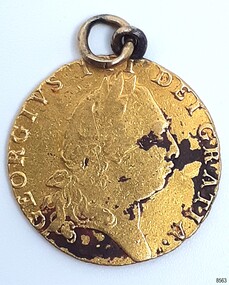
The coin was discovered by Julie Wilkins, a Victorian scuba diver who had already experienced more than 500 dives in Australia and overseas. She was holidaying in Peterborough, Victoria, and looking forward to discovering more about the famous Loch Ard ship, wrecked in June 1878 at Mutton Bird Island. The fast Glasgow-built clipper ship was only five years old when the tragedy occurred. There were 54 people on board the vessel and only two survived Julie's holiday photograph of Boat Bay reminds her of her most memorable dive. Submerged in the calm, flat sea, she was carefully scanning around the remains of the old wreck when, to her amazement, a gold coin and a small gold cross suddenly came up towards her. She excitedly cupped them in her hands, then stowed the treasures safely in her wetsuit and continued her dive. She soon discovered a group of brass carriage clock parts and some bottles of champagne. It was a day full of surprises. The items were easily recognisable, without any build-up of encrustations or concretion. Julie secretly enjoyed her treasures for twenty-four years then packed them up for the early morning train trip to Warrnambool. After a short walk to Flagstaff Hill Maritime Museum and Village, her photograph was taken as she handed over her precious find. She told her story to a local newspaper reporter, lunched a café in town then took the late afternoon train home. Her generous donation is now part of a vast collection of Loch Ard shipwreck artefacts, including the gold watch and the Minton Majolica model peacock. The coin is a British 1793 George III Gold Spade Guinea. It was already 83 years old when the Loch Ard had set sail. The loop and ring have been added, perhaps as a pendant, pocket watch accessory or similar purpose. It may have been worn for ‘good luck’ on the long journey to Australia, where ships had to carefully navigate the treacherous Bass’s Strait before arriving at their destination of Melbourne. Sadly, many met their fate on that short stretch of ocean aptly named the Shipwreck Coast. The coin is very recognisable even though it was exposed to the wrecking of the ship, its consequent movement, and the sea's turbulence. Its bent, scratched, buckled, split, dinted and worn condition is part of its story. The red-brown-black discolouration is similar to that found on other gold coins, sometimes called the ‘corrosion phenomena’. Studies suggest the possible cause is contaminants in the minting process reacting to the coins’ environment. The GEORGE III GOLD SPADE GUINEA: - The British Guinea was introduced in 1663 and was circulated until 1814. It was made of 22 carat gold, was 25 to 26 cm in diameter and weighed 8.35 grams. It had a value of 21 British shillings. The guinea coin ceased circulation after 1816 and was replaced by the one-pound note. However, the term ‘guinea’ continued to represent 21 shillings. King George (1738-1820) had six gold guinea designs minted during his reign from 1760 and 1820. Each of the six had different obverse portraits, all facing the right. There were three different reverse sides. The Spade Guinea was the fifth issue of the coin, introduced in 1787 and produced until 1799. The reverse shows a royal crown over a flat-topped shield with the Royal Arms of Great Britain, used in Scotland between 1714 and 1800. The shield images are, from left to right, top to bottom, the Arms of England and Scotland, the Arms of France, the Arms of Ireland, and the Arms of the House of Hanover. The Gold Guinea is also part of Australia’s history. It was the first coin mentioned in the announcement of Governor King of New South Wales his Australian Proclamation of a limited variety and denomination of coins accepted for use in the Australian Colony. The historic and decorative George III Spade Guinea has been reproduced for special collections of coins. However, replicas and imitations have also been made as souvenirs for tourists, as gaming tokens and chips for gamblers, and as ‘fake’ coins for profit. These coins differ in many ways; they may be only half the weight of the genuine coin. Often have a small stamp on the obverse with “COPY” or the manufacturer’s name or initials. Some have scalloped edges, some have dates that are different to the original dates of issue, and some even have text in Latin that translates as something very different to the original coin.The King George III Guinea was only produced from 1663 to 1814 and was the first English coin to be mechanically minted. The coin is the fifth edition of the King George III Guinea, the Spade Guinea, was only produced between 1787 and 1799. It is the only edition with this portrait of King George and the only one with the Royal Coat of Arms of Great Britain in Scotland on the reverse side. This edition was also the last guinea in circulation, because the sixth edition was reserved as the Military guinea. This edition of the Guinea is unique; This coin is the only guinea in our collection. It was minted in 1793, so it is now over 230 years old. The Gold Guinea is part of Australia’s history; it was the first coin in the list of coins for use in the Australian Colonies, mentioned by Governor King of New South Wales in his Australian Proclamation speech of 1800. The George III Spade Guinea was included in the Limited Edition Sherwood 12 Coin Collection of Notable Coinage of Australia. This coin is the only known guinea coin recovered from the wreck of the Loch Ard. It was already 85 years old when the ship was wrecked.Gold coin; British. 1793, King George III of the United Kingdom of Great Britain and Ireland (1760-1820), Spade Guinea. Yellow gold coin with gold metal loop mount and a gold ring through the loop. The design is the fifth issue of the George III Gold Guinea. The obverse relief is a portrait of George III facing right. Reverse relief is a crown above the Coats of Arms (1801-1816) of flat top spade-shaped shield divided into four quadrants that depict crowned lions, fleur de lies, a harp. These images are identified as, from left to right, top to bottom, England and Scotland, France, Ireland and Hanover. Inscriptions are minted around the rims of each side. The coin is dated 1793. Its surface has dark areas on both sides and the reed edge and surfaces are well worn. The loop mount is bent and the ring is buckled. The coin was recovered from the wreck of the ship Loch Ard.Obverse text; 'GEORGIVS III DEI GRATIA' (translates to George the Third, by the Grace of God) Obverse relief; (King George III bust, facing right, laurel wreath on head) Reverse text; 'M.B.E.ET.H.REX.F. D.B.ET.L.D. S.R.I.A.T.ET.E' '1793' (translates to: King of Great Britain, France and Ireland, Defender of the Faith, Duke of Brunswick and Lüneburg, Arch-Treasurer and Elector of the Holy Roman Empire) Reverse relief; a spade-shaped image i.e. (Crown with fleer de lies, above Shield with crowned lions in different postures, a harp, and other details)flagstaff hill maritime museum and village, warrnambool, great ocean road, shipwreck coast, royal mint, british coin, currency, guinea, military guinea, australian currency, british guinea, gold coin, spade guinea, king george iii, george iii, fifth portrait, arms of england and scotland, arms of france, arms of ireland, arms of the house of hanover, coins, gold coins, gold medallion, georgian era, 1793, numismatics, contamination phenomena, gold corrosion, good luck, lucky charm, pendant, lucky coin, trade, loch ard, wreck of the loch ard, 1878, mutton bird island, peterborough, scuba diver, 1980s, guinea coin, gold guinea, shipwreck artefact, relic, julie wilkins -
 Melbourne Tram Museum
Document - Reports, The Met et al, Royal Exhibition Building and Vintage Tram Route, 1986
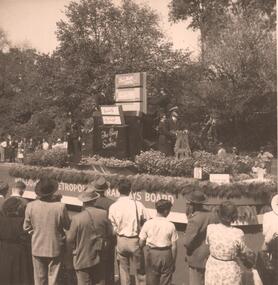
Set of three documents that were prepared to explore the concept of reusing the Royal Exhibition buildings and providing a Vintage tram route between them and the City. The first, an extensive report by The Met is an Addendum to the Fitzroy Feasibility Study of August 1986. The second is a document titled "1888 Street: A proposal for a Museum of Victorian Home and Street Life by Charles Sowerwine, University of Melbourne, and a handwritten note about the possible tram service and its operation written by Doug Prosser commenting on the proposal. The proposal included the reuse of the cable tram winding house on the corner of Gertrude and Nicholson St. Fitzroy.Demonstrates a report on a proposal for a Fitzroy Vintage Tram service.Set of three documents related to the provision of a Royal Exhibition Building and Vintage Tram Route: 1 - Approx 150A4 pages, black comb bound with The Met covers 2 - 66 page, photocopied - stapled in top left hand corner 3 - four page hand written on MTA memo ruled paper.tramways, the met, vintage trams, royal exhibition buildings, proposals, fitzroy, winding house -
 Melbourne Tram Museum
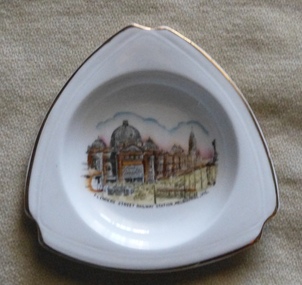
Domestic object - China dish, Royal Stafford, 1920s
Bone China, three sided dish with gold lining, partly embossed around the edges, with an image of Flinders St station, Melbourne, with electric trams (W and single trucker) in Swanston St and cable trams in Flinders St - late 1920's? Image has been coloured. On the rear of the dish: "Royal Stafford / Bone (manufacturer's crown mark) China / Made in England / No. 224"trams, tramways, melbourne, flinders st station, souvenirs -
 Melbourne Tram Museum
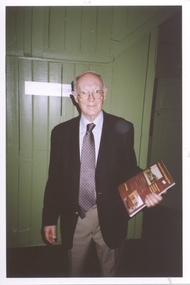
Photograph - Set of 3 Colour Photograph/s, 22/11/2012 12:00:00 AM
Set of three colour prints of FOHTD Member Ian Brady and author of Prahran & Malvern Tramways Trust: Melbourne's foremost municipal tramway on 22-11-2011 formally launching his book in an presentation at the depot. Printed on Kodak Royal Digital Paper.trams, tramways, pmtt, books, fohtd -
 Melbourne Tram Museum
Photograph - Set of 3 Black & White Photograph/s, John Dare, 1975
Set of three photograph by John Dare, 9/3/1975 of the operation of the TMSV horse Royal Park Zoo tram, No. 256, in the South Melbourne Football ground loop. .1 - Side of view of the tram with horse. .2 - With "Seven Colour Television Tram" passing on the inbound track. .3 - general view of the tram. The adtrams article (http://www.vicsig.net/index.php?page=trams&article=adtrams) accessed 22/8/2013 gives the advertising tram as SW6 900. image i4 - scan of three back of the photographs.On .1 and .3 - On rear ink "Recently restored horse tram was one of the highlights of the Labour Day weekend when it operated on a loop of track opposite the South Melbourne Football Ground. 9/3/75". Along with the ARHS Photo collection and John Dare name and address stamp. On .2 - as for .1, but with the additional words "Here it is seen paralleling the seven colour television tram"trams, tramways, horse trams, tmsv, south melbourne loop, advertising trams, tram 256, tram 900 -
 Melbourne Tram Museum
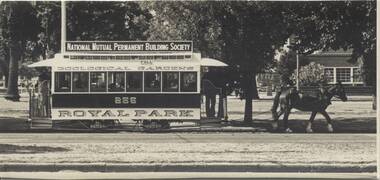
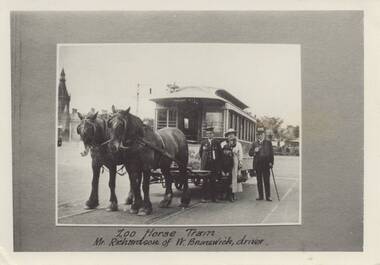
Photograph - Set of 3 Black & White Photograph/s, c1920
Set of three black and white photographs of the Melbourne Zoo Horse tram. .1 - view of tram with horses, a conductor, and a well dressed family in front of the tram. Photo taken at the Sydney road terminus. Has the note under the photo "Zoo Horse Tram Mr Richardson of W. Brunswick, driver." .2 - Side of view of the horse tram - No. 42 with "Royal Park" on the side. .3 - View of the zoo terminus, from the rear of the tram with "Zoological Gardens" on the rear dash panel of the tram. The conductor appears to be applying the hand brake. Note the signage on the right side of the photo. Photos c1900 to 1910. 2nd copy of .2 and .3 added from the Keith Kings collection - 14-8-2021 - see also Reg Item 5993 for another copy.On the rear of .3 -"M. G. R? collection" On rear of 2nd copy of .2 is the MMTB Stamp.trams, tramways, horse trams, royal park, zoo tram, tram 42 -
 Bendigo Military Museum
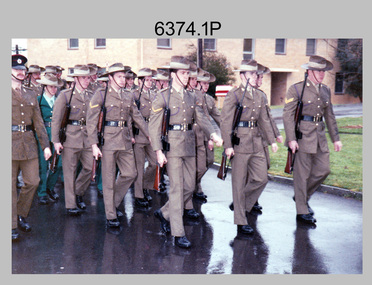
Photograph - Army Survey Regiment – Corps Day Parade, Fortuna Villa, Bendigo, 1990
... three cheers to the Royal Australian Survey Corps. Front rank L... three cheers to the Royal Australian Survey Corps. Front rank L ...This set of 32 photographs were taken at the Corps Day Parade held at the Army Survey Regiment, Bendigo on the 28th of June 1990. The Parade Commander was CO LTCOL Rene van den Tol, and the Reviewing Officer was the Director of the Survey Corps - COL Don Swiney MBE. The Corps Day Parade was held on a wet and miserable day to commemorate the 75th anniversary of the formation of the Royal Australian Survey Corps. This occasion was one of several events held in 1990 to commemorate the 75th anniversary. More information is provided in pages 147 and 150 of Valerie Lovejoy’s book 'Mapmakers of Fortuna – A history of the Army Survey Regiment’ ISBN: 0-646-42120-4.This is a set of 32 photographs of the Corps Day Parade held at the Army Survey Regiment, Fortuna, Bendigo on the 28th of June 1990. The colour photographs were printed on photographic paper and are part of the Army Survey Regiment’s Collection. The photographs were scanned at 300 dpi. .1) - Photo, colour, June 1990. Lithographic Squadron marching onto parade ground. L to R: WO2 Keith Fenton RE – UK Exchange, CPL Peter Dillon, CPL Penny Knott, SPR Andrew Morrison-Evans, unidentified, SPR Greg Howell, LCPL Damien Cole, SPR Graeme Spong, SPR Andrew Arman, unidentified (x2) CPL Rob Jones, CPL Peter Swandale. .2) - Photo, colour, June 1990. Lithographic Squadron marching onto parade ground. L to R: WO2 Keith Fenton RE – UK Exchange, SSGT Peter Imeson (blurred in foreground), LCPL Damien Cole, unidentified, SPR Andrew Morrison-Evans, SPR Andrew Arman, SPR Graeme Spong, SPR Greg Howell, unidentified (x2), CPL Rob Jones, CPL Peter Swandale. .3) &.4) - Photo, colour, June 1990. Lithographic Squadron formed up on parade ground. L to R: WO2 Keith Fenton RE – UK Exchange, LCPL Damien Cole, unidentified, SPR Andrew Arman, SPR Andrew Morrison-Evans, SSGT Peter Imeson, CPL Peter Swandale, CPL Rob Jones, remaining front rank unidentified, WO2 Rob Bogumil. .5) - Photo, colour, June 1990. Lithographic Squadron formed up on parade ground. L to R: SGT Brian Paul (background), SPR Andrew Arman, SPR Graeme Spong, SPR Greg Howell, SPR Michelle Withers, unidentified, CPL Peter Dillon, remaining rear rank unidentified. .6) - Photo, colour, June 1990. Lithographic Squadron’s SSGT Peter Imeson. .7) - Photo, colour, June 1990. Lithographic Squadron’s WO2 Keith Fenton RE – UK Exchange. .8) - Photo, colour, June 1990. Headquarters Squadron formed up on parade ground. L to R: (x3), CPL Wolfgang Hofbauer, CPL Paul Richards (background), SSGT Peter Mustart, WO2 Paul Cheater(background), PTE Mark Bird, unidentified, CPL Roger Pearson, remaining front rank unidentified, WO1 Ken Slater. .9) - Photo, colour, June 1990. Officers ready to take posts. L to R: MAJ Neil Taylor, LT Steve Hledik, CAPT Dave McLachlan, unidentified, MAJ Peter Clark, LT Geoff Ford, LT Craig Hersant, remainder unidentified. .10) - Photo, colour, June 1990. Officers ready to take posts. L to R: MAJ Neil Taylor, LT Steve Hledik, CAPT Dave McLachlan, remainder unidentified. .11) to .13) - Photo, colour, June 1990. Officers ready to take posts. L to R: MAJ Neil Taylor, LT Steve Hledik, CAPT Dave McLachlan, unidentified, MAJ Peter Clark, LT Geoff Ford, LT Craig Hersant, remainder unidentified. .14) - Photo, colour, June 1990. MAJ Neil Taylor at ease after taking post. .15) - Photo, colour, June 1990. 2IC MAJ Duncan Burns hands over Army Survey Regiment parade to CO LTCOL Rene van den Tol. .16) - Photo, colour, June 1990. Air Survey Squadron fixing bayonets. L to R: unidentified (x5), SSGT ‘Andy’ Capp, SGT Paul Hopes, SSGT Noel McNamara. .17) - Photo, colour, June 1990. Army Survey Regiment salutes and presents arms. SPR Gordon Santo in readiness to greet Reviewing Officer, Director of Survey - COL Don Swiney MBE. .18) - Photo, colour, June 1990. SPR Gordon Santo greets Reviewing Officer, Director of Survey - COL Don Swiney MBE. LT Steve Hledik saluting in background. .19) - Photo, colour, June 1990. L to R: WO2 Rhys De Laine, Reviewing Officer, Director of Survey - COL Don Swiney MBE. .20) - Photo, colour, June 1990. CO LTCOL Rene van den Tol salutes the Reviewing Officer, Director of Survey - COL Don Swiney MBE. .21) - Photo, colour, June 1990. Reviewing Officer, Director of Survey - COL Don Swiney MBE returns the Army Survey Regiment’s salute. .22) - Photo, colour, June 1990. Unidentified Chaplains. .23) - Photo, colour, June 1990. CO LTCOL Rene van den Tol escorts the Reviewing Officer, Director of Survey - COL Don Swiney MBE to Headquarters Squadron. L to R: CPL Wolfgang Hofbauer, CPL John ‘Flash’ Anderson, SGT Wolfgang Thun, SPR Paula (Golding) Brinsmead, remainder unidentified. .24) - Photo, colour, June 1990. Unidentified Army Survey Regiment personnel firing volleys. .25) - Photo, colour, June 1990. Air Survey Squadron firing volley salute. Front rank L to R: unidentified (x5), CPL Chris Brown, SSGT ‘Andy’ Capp, SGT Paul Hopes, SSGT Noel McNamara. Centre rank L to R: unidentified, SPR Jo Otto, SPR Rachel (Stanford) Scott, SGT John ‘Shep’ Shepard, LCPL Paul Boulton. Rear rank L to R: unidentified (x2), SPR Phuc ‘Charlie’ Tran, SGT Andy Boath, SGT Frank Downie, LCPL Stuart Midgley. .26) - Photo, colour, June 1990. Army Survey Regiment personnel firing volley salute. Foreground Officers L to R: 2IC MAJ Duncan Burns, unidentified, CAPT Bob Williams, unidentified, MAJ Ray Redman. CAPT Noel ‘Nesty’ Coulthard. .27) - Photo, colour, June 1990. Unidentified Army Survey Regiment personnel firing volley salute. .28) - Photo, colour, June 1990. Cartographic Squadron firing volley salute. Front rank R to L: SSGT Mick Hogan, unidentified, CPL Dan Cirsky, remainder unidentified. Centre rank R to L: unidentified, SPR Allan Blake (in battledress). .29) - Photo, colour, June 1990. Unidentified Cartographic Squadron personnel firing volley salute. .30) - Photo, colour, June 1990. End of parade. Air Survey Squadron giving three cheers to the Royal Australian Survey Corps. Front rank L to R: unidentified (x5), CPL Chris Brown, SSGT ‘Andy’ Capp, SGT Paul Hopes, SSGT Noel McNamara. Centre rank L to R: unidentified, SPR Jo Otto, SPR Rachel (Stanford) Scott, SGT John ‘Shep’ Shepard, LCPL Paul Boulton. Rear rank L to R: unidentified (x2), SPR Phuc ‘Charlie’ Tran, SGT Andy Boath, SGT Frank Downie, LCPL Stuart Midgley. WO2 Neil ‘Ned’Kelly on right. .31) & .32) - Photo, colour, June 1990. Army Survey Regiment squadrons at front of Fortuna Villa preparing to fall out..1P to .4P, .7P to .18P, .20P to .32P – There are no personnel identified. .5P – annotated ‘Corps Day parade’, ‘Corps Day 1990’ .6P - annotated ‘SGT Imeson Corps Day parade’, ‘Corps Day 1990’ .19P – annotated ‘CO, Corps Day parade’, ‘Corps Day 1990’royal australian survey corps, rasvy, army survey regiment, army svy regt, fortuna, asr -
 Wangaratta RSL Sub Branch
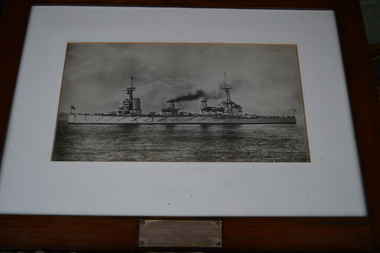
Print - Framed Print, HMAS Australia
With the outbreak of the First World War, HMAS Australia became the flagship of the naval force that captured the German colonies in the southern Pacific. She led a force which captured Rabaul on 13 September 1914 before proceeding to Samoa. With no German forces left in the South Pacific, Australia was deployed to the United Kingdom. En route she sank the German ship Eleanore Woermann. On 8 February 1915 she became flagship of the 2nd Battle-cruiser Squadron of the Royal Navy's Grand Fleet. Australia's service with the Grand Fleet consisted of a series of frequent patrols and exercises. She was twice rammed, firstly on 22 April 1916 by HMS New Zealand. This led to her missing the Battle of Jutland which, considering the disastrous losses in the Battle-cruiser Force, may well have been fortunate. She was rammed again by HMS Repulse in December 1917. Australia carried out experimental aircraft operations in 1918 and led the port column of the Grand Fleet at the surrender of the German High Seas Fleet. Returning home in 1919, Australia suffered a mutiny upon reaching Fremantle, Western Australia. Quite obsolete, she became a training vessel in Westernport until scuttled off Sydney Heads on 12 April 1924.The Australian Navy's first flagship, the battle cruiser HMAS Australia (I) was the centrepiece of the 'Fleet Unit', whose acquisition signalled the RAN's arrival as a credible ocean going force. Ordered from John Brown and Company in March 1910, construction began three months later with the total cost of the ship and fittings expected to be some £2 million. The Commonwealth Government decided upon the name Australia, and it proved a popular choice, carefully avoiding any suggestion of favouritism towards any one Australian State. The ship's badge maintained the national theme by featuring the Federation Star overlaid by a naval crown, while the motto 'Endeavour' reflected the ideal of the Australian spirit and recalled Lieutenant James Cook's ship of 1768-71.Timber frame of black and white print of a ship at sea.Imperial War Museum Photograph HMAS AUSTRALIA - RAN FLAGSHIP First flagship of the Royal Austrlian Navy 1913-1920 Sunk under the terms of the Washington Treaty 12th April 1924 This frame is made of teak from her deckhmas australia, ww1 -
 Bendigo Military Museum
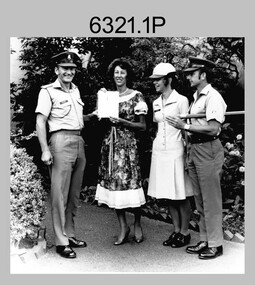
Photograph - Army Survey Regiment – Presentation to Charity Organisation, 1984
These photographs of a presentation to a charity organisation were taken in the grounds of Fortuna Villa, Army Survey Regiment in 1984. SPR Tracy (Parker) Ash was the unit’s Miss Golden North section entrant in the Miss Australia Quest. MAJ Bob Roche, RSM Bob Mason and SPR Parker presented a fundraising cheque to the unidentified representative from the Spastic Society. The the newspaper article is from the Bendigo Advertiser. The following wording is taken from the article: ‘Tracy Parker is a sapper in the Army, and a cartographic technician stationed at Fortuna, Bendigo. Originally from Melbourne, Tracy, 23, is the latest entrant in the Miss Golden North segment of the Miss Australia Quest. The highlight of Tracy’s quest will be an open day at Fortuna, once the magnificent home of Bendigo’s Quartz King, George Lansell. This open day at Fortuna, on Sunday, August 26, between 10 am and 4 pm, will give district residents a rare opportunity of inspecting this magnificent building and its gardens. Tracy said there will be handicrafts, rides, competitions and refreshments available at the open day. The main attraction, apart from the building and gardens, would be a hot air balloon. Admission to the open day would be: Adults $2, children and pensioners $1, family party $5. All proceeds from the open day at Fortuna will go to the Spastic Society. Tracy, like all other Miss Australia candidates work hard for the Spastic Society in fundraising activities. Getting further involved in fundraising, Tracy and her strong committee have organised a 6km fun run for Sunday August 19. Entry forms are available at Bendigo sports stores, and at the end of the fun run will be a barbecue. Apart from her vocation in the Army, and fundraising for the Spastic Society, Tracy Parker has a great love of horses, and associated activities of riding, jumping and showing her horses. Tracy is keen to do well in her fundraising, and with the Australian Army, or more particularly, the ranks of Fortuna behind her, Tracy looks like succeeding.’The first three items are photographs of a presentation to a charity organisation at the Army Survey Regiment, Bendigo in 1984. The fourth item is an article from the Bendigo Advertiser describing Army Survey Regiment’s fund-raising activities. The photographs were printed on photographic paper and are part of the Army Survey Regiment’s Collection. The photographic proof prints were scanned at 600 dpi. Photos .1P and .2P were scanned at 300 dpi. The newspaper article was scanned at 762 dpi. .1) to .3P) - Photo, black & white, 1984, L to R: MAJ Bob Roche, Regional Coordinator Mrs Jan Lamborn, SPR Tracy (Parker) Ash, RSM WO1 Bob Mason. .4) – Bendigo Advertiser newspaper article with photo, black & white, 1984, SPR Tracy (Parker) Ash. .1P to .2P – ‘Presentation of Certificate of Appreciation from Spastic Society. Presented by Regional Coordinator Mrs Jan Lamborn to MAJ Roche, SPR Tracy Ash (entrant in Miss Australia Quest (1984) and WO1 Mason.' .3P – No personnel identified. .4P – SPR Tracy Parker named in newspaper article.royal australian survey corps, rasvy, army survey regiment, army svy regt, fortuna, asr -
 City of Greater Bendigo - Civic Collection
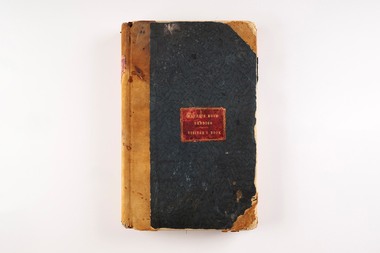
Book, J. B. Young Stationer, Mayor's Room Visitors Book, 1900
The Mayor's room was traditionally a private space in which the Mayor met with visitors and official guests. The signatures in this Visitor's Book reflect the breadth of community members who were received by Mayor's throughout the 20th century. From local people to overseas dignitaries their signatures are recorded for prosperity as evidence of their visit to Bendigo. Signatures include the Duchess and Duke of York (Later the King and Queen of England) who visited on the 28th April 1927 as part of their national visit which coincided with the opening of Parliament House in Canberra. Royals Prince Charles and Lady Diana signed the book on the April 15th, 1983 and Prime Minister John Howard and Members of Cabinet in 1998. Large tan leather and green cloth bound book. 390 lined pages each with three ruled vertical columns titled; Name, Address, Remarks. Marbled front and back end papers. Pages numbered top left or right of each page. Front end page has a small pink piece of paper pasted in centre with makers name and address on it. The book began being used on the 23rd March1900, with the last two pages featuring signatures of federal politicians who attended a Cabinet Meeting at the Bendigo Town Hall on the 21st July 1998.Spine; Embossed leather piece with Visitors Book written on it. Cover; Embossed leather piece with Mayor's Room Bendigo Visitors Bookcity of greater bendigo events, city of greater bendigo town hall, city of greater bendigo royal visits -
 Flagstaff Hill Maritime Museum and Village
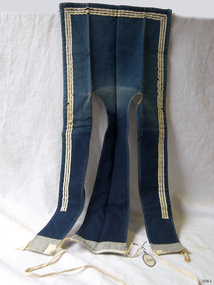
Uniform - Sailor's Collar, Early to mid-20th century
This sailor's collar is part of a naval uniform. It once belonged to R S Wallace, who served in the RAN (Royal Australian Navy) and on the HMAS Warrnambool for three years. After the war he made several ship models including the sailing ship Cutty Sark. From January 1857 the Australian Navy uniform was formally established. The uniform, referred to as a 'sailor's suit', includes a blue flap collar such as this one. Sailors in the Royal Australian Navy wore collars of this design from the early 20th century. The rating personnel of the Royal Canadian Navy were issued with a very similar collar from 1910 to the 1950s. The blue denim collars were buttoned or died inside their tops with the back and the striped portion of the front flaps showing.The square sailor's collar represents the uniform of a rating sailor in the Royal Australian Navy in the early to mid-20th century, connecting it to the maritime history of Australia and the evolution of the uniform of the navy. The collar is the only one in this museum's collection and is connected to a sailor who service in the RAN on the HMAS Warrnambool for three years.Sailor's collar. A square collar of blue cotton fabric with three flaps or strips. Three white stripes make a border on the outside edges and two flaps; the centre flap that has no stripes. There is an inscription. The underside is lined with white cotton fabric that has thin blue stripes. Tapes are attached for fastening the collar. The Royal Australian Navy collar once belonged to R S Wallace."R.S. Wallace"flagstaff hill, flagstaff hill maritime museum and village, warrnambool, maritime museum, maritime village, great ocean road, shipwreck coast, sailor’s collar, sailor’s uniform, uniform, military, navy, ran, royal australian navy, r s wallace, seamen's collar, australian defence forces, naval force, sailor's rig, flap collar, naval collar, robert s wallace, collar, sailor's uniform, world war, hmas warrnambool, sailor's suit -
 Royal Australian and New Zealand College of Obstetricians & Gynaecologists (RANZCOG)
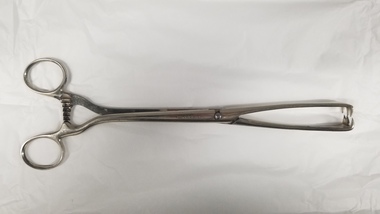
Equipment - Lahey goitre grasping forceps associated with Dr Felix Meyer, Medical Supply Depot
Used for surgery relating to the thyroid gland.This is one of a collection of items associated with Dr Felix Henry Meyer (1858-1937). Meyer was a very prominent early obstetrician and doctor, playing a part in the establishment of the role of the chair of obstetrics at the University of Melbourne in 1929. He was also a foundation member of the Royal Australian College of Surgeons.Set of metal forceps. Design resembles a pair of scissors, consisting of two blades, joined with a pin, with a ratchet for clamping below the finger grips/handles. At the end of each blade of the forceps is a three pronged claw. The manufacturer's name, 'MEDICAL SUPPLY DEPOT', is engraved on one of the blades.'MEDICAL SUPPLY DEPOT'surgery -
 Royal Australian and New Zealand College of Obstetricians & Gynaecologists (RANZCOG)
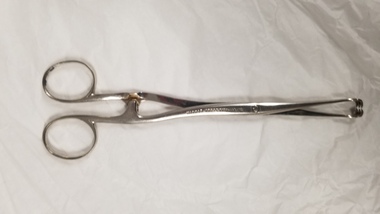
Equipment - Tenaculum forceps associated with Dr Felix Meyer, Mayer & Meltzer
This is one of a collection of items associated with Dr Felix Henry Meyer (1858-1937). Meyer was a very prominent early obstetrician and doctor, playing a part in the establishment of the role of the chair of obstetrics at the University of Melbourne in 1929. He was also a foundation member of the Royal Australian College of Surgeons.Set of tissue forceps. Forceps resemble a thin, elongated pair of scissors with a locking latch below the handle and a small, curved claw with three teeth at the end of each blade. The blades of these forceps curve in towards each other just below the locking latch. Manufacturer's inscription on the forceps reads 'MAYER & MELTZER LONDON'.'MAYER & MELTZER LONDON'surgery -
 National Vietnam Veterans Museum (NVVM)
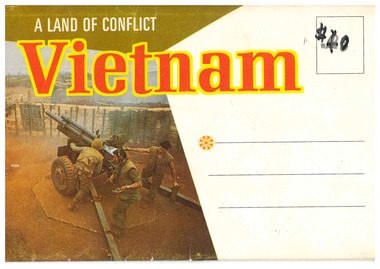
Postcard, Asia-Pacific Color Productions Ltd, Postcard -Foldout booklet
Cover khaki and white. Picture of field gun, three soldiers. Vietnam written in red with yellow outline. Postcard pack consisting of 14 (including front cover) scenes of military life and work in VietnamA Land of Conflict Vietnam Back - Base Camp, An Khepostcard, vietnam, soldiers, julian peter mcnamara, mcnamara, australian army, 3794332, trooper, royal australian armoured corps, national service, b squadron, a squadron, 1st armoured regiment -
 Bendigo Historical Society Inc.
Document - VICTORIA HILL - LETTER TO MR D ALLEN FROM ALBERT RICHARDSON
Handwritten carbon copy of a letter from Albert Richardson to Mr D. Allen, President of the Rotary Club of Bendigo South thanking the Club for the three weekend working bees clearing the rubbish and vegetation.document, memo, victoria hill, victoria hill, letter to mr d. allen from albert richardson, rotary club of bendigo south, central deborah, albert richardson, bendigo branch of royal historical society, bendigo & district tourist association, bendigo trust -
 Wangaratta RSL Sub Branch
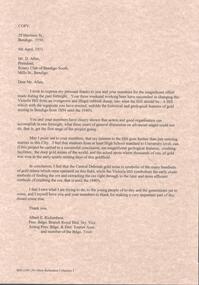
Equipment - Swagger Stick, c1863
This swagger stick belonged to Private Ernest LUCAS who served with the Royal Defence Corps between 17/6/1907 and 18/5/1919 including the 6th Battalion Middlesex Regiment In the British Army before World War I, swagger sticks were carried by all other ranks when off duty as part of their walking out uniform. The stick took the form of a short cane of polished wood, with an ornamented metal head of regimental pattern. The usual custom was for the private soldier or NCO to carry the stick tucked under his arm. Until 1939 swagger sticks were still carried by peacetime regular soldiers when "walking out" of barracks but the practice ceased with the outbreak of World War II. The 6th Battalion Middlesex Regiment can trace its history back to 7 August 1760 as part of the Middlesex Militia. In 1778 it was titled the 1st East Middlesex Militia. By royal order the regiment was later designated the Royal East Middlesex Militia on 24 April 1804. By 1855 it was using the formal title of "1st or Royal East Middlesex Regiment of Militia". In 1900 the number of regular Middlesex Regiment battalions was doubled with the formation of a new the 3rd and 4th battalions; and the two militia battalions were renumbered as 5th and 6th battalions of the regiment. The unit's standing orders of 1863 record the regimental insignia as being somewhat unusual, in that it did not include standard royal crown, but featured a five-pointed Saxon Crown atop a shield with the arms of the East Saxon Kingdom i.e. three stylised Seaxes hilted and pommeledpLong narrow round cane made from polished reddish/brown wood with brass metal tip and embossed silver topSilver metal top embossed with a crown above a shield inscribed 6th Battalion Middlesex Regtswagger stick, 6th battalion middlesex regiment, private ernest lucas -
 National Vietnam Veterans Museum (NVVM)
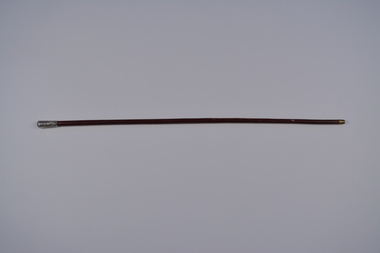
Photograph - Helicopter Convoy landing at U.S Base Long Bihn Vietnam 1968
This item contributes to an understanding of the impact that involvement in the war had on Vietnam (1962 - 1972)A black framed sepia image of three helicopters landing with two trees either side. The terrain has puddles of water around the area.Helicopter Convoy landing at U.S Base Long Bihn\Vietnam 1968stanley william exon, 3791206, royal australian army service corps -
 National Vietnam Veterans Museum (NVVM)
Photograph, Gibbons, Denis, Cool Bath
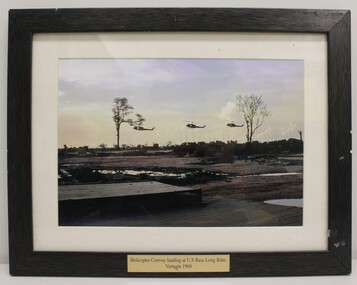
Denis Gibbons (1937 – 2011) Trained with the Australian Army, before travelling to Vietnam in January 1966, Denis stayed with the 1st Australian Task Force in Nui Dat working as a photographer. For almost five years Gibbons toured with nine Australian infantry battalions, posting compelling war images from within many combat zones before being flown out in late November 1970 after sustaining injuries. The images held within the National Vietnam Veterans Museum make up the Gibbons Collection. A black and white photograph of Diggers from 9th Battallion, Royal Australian Regiment enjoy a cool bath during operations South West of the Australian Task force at Nui Dat. The Diggers were allowed, six at a time to complete their ablutions. The battalion had been in the field for three weeksphotograph, 9th battalion, 9 rar, gibbons collection catalogue, australian task force, nui dat, diggers, the royal australian regiment, denis gibbons -
 Wangaratta RSL Sub Branch
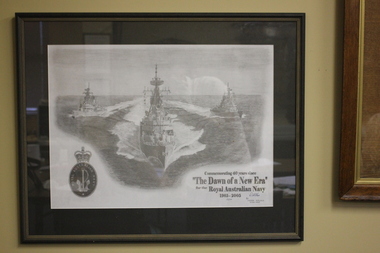
Print - Framed Graphite Print, Darren McAliese, 13/05/2005
To commemorating 40 years since The Dawn Of a New Era for the Royal Australian Navy - 1965-2005 - A limited release of a graphite print of Guided Missile Destroyers HMA Ships PERTH (38), HOBART (39) and BRISBANE (41) served the Royal Australian Navy (RAN) from 1965 and 2001.These ships were the first for the RAN to have been designed for the 'Missile Era' and were also the first to be not of a British design instead they were purchased from the United States of America. All 3 served with distinction on the 'Gun Line' during the Vietnam War and the BRISBANE also saw operations of the First Gulf War.Framed print drawn in graphite depicting three Guided Missile Destroyers at sea RAN - Commemorating 40 years since The Dawn Of a New Era for the Royal Australian Navy - 1965-2005 Limited Edition 3/50 Signed Darren McAliece 13 Nov 2005ran, hmas perth, hobart and brisbane, guided missile destroyers -
 Wangaratta RSL Sub Branch
Photograph - Photographs, K.W. Truscott
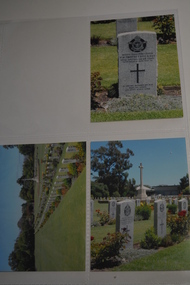
Gravestone photographs of Keith William "Bluey" TRUSCOTT 400213 Awarded DFC & Bar - Born 17/5/1916 Prahran Victoria WW2 RAAF Squadron Leader and Ace fighter pilot who served in Europe, South West Pacific and Milne Bay. Played for Melbourne Football Club. Died at sea and buried at Karrakatta Cemetery in Perth Western Australia. Three coloured photographs depicting head stones in cemetery400213 Squadron Leader K.W. Truscott DFC & Bar Royal Australian Air Force 28th March 1943 Aged 26 In Loving Memory of our Darling Son His duty nobly done. truscott, raaf, ww2, dfc -
 Stawell Historical Society Inc
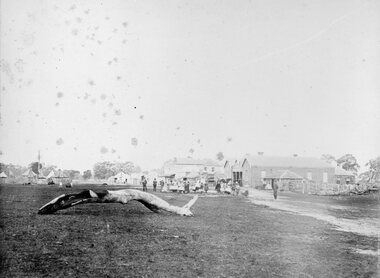
Photograph, Glenorchy 1866
Glenorchy. Part of a collection of Photographs by Mr. O.G. Armstrong as commissioned by the Shire of Stawell for the Inter-colonial and Paris Exhibition in Melbourne in 1866. Glenorchy township began as a resting place for bullock teams and travellers in the 1840s. In 1847, John Gleeson built the Four Posts Inn, which then became the name of the settlement. Gleeson is credited with naming the settlement Glenorchy, meaning tumbling waters, after his birth place in Scotland. In 1865 the Township consisted of a church, school, three hotels the Four Post Inn built 1847, Royal Hotel built 1855, The Royal Mail Hotel built1862. As well as boot makers, a blacksmith, stores, butcher and other enterprises. The town was a postal centre served by three coaches each day until the advent of the railway. stawell -
 Bendigo Military Museum
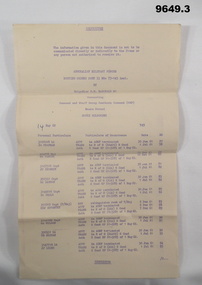
Document - ROUTINE ORDERS, Aust Dept of Defence, c1961
The ACMF was the Australian Citizen Military Forces and was the Army Reserve. Part of the collection of "William Fawcett" V246452 refer Cat No 9627.Three (3) cream colour foolscap sheets with writing in purple, lists 33 officers who have been terminated from ACMF and transferred to Royal Aust Infantry or other related units.Headed: "Routine orders Part 11 No's 77-145 incl. By Brigadier S.M. McDONALD MC", "RESTRICTED".cmf, termination of contract, fawcett 1 -
 Bendigo Military Museum
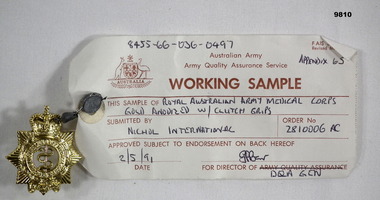
Manual - SAMPLE BADGE, GOLD COLOUR, c.1991
Badge is an example of sample used to ensure standard of manufacture among local contractors. See items 9806, 9807, 9808, 9809.gold coloured badge of Royal Australian Army Medical Corps. Two (2) pins at top and bottom with butterfly clasp on each. Crown at top, caduceus in centre of central circle surrounded by wreath with three (3) points on each side. Banner with motto at bottom. Tag secured to badge with wire and lead seal.Badge - "ROYAL AUSTRALIAN ARMY MEDICAL CORPS" surrounding centre circle. "PAULATIM [little by little]" on banner at base of badge. Tag (handwritten sections) - "8455-66-036-0497" "APPENDIX 65" "ROYAL AUSTRALIAN ARMY MEDICAL CORPS/GOLD ANODISED W/CLUTCH GRIPS" "NICHOL INTERNATIONAL/2810006 AC" "2/5/91" "G P Barr [signature]" "DQA GEN"insignia, badge