Showing 2061 items
matching burke
-
 The Beechworth Burke Museum
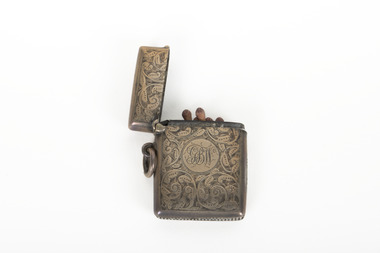
Functional object - Vesta Case, Unknown
This detailed example of a match holding Vesta was owned by someone with the initials GBW but is otherwise difficult to identify ownership. Vestas are the historical name for what are now known as matches. They were named for the Roman goddess Vesta whose domain was the hearth and home. The Swan company began production of short matches, mostly useful for lighting pipes and cigarettes due to their deliberately short length. Due to their small size it became convenient to carry these Vestas within a Vesta Case kept somewhere on the person, large enough to contain enough matches for a days use. The cases prevented their contents from becoming damaged and damp while also stopping them from accidentally striking if held loose in a pocket. This example of a Vesta case is particularly ornate.The social history objects held in the Burke Museum's collection help to tell the stories of Beechworth's past by showing the social, cultural, and economic aspects of the town's history.A decorative silver coloured vesta or match book. It has detailed engraving across the obverse and reverse sides with delicate scrollwork and a monogram set in a circular setting in the centre. The vesta has a hinged top and side loop to allow for attachment.GBW/ A01171/burke museum, vesta case, vesta, matches, silver, social history, luxury -
 The Beechworth Burke Museum
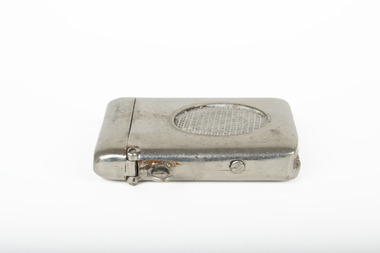
Functional object - Vesta Case, Unknown
Vestas are the historical name for what are now known as matches. They were named for the Roman goddess Vesta whose domain was the hearth and home. The Swan company began production of short matches, mostly useful for lighting pipes and cigarettes due to their deliberately short length. Due to their small size it became convenient to carry these Vestas within a Vesta Case kept somewhere on the person, large enough to contain enough matches for a days use. The cases prevented their contents from becoming damaged and damp while also stopping them from accidentally striking if held loose in a pocket. This is a simple example of a Vesta Case.The social history objects held in the Burke Museum's collection help to tell the stories of Beechworth's past by showing the social, cultural, and economic aspects of the town's history.A decorative silver coloured vesta or match book. It has a raised crosshatch pattern in a circular pattern on the obverse side. The vesta has a hinged top and side loop to allow for attachment.A01199/burke museum, vesta case, vesta, matches, silver, social history -
 The Beechworth Burke Museum
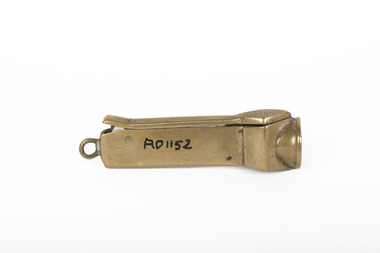
Tool - Cigar Cutter, Unknown
The exact creation of this Cigar Cutter is unknown, however the vintage nature and style of this cutter indicate that it was made in the early to mid 20th century. This cutter closely resembles the V-cut style of cigar cutter. These cutters are the most common type of cigar cutters and have been historically widely used. They cut a 'wedge' into the cigar cap rather than removing the whole cap like guillotine cutters do. This type of cut allows the smoker to get a deep cut into the V shaped cigar. Social history objects held in the Burke Museum help to tell the stories of Beechworth's past by showing the town's social, artistic and cultural community. This cutter shows significance through it's vintage artistic style and it's ability to show the social habits within Beechworth's history. A small bronze metallic cigar cutter with cigar insert on one side of the object and handle on the other side. A01152beechworth museum, cigar cutter, bronze, burke museum, social history -
 The Beechworth Burke Museum
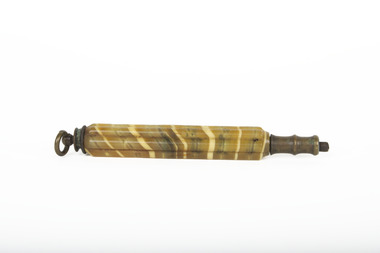
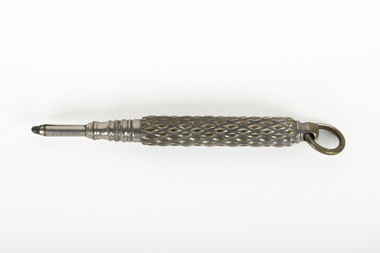
Tool - Propelling Pencil
A propelling pencil is a type of mechanical pencil.The lead is manually pushed down a tube of matching diameter, and is friction-fit. A small rod inside the pencil pushes the lead forward, as needed, usually with a twist an action mechanism.The social history objects held in the Burke Museum's collection help to tell the stories of Beechworth's past by showing the social, cultural, and economic aspects of the town's history.A small propelling pencil that features a stone handle.writing equipment, pencil, mechanical pencil -
 The Beechworth Burke Museum
Tool - Propelling Pencil
A propelling pencil is a type of mechanical pencil.The lead is manually pushed down a tube of matching diameter, and is friction-fit. A small rod inside the pencil pushes the lead forward, as needed, usually with a twist an action mechanism.The social history objects held in the Burke Museum's collection help to tell the stories of Beechworth's past by showing the social, cultural, and economic aspects of the town's history.A small silver propelling pencil with a diamond patterned handle.England/ V. S. Lead/mechanical pencil, writing equipment, pencil -
 The Beechworth Burke Museum
Photograph
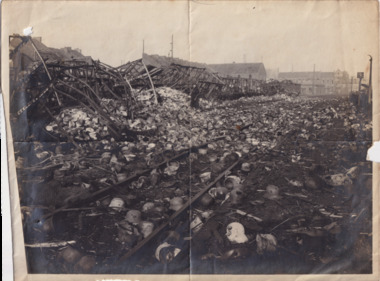
Taken some time between 1914-18 in France, the photograph depicts extensive wreckage of a railway train. There are collapsed buildings, debris, and helmets scattered all across the landscape. There is one unidentified soldier standing in the middle of the photograph. With research that is currently available, it can be inferred that the wreckage depicted in this photograph is from the tragic Saint-Michel-de-Maurienne derailment which occurred on December 12, 1917. The railway accident involved a troop train carrying almost 1,000 French soldiers on their way home for leave from the Italian Front in World War I. As the train descended into the Maurienne Valley, a sudden, uncontrollable acceleration caused a catastrophic crash and subsequent fire. 675 people died in the accident.The record is historically significant due to its connection to World War I. This conflict is integral to Australian culture as it was the single greatest loss of life and the greatest repatriation of casualties in the country's history. Australia’s involvement in the First World War began when the Australian government established the Australian Imperial Force (AIF) in August 1914. Immediately, men were recruited to serve the British Empire in the Middle East and on the Western Front. The record has strong research potential. This is due to the ongoing public and scholarly interest in war, history, and especially the ANZAC legend, which is commemorated annually on 25 April, known as ANZAC Day. Additionally, there is only limited information available about the Sant-Michel-de-Maurienne derailment. The record may be a useful springboard for further investigation into this accident and its history.Black and white rectangular photograph printed on matte photographic paper.Reverse: 6530 / Destruction of train carrying / German helmets (?) to (?) prior to / his retreat at Charleroi /military album, army, war, wwi, world war i, france, charleroi, train, military, wreckage, europe, belgium, saint-michel-de-maurienne, maurienne valley -
 The Beechworth Burke Museum
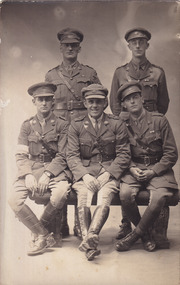
Photograph
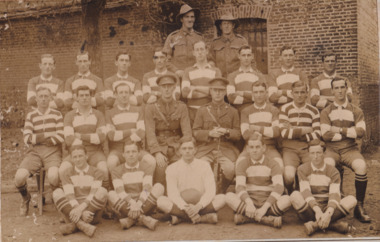
Taken some time between 1914-18, depicted is a large group of unidentified males. Four of them are dressed in Australian military uniforms. The remaining 19 men are dressed in striped uniforms. The male in the centre of the front row is cradling a football, suggesting that the group was part of a football or rugby league team. It is believed that the soldiers in this photograph were part of the Australian Imperial Force. This can be inferred by the chevron rank insignia visible on their uniforms. The placement of this insignia on the sleeve of the right arm suggests that this soldier was either a Warrant Officer or a Non-Commissioned Officer (NCO). Additionally, they are also wearing 'Rising Sun' collar badges on their coats. Australia, unlike most other Commonwealth countries, did not adopt metal regimental badges during the First World War. All units were issued with the Australian Army General Service Badge, better known as the 'Rising Sun’ badge. This insignia is almost always identified with the Australian Imperial Force. Sport has always been entwined with war. Both sport and war demand peak physical fitness, camaraderie, strategy, and allegiance to a team collaboratively working towards a common goal: to win. The connection between sport and war is especially strong in Australia since these two concepts form the basis of our national identity. The Australian War Memorial has a number of World War I recruitment posters linking war and sport in its collection. One of the posters produced in 1915 by the State Parliamentary Recruiting Committee in Victoria attempted to shame young men into enlisting by juxtaposing the image of an Australian soldier standing guard over his deceased mate with a photograph of a Victorian Football League match. Another poster, produced in 1917, features vignettes of different sports including cricket, bowling, boxing, kayaking and golf. Its slogan reads, "Join Together - Train Together - Embark Together - Fight Together: Enlist in the Sportman's 1000".The record is historically significant due to its connection to World War I. This conflict is integral to Australian culture as it was the single greatest loss of life and the greatest repatriation of casualties in the country's history. Australia’s involvement in the First World War began when the Australian government established the Australian Imperial Force (AIF) in August 1914. Immediately, men were recruited to serve the British Empire in the Middle East and on the Western Front. The record has strong research potential. This is due to the ongoing public and scholarly interest in war, history, and especially the ANZAC legend, which is commemorated annually on 25 April, known as ANZAC Day. Additionally, the record presents a unique opportunity to further explore the relationship between the arts, sport and war. This statement of significance has already established that war is integral to Australia's national identity - and sport is of equal importance. Specifically, the record begs to question how the peak physical fitness and camaraderie valued in team sports were creatively translated into military recruitment campaigns during World War I. Evidently, this record and its historic context demonstrates that there is potential here, and if further research is completed on this topic, it may provide insight into Australian military recruitment tactics used in the past and present, and into the future.Sepia rectangular photograph printed on matte photographic paper mounted on card.Reverse: 6529 / hyossest (?) / (?)1/11/1 /military album, army, military, war, wwi, world war i, sport, football, rugby, aif, australian imperial force -
 The Beechworth Burke Museum
Photograph
Taken during World War I from the forecastle of a navy ship, the photograph depicts an eruption of water and smoke as a result of an underwater submarine being bombed from above.The naval war of World War I was a conflict unlike any previous one with the exception of the brief Russo-Japanese War (1904-1905), with naval warfare in World War I being mainly between the German forces and the Great Britain forces. The naval war of World War I proved largely a disappointment to officials on both sides as it did not produce the decisive fleet actions envisioned in the pre-war years. Nevertheless, the war at sea was a crucial part of World War I overall. The German use of the submarine against commerce not only threatened the Allied war effort, but also drew the United States into the conflict. In addition, the British economic blockade of Germany afforded by the Royal Navy’s command of the sea inflicted great damage on the war effort of Germany. Finally, the naval war held great ramifications for the future since many practices employed in the First World War were those pursued in the Second World War.Black and white rectangular reproduced photograph on matte photographic paperReverse: 6527/ (Crown copyright notice from the Imperial War Museum)/ Naval 23/ 23/ A99/ burke museum, world war 1, world war i, ww1, wwi, submarine, submarine warfare, navy, naval vessels -
 The Beechworth Burke Museum
Photograph
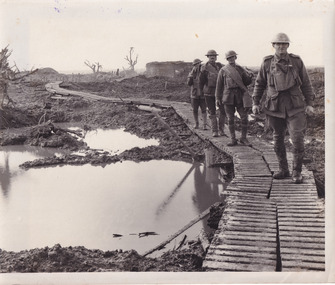
Taken during World War I on the Western Front, this photograph depicts four soldiers dressed in full uniform and kit walking through muddy trenches on wooden duckboards.On the Western Front, the war was fought by soldiers in trenches. Trenches were long, narrow ditches dug into the ground where soldiers lived. They were very muddy, uncomfortable and the toilets overflowed. These conditions caused some soldiers to develop medical problems such as trench foot. There were many lines of German trenches on one side and many lines of Allied trenches on the other. In the middle was no man's land, which soldiers crossed to attack the other side. 'Duckboards' (or 'trench gratings') were first used at Ploegsteert Wood, Ypres in December 1914. They were used throughout the First World War being usually placed at the bottom of the trenches to cover the sump-pits, the drainage holes which were made at intervals along one side of the trench. This made it easier to pump out the pits when necessary. The raised edges of the boards in theory helped protect men's feet from accumulated water; walking along them (especially at night and in the wet) was something of an art as it was easy to lose one's footing and slip or trip on the fequently misaligned sections.Sepia rectangular reproduced photograph on matte photographic paperReverse: 6528/ (A copyright and reproduction notice from the Australian War Museum, printed in blue ink)/burke museum, military album, trench warfare, duckboards, soldiers, ww1, wwi, world war 1, world war i, western front -
 The Beechworth Burke Museum
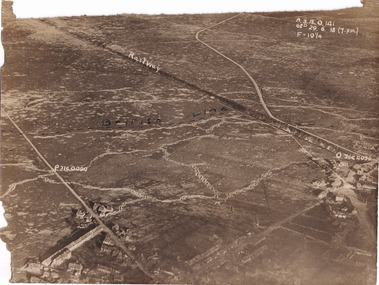
Photograph
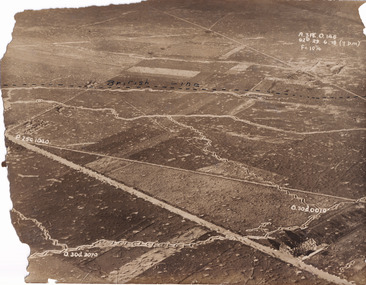
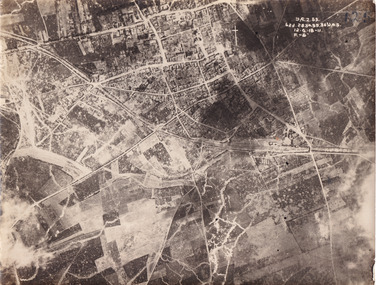
Taken some time between 1914-18, the photograph depicts an aerial view of trenches in France. The image mostly shows rural landscape, although there is a house in the bottom right corner. A dotted line has been drawn across the photograph, marking the section of trenches that belonged to British forces during World War I. It is believed that the line marking on this record denotes a section of the Western Front. The Western Front was the main theatre of war during World War I. Following the outbreak of war in August 1914, the German Army opened the Western Front by invading Luxembourg and Belgium, then gaining military control of important industrial regions in France. The German advance was halted with the Battle of the Marne. Following the Race to the Sea, both the French-British and German armies dug in along a meandering line of fortified trenches, stretching from the North Sea to the Swiss frontier with France. Between 1915 and 1917 there were several offensives along the Western Front. The attacks employed massive artillery bombardments and massed infantry advances. Entrenchments, machine gun emplacements, barbed wire and artillery repeatedly inflicted severe casualties during attacks and counter-attacks and no significant advances were made. Among the most notable of these offensives were the Battle of Verdun (1916), the Battle of the Somme (1916), and the Battle of Passchendaele (1917).The record is historically significant due to its connection to World War I. This conflict is integral to Australian culture as it was the single greatest loss of life and the greatest repatriation of casualties in the country's history. Australia’s involvement in the First World War began when the Australian government established the Australian Imperial Force (AIF) in August 1914. Immediately, men were recruited to serve the British Empire in the Middle East and on the Western Front. The record has strong research potential. This is due to the ongoing public and scholarly interest in war, history, and especially the ANZAC legend, which is commemorated annually on 25 April, known as ANZAC Day.Sepia rectangular photograph printed on matte photographic paper.Obverse: A.3FE.O.146 / G2R 29 . 6 . 18 (Y p.m) / F= 10 1/4 / British Line / ------------------------------------------ / P. 250 1040 / 0. 30d. 0010 / 0. 30d. 3070 /military album, military, war, wwi, world war i, france, great britain, trenches, village, rural, western front -
 The Beechworth Burke Museum
Photograph
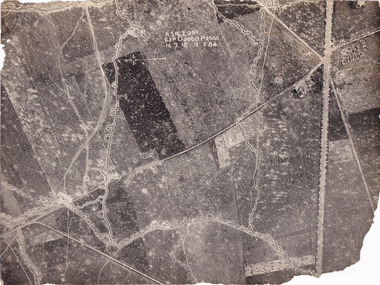
Taken some time between 1914-18, the photograph depicts an aerial view of trenches in France. The image mostly shows rural landscape, although there is a cluster of houses in the top right corner. It is believed that this record denotes a section of the Western Front. The Western Front was the main theatre of war during World War I. Following the outbreak of war in August 1914, the German Army opened the Western Front by invading Luxembourg and Belgium, then gaining military control of important industrial regions in France. The German advance was halted with the Battle of the Marne. Following the Race to the Sea, both the French-British and German armies dug in along a meandering line of fortified trenches, stretching from the North Sea to the Swiss frontier with France. Between 1915 and 1917 there were several offensives along the Western Front. The attacks employed massive artillery bombardments and massed infantry advances. Entrenchments, machine gun emplacements, barbed wire and artillery repeatedly inflicted severe casualties during attacks and counter-attacks and no significant advances were made. Among the most notable of these offensives were the Battle of Verdun (1916), the Battle of the Somme (1916), and the Battle of Passchendaele (1917).The record is historically significant due to its connection to World War I. This conflict is integral to Australian culture as it was the single greatest loss of life and the greatest repatriation of casualties in the country's history. Australia’s involvement in the First World War began when the Australian government established the Australian Imperial Force (AIF) in August 1914. Immediately, men were recruited to serve the British Empire in the Middle East and on the Western Front. The record has strong research potential. This is due to the ongoing public and scholarly interest in war, history, and especially the ANZAC legend, which is commemorated annually on 25 April, known as ANZAC Day.Black and white rectangular photograph printed on matte photographic paper.Obverse: A.3.FE.2.291 / 62D O.20bd.P.25O.C / 16.7.18 / 12 / F 8 1/4 / Reverse: 6532military album, military, army, war, wwi, world war i, france, trenches -
 The Beechworth Burke Museum
Postcard, 1916
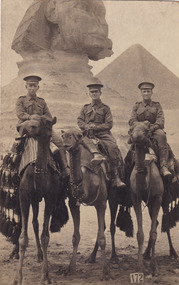
The photograph on the obverse side of the postcard was taken in Egypt on 4 March 1916, during World War I. Depicted are three unidentified Australian soldiers part of the Australian Imperial Force. They are dressed in military uniforms. Each of these men are seated atop a camel's back. All three camels are draped in - what are believed to be - traditional Egyptian textiles, including tassels, carpets and beads. In the background, we can see a triangular pyramid and the Great Sphinx of Giza. The Australian Imperial Force (AIF) were established by the Australian government in August 1914. This announcement marked the beginning of Australia's involvement in World War I. Immediately, men were recruited to serve the British Empire in the Middle East and on the Western Front. The first contingent of the AIF departed Australia by ship in November 1914. England was their destination. Although, their convoy was diverted to Egypt after the Australian High Commissioner in London, Sir George Reid, and the British military authorities unanimously agreed that the overcrowded military camps in England were unsuitable for so many men over winter. The AIF disembarked in Alexandria, Egypt on 3 December 1914, and the men moved to training camps near Cairo. It was in Egypt that the AIF and the New Zealand Expeditionary Force (NZEF) formed one united corps - the Australian and New Zealand Army Corps (ANZAC). This group of troops trained in the desert beneath the pyramids until March 1915.The record is historically significant due to its connection to World War I. This conflict is integral to Australian culture as it was the single greatest loss of life and the greatest repatriation of casualties in the country's history. On 25 April 1915, members of the Australian Imperial Force landed on Gallipoli in Turkey with troops from New Zealand, Britain, and France. This specific event holds very strong significance within Australian history. The record has strong research potential. This is due to the ongoing public and scholarly interest in war, history, and especially the ANZAC legend, which is commemorated annually on 25 April, known as ANZAC Day. The record's unique research potential is strengthened by its relationship to a historically significant site: the Egyptian pyramids. Since the postcard was produced in 1916, the record can be used as primary evidence for historians and conservationists studying these sites, or how these sites have evolved over time. The record may also be a useful resource for those interested in the history of Egyptian textiles. Furthermore, it may also provide insight into international relations between Egypt and Australia in the past and present.Sepia rectangular postcard printed on paper.Obverse: 172 / Reverse: 6536 / CARTE POSTALE / 4/3/16 / Rough riders under / the shadow of the / pyramids /military album, army, war, wwi, world war i, egypt, pyramid, great sphinx of giza, textiles, australian imperial force, aif, uniform -
 The Beechworth Burke Museum
Postcard, 1918
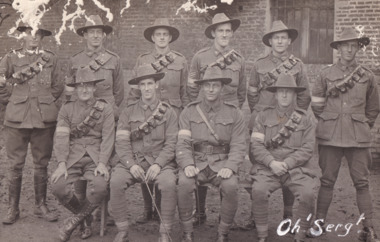
It is believed that the photograph on the obverse side of the postcard was taken in 1918. Depicted are ten Australian male soldiers. Their names are transcribed in pencil on the reverse side of the postcard. Each soldier is dressed in a formal military uniform. It is believed that these soldiers were part of The Australian Imperial Force during World War I. This can be inferred by the chevron rank insignia visible on the uniforms of nine of ten men. The placement of this insignia on the sleeves of their right arms suggests that they were either Warrant Officers or Non-Commissioned Officers (NCO). Specifically, the number of chevron stripes - here, nine men have three - are believed to signify a Corporal rank. The men pictured on this postcard are also wearing 'Rising Sun' collar badges on their coats. Australia, unlike most other Commonwealth countries, did not adopt metal regimental badges during the First World War. All units were issued with the Australian Army General Service Badge, better known as the 'Rising Sun’ badge. This insignia is almost always identified with the Australian Imperial Force. Another characteristic of the Australian Imperial Force uniform are the rectangular colour patches worn by all men on this postcard. In March 1915, a new scheme of unit identification was devised to replace the wearing of unit titles. This consisted of cloth colour patches on the upper arms of a soldier’s tunic. The black and white nature of the record means that we cannot establish which battalion these soldiers were part of. However, one of the handwritten signatures on the reverse side of the postcard reads "W.A. Griggs". This was the signature of Sergeant William Archibald Griggs. Further research shows that Griggs was part of the 5th Australian Division Signals Company. Therefore, it is believed these soldiers were part of the ANZAC Signal Companies. The main role of the Signal Companies during World War I was the laying and maintenance of telephone cables and switchboards, used to connect various units in their area. Furthermore, the man standing in the back row, third from the left side, has an Overseas Service chevron patch on his coat. In January 1918, the Australian Imperial Force approved the wearing of the overseas service chevrons which had been adopted by the British Army. These were embroidered or woven inverted chevrons worn above the cuff on the right arm. Due to a shortage of supply, some men had chevrons privately made. For each year of war service, a blue chevron was awarded, and those men who had embarked in 1914 received a red chevron to indicate that year’s service; however, the black and white nature of the postcard makes it difficult to determine what colours are on this man's patch.The record is historically significant due to its connection to World War I. This conflict is integral to Australian culture as it was the single greatest loss of life and the greatest repatriation of casualties in the country's history. Australia’s involvement in the First World War began when the Australian government established the Australian Imperial Force (AIF) in August 1914. Immediately, men were recruited to serve the British Empire in the Middle East and on the Western Front. The first significant Australian action of the war was the Australian Naval and Military Expeditionary Force’s (ANMEF) landing on Rabaul on 11 September 1914. The ANMEF took possession of German New Guinea at Toma on 17 September 1914 and of the neighbouring islands of the Bismarck Archipelago in October 1914. On 25 April 1915, members of the AIF landed on Gallipoli in Turkey with troops from New Zealand, Britain, and France. This specific event holds very strong significance within Australian history. The record has strong research potential. This is due to the ongoing public and scholarly interest in war, history, and especially the ANZAC legend, which is commemorated annually on 25 April, known as ANZAC Day.Black and white rectangular postcard printed on paper.Obverse: Oh 'Serg!' / Reverse: CARTE POSTALE / 6537 / Correspondance / Adresse / w.a. Grigg / J. Fain / Ruckling / R.J Farrar / (?) / Clarke / L (?) / GFFisher / R. M. Forrest / With Compliments / Sgt's Mess / November 1918 /military album, army, aif, uniform, military, wwi, world war i, rising sun badge, william archibald griggs, anzac, signal companies, postcard, patches, chevron -
 The Beechworth Burke Museum
Postcard
The photograph on the obverse side of the postcard was taken some time between 1914-1918. Depicted are five unidentified Australian soldiers. They are all dressed in military uniforms. It is believed that these soldiers were part of The Australian Imperial Force during World War I. This can be inferred by the 'Rising Sun' collar badges on their coats. Australia, unlike most other Commonwealth countries, did not adopt metal regimental badges during the First World War. All units were issued with the Australian Army General Service Badge, better known as the 'Rising Sun’ badge. This insignia is almost always identified with the Australian Imperial Force. Another characteristic of the Australian Imperial Force uniform are rectangular colour patches. One is visible on the soldier in the front row, first from the left on this postcard. In March 1915, a new scheme of unit identification was devised to replace the wearing of unit titles. This consisted of cloth colour patches on the right arms of a soldier’s tunic. The sepia nature of the record means that we cannot determine the colour, and therefore cannot establish which battalion this soldier was part of. Furthermore, the man seated in the middle of the front row has an Overseas Service chevron patch on his coat. In January 1918, the Australian Imperial Force approved the wearing of the overseas service chevrons which had been adopted by the British Army. These were embroidered or woven inverted chevrons worn above the cuff on the right arm. Due to a shortage of supply, some men had chevrons privately made. For each year of war service, a blue chevron was awarded, and those men who had embarked in 1914 received a red chevron to indicate that year’s service; however, the sepia nature of the postcard makes it difficult to determine what colours are on this man's patch.The record is historically significant due to its connection to World War I. This conflict is integral to Australian culture as it was the single greatest loss of life and the greatest repatriation of casualties in the country's history. Australia’s involvement in the First World War began when the Australian government established the Australian Imperial Force (AIF) in August 1914. Immediately, men were recruited to serve the British Empire in the Middle East and on the Western Front. The first significant Australian action of the war was the Australian Naval and Military Expeditionary Force’s (ANMEF) landing on Rabaul on 11 September 1914. The ANMEF took possession of German New Guinea at Toma on 17 September 1914 and of the neighbouring islands of the Bismarck Archipelago in October 1914. On 25 April 1915, members of the AIF landed on Gallipoli in Turkey with troops from New Zealand, Britain, and France. This specific event holds very strong significance within Australian history. The record has strong research potential. This is due to the ongoing public and scholarly interest in war, history, and especially the ANZAC legend, which is commemorated annually on 25 April, known as ANZAC Day.Sepia rectangular postcard printed on paper.Reverse: CARTE POSTALE / hyossest (?) / 6538 /military album, army, aif, australian imperial force, postcard, wwi, world war i, portrait, soldiers -
 The Beechworth Burke Museum
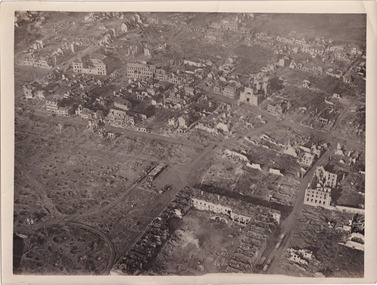
Photograph, c. 1918
Taken in c. 1918, this photograph depicts the ruins of the French village Villers-Bretonneux. In the foreground of the image are rows of shell damaged houses and buildings. In the background of the image stands a tower of the ruined church.On 24 April, Villers-Bretonneux was captured by the Germans as they advanced towards the regional city of Amiens. If they achieved their goal and drove onto the French coast, splitting the British and French armies, the Allied cause might have been lost. The fate of Amiens hung in the balance as two Australian brigades were given the task of retaking Villers-Bretonneux through a swift night-time counter attack. One brigade would assault from the south, while another would attack from the north. The assault began at 10pm on 24 April. The 13th Brigade in the south were held up by German machine guns, before the Australians linked up east of the village. After dawn on 25 April Australian and British troops were involved in fierce fighting to clear the Germans from the village. Some Germans escaped Villers-Bretonneux through nearby woods. Later on the morning of 25 April, three years to the day after the Anzacs landings at Gallipoli, French and Australian flags were raised over Villers-Bretonneux.Black and white rectangular reproduced photograph printed on matte photographic paperReverse: (A copyright and reproduction notice from the Australian War Museum, printed upside-down in blue ink) Church x Ruins/ Villers Bretonneux/ (in pencil) burke museum, world war 1, ww1, wwi, france, australia, villers-bretonneux, ruins, military album -
 The Beechworth Burke Museum
Photograph, 5 November 1917
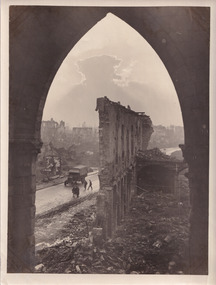
Taken on the 5 November 1917 by James Francis Hurley, this photograph depicts the a war damaged Ypres. The shell damaged wall of the Cloth Hall is featured in the centre of the photograph, with an army vehicle and personal are located on the street beneath the ruined wall.First Battle of Ypres, (October 19–November 22, 1914), first of three costly World War I battles centred on the city of Ypres (now Ieper) in western Flanders. Attempted flank attacks by both the Allies and the Germans failed to achieve significant breakthroughs, and both sides settled into the trench warfare that would characterize the remainder of the war on the Western Front.Black and white rectangular reproduced photograph printed on mate photographic paperReverse: 6525/ (A copyright and reproduction notice from the Australian War Museum, printed upside-down in blue ink)military album, burke museum, world war one, world war 1, ww1, ypres, belguim, ruins, first battle of ypres, james francis hurley -
 The Beechworth Burke Museum
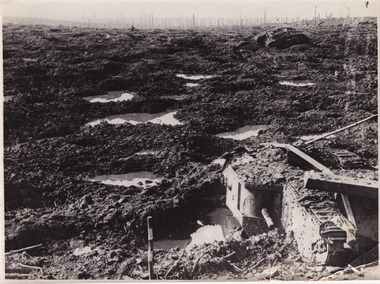
Photograph, c. 1917
This photograph depicts the third battle of Ypres (Battle of Passchendaele). Depicted is a trench battlefield that has been turned to mud. Two army tank vehicles have been buried in the mud of the trenches. A single soldier stands in the background surveying the battlefield.After mid-1917, and following mutinies in the over-strained French Army, the British Forces had to assume an even greater role in the war on the Western Front. For Field Marshal Sir Douglas Haig, the British commander-in-chief, this provided an opportunity to launch an offensive that he had long wanted. Attacking from Ypres in Belgium, he planned to drive the Germans from the surrounding dominant ridges and even hoped to reach the Belgian coast. Following on the success at Messines in June, he unleashed his great attack on 31 July 1917. Fighting went on, often in appalling weather and despite crippling losses, until November. Finally, with the army stuck in muddy fields churned up by the artillery fire, the bloody offensive came to an untidy close. Many would afterwards call this offensive, actually a series of battles, after the name of the village that had become the last objective – 'Passchendaele'. In the Battle off Passchendaele, the 1st, 2nd and 3rd Australian Divisions captured Broodseinde Ridge on 4 October 1917. It was a vital victory. But, then it began to rain. Five days later the 2nd Australian Division suffered heavily in a further attack in the mud. Finally, on 12 October, another attack, involving the 3rd Division assisted by the 4th, was made against the village of Passchendaele atop the main ridge. In the face of heavy fire, the men fought in the mire while struggling to keep up with their artillery barrages. Ground was taken but it could not be held. In wretched conditions, with casualties mounting at an appalling rate, the Australians had to fall back. The troops were finally exhausted and could do no more; by 15 November they handed over to the Canadians.Black and white rectangular reproduced photograph printed on mate photographic paperReverse: 6523/ (A copyright and reproduction notice from the Australian War Museum, printed upside-down in blue ink)/military album, burke museum, beechworth, military vehicle, trenches, trench warfare, wwi, world war one, world war 1, ypres, belgium -
 The Beechworth Burke Museum
Photograph
Taken some time between 1914-18, the photograph depicts an aerial view of Villers-Bretonneux in France, a region which was part of the Western Front during World War I. The image mostly shows rural landscape. The Western Front was the main theatre of war during World War I. Following the outbreak of war in August 1914, the German Army opened the Western Front by invading Luxembourg and Belgium, then gaining military control of important industrial regions in France. The German advance was halted with the Battle of the Marne. Following the Race to the Sea, both the French-British and German armies dug in along a meandering line of fortified trenches, stretching from the North Sea to the Swiss frontier with France. The First Battle of Villers-Bretonneux occurred between 30 March - 5 April 1918. It took place during Operation Michael, part of the German Spring Offensive on the Western Front. The offensive began against the British Fifth Army and the Third Army on the Somme, and pushed back the British and French reinforcements on the north side of the Somme. The capture of Villers-Bretonneux, close to Amiens, a strategically important road and rail-junction, would have brought the Germans within artillery-range. In late March, troops from the Australian Imperial Force were brought south from Belgium as reinforcements to help shore up the line. In early April, the Germans launched an attack to capture Villers-Bretonneux. After a determined defence by British and Australian troops, the attackers were close to success until a counter-attack by the 9th Australian Infantry Brigade and British troops late in the afternoon of 4 April restored the situation and halted the German advance on Amiens. The Second Battle of Villers-Bretonneux occurred between 24 - 27 April 1918, during the German Spring Offensive to the east of Amiens. It is notable for being the first occasion on which tanks fought against each other. A counter-attack by two Australian brigades and a British brigade during the night of 24 April partly surrounded Villers-Bretonneux, and on 25 April, the town was recaptured. On 26 April, the role of the Moroccan division of the French army was crucial in pushing back German units. Australian, British and French troops nearly restored the original front line by 27 April.The record is historically significant due to its connection to World War I. This conflict is integral to Australian culture as it was the single greatest loss of life and the greatest repatriation of casualties in the country's history. Australia’s involvement in the First World War began when the Australian government established the Australian Imperial Force (AIF) in August 1914. Immediately, men were recruited to serve the British Empire in the Middle East and on the Western Front. Additionally, the record's significance is enhanced by its depiction of Villers-Bretonneux. The battles that occurred in this town during World War I are especially historically significant to Australia as this is where the Australian Imperial Force had one their greatest World War I victories. An Australian flag still flies over Villers-Bretonneux in the present. Furthermore, a plaque outside the Villers-Bretonneux Town Hall recounts the battles fought to save the town in 1918. Kangaroos feature over the entrance to the Town Hall, and the main street is named Rue de Melbourne. More officially, recognition of the significance of the battle in Villers-Bretonneux is found at the Australian National Memorial, which was built just outside the town. It commemorates all Australians who fought in France and Belgium and includes the names of 10,772 who died in France and have no known grave. Each year, a small ceremony is held at the memorial to mark the sacrifice made by the soldiers. Lastly, the record has strong research potential. This is due to the ongoing public and scholarly interest in war, history, and especially the ANZAC legend, which is commemorated annually on 25 April, known as ANZAC Day.Sepia rectangular photograph printed on matte photographic paper.Obverse: yAE.2.35. / 125 / 62d.2834.35.36.VA.5. / 12.G.18-11 / F.-(?)" /military album, wwi, world war i, villers-bretonneux, australian imperial force, aif, france, war, army, conflict, germany, 1918, battle -
 The Beechworth Burke Museum
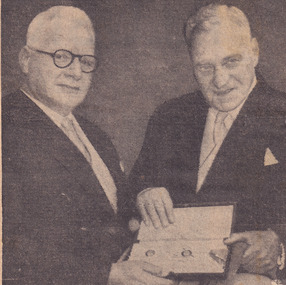
Newspaper - Photograph, c.1950
Taken in the 1950s, this picture is of two veterans of the First World War, Colonel Sir William Leggatt and Brigadier Sir Lionel Harris who fought together in France over 30 years prior. The two men were invested by the Queen at Buckingham palace as Knights, a prestigious honour for Australian soldiers, who for another 20 years would have no official recognition by the Australian government through the 'Order of Australia.' This image showcases the role of Australian service members who fought during the first world war being honoured by the British Government, personally meeting the Queen. Black and white photograph accompanied by text below taken from a NewspaperObverse: VICTORIA'S Agent-General, Colonel Sir William Leggatt (right) and his old / cobber's Brigadier Sir Lionel Harris, outside Buckingham Palace yesterday after hav- / ing received the accolade form the Queen. Thirty-two years ago as sergeant and private / they shared a trench in France. Yesterday as they waited to be knighted by the / Queen, Sir William said, "if anyone had told us then that we were ever going to / meet like this, we would have thought he was off his block. - Today's radiophoto / Reverse: 6539 (in pencil) / burke museum, beechworth, beechworth museum, world war one, military album, trenches, nighted, queen, buckingham palace, wwi, sir william leggatt, sir lionel harris -
 The Beechworth Burke Museum
Photograph, c1914
Aerial photograph of a battle field in France during World War OneBlack and white rectangular photograph printed on photographic paperObverse: Railway / British Line (in pen) / Reverse: Villers Brut /military album, burke museum, beechworth, beechworth museum, world war one, wwi, trenches, aerial photo, aerial photo trenches -
 The Beechworth Burke Museum
Photograph, c1914
Aerial photograph of a battle field in France during World War OneBlack and white rectangular photograph printed on photographic paperReverse: 6534 / Australian Official Photographs, No. E1253 /military album, burke museum, beechworth, beechworth museum, world war war, wwi, trenches, aerial photo, battlefield -
 The Beechworth Burke Museum
Photograph, Unknown
The A1 Gold Mine is located north of Woods Point, near Jamieson, in the Upper Goulburn region of Victoria. Gold was discovered at the A1 site in 1861 and mining operations began in 1864. The A1 Mine Settlement refers to a small township known variously as Castle Reef, Castle Point, and Raspberry Creek, which developed in the 1860s around mining industry centred on a crushing machine that worked the three gold reefs in the area. Historically, the name "A1"referred to the high quality of gold found in the quartz reefs at depths of at least two thousand feet. Along with the Morning Star mine at Woods Point, the A1 gold mine produced almost sixty percent of Victoria's gold output in the 1950s to 1970s and continued operating until 1992 when it went into administration. Operations at the site were revived in 2016 and the A1 Mine is now considered one of Victoria's premier gold mines. The A1 mine is part of the extensive and prospective Lachlan Fold Belt, a north-west trending belt of tightly folded Early Devonian sedimentary rocks extending from New South Wales to Victoria. Mineralisation is hosted within or immediately adjacent to diorite dykes. Contemporary development of the 'Queens Lode' at the A1 mine signals a move from high-grade, narrow vein airleg mining into larger scale, mechanical mining designed to increase ore production volume. This original, undated photograph of the A1 Mine appears to depict an area or phase of disuse or abandonment. The aged and humble appearance of the cottage suggests association with the historical A1 Mine Settlement, therefore the image may have been taken prior to the 1950s-1970s revival period in which the A1 mine is known to have produced high gold yields. The photograph contributes to our understanding of the A1 Gold Mine's impact on the landscape and the social, environmental impacts of mining on communities and may be compared with others in the Burke Museum's extensive collection of mining photographs to deepen our understanding of mining in the Jamieson area.Black and white rectangular photograph printed on photographic paperReverse: 5577 / A1 Mine / Near Jamieson / Vic. /burke museum, beechworth museum, beechworth, gold fields, gold rush, victorian gold rush, mining tunnels, gold ming history, colonial australia, australian gold rushes, mining technology, beechworth historic district, indigo gold trail, indigo shire, upper goulburn shire, jamieson, woods point-walhalla goldfield, a1 gold mine, victorian high country, modern mining methods, orogenic gold province, gold mineralisation, devonian, dykes -
 The Beechworth Burke Museum
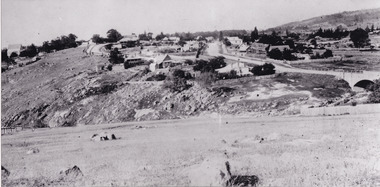
Photograph - Photograph - Reproduction, ca. 1900
This image shows the approach to Beechworth from the south-west via the Newtown Bridge. Numerous early buildings line the road as it bifurcates to become Ford and High Streets on the ridge above Spring Creek and Newtown Falls. The sloping, rocky terrain and water course along the gorge show evidence of the intense mining activity that occurred at the site. The Ovens Gold Rush at Beechworth started when gold was found at Spring Creek in February 1852, prompting an influx of miners from around the world. The population grew over 20,000 by 1857. While the earliest mining at Beechworth was similar to that in other Victorian goldfields like Ballarat and Bendigo, Beechworth is notable for its use of hydraulic sluicing as a major method of removing wash-dirt. Hydraulic sluicing employs high pressure jets of water to blast away large areas of earth and wash it down to be run through a sluice box. Gold gets caught in the sluice and the remaining slurry is washed away. This method of mining is extremely effective but causes significant environmental impacts and damage to waterways. Large water quantities were required for large-scale sluicing, and the long water races and deep tailraces that were constructed in the Beechworth area in the nineteenth century are nonetheless considered feats of engineering. The site in the photograph is associated with the Rocky Mountain Mining Company who constructed an eight hundred meter tunnel under the township between 1876-1880 to reduce water levels at Spring Creek, which had been subject to diversions since the earliest days of alluvial mining. Over four million ounces of gold (115 tones) were found at Beechworth between 1852 and 1868, and the wealth from the gold rushes built Beechworth and the nationally significant buildings that remain standing today.This image shows the early development of the Beechworth township above Spring Creek, where gold was discovered in 1852. Evidence of hydraulic sluicing, a uniquely predominant method at Beechworth, and water-works engineering are present in the landscape. By the 1870s, alluvial gold deposits were depleted and increasingly complex engineering was required so deeper shafts could reach bedrock. This image is significant for understanding changes to the landscape and the evolution of mining methods and engineering practices related to the extensive construction, manipulation and management of water networks. The shift from smaller scale alluvial mining to larger company dominance in the mining industry has implications for understanding wider social, economic, political and industrial changes in the region of Beechworth and within the context of the Victorian Gold Rush more broadly. A black and white rectangular reproduction photograph printed on photographic paper. burke museum, beechworth museum, beechworth, gold fields, gold rush, victorian gold rush, hydraulic sluicing, rocky mountain mining company, spring creek, netwown falls, mining tunnels, water races, tailraces, colonial australia, australian gold rushes, mining technology, beechworth historic district, indigo gold trail, migration, indigo shire, gold mining, gold mining history -
 The Beechworth Burke Museum
Photograph - Photograph - Reproduction
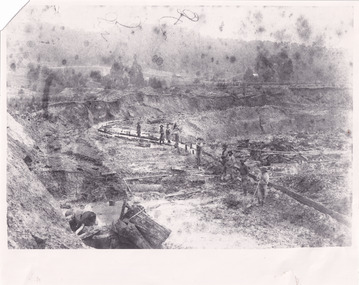
This photograph depicts mining operations within the Beechworth area, in an unidentified valley where sluicing was utilised as a method for extracting gold from the environment. After gold was discovered in the region in 1851, sluicing became a characteristic of gold mining in the region - "Ovens miners carved intricate networks of races" throughout the region - involved the diversion of water in many channels, or water races, which contained inbuilt 'ripple devices' designed to trap gold for later extraction. By 1871, 900 miles of water races had been cut into the Beechworth Mining District. As suggested by the numerous figures involved in labouring along the water race, sluicing was a source of considerable employment within the region. This image is of important historical significance for its ability to convey information about sluicing and the methods used to find gold in the 1850s, and provides clues as to how sluicing and the widespread construction of water ranges changed the environment of the region. This image is important for current research into the history of the Ovens region in Victoria, which played such a prominent role in the early Australian gold mining industry. Therefore, this image has the capacity to be beneficial for research into society and the motivations of those living and working in this region during this period and therefore, has social significance. The Beechworth Burke Museum has additional images relating to gold sluicing and and the mining activities in the area more generally, which can be analysed and studied alongside images like this one.A black and white rectangular photograph printed on matte photographic paperbeechworth, mining, miners, labour, water race, sluicing -
 The Beechworth Burke Museum
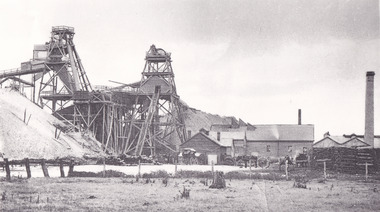
Photograph - Photograph - Reproduction
This photograph depicts the Great Southern Mine located in Rutherglen as it was during the 1900. After the initial Gold Rush of 1853-1854, Gold was discovered deeper under the surface of the earth in the 1860 after the discovery of another deep lead system. Due to the discovery of Gold in Rutherglen, Rutherglen developed into a community in its own right, possessing a population of 6600 by December 1860 and developed into a municipality in 1862. The Great Southern Mine depicted in this photograph required the use of a range of modern technologies, including the hydraulic pumps, in order to reach gold. This photo depicts the mining operations as they were undertaken around the turn of the century.The search for gold is ingrained into the history of Victoria and therefore, images like this one which portray a modern mining operation undertaken in the 1860s, can reveal important information for society and technology for the date when the photograph was taken. This image is of important historical significance for its ability to convey information about the methods used to extract gold in 1900. It is significant as most mining operations around the region, particularly earlier on in the period, used different technologies such as water races. This image is important for current research into the history of Rutherglen more generally, a town which developed singlehandedly due to the discovery of minerals and mining, as depicted here in this photograph, thus indicating an element of social significance as well as historic. The Beechworth Burke Museum has additional images relating to mining and Rutherglen which can be analysed and studied alongside images like this one.A black and white rectangular photograph printed on matte photographic paper.Reverse: $ 3.00 19972503 / a02503 / Great Southern Mine Rutherglen 1900rutherglen mine, rutherglen, great southern mine, beechworth, mine, mining, post goldrush, victoria, gold, 1860s, sluicing, hydrolic sluicing -
 The Beechworth Burke Museum
Photograph
The photograph, captured around 1900, depicts a large group of minors located in Beechworth. Importantly, this photograph can provide information into the clothing and fashion of minors during this period of history. These men wear loose fitting shirts which are mostly a pale white colour, several wear vests and/or jackets and loose fitting trousers with boots. The majority of men wear wide brimmed hats to protect their skin and eyes from the sunlight. One man has a wooden pipe in his mouth and a few have ties/neckerchief's tied around their necks. The outfits of these miners has the potential to provide insight into their social status, these men are all dressed equally which provides the notion that they are of equal societal standing. The outfits of these miners dating to the 1900s is not dissimilar to photographs of those captured in the 1880s. The location of this photograph is not easy to interpret, but the photograph is recorded to have been taken in the Beechworth region. Displayed in this image is some wild shrubbery and grass where the men are standing/sitting and behind the group is a tin wall or even tin building. At the end of 1899, companies were continuing to search for gold in Beechworth and the surrounds but these attempts were not overly successful. In the early 1900's Quartz mining was occurring but this was done by individuals or smaller parties. It is unclear if these men are mining for gold or for quartz.The search for gold is ingrained into the history of Victoria and therefore, the study of images like this one which portrays some of the miners who worked behind-the-scenes for these discoveries has the potential to reveal important information regarding society, fashion etc. The date when the photograph was taken is vague but it allows us to form a timeline of mining activities in the North East. This image is of important historical significance for its ability to convey information about society at the time, regarding fashion (which can potentially reveal social status) and mining in Beechworth in 1900. Black and white rectangular photograph printed on matte photographic paper mounted on board.Reverse: BMM 8032/ Group(?) Beechworth Mines about 1900/ 80quartz, north east gold, sluicing, gold sluicing, hydraulic sluicing, mining, gold mining, north-east victoria, beechworth, burke museum, 1900, group, miners, hats, vests, ties, wild shrubs, tin, quartz mining -
 The Beechworth Burke Museum
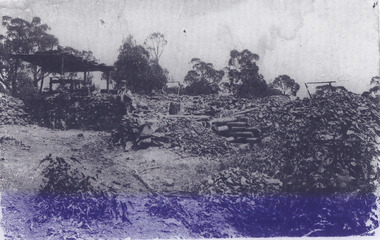
Photograph - Photograph - Reproduction, Unknown
This image is a reproduction of an 1899 original depicting the 'Williams Good Luck Mine' on the Mopoke Reef (also called 'Morepork Gully') in the Dingle Ranges, approximately three miles from Beechworth. The foreground of the image is littered with piles of smashed rock and detritus, known as ‘mullock’, beside a reinforced mine shaft, a vertical access passageway allowing miners to enter the mine and haul ore out using lifting technology such as a poppet heads, whims or windlasses. A group of miners and a dog appear close to an open-sided miner’s hut. Following the discovery of gold at Beechworth in 1852, rushes quickly followed at surrounding creeks and gullies in the district. In the late nineteenth and early twentieth centuries, small syndicates of miners continued to work old or abandoned quartz reefs, often persisting without the assistance of heavy machinery to remove the large amounts of rock, in order to obtain yields at ever greater depths. The group of miners in this photograph are Mr. Roger Williams and Sons, who revived operations at the ‘Old Good Luck’ mine on the Mopoke Reef in the Dingle Range near Beechworth around 1892, working the site for more than two decades. An emigrant from Cornwall with experience in the tin mining industry, 19 year old Roger Williams senior sailed to New Zealand in 1840, then to Australia where he spent time in the Bendigo Gold Fields before settling in Beechworth in the early 1860s. Mr Williams senior worked on various mining activities in the district, including the Rocky Mountain Tunnel project. Conversant with the character of gold-bearing reefs in the area, the syndicate dug an eight hundred foot tunnel, digging down as far down as two hundred feet with little capital save their labour, to connect and provide better working access to the mass of reefs and veins in the vicinity. Progress was hampered by poor air quality charged with fumes from dynamite and large quantities of rock had to be crushed to obtain payable yields. The Victorian Goldfields are filled with ruins and remnants of the area's rich mining history, ranging from small alluvial diggings to the remains of huge mining companies. Site names often changed several times throughout the nineteenth and twentieth centuries. Some sites were abandoned and forgotten, others were worked continuously over many decades. The names of mines were often repeated at different locations throughout the Victorian Goldfields. For example, there is a Mopoke Gully heritage mine near Fryers Creek, Victoria. 'Mopoke' is a common onomatopoeic name for Morepork and Australian Boobook owls. This image has historical, social and research significance for patterns of emigration during of the Victorian Gold Rush, and the historical, social and environmental impacts of mining at Beechworth at the turn of the nineteenth and twentieth centuries. As gold became scarce and government support and large company investment waned, poor hard-working miners laboured intensively to make a living through periods of high unemployment. This image can be compared and studied alongside other historical mining photographs and objects in the Burke Museum Collection. It has potential to improve our understanding of miners working conditions and the shifting character of mining in the Beechworth district. Black and white rectangular reproduction photograph printed on matte photographic paper.Obverse: Williams Good Luck Mine Beechworth / Roger! / Reverse: 6858 / burke museum, beechworth museum, beechworth, gold fields, gold rush, victorian gold rush, gold ming history, colonial australia, australian gold rushes, mining technology, beechworth historic district, indigo gold trail, migration, indigo shire, good luck gold mine, victorian goldfields, mining syndicates, gold fever, quartz-mining, small-scale mining, old good luck mine, mopoke gully, quartz reefs beechworth -
 The Beechworth Burke Museum
Photograph
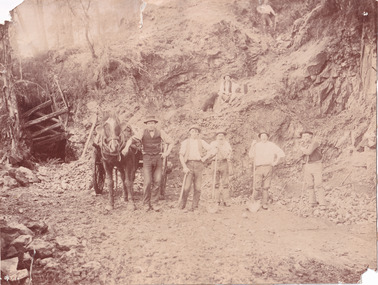
This photograph depicts a reef mine in Beechworth. Reef mining, or quartz reef mining, was common in 19th Century Victoria. This gold mining technique requires mine shafts to be sunk into underground quartz reefs, with horizontal tunnels dug from the original shaft at differing levels to find the gold-bearing rock. The quartz would then be hoisted to the surface, which would then be pounded to access the gold in its metallic state. Gold was discovered in Beechworth in February 1852, at Spring Creek. Within 11 months of that discovery, over 8000 hopeful prospectors quickly descended on this region, transforming it into a thriving, wealthy township. Reef mining and hydraulic sluicing were gold mining techniques used in this region in the 19th and early 20th centuries. This photograph interestingly contains dogs alongside the miners. While dogs have been recorded as deterrents to thieves in the Victorian goldfields, these dogs appear as companions to these men.The search for gold is ingrained into the history of Victoria and therefore, images like this one can reveal important information for society and technology for the date when the photograph was taken. It also shows a location where reef mining was undertaken which provides insight into the impact on the environment at a time when it was done. Although quartz is one of the most common minerals found in the earth's crust, it does not always contain gold. Those reefs that do are rare and highly sought after by prospectors. The Beechworth Burke Museum has additional images relating to gold mining which can be analysed and studied alongside images like this one.Sepia coloured rectangular photograph printed on gloss photographic paper. Obverse: Reverse: United Shire of Beechworth/ Shire Secretary/ Reef Mining, Beechworth./ 6167.abeechworth, burke museum, gold, gold mining, gold rush, victorian gold rush, reef mining, quartz, companion dog, horse and cart -
 The Beechworth Burke Museum
Photograph - Photograph - Reproduction
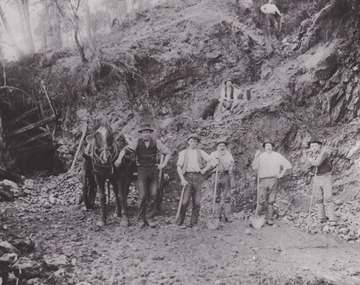
This reproduced photograph depicts a reef mine in Beechworth. Reef mining, or quartz reef mining, was common in 19th Century Victoria. This gold mining technique requires mine shafts to be sunk into underground quartz reefs, with horizontal tunnels dug from the original shaft at differing levels to find the gold-bearing rock. The quartz would then be hoisted to the surface, which would then be pounded to access the gold in its metallic state. Gold was discovered in Beechworth in February 1852, at Spring Creek. 8000 hopeful prospectors quickly descended on this region within the year, transforming it into a thriving, wealthy township. Reef mining and hydraulic sluicing were gold mining techniques used in this region in the 19th and early 20th centuries. This reproduction photograph interestingly contains dogs alongside the miners. While dogs have been recorded as deterrents to thieves in the Victorian goldfields, these dogs appear as companions to these men.The search for gold is ingrained into the history of Victoria and therefore, images like this one can reveal important information for society and technology for the date when the photograph was taken. It also shows a location where reef mining was undertaken which provides insight into the impact on the environment at a time when it was done. The Beechworth Burke Museum has additional images relating to gold mining which can be analysed and studied alongside images like this one.Black and white rectangular reproduction photograph on gloss photographic paper. Obverse: Reverse: L is miners 26%/ 10 x 8/ 6167.bbeechworth, burke museum, gold, gold mining, gold rush, victorian gold rush, reef mining, quartz, companion dog, horse and cart -
 The Beechworth Burke Museum
Photograph - Photograph - Reproduction, c1900
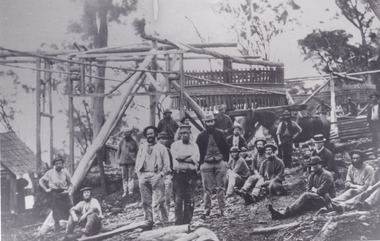
Depicted are a group of men standing in front of a wooden structure. The men wear attire appropriate to the 1920s. This photos is of the shows miners at the Homeward Bound Mine in Hillsborough. The Homeward Bound reef was discovered in 1865 and was worked continuously until 1880. This image is significant as it shows how Victorians worked during the gold rush era. A black and white rectangular photograph depicting 21 separate men, either standing or sitting around a wooden structure. Each man wears the typical attire for gold mining in the 1900s. A horse appears behind a man on the right side of the photograph.The background shows a wooden structure of a mine and the Australian gumtree 7855 /mining, group photo, burke museum, beechworth, photograph, hillsborough, mine, homeward bound mine