Showing 2368 items
matching 7 photos
-
 Ballarat Tramway Museum
Photograph - Colour Photograph/s - set of 22, Carolyn Dean, 10/09/1999 12:00:00 AM
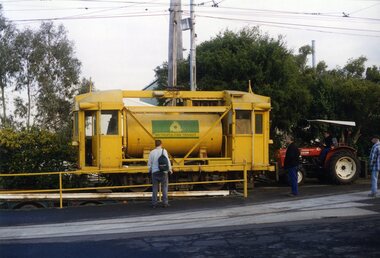
Set of 22 photographs taken by Carolyn Dean of the loading, transport and off loading of ex MMTB/Metropolitan Transit scrubber tram No. 8W (8) from Preston Workshops to Ballarat on 10/9/1999. All on Kodak Royal paper. Most feature a number of people in the photograph. 1. Loading tram at Preston 2. ditto 3. ditto 4. tram loaded 5. Ready to leave Preston with articulated tram No. 2121 alongside. 6. ditto 7. Arrived in Wendouree Parade, rainy day. 8. ditto at Windmill Drive North - L.Arthur truck 9. Moving to off loading position at Old loop, with tower truck in background 10. Barry James crane about to lift. 11. Lifted off truck 12. About to be lowered onto the ground 13. ditto 14. On the track 15. Crane being packed up. 16. Waiting to be towed. 17. W3 661 being coupled up. 18. ditto 19. Group photo - from left to right - Paul Mong, Mark McKay, Alastair Reither, Stephen Butler, Carolyn Dean, John Phillips, Simon Jenkins, Warren Doubleday and Alan Snowball. 20. Being towed into the depot 21. Crossing Wendouree Parade 22. Being pushed by 671into 7 Road. Note image 19A used by Museums Australia in a display - collections and people, 9/2001 - display boards. - similar image to 19, photo by Carolyn Dean on Warren Doubleday's camera. Added 2/2002. All have "10.9.99" and "Photo by Carolyn Dean" on rear.scrubber tram, delivery of tramcars, unloading, btm, tram 8, tram 8w -
 Ballarat Tramway Museum
Negative, Geoff Grant, 6/07/1954 12:00:00 AM
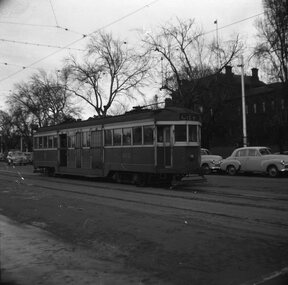
Negative No. 280 and colour print made by colour laser printer (stored in folder ) of W2 496 in bound along St. Kilda road, outside Victoria Barracks, 6/7/1954. Tram has destination of "CITY". Photo by Geoff Grant. Hi res scan of negative and image updated 19/5/2020.trams, tramways, melbourne, st kilda road, victoria barracks, tram 496 -
 Ballarat Tramway Museum
Negative, Geoff Grant, 6/07/1954 12:00:00 AM
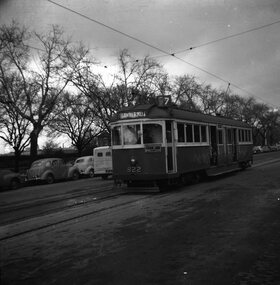
Negative No. 281 and colour print made by colour laser printer (stored in folder ) of W5 822 out bound along St. Kilda road, outside Victoria Barracks, 6/7/1954. Tram has destination of "Camberwell". On route 7. Has auxiliary board "Good Jobs" with the MMTB. Photo by Geoff Grant. Hi res scan of negative and image updated 19/5/2020.trams, tramways, melbourne, st kilda road, victoria barracks, tram 822 -
 Ballarat Tramway Museum
Negative, Geoff Grant, 19/06/1955 12:00:00 AM
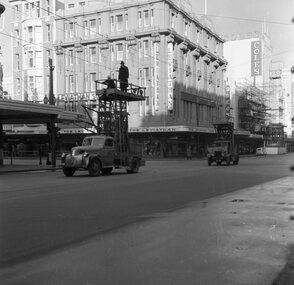
Negative No. N310 and black and white print made by a laser printer (stored in folder ) of the MMTB's tower wagons, Albion No. 8 (the oldest at the time) and No. 2 in Bourke St. at the corner of Bourke and Swanston St. with The Leviathan Ltd. store in the background on the corner. Other shops in background are the Odeon Picture Theatre and G.J. Coles stores. Date of photo 19/6/1955. Negative scanned hi res and imaged updated 21/5/2020. Page 7 of the 1968 Sands and McDougall's Director of Melbourne.trams, tramways, melbourne, bourke st., swanston st, tower truck, tram tower wagon -
 Ballarat Tramway Museum
Negative, Geoff Grant, 24/06/1955 12:00:00 AM
Negative No. N337 and black and white print made by a laser printer (stored in folder ) of MMTB works car No. 7, bogie tank car for flushing rail grooves crossing Swanston St. in Bourke St., heading west with Foy and Gibsons building in the background. Photo taken Friday 24/6/1955. Alongside No. 7 is a Spencer St. bus Negative scanned hi res and imaged updated 22/5/2020.trams, tramways, melbourne, bourke st, swanston st., work trams, tram 7 -
 Ballarat Tramway Museum
Memorabilia - Scrap Book, Neville Gower, Nov. 1992 to June 1997
Scrap Book - with printed cardboard covers - titled scrap book on outside and reproductions of newspaper clippings printed onto covers, 64 pages off white paper. Scrap book compiled by Neville Gower from Nov. 1992 to June 1997. Primarily consists of newspaper clippings glued to the pages involving the Ballarat Tramway Museum. Also contained are other items of relevant interest, such as BTM brochures. Pages number in pencil by Warren Doubleday 2/2001. Where relevant some items contained in this book have been separately catalogued to enable easier reference. Some items were already in the collection and are thereby reference with their registered number. Also contains registered items 1659, 1654 and 1655. Page Description of item 1 Newspaper clipping - 9/11/1992 - Reg. item No. 1105 Newspaper cutting - "New Life for old tram" - Courier 6/11/1992, p7 forthcoming recommissioning of Horse tram No. 1 at depot on Saturday. Gives details of horse tram and some notes on horse trams. 2 Newspaper cutting -"Where is this tram now", BTPS seeking information on the whereabouts of a former ESCo tram, photo taken in Sept. 1971 - See Reg. No. 1651 - Courier Heritage column 19/1/1993 Newspaper cutting "Collector enjoys his postcards of the past", Courier Heritage column 26/1/1992, about Andrews Kabia's collection of postcards. Has a photo of Bridge St. with a tram, c1950's. 3 Reg Item No. 1659 - Newspaper cutting - "SEC offers historic lake property for sale" 20/2/1993. Postcard - Sovereign Hill reproduction - purchased 2/1993, of Bridge St., looking west. Postcard - Sovereign Hill reproduction - purchased 2/1993, of Bridge St looking east - See Item No. 841 and image i4. Newspaper clipping of BTPS advertisement for 1993 Begonia Festival - Courier 3/3/1993. 4 Newspaper clipping "BUCpower on track" Courier 15/5/1993 - Ballarat University College tram pulling challenge to other schools. Has photo of BUC team lined up in front of No. 26. Ballarat Vintage tram brochures - 2 No. - Reg. Item 294.1 5 Lake Wendouree Caravan Park brochure - c1993 - colour photo of No. 26 at St. Aidans Drive. Registered item No. 1654 Newspaper clipping - "Horse drawn transport heritage" (11/5/1993) 6 Newspaper clipping - Courier 28/6/1993 - "New tramways video shows early Ballarat" - launch of BTM/BTPS video, sales details, quotes R.Gilbert. Has head on photo of No. 40 in Sturt St. showing Sebastopol. Postcard of four scenes of Ballarat, Steve Parish production, featuring BTM No. 27 in Wendouree Parade. Postcard - BTM issue - July 1993 - of three trams - see Reg. Item No. 1657. Separate copy of the cutting re video added 29-3-2016 from donation of Lil Butler - see image i3. 7 Postcard - Ballarat Victoria featuring 9 views of Ballarat, first one is of 27 in SEC late 1960's colour scheme in Wendouree Parade, operated by BTPS. - purchased July 1993. Postcard - Ballarat Vic Aust. - featuring four view of Ballarat, fourth one is of BTM 14 at crossing loop - purchased July 1993. Newspaper clipping - Courier 2/8/1993 "Tram Plan too costly" - quoting Dave Macartney about the costs of bringing trams Ballarat to Ballarat - took costly. Also quotes Ballarat Tourist Assoc. Secretary - Brian Whykes and Peter Hiscock of Sovereign Hill. 8 Newspaper clipping - Courier 28/7/1993 - "Major changes planned for lake" (page 1) and "Lake area changes proposed - Plan to narrow Wendouree Parade" - controlling traffic speed in parade. Newspaper clipping - Courier 21/9/1993 - "Council adopts strategy for lake traffic" - control of traffic in Wendouree Parade. 9 Newspaper clipping - Courier 3/8/1993 - "Lake changes will turn tourists away" - letter from R.A. Nelson about Wendouree Parade traffic control. Newspaper clipping - Courier 3/8/1993 - Council plan for Wendouree Parade - not one way traffic. Newspaper clipping - Courier 31/7/1993 - "Lake traffic strategy raises questions" - letter from L. Holloway. Newspaper clipping - Courier 8/8/1993 - "Strategy will improve access" - letter from Cr. Janet Dale. Newspaper clipping - Courier 15/9/1993 -"City defers action on Lake changes" - traffic plans deferred. 10 Newspaper clipping - Courier 31/8/1993 - "Plans threaten Lake amenities" letter from L. Holloway. Copy of letter from Warren Doubleday, Engineering Manager of BTPS to Andrew O'Brien and Associates re traffic study - dated 26/4/1993. 11 page 2 of above letter. 12 Letter from Jim W. Bell of the Golden City Paddle Steamer Museum Society to Neville Gower forwarding a copy of a submission to the Rotary Club of Ballarat South, in which they mentioned a extension of the tramline around Lake Wendouree. Newspaper clipping - Courier 30/9/1993 - "City's plans to narrow lake road dropped". 13 Poster from the Ballarat Tourist Association - for "Days of Discovery" 14-15 August 1993. Lists "Ballarat Historic Tramways" as one of the attractions. Loose item - Invitation from the "Golden City Paddle Steamer Society" to join as a member. 14 Newspaper clipping - Courier - 9/9/1993 - about the BTPS calling for nominations and forthcoming AGM Newspaper clipping - Courier - 18/9/1993 - about the BTPS launching a new book - "Ballarat's Heritage Tramway" - Stephen Butler holding a copy, with No. 12 in the background. Story by Lorrie Brown. (Image of this cutting added 28/3/2011) 15 Newspaper clipping - Courier 23/9/1993 - Reg. Item No. 1108 and 1109. Newspaper clipping - Courier - undated - c late 1993 - of SES challenging other people to a tram pulling competition in forthcoming Begonia Festival. Has photo of group pulling horse tram No. 1 with Frank Puls looking on. 27 in the background. Story by Dennis Torpy. 16 & 17 -copy of brochure (see Item 1108 for launch details) about Lake Wendouree, its history, ecology, wildlife and other attractions, including a drawing of the lake and locations. Printing sponsored by McDonalds. Produced by City of Ballaarat. 18 Newspaper clipping - Courier 30/10/1993 - review of book titled "Watch for Trams", published by Kangaroo Press . Has a photo of a Melbourne cable car set in Sydney Road Brunswick with bogie trailer. 19 Newspaper clippings - In Retrospect section of The Courier 30/7/1994 - 100 years ago - first shipment of electric light equipment for Ballarat in three weeks 30/7/1994 - 25 years ago - Retirement of Dan Irvin as tram depot foreman 17/9/1994 - 25 years ago - Council asking for abandonment of Ballarat trams 3/12/1994 - 25 years ago - hiring of trams by Jewish Youth group for convention 8/7/1995 - 100 years ago - construction of line along the south side of Sturt St between Ripon and Pleasant - related to horse tramways. 15/7/1995 - 100 years ago - Courier reporting completion of above tram line. 18/10/1994 - 40 years ago - retirement of H. W. Preston, former driver and first person to drive an electric tram over the line from Rubicon St. to Sebastopol. Newspaper clipping - Courier 31/12/1993 - School holidays supplement - and free travel voucher for Ballarat Tramways. 20 Newspaper clipping - Courier 4/1/1994 - Reg. item 1655 - "David Kellett's life on the trams" Newspaper clippings - In Retrospect section of The Courier 25/6/1994 - 50 years ago - raising of funds for patriotic appeal by Sylvia Mitchell - conductress 2/7/1994 - 50 years ago - Mayor the City of Maryborough complaining about Treasure Tram in Maryborough and raising funds for patriotic appeal. 21 Newspaper clipping - Courier 4/8/1994 about Transport Minister Alan Brown offering Ballarat surplus trams at a Ballarat Chamber of Commerce AGM. Newspaper clipping - Courier 6.8.1994 - Seaton Ashton in a column about the tram offer of Alan Brown and suggesting a line around the Lake. Newspaper clipping - Courier 6/9/1994 - Reg. Item 1132 Newspaper clipping - Courier 20/9/1994 - Reg Item 1117. 22 Newspaper clipping - Courier 5/10/1994 - Reg Item 1121 23 BTPS pamphlet (brochure) for tramway - see Reg. Item 300.1 24 Newspaper Clipping - Courier 16/3/1995 - advertising feature - Golden City Paddle Steam restored to service on Lake Wendouree and associated Gill Boat shed. Two separate items. 25 Newspaper Clipping - Courier 3/1/1995 - "Rosella searches for memorabilia" - heritage column - Lorrie Brown - has postcard photo of an ESCo tram turning from Sturt St into Lydiard St. North, taken from Post Office. Newspaper clipping - In Retrospect section of The Courier - 7/2/1995 - "Trams revived" - about opening of BTPS tramway, 20 years ago. 26 Newspaper clipping - Courier - 28/6/1995 - Inside/Out column written by Kim Quinlan - Interview with Peter Hiscock. Mentions that he is passionate about the restoration of tramways to Ballarat. 27 - Newspaper clipping - Courier - 3/6/1995 - item about Sunday Trading in Ballarat - Peters Hiscock saying entertainment needed and possibility of tramways in Ballarat. Quotes Warren Doubleday in item. Has photo of Peter Hiscock on steps of No. 27 - Photo by Ian Wilson. Part of front cover of "This month in Ballarat", July 1995, which has a photo of BTM No. 27. 28 Cutting from July 1995 Royalauto magazine - featuring a picture report by Ron Warren on the AETM museum at St Kilda. 29 Newspaper clipping - Courier - 27/7/1995 - about plan to improve Botanical Gardens, extension of tram tracks to Sturt St. Editorial Opinion column 28/7/1995 about the Botanical Gardens and extension of tramway. 30 Newspaper clipping - Courier - 18/8/1995 - "Public Views invited on Strategy Plan" - item by Angela Barlow, about CBD development in Ballarat. Mentions reinstatement of trams in Ballarat. Letter to Editor - 21/8/1995 - "Who asked for Lake Changes" - A. Simpson of Ballarat - questioning possible changes to the Botanical Gardens. 31 Newspaper clipping - Courier - 9/8/1995 - "City Plans to spend $67m in three years - pages 1 and 2 of Courier - notes reinstatement of "tramway communications" 32 - Brochure by City of Ballarat Central Business Area of the Strategy Plan for area - includes possible developments, - notes reinstatement of trams to provide a linkage mechanism between Bridge St and Central Square shopping area - dated August 1995. Newspaper clipping - Courier - 22/11/1995 - item by Ian Haberfield about the endorsement of the strategy plan for the CBD or CBA strategy plan. 33 Newspaper clipping - Courier - 24/11/1995 - letter to the Editor - about CBA strategy plans - by C. McDonald and noting a tramway to Sovereign Hill. Newspaper clipping - Courier - 4/10/1995 - Reg. item 1104. Newspaper clipping - Courier - 29/11/1995 - "Discussion on final gardens plan tonight" - Ian Haberfield - Gardens Masterplan - draft - notes tramway extensions Newspaper clipping - Courier - 30/11/1995 - "First look at Masterplan" for gardens, item by Andrew Lang. 34 Newspaper clipping - Courier - 19/9/1995 - School Holiday fun supplement advert page - includes an advertisement by the BTM noting operation of Horse tram on 1/10/1995. 35 Newspaper clipping - Courier - 12/12/1995 - Reg item 1450.1 Newspaper clipping - Courier - 11/12/1995 - Reg item 1449 Newspaper clipping - Courier - 1/11/1995 - "New face for City" item by Ian Haberfield - Ballarat Central area plan - quotes Chief Commissioner Vern Robson. 36 Newspaper clipping - Courier - 5/12/1995 - Reg item 1444 37 Newspaper clipping - Courier - 8/11/1995 - Reg item 1446 Newspaper clipping - Courier - 9/12/1995 - Reg item 1447.2 37A Newspaper clipping - Courier - 16/12/1995 - Reg Item 1452.1 and .2 Newspaper clipping - Courier - 23/12/1995 - Reg Item 1448 Newspaper clipping - Courier - 16/12/1995 - Reg Item 1453 Newspaper clipping - Courier - 21/12/1995 - "Railway shops would hurt CBD - letter to Editor from David Peile, about the proposal for a shopping centre at the railway station. 37B Newspaper clipping - Courier - 16/12/1995 - column by the Commissioner - Vern Robson, including a note about the BTM and its members and the work it does. Newspaper clipping - Courier - 28/12/1995 - Reg Item 1455 38 Newspaper clipping - Courier - 22/1/1996 - Reg Item 1456 Newspaper clipping - Courier - 27/1/1996 - Reg Item 1463 Newspaper clipping - Courier - 25 Years ago - suggesting retention of tram line by Brown Hill Progress Association around Lake Wendouree - no date. 39 Newspaper clipping - Courier - 27/1/1996 - Reg Item 1464 Newspaper clipping - Courier - 24/1/1996 - Reg Item 1457 40 Newspaper clipping - Courier - 19/2/1996 - Reg Item 1472 Newspaper clipping - Courier - 31/1/1995 - Reg Item 1468 Newspaper clipping - Courier - 30/1/1996 - Reg Item 1467 Newspaper clipping - Courier - 3/1996 - 50 years ago - Retirement of SEC office manager Mr. W. K. J. Dunstan. Newspaper clipping - Courier - 4/5/1996 - 25 years ago - replacement of trams mooted - announcement by Transport Regulation Board. 41 Newspaper clipping - Courier - 24/2/1996 - Reg Item 1473 Newspaper clipping - Courier - 6/4/1996 - 25 years ago - Brown Hill Progress Association seeking support for retention of trams around Lake Wendouree. Newspaper clipping - Courier - 18/5/1996 - 50 years ago - announcement that tram services would be curtailed as from next Monday due to power restrictions. 42 Newspaper clipping - Courier - 5/4/1996 - "Tram Study Close" - Ken Hill reporting that Peter Hiscock saying that study for tramway should get a go ahead within the next three months. Newspaper clipping - Courier - 26/2/1996 - Reg Item 1475. 43 Fax of newspaper clipping 18/5/1996 - of Reg Item 1493 - item fading. 44 Newspaper clipping - Courier - 8/3/1996 - Reg Item 1126 and 1494.1 Envelope, letter and newsletter from Labor Senator Barney Cooney regarding the 1996 Federal Election. Envelope has a photo reproduction of tram 14. 45 Newspaper clipping - Courier - 24/4/1996 - Reg Item 1496 Newspaper clipping - Courier - 17/9/1996 - "Tram submission lodged" - lodging grant application with Tourism Victoria for support for study. Newspaper clipping - Courier - 27/57/1996 - 25 years ago - about the hijacking of the tram in Barkly St. shortly before closure. Newspaper clipping - Courier - 9/11/1996 - 50 years ago - construction of a shelter at corner of Sturt and Drummond St. for tram passengers. Newspaper clipping - Courier - 22/11/2996 - editorial opinion - regarding roofing of mall and possibility of the return of trams. 46 Newspaper Clipping - Courier - 2/10/1996 - Reg Item 826 Newspaper Clipping - Courier - 11/12/1996 - "Live wires scare after bus hits pole" - item by Elise Sullivan, about a bus backing into a tramway pole in Wendouree Parade and breaking it. 47 Newspaper Clipping - Courier - letter from P.Kervarec - undated - c12/1996 - about Eureka Stockade area and removal of tram tracks. Newspaper Clipping - Courier - 16/11/1996 - Reg Item 1499 Newspaper Clipping - Courier - 24/1/1997 - Reg Item 1459 Newspaper Clipping - Courier - 21/9/1996 - 25 years ago - about Council decision for BTPS tram depot. 48 Newspaper Clipping - Courier - 16/1/1997 - Reg Item 1506 Newspaper Clipping - Courier - 10/1/1997 - "Hiscock wants hard facts to back tram sentiment" - discussing results of a survey of Ballarat residents and future studies. Newspaper Clipping - Courier - 11/1/1997 - Eureka Column - about trams coming back and a boon for car panel beaters. Newspaper Clipping - Courier - 11/1/1997 - 50 years ago - Council meeting and granting of fare concessions to children on trams and buses. Newspaper Clipping - Courier - 11/1/1997 -letter - "Keeping rail gates a matter of desire" 49 Newspaper Clipping - Courier - 10/1/1997 - Editorial - "A great idea but can we afford trams" - about the various studies and care should be taken. Newspaper Clipping - Courier - 10/1/1997 - cartoon - "Easy tram funding" - by Burns. Newspaper Clipping - Courier - 9/1/1997 - Reg item 1503 50 Newspaper Clipping - Courier - 7/1/1997 - Reg Item 1502 Newspaper Clipping - Courier - 13/1/1997 - Reg item 1504 51 Newspaper Clipping - Courier - 4/1/1997 - Reg item 1501 Newspaper Clipping - Courier - 14/1/1997 - Reg Item 1505 52 Horse Tram No. 1 pamphlet - Reg Item 1656 53 Newspaper Clipping - Courier - 3/2/1997 - "Sovereign Hill plans to re-invent itself" - report by Seaton Ashton on Sovereign's Hill's future planning. Newspaper clipping - Courier - 30/1/1997 - Reg item 1509 Newspaper clipping - Courier - letter from M. Buret of Wendouree suggest that Cobb and Co coaches be run in Ballarat. 54 - Newspaper Clipping - Courier - 5/2/1997 - "City decides in close vote to keep rail gates" - article on Lydiard St. North Railway Gates - article by Ian Haberfield. 55 - Newspaper Clipping - Ballarat News - 11/6/1997 - Reg Item 605. Image of Numerous - hand written notes of date etc on many of the cuttings.trams, tramways, newspaper clippings, scrap book, ballarat revival, btm, btps -
 Ballarat Tramway Museum
Newspaper, Bendigo Advertiser, "Tram heads off to golden rival", 1/03/2001 12:00:00 AM
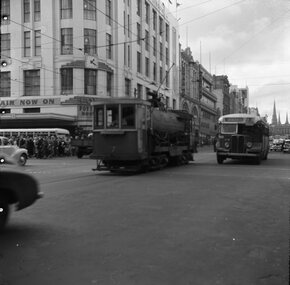
Newspaper Clipping from Bendigo Advertiser, March 1, 2001, page 7, titled "Tram heads off to golden rival" with story and photo about Bendigo tram No. 18, being painted in a gold colour scheme for the 150th anniversary of the discovery of gold and to operate for the Ballarat Tramway Museum. Photo features Central Deborah staff Norm Harris and Jason Dunstone as miners and Darren Hutchesson as the driver. Tram has number covered, destination of "GOLD" and numbers "1851 - 2001" on front dash with the "Bendigo Talking Tram Tour" sign under the driver. Photographed at the mine terminus on 28 Feb. 2001.gold tram, bendigo, btm, gold -
 Ballarat Tramway Museum
Magazine, State Electricity Commission of Victoria (SECV), "SEC News" Oct. 1971, No. 150, Oct. 1971
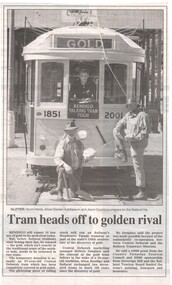
Demonstrates aspects of the closure of the Ballarat Tramways by the SEC in 1971 through a house magazine. Has a front cover photo featuring crews, personal notes on trammies and a feature article on the SEC in Ballarat itself. Strong Association with a number of tramway identities."SEC News", house magazine of the State Electricity Commission of Victoria, October 1971 issue, No. 150, following closure of the SEC Ballarat tramways. Has front cover photo of Lew Walker (Ballarat Motorman) receiving a kiss from Glenda Martin and Janice Greed (left), in front of a bogie tram with the town hall in the background. - btm1699i1 Page 2 - has notes on the cover, trams in Ballarat, a brief history include notes on the "most popular conductress" and happenings on the trams. Centre page spread has 10 photographs of staff and activities in Ballarat, including a photo of Ballarat No. 17 being loaded onto a truck for the TMSV. - btm1699i2 and i3 Page 10 has a small note on the retirement of Mr. Arthur Maxwell, Senior Traffic Inspector Page 11 has a small note and photo of Mr Leslie Denmead, following his retirement as Departmental Tramway Superintendent - btm1699i4. Second copy added 3-8-2006. 3rd copy added 22-7-2016 from donation of Kathy Stanley.On top left hand corner in blue ink, "Sarah"trams, tramways, sec news, ballarat, closure, power supply -
 Ballarat Tramway Museum
Newspaper, The Courier Ballarat, "Breakdown blocks line", 2/07/1971 12:00:00 AM
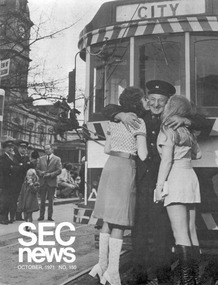
Newspaper clipping from The Courier, Ballarat, dated 2/7/1971, about the derailment of SEC Ballarat No. 41 just past the junction of Main St. and Bridge St. at about 4.10p, the previous day on the way to Mt. Pleasant. Has photo of No. 41 with the repair gang and a crew member. Note with the news item, says a pin broke and "the undercarriage of the tram collapsed". Photo has had No. 41 gone over in ink to highlight the number. One of large group of newspaper cuttings from John Bainbridge, 7/4/02. Has cutting date separate from item. accidents, main st, mt pleasant -
 Ballarat Tramway Museum
Newspaper, The Courier Ballarat, "Now everyone wants a tram", 22/07/1971 12:00:00 AM
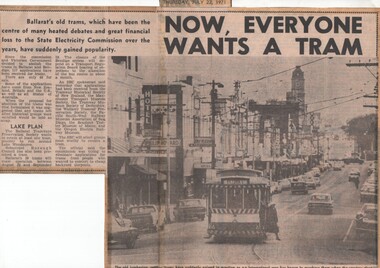
Newspaper clipping from The Courier, Ballarat, dated Thursday 22/7/1971, titled "Now everyone wants a tram". Item reports on the 117 applications for the 48 trams in Ballarat and Bendigo. Applications from NZ, UK and USA had been received. Mentions the Ballarat Tramway Preservation Society, Borough of Sebastopol. The SEC was selecting the most worthy, but eliminating applications for them as sleepouts. Has a photo of No.31 at the junction of Bridge and Main Streets Ballarat. One of large group of newspaper cuttings from John Bainbridge, 7/4/02. Item has been folded for inclusion within a scrap book. Has a piece of plain paper Secured to the back of the portion that was not Secured to the scrap book itself.btps, tram acquisition, sale of trams, sec -
 Ballarat Tramway Museum
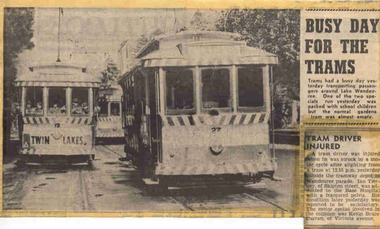
Newspaper, The Courier Ballarat, "Busy day for the trams", "Tram driver injured", 14/08/1971 12:00:00 AM
Set of two newspaper clippings from The Courier, Ballarat, dated about 14/8/1971, that have been taped together. 1. Titled "Busy day for the trams" featured a photo of Ballarat trams 13, 27 and another single truck at Gardens Loop the previous day carrying school children on special trams. See Reg Item 3764 for actual print of photograph. 2. Titled "Tram driver injured" reports on the injury to SEC Driver Ian Tierney of Skipton St. who was severely injured after being hit by a motorcycle outside the SEC Wendouree Parade depot at 12.55pm the previous day. One of a large group of newspaper cuttings from John Bainbridge, 7/4/02. Has cutting date separate from item.special trams, gardens loop -
 Ballarat Tramway Museum
Newspaper, The Courier Ballarat, "All Aboard", 19/08/1971 12:00:00 AM
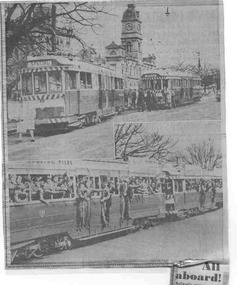
Has a good association with the final days of the SEC Ballarat system with the operation of the trams for schools (Ballarat North Technical College) and the things that could happen while on tour - 40 derails again.Newspaper clipping from The Courier, Ballarat, dated Thursday 19/8/1971, titled "All aboard". Features two photos of No. 40 and one of another bogie tram during a farewell tour of the Ballarat system the previous day by Ballarat North Technical school students. The lower photo features the school students while the upper photo shows No. 40 derailed near the corner of Sturt and Lydiard Streets with the Town Hall in the background. See Reg items 3765, 3766 for actual prints of the Courier photographs and Reg. item 1073 for another copy of the newspaper clipping. One of large group of newspaper cuttings from John Bainbridge, 7/4/02. Item has been folded for inclusion within a scrap book. Has a piece of plain paper Secured to the back of the portion that was not Secured to the scrap book itself. 2nd copy - clipped from newspaper - added 17-08-2006. In good condition.special trams, derailments, sturt st, charter trams -
 Ballarat Tramway Museum
Newspaper, The Courier Ballarat, "The buses take over", 24/08/1971 12:00:00 AM
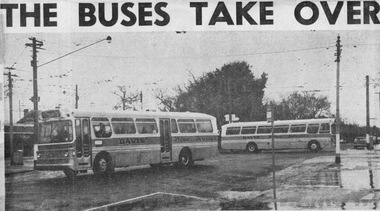
Newspaper clipping from The Courier, Ballarat, dated Tuesday 24/8/1971, titled "The buses take over". Item features a photo of two Davis Bus lines (lettered Davis Urban Services) at the intersection of Sturt and Drummond St. on the first day of bus operation following the closure of the Victoria St. - Gardens Line. One of large group of newspaper cuttings from John Bainbridge, 7/4/02. High Res Images added 5/3/2011.buses, sturt st, drummond st, tram replacement -
 Ballarat Tramway Museum
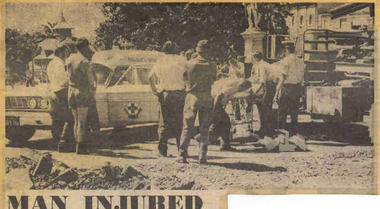
Newspaper, The Courier Ballarat, "Man Injured", 10/02/1972 12:00:00 AM
Newspaper clipping from The Courier, Ballarat, dated Tuesday 10/2/1972, titled "Man injured". Item features a story with a photo of a man injured when a piece of tram rail being removed at the intersection of Sturt and Lydiard Sts fell from the truck. Suffered multiple fractures. Has a photo of the man being lifted onto an ambulance stretcher with the ambulance alongside. One of large group of newspaper cuttings from John Bainbridge, 7/4/02.accidents, track removal, ambulances -
 Ballarat Tramway Museum
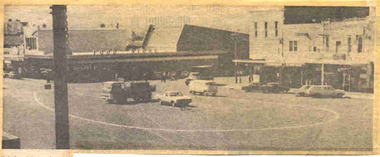
Newspaper, The Courier Ballarat, Traffic works at Grenville, 10/02/1972 12:00:00 AM
Newspaper clipping from The Courier, Ballarat, dated Tuesday 10/2/1972. Item features a story with a photo of about the new traffic patterns at the Sturt St - Grenville St intersection following painting of lines to direct traffic following removal of the tram lines. Photo shows the Dickins Food Store (Supermarket) in the background. One of large group of newspaper cuttings from John Bainbridge, 7/4/02.track removal, traffic control -
 Ballarat Tramway Museum
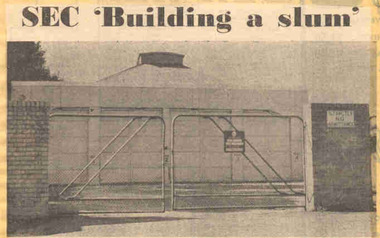
Newspaper, The Courier Ballarat, "SEC 'Building a slum' ", 20/02/1972 12:00:00 AM
Newspaper clipping from The Courier, Ballarat, dated Monday 20/3/1972, titled "SEC 'Building a slum' ". Item with a photo about the proposals of the SEC to convert the former tram depot land to development comprising 16 houses as a built-in slum. The development was considered inappropriate for the area by local residents, who requested a development of 6 lots. Features a photo of the depot building with locked gates and a Security company sign on the gate. One of large group of newspaper cuttings from John Bainbridge, 7/4/02.depot, sale of land, wendouree parade -
 Ballarat Tramway Museum
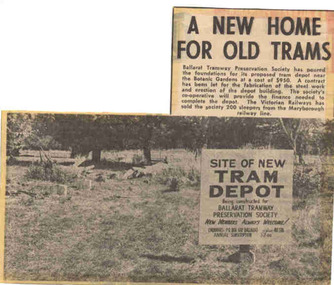
Newspaper, The Courier Ballarat, "A new home for old trams", 3/04/1972 12:00:00 AM
Yields information about the commencement of construction of the BTPS depot in the south Gardens reserve and seeking new members.Newspaper clipping from The Courier, Ballarat, dated Monday 3/4/1972, titled "A new home for old trams". Item reporting the BTPS had poured the foundations for its proposed tram depot near the Botanic Gardens, a contract had been let for the steel fabrication and that 200 sleepers had been obtained from the VR from the Maryborough line. Features a photo of the site with a sign advising the purpose of the works and seeking new members. One of large group of newspaper cuttings from John Bainbridge, 7/4/02. See Reg Item 3817 for a print of the actual photograph.depot, btps, depot construction -
 Ballarat Tramway Museum
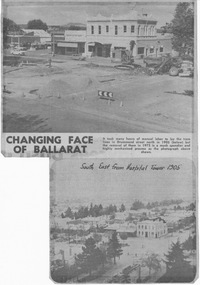
Newspaper, The Courier Ballarat, "Changing face of Ballarat ", 15/04/1972 12:00:00 AM
Newspaper clipping from The Courier, Ballarat, dated Saturday 15/4/1972, titled "Changing face of Ballarat ". Items with two photos of the Drummond and Sturt St., Hospital Corner. The lower one in 1905 showing possible laying of tracks in Drummond St and the top one, the removal of the tracks in 1972. Has the hotel at the intersection in the photograph. One of large group of newspaper cuttings from John Bainbridge, 7/4/02. High Res Images added 5/3/2011.drummond st, sturt st, hospital corner -
 Ballarat Tramway Museum
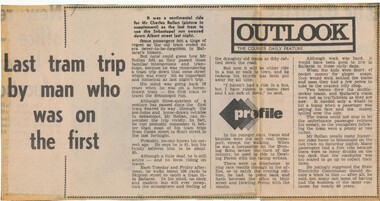
Newspaper, The Courier Ballarat, "Last trip by man who was on the first", 20/09/1971 12:00:00 AM
Newspaper clipping from The Courier, Ballarat, of Monday 20/9/1971, titled "Last trip by man who was on the first" in the Outlook profile Section of the newspaper about Mr. Charles Rollan who was a passenger on the last Sebastopol tram and rode on the horse trams on the Sebastopol line. Noted that a photo of Mr. Rollan was in the supplement Section of the newspaper. See Reg. Item 269. Mr. Rollan, 91, who was a compositor for the Evening Echo newspaper, retold stories about the horse tram days. One of a large group of newspaper cuttings from John Bainbridge, 7/4/02. Item has been folded for inclusion within a scrap book. Has a piece of plain paper Secured to the back of the portion that was not Secured to the scrap book itself.horse trams, sebastopol, last tram -
 Ballarat Tramway Museum
Newspaper, The Courier Ballarat, "Housing plan for tram depot site", 19/06/1972 12:00:00 AM
Newspaper clipping from The Courier, Ballarat, dated Monday, June 19, 1972 titled "Housing plan for tram depot site". Reports on the sale of the former tram depot on Saturday June 17 for $54,500. The purchaser expected to start development of housing on the site within three months. Reports on the sale, purchaser and SEC's views. Features a photo of Edgar Bartrop reading the contract. Others in the photo are Bruce Bartrop, SEC Estate officer, Mr. R. Morrison and SEC Manager Mr. I. F. Pellas. One of a large group of newspaper cuttings from John Bainbridge, 7/4/02.depot, buildings, auctions, bartrop -
 Ballarat Tramway Museum
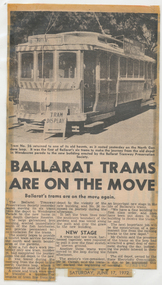
Newspaper, The Courier Ballarat, "Ballarat Trams are on the Move", 17/06/1972 12:00:00 AM
Newspaper clipping from The Courier, Ballarat, dated Saturday, 17 June 1972, titled "Ballarat Trams are on the Move". Reports on the move of tram No. 26 from the SEC Depot to the BTPS depot the previous day. Quotes Society Vice-president, Mr. M. Calnin. Took all day to complete the move on one of the trams. Three other trams had been moved to the loop during the afternoon. Has a photo of No. 26 at the Gardens Loop. One of a large group of newspaper cuttings from John Bainbridge, 7/4/02.depot, buildings, btps, moving trams, gardens loop -
 Ballarat Tramway Museum
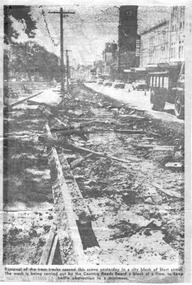
Newspaper, The Courier Ballarat, tram track demolition on the southern side of Sturt S, Jan. 1972
Yields information about the demolition or removal of the track along the Sturt St and how it was done.Newspaper clipping from The Courier, Ballarat, undated, assumed late Jan. 1972 based on Reg. Items 2214.2 and 2215 showing a photo of tram track demolition on the southern side of Sturt St around Doveton / Armstrong St. Has Myers and Town Hall in the background. Loose rail and sleepers in the picture. Courier photograph taken 25/1/1972. One of a large group of newspaper cuttings from John Bainbridge, 7/4/02. See Reg Item 3780 for a print of the Courier Photograph.track removal, tram track removal, crb, sturt st -
 Ballarat Tramway Museum
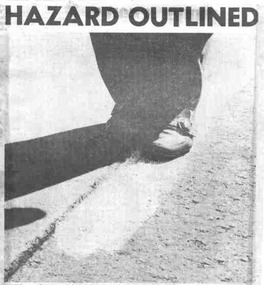
Newspaper, The Courier Ballarat, "Hazard outlined", 29/02/1972 12:00:00 AM
Newspaper clipping from The Courier, Ballarat, Tuesday 29/2/1972 titled "Hazard Outlined" with a photo showing a trip hazard in Sturt St. as a result of the removal of the tram lines. CRB advised pending an additional layer of hotmix. One of a large group of newspaper cuttings from John Bainbridge, 7/4/02.track removal, tram track removal, crb, sturt st -
 Ballarat Tramway Museum
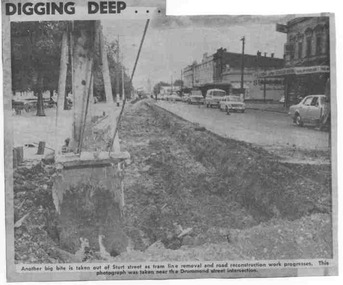
Newspaper, The Courier Ballarat, "Digging deep", 23/03/1972 12:00:00 AM
Newspaper clipping from The Courier, Ballarat, Thursday 23/3/1972 titled "Digging deep" with a photo showing the excavation of the former tram lines near the Drummond St intersection in Sturt St. Photo taken looking east along the south side of Drummond St. One of a large group of newspaper cuttings from John Bainbridge, 7/4/02.track removal, tram track removal, crb, sturt st -
 Ballarat Tramway Museum
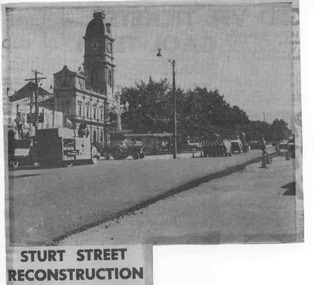
Newspaper, The Courier Ballarat, "Sturt St. reconstruction', 28/03/1972 12:00:00 AM
Newspaper clipping from The Courier, Ballarat, Tuesday 28/3/1972 titled "Sturt St. reconstruction" showing a photo of the hot mix surfacing work in Sturt St. at the intersection with Lydiard St. Has the Town Hall in the background. One of a large group of newspaper cuttings from John Bainbridge, 7/4/02.track removal, tram track removal, crb, sturt st -
 Ballarat Tramway Museum
Newspaper, The Courier Ballarat, "Almost a dry run", 28/06/1971 12:00:00 AM
Newspaper clipping from The Courier, Ballarat, dated Wednesday 28/6/1972, titled "Almost a dry run" showing a photograph of road machinery parked in the middle of Victoria St. during heavy rain the previous day. Work in removing tram line was completed the previous Monday, but the surfacing had yet to be completed. Photo taken looking east near the Rodier St. intersection. One of a large group of newspaper cuttings from John Bainbridge, 7/4/02.track removal, tram track removal, crb, victoria st -
 Ballarat Tramway Museum
Newspaper, Herald Sun, "A Place in the Sun", 17/04/1972 12:00:00 AM
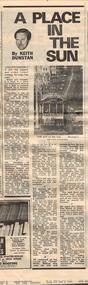
Newspaper clipping from The Melbourne Sun, dated Monday 17/4/1972, column written by Keith Dunstan titled "A place in the sun" detailing the events, musings and some identities names of the closure of the Bendigo tramway system the previous day. Has a photo of No. 26 climbing View St from Charing Cross. One of a large group of newspaper cuttings from John Bainbridge, 7/4/02. Item has been folded for inclusion within a scrap book. Has a piece of plain paper Secured to the back of the portion that was not Secured to the scrap book itself. For full print of the photograph, see Reg Item 3888.bendigo, tramway closure, last tram -
 Ballarat Tramway Museum
Newspaper, The Courier Ballarat, "Trams: 67% Say Yes", "Put tram plan to the vote", "Lets make sure we all get on the right tram", "Trams would be bad for mall: manager", 13/07/2002 12:00:00 AM
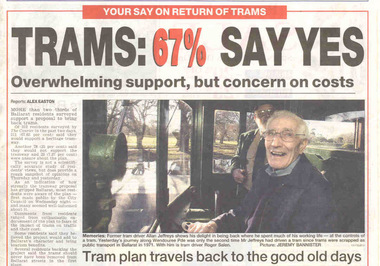
Set of four cuttings from The Courier, Ballarat dated Saturday 13/7/2002 regarding the reintroduction of trams to Ballarat. 2239.1 - Front page with caption "Trams: 67% Say Yes", written by Alex Easton regarding a survey of 312 residents by the Courier. Also has a photo by Jeremy Bannister of former tram driver Alan Jeffreys at the controls of a tram in Wendouree Parade with Roger Salen in the background. 2239.2 - page 9 - Editorial written by Stuart Howie titled "Lets make sure we all get on the right tram" discussing the positive and negative attributes and problems of spending a large amount of money to return trams to Ballarat. Has a digitally composed photo of No. 13 in Lydiard St. North, showing destination "CITY" and a photo of the Eureka Stockade. 2239.3 - Page 4 - lead article titled "Trams would be bad for mall: manager", written by Alex Easton quoting David Nolan and the impact of trams on the mall, along with a cartoon about a tram ticketing machine being out of order. Cartoon by inkcinct. Also continues from page 1, lead article. Notes that readers can have they say on a web poll. 2239.4 - Page 8 - Letter to the Editor, by William J Hoath titled "Put tram plan to the vote", asking for any tram proposal to be put to the vote of ratepayers. Also on the side in a column titled "Short Takes", titled "Link lake to the tram line", provided by Joan C. Ryan of Ballarat.ballarat revival, letter to the editor, ballarat city tramway, lydiard st. nth -
 Ballarat Tramway Museum
Newspaper, The Courier Ballarat, "Return of trams viable study", "New Push for Trams", "Taking tourism to the next level", "More tourists, more jobs expected", "Tram plan worthy of expected debate", 11/07/2002 12:00:00 AM
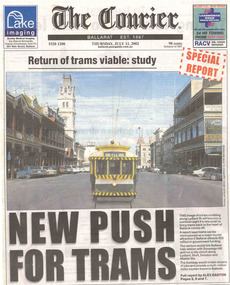
Set of three cuttings from The Courier, Ballarat dated Thursday 11/7/2002 regarding the reintroduction of trams to Ballarat. 2241.1 - Page 1 and 2 of The Courier, with page 1 titled "Return of trams viable study" and "New Push for Trams" as the commencement of a Special report showing a digitally constructed image of No. 13 in Lydiard St. North. Note the tram does not have a driver. Introduces reports by Alex Easton on pages 2, 6 and 7. On Page 2, titled "Taking tourism to the next level", has details of the Council viewpoints on the proposal, public consultation, a map of the route, and notes on the construction issues. Has a digital image of 13 crossing Sturt St. into Lydiard St. North. See images No. 1 to 3. 2241.2 - page 6 of The Courier, which joins with page 7 using the titled "More tourists, more jobs expected". Has Sections reviewing the study outcomes, benefits and a summary of the study. Page 6 has a photo of a passenger boarding No. 21, decorated as the Myers Christmas tram in Sturt St and a photo of Bridge St. in 1971 (very poor quality reproduction). See images No. 4 and 5. 2241.3 - page 7 of The Courier, has Sections detailing the history of Ballarat Trams, proposals for the City Tramway, costs, consultation, and comments from Peter Hiscock. Has a photo of Peter Hiscock and Mayor David Vendy in front of No. 13 at the BTM depot. See image No. 6. Also has a photo of Dianne Smith, Executive Director of Ballarat Tourism. On page 8, as part of The Courier's editorial Section, has comments on the proposals, titled "Tram plan worth of extended debate". Looks at the $20million cost. ballarat revival, editorial, ballarat city tramway, lydiard st. nth -
 Ballarat Tramway Museum
Newspaper, The Courier Ballarat, "Leaders welcome proposal to return trams", "Romantic image captures the city's imagination", 12/07/2002 12:00:00 AM
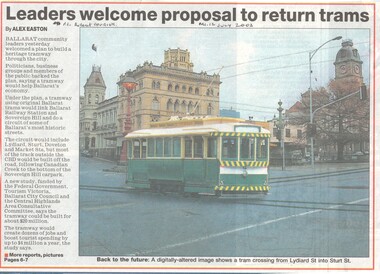
Set of three cuttings from The Courier, Ballarat dated Thursday 11/7/2002 regarding the reintroduction of trams to Ballarat. 2241.1 - Page 1 of The Courier, with page 1 titled "Leaders welcome proposal to return trams" with a digitally constructed image of No. 13 crossing Sturt St from Lydiard St. North. The item looks at the overall outcomes of the study and who funded it. See image No. 1. Text written by Alex Easton. 2241.2 - page 6 of The Courier, which joins with page 7 using the titled "Romantic image captures the city's imagination" reviewing reactions to the proposals from various politicians, business and community groups. Includes comments from Judy Verlin, former Mayor and impacts on traffic and parking issues. Also summarises in a Section "At a Glance" the pros and cons of the proposal. Has a photo of No. 31 at the intersection of Bridge, Victoria and Main Streets. Cartoon by Inkcinct, about the City Tramway and Sturt St redevelopment also on the page. 2241.3 - page 7 of The Courier, has Sections detailing the benefits of the proposals, inviting people to have their say and further summary information. Has a photo of Bendigo 5 in Pall Mall with destination of Eaglehawk and a photo of Christchurch No. 11 noting the economic benefits of trams in that city over the last seven years. Full Image and 2nd copy of sheets added 12-1-2016 from donation of Kathy Stanley. Second copy - Has date and page number written in under headline in ink.ballarat revival, christchurch, bendigo, ballarat city tramway