Showing 1758 items
matching red cross
-
 Churchill Island Heritage Farm
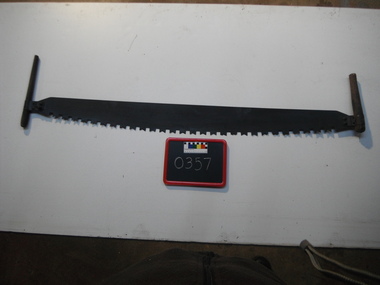
Tool - Crosscut Saw
Cross cut saws have been used for millennia, but they came into wider usage in Europe from the 15th century onwards. The term 'cross cut' refers to the blades on the saw’s cutting edge which come in a variety of different patterns. These saws are specifically designed for cutting across the grain of the wood by timber workers, sawyers, and other land workers for tree felling and cutting up larger pieces of lumber into smaller more manageable pieces. The saws come in variable sizes and lengths and are designed for use by one or two people. With the two-man saws, a method of alternating 'pull and push' to drag the blade back and forth through the timber, maximising efficiency and labour division. Donated by Wilfred Dungan on behalf of the Dungan family Collection originally used on the property of the late Dr Rae Dungan in Falls Creek Rd Olinda, purchased in the late 1930s from Olinda pioneers Harry and Minnie Holden. Also on the property of late May Farndon of Farndon’s and Falls Rd Mt Dandenong – aunt of Dr Rae William Dungan and also an early pioneer. Family holidays and weekends involved use of these sorts of farm implements plus working with horses. Post-war, the Olinda hand tools and machinery moved to the Shady Creek, Nilma North area where bush, pasture and cows had replaced the Olinda property. Wilfred well remembers being on one end of the crosscut saws cutting fence posts, logs and timber under “the tireless and vocal instruction” of a red headed local Darnum Rd legend called Harry Collyer. “He drove an old Rugby car and nearly pulled me through the logs with every cut!” Two handled cross cut saw. One manufactured handle and one bush replacement wedged with three inch nail. 6 broken teeth. Rivets for handle broken off at home-made end. M shaped tooth profile.churchill island, crosscut, saw, tool -
 Australian Gliding Museum
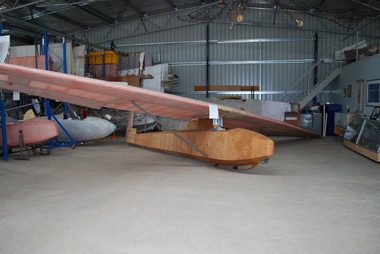
Machine - Glider – Sailplane, 1930s
This Dunstable Kestrel glider, which came to be known as the "Red Kestrel" on account of its colour scheme, was built from plans by Percy Pratt between 1936 and 1938. It was first flown in 1938. Thereafter, it was flown regularly by Pratt at Geelong, Victoria. At the national rally organized by the Australian Gliding Association in December 1939 – January 1940 at the Belmont Common, Geelong, Victoria, Pratt, in his Kestrel, recorded an exceptional 13 kilometre cross country flight of one hour 43 minutes reaching a height of approximately 5500 metres [Allan Ash, Gliding in Australia, p 86]. This Dunstable Kestrel glider represents a good example of a 1930s era sailplane. It is one of three of the type that currently exist in Australia. The aircraft is also important for Australian gliding history because it was built, owned and flown by gliding pioneer Percy Pratt.Wooden airframe covered with plywood and fabric. In course of restoration.australian gliding, glider, sailplane, dunstable, kestrel, bill manuel, percy pratt, belmont, geelong -
 Charlton Golden Grains Museum Inc
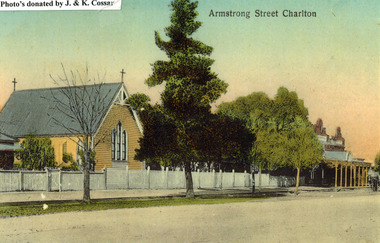
Photograph, St Martin's Anglican Church, Armstrong St Charlton
St Martin's Anglican Church was built in 1889. Victoria Hall was built for E. Miles in 1884. The post card is part of a series taken c. 1907.Copy of a coloured (hand coloured?) post card showing St Martin's Anglican Church, Armstrong St, Charlton. The church is a yellow, timber building with a cross at each end of the roof. A white picket fence runs along the front of the church. There are three trees on the edge of the road in front of the church. There is a large single storey red brick building to the right of the church with a verandah over the footpath. A horse is coming down the road past the red brick building. The post card has Armstrong Street Charlton in the top right. There is a typed note in the top LH corner of the photo that says Photo's donated by J. & K. Cossar.st martin's anglican church, armstrong st charlton -
 National Vietnam Veterans Museum (NVVM)
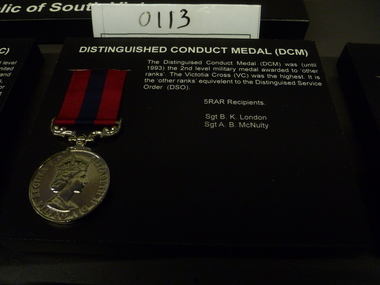
Medal - Medal, Replica, Distingushed Conduct Medal (DCM)
A black board with withe text about Distingushed Conduct Medal (DCM) award to 5 RAR recipients. The medal includes a round silver metal with text "Elizabeth II Dei Gratia F.D." and a ribbon with two big separated red stripes on a black background. the Distinguished Conduct medal (DCM) was (until 1993) the 2nd level military medal awarded to other ranks. The Victoria Cross (VC) was the highest. It is the "other ranks" equivelent to the Distinguised Service Order (DSO) 5RAR Recipients were Sgt B K London, Sgt A B McNultyDistinguished Conduct Medal (DCM);'s details and names of recipients.medal, 5 rar, distinguished conduct medal, sgt b.k. london, sgt a.b. mcnulty, replica medals -
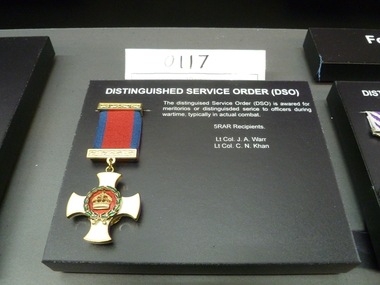 National Vietnam Veterans Museum (NVVM)
Medal - Medal, Replica, Distinguished Service Order (DSO)
A black board with white texts about Distinguished Service Order (DSO) award and the recipients. The medal includes a white cross with golden edged and a gold royal cypher on red background inside a wreath of laurel at center. The ribbon has one big red stripe in between two blue smaller stripes. DISTINGUISHED SERVICE ORDER (DSO). The Distinguished Service Order (DSO) is awarded for meritorios or distinguished service to officers during wartime, typically in actual combat. 5 RAR recipients are Lt Col J A Warr, Lt Col C N KhanDistinguished Service Order (DSO)'s details and names of recipients.medals, distinguished service order, lt col warr, lt col colin khan, replica medals -
 Port Melbourne Historical & Preservation Society
Book - Town of Port Melbourne Valuation, 1898
... Cross streets added in red ink. Signed by Town Clerk... clerks Cross streets added in red ink. Signed by Town Clerk ...Valuation book, Town of Port Melbourne 1898-99. Dark green cloth cover, maroon spine and label gold-stamped. 70 spreads completed, listing name and occupation of tenant and owner of each property, description, number of rooms, size of property, rental etc. Two pp letter detailing demolitions etc pasted to p. 70 (also Rates; assessments)Cross streets added in red ink. Signed by Town Clerk. Pencil markings in marginlocal government, built environment, joseph turner, edward c crockford, town clerks -
Port Melbourne Historical & Preservation Society
Book - Town of Port Melbourne Valuation, 1899
Valuation book, Town of Port Melbourne 1899. Dark grey with maroon spine and label gold-stamped. 71 spreads completed, listing name and occupation of tenant and owner of each property, description, number of rooms, size of property, rental etc. p72/3 removed, folded and placed in p73. (also Rates; assessments)"page 72-73 out for printers copy 29/9/00 ECC" on p73 Separate printers copy has order/instruction for next book in pencil, various markings on pages in pencil and in red ink (the latter indicating cross streets) Signed by Mayor, Town Clerk and an unidentifiable Councillorlocal government, built environment, joseph turner, edward c crockford, town clerks, henry norval edwards -
Port Melbourne Historical & Preservation Society
Book - Town of Port Melbourne Valuation, 1900
... Markings in pencil. Cross streets added in red pen. Notes... government built environment joseph turner Markings in pencil. Cross ...Valuation book, Town of Port Melbourne 1900-01. Dark green cloth cover with maroon spine and label gold-stamped. 70 spreads completed, listing name and occupation of tenant and owner of each property, description, number of rooms, size of property, rental etc. Letter from valuer detailing demolition etc pasted p 70. Pages 73-77 removed but 72/74 and 76/77 placed in book. (also Rates; assessments)Markings in pencil. Cross streets added in red pen. Notes on lined paper pasted front end paper.local government, built environment, joseph turner -
Port Melbourne Historical & Preservation Society
Book - Town of Port Melbourne Valuation, 1903
... Clerk and Councillor Watson added in Feb 1904. Cross streets... and Councillor Watson added in Feb 1904. Cross streets inserted in red ...Valuation book, Town of Port Melbourne 1903-04. Dark blue green textured leather cover, tooled tan suede corners and spine, maroon labels gold-stamped. 76 spreads completed, listing name and occupation of tenant and owner of each property, description, number of rooms, size of property, rental etc. (also Rates; assessments)Errata added by valuer p 76 / signatures of Mayor, Town Clerk and Councillor Watson added in Feb 1904. Cross streets inserted in red ink.local government - town of port melbourne, built environment, joseph turner, william watson, arthur hester, edward c crockford, town clerks -
Port Melbourne Historical & Preservation Society
Book - Town of Port Melbourne Valuation, 1904
... Cross streets inserted in red ink, pencil indications... government built environment joseph turner Cross streets inserted ...Valuation book, Town of Port Melbourne 1904-05. Dark blue green textured leatherette cover, maroon spine both gold stamped with title. 78 spreads completed, listing name and occupation of tenant and owner of each property, description, number of rooms, size of property, rental etc. (also Rates; assessments)Cross streets inserted in red ink, pencil indications in margins. On final spread pencil alteration to valuers statement.local government, built environment, joseph turner -
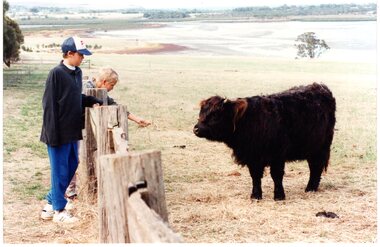 Churchill Island Heritage Farm
Photograph - Photograph of two boys and a cow
... +SHANNON/INGNAM FROM RESERVOIR[crossed out, written in red pen... on reverse] DANIEL +SHANNON/INGNAM FROM RESERVOIR[crossed out ...Churchill Island Heritage Farm has a large collection of photographs. Photograph taken in a paddock of two boys leaning over a wooden log fence, one with hand outstretched, offering hay to a dark brown Highland calf. Churchill Island foreshore and inlet visible in the background.90%/3001 [written in blue pencil on reverse] DANIEL +SHANNON/INGNAM FROM RESERVOIR[crossed out, written in red pen on reverse] BEN + BRETT HAINTZ/FROM RICHMOND, FEEDING/SCOTTISH HIGHLAND CALF/(?) [written in red pen on reverse] [catalogue number written on reverse in pencil]churchill island, photograph -
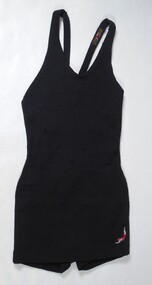 Bendigo Historical Society Inc.
Clothing - Swimming costume
Ladies' Jantzen one piece woollen knit swimming costume with double panel below waist. Jantzen Regd. label stitched to inside left shoulder strap, Size 40. Made in Australia and features an embroidered logo of woman diving in red cap and costume. This logo also appears on front panel at left base. Straps cross over at the back.swimming costume, knitware, jantzen, ladies' wear -
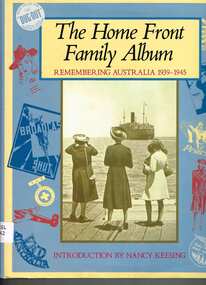 Monbulk RSL Sub Branch
Book, Weldon Publishing, The Home front family album : remembering Australia 1939-1945, 1991
... 1939-1945 - Social aspects Rationing - Red Cross - Women's role ...Rationing - Red Cross - Women's role in wartime - Japanese midget submarines - Clothes rationing - Coalminers' strike - Censorship - Ration books.Index, ill, p.208.non-fictionRationing - Red Cross - Women's role in wartime - Japanese midget submarines - Clothes rationing - Coalminers' strike - Censorship - Ration books.australia 1939-1945 - social conditions, world war 1939-1945 - social aspects -
 Bendigo Historical Society Inc.
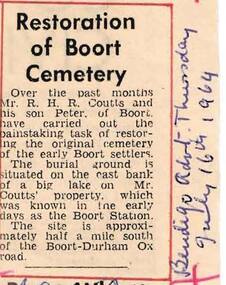
Newspaper - HARRY BIGGS COLLECTION: RESTORATION OF BOORT CEMETERY
Newspaper article on cream coloured paper with red biro outlining the article with a cross at the four corners. Hand written at the side in blue biro is "Bendigo Advertiser July 16th 1964. The Article is about the Restoration of Boort Cemetery by Mr. R. H. R. Coutts and Peter Coutts of Boort. The burial ground is situated on Mr Coutts property which was known in the early days as Boort Station.Bendigo Advertisermemorials, graveboards, boort cemetry, boort cemetery, mr r. h. coutts, boort station. -
 Bendigo Historical Society Inc.
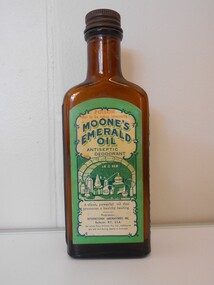
Container - PHARMACY COLLECTION: BOTTLE OF MOONES EMERALD OIL, 1920's
Object. Small amber glass bottle rectangular in cross section. Label in green, white and red for moone's Emerald Oil. Antiseptic and deodorant by International Laboratories Inc. Rochester New York USA. For whom Riley-Williams Pty Ltd Melbourne are sole distributing Agents in Australia. Small stamped metal screw top cap. Directions label on back.Poison.. Not to be Taken internally.medicine, first aid, emerald oil -
 Bendigo Historical Society Inc.
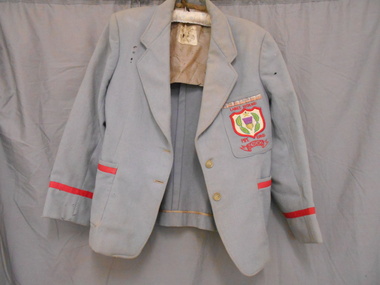
Clothing - LADIES GREY BLAZER
Ladies grey blazer worn by Heather Pain as Pipe Major of the Ladies Pipe Band Bendigo. Grey woollen single breasted blazer. Grey satin lining across shoulders at back. Long sleeves lined with yellow and black striped cotton fabric. Body of blazer unlined. Three pockets on front-one on either side at hip level. One LHS breast pocket with red embroidery shield containing thistles, leaves and crossed swords. The pocket has a 1cm tartan bans across the top. Hip level pockets and lower sleeves have 1.5cm bands of red corded ribbon. Front opening is fastened with two X 2cm grey plastic buttons. Internal seams edged with brown satin ribbon.Red embroidery on breast pocket ""Ladies Highland Pipe Band''.''Bendigo embroidered inside an embroidered banner.Label at back of neck- ''ASHMANS'' The Home of Better Suits, Hargreaves Street Bendigo''. Label attached to lining across shoulders (^cmX6.5cm).Picture of shield with tailor's tools and words, Ashmans, The Home of Better Suits, Hargreaves st Bendigo. Label stitched inside right front Ashmans Hargreaves St., The Home of Better Suits. Miss H. Pain 8141 6/9/55''.costume, female, ladies grey blazer. -
 Bendigo Historical Society Inc.
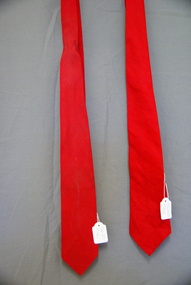
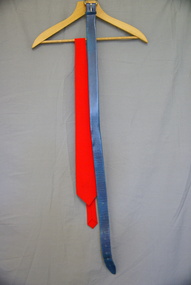
Clothing - MEN'S RED TIE - BAND UNIFORM, Late 1900's -2000
Clothing. Rayon fabric, cut on the cross to give stretch. Machine stitched hem. Spreads to a symetrical point at wide end. Tapers to an asymetrical point at narrow end.CURTIS RAYON CRAVATcostume accessories, male, men's red tie - band uniform -
 Bendigo Historical Society Inc.
Clothing - MEN'S RED TIE - BAND UNIFORM, Late 1900's -2000's
Clothing. Rayon fabric, cut on the cross to give stretch. Machine stitched hem. Spreads to a symetrical point at wide end. Tapers to an asymetrical point narrow end.CURTIS RAYON CRAVATcostume accessories, male, men's red tie - band uniform -
 Bendigo Historical Society Inc.
Clothing - RED POLYESTER TIE - PART OF MARONG MUNICIPAL BAND UNIFORM, 1980's >
Clothing. Red polyester fabric, lined with white silky polyester lining, and hand-stitched, open weave fabric, possibly cotton to help hold shape and body. Symetrical shaping to a point on broad and narrow ends of tie. Cut on the cross to give stretch when tying the tie.RODNEY by John Webster, MADE IN AUSTRALIA.costume accessories, male, marong municipal band uniform tie -
 Bendigo Historical Society Inc.
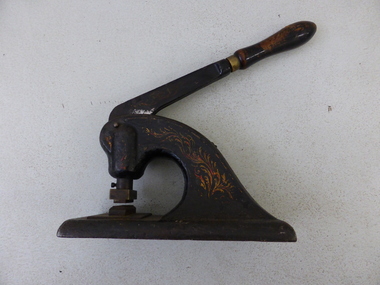
Tool - COMPANY SEAL - GENERAL CROSS HATCHED
Large black enamelled cast iron company seal with wooden handle, red and gold decoration, seal is a general cross hatched pattern.gold mines, mining equipment, company seal, bendigo-companies-gold mines-seals -
 Bendigo Historical Society Inc.
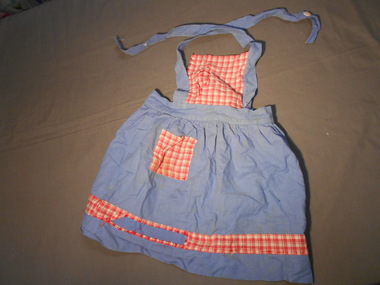
Clothing - AILEEN AND JOHN ELLISON COLLECTION: CHILD'S COTTON APRON, 1950's
Blue cesarine, trimmed with red and white check cotton. Bib has red and white centre panel, with a three cm band on each side. These bands extend over the shoulder, and cross at the back, to fasten with a button and button hole at the back waistline. Skirt gathers onto the 4 cmwide waistband. An 8.5 cm X 9 cm rectangular pocket of red and white check cotton on right hand side. A 3 cm wide band of red and white cotton decorates the skirt 4.5 cm above the hemline.( This trim is badly worn-one section completely gone).costume, children's, child's cotton apron -
 Bendigo Historical Society Inc.
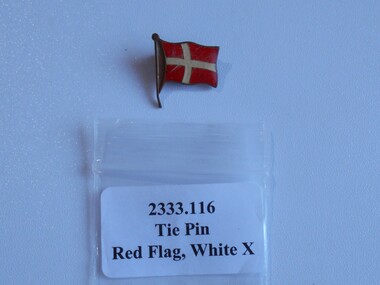
Accessory - QC BINKS COLLECTION: DANISH FLAG PIN
A pin of a Danish flag that was discovered by QC Binks while he was metal detecting for gold. Flag is red background with a white cross. There is a pin on reverse.bendigo, gold mining, qc binks, qc binks, danish, denmark. -
 Bendigo Historical Society Inc.
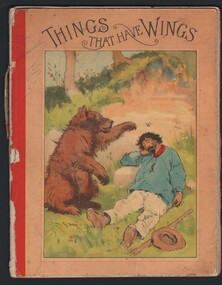
Book - THINGS THAT HAVE WINGS
Book. Things That Have Wings. Child's book titled 'Things That Have Wings'. Part of The Little Lamb Series of Books. Printed by William Clowes and Sons Limited, Stamford Street and Charing Cross, London. Published by The Religious Tract Society, 56 Paternoster Row and 65 St Paul's Churchyard, London. Book has a lithograph on inside title page of foliage and insects drawn by T Sulman. Book contains stories on varying winged animals and insects and contains six lithograph drawings by varying artists. Pages 29 and 30 are missing. Book is a buff colour with a red torn spine binding. Front cover has a coloured picture of a bear swatting a fly away from a sleeping man. Stories contain a religious tone. To Jessie from Florrie (in pencil on inside front cover.)book, story, things that have wings, childrens book -
 Bendigo Historical Society Inc.
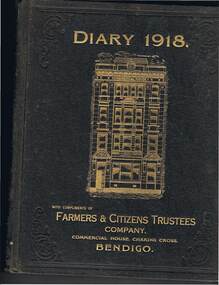
Document - MCCOLL, RANKIN AND STANISTREET COLLECTION: DIARY 1918, 1918
Document: McColl, Rankin & Stanistreet, diary 1918. Brown covered book, on front in gold embossed writing : 'Diary 1918, with compliments of Farmers & Citizens Trustees Company, Commercial House, Charing Cross, Bendigo.' Image of Commercial House, Charing Cross, Bendigo. Manager of Farmers and Citizens Trustees Company Bendigo Limited was R.A. Rankin ( McColl, Rankin & Stanistreet ) Diary contains loose documents including Bendigo Stock Exchange Price List 1918 ( 2 ) , A. Allsop & M.P. Kelly, stock and sharebrokers, Exchange, Bendigo , telegram to Mr. Michael P. Kelly, Wills St., Bendigo re share purchase, first and final notice New Red, White & Blue Consolidated Coy.organization, mining, diary 1918, mccoll, rankin & stanistreet, goldmining, mining -
 Bendigo Historical Society Inc.
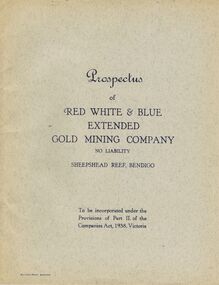
Document - MCCOLL, RANKIN AND STANISTREET COLLECTION: PROSPECTUS OF RED WHITE AND BLUE EXTENDED GOLD MINING CO NL, 1940
McColl Rankin & Stanistreet, Prospectus of Red White & Blue Extended Gold Mining Company NL, Sheepshead Reef, Bendigo. Published by McColl Rankin & Stanistreet, Charing Cross, Bendigo.McColl Rankin & Stanistreetorganization, mining, red white & blue extended gm nl, mccoll rankin & stanistreet, prospectus red white and blue -
 Bendigo Historical Society Inc.
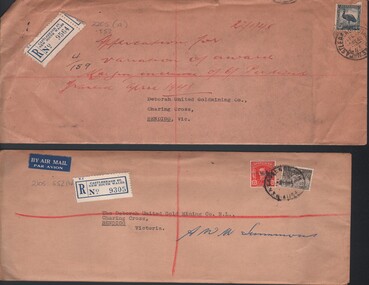
Document - MCCOLL, RANKIN AND STANISTREET COLLECTION: DEBORAH UNITED GOLD MINING CO. NL - CORRESPONDENCE RE AWARD
Document: McColl, Rankin & Stanistreet: Deborah United Gold Mining Co. NL - 2 unopened evelopes addressed to Deborah United Gold Mining Co., Charing Cross, Bendigo, Vic. Sent registered mail from Castlereagh St., New South Wales, No. 9564 and 9305. Written in red on front of (a) in red ink ' aopplication for variation of award ….. ? Increase of 6/- per wek granted April 1948'organization, business, deborah united gold mining co., nl, mccoll, rankin & stanistreet: deborah united gold mining co. nl, gold mining, correpondence, award -
 Bendigo Historical Society Inc.
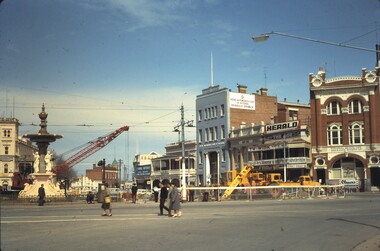
Slide - BENDIGO BUILDINGS, Oct 1964
Slide. Bendigo Buildings. A red crane doing construction work at Charing Cross, between the fountain and cenotaph, with the City Family Hotel on the left, the View Point Hotel, RACV Building, Colonial Mutual Life Building on right.slide, bendigo, bendigo buildings., bendigo buildings. -
 Victorian Interpretive Projects Inc.
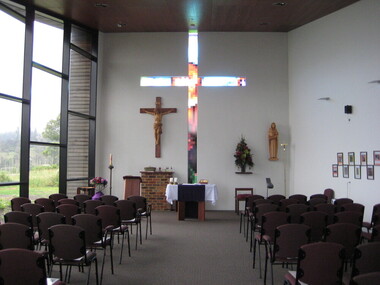
Photograph - Digital, Clare Kathleen Gervasoni, St Mary's Kinglake, 2012, 15/12/2012
The images depict the newly completed fourth Catholic Church at Kinglake. The previous three churches having been destroyed by 'Black Saturday' bushfire. The painting is oil on canvas. The historical continuity is expressed by the continuity of the skyline and the disconnectedness of the colours. it is not a literal depiction of each church, but a recognizable and symbolic image conveying resilience of faith of the local community. The first church was burnt down in a bushfire, the second burnt down by vandals, and the three burnt down in the 2009 bushfires known as 'Black Saturday'.The white cross and black fence at the lower left commemorated the remarkable fact that these remained intact after the 2009 bushfires. The red-orange can be the colour of the kinglake soil or the fires. The return of new life is indicated by the green growth on the burnt gumtrees. The presence of the Holy Trinity is shown above the entrance to the church. The return of new life is indicated by the green growth on the burnt gumtrees. The presence of the Holy Trinity is shown above the entrance to the church. The Holy Sprit is symbolized by the sulphur crested cockatoo, an Australian bird instead of the white dove. The symbol for the father is above the church in the triangle which has God's Holy Name (I AM) as given to Moses from the Burning Bush, written in Hebrew. Christ is represented by the cross above the entrance. The previous church was destroyed in the 2009 bushfires. The area is surrounded by 22,000 hectares of Kinglake National Park, the largest National Park close to Melbourne. The park was established in 1928 to protect native flora and fauna. Kinglake takes its name from Alexander Kinglake who travelled through the area in 1870. Photographs showing the newly built St Mary's Catholic Church at Kinglake. .1) Interior of Church .2) Painting of the Four Churches of Kinglake by Judy Racz .3-5) Views from the Church windows to the adjoining landscape .6) St Mary's Church groundskinglake, bushfire, black saturday, church, catholic, racz, st mary's catholic church kinglake -
 Monbulk RSL Sub Branch
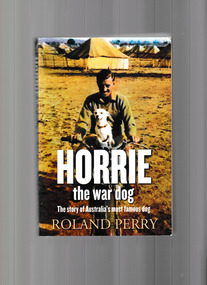
Book, Allen and Unwin, Horrie the War Dog, 2013
... brought Horrie out of hiding to raise money for the Red Cross ...In the harsh Libyan desert in the middle of the second world war, Private Jim Moody, a signaller with the First Australian Machine Gun Battalion, found a starving puppy on a sand dune. Moody called the dog Horrie. Much more than a mascot, Horrie's exceptional hearing picked up the whine of enemy aircraft two minutes before his human counterparts and repeatedly saved the lives of the thousand-strong contingent. The little Egyptian Terrier's ritual of sitting, barking, then dashing for the trenches, had the gunners running for cover before their camp was strafed and bombed. Where Moody went, Horrie went too, through the battle zones of the Middle East and far beyond. As the Japanese forces began their assault in Asia Moody and his soldier mates joined the fight, but not before they had smuggled Horrie onto a troop ship and a harrowing journey back to Australia where they thought their little friend would be safe. The war over, Moody brought Horrie out of hiding to raise money for the Red Cross, and the brave little dog's story became widely known. When quarantine officers pounced and demanded that the dog be put down there was a huge public outcry. Horrie had saved a thousand lives. How could a cruel bureaucracy heartlessly kill him? But defying the authorities would mean gaol for Moody and certain death for Horrie. Was Horrie, the gunner's hero, condemned to die or could Moody devise a scheme to save him?Ill, p.336.non-fictionIn the harsh Libyan desert in the middle of the second world war, Private Jim Moody, a signaller with the First Australian Machine Gun Battalion, found a starving puppy on a sand dune. Moody called the dog Horrie. Much more than a mascot, Horrie's exceptional hearing picked up the whine of enemy aircraft two minutes before his human counterparts and repeatedly saved the lives of the thousand-strong contingent. The little Egyptian Terrier's ritual of sitting, barking, then dashing for the trenches, had the gunners running for cover before their camp was strafed and bombed. Where Moody went, Horrie went too, through the battle zones of the Middle East and far beyond. As the Japanese forces began their assault in Asia Moody and his soldier mates joined the fight, but not before they had smuggled Horrie onto a troop ship and a harrowing journey back to Australia where they thought their little friend would be safe. The war over, Moody brought Horrie out of hiding to raise money for the Red Cross, and the brave little dog's story became widely known. When quarantine officers pounced and demanded that the dog be put down there was a huge public outcry. Horrie had saved a thousand lives. How could a cruel bureaucracy heartlessly kill him? But defying the authorities would mean gaol for Moody and certain death for Horrie. Was Horrie, the gunner's hero, condemned to die or could Moody devise a scheme to save him? animals - war use, australia - armed forces - mascots -
 Creswick Museum
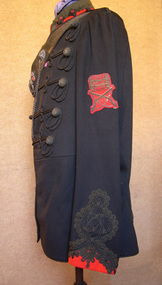
Officer's Uniform Creswick Volunteer, Circa 1880
Uniform used by Major Philip Ketch, Commanding Officer Creswick Volunteers (1883). Was on display for many years at Ballarat Ranger Barracks but at the families request returned to Creswick MuseumOnly known uniform on display of the Creswick (Ballarat) Volunteers.Creswick Volunteers Officer's Dress Tunic. Main body in black wool fabric with rounded red stand up collar and braid. Sleeves end with red wool pointed cuffs with braid. Braiding on main body of uniform. Froged with 5 rows of braid ending with netted button. On sleeve badge with crossed rifles year 1883 and above years 1880, 1881, & 1882. Leather belt across shoulder with whistle attached.volunteer uniform, creswick, philip ketch