Showing 3175 items
matching destinations
-
 Ballarat Tramway Museum
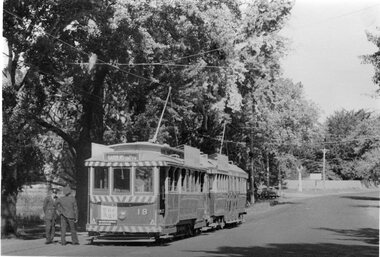
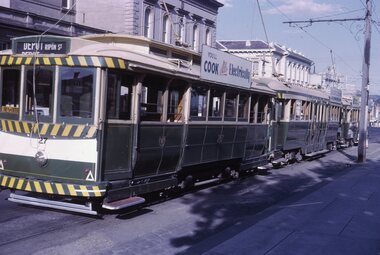
Negative, Wal Jack, between May and Oct. 1946
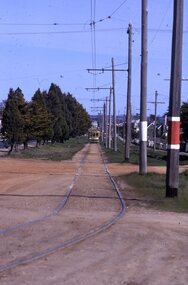
Yields information about the appearance of the Gardens area and car 16, late 1930's?Negative and Digital image of the Wal Jack Ballarat Negative file of tram No. 16 at Gardens Loop. Tram has the destination of Victoria St. Based on Wal Jack records for this car, it was painted in the SEC standard scheme without cream panels in May 1946 and numbers added Oct. 1946 - possibly soon after painting. See Reg Item 5526.trams, tramways, gardens loop, wendouree parade, tram 16 -
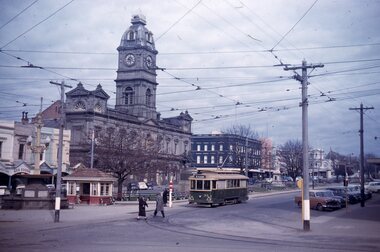 Ballarat Tramway Museum
Slide - 35mm slide/s, Noel Simons, 24/09/1958 12:00:00 AM
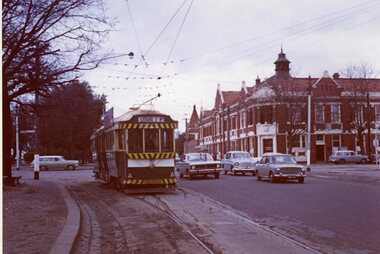
Ballarat SEC 30 at corner of Sturt and Lydiard St. 24/9/1958. No. 30 has large triangles on front dash and showing destination of "Mount Pleasant". Has Town Hall in the background and shops on the south side of Sturt St. and tramway shelter. Town Hall clock showing 930, but no cars moving in Sturt St., all parked."No. 30 in Sturt St. Ballarat at Cnr. of Lydiard St." in ink and "24 SEP 1958" stamped in red ink.tramways, trams, ballarat, sturt st., tramway centre, town hall, tram 30 -
 Ballarat Tramway Museum
Photograph - Black & White Photograph/s, Geoff Grant, 7/04/1956 12:00:00 AM
Black and white photograph of Melbourne trams 1033 (on an Australian Electric Traction Association tour) and tram 957 at the Bourke St. terminus, dated 7/04/1956. 1033 showing SPECIAL, has AETA sign and poster on rear bumper bar. Tram 957 showing destination of "Northcote - Dundas St." route "90". Tramway buildings in background.On rear stamped in bottom rh corner "Geoff Grant / 7 Apr 1956 / Victoria"trams, tramways, melbourne, bourke st, aeta, tours, tram 1033, 957 -
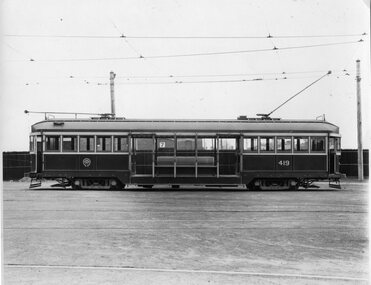 Ballarat Tramway Museum
Photograph - Black & White Photograph/s, Sutcliffe Pty Ltd, 1926
Black and white photograph of W1 419 photographed side on at South Melbourne Depot - 1926c. Photographed by Sutcliffe Pty Ltd. Assumed photograph taken soon after the tram was built in 1926. Has "Sutcliffe Pty. Ltd. Photographers Cromwell buildings 366a Bourke St. Melbourne" stamp in purple on back of photo. See Destination City, 4th Edition.On rear in pencil "W1 we have 30 of these. No more will be constructed." "M&MTB" and "41".trams, tramways, mmtb, w1 class, tram 419 -
 Ballarat Tramway Museum
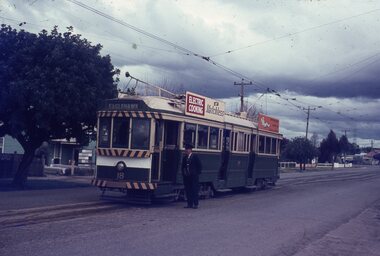
Photograph - Black & White Photograph/s, late 1960's
Black and white photograph of SEC No. 11 at the Mt Pleasant terminus, with the Conductor swinging the pole and school children boarding the tram. Destination showing "Gardens via Drummond Nth". Tram has a "Twin Lakes" sign on the front dash panel and a SEC Briquettes advertisement. Colour photocopy, laminated, of this photograph on display 5/2000 at 02-02-06trams, tramways, mt pleasant, trolley poles, twin lakes, tram 11 -
 Ballarat Tramway Museum
Photograph - Black & White Photograph/s, Dave Macartney, 21/04/1962 12:00:00 AM
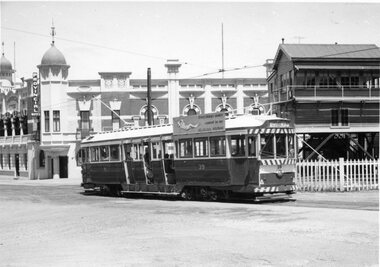
Black and white photograph for SEC trams 18 and 37 at the Carlton St. Loop, Northbound in Wendouree Parade on 21/4/1962. Tram 18 is showing destination of "Gardens via Sturt St. West". Also has an "The Age" advertisement on drivers panel. Two crew members standing alongside the tram. Can see the Olympic monument in the background.In red ink on rear of photograph in three of the four corners "18 and 37 Carlton St. 21-4-62", "Keystone Ballarat" and "Neg 662-10".trams, tramways, carlton st, wendouree parade, crossing loop, keystone, tram 18, tram 37 -
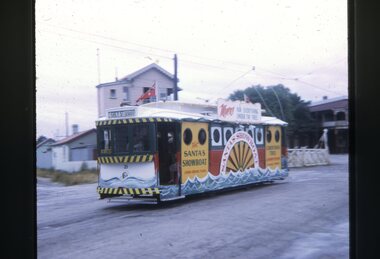 Ballarat Tramway Museum
Slide - 35mm slide/s, Mark Plummer, Dec. 1968
Photo of Ballarat tram No. 21, dressed as the Myers Santa Showboat tram, southbound in Lydiard St North during December 1968. Has the railway level crossing, Ballarat B signal box and the Victoria Guest house in the background. Tram has "Grey St." as the destination. Kodak cardboard mount slide, taken Mark Plummer, December 1968.tramways, trams, lydiard st north, railway crossing, myers santa tram, decorated trams, tram 21 -
 Ballarat Tramway Museum
Slide - 35mm slide/s - set of 3, Mark Plummer, Sep. 1971
Series of three photos of Ballarat No. 17, northbound or inbound in Albert St. Sebastopol, approaching the Ophir St. crossing of Albert St. Note tram stop signs, aerial phone lines, the condition of the track and the gravel crossings. Tram has the destination of Lydiard St. North. Kodak cardboard mount slide, taken Mark Plummer, September 1971tramways, trams, albert st, sebastopol, ophir st, tram 17 -
 Ballarat Tramway Museum
Slide - 35mm slide/s, Travis Jeffrey, c1962
Agfa plastic mount (blue base, white cover) of a photograph of No. 34 northbound, Albert St. south of Ophir St. Photo taken c1962. No. 34 has destination of "Lydiard St. Nth". Slide rescanned at 3200 dpi 24-10-2020, jpg replaced, tiff file retained. This file was scanned in 2003 and may show colour changes."BAS 28" in penciltramways, trams, sebastopol, albert st, ophir st, tram 34 -
 Ballarat Tramway Museum
Photograph - Black & White Photograph/s, Richard Gilbert, Late 1970
Black and white photograph of Ballarat tram No. 21 sitting in Gardens Loop in Wendouree Parade. Only two parked cars in the distance in the photograph. Taken late 1970. No. 21 has an SEC roof advertisement and destination of Mt. Pleasant. Gardens Kiosk in background. On reverse of photo is printing date "17.11.70". On Agfa paper. Photo taken by Richard Gilbert.On rear of photo in blue ink "R.Gilbert".trams, tramways, gardens loop, wendouree parade, tram 21 -
 Ballarat Tramway Museum
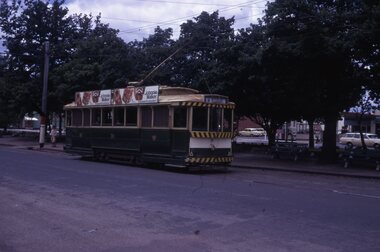
Slide - 35mm slide/s, Peter Moses, Jan. 1966
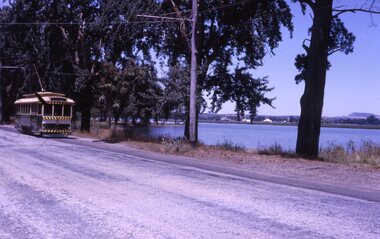
Photo of Ballarat SEC tram No. 13 west bound in Wendouree Parade, near the depot. Tram has destination of "Mt Pleasant". Lake Wendouree is in the background. Note the tram fitted with the white stripe under the dash canopy lights and the use of the large and small numbers of the tram. Kodak cardboard mount slide, taken by Peter Moses January 1966.On back of slide in blue ink "Jan. 1966 Ballarat" and bottom right hand corner "P. Moses".tramways, trams, wendouree parade, lake wendouree, tram 13 -
 Ballarat Tramway Museum
Slide - 35mm slide/s, Peter Moses, Jan. 1966
Photo of SEC Ballarat Tram No. 40, 35 and 27 at the City terminus in Sturt St. at Lydiard St. Tram 27 has destination of "Depot via Ripon St." and roof advertisements SEC "You'll cook better electrically". In the background are the Post Office and the ANZ bank buildings. Kodak cardboard mount slide, taken by Peter Moses January 1966.On back of both slides in blue ink "Jan. 1966, Sturt St. No. 35, 27" and in bottom right hand corner "P. Moses".tramways, trams, city terminus, sturt st, tram 40, tram 35, tram 27 -
 Ballarat Tramway Museum
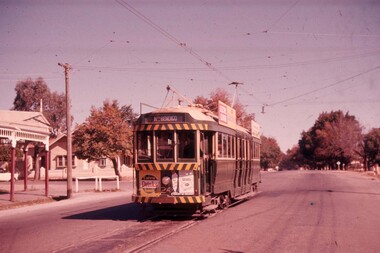
Slide - 35mm slide/s, Peter Moses, Jan. 1969
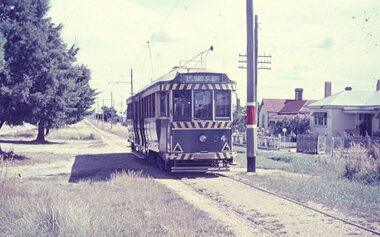
Photo of SEC Ballarat No. 31 east bound in Sturt St. with a destination of Mt. Pleasant, taken from the east of Drummond St. North. Tram about to pick up a passenger at the tram stop. Tram has two Johnnie Walker Whiskey roof advertisements. Kodak cardboard mount slide, taken by Peter Moses assumed Jan. 1969.On the rear of the slide "P. Moses" along bottom right hand corner in black ink.tramways, trams, sturt st, drummond st, tram 31 -
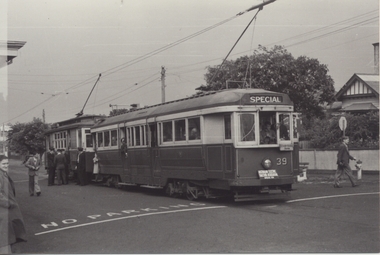
 Ballarat Tramway Museum
Photograph - Black & White Photograph/s, Geoff Grant, 25/06/1955 12:00:00 AM
Black & White photo of M&MTB trams 980 and 1001at the Bourke St. terminus (Spencer St.) while on AETA tour of 25/6/1955. 980 has "SPECIAL" destination, route number "A", AETA boards on front bumper. 1001 similar, but lettered "B". Both trams on southern track. See Reg. Item 1618 for negatives.On typed paper on rear "980 & 1001 lined up at Spencer ST terminus on AETA Bourke St. tour. June 25 1955." and "Geoff Grant" stamp in btm rh corner.trams, tramways, melbourne, bourke st., aeta, tours , tram 980, 1001 -
 Ballarat Tramway Museum
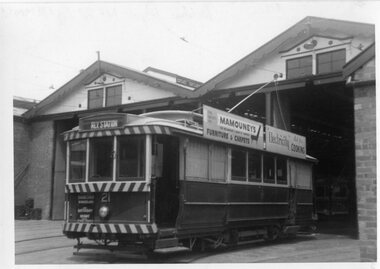
Photograph - Black & White Photograph/s, Ian Barkla, Nov. 1964
Black and white photo of Bendigo 21 at SEC depot Bendigo. Tram has been fitted with dash canopy lights, but not the enlarged white strip. Taken 11/64. Tram has destination of "Rly Station", roof ads for SEC and Mamouney's Furniture and Carpets and a small ad on the drivers cab panel for "Dancing" on Saturday night. On Kodak paper.On rear in black biro "11/64 Bendigo Dept No. 21 ex 188 MMTB"trams, tramways, bendigo, depot , tram 21 -
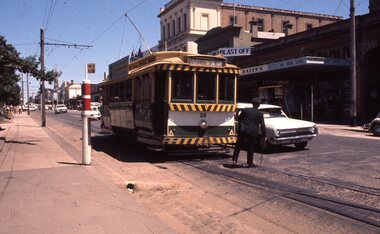
 Ballarat Tramway Museum
Photograph - Colour Photograph/s, Travis Jeffrey, 14/08/1971 12:00:00 AM
Colour photograph of Ballarat No. 41 turning from Sturt St into Drummond St. South, with the destination of Sebastopol. Tram has a SEC "Everything's under control in my all electric kitchen" roof advertisement. Photo taken at Hospital corner. Has the Ballarat Base Hospital buildings in the background. Photo on Agfa Paper and taken on Friday 14 August 1971.Stamps with faded green ink: "Photo by Chris Jeffrey / Number" with number "104PC/03" in blue ink and date stamp "Friday 14 August 1971" also in faded green ink.sturt st, drummond st sth, hospital corner, tram 41 -
 Ballarat Tramway Museum
Photograph - Colour Photograph/s, Travis Jeffrey, 14/08/1971 12:00:00 AM
Colour photograph of Ballarat No. 39 completing turning from Drummond St South into the north side of Sturt St. through the Hospital corner junction. Tram has destination of Lydiard St. Nth. Photo taken at Hospital corner. Has the Ballarat Base Hospital buildings in the background. Photo on Agfa Paper and taken on Friday 14 August 1971.Stamps with faded green ink: "Photo by Chris Jeffrey / Number" with number "104PC/06" in blue ink and date stamp "Friday 14 August 1971" also in faded green ink.sturt st, drummond st, hospital corner, tram 39 -
 Ballarat Tramway Museum
Photograph - Colour Photograph/s, Travis Jeffrey, 21/08/1971 12:00:00 AM
Colour photograph of Ballarat No. 39 westbound in Sturt St. at Dawson St. with the Golden City Hotel in the background. Tram has destination Sebastopol and SEC roof advertisement "Everything's under control in my all electric kitchen". Note red post box on corner and tram stop signage. Photo on Agfa Paper and taken on Friday 21 August 1971.Stamps with faded green ink: "Photo by Chris Jeffrey / Number" with number "104PC/20" in blue ink and date stamp "Friday 21 August 1971" also in faded green ink.sturt st, dawson st, tram stops, golden city hotel, post box, tram 39 -
 Ballarat Tramway Museum
Photograph - Black & White Photograph/s, State Electricity Commission of Victoria (SECV), late 1950's or early 1960
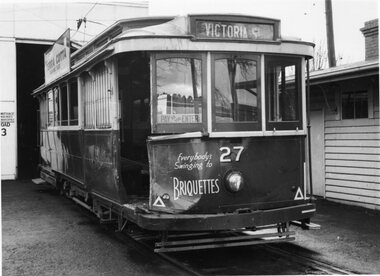
Yields information about the damage to an SEC tramcar following an accident with a vehicle. Also gives information about the way the trams appeared.Black and White photograph, of Ballarat No. 27 after being involved in an accident with damage to the doorway entry, including the removal of the door itself. Tram has the destination of Victoria St, a Terra Cotta roof tiles roof advertisement and an "Everybody's Swinging to Briquettes" dash panel ad. Photographed at the SEC depot. Photo late 1950's or early 1960.tramways, trams, accidents, collision, depot, colour schemes, tram 27 -
 Ballarat Tramway Museum
Photograph - Colour Photograph/s, John Stormont, 3/03/1968 12:00:00 AM
Demonstrates an aspect of Ballarat where trams crossed the railway level crossing in Lydiard St Nth.Colour photograph of SEC No. 11 crossing the railway level crossing Ballarat southbound in Lydiard St Nth. Shows the railway station building, the signal gantry and crossing gates. No. 11 has destination of Sebastopol, a Twin Lakes advertisement on the rear and a roof advertisement for SEC Briquettes. Photo taken 3-3-1968. On Kodak Paper. Photo by John Stormont.On rear, written on a label in ink "Car 11crossing tracks at Ballarat Station, 3 March 1968" and on the photo "John Stormont"level crossings, railway station, lydiard st nth, tram 11 -
 Ballarat Tramway Museum
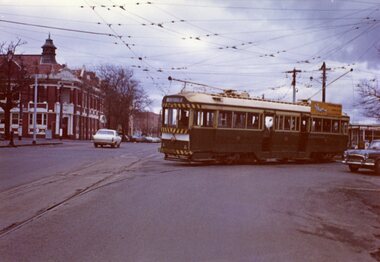
Photograph - Black & White Photograph/s, George Bishop, 1969
Black and white photograph of Ballarat No. 39 Lydiard St Nth Level crossing, heading north. Tram has destination of Lydiard St Nth, and a "Everything is under control in my all electric kitchen" roof advertisement. In the back is the Moody's Provincial Hotel, and the railway signal box. Photo by George Bishop 1969. Five copies of the photograph held.In ink or pencil "No. 39 / Ballarat tram operated by SEC 1969 / Photo G. Bishop"tramways, trams, lydiard st nth, level crossings, provincial hotel, railway crossing, tram 39 -
 Ballarat Tramway Museum
Photograph - B&W print of donated negative
Yields information about a converted Geelong Pengelly tram at the Railway Station, Yields information about a converted Geelong Pengelly tram at the Railway StationBlack and white digital print from scan of a donated negative showing a converted single truck Pengelly car at the Geelong Railway station. Has the destination of West. Photographer and date unknown. Black and White print made from scan of negative. Original Negative stored with Negatives. Image rescanned from copy neg and updated 1/6/2020.tramways, trams, geelong, railway station -
 Ballarat Tramway Museum
Slide - 35mm slide/s - set of 2, Travis Jeffrey, 12/1994 or 1/1995
Two Plastic mount (black base, white cover) slides, of No. 671 on No. 4 road of the BTM Depot, being repainted, taken by Travis Jeffrey either Dec. 1994 or Jan. 1995. Painting of the tram in Melbourne MMTB green had commenced, note colour of the destination box. The decision was made soon after to paint the tram in the City of Ballarat Colour.tramways, trams, btm depot, depot, city of ballarat, tram 671 -
 Ballarat Tramway Museum
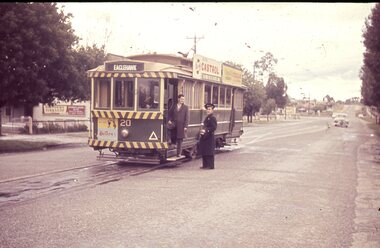
Slide - 35mm slide/s, Travis Jeffrey, c1962
Agfa plastic mount (blue base, white cover) with a photo of Bendigo 20 at the Quarry Hill terminus. Tram has the destination of Eaglehawk and has a Castrol Oil, and another company roof advertisements, with Huttons Ham advertisement on the dash panel. Conductor and another person (enthusiast) outside the tram, driver changing ends on the inside. In the background is the premises for "Northern Terrazzo"."BES 15" in penciltramways, trams, bendigo, quarry hill, tram 20 -
 Ballarat Tramway Museum
Slide - 35mm slide/s, Travis Jeffrey, c1962
Agfa plastic mount (blue base, white cover) with a photo of Bendigo No. 24 at Golden Square terminus. Tram has destination of North Bendigo. On the front dash panel is advertisement for Cohns Soft drinks and Streets Ice Cream. Roof advertisements for SEC, Electric Cooking and another one. Note empty advert racks on the left hand side of the tramcar."BES 22" in penciltramways, trams, bendigo, golden square, tram 24 -
 Ballarat Tramway Museum
Slide - 35mm slide/s, Travis Jeffrey, late 1960's or early 1970's
Agfa plastic mount (blue base, white cover) with a photo of Bendigo No. 18 at the Quarry Hill terminus, with the conductor standing by the front of the tramcar. Photo taken late 1960's early 1970's. No. 18 has the destination of Eaglehawk and two SEC roof advertisements, "Electric Cooking Matchless" and "Everything's fine in my all electric kitchen"."BES 38" in penciltramways, trams, bendigo, quarry hill, conductors, tram 18 -
 Ballarat Tramway Museum
Negative, Travis Jeffrey, 17/06/1962 12:00:00 AM
Colour Negative No. N400, of Bendigo Birney No. 28 at Pinders? loop on the Quarry Hill line with the driver standing alongside the door. Tram has the destination of Quarry Hill. Photo possibly 17/6/1962. Colour laser printed copy of image stored in box 73. Image scanned at hi res 27/5/2020 and image updated.In red pen on folder that contained negative, "NR72B" and "17 Jun 62". trams, tramways, bendigo, quarry hill, pinders loop, tram 28 -
 Ballarat Tramway Museum
Photograph - Black & White Photograph/s, Postcard, 2/04/1955 12:00:00 AM
Yields information about a Geelong tram that was later to become a Ballarat tram.Black and white print of Geelong No. 39 and a single truck tram at the Newtown terminus while operating the Australian Electric Traction Association's special tram tour of Geelong on 2/4/1955. Tram has destination of "SPECIAL" and an auxiliary board of "CHARTERED" and AETA tour board on bumper bar. See also Reg items 486 and 1549 for similar photographs.On rear in ink "Chilwell PMTT MMTB E39, Geelong 39 Ball 41"trams, tramways, geelong, aeta, newtown, tram 39 -
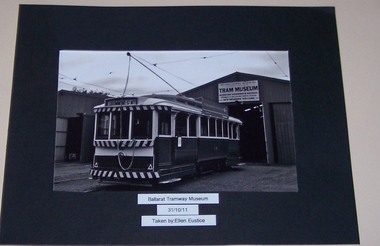 Ballarat Tramway Museum
Photograph - Black and White photograph - mounted, Ellen Eustice, 30/10/2011 12:00:00 AM
Demonstrates the work of the Ballarat Tramway Museum and has a strong association with the photographer and photo competition.Mounted digital print of SEC Ballarat Tram No. 14 outside the BTM Depot, 31/10/2011 - photographed by Ellen Eustice. Made for the Ballarat Agricultural and Pastoral Society 2011 show, printed on Fujifilm paper. Exhibit 5. Tram has the destination of Drummond St North, and the Bendigo Bank roof advertisement. Details of photograph on the front and rear of the photograph.trams, tramways, btm, depot, showgrounds, tram 14 -
 Ballarat Tramway Museum
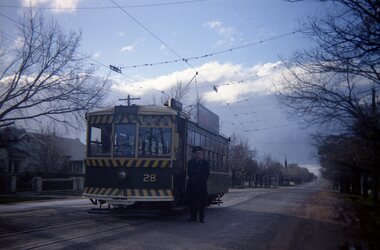
Slide - 35mm slide/s, Chas Bevan, c1970
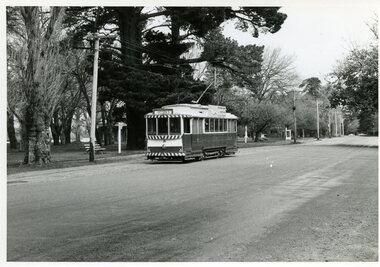
Yields information about the city junction between Sturt and Lydiard St north and demonstrates the operation at this point by a driver.Colour slide - 35mm - of Ballarat No. 28 at the junction between Sturt St and Lydiard St North, with the driver changing points for Lydiard St North. The tram has the destination for Lydiard St North. Shows the SEC offices in the background, Racey's store, the small tram stop sign and end of section sign and the motor traffic at this point. Photo by Chas Bevan."Ballarat trams" in ink.tramways, trams, lydiard st nth, sturt st, motormen, drivers, city, tram 28