Showing 2022 items matching "station building"
-
 Ballarat Tramway Museum
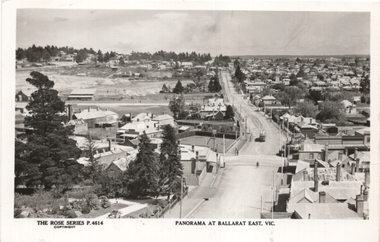
Postcard, Rose Stereograph Co, "Panorama at Ballarat East Vic", c1916
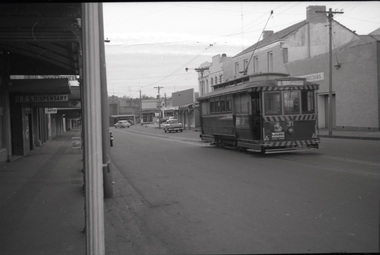
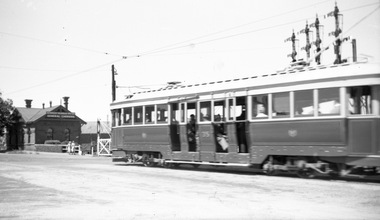
Photo looks west from the Ballarat Fire Station (East) tower, and has a good view looking along Barkly St. Shows the crossing loop between Eastwood and Main St with one tram in the view. Wal has dated the photo as 1914 in his album notes. On rear Wal Jack has written "Looking up Barkly St towards Mt Pleasant. Photo taken from Ballarat Fire Station about 1914-1916 period. Old type tram from Mt Pleasant about to turn into Main St. Note old passing loop behind tram. Loop removed to top of rise in centre background. Old Ballarat East Gardens on left and council yards, showing big tin shed in centre of picture. Locality much altered today." See item 5127 for a digital image.Yields information about the buildings and scene looking west from the Fire Station tower along Barkly St. East BallaratPostcard Black and white - Rose Series No P4614, Divided back. No publishers details on rear.See image 2 for Wal Jack's notes.tramways, trams, esco, ballarat east, barkly st -
 Ballarat Tramway Museum
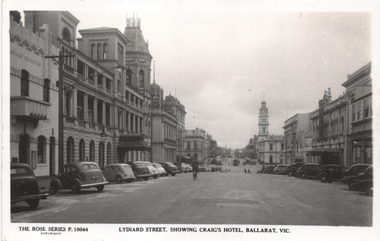
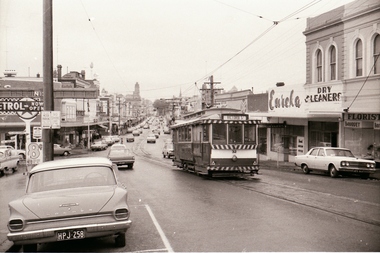
Postcard, Rose Stereograph Co, "Lydiard Street, showing Craig's Hotel, Ballarat Vic", late 1940s
The photo shows a view looking north from Lydiard St South with a tram in the far distance. Rose Series P10044. In the view are the buildings of Franklin Chambers, Craigs Hotel, and the Post Office. The Franklin Chambers Building with its Art Deco front has been refaced since this photo was taken. On the rear, Wal Jack in a note to Ken Magor has written "4-wheeler tram from Lydiard St North is about to turn left into Sturt St. Another tram seen in the background is just over the level crossing outside Ballarat Railway Station. Photo taken from Lydiard St South, about 1939-1940". Item 5463 has a poor-quality negative with a similar image to this postcard. See 8977 for a similar image also by Rose. Yields information about Lydiard St south during the 1940s.Postcard black and white, divided back, with a handwritten note on rear.See image 2 for details of the handwritten note by Wal Jack on the rear. tramways, trams, lydiard st south, criags hotel -
 Ballarat Tramway Museum
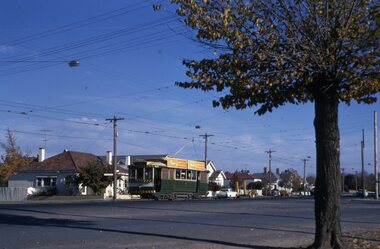
Slide - 27 mm sq slide/s - set of 7, Lilian Butler, Mt Pleasant line, Sep. 1971
Yields information about the streetscapes of Stones Corner to Mt Pleasant route and in particular buildings and people that crewed the trams.Set of seven Colour 27 x 27 mm slide in a Kodachrome cardboard mount. .1 - Tram turning onto the Mt Pleasant line at Stones Corner - Bridge St, Main Road .2 - Main Road looking south with Inland Body Works building on the left and Ampol Service Station .3 - Mt Pleasant terminus with the butcher shop on the left and the diary on the right - shows the terminating tram track .4 - Conductor changing pole. .5 - Putting pole on the overhead .6 - Conductor (D O'Leary - No. 38) standing in front of tram and Motorman or driver (N. Hall - No. 43) .7 - ditto with number visible. See Reg item 3425 for crew lists. Slide mount date September 1971. Photo from the collection of Lilian Butler.ballarat, tramways, trams, stones corner, main road, mt pleasant, crews, drivers, conductors, trolley poles, tram 41 -
 Ballarat Tramway Museum
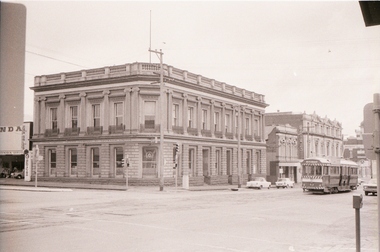
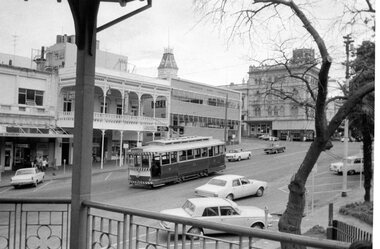
Negative - Set of 4, Campbell Duncan, 2/07/1971 12:00:00 AM
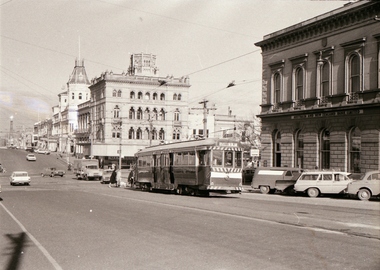
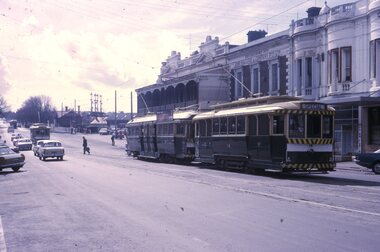
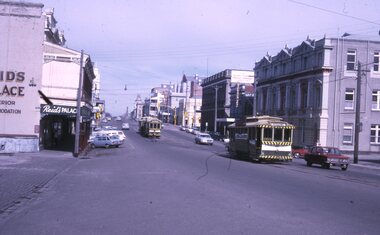
Set of 4 photographs taken on 28/2/1971 by Campbell Duncan of trams on the Lydiard St North line between Sturt St and the Railway Station. .1 - No. 40 just after entering Lydiard St Nth, with Craigs Hotel, National Mutual Building and the ANZ bank in the background. .2 No. 36 entering the double track near the railway station with No. 40 waiting. Has buildings on the east side of the street, including JJ Coller & Co and Reid's Coffee Palace in the background. .3 - ditto .4 - Nos 36 and 40 crossing on the double track in Lydiard St North,trams, tramways, lydiard st north, tram 36 tram 40 -
 Ballarat Tramway Museum
Negative - Set of 5, Campbell Duncan, 2/07/1971 12:00:00 AM
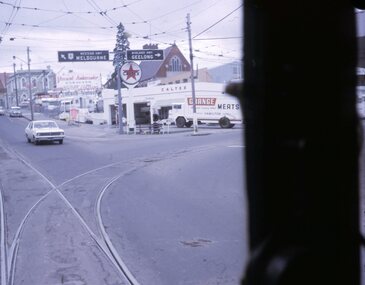
Yields information about tram operations and the street views at Stones Corner.Set of 4 photographs taken on 28/2/1971 by Campbell Duncan of trams at Stones Corner - Bridge St, Victoria St and Main Road. .1 - No. 32 leaving Bridge St, climbing Victoria St, for Victoria St. In the view are Eureka Dry Cleaners, Caltex Service Station, Stones Corner and a busy Bridge St. .2 - No. 27? City bound in Bridge St with Stones Corner buildings, K&O (Digger) Schonell Sports Cycles Electrical store, Kodak, Gear Chemist, State Savings Bank of Victoria. .3 - No. 34 for Mt Pleasant, as above and with H. Whitefield Hair Dresser shop in the view. .4 - ditto with tram at the junction and a passenger alighting. .5 - ditto with tram turning the corner for Mt Pleasant.trams, tramways, bridge st, stones corner, victoria st, tram 32 tram 27? tram 34 -
 Ballarat Tramway Museum
Negative - Set of 2, Campbell Duncan, 10/08/1971 12:00:00 AM
Yields information about tram operations and the street views in Lydiard St near the railway station.Set of 2 photographs taken on 10/8/1971 by Campbell Duncan of trams in Lydiard St North. .1 - No. 43 inbound at Mair St with the Union Fidelity Insurance Company of Australasia Limited building in the background. Note the street fire alarm on the right hand side of the photograph. .2 - No. 34, outbound at Seymour St photographed through the verandah supports of the North Star Hotel - now (2016) Seymour's on Lydiard.trams, tramways, lydiard st north, traffic lights, mair st, seymour st, tram 43 -
 Ballarat Tramway Museum
Photograph - Digital image Set of 10, George Coop, 1968 - 1970
Yields information about the tram operations and the landscape views of the Sturt St median strip.Ten (10) Digital images taken by George Coop during the period 1968 - 1970, of SEC trams in Sturt St, between the City and Pleasant Streets. .1 - Tram 26 climbing the Sturt St hill to Lydiard St, with the Cook's Private Hotel, the Commonwealth Bank and the National Mutual Life building in the background. Photo taken from the Titanic Bandstand. .2 - Tram 40 Sturt St, enough to Lydiard St North just before Raglan St. Has a lady passenger by the tram stop. .3 - Tram 30 - Sturt St north side, near Armstrong St, - has a blue framing line around the photograph. .4 - Tram 39, Sturt St, near Doveton St, shows the rotunda in the median strip. .5 - Tram 18, with median step in view. .6 - Tram 31, with two Johnnie Walker whiskey roof adverts, outside the National Mutual Life building with the Alan Bros Jewellers and Golden Star Chinese Cafe in the view. .7 - Tram 31, Sturt St south side with Town Hall and the Golden City Hotel in the view. Tram has destination of Gardens via Drummond North. .8 - Tram 41 - ditto - going to Sebastopol. .9 - Tram 13, south side, Gardens via Sturt West, about , near Ripon St, with the Ampol service station in the background and about to pick up a lady passenger .10 - Tram 17, near Doveton St. Has a Twin Lakes sign and a Wilkinson Sword Razor Bladese roof advert. trams, tramways, sturt st, raglan st, passengers, doveton st, tram 26, tram 40, tram 30, tram 39, tram 18, tram 31, tram 41, tram 13, tram 17 -
 Ballarat Tramway Museum
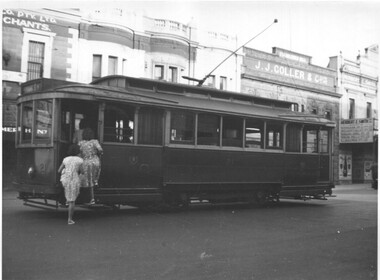
Photograph - Black & White Photograph/s, Charles Craig, early 1950's?
Yields information about the use of the trams and the appearance of Lydiard St North buildings during the early 1950's.Photograph of No. 21, in Lydiard St North, near the Railway Station, boarding two lady passengers. Has J. J. Coller & Co. building and the Hersert E Smith building and sign in the view. Early 1950's? photo by Charles Craig. trams, tramways, lydiard st north, tram 21 -
 Ballarat Tramway Museum
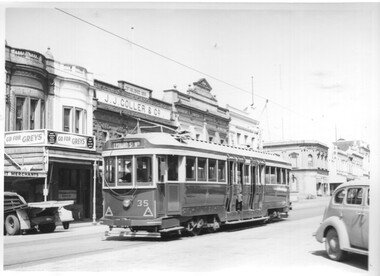
Photograph - Black & White Photograph/s, Charles Craig, 1950's
Yields information about the use of the appearance of tram 35 and Lydiard St North between Mair St and the railway station during the late 1950's.Black and white photograph of Ballarat tram 35, northbound in Lydiard St North with the J J Coller & Co building, Herbert E Smith Merchant in the background. Advert for Greys cigarettes in the view. The buildings on the corner of Mair St are in the view as well. Photo by Charles Craig possibly late 1950's. trams, tramways, lydiard st north, mair st, tram 35 -
 Ballarat Tramway Museum
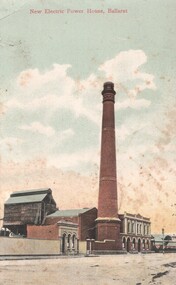
Postcard, "New Electric Power House Ballarat", c1905
Colour postcard of the ESCo power station in Ripon St and Wendouree Parade, titled "New Electric Power House Ballarat". Shows the chimney, buildings and the cooling tower facility. Later known as Ballarat A Divided back with space for correspondence and address. No details as to printing.trams, tramways, ballarat a power station, power station, esco, chimney stack -
 Ballarat Tramway Museum
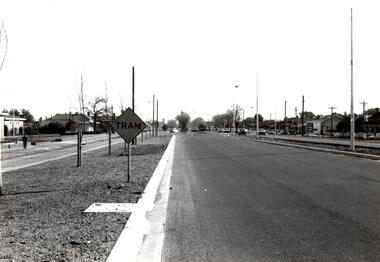
Photograph - Black & White Photograph/s - set of 5 - tram operations on the Victoria St, Richard Gilbert, c August 1971
Yields information about the appearance of the Victoria St line shortly before the closure of the Victoria St line. Series of 5 Black and white photographs of tram operations on the Victoria St line prior to its closure in August 1971. .1 - View of the Victoria St terminus as you arrive in Ballarat from Melbourne, with the divided highway and a tram warning sign. Has a tram at the terminus. .2 - Tram 39, running a special tour with St Alipius church in the background. A new bus stop sing has been positioned. Another tram has departed the King St loop. .3 - No. 13, (Gardens via Sturt St West and a Twin Lakes sign) entering the King St loop. .4 - No. 31 (to Gardens crossing No. 39) at the King St loop. .5 - No. 31 leaving Stones Corner for Victoria St with Stones Corner building in the background along with the Caltex service station and Viscount Ambassador caravans.trams, tramways, victoria st, king st, stones corner, tram 39, tram 13, tram 31 -
 Ballarat Tramway Museum
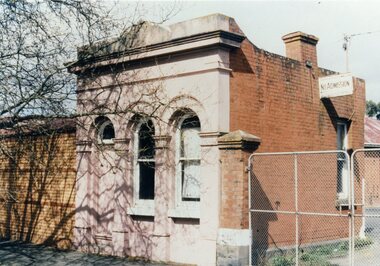
Photograph - Colour Photograph/s, Alan Bradley, Nov. 1993
Set of three colour photographs of buildings and demolition of the former ESCo / SECV Wendouree Parade Power station sent to the Editor of Trolley Wire - used in the November 1997 issue of Trolley Wire. All photos by Alan Bradley. Photos taken during November 1993 or March 1994. All photos on AGFA paper. 1140.1 - The gate house building in Wendouree Parade - Nov. 1993 - used on page 21 of Nov. 1997 Trolley Wire. 1140.2 - Foundation stone - 23/8/1904 - of the ESCo power house. Gives names of people involved and contractors etc. - used on page 20 of Trolley Wire. Taken during November 1993. 1140.3 - Demolition work well advanced showing foundations and basement areas of power station - taken during March 1994. Used on page 25 of Trolley Wire. Hi res image of i2 added 16-12-2015. All have yellow stickers with photo number for magazine printer, and white sticky labels with photo number and words "same size" written on black ink. 1140.1 and 1140.2 have pencil cropping marks.trolley wire, esco, power station, demolition -
 Ballarat Tramway Museum
Photograph - Black & White Photograph/s - set of 4, Richard Gilbert, 20/08/1971 12:00:00 AM
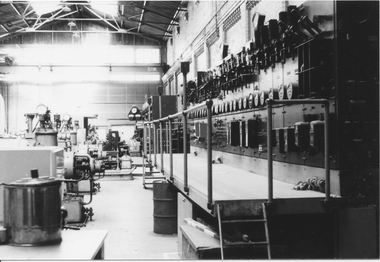
Set of four black and white photographs of interior and equipment of the former ESCo / SECV Wendouree Parade Ballarat A power station sent to the Editor of Trolley Wire - used in the November 1997 issue of Trolley Wire. All photos by Richard Gilbert. Photos taken on 20/8/1971. All photos on Kodak paper. 1144.1 - Looking along building at main distribution switch panel - used on page 24 of trolley wire. 1144.2 - a view across the main steam generator section of the power station - and AC plant - used on page 23. 1144.3 - of the British Thomson Houston rotary converters in used at the time of the photo - used on page 23. 1144.4 - a view from the opposite end of the building shown in 1144.1 - showing the rotary converters are in the front of the photo, AC generators in the middle and foreman's cabin - used on page 22. All have yellow stickers with photo number for magazine printer, and white sticky labels with photo number and words "photo xx same size" written on black ink and photo numbers in pencil from Richard.trams, tramways, trolley wire, esco, power station, ballarat a power station, rotary converters -
 Ballarat Tramway Museum
Slide - 35mm slide/s - set of 5, Noel Simons, 19/11/1962 12:00:00 AM
Set of 5 transparencies taken on 19/11/1962 on Kodak mounts. 1186.1 - Bendigo 21 bound for Golden Square at Charing Cross with The Beehive buildings and shops in Pall Mall in the background. Trams has an ad for Cohns drinks on front bumper, SEC Best for Cooking roof ad. and Mamouney's furniture roof ad. Two women passengers boarding. 1186.2 - Bendigo 26 crossing Pall Mall from Mitchell St. bound for Eaglehawk with "Ezywalkin" shop in background. Tram has an SEC 'Electric Cooking' roof ad and a 'Streets Ice cream' ad on front dash. 1186.3 - Bendigo 7 arriving at the Charing Cross stop, bound for North Bendigo. Has a Huttons dash panel ad, a Castrol roof ad. Buildings as for 1186.1. Passengers waiting at the stop. 1186.4 - Bendigo 19 leaving Charing Cross for Golden Square with City Club Hotel alongside and other buildings as for 1186.1 in the background. Tram has Briquettes ad on front dash and SEC 'Electric Cooking' roof ad. 1186.5 - Bendigo 21in High St. at corner of Short St. heading for Charing Cross. Destination half way between Depot and Railway Station. Tram has ads for Cohns Drinks on dash panel, SEC 'Cook with Electricity' and a Sandhurst Milk roof ads.Information written on in black ink and date stamped in purple ink. 1186.1 - "No. 21 in Pall Mall at Charing Cross, Bendigo" 1186.2 - "No. 26 arriving at Alexandra Fountain, Charing Cross, Bendigo" 1186.3 - "No. 7 in Pall Mall at Charing Cross, Bendigo" 1186.4 - "No. 19 in High St., Bendigo, leaving Charing Cross for Golden Square" 1186.5 - "No. 21 in High St. Bendigo, at corner of Short St." tramways, trams, bendigo, charing cross, pall mall, high st., tram 7, tram 19, tram 21, tram 26 -
 Ballarat Tramway Museum
Slide - 35mm slide/s - set of 24, Noel Simons, 20/05/1971 12:00:00 AM
Set of 24 transparencies taken on 20/5/1971 on Kodak mounts. 1195.1 - Bendigo 19 arriving at Charing Cross en route to North Bendigo with Fountain Plaza and the City Family Hotel in the background. No. 19 has two roof ads for the SEC. -'Electricity better for cooking' and 'Everything's under control in my all electric kitchen' 1195.2 - as above, but standing at the Charing cross stop, with the Beehive Stores and other buildings along the east side of Pall Mall in the background. 1195.3 - No 21 ex Golden Square crossing View St. trackwork in front of No. 25 waiting to depart for Quarry Hill. No.21 has two roof ads (as for No.19 in 1195.1) and No.25 has one SEC roof ad and another. Ezywalkin sign in the background, and Fountain Plaza. 1195.4 - as for 1195.3, but after 21 has arrived and 25 left for Quarry Hill. Has Ezywalkin store and the Beehive store in the background. 1195.5 - No. 5 at the Eaglehawk terminus. Photo taken with a cannon in foreground looking along High St. Eaglehawk. Has shops on the west side of High St. in the background. 1195.6 - No. 5 at the Eaglehawk terminus, close up of the rear of the tram - note tow bar arrangement. Has destination of Quarry Hill. 1195.7-Nos.25 and 5 crossing at the Thorpe St. Loop, California Gully. No. 25 bound for Eaglehawk (has SEC Briquette and electric cooking roof ads) and 5 en route for Quarry Hill with a SEC and Cinzano roof ad. 1195.8 - as for 1195.7, but after trams have passed each other. Has Borough Auto Service building in the background. 1195.9 - No. 5 in Mt Korong Road, towards Bamard Street, photo taken after tram has passed photographer. 1195.10 - No. 30 at the Golden Square terminus with the Milk Bar on the right hand side of the photograph. 1195.11 - No. 30 inbound at Fire Station Loop, High St. Golden Square. Has old fire station in the background. Passengers are boarding the tramcar. 1195.12 - No. 30 in High St, bound for North Bendigo between Vine and Wattle Streets. 1195.13 - No. 5 bound for Eaglehawk waits at Iron Bark Gully Loop, at Hayes St. 1195.14 - No. 5 and No. 2 crossing at Iron Bark Gully Loop. 1195.15 - No. 5 bound for Eaglehawk leaving the Manchester Loop, Long gully. 1195.16 - No. 5 passing William Street, Long Gully en route to Eaglehawk. 1195.17 - No. 5 just before the California Gully Crossing Loop. 1195.18 - Nos. 5 and 26 crossing at California Gully crossing Loop. No. 5 heading to Eaglehawk, 26, Quarry Hill. 1195.19 - No. 5 in High St. Eaglehawk with Bob Moyle's Victoria Hotel and the TAB in the background. 1195.20 - No. 5 in High St. Eaglehawk approaching the terminus. Photo taken after the tram has passed the photographer. Has Foodland store and J. Best Fruit supply in the background, along with Eaglehawk Town Hall. 1195.21 - No. 5 at the Eaglehawk terminus, photo taken along seldom used track along High St. 1195.22 - as for 1195.22 - but at the very end of the track. 1195.23 - No. 5 en route for Quarry Hill climbs High St. Eaglehawk with the Victoria Hotel and Eaglehawk Town Hall in the background. 1195.24 - No. 5 and 25 crossing at Jobs Gully Loop. Note 25 has a black on white destination roll, while No. 5 has a white on black destination roll. Information written on in black ink and date stamped on purple ink. 1195.1 - "No. 19 arrives at Charing Cross Bendigo from Golden Square" 1195.2 - "No. 19 about to leave Charing Cross for North Bendigo" 1195.3 - "No. 25 awaiting departure for Quarry Hill, watches No. 21 arrive at Charring Cross from Golden Square" 1195.4 - "No. 21 on North Bendigo service and No. 25 on Quarry Hill run await departure at Charing Cross" 1195.5 - "No. 5 at Eaglehawk terminus" 1195.6 - "No. 5 at Eaglehawk terminus" 1195.7 - "Nos. 5 and 25 crossing at Thorpe St. Loop, California". 1195.8 - "Nos. 25 and 5 crossing Thorpe St. Loop, California Gully". 1195.9 - "No. 5 descending Mt Korong Rd. towards Bamard St." 1195.10 - "Birney car No. 30 at Golden Square terminus" 1195.11 - "Birney car No. 30 in High Street near Thistle Street (Fire Station Loop)" 1195.12 - "No. 30 in High St. between vine and Wattle Streets" 1195.13 - "No. 25 at Hayes Street Loop Iron Bark". 1195.14 - "Nos. 2 and 5 crossing at Hayes Street Loop Iron Bark" 1195.15 - "No. 5 at Manchester Loop opposite Havilah Road, Long Gully" 1195.16 - "No. 5 passing William Street, Long Gully". 1195.17 - "No. 5 at California Gully" 1195,18 - "Nos. 26 and 5 at Thorpe St. Loop, California Gully". 1195.19 - "No. 5 in High St. Eaglehawk". 1195.20 - "No. 5 approaching Eaglehawk terminus" 1195.21 - "No. 5 at Eaglehawk terminus" 1195.22 - "No. 5 at Eaglehawk terminus" 1195.23 - "No. 5 in High St. Eaglehawk" tramways, trams, bendigo, charing cross, eaglehawk, california gully, golden square, iron bark gully, jobs gully, tram 2, tram 5, tram 19, tram 21, tram 25, tram 26, tram 30 -
 Ballarat Tramway Museum
Slide - 35mm slide/s - set of 4, Noel Simons, 24/05/1971 12:00:00 AM
Set of 4 transparencies taken on 24/5/1971 on Kodak mounts. 1199.1 - No. 21 in High St. at junction with old High St., near Fire Station Loop. Tram has two SEC roof ads. 1199.2 - No. 21 in High St. between Shamrock and Thistle Sts. Photo taken after the tram has passed the photographer. 1199.3 - Photo of a green box containing timetables for the four Bendigo routes. Located at Charing Cross. 1199.4 - Bendigo No. 23 en route to Eaglehawk at Charing Cross, with two SEC roof ads 'Everything's fine in my all electric kitchen' and "Switch to electric cooking'. Has the Ezywalkin building and the Beehive building in the background. Information written on in black ink and date stamped on purple ink. 1199.1 - "No. 21 in High St. at junction with old High St., near Fire Station Loop." 1199.2 - "No. 21 in High St. between Shamrock and Thistle Sts." 1199.3 - "Bendigo Tramways timetable at Alexandra Fountain Charing Cross." 1199.4 - "No. 23 at Alexandra Fountain Charing Cross, Bendigo." tramways, trams, bendigo, timetables, charing cross, high st., tram 21, tram 23 -
 Ballarat Tramway Museum
Slide - 35mm slide/s - set of 13, Noel Simons, 24/05/1971 12:00:00 AM
Set of 13 transparencies taken on 24/5/1971 on Kodak mounts. 1200.1 - No. 7 en route to Golden Square turning from Bridge St. into Nolan St. Photo taken after tram has passed photographer. Tram has a briquettes roof ad. 1200.2 - No. 21 in McCrae St. just before Nolan St. Photo taken after tram has passed photographer. 1200.3 - No. 7 in Nolan St at corner with McCrae St. Passenger boarding tram at a tram stop. 1200.4 - No 7 turning from Nolan into McCrae St. with Golden Fleece service station in background. 1200.5 - No. 7 in Thunder St en route to North Bendigo. Photo taken after tram has passed photographer. 1200.6 - No. 5 en route to Eaglehawk just after leaving Needle Loop between Long Gully and California Gully. 1200.7 - No. 5 at the start of the double track in High St. Eaglehawk. 1200.8 - No. 5 at Eaglehawk terminus showing "Depot" with Leo A Hughes Photographer advertisement on building in background. 1200.9 - No. 5 at Eaglehawk terminus. Has two SEC roof ads 'Everything's fine in my all electric kitchen' and 'Electricity best for cooking'. 1200.10 - No. 5 at Eaglehawk terminus, with canon, war memorial outside Town Hall and Leo A Hughes Photographer advertisement on building in background. 1200.11 - No. 5 in McCrae St. about to enter Arnold St. and depot. Tram showing depot, has driver changing points. 1200.12 - No. 5 in Arnold St. Photo taken looking up the centre of the access track - shows the overhead at depot junction. 1200.13 - Depot entrance with signage at depot entrance and depot building in background.Information written on in black ink and date stamped on purple ink. 1200.1 - "No. 7 entering Nolan St. from Bridge St." 1200.2 -"No. 21 in McRae St. about to turn into Nolan St." 1200.3 - "No. 7 in Nolan St. at corner of McRae St." 1200.4 - "No. 7 turning from Nolan St. into McRae St." 1200.5 - "No. 7 in Thunder St. just after turning from Caledonia St." 1200.6 - "No. 5 just after leaving Needle Loop between Long Gully and California Gully. 1200.7 - "No. 5 in High St. Eaglehawk at start of double track." 1200.8 - "No. 5 at Eaglehawk terminus" 1200.9 - "No. 5 at Eaglehawk terminus" 1200.10 - "No. 5 at Eaglehawk terminus."\ 1200.11 - "No. 5 in McCrae St. about to enter Arnold St." 1200.12 - "No. 5 in Arnold St." 1200.13 - "Entrance to Bendigo Tram Depot, No. 5 running into shed."tramways, trams, bendigo, mccrae st, north bendigo, california gully, eaglehawk, depot, tram 5, tram 7, tram 21 -
 Ballarat Tramway Museum
Slide - 35mm slide/s - set of 32, Noel Simons, 25/02/1971 12:00:00 AM
Set of 31 transparencies taken on 25/2/1972 on Kodak mounts. 1201.1 - Bendigo No. 26 in Bond St. just after leaving Long Gully en route for Quarry Hill. Has Norris Supermarket in background. Has two SEC roof ads. 1201.2 - No. 26 climbing View St. from Charing Cross en route to Eaglehawk. Has ANZ bank and AMOCO service station in background. 1201.3 - as for 1201.3, but after tram has passed photographer. Has buildings west of Mackenzie St. in photograph. 1201.4 - Tram stop and centre of the road pole with two "CARS STOP BY REQUEST" signs mounted on pole at the corner of Mackenzie St. 1201.5 - same position as for 1201.3, but with No. 5 descending the street. 1201.6 - same position as for 1201.2, but with No. 5 descending the street. Photo taken after tram has passed photographer. 1201.7 - No. 7 in Nolan St. from across the park at Lake Weeroona. 1201.8 - No. 7 entering McCrae St from Nolan St. - distant view. Note "TRAM "sign on left hand side under tree and overhead in McCrae St. from former track that once was in this street. 1201.9 - No. 7 in High St. with Cathedral in background. Tram en route to North Bendigo. Note scaffolding around Cathedral main spire area. 1201.10 - No. 7 crossing Bendigo Creek bridge in High St. near Golden Square. Has a Caltex Service station in the background. 1201.11 - No. 7 at Golden Square terminus with Sunburst Fruit Juices and a Peters Ice cream delivery vans alongside. 1201.12 - as for 1201.11 but photo taken from behind tram, with the end of the rails in the photograph. 1201.13 - No. 7 and 21 in Pall Mall at Charing Cross with No. 5 in the background. Taken some distance away from the location. 1201.14 - No. 7 at Golden Square terminus, taken a short distance from the tram terminus. Shows Milk Bar on right hand side and the hotel on the left hand side. Taken from the south side of the roadway. 1201.15 - as from 1201.14 but taken from the north side of the roadway. 1201.16 - No 5 waiting at California Gully loop. Distant photo showing surrounds 1201.17 - No. 5 en route for Quarry Hill crossing No. 26 at California Gully. 1201.18 - No. 26 at Eaglehawk terminus with Eaglehawk Town Hall and Post Office in background. 1201.19 - No. 21 arriving at Charing Cross en route to North Bendigo. Has Alexandra Fountain in the background, ANZ bank RACV building, and other buildings on the north side of Pall Mall or Nolan St. 1201.20 - No. 26 en route for Quarry Hill at Charing Cross, with crew standing by front door. Has Colonial Mutual life building, Armstrong Tyre Service (Firestone) and a sign for Cohns Drinks in the background. 1201.21 - as for 1201.20 but with No. 5 en route to Eaglehawk now in photograph. 1201.22 - No. 26 at Quarry Hill terminus. 1201.23 - No. 26 at Quarry Hill terminus, view of front portion of tram only from a gate at the Bendigo cemetery. 1201.24 - Track at the end of the Quarry Hill line showing the point blades of the former "Y" terminus and the overhead for this. 1201.25 - No. 2 at the Quarry Hill terminus, looking along the former Trackwork. 1201.26 - as for 1201.25 1201.27 - number not used. 1201.28 - Golden Square terminus from some distance from the actual terminus, showing the Warning sign "TRAM" for motorists from the south. No. 7 at the terminus. 1201.29 - No. 7 passing through the Golden Square shopping centre. Numerous cars and pedestrians. Tram en route for North Bendigo. 1201.30 - No. 7 in High St. Golden Square, en route for North Bendigo. Photo taken after tram has passed photographer. 1201.31 - No. 7 in High St. just past Wattle St. with the Cathedral in the background. Tram has two SEC roof ads good side on photo, 'Everything's fine in my all electric kitchen' and 'Electrical cooking - clean, quick, economical'. 1201.32 - No. 7 in High St. nearing Wattle St. Has Cathedral in the background. Photo taken after tram has passed photographer.Information written on in black ink and date stamped on purple ink. 1201.1 - "No. 26 in Bond St just after leaving Long Gully" 1201.2 - "No. 26 climbing View St. from Charing Cross" 1201.3 - "No. 26 ascending View St. from Charing Cross (At Mackenzie St.)" 1201.4 - "View St. & Mackenzie St." 1201.5 - "No. 5 in View St. near Mackenzie St." 1201.6 - "No. 5 in View St. nearing Charing Cross." 1201.7 - "No. 7 in Nolan St. seen from Lake Weeroona Park." 1201.8 - "No. 7 entering McRae St. from Nolan St. Note "TRAM" warning sign on left. 1201.9 - "No. 7 in High St. passing Short St." 1201.10 - "No. 7 crossing Bendigo Creek bridge in High St. near Golden Square." 1201.11 - "No. 7 at Golden Square terminus" 1201.12 - "No. 7 at Golden Square terminus" 1201.13 - "No 7, 21 and 5 at Charing Cross" 1201.14 - "No. 7 at Golden Square terminus" 1201.15 - "No. 7 at Golden Square terminus" 1201.16 - "No 5 waiting at California Gully loop." 1201.17 - "Nos. 5 and 26 crossing at California Gully loop" 1201.18 - "No. 26 at Eaglehawk terminus" 1201.19 - "No. 21 arriving at Charing Cross from Golden Square" 1201.20 - "No. 26 at Charing Cross" 1201.21 - "Nos. 5 and 26 at Charing Cross." 1201.22 - "No. 26 at Quarry Hill terminus" 1201.23 - "No. 26 at Quarry Hill terminus seen through the gates of the Bendigo Cemetery." 1201.24 - "Quarry Hill terminus showing remains for former double track layout abandoned before 1964." 1201.25 - "No. 2 at Quarry Hill terminus" 1201.26 - "No. 2 at Quarry Hill terminus" 1201.28 - "The Southern approach to Golden Square with No. 7 standing at the terminus, "TRAM" warning sign on the left. 1201.29 - "No. 7 passing through Golden Square Shopping Centre" 1201.30 - "No. 7 in High St. Golden Square" 1201.31 - "No. 7 in High St. passing Wattle St." 1201.32 - "No. 7 in High St. nearing Wattle St."tramways, trams, bendigo, bond st., view st., nolan st., high st., eaglehawk, california gully, charing cross, quarry hill, trackwork, tram 2, tram 5, tram 7, tram 21, tram 26 -
 Ballarat Tramway Museum
Slide - 35mm slide/s - set of 25, Noel Simons, 26/02/1972 12:00:00 AM
Set of 25 transparencies taken on 26/2/1972 on Kodak mounts. 1204.1 - Bendigo No. 5 - just arrived at Manchester Loop near Havilah Road, Long Gully. Photo taken after tram has passed photographer. 1204.2 - No. 26 in Backhaus St. Long Gully passing William St, en route to Quarry Hill. Photo taken after tram has passed photographer. 1204.3 - No. 5 climbing the High St. Hill Eaglehawk, heading for Quarry Hill with the buildings on the West side of High St. in the background, including the Eaglehawk Town Hall. 1204.4 - as for 1204.3, but tram close up. 1204.5 - as for 1204.3, but after tram has passed photographer. 1204.6 - No. 5 at intersection of Mt Korong Road Ironbark and Calder Highway, with the AMPOL service 'station in the background. Photo taken after tram has passed photographer. 1204.7 - No. 26 en route to Quarry Hill shortly after leaving Needle Loop, passing William St., Long Gully. 1204.8 - No. 5 at California Gully Loop, picking up a passenger, with the shops at Long Gully in the background. Photo taken after tram has passed photographer. 1204.9 - No. 5 in Long Gully, en route to Quarry Hill. Photo taken after tram has passed photographer. 1204.10 - No. 2 at Eaglehawk terminus with the Eaglehawk Town Hall and Post Office in the background. Tram has two SEC roof ads. 1204.11 - No. 2 at Eaglehawk terminus, close up. 1204.12 - as for 1204.11, but through the park gates. 1204.13 - as for 1204.11, but with tram stop shelters in the foreground and buildings on the West side of High St in the background. 1204.14 - No. 2 in Mt. Korong Rd, midway between California Gully Loop and Needle Loop. Photo taken after tram has passed photographer. 1204.15 - No. 5 in Long Gully, en route to Quarry Hill. 1204.16 - as for 1204.15, but with trams departed loop. Has an ESSO service station in the background. 1204.17 - No. 26 leaves Charing Cross up View St.. Photo taken after tram has passed photographer. Has Armstrong Tyre Service, Cohns Drinks ad on a building and the T&G building in the background. Also Firestone ads on the tyre service building. 1204.18 - No. 5 waits at Charing Cross with the Alexandra Fountain in the background. Tram has two SEC roof ads, 'Everything s fine in my all electric kitchen' and 'Electricity Best for Cooking'. Has RACV, Colonial Mutual Life buildings in the background and the planting areas around Charing Cross gardens in the foreground. 1204.19 - No. 21 en route to North Bendigo arrives at Charing Cross, with passengers waiting to board. No. 5 in the background. In the background is the Fountain Gate Plaza building and the City Family Hotel. 1204.20 - as for 1204.19, but with No. 7 en route to Golden Square. 1204.21 - as for 1204.19, but closer up. 1204.22 - as for 1204.18 1204.23 - No. 25 in Nolan St. near the crossing of Bendigo Creek, running a special tram tour. 1204.24 - No. 25 on a special charter, in Weeroona Ave. at Cnr of Caledonia St. passing the Gas works. 1204.25 - Nos. 25 (showing Golden Square), 7 and 26 at Charing Cross. Has fountain in the background.Information written on in blue ink and date stamped on purple ink. 1204.1 - "No. 5 at Manchester Loop, near Havilah Rd. Long Gully." 1204.2 - "No. 26 in Backhaus St. Long Gully passing William St." 1204.3 - "No. 5 in High St. Eaglehawk." 1204.4 - "No. 5 in High St. Eaglehawk." 1204.5 - "No. 5 in High St. Eaglehawk." 1204.6 - "No. 5 in Mt. Korong Rd., Ironbark, passing Calder Highway Junctn." 1204.7 - "No. 26 shortly after leaving Needle Loop, passing William St., Long Gully. No. 5 cresting hill in distance." 1204.8 - "No. 5 at California Gully Loop." 1204.9 - "No. 5 in Long Gully" 1204.10 - "No. 2 at Eaglehawk terminus." 1204.11 - "No. 2 at Eaglehawk terminus." 1204.12 - "No. 2 at Eaglehawk terminus." 1204.13 - "No. 2 at Eaglehawk terminus." 1204.14 - "No. 2 in Mt. Korong Rd, midway between California Gully Loop and Needle Loop. 1204.15 - "Nos. 2 and 26 crossing at Long Gully." 1204.16 - "No. 26 leaves Long Gully loop for Eaglehawk as No. 2 pulls out of the far end towards Bendigo" 1204.17 - "No. 26 beginning the climb up View St. from Charing Cross." 1204.18 - "No. 5 at Charing Cross." 1204.19 - "No 21 arrives at Charing Cross from Golden Square while No. 5 awaits departure time for Eaglehawk." 1204.20 - "Nos. 7, 21, and 2 (behind which is No. 5) at Charing Cross." 1204.21 - "Nos. 7, 21, and 2 at Charing Cross." 1204.22 - "No. 5 at Charing Cross." 1204.23 - "No. 25 in Nolan St. near Bendigo creek crossing" 1204.24 - "No. 25 in Weeroona Ave. at cnr of Caledonia St." 1204.25 - "Nos. 25, 7, 26 and 2 (behind 26) at Charing Cross."tramways, trams, bendigo, eaglehawk, long gully, california gully, charing cross, north bendigo, tram 2, tram 5, tram 7, tram 21, tram 25, tram 26 -
 Ballarat Tramway Museum
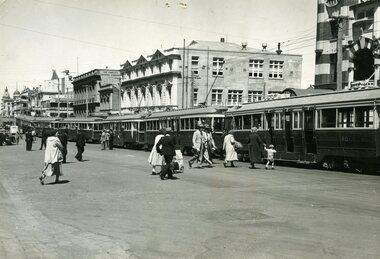
Photograph - Black & White Photograph/s, Harvey Studios, 18/02/1953 12:00:00 AM
Yields information about the tram arrangements for a large group from Geelong and the Geelong wharfies made for their picnic - probably at the Gardens. Demonstrates transport arrangements in the 1950's.Black and white photograph of seven bogie trams lined up with passengers boarding in Lydiard St. North, between Mair St and the Railway Station for the Geelong Waterside Workers picnic day on Wednesday 18/2/1953. Closest tram is No. 40. Photo taken from the Railway Station car park entrance. Provincial Hotel and other buildings on west side of Lydiard St. in photo. Published in the Courier 19/2/1953 - advised by Alan Bradley - 15/3/2003. 1880.1 - Digital image of the same photo from the Wal Jack Album. See images i2 and i3 for details, i3 for the rear of the photograph. Wal Jack notes identifies the trams as Nos. 15, 35, 39, 38, 34, 37, 40"On rear in blue ink "10 - Special trams chartered to convey Geelong Waterside Workers Picnic participants from Railway Station to Lake Wendouree Botanical Gardens o Wednesday 18 Feby '53". Under writing is word "Ballarat" in pencil. In top right hand corner, in a purple ink hand stamp is "N.L. Harvey (Photo Press Service) A.M.P. Chambers Lydiard St. N Ballarat" On rear of .1 is the N.L.Harvey stamp and Wal's notes "SEC Ballarat Geelong Wharfies Specials, Lydiard St Nth at 11.5am, 18-2-53, Nos. 15, 35, 39, 38, 34, 37, 40"trams, tramways, picnics, lydiard st. nth, geelong waterside workers, charters, tram hire, tram 40 -
 Ballarat Tramway Museum
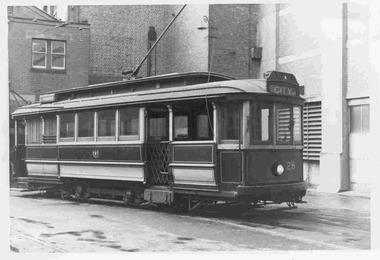
Photograph - Black & White Photograph/s, Keith Kings, Geelong 28 on depot fan, 21/08/1955
... buildings and power station walls in the background. See item 8879... of "City". Has depot buildings and power station walls ...Photograph of SEC Geelong, No 28 on the depot fan, 21/8/1955. Tram showing the destination of "City". Has depot buildings and power station walls in the background. See item 8879 for a colour version. Keith Kings No. P(e)(4)Black and White photograph contained with Reg. Item 1902 - Photo Album from Keith Kings to Les Denmead 1970. Stamp in top left hand corner and handwritten number with "K.S. Kings No. P(e)(4) Copyright reserved". In blue ink "Geelong / No. 28 / Ex-Melbourne car, as altered for "one-man" operation / Depot / 21/8/55".trams, tramways, geelong, depot, tram 28 -
 Ballarat Tramway Museum
Photograph - B&W print of donated negative, Ron E. Fluck, 23/06/1962 12:00:00 AM
Black and white print of a donated negative. Print made 8/1998. Photo of SEC tram no. 31 in Main St, Ballarat East, with destination of "Gardens via Drummond St." Tram has been fitted with dash canopy lighting, but not the large white strip under the lighting. Has small triangles on the panels. Also has a small ad for White Horse whisky. Shows buildings on either side of Main St. and the Caltex service station in the background on Main Road and Bridge St. Photo taken 23-6-1962. Copy made Oct. 2001 for the "gold, Gold GOLD" temporary exhibition - colour laser print onto card, with Velcro dots on rear. Stored in box D1 (Display Box) 02/2003. High Res scan of negative added 17/1/2019.tramways, trams, main st, 31, ballarat, tram 31 -
 Ballarat Tramway Museum
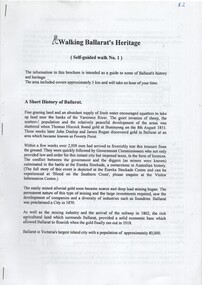
Ephemera - Tour Notes, Jennifer Barnes, 'Walking Ballarat's Heritage', Aug. 1998
... Railway Station Heritage Buildings Tourism $2 (in blue biro top ...18 page self-guided walk No. 1 of Ballarat with three staples along left hand edge. Page 1 incorporates a short history of Ballarat, followed by tour commencing at Ballarat Visitor Information Centre, 33 Sturt St., west to Lydiard St., south to former goal (jail) and return to Railway station. Returning to Sturt St. via Mair and Camp Streets finishing up in Bridge St. Mall. Interest: Page 3, under "2. Sturt St.", on paragraph on electric trams and second re 'Ballarat Vintage Tramway'. Mrs. Jennifer Barnes is the wife of City of Ballarat Councillor, Mr. John Barnes$2 (in blue biro top left hand corner page 1) - cost price of purchase from Ballarat Visitor Information Centre.local history, ballarat railway station, heritage buildings, tourism -
 Ballarat Tramway Museum
Photograph - Leaf from a photo album, 1920s
Leaf from a photo album containing 4 black and white photographs pasted onto sheet of brown/grey cardboard with two punch holes at one end. Photos taken early 1920's or just after construction of the Memorial Arch. Photo 1 - "Ballarat" handwritten in pencil at top - Town Hall from the North West taken from a building near Doveton St. Has a Sebastopol tram west bound in Sturt St. passing Town Hall. Photo 2 - "Sturt Street Ballarat" handwritten in pencil at base - Sturt St. Ballarat looking east from most likely the Ballarat City fire station lookout tower. Has a Sebastopol tram travelling eastbound in the photograph. Town Hall in background. No motor vehicles in photograph. Photo 3 - "Memorial Arch, Ballarat" handwritten in pencil at top - photo of the new Memorial Arch at the start of the Avenue of Honour. Photo 4 - "Eureka Stockade, Ballarat" - photo of the Eureka Stockade monument the park.trams, tramways, ballarat, sturt st, memorial arch - avenue of honour, eureka -
 Ballarat Tramway Museum
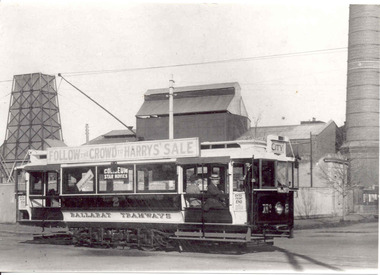
Photograph - Black & White Photograph/s and Digital Image, ESCo No. 2 passing Electric Supply Co. (ESCo) power station, c1913
Black and white photographs of ESCo No. 2 passing Electric Supply Co. (ESCo) power station , Ripon St., near Wendouree Parade. No. 2 fitted with windscreens, has seats facing inwards and an ad on roof "Follow the Crowd to Harrys' Sale", Coliseum Star Movie ad in window. Power station features chimney, cooling tower and other buildings. Driver of No. 2 standing by doorway while photo taken. Yields information about the Power station and ESCo tram No. 2 and the appearance of both at the time.Series of black and white photographs some with notes on rear.trams, tramways, power station, wendouree parade, ripon st, esco , tram 2 -
 Ballarat Tramway Museum
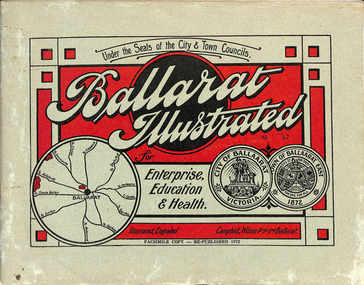
Book, "Ballarat Illustrated", 1972
Original c 1914 (see below), facsimile copy - re-published 1972. Original features photos of Ballarat City and Town, its buildings, parks and the various industries and organisations that were in Ballarat at the time of publication, including ESCo. Many photos features ESCo trams. Photos sepia toned. Has some red colour block printing on the front cover and rear, for Star Oil Engines. On inside back cover is a map with the places of interest and tram route map, marked in red. Pages are un-numbered. Original published by Ballarat East Town Council and Ballaarat City Council. On cover has number stamped in black in, "No. 87" (assume facsimile copy No.). Photos with publication show tram No. 21, built 1913 and ESCo photo page shows Mr. Pringle as Manager. Mr Pringle became manager in January 1911, As there is no photos of the "Avenue of Honour", or other mention of the first world war, assume original published about 1913 or 1914. Original shows Engravings and printing by "Campbell Wilson Prop Ltd, Ballarat". See Other Information as well for more listing details. High Resolution image added 31/8/2012 of i2 of ESCo page and i3 for Ballarat identies and sheet i4 extracted for Mr Pringle. PDF scan of full document added 21/5/2019 - see images btm633-1i.pdf and btm633-2i.pdf Notes on "Ballarat Illustrated" Reg. Item No. 733 From notes made by Neville Gower 12/1/1997 Cover: Inside front cover: Last paragraph, "Facilities for Travelling" - Electric trams serve all parts of Ballarat. Page 3: Street Scene, Municipal Town Hall, showing tram wiring Page 7: Street Scene, Lydiard St. North, intersection and tramway centre, with ESCo tram No. 21 in the bottom photo. Other photos features trams as well in Sturt St and Lydiard St. North. Page 9: Street Scene, Top photo of Sturt St. from Lydiard St. looking east, shows piles on right-hand side of road. Car parked by Post Office has a car registration number "9007". Bottom photo, an tram climbing hill, shows double trolley in the street, with early English type of pull offs. Page 13: Street Scenes and Historic Buildings: One of five photos, shows Victoria St. looking East, with tram track prominent in photo and how stone work was set up about the rails and overhead poles. Page 23: Street scene, Gardens North Entrance gates, shows details of gates near St. Aidans Drive. Note double trolley wire on poles, and style of insulators. No trams in photo, three ladies walking down the track. Page 37: Street Scene; Lydiard St views, top left hand photo, shows Railway station and railway gates with signal gantry and horse drawn vehicles. Tram tracks apparent. Bottom left hand photo shows Lydiard St. North, near Post Office, double track with centre poles - Single wire per track. Top right hand photo, showing Cemetery gates in background. Bottom right hand photo - from north end of Lydiard St. South, looking north, with an ESCo tram in background. Also has a parked car on left hand side. Page 45: Street Scenes - Bridge St; top photo at west end of Bridge St. with ESCo No. 11 with possibly double trolley wire in photo. Bottom photo at east end of Bridge St. with tram in background, shows junction. Double trolley heading out to Mt. Pleasant, single trolley for Victoria St. Page 45: Street Scenes - Bridge St; top photo at west end of Bridge St. with ESCo No. 11 with possibly double trolley wire in photo. Bottom photo at east end of Bridge St. with tram in background, shows junction. Double trolley heading out to Mt. Pleasant, single trolley for Victoria St. Page 61: Street Scenes and Historic Buildings - Public Institutions Ballarat - top left hand photo of the Hospital shows some tram track in foreground, with double trolley wire. Top right photo is of the Orphanage, the name of the tram terminus for many years. Page 68: Electric Supply Co. of Victoria's pages - top photo showing powerhouse in background, across the lake, can hardly see anything for the trees, except for the chimney. Bottom photos of the steam Turbo Generators and the switchboard. Gives Mr. P.J. Pringle as Chief Engineer and General Manager. He took over in Jan. 1911. Page 69: Ballarat East Views - features photo of Black Hill open cut, Ballarat East Railway Station, Ballarat Fire Station and "Victoria St. looking East", repeat of photo printed on page 12, but slightly darker. Image on system includes fire station and railway station, - Ballarat East. Page 78: Series of photos of various Ballarat VIP's of the era, fourth one in on top line features "P.J.Pringle, Electric Supply Co." Inside Back cover - map of Ballarat including tram lines and places of interest marked in red. Gives a detailed photographic presentation of Ballarat in 1914.80 page book with, in addition, light green card covers, titled "Ballarat Illustrated". Loose copy of page 9 and 10 held.trams, tramways, ballarat, local history, heritage buildings, esco -
 Ballarat Tramway Museum
Photograph - B&W print of donated negative, Ron E. Fluck, 2/01/1959 12:00:00 AM
Black and white print of a donated negative. Print made 8/1998. Photo of SEC bogie tram 35, north bound in Lydiard St. North, about to cross the railway level crossing. Has the signal gantry in the background with part of the railway gates and Kennedy Murray Pty Ltd. General Carriers building in the background as well. Photo taken 2-1-1959. High Res scan of copy negative added 17/1/2019tramways, trams, railway station, lydiard st. north, ballarat, tram 35 -
 Ballarat Tramway Museum
Photograph - Colour Photograph/s, Dave Macartney, 1963
Colour print with black borders of MMTB Works car No. 16 (later 16W), decorated for Myers Emporium at South Melbourne Depot. Destination City, 4th Edition, page 100 gives dates of this car decorated for Myers as being 11/59 to 12/59 and 11/63 to 12/63. Photo taken of 1963 tram by Dave Macartney. Tram fitted with trolley pole skid, two speakers and has a Cinderella scene painted on the side of the tram. Buildings in Hanna Street (later Kingsway) visible, Golden Fleece Service station in background. See Destination City, 4th Edition, page 100decorated trams, myers, south melbourne, work trams, tram 16, tram 16w -
 Ballarat Tramway Museum
Slide - 35mm slide/s, Peter Moses, 21/08/1971 12:00:00 AM
Photo of SEC Ballarat No. 14 and possibly No. 42 (Briquette roof advertisement and features on the same special trams in Reg. item 2064) waiting in Lydiard St. North for the arrival of the ARHS special on Saturday 21/8/1971 to undertake the last tour of Ballarat Tramways, prior to the closure of the system. The first line closure (Victoria St.) took place the following day. Has Reid's Coffee Palace building in the background and other buildings on the east side of Lydiard St. North. Two other single truck cars in the photo as are the railway gates at the station. Kodak cardboard mount slide, taken by Peter Moses 21 August 1971.On back of slide in light black ink "N14 Ballarat / ARHS / 4 trams special Lydiard St" and "P. Moses" in black ink in the upper right hand side of the slide.tramways, trams, arhs, lydiard st north, railway crossing, tram 14, tram 42 -
 Ballarat Tramway Museum
Slide - 35mm slide/s, Peter Moses, 21/08/1971 12:00:00 AM
Photo of SEC Ballarat 26, with No. 14 and possibly No. 42 (Briquette roof advertisement and features on the same special trams in Reg. item 2064) waiting in Lydiard St. North for the arrival of the ARHS special on Saturday 21/8/1971 to undertake the last tour of Ballarat Tramways, prior to the closure of the system. The first line closure (Victoria St.) took place the following day. Has Reid's Coffee Palace building in the background and other buildings on the east and west side of Lydiard St. North. No. 26 has an SEC briquettes roof advertisement Kodak cardboard mount slide, taken by Peter Moses 21 August 1971.On back of slide in light black ink "Ballarat / ARHS outside station / special trams Lydiard St." and "P. Moses" in black ink in the upper right hand side of the slide.tramways, trams, arhs, lydiard st, tram 26