Showing 2500 items
matching closure
-
 Ballarat Tramway Museum
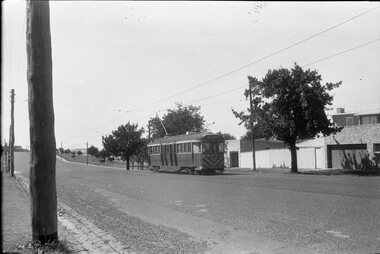
Negative - Geelong tram inbound Mercer Street, Laurie Gallop, early 1956
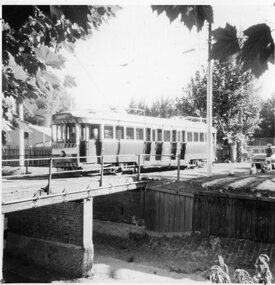
Photo shows a Geelong tram inbound in Mercer Street, near The Esplanade. Tram has the destination of Belmont. Based on the running board at item 8267, most likely No. 33. One of a set of photos was taken between 15/2/1956 and 3/3/1956 when services operated only between Belmont and North before the final closure of the Belmont route on 25/31956 and that bogie tram 31 is not shown on the board, having gone to Ballarat on 15/2/1956 - see item 5554. See item 8213 for an article on the Geelong system by Keith Kings. Yields information about tramway operations prior to closure of the Geelong system.Black and white Negative - 120 sizetram stops, tramways, geelong, mercer st, tram 33 -
 Melbourne Tram Museum
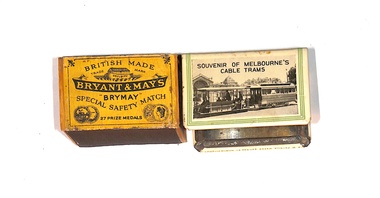
Memorabilia - Matchbox Holder, Bryant & May, Souvenir of Melbourne's cable trams, 1940
Souvenir of Melbourne cable tram closure in Oct. 1940 - made to fit a box of matches to minimize damage to the box while being carried in a pocket. Consists of a printed photo of cable trailer 571 in Nicholson St Fitzroy with the Royal Exhibition buildings in the background. Lists the opening dates of the various lines. The matchbox is by Bryant and May, made in Britain. On the rear of the box is an advert for the Orient Line of Royal Mail steamers in Europe and Australia. Not know who made the matchbox holder. Second matchbox made by Bryant & May of Richmond - has a 2nd world war message on the box label. Demonstrates a souvenir of Melbourne's cable trams.Match box holder from folded metal with a printed plastic covered insert, the matchbox itself is from a wooden box with a cardboard insert, and many matches on wooden sticks. 2nd copy has an empty Bryant & May matchbox, cardboard. tramways, trams, cable trams, opening, souvenirs, matches, bryant and may, orient line -
 Orbost & District Historical Society
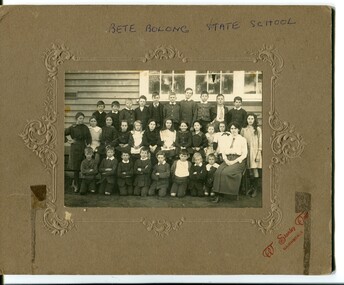
black and white photograph, 1912 - 1920
This school photograph has been identified by Mary Gilbert as being of Bete Bolong students with their teacher. The names are written on a separate piece of paper which was attached to the photograph. Back Row - George Healey; George Madden; Bert Paton; Harold Cumming; Charlie Ingram; Stan Paton; Bill Madden; Frank Sealey; Tom Cumming; Ted Johnston Middle Row - Rita Mundy; Ruby Richardson; Mary Cumming; Mollie Ingram; Clarrie Paton; Irene Richardson; Ella Paton; Ena Cumming; Grace Mundy; Violet Sealey; Maggie Webb; Bertha Johnstone Front Row - Billy Ingram; Ernie Sealey; Archie Johnston; Rupert Madden; Ron Healey; Jack Cumming; Gordon Healey; Mrs Hannak (?) Conner - teacher n 1912 the school at Pumpkin Point opened to serve the children of farmers living in the Bete Bolong district. This meant a big change in their way of life because in the past the children had been rowed across the Snowy River each day to attend school at Jarrahmond. Myrtle Bunting was the first HT of the school which had been erected on a block of land purchased from H. Richardson. The school functioned until 1952 when a shortage of pupils caused its closure. As a bus service to Orbost now operated, the school at Pumpkin Point faced permanent closure.This photograph is associated with education in Orbost. There is no longer a school at Bete Bolong.A black / white photograph of a group of school children with an adult. Behind the three rows of children is a wall and windows. The back row is standing,the middle seated and the front row kneeling. The photograph is glued onto a brown cardboard mount with embossed decoration. On the front bottom right in red lettering "W Stanley Vogt, BAIRNSDALE".BETE BOLONG STATE SCHOOL W.Stanley Vogt, BAIRNSDALEbete-bolong-state-school education-orbost -
 Ballarat Tramway Museum
Slide - 27 mm sq slide/s - set of 2, Lilian Butler, No. 30 towing a bogie tram with the trolley poles and lifeguards removed, Sep. 1971
Yields information about the SEC Wendouree Parade depot and the activities at the depot after closure.Set of two Colour 27 x 27 mm slides in Fuji film, processed by Hanimex white cardboard mounts. .1 - view of the SEC depot front with three and four roads doors, shows the sign and the small personnel door open. .2 - No. 30 towing a bogie tram with the trolley poles and lifeguards removed (possibly No. 37 but looks more like an ex HTT car) onto Wendouree Parade to be loaded. Photo from the collection of Lilian Butler.ballarat, tramways, trams, sec depot, depot, wendouree parade, closure, tramcars, loading trams, scrubber, tram 37 -
 Ballarat Tramway Museum
Photograph - Black & White Photograph/s - set of 7, 16/04/1972 12:00:00 AM
Yields information about the final day of the Bendigo tramways and some of the tramcars used.Set of seven black and white photographs of the day Bendigo Tramways closed 16-4-1972. Taken on Agfa paper. Has printing date of 18.8.72 stamped on rear. All have been used for display purposes. .1 - 25 leaving the depot .2 - 2 at Charing Cross, bound for Eaglehawk - has Ezywalkin Store in background. .3 - 18 crossing another tram at a loop on the Eaglehawk line. .4 - 28 at Charing Cross showing Special .5 - 26 inside depot, with Borough of Eaglehawk sign on the front bumper and bunting around the tram. .6 - 29 leaving the depot .7 - 26 in the final parade, with "Destination Eaglehawk" on a roof mounted advertisement board, with the Beehive building in the background and Coca Cola advertisement on top of the building. Photographer not known.3549.8 - has "photo No. 8" on rear and been marked out for publication. tramways, trams, bendigo, closure, eaglehawk, tram 25, tram 2, tram 18, tram 28, tram 26, tram 29 -
 Melbourne Tram Museum
Document - Report, "The Survival of Melbourne's Trams", c1990
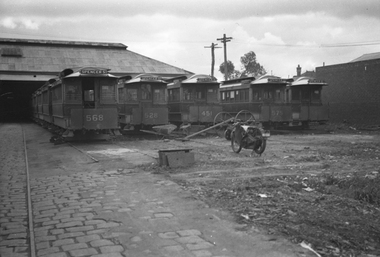
Digital image of a report - 12 pages - titled "The Survival of Melbourne's Trams". Article looks at the factors behind the survival - modal decision, the motor lobby, cable operation, buses and trams (compares extensively to that of Sydney), departmental autonomy and capital management. Looks at the history of Melbourne trams up the retirement of Robert Risson. Has a list of notes and sources. Author not given.trams, tramways, history, significance, mmtb, melbourne, tramways, transport, buses, sydney, closure -
 Melbourne Tram Museum
Negative, Wal Jack, c1940
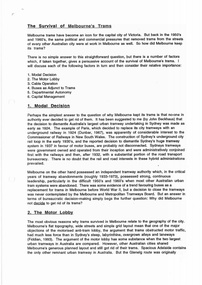
Black and white negative, by Wal Jack, of the outside storage area at Clifton Hill cable tram depot with many trailers stored outside. Photo dated 26-5-1941 in album held by the Ballarat Tramway Museum. Cars: 568, 528, 451, 575 and 496?trams, tramways, cable trams, clifton hill, trailers, closure, tram 568, tram 528, tram 451, tram 575, tram 496? -
 Bendigo Military Museum
Uniform - UNIFORM, DISRUPTIVE PATTERN, NAVY, CTE Pty Ltd, 2010 - 2011
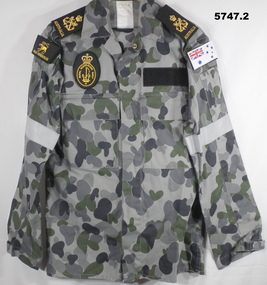
Naval Uniform - brand new. 1. Jacket - 75% cotton, 25% polyester fabric. Grey, dark grey and dark green disruptive pattern. Metal stud closures. Epaulettes - gold embroidered crown, crossed anchors and "AUSTRALIA" unit shoulder flashes - both embroidered with gold, white and red thread - R. three headed dog/ "HMAS CERBERUS" - ships badge. L. Australian Navy White Ensign. Chest patch - embroidered gold, red and white RAN Patch - Crown, Anchor and R.A.N. logo. 2. Trousers - 75% cotton, 25% polyester fabric, grey, dark grey and dark green disruptive pattern.Both - Maker's label - black print on white label "CTE PTY LTD/ JUNE 2010/2011" / "75% cotton 25% polyester/ FR treated". Then extensive information on laundering care of fabric. "MADE IN AUSTRALIA" .uniforms, dpnu, ran -
 4th/19th Prince of Wales's Light Horse Regiment Unit History Room
Regimental Scrap Book: 1990-1999, 2009
Archival quality A3 loose leaf slip case containing memorabilia documents, cuttings and photos about the Regiment for the period 1990-1999. Contents include:Training, Ceremonial, social activities. Hansard 18 Oct 1990 re future of the Regiment. Threats to the Regiment. Chief of General Staff Commendation to A Squadron 4/19 PWLH for assistance with flood emergency in Gippsland April 1990. Meritorious Unit Commendation to Prince of Wales Light Horse Troop while attached to 173 US Airborne Brigade, South Vietnam 1965/66. Freedom of City of Melbourne May 1992. 50th Birthday of Regiment. Closure of Traralgon Depot 1998.ceremonial, training, vietnam war, history 4 19 prince of wales s light horse, freedom of city melbourne, freedom of city traralgon, traralgon army depot, commendations, gippsland floods -
 Flagstaff Hill Maritime Museum and Village
Leisure object - Toy Soldier, circa 1878
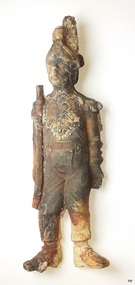
The toy soldier is a relic from the shipwreck of the LOCH ARD in 1878. It has a companion piece in the Flagstaff Hill collection. The toy soldier is unpainted, but the style of uniform, and the weapons carried (a musket and a basket-handled cutlass), indicate it is a representation of the Napoleonic Wars period from the beginning of the nineteenth century. Mass-produced toy soldiers made of cast metal (lead or tin) became popular during the 1800s. Heyde of Germany manufactured silhouette-shaped flat toy soldiers early in the century. Mignot of France released three-dimensional solid figures and later around 1893 W. Britain, a toy company became known for its die-cast lead toy soldiers. These innovations were designed to make sets of toy soldiers more affordable for middle and lower-class children, extending the market beyond the intricately made and hand-crafted replicas that were the preserve of the rich in the eighteenth century. Wooden military figures, specially carved and unpainted ones, were therefore not particularly common at the time when the Loch Ard foundered on Victoria’s southwest coast. Mignot was the first to sell unpainted soldiers, leaving their customers to fill in the colours according to their own patriotic preferences. It is, therefore, possible the two figures in the Flagstaff Hill collection were part of a new set intended for sale, rather than part of a passenger’s existing collection. Loch Ard History: The Loch Ard got its name from ”Loch Ard” a loch that lies to the west of Aberfoyle, and the east of Loch Lomond. It means "high lake" in Scottish Gaelic. The vessel belonged to the famous Loch Line which sailed many vessels from England to Australia. The Loch Ard was built in Glasgow by Barclay, Curle & Co. in 1873, the vessel was a three-masted square-rigged iron sailing ship that measured 79.87 meters in length, 11.58 m in width, and 7 m in depth with a gross tonnage of 1693 tons with a mainmast that measured a massive 45.7 m in height. Loch Ard made three trips to Australia and one trip to Calcutta before its fateful voyage. Loch Ard left England on March 2, 1878, under the command of 29-year-old Captain Gibbs, who was newly married. The ship was bound for Melbourne with a crew of 37, plus 17 passengers. The general cargo reflected the affluence of Melbourne at the time. Onboard were straw hats, umbrellas, perfumes, clay pipes, pianos, clocks, confectionery, linen and candles, as well as a heavier load of railway irons, cement, lead and copper. There were other items included that were intended for display in the Melbourne International Exhibition of 1880. The voyage to Port Phillip was long but uneventful. Then at 3 am on June 1, 1878, Captain Gibbs was expecting to see land. But the Loch Ard was running into a fog which greatly reduced visibility. Captain Gibbs was becoming anxious as there was no sign of land or the Cape Otway lighthouse. At 4 am the fog lifted and a lookout aloft announced that he could see breakers. The sheer cliffs of Victoria's west coast came into view, and Captain Gibbs realised that the ship was much closer to them than expected. He ordered as much sail to be set as time would permit and then attempted to steer the vessel out to sea. On coming head-on into the wind, the ship lost momentum, the sails fell limp and Loch Ard's bow swung back towards land. Gibbs then ordered the anchors to be released in an attempt to hold their position. The anchors sank some 50 fathoms - but did not hold. By this time the ship was among the breakers and the tall cliffs of Mutton Bird Island rose behind. Just half a mile from the coast, the ship's bow was suddenly pulled around by the anchor. The captain tried to tack out to sea, but the ship struck a reef at the base of Mutton Bird Island, near Port Campbell. Waves subsequently broke over the ship and the top deck became loosened from the hull. The masts and rigging came crashing down knocking passengers and crew overboard. When a lifeboat was finally launched, it crashed into the side of Loch Ard and capsized. Tom Pearce, who had launched the boat, managed to cling to its overturned hull and shelter beneath it. He drifted out to sea and then on the flood tide came into what is now known as Lochard Gorge. He swam to shore, bruised and dazed, and found a cave in which to shelter. Some of the crew stayed below deck to shelter from the falling rigging but drowned when the ship slipped off the reef into deeper water. Eva Carmichael a passenger had raced onto the deck to find out what was happening only to be confronted by towering cliffs looming above the stricken ship. In all the chaos, Captain Gibbs grabbed Eva and said, "If you are saved Eva, let my dear wife know that I died like a sailor". That was the last Eva Carmichael saw of the captain. She was swept off the ship by a huge wave. Eva saw Tom Pearce on a small rocky beach and yelled to attract his attention. He dived in and swam to the exhausted woman and dragged her to shore. He took her to the cave and broke the open case of brandy which had washed up on the beach. He opened a bottle to revive the unconscious woman. A few hours later Tom scaled a cliff in search of help. He followed hoof prints and came by chance upon two men from nearby Glenample Station three and a half miles away. In a complete state of exhaustion, he told the men of the tragedy. Tom then returned to the gorge while the two men rode back to the station to get help. By the time they reached Loch Ard Gorge, it was cold and dark. The two shipwreck survivors were taken to Glenample Station to recover. Eva stayed at the station for six weeks before returning to Ireland by steamship. In Melbourne, Tom Pearce received a hero's welcome. He was presented with the first gold medal of the Royal Humane Society of Victoria and a £1000 cheque from the Victorian Government. Concerts were performed to honour the young man's bravery and to raise money for those who lost family in the disaster. Of the 54 crew members and passengers on board, only two survived: the apprentice, Tom Pearce and the young woman passenger, Eva Carmichael, who lost her family in the tragedy. Ten days after the Lochard tragedy, salvage rights to the wreck were sold at auction for £2,120. Cargo valued at £3,000 was salvaged and placed on the beach, but most washed back into the sea when another storm developed. The wreck of Lochard still lies at the base of Mutton Bird Island. Much of the cargo has now been salvaged and some items were washed up into Lochard Gorge. Cargo and artefacts have also been illegally salvaged over many years before protective legislation was introduced in March 1982. One of the most unlikely pieces of cargo to have survived the shipwreck was a Minton majolica peacock- one of only nine in the world. The peacock was destined for the Melbourne 1880 International Exhibition. It had been well packed, which gave it adequate protection during the violent storm. Today the Minton peacock can be seen at the Flagstaff Hill Maritime Museum in Warrnambool. From Australia's most dramatic shipwreck, it has now become Australia's most valuable shipwreck artifact and is one of very few 'objects' on the Victorian State Heritage Register.The toy soldier represents a 19th-century child's interest in military history. The item is one of two toy soldiers recovered from the Loch Ard in Flagstaff Hill's collection. The shipwreck of the Loch Ard is of significance for Victoria and is registered on the Victorian Heritage Register ( S 417). Flagstaff Hill has a varied collection of artefacts from Loch Ard and its collection is significant for being one of the largest accumulations of artefacts from this notable Victorian shipwreck of which the subject items are a small part. The collections of objects give us a snapshot of how we can interpret the story of this tragic event. The collection is also archaeologically significant as it represents aspects of Victoria's shipping history, allowing us to interpret Victoria's social and historical themes. Through is associated with the worst and best-known shipwreck in Victoria's history.An unpainted, cream-coloured toy soldier, recovered from the Loch Ard. The figure wears a Napoleonic Wars-era uniform, a plumed helmet, a short jacket with tails, bib-front trousers with button closure, straps crossed at the front and back, and epaulettes. The figure is in marching posture with one foot extended forward, and is bearing a musket at the slope-arms position, with a sabre or cutlass slung behind. It is unable to stand on its own. There are reddish-brown and orange-brown stains on the head and body. The body has seams along both sides that are uneven at the lower leg. There is a hole in the back and the inside is hollow. The material has a rough texture.flagstaff hill, warrnambool, flagstaff hill maritime museum, shipwreck coast, flagstaff hill maritime village, great ocean road, loch ard, toy soldier, napoleonic uniforms, military toy, moulded soldier -
 Ballarat Tramway Museum
Newspaper, The Courier Ballarat, "Old Ballarat was lit with Tallow Candles", 24/08/1983 12:00:00 AM
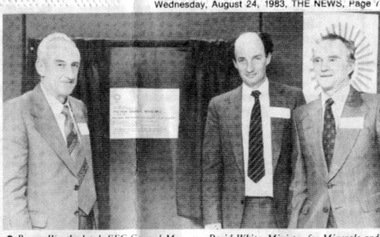
Newspaper clipping from the The News, Ballarat of 24/8/1983 about the opening of the new SEC Norman St. depot by the Minister for Minerals and Energy, Mr. David White, the previous Friday. Has photograph of the SEC General Manger (Rowan Weatherhead), the Minister and Acting Manger mid-western division (Neville Morris) of the official opening of the depot. Item covers the history of the power supply in Ballarat, the tramways, power distribution, number of customers. Second photo is of the group of Ballarat conductresses. Also covers the proposed consolidation of the SEC offices to Norman St and the eventual closure of the Wendouree Parade office. See Reg item No. 239trams, tramways, secv, ballarat power supply, wendouree parade, norman st -
 Ballarat Tramway Museum
Newspaper, Herald Sun, "A Place in the Sun", 17/04/1972 12:00:00 AM
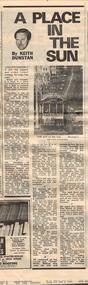
Newspaper clipping from The Melbourne Sun, dated Monday 17/4/1972, column written by Keith Dunstan titled "A place in the sun" detailing the events, musings and some identities names of the closure of the Bendigo tramway system the previous day. Has a photo of No. 26 climbing View St from Charing Cross. One of a large group of newspaper cuttings from John Bainbridge, 7/4/02. Item has been folded for inclusion within a scrap book. Has a piece of plain paper Secured to the back of the portion that was not Secured to the scrap book itself. For full print of the photograph, see Reg Item 3888.bendigo, tramway closure, last tram -
 Ballarat Tramway Museum
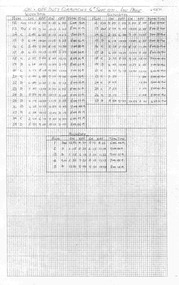
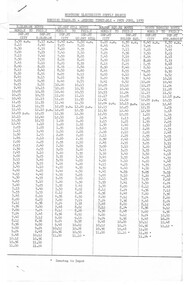
Document - Table Cards (Sheets), State Electricity Commission of Victoria (SECV), Sunday tables or runs for the SEC Ballarat trams, Aug. 1971
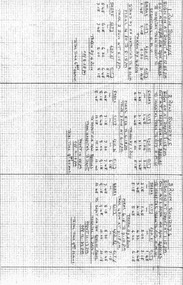
Set of 3 sheets, photocopied on heat sensitive paper, foolscap size graph paper sheets giving the Sunday tables or runs for the SEC Ballarat trams following the closure of the Victoria St. - Gardens via Drummond St. North service. Gives details of 8 tables or runs, numbered from 1 Run to 8 Run. Each sheet headed "Sunday29". Used for two Sundays only. Each run details where the driver/conductor would sign on, time, the trips, meal breaks, finish time and the total time of the shift. Stored separately with these sheets are a photocopies of each sheet reduced to A4 size.trams, tramways, timetables, sec, ballarat, crews -
 Ballarat Tramway Museum
Document - Table Cards (Sheets), State Electricity Commission of Victoria (SECV), Weekdays, Saturdays and Sunday tables, Aug. 1971
Copy of sheet, photocopied on heat sensitive paper, demi-quarto (double quarto) size graph paper sheets giving the summary of the hours worked for each run or table for Weekdays, Saturdays and Sunday tables or runs for the SEC Ballarat trams on the Sebastopol - Lydiard St. Nth service following the closure of the Victoria St. - Gardens via Drummond St Nth and Mt Pleasant - Gardens via Sturt St. West services. Gives ON - OFF times for meal breaks. Each sheet has "LJD/71" in the top left hand corner. Stored separately with these sheets are a photocopies of each sheet reduced to A4 size.In top left hand corner in ink "B.T.P.S. No. 813".trams, tramways, timetables, secv, ballarat, crews -
 Ballarat Tramway Museum
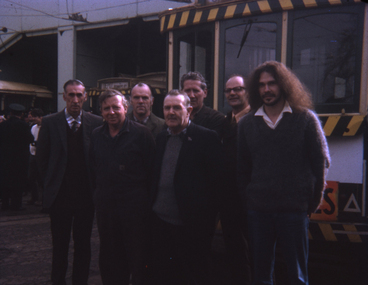
Slide - 35mm slide/s, Theo Dunstan, Aug. 1971
35mm slide, square format mounted in a "Kodak " cardboard slide mount with Kodak logos and printing of the SEC shed staff in front of the depot shortly before the closure of the tramway system. Underexposed photo. Standing in front of No. 33. From matching names and faces on Reg. Item 1861 Back row from left - S. Lakey, W. Trusler, N.Lorensini, A.Donaschenz Front row from left - G. Gray, B. Peart, W. Kell. See also Reg Item 1861 for a black and white photo and 1862 for the listing. Taken 23/8/1971 - the last Sunday of full operations? Has date of "Sep 71" and "11" stamped onto the slide.tramways, trams, crews, ballarat, sec crews, personnel, staff photo -
 Ballarat Tramway Museum
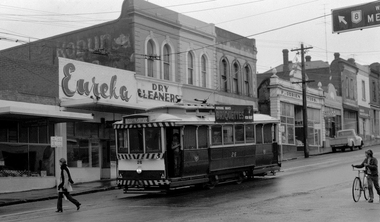
Photograph - Digital image, 1970s
Yields information about the Bakery St Hill on the Victoria St route.Digital image, black and white, of No. 26 at Stones Corner, junction of Bridge, Victoria and Main St, Bakery Hill. No the young girl in slacks walking in front of the tram, the boy wheeling the bike down the street and the young boy standing in the front door of the tram. In the background is Eureka Dry Cleaners, an old Robur tea ad on a building, F. O'Brien Motors. The tram has the destination of Gardens via Sturt St West and a SEC Briquettes Roof advert. Photo taken by Peter Bruce 1970's and 1971, prior to the closure of the Ballarat tramway system. Peter's Title of image: "No. 26 Victoria and Bridge"trams, tramways, stones corner, bakery hill, victoria st, bridge st, tram 26 -
 Ballarat Tramway Museum
Photograph - Digital image Set of 2, Peter Bruce, "No.30 Bridge and Main", 1970s
Yields information about Bridge St Ballarat and its associated shopping strip.Digital image, black and white, two images, of No. 30 in Bridge St. 4605.1 - at Stones Corner, enroute to Mt Pleasant with Rodda's, Gill & O'Keffe, C.W. Pennan, ANZ Bank and other shops in the background. Note the signal lamps on the right hand side of the photo above the tram stop sign and how the overhead was arranged at this junction. 4605.2 - at Grenville St end, with Faulls Shoes, Suttons HMV and other shops in the background. Photo taken by Peter Bruce 1970's and 1971, prior to the closure of the Ballarat tramway system. Peter's Title of image: "No.30 Bridge and Main" and "No. 30 Bridge St up end".trams, tramways, bridge st, mt pleasant, tram 30 -
 Flagstaff Hill Maritime Museum and Village
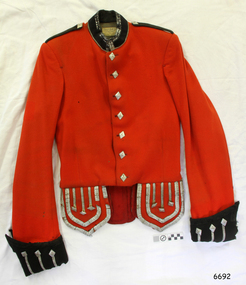
Uniform - Tunic or Doublet, David Lack Pty. Ltd, ca 1940s
The design of the uniform with its silver, diamond shaped buttons with the Scottish thistle symbol on them, indicate that the uniform was made for a Scottish Pipe Band member. There may be a connection with the local Warrnambool and District Pipes and Drums Inc, which began as the Warrnambool Pip Band in 1906, formed with the purpose of popularising Scottish music. Those with uniforms wore the Gordon tartan. In 1946 the uniforms were changed, with the Cameron or Errcht tartan chosen for the uniform. The Band now wears the Anderson tartan. The maker, David Lack Pty Ltd, advertised as a uniform specialist. In 1941 the business was located at 35-37 Little Latrobe Street, Melbourne. In the same year the firm won a contract with the Commonwealth Government Department of Supply, providing blue trousers for the Department of Air. In 1946 a branch of the firm operated in Myrtleford, Victoria. The Elizabeth Street, Melbourne, branch provided new uniforms in 1948 for the Leeton District Band. In the 1950s and 1960s David Lack manufactured blazers for the Olympic Teams as well as for bowls teams and schools. The Broken Hills Cameron Pipe Band' was gifted with uniforms that were also made by David Lack. It was a "... a Cameron of Lochlel red kilt and plaid, with black doublets and cross belts, and silver trimmings.” [Barrier Miner, Broken Hiss, 15-03-1954].The pipe band uniform jacket's design is associated with traditional Scottish pipe bands that originated in the United Kingdom and continue to this day in Australia and even locally in Warrnambool since 1908. The maker, David Lack Pty Ltd, is renowned as the maker of good quality uniforms who has supplied many government contracts for clothing and uniforms since the early 1940s. Uniform tunic; red jacket; Scottish Pipe Band Doublet with silver braid and silver diamond-shaped button closure and decoration. The buttons have the Scottish thistle symbol on them. There are seven buttons on the tunic front, three on each skirt flap, three on each contrasting black cuff and one on each black epaulette. The tunic has a two-inch stand-up collar. The whole item is fully lined with black nylon/silk blend fabric, the shoulders are padded, and there are pockets under the front skirts. There is an inscription on the maker's sewn-in label. Made by David Lack Pty Ltd, a uniform specialist in Melbourne.Label "David Lack Pty Ltd, uniform specialist Melbourne. "flagstaff hill maritime museum and village, warrnambool, great ocean road, shipwreck coast, uniform, tunic, dublet, jacket, scottish pipe band, pipe band, david lack pty ltd, david lack melbourne, uniform specialists, david lack, diamond buttons, silver buttons, scottish thistle buttons, scottish piper's buttons, thistle, scottland symbol, pipe band uniform, bag pipes -
 Melbourne Tram Museum
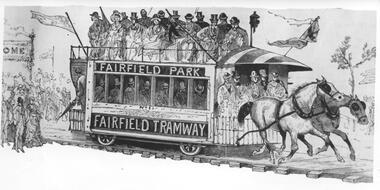
Photograph - Black & White Photograph/s, c1890
Black and white photograph of an illustration of the Fairfield Horse Tram. The illustration is from The Australasian Sketcher with Pen and Pencil (Melbourne, Vic. : 1873 - 1889), No 188 Vol XIIL, 14/1/1885. The magazine was owned by the Argus. The drawing is from a series of sketches at one of the Saturday land sales. The tramcar is numbered 1 and has signage Fairfield Park and Fairfield Tramway. The tramway was operated by Charles Henry James in an attempt to sell land developed by him north of the Fairfield railway station. The tramway operated from 20/12/1884 until its closure in 1890. Stamped on the back "...The Argus...negative No X2656"trams, tramways, argus, fairfield, horse trams, tram 1 -
 Nhill Aviation Heritage Centre
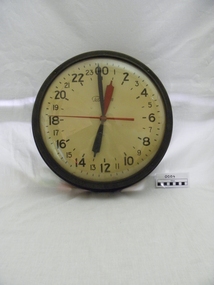
Memorabilia - Wall Clock, c. 1940
Following the closure of the RAAF Air Base after the Second World War an auction sale was held. Mr Goldsworthy, mechanic and garage owner of Kaniva purchased the clock and hung it on the wall of the garage where it remained when the business was sold to Mr Eddy Rowe of Kaniva. The clock remained in action until the 17th October 2009 when Mr Rowe disconnected the power supply to the clock, and donated it to the Nhill Aviation Heritage Centre (NAHC) to be kept as memorabilia of the Second World War. On completion of the building of a new hangar/exhibition centre at the Nhill Aerodrome, the clock will be hung on the wall and once again connected to the power supply.Clock was used at the air school at Nhill during WW224 hour electric wall clock with Telechron brand on face. It has a pair of hour hands, one red one black and a black minute hand and second hand. A domed shaped Perspex front. The clock face has 24 hour markings. The glass and clock face are set within a steel frame.The clock has Telechron and twenty-four hour numbers written on the clock face. Pasted on the back side is "instructions for setting the clock which is marked WARREN TELECHRON COMPANY/Ashland Mass. U.S.A world war two, clock, electric clock,twenty four hour clock, nhill aerodrome, raaf air base, warren telechron, goldsworthy, eddy rowe -
 Puffing Billy Railway
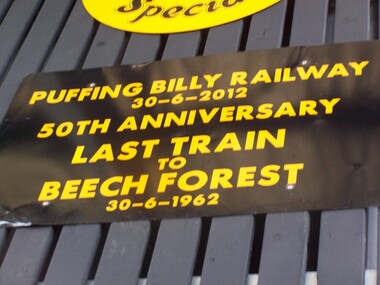
Locomotive Head Board - 50th Anniversary Last Train to Beech Forest
Historic - Puffing Billy Railway Locomotive Head Board used in the Celebration of the Last Train to Beech Forest 50th Anniversary Last Train to Beech Forest 30 - 6 1962 G42 ran from Belgrave to Gembrook to commemorate the 50th Anniversary of the closure of the Beech Forest Railway. Puffing Billy Railway, Victoria, 30th June, 2012. The Beech Forest line was opened in 1902 and later extended to Crowes. The line was closed in sections with the last section being between Colac and Beech Forest. The last train was hauled by locomotive G 42, which also hauled the re-enactment train in 2012.Historic - Puffing Billy Railway Locomotive Head Board used in the Celebration of the Last Train to Beech Forest 50th Anniversary Last Train to Beech Forest 30 - 6 1962 G 42 ran from Belgrave to Gembrook to commemorate the 50th Anniversary of the closure of the Beech Forest Railway. Puffing Billy Railway, Victoria, 30th June, 2012.Wooden - Locomotive Head Board - 50th Anniversary Last Train to Beech Forest Puffing Billy Railway 30- 6 - 2012 50th Anniversary Last Train to Beech Forest puffing billy, head board, last train to beech forest -
 Unions Ballarat
Meeting of Ballarat Save TAFE Group - Trades Hall, Ballarat, Australian Education Union, 2013
The Ballarat Save TAFE campaign ran from 2012 to 2014. It was a Trades Hall and community campaign in partnership with the Australian Education Union and National Tertiary Education Union. The campaign was in response to significant financial cuts and closure of many courses by the Baillieu/Napthine governments. Availability of TAFE in Ballarat is particularly important in training future tradespersons and future provision of many services. Campaign President: Athan McCaw Campaign Vice-President: Brigid O'Carroll Walsh Campaign Secretary and Treasurer: Brett Edgington The meeting was held at Trades Hall, Ballarat. Speaker: Meredith Peace, Victorian Branch Secretary, AEU. Purpose: campaign update. As above (see historical information).jpeg filebtlc, ballarat trades and labour council, ballarat trades hall, tafe, union campaigns, baillieu, edward (ted), napthine, denis, education and training, nteu - national tertiary education union, aeu - australian education union -
 Ballarat Tramway Museum
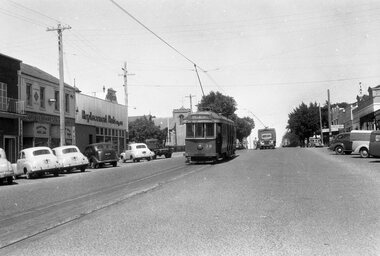
Negative - Geelong 38 and welding truck - Moorabool St, Laurie Gallop, early 1956
Photo shows Geelong 38 south bound to Belmont and welding truck - Moorabool St between Myers and McKillop Streets. The welding with the power supply from the overhead would most likely be repairing a broken joint. One of a set of photos was taken between 15/2/1956 and 3/3/1956 when services operated only between Belmont and North before the final closure of the Belmont route on 25/31956 and that bogie tram 31 is not shown on the board, having gone to Ballarat on 15/2/1956 - see item 5554. See item 8213 for an article on the Geelong system by Keith Kings. Yields information about the Geelong operations toward the closure of the tram system.Black and white Negative - 120 sizetramways, geelong, tram 38, moorabool st, welding truck, track repairs -
 Ballarat Tramway Museum
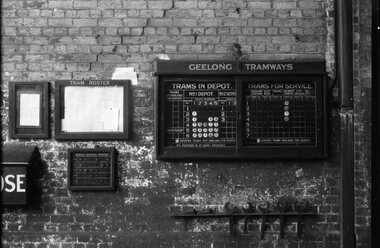
Negative - Tramcar allocation board - Geelong, Laurie Gallop, early 1956
Photo shows the Tramcar allocation board - in the Geelong depot. Shows the four bogie cars in operation or available on the day the photograph was taken. Shows that some of the Meadowbank-built trams and bogie trams had already left the depot. One of a set of photos was taken between 15/2/1956 and 3/3/1956 when services operated only between Belmont and North before the final closure of the Belmont route on 25/31956 and that bogie tram 31 is not shown on the board, having gone to Ballarat on 15/2/1956 - see item 5554. See item 8213 for an article on the Geelong system by Keith Kings. Yields information about the Geelong depot allocation board that showed the location and use of the tramcars on the day.Black and white Negative - 120 sizetramways, geelong, depot, depot allocation, tramcar allocation -
 Ballarat Tramway Museum
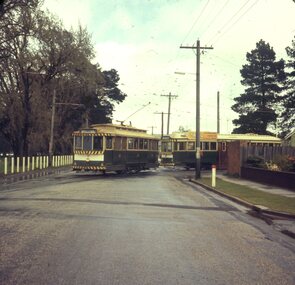
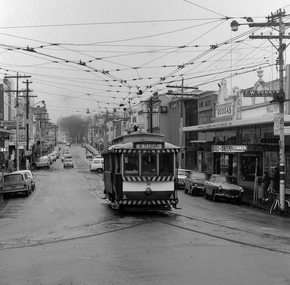
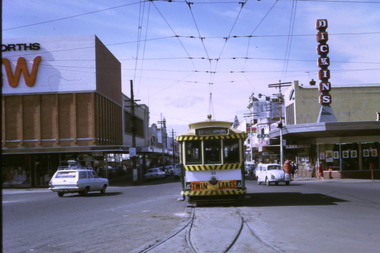
Photograph - Digital image Set of 10, Tony Smith, 1971
Yields information about Ballarat Tramways and trams prior to the closure of the tramway system.Set of 10 digital images of Ballarat trams prior to closure, scanned from original slides by Tony Smith, 1971 prior to closure of the system. .1 - 33 leaving Bridge St at Grenville St. Tram has destination of Gardens via Sturt St West and a Twin Lakes advert. Has Dickins and Woolworths in the background. .2 - 31 and another single trucker at the Victoria St terminus. Has the widened highway beyond the terminus in the background and Meagher's Hotel. .3 - 21 on the Dawson St cross over (has the destination of Mt Pleasant) with 37 in Sturt St, enroute to Lydiard St Nth. Has St Patrick's Cathedral in the background. .4 - 21 on crossover. .5 - 21 on crossover, waiting for 34 to pass by. .6 - 21 at Stones Corner, Bridge St., has Gear Chemist in the background, along with Bank of NSW. Tram has the destination of Mt Pleasant. .7 - 27 descending the Victoria St hill to Stones Corner, Main St junction. Tram has the destination of Gardens via Drummond St Nth. Has the Viscount ambassador Caravans site in the background. .8 - 21 outbound to Mt Pleasant at the Grant St loop in Barkly St. .9 - 21 and 34 at Grant St loop in Barkly St. .10 - 21 at Mt Pleasant terminus, showing Special. Has a person standing alongside the tram. On the adjacent shop is a "The Sun" sign.trams, tramways, grenville st, sturt st, victoria st, sturt st, dawson st, bridge st, stones corner, mt pleasant, grant st, barkly st, tram 33, tram 31, tram 21, tram 37, tram 34 -
 Ballarat Tramway Museum
Ephemera - Timetable/s, State Electricity Commission of Victoria (SECV), "Bendigo Tramways - amended Timetable", Jun. 1970
Set of Bendigo Tramway timetables. Each Two page Gestetner duplicated documents, stapled in the top left hand corner, providing weekday and weekend services for each route departing the city and the nominated route terminus. .1 - Issued 29/6/1970 - see images 1 and 2 .2 - issued 27/9/1971 - see image 3 and 4 .3 - issued 26/6/1970 - same as .1 - three copies held - three copies of SECV copies given to the BTPS at the time of closure. .4 - issued 29/6/1970 - different layout at heading and changes to the bottom of the second page - images 5 and 6. Yields information about Bendigo trams and their timetables for the various lines.Set of four SECV North Electricity Supply Branch timetables. 285.3 - each of three copies marked in ink - "BTPS No 502" in top right hand corner, with copy 1 having "408" crossed out.bendigo, secv, timetables, tram services -
 Ballarat Tramway Museum
Document - Manuscript, Keith Kings, A brief History of the Tramways of Bendigo, 1965
Manuscript titled "A brief history of the Tramways of Bendigo", prepared by Keith Kings during 1965 based on the text in the last paragraph. Was to be a joint effort with Wal Jack, notes Wal's death in 1964. Provides a short history of Bendigo, the construction and operation of the battery and steam tram system, the take over and construction of the electric tramways by the Electric Supply Co. of Victoria. Includes the takeover by the SEC, replacement tramcars, the North Bendigo extension, exchange of cars with Ballarat, Geelong, attempts to close the system and operations during the mid 1960s. The material in this manuscript would have formed by the basis of a booklet published by the ARHS/TMSV at the time of the closure of the SEC operated tramways in 1971.Yields information about the history of Bendigo Tramways written in 1965. Has a strong association with the author who prepared a larger work when the tram system closed in 1971.Manuscript titled - The Tramways of Bendigo - 31 quarto typed pages, carbon copy.Has a number of corrections to the text.trams, tramways, manuscript, history, esco, sec, tramcars, steam trams, bendigo tramways -
 Melbourne Tram Museum
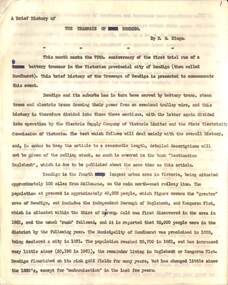
Photograph - Black and White - Cable tram at Queens Bridge South Melbourne
Photograph - undated, possibly prior to the First World War, shows a cable tram with the destination of Spring St passing under the Port Melbourne/St Kilda Rail lines overbridge in Queens Bridge Street. The bridge has a large advert for Wolfe's Schnapps - "for your health sake". On the left-hand side are two policemen talking to each other. There are four horse-drawn carts and one open-top motor car. In the background are Queens Bridge Motors Pty Ltd building and the Queens Bridge Family Hotel. Note the windmill on the left-hand side of the photograph. The railway bridge was partially demolished following the closure of the railway lines in 1987.Yields information about Queens Bridge Melbourne and the rail line over bridge.Black and White Photograph of a cable tram passing under the rail line over bridge at Queens Bridge South Melbourne.trams, tramways, cable trams, queens bridge street, queens bridge motors, queens bridge hotel, wolfe's schnapps, windmills, horse drawn vehicles, railways, port melbourne railway, st kilda railway -
 Melbourne Tram Museum
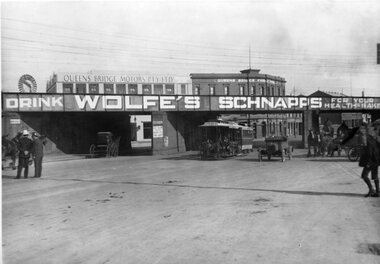
Photograph - Black and White - Victorian Railways Tram at Preston Workshops 1959
Photograph of one of the three Victorian Railways "Luxury" cars that were sold to the MMTB following the closure of the final section of the St Kilda - Brighton tramway on 28-2-1959. The tramcar has been placed on No. 15 trucks to enable movement around the workshops. Two of the trams, No. 52 and 53 were modified with longer running boards, full driver's bulkheads to replace the blackout blinds, route number boxes, removal of the red oil lamps above the headlight, conversion to from Broad gauge (5'3") to standard gauge, changes to destination boxes, seating and many other changes. Reference Destination City, Edition 5, page 103.Yields information about the former VR "Luxury" trams sold to the MMTB in 1959.Black and white photograph of one of the three Victorian Railways Trams sold to the MMTB at Preston Workshops.tramways, mmtb, trams, victorian railways, st kilda brighton electric tramway, preston workshops, vr class -
 Ballarat Tramway Museum
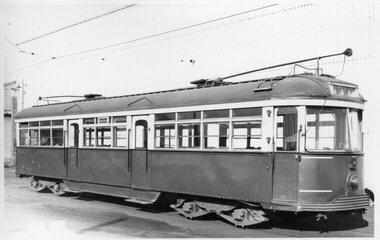
Photograph - Black & White Photograph/s - set of 3, Geoff Grant, 8/01/1956 12:00:00 AM
Yields information about the appearance of Geelong's trams in particular ex Melbourne J class trams after receipt in Geelong. This tram later became Ballarat No. 11.Black and white print from a Geoff Grant negative of a Geelong bogie tram entering Corio Terrace from the Geelong depot on 8/1/1956, while Pengelley 19 waits in the siding. The bogie tram (37) has destination of "Special", 19 - "Chilwell". Has the Geelong SEC depot/powerhouse building in the background with part of the Blakistons' sign visible. Photo used in Trolley Wire, Feb. 1999, page 11, article on Geelong tramways. Pencil marks on the rear of the photo indicate proposed used of the photo in the article. 2472.2 - As above but with the rear of the motor vehicle edited from the photograph. Produced by William Scott for his book, 2008. Two copies. Added 21/7/2009. 2472.3 - large format print from Lloyd Rogers collection via Robert Green 2/2014. Added 4-4-20192472 - On rear in red ink "Geelong Depot 8-1-56" in top left hand corner and in bottom left hand corner "G.A. Grant" 2472.1 - on rear of copy 1 in ink in top left hand corner "40) Geelong 8.1.1956 / G. Grant pic / modified image (background only). Last day of Chilwell Route in 1st closures. Single truck car being changed over about mid afternoon for a bogie car to cater for increased traffic / Cars 19 and 37." copy 2 - "Geelong 8.1.1956 / G. Grant pic / cars 19 & 37." copy 3 - "Geelong tram depot / 8th Jan 1956"trams, tramways, geelong, geelong depot, corio terrace, chilwell, tram 19, tram 37