Showing 4656 items
matching garden st
-
 Ballarat Tramway Museum
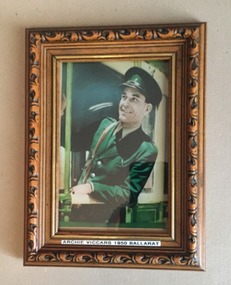
Photograph - Framed Photographs, "Archie Viccars 1950 Ballarat", Original 1950
Containing a colour copy photograph of Conductor Archie Viccars, leaning out of a bogie tram. He has cap number 2 with the conductor's bag slung over his shoulder. The donor noted that Archie worked as a Trammie from the 50's to the 60's when he transferred to the Ripon St offices on clerical duties. See acquisition notes for a story from Noel Forster - email of 1-3-2017 re Archie. Has a strong association with the family of SEC Conductor Archie Viccars and demonstrates the uniform of the time.Wooden frame, with carved out front edge, inner gold lining, varnished with title "Archie Viccars 1950 Ballarat". Printed onto Fujifilm Crystal Archive paper. Has a strip of tape at the base of the photograph ""Archie Viccars 1950 Ballarat".trams, tramways, conductors, ballarat, crews, archie viccars -
 Ballarat Tramway Museum
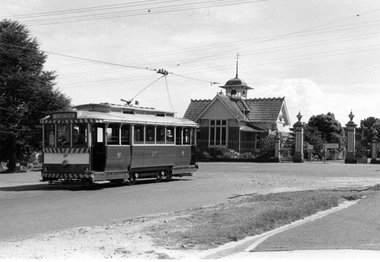
Photograph - Digital image, George Coop, 1968 - 1970
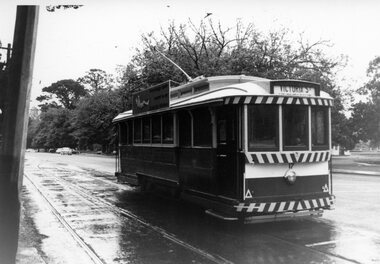
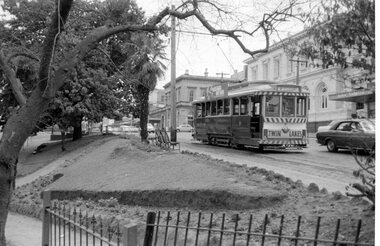
Digital Image of tram No. 27 at the Lydiard St North with the Ballarat General Cemetery gates and building in the background. Tram has the destination of Sebastopol.trams, tramways, lydiard st north, cemetery, tram 27 -
 Ballarat Tramway Museum
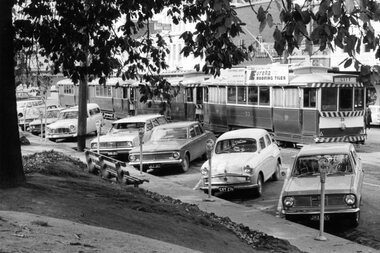
Photograph - Digital image Set of 8, George Coop, 1968 - 1970
Yields information about the City Loop area and its operation. Eight (8) Digital images taken by George Coop during the period 1968 - 1970, of trams at the City Loop. .1 - 33, 17 and two other single truckers parked in the loop with motor vehicles and parking meters. No. 33 has an Eureka Roofing Tile Advert. .2 - 28? passing two track workers cleaning the west end points with a bogie car and three single truckers in the loop. In the background are Patersons and Dickins Food Store. .3 - No. 12 parked at the east end of the loop, hard up against the tram in front. Shows the Section Insulator. .4 - As for .1, front on photo with the destination of City and a "Pay as You Enter". The Dickins sign can be seen. .5 - as for .2, No. 35 leads the queue. Has the Woolworths Big W store in the background. .6 - view from the rear (12, 30, 17) with No. 33 being driven out of the loop. .7 - View from the rear, 33 has moved out of view. Has the T&G (Temperance and General) building in the view. .8 - No. 31 moves over the points at the west end of the loop. The tram has the Destination of Gardens via Drummond North, a Twin Lakes advert and a SEC Electric Cooking Advert.trams, tramways, city loop, sturt st, trackwork, overhead, tram 33, tram 17, tram 26, tram 12, tram 35, tram 31 -
 Ballarat Tramway Museum
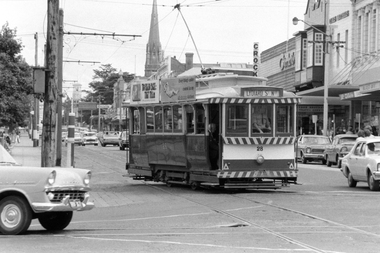
Photograph - Digital image Set of 2, George Coop, 1968 - 1970
Yields information about the City tram terminus and its operation.Two (2) Digital images taken by George Coop during the period 1968 - 1970, of trams at the City Terminus, Sturt and Lydiard St North. .1 - No. 28 with the destination of Lydiard St North turns into Lydiard St from Sturt St. Tram has a SEC roof advert and Tristrams Bliss bombs (to read pack, tilt tram) roof advert. In the background is the Crockers Store. .2 - No. 17 at the terminus, with the destination of Victoria St. The short end of section pole is in the view with its point bar.trams, tramways, sturt st, city, lydiard st north, tram 28, tram 17 -
 Ballarat Tramway Museum
Photograph - Digital image Set of 5, George Coop, 1968 - 1970
... Wendouree Parade near Gardens Loop and Carlton St Trams tramways ...Yields information about Wendouree Parade near Gardens Loop and Carlton StFive (5) Digital images taken by George Coop during the period 1968 - 1970, of SEC trams in the Gardens area. .1 - 17 in Gardens Loop with destination of Victoria St. .2 - 43 climbing the hill to Carlton St Loop. Has the destination of Mt Pleasant .3 - 26 and 31 in Carlton St Loop. 26 - Victoria St and 31, Mt Pleasant .4 - 33 climbing the hill to Carlton St, has the destination of Victoria St. .5 - 26 and 31 - side on at Carlton St loop (end of rowing coarse), crossing 26 - has a Briquettes roof advert and 31 a Electric Cooking advert. trams, tramways, wendouree parade, gardens loop, carlton st loop, tram 17, tram 43, tram 26, tram 31, tram 33 -
 Ballarat Tramway Museum
Photograph - Digital image Set of 5, George Coop, 1968 - 1970
Yields information about the tram operations on the Sebastopol line at Grey St and the terminus.Five (5) Digital images taken by George Coop during the period 1968 - 1970, of SEC trams on the Sebastopol line .1 - Trams 40 (Sebastopol) and 41 (Lydiard St North, with Johnny Walker Whiskey roof adverts) cross at Grey St. .2 - Trams 40 (Lydiard St North) and 35 (Sebastopol) cross at Grey St. Photos has the street signs - Gray St and Bala St in the photo. .3 - ditto, with a male passenger with walking stick boarding 40 - photo shows the loop arrangements. .4 - Tram 40 at the Sebastopol terminus - has destination of Lydiard St North, the Royal Mail Hotel in the background. .5 - ditto with poles being reversed. Tram has roof adverts for Eureka Tiles and a SEC roof advert. trams, tramways, sebastopol, grey st loop, gray st, passengers, crews, tram 40, tram 41, tram 35 -
 Ballarat Tramway Museum
Photograph - Digital image Set of 6, George Coop, 1968 - 1970
Yields information about the tram operations at or near the Ballarat Railway Station.Six (6) Digital images taken by George Coop during the period 1968 - 1970, of SEC trams in Lydiard St North near or at the Railway station/ .1 - Tram 28 northbound with the station building and signal gantry in the background. No. 28 has a White Florist roof advert. .2 - Tram 32 southbound - taken from the signal box, has the gate wheel in the foreground. .3 - Tram 27 south bound, with destination of Sebastopol, with the station building, signal gantry and Reid's Coffee Palace in the background. No. 27 has a Twin Lakes sign and a Bliss Bombs roof advert. .4 - Tram 32, northbound, crossing the railway tracks, taken from the signal box has the railway station goods shed, building and signal gantry in the background. The tram has a Wilkinson Sword Razor blades roof advert. .5 - Tram 28, southbound from signal box. See image .1 for details. .6 - Tram 27, southbound in Lydiard St north with Bliss Bombs advert and destination of Sebastopol. Has the goods yard in the background. Taken through the verandah of Victoria House. trams, tramways, level crossings, railway station, lydiard st north, signals, tram 28, tram 32, tram 27 -
 Ballarat Tramway Museum
Photograph - Digital image Set of 5, George Coop, 1968 - 1970
Yields information about the tram operations at or near the Titanic Bandstand in Sturt St.Five (5) Digital images taken by George Coop during the period 1968 - 1970, of SEC trams in Sturt St, between Lydiard and Grenville Streets on the north side of Sturt St. .1 - Tram 11, descending the hill by the Titanic bandstand with the Post Office in the background. Trams has a Twin Lakes advert, Bliss Bombs and the destination of Mt Pleasant. .2 - Tram 31 ditto, except destination of Victoria St. .3 - Tram 13 with bandstand in the view - for Mt Pleasant. .4 - Tram 33, with a lady and man carrying a box descending the footpath. Tram has the destination of Victoria St and a Twin Lakes sign. .5 - Tram 26, at corner of Sturt and Camp Streets, with the Owen Williams store in the background. trams, tramways, sturt st, tram 11, tram 31, tram 13, tram 33, tram 26 -
 Ballarat Tramway Museum
Photograph - Digital image Set of 10, George Coop, 1968 - 1970
Yields information about the tram operations and the landscape views of the Sturt St median strip.Ten (10) Digital images taken by George Coop during the period 1968 - 1970, of SEC trams in Sturt St, between the City and Pleasant Streets. .1 - Tram 26 climbing the Sturt St hill to Lydiard St, with the Cook's Private Hotel, the Commonwealth Bank and the National Mutual Life building in the background. Photo taken from the Titanic Bandstand. .2 - Tram 40 Sturt St, enough to Lydiard St North just before Raglan St. Has a lady passenger by the tram stop. .3 - Tram 30 - Sturt St north side, near Armstrong St, - has a blue framing line around the photograph. .4 - Tram 39, Sturt St, near Doveton St, shows the rotunda in the median strip. .5 - Tram 18, with median step in view. .6 - Tram 31, with two Johnnie Walker whiskey roof adverts, outside the National Mutual Life building with the Alan Bros Jewellers and Golden Star Chinese Cafe in the view. .7 - Tram 31, Sturt St south side with Town Hall and the Golden City Hotel in the view. Tram has destination of Gardens via Drummond North. .8 - Tram 41 - ditto - going to Sebastopol. .9 - Tram 13, south side, Gardens via Sturt West, about , near Ripon St, with the Ampol service station in the background and about to pick up a lady passenger .10 - Tram 17, near Doveton St. Has a Twin Lakes sign and a Wilkinson Sword Razor Bladese roof advert. trams, tramways, sturt st, raglan st, passengers, doveton st, tram 26, tram 40, tram 30, tram 39, tram 18, tram 31, tram 41, tram 13, tram 17 -
 Ballarat Tramway Museum
Photograph - Black & White Photograph/s, Charles Craig, mid 1950's
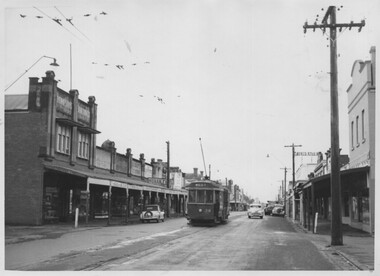
Black and White photograph of Geelong No. 38 (Destination West), in Pakington St Geelong, near Hope St just past the Autumn St loop. Has buildings of the shopping centre in the view. Two copies held - two different sizes.trams, tramways, geelong, pakington st, west, tram 38 -
 Ballarat Tramway Museum
Photograph - Black & White Photograph/s, Charles Craig, mid 1950's
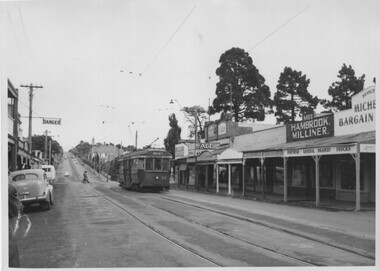
Black and White photograph of Geelong No. 38 (Destination West), in Pakington St Geelong, entering the Autumn St loop. Has buildings of the shopping centre in the view, including Hambrook Milliner. Two copies held - two different sizes.trams, tramways, geelong, pakington st, west, tram 38 -
 Ballarat Tramway Museum
Photograph - Black & White Photograph/s, Charles Craig, mid 1950's
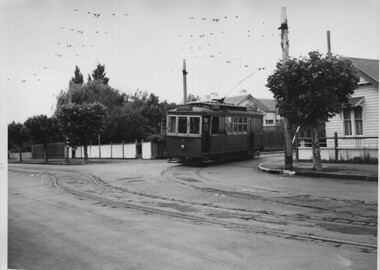
Photograph of ex Geelong No. 6 with destination of Eastern Park turning from Aphrasia St into Pakington St Geelong. Shows the condition of the trackwork and the road surface. Tram ex Newtown. Two prints held - one large and one small. trams, tramways, geelong, newtown, aphrasia st, pakington st, tram 6 -
 Ballarat Tramway Museum
Photograph - Black & White Photograph/s, Charles Craig, mid 1950's
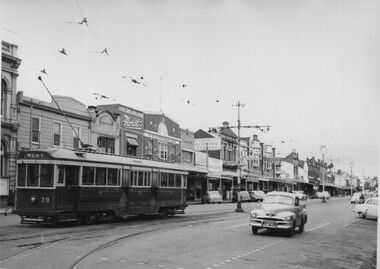
Photograph of ex Geelong No. 39 in Ryrie St at Moorabool St looking west. Tram has the destination of West. Shows the centre poles and the shops in the street. Two prints held - one large and one small. trams, tramways, geelong, ryrie st, moorabool st, tram 39 -
 Ballarat Tramway Museum
Photograph - Black & White Photograph/s, Charles Craig, mid 1950's
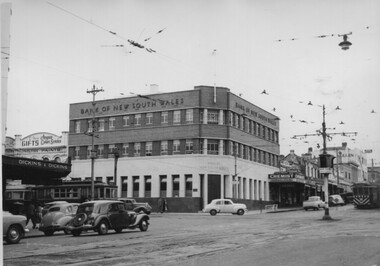
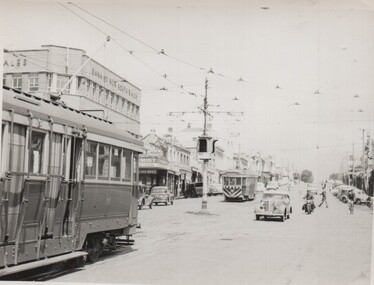
Photograph of the intersection of Ryrie and Moorabool Streets Geelong with the Bank of New South Wales building - three trams can been seen in the view. shows the bar type traffic lights. Also in the view are Dickins and Dickins store and other shops. Two prints held - one large and one small. trams, tramways, geelong, ryrie st, moorabool st, traffic lights -
 Ballarat Tramway Museum
Photograph - Black & White Photograph/s, Charles Craig, mid 1950's
Photograph of the intersection of No. 17 with the destination of Beach in Pakington St at the junction with Aphrasia St. Shows the nature of the layout of the junction and has signs indicating a tram stop and "End of Section". Two large prints held - and one small one, with a vertical frame. trams, tramways, geelong, signs, aphrasia st, pakington st, tram 17 -
 Ballarat Tramway Museum
Photograph - Black & White Photograph/s, Charles Craig, mid 1950's
Photograph of a Geelong single trucker, leaving the loop in Pakington St, outside the Newtown Town Hall, heading north. Two copies held - one large and one small print. (location advised by Dave O'Neil 31-12-2016 by e-mail)trams, tramways, geelong, signs, newtown, pakington st -
 Ballarat Tramway Museum
Photograph - Black & White Photograph/s, Charles Craig, mid 1950's
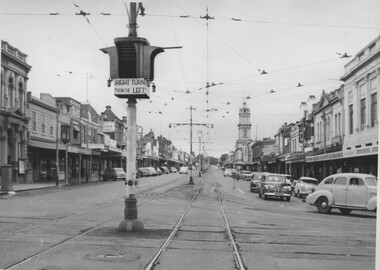
Photograph of the intersection of Ryrie and Moorabool Streets Geelong looking West along Ryrie St, showing the bar type traffic lights and that right hand turns were done from the left lane. Note the Safety zone sign. Two prints held - one large and one small in a vertical form with the traffic lights featured.. trams, tramways, geelong, ryrie st, moorabool st, traffic lights, safety zone -
 Ballarat Tramway Museum
Photograph - Black & White Photograph/s, Charles Craig, mid 1950's
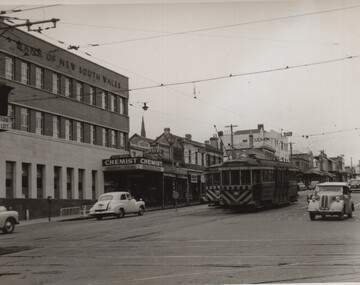
Photograph of the intersection of Ryrie and Moorabool Streets Geelong looking south along Moorabool St, showing the bar type traffic lights and two bogie trams in Ryrie St, one with safety or hazard stripes. Has the Bank of NSW in the view. trams, tramways, geelong, ryrie st, moorabool st, traffic lights -
 Ballarat Tramway Museum
Photograph - Black & White Photograph/s, Charles Craig, mid 1950's
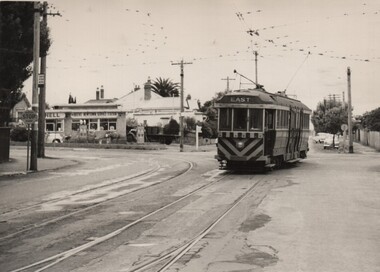
Photograph of the intersection of a bogie tram with destination of East and hazard stripes and dash canopy lighting turning from Pakington St (from West) into Aberdeen St at Pakington St junction. In the background is the Shell service station. Note the metal tram stop sign on the left. Two copies of the print held. trams, tramways, geelong, aberdeen st, east, west, tram stops -
 Ballarat Tramway Museum
Photograph - Black & White Photograph/s, Charles Craig, mid 1950's
Photograph of the intersection of Ryrie and Moorabool Streets Geelong looking south along Moorabool St, with two bogie trams in Ryrie St, both with safety or hazard stripes. Trams have the destination of Belmont and North. Has the Bank of NSW in the view, E. A. O'Meara Chemist advertising Kodak film and the Geelong Nursery Nook. Adjacent to the tram for Belmont is the safety zone sign. trams, tramways, geelong, ryrie st, moorabool st, traffic lights -
 Ballarat Tramway Museum
Photograph - Black & White Photograph/s, Charles Craig, 21/04/1962 12:00:00 AM
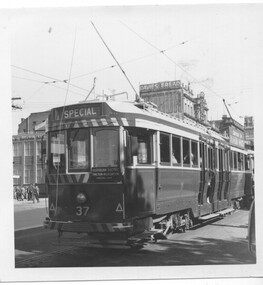
Yields information about tram 37 and an AETA charter.Photograph of the rear of tram 37 in City Loop, Sturt St, on an AETA tour, 21-4-1962 with an AETA auxiliary board. Photo Charles Craig? Has in the background the Mechanics Institute buildings with a Davies Bread and Robur tea advertisement. Has in red ink on rear - "AETA tour 21-4-62".trams, tramways, ballarat, city loop, aeta, sturt st, tram 37 -
 Ballarat Tramway Museum
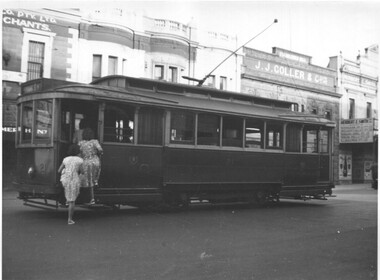
Photograph - Black & White Photograph/s, Charles Craig, early 1950's?
Yields information about the use of the trams and the appearance of Lydiard St North buildings during the early 1950's.Photograph of No. 21, in Lydiard St North, near the Railway Station, boarding two lady passengers. Has J. J. Coller & Co. building and the Hersert E Smith building and sign in the view. Early 1950's? photo by Charles Craig. trams, tramways, lydiard st north, tram 21 -
 Ballarat Tramway Museum
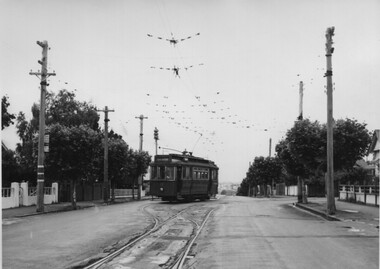
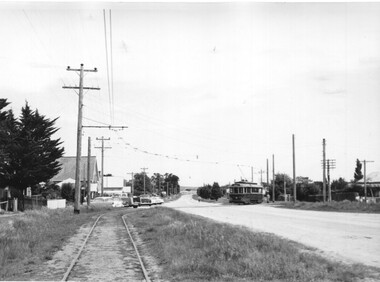
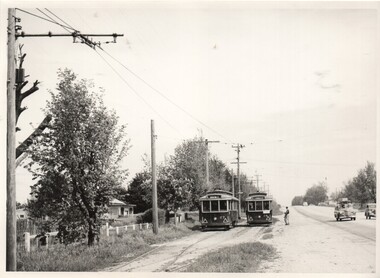
Photograph - Black & White Photograph/s set of 2, Charles Craig, tram No. 27 travelling to Sebastopol in Albert St, early 1950's
Yields information about the traffic and appearance of Albert St Sebastopol during the 1950's and the buildings on either side of the street.Set of two black and white photographs of trams Photo possibly early 1950's of No. 27 travelling to Sebastopol in Albert St. .1 - crossing the roadway near Ophir St with the Trinity Church in the background. .2 - Tram at the Sebastopol Terminus with the new housing on the left side of the roadway and the Royal Mail Hotel. Both photos by Charles Craig trams, tramways, albert st, sebastopol, ophir st, tram 27 -
 Ballarat Tramway Museum
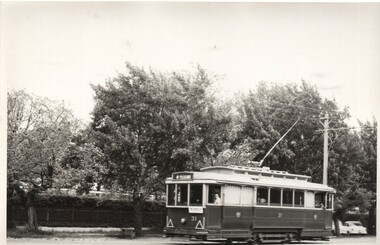
Photograph - Black & White Photograph/s, Charles Craig, late 1950's
Yields information about the tram 31 and Sturt St West during the late 1950's.Black and white photograph of tram No. 31 Sturt St west inbound to the City and then Mt Pleasant. Photo by Charles Craig possibly late 1950's. trams, tramways, sturt st west, mt pleasant, tram 31 -
 Ballarat Tramway Museum
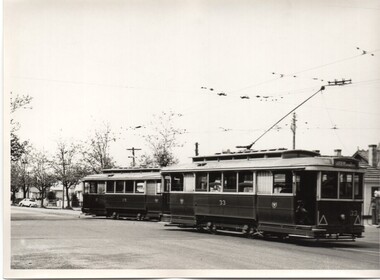
Photograph - Black & White Photograph/s, Charles Craig, late 1950's
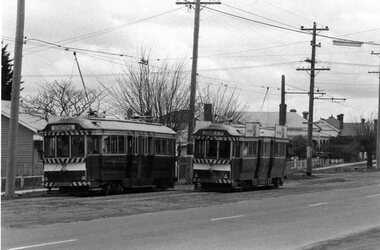
Yields information about the trams at Hospital Corner during the late 1950's.Black and white photograph of trams 28 and 33 at the intersection with Sturt and Drummond St North. Tram 33 has destination of Sturt via Drummond North. Tram 28 is inbound. Has the Shell service station bowser in the background. Photo by Charles Craig possibly late 1950's. trams, tramways, sturt st, drummond st nth, hospital corner, tram 33, tram 28 -
 Ballarat Tramway Museum
Photograph - Black & White Photograph/s set of 2, Charles Craig, early 1950's
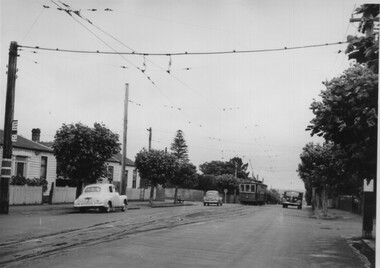
Yields information about the use of the Gray St loop on the Sebastopol line during the early 1950's and its appearance.Black and white photographs of trams 27 and 25 crossing at the Grey St loop in Albert St on the Sebastopol line. Passengers are either waiting or boarding the trams. Tram 27 has the destination of Rubicon St. Note the overgrown area around the loop. Both photos by Charles Craig possibly early 1950's. trams, tramways, sebastopol, albert st, grey st, rubicon st, tram 25, tram 27 -
 Ballarat Tramway Museum
Photograph - Black & White Photograph/s, Charles Craig, 1950's
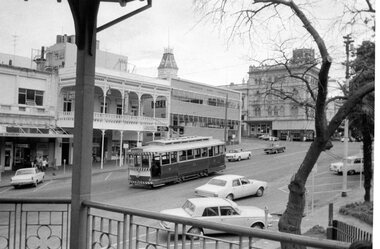
Yields information about the use of the appearance of City terminus and vehicles during the late 1950's.Black and white photograph of Ballarat tram 11 and another single trucker at the City tram stop, Sturt St, with the Town Hall in the background. Tram 11 has the destination of Mt Pleasant. In the view is the City Shelter and a number of Holden motor cars. Photo by Charles Craig possibly late 1950's. trams, tramways, sturt st, town hall, city, shelters, tram 11 -
 Ballarat Tramway Museum
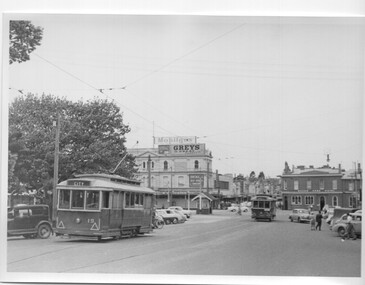
Photograph - Black & White Photograph/s, Charles Craig, 1950's
Yields information about the use of the appearance of City Loop and the intersection with Grenville St during the late 1950's.Black and white photograph of Ballarat tram 19 in the City Loop and tram 30 in Sturt St, leaving Grenville St. Photo has a number of motor vehicles in the view, along with the Bucks Head Hotel, S E Dickins Grocery store on the north side of Bridge St, with adverts for Mobilgas and Greys cigarettes. The Grenville St shelter is in the view as well. Photo by Charles Craig possibly late 1950's. trams, tramways, sturt st, grenville st, city loop, tram 19, tram 30 -
 Ballarat Tramway Museum
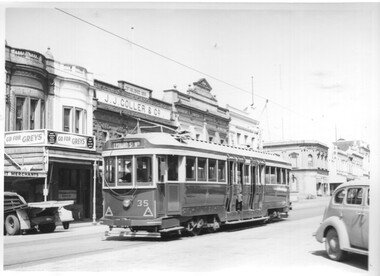
Photograph - Black & White Photograph/s, Charles Craig, 1950's
Yields information about the use of the appearance of tram 35 and Lydiard St North between Mair St and the railway station during the late 1950's.Black and white photograph of Ballarat tram 35, northbound in Lydiard St North with the J J Coller & Co building, Herbert E Smith Merchant in the background. Advert for Greys cigarettes in the view. The buildings on the corner of Mair St are in the view as well. Photo by Charles Craig possibly late 1950's. trams, tramways, lydiard st north, mair st, tram 35 -
 Ballarat Tramway Museum
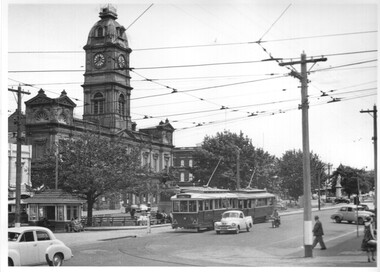
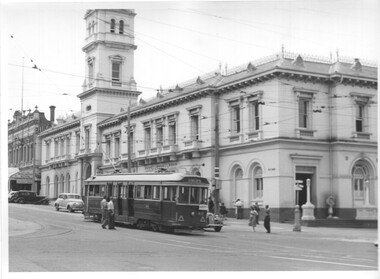
Photograph - Black & White Photograph/s, Charles Craig, 1950's
Yields information about the use of the appearance of tram 40 in Lydiard St North and the Ballarat Post Office during the late 1950's.Black and white photograph of Ballarat tram 40 southbound in Lydiard St North, about to cross Sturt St, enroute to Sebastopol. Photos has the Ballarat Post Office in the background. Photo by Charles Craig possibly late 1950's. Two copies held. trams, tramways, lydiard st north, sturt st, post office, tram 40