Showing 2440 items
matching goldfields north
-
 Ballarat Tramway Museum
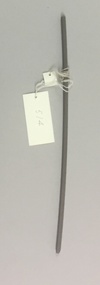
Functional Object - Trolley Wire Sample
Piece of worn trolley wire (copper, probably cadmium copper) taken from north bound trolley wire between poles 9 and 17 (Loop and St. Aidans Drive) on 4/3/1997 during replacement operations. Is badly worn on one side. OK on the other side - slightly curve with worn side on the outside of the curve. Green (Oxidized) and sides, dark brown on top. Has been cut at either end. Images added 3-12-2016 See p14 of Section 65 of ICS Manual Tramway systems etc. London c1921.ballarat, overhead, fittings, trolley wire -
 Ballarat Tramway Museum
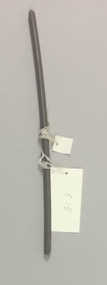
Functional Object - Trolley Wire Sample
Piece of partly worn trolley wire taken from North bound wire between poles 9 and 17 (Loop & St Aidans Drive) on 4/3/97, during replacement operations. Is slightly curved, and only partly worn, both grooves are still good. Has been cut from other wire. See sketch on original worksheet for colours of wire. Images added 3-12-2016ballarat, overhead, fittings, trolley wire -
 Ballarat Tramway Museum
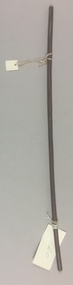
Functional Object - Trolley Wire Sample
Sample of trolley wire taken from overhead (South wire ear 10B) which has worn end and then suffered a fractured or break (North end), during replacement operation. Item noted as fractured when ear was disconnected from hanger. Finally fractured or parted at time of lowering wire to the ground. Images added 3-12-2016ballarat, overhead, fittings, trolley wire -
 Ballarat Tramway Museum
Photograph - Black & White Photograph/s - Last tram from Sebastopol, Greg Triplett, Sep. 1971
Black and white reproduction of photographs used to illustrate the closure of the SEC Ballarat System, published in Association of Railway Enthusiast's (ARE) Dec 1971 issue of their magazine. Centre page photo shows tram 40 at Hospital corner, prior to running into the depot, while on rear pages are night photos of tram 35 at Sebastopol terminus (Royal Mail Hotel in background) and No. 41? at the Lydiard St. north terminus. trams, tramways, ballarat, closure, last tram , tram 40, 35 and 41? -
 Ballarat Tramway Museum
Photograph - Colour Photograph/s - set of 25, Neville Gower, 7/02/1997 12:00:00 AM
Group of twenty five photographs taken on 7/2/1997 of some power poles around Ballarat that still carry the paintwork, faded and worn, of the SEC tramway system tram stops. 1652.1 - North East corner of Drummond Street South and Sebastopol St. 1652.2 - ditto 1652.3 - North east corner of Drummond St. South and La Trobe St. - with bus stop sign 1652.4 - ditto 1652.5 - North corner of Drummond St. South and Skipton St. 1652.6 - ditto 1652.7 - North east corner of Ripon St. North and Sturt St with King Chicken and Seafood shop in the background. 1652.8 - ditto looking down Sturt St. 1652.9 - South West corner of Ripon St. North and Sussex Streets 1652.10 - ditto 1652.11 - Power pole east side of Ripon St North between Mair and Sturt Streets 1652.12 - South west corner of Mair and Ripon North Streets 1652.13 - ditto 1652.14 - North East corner of Mair and Ripon Streets 1652.15 - ditto 1652.16 - ditto 1652.17 - North west corner of Burbank and Macarthur St 1652.18 - ditto 1652.19 - North east corner of Drummond St. North and Webster St. 1652.20 - ditto 1652.21 - Powerlines between Doveton and Dawson in Sturt St. 1652.22 - South corners of Sturt and Doveton Streets 1652.23 - ditto 1652.24 - ditto 1652.25 - ditto Negatives and envelope for the prints with the Reg Item 1652 sheet in documents folder. Photo folder with handwritten notes and negatives with Catalogue Worksheet.tram stops, drummond st., ripon st, sturt st -
 Ballarat Tramway Museum
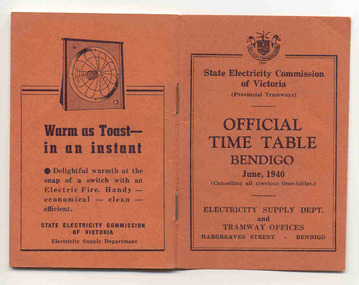
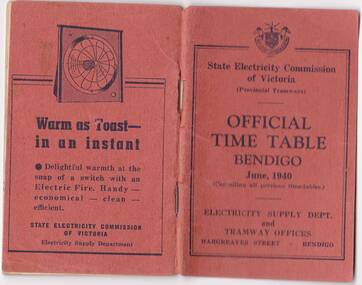
Ephemera - Timetable/s, State Electricity Commission of Victoria (SECV), "Official Time Table Bendigo June 1940", Jun. 1940
Centre pages show a map of the system and the sections. The extension to North Bendigo is yet to be constructed. Gives times for trams leaving the city or the terminals for the routes and for the Eaglehawk route, leaving Long Gully Bridge. Has four SECV Advertisements within the book for hot water, ovens - cookers, toasters and electric fan heaters. Three copies held. See item 5356 for a digital image of the same document with a photograph of Len Smith of Geelong loading a pram into a Birney tram.Provides details of 1940 tram services in Bendigo.Forty-page booklet, with orange lightweight covers, saddle-stapled, SECV Provincial Tramways with the title "Official Time Table Bendigo June 1940". Has address if Hargreaves St Bendigo on bottom of the cover. Two copies held.bendigo, timetables, secv -
 Ballarat Tramway Museum
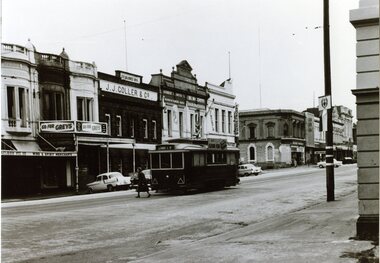
Photograph - Black & White Photograph/s, Tram 14 Lydiard St Nth, late 1950's or early 1960
Black and White photograph, of Ballarat No. 14, late 1950's or early 1960 northbound in Lydiard St. North just to the north of Mair St. Tram has the destination of Lydiard St. Nth and has an Ilford film roof advertisement. In the background are buildings / advertisements for Malled Pty Ltd - Wine and Spirit Merchants, Greys cigarettes, J.J. Coller & Co., Herbert E. Smith Manufacturers Agents, E. Scott hairdresser, and a travel agent. Lady has possibly gotten off the tram and is walking in front of it - at a tram stop. 2nd copy added 6/1/15."TMSV Sales" stamp on rear.tramways, trams, lydiard st north, mair st, tram 14 -
 Ballarat Tramway Museum
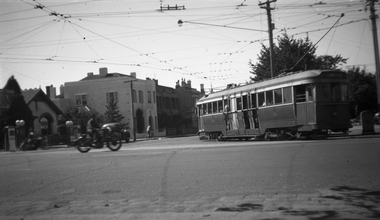
Negative - Print, Wal Jack, No. 35, turning from Drummond St Sth into Sturt St, 30-3-1951
No. 35, turning from Drummond St Sth into Sturt St. Has buildings on the north side of the street photograph and the Shell petrol pumps on the street. At Hospital Corner. Taken on 30.03.1951Yields information about Ballarat 's bogie trams and the scene at Hospital corner.Copy negative of a black and white photograph from Ray Pearson Collection, taken by Dave Macartney in 1975c of a bogie tram, No. 35, turning from Drummond St Sth into Sturt St. Has buildings on the north side of the street photograph and the Shell petrol pumps on the street. At Hospital Corner. Taken on 30.03.1951, see notes around the photo in the hi res image. Image revised from actual hi res scan of original print from the Ray Pearson Album 30/5/2020 and scan of the original Wal Jack 125 negative on 125 film added as image i3 15/7/2020. Print also held. Image i2 - hi res scan of the photo from the Album with notes. trams, tramways, sturt st, drummond st sth, hospital corner -
 Ballarat Tramway Museum
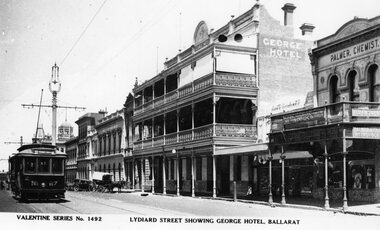
Photograph - Black & White Photograph/s and Digital Image, Valentine & Sons Publishing Co, "Lydiard Street showing George Hotel Ballarat", 1931
View of the early 1930's of No. 27 inbound in Lydiard St Nth. Valentine series No. 1492, with caption "Lydiard Street showing George Hotel, Ballarat". See page 59 of The Golden City and its Tramways and for the photo itself. Photo shows the wooden centre poles, street lighting, tram 27 in ESCo colour scheme, buildings on the west side of Lydiard St North, including the George Hotel, A.M.Palmer & Co Chemist, Wm Hiscock Dentist and other buildings. A horse drawn cart and two motor cars parked at the kerb. See item 8983 for the actual postcard. 3893.1 - Digital image from the Wal Jack Ballarat Album of the same photograph. Wal album notes date the photograph as 1931.Image i2 for the rear of the postcard, Image i3 for high res scan of the postcard. Copy negative image i4 added 3-5-2020.Yields information about Lydiard St Nth in the 1930's, the centre poles, traffic and the appearance of the trams.Black and White copy photograph of a Valentine Series postcard.tramways, trams, esco, lydiard st nth, george hotel, tram 27 -
 Ballarat Tramway Museum
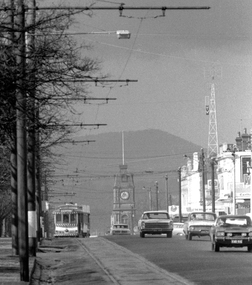
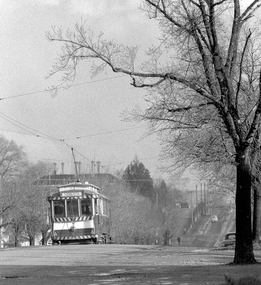
Photograph - Digital image, Peter Bruce, Sturt St into Drummond St North at 1.55pm, 1970s
Yields information about the Sturt St landscape looking east.Digital Image of a tram turning from Sturt St into Drummond St North at 1.55pm - long telephoto lens shot from about Ripon St, looking east. Mt Warrenheip in the far background. Photo taken by Peter Bruce 1970's and 1971 prior to the closure of the Ballarat System. Peter's Title of image: 1.55pmtrams, tramways, ballarat, sturt st, town hall, drummond st nth -
 Ballarat Tramway Museum
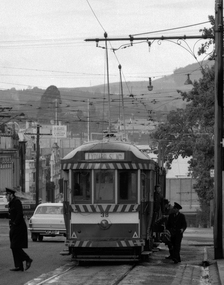
Photograph - Digital image, Peter Bruce, "No. 34 at Drummond Street South", 1970s
Yields information about the Hospital Corner intersection.Digital image of No. 34 turning from Drummond St South into Sturt St. Tram has the destination of Lydiard St North. At Hospital Corner. Photo taken by Peter Bruce 1970's and 1971, prior to the closure of the Ballarat tramway system. Peter's Title of image: "No. 34 at Drummond Street South"trams, tramways, drummond st sth, hospital corner, sturt st, tram 34 -
 Ballarat Tramway Museum
Photograph - Digital image, Peter Bruce, "No. 40 and Valiant", 1970s
Yields information about Albert St Sebastopol and the way the tram related to the roadway.Digital image of No. 40 southbound in Albert St Sebastopol with a Valiant motor car parked on the gravel portion of the road. Note the destination on the tram, Lydiard St North, either reset to early or forgot to change it. Photo taken by Peter Bruce 1970's and 1971, prior to the closure of the Ballarat tramway system. Peter's Title of image: "No. 40 and Valiant"trams, tramways, albert st, sebastopol, tram 40 -
 Ballarat Tramway Museum
Photograph - Digital image Set of 2, Peter Bruce, Lydiard St North, 1970s
Yields information about the Sturt St and Lydiard St intersection.Digital image, black and white, two images of No. 32 in Lydiard St North. .1 - adjacent to the post office, about to turn into Sturt St, enroute for Sebastopol. .2 - further up Lydiard St North, taken from outside Craigs Royal Hotel (see also Reg Item 4594 for a similar photo) Photo taken by Peter Bruce 1970's and 1971, prior to the closure of the Ballarat tramway system. Peter's Title of image: "No. 32 Lydiard St Nth".trams, tramways, lydiard st, craig s hotel, post office, tram 32 -
 Ballarat Tramway Museum
Photograph - Digital image Set of 3, Peter Bruce, "No. 32 Lydiard St North", 1970s
Yields information about the Lydiard St North Route, and the landscape.Digital image, black and white, set of three images of No. 32 in Lydiard St North, taken with a telephoto lens at various locations. Photo taken by Peter Bruce 1970's and 1971, prior to the closure of the Ballarat tramway system. Peter's Title of image: "No. 32 Lydiard St North"trams, tramways, lydiard st north, tram 32 -
 Ballarat Tramway Museum
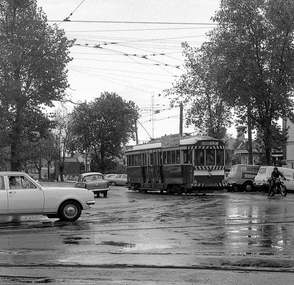
Photograph - Digital image, Peter Bruce, "No. 38 taken at 1015", 1970s
Yields information about Sturt St City terminus and passengers and crews getting on and off the tram, after changing crews.Digital image, black and white, of No. 38 at the city terminus in Sturt St, with passengers getting off the tram and crews starting to walk across the road, probably after a change over of crews. There is another tram in front of No. 38. No. 38 has the destination of Lydiard St North. Photo taken by Peter Bruce 1970's and 1971, prior to the closure of the Ballarat tramway system. Peter's Title of image: "No. 38 taken at 1015"trams, tramways, crews, sturt st, tram 38 -
 Ballarat Tramway Museum
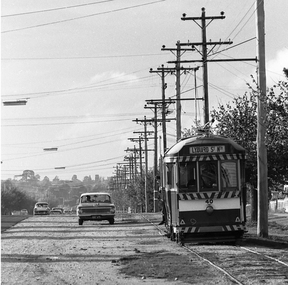
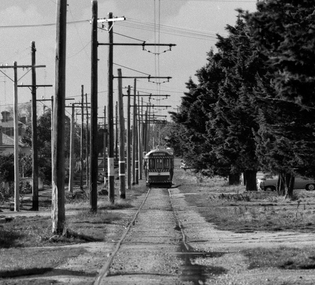
Photograph - Digital image, Peter Bruce, "No. 39 approaching Sebas", 1970s
Yields information about the Sebastopol route and area near the terminus.Digital image, black and white, of No. 39 in Albert St Sebastopol, north of the Sebastopol terminus. Shows the condition of the track and the number of poles in the section. Taken with a telephoto lens. Photo taken by Peter Bruce 1970's and 1971, prior to the closure of the Ballarat tramway system. Peter's Title of image: "No. 39 approaching Sebas"trams, tramways, sebastopol, tram 38 -
 Ballarat Tramway Museum
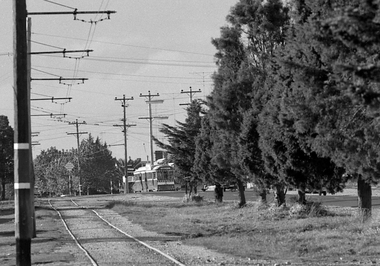
Photograph - Digital image Set of 3, Peter Bruce, 1970s
Yields information about the highway crossing Albert St Sebastopol from both sides.Digital image, black and white, set of three images of No. 41 crossing Albert St Sebastopol. .1 - No. 41 southbound, before crossing Albert St. .2 - ditto, after crossing Albert St .3 - No. 41 on return, north bound. Note the pole with directions for Mt Clean, Sebastopol Gun Club. Photo taken by Peter Bruce 1970's and 1971, prior to the closure of the Ballarat tramway system. Peter's Title of image: "No. 41 at the Highway"trams, tramways, albert st, sebastopol, tram 41 -
 Ballarat Tramway Museum
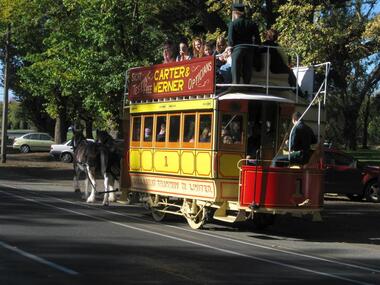
Photograph - Digital image set of 12, Peter Winspur, Museum horse tram operating, 8 & 9 May 2010
Yields information about the operation of the horse tram by the BTM during the Ballarat Heritage Weekend 2010.Set of 12 digital images taken on Saturday 8 or Sunday 9 May 2010 of the horse tram operating between Gardens Loop and St Aidans Drive by Peter Winspur, for the City of Ballarat 2010 Heritage Weekend. .1 - tram heading north from the loop area. .2 - view at the stop where the tram was turned around with people swapping around. .3 - admiring the horses. .4 - ditto .5 - ditto .6 - queuing for the tram - Len Millar by the sign. .7 - tram ride sign .8 - travelling towards St Aidans Drive. .9 - ditto .10 - ditto - returning from St Aidans Drive, Len Millar and Lyle Drayton .11 - scene at the loop with people swapping trams. .12 - ditto and No. 28trams, tramways, horse tram, btm, wendouree parade, tram 1, tram 28 -
 Ballarat Tramway Museum
Photograph - Digital image Set of 11, Stuart Loddington, 10 images of Ballarat trams prior to closure, 1971
Yields information about Ballarat Tramways and trams prior to the closure of the tramway system.Set of 11 digital images, comprising 1 donation text image and 10 images of Ballarat trams prior to closure, scanned from original slides by Stuart Lodington, 1971 prior to closure of the system. .1 - Donation text slide. .2 - No. 26 southbound in Lydiard St North, with the Ballarat Railway Station level crossing gates in the background. .3 - No. 27 and 30 crossing at Bell St Loop, Skipton St. (see also btm4976i4) .4 - No. 17 Wendouree Parade, near Gardens Loop .5 - Single truck tram at Victoria St terminus, taken from the west side of the Buninyong Rail line bridge, with CRB Roadwork sign, Eureka Caravan Park and Meagher Hotel in the background, possibly No. 11, see entry for .10 .6 - No. 12 and 30 crossing at the Urquhart St Loop, Drummond St South. .7 - No. 12 westbound in Sturt St, with Grenville St in the background. .8 - No. 17 at Gardens Loop with the Trolley pole being reversed. .9 - No. 30, Lydiard St North with Reid's Palace building in the background. .10 - No. 11 passing over the Buninyong rail line bridge, with Gardens via Sturt St West and a Twin Lakes sign. Has a number of children alongside the driver. .11 - No. 21 heading northbound in Wendouree Parade, Gardens, just to the north of the now BTM depot junction.trams, tramways, ballarat, level crossings, buninyong railway, lydiard st north, bell st, victoria st, wendouree parade, gardens, drummond st, sturt st, tram 26, tram 27, tram 30, tram 17, tram 12, tram 21, tram 11 -
 Ballarat Tramway Museum
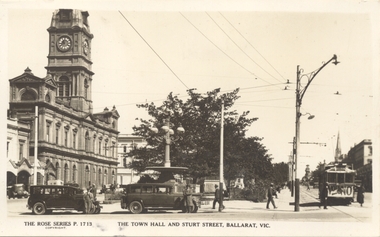
Photograph - Digital image, Rose Stereograph Co, "The Town Hall and Sturt Street Ballarat Vic", 1930
Yields information the buildings, buildings and scene at the intersection of Sturt and Lydiard St North Ballarat c1930, voting advertisements for the introduction of restriction alcohol trading and details of the taxis used in the period.Digital image from the Wal Jack Ballarat Album of a postcard - Rose Series - P1713, titled "The Town Hall and Sturt St, Ballarat Vic" with an ESCo tram with a "Vote No" on the front dash panel, two taxis mid block and the Town Hall in the background. Drivers standing along both taxis. Wal Jack has said in his hand written caption "Old type Electric No. 6, 1930" High resolution image scanned at 2400dpi. See item 8979 for the actual postcard.Written in pencil on back of photo "Old type Electric No. 6, 1930"trams, tramways, esco, sturt st, lydiard st, taxis, town hall, tram 6 -
 Ballarat Tramway Museum
Photograph - Digital image, Murray Views, Title Postcard Murray Views No. 40 Lydiard St Ballarat, 1948
Digital image from the Wal Jack Ballarat Album of No. 25 at the intersection of Sturt and Lydiard St, c 1948, and of motorcars and other users in Lydiard St North. Looking south. Murray Views No. 40 Postcard. Has Post Office and the Commonwealth Bank in the view. See image i2 for rear of photograph and 8974 for the actual postcard.Yields information about the appearance of Lydiard St and Sturt St intersection from the north-eastern corner and the nature of the vehicular traffic using the street, c1948.Digital image of a postcard from an album compiled by Wal Jack, loaned to the Museum.Printed on rear - Real Photograph Produced in Australia by Murray Views, Gympie Q" and places for stamp, dividing line and word "postcard"trams, tramways, lydiard st, sturt st, tram 25 -
 Ballarat Tramway Museum
Photograph - Digital image, Murray Views, Murray Views No. 29 - Sturt Street Looking West, Ballarat Vic.", 1948
Digital image from the Wal Jack Ballarat Album of Photo of Sturt St. looking North East from Town Hall with tram 32 westbound. Tunbridge store (now demolished in photo), Murray Views Photo No. 29. See image i2 for rear of photograph, and 8971 for the actual postcard. See also Reg Item 189 for a larger wider version of this card.Yields information about the appearance of Sturt St looking towards the Post Office c1948.Digital image of a postcard from an album compiled by Wal Jack, loaned to the Museum.On rear of postcard in ink "No. 32 1948"trams, tramways, sturt st, tram 32 -
 Ballarat Tramway Museum
Photograph - Digital image, State Electricity Commission of Victoria (SECV), "Official Timetable Bendigo June 1940"
Yields information about the Bendigo Tram services.Digital image or copy of the SEC "Official Timetable Bendigo June 1940", 22 image files - 44 pages, giving details of the fares, transfers, luggage or parcels, lost property, times of each tram on the Quarry Hill, Eaglehawk, Lake Weeroona and Golden Square for both directions and Monday to Thursday, Friday, Saturday and Sunday. Has a number of advertisements for SEC home equipment, cookers, toasters, refrigerator, electric radiators and hot water. In the middle page is a map of the Tramway Routes, which has been hand drawn to shown North Bendigo and the depot location. Inside the rear cover, on a sheet headed "Memorandum" is a photograph, taped in of a conductor loading a pram onto a Birney tram. Under the photograph is in ink "Len Smith (Geelong)" See item3127 for an original copy and pdf scan. trams, tramways, bendigo, timetables -
 Ballarat Tramway Museum
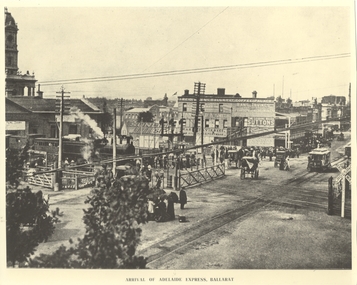
Photograph - Black & White Photograph/s, Lydidard St level crossing and a picnic train, c1905 to 1906
Yields information about the Lydiard St level crossing.Black and white photograph of No. ESCo No. 10 about to cross the Lydiard St level crossing. Photo has the title of "Arrival of Adelaide Express, Ballarat", which is not correct for the trains consist - more like a picnic special - this photo has been written up somewhere. D class loco, with two six wheel carriages behind the locomotive. Group of women with umbrellas (sun) waiting for the tram. Horse drawn carts, interlocked gates, signals prior to resignalling of the post and railway level crossing signs. In the background is Reids Coffee Palace, advertising Sunlight soap, Suttons Music, Pearson's Hard soap, Hans Irvines Champion Wines and Standard & Smith.trams, tramways, railway station, lydiard st north, reids coffee palace, esco, tram 10 -
 Ballarat Tramway Museum
Document - Handwritten Notes, Wal Jack, "Bendigo Tramways 1890 - 1942", 1930-1940's
Covers the development of the battery tramway, depot, battery tramcar operations, steam locomotives, horse trams, steam trams, track, managers of the private company, ESCo purchase, electric trams, trams from Melbourne, SEC, description and extension to North Bendigo. May have been copied from another source.Yields information about the history of tramway operations in Bendigo and the tramcars.Handwritten copy of an article or an original article, titled "Bendigo Tramways 1890 - 1942" Eleven pages. Contained within Reg Item 5485 - Service Exercise Book, black covers, with label, red binding titled "No. 2 - Ballarat Tramways & S.E.C. Systems". trams, tramways, bendigo, battery trams, steam trams, sec, esco -
 Ballarat Tramway Museum
Ephemera - Timetable, Wal Jack, notes on the Ballarat Tramways overhead, 1940's - 1950's
Yields information about the Ballarat overhead, track layouts, terminals and the Sebastopol type cars.Three hand written foolscap pages with notes on the Ballarat Tramways overhead, the Sebastopol tramcars axle boxes, double ended sidings at Victoria St and Lydiard St North, possible track extensions, Viewpoint terminus, Forest City signs, View Point Loop and Bridge St relaying in 1957. Contained within Reg Item 5507 - Foolscap binder with green covers, black binding edge and metal clips. overhead, terminus, view point, signals, sebastopol type -
 Ballarat Tramway Museum
document - Typed Notes, "Track Grades" and "Tramway Route Distances", 1953
Yields information about the curves and grades and track distances in Ballarat on its tramways.Typed notes titled 1. - "Tramway Route Distances" detailing the distances in Ballarat over the various routes and within the city, often measured from building lines, provided in chains. Typed 12/3/1953, initials "WM" 2 - "Track Grades" - for Sturt St, South track between Albert and Lydiard St (south side), North side (between Courier Office and Lydiard St", Victoria St, east from Main Road, location of sharpest curve (Main Road into Barkly St), Dawson St crossover, Contained within Reg Item 5507 - Foolscap binder with green covers, black binding edge and metal clips. track, ballarat -
 Ballarat Tramway Museum
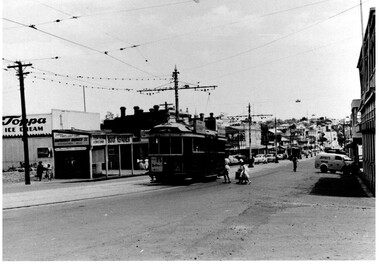
Photograph - Black & White, Bendigo 3 climbing Mitchell St, late 1950's
Black and White photograph, of Bendigo 3 climbing Mitchell St, near the Railway Station with the Destination of Quarry Hill. Has a Hutton's Ham ad on the front drivers panel and two rood ads. In the background are Sandhurst Dairies shop advertising Toppa Ice Cream, a boot repairer and a van marked Jeffreys Bread parked on the north side of Mitchell St. Nearing the point where the double track became single - see the signal wire insulators in the overhead. Printed on Fujichrome paper. Two copies held."TMSV Sales" stamp on rear. On rear of in ink 'HTT16 = MM N 102 = Geel 32 = BED 3"trams, tramways, bendigo, mitchell st, quarry hill, overhead, tram 3 -
 Ballarat Tramway Museum
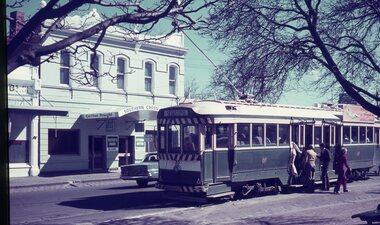
Slide - 35mm slide/s - set of 3, Dave Simpson, trams in Sturt St near Hospital Corner, late 1960's early 1970's
.1 -No. 35, outbound to Sebastopol with the Southern Cross Hotel in the background. Has signs for Fosters Larger, Carlton Draught and Victoria Bitter. Has a number of passengers boarding the tram. .2 - at Hospital corner with the signal system control box for the Forest City signals in the foreground on a pole. Has marking for Sebastopol, Sturt St West and Drummond St North? written on the box. Above this is a sign advising passengers that trams depart this point for The Gardens, View Point and Sebastopol. In the background is J. A. Malpass Hairdresser shop. See item 8900 for the actual switch. .3 - No. 35 turning into Drummond St south with the bottle shop on the south east corner in the background.Yields information about Hospital corner and the switch for the Forest City signalling system controls.Set of three 35mm slides - AGFA dark blue / white plastic mounts of trams in Sturt St near Hospital Corner. tramways, trams, sturt st, hotels, hospital corner, forest city signals, signs, tram 35 -
 Ballarat Tramway Museum
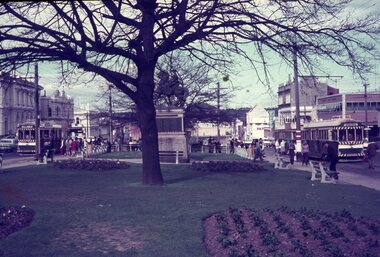
Slide - 35mm slide/s - set of 3, Dave Simpson, trams at the intersection of Sturt and Lydiard St - City terminus, late 1960's early 1970's
Yields information about the intersection of Sturt and Lydiard Sts tramway centre and Boer War monument.Set of three 35mm slides - AGFA dark blue / white plastic mounts of trams at the intersection of Sturt and Lydiard St - City terminus. 1 - view from the central median on the west side of Lydiard St, looking East with the Commonwealth Bank, Post Office, with many passengers at the location. The Boer War monument /statue is in the centre part of the photograph. 2 - No. 14 about to turn into Lydiard St North/ The short tram stop and End of Section sign are adjacent to the tram. 3 - Tram waiting at the north side tram stop - has a Twin Lakes and Cinzano sign. Has the ANZ bank and the SEC offices in the background.tramways, trams, sturt st, city, lydiard st, passengers, signs, tram 14