Showing 2634 items
matching otway-reef
-
 Flagstaff Hill Maritime Museum and Village
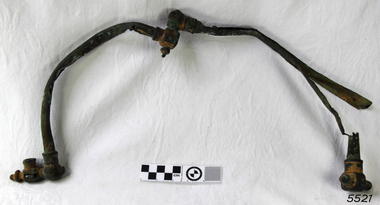
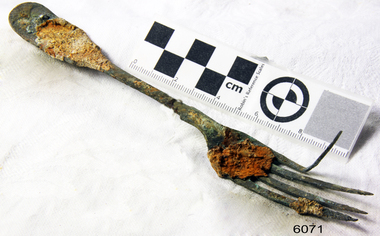
Functional object - Gas Fitting, c. 1873
This gas fitting was recovered from the wreck of the Loch Ard circa 1970, at the time of the discovery of the wreck. HISTORY OF THE LOCH ARD: - The LOCH ARD belonged to the famous Loch Line which sailed many ships from England to Australia. Built in Glasgow by Barclay, Curdle and Co. in 1873, the LOCH ARD was a three-masted square rigged iron sailing ship. The ship measured 262ft 7" (79.87m) in length, 38ft (11.58m) in width, 23ft (7m) in depth and had a gross tonnage of 1693 tons. The LOCH ARD's main mast measured a massive 150ft (45.7m) in height. LOCH ARD made three trips to Australia and one trip to Calcutta before its final voyage. LOCH ARD left England on March 2, 1878, under the command of Captain Gibbs, a newly married, 29 year old. She was bound for Melbourne with a crew of 37, plus 17 passengers and a load of cargo. The general cargo reflected the affluence of Melbourne at the time. On board were straw hats, umbrella, perfumes, clay pipes, pianos, clocks, confectionary, linen and candles, as well as a heavier load of railway irons, cement, lead and copper. There were items included that intended for display in the Melbourne International Exhibition in 1880. The voyage to Port Phillip was long but uneventful. At 3am on June 1, 1878, Captain Gibbs was expecting to see land and the passengers were becoming excited as they prepared to view their new homeland in the early morning. But LOCH ARD was running into a fog which greatly reduced visibility. Captain Gibbs was becoming anxious as there was no sign of land or the Cape Otway lighthouse. At 4am the fog lifted. A man aloft announced that he could see breakers. The sheer cliffs of Victoria's west coast came into view, and Captain Gibbs realised that the ship was much closer to them than expected. He ordered as much sail to be set as time would permit and then attempted to steer the vessel out to sea. On coming head on into the wind, the ship lost momentum, the sails fell limp and LOCH ARD's bow swung back. Gibbs then ordered the anchors to be released in an attempt to hold its position. The anchors sank some 50 fathoms - but did not hold. By this time LOCH ARD was among the breakers and the tall cliffs of Mutton Bird Island rose behind the ship. Just half a mile from the coast, the ship's bow was suddenly pulled around by the anchor. The captain tried to tack out to sea, but the ship struck a reef at the base of Mutton Bird Island, near Port Campbell. Waves broke over the ship and the top deck was loosened from the hull. The masts and rigging came crashing down knocking passengers and crew overboard. When a lifeboat was finally launched, it crashed into the side of LOCH ARD and capsized. Tom Pearce, who had launched the boat, managed to cling to its overturned hull and shelter beneath it. He drifted out to sea and then on the flood tide came into what is now known as LOCH ARD Gorge. He swam to shore, bruised and dazed, and found a cave in which to shelter. Some of the crew stayed below deck to shelter from the falling rigging but drowned when the ship slipped off the reef into deeper water. Eva Carmichael had raced onto deck to find out what was happening only to be confronted by towering cliffs looming above the stricken ship. In all the chaos, Captain Gibbs grabbed Eva and said, "If you are saved Eva, let my dear wife know that I died like a sailor". That was the last Eva Carmichael saw of the captain. She was swept off the ship by a huge wave. Eva saw Tom Pearce on a small rocky beach and yelled to attract his attention. He dived in and swam to the exhausted woman and dragged her to shore. He took her to the cave and broke open case of brandy which had washed up on the beach. He opened a bottle to revive the unconscious woman. A few hours later Tom scaled a cliff in search of help. He followed hoof prints and came by chance upon two men from nearby Glenample Station three and a half miles away. In a state of exhaustion, he told the men of the tragedy. Tom returned to the gorge while the two men rode back to the station to get help. By the time they reached LOCH ARD Gorge, it was cold and dark. The two shipwreck survivors were taken to Glenample Station to recover. Eva stayed at the station for six weeks before returning to Ireland, this time by steamship. In Melbourne, Tom Pearce received a hero's welcome. He was presented with the first gold medal of the Royal Humane Society of Victoria and a £1000 cheque from the Victorian Government. Concerts were performed to honour the young man's bravery and to raise money for those who lost family in the LOCH ARD disaster. Of the 54 crew members and passengers on board, only two survived: the apprentice, Tom Pearce and the young woman passenger, Eva Carmichael, who lost all of her family in the tragedy. Ten days after the LOCH ARD tragedy, salvage rights to the wreck were sold at auction for £2,120. Cargo valued at £3,000 was salvaged and placed on the beach, but most washed back into the sea when another storm developed. The wreck of LOCH ARD still lies at the base of Mutton Bird Island. Much of the cargo has now been salvaged and some was washed up into what is now known as LOCH ARD Gorge. Cargo and artefacts have also been illegally salvaged over many years before protective legislation was introduced. One of the most unlikely pieces of cargo to have survived the shipwreck was a Minton porcelain peacock - one of only nine in the world. The peacock was destined for the Melbourne International Exhibition in 1880. It had been well packed, which gave it adequate protection during the violent storm. Today, the Minton peacock can be seen at the Flagstaff Hill Maritime Museum in Warrnambool. From Australia's most dramatic shipwreck it has now become Australia's most valuable shipwreck artefact and is one of very few 'objects' on the Victorian State Heritage Register. Flagstaff Hill’s collection of artefacts from LOCH ARD is significant for being one of the largest collections of artefacts from this shipwreck in Victoria. It is significant for its association with the shipwreck, which is on the Victorian Heritage Register (VHR S417). The collection is significant because of the relationship between the objects, as together they have a high potential to interpret the story of the LOCH ARD. The LOCH ARD collection is archaeologically significant as the remains of a large international passenger and cargo ship. The LOCH ARD collection is historically significant for representing aspects of Victoria’s shipping history and its potential to interpret sub-theme 1.5 of Victoria’s Framework of Historical Themes (living with natural processes). The collection is also historically significant for its association with the LOCH ARD, which was one of the worst and best known shipwrecks in Victoria’s history. Copper gas pipe and fitting. Tow C-shaped pipes with fittings at each end. One end of each pipe is joined to the other pipe, making a U-shape. It was recovered from the 1878 wreck of the ship Loch Ard in the 1970s. flagstaff hill, warrnambool, shipwrecked coast, flagstaff hill maritime museum, maritime museum, shipwreck coast, flagstaff hill maritime village, great ocean road, loch line, loch ard, captain gibbs, eva carmichael, tom pearce, glenample station, mutton bird island, loch ard gorge, copper gas pipe and fitting, copper gas pipe -
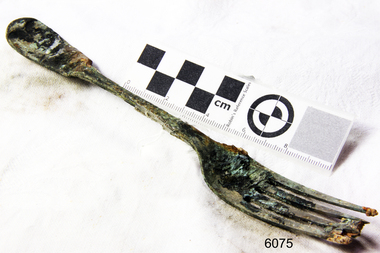
 Flagstaff Hill Maritime Museum and Village
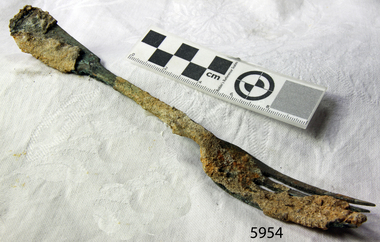
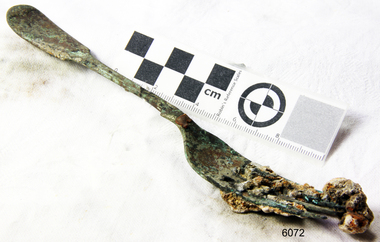
Domestic object - Fork
HISTORY OF THE LOCH ARD The LOCH ARD belonged to the famous Loch Line which sailed many ships from England to Australia. Built in Glasgow by Barclay, Curdle and Co. in 1873, the LOCH ARD was a three-masted square rigged iron sailing ship. The ship measured 262ft 7" (79.87m) in length, 38ft (11.58m) in width, 23ft (7m) in depth and had a gross tonnage of 1693 tons. The LOCH ARD's main mast measured a massive 150ft (45.7m) in height. LOCH ARD made three trips to Australia and one trip to Calcutta before its final voyage. LOCH ARD left England on March 2, 1878, under the command of Captain Gibbs, a newly married, 29 year old. She was bound for Melbourne with a crew of 37, plus 17 passengers and a load of cargo. The general cargo reflected the affluence of Melbourne at the time. On board were straw hats, umbrella, perfumes, clay pipes, pianos, clocks, confectionary, linen and candles, as well as a heavier load of railway irons, cement, lead and copper. There were items included that intended for display in the Melbourne International Exhibition in 1880. The voyage to Port Phillip was long but uneventful. At 3am on June 1, 1878, Captain Gibbs was expecting to see land and the passengers were becoming excited as they prepared to view their new homeland in the early morning. But LOCH ARD was running into a fog which greatly reduced visibility. Captain Gibbs was becoming anxious as there was no sign of land or the Cape Otway lighthouse. At 4am the fog lifted. A man aloft announced that he could see breakers. The sheer cliffs of Victoria's west coast came into view, and Captain Gibbs realised that the ship was much closer to them than expected. He ordered as much sail to be set as time would permit and then attempted to steer the vessel out to sea. On coming head on into the wind, the ship lost momentum, the sails fell limp and LOCH ARD's bow swung back. Gibbs then ordered the anchors to be released in an attempt to hold its position. The anchors sank some 50 fathoms - but did not hold. By this time LOCH ARD was among the breakers and the tall cliffs of Mutton Bird Island rose behind the ship. Just half a mile from the coast, the ship's bow was suddenly pulled around by the anchor. The captain tried to tack out to sea, but the ship struck a reef at the base of Mutton Bird Island, near Port Campbell. Waves broke over the ship and the top deck was loosened from the hull. The masts and rigging came crashing down knocking passengers and crew overboard. When a lifeboat was finally launched, it crashed into the side of LOCH ARD and capsized. Tom Pearce, who had launched the boat, managed to cling to its overturned hull and shelter beneath it. He drifted out to sea and then on the flood tide came into what is now known as LOCH ARD Gorge. He swam to shore, bruised and dazed, and found a cave in which to shelter. Some of the crew stayed below deck to shelter from the falling rigging but drowned when the ship slipped off the reef into deeper water. Eva Carmichael had raced onto deck to find out what was happening only to be confronted by towering cliffs looming above the stricken ship. In all the chaos, Captain Gibbs grabbed Eva and said, "If you are saved Eva, let my dear wife know that I died like a sailor". That was the last Eva Carmichael saw of the captain. She was swept off the ship by a huge wave. Eva saw Tom Pearce on a small rocky beach and yelled to attract his attention. He dived in and swam to the exhausted woman and dragged her to shore. He took her to the cave and broke open case of brandy which had washed up on the beach. He opened a bottle to revive the unconscious woman. A few hours later Tom scaled a cliff in search of help. He followed hoof prints and came by chance upon two men from nearby Glenample Station three and a half miles away. In a state of exhaustion, he told the men of the tragedy. Tom returned to the gorge while the two men rode back to the station to get help. By the time they reached LOCH ARD Gorge, it was cold and dark. The two shipwreck survivors were taken to Glenample Station to recover. Eva stayed at the station for six weeks before returning to Ireland, this time by steamship. In Melbourne, Tom Pearce received a hero's welcome. He was presented with the first gold medal of the Royal Humane Society of Victoria and a £1000 cheque from the Victorian Government. Concerts were performed to honour the young man's bravery and to raise money for those who lost family in the LOCH ARD disaster. Of the 54 crew members and passengers on board, only two survived: the apprentice, Tom Pearce and the young woman passenger, Eva Carmichael, who lost all of her family in the tragedy. Ten days after the LOCH ARD tragedy, salvage rights to the wreck were sold at auction for £2,120. Cargo valued at £3,000 was salvaged and placed on the beach, but most washed back into the sea when another storm developed. The wreck of LOCH ARD still lies at the base of Mutton Bird Island. Much of the cargo has now been salvaged and some was washed up into what is now known as LOCH ARD Gorge. Cargo and artefacts have also been illegally salvaged over many years before protective legislation was introduced. One of the most unlikely pieces of cargo to have survived the shipwreck was a Minton porcelain peacock - one of only seven in the world. The peacock was destined for the Melbourne International Exhibition in 1880. It had been well packed, which gave it adequate protection during the violent storm. Today, the Minton peacock can be seen at the Flagstaff Hill Maritime Museum in Warrnambool. From Australia's most dramatic shipwreck it has now become Australia's shipwreck artefact and is one of very few 'objects' on the Victorian State Heritage Register most valuable. The LOCH ARD shipwreck is of State significance – Victorian Heritage Register S 417 Flagstaff Hill’s collection of artefacts from LOCH ARD is significant for being one of the largest collections of artefacts from this shipwreck in Victoria. It is significant for its association with the shipwreck, which is on the Victorian Heritage Register (VHR S417). The collection is significant because of the relationship between the objects, as together they have a high potential to interpret the story of the LOCH ARD. The LOCH ARD collection is archaeologically significant as the remains of a large international passenger and cargo ship. The LOCH ARD collection is historically significant for representing aspects of Victoria’s shipping history and its potential to interpret sub-theme 1.5 of Victoria’s Framework of Historical Themes (living with natural processes). The collection is also historically significant for its association with the LOCH ARD, which was one of the worst and best known shipwrecks in Victoria’s history. Silver plated copper alloy table fork from the wreck of the Loch Ard. Some verdigris and large amount of encrustation covers fork.flagstaff hill maritime museum, maritime museum, shipwreck coast, great ocean road, loch line, loch ard, mutton bird island, loch ard gorge, fork -
 Flagstaff Hill Maritime Museum and Village
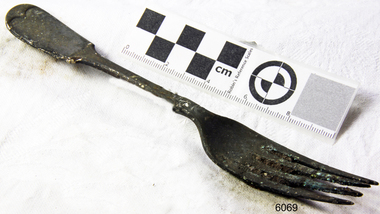
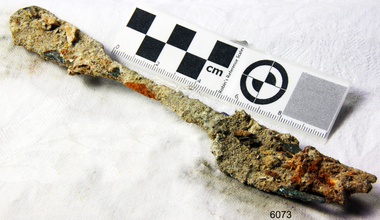
Domestic object - Fork, c. 19th century
HISTORY OF THE LOCH ARD The LOCH ARD belonged to the famous Loch Line which sailed many ships from England to Australia. Built in Glasgow by Barclay, Curdle and Co. in 1873, the LOCH ARD was a three-masted square rigged iron sailing ship. The ship measured 262ft 7" (79.87m) in length, 38ft (11.58m) in width, 23ft (7m) in depth and had a gross tonnage of 1693 tons. The LOCH ARD's main mast measured a massive 150ft (45.7m) in height. LOCH ARD made three trips to Australia and one trip to Calcutta before its final voyage. LOCH ARD left England on March 2, 1878, under the command of Captain Gibbs, a newly married, 29 year old. She was bound for Melbourne with a crew of 37, plus 17 passengers and a load of cargo. The general cargo reflected the affluence of Melbourne at the time. On board were straw hats, umbrella, perfumes, clay pipes, pianos, clocks, confectionary, linen and candles, as well as a heavier load of railway irons, cement, lead and copper. There were items included that intended for display in the Melbourne International Exhibition in 1880. The voyage to Port Phillip was long but uneventful. At 3am on June 1, 1878, Captain Gibbs was expecting to see land and the passengers were becoming excited as they prepared to view their new homeland in the early morning. But LOCH ARD was running into a fog which greatly reduced visibility. Captain Gibbs was becoming anxious as there was no sign of land or the Cape Otway lighthouse. At 4am the fog lifted. A man aloft announced that he could see breakers. The sheer cliffs of Victoria's west coast came into view, and Captain Gibbs realised that the ship was much closer to them than expected. He ordered as much sail to be set as time would permit and then attempted to steer the vessel out to sea. On coming head on into the wind, the ship lost momentum, the sails fell limp and LOCH ARD's bow swung back. Gibbs then ordered the anchors to be released in an attempt to hold its position. The anchors sank some 50 fathoms - but did not hold. By this time LOCH ARD was among the breakers and the tall cliffs of Mutton Bird Island rose behind the ship. Just half a mile from the coast, the ship's bow was suddenly pulled around by the anchor. The captain tried to tack out to sea, but the ship struck a reef at the base of Mutton Bird Island, near Port Campbell. Waves broke over the ship and the top deck was loosened from the hull. The masts and rigging came crashing down knocking passengers and crew overboard. When a lifeboat was finally launched, it crashed into the side of LOCH ARD and capsized. Tom Pearce, who had launched the boat, managed to cling to its overturned hull and shelter beneath it. He drifted out to sea and then on the flood tide came into what is now known as LOCH ARD Gorge. He swam to shore, bruised and dazed, and found a cave in which to shelter. Some of the crew stayed below deck to shelter from the falling rigging but drowned when the ship slipped off the reef into deeper water. Eva Carmichael had raced onto deck to find out what was happening only to be confronted by towering cliffs looming above the stricken ship. In all the chaos, Captain Gibbs grabbed Eva and said, "If you are saved Eva, let my dear wife know that I died like a sailor". That was the last Eva Carmichael saw of the captain. She was swept off the ship by a huge wave. Eva saw Tom Pearce on a small rocky beach and yelled to attract his attention. He dived in and swam to the exhausted woman and dragged her to shore. He took her to the cave and broke open case of brandy which had washed up on the beach. He opened a bottle to revive the unconscious woman. A few hours later Tom scaled a cliff in search of help. He followed hoof prints and came by chance upon two men from nearby Glenample Station three and a half miles away. In a state of exhaustion, he told the men of the tragedy. Tom returned to the gorge while the two men rode back to the station to get help. By the time they reached LOCH ARD Gorge, it was cold and dark. The two shipwreck survivors were taken to Glenample Station to recover. Eva stayed at the station for six weeks before returning to Ireland, this time by steamship. In Melbourne, Tom Pearce received a hero's welcome. He was presented with the first gold medal of the Royal Humane Society of Victoria and a £1000 cheque from the Victorian Government. Concerts were performed to honour the young man's bravery and to raise money for those who lost family in the LOCH ARD disaster. Of the 54 crew members and passengers on board, only two survived: the apprentice, Tom Pearce and the young woman passenger, Eva Carmichael, who lost all of her family in the tragedy. Ten days after the LOCH ARD tragedy, salvage rights to the wreck were sold at auction for £2,120. Cargo valued at £3,000 was salvaged and placed on the beach, but most washed back into the sea when another storm developed. The wreck of LOCH ARD still lies at the base of Mutton Bird Island. Much of the cargo has now been salvaged and some was washed up into what is now known as LOCH ARD Gorge. Cargo and artefacts have also been illegally salvaged over many years before protective legislation was introduced. One of the most unlikely pieces of cargo to have survived the shipwreck was a Minton porcelain peacock - one of only seven in the world. The peacock was destined for the Melbourne International Exhibition in 1880. It had been well packed, which gave it adequate protection during the violent storm. Today, the Minton peacock can be seen at the Flagstaff Hill Maritime Museum in Warrnambool. From Australia's most dramatic shipwreck it has now become Australia's shipwreck artefact and is one of very few 'objects' on the Victorian State Heritage Register most valuable. The LOCH ARD shipwreck is of State significance – Victorian Heritage Register S 417 Flagstaff Hill’s collection of artefacts from LOCH ARD is significant for being one of the largest collections of artefacts from this shipwreck in Victoria. It is significant for its association with the shipwreck, which is on the Victorian Heritage Register (VHR S417). The collection is significant because of the relationship between the objects, as together they have a high potential to interpret the story of the LOCH ARD. The LOCH ARD collection is archaeologically significant as the remains of a large international passenger and cargo ship. The LOCH ARD collection is historically significant for representing aspects of Victoria’s shipping history and its potential to interpret sub-theme 1.5 of Victoria’s Framework of Historical Themes (living with natural processes). The collection is also historically significant for its association with the LOCH ARD, which was one of the worst and best known shipwrecks in Victoria’s history. Silver plated copper alloy dessert fork from the wreck of the Loch Ard. , Covered in Silver oxide. Light encrustation on fork between tines.flagstaff hill maritime museum, shipwreck coast, great ocean road, loch line, loch ard, mutton bird island, loch ard gorge, electroplated cutlery, fork, dessert fork -
 Flagstaff Hill Maritime Museum and Village
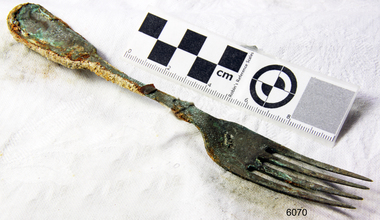
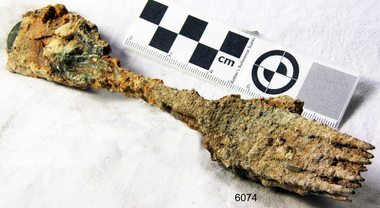
Domestic object - Fork, c. 19th century
HISTORY OF THE LOCH ARD The LOCH ARD belonged to the famous Loch Line which sailed many ships from England to Australia. Built in Glasgow by Barclay, Curdle and Co. in 1873, the LOCH ARD was a three-masted square rigged iron sailing ship. The ship measured 262ft 7" (79.87m) in length, 38ft (11.58m) in width, 23ft (7m) in depth and had a gross tonnage of 1693 tons. The LOCH ARD's main mast measured a massive 150ft (45.7m) in height. LOCH ARD made three trips to Australia and one trip to Calcutta before its final voyage. LOCH ARD left England on March 2, 1878, under the command of Captain Gibbs, a newly married, 29 year old. She was bound for Melbourne with a crew of 37, plus 17 passengers and a load of cargo. The general cargo reflected the affluence of Melbourne at the time. On board were straw hats, umbrella, perfumes, clay pipes, pianos, clocks, confectionary, linen and candles, as well as a heavier load of railway irons, cement, lead and copper. There were items included that intended for display in the Melbourne International Exhibition in 1880. The voyage to Port Phillip was long but uneventful. At 3am on June 1, 1878, Captain Gibbs was expecting to see land and the passengers were becoming excited as they prepared to view their new homeland in the early morning. But LOCH ARD was running into a fog which greatly reduced visibility. Captain Gibbs was becoming anxious as there was no sign of land or the Cape Otway lighthouse. At 4am the fog lifted. A man aloft announced that he could see breakers. The sheer cliffs of Victoria's west coast came into view, and Captain Gibbs realised that the ship was much closer to them than expected. He ordered as much sail to be set as time would permit and then attempted to steer the vessel out to sea. On coming head on into the wind, the ship lost momentum, the sails fell limp and LOCH ARD's bow swung back. Gibbs then ordered the anchors to be released in an attempt to hold its position. The anchors sank some 50 fathoms - but did not hold. By this time LOCH ARD was among the breakers and the tall cliffs of Mutton Bird Island rose behind the ship. Just half a mile from the coast, the ship's bow was suddenly pulled around by the anchor. The captain tried to tack out to sea, but the ship struck a reef at the base of Mutton Bird Island, near Port Campbell. Waves broke over the ship and the top deck was loosened from the hull. The masts and rigging came crashing down knocking passengers and crew overboard. When a lifeboat was finally launched, it crashed into the side of LOCH ARD and capsized. Tom Pearce, who had launched the boat, managed to cling to its overturned hull and shelter beneath it. He drifted out to sea and then on the flood tide came into what is now known as LOCH ARD Gorge. He swam to shore, bruised and dazed, and found a cave in which to shelter. Some of the crew stayed below deck to shelter from the falling rigging but drowned when the ship slipped off the reef into deeper water. Eva Carmichael had raced onto deck to find out what was happening only to be confronted by towering cliffs looming above the stricken ship. In all the chaos, Captain Gibbs grabbed Eva and said, "If you are saved Eva, let my dear wife know that I died like a sailor". That was the last Eva Carmichael saw of the captain. She was swept off the ship by a huge wave. Eva saw Tom Pearce on a small rocky beach and yelled to attract his attention. He dived in and swam to the exhausted woman and dragged her to shore. He took her to the cave and broke open case of brandy which had washed up on the beach. He opened a bottle to revive the unconscious woman. A few hours later Tom scaled a cliff in search of help. He followed hoof prints and came by chance upon two men from nearby Glenample Station three and a half miles away. In a state of exhaustion, he told the men of the tragedy. Tom returned to the gorge while the two men rode back to the station to get help. By the time they reached LOCH ARD Gorge, it was cold and dark. The two shipwreck survivors were taken to Glenample Station to recover. Eva stayed at the station for six weeks before returning to Ireland, this time by steamship. In Melbourne, Tom Pearce received a hero's welcome. He was presented with the first gold medal of the Royal Humane Society of Victoria and a £1000 cheque from the Victorian Government. Concerts were performed to honour the young man's bravery and to raise money for those who lost family in the LOCH ARD disaster. Of the 54 crew members and passengers on board, only two survived: the apprentice, Tom Pearce and the young woman passenger, Eva Carmichael, who lost all of her family in the tragedy. Ten days after the LOCH ARD tragedy, salvage rights to the wreck were sold at auction for £2,120. Cargo valued at £3,000 was salvaged and placed on the beach, but most washed back into the sea when another storm developed. The wreck of LOCH ARD still lies at the base of Mutton Bird Island. Much of the cargo has now been salvaged and some was washed up into what is now known as LOCH ARD Gorge. Cargo and artefacts have also been illegally salvaged over many years before protective legislation was introduced. One of the most unlikely pieces of cargo to have survived the shipwreck was a Minton porcelain peacock - one of only seven in the world. The peacock was destined for the Melbourne International Exhibition in 1880. It had been well packed, which gave it adequate protection during the violent storm. Today, the Minton peacock can be seen at the Flagstaff Hill Maritime Museum in Warrnambool. From Australia's most dramatic shipwreck it has now become Australia's shipwreck artefact and is one of very few 'objects' on the Victorian State Heritage Register most valuable. The LOCH ARD shipwreck is of State significance – Victorian Heritage Register S 417 Flagstaff Hill’s collection of artefacts from LOCH ARD is significant for being one of the largest collections of artefacts from this shipwreck in Victoria. It is significant for its association with the shipwreck, which is on the Victorian Heritage Register (VHR S417). The collection is significant because of the relationship between the objects, as together they have a high potential to interpret the story of the LOCH ARD. The LOCH ARD collection is archaeologically significant as the remains of a large international passenger and cargo ship. The LOCH ARD collection is historically significant for representing aspects of Victoria’s shipping history and its potential to interpret sub-theme 1.5 of Victoria’s Framework of Historical Themes (living with natural processes). The collection is also historically significant for its association with the LOCH ARD, which was one of the worst and best known shipwrecks in Victoria’s history. Silver plated copper alloy dessert fork from the wreck of the Loch Ard. Some verdigris. Encrustation on fork.flagstaff hill maritime museum, shipwreck coast, great ocean road, loch line, loch ard, mutton bird island, loch ard gorge, electroplated cutlery, fork, dessert fork -
 Flagstaff Hill Maritime Museum and Village
Domestic object - Fork, c. 19th century
HISTORY OF THE LOCH ARD The LOCH ARD belonged to the famous Loch Line which sailed many ships from England to Australia. Built in Glasgow by Barclay, Curdle and Co. in 1873, the LOCH ARD was a three-masted square rigged iron sailing ship. The ship measured 262ft 7" (79.87m) in length, 38ft (11.58m) in width, 23ft (7m) in depth and had a gross tonnage of 1693 tons. The LOCH ARD's main mast measured a massive 150ft (45.7m) in height. LOCH ARD made three trips to Australia and one trip to Calcutta before its final voyage. LOCH ARD left England on March 2, 1878, under the command of Captain Gibbs, a newly married, 29 year old. She was bound for Melbourne with a crew of 37, plus 17 passengers and a load of cargo. The general cargo reflected the affluence of Melbourne at the time. On board were straw hats, umbrella, perfumes, clay pipes, pianos, clocks, confectionary, linen and candles, as well as a heavier load of railway irons, cement, lead and copper. There were items included that intended for display in the Melbourne International Exhibition in 1880. The voyage to Port Phillip was long but uneventful. At 3am on June 1, 1878, Captain Gibbs was expecting to see land and the passengers were becoming excited as they prepared to view their new homeland in the early morning. But LOCH ARD was running into a fog which greatly reduced visibility. Captain Gibbs was becoming anxious as there was no sign of land or the Cape Otway lighthouse. At 4am the fog lifted. A man aloft announced that he could see breakers. The sheer cliffs of Victoria's west coast came into view, and Captain Gibbs realised that the ship was much closer to them than expected. He ordered as much sail to be set as time would permit and then attempted to steer the vessel out to sea. On coming head on into the wind, the ship lost momentum, the sails fell limp and LOCH ARD's bow swung back. Gibbs then ordered the anchors to be released in an attempt to hold its position. The anchors sank some 50 fathoms - but did not hold. By this time LOCH ARD was among the breakers and the tall cliffs of Mutton Bird Island rose behind the ship. Just half a mile from the coast, the ship's bow was suddenly pulled around by the anchor. The captain tried to tack out to sea, but the ship struck a reef at the base of Mutton Bird Island, near Port Campbell. Waves broke over the ship and the top deck was loosened from the hull. The masts and rigging came crashing down knocking passengers and crew overboard. When a lifeboat was finally launched, it crashed into the side of LOCH ARD and capsized. Tom Pearce, who had launched the boat, managed to cling to its overturned hull and shelter beneath it. He drifted out to sea and then on the flood tide came into what is now known as LOCH ARD Gorge. He swam to shore, bruised and dazed, and found a cave in which to shelter. Some of the crew stayed below deck to shelter from the falling rigging but drowned when the ship slipped off the reef into deeper water. Eva Carmichael had raced onto deck to find out what was happening only to be confronted by towering cliffs looming above the stricken ship. In all the chaos, Captain Gibbs grabbed Eva and said, "If you are saved Eva, let my dear wife know that I died like a sailor". That was the last Eva Carmichael saw of the captain. She was swept off the ship by a huge wave. Eva saw Tom Pearce on a small rocky beach and yelled to attract his attention. He dived in and swam to the exhausted woman and dragged her to shore. He took her to the cave and broke open case of brandy which had washed up on the beach. He opened a bottle to revive the unconscious woman. A few hours later Tom scaled a cliff in search of help. He followed hoof prints and came by chance upon two men from nearby Glenample Station three and a half miles away. In a state of exhaustion, he told the men of the tragedy. Tom returned to the gorge while the two men rode back to the station to get help. By the time they reached LOCH ARD Gorge, it was cold and dark. The two shipwreck survivors were taken to Glenample Station to recover. Eva stayed at the station for six weeks before returning to Ireland, this time by steamship. In Melbourne, Tom Pearce received a hero's welcome. He was presented with the first gold medal of the Royal Humane Society of Victoria and a £1000 cheque from the Victorian Government. Concerts were performed to honour the young man's bravery and to raise money for those who lost family in the LOCH ARD disaster. Of the 54 crew members and passengers on board, only two survived: the apprentice, Tom Pearce and the young woman passenger, Eva Carmichael, who lost all of her family in the tragedy. Ten days after the LOCH ARD tragedy, salvage rights to the wreck were sold at auction for £2,120. Cargo valued at £3,000 was salvaged and placed on the beach, but most washed back into the sea when another storm developed. The wreck of LOCH ARD still lies at the base of Mutton Bird Island. Much of the cargo has now been salvaged and some was washed up into what is now known as LOCH ARD Gorge. Cargo and artefacts have also been illegally salvaged over many years before protective legislation was introduced. One of the most unlikely pieces of cargo to have survived the shipwreck was a Minton porcelain peacock - one of only seven in the world. The peacock was destined for the Melbourne International Exhibition in 1880. It had been well packed, which gave it adequate protection during the violent storm. Today, the Minton peacock can be seen at the Flagstaff Hill Maritime Museum in Warrnambool. From Australia's most dramatic shipwreck it has now become Australia's shipwreck artefact and is one of very few 'objects' on the Victorian State Heritage Register most valuable. The LOCH ARD shipwreck is of State significance – Victorian Heritage Register S 417 Flagstaff Hill’s collection of artefacts from LOCH ARD is significant for being one of the largest collections of artefacts from this shipwreck in Victoria. It is significant for its association with the shipwreck, which is on the Victorian Heritage Register (VHR S417). The collection is significant because of the relationship between the objects, as together they have a high potential to interpret the story of the LOCH ARD. The LOCH ARD collection is archaeologically significant as the remains of a large international passenger and cargo ship. The LOCH ARD collection is historically significant for representing aspects of Victoria’s shipping history and its potential to interpret sub-theme 1.5 of Victoria’s Framework of Historical Themes (living with natural processes). The collection is also historically significant for its association with the LOCH ARD, which was one of the worst and best known shipwrecks in Victoria’s history. Silver plated copper alloy dessert fork from the wreck of the Loch Ard. Some verdigris. Encrustation on fork. One fork tine bent up.flagstaff hill maritime museum, shipwreck coast, great ocean road, loch line, loch ard, mutton bird island, loch ard gorge, electroplated cutlery, fork, dessert fork -
 Flagstaff Hill Maritime Museum and Village
Domestic object - Fork, c. 19th century
HISTORY OF THE LOCH ARD The LOCH ARD belonged to the famous Loch Line which sailed many ships from England to Australia. Built in Glasgow by Barclay, Curdle and Co. in 1873, the LOCH ARD was a three-masted square rigged iron sailing ship. The ship measured 262ft 7" (79.87m) in length, 38ft (11.58m) in width, 23ft (7m) in depth and had a gross tonnage of 1693 tons. The LOCH ARD's main mast measured a massive 150ft (45.7m) in height. LOCH ARD made three trips to Australia and one trip to Calcutta before its final voyage. LOCH ARD left England on March 2, 1878, under the command of Captain Gibbs, a newly married, 29 year old. She was bound for Melbourne with a crew of 37, plus 17 passengers and a load of cargo. The general cargo reflected the affluence of Melbourne at the time. On board were straw hats, umbrella, perfumes, clay pipes, pianos, clocks, confectionary, linen and candles, as well as a heavier load of railway irons, cement, lead and copper. There were items included that intended for display in the Melbourne International Exhibition in 1880. The voyage to Port Phillip was long but uneventful. At 3am on June 1, 1878, Captain Gibbs was expecting to see land and the passengers were becoming excited as they prepared to view their new homeland in the early morning. But LOCH ARD was running into a fog which greatly reduced visibility. Captain Gibbs was becoming anxious as there was no sign of land or the Cape Otway lighthouse. At 4am the fog lifted. A man aloft announced that he could see breakers. The sheer cliffs of Victoria's west coast came into view, and Captain Gibbs realised that the ship was much closer to them than expected. He ordered as much sail to be set as time would permit and then attempted to steer the vessel out to sea. On coming head on into the wind, the ship lost momentum, the sails fell limp and LOCH ARD's bow swung back. Gibbs then ordered the anchors to be released in an attempt to hold its position. The anchors sank some 50 fathoms - but did not hold. By this time LOCH ARD was among the breakers and the tall cliffs of Mutton Bird Island rose behind the ship. Just half a mile from the coast, the ship's bow was suddenly pulled around by the anchor. The captain tried to tack out to sea, but the ship struck a reef at the base of Mutton Bird Island, near Port Campbell. Waves broke over the ship and the top deck was loosened from the hull. The masts and rigging came crashing down knocking passengers and crew overboard. When a lifeboat was finally launched, it crashed into the side of LOCH ARD and capsized. Tom Pearce, who had launched the boat, managed to cling to its overturned hull and shelter beneath it. He drifted out to sea and then on the flood tide came into what is now known as LOCH ARD Gorge. He swam to shore, bruised and dazed, and found a cave in which to shelter. Some of the crew stayed below deck to shelter from the falling rigging but drowned when the ship slipped off the reef into deeper water. Eva Carmichael had raced onto deck to find out what was happening only to be confronted by towering cliffs looming above the stricken ship. In all the chaos, Captain Gibbs grabbed Eva and said, "If you are saved Eva, let my dear wife know that I died like a sailor". That was the last Eva Carmichael saw of the captain. She was swept off the ship by a huge wave. Eva saw Tom Pearce on a small rocky beach and yelled to attract his attention. He dived in and swam to the exhausted woman and dragged her to shore. He took her to the cave and broke open case of brandy which had washed up on the beach. He opened a bottle to revive the unconscious woman. A few hours later Tom scaled a cliff in search of help. He followed hoof prints and came by chance upon two men from nearby Glenample Station three and a half miles away. In a state of exhaustion, he told the men of the tragedy. Tom returned to the gorge while the two men rode back to the station to get help. By the time they reached LOCH ARD Gorge, it was cold and dark. The two shipwreck survivors were taken to Glenample Station to recover. Eva stayed at the station for six weeks before returning to Ireland, this time by steamship. In Melbourne, Tom Pearce received a hero's welcome. He was presented with the first gold medal of the Royal Humane Society of Victoria and a £1000 cheque from the Victorian Government. Concerts were performed to honour the young man's bravery and to raise money for those who lost family in the LOCH ARD disaster. Of the 54 crew members and passengers on board, only two survived: the apprentice, Tom Pearce and the young woman passenger, Eva Carmichael, who lost all of her family in the tragedy. Ten days after the LOCH ARD tragedy, salvage rights to the wreck were sold at auction for £2,120. Cargo valued at £3,000 was salvaged and placed on the beach, but most washed back into the sea when another storm developed. The wreck of LOCH ARD still lies at the base of Mutton Bird Island. Much of the cargo has now been salvaged and some was washed up into what is now known as LOCH ARD Gorge. Cargo and artefacts have also been illegally salvaged over many years before protective legislation was introduced. One of the most unlikely pieces of cargo to have survived the shipwreck was a Minton porcelain peacock - one of only seven in the world. The peacock was destined for the Melbourne International Exhibition in 1880. It had been well packed, which gave it adequate protection during the violent storm. Today, the Minton peacock can be seen at the Flagstaff Hill Maritime Museum in Warrnambool. From Australia's most dramatic shipwreck it has now become Australia's shipwreck artefact and is one of very few 'objects' on the Victorian State Heritage Register most valuable. The LOCH ARD shipwreck is of State significance – Victorian Heritage Register S 417 Flagstaff Hill’s collection of artefacts from LOCH ARD is significant for being one of the largest collections of artefacts from this shipwreck in Victoria. It is significant for its association with the shipwreck, which is on the Victorian Heritage Register (VHR S417). The collection is significant because of the relationship between the objects, as together they have a high potential to interpret the story of the LOCH ARD. The LOCH ARD collection is archaeologically significant as the remains of a large international passenger and cargo ship. The LOCH ARD collection is historically significant for representing aspects of Victoria’s shipping history and its potential to interpret sub-theme 1.5 of Victoria’s Framework of Historical Themes (living with natural processes). The collection is also historically significant for its association with the LOCH ARD, which was one of the worst and best known shipwrecks in Victoria’s history. Silver plated copper alloy dessert fork from the wreck of the Loch Ard. Some verdigris and silver oxide. Concretion on fork. Hallmark partly visible.flagstaff hill maritime museum, shipwreck coast, great ocean road, loch line, loch ard, mutton bird island, loch ard gorge, electroplated cutlery, fork, dessert fork -
 Flagstaff Hill Maritime Museum and Village
Domestic object - Fork, c. 19th century
HISTORY OF THE LOCH ARD The LOCH ARD belonged to the famous Loch Line which sailed many ships from England to Australia. Built in Glasgow by Barclay, Curdle and Co. in 1873, the LOCH ARD was a three-masted square rigged iron sailing ship. The ship measured 262ft 7" (79.87m) in length, 38ft (11.58m) in width, 23ft (7m) in depth and had a gross tonnage of 1693 tons. The LOCH ARD's main mast measured a massive 150ft (45.7m) in height. LOCH ARD made three trips to Australia and one trip to Calcutta before its final voyage. LOCH ARD left England on March 2, 1878, under the command of Captain Gibbs, a newly married, 29 year old. She was bound for Melbourne with a crew of 37, plus 17 passengers and a load of cargo. The general cargo reflected the affluence of Melbourne at the time. On board were straw hats, umbrella, perfumes, clay pipes, pianos, clocks, confectionary, linen and candles, as well as a heavier load of railway irons, cement, lead and copper. There were items included that intended for display in the Melbourne International Exhibition in 1880. The voyage to Port Phillip was long but uneventful. At 3am on June 1, 1878, Captain Gibbs was expecting to see land and the passengers were becoming excited as they prepared to view their new homeland in the early morning. But LOCH ARD was running into a fog which greatly reduced visibility. Captain Gibbs was becoming anxious as there was no sign of land or the Cape Otway lighthouse. At 4am the fog lifted. A man aloft announced that he could see breakers. The sheer cliffs of Victoria's west coast came into view, and Captain Gibbs realised that the ship was much closer to them than expected. He ordered as much sail to be set as time would permit and then attempted to steer the vessel out to sea. On coming head on into the wind, the ship lost momentum, the sails fell limp and LOCH ARD's bow swung back. Gibbs then ordered the anchors to be released in an attempt to hold its position. The anchors sank some 50 fathoms - but did not hold. By this time LOCH ARD was among the breakers and the tall cliffs of Mutton Bird Island rose behind the ship. Just half a mile from the coast, the ship's bow was suddenly pulled around by the anchor. The captain tried to tack out to sea, but the ship struck a reef at the base of Mutton Bird Island, near Port Campbell. Waves broke over the ship and the top deck was loosened from the hull. The masts and rigging came crashing down knocking passengers and crew overboard. When a lifeboat was finally launched, it crashed into the side of LOCH ARD and capsized. Tom Pearce, who had launched the boat, managed to cling to its overturned hull and shelter beneath it. He drifted out to sea and then on the flood tide came into what is now known as LOCH ARD Gorge. He swam to shore, bruised and dazed, and found a cave in which to shelter. Some of the crew stayed below deck to shelter from the falling rigging but drowned when the ship slipped off the reef into deeper water. Eva Carmichael had raced onto deck to find out what was happening only to be confronted by towering cliffs looming above the stricken ship. In all the chaos, Captain Gibbs grabbed Eva and said, "If you are saved Eva, let my dear wife know that I died like a sailor". That was the last Eva Carmichael saw of the captain. She was swept off the ship by a huge wave. Eva saw Tom Pearce on a small rocky beach and yelled to attract his attention. He dived in and swam to the exhausted woman and dragged her to shore. He took her to the cave and broke open case of brandy which had washed up on the beach. He opened a bottle to revive the unconscious woman. A few hours later Tom scaled a cliff in search of help. He followed hoof prints and came by chance upon two men from nearby Glenample Station three and a half miles away. In a state of exhaustion, he told the men of the tragedy. Tom returned to the gorge while the two men rode back to the station to get help. By the time they reached LOCH ARD Gorge, it was cold and dark. The two shipwreck survivors were taken to Glenample Station to recover. Eva stayed at the station for six weeks before returning to Ireland, this time by steamship. In Melbourne, Tom Pearce received a hero's welcome. He was presented with the first gold medal of the Royal Humane Society of Victoria and a £1000 cheque from the Victorian Government. Concerts were performed to honour the young man's bravery and to raise money for those who lost family in the LOCH ARD disaster. Of the 54 crew members and passengers on board, only two survived: the apprentice, Tom Pearce and the young woman passenger, Eva Carmichael, who lost all of her family in the tragedy. Ten days after the LOCH ARD tragedy, salvage rights to the wreck were sold at auction for £2,120. Cargo valued at £3,000 was salvaged and placed on the beach, but most washed back into the sea when another storm developed. The wreck of LOCH ARD still lies at the base of Mutton Bird Island. Much of the cargo has now been salvaged and some was washed up into what is now known as LOCH ARD Gorge. Cargo and artefacts have also been illegally salvaged over many years before protective legislation was introduced. One of the most unlikely pieces of cargo to have survived the shipwreck was a Minton porcelain peacock - one of only seven in the world. The peacock was destined for the Melbourne International Exhibition in 1880. It had been well packed, which gave it adequate protection during the violent storm. Today, the Minton peacock can be seen at the Flagstaff Hill Maritime Museum in Warrnambool. From Australia's most dramatic shipwreck it has now become Australia's shipwreck artefact and is one of very few 'objects' on the Victorian State Heritage Register most valuable. The LOCH ARD shipwreck is of State significance – Victorian Heritage Register S 417 Flagstaff Hill’s collection of artefacts from LOCH ARD is significant for being one of the largest collections of artefacts from this shipwreck in Victoria. It is significant for its association with the shipwreck, which is on the Victorian Heritage Register (VHR S417). The collection is significant because of the relationship between the objects, as together they have a high potential to interpret the story of the LOCH ARD. The LOCH ARD collection is archaeologically significant as the remains of a large international passenger and cargo ship. The LOCH ARD collection is historically significant for representing aspects of Victoria’s shipping history and its potential to interpret sub-theme 1.5 of Victoria’s Framework of Historical Themes (living with natural processes). The collection is also historically significant for its association with the LOCH ARD, which was one of the worst and best known shipwrecks in Victoria’s history. Silver plated copper alloy dessert fork from the wreck of the Loch Ard. Some verdigris. Concretion on fork.flagstaff hill maritime museum, shipwreck coast, flagstaff hill maritime village, great ocean road, loch line, loch ard, mutton bird island, loch ard gorge, electroplated cutlery, fork, dessert fork -
 Flagstaff Hill Maritime Museum and Village
Forks, c. 19th century
HISTORY OF THE LOCH ARD The LOCH ARD belonged to the famous Loch Line which sailed many ships from England to Australia. Built in Glasgow by Barclay, Curdle and Co. in 1873, the LOCH ARD was a three-masted square rigged iron sailing ship. The ship measured 262ft 7" (79.87m) in length, 38ft (11.58m) in width, 23ft (7m) in depth and had a gross tonnage of 1693 tons. The LOCH ARD's main mast measured a massive 150ft (45.7m) in height. LOCH ARD made three trips to Australia and one trip to Calcutta before its final voyage. LOCH ARD left England on March 2, 1878, under the command of Captain Gibbs, a newly married, 29 year old. She was bound for Melbourne with a crew of 37, plus 17 passengers and a load of cargo. The general cargo reflected the affluence of Melbourne at the time. On board were straw hats, umbrella, perfumes, clay pipes, pianos, clocks, confectionary, linen and candles, as well as a heavier load of railway irons, cement, lead and copper. There were items included that intended for display in the Melbourne International Exhibition in 1880. The voyage to Port Phillip was long but uneventful. At 3am on June 1, 1878, Captain Gibbs was expecting to see land and the passengers were becoming excited as they prepared to view their new homeland in the early morning. But LOCH ARD was running into a fog which greatly reduced visibility. Captain Gibbs was becoming anxious as there was no sign of land or the Cape Otway lighthouse. At 4am the fog lifted. A man aloft announced that he could see breakers. The sheer cliffs of Victoria's west coast came into view, and Captain Gibbs realised that the ship was much closer to them than expected. He ordered as much sail to be set as time would permit and then attempted to steer the vessel out to sea. On coming head on into the wind, the ship lost momentum, the sails fell limp and LOCH ARD's bow swung back. Gibbs then ordered the anchors to be released in an attempt to hold its position. The anchors sank some 50 fathoms - but did not hold. By this time LOCH ARD was among the breakers and the tall cliffs of Mutton Bird Island rose behind the ship. Just half a mile from the coast, the ship's bow was suddenly pulled around by the anchor. The captain tried to tack out to sea, but the ship struck a reef at the base of Mutton Bird Island, near Port Campbell. Waves broke over the ship and the top deck was loosened from the hull. The masts and rigging came crashing down knocking passengers and crew overboard. When a lifeboat was finally launched, it crashed into the side of LOCH ARD and capsized. Tom Pearce, who had launched the boat, managed to cling to its overturned hull and shelter beneath it. He drifted out to sea and then on the flood tide came into what is now known as LOCH ARD Gorge. He swam to shore, bruised and dazed, and found a cave in which to shelter. Some of the crew stayed below deck to shelter from the falling rigging but drowned when the ship slipped off the reef into deeper water. Eva Carmichael had raced onto deck to find out what was happening only to be confronted by towering cliffs looming above the stricken ship. In all the chaos, Captain Gibbs grabbed Eva and said, "If you are saved Eva, let my dear wife know that I died like a sailor". That was the last Eva Carmichael saw of the captain. She was swept off the ship by a huge wave. Eva saw Tom Pearce on a small rocky beach and yelled to attract his attention. He dived in and swam to the exhausted woman and dragged her to shore. He took her to the cave and broke open case of brandy which had washed up on the beach. He opened a bottle to revive the unconscious woman. A few hours later Tom scaled a cliff in search of help. He followed hoof prints and came by chance upon two men from nearby Glenample Station three and a half miles away. In a state of exhaustion, he told the men of the tragedy. Tom returned to the gorge while the two men rode back to the station to get help. By the time they reached LOCH ARD Gorge, it was cold and dark. The two shipwreck survivors were taken to Glenample Station to recover. Eva stayed at the station for six weeks before returning to Ireland, this time by steamship. In Melbourne, Tom Pearce received a hero's welcome. He was presented with the first gold medal of the Royal Humane Society of Victoria and a £1000 cheque from the Victorian Government. Concerts were performed to honour the young man's bravery and to raise money for those who lost family in the LOCH ARD disaster. Of the 54 crew members and passengers on board, only two survived: the apprentice, Tom Pearce and the young woman passenger, Eva Carmichael, who lost all of her family in the tragedy. Ten days after the LOCH ARD tragedy, salvage rights to the wreck were sold at auction for £2,120. Cargo valued at £3,000 was salvaged and placed on the beach, but most washed back into the sea when another storm developed. The wreck of LOCH ARD still lies at the base of Mutton Bird Island. Much of the cargo has now been salvaged and some was washed up into what is now known as LOCH ARD Gorge. Cargo and artefacts have also been illegally salvaged over many years before protective legislation was introduced. One of the most unlikely pieces of cargo to have survived the shipwreck was a Minton porcelain peacock - one of only seven in the world. The peacock was destined for the Melbourne International Exhibition in 1880. It had been well packed, which gave it adequate protection during the violent storm. Today, the Minton peacock can be seen at the Flagstaff Hill Maritime Museum in Warrnambool. From Australia's most dramatic shipwreck it has now become Australia's shipwreck artefact and is one of very few 'objects' on the Victorian State Heritage Register most valuable. The LOCH ARD shipwreck is of State significance – Victorian Heritage Register S 417 Flagstaff Hill’s collection of artefacts from LOCH ARD is significant for being one of the largest collections of artefacts from this shipwreck in Victoria. It is significant for its association with the shipwreck, which is on the Victorian Heritage Register (VHR S417). The collection is significant because of the relationship between the objects, as together they have a high potential to interpret the story of the LOCH ARD. The LOCH ARD collection is archaeologically significant as the remains of a large international passenger and cargo ship. The LOCH ARD collection is historically significant for representing aspects of Victoria’s shipping history and its potential to interpret sub-theme 1.5 of Victoria’s Framework of Historical Themes (living with natural processes). The collection is also historically significant for its association with the LOCH ARD, which was one of the worst and best known shipwrecks in Victoria’s history. Silver plated copper alloy dessert forks from the wreck of the Loch Ard. Some very little verdigris. Heavy concretion on forks. 2 forks in group.maritime museum, shipwreck coast, great ocean road, loch line, loch ard, mutton bird island, loch ard gorge, electroplated cutlery, fork, dessert fork -
 Flagstaff Hill Maritime Museum and Village
Domestic object - Fork
HISTORY OF THE LOCH ARD The LOCH ARD belonged to the famous Loch Line which sailed many ships from England to Australia. Built in Glasgow by Barclay, Curdle and Co. in 1873, the LOCH ARD was a three-masted square rigged iron sailing ship. The ship measured 262ft 7" (79.87m) in length, 38ft (11.58m) in width, 23ft (7m) in depth and had a gross tonnage of 1693 tons. The LOCH ARD's main mast measured a massive 150ft (45.7m) in height. LOCH ARD made three trips to Australia and one trip to Calcutta before its final voyage. LOCH ARD left England on March 2, 1878, under the command of Captain Gibbs, a newly married, 29 year old. She was bound for Melbourne with a crew of 37, plus 17 passengers and a load of cargo. The general cargo reflected the affluence of Melbourne at the time. On board were straw hats, umbrella, perfumes, clay pipes, pianos, clocks, confectionary, linen and candles, as well as a heavier load of railway irons, cement, lead and copper. There were items included that intended for display in the Melbourne International Exhibition in 1880. The voyage to Port Phillip was long but uneventful. At 3am on June 1, 1878, Captain Gibbs was expecting to see land and the passengers were becoming excited as they prepared to view their new homeland in the early morning. But LOCH ARD was running into a fog which greatly reduced visibility. Captain Gibbs was becoming anxious as there was no sign of land or the Cape Otway lighthouse. At 4am the fog lifted. A man aloft announced that he could see breakers. The sheer cliffs of Victoria's west coast came into view, and Captain Gibbs realised that the ship was much closer to them than expected. He ordered as much sail to be set as time would permit and then attempted to steer the vessel out to sea. On coming head on into the wind, the ship lost momentum, the sails fell limp and LOCH ARD's bow swung back. Gibbs then ordered the anchors to be released in an attempt to hold its position. The anchors sank some 50 fathoms - but did not hold. By this time LOCH ARD was among the breakers and the tall cliffs of Mutton Bird Island rose behind the ship. Just half a mile from the coast, the ship's bow was suddenly pulled around by the anchor. The captain tried to tack out to sea, but the ship struck a reef at the base of Mutton Bird Island, near Port Campbell. Waves broke over the ship and the top deck was loosened from the hull. The masts and rigging came crashing down knocking passengers and crew overboard. When a lifeboat was finally launched, it crashed into the side of LOCH ARD and capsized. Tom Pearce, who had launched the boat, managed to cling to its overturned hull and shelter beneath it. He drifted out to sea and then on the flood tide came into what is now known as LOCH ARD Gorge. He swam to shore, bruised and dazed, and found a cave in which to shelter. Some of the crew stayed below deck to shelter from the falling rigging but drowned when the ship slipped off the reef into deeper water. Eva Carmichael had raced onto deck to find out what was happening only to be confronted by towering cliffs looming above the stricken ship. In all the chaos, Captain Gibbs grabbed Eva and said, "If you are saved Eva, let my dear wife know that I died like a sailor". That was the last Eva Carmichael saw of the captain. She was swept off the ship by a huge wave. Eva saw Tom Pearce on a small rocky beach and yelled to attract his attention. He dived in and swam to the exhausted woman and dragged her to shore. He took her to the cave and broke open case of brandy which had washed up on the beach. He opened a bottle to revive the unconscious woman. A few hours later Tom scaled a cliff in search of help. He followed hoof prints and came by chance upon two men from nearby Glenample Station three and a half miles away. In a state of exhaustion, he told the men of the tragedy. Tom returned to the gorge while the two men rode back to the station to get help. By the time they reached LOCH ARD Gorge, it was cold and dark. The two shipwreck survivors were taken to Glenample Station to recover. Eva stayed at the station for six weeks before returning to Ireland, this time by steamship. In Melbourne, Tom Pearce received a hero's welcome. He was presented with the first gold medal of the Royal Humane Society of Victoria and a £1000 cheque from the Victorian Government. Concerts were performed to honour the young man's bravery and to raise money for those who lost family in the LOCH ARD disaster. Of the 54 crew members and passengers on board, only two survived: the apprentice, Tom Pearce and the young woman passenger, Eva Carmichael, who lost all of her family in the tragedy. Ten days after the LOCH ARD tragedy, salvage rights to the wreck were sold at auction for £2,120. Cargo valued at £3,000 was salvaged and placed on the beach, but most washed back into the sea when another storm developed. The wreck of LOCH ARD still lies at the base of Mutton Bird Island. Much of the cargo has now been salvaged and some was washed up into what is now known as LOCH ARD Gorge. Cargo and artefacts have also been illegally salvaged over many years before protective legislation was introduced. One of the most unlikely pieces of cargo to have survived the shipwreck was a Minton porcelain peacock - one of only seven in the world. The peacock was destined for the Melbourne International Exhibition in 1880. It had been well packed, which gave it adequate protection during the violent storm. Today, the Minton peacock can be seen at the Flagstaff Hill Maritime Museum in Warrnambool. From Australia's most dramatic shipwreck it has now become Australia's shipwreck artefact and is one of very few 'objects' on the Victorian State Heritage Register most valuable. The LOCH ARD shipwreck is of State significance – Victorian Heritage Register S 417 Flagstaff Hill’s collection of artefacts from LOCH ARD is significant for being one of the largest collections of artefacts from this shipwreck in Victoria. It is significant for its association with the shipwreck, which is on the Victorian Heritage Register (VHR S417). The collection is significant because of the relationship between the objects, as together they have a high potential to interpret the story of the LOCH ARD. The LOCH ARD collection is archaeologically significant as the remains of a large international passenger and cargo ship. The LOCH ARD collection is historically significant for representing aspects of Victoria’s shipping history and its potential to interpret sub-theme 1.5 of Victoria’s Framework of Historical Themes (living with natural processes). The collection is also historically significant for its association with the LOCH ARD, which was one of the worst and best known shipwrecks in Victoria’s history. Silver plated copper alloy table fork - entrèe from the wreck of the Loch Ard. Some verdigris and silver oxide. Some encrustation on fork.flagstaff hill maritime museum, maritime museum, shipwreck coast, flagstaff hill maritime village, great ocean road, loch line, loch ard, mutton bird island, loch ard gorge, electroplated cutlery, fork -
 Flagstaff Hill Maritime Museum and Village
Print, Loch Ard
HISTORY OF THE LOCH ARD The LOCH ARD belonged to the famous Loch Line which sailed many ships from England to Australia. Built in Glasgow by Barclay, Curdle and Co. in 1873, the LOCH ARD was a three-masted square rigged iron sailing ship. The ship measured 262ft 7" (79.87m) in length, 38ft (11.58m) in width, 23ft (7m) in depth and had a gross tonnage of 1693 tons. The LOCH ARD's main mast measured a massive 150ft (45.7m) in height. LOCH ARD made three trips to Australia and one trip to Calcutta before its final voyage. LOCH ARD left England on March 2, 1878, under the command of Captain Gibbs, a newly married, 29 year old. She was bound for Melbourne with a crew of 37, plus 17 passengers and a load of cargo. The general cargo reflected the affluence of Melbourne at the time. On board were straw hats, umbrella, perfumes, clay pipes, pianos, clocks, confectionary, linen and candles, as well as a heavier load of railway irons, cement, lead and copper. There were items included that intended for display in the Melbourne International Exhibition in 1880. The voyage to Port Phillip was long but uneventful. At 3am on June 1, 1878, Captain Gibbs was expecting to see land and the passengers were becoming excited as they prepared to view their new homeland in the early morning. But LOCH ARD was running into a fog which greatly reduced visibility. Captain Gibbs was becoming anxious as there was no sign of land or the Cape Otway lighthouse. At 4am the fog lifted. A man aloft announced that he could see breakers. The sheer cliffs of Victoria's west coast came into view, and Captain Gibbs realised that the ship was much closer to them than expected. He ordered as much sail to be set as time would permit and then attempted to steer the vessel out to sea. On coming head on into the wind, the ship lost momentum, the sails fell limp and LOCH ARD's bow swung back. Gibbs then ordered the anchors to be released in an attempt to hold its position. The anchors sank some 50 fathoms - but did not hold. By this time LOCH ARD was among the breakers and the tall cliffs of Mutton Bird Island rose behind the ship. Just half a mile from the coast, the ship's bow was suddenly pulled around by the anchor. The captain tried to tack out to sea, but the ship struck a reef at the base of Mutton Bird Island, near Port Campbell. Waves broke over the ship and the top deck was loosened from the hull. The masts and rigging came crashing down knocking passengers and crew overboard. When a lifeboat was finally launched, it crashed into the side of LOCH ARD and capsized. Tom Pearce, who had launched the boat, managed to cling to its overturned hull and shelter beneath it. He drifted out to sea and then on the flood tide came into what is now known as LOCH ARD Gorge. He swam to shore, bruised and dazed, and found a cave in which to shelter. Some of the crew stayed below deck to shelter from the falling rigging but drowned when the ship slipped off the reef into deeper water. Eva Carmichael had raced onto deck to find out what was happening only to be confronted by towering cliffs looming above the stricken ship. In all the chaos, Captain Gibbs grabbed Eva and said, "If you are saved Eva, let my dear wife know that I died like a sailor". That was the last Eva Carmichael saw of the captain. She was swept off the ship by a huge wave. Eva saw Tom Pearce on a small rocky beach and yelled to attract his attention. He dived in and swam to the exhausted woman and dragged her to shore. He took her to the cave and broke open case of brandy which had washed up on the beach. He opened a bottle to revive the unconscious woman. A few hours later Tom scaled a cliff in search of help. He followed hoof prints and came by chance upon two men from nearby Glenample Station three and a half miles away. In a state of exhaustion, he told the men of the tragedy. Tom returned to the gorge while the two men rode back to the station to get help. By the time they reached LOCH ARD Gorge, it was cold and dark. The two shipwreck survivors were taken to Glenample Station to recover. Eva stayed at the station for six weeks before returning to Ireland, this time by steamship. In Melbourne, Tom Pearce received a hero's welcome. He was presented with the first gold medal of the Royal Humane Society of Victoria and a £1000 cheque from the Victorian Government. Concerts were performed to honour the young man's bravery and to raise money for those who lost family in the LOCH ARD disaster. Of the 54 crew members and passengers on board, only two survived: the apprentice, Tom Pearce and the young woman passenger, Eva Carmichael, who lost all of her family in the tragedy. Ten days after the LOCH ARD tragedy, salvage rights to the wreck were sold at auction for £2,120. Cargo valued at £3,000 was salvaged and placed on the beach, but most washed back into the sea when another storm developed. The wreck of LOCH ARD still lies at the base of Mutton Bird Island. Much of the cargo has now been salvaged and some was washed up into what is now known as LOCH ARD Gorge. Cargo and artefacts have also been illegally salvaged over many years before protective legislation was introduced. One of the most unlikely pieces of cargo to have survived the shipwreck was a Minton porcelain peacock - one of only nine in the world. The peacock was destined for the Melbourne International Exhibition in 1880. It had been well packed, which gave it adequate protection during the violent storm. Today, the Minton peacock can be seen at the Flagstaff Hill Maritime Museum in Warrnambool. From Australia's most dramatic shipwreck it has now become Australia's most valuable shipwreck artefact and is one of very few 'objects' on the Victorian State Heritage Register. Flagstaff Hill’s collection of artefacts from LOCH ARD is significant for being one of the largest collections of artefacts from this shipwreck in Victoria. It is significant for its association with the shipwreck, which is on the Victorian Heritage Register (VHR S417). The collection is significant because of the relationship between the objects, as together they have a high potential to interpret the story of the LOCH ARD. The LOCH ARD collection is archaeologically significant as the remains of a large international passenger and cargo ship. The LOCH ARD collection is historically significant for representing aspects of Victoria’s shipping history and its potential to interpret sub-theme 1.5 of Victoria’s Framework of Historical Themes (living with natural processes). The collection is also historically significant for its association with the LOCH ARD, which was one of the worst and best known shipwrecks in Victoria’s history. Reproduction 0620 of 1000 taken from the original painting of the Loch Ard by Neil Savage.flagstaff hill, warrnambool, shipwrecked coast, flagstaff hill maritime museum, maritime museum, shipwreck coast, flagstaff hill maritime village, great ocean road, loch line, loch ard, captain gibbs, eva carmichael, tom pearce, glenample station, mutton bird island, loch ard gorge, photograph, neil savage -
 Flagstaff Hill Maritime Museum and Village
Ceramic - Plate, before March 1878
This Asiatic Pheasant china dinner plate was salvaged from the wreck of the " Loch Ard". The design on the plate was popular in the late 1800's and early 1900's. History of the Loch Ard: The Loch Ard got its name from "Loch Ard" a loch which lies to the west of Aberfoyle, and the east of Loch Lomond. It means "high lake" in Scottish Gaelic. The vessel belonged to the famous Loch Line which sailed many vessels from England to Australia. The Loch Ard was built in Glasgow by Barclay, Curdle and Co. in 1873, the vessel was a three-masted square-rigged iron sailing ship that measured 79.87 meters in length, 11.58 m in width, and 7 m in depth with a gross tonnage of 1693 tons with a mainmast that measured a massive 45.7 m in height. Loch Ard made three trips to Australia and one trip to Calcutta before its fateful voyage. Loch Ard left England on March 2, 1878, under the command of 29-year-old Captain Gibbs, who was newly married. The ship was bound for Melbourne with a crew of 37, plus 17 passengers. The general cargo reflected the affluence of Melbourne at the time. Onboard were straw hats, umbrella, perfumes, clay pipes, pianos, clocks, confectionery, linen and candles, as well as a heavier load of railway irons, cement, lead and copper. There were other items included that were intended for display in the Melbourne International Exhibition of 1880. The voyage to Port Phillip was long but uneventful. Then at 3 am on June 1, 1878, Captain Gibbs was expecting to see land. But the Loch Ard was running into a fog which greatly reduced visibility. Captain Gibbs was becoming anxious as there was no sign of land or the Cape Otway lighthouse. At 4 am the fog lifted and a lookout aloft announced that he could see breakers. The sheer cliffs of Victoria's west coast came into view, and Captain Gibbs realised that the ship was much closer to them than expected. He ordered as much sail to be set as time would permit and then attempted to steer the vessel out to sea. On coming head-on into the wind, the ship lost momentum, the sails fell limp and Loch Ard's bow swung back towards land. Gibbs then ordered the anchors to be released in an attempt to hold its position. The anchors sank some 50 fathoms - but did not hold. By this time the ship was among the breakers and the tall cliffs of Mutton Bird Island rose behind. Just half a mile from the coast, the ship's bow was suddenly pulled around by the anchor. The captain tried to tack out to sea, but the ship struck a reef at the base of Mutton Bird Island, near Port Campbell. Waves subsequently broke over the ship and the top deck became loosened from the hull. The masts and rigging came crashing down knocking passengers and crew overboard. When a lifeboat was finally launched, it crashed into the side of Loch Ard and capsized. Tom Pearce, who had launched the boat, managed to cling to its overturned hull and shelter beneath it. He drifted out to sea and then on the flood tide came into what is now known as Loch Ard Gorge. He swam to shore, bruised and dazed, and found a cave in which to shelter. Some of the crew stayed below deck to shelter from the falling rigging but drowned when the ship slipped off the reef into deeper water. Eva Carmichael a passenger had raced onto the deck to find out what was happening only to be confronted by towering cliffs looming above the stricken ship. In all the chaos, Captain Gibbs grabbed Eva and said, "If you are saved Eva, let my dear wife know that I died like a sailor". That was the last Eva Carmichael saw of the captain. She was swept off the ship by a huge wave. Eva saw Tom Pearce on a small rocky beach and yelled to attract his attention. He dived in and swam to the exhausted woman and dragged her to shore. He took her to the cave and broke the open case of brandy which had washed up on the beach. He opened a bottle to revive the unconscious woman. A few hours later Tom scaled a cliff in search of help. He followed hoof prints and came by chance upon two men from nearby Glenample Station three and a half miles away. In a complete state of exhaustion, he told the men of the tragedy. Tom then returned to the gorge while the two men rode back to the station to get help. By the time they reached Loch Ard Gorge, it was cold and dark. The two shipwreck survivors were taken to Glenample Station to recover. Eva stayed at the station for six weeks before returning to Ireland by steamship. In Melbourne, Tom Pearce received a hero's welcome. He was presented with the first gold medal of the Royal Humane Society of Victoria and a £1000 cheque from the Victorian Government. Concerts were performed to honour the young man's bravery and to raise money for those who lost family in the disaster. Of the 54 crew members and passengers on board, only two survived: the apprentice, Tom Pearce and the young woman passenger, Eva Carmichael, who lost her family in the tragedy. Ten days after the Loch Ard tragedy, salvage rights to the wreck were sold at auction for £2,120. Cargo valued at £3,000 was salvaged and placed on the beach, but most washed back into the sea when another storm developed. The wreck of Loch Ard still lies at the base of Mutton Bird Island. Much of the cargo has now been salvaged and some items were washed up into Loch Ard Gorge. Cargo and artefacts have also been illegally salvaged over many years before protective legislation was introduced in March 1982. One of the most unlikely pieces of cargo to have survived the shipwreck was a Minton majolica peacock- one of only nine in the world. The peacock was destined for the Melbourne 1880 International Exhibition in. It had been well packed, which gave it adequate protection during the violent storm. Today the Minton peacock can be seen at the Flagstaff Hill Maritime Museum in Warrnambool. From Australia's most dramatic shipwreck it has now become Australia's most valuable shipwreck artifact and is one of very few 'objects' on the Victorian State Heritage Register.The shipwreck of the Loch Ard is of significance for Victoria and is registered on the Victorian Heritage Register ( S 417). Flagstaff Hill has a varied collection of artefacts from Loch Ard and its collection is significant for being one of the largest accumulation of artefacts from this notable Victorian shipwreck. The collections object is to also give us a snapshot into history so we can interpret the story of this tragic event. The collection is also archaeologically significant as it represents aspects of Victoria's shipping history that allows us to interpret Victoria's social and historical themes of the time. The collections historically significance is that it is associated unfortunately with the worst and best-known shipwreck in Victoria's history.Dinner plate, white ceramic with scalloped rim, white china with blue transfer "Asiatic Pheasant" design. Inscription on underside. Recovered from the wreck of the Loch Ard.Mark on underside"-HEE-- " [within a flower pattern cartouche].flagstaff hill, warrnambool, shipwrecked coast, flagstaff hill maritime museum, maritime museum, shipwreck coast, flagstaff hill maritime village, great ocean road, loch line, loch ard, captain gibbs, eva carmichael, tom pearce, glenample station, mutton bird island, loch ard gorge, china plate, asiatic pheasant, dinnerwear, crockery, table setting -
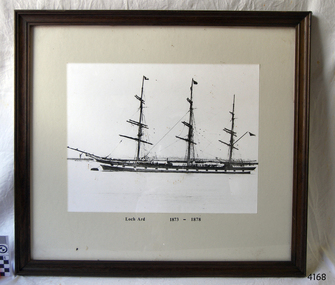 Flagstaff Hill Maritime Museum and Village
Photograph
HISTORY OF THE LOCH ARD The LOCH ARD belonged to the famous Loch Line which sailed many ships from England to Australia. Built in Glasgow by Barclay, Curdle and Co. in 1873, the LOCH ARD was a three-masted square rigged iron sailing ship. The ship measured 262ft 7" (79.87m) in length, 38ft (11.58m) in width, 23ft (7m) in depth and had a gross tonnage of 1693 tons. The LOCH ARD's main mast measured a massive 150ft (45.7m) in height. LOCH ARD made three trips to Australia and one trip to Calcutta before its final voyage. LOCH ARD left England on March 2, 1878, under the command of Captain Gibbs, a newly married, 29 year old. She was bound for Melbourne with a crew of 37, plus 17 passengers and a load of cargo. The general cargo reflected the affluence of Melbourne at the time. On board were straw hats, umbrella, perfumes, clay pipes, pianos, clocks, confectionary, linen and candles, as well as a heavier load of railway irons, cement, lead and copper. There were items included that intended for display in the Melbourne International Exhibition in 1880. The voyage to Port Phillip was long but uneventful. At 3am on June 1, 1878, Captain Gibbs was expecting to see land and the passengers were becoming excited as they prepared to view their new homeland in the early morning. But LOCH ARD was running into a fog which greatly reduced visibility. Captain Gibbs was becoming anxious as there was no sign of land or the Cape Otway lighthouse. At 4am the fog lifted. A man aloft announced that he could see breakers. The sheer cliffs of Victoria's west coast came into view, and Captain Gibbs realised that the ship was much closer to them than expected. He ordered as much sail to be set as time would permit and then attempted to steer the vessel out to sea. On coming head on into the wind, the ship lost momentum, the sails fell limp and LOCH ARD's bow swung back. Gibbs then ordered the anchors to be released in an attempt to hold its position. The anchors sank some 50 fathoms - but did not hold. By this time LOCH ARD was among the breakers and the tall cliffs of Mutton Bird Island rose behind the ship. Just half a mile from the coast, the ship's bow was suddenly pulled around by the anchor. The captain tried to tack out to sea, but the ship struck a reef at the base of Mutton Bird Island, near Port Campbell. Waves broke over the ship and the top deck was loosened from the hull. The masts and rigging came crashing down knocking passengers and crew overboard. When a lifeboat was finally launched, it crashed into the side of LOCH ARD and capsized. Tom Pearce, who had launched the boat, managed to cling to its overturned hull and shelter beneath it. He drifted out to sea and then on the flood tide came into what is now known as LOCH ARD Gorge. He swam to shore, bruised and dazed, and found a cave in which to shelter. Some of the crew stayed below deck to shelter from the falling rigging but drowned when the ship slipped off the reef into deeper water. Eva Carmichael had raced onto deck to find out what was happening only to be confronted by towering cliffs looming above the stricken ship. In all the chaos, Captain Gibbs grabbed Eva and said, "If you are saved Eva, let my dear wife know that I died like a sailor". That was the last Eva Carmichael saw of the captain. She was swept off the ship by a huge wave. Eva saw Tom Pearce on a small rocky beach and yelled to attract his attention. He dived in and swam to the exhausted woman and dragged her to shore. He took her to the cave and broke open case of brandy which had washed up on the beach. He opened a bottle to revive the unconscious woman. A few hours later Tom scaled a cliff in search of help. He followed hoof prints and came by chance upon two men from nearby Glenample Station three and a half miles away. In a state of exhaustion, he told the men of the tragedy. Tom returned to the gorge while the two men rode back to the station to get help. By the time they reached LOCH ARD Gorge, it was cold and dark. The two shipwreck survivors were taken to Glenample Station to recover. Eva stayed at the station for six weeks before returning to Ireland, this time by steamship. In Melbourne, Tom Pearce received a hero's welcome. He was presented with the first gold medal of the Royal Humane Society of Victoria and a £1000 cheque from the Victorian Government. Concerts were performed to honour the young man's bravery and to raise money for those who lost family in the LOCH ARD disaster. Of the 54 crew members and passengers on board, only two survived: the apprentice, Tom Pearce and the young woman passenger, Eva Carmichael, who lost all of her family in the tragedy. Ten days after the LOCH ARD tragedy, salvage rights to the wreck were sold at auction for £2,120. Cargo valued at £3,000 was salvaged and placed on the beach, but most washed back into the sea when another storm developed. The wreck of LOCH ARD still lies at the base of Mutton Bird Island. Much of the cargo has now been salvaged and some was washed up into what is now known as LOCH ARD Gorge. Cargo and artefacts have also been illegally salvaged over many years before protective legislation was introduced. One of the most unlikely pieces of cargo to have survived the shipwreck was a Minton porcelain peacock - one of only nine in the world. The peacock was destined for the Melbourne International Exhibition in 1880. It had been well packed, which gave it adequate protection during the violent storm. Today, the Minton peacock can be seen at the Flagstaff Hill Maritime Museum in Warrnambool. From Australia's most dramatic shipwreck it has now become Australia's most valuable shipwreck artefact and is one of very few 'objects' on the Victorian State Heritage Register. Flagstaff Hill’s collection of artefacts from LOCH ARD is significant for being one of the largest collections of artefacts from this shipwreck in Victoria. It is significant for its association with the shipwreck, which is on the Victorian Heritage Register (VHR S417). The collection is significant because of the relationship between the objects, as together they have a high potential to interpret the story of the LOCH ARD. The LOCH ARD collection is archaeologically significant as the remains of a large international passenger and cargo ship. The LOCH ARD collection is historically significant for representing aspects of Victoria’s shipping history and its potential to interpret sub-theme 1.5 of Victoria’s Framework of Historical Themes (living with natural processes). The collection is also historically significant for its association with the LOCH ARD, which was one of the worst and best known shipwrecks in Victoria’s history. Photograph of Loch Ard ship, wood frame glass front mounted on white boardflagstaff hill, warrnambool, shipwrecked coast, flagstaff hill maritime museum, maritime museum, shipwreck coast, flagstaff hill maritime village, great ocean road, loch line, loch ard, captain gibbs, eva carmichael, tom pearce, glenample station, mutton bird island, loch ard gorge, photograph -
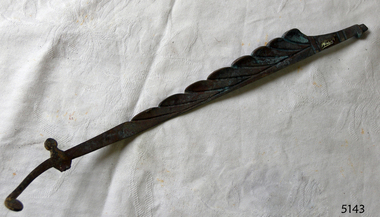 Flagstaff Hill Maritime Museum and Village
Ornament
HISTORY OF THE LOCH ARD The LOCH ARD belonged to the famous Loch Line which sailed many ships from England to Australia. Built in Glasgow by Barclay, Curdle and Co. in 1873, the LOCH ARD was a three-masted square rigged iron sailing ship. The ship measured 262ft 7" (79.87m) in length, 38ft (11.58m) in width, 23ft (7m) in depth and had a gross tonnage of 1693 tons. The LOCH ARD's main mast measured a massive 150ft (45.7m) in height. LOCH ARD made three trips to Australia and one trip to Calcutta before its final voyage. LOCH ARD left England on March 2, 1878, under the command of Captain Gibbs, a newly married, 29 year old. She was bound for Melbourne with a crew of 37, plus 17 passengers and a load of cargo. The general cargo reflected the affluence of Melbourne at the time. On board were straw hats, umbrella, perfumes, clay pipes, pianos, clocks, confectionary, linen and candles, as well as a heavier load of railway irons, cement, lead and copper. There were items included that intended for display in the Melbourne International Exhibition in 1880. The voyage to Port Phillip was long but uneventful. At 3am on June 1, 1878, Captain Gibbs was expecting to see land and the passengers were becoming excited as they prepared to view their new homeland in the early morning. But LOCH ARD was running into a fog which greatly reduced visibility. Captain Gibbs was becoming anxious as there was no sign of land or the Cape Otway lighthouse. At 4am the fog lifted. A man aloft announced that he could see breakers. The sheer cliffs of Victoria's west coast came into view, and Captain Gibbs realised that the ship was much closer to them than expected. He ordered as much sail to be set as time would permit and then attempted to steer the vessel out to sea. On coming head on into the wind, the ship lost momentum, the sails fell limp and LOCH ARD's bow swung back. Gibbs then ordered the anchors to be released in an attempt to hold its position. The anchors sank some 50 fathoms - but did not hold. By this time LOCH ARD was among the breakers and the tall cliffs of Mutton Bird Island rose behind the ship. Just half a mile from the coast, the ship's bow was suddenly pulled around by the anchor. The captain tried to tack out to sea, but the ship struck a reef at the base of Mutton Bird Island, near Port Campbell. Waves broke over the ship and the top deck was loosened from the hull. The masts and rigging came crashing down knocking passengers and crew overboard. When a lifeboat was finally launched, it crashed into the side of LOCH ARD and capsized. Tom Pearce, who had launched the boat, managed to cling to its overturned hull and shelter beneath it. He drifted out to sea and then on the flood tide came into what is now known as LOCH ARD Gorge. He swam to shore, bruised and dazed, and found a cave in which to shelter. Some of the crew stayed below deck to shelter from the falling rigging but drowned when the ship slipped off the reef into deeper water. Eva Carmichael had raced onto deck to find out what was happening only to be confronted by towering cliffs looming above the stricken ship. In all the chaos, Captain Gibbs grabbed Eva and said, "If you are saved Eva, let my dear wife know that I died like a sailor". That was the last Eva Carmichael saw of the captain. She was swept off the ship by a huge wave. Eva saw Tom Pearce on a small rocky beach and yelled to attract his attention. He dived in and swam to the exhausted woman and dragged her to shore. He took her to the cave and broke open case of brandy which had washed up on the beach. He opened a bottle to revive the unconscious woman. A few hours later Tom scaled a cliff in search of help. He followed hoof prints and came by chance upon two men from nearby Glenample Station three and a half miles away. In a state of exhaustion, he told the men of the tragedy. Tom returned to the gorge while the two men rode back to the station to get help. By the time they reached LOCH ARD Gorge, it was cold and dark. The two shipwreck survivors were taken to Glenample Station to recover. Eva stayed at the station for six weeks before returning to Ireland, this time by steamship. In Melbourne, Tom Pearce received a hero's welcome. He was presented with the first gold medal of the Royal Humane Society of Victoria and a £1000 cheque from the Victorian Government. Concerts were performed to honour the young man's bravery and to raise money for those who lost family in the LOCH ARD disaster. Of the 54 crew members and passengers on board, only two survived: the apprentice, Tom Pearce and the young woman passenger, Eva Carmichael, who lost all of her family in the tragedy. Ten days after the LOCH ARD tragedy, salvage rights to the wreck were sold at auction for £2,120. Cargo valued at £3,000 was salvaged and placed on the beach, but most washed back into the sea when another storm developed. The wreck of LOCH ARD still lies at the base of Mutton Bird Island. Much of the cargo has now been salvaged and some was washed up into what is now known as LOCH ARD Gorge. Cargo and artefacts have also been illegally salvaged over many years before protective legislation was introduced. One of the most unlikely pieces of cargo to have survived the shipwreck was a Minton porcelain peacock - one of only nine in the world. The peacock was destined for the Melbourne International Exhibition in 1880. It had been well packed, which gave it adequate protection during the violent storm. Today, the Minton peacock can be seen at the Flagstaff Hill Maritime Museum in Warrnambool. From Australia's most dramatic shipwreck it has now become Australia's most valuable shipwreck artefact and is one of very few 'objects' on the Victorian State Heritage Register. Flagstaff Hill’s collection of artefacts from LOCH ARD is significant for being one of the largest collections of artefacts from this shipwreck in Victoria. It is significant for its association with the shipwreck, which is on the Victorian Heritage Register (VHR S417). The collection is significant because of the relationship between the objects, as together they have a high potential to interpret the story of the LOCH ARD. The LOCH ARD collection is archaeologically significant as the remains of a large international passenger and cargo ship. The LOCH ARD collection is historically significant for representing aspects of Victoria’s shipping history and its potential to interpret sub-theme 1.5 of Victoria’s Framework of Historical Themes (living with natural processes). The collection is also historically significant for its association with the LOCH ARD, which was one of the worst and best known shipwrecks in Victoria’s history. Brass ornamental fitting recovered from the Loch Ardflagstaff hill, warrnambool, shipwrecked coast, flagstaff hill maritime museum, maritime museum, shipwreck coast, flagstaff hill maritime village, great ocean road, loch line, loch ard, captain gibbs, eva carmichael, tom pearce, glenample station, mutton bird island, loch ard gorge, brass ornamental fitting, ornamental fitting -
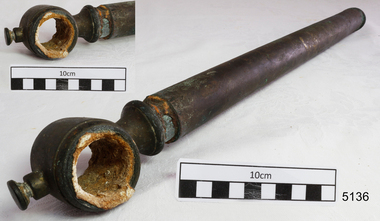 Flagstaff Hill Maritime Museum and Village
Functional object - Pipe, Before 1878
HISTORY OF THE LOCH ARD: - The Loch Ard got its name from ”Loch Ard” a loch that lies to the west of Aberfoyle, and to the east of Loch Lomond. It means "high lake" in Scottish Gaelic. The vessel belonged to the famous Loch Line which sailed many vessels from England to Australia. The Loch Ard was built in Glasgow by Barclay, Curdle and Co. in 1873, the vessel was a three-masted square-rigged iron sailing ship that measured 79.87 meters in length, 11.58 m in width, and 7 m in depth with a gross tonnage of 1693 tons with a mainmast that measured a massive 45.7 m in height. Loch Ard made three trips to Australia and one trip to Calcutta before its fateful voyage. Loch Ard left England on March 2, 1878, under the command of 29-year-old Captain Gibbs, who was newly married. The ship was bound for Melbourne with a crew of 37, plus 17 passengers. The general cargo reflected the affluence of Melbourne at the time. Onboard were straw hats, umbrellas, perfumes, clay pipes, pianos, clocks, confectionery, linen and candles, as well as a heavier load of railway irons, cement, lead and copper. There were other items included that were intended for display in the Melbourne International Exhibition of 1880. The voyage to Port Phillip was long but uneventful. Then at 3 am on June 1, 1878, Captain Gibbs was expecting to see land. But the Loch Ard was running into a fog which greatly reduced visibility. Captain Gibbs was becoming anxious as there was no sign of land or the Cape Otway lighthouse. At 4 am the fog lifted and a lookout aloft announced that he could see breakers. The sheer cliffs of Victoria's west coast came into view, and Captain Gibbs realised that the ship was much closer to them than expected. He ordered as much sail to be set as time would permit and then attempted to steer the vessel out to sea. On coming head-on into the wind, the ship lost momentum, the sails fell limp and Loch Ard's bow swung back towards land. Gibbs then ordered the anchors to be released in an attempt to hold their position. The anchors sank some 50 fathoms - but did not hold. By this time the ship was among the breakers and the tall cliffs of Mutton Bird Island rose behind. Just half a mile from the coast, the ship's bow was suddenly pulled around by the anchor. The captain tried to tack out to sea, but the ship struck a reef at the base of Mutton Bird Island, near Port Campbell. Waves subsequently broke over the ship and the top deck became loosened from the hull. The masts and rigging came crashing down knocking passengers and crew overboard. When a lifeboat was finally launched, it crashed into the side of Loch Ard and capsized. Tom Pearce, who had launched the boat, managed to cling to its overturned hull and shelter beneath it. He drifted out to sea and then on the flood tide came into what is now known as Loch Ard Gorge. He swam to shore, bruised and dazed, and found a cave in which to shelter. Some of the crew stayed below deck to shelter from the falling rigging but drowned when the ship slipped off the reef into deeper water. Eva Carmichael a passenger had raced onto the deck to find out what was happening only to be confronted by towering cliffs looming above the stricken ship. In all the chaos, Captain Gibbs grabbed Eva and said, "If you are saved Eva, let my dear wife know that I died like a sailor". That was the last Eva Carmichael saw of the captain. She was swept off the ship by a huge wave. Eva saw Tom Pearce on a small rocky beach and yelled to attract his attention. He dived in and swam to the exhausted woman and dragged her to shore. He took her to the cave and broke the open case of brandy which had washed up on the beach. He opened a bottle to revive the unconscious woman. A few hours later Tom scaled a cliff in search of help. He followed hoof prints and came by chance upon two men from nearby Glenample Station three and a half miles away. In a complete state of exhaustion, he told the men of the tragedy. Tom then returned to the gorge while the two men rode back to the station to get help. By the time they reached Loch Ard Gorge, it was cold and dark. The two shipwreck survivors were taken to Glenample Station to recover. Eva stayed at the station for six weeks before returning to Ireland by steamship. In Melbourne, Tom Pearce received a hero's welcome. He was presented with the first gold medal of the Royal Humane Society of Victoria and a £1000 cheque from the Victorian Government. Concerts were performed to honour the young man's bravery and to raise money for those who lost family in the disaster. Of the 54 crew members and passengers on board, only two survived: the apprentice, Tom Pearce and the young woman passenger, Eva Carmichael, who lost her family in the tragedy. Ten days after the Loch Ard tragedy, salvage rights to the wreck were sold at auction for £2,120. Cargo valued at £3,000 was salvaged and placed on the beach, but most washed back into the sea when another storm developed. The wreck of Loch Ard still lies at the base of Mutton Bird Island. Much of the cargo has now been salvaged and some items were washed up into Loch Ard Gorge. Cargo and artefacts have also been illegally salvaged over many years before protective legislation was introduced in March 1982. One of the most unlikely pieces of cargo to have survived the shipwreck was a Minton majolica peacock- one of only nine in the world. The peacock was destined for the Melbourne 1880 International Exhibition. It had been well packed, which gave it adequate protection during the violent storm. Today the Minton peacock can be seen at the Flagstaff Hill Maritime Museum in Warrnambool. From Australia's most dramatic shipwreck, it has now become Australia's most valuable shipwreck artifact and is one of very few 'objects' on the Victorian State Heritage Register.The shipwreck of the Loch Ard is of significance for Victoria and is registered on the Victorian Heritage Register ( S 417). Flagstaff Hill has a varied collection of artefacts from Loch Ard and its collection is significant for being one of the largest accumulation of artefacts from this notable Victorian shipwreck. The collections object is to also give us a snapshot into history so we are able to interpret the story of this tragic event. The collection is also archaeologically significant as it represents aspects of Victoria's shipping history that allows us to interpret Victoria's social and historical themes of the time. The collections historically significance is that it is associated unfortunately with the worst and best-known shipwreck in Victoria's history. Heavy duty brass sleeve retrieved from the wreck of the LOCH ARD. It is pinched and broken off at one end, enclosing an extendable inner sleeve, which is connected to a brass bracket fixed at right angles. The circular enclosing bracket would hold (and fix by an adjustable brass screw) a through or cross pipe of similar diameter to the outer sleeve. The artefact is a structural piece delivering vertical support to a horizontal rail (missing) and not for transporting gas. It is constructed of thick gauge metal suitable for weight/load bearing and its sliding sleeve design is similar to a modern shock absorber, or a telescopic leg supporting a surveying instrument. There is concreting sediment immobilising the sleeves and lining the inner surface of the bracket. flagstaff hill, warrnambool, shipwrecked coast, flagstaff hill maritime museum, maritime museum, shipwreck coast, flagstaff hill maritime village, great ocean road, loch line, loch ard, captain gibbs, eva carmichael, tom pearce, glenample station, mutton bird island, loch ard gorge, brass fitting, brass pipe, 1878 shipwreck -
 Flagstaff Hill Maritime Museum and Village
Functional object - Glass Lens, 1886-1908
This glass lens was recovered from the wreck of the Falls of Halladale. Its purpose is unknown but could have been a clock face cover, a lamp or torch lens or even the lens from underwater equipment. The FALLS of HALLADALE 1886 - 1908- The sailing ship Falls of Halladale was an iron-hulled, four-masted barque, used as a bulk carrier of general cargo. She left New York in August 1908 bound for Melbourne and Sydney. In her hold was general cargo consisting of roof tiles, barbed wire, stoves, oil, benzene, and many other manufactured items. After three months at sea and close to her destination, a navigational error caused the Falls of Halladale to be wrecked on a reef off the Peterborough headland on the 15th of November, 1908. The captain and 29 crew members survived, but her cargo was largely lost, despite two salvage attempts in 1908-09 and 1910. The Court of Marine Inquiry in Melbourne ruled that the foundering of the ship was entirely due to Captain David Wood Thomson's navigational error, not too technical failure of the Clyde-built ship. The Falls of Halladale was built in1886 by Russell & Co., at Greenock shipyards on the River Clyde, Scotland for Wright, Breakenridge & Co of Glasgow. The ship had a sturdy construction built to carry maximum cargo and was able to maintain full sail in heavy gales, one of the last of the 'windjammers' that sailed the Trade Route. She and her sister ship, the Falls of Garry, were the first ships in the world to include fore and aft lifting bridges. The new raised catwalk-type decking allowed the crew to move above the deck in stormy conditions. This glass lens is significant for its association with the wreck of the sailing ship the Falls of Halladale. The Falls of Halladale shipwreck is listed on the Victorian Heritage (No. S255). She was one of the last ships to sail the Trade Routes from Europe and the Americas. Also of significance is that the vessel was one of the first ships to have fore and aft lifting bridges as a significant safety feature still in use on modern vessels today. The subject model is an example of an International Cargo Ship used during the 19th and early 20th centuries to transport goods around the world and represents aspects of Victoria’s shipping industry. Glass lens; transparent glass rectangle with bevelled edges. It was recovered from the wreck of the Falls of Halladale. flagstaff hill, warrnambool, flagstaff hill maritime museum and village, shipwreck coast, great ocean road, shipwreck artefact, falls of halladale, glass lens, rectangular lens, glass cover -
 Flagstaff Hill Maritime Museum and Village
Wood Sample, 1854
This timber fragment is from the shipwreck of the SCHOMBERG (1855). The bow of the ship broke off after an unsuccessful salvage attempt to tow her off the Peterborough reef. At the wreck-site the submerged hull points north towards the beach but the front section is missing. Parts of the bow have been carried away by the eastward bearing ocean currents and have come ashore on the western coast of New Zealand’s South Island. Don Charlwood writes in Wrecks & Reputations (1977) that in 1871 “a piece of wreckage over 20 feet long and 12 feet wide was brought out” by land from its remote location at Tauperika Creek. In 1875 “an even larger section was brought out by sea”. It was suggested at the time that these relics of a large wooden sailing ship were from the wreck of the SCHOMBERG some 20 years earlier on the Victorian coast. “To corroborate the theory”, Charlwood continues, “a piece was sent to Halls of Aberdeen [the ship’s builders in Scotland]. They identified it as having come from the ship they had launched with such pride in 1852.” Charlwood, whose great-grandparents were passengers on the SCHOMBERG’s fateful maiden voyage, acquired some samples of the wreckage timber recovered in New Zealand, and brought them back with him to Australia. In 1976 “comparison was made of timbers from the New Zealand find and timber from the remains of the hull at Peterborough. They proved to be from the same ship.” The extraordinary journey of these pieces of wood from the once mighty clipper ship SCHOMBERG came to an end in 1984, when they were given to Flagstaff Hill by the author, and reunited with other shipwreck timbers and copper bolts from the vessel that are on display at the Maritime Village. The shipwreck of the SCHOMBERG is of State significance - Victorian Heritage Register S612The artefact is a small piece of wood that was broken from the timbers of the shipwreck of the SCHOMBERG (1855) and carried by the eastern currents to New Zealand (1875). It has 2 drilled holes that show faint screw marks and no metallic residue (possibly for patent treenails). The top surface is rounded, of a dark colour, and showing clear grains that have been worn smooth by the action of the sea. There is a reddish stain on the timber where breakage has occurred. The wood appears to have been strong in its original condition but is now light to lift and soft and crumbly at its exposed edges. The artefact is in fragile condition.flagstaff hill, warrnambool, shipwrecked-coast, flagstaff-hill, flagstaff-hill-maritime-museum, maritime-museum, shipwreck-coast, flagstaff-hill-maritime-village, schomberg, shipwreck timber, don charlwood, ‘wrecks & reputations’ -
 Flagstaff Hill Maritime Museum and Village
Wood Sample, 1854
This timber fragment is from the shipwreck of the SCHOMBERG (1855). The bow of the ship broke off after an unsuccessful salvage attempt to tow her off the Peterborough reef. At the wreck-site the submerged hull points north towards the beach but the front section is missing. Parts of the bow have been carried away by the eastward bearing ocean currents and have come ashore on the western coast of New Zealand’s South Island. Don Charlwood writes in Wrecks & Reputations (1977) that in 1871 “a piece of wreckage over 20 feet long and 12 feet wide was brought out” by land from its remote location at Tauperika Creek. In 1875 “an even larger section was brought out by sea”. It was suggested at the time that these relics of a large wooden sailing ship were from the wreck of the SCHOMBERG some 20 years earlier on the Victorian coast. “To corroborate the theory”, Charlwood continues, “a piece was sent to Halls of Aberdeen [the ship’s builders in Scotland]. They identified it as having come from the ship they had launched with such pride in 1852.” Charlwood, whose great-grandparents were passengers on the SCHOMBERG’s fateful maiden voyage, acquired some samples of the wreckage timber recovered in New Zealand, and brought them back with him to Australia. In 1976 “comparison was made of timbers from the New Zealand find and timber from the remains of the hull at Peterborough. They proved to be from the same ship.” The extraordinary journey of these pieces of wood from the once mighty clipper ship SCHOMBERG came to an end in 1984, when they were given to Flagstaff Hill by the author, and reunited with other shipwreck timbers and copper bolts from the vessel that are on display at the Maritime Village. The shipwreck of the SCHOMBERG is of State significance - Victorian Heritage Register S612A small piece of wood broken from the timbers of the shipwrecked clipper SCHOMBERG (1855, Peterborough) and retrieved from the southwest coast of New Zealand’s South Island. The artefact bears a reddish stain on exposed parts but the main surface is grey coloured. It appears to have been split off other wood fragments in the Flagstaff Hill collection (6257, 6259). It presents as a lighter less dense wood than oak, but may have lost mass through submersion.flagstaff hill, warrnambool, shipwrecked-coast, flagstaff-hill, flagstaff-hill-maritime-museum, maritime-museum, shipwreck-coast, flagstaff-hill-maritime-village, schomberg, shipwreck timber, don charlwood, ‘wrecks & reputations’ -
 Flagstaff Hill Maritime Museum and Village
Wood Sample, 1854
This timber fragment is from the shipwreck of the SCHOMBERG (1855). The bow of the ship broke off after an unsuccessful salvage attempt to tow her off the Peterborough reef. At the wreck-site the submerged hull points north towards the beach but the front section is missing. Parts of the bow have been carried away by the eastward bearing ocean currents and have come ashore on the western coast of New Zealand’s South Island. Don Charlwood writes in Wrecks & Reputations (1977) that in 1871 “a piece of wreckage over 20 feet long and 12 feet wide was brought out” by land from its remote location at Tauperika Creek. In 1875 “an even larger section was brought out by sea”. It was suggested at the time that these relics of a large wooden sailing ship were from the wreck of the SCHOMBERG some 20 years earlier on the Victorian coast. “To corroborate the theory”, Charlwood continues, “a piece was sent to Halls of Aberdeen [the ship’s builders in Scotland]. They identified it as having come from the ship they had launched with such pride in 1852.” Charlwood, whose great-grandparents were passengers on the SCHOMBERG’s fateful maiden voyage, acquired some samples of the wreckage timber recovered in New Zealand, and brought them back with him to Australia. In 1976 “comparison was made of timbers from the New Zealand find and timber from the remains of the hull at Peterborough. They proved to be from the same ship.” The extraordinary journey of these pieces of wood from the once mighty clipper ship SCHOMBERG came to an end in 1984, when they were given to Flagstaff Hill by the author, and reunited with other shipwreck timbers and copper bolts from the vessel that are on display at the Maritime Village. The shipwreck of the SCHOMBERG is of State significance - Victorian Heritage Register S612A piece of wood broken from the timbers of the shipwrecked SCHOMBERG (1855, Peterborough) and retrieved from the southwest coast of New Zealand’s South Island. The artefact is a light grey colour with plain long grain and bears a reddish stain on parts. Part of a drilled hole is red stained with traces of corroded metal still evident. The piece appears to have split off from other fragments that are in the Flagstaff Hill collection (6257, 6258) and it is in fragile condition.flagstaff hill, warrnambool, shipwrecked-coast, flagstaff-hill, flagstaff-hill-maritime-museum, maritime-museum, shipwreck-coast, flagstaff-hill-maritime-village, schomberg, shipwreck timber, don charlwood, ‘wrecks & reputations’ -
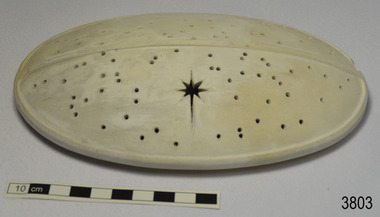 Flagstaff Hill Maritime Museum and Village
Ceramic - Cover, circa 1883
This ceramic cover was recovered from the wreck of the 1882-1883 George Roper between the late 1960’s to early 1970’s. It is one of the shipwreck artefacts in the John Chance Collection. The purpose of the cover is unclear. The holes could be for ventilation. The cover may have been used to protect food or keep it at an even temperature. It may also have been used for covering fragrant petals, allowing some scent to escape through the holes. The residue around the underside of the holes and their random placement indicate that the cover could be partially handmade. The discolouration could have come from its time in the sea. The GEORGE ROPER 1882 - 1883 - The George Roper was a 4-masted iron sailing ship built in Liverpool, England, in 1882 for fast international trade with Australia. The large vessel was launched in February 1883. The ship was on its first trip, departing Liverpool for Melbourne, captained by John Ward and a crew of 31. She had almost reached her destination on July 4 1883, approaching Port Phillip Bay and being towed by the steam tug William. The weather changed to rough with fog and both the George Roper and the William hit the dangerous Lonsdale Reef at Port Phillip Heads. The Captain and crew were eventually rescued and taken to Queenscliff. Salvage syndicates were able to recover a lot of the cargo before the George Roper broke up and sank. Amongst the cargo was soft goods, draperies, household items, spirits of malt and distilled liquors, chemicals, dynamite, and 1,400 tons of steel rails for the Victorian Government. Also in the hold were Russell Stourbridge bricks, as paying ballast. The ventilated cover is as an example of domestic ceramic ware of the 1880s. The cover also holds significance as it was recovered by John Chance, a diver from the wreck of the George Groper in the 1960s-70s. Items that come from several wrecks along Victoria's coast have since been donated to the Flagstaff Hill Maritime Village’s museum collection by his family, illustrating this item’s level of historical value. The George Roper is considered historically and archaeologically significant and as such, is listed on the Victorian Heritage Database, VHR S286. It is an example of a vessel built specifically for fast travel to and from Australia with a large shipment of cargo. The George Roper’s cargo of steel rails adds to the historical significance of international trade to the growing colony of Australia and Victoria in particular, with rail transportation soon to become a faster and safer form of transportation between colonial towns. Divers can still access parts of the scattered wreck and other artefacts recovered in the 1970s and 1980s can be viewed in both public and private collections. Cover; unglazed white ceramic, oval shape. The cover has holes randomly poked through its surface, one large hole is a six pointed star shape. Underneath there is a narrow rim placed slightly inside the edge. There is residue on the underneath around the holes. There is orange-brown discolouration and areas where the surface is lighter coloured. flagstaff hill, warrnambool, flagstaff hill maritime museum, maritime museum, shipwreck coast, flagstaff hill maritime village, great ocean road, john chance, west coast trader, george roper, w. h. potter & sons, w.t. dickson and son, captain john ward, russell stourbridge bricks, port phillip heads, lonsdale reef, dive wreck, vhr s286, coastal trader, ceramic, vintage, ventilated cover, domestic item -
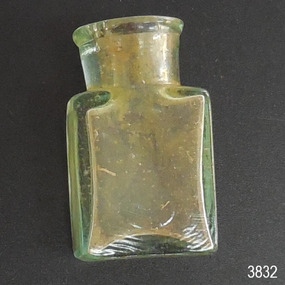 Flagstaff Hill Maritime Museum and Village
Container - Pill bottle, from mid-19th century to 1902
This small handmade bottle possibly dates from the mid-1840s. It may have been used as a traveller's ink bottle, due to its wide mouth. It was recovered from the wreck of the Inverlochy and is part of the John Chance collection. Small glass ink bottles similar to this one were handmade, blown into a cup shaped mould, and sharply broken off from the blow-pipe at the neck and sealed with a cork or wax. The mouth of this bottle appears to have been added after it was blown. INVERLOCHY 1895-1902 - The Inverlochy was a steel sailing barque built in Scotland in 1895 for international trade. In 1902 the Inverlochy left Liverpool under the command of Captain E.R. Kendrick. There were 21 officers and crew and the captain’s wife Mrs Kendrick, on board, bound for Australia with cargo that included tools, chemicals, liquor (beer, whisky, stout, rum, and brandy), steel, iron, wire netting, hoop iron, tinplate and pig iron), and steel wire for the Melbourne Tramway Company, tiles, soap, soft goods and earthenware. On December 18 almost at their destination, the Inverlochy ran aground on Ingoldsby Reef at Point Addis, near Anglesea. The crew and passengers left the ship via lifeboat and landed at Thompson’s Creek, then walked about 20 kilometres to Barwon Heads. Salvagers were interested in the 10 miles of cable in the hold. Mrs Kendrick’s ‘high grade’ bicycle was amongst the items salvaged but she lost her jewellery and two pianos. By February 1903 the ship had broken up and objects such as bottles and casks of liquor were washed ashore. Bad weather shook the wreck in June 1903, causing the ship’s spars and figurehead to be washed ashore. This handmade bottle is historically significant for its association with being made and used during the mid-to-late 19th century. This handmade glass bottle is significant for its connection with the John Chance Collection, which is historically significant as an example of artefacts from wrecks that had been lost in the coastal waters of Victoria from thirty to over one hundred years before John Chance and others discovered them. These artefacts are a sample of goods carried as cargo or personal possessions, and of ship hardware of that era. The bottle is significant through its connection with the barque, Inverlochy, The Inverlochy is significant for its cargo, which is a snapshot of the array of goods imported into Australia at the turn of the 19th century, including cable for the Melbourne Tramway Company. The Inverlochy is historically significant and is registered on the Victorian Heritage Database, VHR S338. The wreck of the Inverlochy is important as an accessible dive site that shows the remains of a large international trading vessel and its contents. It is valuable for an insight into Victorian era of shipping and maritime history.Bottle, clear glass, handmade, mould-blown. Small pill bottle has round mouth and neck, straight sides, rectangular base, no seams, shiny surface. Thickness of glass varies. Mouth is lop-sided and lip varies in width. Inscription of logo on both wide sides. Inscription embossed on sides [tear drop] logo. flagstaff hill, warrnambool, flagstaff hill maritime museum, maritime museum, shipwreck coast, flagstaff hill maritime village, great ocean road, john chance, inverlochy, scotland, captain e.r. kendrick, melbourne tramway company, tramway cable, ingoldsby reef, point addis, anglesea, thompson’s creek, barwon heads, victorian, antique, handmade, mould blown, small glass bottle, rectangular glass bottle, pill bottle -
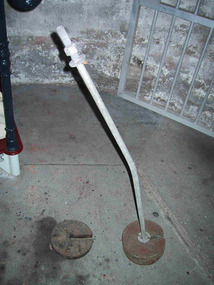 Parks Victoria - Point Hicks Lightstation
Weights
A small number of heavy cast iron weights and two rods remain at the Point Hicks. The weights and rods were part of the original clockwork mechanism that was fitted beneath the lens to keep the kerosene-fuelled light turning. They were attached to a cable or chains and moved vertically in similar fashion to the way weights move on grandfather clocks. As the weight fell, the optic clock was driven and the lens was turned. To keep the clock turning, the weight needed to be wound back up to the top of its travel. The cables and weights in this lighthouse were visible as they moved through the length of the tower up to the lantern room. It was usual for systems to move inside a tube extending up to the top, but in this case the tower’s cast iron spiral staircase, which is supported on cantilever cast iron brackets set into the concrete wall, spiralled around the space in which they moved. Lighthouse keepers had the arduous job of having to constantly wind the clock to keep the light active, and at least two keepers needed to observe a strict roster of hours. When electric motors were invented, all of this became redundant and the motors were able to turn the optic for as long as there was power to drive them. In December 1964, the original 1890 Chance Bros kerosene-fuelled light and clockwork mechanism were replaced by small electric motor, and the number of keepers reduced to two. The six circular weights and rods originate from the obsolete system and may have been part of a larger set. Wilsons Promontory retains seven of its original set of ten weights, all of which are detached from the tower’s weight tube. Cape Schanck has a set of fourteen weights remaining in situ as well as another four detached weights, which have inscriptions . One weight is displayed in the lantern room at Cape Otway. The Point Hicks weights have first level contributory significance for the insights they provide into the superseded technology and operations of a late nineteenth century lighthouse. They are well provenanced and are significant for their historic value as part of the lightstation’s Chance Brothers optical system installed in 1890.PHLS0005.1 Round cast iron weight with flat base used for lens clock-work mechanism attached to a bent metal rod. PHLS0005.2 Removable round cast iron weight with flat base used for lens clock-work mechanism stored above the other weight. -
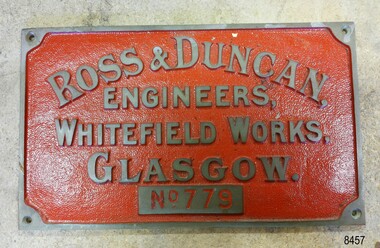 Flagstaff Hill Maritime Museum and Village
Plaque - Nameplate, ca. 1970s
This nameplate is a reproduction of the Ross & Duncan nameplate and was displayed on the Rowitta vessel activation at Flagstaff Hill. Ross & Duncan of Glasgow manufactured marine engines and boilers from the time it was established in 1860 and growing to employ 450-500 workers by 1911. SS ROWITTA: - The 1909 steam ferry, SS Rowitta, was installed as an exhibit at Flagstaff Hill in 1975 and was enjoyed by many visitors for 40 years. Rowitta was a timber steam ferry built in Hobart in 1909 using planks of Huon and Karri wood. It was a favourite of sightseeing passengers along Tasmania’s Tamar and Derwent rivers for 30 years. Rowitta was also known as Tarkarri and Sorrento and had worked as a coastal trading vessel between Devonport and Melbourne, and Melbourne Queenscliff and Sorrento. In 1974 Rowitta was purchased by Flagstaff Hilt to convert into a representation of the Speculant, a historic and locally significant sailing ship listed on the Victorian Heritage Database. (The Speculant was built in Scotland in 1895 and traded timber between the United Kingdom and Russia. Warrnambool’s P J McGennan & Co. then bought the vessel to trade pine timber from New Zealand to Victorian ports and cargo to Melbourne. It was the largest ship registered with Warrnambool as her home port, playing a key role in the early 1900s in the Port of Warrnambool. In 1911, on her way to Melbourne, it was wrecked near Cape Otway. None of the nine crew lost their lives.) The promised funds for converting Rowitta into the Speculant were no longer available, so it was restored back to its original configuration. The vessel represented the importance of coastal traders to transport, trade and communication in Australia times before rail and motor vehicles. Sadly, in 2015 the time had come to demolish the Rowitta due to her excessive deterioration and the high cost of ongoing repairs. The vessel had given over 100 years of service and pleasure to those who knew her. The nameplate was reproduced to represent the Glasow marine engineers and boilermakers, Ross & Duncan, that were the makers of the engine for the exhibition steam ferry Rowitta. The Tasmanian-built vessel had a long career in Tasmania and Victoria. The nameplate is significant for its connection with the Rowitta, representing the importance of coastal traders to transport, trade and communication in Australia in conjunction with the new rail and motor vehicles. The nameplate is a record of an exhibit at Flagstaff Hill Maritime Village from its early beginnings. Maker's brass nameplate; brass, with embossed text and a hole in each corner. The background is painted red. There are five rows of text; the top row is arranged in an arc. On the bottom row is a number. The nameplate is a replica that was once displayed on the Rowitta vessel at Flagstaff Hill. The reproduction nameplate is for the company Ross & Duncan of Glasgow."ROSS & DUNCAN / ENGINEERS / WHITEFIELD WORKS GLASGOW / NO. 779" flagstaff hill, flagstaff hill maritime museum and village, warrnambool, maritime museum, maritime village, great ocean road, shipwreck coast, steamer, steam ferry, ross & duncan, marine engineers, marine boilers, glasgow engineers, whitefield works, reproduction, scotland, steamer engine, rowitta, sorrento, ss rowitta, navigation, marine technology, steam power, hobart, tasmania, devonport, tasmanian-built, ferry, 1909, early 20th century vessel, passenger vessel, tamar trading company, tamar river, launceston, george town, tarkarri, speculant, peter mcgennan, p j mcgennan & co. port phillip ferries pty ltd, melbourne, coastal trader, timber steamer, huon, karri, freighter, supply ship, charter ferry, floating restaurant, prawn boat, lakes entrance -
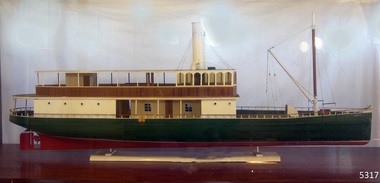 Flagstaff Hill Maritime Museum and Village
Craft - Ship Model, S.S. Rowitta, after 1975
This remote-controlled ship model was made by the blacksmith at Flagstaff Hill Maritime Village in the likeness of the Village's display passenger ferry, the S.S. Rowitta. SS ROWITTA: - The 1909 steam ferry, SS Rowitta, was installed as an exhibit at Flagstaff Hill in 1975 and was enjoyed by many visitors for 40 years. Rowitta was a timber steam ferry built in Hobart in 1909 using planks of Huon and Karri wood. She was a favourite of sightseeing passengers along Tasmania’s Tamar and Derwent rivers for 30 years. Rowitta was also known as Tarkarri and Sorrento and had worked as a coastal trading vessel between Devonport and Melbourne, and Melbourne Queenscliff and Sorrento. In 1974 Rowitta was purchased by Flagstaff Hilt to convert into a representation of the Speculant, a historic and locally significant sailing ship listed on the Victorian Heritage Database. (The Speculant was built in Scotland in 1895 and traded timber between the United Kingdom and Russia. Warrnambool’s P J McGennan & Co. then bought the vessel to trade pine timber from New Zealand to Victorian ports and cargo to Melbourne. She was the largest ship registered with Warrnambool as her home port, playing a key role in the early 1900s in the Port of Warrnambool. In 1911, on her way to Melbourne, she was wrecked near Cape Otway. None of the nine crew lost their lives.) The promised funds for converting Rowitta into the Speculant were no longer available, so she was restored back to her original configuration. She represented the importance of coastal traders to transport, trade and communication in Australian times before rail and motor vehicles. Sadly, in 2015 the time had come to demolish the Rowitta due to her excessive deterioration and the high cost of ongoing repairs. She had given over 100 years of service and pleasure to those who knew her. The remote-controlled model of the S.S. Rowitta is significant for its association with the Tasmanian early to mid-1900s passenger ferry, the wooden screw steamer Rowitta. It is is connected to the history of the Rowitta, that was a large exhibit on display at Flagstaff Hill Maritime Village from the museum’s early beginnings until the vessel’s end of life 40 years later. The display was used as an aid to maritime education. The Rowitta represents the importance of coastal traders to transport, trade and communication along the coast of Victoria, between states, and in Australia before rail and motor vehicles. The vessel was an example of a ferry built in the early 20th century that served many different roles over its lifetime of over 100 years. Model of the wooden steam ferry "S.S. Rowitta". This is a radio-controlled model built by the Flagstaff Hill blacksmith.flagstaff hill, warrnambool, shipwrecked coast, flagstaff hill maritime museum, maritime museum, shipwreck coast, flagstaff hill maritime village, great ocean road, ship model, remote controlled steam ship model, s.s. rowitta, tarkarri, speculant, purdon & featherstone of hobart, passenger ferry 1909, tasmanian passenger ferry, vessel, charles street wharf launceston, sorrento, remote control boat, rowitta model, remote-controlled model -
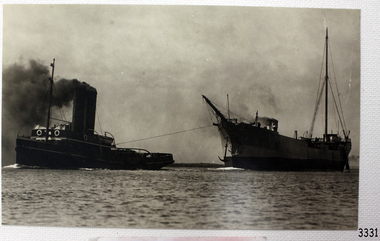 Flagstaff Hill Maritime Museum and Village
Photograph, C. 1915 - 09/07/1917
This black and white photograph of the tugboat NYORA towing the steam ship INVERNESS-SHIRE was taken between 1915, when the INVERNESS-SHIRE was dis-masted, and 9the July 1917, when NYORA tragically sank. The sailing ship INVERNESS-SHIRE was a four masted steel barque built in 1894 by Robert Duncan & Co. Limited, Glasgow, U.K. (The supervising engineer during the building was William Cumming. He accompanied every ship he’d built on their maiden voyages from UK to Melbourne.) In 1916 she was purchased by A/S Christiansand (Sven O. Stray), Kristiansand, Norway and renamed SVARTSKOG. In October 1920 she disappeared at sea, carrying a cargo of coal, and all hands were lost. The steam powered NYORA was a powerful tugboat and a salvage vessel built by J.P. Rennoldson & Sons Ltd, South Shields, Tyne and Wear, UK. She was originally launched with the name NEPEAN in May 1909, then as NYORA in August 1909 and registered in Melbourne in November 1909 by owners Huddart Parker Pty Ltd. She was made of steel, had triple-compounded steam engines, and her dimensions were 306 ton, 135.0 x 25.1 x 13.6ft. The Melbourne tug NYORA was known as “one of the best known tugs in Victoria, and carried the latest appliances for firefighting and salvage purposes.” She serviced the Port of Melbourne for most of her career. In July 1917 NYORA was towing the American schooner ASTORIA from Port Pirie to Sydney, because ASTORIA’s engines had broken down; she had been delivering a large cargo of timber. On July 9th the vessels were two days out from Port Pirie. At 10:30am NYORA foundered after casting off at Cape Jaffa, 50 miles south of Kingston, South Australia, and sank. Only 2 of the 16 crew survived; NYORA’s Master, Captain W.M. McBain (William Murray) and helmsman, able seaman Gordon Lansley. They were rescued by the two Cape Jaffa light keepers, Jamieson & Clark, who launched the rescue from the Cape Jaffa lighthouse on Margaret Brock Reef. Both men were brought to the lighthouse keeper’s cottage where they recuperated after their long exposure to the rough. (The Queenscliff Sentinal of 14th July 1917 noted that both saved men originated from the same district; Gordon Lansley was from Queenscliff and Captain McBain formerly from Point Lonsdale.) The ASTORIA was “in a very dangerous position ten miles west of the Margaret Brock reef near the Cape Jaffa lighthouse, setting towards the land.” Captain Solly from Beachport later said “Owing to the position … the ship was very fortunate in making Guichen Bay in safety, as she did” (Guichen Bay is south of Robe). Captain Bull, manager of Huddart Packer Pty Ltd, NYORA’s owner, was unable to see any reason for the foundering, as the NYORA was well known for its seaworthiness. At a hearing later on, the Marine Board could blame on no-one either, but found that the ship had been swamped by heavy seas, and had listed to one side when a load of 40 tons of coal in sacks on her deck shifted. The tow line to the ASTORIA was cut to try and save the tug but a huge wave swamped her, crashed open the engine room door and flooded the compartment. It was impossible to launch the lifeboats due to the listing of the sea and NYORA sank within 15 minutes. There was some criticism of the length of time it took Captain Solly and the lifeboat crew to get from Beachport to Cape Jaffa to help with the rescue. However, they had great difficulty in the very strong seas, taking 9 hours just to reach Robe, which was only 32 miles away. There they filled the tanks with ample benzene for the task ahead (impossible to do at sea at the time), took in food and brought on board the Robe Harbour Master, Mr Sneath. The Harbour Master was then able to safely pilot the lifeboat to Cape Jaffa in the smoother coastal waters, saving very much time, but by the time they arrived at Cape Jaffa the 2 survivors had already been taken to the lighthouse on the mainland. There was also a question as to the chances of the ship ASTORIA lowering a lifeboat to help with the disaster. Captain Solly explained that it would have been impossible without sacrificing the lives of the lifeboat crew , due to the great height of the ship out of the water and the roughness of the sea. Captain Svenson, of the ASTORIA, said himself “We are ourselves in a helpless position” and “"Cannot see anything of lifeboats”. One of the 14 lost crew of the NYORA was Hugh Edwards, whose body was not recovered. The descendants of Captain William McBain have continued the seafaring heritage. His son was also a tugboat captain (Captain Norman Clive McBain), working mostly from Reid Street Pier, Williamstown, who would often take his own grandson out to sea to spend time with him on his tugboat. Now that grandson has built a tugboat in memory of his heritage and spends time in it with his own grandson. The Cape Jaffa original lighthouse has been dismantled and moved to Kingston and is now a Lighthouse Museum. The attached photographs of Margaret Brock Reef, and the Cape Jaffa Lighthourse keeper's cottage (now in ruins) is courtesy of Capt. William McBain's great grandson, who visited the area in 2015. There is a model of the NYORA in Museum Victoria, donated by Huddart Packer & Co Ltd. in 1937. This photograph is significant for its association with the tugboat NYORA, that is part of the seafaring history of the Port of Melbourne and associated Victorian ports. Black and White photograph of the tugboat NYORA and steam ship INVERNESS-SHIRE. C. 1915-1917.flagstaff hill, warrnambool, shipwrecked-coast, flagstaff-hill, flagstaff-hill-maritime-museum, maritime-museum, shipwreck-coast, flagstaff-hill-maritime-village, historic maritime photograph, lighthouses, shipwrecks, steamships, j.p. rennoldson & sons ltd, huddart parker pty ltd, nepean, nyora, inverness-shire, astoria, captain w.m. mcbain, william cummings supervising engineer, cape jaffa lighthouse, beachport lifeboat, captain solly, captain svenson, margaret brock reef -
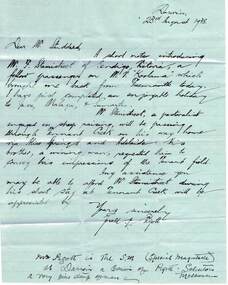 Bendigo Historical Society Inc.
Document - MCCOLL, RANKIN AND STANISTREET COLLECTION: TENNANT CREEK, 1938
McColl Rankin & Stanistreet, Tennant Creek. a/ Envelope from Commercial Union Company Limited, Melbourne. Addressed to Tennant Creek. b/ Letter inside addressed ,dated 23//8/1938, addressed to W Studderd from Gerald J Pigott Letter is introducing Mr F Stanistreet (Bendigo) whom he met on M V Korlana. Mentions holidaying in Java, Malaya & Sumatra. Mr Stanistreet is a pastoralist engaged I sheep raising, will be passing through via Alice springs and Adelaide. His brother a mining man requested him to convey his impressions of the Tennant field. Goes on to ask him to assist where he is able. (written on blue writing paper). c/ Also enclosed in envelope a, was a envelope with a letter inside, on the front addressed to L N Studderd, Esq., Mining Warden, Tennant Creek. Written on the left side, for J J Stanistreet. On back of envelope message to W Studderd. Letter tells about the iron mine in Tennant Creek, the shortage of water, investors, size of mine, water bores, approach to town. d/ Letter from J J Stanistreet Sent, Re Tennants Creek Mines NT. Letters tells how he has seen Tennant Creek mines which have been going for 4 years & holding its own, gold found in pockets, no deep reef has been located so far, Mr Stoddard indicated no field, only gouges shows - that is few men to each shaft, water very scarce cover only.organization, business, mine, mccoll rankin & stanistreet tennant creek mr f stanistreet pastoralist sheep raising w studderd gerald j pigott m v korlana tennant field l n studderd, esq., mining warden, tennant creek gold found in pockets the field was a gouges show -
 Bendigo Historical Society Inc.
Document - MCCOLL, RANKIN AND STANISTREET COLLECTION: NORTH VIRGINIA GOLD MINING CO NL, 1933
McColl Rankin & Stanistreet, North Virginia Gold Mining Co NL. a/ Agreement dated 13/1/1933 Claim No. 115, mining right transfer from Harold John Veale to J J Hall, J A Michelson, J J Stanistreet & H J Leed owners of lease No. 10027. b/ Consent To Grant Of Lease, Quartz Prospecting Claim or otherwise 13/1/1933. Lease No. 10027 Signed by H J Veale in the presence of ?? Leed (p1). Leslie Veale partner of Harold John Veale Claim No. 115 authorizes H J Veale to act on his behalf to transfer the claim to New Virginia Syndicate. Signed by Leslie Veale (p2). Transfer Of Claim etc. to New Virginia Syndicate all right title and interest in Quartz Prospecting Claim numbered 115 known as Paddys Gully line of reef West of Neanger Mine at Sailors Gully Eaglehawk. Signed H J Veale Miner's No. 70059 dated 3/8/1933 (p3). c/ Agreement, North Virginia Mining Company NL application for mining leases from the Crown Numbers 10027 & 10150 Bendigo about 30 acres in Sailors Gully Eaglehawk and Bendigo and a company is intended to be formed and incorporated called North Virginia Gold Mining Company No Liability. Signatures: J J Hall, E D Doyle, J J Stanistreet, E R Grelis, Albert Beischer, J B Young. 3 sheets. d/ Duplicate of 2205.156corganization, business, gold mine, mccoll rankin & stanistreet, north virginia gold mining co nl claim no. 115, mining right transfer quartz prospecting claim transfer new virginia syndicate mining right transfer 1933 lease no. 10027 claim no 115 paddys gully neanger mine e/h bendigo -
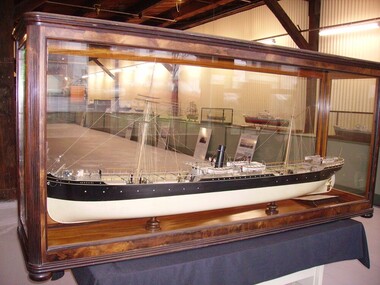 Seaworks Maritime Museum
Shipbuilders model, SS ARGUS (1889-1907) - Steel steamship built by Palmers & Co., at Newcastle on Tyne for Archibald Currie & Partners, Melbourne, SS Argus, 1889-1907
Steel screw steamer launched 1889 at Newcastle on Tyne by Palmers & Co., built for Archibald Currie and Partners - the Currie Line of Melbourne. Gross tonnage: 2,792, Length: 99.06m (325'). Width: 12.3m (40.3'). Triple expansion steam engines producing 363 nhp. Avge speed 11 knots. Coal consumption 26 ½ tons per 24 hours. Steel hull, one funnel, two masts, barque rig. • 1889: Argus launched. Worked in the Australia to India trade, passengers, goods and horses. • 1891 July: While taking coal from Newcastle to Singapore, ran onto sunken rock in Gaspar Strait (in Indonesia). Watertight bulkheads held, got to Singapore, was repaired for two months, 60,000 Straits dollars (about £12,000). • 1895 July: While taking 400 horses to Colombo, ran onto reef near Somerset, North Queensland. holed, water in two compartments. 400 tons coal jettisoned, finally got off in spring tides. • 1901 Feb: During Boer War took Victorian contingent, 5th Mounted Rifles, fromMelbourne to Durban and Cape Town, with 500 horses. • 1901 Dec: Took horses for Boer War from Brisbane to Durban. • 1903 31 July: Leaving Sydney for Calcutta with 86 horses, 20 passengers including the Sultan of Johore, was rammed by the incoming steamer Mildura (on the wrong side of the channel). Argus's side plating was cut from deck to below waterline, had to be beached on Goat Island to prevent sinking. Refloated 2 August and repaired. • 1905: Argus sold to the Japanese shipping company, Osaka Shosen Kaisha. Renamed Giran Maru. • 1907 11 Sept: Wrecked in Soya Strait, between Hokkaido & Sakhalin Island.Built for Archibald Currie & Partners, Melbourne. Carried passengers between Australia and India and between western and eastern Australia.Large ship builder's model in glass case -
 Flagstaff Hill Maritime Museum and Village
Geological specimen - Slate Roof Tiles
These rectangular slates of 'beautiful, unusual, expensive, green' American roof tiles were recovered from the wreck of the Falls of Halladale. Salvaging began in 1974 by volunteer divers, using local cray-fishing boats. An efficient system was devised to recover up to 4,000 of the still neatly packed slates a day. Many of the 22,000 salvaged slates can be seen on the roofs of eight Flagstaff Hill Maritime Village buildings. The iron-hulled, four-masted barque, the Falls of Halladale (1886 - 1908), was a bulk carrier of general cargo. She left New York in August 1908 on her way to Melbourne and Sydney. In her hold, along with 56,763 tiles of unusual beautiful green American slates (roof tiles), 5,673 coils of barbed wire, 600 stoves, 500 sewing machines, 6500 gallons of oil, 14400 gallons of benzene, and many other manufactured items, were 117 cases of crockery and glassware. Three months later and close to her destination, a navigational error caused the Falls of Halladale to be wrecked, grounded on a reef at Wreck Point, midway between Peterborough and the Bay of Islands, during the night of 14th November 1908. The captain and 29 crew members all survived, but her valuable cargo was largely lost, despite two salvage attempts in 1908-09 and 1910. The ship stayed in full sail on the rocky shelf for nearly two months, attracting hundreds of sightseers who watched her slowly disintegrate until the pounding seas and dynamiting by salvagers finally broke her back, and her remains disappeared back into deeper water. The shipwreck is a popular site for divers, about 300m offshore and in 3 – 15m of water. Some of the original cargo can be seen at the site, including pieces of roof slate and coils of barbed wire.The American slate tiles are significant as an example of cargo imported for use as building materials in Australia. The Falls of Halladale shipwreck is listed on the Victorian Heritage Register (No. S255). She was one of the last ships to sail the Trade Routes. She is one of the first vessels to have fore and aft lifting bridges. She is an example of the remains of an International Cargo Ship and also represents aspects of Victoria’s shipping industry The wreck is protected as a Historic Shipwreck under the Commonwealth Historic Shipwrecks Act (1976).Bundle of slate roof tiles (18); rectangular, green American slate roof tiles, some with red-brown stains. Two tiles both have two holes drilled through them. Two different tiles are thicker than the others. The tiles were salvaged from the wreck of Falls of Halladale. flagstaff hill, warrnambool, maritime village, maritime museum, shipwreck coast, great ocean road, cargo, slate, slate tile, green american slates, building material, wreck point, peterborough, bay of islands, russell & co., 1908 shipwreck, salvage, recover -
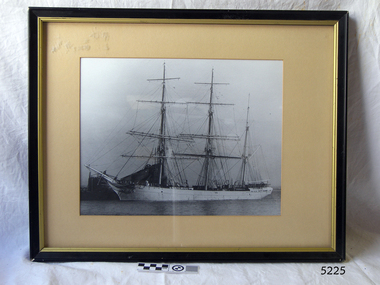 Flagstaff Hill Maritime Museum and Village
Photograph - Maritime, John Murray, 1909-1917
The image in this photograph is the 'John Murray', which was owned by the Government of Victoria from 1909 to 1917 as a training vessel. It was built and registered in Glasgow, UK in 1877 as the 'Loch Ryan'. This photograph is a copy of the original photograph, which was owned by Dr J. Douglas, brother o the donor. The iron baque 'Loch Ryan' was a three masted, 1207 ton sailing ship built by James & George Thomson in Glasgow in 1877. It was purposed as a general cargo vessel and owned by the General Shipping Company, known as the Loch Line because the ships were named after Scottish lochs. The company had a fleet of 25 colonial clipper ships that traded between the UK and Australia between 1866 and 1909, mainly from Glasgow to Melbourne, Sydney and Adelaide. Many of the sips, including the Loch Ryan, had a distinctive white stripe on their dark coloured hulls. The 'Loch Ryan' was purchased in 1909 by the Victorian Government's Défense Department and converted for the purposes of a training in Williamstown. In 1910 it was renamed John Murray, whose namesake, John (Jack) Murray (1851-1916) was born near Koroit. He was the 23rd Premier of Victoria (1909-1912), and a Warrnambool Member of Parliament for twenty years. The government commissioned the ship from 1910-1917 for reforming juvenile offenders, training them as seamen for the Navy and Merchant Navy. The training project ceased after reports of the treatment of the boys. Although 411 did their training under this scheme, the success rate of them qualifying to serve on other vessels was less than twenty percent. In 1917 the John Murray was sold to the Government of Australia to serve during WWI. The ship was loaded with a cargo of dynamite and petroleum at San Francisco then departed for Melbourne when, during its passage, it was wrecked at Malden Island reef in the mid-Pacific Ocean on May 29th, 1918.The photograph of the John Murray , formerly the 'Loch Ryan' is significant for its connection with the Loch Line of the General Shipping Company of Glasgow, the same company that owned the Loch Ard, which was wrecked and tragically lost 52 lives. The photograph is also significant for its connection with Victoria's training ship John Murray, which aimed at reforming delinquent juveniles, to be suitable as seamen for Australia's Navy or Merchant Navy. The ship was the namesake of John Murray, so the photograph is also significant for its connection with Victorian and local Government, as John Murray was the 23rd Premier of Victoria and a Warrnambool Member of Parliament for over 20 years. He was born in the local town of Koroit. The photograph is significant as an image of the many clipper ships that traded between the United Kingdom and Australia, with goods collected from other countries along the way.Photograph, black and white, behind glass, matt, framed in black with gold trim. Image is the Government of Victoria's training ship "John Murray". Label attached to back of frame with inscription. Also a square white sticker with handwritten number.Text on label includes: "The "John Murray" / A training ship for delinquent boys about 1910 / Formerly the Loch Ryan / John Murray - Premier of Victoria and Member for Warrnambool for over 20 years / Donated by Elizabeth O'Callaghan / Original photo in possession of Dr J. Douglas / (Brother of Elizabeth O'Callaghan - nee Douglas)" Sticker; handwritten "57"flagstaff hill, warrnambool, shipwrecked-coast, flagstaff-hill, flagstaff-hill-maritime-museum, maritime-museum, shipwreck-coast, flagstaff-hill-maritime-village, the john murray, loch ryan, john murray, loch line, general shipping company, government of victoria, training ship, juvenile reformation, delinquent boys, james & george thomson, iron barque, three masted ship, clipper ship, uk to australia trade, dynamite cargo, petroleum cargo, maldon island reef, 1909-1917 -
 Flagstaff Hill Maritime Museum and Village
Geological specimen - Slate, c. 1908
These rectangular slates of 'beautiful, unusual, expensive, green' American roof tiles were recovered from the wreck of the Falls of Halladale. Salvaging began in 1974 by volunteer divers, using local cray-fishing boats. An efficient system was devised to recover up to 4,000 of the still neatly packed slates a day. Many of the 22,000 salvaged slates can be seen on the roofs of eight buildings in the Flagstaff Hill Maritime Village. The iron-hulled, four-masted barque, the Falls of Halladale (1886 - 1908), was a bulk carrier of general cargo. She left New York in August 1908 on her way to Melbourne and Sydney. In her hold, along with 56,763 tiles of unusual beautiful green American slates (roof tiles), 5,673 coils of barbed wire, 600 stoves, 500 sewing machines, 6500 gallons of oil, 14400 gallons of benzene, and many other manufactured items, were 117 cases of crockery and glassware. Three months later and close to her destination, a navigational error caused the Falls of Halladale to be wrecked on a reef off the Peterborough headland at 3 am on the morning of the 15th of November, 1908. The captain and 29 crew members all survived, but her valuable cargo was largely lost, despite two salvage attempts in 1908-09 and 1910. The ship stayed in full sail on the rocky shelf for nearly two months, attracting hundreds of sightseers who watched her slowly disintegrate until the pounding seas and dynamiting by salvagers finally broke her back, and her remains disappeared back into deeper water. The shipwreck is a popular site for divers, about 300m offshore and in 3 – 15m of water. Some of the original cargo can be seen at the site, including pieces of roof slate and coils of barbed wire.The Falls of Halladale shipwreck is listed on the Victorian Heritage Register (No. S255). She was one of the last ships to sail the Trade Routes. She is one of the first vessels to have fore and aft lifting bridges. She is an example of the remains of an International Cargo Ship and also represents aspects of Victoria’s shipping industry The wreck is protected as a Historic Shipwreck under the Commonwealth Historic Shipwrecks Act (1976).Rectangular slates of green American roof tiles, some with a red-brown stain. These are a sample of hundreds of slate roof tiles salvaged from the vessel FALLS of HALLADALENoneflagstaff hill, warrnambool, maritime museum, maritime village, great ocean road, shipwreck coast, cargo, slate, slate tile, green american slates, building material, wreck point, peterborough, bay of islands, russell & co., 1908 shipwreck, salvage, recover