Showing 172 items
matching k class
-
 Melbourne Tram Museum
Book, Ian N Lynas, "Buses and Trams of Australian Government and Municipal Operators", 1983
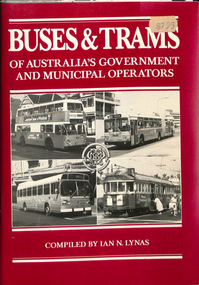
Book - 96 pages + covers - A5, titled "Buses and Trams of Australian Government and Municipal Operators", by Ian N Lynas, listing the fleet details of all states with details of each operator, fleet list, builder, year build, Engine, Chassis, and an Addendum with some corrections. Published 1983. Lists up to Melbourne Z3 class.Has "K. Stodden 21-8-83" in ink on the top right hand corner of the first page.trams, tramways, buses, trams, lists, melbourne -
 Melbourne Tram Museum
Book, Australia Post, "Capital City Transport", 1983
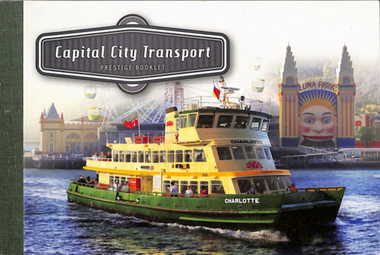
... Perth Stamps W2 class Has "K. S 22-2-12" in ink on the top right ...Book - 16 pages, perfect bound, titled "Capital City Transport", containing five sheets of four stamps and a short note about each city transport means - Sydney Ferries, Melbourne Trams, Sydney Trains, Perth Trains and Adelaide O'Bahn. Printed and published by Australia Post 2012, priced $12.95 on rear cover. The Melbourne stamps and photos feature W2 529, 266 and on the stamp - SW6? Image credits on the last page - mostly National Archives.Has "K. S 22-2-12" in ink on the top right hand corner of the first page.trams, tramways, buses, trams, ferries, melbourne, sydney, adelaide, perth, stamps, w2 class -
 Melbourne Tram Museum
Album - Photographs - Comeng Dandenong, 1980s - 1990s
In March 2024, Milissa Box (DTP) was at a trash and treasure market. She'd found a $5 photo album for sale with some photos that she thought might be of interest… From what I can gather it belonged to the gentleman pictured who was a worker at Dandenong in the Comeng and ABB eras. He appears to have worked on the Z3, A1/A2, B1/B2 class trams, Hong Kong LRVs, Comeng Melbourne suburban trains, and later the extra Victorian-purchased XP power cars and XAM sleepers to enable the Riverina XPT to be extended to Melbourne. It's clear he was very proud of the vehicles he'd helped to build. I have scanned a selection of the images, which appear to be a mix of official builder's portraits, team photos, and self-taken shots showing candid everyday scenes on the shop floor. There are also images of the launch of the XP power cars with then-Victorian Premier Joan Kirner; and some personal visits to see the Flying Scotsman, Victorian Goldfields Railway, Coal Creek, etc. Filename Description Date Comeng Scans 2024-03-05 0001 Three Comeng workers (including the photographer) stand in front of Comeng suburban train 697M (Chopper unit) c. June-July 1989 Comeng Scans 2024-03-05 0002 Three Comeng workers (including the photographer) stand in front of Comeng suburban train 697M (Chopper unit) c. June-July 1989 Comeng Scans 2024-03-05 0003 Hong Kong Light Rail Phase 1 LRV 1013 being lifted onto its transport loader c. 1987-88 Comeng Scans 2024-03-05 0004 Walter Wright transport truck (Mack) waits to draw a heavy transport platform out of a shed at Comeng Dandenong. Hong Kong Phase I LRV (1024) can be seen inside the shed c. 1988 Comeng Scans 2024-03-05 0005 Hong Kong Light Rail Phase 1 LRV 1013 on its transport loader in a shed at Comeng Dandenong ready for transport c. 1988 Comeng Scans 2024-03-05 0006 Hong Kong Light Rail Phase 1 LRV 1013 on its transport loader in a shed at Comeng Dandenong ready for transport c. 1988 Comeng Scans 2024-03-05 0007 The photographer is pictured fitting components to the cab of a Phase I Hong Kong LRV No 1026 c. 1988 Comeng Scans 2024-03-05 0008 Hong Kong Light Rail Phase 1 LRV 1013 on its transport loader at Comeng Dandenong ready for transport c. 1988 Comeng Scans 2024-03-05 0009 Hong Kong Light Rail Phase 1 LRV 1013 on its transport loader at Comeng Dandenong ready for transport c. 1988 Comeng Scans 2024-03-05 0010 Hong Kong Light Rail Phase 1 LRV 1013 on its transport loader at Comeng Dandenong ready for transport c. 1988 Comeng Scans 2024-03-05 0011 The photographer and a colleague are pictured in the car park posing for a photo at Comeng Dandenong c. 1988 Comeng Scans 2024-03-05 0012 The photographer and a colleague are pictured inside the cab of Comeng suburban train 697M, posing for a photo at Comeng Dandenong c. 1989 Comeng Scans 2024-03-05 0013 A stainless steel Hitachi train bodyshell is being transported on a truck-trailer. Possibly taken at Martin and King in Bayswater, under transport to the station for railing to Somerton for fitout. This is a later series M car with the rear-mounted pantograph (note the mounting lugs above the non-driving end) c. 1980 Comeng Scans 2024-03-05 0014 A shot at Comeng Dandenong of the onsite workforce standing in front of a Phase I Hong Kong LRV. c.1987-88 Comeng Scans 2024-03-05 0015 A shot at Comeng Dandenong of the onsite workforce standing in front of a Phase I Hong Kong LRV. c.1987-88 Comeng Scans 2024-03-05 0016 Hong Kong Light Rail Phase 1 LRV 1038 on its transport loader at Port of Melbourne ready for transport c. 1988 Comeng Scans 2024-03-05 0017 Three Comeng workers (including the photographer) stand in front of a workbench at Comeng Dandenong c. June-July 1989 Comeng Scans 2024-03-05 0018 A newly completed Comeng train (wearing VicRail teacup orange) on the factory access track at Comeng Dandenong c. 1981 Comeng Scans 2024-03-05 0019 A newly completed Z3 class tram on a transporter, with its bogie frames waiting transport to Preston Workshops for final fitout and commissioning c. 1981 Comeng Scans 2024-03-05 0020 A newly completed Comeng train (wearing VicRail teacup orange) on the factory access track at Comeng Dandenong c. 1981 Comeng Scans 2024-03-05 0021 A newly completed Z3 class tram on a transporter, with its bogie frames waiting transport to Preston Workshops for final fitout and commissioning c. 1981 Comeng Scans 2024-03-05 0022 A Comeng/ABB artist impression presumably part of their bid for the Double Decker demonstrator train for Melbourne. Note the similarity to similar Comeng sets constructed for Sydney. c. Nov 1989 – April 1990 Comeng Scans 2024-03-05 0023 Victorian Railways steam locomotive K 169 on static display at Coal Creek. c. 1980s Comeng Scans 2024-03-05 0024 Comeng suburban train carriage 1190T on a traverser in the yard at Comeng Dandenong. c. June-July 1989 Comeng Scans 2024-03-05 0025 Comeng suburban train carriages the yard at Comeng Dandenong. c. June-July 1989 Comeng Scans 2024-03-05 0026 Comeng suburban train carriages the yard at Comeng Dandenong. c. June-July 1989 Comeng Scans 2024-03-05 0027 Comeng suburban train carriages the yard at Comeng Dandenong. c. June-July 1989 Comeng Scans 2024-03-05 0028 Comeng suburban train carriages the yard at Comeng Dandenong. c. June-July 1989 Comeng Scans 2024-03-05 0029 Comeng suburban train in a shed at Comeng Dandenong. c. June-July 1989 Comeng Scans 2024-03-05 0030 Comeng suburban train carriage 1190T on a traverser in the yard at Comeng Dandenong – possible Factory Acceptance Inspection by the Met c. June-July 1989 Comeng Scans 2024-03-05 0031 Comeng suburban train carriage 1190T being tractor-shunted in the yard at Comeng Dandenong – possible Factory Acceptance Inspection by the Met c. June-July 1989 Comeng Scans 2024-03-05 0032 Two Comeng workers carry a train part (possibly a first aid kit) for fitting to a Comeng suburban train. c. June-July 1989 Comeng Scans 2024-03-05 0033 Comeng suburban train carriage 1190T on a traverser in the yard at Comeng Dandenong – possible Factory Acceptance Inspection by the Met. One of the Met staff appears to be giving one of the Comeng workers a kiss on the cheek. c. June-July 1989 Comeng Scans 2024-03-05 0034 A B2 Class tram is on a low-loader multiwheel transport trailer waiting transport to Preston Workshops; while what appears to be a classic AP6 Valiant Safari Wagon is in the foreground. c. June-July 1989 Comeng Scans 2024-03-05 0035 A B2 Class tram is on a low-loader multiwheel transport trailer waiting transport to Preston Workshops; while a worker poses for a photo with his hand on the rigging. c. June-July 1989 Comeng Scans 2024-03-05 0036 A B2 Class tram is on a low-loader multiwheel transport trailer waiting transport to Preston Workshops; An HT Holden Belmont sedan has been posed in front to appear as if it is towing the heavy vehicle. c. June-July 1989 Comeng Scans 2024-03-05 0037 A B2 Class tram is on a low-loader multiwheel transport trailer waiting transport to Preston Workshops; An HT Holden Belmont sedan has been posed in front to appear as if it is towing the heavy vehicle. c. June-July 1989 Comeng Scans 2024-03-05 0038 A1 Class tram 232 is pictured up on stands while various A/B class tram cab frames are in the foreground in various stages of assembly. Of note, 232 appears to have been returned to Dandenong for major repair or other work, and shows signs of having been in traffic for some time (weathering and wear) c. June-July 1989 Comeng Scans 2024-03-05 0039 various A/B class tram cab frames are in the foreground in various stages of assembly. c. June-July 1989 Comeng Scans 2024-03-05 0040 A group of Comeng Dandenong workers stopped on a tea break. c. June-July 1989 Comeng Scans 2024-03-05 0041 An A/B Class tram cab being fitted out with electronics and controls. c. June-July 1989 Comeng Scans 2024-03-05 0042 A new Comeng suburban train in Metropolitan Transit livery on the test track at Comeng Dandenong. c. mid 1980s Comeng Scans 2024-03-05 0043 A new Comeng suburban train in Metropolitan Transit livery on the test track at Comeng Dandenong. c. mid 1980s Comeng Scans 2024-03-05 0044 Interior shot of a new Comeng suburban train at Comeng Dandenong. c. mid 1980s Comeng Scans 2024-03-05 0045 Interior shot of a new Comeng suburban train at Comeng Dandenong. c. mid 1980s Comeng Scans 2024-03-05 0046 The exterior sign at Dandenong showing ABB brand. Early 1990s Comeng Scans 2024-03-05 0047 A B2 Class tram is on a low-loader multiwheel transport trailer waiting transport to Preston Workshops. Early 1990s Comeng Scans 2024-03-05 0048 The Brush generator and Paxman Valenta engine as fitted inside a new XP power car for NSW Countrylink (paid for by Victoria) c. 1992 Comeng Scans 2024-03-05 0049 An exterior shot of a new Countrylink XP power car for NSW under construction (paid for by Victoria) c. 1992 Comeng Scans 2024-03-05 0050 Two new XAM class XPT sleeper carriages under construction at Comeng Dandenong c. 1992 Comeng Scans 2024-03-05 0051 A B2 class tram under construction at Comeng Dandenong Early 1990s Comeng Scans 2024-03-05 0052 A B2 class tram under construction at Comeng Dandenong Early 1990s Comeng Scans 2024-03-05 0053 An exterior shot of a new Countrylink XP power car for NSW being moved out of the shed c. 1992 Comeng Scans 2024-03-05 0054 An exterior shot of a new Countrylink XP power car at Comeng Dandenong c. 1992 Comeng Scans 2024-03-05 0055 An exterior shot of a new Countrylink XP power car at Comeng Dandenong c. 1992 Comeng Scans 2024-03-05 0056 An exterior shot of a new Countrylink XP power car at Comeng Dandenong c. 1992 Comeng Scans 2024-03-05 0057 B2 class trams under construction at Comeng Dandenong Early 1990s Comeng Scans 2024-03-05 0058 An XP Powercar from NSW wearing the Intercity XPT Candy Livery at Comeng Dandenong. It is not known if this was originally painted in this livery (incorrectly) or if this was one of the first delivered series transported to Dandenong to aid the construction process of the four additional locomotives. Early 1990s Comeng Scans 2024-03-05 0059 Melbourne B2 Class tram B2.2100 (renumbered from 2102) painted in the distinctive Chocolate and Cream livery to mark the completion of 100 B2 class trams Early 1990s Comeng Scans 2024-03-05 0060 A factory forklift wearing a hand painted “We love Labo(u)r” cardboard sign, possibly in connection to a media event with the Victorian Premier onsite at Comeng Dandenong. c. 1992 Comeng Scans 2024-03-05 0061 An exterior shot of a new Countrylink XP power car at Comeng Dandenong c. 1992 Comeng Scans 2024-03-05 0062 Two new new Countrylink XP power cars under construction and final fitout at Comeng Dandenong c. 1992 Comeng Scans 2024-03-05 0063 An exterior shot of a new Countrylink XP power car on the traverser at Comeng Dandenong c. 1992 Comeng Scans 2024-03-05 0064 A B2 Class tram is on a low-loader multiwheel transport trailer waiting transport to Preston Workshops. A large banner is draped on the side explaining that this is the 106th vehicle delivered to the Public Transport Corporation (B2.2108). c. Oct 1992 (based on delivery date) Comeng Scans 2024-03-05 0065 Victorian Premier Joan Kirner addresses a group of dignitaries in front of an ABB banner inside the main administration building at Dandenong, on the occasion of the first XPT power car purchased by Victoria being unveiled at a media event c. 1992 Comeng Scans 2024-03-05 0066 An ABB executive addresses a group of dignitaries in front of an ABB banner inside the main administration building at Dandenong, on the occasion of the first XPT power car purchased by Victoria being unveiled at a media event c. 1992 Comeng Scans 2024-03-05 0067 Victorian Premier Joan Kirner addresses the media in front of a completed XP class XPT power car at Dandenong, on the occasion of the first XPT power car purchased by Victoria being unveiled at a media event c. 1992 Comeng Scans 2024-03-05 0068 An exterior shot of a new Countrylink XP power car at Comeng Dandenong c. 1992 Comeng Scans 2024-03-05 0069 A Melbourne B2 class tram undergoing testing on the test circuit at ABB Dandenong c. early 1990s Comeng Scans 2024-03-05 0070 An XPlorer type DMU emerges from a shed at ABB Dandenong c.1994 Comeng Scans 2024-03-05 0071 Voith final drive axle mounted units for XPlorer railcars waiting to be fitted at Dandenong. c.1994 Comeng Scans 2024-03-05 0072 A completed XAM class sleeper carriage at ABB Dandenong. c.1993 Comeng Scans 2024-03-05 0073 Completed XPlorer railcars wait transfer to South Dynon for bogie exchange and transfer to NSW at ABB Dandenong. c. 1994 Comeng Scans 2024-03-05 0074 A clipping from an ABB internal newsletter outlining the staff-led initiative to commemorate the 100th B2 class tram with a special livery c.1992 Has photographs of ABB, Steamrail tours, Castlemaine and Maldon Railway, Fying Scotsman 4472 visit and Puffing Billy.Yields information about the people and events at Commonwealth Engineering plant Dandenong and the activities of the unknown compiler.Album containing 40 leaves, photos in a heavy card 3 ring spring binder.comeng, commonwealth engineering co., tramcars, hong kong, nsw, sydney, melbourne, railways, the met, b class, cmr, steam engines, abb, asea brown boveri -
 Melbourne Tram Museum
Photograph - X 217 Hawthorn Depot, c1925
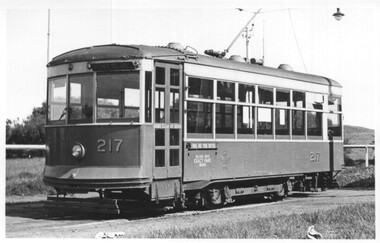
Shows X class tram No. 217 at Hawthorn Depot with a bow collector. Tram has the destination of "Bridge Rd" (Bridge Road). Yields information about X 217 when it was fitted with a bow collector and Hawthorn Depot.Black and white photograph notes on rearIn ink by Keith Kings: - X217 Hawthorn depot about 1925, courtesy of Mr Stephenson Preston Workshops", has Rev L Marshall Wood stamp and K S Kings stamp - with number S-A 111.tramways, tramcars, tram 217, hawthorn depot, bow collector, x class, mmtb -
 Melbourne Tram Museum
Administrative record - Set of 3 lists, Melbourne & Metropolitan Tramways Board (MMTB), DK Controllers, 28" Dia wheels, roller bearing trams, 1963
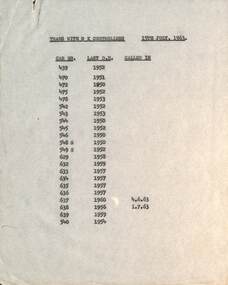
Lists provide information about the type of equipment fitted to W2 class trams 1 - "Trams fitted with D K (Dick Kerr model) controlleres - dated 15/7/1963 2 - "Class W2 cars with 28" dia wheels" - 11/7/1963 3 - "Roller Bearing trams" - listed by motor type, giving the number armatures for GE 288, BTM 265, MV 101 and MV 101 BR motors - These trams were fitted with roller bearings on their armatures = dated 14/10/64. Yields information about the equipment fitted to W2 class trams during the mid 1960sSet of lists - carbon copies on either foolscap or quarto paper.trams, tramways, tramcars, motors, wheels, armatures, dick kerr, w2 class -
 Melbourne Tram Museum
Postcard, Rose Stereograph Co, "Swanston Street Melbourne", early 1940s
Rose Series postcard No. P 3288 titled "Swanston Street Melbourne", looking north from just past (or south) of Batman Ave. There are five trams in the view and one private Reo bus. W2 class tram 452 (route 64 - City). The trams have a white strip under the driver's windows indicating the war time black out measure. The sign board advertising tram routes to Wattle Park, Burwood etc can be seen above the footpath leading to Batman Ave.Yields information about Swanston St. at the intersection with Batman Ave.Postcard - printed real photograph with Rose Stereograph Co. name on the rear.Has "K J Magor" stamp on rear.trams, tramways, w2 class, swanston st, bus, batman ave, tram 452, route 64, world war ii -
 Melbourne Tram Museum
Postcard, Rose Stereograph Co, "St Kilda Road, Melbourne", 1936
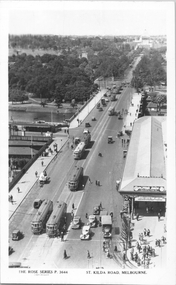
Rose Series postcard No. P 3644 titled "St Kilda Road, Melbourne" looking south from the Flinders St station clocktower along St Kilda Road with 10 trams and at least two horse-drawn carts in the view. There are two trams running route 4D (Darling Road - City) and two route 6B (Malvern Town Hall - City) trams. On the northern end of the Flinders St station verandah are two adverts - one for a Deaf and Blind Institute Flower show and one for a Special Easter Tour to Adelaide for the South Australian Centenary of 1936.Yields information about St Kilda Road in 1936.Postcard - printed real photograph with Rose Stereograph Co. name on the rear.Has "K J Magor" stamp on rear.trams, tramways, w2 class, swanston st, batman ave, st kilda road, route 4b, route 6b -
 Melbourne Tram Museum
Photograph - Set of 2 Black & White Photograph/s, Keith Kings, 13/08/1949 12:00:00 AM
Black and White photographs of X class trams at the Point Ormond terminus by Keith Kings. Photos shows the lettering and signs for one man trams. .1 - X-217 - 13/8/1949 .2 - X-218 - 29/4/1950On the rear in ink details of each tram and photo along with Keith's photo numbers c(e)(4) and D(k)(7).trams, tramways, x class, point ormond, one man trams, tram 217, tram 218 -
 Melbourne Tram Museum
Photograph - Set of 11 Black and White photograph, Ken Flood, 18/04/1974 12:00:00 AM
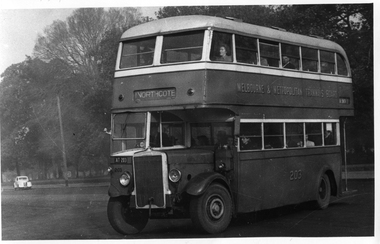
Set of 11 black and white photographs sent to Keith Kings received from Ken Flood 4/6/1975. .1 - Bus No 203 1940 Leyland TD5c - Turning from Nicholson Street into Gertrude Street. - bound for Northcote. .2 - Bus No 201 1940 Leyland TD5c - In Nicholson Street at Albert Street - Photo. bound for Northcote .3.- Bus No 492 1943 Ford Austerity - at Queens Pde Clifton Hill - Note the Pram and Passenger bus sign by the front doorway. Photo not dated. .4 - Bus No 365 1948 OPS1 - Nicholson Street at Victoria Pde. bound for East Brunswick. Photo not dated. .5 - Bus No 325 1950 OPS4 - Nicholson Street at Victoria Pde. bound for East Brunswick. Photo not dated. Bus did not enter service until 1950. .6 - Bus No 500 1943 Ford Austerity - Marine Pde. Point Ormond. Note the Pram bus sign by the front door. .7 - Bus No 19 1938 Leyland Cub (diesel) with Preston Workshops body. - Lonsdale Street at William Street. W2 No 305 passes behind the bus. Late 1940's photo. .8 - Bus No 143 1940 Leyland TS8c drop enter - in Russell Street at LaTrobe Street bound for North Kew. (Belford Road via Collingwood). Photo not dated. .9 - Bus No 9 1938 Leyland Cub (diesel) with Preston Workshops body. - in Russell Street at LaTrobe Street bound for North Carlton .10 - Bus No 4 1938 Leyland Cub (Diesel) with Preston Workshops body - in Lonsdale Street at William Street. note destination not reset for the return trip. .11 - Bus No 150 1940 Leyland TS11c Drop enter - Nicholson Street at Victoria Pde. Photo not dated. Most of the photos dated 9/6/1949 unless noted otherwise. Notes on photos provided by Rod Atkins - see htd5860doc.pdfOn rear of the photos in ink; .1 - MMTB 203 9/6/49 - K Flood .2 - MMTB 201 - 9/6/49 - K Flood .3 - MMTB Ford #492 - K Flood .4 - MMTB #365 - K Flood .5 - MMTB #325 - K Flood .6 - MMTB #500 Pt Ormond 6/6/49 - K Flood .7 - MMTB #19 9/6/49 - K Flood .8 - MMTB #143 - K Flood .9 - MMTB #4 9/6/49, K Flood .10 - MMTB #4 9/6/49, K Flood .11 - MMTB #150 - K Floodtrams, tramways, buses, double deck buses, prams, mmtb buses, austerity buses, w2 class, tram 305, bus 203, bus 201, bus 492, bus 365, bus 500, bus 19, bus 143, bus 9, bus 4, bus 150, leyland, ford motor company, td5c class, ops1 class, ops4 class, ts8c class, cub class, ts11c class -
 Melbourne Tram Museum
Drawing, Melbourne & Metropolitan Tramways Board (MMTB), "Car Templates", c1920 onwards
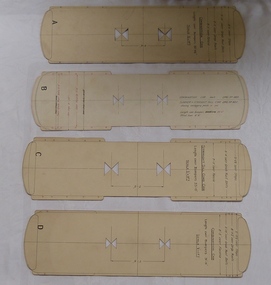
Set of 14 tram car templates contained within Reg Item 356, cut from card board to indicate the over all dimensions of the various type of tramcars. Would have been used in the drawing office for checking clearances on buildings, trackwork, junctions. Cut with holes in the centre to enable this to be done. Scale 1/2" = 1 foot. .1 - Marked "A" - for a combination car - 30' 11.25" long, 7'6" wheelbase .2 - "B" - for a combination car - 32' long, 6'6" wheel base to drawing R489 and summer or straight sill car to drawing R820. .3 - "C" - Straight Sill combination car - 33' long, 7'6" wheelbase. .4 - "D" - Combination car, length 31'11", 7'6" wheelbase .5 - "E" - Combination car, length 35', 7' wheelbase .6 - "F" - DC Bogie car, to Drawing 112, length - 44' 3.5", truck centres 22 '4" .7 - "G" - ditto length 44' 5.5", truck centres 23' 7.5" .8 - "H" - ditto length 44' 5.5", truck centres 24' 7.5" .9 - "J" - four motor bogie, to drawing 854, length 45' 6", truck centres 24'6" .10 - "K" - Combination car, length 35', 12' Radiax truck. .11 - Bogie tramcar, W class length 48', truck centres 26' 6" .12 - ditto, W2 534, length 48', truck centres 26' 0" .13 - W4 class tram, .14 - W5 730, length 46' 6', truck centres 28'trams, tramways, mmtb, plans, drawings, templates -
 Melbourne Tram Museum
Document - Tramcar Data Sheet, Keith Kings, "Data sheet for "W2 Day", special tour, Sunday 19/5/68", May. 1968
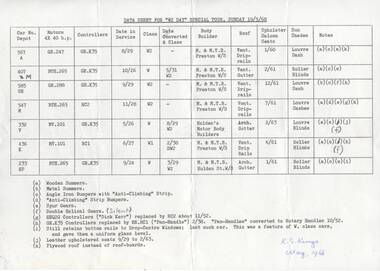
... Trams tramways Tramcars MMTB Lists Tours W2 class TMSV "K. S ...Gestener print of a sheet titled "Data sheet for "W2 Day", TMSV special tour, Sunday 19/5/68", listing the tramcars used on the day; car number and depot, motors, controllers, date in service, class, date converted and class, body builder, roof, date of Upholstered seats in saloons, sun shades and notes on the tramcars them selves. Data for 567, 407, 585, 547, 332, 436 and 233. Made by Keith Kings May 1968. See Reg Item 605 for the ticket used on this tour and Reg item 3543 for a photograph of tram W2 332 at Wattlepark Loop."K. S Kings May 1968" in bottom right hand corner in light blue ink.trams, tramways, tramcars, mmtb, lists, tours, w2 class, tmsv -
 Melbourne Tram Museum
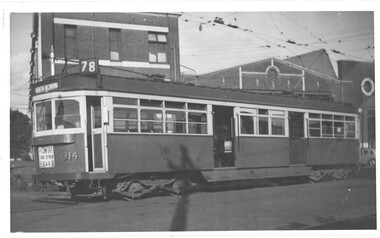
Photograph - SW6 914 at Hawthorn Depot, K J Magor, late 1940s
... SW6 class K J Magor stamp with number 391, written in ink ...Photograph of W6 class tram No. 914 leaving Hawthorn Depot for North Richmond, showing route 78. The tram has a sign on the front about travelling in comfort between 930 and 430 on the front under the dash canopy lighting. The tram was built in May 1946. There are no holes in the dash canopy lighting which were installed in Nov. 1951. The facade of the depot behind was demolished during the mid to late 1940s.Yields information about tram 914 mid to late 1940s.Black and white photo with Ken Magor stamp on the rear.K J Magor stamp with number 391, written in ink.tramcars, hawthorn depot, tram 914, sw6 class -
 Melbourne Tram Museum
Photograph - Freight car 206 Preston Workshops, Ken Winney, May 1947
Black and white photograph showing the Spare Freight car, former U class, No. 206 at Preston Workshops. Has the destination of "Freight Car". Photo by Ken Winney May 1947.Yields information about the trams used as Freight cars in 1947Photograph with typed details on the rear.Typed "MMTB Freight car spare, No. 206 at rear of Preston Workshops, May 1947 " and the K J Magor stamp with "K Winney" typed in. trams, tramways, tram 206, u class, freight car, preston workshops -
 Melbourne Tram Museum
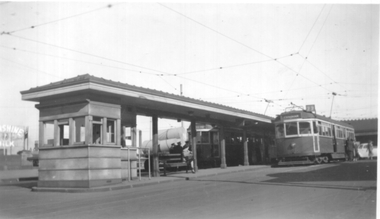
Photograph - Batman Ave with trams 846 & 538, Ken Winney, May 1947
Black and white photograph showing the Batman Ave terminus building and shelter with W2 class tram No. 538 and on the right side, SW5 class 846 (Prahran, route 77). Photo by Ken Winney May 1947.Yields information about the Batman Ave terminus in 1947.Photograph with typed details on the rear.Typed "Batman Ave (City) terminus showing SW5 car no 846 on right & W2 car no. 538 on left side of platform, May 1947 " and the K J Magor stamp with "K Winney" typed in. trams, tramways, batman ave, tram 538, tram 846, w2 class, sw5 class -
 Flagstaff Hill Maritime Museum and Village
Photograph - Vessel, Sail and Steam Ship, S.S. Warrnambool
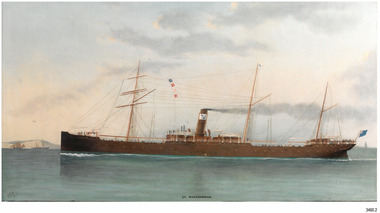
This photograph and a matching earlier photograph are the images of a painting of the British steamship SS Warrnambool at Dover Strait in the English Channel. The photographs were donated by the painting’s owner, who acquired the 30” x 56” (76 x 142.5 cm) oil on canvas painting in 1998. Both photographs were accompanied by a letter, one written in 2001, and the other in 2003. The letters confirm that the artist of the painting was Charles Keith Miller, signed with the initials “CKM” and dated “1893”. The painting shown in the photographs was a gift to the Town Council of Warrnambool, presented to Warrnambool folks in Melbourne on December 1, 1892, by the Captain of William Lund’s ship SS Warrnambool. The painting was given by Lund in appreciation of the Ladies of Warrnambool who had presented the ship with a ‘house’ flag bearing the Blue Anchor Line’s symbol of a diagonal blue anchor on a white background; the ladies had made the decision to present the flag only a month earlier. A few days later, December 6th, the SS Warrnambool was on its homeward journey to Britain, sailing via Adelaide. It anchored for a short time off the Port of Warrnambool. A boat was launched from Lady Bay to take a group of friends to the ship with a delivery of gifts. After cheers were roused for both the ship and the Captain, the ship continued on its way. The photograph shows the gifted white flag with a diagonal blue anchor flying from the masthead. The same symbol is painted on the ship’s black funnel. The signal flags on the foremast display ‘M’ ‘R’ ‘V’ ‘B’. These letters are most likely the ship’s call number ‘MRVB’. Although the painting was given as a gift in December 1892, it is post-dated “1893”. Perhaps the painting was given earlier than anticipated; or the date added later, but whatever the reason, the provenance of the painting was confirmed at auctions of this painting and other works by the same artist. CHARLES KEITH MILLER 1836-1907:- Captain Charles Miller left his home in Scotland at the age of 15 years for a life at sea. He earned his Master’s Certificate ten years later. After being the captain of sailing ships he moved over to the steamships because they were faster. In 1866 he married and settled in Glasgow. Over the following eleven years he and his wife had five children, then sadly his wife passed away. Captain Miller returned to the sea for a while but in 1888 he gave up his sea life to spend his time as a marine artist. His understanding of seafaring life and vessels, combined with his artistic skills, gave him the ability to produce fine art and several galleries and museums have collections of his sought-after works. S.S. WARRNAMBOOL 1892-1925:- The steamship SS Warrnambool was built in 1892 by the Sunderland Ship Building Company for the Lund Line of London, founded by William Lund in 1869. It efficiently carried both passengers and cargo across the world to Australia, under the command of her master Captain Joshua Edward Iibery, who had many years of experience with the Blue Anchor Line. The company, referred to as the Blue Anchor Line or BAL, owned a fleet of both sail and steamships. The funnels of all of the steamships were painted black, with a white band around the top bearing a diagonal blue anchor and chain. The company’s house flag was also white with a diagonal blue anchor. The SS Warrnambool carried passengers and cargo in a ‘no frills’ service to and from Europe around the Cape of Good Hope, stopping at some ports in between. The ship was involved in bringing home returned solders in 1895. At one time it carried a doctor from Victoria, Australia, to assist at the war front in South Africa. The ship had a very good reputation for its cargo arriving ‘almost always in excellent condition.’ Exported goods from Australia included iron safes, flour, wool, apples, frozen rabbits, butter, cheese, pork, cattle, poultry and sheep. One remarkable delivery contained Ostriches for Queen Victoria and they survived the journey well. The SS Warrnambool was sold in 1900 to the British and South American Steam Navigation Co. Ltd of Liverpool and was renamed ‘Harmodius’. The company was managed by R.P. Houston & Company of London and its Houston Line funnels were red with a black top. The Harmodius was sold in 1919 to K.S.S. Co. Ltd, managed by Kaye Son & Co. Ltd. of Liverpool, and was renamed ‘Kut’. The line had black funnels with a white ‘K’ in a diamond or between white stripes. In 1926 it was purchased by T.W. Ward Ltd. and broken up. NOTE- other vessels named “Warrnambool” Two other vessels carried the name “Warrnambool” (1)- HMAS Warrnambool J202 (1941-1947), a Bathurst Class corvette vessel owned by the Royal Australian Navy, destroyed by a mine. The photograph is significant for its association with the painting "SS Warrnambool" by well-known early 20th century marine artist Charles Keith Miller, whose paintings are well valued. The painting and the photograph of it are namesakes of Warrnambool and are connected through the gifts exchanged between the ship company owner, the City of Warrnambool and the Ladies of Warrnambool; the House Flag and the painting by C K Miller. The image is a good likeness to original photographs of the late-19th to early-20th century steam and sale vessel. Coloured photograph of a painting, the steamship S.S. Warrnambool. The three-masted ship has lowered sails. It is in calm water, land on one side, and other vessels in the water. The ship has four raised signal flags, a house flag and a blue ensign. The funnel also bears the house flags symbol. Smoke emits from the funnel. Figures are visible onboard. There is a signature and a title on the lower edge of the photograph. (Artist of the painting in the photograph was Charles Keith Miller)House flag symbol, [diagonal blue anchor on white background] Text "CKM" and "1893" Text "S. S. WARRNAMBOOL."flagstaff hill, warrnambool, photograph, steam ship warrnambool, flagstaff hill maritime village, shipwreck coast, ss warrnambool, captain, charles keith miller, ckm, 1893, william lund, warrnambool town council, blue anchor line, lund line, ladies of warrnambool, house flag, diagonal blue anchor, captain miller, sunderland ship building company, migrant ship, 1892 ship, home flag, bal, australian export, s.s.warrnambool, dover strait, english chanel, port of warrnambool, lady bay, mrvb, captain charles miller, captain joshua edward iibery, ostriches, queen victoria, british and south american steam navigation co., harmodius, r.p. houston & company, houston line, k.s.s. co. ltd, kaye son & co. ltd, kut, t.w. ward ltd -
 Melbourne Tram Museum
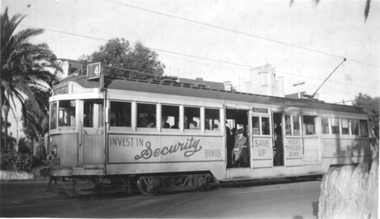
Photograph - Tram 493 advertising Savings Certificates, Ken Winney, May 1947
Black and white photograph showing W2 class tram 493 (City Route 4) in St Kilda Road, Prahran. One of several painted cream & dust colour advertising Savings Certificates. See item 6600 - image CC60 for a photo of the same tram at Franklin St. Photo by Ken Winney May 1947.Yields information about trams advertising Victory Bonds in 1947.Photograph with typed details on the rear.Typed "MMTB W2 car no. 493 in St Kilda Road, Prahran. One of several painted cream & dust colour advertising Victory Bonds and the K J Magor stamp with "K Winney" typed in. trams, tramways, w2 class, decorated trams, tram 493, st kilda road -
 Bendigo Military Museum
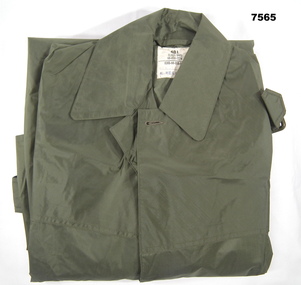
Uniform - COAT, WATERPRROF, ARMY, M. PENNISI CLOTHING CO. PTY.LTD, 1970
Part of the "Kevin John Herdman", No. 397661 Collection. See cat No. 5942P or details of his service.Green plastic waterproof coat with belt. Belt has a buckle for adjustment. Mesh vent across back covered with a flap. Two vents at shoulder level on front. Metal vent holes under arms. Front closed with buttons. Two side pockets. Sizing label on inside neck. Manufacturers label on inside left.On sizing label: 40L, CLASS 8405, 66-018-1274, 8305-66-018-0450'. Stamped on sizing label: 'BRK, 70, 70". Handwritten on sizing label: 'K. HERDMAN'. On Manufacturer's label: 'M.PENNISI, CLOTHNG CO. PTY LTD, VICTORIA, 1970 (upwards arrow ^).accessory, waterproof coat, australian army, kevin john herdman -
 Melbourne Tram Museum
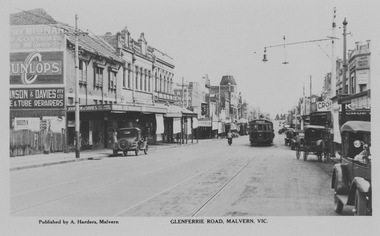
Photograph - M&MTB W class 255 in Glenferrie Rd, Malvern, Rose Stereograph Co, 1920s
The photograph shows Melbourne and Metropolitan Tramways Board W class tram 255 in Glenferrie Rd showing destination Victoria Bridge. The tramcar is in the mid ground and Glenferrie Rd is lined with retail shop verandahs on the ground floor and ornate second floor residences or workshops. Span poles hold the tramway overhead and several early motor cars are seen along the roadway.Yields information about Glenferries Rd and M&MTBBlack and white photograph with writing on the rear.Printed Post Card by Rose Stereograph, Armadale with ink stamp reading "K J Magor No." glenferrie rd, melbourne and metropolitan tramways board, w class, tram 255, victoria bridge, span poles, retail shop verandahs -
 Bendigo Historical Society Inc.
Ephemera - Gertrude Perry Collection - V.S.C.C. Inc. Certificate
Gertrude Perry was born in California Gully in 1917. Her singing skills were recognized at an early age. She later sang with local choirs and sang on radio. She was involved with the Bendigo Operatic Society for many years. Gertrude began her working life in sales. After studying book keeping she worked at the Bendigo Ordnance Factory during WW2 and then worked for local solicitors and accountants. Gertrude was involved with many community and sporting organizations.V.S.C.C. Inc. Certificate noting Gertrude Perry has been acknowledged as a SILVER STAR MEMBER of the club having achieved the distinction of collecting 500 Souvenir Tea Spoons. Certificate from Victorian Spoon Collectors Club inc. Certificate signed on 20/7/91 by President M A Tobias, and Secretary K Rowe. Card has green printing on a yellow base. Gertrude Perry Collection.Certificate signed on 20/7/91 by President M A Tobias, and Secretary K Rowephysical culture class, fitness, exercise -
 Bendigo Historical Society Inc.
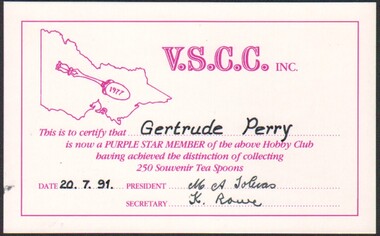
Ephemera - Gertrude Perry Collection - V.S.C.C. Inc. Certificate
Gertrude Perry was born in California Gully in 1917. Her singing skills were recognized at an early age. She later sang with local choirs and sang on radio. She was involved with the Bendigo Operatic Society for many years. Gertrude began her working life in sales. After studying book keeping she worked at the Bendigo Ordnance Factory during WW2 and then worked for local solicitors and accountants. Gertrude was involved with many community and sporting organizations.V.S.C.C. Inc. Certificate noting Gertrude Perry has been acknowledged as a PURPLE STAR MEMBER of the club having achieved the distinction of collecting 250 Souvenir Tea Spoons. Certificate from Victorian Souvenir Collectors Club inc. Certificate signed on 20/7/91 by President M A Tobias, and Secretary K Rowe. Gertrude Perry Collection.Certificate signed on 20/7/91 by President M A Tobias, and Secretary K Rowephysical culture class, fitness, exercise -
 Melbourne Tram Museum
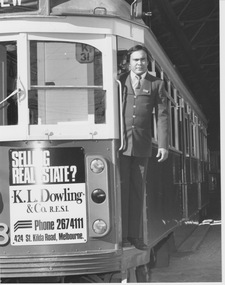
Album - Drivers Kerr, Tran and Cond/ress To in W class at Kew Depot, 1979
These photographs show staff in brown coloured uniform leaning out of/standing beside W class driver's cab showing Kew Depot run number 31. All have a advert for K L Dowling Real Estate on the front dash panel.Yields information about multicultural nature of workforceSet of three black and white photographs with pencil notes on rearDriver Robert Anthony Kerr Pakistan Kew Depot 1979, Driver Khac Cang Tran Vietnam Kew Depot 1979, Driver Tran and Conductress Ngoc Nga To Vietnam Kew Depot 1979tram, w class, kew depot, run number, brown uniform, multiculture -
 Broadmeadows Historical Society & Museum
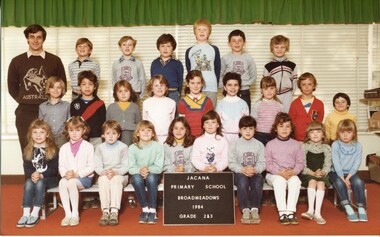
Photograph - School Photograph, Jacana Primary School, Jacana Primary School, Broadmeadows, 1984, Grade 2 & 3, 1984
This 1984 photo shows Grades 2 and 3 at Jacana Primary School, once located in Melbourne’s northern suburbs. The school, now closed and demolished, served the local community for decades. This image offers a nostalgic glimpse into a bygone era of local education and childhood in Jacana.This 1984 photograph of Grades 2 and 3 at Jacana Primary School captures a moment in the educational and social history of Melbourne’s northern suburbs. As the school no longer exists, the image holds historical value, preserving the memory of a once-vital community institution and its students.Colour photograph on matte paper.White Label: PH-4471 Blue Label: PH-5189 Brown Label: See attached Sheet 1jacana primary school, education, class photograph, 1984, d. stanton, s. phillips, h. nagten, a. gough, c. hennessy, r. perceval, t. gray, l. ziervogel, s. gibbon, l. bailey, t. narman, b. wehbe, l. manson, d. scarffe, m. tiernan, m. miller, a. andre-janz, t. blythe, t. ponicwaz, i. szuhai, h. alderman, k. muscat, j. cilia, n. urlich, s. paniewaz, grade 2 & 3