Showing 908 items
matching british military
-
 Flagstaff Hill Maritime Museum and Village
Clothing - Leather Leggings, 1899 to 1918
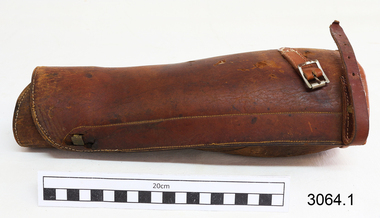
The subject leather leggings are associated with mounted troops known as the Australian Light Horse that served in the South African War from 1899 to 1902. After the war, Britain wanted to use fewer mounted troops and restructured its force around a style of combat that needed more infantry. But the defence of Australia still relied upon mounted military units as these were more mobile than infantry and could travel faster over long distances. Light Horse brigades in the Australian Imperial Force (AIF) mostly contained recruits who served in the Light Horse regiments of the Citizen Forces. Many young men from rural areas of Australia volunteered for the Light Horse regiments. They had to pass a riding test to join, this test was easier for men from the bush because horses were still the main method of transport on farms and in country towns. The army did not officially accept First Australians into the AIF until May 1917 when enlistment standards were relaxed to include 'half-castes' with a parent of European origin. Indigenous soldiers served as valuable members of the Light Horse and many possessed excellent horse handling skills and specialist tracking knowledge.The subject items are part of the uniform for the Light Horse Units that served in the Australian army from 1899 until 1918. These leggings were worn by soldiers on horseback and are significant as they represent a noteworthy time in Australia's early military history. It was a time when many young men gave their lives during the South African and First World Wars in the defence of the then British Empire as part of the Imperial Forces that were gathered from many British-controlled Colonial countries.A pair of two Leather Leggings used by Mounted Australian soldiers during the first world war. The leggings are dark tan in colour with stitching to attach buckles and fastener straps. The strap buckles are made of brass and the leather legging straps are of same leather as leggings. Noneflagstaff hill, warrnambool, flagstaff hill maritime museum, shipwreck coast, flagstaff hill maritime village, great ocean road, leggings, leather leggings, protective leggings, protective clothing, australian mounted light horse units, military equipment -
 Bendigo Military Museum
Medal - BRITISH WAR MEDAL WW1
Robert H. Baron was only issued with the British War Medal for his WW1 Service. He did not see action and was therefore ineligible for the Victory Medal. Part of the "Robert H. Baron", No. 3596 and Cooper Collections. See catalogue No.1981P for details of R.H. Baron's service.Court mounted circular silver medal with blue, black, white and yellow coloured ribbon. Recipients name stamped on the rim of the medal.Stamped on medal rim "3596 A.L. Cpl R.H. BARON, 57 BN A.I.F."robert h. baron, cooper collection, british war medal, medal ww1 -
 Bendigo Military Museum
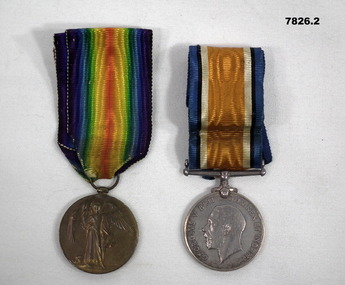
Medal - MEDALS, WW1
Victory Medal authorised 1919 to Commemorate Victory of Allied Forces over central powers in WW1. British War Medal authorised 1919 by King George to Army, Navy and Mercantile Marine. Items in the collection re "John Arthur Remington Alexander" No. 2237, AFC, AIF. Refer Cat No 7820 for his service details.Set of medals in split plastic pockets. 1. Victory Medal - Brass coloured medal with the Goddess Victoria on one side and inscription on the other. Round clasp on top with multi coloured ribbon attached. 2. British War Medal 1914-20. One side picture of man on a horse with 1914-1918 written on sides. Silver in colour with ribbon clasp on top. Ribbon colours are light blue, dark blue, white and orange. Other side picture of King George.1. Inscribed "The Great War for Civilisation 1914-1918".victory medal, british war medal, ww1, john arthur remington alexander -
 Bendigo Military Museum
Photograph - PHOTOGRAPH, AIR CREW 466 SQD, C. Originals 1944
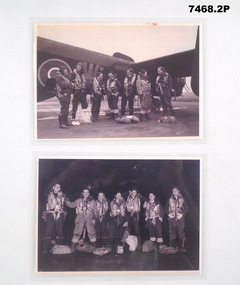
Items in the collection re "Jack Mitchell". It is not sure if .1) was taken before the Mission. As per .2) The target was Berlin on 21.1.1944. There was 769 Aircraft on the mission which included 264 Halifax's of which 22 were lost. The Crew; Roger John Evans No 410202, Flt/Sgt, enlisted 5.12.1941 age 31 years. (refer Cat No 7467) John Henry Maunder No 412562, Flt/Sgt, (refer Cat No 7467) Jack Mitchell, Flt/Sgt, (refer Cat No 7467) F. Greenwood Sgt British RAF. Sidney Robert McDonald No 413239, P/O, enlisted16.8.1941 age 19 years 3 months. Keith Mossman Tranent No 426402, Flt/Sgt, enlisted 20.6.1942 age 19 years 2 months. (refer Cat No 7467) Patrick John Bourke No 426822, Flt/Sgt, enlisted 11.8.1942 age 21 years. (Later KIA on 11.4.1944, craft No HX274) Black & white photographs laminated. .1) Day light photo shows 7 Aircrew standing beside a Halifax Bomber before take off. .2) Night time photo showing 7 Aircrew standing beside a Halifax Bomber on return from a mission..1) "Jack Evans Flt/Sgt DFC, Jack Maunder Flt/Sgt KIA, Jack Mitchell Flt/Sgt POW, Frank Greenwood Sgt RAF, Bob McDonald Flt/Sgt, Keith Tranent Flt/Sgt POW, Pat Bourke Flt/Sgt KIA". .2) "Back from a raid on Berlin 21.1.1944. Same names but in a different order"photographs, 466, raaf, berlin -
 Bendigo Military Museum
Award - MEDAL SET, MINIATURE, WW1, Post 1918
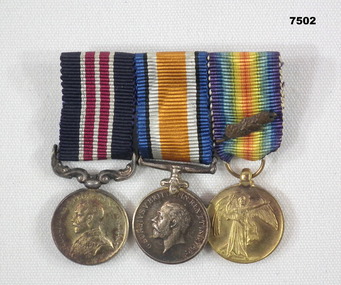
... Medal set miniatures, metal plate mounted. 1. Military... miniatures, metal plate mounted. 1. Military Medal. 2. British War ...Miniatures re: “Augustus PEGLER MM", No. 967 C. Coy 38th Bn, rank Sgt. Awarded MM 31/8/1918. See Cat No 7501P for his full service details.Medal set miniatures, metal plate mounted. 1. Military Medal. 2. British War Medal 1914-18. 3. Victory Medal with clasp "MID” ww1, medals, augustus pegler -
 Bendigo Military Museum
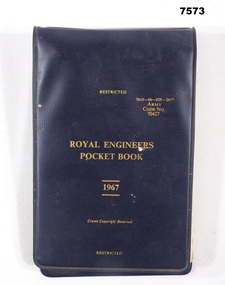
Manual - ENGINEERS POCKET BOOK, British M.O.D, 1967
British Army Manual Army code 70427.This is a vinyl covered book. Dark blue colour, the printing is in gold ink. Inside are instructions for field engineers with drawings and charts. At the rear are several lined square blank pages, 1" square. They are a different shade. The binding is metal and pages can be removed.military engineering, manual, royal engineers -
 Bendigo Military Museum
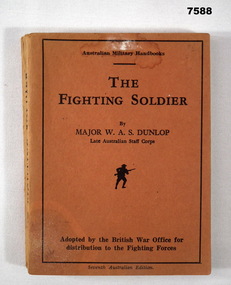
Book - AUSTRALIAN MILITARY HAND BOOK, Angus & Robertson Ltd, The Fighting Soldier, 1941
Written by Major W.A.S. Dunlop (late Australian Staff Corps) this book is noted as "Adopted by British War Office for distribution to the Fighting Forces". This is a pocket handbook. It has a thin cardboard cover, orange in colour. Black printing. In the centre is a silhouette of a charging soldier with bayonet. It has 202 pages of text.ww2, infantry training -
 Bendigo Military Museum
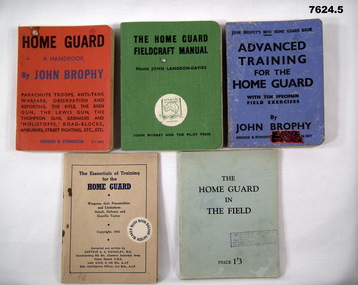
Manual - HOME GUARD TRAINING MANUALS, Hodder and Stoughton, 1940-1942
1. 2. 3. This is an English book designed for WW2. 4. This is an Australian book designed for WW2. 5. This is a British Commonwealth Book. GB, NZ, Aust.1. Home Guard Handbook - red buckram cover. Blue and black printing, it has 126 pages of text and weapon drawings. Author John Brophy. 2. Home Guard Fieldcraft Manual. Green buckram cover, black print, small book and map of Australia on front. 171 pages of text and drawings and photos. Author Major John Langdon-Davies. 3. Advance Training for the Home Guard. Author John Brophy. This book has a blue buckram cover. Printing is in black ink. It has 142 pages of text and drawings. 4. The essentials of training for the home guard, Weapons and minor Infantry tactics. Author Capt. A.S. Keighley ex AIF . 36 pages and drawings. 5. The Home Guard in the Field. Light blue cardboard cover. 52 pages of text and drawings.1. Marked on the top is “1/9” 2. First page has “3/3” written in pencil. 3. Front cover has a tattered label from “McGills Agency, Elizabeth St, Vic” 4. Marked on front in pencil “5/8” Also has a round sticky label from “Albury Book Bazaar” 5. Rubber stamp on front cover from McGills Agency.ww2, home guard, manuals -
 Bendigo Military Museum
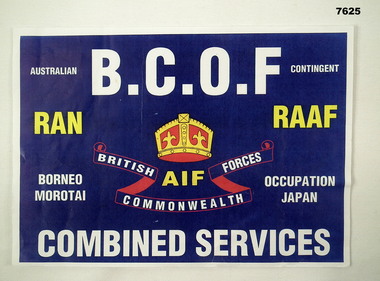
Poster - B.C.O.F. POSTER, BCOF Association of Australia, Australian BCOF Contingent Poster
Item is part of the BCOF Association collection related to this Cat No 7625.This is a simple A4 sheet of paper on which is printed the title of BCOF. In the centre is a stylised crown. under the crown is the phrase AIF. Under that is a banner with the phrase:- 'BRITISH COMMONWEALTH FORCES" Under that, at the bottom is the phrase "Combined Services". RAN, RAAF are included in yellow ink. On left side are the places Borneo and Morotai. On right side are the words "Occupation Japan".bcof, poster -
 Bendigo Military Museum
Book - BOOK ABOUT JAPAN 1945-1948, The Rodney Press, British Commonwealth Occupation Forces - Know Japan
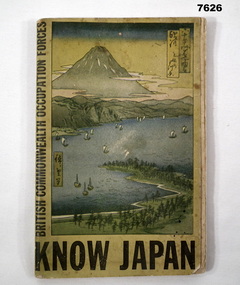
Australia was part of the British Commonwealth Occupation Forces in Japan after their surrender. Item s pat of the BCOF Association Collection, refer Cat No 7625.This is a cardboard covered book. There is a large image of Japan on front cover in colour. It shows a volcano mountain range - numerous boats on seaways. In the foreground is a thin pine plantation. It has 95 pages of text, charts and photos about Japanese history and culture.Inside front cover is modern price of $18.00.ww2, japan, 1945 on -
 Bendigo Military Museum
Booklet - OCCUPATION OF JAPAN, Brief History of Australia's Participation of Japan 1945 - 1952
After the Japanese surrender in WW2 the Allies (inc Australia) occupied Japan. Australia was part of the BCOF contingent. (British Commonwealth Occupation Force) one of the man Aimee was the disarmament of the Military. Item is part of the BCOF Association Collection, refer Cat No 7625.This is a fairly modern local production (it had an internet address at the top). It has six pages, printed in black ink. Fastened with one staple.ww2, japan, ocupation -
 Bendigo Military Museum
Photograph - Directors of Survey Army Headquarters, c1942-1967
This is a set of two photographs of Directors of Survey Army Headquarters circa 1942 to 1967. COL Lawrence FitzGerald OBE was Director from 1942 to 1960. He received the Order of the British Empire in 1948 for his service in WW2. Although it is not known when BRIG Lawrence FitzGerald OBE was promoted to Brigadier, it is possibly an honorary promotion on his retirement in 1960. He served in the Australian Army from 03 September 1923 to 05 January 1960. COL Lawrence FitzGerald OBE was succeeded by COL Donald Macdonald AM, whose appointment to Director was from 1960 to 1967. COL Macdonald AM was promoted to Brigadier on his retirement before assuming the honorary position of Colonel Commandant of the Royal Australian Survey Corps. He served in the Australian Army from 01 January 1936 to 22 March 1960.This is a set of two photographs of Directors of Survey Army Headquarters circa 1942 to 1967.The photographs were printed on photographic paper and are part of the Army Survey Regiment’s Collection. They were scanned at 300 dpi. .1) - Photo, black and white, c1950s. D-SVY COL Lawrence FitzGerald OBE. .2) - Photo, black and white, c1960s. D-SVY COL Don Macdonald AM, MID. .1P to .2P – no annotationsroyal australian survey corps, rasvy, army survey regiment, army svy regt, fortuna, asr -
 Bendigo Military Museum
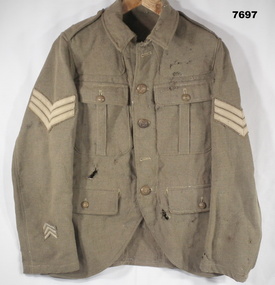
Uniform - JACKET, BATTLE DRESS, ARMY WW1, Australian Defence Industries, 1914-18
Jacket, Khaki colour, wool serge fabric. Battle dress style. Metal buttons with shank with split ring or safety pin. Buttons have raised emblem and letters -"LONDON ENGLAND" - appear to be British. Two buttons missing. Collar, shoulder epaulettes, four front pockets with button down flaps. White cotton fabric pocket lining. Two rank insignia top of sleeves, three stripes - Sergeant. Lower right sleeve, three chevrons; denotes overseas service. Right pocket lining - handwritten writing.Right pocket lining - handwritten black ink - writing illegible.uniform, army, battle dress, ww1 -
 Bendigo Military Museum
Book - AIRCRAFT IDENTIFICATION, Temple Press Ltd
Books were used as references for aircraft spotter on the home front and in battle during WW2.1. 64 page book outlining descriptions of British monoplanes. Front cover predominately black with red writing. Pictures of a plane in a search light over a city landscape. 2. 64 page book outlining descriptions of German warplane. Front cover predominately black with green writing with same background.1. Title "AIRCRAFT IDENTIFICATION" - British. 2. Title - "AIRCRAFT IDENTIFICATION" - German.german aircraft, british aircaft, books, ww2 -
 Bendigo Military Museum
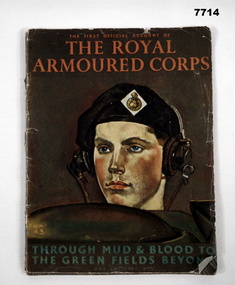
Magazine - THE ROYAL ARMOURED CORPS, His Majesty's Stationery Office, First Official Account of The Royal Armoured Corps, c1945
Magazine was issued by British Govt to give history of the R.A.C., starts with invention of tank in WW1, it's development and actions in WW2.72 page magazine, dark brown cover with image of a soldiers head protruding out of the top of an armoured vehicle wearing ear phones.Titled "The First Official Account of The Royal Armoured Corps" in red. At bottom "Through mud and blood to green fields beyond" in green.rac, history, book, ww2 -
 Bendigo Military Museum
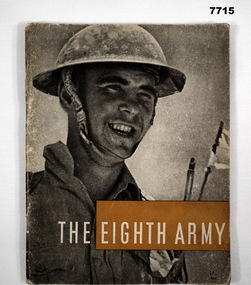
Magazine - HISTORY OF EIGHTH ARMY, His Majesty's Stationery Office, The Eighth Army, 1944
History of the Eighth Army from Sept 41 - Jan 43. Covered it's glory years of defeating the Axis Forces in North Africa.Well worn Magazine, Titled "The 8th Army". Picture of British Soldier on front smiling and picture of 3 soldiers on back in an armoured vehicle in a desert scene. Contents covered the actions of The 8th Army in the battles of North Africa.Titled "The Eighth Army" Inside written "J. Reeves, 19 Alphinall St. B/Head, Cheshire"8th army, north africa, ww2, magazine -
 Bendigo Military Museum
Manual - MANUAL, TACTICAL HANDLING of TANKS, British War Office, 1949
Item in the collection re Lt Col J Swatton, refer Cat No 6719.2P for his service details.This is a pocket size booklet. Cover is Khaki cardboard. On the front is an image of two tanks and two rifleman advancing thru a destroyed village. It has 45 pages of text and signal nets.Written in ink of outside front cover is "Sgt Swatton 3/92464".passchendaele barracks trust, tank warfare, book -
 Bendigo Military Museum
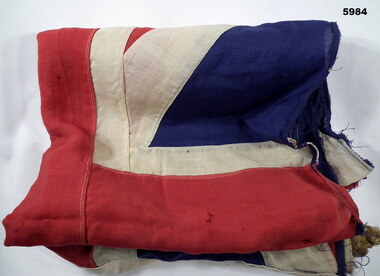
Flag - FLAG, BRITISH, Harry West Pty Ltd, 1939 - 1945
Item relates back to Cat No 4316.4.Flag - cotton, coloured red, blue, white. Rope, Union Jack, wide heavier cotton along one short end.flag, british -
 Bendigo Military Museum
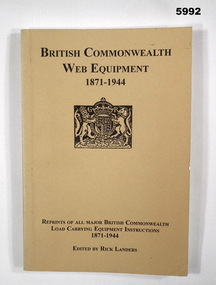
Book - BOOK, REFERENCE, Rick LANDERS, " BRITISH COMMONWEALTH WEB EQUIPMENT 1871-1944", 2005
... Guide History Military Accoutrements British Handwritten ...Peter Ball collection, refer Cat No 4704.Soft cover book. Cover - cardboard, black print on front and spine, beige background, small illustration. British Coat of Arms. 192 pages, cut, plain, white paper. Illustrated black and white illustration, diagrams and photographs. Handwritten - signature of author and owner's name.Handwritten signatures - front end paper - owner "Peter C Ball". Title page - author - "Rick Landers".books, reference guide, history, military accoutrements, british -
 Bendigo Military Museum
Uniform - SERVICE DRESS, ARMY, Aust Govt Clothing Factory, Fletcher Jones, ADA, 1. Hat 1988, 2. 1995. 3. ADI 1991. 4. - 5. 2006
Belonged to Craig Triffett No 326845/8253666 Enlisted: 27 .3.1985 Discharged: 9.2.2005 Unit/Corps: RAA Rank - Warrant Officer Class 2 Served tour with British Forces - Bosnia, Herzegovina 1997.1. Khaki peaked cap with Royal Aust Artillery Badge. 2. Jacket - Khaki with RAA Collar badges, white lanyard, WO2 and parachute badges, Australian Army Rising Sun Badge top of left arm. 3. Trousers - Khaki - (polyester). 4. Tie - khaki (polyester). 5. Tie - khaki (polyester). The ribbons are; The Australian Service medal. Long Service Medal with 20 years service. Australian Service Medal. Nato Medal (Bosnia Herzegovina)1. Written inside is "326845 Triffett". 2 - 3. Nil. 4. Written on small end is "326845 Triffett". 5. Nil.dress uniform, australian army, raa -
 Bendigo Military Museum
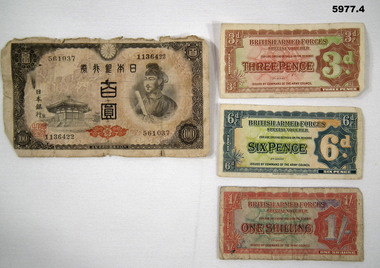
Currency - PAPER CURRENCY, Imperial Japanese Govt, 1. Asian. 2. 3. 4. British Army Forces, cWW2
1. Old Japanese 100 year old note. Black and Red printing on face, blue ink on rear side. Face side has image of a building and traditional man. rear side images has buildings and two dragons. NRS: 561037 1136422. 2. British Armed Forces - Special voucher. Three pence. printing on front is in brown green and red ink. rear side, brown ink. 3. British Armed Forces - Special voucher. Six pence. Printing on front is in blue, orange and green ink - rearside in blue ink. 4. British Armed Forces - Special voucher. One shilling. Printing on front is in red, blue and green ink - rearside in red ink.army overseas, barracks money, japan, britian -
 Bendigo Military Museum
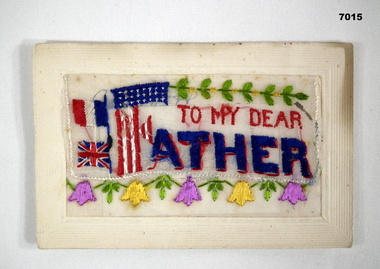
Postcard - POSTCARD WW1, EMBROIDERED, 1917-18
Sent by Cpl William Edward WENNERBOM Reg'n 2249, 3 October 1918. E. Coy, 12th Battn, Oct 1914, Discharged Dec 1919.Postcard - Cream cardboard, coloured thread embroidery, red, blue, white, green, yellow, purple.“To My Dear Father” French, British, American Flags, Flowers, Leaves.postcard, ww1 -
 Bendigo Military Museum
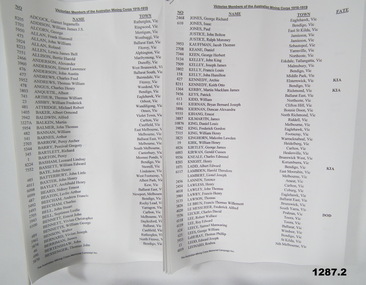
Administrative record - ADMINISTRATIVE RECORD, WW1, The Australian Mining Corps Memorial Campaign Inc, "Victorian Members of the Australian Mining Corps 1916-1919", unknown
"Victorian Members of the Australian Mining Corps 1916 - 1919". The 4 mining units formed by the Royal Australian Engineers for the British Expeditionary Force departed Australia for the United Kingdom 1916. After May 1916 the four constituent companies of the Australian Mining Corps were deployed directly as part of the Tunnelling Companies of the Royal Engineers. list produced by "The Australian Mining Corps Memorial Campaign Inc".1. & 2. Record document - facsimile copy of names. Black print on white paper. Both 8 pages - printed on one side, white paper. Stapled top left corner.records, royal australian engineers, tunnellers, ww1 -
 Bendigo Military Museum
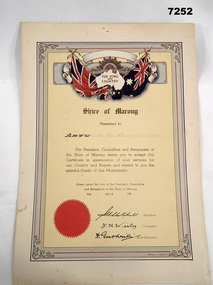
Certificate - CERTIFICATE OF APPRECIATION
Letter of Appreciation given to Servicemen and Women in recognition of their service to the country. This certificate unlikely to have been issued as name not complete and not dated. Soldier named is Arthur Garfield Genders V78542Certificate of Appreciation from Marong Shire. On yellow cardboard with blue and red flag emblems of Britain and Australia at top. Formal council stamp and signatures of President, Councillor & Shire Secretary. Writing in gold and surrounded by stylised brown, red and green board. Name of person presented to outlined but not completed. Date also not filled in.Name only partially done "ARTHUR G. GENDERS Signed by President, Councillor and Shire President with Red official Council stamp.shire of marong, certificate of appreciation, ww2 -
 Bendigo Military Museum
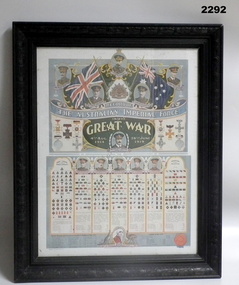
Poster - POSTER, FRAMED WW1, Osboldstone & Co Pty Ltd, Post WW1
Original Poster. Poster - colour print on paper. Top depicts British and Australian Flags with portraits of "H.M.KING GEORGE V" and four AIF Generals. Middle section - Honours and Decorations awarded to Members of the AIF with portrait of one AIF Major General. Lower Section - Portraits of five AIF Major Generals above seven columns of Unit Colour Patches of AIF Divisions, Corps, Troops and miscellaneous. Below - portrait of a Nurse within Kangaroo/emu emblem. Frame - timber with black/brown finish and decorative moulding. Glass front and brown paper backing over timber backing board.Heading on Poster - "RECORD OF/ THE AUSTRALIAN IMPERIAL FORCE/ IN THE/ GREAT WAR/ 4TH AUG/ 1914/ 28TH JUNE/ 1919" poster, framed accessories, ww1, aif -
 Bendigo Military Museum
Photograph - Army Survey Regiment’s Rifle Shooting Team, Fortuna, Bendigo, c1979
This set of 10 photographs of the Army Survey Regiment’s victorious rifle shooting team was taken outside the Tavern at Fortuna, Bendigo in c1979. The rifle shooting competition was the ‘Irwin Trophy for Shooting’, a contest with the British Army’s 42nd Engineer Regiment, the equivalent military geographic mapping unit at the time to the Army Survey Regiment. The bent .303 rifle seen in photo .3P was retrieved from the bottom of Fortuna’s lake when it was drained for restoration. It is believed an excavator drove over the rifle before it was retrieved.This set of 10 photographs of the Army Survey Regiment’s rifle shooting team was taken at Fortuna, Bendigo in c1979. The photographs were printed on photographic paper and are part of the Army Survey Regiment’s Collection. The 35mm positive photographic proofs were scanned at 600 dpi. Larger prints of .1P, .3P and .10P were scanned at 300 dpi. .1) & 2) - Photo, black & white, c1979, Rifle Shooting Team - L to R: Warren ‘Waldo’ Shirley, John Waight, Peter Searle UK Exchange, CO LTCOL Bob Skitch, Jim Macdonald, John Harrison, Max Neil, Stan Vote. .3) - Photo, black & white, c1979, Rifle Shooting Team - L to R: Stan Vote, John Harrison, Max Neil, Warren ‘Waldo’ Shirley, Jim Macdonald, John Waight. .4) - Photo, black & white, c1979, Rifle Shooting Team - L to R: CO LTCOL Bob Skitch, Jim Macdonald, Stan Vote. .5) - Photo, black & white, c1979, Rifle Shooting Team - L to R: John Waight, Warren ‘Waldo’ Shirley. .6) - Photo, black & white, c1979, Rifle Shooting Team - L to R: Warren ‘Waldo’ Shirley, CO LTCOL Bob Skitch. .7) - Photo, black & white, c1979, Rifle Shooting Team - L to R: CO LTCOL Bob Skitch, Warren ‘Waldo’ Shirley, Stan Vote, Jim Macdonald, Max Neil. .8) - Photo, black & white, c1979, Rifle Shooting Team - L to R: Jim Macdonald, Max Neil, Stan Vote. .9) - Photo, black & white, c1979, Rifle Shooting Team - L to R: CO LTCOL Bob Skitch, Peter Searle UK Exchange, Warren ‘Waldo’ Shirley. .10) - Photo, black & white, c1979, Irwin Trophy for Shooting..1P to .10P –No personnel are identified.royal australian survey corps, rasvy, army survey regiment, army svy regt, fortuna, asr -
 Bendigo Military Museum
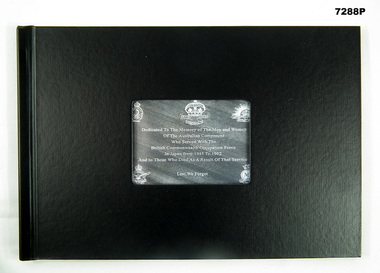
Album - ALBUM, PHOTOGRAPHIC, March 2018
Reunion held at Junee in NSW for those that served in Japan as part of occupational forces of the Commonwealth from 1945-52. Item in the collection of Richard William McGILVERY, RAAF. Refer Cat No.7287P for Service details, photos and awards.Hard cover black photo album for British Commonwealth Occupational Forces of Japan Reunion in 2018. Album contains photos and a newspaper article relating to reunion at Junee. Photos, actual part of a booklet on glossy coloured paper. 10 pages, both sides. Cover has a window into the first page highlighting a memorial statement to those that served. A plastic isert is at the front and back of the inside pages. Inside is a separate A4 page with photo print of a ceremony at the War Memorial.On front cover, a dedication to Australian Forces who served from 1945-52.japanese occupational forces, photo album, bcof -
 Bendigo Military Museum
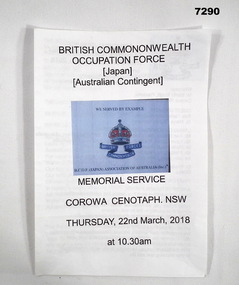
Programme - PROGRAMME, BCOF
For Memorial Service held at Corowa Cenotaph of Thursday 22 March 2018 to Celebrate the Australian Contingent of BCOF in occupying Japan Post WW2. Items in the collection of Richard William McGILVERY, RAAF. refer Cat No. 7287P for his service details, photos and awards. Folded white paper, A5 size of programme for memorial service at Corowa Cenotaph NSW. Black writing on front and inside. Blue square in middle of front with British Forces Commonwealth Emblem. Emblem is "British Forces Commonwealth" written on a dark blue ribbon with a blue and red crown on top.Header - "British Commonwealth Occupation Forces (Japan) Australian Contingent. Bottom '(Memorial Service Corowa Cenotaph, NSW. Thursday 22 March 2018 at 10.30 pm).bcof, japanese occupational forces -
 Bendigo Military Museum
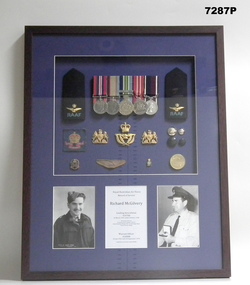
Photograph - PHOTOGRAPH, MEMORABILIA FRAMED, Accent Framing Ballarat, Post 1970
Richard William McGilvery. Enlisted No. 450708 in the RAAF on 20/3/45, age 19 years. Served with BCOF in Japan post War, discharged on 16/10/1948, re enlisted 1950, discharged 30.9.1970 with the rank of Warrant Officer, awarded the "Long Service & Good Conduct Medal.Framed memorabilia, frame brown timber, Memorabilia has blue inset backing, there are 4 inserts. Top insert has, 2 x RAAF shoulder epaulettes, 2. Shoulder patches "British Commonwealth Forces" 3. 2 x badges with lion and horse. 4. 1 x RAAF hat badge. 5. 4 x uniform buttons. 6. 1 x badge "British Commonwealth Forces Association". 7. 1 x brown shoulder wings. 8. 1 x miniature badge "Air Training Corps Australia". 9. Set of medals mounted. (1) Defence medal 1939-45. (2) Australian Service Medal. (3) Australian Defence Medal. (4) Long Service and good conduct medal. 10. Medallion 60 years 1945 - 2005. Photo insert showing portrait of "McGilvery" in Japan. Centre insert: Details re McGilvery with "Long Service & Good conduct Medal". "memorabilia, photographs, bcof -
 Bendigo Military Museum
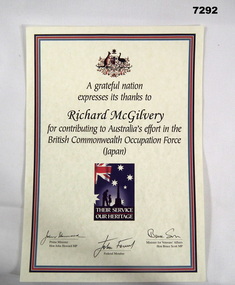
Certificate - CERTIFICATE - BCOF
Certificate issued to Australian Serviceman for their contribution towards BCOF. Signed by Prime Minister John Howard and VA Minister Bruce Scott so would be circa 1996-2001. Items in the collection of Richard William McGilvery, RAAF. Refer No.7287P for his service details, photo and awards.Hard cardboard, yellow pages with thin black, red and blue lines. Commonwealth Government emblem at top, a message of thanks and signatures at bottom. Also stylised picture of Australian Flag and image of child and man in front of a cenotaph.Says " A grateful nation expresses it's thanks to Richard McGilvery for contributing to Australia's effort in the British Commonwealth Occupation Forces (Japan). Signed by Prime Minister, His local MP & Minister for Veteran Affairs.bcof, certificate