Showing 1056 items
matching display board
-
 University of Melbourne, Burnley Campus Archives
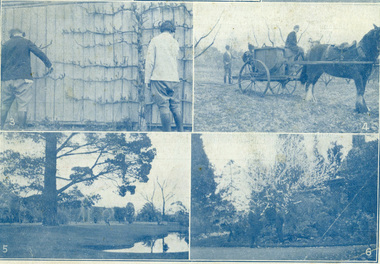
Photograph - Colour print, The Australian Garden Lover, "An Australian Horticultural School.", 1926
... in the Centennial Display mounted on board. The espaliered fruit tree... and also used in the Centennial Display mounted on board ...The 4 bottom photographs used as an illustration in, "Green Grows Our Garden," A.P. Winzenried p 52 and also used in the Centennial Display mounted on board. The espaliered fruit tree was located in the old nursery trained by George Russ. Top right orchard spraying. Bottom left View of Pavilion showing Luffmann's pond and a Pinus radiata planted in the 1860's. Bottom right A.W. Jessep (Principal) and E.E. Pescott (Lecturer). outside Principal's Residence. E.B. Littlejohn.See detailed description in paper catalogue and B91.404 for Journal Article.Colour photograph of part of the cover of , "The Australian Garden Lover," Vol. 2 No. 7 October, 1926, entitled, " 'An Australian Horticultural School.' Enterprise at Burnley, Vic." ella chalmers (née fry), green grows our garden, a.p. winzenried, centennial display, a.w. jessep, principal, e.e. pescott, lecturer, principal's residence, e.b. littlejohn, espaliered fruit tree, old nursery, george russ, orchard spraying, pavilion, pinus radiata, ponds., lily ponds, luffmann ponds -
 Melbourne Legacy
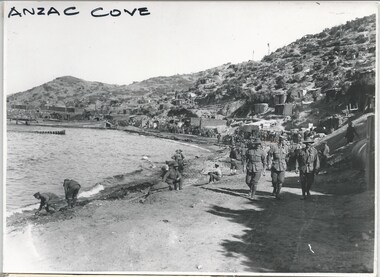
Photograph - Photo, Anzac Cove Gallipoli
... on board for display at Legacy House at some stage. When they were... on board for display at Legacy House at some stage. When they were ...A photo of the foreshore at Anzac Cove at Gallipoli in 1915. Was with 11 other photos of World War One that had been mounted on board for display at Legacy House at some stage. When they were taken off display they were put in the archive cabinets. The founding legatees all served in World War One so these photos would have been of significant places for them. (see 01888 to 01899)Photos from World War One that would have been significant to the founding legatees.Black and white photo of Anzac Cove beach at Gallipoli.gallipoli, world war one, soldiers -
 Melbourne Legacy
Photograph - Photo, Gallipoli Stretcher Bearers
... mounted on board for display at Legacy House at some stage. When... on board for display at Legacy House at some stage. When they were ...A photo of 8 stretcher bearers carrying a wounded man at Gallipoli. Was with 11 other photos of World War One that had been mounted on board for display at Legacy House at some stage. When they were taken off display they were put in the archive cabinets. The founding legatees all served in World War One so these photos would have been of significant places for them. (see 01888 to 01899)Photos from World War One that would have been significant to the founding legatees.Black and white photo of stretcher bearers at Gallipoli.gallipoli, world war one, soldiers, stretcher bearers, tents -
 Melbourne Legacy
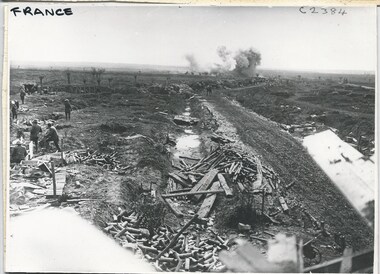
Photograph - Photo, France
... that had been mounted on board for display at Legacy House at some... mounted on board for display at Legacy House at some stage. When ...A photo of soldiers having a break or meal in France in World War One. Was with 11 other photos of World War One that had been mounted on board for display at Legacy House at some stage. When they were taken off display they were put in the archive cabinets. The founding legatees all served in World War One so these photos would have been of significant places for them. (see 01888 to 01899)Photos from World War One that would have been significant to the founding legatees.Black and white photo of soldiers in France during World War One.world war one, france, soldiers -
 Melbourne Legacy
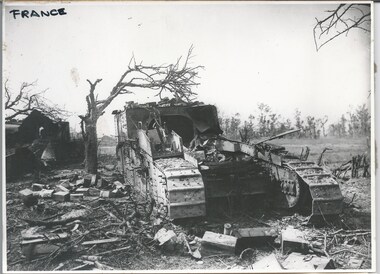
Photograph - Photo, Ruined Tank in France
... on board for display at Legacy House at some stage. When they were... other photos of World War One that had been mounted on board ...A photo a ruined tank in France during World War One. Was with 11 other photos of World War One that had been mounted on board for display at Legacy House at some stage. When they were taken off display they were put in the archive cabinets. The founding legatees all served in World War One so these photos would have been of significant places for them. (see 01888 to 01899)Photos from World War One that would have been significant to the founding legatees.Black and white photo of a ruined tank in France during World War One.world war one, france, tank -
 Melbourne Legacy
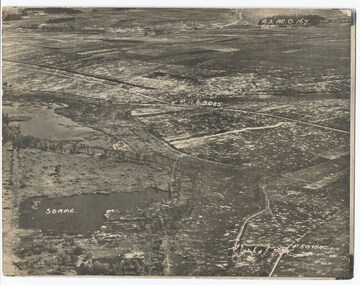
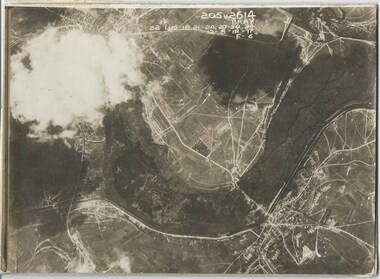
Photograph - Photo, Aerial view of the Somme
... on board for display at Legacy House at some stage. When they were... of World War One that had been mounted on board for display ...An aerial photo of the Somme Swamp in France during World War One. There are coordinates or numbers in some areas. Was with 11 other photos of World War One that had been mounted on board for display at Legacy House at some stage. When they were taken off display they were put in the archive cabinets. The founding legatees all served in World War One so these photos would have been of significant places for them. (see 01888 to 01899)Photos from World War One that would have been significant to the founding legatees.Sepia photo of the Somme battlefield in France during World War One.world war one, france, somme -
 Melbourne Legacy
Photograph - Photo, France
... mounted on board for display at Legacy House at some stage. When... mounted on board for display at Legacy House at some stage. When ...A photo in France during World War One, it may have been taken from a train or truck. It shows took on the trenches and embankments. Was with 11 other photos of World War One that had been mounted on board for display at Legacy House at some stage. When they were taken off display they were put in the archive cabinets. The founding legatees all served in World War One so these photos would have been of significant places for them. (see 01888 to 01899)Photos from World War One that would have been significant to the founding legatees.Black and white photo of soldiers and trenches in France during World War One.world war one, france, soldiers -
 Melbourne Legacy
Photograph - Photo, Aerial view of the Somme
... on board for display at Legacy House at some stage. When they were... on board for display at Legacy House at some stage. When they were ...An aerial photo of the Somme in France during World War One. There are coordinates or numbers in some areas. Also labelled is Bray. Was with 11 other photos of World War One that had been mounted on board for display at Legacy House at some stage. When they were taken off display they were put in the archive cabinets. The founding legatees all served in World War One so these photos would have been of significant places for them. (see 01888 to 01899)Photos from World War One that would have been significant to the founding legatees.Sepia photo of the Somme battlefield in France during World War One.world war one, france, somme -
 National Communication Museum
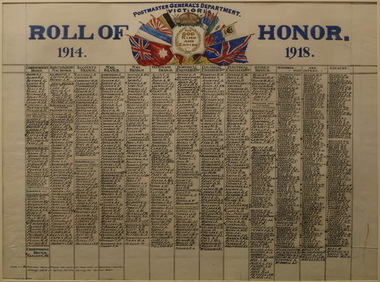
Memorabilia - Honour board, Roll of Honour 1914 - 1918, 1920
... in key positions could not be spared. This board was displayed... in key positions could not be spared. This board was displayed ...This honour board commemorates Victorian Postmaster General's Department workers who served in the First World War. A total of 3,726 employees of the Postmaster General's Department enlisted in the Australian Imperial Force during the First World War. This represented about one in every five of the total number of men employed by the Department. Many other employees volunteered, but were rejected for health or other reasons, whilst men in key positions could not be spared. This board was displayed at the Spirit of ANZAC Centenary Experience, Melbourne, in February 2016.This honour board was produced by the Postmaster-General's Department and passed through its successor entities until donation to the National Communications Museum in 2018. Its provenance is further supported by the supplementary photograph (VH256) held by the Museum which shows the board in production. The board provides a comprehensive list of the names of Postmaster-General staff across various departments, constituting an important resource for genealogical or social history researchers and a focal point for remembrance by fellow communications workers. The style of the board itself is rare, as it was an unusual practice for honour boards to be hand-lettered on paper.Handpainted paper on linen honour board, perspex glazed with a wooden frame."POSTMASTER GENERAL'S DEPARTMENT / VICTORIA" "ROLL OF HONOR / 1914 1918" "FOR / GOD / KING / AND / EMPIRE"|Headings that precede list of names: "CORRESPONDENCE / BRANCH" "CENTRAL EXCHE" "SUBURBAN AND COUNTRY / POST OFFICES" "TELEGRAPH / BRANCH" "ELECTRICAL ENGINEER'S BCH" "MAIL / BRANCH"pmg, postmaster general's department (pmg), world war 1, ww1, postal workers, honour boards, first world war -
 Melbourne Legacy
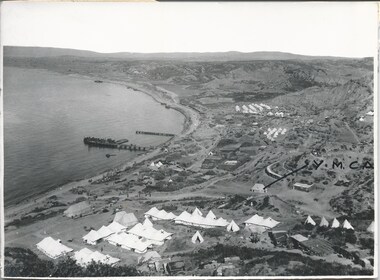
Photograph - Photo, Anzac Cove Gallipoli
... photos of World War One that had been mounted on board... of World War One that had been mounted on board for display ...A photo of Anzac Cove taken from a high vantage point. The white tents in the foreground appear to be medical aid tents. A small tent is labelled YMCA in black texta. Was with 11 other photos of World War One that had been mounted on board for display at Legacy House at some stage. When they were taken off display they were put in the archive cabinets. The founding legatees all served in World War One so these photos would have been of significant places for them. (see 01888 to 01899)Photos from World War One that would have been significant to the founding legatees.Black and white photo of medical tents, YMCA and landing pier at Anzac Cove.gallipoli, world war one, tents, tent hospital, ymca -
 Melbourne Legacy
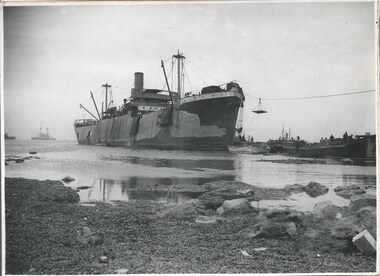
Photograph - Photo, Unloading supplies at Gallipoli
... mounted on board for display at Legacy House at some stage. When... mounted on board for display at Legacy House at some stage. When ...A photo of a boat called River Clyde unloading supplies at a beach presumed to be at the Gallipoli Peninsula. The book 'The Dardanelles' at 01886 has a photo of this boat at Seddul Bahr on page 8. Was with 11 other photos of World War One that had been mounted on board for display at Legacy House at some stage. When they were taken off display they were put in the archive cabinets. The founding legatees all served in World War One so these photos would have been of significant places for them. (see 01888 to 01899)Photos from World War One that would have been significant to the founding legatees.Black and white photo of a boat unloading at Gallipoli.gallipoli, world war one, ship -
 Melbourne Legacy
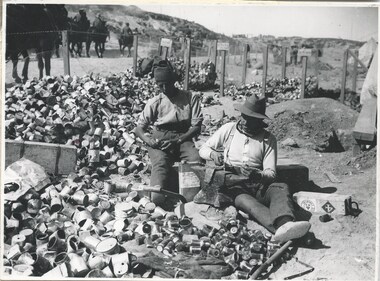
Photograph - Photo, Soldiers at Gallipoli
... other photos of World War One that had been mounted on board... other photos of World War One that had been mounted on board ...A photo of two soldiers working on tins and barbed wire at Gallipoli. One man is working with a strip of barbed wire on an anvil. They are surrounded by discarded cans. It was with 11 other photos of World War One that had been mounted on board for display at Legacy House at some stage. When they were taken off display they were put in the archive cabinets. The founding legatees all served in World War One so these photos would have been of significant places for them. (see 01888 to 01899)Photos from World War One that would have been significant to the founding legatees.Black and white photo of two soldiers working at Gallipoli.gallipoli, world war one, soldiers -
 Melbourne Legacy
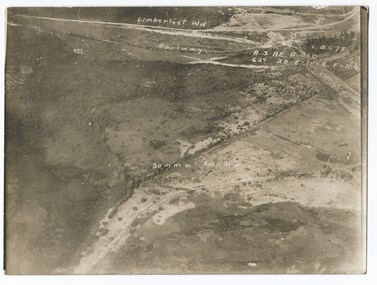
Photograph - Photo, Aerial view of the Somme
... on board for display at Legacy House at some stage. When they were... photos of World War One that had been mounted on board ...An aerial photo of the Somme Swamp in France during World War One. There are coordinates or numbers in some areas. Also labelled are the railway line and Canal du Nor and Limberlost Wood. Was with 11 other photos of World War One that had been mounted on board for display at Legacy House at some stage. When they were taken off display they were put in the archive cabinets. The founding legatees all served in World War One so these photos would have been of significant places for them. (see 01888 to 01899)Photos from World War One that would have been significant to the founding legatees.Sepia photo of the Somme battlefield in France during World War One.world war one, france, somme -
 University of Melbourne, Burnley Campus Archives
Photograph, Ministry for Planning and Environment April 1966. Photographic Archive Project, Museum of Victoria, Display of Early Victorian Gardens, 1996
... Display items created by Victorian Ministry for Planning... Boulevard Richmond melbourne display early victorian gardens garden ...display, early victorian gardens, garden design, linton district, geelong, stockyard hill, amherst -
 City of Moorabbin Historical Society (Operating the Box Cottage Museum)
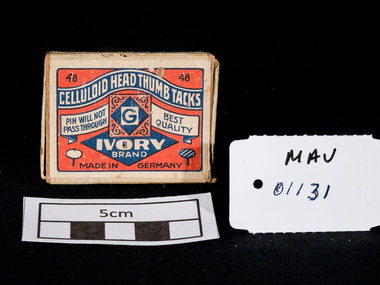
Manufactured Objects, Thumb Tacks 'Ivory', 20thC
... or pin used to fasten items to a wall or board for display... to fasten items to a wall or board for display and intended ...A thumb tack, push pin or drawing pin is a short nail or pin used to fasten items to a wall or board for display and intended to be inserted by hand, generally without the assistance of tools. A variety of names are used to refer to different designs intended for various purpose. Edwin Moore invented the "push-pin" in 1900 and founded the Moore Push-Pin Company. Moore described the push-pin as a pin with a handle. Later, in 1904, in Lychen, German clockmaker Johann Kirsten invented flat-headed thumb tacks for use with drawings. A thumb tack has two basic components: the head, often made of plastic, metal or wood, and the body, usually made of steel or brass. The head is wide to distribute the force of pushing the tack in, allowing only the hands to be used. Many head designs exist: flat, domed, spherical, cylindrical and a variety of novelty heads.Cardboard box with sliding insert that contained 48 'IVORY' Brand celluloid head Thumb Tackson Box ; 48 / 48 / CELLULOID HEAD THUMB TACKS / 'G' / PIN WILL NOT / PASS THROUGH / BEST / QUALITY / IVORY / BRAND / MADE IN GERMANYdrawing pins, thumb tacks, brass tacks, moore edwin, kirsten johann -
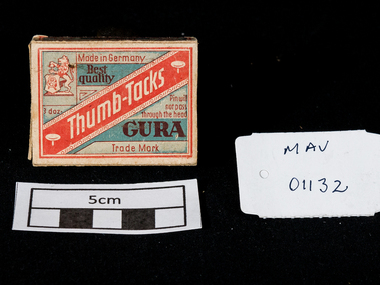 City of Moorabbin Historical Society (Operating the Box Cottage Museum)
Manufactured Objects, Thumb Tacks 'GURA', GURA Pty Ltd
... or pin used to fasten items to a wall or board for display... to fasten items to a wall or board for display and intended ...A thumb tack, push pin or drawing pin is a short nail or pin used to fasten items to a wall or board for display and intended to be inserted by hand, generally without the assistance of tools. A variety of names are used to refer to different designs intended for various purpose. Edwin Moore invented the "push-pin" in 1900 and founded the Moore Push-Pin Company. Moore described the push-pin as a pin with a handle. Later, in 1904, in Lychen, German clockmaker Johann Kirsten invented flat-headed thumb tacks for use with drawings. A thumb tack has two basic components: the head, often made of plastic, metal or wood, and the body, usually made of steel or brass. The head is wide to distribute the force of pushing the tack in, allowing only the hands to be used. Many head designs exist: flat, domed, spherical, cylindrical and a variety of novelty heads. Cardboard box with sliding insert that contained 3 Doz. GURA Brand Thumb Tacks On box ; MADE IN GERMANY / BEST / QUALITY / 3 doz. / THUMB-TACKS / Pin will / not pass / through the head / GURA / Trade Mark -
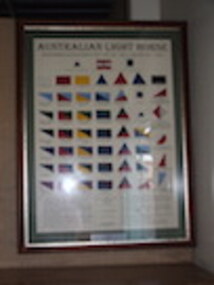 4th/19th Prince of Wales's Light Horse Regiment Unit History Room
Colour Patch Display, Frontier Military History Services, Australian Light Horse Colour Patches of the 1st AIF 1915-1920 & AMF/CMF 1921-1940's, 24/07/2010
... Display board of replica cloth colour patches, mounted... and design of colour patches Display board of replica cloth colour ...Display board of replica cloth colour patches, mounted in glass fronted wooden frame. Colour patches displayed are those of : 1st Cavalry Division HQ (CMF) Desert Mounted Corps HQ 2nd Cavalry Division HQ (CMF) HQ 1st Light Horse Brigade (AIF & CMF) HQ 2nd Light Horse Brigade (AIF & CMF) HQ 3rd Light Horse Brigade (AIF & CMF) HQ 4th Light Horse Brigade (AIF) HQ 5th Light Horse Brigade (AIF & CMF) HQ 4th Light Horse Brigade (CMF) HQ 6th Light Horse Brigade (CMF) 1st Light Horse Regiment / 1st Royal NSW Lancers 5th Light Horse Regiment / 5th Wide Bay & Burnett Light Horse 8th Light Horse Regiment / 8th Indi Light Horse Regiment 4th Light Horse Regiment / 4th Corangamite Light Horse Regiment 14th Light Horse Regiment / 14th West Moreton Light Horse Regiment 18th Adelaide Lancers 4th Light Horse Regiment / 1st Aust Div Mounted Regiment / 2nd ANZAC Mounted Regiment / 22nd Corps Mounted Regiment. 2nd Light Horse Regiment / 2nd Moreton Light Horse Regiment 6th Light Horse Regiment / 6th NSW Mounted Rifles 9th Light Horse Regiment / 9th Flinders Light Horse Regiment 11th Light Horse Regiment / 11th Darling Downs Light Horse Regiment 15th Light Horse Regiment / 15th Northern River Lancers 21st Riverina Light Horse 13th Light Horse Regiment / 2nd Aust Div Mounted Regiment / 1st ANZAC Mounted Regiment / Aust Corps Mounted Regiment / 13th Gippsland Light Horse Regiment 3rd Light Horse Regiment / 3rd South Australian Mounted Rifles 7th Light Horse Regiment / 7th Australian Horse 10th Light Horse Regiment / 10th Western Australian Mounted Infantry 12th Light Horse Regiment / 12th New England Light Horse Regiment 17th Prince of Wales Light Horse Regiment 22nd Tasmanian Mounted Infantry 11th Light Horse Regiment / 4th Aust Div Mounted Regiment / 24th Gwydir Light Horse Regiment 1st Machine Gun Squadron / 25th Light Horse (MG) 2nd Machine Gun Squadron / 16th Hunter River Lancers 3rd Machine Gun Squadron / 20th Victorian Mounted Rifles 4th Machine Gun Squadron / 26th Light Horse (MG) 5th Machine Gun Squadron / 19th Yarrowee Light Horse 23rd Barossa Light Horse Regiment 12th Light Horse Regiment / 5th Aust Div Mounted Regiment 1st Light Horse Field Ambulance 2nd Light Horse Field Ambulance 3rd Light Horse Field Ambulance 4th Light Horse Field Ambulance 5th Light Horse Field Ambulance 4th Signal Troop / 4th Light Horse brigade 6th Mobile Veterinary Section /1st Light Horse Brigade 7th Mobile Veterinary Section / 2nd Light Horse Brigade 8th Mobile Veterinary Section / 3rd Light Horse Brigade 9th Mobile Veterinary Section / 4th Light Horse brigade 10th Mobile Veterinary Section / 5th Light Horse Brigade 5th Signal Troop / 5th Light Horse Brigade 1st Signal Squadron / NZ & Aust Mounted Div Signal SquadronColour Patch Display No 39. Includes detailed notes about history, usage and design of colour patchesworld war one, ww1, army, aif, insignia, heraldry, light horse, militia, badges, colour patches, cmf -
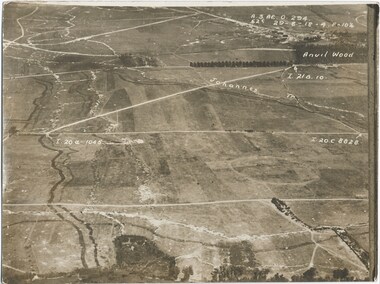 Melbourne Legacy
Photograph - Photo, Aerial view of the Somme
... been mounted on board for display at Legacy House at some stage... been mounted on board for display at Legacy House at some stage ...An aerial photo of the Somme in France during World War One. There are coordinates or numbers in some areas. Also labelled are the Johannes and Anvil Wood. Was with 11 other photos of World War One that had been mounted on board for display at Legacy House at some stage. When they were taken off display they were put in the archive cabinets. The founding legatees all served in World War One so these photos would have been of significant places for them. (see 01888 to 01899). From the AWM: Anvil Wood was a small wood to the north of Peronne that marked the centreline of an attack by the 14th Brigade on the morning of 1 September 1918. The northern approaches to Peronne were covered by numerous field and machine-guns, but the leading battalions of the brigade - the 53rd and 54th - pushed their attack home with determination, and sent the German defenders fleeing back to Peronne. The attack opened the way for the 14th Brigade to advance on to Peronne itself and break into the town's northern defences.Photos from World War One that would have been significant to the founding legatees.Sepia photo of the Somme battlefield in France during World War One.world war one, france, somme -
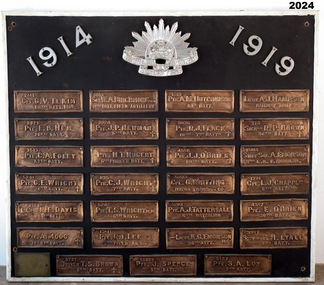 Bendigo Military Museum
Honour Board - EAST BENDIGO PRIMARY SCHOOL HONOUR BOARD WW1, original plaques, post WW1
... at some stage before 1964, mounted on a board and displayed... at some stage before 1964, mounted on a board and displayed ...The Bendigo East Primary School was opened in 1915. In 1916 it was decided to plant an ANZAC Avenue of trees and this was completed on 16 June 1916. The plaques were placed after WW1. The school was closed in 1998 and the plaques were relocated to the nearby White Hills Secondary College in Napier Street on this board. In the early 2000's the Honour Board was donated to what is now called the Bendigo Military Museum. One hundred years after planting, later in 2016 the trees were removed in controversial circumstances. On the board 8 never returned, there is 1 x "DCM" winner, 1 x "MC" winner and 1 x "MM" winner. There are 3 x Wright Brothers of which 2 never returned. The plaque states that the soldiers attended the school which is obvious they could not have due to the opening date. The following Heritage report suggests that the names were of individual soldiers who lived in the area. EXTRACT FROM HERITAGE COUNCIL VICTORIA 2016 SUBMISSIONS HEARING “The Bendigo East School (‘the school’) was officially opened by Mr Frank Tate, Director of Education, on 7 April 1916. Approximately two months later, on 16 June 1916, Arbor Day was celebrated at the school with the planting of an ‘Anzac Avenue’ along a path from the front gate on Strickland Road (‘the pathway’) to commemorate the landing of soldiers at Gallipoli. The school’s ‘Anzac Avenue’ was one of an estimated 37 known to have been planted by school children throughout Victoria during mid-1916 as part of a program led by the Education Department, which included a recommendation to schools on 18 May 1916 that commemorative avenues be planted (‘the 1916 plantings recommendation’). At around this time, avenues of honour were also planted across Victoria to commemorate fallen WWI soldiers (‘the wider commemorative plantings phenomenon’). There were other commemorative plantings at the Place away from the pathway (‘the other commemorative plantings’). Anzac Day was celebrated at the Place in the years subsequent to 1916 and on 11 December 1920 the school’s ‘Anzac Avenue’ was officially opened. Embossed copper plates, mounted on wood, were fixed in front of the trees in memory of individual soldiers from the district who had seen active service in WWI. There is evidence that as many as 32 plaques may have been made and affixed (‘the name plaques’). Plaques were removed from their locations at some stage before 1964, mounted on a board and displayed in the school building. These are now located and displayed at Bendigo Sub - Branch of the Returned Services League.” EAST BENDIGO HONOUR BOARD – COPPER PLAQUES (27 PLAQUES in total). 1. 2441 CPL G.V. LE KIM 60th BATT. M.M. (George Vincent LEE-KIM, born in Bendigo, Awarded Military Medal. RTA. NOK Father’s Address: C/- Strickland Rd, Bendigo). 2. 3821 PTE. E.B. HEM 20TH BATT. (Edward Bert Hem born in Bendigo. RTA. NOK Mother’s address: White Hills Post Office). 3. 3513 PTE. C.A. FOLEY 57th BATT. (Charles Albert Foley born in Bendigo. RTA. NOK Father’s address: Wilkie Street, Bendigo). 4. 5241 PTE. G. E. WRIGHT 6th BATT. † (George Edwin Wright born in Bendigo. KIA 8/12/1916. NOK Father’s address: 55 Charleston Rd. Bendigo). 5. 2663 L.CPL. N. E. DAVIS 60th BATT. (Norman Edward Davis born in Footscray. RTA. NOK Mother’s address: 193 Strickland Rd. Bendigo). 6. PTE. A. MOOG 16-6th BATT. † (5143 Adolph Moog born in Bendigo. Died of wounds received in action 8/12/1916, NOK Father’s address: Municipal Yards, Bendigo.) 7. 6515 SGT. W.A. BIRCHMORE DCM 11TH BATT. FIELD ARTILLERY (William Albert Birchmore born in Bendigo. Awarded DCM. RTA. NOK Mother’s address: Butler Street, California Gully) 8. 3924 PTE. J.P. NEWMAN 5TH BATT. † (392 (NAA) James Pausey Newman. Born in Bendigo. KIA 25/7/1916. NOK Father’s address Strickland Road, Bendigo) 9. 4865 PTE. H. T. NUGENT 5TH PIONEER BATT. † (also 4765 Hector Thomas Nugent born in Bendigo. KIA 26/11/1916. NOK Mother’s address: 55 Charleston Rd Bendigo). 10. 835 PTE. C.J. WRIGHT 7TH BATT. † (825(NAA) Charles Julian Wright. Born in Bendigo. KIA at Gallipoli 25/4/1915 NOK Father’s address 55 Charleston Rd Bendigo) 11. 5242 PTE. T.S. WRIGHT M.M. 6TH BATT. (Thomas Stanley Wright born in Bendigo. RTA. NOK Father’s address: 55 Charleston Road, Bendigo). 12. 13111 PTE. R.I. LEE 5TH FIELD AMBCE (19111 Robert Irwin Lee. Born in Kilcunda, Vic. RTA. NOK Wife’s address C/- Barnard Street, Bendigo) 13. 3731 DRIVER T.S. BROWN 5TH BATT.† (Thomas Sheridan Brown born in Bendigo. Died in the Field in France of Heart Failure. NOK Father’s address: Mundy Street, Bendigo). 14. 60999 PTE. J. SPENCE 5th BATT. (John Spence born in Bendigo. RTA. NOK Father’s address: 99 Talbot St, Brunswick) 15. 5127 PTE. S.A. LOY 7TH BATT. (Samuel Arthur John Loy. Born in White Hills, Bendigo. RTA Medical discharge. NOK Wife’s address C/- Hargreaves St Bendigo.) 16. 1649 PTE. A.M. HUTCHINSON 60TH BATT. (Alexander Morton Hutchison. (Note different spelling) born in Bendigo. RTA. NOK Mother’s address Wilkie Street, Bendigo). 17. 3035 PTE. R.J. FLACK 10TH – 7TH BATTs. † (Robert John Flack born in Bendigo. KIA France 17/8/1916. NOK Father’s address: Strickland Road, Bendigo). 18. 4558 PTE. J.J. O’BRIEN 60TH BATT.† (John James O’Brien born in Glenalbyn, Vic. KIA 28/9/1917. NOK Father’s address 68 Strickland Rd. Bendigo). 19. 5233 CPL. G. WHITTING MOTOR TRANSPT. COY. (George Whitting born in White Hills, Bendigo. RTA. NOK Mother’s address: 46 Baxter Street, Bendigo). 20. 5203 PTE. A.J. TATTERSALL 6TH BATTALION (Arthur James Tattersall born in Mandurang, Vic. RTA. NOK Wife’s address “Thornwell”, Bendigo East PO.) 21. 2ND LIEUT. K.G. EMONSON M.C. 38th BATT. (Keith Glanfield Emonson born in Sydney NSW. RTA – Medical discharge/ GSW head. NOK Father’s address: Strickland Road, Bendigo). 22. LIEUT. A.J. HAMPSON RAILWAY UNIT (Alfred John Hampson R/N 2300. Born in Bendigo. RTA. NOK wife’s address: 76 Addison St. Elwood, Vic). 23. 216 SIGNLR R.P. BROWN 38TH BATT † (Raymond Patrick Brown, born in Bendigo. KIA 28 May 1917. NOK. Mother’s address: 138 Mundy Street, Bendigo). 24. 15118 STAFF SGT. A. EMONSON 3RD L. H. F. AMBULANCE (Harry Allen Phipps Emonson born in Sydney NSW. RTA. NOK Father’s address Strickland Road, Bendigo, Vic). 25. 1724 CPL. L.J. CHAPPLE 5TH BATT. (Leslie John Chapple born in Bendigo. RTA. NOK Father’s address: Nolan Street, Bendigo) 26. 4557 PTE. E. O’BRIEN 60TH BATT. (Edward Charles O’ Brien, RTA. (NOK Father’s address: Strickland Rd, Bendigo). 27. 3557 SIGNLER F. H. LYALL 5TH BATT. (Francis Hubert Lyall born in Bendigo. RTA. NOK Father’s address: Strickland Rd, Bendigo). Honour Board, Bendigo East Primary School, timber backing with a white timber edging. At the top is a silver Rising Sun Badge with the dates in white "1914 & 1919". There are 27 bronze plaques, each has the Soldiers Regt Number, Name, Rank and Unit, for those that did not return there is a Cross added, if the Soldier won an award it is also added. At the bottom left hand corner is a brass plaque with details. Refer Aquisition for details. On the brass plaque, “These plaques were placed on the Avenue of trees at the school entrance on 20 December 1920. They were a memorial to those who enlisted from the Bendigo East School in the 1914 - 18 War. Mr R. J. Lee a Returned Soldier was Principal at this time”memorials-honour boards, military history-service records, metalcraft-bronze, east bendigo -
 The Beechworth Burke Museum
Animal specimen - Quoll, Trustees of the Australian Museum, 1860-1880
Four species of quoll occur in Australia: the northern, spotted-tailed, eastern and western quolls. Once, most parts of Australia were inhabited by at least one of the species.Captain Cook collected quolls along the east coast in 1770, and recorded "quoll" as their local Aboriginal name. Quolls were often seen by early settlers, who called them "native cat", "native polecat" and "spotted marten", names based on familiar European animals. Since 1770, all four species have declined dramatically in numbers. This is mainly because of habitat loss or change across Australia, and introduced predators such as foxes and cats. Quolls are carnivorous marsupials with a pointed snout, a long tail and brown to black fur distinctively spotted with white. They are lively, attractive animals, with bright eyes, a moist pink nose and many sharp teeth. Like most Australian mammals, quolls are mainly active at night. Typically, they spend the day in one of their many dens, although spotted-tailed quolls and northern quolls sometimes forage and bask in the sunshine. Their large home ranges can extend for several kilometres in each direction from a smaller core range, and the range of a male quoll often overlaps those of several females. An interesting feature of their behaviour is the use of shared latrine (toilet) sites in open spaces such as rock ledges, for marking their territory and other social functions. Male quolls travel widely during the breeding season, with mating occurring during winter. All four species have a gestation period of 21 days. Because they are marsupial mammals, their young are born tiny and undeveloped and must work their way to the pouch, where they attach themselves to a teat to feed. Only the spotted-tailed quoll has a true pouch. In the other species, the young are protected by shallow folds of skin around the teats. As the pups grow, they dangle from the mother's belly; later, she carries them on her back. Quolls reach sexual maturity at one year. They have a naturally short life span, with smaller quolls living an average of only two years, and the larger spotted-tailed quoll about four to five years. The northern quoll is particularly short-lived. This specimen is part of a collection of almost 200 animal specimens that were originally acquired as skins from various institutions across Australia, including the Australian Museum and the National Museum of Victoria, as well as individuals such amateur anthropologist Reynell Eveleigh Johns between 1860-1880. These skins were then mounted by members of the Burke Museum Committee and put-on display in the formal space of the Museum’s original exhibition hall where they continue to be on display. This display of taxidermy mounts initially served to instruct visitors to the Burke Museum of the natural world around them, today it serves as an insight into the collecting habits of the 19th century. This specimen is part of a significant and rare taxidermy mount collection in the Burke Museum. This collection is scientifically and culturally important for reminding us of how science continues to shape our understanding of the modern world. They demonstrate a capacity to hold evidence of how Australia’s fauna history existed in the past and are potentially important for future environmental research. This collection continues to be on display in the Museum and has become a key part to interpreting the collecting habits of the 19th century.Average sized quoll with brown fur with white spots on body but absence on the long tail which is furry unlike the smooth body fur. The quoll has a small had with a pointed snout lined with sharp teeth, and thin membraned ears that are slightly covered in fur. The forelegs of the quoll are slightly smaller than the hindlegs, with all four legs featuring sharp clawed paws.On mounting board: BMM5984/ On Catalogue Tag (attached to left hindleg): Native Cat./ Catalogue. Page 50./ burke museum, taxidermy, taxidermy mount, fauna, animal, animalia, reynell eveleigh johns, quoll, native cat, dasyurus -
 The Beechworth Burke Museum
Photograph
This photograph is of Robert O'Hara Burke (6 May 1821 – c. 28 June 1861) who was an Irish soldier and police officer who achieved fame as an Australian explorer. He was the leader of the ill-fated Burke and Wills expedition, which was the first expedition to cross Australia from south to north, finding a route across the continent from the settled areas of Victoria to the Gulf of Carpentaria. Prior to leading this expedition, Burke was the superintendent of Police in Beechworth from 1858-1860. The Robert O’Hara Burke Memorial Museum was named in honour of Robert O’Hara Burke after his death at Coopers Creek in 1861 during expedition. This particular image of Robert O'Hara Burke features on the 'Pioneer Board' which is currently on display in the Museum. Black and white rectangular copy of a photograph. Image is printed on gloss photographic paper and has a white unprinted boarder. Reverse: 34 / Photo credit: Burke Museum / BEECHWORTH / 46% /robert o'hara burke, pioneers of beechworth, pioneer board, beechworth, police superintendent -
 The Beechworth Burke Museum
Photograph, Macrh 1892
This photograph depicts the winners of trophies for the eight men hose and ladder and Y coupling events in Ballarat, March 1892. The individuals represented are from let to right J..Keane. / R.Spencer / R. Clements / G.Davis / F.Lloyd (captain) / H.Duncan /G.Weetman / R.Ballantyne, all wearing dress uniforms and holding nozzles and trophies. The clock pictured is this photograph is currently on display in the Falck Street of Shops display in the Burke Museum.Sepia rectangular photograph printed on matte photographic paper and mounted on boardObverse: Beechworth Fire Brigade / Winners of trophies for eight men hose and ladder and y coupling events / Ballarat, March 10th, 1892 / J..Keane. / R.Spencer / G.Davis . F.Lloyd (captain) / H.Duncan / G.Weetman / R.Ballantyneburke museum, fire brigade, sepia, photograph, emergency services, trophy, ballarat -
 The Beechworth Burke Museum
Photograph, 1877
Taken in 1877, this photograph features nine members of the Beechworth Volunteer Fire Brigade holding a cup that was awarded to the group for winning the double hose competition. The cup is currently on display in the Burke Museum's 'Street of Shops' display Report of the event in the Ovens and Murray Advertiser, 3/4/1877 - The Fire Brigade Competition was held in Beechworth at Easter 1877. The double-hose competition carried a prize of ten pounds with an entry fee of ten shillings. The task was for eight men to run with reel 200 yards. fix hydrant, run out not less than 100ft of hose, fix branch, and throw water over rope 10ft high. Run out a second line of hose, not less than 100ft, fix branch, and throw water as before. Beechwoeth first team competed against Wangaratta and Chiltern, coming first in a time of 70 seconds. Wangaratta were disqualified. Sepia rectangular photograph printed on photographic paper and mounted on boardReverse: Member of B.V.Brigade, 1877. The Trophy Cup showing in the Photo is the small cup on display in the adjacent display case./ BMM 3936burke museum, emergency services, fire brigade, fire, competition, cup, photograph -
 Flagstaff Hill Maritime Museum and Village
Photograph
HISTORY OF THE LOCH ARD The LOCH ARD belonged to the famous Loch Line which sailed many ships from England to Australia. Built in Glasgow by Barclay, Curdle and Co. in 1873, the LOCH ARD was a three-masted square rigged iron sailing ship. The ship measured 262ft 7" (79.87m) in length, 38ft (11.58m) in width, 23ft (7m) in depth and had a gross tonnage of 1693 tons. The LOCH ARD's main mast measured a massive 150ft (45.7m) in height. LOCH ARD made three trips to Australia and one trip to Calcutta before its final voyage. LOCH ARD left England on March 2, 1878, under the command of Captain Gibbs, a newly married, 29 year old. She was bound for Melbourne with a crew of 37, plus 17 passengers and a load of cargo. The general cargo reflected the affluence of Melbourne at the time. On board were straw hats, umbrella, perfumes, clay pipes, pianos, clocks, confectionary, linen and candles, as well as a heavier load of railway irons, cement, lead and copper. There were items included that intended for display in the Melbourne International Exhibition in 1880. The voyage to Port Phillip was long but uneventful. At 3am on June 1, 1878, Captain Gibbs was expecting to see land and the passengers were becoming excited as they prepared to view their new homeland in the early morning. But LOCH ARD was running into a fog which greatly reduced visibility. Captain Gibbs was becoming anxious as there was no sign of land or the Cape Otway lighthouse. At 4am the fog lifted. A man aloft announced that he could see breakers. The sheer cliffs of Victoria's west coast came into view, and Captain Gibbs realised that the ship was much closer to them than expected. He ordered as much sail to be set as time would permit and then attempted to steer the vessel out to sea. On coming head on into the wind, the ship lost momentum, the sails fell limp and LOCH ARD's bow swung back. Gibbs then ordered the anchors to be released in an attempt to hold its position. The anchors sank some 50 fathoms - but did not hold. By this time LOCH ARD was among the breakers and the tall cliffs of Mutton Bird Island rose behind the ship. Just half a mile from the coast, the ship's bow was suddenly pulled around by the anchor. The captain tried to tack out to sea, but the ship struck a reef at the base of Mutton Bird Island, near Port Campbell. Waves broke over the ship and the top deck was loosened from the hull. The masts and rigging came crashing down knocking passengers and crew overboard. When a lifeboat was finally launched, it crashed into the side of LOCH ARD and capsized. Tom Pearce, who had launched the boat, managed to cling to its overturned hull and shelter beneath it. He drifted out to sea and then on the flood tide came into what is now known as LOCH ARD Gorge. He swam to shore, bruised and dazed, and found a cave in which to shelter. Some of the crew stayed below deck to shelter from the falling rigging but drowned when the ship slipped off the reef into deeper water. Eva Carmichael had raced onto deck to find out what was happening only to be confronted by towering cliffs looming above the stricken ship. In all the chaos, Captain Gibbs grabbed Eva and said, "If you are saved Eva, let my dear wife know that I died like a sailor". That was the last Eva Carmichael saw of the captain. She was swept off the ship by a huge wave. Eva saw Tom Pearce on a small rocky beach and yelled to attract his attention. He dived in and swam to the exhausted woman and dragged her to shore. He took her to the cave and broke open case of brandy which had washed up on the beach. He opened a bottle to revive the unconscious woman. A few hours later Tom scaled a cliff in search of help. He followed hoof prints and came by chance upon two men from nearby Glenample Station three and a half miles away. In a state of exhaustion, he told the men of the tragedy. Tom returned to the gorge while the two men rode back to the station to get help. By the time they reached LOCH ARD Gorge, it was cold and dark. The two shipwreck survivors were taken to Glenample Station to recover. Eva stayed at the station for six weeks before returning to Ireland, this time by steamship. In Melbourne, Tom Pearce received a hero's welcome. He was presented with the first gold medal of the Royal Humane Society of Victoria and a £1000 cheque from the Victorian Government. Concerts were performed to honour the young man's bravery and to raise money for those who lost family in the LOCH ARD disaster. Of the 54 crew members and passengers on board, only two survived: the apprentice, Tom Pearce and the young woman passenger, Eva Carmichael, who lost all of her family in the tragedy. Ten days after the LOCH ARD tragedy, salvage rights to the wreck were sold at auction for £2,120. Cargo valued at £3,000 was salvaged and placed on the beach, but most washed back into the sea when another storm developed. The wreck of LOCH ARD still lies at the base of Mutton Bird Island. Much of the cargo has now been salvaged and some was washed up into what is now known as LOCH ARD Gorge. Cargo and artefacts have also been illegally salvaged over many years before protective legislation was introduced. One of the most unlikely pieces of cargo to have survived the shipwreck was a Minton porcelain peacock - one of only nine in the world. The peacock was destined for the Melbourne International Exhibition in 1880. It had been well packed, which gave it adequate protection during the violent storm. Today, the Minton peacock can be seen at the Flagstaff Hill Maritime Museum in Warrnambool. From Australia's most dramatic shipwreck it has now become Australia's most valuable shipwreck artefact and is one of very few 'objects' on the Victorian State Heritage Register. Flagstaff Hill’s collection of artefacts from LOCH ARD is significant for being one of the largest collections of artefacts from this shipwreck in Victoria. It is significant for its association with the shipwreck, which is on the Victorian Heritage Register (VHR S417). The collection is significant because of the relationship between the objects, as together they have a high potential to interpret the story of the LOCH ARD. The LOCH ARD collection is archaeologically significant as the remains of a large international passenger and cargo ship. The LOCH ARD collection is historically significant for representing aspects of Victoria’s shipping history and its potential to interpret sub-theme 1.5 of Victoria’s Framework of Historical Themes (living with natural processes). The collection is also historically significant for its association with the LOCH ARD, which was one of the worst and best known shipwrecks in Victoria’s history. Photograph of Loch Ard Gorge. Photograph taken some distance from the Gorge. Three men in the Gorge and outlines of steps can be seen. Right hand side of the photograph is written "Loch Ard Gorge"flagstaff hill, warrnambool, shipwrecked coast, flagstaff hill maritime museum, maritime museum, shipwreck coast, flagstaff hill maritime village, great ocean road, loch line, loch ard, captain gibbs, eva carmichael, tom pearce, glenample station, mutton bird island, loch ard gorge, photograph of loch ard gorge, photograph -
 Flagstaff Hill Maritime Museum and Village
Painting
HISTORY OF THE LOCH ARD The LOCH ARD belonged to the famous Loch Line which sailed many ships from England to Australia. Built in Glasgow by Barclay, Curdle and Co. in 1873, the LOCH ARD was a three-masted square rigged iron sailing ship. The ship measured 262ft 7" (79.87m) in length, 38ft (11.58m) in width, 23ft (7m) in depth and had a gross tonnage of 1693 tons. The LOCH ARD's main mast measured a massive 150ft (45.7m) in height. LOCH ARD made three trips to Australia and one trip to Calcutta before its final voyage. LOCH ARD left England on March 2, 1878, under the command of Captain Gibbs, a newly married, 29 year old. She was bound for Melbourne with a crew of 37, plus 17 passengers and a load of cargo. The general cargo reflected the affluence of Melbourne at the time. On board were straw hats, umbrella, perfumes, clay pipes, pianos, clocks, confectionary, linen and candles, as well as a heavier load of railway irons, cement, lead and copper. There were items included that intended for display in the Melbourne International Exhibition in 1880. The voyage to Port Phillip was long but uneventful. At 3am on June 1, 1878, Captain Gibbs was expecting to see land and the passengers were becoming excited as they prepared to view their new homeland in the early morning. But LOCH ARD was running into a fog which greatly reduced visibility. Captain Gibbs was becoming anxious as there was no sign of land or the Cape Otway lighthouse. At 4am the fog lifted. A man aloft announced that he could see breakers. The sheer cliffs of Victoria's west coast came into view, and Captain Gibbs realised that the ship was much closer to them than expected. He ordered as much sail to be set as time would permit and then attempted to steer the vessel out to sea. On coming head on into the wind, the ship lost momentum, the sails fell limp and LOCH ARD's bow swung back. Gibbs then ordered the anchors to be released in an attempt to hold its position. The anchors sank some 50 fathoms - but did not hold. By this time LOCH ARD was among the breakers and the tall cliffs of Mutton Bird Island rose behind the ship. Just half a mile from the coast, the ship's bow was suddenly pulled around by the anchor. The captain tried to tack out to sea, but the ship struck a reef at the base of Mutton Bird Island, near Port Campbell. Waves broke over the ship and the top deck was loosened from the hull. The masts and rigging came crashing down knocking passengers and crew overboard. When a lifeboat was finally launched, it crashed into the side of LOCH ARD and capsized. Tom Pearce, who had launched the boat, managed to cling to its overturned hull and shelter beneath it. He drifted out to sea and then on the flood tide came into what is now known as LOCH ARD Gorge. He swam to shore, bruised and dazed, and found a cave in which to shelter. Some of the crew stayed below deck to shelter from the falling rigging but drowned when the ship slipped off the reef into deeper water. Eva Carmichael had raced onto deck to find out what was happening only to be confronted by towering cliffs looming above the stricken ship. In all the chaos, Captain Gibbs grabbed Eva and said, "If you are saved Eva, let my dear wife know that I died like a sailor". That was the last Eva Carmichael saw of the captain. She was swept off the ship by a huge wave. Eva saw Tom Pearce on a small rocky beach and yelled to attract his attention. He dived in and swam to the exhausted woman and dragged her to shore. He took her to the cave and broke open case of brandy which had washed up on the beach. He opened a bottle to revive the unconscious woman. A few hours later Tom scaled a cliff in search of help. He followed hoof prints and came by chance upon two men from nearby Glenample Station three and a half miles away. In a state of exhaustion, he told the men of the tragedy. Tom returned to the gorge while the two men rode back to the station to get help. By the time they reached LOCH ARD Gorge, it was cold and dark. The two shipwreck survivors were taken to Glenample Station to recover. Eva stayed at the station for six weeks before returning to Ireland, this time by steamship. In Melbourne, Tom Pearce received a hero's welcome. He was presented with the first gold medal of the Royal Humane Society of Victoria and a £1000 cheque from the Victorian Government. Concerts were performed to honour the young man's bravery and to raise money for those who lost family in the LOCH ARD disaster. Of the 54 crew members and passengers on board, only two survived: the apprentice, Tom Pearce and the young woman passenger, Eva Carmichael, who lost all of her family in the tragedy. Ten days after the LOCH ARD tragedy, salvage rights to the wreck were sold at auction for £2,120. Cargo valued at £3,000 was salvaged and placed on the beach, but most washed back into the sea when another storm developed. The wreck of LOCH ARD still lies at the base of Mutton Bird Island. Much of the cargo has now been salvaged and some was washed up into what is now known as LOCH ARD Gorge. Cargo and artefacts have also been illegally salvaged over many years before protective legislation was introduced. One of the most unlikely pieces of cargo to have survived the shipwreck was a Minton porcelain peacock - one of only nine in the world. The peacock was destined for the Melbourne International Exhibition in 1880. It had been well packed, which gave it adequate protection during the violent storm. Today, the Minton peacock can be seen at the Flagstaff Hill Maritime Museum in Warrnambool. From Australia's most dramatic shipwreck it has now become Australia's most valuable shipwreck artefact and is one of very few 'objects' on the Victorian State Heritage Register. Flagstaff Hill’s collection of artefacts from LOCH ARD is significant for being one of the largest collections of artefacts from this shipwreck in Victoria. It is significant for its association with the shipwreck, which is on the Victorian Heritage Register (VHR S417). The collection is significant because of the relationship between the objects, as together they have a high potential to interpret the story of the LOCH ARD. The LOCH ARD collection is archaeologically significant as the remains of a large international passenger and cargo ship. The LOCH ARD collection is historically significant for representing aspects of Victoria’s shipping history and its potential to interpret sub-theme 1.5 of Victoria’s Framework of Historical Themes (living with natural processes). The collection is also historically significant for its association with the LOCH ARD, which was one of the worst and best known shipwrecks in Victoria’s history. Painting of The Loch Ard oil on board depicting wreck. It shows stormy sea and coastline in background. Ship appears to be capsized.flagstaff hill, warrnambool, shipwrecked coast, flagstaff hill maritime museum, maritime museum, shipwreck coast, flagstaff hill maritime village, great ocean road, loch line, loch ard, captain gibbs, eva carmichael, tom pearce, glenample station, mutton bird island, loch ard gorge, painting -
 Flagstaff Hill Maritime Museum and Village
Photograph
HISTORY OF THE LOCH ARD The LOCH ARD belonged to the famous Loch Line which sailed many ships from England to Australia. Built in Glasgow by Barclay, Curdle and Co. in 1873, the LOCH ARD was a three-masted square rigged iron sailing ship. The ship measured 262ft 7" (79.87m) in length, 38ft (11.58m) in width, 23ft (7m) in depth and had a gross tonnage of 1693 tons. The LOCH ARD's main mast measured a massive 150ft (45.7m) in height. LOCH ARD made three trips to Australia and one trip to Calcutta before its final voyage. LOCH ARD left England on March 2, 1878, under the command of Captain Gibbs, a newly married, 29 year old. She was bound for Melbourne with a crew of 37, plus 17 passengers and a load of cargo. The general cargo reflected the affluence of Melbourne at the time. On board were straw hats, umbrella, perfumes, clay pipes, pianos, clocks, confectionary, linen and candles, as well as a heavier load of railway irons, cement, lead and copper. There were items included that intended for display in the Melbourne International Exhibition in 1880. The voyage to Port Phillip was long but uneventful. At 3am on June 1, 1878, Captain Gibbs was expecting to see land and the passengers were becoming excited as they prepared to view their new homeland in the early morning. But LOCH ARD was running into a fog which greatly reduced visibility. Captain Gibbs was becoming anxious as there was no sign of land or the Cape Otway lighthouse. At 4am the fog lifted. A man aloft announced that he could see breakers. The sheer cliffs of Victoria's west coast came into view, and Captain Gibbs realised that the ship was much closer to them than expected. He ordered as much sail to be set as time would permit and then attempted to steer the vessel out to sea. On coming head on into the wind, the ship lost momentum, the sails fell limp and LOCH ARD's bow swung back. Gibbs then ordered the anchors to be released in an attempt to hold its position. The anchors sank some 50 fathoms - but did not hold. By this time LOCH ARD was among the breakers and the tall cliffs of Mutton Bird Island rose behind the ship. Just half a mile from the coast, the ship's bow was suddenly pulled around by the anchor. The captain tried to tack out to sea, but the ship struck a reef at the base of Mutton Bird Island, near Port Campbell. Waves broke over the ship and the top deck was loosened from the hull. The masts and rigging came crashing down knocking passengers and crew overboard. When a lifeboat was finally launched, it crashed into the side of LOCH ARD and capsized. Tom Pearce, who had launched the boat, managed to cling to its overturned hull and shelter beneath it. He drifted out to sea and then on the flood tide came into what is now known as LOCH ARD Gorge. He swam to shore, bruised and dazed, and found a cave in which to shelter. Some of the crew stayed below deck to shelter from the falling rigging but drowned when the ship slipped off the reef into deeper water. Eva Carmichael had raced onto deck to find out what was happening only to be confronted by towering cliffs looming above the stricken ship. In all the chaos, Captain Gibbs grabbed Eva and said, "If you are saved Eva, let my dear wife know that I died like a sailor". That was the last Eva Carmichael saw of the captain. She was swept off the ship by a huge wave. Eva saw Tom Pearce on a small rocky beach and yelled to attract his attention. He dived in and swam to the exhausted woman and dragged her to shore. He took her to the cave and broke open case of brandy which had washed up on the beach. He opened a bottle to revive the unconscious woman. A few hours later Tom scaled a cliff in search of help. He followed hoof prints and came by chance upon two men from nearby Glenample Station three and a half miles away. In a state of exhaustion, he told the men of the tragedy. Tom returned to the gorge while the two men rode back to the station to get help. By the time they reached LOCH ARD Gorge, it was cold and dark. The two shipwreck survivors were taken to Glenample Station to recover. Eva stayed at the station for six weeks before returning to Ireland, this time by steamship. In Melbourne, Tom Pearce received a hero's welcome. He was presented with the first gold medal of the Royal Humane Society of Victoria and a £1000 cheque from the Victorian Government. Concerts were performed to honour the young man's bravery and to raise money for those who lost family in the LOCH ARD disaster. Of the 54 crew members and passengers on board, only two survived: the apprentice, Tom Pearce and the young woman passenger, Eva Carmichael, who lost all of her family in the tragedy. Ten days after the LOCH ARD tragedy, salvage rights to the wreck were sold at auction for £2,120. Cargo valued at £3,000 was salvaged and placed on the beach, but most washed back into the sea when another storm developed. The wreck of LOCH ARD still lies at the base of Mutton Bird Island. Much of the cargo has now been salvaged and some was washed up into what is now known as LOCH ARD Gorge. Cargo and artefacts have also been illegally salvaged over many years before protective legislation was introduced. One of the most unlikely pieces of cargo to have survived the shipwreck was a Minton porcelain peacock - one of only nine in the world. The peacock was destined for the Melbourne International Exhibition in 1880. It had been well packed, which gave it adequate protection during the violent storm. Today, the Minton peacock can be seen at the Flagstaff Hill Maritime Museum in Warrnambool. From Australia's most dramatic shipwreck it has now become Australia's most valuable shipwreck artefact and is one of very few 'objects' on the Victorian State Heritage Register. Flagstaff Hill’s collection of artefacts from LOCH ARD is significant for being one of the largest collections of artefacts from this shipwreck in Victoria. It is significant for its association with the shipwreck, which is on the Victorian Heritage Register (VHR S417). The collection is significant because of the relationship between the objects, as together they have a high potential to interpret the story of the LOCH ARD. The LOCH ARD collection is archaeologically significant as the remains of a large international passenger and cargo ship. The LOCH ARD collection is historically significant for representing aspects of Victoria’s shipping history and its potential to interpret sub-theme 1.5 of Victoria’s Framework of Historical Themes (living with natural processes). The collection is also historically significant for its association with the LOCH ARD, which was one of the worst and best known shipwrecks in Victoria’s history. Photograph of Loch Ard Gorge c1900flagstaff hill, warrnambool, shipwrecked coast, flagstaff hill maritime museum, maritime museum, shipwreck coast, flagstaff hill maritime village, great ocean road, loch line, loch ard, captain gibbs, eva carmichael, tom pearce, glenample station, mutton bird island, loch ard gorge, photograph of loch ard gorge, photograph -
 Flagstaff Hill Maritime Museum and Village
Calendar
HISTORY OF THE LOCH ARD The LOCH ARD belonged to the famous Loch Line which sailed many ships from England to Australia. Built in Glasgow by Barclay, Curdle and Co. in 1873, the LOCH ARD was a three-masted square rigged iron sailing ship. The ship measured 262ft 7" (79.87m) in length, 38ft (11.58m) in width, 23ft (7m) in depth and had a gross tonnage of 1693 tons. The LOCH ARD's main mast measured a massive 150ft (45.7m) in height. LOCH ARD made three trips to Australia and one trip to Calcutta before its final voyage. LOCH ARD left England on March 2, 1878, under the command of Captain Gibbs, a newly married, 29 year old. She was bound for Melbourne with a crew of 37, plus 17 passengers and a load of cargo. The general cargo reflected the affluence of Melbourne at the time. On board were straw hats, umbrella, perfumes, clay pipes, pianos, clocks, confectionary, linen and candles, as well as a heavier load of railway irons, cement, lead and copper. There were items included that intended for display in the Melbourne International Exhibition in 1880. The voyage to Port Phillip was long but uneventful. At 3am on June 1, 1878, Captain Gibbs was expecting to see land and the passengers were becoming excited as they prepared to view their new homeland in the early morning. But LOCH ARD was running into a fog which greatly reduced visibility. Captain Gibbs was becoming anxious as there was no sign of land or the Cape Otway lighthouse. At 4am the fog lifted. A man aloft announced that he could see breakers. The sheer cliffs of Victoria's west coast came into view, and Captain Gibbs realised that the ship was much closer to them than expected. He ordered as much sail to be set as time would permit and then attempted to steer the vessel out to sea. On coming head on into the wind, the ship lost momentum, the sails fell limp and LOCH ARD's bow swung back. Gibbs then ordered the anchors to be released in an attempt to hold its position. The anchors sank some 50 fathoms - but did not hold. By this time LOCH ARD was among the breakers and the tall cliffs of Mutton Bird Island rose behind the ship. Just half a mile from the coast, the ship's bow was suddenly pulled around by the anchor. The captain tried to tack out to sea, but the ship struck a reef at the base of Mutton Bird Island, near Port Campbell. Waves broke over the ship and the top deck was loosened from the hull. The masts and rigging came crashing down knocking passengers and crew overboard. When a lifeboat was finally launched, it crashed into the side of LOCH ARD and capsized. Tom Pearce, who had launched the boat, managed to cling to its overturned hull and shelter beneath it. He drifted out to sea and then on the flood tide came into what is now known as LOCH ARD Gorge. He swam to shore, bruised and dazed, and found a cave in which to shelter. Some of the crew stayed below deck to shelter from the falling rigging but drowned when the ship slipped off the reef into deeper water. Eva Carmichael had raced onto deck to find out what was happening only to be confronted by towering cliffs looming above the stricken ship. In all the chaos, Captain Gibbs grabbed Eva and said, "If you are saved Eva, let my dear wife know that I died like a sailor". That was the last Eva Carmichael saw of the captain. She was swept off the ship by a huge wave. Eva saw Tom Pearce on a small rocky beach and yelled to attract his attention. He dived in and swam to the exhausted woman and dragged her to shore. He took her to the cave and broke open case of brandy which had washed up on the beach. He opened a bottle to revive the unconscious woman. A few hours later Tom scaled a cliff in search of help. He followed hoof prints and came by chance upon two men from nearby Glenample Station three and a half miles away. In a state of exhaustion, he told the men of the tragedy. Tom returned to the gorge while the two men rode back to the station to get help. By the time they reached LOCH ARD Gorge, it was cold and dark. The two shipwreck survivors were taken to Glenample Station to recover. Eva stayed at the station for six weeks before returning to Ireland, this time by steamship. In Melbourne, Tom Pearce received a hero's welcome. He was presented with the first gold medal of the Royal Humane Society of Victoria and a £1000 cheque from the Victorian Government. Concerts were performed to honour the young man's bravery and to raise money for those who lost family in the LOCH ARD disaster. Of the 54 crew members and passengers on board, only two survived: the apprentice, Tom Pearce and the young woman passenger, Eva Carmichael, who lost all of her family in the tragedy. Ten days after the LOCH ARD tragedy, salvage rights to the wreck were sold at auction for £2,120. Cargo valued at £3,000 was salvaged and placed on the beach, but most washed back into the sea when another storm developed. The wreck of LOCH ARD still lies at the base of Mutton Bird Island. Much of the cargo has now been salvaged and some was washed up into what is now known as LOCH ARD Gorge. Cargo and artefacts have also been illegally salvaged over many years before protective legislation was introduced. One of the most unlikely pieces of cargo to have survived the shipwreck was a Minton porcelain peacock - one of only nine in the world. The peacock was destined for the Melbourne International Exhibition in 1880. It had been well packed, which gave it adequate protection during the violent storm. Today, the Minton peacock can be seen at the Flagstaff Hill Maritime Museum in Warrnambool. From Australia's most dramatic shipwreck it has now become Australia's most valuable shipwreck artefact and is one of very few 'objects' on the Victorian State Heritage Register. Flagstaff Hill’s collection of artefacts from LOCH ARD is significant for being one of the largest collections of artefacts from this shipwreck in Victoria. It is significant for its association with the shipwreck, which is on the Victorian Heritage Register (VHR S417). The collection is significant because of the relationship between the objects, as together they have a high potential to interpret the story of the LOCH ARD. The LOCH ARD collection is archaeologically significant as the remains of a large international passenger and cargo ship. The LOCH ARD collection is historically significant for representing aspects of Victoria’s shipping history and its potential to interpret sub-theme 1.5 of Victoria’s Framework of Historical Themes (living with natural processes). The collection is also historically significant for its association with the LOCH ARD, which was one of the worst and best known shipwrecks in Victoria’s history. Calendar printed by Terang Express for December 1923 with picture of Loch Ard Gorge and survivors of wreck and also story of the episode. Has some large tears in it.flagstaff hill, warrnambool, shipwrecked coast, flagstaff hill maritime museum, maritime museum, shipwreck coast, flagstaff hill maritime village, great ocean road, loch line, loch ard, captain gibbs, eva carmichael, tom pearce, glenample station, mutton bird island, loch ard gorge, calendar, terang express -
 Flagstaff Hill Maritime Museum and Village
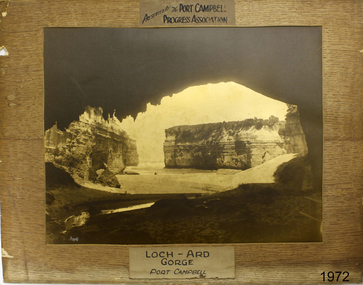
Photograph - Coastal Scene, Foyle Photographic Studio, Loch Ard Gorge Port Campbell, 1889-1919
The photograph shows the popular tourist attraction, Loch Ard Gorge, which is located along the Great Ocean Road in Victoria, near Port Campbell. The gorge is named after the famous sailing ship, the LOCH ARD, that was wrecked there in 1878. Only two of the 54 passengers and crew survived. FOYLE “Foyle” written on the photograph is the name of Foyle’s Photographic studio. At the time of the photograph, the studio was owned by both Charles and Lilian Foyle (sometimes known as Lillian or Lily), either of whom could have taken this photograph. They also worked together at a later date on the photographs, sketches and paintings of the famous and historical Pioneers’ Honour Board, which is currently on view in the Warrnambool Library. Foyles Photography was the studio of James Charles Foyle. He owned “Foyle’s Photo Card Studios” in Liebig St, Warrnambool, which operated between 1889 – 1919. A letter to the editor (by Mr Edward Vidler) in the Melbourne Argus, 3rd August 1907, mentions that in that year Warrnambool would celebrate the 60th anniversary of its proclamation as a town, and that talented local artist Miss Lily Foyle would paint 200 portraits in watercolour of the pioneers who settled in the district prior to 1860. The Pioneer Honour Board can still be seen on display in the Warrnambool Library. In the Warrnambool Standard, Dec. 1917, “Mr Foyle’s studio was awarded the contract to decorate rail cars on newly opened Trans-Continental railway, assisted by his sister, Miss Findlay.” HISTORY OF THE LOCH ARD The LOCH ARD belonged to the famous Loch Line which sailed many ships from England to Australia. Built-in Glasgow by Barclay, Curdle and Co. in 1873, the LOCH ARD was a three-masted square-rigged iron sailing ship. The ship measured 262ft 7" (79.87m) in length, 38ft (11.58m) in width, 23ft (7m) in depth and had a gross tonnage of 1693 tons. The LOCH ARD's main mast measured a massive 150ft (45.7m) in height. LOCH ARD made three trips to Australia and one trip to Calcutta before its final voyage. LOCH ARD left England on March 2, 1878, under the command of Captain Gibbs, a newly married, 29-year-old. She was bound for Melbourne with a crew of 37, plus 17 passengers and a load of cargo. The general cargo reflected the affluence of Melbourne at the time. Onboard were straw hats, umbrella, perfumes, clay pipes, pianos, clocks, confectionary, linen and candles, as well as a heavier load of railway irons, cement, lead and copper. There were items included that intended for display in the Melbourne International Exhibition in 1880. The voyage to Port Phillip was long but uneventful. At 3 am on June 1, 1878, Captain Gibbs was expecting to see land and the passengers were becoming excited as they prepared to view their new homeland in the early morning. But LOCH ARD was running into a fog which greatly reduced visibility. Captain Gibbs was becoming anxious as there was no sign of land or the Cape Otway lighthouse. At 4 am the fog lifted. A man aloft announced that he could see breakers. The sheer cliffs of Victoria's west coast came into view, and Captain Gibbs realised that the ship was much closer to them than expected. He ordered as much sail to be set as time would permit and then attempted to steer the vessel out to sea. On coming head-on into the wind, the ship lost momentum, the sails fell limp and LOCH ARD's bow swung back. Gibbs then ordered the anchors to be released in an attempt to hold its position. The anchors sank some 50 fathoms - but did not hold. By this time LOCH ARD was among the breakers and the tall cliffs of Mutton Bird Island rose behind the ship. Just half a mile from the coast, the ship's bow was suddenly pulled around by the anchor. The captain tried to tack out to sea, but the ship struck a reef at the base of Mutton Bird Island, near Port Campbell. Waves broke over the ship and the top deck was loosened from the hull. The masts and rigging came crashing down knocking passengers and crew overboard. When a lifeboat was finally launched, it crashed into the side of LOCH ARD and capsized. Tom Pearce, who had launched the boat, managed to cling to its overturned hull and shelter beneath it. He drifted out to sea and then on the flood tide came into what is now known as LOCH ARD Gorge. He swam to shore, bruised and dazed, and found a cave in which to shelter. Some of the crew stayed below deck to shelter from the falling rigging but drowned when the ship slipped off the reef into deeper water. Eva Carmichael had raced onto the deck to find out what was happening only to be confronted by towering cliffs looming above the stricken ship. In all the chaos, Captain Gibbs grabbed Eva and said, "If you are saved Eva, let my dear wife know that I died like a sailor". That was the last Eva Carmichael saw of the captain. She was swept off the ship by a huge wave. Eva saw Tom Pearce on a small rocky beach and yelled to attract his attention. He dived in and swam to the exhausted woman and dragged her to shore. He took her to the cave and broke and opened the case of brandy, which had washed up on the beach. He opened a bottle to revive the unconscious woman. A few hours later Tom scaled a cliff in search of help. He followed hoof prints and came by chance upon two men from nearby Glenample Station three and a half miles away. In a state of exhaustion, he told the men of the tragedy. Tom returned to the gorge while the two men rode back to the station to get help. By the time they reached LOCH ARD Gorge, it was cold and dark. The two shipwreck survivors were taken to Glenample Station to recover. Eva stayed at the station for six weeks before returning to Ireland, this time by steamship. In Melbourne, Tom Pearce received a hero's welcome. He was presented with the first gold medal of the Royal Humane Society of Victoria and a £1000 cheque from the Victorian Government. Concerts were performed to honour the young man's bravery and to raise money for those who lost family in the LOCH ARD disaster. Of the 54 crew members and passengers on board, only two survived: the apprentice, Tom Pearce and the young woman passenger, Eva Carmichael, who lost all of her family in the tragedy. Ten days after the LOCH ARD tragedy, salvage rights to the wreck were sold at auction for £2,120. Cargo valued at £3,000 was salvaged and placed on the beach, but most washed back into the sea when another storm developed. The wreck of LOCH ARD still lies at the base of Mutton Bird Island. Much of the cargo has now been salvaged, and some of it was washed up into what is now known as LOCH ARD Gorge. Cargo and artefacts have also been illegally salvaged over many years before protective legislation was introduced. One of the most unlikely pieces of cargo to have survived the shipwreck was a Minton porcelain peacock - one of only nine in the world. The peacock was destined for the Melbourne International Exhibition in 1880. It had been well packed, which gave it adequate protection during the violent storm. Today, the Minton peacock can be seen at the Flagstaff Hill Maritime Museum in Warrnambool. From Australia's most dramatic shipwreck it has now become Australia's most valuable shipwreck artefact and is one of very few 'objects' on the Victorian State Heritage Register.Flagstaff Hill’s collection of artefacts from LOCH ARD is significant for being one of the largest collections of artefacts from this shipwreck in Victoria. It is significant for its association with the shipwreck, which is on the Victorian Heritage Register (VHR S417). The collection is significant because of the relationship between the objects, as together they have a high potential to interpret the story of the LOCH ARD. The LOCH ARD collection is archaeologically significant as the remains of a large international passenger and cargo ship. The LOCH ARD collection is historically significant for representing aspects of Victoria’s shipping history and its potential to interpret sub-theme 1.5 of Victoria’s Framework of Historical Themes (living with natural processes). The collection is also historically significant for its association with the LOCH ARD, which was one of the worst and best-known shipwrecks in Victoria’s history. Foyle's photographs date from the late 19th century to the early 20th century, representing a time of growth in the Warrnambool district and a time when the still relatively new technology of photography was more available to the community.Photograph of Loch Ard Gorge. This sepia coloured rectangular photograph is mounted on a brown cardboard backing that has a wood grain pattern. The photograph has an inscription above it, below it, and in the bottom left corner. It was made for the purpose of a presentation by the Port Campbell Progress Association. Printed above the photograph "PRESENTED BY THE PORT CAMPBELL / PROGRESS ASSOCIATION". Printed below the photograph "LOCH ARD GORGE / PORT CAMPBELL". Hand written on bottom left corner "Foyle". flagstaff hill, warrnambool, shipwrecked coast, flagstaff hill maritime museum, maritime museum, shipwreck coast, flagstaff hill maritime village, great ocean road, loch line, loch ard, captain gibbs, eva carmichael, tom pearce, glenample station, mutton bird island, loch ard gorge, photograph, port campbell, port campbell progress association, foyle photograph, foyle photographic studio warrnambool, warrnambool photo studio -
 Flagstaff Hill Maritime Museum and Village
Spoon, circa 1878
This tea spoon is from the wreck of the LOCH ARD, a Loch Line ship of 1,693 tons which sailed from Gravesend, London, on 2 March 1878 with 17 passengers and a crew of 36 under Captain George Gibbs. “The intention was to discharge cargo in Melbourne, before returning to London via the Horn with wool and wheat”. Instead, on 1 June 1878, after 90 days at sea, she struck the sandstone cliffs of Mutton Bird Island on the south west coast of Victoria, and sank with the loss of 52 lives and all her cargo. The manifest of the LOCH ARD listed an array of manufactured goods and bulk metals being exported to the Colony of Victoria, with a declared value of £53,700. (202 bills of lading show an actual invoice value of £68, 456, with insurance underwriting to £30,000 of all cargo). Included in the manifest is the item of “Tin hardware & cutlery £7,530”. This teaspoon is one of 482 similar items of electro-plated cutlery from the LOCH ARD site, comprising spoons and forks of various sizes but all sharing the same general shape or design and metallic composition. 49 of these pieces display a legible makers’ mark — the initials “W” and “P” placed within a raised diamond outline, which is in turn contained within a sunken crown shape — identifying the manufacturer as William Page & Co of Birmingham. An electroplater’s makers’ marks, unlike sterling silver hallmarks, are not consistent identifiers of quality or date and place of manufacture. A similar line of five impressions was usually made to impress the consumer with an implication of industry standards, but what each one actually signified was not regulated and so they varied according to the whim of the individual foundry. In this case, the maker’s marks are often obscured by sedimentary accretion or removed by corrosion after a century of submersion in the ocean. However sufficient detail has survived to indicate that these samples of electro-plated cutlery probably originated from the same consignment in the LOCH ARD’s cargo. The following descriptions of maker’s marks are drawn from 255 tea spoons, 125 dessert spoons, and 99 table forks. These marks are clearly visible in 66 instances, while the same sequence of general outlines, or depression shapes, is discernible in another 166 examples. 1. A recessed Crown containing a raised Diamond outline and the initials “W” and “P” (the recognised trademark of William Page & Co) 2. An impressed Ellipse containing a raised, pivoted, Triangle in its lower part and bearing a Resurrection Cross on its upper section (a possible dissenting church symbol reflecting religious affiliation); OR a rounded Square impression containing a raised, ‘lazy’, letter “B” (possibly mimicking sterling silver hallmark signifying city of manufacture i.e. Birmingham) 3. An impressed rounded Square filled with a raised Maltese Cross (the base metal composite of nickel silver was also known as ‘German silver’ after its Berlin inventors in 1823) 4. A recessed Circle containing a Crab or Scarab Beetle image; OR a recessed Circle containing a rotated ‘fleur de lys’ or ‘fasces’ design 5. A depressed Diamond shape enclosing a large raised letter “R” and a small raised letter “D” (mimicking the U.K. Patent Office stamp which abbreviated the term ‘registered’ to “RD”, but also included date and class of patent) Suggested trade names for William Page & Co’s particular blend of brass plating are ‘roman silver’ or ‘silverite’. This copper alloy polishes to a lustrous gold when new, discolouring to a murky grey with greenish hue when neglected. HISTORY OF THE LOCH ARD The LOCH ARD belonged to the famous Loch Line which sailed many ships from England to Australia. Built in Glasgow by Barclay, Curdle and Co. in 1873, the LOCH ARD was a three-masted square rigged iron sailing ship. The ship measured 262ft 7" (79.87m) in length, 38ft (11.58m) in width, 23ft (7m) in depth and had a gross tonnage of 1693 tons. The LOCH ARD's main mast measured a massive 150ft (45.7m) in height. LOCH ARD made three trips to Australia and one trip to Calcutta before its final voyage. LOCH ARD left England on March 2, 1878, under the command of Captain Gibbs, a newly married, 29 year old. She was bound for Melbourne with a crew of 37, plus 17 passengers and a load of cargo. The general cargo reflected the affluence of Melbourne at the time. On board were straw hats, umbrella, perfumes, clay pipes, pianos, clocks, confectionary, linen and candles, as well as a heavier load of railway irons, cement, lead and copper. There were items included that intended for display in the Melbourne International Exhibition in 1880. The voyage to Port Phillip was long but uneventful. At 3am on June 1, 1878, Captain Gibbs was expecting to see land and the passengers were becoming excited as they prepared to view their new homeland in the early morning. But LOCH ARD was running into a fog which greatly reduced visibility. Captain Gibbs was becoming anxious as there was no sign of land or the Cape Otway lighthouse. At 4am the fog lifted. A man aloft announced that he could see breakers. The sheer cliffs of Victoria's west coast came into view, and Captain Gibbs realised that the ship was much closer to them than expected. He ordered as much sail to be set as time would permit and then attempted to steer the vessel out to sea. On coming head on into the wind, the ship lost momentum, the sails fell limp and LOCH ARD's bow swung back. Gibbs then ordered the anchors to be released in an attempt to hold its position. The anchors sank some 50 fathoms - but did not hold. By this time LOCH ARD was among the breakers and the tall cliffs of Mutton Bird Island rose behind the ship. Just half a mile from the coast, the ship's bow was suddenly pulled around by the anchor. The captain tried to tack out to sea, but the ship struck a reef at the base of Mutton Bird Island, near Port Campbell. Waves broke over the ship and the top deck was loosened from the hull. The masts and rigging came crashing down knocking passengers and crew overboard. When a lifeboat was finally launched, it crashed into the side of LOCH ARD and capsized. Tom Pearce, who had launched the boat, managed to cling to its overturned hull and shelter beneath it. He drifted out to sea and then on the flood tide came into what is now known as LOCH ARD Gorge. He swam to shore, bruised and dazed, and found a cave in which to shelter. Some of the crew stayed below deck to shelter from the falling rigging but drowned when the ship slipped off the reef into deeper water. Eva Carmichael had raced onto deck to find out what was happening only to be confronted by towering cliffs looming above the stricken ship. In all the chaos, Captain Gibbs grabbed Eva and said, "If you are saved Eva, let my dear wife know that I died like a sailor". That was the last Eva Carmichael saw of the captain. She was swept off the ship by a huge wave. Eva saw Tom Pearce on a small rocky beach and yelled to attract his attention. He dived in and swam to the exhausted woman and dragged her to shore. He took her to the cave and broke open case of brandy which had washed up on the beach. He opened a bottle to revive the unconscious woman. A few hours later Tom scaled a cliff in search of help. He followed hoof prints and came by chance upon two men from nearby Glenample Station three and a half miles away. In a state of exhaustion, he told the men of the tragedy. Tom returned to the gorge while the two men rode back to the station to get help. By the time they reached LOCH ARD Gorge, it was cold and dark. The two shipwreck survivors were taken to Glenample Station to recover. Eva stayed at the station for six weeks before returning to Ireland, this time by steamship. In Melbourne, Tom Pearce received a hero's welcome. He was presented with the first gold medal of the Royal Humane Society of Victoria and a £1000 cheque from the Victorian Government. Concerts were performed to honour the young man's bravery and to raise money for those who lost family in the LOCH ARD disaster. Of the 54 crew members and passengers on board, only two survived: the apprentice, Tom Pearce and the young woman passenger, Eva Carmichael, who lost all of her family in the tragedy. Ten days after the LOCH ARD tragedy, salvage rights to the wreck were sold at auction for £2,120. Cargo valued at £3,000 was salvaged and placed on the beach, but most washed back into the sea when another storm developed. The wreck of LOCH ARD still lies at the base of Mutton Bird Island. Much of the cargo has now been salvaged and some was washed up into what is now known as LOCH ARD Gorge. Cargo and artefacts have also been illegally salvaged over many years before protective legislation was introduced. One of the most unlikely pieces of cargo to have survived the shipwreck was a Minton porcelain peacock - one of only seven in the world. The peacock was destined for the Melbourne International Exhibition in 1880. It had been well packed, which gave it adequate protection during the violent storm. Today, the Minton peacock can be seen at the Flagstaff Hill Maritime Museum in Warrnambool. From Australia's most dramatic shipwreck it has now become Australia's most valuable shipwreck artefact and is one of very few 'objects' on the Victorian State Heritage Register. The LOCH ARD shipwreck is of State significance – Victorian Heritage Register S 417. Flagstaff Hill’s collection of artefacts from LOCH ARD is significant for being one of the largest collections of artefacts from this shipwreck in Victoria. It is significant for its association with the shipwreck, which is on the Victorian Heritage Register (VHR S417). The collection is significant because of the relationship between the objects, as together they have a high potential to interpret the story of the LOCH ARD. The LOCH ARD collection is archaeologically significant as the remains of a large international passenger and cargo ship. The LOCH ARD collection is historically significant for representing aspects of Victoria’s shipping history and its potential to interpret sub-theme 1.5 of Victoria’s Framework of Historical Themes (living with natural processes). The collection is also historically significant for its association with the LOCH ARD, which was one of the worst and best known shipwrecks in Victoria’s history. Unrestored tea spoon from the wreck of the LOCH ARD. The spoon design has a flattened fiddle-back handle, with a thin stem or shank, flared collar, and elongated bowl. The spoons metallic composition is a thin layer of brass alloy which has partially corroded back to a nickel-silver base metal. Approximately 30%of original electroplating remains. Small amount of concretion on stem.flagstaff hill, warrnambool, shipwrecked coast, flagstaff hill maritime museum, maritime museum, shipwreck coast, flagstaff hill maritime village, great ocean road, loch line, loch ard, captain gibbs, eva carmichael, tom pearce, glenample station, mutton bird island, loch ard gorge, electroplated cutlery, loch ard shipwreck, nickel silver, william page & co, birmingham, brass plating, makers marks -
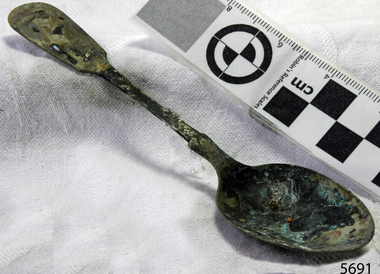 Flagstaff Hill Maritime Museum and Village
Spoon, circa 1878
This tea spoon is from the wreck of the LOCH ARD, a Loch Line ship of 1,693 tons which sailed from Gravesend, London, on 2 March 1878 with 17 passengers and a crew of 36 under Captain George Gibbs. “The intention was to discharge cargo in Melbourne, before returning to London via the Horn with wool and wheat”. Instead, on 1 June 1878, after 90 days at sea, she struck the sandstone cliffs of Mutton Bird Island on the south west coast of Victoria, and sank with the loss of 52 lives and all her cargo. The manifest of the LOCH ARD listed an array of manufactured goods and bulk metals being exported to the Colony of Victoria, with a declared value of £53,700. (202 bills of lading show an actual invoice value of £68, 456, with insurance underwriting to £30,000 of all cargo). Included in the manifest is the item of “Tin hardware & cutlery £7,530”. This teaspoon is one of 482 similar items of electro-plated cutlery from the LOCH ARD site, comprising spoons and forks of various sizes but all sharing the same general shape or design and metallic composition. 49 of these pieces display a legible makers’ mark — the initials “W” and “P” placed within a raised diamond outline, which is in turn contained within a sunken crown shape — identifying the manufacturer as William Page & Co of Birmingham. An electroplater’s makers’ marks, unlike sterling silver hallmarks, are not consistent identifiers of quality or date and place of manufacture. A similar line of five impressions was usually made to impress the consumer with an implication of industry standards, but what each one actually signified was not regulated and so they varied according to the whim of the individual foundry. In this case, the maker’s marks are often obscured by sedimentary accretion or removed by corrosion after a century of submersion in the ocean. However sufficient detail has survived to indicate that these samples of electro-plated cutlery probably originated from the same consignment in the LOCH ARD’s cargo. The following descriptions of maker’s marks are drawn from 255 tea spoons, 125 dessert spoons, and 99 table forks. These marks are clearly visible in 66 instances, while the same sequence of general outlines, or depression shapes, is discernible in another 166 examples. 1. A recessed Crown containing a raised Diamond outline and the initials “W” and “P” (the recognised trademark of William Page & Co) 2. An impressed Ellipse containing a raised, pivoted, Triangle in its lower part and bearing a Resurrection Cross on its upper section (a possible dissenting church symbol reflecting religious affiliation); OR a rounded Square impression containing a raised, ‘lazy’, letter “B” (possibly mimicking sterling silver hallmark signifying city of manufacture i.e. Birmingham) 3. An impressed rounded Square filled with a raised Maltese Cross (the base metal composite of nickel silver was also known as ‘German silver’ after its Berlin inventors in 1823) 4. A recessed Circle containing a Crab or Scarab Beetle image; OR a recessed Circle containing a rotated ‘fleur de lys’ or ‘fasces’ design 5. A depressed Diamond shape enclosing a large raised letter “R” and a small raised letter “D” (mimicking the U.K. Patent Office stamp which abbreviated the term ‘registered’ to “RD”, but also included date and class of patent) Suggested trade names for William Page & Co’s particular blend of brass plating are ‘roman silver’ or ‘silverite’. This copper alloy polishes to a lustrous gold when new, discolouring to a murky grey with greenish hue when neglected. HISTORY OF THE LOCH ARD The LOCH ARD belonged to the famous Loch Line which sailed many ships from England to Australia. Built in Glasgow by Barclay, Curdle and Co. in 1873, the LOCH ARD was a three-masted square rigged iron sailing ship. The ship measured 262ft 7" (79.87m) in length, 38ft (11.58m) in width, 23ft (7m) in depth and had a gross tonnage of 1693 tons. The LOCH ARD's main mast measured a massive 150ft (45.7m) in height. LOCH ARD made three trips to Australia and one trip to Calcutta before its final voyage. LOCH ARD left England on March 2, 1878, under the command of Captain Gibbs, a newly married, 29 year old. She was bound for Melbourne with a crew of 37, plus 17 passengers and a load of cargo. The general cargo reflected the affluence of Melbourne at the time. On board were straw hats, umbrella, perfumes, clay pipes, pianos, clocks, confectionary, linen and candles, as well as a heavier load of railway irons, cement, lead and copper. There were items included that intended for display in the Melbourne International Exhibition in 1880. The voyage to Port Phillip was long but uneventful. At 3am on June 1, 1878, Captain Gibbs was expecting to see land and the passengers were becoming excited as they prepared to view their new homeland in the early morning. But LOCH ARD was running into a fog which greatly reduced visibility. Captain Gibbs was becoming anxious as there was no sign of land or the Cape Otway lighthouse. At 4am the fog lifted. A man aloft announced that he could see breakers. The sheer cliffs of Victoria's west coast came into view, and Captain Gibbs realised that the ship was much closer to them than expected. He ordered as much sail to be set as time would permit and then attempted to steer the vessel out to sea. On coming head on into the wind, the ship lost momentum, the sails fell limp and LOCH ARD's bow swung back. Gibbs then ordered the anchors to be released in an attempt to hold its position. The anchors sank some 50 fathoms - but did not hold. By this time LOCH ARD was among the breakers and the tall cliffs of Mutton Bird Island rose behind the ship. Just half a mile from the coast, the ship's bow was suddenly pulled around by the anchor. The captain tried to tack out to sea, but the ship struck a reef at the base of Mutton Bird Island, near Port Campbell. Waves broke over the ship and the top deck was loosened from the hull. The masts and rigging came crashing down knocking passengers and crew overboard. When a lifeboat was finally launched, it crashed into the side of LOCH ARD and capsized. Tom Pearce, who had launched the boat, managed to cling to its overturned hull and shelter beneath it. He drifted out to sea and then on the flood tide came into what is now known as LOCH ARD Gorge. He swam to shore, bruised and dazed, and found a cave in which to shelter. Some of the crew stayed below deck to shelter from the falling rigging but drowned when the ship slipped off the reef into deeper water. Eva Carmichael had raced onto deck to find out what was happening only to be confronted by towering cliffs looming above the stricken ship. In all the chaos, Captain Gibbs grabbed Eva and said, "If you are saved Eva, let my dear wife know that I died like a sailor". That was the last Eva Carmichael saw of the captain. She was swept off the ship by a huge wave. Eva saw Tom Pearce on a small rocky beach and yelled to attract his attention. He dived in and swam to the exhausted woman and dragged her to shore. He took her to the cave and broke open case of brandy which had washed up on the beach. He opened a bottle to revive the unconscious woman. A few hours later Tom scaled a cliff in search of help. He followed hoof prints and came by chance upon two men from nearby Glenample Station three and a half miles away. In a state of exhaustion, he told the men of the tragedy. Tom returned to the gorge while the two men rode back to the station to get help. By the time they reached LOCH ARD Gorge, it was cold and dark. The two shipwreck survivors were taken to Glenample Station to recover. Eva stayed at the station for six weeks before returning to Ireland, this time by steamship. In Melbourne, Tom Pearce received a hero's welcome. He was presented with the first gold medal of the Royal Humane Society of Victoria and a £1000 cheque from the Victorian Government. Concerts were performed to honour the young man's bravery and to raise money for those who lost family in the LOCH ARD disaster. Of the 54 crew members and passengers on board, only two survived: the apprentice, Tom Pearce and the young woman passenger, Eva Carmichael, who lost all of her family in the tragedy. Ten days after the LOCH ARD tragedy, salvage rights to the wreck were sold at auction for £2,120. Cargo valued at £3,000 was salvaged and placed on the beach, but most washed back into the sea when another storm developed. The wreck of LOCH ARD still lies at the base of Mutton Bird Island. Much of the cargo has now been salvaged and some was washed up into what is now known as LOCH ARD Gorge. Cargo and artefacts have also been illegally salvaged over many years before protective legislation was introduced. One of the most unlikely pieces of cargo to have survived the shipwreck was a Minton porcelain peacock - one of only seven in the world. The peacock was destined for the Melbourne International Exhibition in 1880. It had been well packed, which gave it adequate protection during the violent storm. Today, the Minton peacock can be seen at the Flagstaff Hill Maritime Museum in Warrnambool. From Australia's most dramatic shipwreck it has now become Australia's most valuable shipwreck artefact and is one of very few 'objects' on the Victorian State Heritage Register. The LOCH ARD shipwreck is of State significance – Victorian Heritage Register S 417. Flagstaff Hill’s collection of artefacts from LOCH ARD is significant for being one of the largest collections of artefacts from this shipwreck in Victoria. It is significant for its association with the shipwreck, which is on the Victorian Heritage Register (VHR S417). The collection is significant because of the relationship between the objects, as together they have a high potential to interpret the story of the LOCH ARD. The LOCH ARD collection is archaeologically significant as the remains of a large international passenger and cargo ship. The LOCH ARD collection is historically significant for representing aspects of Victoria’s shipping history and its potential to interpret sub-theme 1.5 of Victoria’s Framework of Historical Themes (living with natural processes). The collection is also historically significant for its association with the LOCH ARD, which was one of the worst and best known shipwrecks in Victoria’s history. Unrestored tea spoon from the wreck of the LOCH ARD. The spoon design has a flattened fiddle-back handle, with a thin stem or shank, flared collar, and elongated bowl. The spoons metallic composition is a thin layer of brass alloy which has partially corroded back to a nickel-silver base metal. Only 10% of original electroplating remains with some verdigris. No marks visible.flagstaff hill, warrnambool, shipwrecked coast, flagstaff hill maritime museum, maritime museum, shipwreck coast, flagstaff hill maritime village, great ocean road, loch line, loch ard, captain gibbs, eva carmichael, tom pearce, glenample station, mutton bird island, loch ard gorge, electroplated cutlery, loch ard shipwreck, nickel silver, william page & co, birmingham, brass plating, makers marks