Showing 180 items
matching mtb
-
 Melbourne Tram Museum
Album - Ron Wilson 46 Photographs -1987 to 1999
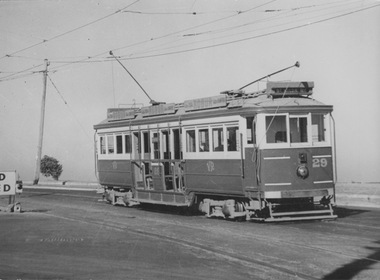
Photo - see pdf file for further information. Number Brief Description RWC1 SW6 897 in MTA livery on Rt 5 in Swanston St outside Flinders St Station RWC2 WS6 965 as an advertising car for Next Flight on Rt 15 in Swanston St outside Flinders St Station RWC3 W1 427 on tourist Service in Swanston St at the city shunt. Photo taken from the signal box RWC4 SW5 814 as an advertising car for the RVIB in Park St near St Kilda Rd RWC5 PMTT foundation stone for Kew Depot RWC6 SW5 682 as an arts car in Coldblo Rd in Malvern Depot RWC7 SW5 724 as an arts car on Rt 6 in St Kilda Rd at Domain Rd RWC8 SW6 866 on Rt 6 and a Z 107 in MTA livery in Swanston St outside Flinders St Station RWC9 W5 821 with 2 doors in MTA livery in Victoria Prd at Brunswick St RWC10 782 at Bylands RWC11 SW5 847 in MTA livery turns into Preston Workshops during track repairs RWC12 Scrubber 10W in St Kilda Rd outside the arts centre RWC13 W5 685 on the fan of South Melb Depot RWC14 SW6 880 on Rt 8 in St Kilda Rd outside Flinders St Station RWC15 W6 997 on Rt 15 in St Kilda Rd outside Flinders St Station RWC16 W6 971 in Victoria Prd crossing Nicholson St RWC17 SW5 846 on Rt 6 in Swanston St at Flinders St RWC18 SW6 852 on Rt 72 in Swanston St at Flinders St RWC19 Z 217 on Rt 22 as an advertising car for Qantas in Swanston St outside Flinders St Station RWC20 Z 230 on Rt 1 in Swanston St at Little Lonsdale St RWC21 W7 1011 on Rt 8 as an advertising car for St George Bank in St Kilda Rd outside the Arts Centre RWC22 Z 220 as an advertising car foe Telstra in Swanston St at Flinders Lane RWC23 SW6 854 on RT passes 946 in Swanston St outside Flinders St Station RWC24 Z 56 in MTA livery in Swanston St outside Flinders St Station RWC25 SW6 930 in MTA Livery at the end of the siding in the South Melb per way depot RWC26 SW6 954 on Rt 69 at the St Kilda Terminus RWC27 SW6 948 on a semi-trailer in Preston Workshops RWC28 Z 159 in MTA Livery in Elizabeth St at Victoria St RWC29 B2 2003 on Rt 59 in Elizabeth St at Victoria St RWC30 A1 235 at the Batman Ave Terminus RWC31 Z 191 at the Batman Ave Terminus RWC32 SW6 998 on Rt 15 in MTA livery in Swanston St at Collins St RWC33 SW6 925 on Rt 8 in MTA livery in Swanston St at Collins St RWC34 SW6 993 on Rt 67 in MTA livery in Swanston St at Collins St RWC35 SW5 846 on Rt 6 in MTA livery in Swanston St at Collins St RWC36 W2 643 at Bylands RWC37 A1 233 at the Batman Ave Terminus RWC38 SW6 883 on Rt 64 in MTA livery in Swanston St at Collins St RWC39 SW6 939 in MTA Livery running in to South Melb Depot in Swanston St at Collins St RWC40 SW5 844 in M&MTB on Rt 72 in Swanston St at Collins St RWC41 W7 1024 advertising Buy Australian on Rt 5 in Swanston St at Collins ST RWC42 W7 1007 on RT 64 in M&MTB livery in Swanston St at Collins St RWC43 SW6 880 in MTA livery on Rt 69 at the St Kilda Terminus RWC44 SW6 884 on Rt 16 waits as Z 169 shunts in ST Kilda Rd outside the Arts Centre RWC45 SW5 in M&MTB livery on Rt 8 in ST Kilda Rd outside the Arts Centre RWC46 Z 133 in MTA Livery on Rt 50 in Elizabeth St at the Terminus Demonstrates the work of Ron Wilson in photography and collection of prints. Assembled album in a black presentation folder of 46 photographs from the Ron Wilson Collection - 12 A4 sleeves. All photographs have been scanned and placed on the Museum's G drive. A list of all photographs with details has been compiled. melbourne, tramways, trams, flinders st, mta, advertising trams -
 Melbourne Tram Museum
Photograph - Black & White Photograph/s, mid 1920's
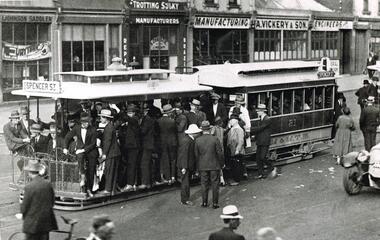
Black and white photograph of a very crowded cable tram set inbound in Bridge Road, c1925, lettered M&MTB" with the destination of Spencer St with many men crowding onto the tram. Alongside the tram is the front of a motor vehicle. Cable tram 81? In the background is a number of shops - L. Johnson Saddler, S. Christie and J Hogan (?) Trotting Sulky Manufacturers and A. Vickery & Son Manufacturing Engineers, Photo from the Collection of the Department of Infrastructure now with the Public Records Office - image number H212. Note: this photo is now out of copyright and was not an original VR photograph, but one copied from another source and collected as their Heritage series. Note from Rod Atkins 29/7/2019: The tram is full because the crowd as discharged from the racecourse so most likely taken on a Saturday. A few of buildings are still there today on the north side. Date 1920’s 2nd copy from Keith Kings added 6/8/2020 - see images i2 and i3.Has Department of Infrastructure copy right stamp on rear and number "H 212" in ink on rear and "1-10"trams, tramways, bridge rd, spencer st, cable trams, tram 81 -
 Melbourne Tram Museum
Postcard, La Trobe Collection, State Library of Victoria, Cable tram display at Box Hill, c1980
Postcard - black and white reproduction of a wall poster used by the Box Hill - Doncaster Tramway, includes sketch of Doncaster Tower, one of the tram cars and timetable. See Reg Item 699 and 198. Printed for the State Library of Victoria, by John Sands - Number PC11. Divided back, caption, printing information and bar code where a stamp would go. Robert Green advised by email 20-1-2018: "The tram in Russell Street was unveiled by the Premier, R J Hamer, on 1 May 1975. The ceremony was attended by F R Kirby, the Chairman of the M&MTB, and the Chairman (Judge Leckie) and Director (R H Fowler) of the Science Museum of Victoria." The tram was removed from the glass case when further development to the buildings occurred and temporarily relocated to Box Hill for the centenary of the Doncaster Tramway. 2nd copy of postcard - on rear - Has 33 cent stamp, postmarked for the Centenary of Cable Car Services, 11/11/1985 with a grip included and stamped "100 years of Melbourne trams carried on Commemorative official trip from Flinders St, Melbourne to Richmond Town Hall, November 11, 1985" in blue ink in the top left hand corner.trams, tramways, box hill, posters, timetables, doncaster, postcards, cable trams -
 Melbourne Legacy
Letter, Intermediate Legacy Club, 1975
A letter written by Norm Smith and addressed to Kem Kemsley on 21 July 1975. It outlines recollections compiled by Norm Smith about the Intermediate Legacy Club (ILC) and individual members. His letter mentions 'Looking back over those years, recalling old time, old faces and places, we as Junior Legatees have a lot to be thankful for and I, for one, have always been exceedingly grateful to you, and those like you in legacy, who helped us so much.' Graham Billiet's letter dated 23 Mar 1974, mentions taking Frank Doolan to the reunion in 1974. Graham felt the ILC was winding down and was only running on half steam. He gives ILC members' addresses. Norm Smith's letter includes: Ted Kennedy, was the first president of the ILC, he was 'tall rangy lad with fiery red hair' who worked for United Distillers Ltd for 40 years (mostly in Brisbane where he joined Brisbane Legacy). Had been a keen junior legatee and taken part in Literary and Debating group and the Dramatic group where he met his future wife, Florence Pittard - which was the first marriage between junior legatees. He had been a naval cadet in the 1928 compulsory training and later joined the CMF where he was closely associated with L/ Stan Savige. He rose to rank of Major in AIF. Jack and Tom Kennedy, his brothers were in the Lacrosse team and his sister Molly in the JLC for years. G Billiet, a first nighter, very well known to legatees of the time. Bill Johnston, a studious type, went to MHS and university, became a Solicitor. Served in the RAAF as a Flight Lieut. Frank Corrie, prominent Junior Legatee in the Literary and Debating group, a fitter and turner by trade, was on JLC cricket and lacrosse teams, joined the AIF. Fred Hollingsworth, a motor mechanic, he joined CIG. He joined the AIF and served in the Middle East, and was one of the Rats of Tobruk as a sergeant. Bert Hollingsworth (brother of Fred) also in AIF and rank of Lieut. Is a past president of ILC. Bert Wood, a past president, worked for Victorian Railways, moved to Coolangatta. Dan Fitzgerald, active in the Drama group of JLC, worked as an announcer at the ABC. Alan Davidson, keen gymnast - particularly wrestling, helped with Alan Beattie (instructor of boys classes). Roy Davidson (brother of Alan) joined the AIF, afterwards joined M&MTB as a driver, married a Junior Legacy girl. Their younger brother Arthur was also in the lacrosse team. Roy Gilbert, keen junior legatee took part in Literary and Debating group and the Dramatic group and lacrosse team. Worked for Vacuum Oil Co., a past president of ILC and also married a Junior Legatee, Miss Lil Edmunds. Served in the AIF and was a Lieutenant in the Middle East. 'Jimmy' MacGregor, a colourful and handsome Junior Legatee, born in Collingwood, was one of L/ Stan Savige original contacts. Keen JLC gymnast and member of the football team. Worked at the Ret. Soldiers Woollen Mills in Geelong and was in the Geelong ILC. Frank 'Happy' Holliday, was in the lacrosse team, foundation member of ILC and past president. Served with the RAAF as an air frame fitter. Worked for L/ Con Fahle in the printing workshop for 40 years. Howard Auterey, joined the RAAF during the war and returned work for the State Saving bank before retiring in Warrnambool. Norman Smith, was working as an apprentice with M&MTB, took interest in Literary and Debating group and was in the lacrosse team. Was ILC president in 1946. Enliseted in the RAAF as airframe fitter. Retired from M&MTB after serving 50 years, married for 40 years to a daughter of an original Anzac who has also been an active member of the Ladies ILC for many years. Background: The ILC was formed in 1929. The idea of the club sprang from those boys who had outgrown the Junior Legacy Club. In the early days it fielded a lacrosse team and it was this that mainly held the members together (formed under guidance of L/ Jimmy Downing). Enthusiasm wained after a few years as it lacked a solid objective. The answer came from one of its members and in 1938 they founded the Don Esses Club. This was a club for the children of incapacitated ex-servicemen which met every Thursday night at 7.30 run by the ILC members. The name came from the signallers' code Disabled Servicemen's Sons. During the second world war 80% of the members of the ILC enlisted in the services. Leaving only 8 members that could not join due to ill health or reserved occupations. They continued the Don Esses and whatever aid they could to Legacy. ILC members had always helped Legacy where possible including being camp leaders or camp staff, with the annual demonstrations, and coffee stalls at the ANZAC dawn service. Post second world war some ILC members were nominated into Legacy, others drifted away in civil occupations. It was found difficult to recruit new blood into the ILC and eventually membership waned when the boys from the Don Esses clubs found other youth activities to join. The ILC ceased to meet regularly in the mid fifties. However a strong comradeship still existed between members and they would meet in one anothers homes. Members were always ready to help the senior Legacy Club in any way in their power and still helped at Christmas parties and summer camps. ILC was a service rendering organisation and was self governing. Non-sectarian and non-political, the members were ex-junior legatees over 18 years of age. After serving in World War 2 members were eligible to become members of Legacy. Was in a folder of material collated about the ILC by an early archive committee. A record of a Junior Legatee recording what he knew about ILC members and their life outside of Legacy in response to a request from L/ Kem Kemsley. It could have been part of the early archive committee working to capture Legacy history.White note paper x 18 pages handwritten by Norm Smith about the ILC members and a handwritten letter x 3 pages from Graham Billiet about ILC members with addresses.ilc, membership, junior legatee -
 Flagstaff Hill Maritime Museum and Village
Badge - Gripman Badge, Stokes & Sons, Jul 1916 - Nov. 1919
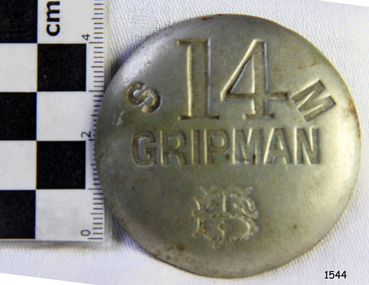
This cable tram Gripman’s badge, or driver’s badge, was part of a tram driver’s uniform. The inscriptions on the front of the badge identify it as belonging to Gripman number 14, at the South Melbourne Car House depot of the Tramways Board. The Gripman Badge would be re-issued whenever another Gripman takes over the position. Cable trams were invented in America in 1873. In Melbourne, cable trams were in use from 1885 until 1940, with a network of up to 1200 cable cars or 'dummies' and trailers travelling at around 9.5 miles (15km) per hour along 46 miles (74km) of double tracks. The Gripman drove the dummy car, operating the heavy levers to connect the gripping gears to the cable installed in a slot in the road. To turn at intersections he would skilfully disconnect, freewheel around the corner and carefully reconnect to the continuously operating steel cable. Large winding gears in an Engine House along the line pulled the cable along, powered by steam engines and later electric engines. The gripping gears were in the centre of the car's floor with seating all around the sides, a dangerous place for curious children. , whose worried parents would guide them into the tram that was towed behind the dummy car. The Melbourne Tramways Board operated the cable trams between July 1916 and November 1919 after taking over from the privately operated Melbourne Tramway and Omnibus Company. In 1919, the Melbourne and Metropolitan Tramways Board (MMTB) took over the Tramways Board. Stokes & Sons: - The maker of the badge, Thomas Stokes, migrated to Melbourne from Birmingham in 1854 and set up business in Mincer Lane as a die-sinker, producing medals, tokens, buttons and silverware, and an engraving service. He moved to Flinders Lane in 1856. After a time, in 1894, the business became Stokes & Sons Pty: Ltd, electroplates and badge makers at Post Office Place in Melbourne. The maker's mark 'Stokes & Sons' was made on badges until 1962. LOCAL CONNECTION: -t was common practice to recycle the used cables from the tramway. For example, the Wollaston Bridge in Warrnambool, Victoria, is suspended by recycled cable tram Melbourne. (Other recycled cables were used for fencing wire.) -Portland's cable tram is an example of the cable trams used in Melbourne from 1885 to 1940.This badge was used to identify a Gripman who operated a cable car tram's dummy car for the Tramways Board in Melbourne between 1916 and 1919. It represents the need for people to be able to identify workers in the service industry, a need still addressed today by staff ID badges and digital identification. The badge also represents the period in Melbourne's history when cable cars were used for public transport for over four decades, gradually changing from steam to electric power. Trams still have an important role in Melbourne's public transport. Badge, round hollow metal dome with two open metal guides on the back. A cable tram Gripman (driver) badge with embossed inscriptions on the front and stamped on the back. There is a logo of entwined letters T and B on the front. It identifies Gripman number 14, South Melbourne, Tramway Board. It was made by Stokes & Sons of Melbourne. Impressed into the front: "S / 14 / M" "GRIPMAN" Logo intertwined "T" and "B" Embossed on reverse "STOKES &o SONS"flagstaff hill, flagstaff hill maritime museum and village, warrnambool, maritime museum, maritime village, great ocean road, shipwreck coast, badge, gripman, stokes & sons, numesmatics, tramway, tram, tram driver, uniform, cable tram, identification, cable car driver, tramway board, south melbourne, melbourne tramways board, tb, mtb, mmtb, melbourne and metropolitan tramways board, tramway button, gripman button, id, identification badg, staff badge, name badge, employee, grip car, dummy car -
 Melbourne Tram Museum
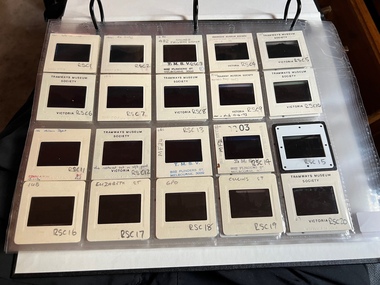
Album - Ron Scholten Slide Collection, Ron Scholten
Photo - see pdf file for further information. Number Brief Description RSC1 PCC 1041 at the gates of Preston Workshops on a test run without it’s trolley retriever RSC2 PCC 1041 in Glenhuntly Road on Route 67 en route to Carnegie crossing the Railway Gates at Glenhuntly Station RSC3 W2 482 stored at Malvern Depot with Olympic Park on the Destination RSC4 Cable Car Set 64 in Swanston St outside Princess Bridge Station in Bound with open top Double Deck Bus, Trak Motors ? Departing from Flinders St Station RSC5 W3 669 in St George Rd at Sumner St en route to Preston Workshops for scrapping RSC6 Cable Car in Lygon St en route to Carlton RSC7 PCC 1041 turning from St Georges Rd into Miller St to enter Preston Workshops RSC8 Flinders St Station with cable cars RSC9 PCC 1041 in strife on it’s maiden day in service. Trams on route 88 delayed in Queens Parade Clifton Hill RSC10 Flinders St at William St with Cable Cars RSC11 L 104 on the fan of the new shed at Malvern Depot on a TMSV tour RSC12 Cable Set 1 after it’s restoration at Preston Workshops on the fan near the front gate RSC13 X1 466 at a suburban terminus of the Footscray System RSC14 X2 680 at Point Ormond Terminus RSC15 An ex Launceston Tram at the outside terminus of the Penny Royal Complex Tramway in Launceston RSC16 Q 148 at Preston Workshops awaiting disposal RSC17 Elizabeth St with Cable Cars RSC18 Elizabeth and Bourke St corner outside the GPO with cable cars RSC19 Collins St with Cable Cars RSC20 A photo taken from the observation deck of the ICI building showing a view of Parliament house with a w class tram in Nicholson St RSC21 Auburn Horse car with a posed photo of all the tramwaymen employed RSC22 Cheltenham Double Deck Horsecar with a full load of passengers RSC23 City of Northcote cable trailer 3 at a terminus RSC24 City of Northcote Cable cars passing in High St Northcote RSC25 St Kilda Rd at Princes Bridge with Cable Cars RSC26 Flinders St with Cable Cars RSC27 Cable Cars RSC28 Bourke St looking towards Elizabeth St from Queen St RSC29 Cable cars in Bourke St at Elizabeth St looking East RSC30 Cable cars in Elizabeth St at the terminus at Flinders St RSC31 Cable cars in Bourke St at Swanston St looking west RSC32 Cable cars in Swanston St at Flinders St looking North RSC33 Cable cars in Collins St near Russell St RSC34 Cable cars in Elizabeth St at Bourke St RSC35 Cable cars in Collins St at Elizabeth St RSC36 Cable Cars in Swanston St at Flinders St RSC37 Cable cars in Collins St RSC38 Cable Cars RSC39 Cable cars in St Kilda Rd near Princes Bridge RSC40 Cable cars in Collins St East of Swanston St RSC41 Cable cars in Spring St outside Parliament house RSC42 K 92 in M&MTB Chocolate and cream livery but with a P&MTT Destination box on Route 14 RSC43 Thornbury depot viewed from Miller St and St Georges rd. Two W2 class cars are laying over between the peaks RSC44 Z3 201 in Met Livery passes D1 3510 in new M Tram livery. A Staff member in uniform stands in the doorway. Dandenong Rd RSC45 D1 3530 advertising Heinekin Super Golf on Route 55 in Royal Park RSC46 D1 3504 in M Tram livery on the reserved track in Matthews Ave near Essendon Airport showing Route 81 Travancore . I suspect it is a private enthusiasts charter due to the Malvern W class run number in the rear windscreen RSC47 D1 3504 on Route 64 in Dandenong Rd in M Tram Livery RSC48 D1 3504 in M Tram Livery at Airport West Terminus RSC49 D1 3504 in M Tram Livery in Union Rd outside the Showgrounds RSC50 D1 3504 at West Maribyrnong Terminus in M Tram Livery RSC51 D1 3503 in M Tram Livery in Malvern Depot RSC52 SW6 960 and VR 53 in Harbour Esplanade for the NMEL&T Co Centenary RSC53 Hawthorn Tramways Trust 32 in Harbour Esplanade for the NMEL&T Co Centenary RSC54 VR 53 & B 2042 in Harbour Esplanade for the NMEL&T Co Centenary RSC55 VR 53 & C 3016 in Harbour Esplanade for the NMEL&T Co Centenary RSC56 NMEL&T Co 13 usually V214 in Harbour Esplanade for the NMEL&T Co Centenary RSC57 NMEL&T Co 13 usually V214 at Preston Workshops for the NMEL&T Co Centenary RSC58 Hawthorn Tramways Trust Lettering on HTT 32 in Harbour Esplanade for the NMEL&T Co Centenary RSC59 Hawthorn Tramways Trust 32 in Harbour Esplanade for the NMEL&T Co Centenary RSC60 Hawthorn Tramways Trust 32in Harbour Esplanade for the NMEL&T Co Centenary RSC61 Hawthorn Tramways Trust 32 in Harbour Esplanade for the NMEL&T Co Centenary RSC62 NMEL&T Co 13 usually V214 at Preston Workshops for the NMEL&T Co Centenary RSC63 W2 516 and another on route 59 wait to shunt at Essendon Airdrome Terminus as W2 571 on route 49 departs. This was the last day of operation. RSC64 Australia’s First Electric Tram at Box Hill with Tramwaymen including H J Hilton who is in the centre RSC65 W2 484 en route to St Kilda Junction and another wait for passengers after a race meeting at Caulfield Racecourse RSC66 X1 463 on the Footscray system en route to Russell St RSC67 Geelong 35 on Chilwell Route, Formerly HTT 13, M&MTB 119, then Bendigo 1 and Ballarat 37 RSC68 P&MTT 4 on Opening Day of the system in Glenferrie Rd RSC69 Bendigo 6 in McCrae St near the Depot end route to North Bendigo RSC70 P&MTT 4 in Glenferrie on opening day of the System RSC71 Scrubber 3 stripped and awaiting scrapping at Preston Workshops RSC72 Scrubber 4 at South Melbourne Depot RSC73 Q 191 & 139 at Preston Workshops awaiting scrapping RSC74 Rail Grinder 3 at Preston Workshops as purchased from Sydney RSC75 Y 469 waits to shunt at Wattle Park Terminus as Y1 613 departs on driver training duties RSC76 VR 53 on the outside roads at Essendon Depot RSC77 W5 796 with three doors and square windows running out of Brunswick Depot in Cameron St, with a supplementary destination board showing “City via Swanston St” RSC78 W2 258 on the wheel grinder road at Brunswick depot RSC79 X2 676 on a TMSV tour, W5 817 & 836 & VR 53 on the open roads at Essendon Depot RSC80 PCC 1041 on test, passes W71035 in High St Preston RSC81 D1 class production number 7 as delivered on test in Matthews Ave RSC82 W2 383 on route 5 turning from the reserved track in Dandenong Rd into St Kilda Rd at St Kilda Junction RSC83 Z3 204 as advertising tram for Vodaphone Grand Prix running into Malvern Depot new shed RSC84 Z1 4 on test in St Georges Rd RSC85 PCC 1041 on Route 96 in Burke St near Exhibition St RSC86 Z1 3 without numbers on test turning from Miller St in St Georges Rd RSC87 Track components stored in Coldblo Rd at Malvern Depot with Z class cars adjacent RSC88 D1 3501 in M Tram Livery on Route 55 in Peel St at Franklin St RSC89 C 3001 in Yarra Trams Livery Porto 018 & D13502 in M Tram Livery on Display in Harbourside Esplanade RSC90 D1 class tram production number 7, in as delivered condition on test in Matthews Ave RSC91 D1 3503 inside Malvern Depot RSC92 SW6 955 and W6 974 in St Kilda at City Rd at Dusk RSC93 Freight Car 19 at Preston Workshops in green Livery RSC94 Rail Grinder 3 in green Livery at South Melb Per Way Yard RSC95 A SW6 class car on route 50 shunting at Elizabeth St Terminus at night, taken from Flinders St Station RSC96 W2 588 & 435 in St Kilda Rd at Batman Ave RSC97 Y1 613 in service at Wattle Park Terminus RSC98 W2 588 in Wellington Parade en-route to the City with a Grand Final Load of passengers followed closely by 384 RSC99 W2 558 on a MCG Footy Special entering the Simpson St sidings RSC100 W3 657 & an L Class in the new shed at Malvern Depot RSC101 Y1 613 in St Kilda Rd on an enthusiasts tour in St Kilda Rd south of St Kilda jun RSC102 Y1 613 on an enthusiasts tour in Clarendon St with the two extra tracks on the Viaduct under construction RSC103 W6 976 on the fan of the new shed at Malvern Depot RSC104 W7 1024 as an advertising car for Bank of NSW at the route 1 terminus at South Melb Beach RSC105 PCC 980 on route 96 in Nicholson St near North Fitzroy Depot RSC106 SW6 890 with dash canopy lighting in Market St on the opening day of William St Services RSC107 W2 444 with big numbers heads a line of footy specials in Simpson St Sidings RSC108 Cable Cars in Elizabeth St RSC109 NMEL&T co 2 with a trailer outside the power station in Mount Alexander Rd RSC110 Alf Twentyman’s cable car set in his Northcote backyard RSC111 Cable Cars in Queens Parade Clifton Hill RSC112 Cable cars in Collins St outside the Townhall RSC113 PCC 1041 at Carnegie terminus RSC114 Cable cars in Elizabeth St RSC115 Cable cars in Collins St near Swanston St RSC116 HTT 19 turns from Riversdale Rd into Camberwell Rd at Camberwell Junction RSC117 W1 419 official builders photo of first car of the class RSC118 Cable car with a full load of passengers RSC119 W1 422 illuminated for the visit of T.R.H. The Duke and Duchess of York RSC120 PCC 1041 in strife on it’s maiden day in service. Trams on route 88 delayed in Queens Parade Clifton Hill RSC121 Bendigo birney in Finn St near North Bendigo terminus RSC122 SW6 in St Kilda Rd at Domain Rd at night RSC123 All 3 of Alf Twentyman’s cable cars in his Northcote backyard RSC124 Cable trailer 256 being unloaded into the shed at Bylands RSC125 Cable grip car 1 being removed from the Melbourne Museum RSC126 Alf Twentyman's cable cars in his Northcote Backyard RSC127 Alf Twentyman's cable cars in his Northcote Backyard RSC128 Alf Twentyman's cable cars in his Northcote Backyard RSC129 Alf Twentyman's cable cars in his Northcote Backyard RSC130 W class car in Swanston St at Collins St RSC131 Y1 469, L & W3 on the run out of Glenhuntly Depot on a tour RSC132 W7 1024 as an advertising tram for Bank of NSW at Clifton Hill RSC133 W2 496 on a footy special in Simpson St Sidings RSC134 W2 as originally converted to a test car at Preston Workshops RSC135 W3 667 in Brunswick Depot with Ellen Butland at the controls RSC136 W3 669 on it’s final run at Victoria Prd & Brunswick St RSC137 W2 571 in Wellington Prd at Clarendon St with a Footy Final load of Passengers RSC138 Y1 613 shunts at Spencer St Terminus as X217 waits on Australia Day Pageant RSC139 PCC 1041 on Rt 96 in Burke St outside the Southern Cross Hotel RSC140 890 with accident damage on the outside roads at Preston Workshops c1978 RSC141 535 on Rt 4 at the old St Kilda Jun c1967 RSC142 1041 on Rt 88 turns from Bourke St into Spring St 1973 RSC143 102 on a tour at Albert Park Beach Terminus Feb 1972 RSC144 833, 835 & 834 in the shed at Malvern Depot c1976 RSC145 281 in Wellington Parade on a football very crowded special c1974 RSC146 464 Ballarat Rd 1960 RSC147 181 Explosives Fty - at Footscray Station - July 1960 RSC148 181 Williamstown Road 1960 RSC149 Cable car set at Alf Twentyman’s c1970 RSC150 X 217 at Malvern Depot c1970 RSC151 X1 465 and T181 Footscray Football ground in Barkly St. c1960 RSC152 Scrubber 5 at South Melbourne depot c1960 RSC153 X1 465 Footscray to Russell St, c1960 RSC154 X1 467 Leeds St Footscray 1960 RSC155 PMTT 4 Glenferrie Road, 1910 RSC156 S 164 at Malvern Depot c1970 RSC157 T178 Footscray c1960 RSC158 Cleaner No. 7 at South Melbourne depot c1960 RSC159 Two Y classes at Princes Bridge / Batman Ave mid 1950s RSC160 Swanston St – Nu color vue slide – M142 Demonstrates the work of Ron Scholten in photography, collection and/or production of duplicate slidesAssembled album in a black presentation folder of 160 colour slides, 8 slide sleeves, collected or produced by Ron Scholten. Many are TMSV or Windsor Publications slides. All photographs have been scanned and placed on the Museum's G drive. A list of all photographs with details has been compiled. melbourne, tramways, trams, cable trams -
 Ballarat Tramway Museum
Manual, Doug Prosser, "General Electric Data for Car Equipment Maintenance", 1998
A black plastic folder containing a set of 38 General Electric Data Sheets for MMTB and tramway trust equipment, dated July 8 1924. Contained in folder with flexible clips. Pages have been punched with four holes. Copy of document made for BTM Feb 1998 by Doug Prosser. For scan of list - see btm780sheet.pdf General Electric Data for Car Equipment Maintenance Contents For scan see btm780d1 (5 pages) Title sheet Data contents summary sheet showing manual prepared for Melbourne & Metropolitan Tramways Board Including Footscray Tramway Trust Hawthorne Tramways Trust Melbourne, Brunswick and Coburg Tramway Trust Prahran and Malvern Tramways Trust. 2 sheets dated July 8, 1924 giving equipment schedules for the various operators, and diagrams. - hard to read the background sheet information. Does not reference the tramcars. For scan see btm780d2 (54 sheets - items 1 to 27) 1. Methods of Removing the Armature from Box Frame Railway Motors Dated 9/1924, 7 pages 2. Instructions for order Magnet Frames for Railways and Mine Haulage Motors 2 pages, not dated 3 Winter Covers for Ventilated Railway Motors - 2 pages 4 Better Commutation for Railway Motors - 1 page 5 Commutator Grooving Machines - 1 page 6 Railway Motor Armature Coils - 2 pages 7 Carbon Brushes for Railway motors - including brush pressure adjustment - 2 pages 8 Renewable Carbon-Way Brush holders for Railway Motors - 2 pages 9 Commutator Grooving Machines (2nd version) - 2 pages 10 The Repair of Railway Motor Commutators - 3 pages 11 Dimensions of Electrical Apparatus used with 600-volv Type PC railway control equipment, (Sheet 15380, dated 2/1/1924) - 1 sheet including · US-13-E Trolley Base, · MS-118-A main switch, · MA-13-F Fuse Box, · MD3 - lightning Arrester, · BJ-386-B Distributing Box, · Type BG Railway Resistors. 12 Connections of Type KM-63-BR Railway Controllers and Equipment - Drawing 15257, 1 page, dated 1/3/1921 with dimension details on rear of type K-63-BR railway controller equipment including: · SG Resister, · BK-13-A Insulator, · MR11 - Circuit breaker, · MD3 - Lightning Arrester box, · K63-BR Controller, · US15C Trolley Base. 13 Method of Supporting Railway Resistors using Porcelain Bolt insulators for 600 and 1500 Volt Work. Drawing dated 1/11/1923, No. 15249B - 1 page 14 Dimensions of Electrical Apparatus used with 600-volv Type M railway control equipment, (Sheet 15381, dated 2/1/1924) - 1 sheet including · US-13-E Trolley Base, · MS-118-A main switch, · MA-13-F Fuse Box, · MD3 - lightning Arrester, · BJ-386-B Distributing Box, · Type BG Railway Resistors. 15 Dimensions of Electrical Apparatus used with 600Volt, Type PC Railway Control Equipment. Drawing No. 15382, dated 2/1/1924. Includes: · C129-A Master Controller, · DA82C Coupler sockets, · MS-14-G switch, · MS-46-H switch. 16 Dimensions of Electrical Apparatus used with 600-volv Type M railway control equipment, (Sheet 15383, dated 2/1/1924) - 1 sheet including · C-169-A Controller · DA-69-B Coupler Socket and DC-66-C Coupler Plug · MS-14-G Switch · MS-46-H-Switch 17 Method of Making Tap Connections for Car Cables -= SD 15468, 1/11/1924, 1 page 18 The Repair of 600 Volt Railway Motor Armatures, 64408, 9/2/1924, 4 pages 19 Proper Method of Mounting and Dismounting Railway Motor Pinions. - 2 pages 20 Pinion Pullers for Railway Motors - 2 pages, dated 8/1/1924. 21 The Care of Railway Motor Bearings - 4 pages 22 Oil Scraper Rings for Air Compressors - 64590 - May 1924 - 1 page 23 Finger Bases for type K 63 controller 1 page 24 Adjustment of Drum Controller fingers - 29/1/1924, 64600A - 1 page 25 Star Wheels for Type K Controllers - 64603 - 1 page 26 Soldering Aluminium Controller Cylinder Castings - 2 pages 27 Porcelain Bolt Insulators for Railway Service - and drawing on rear showing mounting arrangement of resistor Grids - 2 pages. For scan see btm780d3 (13 pages) 28 Connections of Armature and Field Winding for GE-201-F and GE 263A railway motors. DS37869 29 Connections of Armature and Field Winding for GE-201-I railway motors. K1629303 30 Connections of Armature and Field Winding for GE-202 motor, DS 10472 31 Connections of Armature and Field Winding for GE-203 A and GE 226 railway motors. DS23869. 32 Connections of Armature and Field Winding for GE-241 motors - K1629077 33 Connections of Armature and Field Winding for CP25A Air compressor 34 Connections of Armature and Field Winding for CP27A Air compressor 35 Connections of Armature and Field Winding for GE-258 and GE 264 railway motors. K1629343. 36A- Dimensions of Type K-63-BR Railway Controller Equipment 36 US-13-E Trolley Base for Railway Service - 3/1/1923, 64823 - 2 pages 37 Copy of M&MTB (Eastern System) Certificate of Competency as Motorman. 38 Photocopies of a series of four photos of 22E trucks under an SEC tramcar. For scan see btm780d4 (40 pages) 39 Sprague G-E Multiple Unit Control, Type PC, Instruction Book 84772 - Oct. 1922 - 40 Pages. Images of sheets added 2-11-15 trams, tramways, general electric, motors, controllers, trolley pole bases -
 Melbourne Tram Museum
Album - David Frost Slide Collection, David Frost
Photo - see pdf file for further information. Number Brief Description date DFC1 A general view from the former railway platform at Port Melb Station looking towards Station Pier on opening day 20-12-1987 DFC2 A2 285 in the Tramway Platform at Port Melbourne Station on opening Day 20-12-1987 DFC3 A2 285 in the Tramway Platform at Port Melbourne Station on opening Day 20-12-1987 DFC4 A2 285 in the Tramway Platform at Port Melbourne Station on opening Day 20-12-1987 DFC5 A2 273 at St Kilda Tramway Station on opening day 22-11-1987 DFC6 A2 273 turning from Fitzroy St into St Kilda Tramway Station on opening day 22-11-1987 DFC7 B1 2001 at St Kilda Tramway Station turning into Fitzroy St on opening day 22-11-1987 DFC8 B1 2002 enters St Kilda Tramway Station on opening day 22-11-1987 DFC9 An A2 approaches St Kilda Tramway Station on opening day 22-11-1987 DFC10 Concreting the connecting curve from Fitroy St into St Kilda Station c July 1987 DFC11 An MTA AEC MKVI bus in Grey St St Kilda at Dalgety St with Tramway works in the background c July 1987 DFC12 Grey St St Kilda at Dalgety St with Tramway works in the background in Fitzroy St c July 1987 DFC13 Concreting the connecting curve from Fitroy St into St Kilda Station c July 1987 DFC14 Restaurant Tram 442 in Fitzroy St at Grey St Passing MTA bus 59 outside St Kilda Station c1986 DFC15 Former VR tram stop sign painted on a pole at Glenhuntly Rd & Broadway DFC16 Former VR Elwood Tram Depot under demolition 1996 DFC17 Former VR Elwood Tram Depot under demolition 1996 DFC18 Former VR Elwood Tram Depot under demolition 1996 DFC19 Former VR Elwood Tram Depot under demolition 1996 DFC20 Former VR Elwood Tram Depot under demolition 1996 DFC21 Former VR Elwood Tram Depot under demolition 1996 DFC22 Former VR Elwood Tram Depot under demolition 1996 DFC23 Former VR Elwood Tram Depot under demolition 1996 DFC24 MTS Tower waggon in use at the former VR Elwood Tram Depot under demolition 1996 DFC25 A Sign advertising the sale of the Former VR Elwood Tram Depot – 10/8/1996 1996 DFC26 Former VR Elwood Tram Depot under demolition 1996 DFC27 Interior of a shed at the former VR Elwood Tram Depot under demolition 1996 DFC28 Former VR Elwood Tram Depot under demolition 1996 DFC29 Former VR Elwood Tram Depot under demolition 1996 DFC30 Former VR Elwood Tram Depot under demolition 1996 DFC31 VR 20, former breakdown car in Bob Prentice’s Back Yard Jan 1974 DFC32 VR 20 on a low loader en route to Bob Prentice’s for preservation 1959 DFC33 VR 20 as the breakdown car on the St Kilda Electric Street Railway c1955 DFC34 VR 39 waits in St Kilda St as breakdown car 20 enters Elwood Depot c1955 DFC35 VR 54 and 50 in the rear yard of Elwood Depot c1958 DFC36 VR 50 in the rear yard of Elwood Depot c1958 DFC37 VR 50 in the rear yard of Elwood Depot c1958 DFC38 VR 28 in St Kilda St outside Elwood depot after the line had been cut back to this point c1958 DFC39 VR 29 in St Kilda St outside Elwood depot after the line had been cut back to this point c1958 DFC40 VR 35 passes 28 on the St Kilda Electric Street Railway c1955 DFC41 VR 39 on the St Kilda Electric Street Railway c1955 DFC42 Y1 613 on a tour c1970 DFC43 VR 54 in St Kilda St outside Elwood Depot c1955 DFC44 VR 28 at Brighton Beach Terminus c1955 DFC45 VR 33 being washed in the wash bay at the rear of Elwood Depot c1955 DFC46 VR 20 breakdown car running into Elwood Depot c1955 DFC47 VR 3 in the rear yard at Elwood Depot c1955 DFC48 VR 51 on an AETA Tour running out of Elwood Depot c1958 DFC49 VR 28 on the St Kilda Electric Street Railway c1955 DFC50 VR 28 with crew in St Kilda St outside Elwood depot after the line had been cut back to this point 1959 DFC51 VR 52 in Grey St near Fitzroy St c1958 DFC52 VR 51 on a AETA Tour passes 33 in Grey St near Fitzroy St c1958 DFC53 VR 29 in Grey St near Fitzroy St c1958 DFC54 VR51 on an AETA Tour shunts as 52 waits on the St Kilda Electric Street Railway c1958 DFC55 VR 51 on the Black Rock Electric Street Railway c1955 DFC56 VR 28 in St Kilda St outside Elwood depot after the line had been cut back to this point c1958 DFC57 Combined Rail-Tram Tickets of the Black Rock Electric Street Railway Feb 1975 DFC58 Combined Rail-Tram Tickets of the St Kilda Electric Street Railway Feb 1975 DFC59 Electric Street Railway & Motor Coach Paper Tear off Tickets Feb 1975 DFC60 VR 52 & 53 on Rt 82 pass in Cordite Ave near Wests Rd Sept 1975 DFC61 Z 68 & 52 in East Preston Depot in M&MTB Livery c1977 DFC62 Copy photo of VR 18 in Elwood Depot c1910 DFC63 VR 51 as a one man car at Black Rock Terminus c1955 DFC64 VR 53 on Rt 82 in Droop St Footscray Jan 1974 DFC65 B2 2027 on Rt 96 in South Melb Station c1988 DFC66 VR 20 as preserved in Bob Prentice’s backyard High St Prahran Jan 1974 DFC67 VR 700 on Rt 82 in Droop St Footsray c1978 DFC68 VR 28 as the last car from ST Kilda Station 28-2-1959 DFC69 VR 700 at the Rt 82 Moonee Ponds Terminus c1978 DFC70 VR 52 waiting time at the Rt 82 Footscray Terminus, the driver intently stares at the bundy clock as the Braid and the Connie gossip Jul 1972 DFC71 VR 54 shunting outside Elwood Depot to return to St Kilda Station 1959 DFC72 SW6 969 in MTA Livery blocking the entrance to South Melb Depot presumably during the scratch ticket dispute Jan 1990 DFC73 VR 52 & 53 on Rt 82 pass in Droop St Footscray Sept 1975 DFC74 VR 700 after withdrawl in the Newport Railway museum in the process of a repaint c1985 DFC75 VR 700 after withdrawl in the Newport Railway museum in the process of a repaint c1985 DFC76 VR 700 on Rt 82 in Droop St Footsray at The Cresent c1978 DFC77 VR 700 on Rt 82 in Droop St Footsray c1978 DFC78 Former VR tram depot in use as an MTA Bus depot c1990 DFC79 VR 52 waiting time at the Rt 82 Footscray Terminus Jul 1972 DFC80 VR 52 waiting time at the Rt 82 Footscray Terminus with Connie changing the pole Jul 1972 DFC81 VR 52 at the Rt 82 Moonee Ponds Terminus with the crew chatting 7-12-1974 DFC82 VR 52 on Rt 82 on the reserved track in Raleigh Rd Ascot Vale Jan 1974 DFC83 VR 53 on Rt 82 in Leeds St Footscray about to turn into Hopkins St April 1976 DFC84 VR 53 on Rt 82 in Droop St Footsray Jan 1974 DFC85 VR 700 on Rt 82 in Droop St Footsray at Hopkins St c1978 DFC86 Z 52 in MTA livery on Rt 19 in Elizabeth St near Bourke St c1985 DFC87 VR 52 at the Rt 82 Moonee Ponds Terminus Jul 1972 DFC88 VR 53 at the Rt 82 Footscray Terminus Jan 1974 DFC89 VR 52 freshly outshopped from the workshops and W7 1011 at the Bourke St Terminus with 52 on display for the 1968 railway exhibition 1968 DFC90 Painting of W class 369 in Chocolate & Cream c1930 DFC91 Charing Cross, Bendigo at night c1965 DFC92 Ballarat ? c1965 DFC93 Bendigo 18 on an AETA tour in McCrae St near Tramway Ave c1965 DFC94 View from the roof of a tram in the body shop at Preston Workshops 1977 DFC95 View from the roof of a tram in the body shop at Preston Workshops 1977 DFC96 View from the roof of a tram in the body shop at Preston Workshops showing the panto on 546 1977 DFC97 Interior view of Carlton Control Centre showing desk and wall panel c1968 DFC98 W2 493 on Rt 55 in Kingsway outside South Melb Depot Aug 1973 DFC99 W2 496 in Sturt St at Kingsway on Rt 1 Jul 1973 DFC100 Z class truck c1975 DFC101 Z3 116 in Bourke St at King St as new c1979 DFC102 Bob Prentice on tour c1968 DFC103 SW6 900 as an advertising tram for Newsday at night 1969 DFC104 597 Jul 1973 DFC105 W2 480 on Rt 3 passing under the railway bridge at Caulfield Oct 1972 DFC106 Interior view of Carlton Control Centre showing desk c1968 DFC107 SW6 856 on Rt 77 at night Jul 1973 DFC108 W2 496 in Sturt St at Kingsway on Rt 1 Jul 1973 DFC109 PCC 980 on a tour at South Melb Depot c1968 DFC110 SW6 856 on Rt 77 at night Jul 1973 DFC111 View from the roof of a tram in the body shop at Preston Workshops showing the panto on 546 1977 DFC112 Dandenong Rd from Chapel St Nov 1968 DFC113 A Z class car turns from Gertrude into Nicholson St c1990 DFC114 SW6 900 as an advertising tram for Newsday at night 1969 DFC115 Port Melbourne Station showing Centennial bridge and station building prior to closure. 10-1987 DFC116 Port Melbourne station with train prior to closure, looking south 10-1987 Demonstrates the work of David Frost in photography and or collecting slides.Assembled album in a black presentation folder of 116 colour slides, 6 slide sleeves, collected or photographed by David Frost. Many are TMSV or Windsor Publications slides. All photographs have been scanned and placed on the Museum's G drive. A list of all photographs with details has been compiled. melbourne, tramways, trams, vr trams, elwood, st kilda light rail, port melbourne, opening, elwood depot, buses -
 Ballarat Tramway Museum
Album - Postcards & Photographs - Vic Solomons and others - Australian Tramways, Vic Solomons, 2023
Contains 184 images of postcards and photographs collected primarily by Vic Solomons of Sydney, with others from the collection of Wal Jack and Warren Doubleday. Covers almost all of Australia's tramway systems. 1 Post Card Hay St Perth Looking East No 3 Unknown Perth 2 Post Card Cars 30 & 90 both on Route 19 pass in Barrack St looking South Perth WA 1935.02.18 Perth 3 Post Card Hay St Looking East Perth WA Unknown Perth 4 Post Card William St Perth WA Unknown Perth 5 Post Card Perth from Shaftsbury Hotel Unknown Perth 6 Post Card Hay St Perth WA Looking East Unknown Perth 7 Post Card Barrack St Perth Unknown Perth 8 Post Card Murray Views No 3 High St Showing Town Hall Fremantle WA Unknown Fremantle 9 Post Card High St Fremantle WA Unknown Fremantle 10 Post Card View of Bolder City Golden Mile in the Background (Section No 1) 1908.08.20 Kalgoolie 11 Post Card Hannan St Kalgoolie 1900.08.19 Kalgoolie 12 Post Card Hannan St Kalgoolie WA (No 2) Unknown Kalgoolie 13 Post Card Intersection Hannan & Maritana Sts Kalgoolie WA Unknown Kalgoolie 14 Post Card Hannan St Kalgoolie Unknown Kalgoolie 15 Post Card Lane Street Bolder City Unknown Kalgoolie 16 Post Card Hobart Double Deck Tram Unknown Hobart 17 Post Card Macquarie St Hobart Unknown Hobart 18 Photo Liverpool Street Hobart Unknown Hobart 19 Photo Hobart 21 Unknown Hobart 20 Photo Hobart 14 in Elizabeth St Hobart Unknown Hobart 21 Post Card Macquarie St Hobart Unknown Hobart 22 Post Card Macquarie St Hobart Tas Unknown Hobart 23 Photo Double Decker Tram 3 at G.P.O. Hobart Tas No 31 Unknown Hobart 24 Post Card Double Decker Tram 19 Hobart Tas A B Series No 24 Unknown Hobart 25 Photo Hobart Municipal Tramways Tas No 95 Unknown Hobart 26 Post Card Elizabeth St Hobart Unknown Hobart 27 Post Card Elizabeth St Hobart Unknown Hobart 28 Post Card Elizabeth St Hobart Unknown Hobart 29 Post Card Elizabeth St Hobart Tas Unknown Hobart 30 Post Card HMT 21 with crew at Beach Road Terminus Unknown Hobart 31 Post Card HMT 9 & another with crew at Beach Road Terminus. Front cover photo of Destination GPO 1921.01.00 Hobart 32 Post Card Cascade Road and Mount Wellington Hobart Unknown Hobart 33 Post Card Elizabeth St Hobart Unknown Hobart 34 Post Card Elizabeth St Hobart Unknown Hobart 35 Post Card Elizabeth St Hobart 1915.04.07 Hobart 36 Post Card Macquarie St Hobart Tas Unknown Hobart 37 Post Card Macquarie St showing Post Office Hobart 1908.03.12 Hobart 38 Post Card Hobart Municipal Tramways 21 Unknown Hobart 39 Post Card Elizabeth St Hobart Tas Unknown Hobart 40 Post Card Liverpool Street Hobart Unknown Hobart 41 Post Card Electric Tram Launceston Tas 446 W J Little Photo 1919.02.08 Launbceston 42 Post Card Launceston Tram no 3 1911.08.30 Launbceston 43 Post Card Launceston Tram no 3 passes tram No 1 Unknown Launbceston 44 Post Card Tram 6 at Trevallyn a popular suburb Launceston Tasmania Unknown Launbceston 45 Post Card Tram 7 at Trevallyn Road Terminus Launceston Tasmania Unknown Launbceston 46 Post Card Tram 4 in Brisbane St Launceston Unknown Launbceston 47 Post Card Tram 9 in Brisbane St Launceston Tasmania Unknown Launbceston 48 Post Card Camerom Street Launceston Tasmania Unknown Launbceston 49 Post Card Murray Views No 15 Jetty Road Glenelg Terminus 1962-02-08 Adelaide 50 Post Card Bay Tram at Jetty Road Terminus Glenelg SA Unknown Adelaide 51 Post Card Tram 3 in King William Street Adelaide S Aust Unknown Adelaide 52 Post Card Valentine Series No 3065 The Old Horse Tram Victor Harbour Unknown Victor Harbour 53 Post Card Bourke Street Melbourne with Cable Car Looking East 1904.04.25 Melbourne 54 Post Card Opening of New Electric Tramway Elsternwick 1913-11-13 Melbourne 55 Post Card Cable trams in Clarendon St Sth Melb Unknown Melbourne 56 Post Card Pall Mall from Charing Cross Bendigo Unknown Bendigo 57 Post Card Tram 4 & 7 pass at The Fountain and Mitchell Street Bendigo Vic Rose Series P 3198 Unknown Bendigo 58 Post Card M&MTB 133 at Charing Cross bound for Eaglehawk Bendigo Vic Murray Views No 45 Unknown Bendigo 59 Post Card Pall Mall Bendigo Vic Unknown Bendigo 60 Post Card Charing Cross & Mitchell St Bendigo Trams passing 1919.00.00 Bendigo 61 Post Card Pall Mall Looking East Unknown Bendigo 62 Post Card Electric Trams and City Hotel Bendigo Vic Unknown Bendigo 63 Post Card Moorabool Street Geelong V 23 Unknown Geelong 64 Post Card Murray Views No 3 Moorabool Street Geelong Vic Unknown Geelong 65 Post Card The Rose Series P 2487 Ryrie Street Geelong Vic Unknown Geelong 66 Post Card Southern Cross Series 2696 Ryrie Stret Geelong Vic Unknown Geelong 67 Post Card The Rose Series P 1490 Ryrie Street Geelong Vic 1920-03-04 Geelong 68 Post Card Valentine Series No 1568 Lower Sturt Street Ballarat Unknown Ballarat 69 Post Card Rose Series P 1710 Sturt Street Ballarat Victoria Unknown Ballarat 70 Post Card Sturt Street Ballarat Victoria Unknown Ballarat 71 Post Card Horse Tram In Sturt Street Ballarat 1905.11.10 Ballarat 72 Post Card Sturt Street Ballarat Looking North-West Unknown Ballarat 73 Post Card Shoppes Square Sturt Street Ballarat Looking North Unknown Ballarat 74 Post Card Junction Sturt and Lydiard Streets Ballarat 1909-09-01 Ballarat 75 Post Card The Electric Supply Co Souvenir Tram Ticket No 3085of the opening of Electric System August 18 1905 1905.08.18 Ballarat 76 Post Card Sturt Street Ballarat Victoria 1907.11.25 Ballarat 77 Post Card Off to the Gardens Electric Tram Ballarat Unknown Ballarat 78 Post Card Sturt Street Ballarat 1907.04.16 Ballarat 79 Post Card Sturt Street Ballarat Looking East Electric tram with Double Deck Trailer 1911.04.17 Ballarat 80 Post Card Sturt Street Ballarat Looking East Unknown Ballarat 81 Post Card Sturt Street Ballarat Looking West 1911.03.01 Ballarat 82 Post Card Town Hall and Sturt Street Ballarat Unknown Ballarat 83 Post Card Lydiard Street Ballarat 1906.11.23 Ballarat 84 Post Card Looking North along Adelaide Street from George Street Brisbane Sidues Series No 764 Unknown Brisbane 85 Post Card Looking South along Queen Street from the Creek Street Intersection Brisbane Qld Sirues Series No 1379 Unknown Brisbane 86 Post Card George Street from near Supreme Court Brisbane Unknown Brisbane 87 Post Card Queen and Eagle Streets Brisbane 1907.07.04 Brisbane 88 Post Card Queen Street showing His Majesty’s Theatre Brisbane Unknown Brisbane 89 Post Card Queen Street Treasury Building 1908.01.20 Brisbane 90 Post Card G P O and Queen Street Brisbane Unknown Brisbane 91 Post Card Queen Street Brisbane Looking from Wharf Street Unknown Brisbane 92 Post Card Customs House Brisbane 1905.02.16 Brisbane 93 Post Card Queen St Brisbane 1905.09.16 Brisbane 94 Post Card Queen St Brisbane 1907.11.19 Brisbane 95 Post Card Treasury Buildings Brisbane Unknown Brisbane 96 Post Card Queen and Eagle Streets Brisbane Unknown Brisbane 97 Post Card The Valley Corner Brisbane Unknown Brisbane 98 Post Card Brisbane Queen Street opposite General Post Office Unknown Brisbane 99 Post Card North Quay and Milton Beach Brisbane Q Unknown Brisbane 100 Post Card Victoria Bridge Brisbane South Side 1907.08.14 Brisbane 101 Post Card Victoria Bridge Brisbane Unknown Brisbane 102 Post Card Breakfast Creek Bridge Brisbane Q Unknown Brisbane 103 Post Card Melbourne Street Station South Brisbane Queensland Unknown Brisbane 104 Post Card General Post Office Queen Street Brisbane 1955.09.23 Brisbane 105 Post Card Customs House Brisbane 1904.11.04 Brisbane 106 Post Card Queen St Brisbane 1919.11.00 Brisbane 107 Post Card Queen St Brisbane Sidues Series No 627 Unknown Brisbane 108 Post Card Creek Street Brisbane Queensland Unknown Brisbane 109 Post Card Customs House and Garden Reach Brisbane Queensland 1910.00.08 Brisbane 110 Post Card Queen and Creek Streets Brisbane 1909.06.07 Brisbane 111 Post Card Queensland National Bank andd Queen Street Brisbane Queensland Unknown Brisbane 112 Post Card Queen Street and Treasury Buildings Brisbane 0000.09.07 Brisbane 113 Post Card Queen Street showing “Courier” Buildings Brisbane Unknown Brisbane 114 Post Card Intersection George & Roma Streets Brisbane Q 1916.05.11 Brisbane 115 Post Card Adelaide Street Brisbane Q Unknown Brisbane 116 Post Card G P O Queen Street Brisbane Q Unknown Brisbane 117 Post Card Treasury Building Brisbane 1906.03-20 Brisbane 118 Post Card Queen and Eagle Streets Brisbane 1907.02.01 Brisbane 119 Post Card Queen St Brisbane Unknown Brisbane 120 Post Card Queen St Brisbane Q Unknown Brisbane 121 Post Card Victoria Bridge Brisbane 1906.07.30 Brisbane 122 Post Card An Unusual View showing Head of Queen Street Victoria Bridge & South SideSuburbs Brisbane Q Unknown Brisbane 123 Post Card Petries Bight Brisbane Q Unknown Brisbane 124 Post Card South End Victoria Bridge Brisbane Q Unknown Brisbane 125 Post Card Customs House Brisbane Unknown Brisbane 126 Post Card Photo of toastrack car circa 1910 Unknown Brisbane 127 Post Card Treasury Buildings Brisbane Unknown Brisbane 128 Post Card East Street Rockhampton with Steam Tram & trailer Unknown Rockhampton 129 Post Card Post Office Rockhampton with steam tram Unknown Rockhampton 130 Post Card East Street Rockhampton with Steam Trams Rose Series P 7154 Unknown Rockhampton 131 Post Card William Street Rockhampton Rose Series P 7156 Unknown Rockhampton 132 Post Card Central East Street Rockhampton Q with Steam Trams Unknown Rockhampton 133 Photo Sturt St Ballarat Unknown Ballarat 134 Photo Bridge Street Ballarat Unknown Ballarat 135 Post Card George St Sydney Unknown Sydney 136 Post Card Elizabeth St Sydney Unknown Sydney 137 Post Card Railway Square Unknown Sydney 138 Post Card Sydney Harbor Bridge - pending receipt 139 Post Card Kings Cross - Mowbray Series with description on rear from C Roy G Field Unknown Sydney 140 Post Card Kings Cross - Mowbray Series with description on rear from C Roy G Field Unknown Sydney 141 Post Card Central Railway Station Sydney - Rose Series P6033 1954-01-26 Sydney 142 Post card William Street Darlinghurst looking towards City - Rose Series P6602 unknown Sydney 143 Post Card Circular Quay Sydney - Rose Series P6680 Unknown Sydney 144 Post Card View at Manly NSW - Rose Series B1003 Unknown Sydney 145 Post Card Hunter St Newcastle NSW - Rose Series P7843 Unknown Newcastle 146 Post Card Bank Corner Newcastle NSW - Mowbray Series No. 155 Unknown Newcastle 147 Post Card Hunter St Newcastle NSW Unknown Newcastle 148 Post Card Criterion Hotel Hunter St Newcastle NSW Unknown Newcastle 149 Photo Horse tram at Newtown Station 1894 to 1898 - PTC photo c1894 Newtown 150 Photo Steam tram motor No 3 at Railway Square 1879 1879 Sydney 151 Photo Railway steam tram c1900 with a horse drawn double deck bus c1900 Sydney 152 Photo Steam motor 5A and doubled deck bus Unknown Sydney 153 Photo Steam motor 53A with detail notes on rear 1922 Sydney 154 Photo Cable tram set at Milsons Point ferry terminal c1900 Sydney 155 Photo Early Sydney electric car - Ocean St - Rose Bay Unknown Sydney 156 Photo George St looking souoth c1905 c1905 Sydney 157 Photo Tram 165 at Circular Quay Unknown Sydney 158 Photo Tramcar ferry or transporter at The Spit Unknown Sydney 159 Photo tram 882 George St at Marti Place, 1937 1937 Sydney 160 Photo Tram 826 Railway Sq area Unknown Sydney 161 Photo Railway Sq in background, Broadway with double decker bus and toastrack car late 1930s Sydney 162 Photo Coupled St Pitt St? - photo Ben Parle Feb. 1950 Sydney 163 Photo Electric tram No. 2 - North Sydney with side trolley pole running Unknown Sydney 164 Photo George St - Horden's Corner Unknown Sydney 165 Photo George St at Martin Place c1920 Sydney 166 Photo Castlereagh St Sydney c1928 c1928 Sydney 167 Photo Railway Sqare c1920 c1920 Sydney 168 Photo Darling St Countereweight Unknown Sydney 169 Photo Trolley bus depot Unknown Sydney 170 Photo Trolley bus No. 14 Unknown Sydney 171 Photo Newcastle Railway Station with steam tram - Wharf Road?? Unknown Newcastle 172 Photo High St West Maitland - steam tram Unknown Maitland 173 Photo High St West Maitland - steam tram Unknown Maitland 174 Post Card Argent St near tram terminal Broken Hill NSW c1900 Broken Hill 175 postcard Argent St looking south Broken Hill - with Ken Magor's notes on rear Unknown Broken Hill 176 Photo Toronto - steam tram 61A Unknown Toronto 177 Photo 124A trial run 1911? Sutherland - Cronulla line 1911 Sutherland 178 Photo 103A at a tram stop Unknown Sydney 179 Photo Cable tram set at Crows Nest terminus grip car 12, trailer 22 Unknown Sydney 180 Photo Cable tram Queens Square Sydney 1903 Sydney 181 Photo cars 2078 and 2077 Chatswood late 1950s Sydney 182 Photo car 1877 Balmain area late 1950s Sydney 183 Photo Trolley bus - Rockdale destination Late 1950s Sydney 184 Photo Broken Hill steam tram - motor 18A North Tram Unknown Broken Hill 185 Photo Millars Point Sydney NSW - ferry/tram interchange, unknown Sydney All items imaged including the rear or back where there was writing of information. All files stored on the Museum's Photo Collections directory. Demonstrates through the medium of many images, Australian tramway systems and Ballarat's place in them.Album - heavy card covers, plastic lined with postcard or 6x4 photo sleeves.australia, tramways, postcards, photographs, steam trams, horse trams, cable trams, trolley buses -
 Tramway Heritage Centre
Book, Rules And Regulations, Unknown, thought to be 1960's
Book with tan coloured fabric cover, 68 internal pages. Book has many clippings added to the pages showing updated, replaced regulations. Is showing signs of wear, with worn edges of cover, a small deposit is stuck to the front cover in top right corner, most pages are yellowing.Cover is plain tan. First internal cover has insciption: Melbourne & Metropolitan Tramways Board Rules And Regulations (snip) Issued by Order of the Board. H.A. Warner, Secretary, 30/5/57 It is numbered 1651.book, mmtb, m&mtb, melbourne & metropolitan tramways board, rules and regulations -
 Tramway Heritage Centre
Book, How To Become An Efficient Conductor, Unknown, thought to be 1960's
Book with tan coloured cardboard cover, 20 internal pages. Pages 3 to 14 are text while pages 15 to 20 contain pictures, including how to properly wear a uniform. Is showing some signs of wear, with worn edges of cover, and stains on the front and back covers, pages are in good condition with very little yellowing.Cover is plain tan. First internal cover has insciption: Melbourne And Metropolitan Tramways Board (MMTB logo) A Brief Summary of the Essential Features of Your Job Caution + Commonsense = Safetybook, mmtb, m&mtb, melbourne & metropolitan tramways board, conductor, how to become an efficient conductor -
 Tramway Heritage Centre
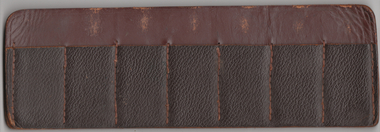
Ticket Holder, Unknown
A leather ticket holder for conductors to use to store books of tickets, it can hold seven books on either side for a 14 books of tickets.One side is showing wear and has markings where the leather is worn down around the area that the ticket book staples would be, the other side shows no markings.ticket holder, ticket, mmtb, m&mtb, melbourne & metropolitan tramways board -
 Tramway Heritage Centre
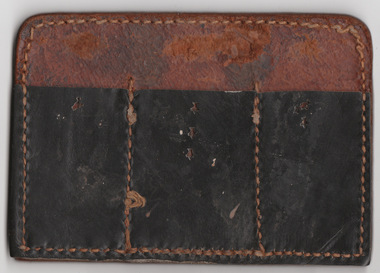
Ticket Holder, Unknown
A leather ticket holder for conductors to use to store books of tickets, it can hold three books on either side for a six books of tickets.Both sides are showing wear and have markings where the leather is worn down around the area that the ticket book staples would be.ticket holder, ticket, mmtb, m&mtb, melbourne & metropolitan tramways board -
 Ballarat Tramway Museum
Album - Photo Album, Wal Jack, MMTB No. 2, 1950's
Includes pages on 980, decorated trams, Birney, PMTT, HTT works, S, T, Footscray, AETA Tours, Q, U, W's, Works cars, opening of Bourke St, Essendon, Flinders St overpass, Kingsway, Point Ormond, G class bodies. For details of each photograph and layouts see - Wal Jack Melbourne Album Reg Item 5001 listingHas a strong association with Wal Jack and tramway developments within Australasia until 1964 and given their extent particular significance. Features M&MTB Melbourne Trams.Dark brown binder cloth covered folder, brass screw binders (2 of 3 in position), grey paper inside covers holding some 44 manila cover foolscap size sheets of card on which photos have been mounted using photo corners so various types, captions in black ink. Has a colour illustration of Flinders St station with three trams on inside front cover. de of covers, some 157 black and white photographs.. trams, tramways, mmtb, tramcars, melbourne, wal jack -
 Kew Historical Society Inc
Photograph - Looking towards Kew from Strathalbyn Street and High Street, c.1916
An electrified tram route from Melbourne along High Street replaced an original Horse Tram that terminated at the Kew Cemetery. This new tram only reached the bridge over the Outer Circle railway at the Harp Junction. The line was later extended to North Balwyn.Black and white print positive showing the view west along High Street, Kew (formerly Bulleen Road). In the centre distance is the Boroondara General (Kew) Cemetery. In the foreground, the road crosses the Outer Circle railway. The photograph reflects the level of urbanisation in Kew during the First World War. "Looking towards Kew from Strathalbyn St / High St corner, about 1916. Courtesy Mrs E Bennett, Kew East / Property of Miss Foley"trams -- kew, trams -- kew east, mmtb, m&mtb, tramways, harp junction -
 Kew Historical Society Inc
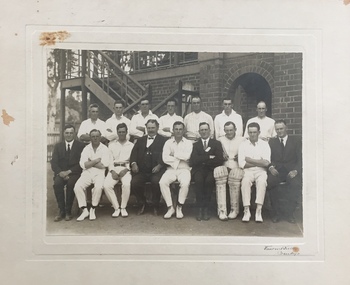
Photograph - M&MTB Cricket Team, c.1926-9
Arthur Henry Miers, pictured in the photograph played for cricket, football and baseball teams in Kew for a number of decades in the first half of the twentieth century. He was born on 22 November 1901, the son of Rodolph Theophilus Miers (1874-1951) and Margaret Frances (Margaretta) Fry (1875-1958). He had two brothers, Rodolph Cecil Miers (1904-80) and Charles Wilfred Miers (1906-88), and a sister Marjorie Elizabeth Miers (1911-84). Arthur Miers died in Kew on 25 January 1966, and after his body was cremated, his body was interred in the Mausoleum of Boroondara General (Kew) Cemetery.Rare early photograph of a Melbourne & Metropolitan Tramways Board cricket team from 1926-9A Melbourne & Metropolitan Tramways Board (MMMTB) cricket team and officials posed in front of a red brick grandstand, mounted on cardDonor note: CRICKET - PHOTO 8" X 6" / ARTHUR MIERS 2ND FROM RIGHT - BACK ROW / VINCENT KELLY - BENDIGOcricket teams, arthur miers, m&mtb -
 Kew Historical Society Inc
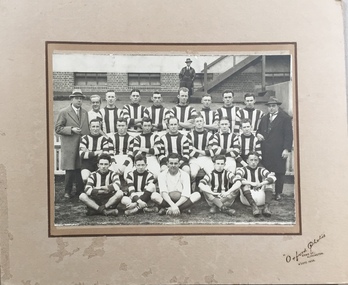
Photograph - M&MTB Works Football Team, Orford Studios, 1918
Arthur Henry Miers, pictured in the photograph played for cricket, football and baseball teams in Kew for a number of decades in the first half of the twentieth century. He was born on 22 November 1901, the son of Rodolph Theophilus Miers (1874-1951) and Margaret Frances (Margaretta) Fry (1875-1958). He had two brothers, Rodolph Cecil Miers (1904-80) and Charles Wilfred Miers (1906-88), and a sister Marjorie Elizabeth Miers (1911-84). Arthur Miers died in Kew on 25 January 1966, and after his body was cremated, his body was interred in the Mausoleum of Boroondara General (Kew) Cemetery.Rare early photograph of a football club team in c.1918 MMTB Works Football Team, posed in front of a brick grandstand, mounted on card. The team was possibly from the Brunswick Depot.Donor notes: 1918 FOOTBALL PHOTO 8" X 6" OVERALL SIZE 12" X 10" / ARTHUR MIERS 3RD FOOTBALLER FROM LEFT BACK ROW / OXFORD PHOTOS COMO ST. ALPHINGTON N'COTE 1656arthur miers, football clubs -
 Melbourne Tram Museum
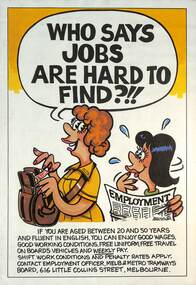
Poster - Be a Tram Conductoress, Augustine, c1982
Poster featuring a cartoon conductoress and a lady looking for a job, drawn by Augustine for the MMTB c1982. Has a description of the job, wages, and where to apply. See also item 7891 for another version.Demonstrates a MMTB Recruiting poster. Poster, full colour - two copies held.m&mtb, employment, conductors, recruiting, conductoress -
 Melbourne Tram Museum
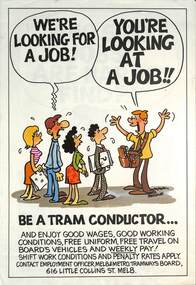
Poster, Augustine, "Be a Tram Conductor", c1982
Poster featuring a cartoon conductor and people looking for a job, drawn by Augustine for the MMTB c1982. Has a description of the job, wages, and where to apply. See also item 7892 for another version.Demonstrates a MMTB Recruiting poster. Poster, full colour - two copies held.m&mtb, employment, conductors, recruiting -
 Melbourne Tram Museum
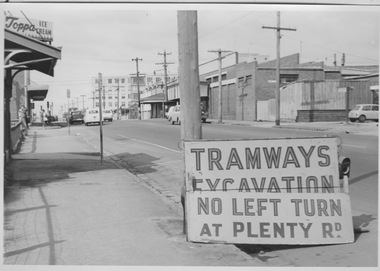
Photograph - Tramway excavation signage at Bell St and Plenty Rd, Preston, c1960s
Photograph shows Bell St, Preston looking eastward toward Plenty Rd with the newly constructed (1958-60) Preston and Northcote Community Hospital in the background. Signage in the foreground reads 'Tramway Excavation - No left turn at Plenty Rd' which may indicate works outside the East Preston tram depot (opened 1955) located in Plenty Rd less than 100 metres north of Bell St. In the mid-ground, several passengers wearing coats wait for a Bell St bus and numerous motor cars are shown on this narrow stretch of Bell St that would not be widened until the 1970s. While no note is attached, the model of motor cars suggest a date in the 1960s.Yields information about Bell St preston in 1960s Black and white photograph stuck to thick boardm&mtb, bell st, preston, plenty rd, tramway signage, preston and northcote community hospital, bell st widening -
 Melbourne Tram Museum
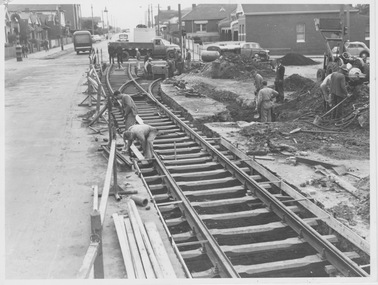
Photograph - Track laying Nicholson St and Holden St, 1956
Photograph shows construction of new track including a turnout to the right. While no notes are attached, landmarks indicate the photograph is of Nicholson St, North Fitzroy looking northward over Holden St/Brunswick Rd with a track connection to the remaining single track in those streets. This line was constructed in 1956 to replace the bus service.Yields information about construction of Bourke st electric line Black and white photograph with blue biro measurements on rearHandwritten notes read: '16, 8 2/16 x 6 1/8'm&mtb, track laying, nicholson st, east brunswick, holden st -
 Melbourne Tram Museum
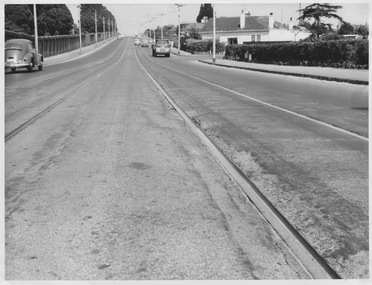
Photograph - Double track High St, Kew, 1960s or 1970s
Photograph shows double track section of tramway in High St, Kew looking southwest towards Childers St. The rails appear slightly sunken into the bitumen covered roadway, the Kew cemetery wall is prominent along the left of the roadway and numerous motor vehicles feature in the mid and background dating the photograph as 1960s or 1970s.Yields information about section of track before relaying in mas concrete. Black and white photographm&mtb, high st, kew, doulbe track, sunken track, childers st -
 Melbourne Tram Museum
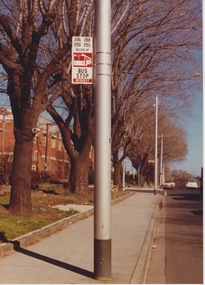
Album - Tram & bus stop signage
Photographs show information signage at tram and bus stops. Yields information about passenger signage Colour and black and white photographsm&mtb, signage, tram stop, bus stop -
 Melbourne Tram Museum
Photograph - VR tram 29 at Brighton Beach Baths terminus
Photograph shows bogie car VR tram 29 waiting on UP track with trolley pole raised, destination 'St Kilda Rly', driver's cab vacant, all windows closed and all off-side weather blinds open. Port Philip Bay is in the background and a partially obscured Road Closed sign is at the left of the photo. Yields information of Railways tramcar 34 and St Kilda Railway Station Black and white photograph with note on rear.In red biro: 'VR "Ricketty Kate" 29 Brighton Beach Baths Terminus Jan 58 D Print'victorian railways, vr tram 34, st kilda railway station, fitzroy st, m&mtb -
 Melbourne Tram Museum
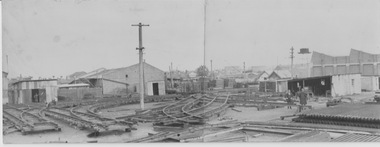
Photograph - Depot track laying, Dorcas St Special Works Yard, 1936
Photograph shows special works (track junctions) fully constructed within the Dorcas St yard. These will then be transported in large sections and installed at the listed locations.Yields information about track construction Black and white panoramic photograph with labels on rearHandwritten notes read: 'MMTB Dorcas St Yard Aug 1936; Crossing Barkly St & Carlisle St; Miller, Dundas & St Georges Rd Junction; High St & Glenferrie Rd Junction.'m&mtb, track laying, special works, dorcas st yard -
 Melbourne Tram Museum
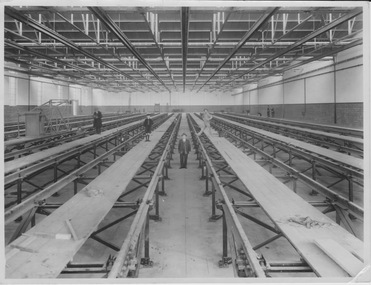
Album - Depot track laying
Photographs show track laying inside tram car sheds. One of the photos is the Malvern Depot new shed - shows the rail support method.Yields information about depot construction Colour and black and white photographsOne photograph is stamped on rear 'Sutcliffe Pty Ltd Photographers. Crowwell Buildings 306 Bourke St Melbourne'm&mtb, depot, car shed, track laying, east preston depot -
 Melbourne Tram Museum
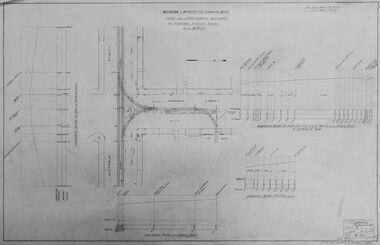
Drawing - Digtial image, Melbourne & Metropolitan Tramways Board (MMTB), "Plan and Longitudinal sections of Howard Street Siding", 2/1925
Digital image of a drawing for the access tracks to the Howard St car house or cable tram depot from Victoria St. Shows the plan and longitudinal sections. Prepared 23/2/1925 and signed by Mr Strickland Chief Engineer on 25/2/1925. This depot was made necessary by the construction of electric tram tracks in Flemington Road in 1925 which resulted in the closure of the Flemington Road car house near Racecourse Road North Melbourne.Yields information about the access track from Victoria St to the Howard St car house. Digital image of drawing P1613, "Plan and Longitudinal sections of Howard Street Siding".m&mtb, drawings, howard st, cable trams, car houses, depots -
 Melbourne Tram Museum
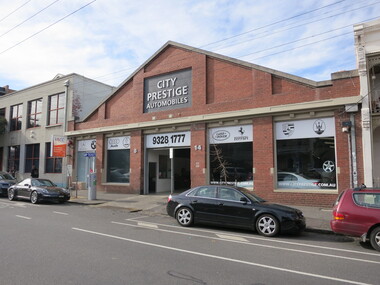
Photograph - Digtial image, Geoff Brown, Howard St North Melbourne - a cable tram car house or depot, June 2017
Set of 7 images of the last built (1925) cable tram car house or depot in Howard St North Melbourne. This building replaced the Flemington Road car house when the cable tram track in Flemington Road was electrified during July 1925. The building is on the Heritage Register - see reference. When closed in 1935, it was subsequently sold to a furniture company. In 2017 it was occupied by City Prestige Automobiles. During 2025, part of the building is occupied by a coffee shop - Le Bajo Milkbar. Photos by Geoff Brown June 2017 and Jan. 2025.Yields information about the Howard St cable car house. Set of 7 digital images of 8-10 Howard St North Melbournem&mtb, howard st, cable trams, car houses, depots -
 Melbourne Tram Museum
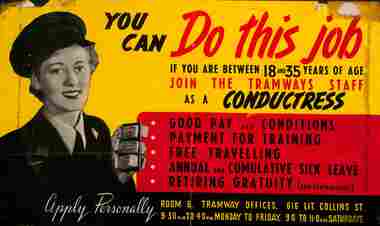
Poster, Melbourne & Metropolitan Tramways Board (MMTB), "You can do this job", 1950s
Poster featuring a conductress holding a set of tickets, titled "You can do this job". Has a description of the job, wages, and where to apply. Has a piece of paper taped over the ages correcting or changing it to between "18 and 35" years of age. Copy underneath shows "19 and 35" years of age. 1950s?Demonstrates a MMTB Recruiting poster. Poster, full colour - two copies taped together with adhesive tape on the sides.m&mtb, employment, conductors, recruiting, conductresses -
 Melbourne Tram Museum
Booklet, Melbourne & Metropolitan Tramways Board (MMTB), "Statistical Information re Electric Services", June 1955
Booklet titled "Statistical Information re Electric Services" - dated June 1955, providing details of the MMTB tram system, tramcars, tramcar description, wheels and brakes, electricity supply, per way or track, and East Preston Depot. It would have been issued at the time of the opening of the Bourke St lines. There are number of corrections marked in the booklet in ink.Demonstrates a MMTB publication giving statistics of the tramway system in 1955. Booklet - manila card covers, stapled on left hand side containing 6 duplicated sheets. Two copies held.m&mtb, statistics, track, electrical engineering, overhead, tramcars, wheels, brakes, east preston depot