Showing 331 items
matching stations of the cross
-
 National Wool Museum
Photo Album, 1930-1934
The Photo Album was created by Hans Beck, who interned with the donor's father (Wilhelm Eckels). The Photo Album depicts wool buying and sheep station related life between 1927-1939. Each photograph has been individually labelled.Straw coloured booklet with gold cursive writing on front cover spelling 'Photo Album'. Inside are 18 pages containing 63 photographs, each individually captioned. Internal pages show signs of age with discolouration, particularly in areas of previous adhesive application.Lettering, Front: Historic Interest Before WME arrived - 1930-1934 Wool & Sheep Photo Album Lettering, Internal by Page: Page 1 - Bottom Left Conner: Table from right:/ O. Hilbert sen. / WW. Richter, W. Ehrig/ Sampler: C. McCarthy/ at desk: E.S. Bottom Right Corner: 1927/ Wool Sample Room/ O. Hilbert/ Terranora Buildings/ Reiby Lane Page 2 - Bottom Middle: 1931/ Opening Sale/ Sydney Page 3 - Bottom Middle: 1934/ Opening Sale/ Sydney Page 4 - Bottom Middle: 1933/ Wool Auctions/ Brisbane Page 5 - Top Left Corner: 1930 Escapade/ Sydney to CAIRNS/ via Bourke, Central/ Queensland, Hinter-/ land & Atherton/ Table Lands Top Right Corner: Dubbo: Main Street/ (1st Night)/ 31.7.1930 Middle Right: 1st Night-"OUT"/ Stranded 11 miles/ from Bourke. (Red/ Dust in Carburettor Bottom Right Corner: Our "ERSKINE'/ hits Culvert &/ breaks both King-/pins. 1 1/2 miles from/ CUNNAMULLA SW-Q. Page 6 - Top Right Corner: "Rosevale Station"/ via Cunnamulla SWQ/ "Gidgi" country/ Gidgi Creak &/ Warrigo R. Middle Left: STAN HILL Page 7 - Middle Top: Blackhall/ Tattersall's Hotel/ Yarning at Cross-/roads. Middle Left: FO Wool Sales/ 22 Horse team Middle Right: Roadsign to:/ ISIS DOWNS &/ Homestead (Fart Page 8 - Middle Top: Muster: 3000 sheep/ Semi-circular/ Shearing shed/ ISIS DOWNS Page 9 - Middle Top: Shearer/ Water Tower/ Counting out/ pens Middle Bottom: Shearers Cook/ Hot Water & Soup/ Cake for Shearing/ Shed Charity Ball Page 10 - Middle Left: Isis Downs Home-/ stead with fire// flood Lookout./ Artesian Borewell Bottom Right: Manager: Moore/ & Alfred Loh-/ mann with kills/ Ducks & Emus Page 11 - Top Middle: PORTLAND DOWNS/ Muster: 10,000/ Sheep Bottom Left: Manager:/ Mr. Luck/ with A.L./Moore Page 12 - Middle Top: ROOKWOOD Station/ near/ HUGHENDEN/ Central NWQ Page 13 - Top Middle: 'HINTERLAND"/ Cattle country/ Spear Grass/ Tracks Bottom Middle: Crossings:/ Creeks: Quick/ Sand/ Rivers: rocky Page 14 - Middle Right: Lyndhurst stat/tion/ Head Stockman Middle Left: -Valley of la-/goons/ Station Bottom Right Corner: Master Atkinson/ saves/ Petrol shortage Page 15 - Top Middle: ATHERTON TABLELANDS/ LAKE BERRINE Middle Centre: Tropical Rainforest/ near/ Lake Berrine Page 16 - Top Middle: ATHERTON TABLELANDS/ Timber Country Bottom Middle Edge: CAIRNS/ Imperial Hotel Page 17 - Hans Beck with/ Betty Hilbert/ Lapstone Hill 1931 wool - transportation, wool sales, wool growing, wool growing agriculture farming, wool industry, wool sales - sydney, wool sales - brisbane, dubbo, 1930, bourke, cunnamulla, isis downs, shearing, shearing - lifestyle, portland downs, muster, hughenden, hinterland, lake berrine, cairns -
 Whitehorse Historical Society Inc.
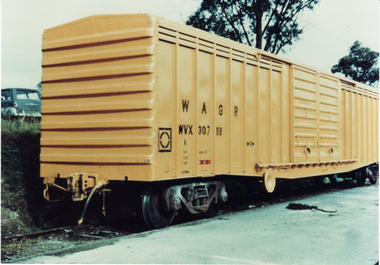
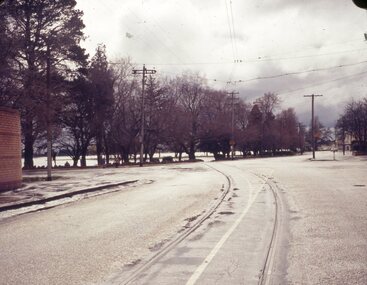
Photograph, Heavy railway wagons at Mitcham Railway siding - reflects the use of the siding by local industry - site is now a car park, C.1956
... Mitcham melbourne mitcham railway station glasson bill See also ...See also NP1810 Cross Ref. ND1837.mitcham railway station, glasson, bill -
 Whitehorse Historical Society Inc.
Article, Anne Payne, 2016
... Red Cross Blackburn Railway Crossing Blackburn Railway Station ...An interview with Anne Payne, recipient of the Whitehorse Citizen of the Year Award.An interview with Anne Payne, recipient of the Whitehorse Citizen of the Year Award.An interview with Anne Payne, recipient of the Whitehorse Citizen of the Year Award.payne, anne, whitehorse citizen of the year, blackburn lake sanctuary, blackburn lake sanctuary advisory committee, red cross, blackburn railway crossing, blackburn railway station -
Highett RSL Sub Branch Inc
Pennant:, "HMAS Southern Cross"
... Highett RSL Sub Branch Inc 1 Station St Highett melbourne ... -
![Badge - Mounted Badge for the Pioneer Regiment (world War 1), Crossed Axe [Pioneer Regiment]](/media/collectors/57fb2d7ed0cdd1171412db8e/items/5bfb668821eac00c0c722bfa/item-media/5bfb669d21eac00c0c724bcb/item-fit-380x285.jpg) Highett RSL Sub Branch Inc
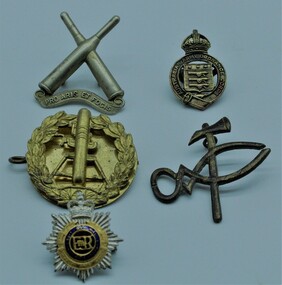
Highett RSL Sub Branch IncBadge - Mounted Badge for the Pioneer Regiment (world War 1), Crossed Axe [Pioneer Regiment]
Double Axe mounted on discNone -
Highett RSL Sub Branch Inc
Medals and Memrobilia:, Service Medals
Penant "HMAS Southern Cross" Fighting for Comforts Fund Badge 1939 - 1945 Medal George Wilson 1939- 1945 Australian defence Medal 1939 -1945 Empire Defence Medal Pacific Star 1939 -1945 Star PM6378 G W Wilson -
 Ballarat Heritage Services
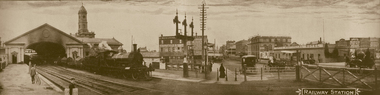
Photograph - Image - Black and White, Ballarat Railway Station, c1904, c1904
The Ballarat to Melbourne Railway line opened in 1862.Black and white panoramic view of the Ballarat Railway Station. A steam train is about to cross Lydiard Street North, and the railway gates are shut to prevent cars crossing the tracks. ballarat railway station, signals, railway track, provincial hotel, railway gates -
 Ringwood RSL Sub-Branch
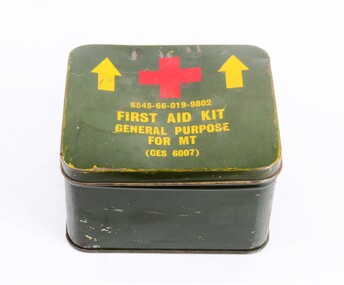
Equipment, First Aid Kit
First aid container metal Drab olive green metal container with red cross and yellow writing, Containg first aid equipment 3 first field dressing, Electrolyte powder, Kaolin compound powder, 1 band aid, adhiesive plastic patch. 3 Pin, Safety, Brass, Nickel plated, 1/2 inch 00083.1openend field dressing 00083.2 first field dressing un opened 00083.3 first field dressing un opened 00083.4 kaolin compound powder 00083.5 plastic band aid 00083.6 electrolyte powder 00083.7 safety pins X3 6545-66-019-9802 First Aid Kit General purpose For MT (CES 6007)first aid kit, medical supplies, bandages, metal medical container -
 Ringwood RSL Sub-Branch
Headgear Army, Soft Peak Cap
Rhodesian camaflauge hat belonging to T.G. Cross No. 48863. This cap was designed with a rear flap to keep rain and sun off the next. Velcro attached to hold flap up. -
 Ringwood RSL Sub-Branch
Badges (Assorted)
... Ringwood RSL Sub-Branch 16 Station Street Ringwood ...00515.1 Crossed bullets with latin inscription "pro aris et focis" 00515.2 Austn Ordnce collar badge with Kings Crown 00515.3 Mortarman trade badge 00515.4 Farriers badge 00515.5 Royal Aust Army Service Corps -
 Ringwood RSL Sub-Branch
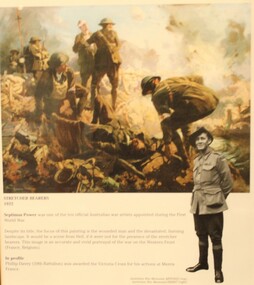
Printed Display Item - Army, Stretcher bearers painted in 1922 by Septimus Power, Circa 1990
Framed colour print of a painting of stretcher bearers with original held in Australian War Memorial Canberra. With profile photo of Phillip Davey from 10th Bn who was awarded the Victoria Cross. -
 Ringwood RSL Sub-Branch
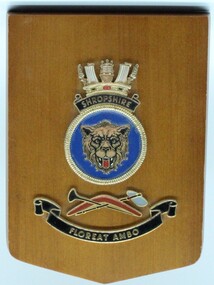
Shield - Navy, LEGA Pty Ltd, Circa 1990
Wooden shield with plastic fittings.Motto "Floreat Ambo". Emblem with Navy Crown with Lions head in the centre. Shropshire embossed over the navy Crown. Also with upturned boomerang with crossed aboriginal "tools". -
 Ringwood RSL Sub-Branch
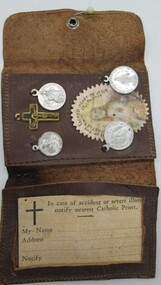
Souvenir, Circa WW1
Leather wallet containing crosses and St Christophers"In case of accident or severe illness notify nearest Catholic priest." -
 Ringwood RSL Sub-Branch
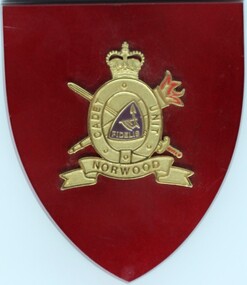
Plaque - Souvenir Plaque Norwood Cadets, Norwood cadets
Wooden base with plastic insignia, torch and sword crossed behind shield.Cadet Unit Norwood. Fidelis. -
 Ringwood RSL Sub-Branch
Equipment - Equipment - Royal Navy Pennant, Royal Navy Pennant, C 1912
The donor said that it was flown on Jellicoe's ship at the Battle of Jutland.White flag with a red cross with rope lanyard -
 Ambulance Victoria Museum
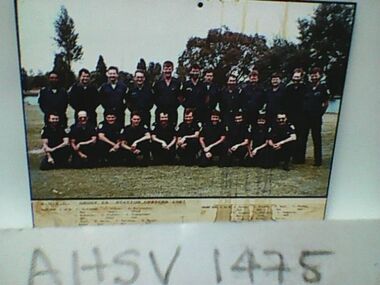
Photograph, Ambulance Officers Training Centre Group 6S Station Officer, 1987, 1987
Front Row L to R: A. Cross (MAS), C. McLeod (MAS), D. Hadj (MAS), P. Thomas (MAS), G. Cooper (MAS), B. Wallace (LDVAS), R. Ferguson (MAS), A. Kemp (EGAS), P. Brown (EGAS), L. Burton (MAS). Back Row: C. Mackinnon (MAS), C. Wilton (MAS), G. MacCreadie (LVDAS), A. McMaster (MAS), A. Pipkorn (CVDAS), R. Stanistreet (MAS), J. Wood (B&DAS)./ N. Smith (MAS), D. Matthews (MAS), V. Barger (MAS), D. Hyndman (MAS), D. Sell (MAS).Colour photograph of ambulance station officer traineesambulance officers training centre, station officer -
 Ringwood RSL Sub-Branch
Uniform
1178 Three shoulder patches for Australian Army band member 1178.1 Two shoulder patches depicting crossed rifles -
 Ballarat Tramway Museum
Photograph - Digital image, Chris Phillips, c1970
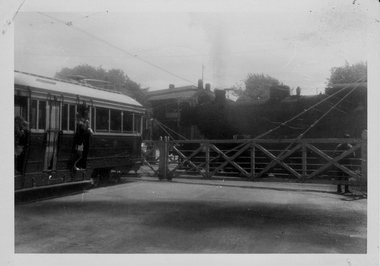
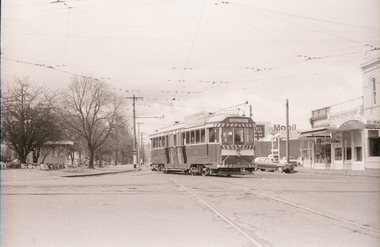
Yields information about the tram and railway operations in Lydiard St North at the railway level crossings.Digital image, black and white, of a bogie tram waiting at the Ballarat station level crossing for a locomotive (K class) to cross.trams, tramways, level crossings, lydiard st north, ballarat railway station, railways -
 Ballarat Tramway Museum
Ephemera - Ticket/s, State Electricity Commission of Victoria (SECV), Set of 9 pre-decimal or imperial currency, 1959 to 1965
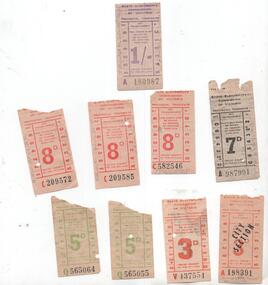
... Section" - A 198391 - used "Charing Cross to Station - tram 23..." - A 198391 - used "Charing Cross to Station - tram 23 - Sat 22 May ...Has a strong association with the Ballarat and Bendigo tramway system as being identified as being used on the system and for which trip on a specific date and demonstrates the ticket style prior to the time of decimal conversion in Australia.Set of 9 pre-decimal or imperial currency tickets used on the Ballarat or the Bendigo tramway system with three of them noted as to their use on the rear. 1 - 3d - orange ticket, over printed "City Section" - A 198391 - used "Charing Cross to Station - tram 23 - Sat 22 May 1965" 2 - 3d - orange - V437554 - on rear "Tram 34 Going to Mt Pleasant Easter Tuesday 31 March 1959". 3 - 5d - green - Q565064 - on rear in pencil "Quarry Hill to Charing Cross (No. 3) 4 - 5d - green - Q565055 - ditto, with addition of "2nd tram" 5 - 7d - black A987991 - on side in pencil' "Eaglehawk to Q Hill No. 3" 6 - 8d - red C209572 - "18 Drummond from L St N Sun 8 Nov. 1964" 7 - 8d- red - C209585 - "ditto" 8 - 8d - red - C582546 - "Q Hill to station tram 23, Sat 22 May 1965" 9 - 1/- purple - A 180987 - "18 decorated for Sebastopol Gold Cent. Sun 8 Nov. 1964 to Sebastopol" trams, tramways, tickets, secv, ballarat, bendigo, gold, sebastopol, quarry hill, mt pleasant, lydiard st north -
 Ballarat Tramway Museum
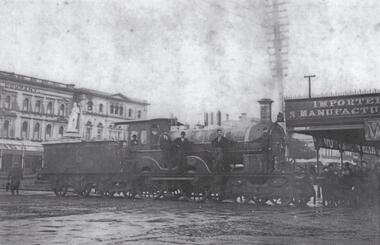
Document - Photocopy, Phoenix Foundry AA class 4-4-0 locomotive
Yields information and demonstrates the use of the railway line that connected the Phoenix Foundry and the railway yards at Ballarat and how it crossed the tram line.Photocopy of a Black and white photograph of a Phoenix Foundry AA class 4-4-0 locomotive, 1893c, crossing Sturt St at Armstrong St from the locomotive works om the way to be painted at a siding near the railway station. Has the Snows store in the background and the Poet Thomas Moore statue in the background. Photo from the Butrims and Macartney book on the Phoenix Foundry. trams, tramways, phoenix foundry, locomotives, sturt st, statues, armstrong st -
 Ballarat Tramway Museum
Slide - 27 mm sq slide/s - set of 9, Lilian Butler, View Point line:, 1971
Yields information about the View Point line.Set of 8 Hanimex colour slides, white cardboard mount and one AGFA blue and white plastic mount slide of the View Point line: .1 - Point where the View Point line crossed from Ripon St to Wendouree Parade at Webster St. .2 - Trackwork arrangement at the intersection of Ripon St and Sturt St - shows blue stone paving around the tracks. .3 - Ballarat A Power Station - Wendouree Parade and Ripon St .4 - View Point track looking North near the boat sheds. .5 - View Point looking north to the Lake View Hotel, shows part of the View Point loop which has been removed. .6 - Trackwork arrangement at the intersection of Ripon and Sturt St, looking south with the Western Hotel in the view. Shows the shelter at the left hand side. .7 - View of the View Point Loop, with a warning on coming trams sign and the Hotel in the far distance. .8 - View of the curves at Mair and Ripon St. .9 - Looking north from the View Point terminus along Wendouree Parade. Photo from the collection of Lilian Butler. ballarat, tramways, trams, wendouree parade, ripon st, view point, ballarat a power station, sturt st, shelters, signs, mair st -
 Ballarat Tramway Museum
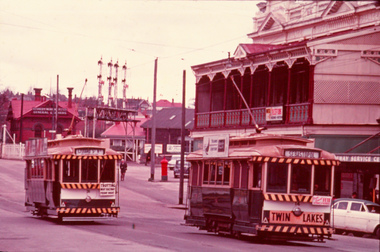
Slide - 35mm slide/s, Max Michell, No. 14 southbound in Lydiard St North, Sep. 1971
Yields information the operation of trams prior to the closure of the SEC system near the Railway Station. Has a strong association with the work of the Association of Railway Enthusiasts.AGFA blue and white plastic mount, 35mm slide, from the Association of Railway Enthusiast's film strip titled "Provincial Tramway Film Strip" of No. 14 southbound in Lydiard St North with a Twin Lakes and an auxiliary board advertising a Fete. No. 31 is northbound to Lydiard St North with an auxiliary board "Trotting Bray Raceway Friday Night". Photo taken Sept. 1971. In the background is the railway level crossing signal gantry and Reid's Coffee Palace. Note the letter box at the railway station yard. The film strip notes (Reg. Item 2560), provided the following caption details: "No. 31 and 14 cross at the end of the double track outside the Ballarat Coffee Palance - Oct. '68" Photo Max Michell Slide No. 7 Various notations by John as to the slide number and the trams in pencil and ink.tramways, trams, are, film strip, level crossings, lydiard st north, bray raceway, tram 31, tram 14 -
 Ballarat Tramway Museum
Negative - Set of 10, Campbell Duncan, 10/08/1971 12:00:00 AM
Yields information about tram operations and the street views at Hospital Corner.Set of 10 photographs taken on 10/8/1971 by Campbell Duncan of trams at Hospital Corner. .1 - No. 35 turning from Sturt into Drummond St South heading for Sebastopol. .2 - No. 31 inbound to Mt Pleasant with Hospital in background. Tram has two Johnny Walker whiskey roof adverts. .3 - No. 27 turning from Sturt St into Drummond St North, to the Gardens. Has the Mobil Service station and other buildings in the background and the ESCo street pillar. .4 - No. 43 turning from Drummond St South into Sturt St with the Southern Cross Hotel etc in the background. .5 - ditto - side on view. .6 - No. 39 and a single trucker on the north side of Sturt St - No. 39 has arrived from the depot via Sturt St west and about to turn to run to Grey St. .7 - ditto .8 - ditto .9 - ditto .10 - No. 39 crossing Sturt St in Drummond St.trams, tramways, hospital corner, drummond st, sturt st, electrical equipment, tram 35 tram 39 tram 31 tram 27 tram 43 -
 Ballarat Tramway Museum
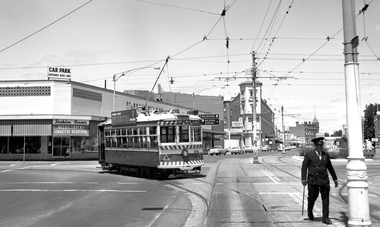
Photograph - Digital image, John Ward, 2/01/1972 12:00:00 AM
Digital image of the Bendigo tram 29 turning from Pall Mall into Mitchell St with the destination of Railway Station. In the background is the Fountain Plaza, advertising Melba Frocks and Gidgette Boutique, the City Family Hotel, Park Lane chicken shop. In the foreground is the Inspector returning the point bar to its holder on a pole. Photo by John Ward 2-1-1972. Slide title "04771 020172 7210-F SECV Birney tram 29 Pall Mall to Mitchell St at High St & View St Charing Cross Bendigo Vic"trams, tramways, bendigo, pall mall, mitchell st, charing cross, tram 29 -
 Ballarat Tramway Museum
Slide - 35mm slide/s - set of 5, Noel Simons, 19/11/1962 12:00:00 AM
Set of 5 transparencies taken on 19/11/1962 on Kodak mounts. 1186.1 - Bendigo 21 bound for Golden Square at Charing Cross with The Beehive buildings and shops in Pall Mall in the background. Trams has an ad for Cohns drinks on front bumper, SEC Best for Cooking roof ad. and Mamouney's furniture roof ad. Two women passengers boarding. 1186.2 - Bendigo 26 crossing Pall Mall from Mitchell St. bound for Eaglehawk with "Ezywalkin" shop in background. Tram has an SEC 'Electric Cooking' roof ad and a 'Streets Ice cream' ad on front dash. 1186.3 - Bendigo 7 arriving at the Charing Cross stop, bound for North Bendigo. Has a Huttons dash panel ad, a Castrol roof ad. Buildings as for 1186.1. Passengers waiting at the stop. 1186.4 - Bendigo 19 leaving Charing Cross for Golden Square with City Club Hotel alongside and other buildings as for 1186.1 in the background. Tram has Briquettes ad on front dash and SEC 'Electric Cooking' roof ad. 1186.5 - Bendigo 21in High St. at corner of Short St. heading for Charing Cross. Destination half way between Depot and Railway Station. Tram has ads for Cohns Drinks on dash panel, SEC 'Cook with Electricity' and a Sandhurst Milk roof ads.Information written on in black ink and date stamped in purple ink. 1186.1 - "No. 21 in Pall Mall at Charing Cross, Bendigo" 1186.2 - "No. 26 arriving at Alexandra Fountain, Charing Cross, Bendigo" 1186.3 - "No. 7 in Pall Mall at Charing Cross, Bendigo" 1186.4 - "No. 19 in High St., Bendigo, leaving Charing Cross for Golden Square" 1186.5 - "No. 21 in High St. Bendigo, at corner of Short St." tramways, trams, bendigo, charing cross, pall mall, high st., tram 7, tram 19, tram 21, tram 26 -
 Ballarat Tramway Museum
Slide - 35mm slide/s - set of 24, Noel Simons, 20/05/1971 12:00:00 AM
Set of 24 transparencies taken on 20/5/1971 on Kodak mounts. 1195.1 - Bendigo 19 arriving at Charing Cross en route to North Bendigo with Fountain Plaza and the City Family Hotel in the background. No. 19 has two roof ads for the SEC. -'Electricity better for cooking' and 'Everything's under control in my all electric kitchen' 1195.2 - as above, but standing at the Charing cross stop, with the Beehive Stores and other buildings along the east side of Pall Mall in the background. 1195.3 - No 21 ex Golden Square crossing View St. trackwork in front of No. 25 waiting to depart for Quarry Hill. No.21 has two roof ads (as for No.19 in 1195.1) and No.25 has one SEC roof ad and another. Ezywalkin sign in the background, and Fountain Plaza. 1195.4 - as for 1195.3, but after 21 has arrived and 25 left for Quarry Hill. Has Ezywalkin store and the Beehive store in the background. 1195.5 - No. 5 at the Eaglehawk terminus. Photo taken with a cannon in foreground looking along High St. Eaglehawk. Has shops on the west side of High St. in the background. 1195.6 - No. 5 at the Eaglehawk terminus, close up of the rear of the tram - note tow bar arrangement. Has destination of Quarry Hill. 1195.7-Nos.25 and 5 crossing at the Thorpe St. Loop, California Gully. No. 25 bound for Eaglehawk (has SEC Briquette and electric cooking roof ads) and 5 en route for Quarry Hill with a SEC and Cinzano roof ad. 1195.8 - as for 1195.7, but after trams have passed each other. Has Borough Auto Service building in the background. 1195.9 - No. 5 in Mt Korong Road, towards Bamard Street, photo taken after tram has passed photographer. 1195.10 - No. 30 at the Golden Square terminus with the Milk Bar on the right hand side of the photograph. 1195.11 - No. 30 inbound at Fire Station Loop, High St. Golden Square. Has old fire station in the background. Passengers are boarding the tramcar. 1195.12 - No. 30 in High St, bound for North Bendigo between Vine and Wattle Streets. 1195.13 - No. 5 bound for Eaglehawk waits at Iron Bark Gully Loop, at Hayes St. 1195.14 - No. 5 and No. 2 crossing at Iron Bark Gully Loop. 1195.15 - No. 5 bound for Eaglehawk leaving the Manchester Loop, Long gully. 1195.16 - No. 5 passing William Street, Long Gully en route to Eaglehawk. 1195.17 - No. 5 just before the California Gully Crossing Loop. 1195.18 - Nos. 5 and 26 crossing at California Gully crossing Loop. No. 5 heading to Eaglehawk, 26, Quarry Hill. 1195.19 - No. 5 in High St. Eaglehawk with Bob Moyle's Victoria Hotel and the TAB in the background. 1195.20 - No. 5 in High St. Eaglehawk approaching the terminus. Photo taken after the tram has passed the photographer. Has Foodland store and J. Best Fruit supply in the background, along with Eaglehawk Town Hall. 1195.21 - No. 5 at the Eaglehawk terminus, photo taken along seldom used track along High St. 1195.22 - as for 1195.22 - but at the very end of the track. 1195.23 - No. 5 en route for Quarry Hill climbs High St. Eaglehawk with the Victoria Hotel and Eaglehawk Town Hall in the background. 1195.24 - No. 5 and 25 crossing at Jobs Gully Loop. Note 25 has a black on white destination roll, while No. 5 has a white on black destination roll. Information written on in black ink and date stamped on purple ink. 1195.1 - "No. 19 arrives at Charing Cross Bendigo from Golden Square" 1195.2 - "No. 19 about to leave Charing Cross for North Bendigo" 1195.3 - "No. 25 awaiting departure for Quarry Hill, watches No. 21 arrive at Charring Cross from Golden Square" 1195.4 - "No. 21 on North Bendigo service and No. 25 on Quarry Hill run await departure at Charing Cross" 1195.5 - "No. 5 at Eaglehawk terminus" 1195.6 - "No. 5 at Eaglehawk terminus" 1195.7 - "Nos. 5 and 25 crossing at Thorpe St. Loop, California". 1195.8 - "Nos. 25 and 5 crossing Thorpe St. Loop, California Gully". 1195.9 - "No. 5 descending Mt Korong Rd. towards Bamard St." 1195.10 - "Birney car No. 30 at Golden Square terminus" 1195.11 - "Birney car No. 30 in High Street near Thistle Street (Fire Station Loop)" 1195.12 - "No. 30 in High St. between vine and Wattle Streets" 1195.13 - "No. 25 at Hayes Street Loop Iron Bark". 1195.14 - "Nos. 2 and 5 crossing at Hayes Street Loop Iron Bark" 1195.15 - "No. 5 at Manchester Loop opposite Havilah Road, Long Gully" 1195.16 - "No. 5 passing William Street, Long Gully". 1195.17 - "No. 5 at California Gully" 1195,18 - "Nos. 26 and 5 at Thorpe St. Loop, California Gully". 1195.19 - "No. 5 in High St. Eaglehawk". 1195.20 - "No. 5 approaching Eaglehawk terminus" 1195.21 - "No. 5 at Eaglehawk terminus" 1195.22 - "No. 5 at Eaglehawk terminus" 1195.23 - "No. 5 in High St. Eaglehawk" tramways, trams, bendigo, charing cross, eaglehawk, california gully, golden square, iron bark gully, jobs gully, tram 2, tram 5, tram 19, tram 21, tram 25, tram 26, tram 30 -
 Ballarat Tramway Museum
Slide - 35mm slide/s - set of 4, Noel Simons, 24/05/1971 12:00:00 AM
Set of 4 transparencies taken on 24/5/1971 on Kodak mounts. 1199.1 - No. 21 in High St. at junction with old High St., near Fire Station Loop. Tram has two SEC roof ads. 1199.2 - No. 21 in High St. between Shamrock and Thistle Sts. Photo taken after the tram has passed the photographer. 1199.3 - Photo of a green box containing timetables for the four Bendigo routes. Located at Charing Cross. 1199.4 - Bendigo No. 23 en route to Eaglehawk at Charing Cross, with two SEC roof ads 'Everything's fine in my all electric kitchen' and "Switch to electric cooking'. Has the Ezywalkin building and the Beehive building in the background. Information written on in black ink and date stamped on purple ink. 1199.1 - "No. 21 in High St. at junction with old High St., near Fire Station Loop." 1199.2 - "No. 21 in High St. between Shamrock and Thistle Sts." 1199.3 - "Bendigo Tramways timetable at Alexandra Fountain Charing Cross." 1199.4 - "No. 23 at Alexandra Fountain Charing Cross, Bendigo." tramways, trams, bendigo, timetables, charing cross, high st., tram 21, tram 23 -
 Ballarat Tramway Museum
Slide - 35mm slide/s - set of 32, Noel Simons, 25/02/1971 12:00:00 AM
Set of 31 transparencies taken on 25/2/1972 on Kodak mounts. 1201.1 - Bendigo No. 26 in Bond St. just after leaving Long Gully en route for Quarry Hill. Has Norris Supermarket in background. Has two SEC roof ads. 1201.2 - No. 26 climbing View St. from Charing Cross en route to Eaglehawk. Has ANZ bank and AMOCO service station in background. 1201.3 - as for 1201.3, but after tram has passed photographer. Has buildings west of Mackenzie St. in photograph. 1201.4 - Tram stop and centre of the road pole with two "CARS STOP BY REQUEST" signs mounted on pole at the corner of Mackenzie St. 1201.5 - same position as for 1201.3, but with No. 5 descending the street. 1201.6 - same position as for 1201.2, but with No. 5 descending the street. Photo taken after tram has passed photographer. 1201.7 - No. 7 in Nolan St. from across the park at Lake Weeroona. 1201.8 - No. 7 entering McCrae St from Nolan St. - distant view. Note "TRAM "sign on left hand side under tree and overhead in McCrae St. from former track that once was in this street. 1201.9 - No. 7 in High St. with Cathedral in background. Tram en route to North Bendigo. Note scaffolding around Cathedral main spire area. 1201.10 - No. 7 crossing Bendigo Creek bridge in High St. near Golden Square. Has a Caltex Service station in the background. 1201.11 - No. 7 at Golden Square terminus with Sunburst Fruit Juices and a Peters Ice cream delivery vans alongside. 1201.12 - as for 1201.11 but photo taken from behind tram, with the end of the rails in the photograph. 1201.13 - No. 7 and 21 in Pall Mall at Charing Cross with No. 5 in the background. Taken some distance away from the location. 1201.14 - No. 7 at Golden Square terminus, taken a short distance from the tram terminus. Shows Milk Bar on right hand side and the hotel on the left hand side. Taken from the south side of the roadway. 1201.15 - as from 1201.14 but taken from the north side of the roadway. 1201.16 - No 5 waiting at California Gully loop. Distant photo showing surrounds 1201.17 - No. 5 en route for Quarry Hill crossing No. 26 at California Gully. 1201.18 - No. 26 at Eaglehawk terminus with Eaglehawk Town Hall and Post Office in background. 1201.19 - No. 21 arriving at Charing Cross en route to North Bendigo. Has Alexandra Fountain in the background, ANZ bank RACV building, and other buildings on the north side of Pall Mall or Nolan St. 1201.20 - No. 26 en route for Quarry Hill at Charing Cross, with crew standing by front door. Has Colonial Mutual life building, Armstrong Tyre Service (Firestone) and a sign for Cohns Drinks in the background. 1201.21 - as for 1201.20 but with No. 5 en route to Eaglehawk now in photograph. 1201.22 - No. 26 at Quarry Hill terminus. 1201.23 - No. 26 at Quarry Hill terminus, view of front portion of tram only from a gate at the Bendigo cemetery. 1201.24 - Track at the end of the Quarry Hill line showing the point blades of the former "Y" terminus and the overhead for this. 1201.25 - No. 2 at the Quarry Hill terminus, looking along the former Trackwork. 1201.26 - as for 1201.25 1201.27 - number not used. 1201.28 - Golden Square terminus from some distance from the actual terminus, showing the Warning sign "TRAM" for motorists from the south. No. 7 at the terminus. 1201.29 - No. 7 passing through the Golden Square shopping centre. Numerous cars and pedestrians. Tram en route for North Bendigo. 1201.30 - No. 7 in High St. Golden Square, en route for North Bendigo. Photo taken after tram has passed photographer. 1201.31 - No. 7 in High St. just past Wattle St. with the Cathedral in the background. Tram has two SEC roof ads good side on photo, 'Everything's fine in my all electric kitchen' and 'Electrical cooking - clean, quick, economical'. 1201.32 - No. 7 in High St. nearing Wattle St. Has Cathedral in the background. Photo taken after tram has passed photographer.Information written on in black ink and date stamped on purple ink. 1201.1 - "No. 26 in Bond St just after leaving Long Gully" 1201.2 - "No. 26 climbing View St. from Charing Cross" 1201.3 - "No. 26 ascending View St. from Charing Cross (At Mackenzie St.)" 1201.4 - "View St. & Mackenzie St." 1201.5 - "No. 5 in View St. near Mackenzie St." 1201.6 - "No. 5 in View St. nearing Charing Cross." 1201.7 - "No. 7 in Nolan St. seen from Lake Weeroona Park." 1201.8 - "No. 7 entering McRae St. from Nolan St. Note "TRAM" warning sign on left. 1201.9 - "No. 7 in High St. passing Short St." 1201.10 - "No. 7 crossing Bendigo Creek bridge in High St. near Golden Square." 1201.11 - "No. 7 at Golden Square terminus" 1201.12 - "No. 7 at Golden Square terminus" 1201.13 - "No 7, 21 and 5 at Charing Cross" 1201.14 - "No. 7 at Golden Square terminus" 1201.15 - "No. 7 at Golden Square terminus" 1201.16 - "No 5 waiting at California Gully loop." 1201.17 - "Nos. 5 and 26 crossing at California Gully loop" 1201.18 - "No. 26 at Eaglehawk terminus" 1201.19 - "No. 21 arriving at Charing Cross from Golden Square" 1201.20 - "No. 26 at Charing Cross" 1201.21 - "Nos. 5 and 26 at Charing Cross." 1201.22 - "No. 26 at Quarry Hill terminus" 1201.23 - "No. 26 at Quarry Hill terminus seen through the gates of the Bendigo Cemetery." 1201.24 - "Quarry Hill terminus showing remains for former double track layout abandoned before 1964." 1201.25 - "No. 2 at Quarry Hill terminus" 1201.26 - "No. 2 at Quarry Hill terminus" 1201.28 - "The Southern approach to Golden Square with No. 7 standing at the terminus, "TRAM" warning sign on the left. 1201.29 - "No. 7 passing through Golden Square Shopping Centre" 1201.30 - "No. 7 in High St. Golden Square" 1201.31 - "No. 7 in High St. passing Wattle St." 1201.32 - "No. 7 in High St. nearing Wattle St."tramways, trams, bendigo, bond st., view st., nolan st., high st., eaglehawk, california gully, charing cross, quarry hill, trackwork, tram 2, tram 5, tram 7, tram 21, tram 26 -
 Ballarat Tramway Museum
Slide - 35mm slide/s - set of 25, Noel Simons, 26/02/1972 12:00:00 AM
Set of 25 transparencies taken on 26/2/1972 on Kodak mounts. 1204.1 - Bendigo No. 5 - just arrived at Manchester Loop near Havilah Road, Long Gully. Photo taken after tram has passed photographer. 1204.2 - No. 26 in Backhaus St. Long Gully passing William St, en route to Quarry Hill. Photo taken after tram has passed photographer. 1204.3 - No. 5 climbing the High St. Hill Eaglehawk, heading for Quarry Hill with the buildings on the West side of High St. in the background, including the Eaglehawk Town Hall. 1204.4 - as for 1204.3, but tram close up. 1204.5 - as for 1204.3, but after tram has passed photographer. 1204.6 - No. 5 at intersection of Mt Korong Road Ironbark and Calder Highway, with the AMPOL service 'station in the background. Photo taken after tram has passed photographer. 1204.7 - No. 26 en route to Quarry Hill shortly after leaving Needle Loop, passing William St., Long Gully. 1204.8 - No. 5 at California Gully Loop, picking up a passenger, with the shops at Long Gully in the background. Photo taken after tram has passed photographer. 1204.9 - No. 5 in Long Gully, en route to Quarry Hill. Photo taken after tram has passed photographer. 1204.10 - No. 2 at Eaglehawk terminus with the Eaglehawk Town Hall and Post Office in the background. Tram has two SEC roof ads. 1204.11 - No. 2 at Eaglehawk terminus, close up. 1204.12 - as for 1204.11, but through the park gates. 1204.13 - as for 1204.11, but with tram stop shelters in the foreground and buildings on the West side of High St in the background. 1204.14 - No. 2 in Mt. Korong Rd, midway between California Gully Loop and Needle Loop. Photo taken after tram has passed photographer. 1204.15 - No. 5 in Long Gully, en route to Quarry Hill. 1204.16 - as for 1204.15, but with trams departed loop. Has an ESSO service station in the background. 1204.17 - No. 26 leaves Charing Cross up View St.. Photo taken after tram has passed photographer. Has Armstrong Tyre Service, Cohns Drinks ad on a building and the T&G building in the background. Also Firestone ads on the tyre service building. 1204.18 - No. 5 waits at Charing Cross with the Alexandra Fountain in the background. Tram has two SEC roof ads, 'Everything s fine in my all electric kitchen' and 'Electricity Best for Cooking'. Has RACV, Colonial Mutual Life buildings in the background and the planting areas around Charing Cross gardens in the foreground. 1204.19 - No. 21 en route to North Bendigo arrives at Charing Cross, with passengers waiting to board. No. 5 in the background. In the background is the Fountain Gate Plaza building and the City Family Hotel. 1204.20 - as for 1204.19, but with No. 7 en route to Golden Square. 1204.21 - as for 1204.19, but closer up. 1204.22 - as for 1204.18 1204.23 - No. 25 in Nolan St. near the crossing of Bendigo Creek, running a special tram tour. 1204.24 - No. 25 on a special charter, in Weeroona Ave. at Cnr of Caledonia St. passing the Gas works. 1204.25 - Nos. 25 (showing Golden Square), 7 and 26 at Charing Cross. Has fountain in the background.Information written on in blue ink and date stamped on purple ink. 1204.1 - "No. 5 at Manchester Loop, near Havilah Rd. Long Gully." 1204.2 - "No. 26 in Backhaus St. Long Gully passing William St." 1204.3 - "No. 5 in High St. Eaglehawk." 1204.4 - "No. 5 in High St. Eaglehawk." 1204.5 - "No. 5 in High St. Eaglehawk." 1204.6 - "No. 5 in Mt. Korong Rd., Ironbark, passing Calder Highway Junctn." 1204.7 - "No. 26 shortly after leaving Needle Loop, passing William St., Long Gully. No. 5 cresting hill in distance." 1204.8 - "No. 5 at California Gully Loop." 1204.9 - "No. 5 in Long Gully" 1204.10 - "No. 2 at Eaglehawk terminus." 1204.11 - "No. 2 at Eaglehawk terminus." 1204.12 - "No. 2 at Eaglehawk terminus." 1204.13 - "No. 2 at Eaglehawk terminus." 1204.14 - "No. 2 in Mt. Korong Rd, midway between California Gully Loop and Needle Loop. 1204.15 - "Nos. 2 and 26 crossing at Long Gully." 1204.16 - "No. 26 leaves Long Gully loop for Eaglehawk as No. 2 pulls out of the far end towards Bendigo" 1204.17 - "No. 26 beginning the climb up View St. from Charing Cross." 1204.18 - "No. 5 at Charing Cross." 1204.19 - "No 21 arrives at Charing Cross from Golden Square while No. 5 awaits departure time for Eaglehawk." 1204.20 - "Nos. 7, 21, and 2 (behind which is No. 5) at Charing Cross." 1204.21 - "Nos. 7, 21, and 2 at Charing Cross." 1204.22 - "No. 5 at Charing Cross." 1204.23 - "No. 25 in Nolan St. near Bendigo creek crossing" 1204.24 - "No. 25 in Weeroona Ave. at cnr of Caledonia St." 1204.25 - "Nos. 25, 7, 26 and 2 (behind 26) at Charing Cross."tramways, trams, bendigo, eaglehawk, long gully, california gully, charing cross, north bendigo, tram 2, tram 5, tram 7, tram 21, tram 25, tram 26 -
 Ballarat Tramway Museum
Slide - 35mm slide/s - set of 23, Noel Simons, 26/02/1972 12:00:00 AM
... Square Myrtle St. Fire Station Depot Charing Cross tram 5 tram 7 ...Set of 23 transparencies taken on 26/2/1972 on Kodak mounts. 1205.1 - Bendigo No. 25 on a special tour at Fire Station Loop, en route to Golden Square. 1205.2 - No. 21 and 25 crossing at Fire Station Loop, note photographers on the ground. No. 21 bound for North Bendigo. 1205.3 - as for 1205.3, but with trams departing loop and fire station in the background. 1205.4 - No. 25 at Golden Square Hotel with 'Rodda's Golden Square Hotel' in the background. Tram on a special tour, but showing destination of North Bendigo. 1205.5 - as for 1205.4 - but showing special. Has the end of the track in the photograph. 1205.6 - Nos. 7 and 25 (on a special tour) crossing at Myrtle St. Loop. 1205.7 - No. 7 leaving Myrtle St. loop with the mine poppet head in the background. Photo taken after tram has passed photographer. (Print made of this slide 10/2001 for use in the Gold Gold Gold exhibition of 10/2001 - See Reg. item 1979. 1205.8 - No. 25 entering depot. Tram showing 'special'. Tennis court on right has players. Photo taken after tram has passed photographer. 1205.9 - No. 24 (showing 'special') and No. 20 (showing 'Long Gully') at Bendigo Depot. 1205.10 - No. 24 on a special charter, leaving Bendigo depot. Tram has two 'Johnnie Walker' roof ads. 1205.11 - Bendigo depot with 29, 25 and a bogie car inside the depot doors. 1205.12 - As for 1205.11, but with 28 and 29. 1205.13 - No. 24 standing at front entrance of Bendigo depot with No. 20 in the background. 1205.14 - No. 24 running out into McCrae St showing special, with conductor on front step. 1205.15 - No. 24 in Caledonia St. at corner of Thunder St with the Gasworks in the background. 1205.16 - No. 5 en route for Quarry Hill at Charing cross with No. 26 (en route for Eaglehawk) about to arrive. Has former crossover at this location in the foreground. Has the Ezywalkin building in the background. 1205.17 - No. 5 and 26 at Charing Cross, with the Alexandra Fountain in the foreground and the Beehive and Ezywalkin buildings in the background. No.26 has two SEC roof ads. 1205.18 - Charing Cross looking along Pall Mall with trams 7 and 21 and 26 in the picture. 1205.19 - Charing Cross, with 21 departing for Golden Square and No. 5 heading for Quarry Hill. Has the Ezywalkin and the Beehive buildings in the background. 1205.20 - as for 1205.19, but a few moments later. Adjacent pole has a "NO ROAD" letter in reflectors vertically. 1205.21 - Charing Cross with Nos. 25, 21, 26 and 7, looking south from Pall Mall end. 1205.22 - No. 24 crossing Mitchell St. en route for Golden Square, showing 'special' with the Beehive and Ezywalkin buildings in the background. 1205.23 - Charing Cross with Nos. 24, 21 and 7 in the photo and Fountain Plaza in the background. Print of 1205.7 - stored in box D1.Information written on in blue ink and date stamped on purple ink. 1205.1 - "No. 25 at Fire Station Loop High Street, Golden Square." 1205.2 - "Nos. 25 and 21 crossing at Fire Station Loop, near Golden Square." 1205.3 - "Nos. 25 and 21 crossing at Fire Station Loop, near Golden Square." 1205.4 - "No. 25 at Golden Square terminus." 1205.5 - "No. 25 at Golden Square terminus." 1205.6 - "Nos. 7 and 25 crossing at Myrtle St. Loop." 1205.7 - "No. 7 leaving Myrtle St. Loop." 1205.8 - "No 25, entering Bendigo Depot." 1205.9 - "Nos. 20 and 24 at Bendigo Depot." 1205.10 - "No. 24 at Bendigo Depot." 1205.11 - "Nos. 25 and 29 at Bendigo Depot." 1205.12 - "Birney cars 29 and 28 at Bendigo Depot." 1205.13 - "No. 24 (with 20 beyond) at Bendigo Depot." 1205.14 - "No. 24 entering McCrae St. from Arnold St." 1204.15 - "No. 24 in Caledonia St. at cnr of Thunder St." 1204.16 - "No. 5 waits at Charing Cross as No. 26 arrives from Quarry Hill. Note remains of crossover abandoned on relocation in 1965." 1204.17 - "Nos. 5 and 26 at Charing Cross." 1204.18 - "Nos. 26, 7 and 21 at Charing Cross (No. 5 just visible behind No. 26)." 1204.19 - "No. 21 leaves Charing Cross for Golden Square as No. 5 starts off for Quarry Hill." 1204.20 - "No. 21 swings onto the single track Golden Square line as No. 5 heads into Mitchell St. towards Quarry Hill." 1204.21 - "Nos. 25, 21 and 26 watch No. 7 arrive at Charing Cross from Golden Square." 1204.22 - "No. 24 at Charing Cross crossing Mitchell St." 1204.23 - "Nos. 24, 21 and 7 at Charing Cross."tramways, trams, bendigo, golden square, myrtle st., fire station, depot, charing cross, tram 5, tram 7, tram 20, tram 21, tram 24, tram 25, tram 28, tram 29