Showing 666 items matching "table cover"
-
 Flagstaff Hill Maritime Museum and Village
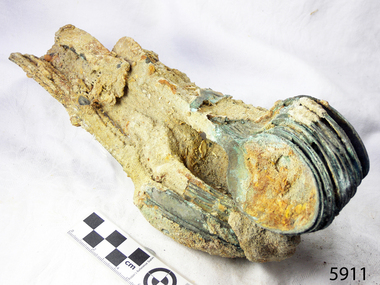
Domestic object - Spoon, circa 1878
These table spoons are from the wreck of the LOCH ARD, a Loch Line ship of 1,693 tons which sailed from Gravesend, London, on 2 March 1878 with 17 passengers and a crew of 36 under Captain George Gibbs. “The intention was to discharge cargo in Melbourne, before returning to London via the Horn with wool and wheat”. Instead, on 1 June 1878, after 90 days at sea, she struck the sandstone cliffs of Mutton Bird Island on the south west coast of Victoria, and sank with the loss of 52 lives and all her cargo. The manifest of the LOCH ARD listed an array of manufactured goods and bulk metals being exported to the Colony of Victoria, with a declared value of £53,700. (202 bills of lading show an actual invoice value of £68, 456, with insurance underwriting to £30,000 of all cargo). Included in the manifest is the item of “Tin hardware & cutlery £7,530”. These table spoons are some of 482 similar items of electro-plated cutlery from the LOCH ARD site, comprising spoons and forks of various sizes but all sharing the same general shape or design and metallic composition. 49 of these pieces display a legible makers’ mark — the initials “W” and “P” placed within a raised diamond outline, which is in turn contained within a sunken crown shape — identifying the manufacturer as William Page & Co of Birmingham. An electroplater’s makers’ marks, unlike sterling silver hallmarks, are not consistent identifiers of quality or date and place of manufacture. A similar line of five impressions was usually made to impress the consumer with an implication of industry standards, but what each one actually signified was not regulated and so they varied according to the whim of the individual foundry. In this case, the maker’s marks are often obscured by sedimentary accretion or removed by corrosion after a century of submersion in the ocean. However sufficient detail has survived to indicate that these samples of electro-plated cutlery probably originated from the same consignment in the LOCH ARD’s cargo. The generally common range of marks are drawn from 255 tea spoons, 125 dessert spoons, and 99 table forks. These marks are clearly visible in 66 instances, while the same sequence of general outlines, or depression shapes, is discernible in another 166 examples. Suggested trade names for William Page & Co’s particular blend of brass plating are ‘roman silver’ or ‘silverite’. This copper alloy polishes to a lustrous gold when new, discolouring to a murky grey with greenish hue when neglected. HISTORY OF THE LOCH ARD The LOCH ARD belonged to the famous Loch Line which sailed many ships from England to Australia. Built in Glasgow by Barclay, Curdle and Co. in 1873, the LOCH ARD was a three-masted square rigged iron sailing ship. The ship measured 262ft 7" (79.87m) in length, 38ft (11.58m) in width, 23ft (7m) in depth and had a gross tonnage of 1693 tons. The LOCH ARD's main mast measured a massive 150ft (45.7m) in height. LOCH ARD made three trips to Australia and one trip to Calcutta before its final voyage. LOCH ARD left England on March 2, 1878, under the command of Captain Gibbs, a newly married, 29 year old. She was bound for Melbourne with a crew of 37, plus 17 passengers and a load of cargo. The general cargo reflected the affluence of Melbourne at the time. On board were straw hats, umbrella, perfumes, clay pipes, pianos, clocks, confectionary, linen and candles, as well as a heavier load of railway irons, cement, lead and copper. There were items included that intended for display in the Melbourne International Exhibition in 1880. The voyage to Port Phillip was long but uneventful. At 3am on June 1, 1878, Captain Gibbs was expecting to see land and the passengers were becoming excited as they prepared to view their new homeland in the early morning. But LOCH ARD was running into a fog which greatly reduced visibility. Captain Gibbs was becoming anxious as there was no sign of land or the Cape Otway lighthouse. At 4am the fog lifted. A man aloft announced that he could see breakers. The sheer cliffs of Victoria's west coast came into view, and Captain Gibbs realised that the ship was much closer to them than expected. He ordered as much sail to be set as time would permit and then attempted to steer the vessel out to sea. On coming head on into the wind, the ship lost momentum, the sails fell limp and LOCH ARD's bow swung back. Gibbs then ordered the anchors to be released in an attempt to hold its position. The anchors sank some 50 fathoms - but did not hold. By this time LOCH ARD was among the breakers and the tall cliffs of Mutton Bird Island rose behind the ship. Just half a mile from the coast, the ship's bow was suddenly pulled around by the anchor. The captain tried to tack out to sea, but the ship struck a reef at the base of Mutton Bird Island, near Port Campbell. Waves broke over the ship and the top deck was loosened from the hull. The masts and rigging came crashing down knocking passengers and crew overboard. When a lifeboat was finally launched, it crashed into the side of LOCH ARD and capsized. Tom Pearce, who had launched the boat, managed to cling to its overturned hull and shelter beneath it. He drifted out to sea and then on the flood tide came into what is now known as LOCH ARD Gorge. He swam to shore, bruised and dazed, and found a cave in which to shelter. Some of the crew stayed below deck to shelter from the falling rigging but drowned when the ship slipped off the reef into deeper water. Eva Carmichael had raced onto deck to find out what was happening only to be confronted by towering cliffs looming above the stricken ship. In all the chaos, Captain Gibbs grabbed Eva and said, "If you are saved Eva, let my dear wife know that I died like a sailor". That was the last Eva Carmichael saw of the captain. She was swept off the ship by a huge wave. Eva saw Tom Pearce on a small rocky beach and yelled to attract his attention. He dived in and swam to the exhausted woman and dragged her to shore. He took her to the cave and broke open case of brandy which had washed up on the beach. He opened a bottle to revive the unconscious woman. A few hours later Tom scaled a cliff in search of help. He followed hoof prints and came by chance upon two men from nearby Glenample Station three and a half miles away. In a state of exhaustion, he told the men of the tragedy. Tom returned to the gorge while the two men rode back to the station to get help. By the time they reached LOCH ARD Gorge, it was cold and dark. The two shipwreck survivors were taken to Glenample Station to recover. Eva stayed at the station for six weeks before returning to Ireland, this time by steamship. In Melbourne, Tom Pearce received a hero's welcome. He was presented with the first gold medal of the Royal Humane Society of Victoria and a £1000 cheque from the Victorian Government. Concerts were performed to honour the young man's bravery and to raise money for those who lost family in the LOCH ARD disaster. Of the 54 crew members and passengers on board, only two survived: the apprentice, Tom Pearce and the young woman passenger, Eva Carmichael, who lost all of her family in the tragedy. Ten days after the LOCH ARD tragedy, salvage rights to the wreck were sold at auction for £2,120. Cargo valued at £3,000 was salvaged and placed on the beach, but most washed back into the sea when another storm developed. The wreck of LOCH ARD still lies at the base of Mutton Bird Island. Much of the cargo has now been salvaged and some was washed up into what is now known as LOCH ARD Gorge. Cargo and artefacts have also been illegally salvaged over many years before protective legislation was introduced. One of the most unlikely pieces of cargo to have survived the shipwreck was a Minton porcelain peacock - one of only seven in the world. The peacock was destined for the Melbourne International Exhibition in 1880. It had been well packed, which gave it adequate protection during the violent storm. Today, the Minton peacock can be seen at the Flagstaff Hill Maritime Museum in Warrnambool. From Australia's most dramatic shipwreck it has now become Australia's shipwreck artefact and is one of very few 'objects' on the Victorian State Heritage Register most valuable. The LOCH ARD shipwreck is of State significance – Victorian Heritage Register S 417 Flagstaff Hill’s collection of artefacts from LOCH ARD is significant for being one of the largest collections of artefacts from this shipwreck in Victoria. It is significant for its association with the shipwreck, which is on the Victorian Heritage Register (VHR S417). The collection is significant because of the relationship between the objects, as together they have a high potential to interpret the story of the LOCH ARD. The LOCH ARD collection is archaeologically significant as the remains of a large international passenger and cargo ship. The LOCH ARD collection is historically significant for representing aspects of Victoria’s shipping history and its potential to interpret sub-theme 1.5 of Victoria’s Framework of Historical Themes (living with natural processes). The collection is also historically significant for its association with the LOCH ARD, which was one of the worst and best known shipwrecks in Victoria’s history. Unrestored table spoons from the wreck of the LOCH ARD. The spoon design has a flattened fiddle-back handle, with a thin stem or shank, flared collar, and a shallow rounded bowl. The spoons metallic composition is a thin layer of brass alloy which has partially corroded back to a nickel-silver base metal. Some verdigris. Spoons are covered in large amount of concretion. Pieces of rock, glass and shell are embedded in the concretion. 24 spoons approx. in group.flagstaff hill maritime museum, shipwreck coast, great ocean road, loch line, loch ard, mutton bird island, loch ard gorge, electroplated cutlery, loch ard shipwreck, william page and co, birmingham brass plating, table spoons -
 Flagstaff Hill Maritime Museum and Village
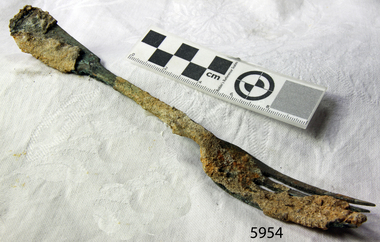
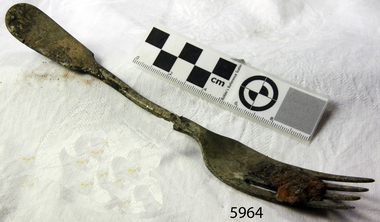
Domestic object - Fork
HISTORY OF THE LOCH ARD The LOCH ARD belonged to the famous Loch Line which sailed many ships from England to Australia. Built in Glasgow by Barclay, Curdle and Co. in 1873, the LOCH ARD was a three-masted square rigged iron sailing ship. The ship measured 262ft 7" (79.87m) in length, 38ft (11.58m) in width, 23ft (7m) in depth and had a gross tonnage of 1693 tons. The LOCH ARD's main mast measured a massive 150ft (45.7m) in height. LOCH ARD made three trips to Australia and one trip to Calcutta before its final voyage. LOCH ARD left England on March 2, 1878, under the command of Captain Gibbs, a newly married, 29 year old. She was bound for Melbourne with a crew of 37, plus 17 passengers and a load of cargo. The general cargo reflected the affluence of Melbourne at the time. On board were straw hats, umbrella, perfumes, clay pipes, pianos, clocks, confectionary, linen and candles, as well as a heavier load of railway irons, cement, lead and copper. There were items included that intended for display in the Melbourne International Exhibition in 1880. The voyage to Port Phillip was long but uneventful. At 3am on June 1, 1878, Captain Gibbs was expecting to see land and the passengers were becoming excited as they prepared to view their new homeland in the early morning. But LOCH ARD was running into a fog which greatly reduced visibility. Captain Gibbs was becoming anxious as there was no sign of land or the Cape Otway lighthouse. At 4am the fog lifted. A man aloft announced that he could see breakers. The sheer cliffs of Victoria's west coast came into view, and Captain Gibbs realised that the ship was much closer to them than expected. He ordered as much sail to be set as time would permit and then attempted to steer the vessel out to sea. On coming head on into the wind, the ship lost momentum, the sails fell limp and LOCH ARD's bow swung back. Gibbs then ordered the anchors to be released in an attempt to hold its position. The anchors sank some 50 fathoms - but did not hold. By this time LOCH ARD was among the breakers and the tall cliffs of Mutton Bird Island rose behind the ship. Just half a mile from the coast, the ship's bow was suddenly pulled around by the anchor. The captain tried to tack out to sea, but the ship struck a reef at the base of Mutton Bird Island, near Port Campbell. Waves broke over the ship and the top deck was loosened from the hull. The masts and rigging came crashing down knocking passengers and crew overboard. When a lifeboat was finally launched, it crashed into the side of LOCH ARD and capsized. Tom Pearce, who had launched the boat, managed to cling to its overturned hull and shelter beneath it. He drifted out to sea and then on the flood tide came into what is now known as LOCH ARD Gorge. He swam to shore, bruised and dazed, and found a cave in which to shelter. Some of the crew stayed below deck to shelter from the falling rigging but drowned when the ship slipped off the reef into deeper water. Eva Carmichael had raced onto deck to find out what was happening only to be confronted by towering cliffs looming above the stricken ship. In all the chaos, Captain Gibbs grabbed Eva and said, "If you are saved Eva, let my dear wife know that I died like a sailor". That was the last Eva Carmichael saw of the captain. She was swept off the ship by a huge wave. Eva saw Tom Pearce on a small rocky beach and yelled to attract his attention. He dived in and swam to the exhausted woman and dragged her to shore. He took her to the cave and broke open case of brandy which had washed up on the beach. He opened a bottle to revive the unconscious woman. A few hours later Tom scaled a cliff in search of help. He followed hoof prints and came by chance upon two men from nearby Glenample Station three and a half miles away. In a state of exhaustion, he told the men of the tragedy. Tom returned to the gorge while the two men rode back to the station to get help. By the time they reached LOCH ARD Gorge, it was cold and dark. The two shipwreck survivors were taken to Glenample Station to recover. Eva stayed at the station for six weeks before returning to Ireland, this time by steamship. In Melbourne, Tom Pearce received a hero's welcome. He was presented with the first gold medal of the Royal Humane Society of Victoria and a £1000 cheque from the Victorian Government. Concerts were performed to honour the young man's bravery and to raise money for those who lost family in the LOCH ARD disaster. Of the 54 crew members and passengers on board, only two survived: the apprentice, Tom Pearce and the young woman passenger, Eva Carmichael, who lost all of her family in the tragedy. Ten days after the LOCH ARD tragedy, salvage rights to the wreck were sold at auction for £2,120. Cargo valued at £3,000 was salvaged and placed on the beach, but most washed back into the sea when another storm developed. The wreck of LOCH ARD still lies at the base of Mutton Bird Island. Much of the cargo has now been salvaged and some was washed up into what is now known as LOCH ARD Gorge. Cargo and artefacts have also been illegally salvaged over many years before protective legislation was introduced. One of the most unlikely pieces of cargo to have survived the shipwreck was a Minton porcelain peacock - one of only seven in the world. The peacock was destined for the Melbourne International Exhibition in 1880. It had been well packed, which gave it adequate protection during the violent storm. Today, the Minton peacock can be seen at the Flagstaff Hill Maritime Museum in Warrnambool. From Australia's most dramatic shipwreck it has now become Australia's shipwreck artefact and is one of very few 'objects' on the Victorian State Heritage Register most valuable. The LOCH ARD shipwreck is of State significance – Victorian Heritage Register S 417 Flagstaff Hill’s collection of artefacts from LOCH ARD is significant for being one of the largest collections of artefacts from this shipwreck in Victoria. It is significant for its association with the shipwreck, which is on the Victorian Heritage Register (VHR S417). The collection is significant because of the relationship between the objects, as together they have a high potential to interpret the story of the LOCH ARD. The LOCH ARD collection is archaeologically significant as the remains of a large international passenger and cargo ship. The LOCH ARD collection is historically significant for representing aspects of Victoria’s shipping history and its potential to interpret sub-theme 1.5 of Victoria’s Framework of Historical Themes (living with natural processes). The collection is also historically significant for its association with the LOCH ARD, which was one of the worst and best known shipwrecks in Victoria’s history. Silver plated copper alloy table fork from the wreck of the Loch Ard. Some verdigris and large amount of encrustation covers fork.flagstaff hill maritime museum, maritime museum, shipwreck coast, great ocean road, loch line, loch ard, mutton bird island, loch ard gorge, fork -
 Flagstaff Hill Maritime Museum and Village
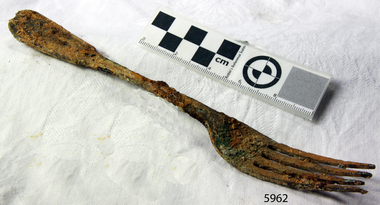
Fork
HISTORY OF THE LOCH ARD The LOCH ARD belonged to the famous Loch Line which sailed many ships from England to Australia. Built in Glasgow by Barclay, Curdle and Co. in 1873, the LOCH ARD was a three-masted square rigged iron sailing ship. The ship measured 262ft 7" (79.87m) in length, 38ft (11.58m) in width, 23ft (7m) in depth and had a gross tonnage of 1693 tons. The LOCH ARD's main mast measured a massive 150ft (45.7m) in height. LOCH ARD made three trips to Australia and one trip to Calcutta before its final voyage. LOCH ARD left England on March 2, 1878, under the command of Captain Gibbs, a newly married, 29 year old. She was bound for Melbourne with a crew of 37, plus 17 passengers and a load of cargo. The general cargo reflected the affluence of Melbourne at the time. On board were straw hats, umbrella, perfumes, clay pipes, pianos, clocks, confectionary, linen and candles, as well as a heavier load of railway irons, cement, lead and copper. There were items included that intended for display in the Melbourne International Exhibition in 1880. The voyage to Port Phillip was long but uneventful. At 3am on June 1, 1878, Captain Gibbs was expecting to see land and the passengers were becoming excited as they prepared to view their new homeland in the early morning. But LOCH ARD was running into a fog which greatly reduced visibility. Captain Gibbs was becoming anxious as there was no sign of land or the Cape Otway lighthouse. At 4am the fog lifted. A man aloft announced that he could see breakers. The sheer cliffs of Victoria's west coast came into view, and Captain Gibbs realised that the ship was much closer to them than expected. He ordered as much sail to be set as time would permit and then attempted to steer the vessel out to sea. On coming head on into the wind, the ship lost momentum, the sails fell limp and LOCH ARD's bow swung back. Gibbs then ordered the anchors to be released in an attempt to hold its position. The anchors sank some 50 fathoms - but did not hold. By this time LOCH ARD was among the breakers and the tall cliffs of Mutton Bird Island rose behind the ship. Just half a mile from the coast, the ship's bow was suddenly pulled around by the anchor. The captain tried to tack out to sea, but the ship struck a reef at the base of Mutton Bird Island, near Port Campbell. Waves broke over the ship and the top deck was loosened from the hull. The masts and rigging came crashing down knocking passengers and crew overboard. When a lifeboat was finally launched, it crashed into the side of LOCH ARD and capsized. Tom Pearce, who had launched the boat, managed to cling to its overturned hull and shelter beneath it. He drifted out to sea and then on the flood tide came into what is now known as LOCH ARD Gorge. He swam to shore, bruised and dazed, and found a cave in which to shelter. Some of the crew stayed below deck to shelter from the falling rigging but drowned when the ship slipped off the reef into deeper water. Eva Carmichael had raced onto deck to find out what was happening only to be confronted by towering cliffs looming above the stricken ship. In all the chaos, Captain Gibbs grabbed Eva and said, "If you are saved Eva, let my dear wife know that I died like a sailor". That was the last Eva Carmichael saw of the captain. She was swept off the ship by a huge wave. Eva saw Tom Pearce on a small rocky beach and yelled to attract his attention. He dived in and swam to the exhausted woman and dragged her to shore. He took her to the cave and broke open case of brandy which had washed up on the beach. He opened a bottle to revive the unconscious woman. A few hours later Tom scaled a cliff in search of help. He followed hoof prints and came by chance upon two men from nearby Glenample Station three and a half miles away. In a state of exhaustion, he told the men of the tragedy. Tom returned to the gorge while the two men rode back to the station to get help. By the time they reached LOCH ARD Gorge, it was cold and dark. The two shipwreck survivors were taken to Glenample Station to recover. Eva stayed at the station for six weeks before returning to Ireland, this time by steamship. In Melbourne, Tom Pearce received a hero's welcome. He was presented with the first gold medal of the Royal Humane Society of Victoria and a £1000 cheque from the Victorian Government. Concerts were performed to honour the young man's bravery and to raise money for those who lost family in the LOCH ARD disaster. Of the 54 crew members and passengers on board, only two survived: the apprentice, Tom Pearce and the young woman passenger, Eva Carmichael, who lost all of her family in the tragedy. Ten days after the LOCH ARD tragedy, salvage rights to the wreck were sold at auction for £2,120. Cargo valued at £3,000 was salvaged and placed on the beach, but most washed back into the sea when another storm developed. The wreck of LOCH ARD still lies at the base of Mutton Bird Island. Much of the cargo has now been salvaged and some was washed up into what is now known as LOCH ARD Gorge. Cargo and artefacts have also been illegally salvaged over many years before protective legislation was introduced. One of the most unlikely pieces of cargo to have survived the shipwreck was a Minton porcelain peacock - one of only seven in the world. The peacock was destined for the Melbourne International Exhibition in 1880. It had been well packed, which gave it adequate protection during the violent storm. Today, the Minton peacock can be seen at the Flagstaff Hill Maritime Museum in Warrnambool. From Australia's most dramatic shipwreck it has now become Australia's shipwreck artefact and is one of very few 'objects' on the Victorian State Heritage Register most valuable. The LOCH ARD shipwreck is of State significance – Victorian Heritage Register S 417 Flagstaff Hill’s collection of artefacts from LOCH ARD is significant for being one of the largest collections of artefacts from this shipwreck in Victoria. It is significant for its association with the shipwreck, which is on the Victorian Heritage Register (VHR S417). The collection is significant because of the relationship between the objects, as together they have a high potential to interpret the story of the LOCH ARD. The LOCH ARD collection is archaeologically significant as the remains of a large international passenger and cargo ship. The LOCH ARD collection is historically significant for representing aspects of Victoria’s shipping history and its potential to interpret sub-theme 1.5 of Victoria’s Framework of Historical Themes (living with natural processes). The collection is also historically significant for its association with the LOCH ARD, which was one of the worst and best known shipwrecks in Victoria’s history. Silver plated copper alloy table fork from the wreck of the Loch Ard. Length 8 Some verdigris. Encrustation covers the fork.flagstaff hill, warrnambool, shipwrecked coast, flagstaff hill maritime museum, maritime museum, shipwreck coast, flagstaff hill maritime village, great ocean road, loch line, loch ard, captain gibbs, eva carmichael, tom pearce, glenample station, mutton bird island, loch ard gorge, fork -
 Flagstaff Hill Maritime Museum and Village
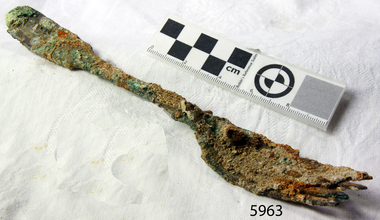
Fork
HISTORY OF THE LOCH ARD The LOCH ARD belonged to the famous Loch Line which sailed many ships from England to Australia. Built in Glasgow by Barclay, Curdle and Co. in 1873, the LOCH ARD was a three-masted square rigged iron sailing ship. The ship measured 262ft 7" (79.87m) in length, 38ft (11.58m) in width, 23ft (7m) in depth and had a gross tonnage of 1693 tons. The LOCH ARD's main mast measured a massive 150ft (45.7m) in height. LOCH ARD made three trips to Australia and one trip to Calcutta before its final voyage. LOCH ARD left England on March 2, 1878, under the command of Captain Gibbs, a newly married, 29 year old. She was bound for Melbourne with a crew of 37, plus 17 passengers and a load of cargo. The general cargo reflected the affluence of Melbourne at the time. On board were straw hats, umbrella, perfumes, clay pipes, pianos, clocks, confectionary, linen and candles, as well as a heavier load of railway irons, cement, lead and copper. There were items included that intended for display in the Melbourne International Exhibition in 1880. The voyage to Port Phillip was long but uneventful. At 3am on June 1, 1878, Captain Gibbs was expecting to see land and the passengers were becoming excited as they prepared to view their new homeland in the early morning. But LOCH ARD was running into a fog which greatly reduced visibility. Captain Gibbs was becoming anxious as there was no sign of land or the Cape Otway lighthouse. At 4am the fog lifted. A man aloft announced that he could see breakers. The sheer cliffs of Victoria's west coast came into view, and Captain Gibbs realised that the ship was much closer to them than expected. He ordered as much sail to be set as time would permit and then attempted to steer the vessel out to sea. On coming head on into the wind, the ship lost momentum, the sails fell limp and LOCH ARD's bow swung back. Gibbs then ordered the anchors to be released in an attempt to hold its position. The anchors sank some 50 fathoms - but did not hold. By this time LOCH ARD was among the breakers and the tall cliffs of Mutton Bird Island rose behind the ship. Just half a mile from the coast, the ship's bow was suddenly pulled around by the anchor. The captain tried to tack out to sea, but the ship struck a reef at the base of Mutton Bird Island, near Port Campbell. Waves broke over the ship and the top deck was loosened from the hull. The masts and rigging came crashing down knocking passengers and crew overboard. When a lifeboat was finally launched, it crashed into the side of LOCH ARD and capsized. Tom Pearce, who had launched the boat, managed to cling to its overturned hull and shelter beneath it. He drifted out to sea and then on the flood tide came into what is now known as LOCH ARD Gorge. He swam to shore, bruised and dazed, and found a cave in which to shelter. Some of the crew stayed below deck to shelter from the falling rigging but drowned when the ship slipped off the reef into deeper water. Eva Carmichael had raced onto deck to find out what was happening only to be confronted by towering cliffs looming above the stricken ship. In all the chaos, Captain Gibbs grabbed Eva and said, "If you are saved Eva, let my dear wife know that I died like a sailor". That was the last Eva Carmichael saw of the captain. She was swept off the ship by a huge wave. Eva saw Tom Pearce on a small rocky beach and yelled to attract his attention. He dived in and swam to the exhausted woman and dragged her to shore. He took her to the cave and broke open case of brandy which had washed up on the beach. He opened a bottle to revive the unconscious woman. A few hours later Tom scaled a cliff in search of help. He followed hoof prints and came by chance upon two men from nearby Glenample Station three and a half miles away. In a state of exhaustion, he told the men of the tragedy. Tom returned to the gorge while the two men rode back to the station to get help. By the time they reached LOCH ARD Gorge, it was cold and dark. The two shipwreck survivors were taken to Glenample Station to recover. Eva stayed at the station for six weeks before returning to Ireland, this time by steamship. In Melbourne, Tom Pearce received a hero's welcome. He was presented with the first gold medal of the Royal Humane Society of Victoria and a £1000 cheque from the Victorian Government. Concerts were performed to honour the young man's bravery and to raise money for those who lost family in the LOCH ARD disaster. Of the 54 crew members and passengers on board, only two survived: the apprentice, Tom Pearce and the young woman passenger, Eva Carmichael, who lost all of her family in the tragedy. Ten days after the LOCH ARD tragedy, salvage rights to the wreck were sold at auction for £2,120. Cargo valued at £3,000 was salvaged and placed on the beach, but most washed back into the sea when another storm developed. The wreck of LOCH ARD still lies at the base of Mutton Bird Island. Much of the cargo has now been salvaged and some was washed up into what is now known as LOCH ARD Gorge. Cargo and artefacts have also been illegally salvaged over many years before protective legislation was introduced. One of the most unlikely pieces of cargo to have survived the shipwreck was a Minton porcelain peacock - one of only seven in the world. The peacock was destined for the Melbourne International Exhibition in 1880. It had been well packed, which gave it adequate protection during the violent storm. Today, the Minton peacock can be seen at the Flagstaff Hill Maritime Museum in Warrnambool. From Australia's most dramatic shipwreck it has now become Australia's shipwreck artefact and is one of very few 'objects' on the Victorian State Heritage Register most valuable. The LOCH ARD shipwreck is of State significance – Victorian Heritage Register S 417 Flagstaff Hill’s collection of artefacts from LOCH ARD is significant for being one of the largest collections of artefacts from this shipwreck in Victoria. It is significant for its association with the shipwreck, which is on the Victorian Heritage Register (VHR S417). The collection is significant because of the relationship between the objects, as together they have a high potential to interpret the story of the LOCH ARD. The LOCH ARD collection is archaeologically significant as the remains of a large international passenger and cargo ship. The LOCH ARD collection is historically significant for representing aspects of Victoria’s shipping history and its potential to interpret sub-theme 1.5 of Victoria’s Framework of Historical Themes (living with natural processes). The collection is also historically significant for its association with the LOCH ARD, which was one of the worst and best known shipwrecks in Victoria’s history. Silver plated copper alloy table fork from the wreck of the Loch Ard. Some little verdigris. Large amount of encrustation covers the fork. flagstaff hill, warrnambool, shipwrecked coast, flagstaff hill maritime museum, maritime museum, shipwreck coast, flagstaff hill maritime village, great ocean road, loch line, loch ard, captain gibbs, eva carmichael, tom pearce, glenample station, mutton bird island, loch ard gorge, fork -
 Flagstaff Hill Maritime Museum and Village
Fork
HISTORY OF THE LOCH ARD The LOCH ARD belonged to the famous Loch Line which sailed many ships from England to Australia. Built in Glasgow by Barclay, Curdle and Co. in 1873, the LOCH ARD was a three-masted square rigged iron sailing ship. The ship measured 262ft 7" (79.87m) in length, 38ft (11.58m) in width, 23ft (7m) in depth and had a gross tonnage of 1693 tons. The LOCH ARD's main mast measured a massive 150ft (45.7m) in height. LOCH ARD made three trips to Australia and one trip to Calcutta before its final voyage. LOCH ARD left England on March 2, 1878, under the command of Captain Gibbs, a newly married, 29 year old. She was bound for Melbourne with a crew of 37, plus 17 passengers and a load of cargo. The general cargo reflected the affluence of Melbourne at the time. On board were straw hats, umbrella, perfumes, clay pipes, pianos, clocks, confectionary, linen and candles, as well as a heavier load of railway irons, cement, lead and copper. There were items included that intended for display in the Melbourne International Exhibition in 1880. The voyage to Port Phillip was long but uneventful. At 3am on June 1, 1878, Captain Gibbs was expecting to see land and the passengers were becoming excited as they prepared to view their new homeland in the early morning. But LOCH ARD was running into a fog which greatly reduced visibility. Captain Gibbs was becoming anxious as there was no sign of land or the Cape Otway lighthouse. At 4am the fog lifted. A man aloft announced that he could see breakers. The sheer cliffs of Victoria's west coast came into view, and Captain Gibbs realised that the ship was much closer to them than expected. He ordered as much sail to be set as time would permit and then attempted to steer the vessel out to sea. On coming head on into the wind, the ship lost momentum, the sails fell limp and LOCH ARD's bow swung back. Gibbs then ordered the anchors to be released in an attempt to hold its position. The anchors sank some 50 fathoms - but did not hold. By this time LOCH ARD was among the breakers and the tall cliffs of Mutton Bird Island rose behind the ship. Just half a mile from the coast, the ship's bow was suddenly pulled around by the anchor. The captain tried to tack out to sea, but the ship struck a reef at the base of Mutton Bird Island, near Port Campbell. Waves broke over the ship and the top deck was loosened from the hull. The masts and rigging came crashing down knocking passengers and crew overboard. When a lifeboat was finally launched, it crashed into the side of LOCH ARD and capsized. Tom Pearce, who had launched the boat, managed to cling to its overturned hull and shelter beneath it. He drifted out to sea and then on the flood tide came into what is now known as LOCH ARD Gorge. He swam to shore, bruised and dazed, and found a cave in which to shelter. Some of the crew stayed below deck to shelter from the falling rigging but drowned when the ship slipped off the reef into deeper water. Eva Carmichael had raced onto deck to find out what was happening only to be confronted by towering cliffs looming above the stricken ship. In all the chaos, Captain Gibbs grabbed Eva and said, "If you are saved Eva, let my dear wife know that I died like a sailor". That was the last Eva Carmichael saw of the captain. She was swept off the ship by a huge wave. Eva saw Tom Pearce on a small rocky beach and yelled to attract his attention. He dived in and swam to the exhausted woman and dragged her to shore. He took her to the cave and broke open case of brandy which had washed up on the beach. He opened a bottle to revive the unconscious woman. A few hours later Tom scaled a cliff in search of help. He followed hoof prints and came by chance upon two men from nearby Glenample Station three and a half miles away. In a state of exhaustion, he told the men of the tragedy. Tom returned to the gorge while the two men rode back to the station to get help. By the time they reached LOCH ARD Gorge, it was cold and dark. The two shipwreck survivors were taken to Glenample Station to recover. Eva stayed at the station for six weeks before returning to Ireland, this time by steamship. In Melbourne, Tom Pearce received a hero's welcome. He was presented with the first gold medal of the Royal Humane Society of Victoria and a £1000 cheque from the Victorian Government. Concerts were performed to honour the young man's bravery and to raise money for those who lost family in the LOCH ARD disaster. Of the 54 crew members and passengers on board, only two survived: the apprentice, Tom Pearce and the young woman passenger, Eva Carmichael, who lost all of her family in the tragedy. Ten days after the LOCH ARD tragedy, salvage rights to the wreck were sold at auction for £2,120. Cargo valued at £3,000 was salvaged and placed on the beach, but most washed back into the sea when another storm developed. The wreck of LOCH ARD still lies at the base of Mutton Bird Island. Much of the cargo has now been salvaged and some was washed up into what is now known as LOCH ARD Gorge. Cargo and artefacts have also been illegally salvaged over many years before protective legislation was introduced. One of the most unlikely pieces of cargo to have survived the shipwreck was a Minton porcelain peacock - one of only seven in the world. The peacock was destined for the Melbourne International Exhibition in 1880. It had been well packed, which gave it adequate protection during the violent storm. Today, the Minton peacock can be seen at the Flagstaff Hill Maritime Museum in Warrnambool. From Australia's most dramatic shipwreck it has now become Australia's shipwreck artefact and is one of very few 'objects' on the Victorian State Heritage Register most valuable. The LOCH ARD shipwreck is of State significance – Victorian Heritage Register S 417 Flagstaff Hill’s collection of artefacts from LOCH ARD is significant for being one of the largest collections of artefacts from this shipwreck in Victoria. It is significant for its association with the shipwreck, which is on the Victorian Heritage Register (VHR S417). The collection is significant because of the relationship between the objects, as together they have a high potential to interpret the story of the LOCH ARD. The LOCH ARD collection is archaeologically significant as the remains of a large international passenger and cargo ship. The LOCH ARD collection is historically significant for representing aspects of Victoria’s shipping history and its potential to interpret sub-theme 1.5 of Victoria’s Framework of Historical Themes (living with natural processes). The collection is also historically significant for its association with the LOCH ARD, which was one of the worst and best known shipwrecks in Victoria’s history. Silver plated copper alloy table fork from the wreck of the Loch Ard. Some little verdigris. Large amount of encrustation covers the fork. Fork is bent.flagstaff hill, warrnambool, shipwrecked coast, flagstaff hill maritime museum, maritime museum, shipwreck coast, flagstaff hill maritime village, great ocean road, loch line, loch ard, captain gibbs, eva carmichael, tom pearce, glenample station, mutton bird island, loch ard gorge, fork -
 Flagstaff Hill Maritime Museum and Village
Fork
HISTORY OF THE LOCH ARD The LOCH ARD belonged to the famous Loch Line which sailed many ships from England to Australia. Built in Glasgow by Barclay, Curdle and Co. in 1873, the LOCH ARD was a three-masted square rigged iron sailing ship. The ship measured 262ft 7" (79.87m) in length, 38ft (11.58m) in width, 23ft (7m) in depth and had a gross tonnage of 1693 tons. The LOCH ARD's main mast measured a massive 150ft (45.7m) in height. LOCH ARD made three trips to Australia and one trip to Calcutta before its final voyage. LOCH ARD left England on March 2, 1878, under the command of Captain Gibbs, a newly married, 29 year old. She was bound for Melbourne with a crew of 37, plus 17 passengers and a load of cargo. The general cargo reflected the affluence of Melbourne at the time. On board were straw hats, umbrella, perfumes, clay pipes, pianos, clocks, confectionary, linen and candles, as well as a heavier load of railway irons, cement, lead and copper. There were items included that intended for display in the Melbourne International Exhibition in 1880. The voyage to Port Phillip was long but uneventful. At 3am on June 1, 1878, Captain Gibbs was expecting to see land and the passengers were becoming excited as they prepared to view their new homeland in the early morning. But LOCH ARD was running into a fog which greatly reduced visibility. Captain Gibbs was becoming anxious as there was no sign of land or the Cape Otway lighthouse. At 4am the fog lifted. A man aloft announced that he could see breakers. The sheer cliffs of Victoria's west coast came into view, and Captain Gibbs realised that the ship was much closer to them than expected. He ordered as much sail to be set as time would permit and then attempted to steer the vessel out to sea. On coming head on into the wind, the ship lost momentum, the sails fell limp and LOCH ARD's bow swung back. Gibbs then ordered the anchors to be released in an attempt to hold its position. The anchors sank some 50 fathoms - but did not hold. By this time LOCH ARD was among the breakers and the tall cliffs of Mutton Bird Island rose behind the ship. Just half a mile from the coast, the ship's bow was suddenly pulled around by the anchor. The captain tried to tack out to sea, but the ship struck a reef at the base of Mutton Bird Island, near Port Campbell. Waves broke over the ship and the top deck was loosened from the hull. The masts and rigging came crashing down knocking passengers and crew overboard. When a lifeboat was finally launched, it crashed into the side of LOCH ARD and capsized. Tom Pearce, who had launched the boat, managed to cling to its overturned hull and shelter beneath it. He drifted out to sea and then on the flood tide came into what is now known as LOCH ARD Gorge. He swam to shore, bruised and dazed, and found a cave in which to shelter. Some of the crew stayed below deck to shelter from the falling rigging but drowned when the ship slipped off the reef into deeper water. Eva Carmichael had raced onto deck to find out what was happening only to be confronted by towering cliffs looming above the stricken ship. In all the chaos, Captain Gibbs grabbed Eva and said, "If you are saved Eva, let my dear wife know that I died like a sailor". That was the last Eva Carmichael saw of the captain. She was swept off the ship by a huge wave. Eva saw Tom Pearce on a small rocky beach and yelled to attract his attention. He dived in and swam to the exhausted woman and dragged her to shore. He took her to the cave and broke open case of brandy which had washed up on the beach. He opened a bottle to revive the unconscious woman. A few hours later Tom scaled a cliff in search of help. He followed hoof prints and came by chance upon two men from nearby Glenample Station three and a half miles away. In a state of exhaustion, he told the men of the tragedy. Tom returned to the gorge while the two men rode back to the station to get help. By the time they reached LOCH ARD Gorge, it was cold and dark. The two shipwreck survivors were taken to Glenample Station to recover. Eva stayed at the station for six weeks before returning to Ireland, this time by steamship. In Melbourne, Tom Pearce received a hero's welcome. He was presented with the first gold medal of the Royal Humane Society of Victoria and a £1000 cheque from the Victorian Government. Concerts were performed to honour the young man's bravery and to raise money for those who lost family in the LOCH ARD disaster. Of the 54 crew members and passengers on board, only two survived: the apprentice, Tom Pearce and the young woman passenger, Eva Carmichael, who lost all of her family in the tragedy. Ten days after the LOCH ARD tragedy, salvage rights to the wreck were sold at auction for £2,120. Cargo valued at £3,000 was salvaged and placed on the beach, but most washed back into the sea when another storm developed. The wreck of LOCH ARD still lies at the base of Mutton Bird Island. Much of the cargo has now been salvaged and some was washed up into what is now known as LOCH ARD Gorge. Cargo and artefacts have also been illegally salvaged over many years before protective legislation was introduced. One of the most unlikely pieces of cargo to have survived the shipwreck was a Minton porcelain peacock - one of only seven in the world. The peacock was destined for the Melbourne International Exhibition in 1880. It had been well packed, which gave it adequate protection during the violent storm. Today, the Minton peacock can be seen at the Flagstaff Hill Maritime Museum in Warrnambool. From Australia's most dramatic shipwreck it has now become Australia's shipwreck artefact and is one of very few 'objects' on the Victorian State Heritage Register most valuable. The LOCH ARD shipwreck is of State significance – Victorian Heritage Register S 417 Flagstaff Hill’s collection of artefacts from LOCH ARD is significant for being one of the largest collections of artefacts from this shipwreck in Victoria. It is significant for its association with the shipwreck, which is on the Victorian Heritage Register (VHR S417). The collection is significant because of the relationship between the objects, as together they have a high potential to interpret the story of the LOCH ARD. The LOCH ARD collection is archaeologically significant as the remains of a large international passenger and cargo ship. The LOCH ARD collection is historically significant for representing aspects of Victoria’s shipping history and its potential to interpret sub-theme 1.5 of Victoria’s Framework of Historical Themes (living with natural processes). The collection is also historically significant for its association with the LOCH ARD, which was one of the worst and best known shipwrecks in Victoria’s history. Silver plated copper alloy table fork from the wreck of the Loch Ard. Some very little verdigris and silver oxide. Amount of encrustation covers the fork tines. Hallmark is visible. flagstaff hill, warrnambool, shipwrecked coast, flagstaff hill maritime museum, maritime museum, shipwreck coast, flagstaff hill maritime village, great ocean road, loch line, loch ard, captain gibbs, eva carmichael, tom pearce, glenample station, mutton bird island, loch ard gorge, fork -
 Flagstaff Hill Maritime Museum and Village
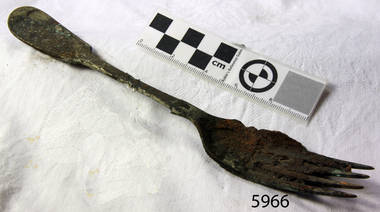
Fork
HISTORY OF THE LOCH ARD The LOCH ARD belonged to the famous Loch Line which sailed many ships from England to Australia. Built in Glasgow by Barclay, Curdle and Co. in 1873, the LOCH ARD was a three-masted square rigged iron sailing ship. The ship measured 262ft 7" (79.87m) in length, 38ft (11.58m) in width, 23ft (7m) in depth and had a gross tonnage of 1693 tons. The LOCH ARD's main mast measured a massive 150ft (45.7m) in height. LOCH ARD made three trips to Australia and one trip to Calcutta before its final voyage. LOCH ARD left England on March 2, 1878, under the command of Captain Gibbs, a newly married, 29 year old. She was bound for Melbourne with a crew of 37, plus 17 passengers and a load of cargo. The general cargo reflected the affluence of Melbourne at the time. On board were straw hats, umbrella, perfumes, clay pipes, pianos, clocks, confectionary, linen and candles, as well as a heavier load of railway irons, cement, lead and copper. There were items included that intended for display in the Melbourne International Exhibition in 1880. The voyage to Port Phillip was long but uneventful. At 3am on June 1, 1878, Captain Gibbs was expecting to see land and the passengers were becoming excited as they prepared to view their new homeland in the early morning. But LOCH ARD was running into a fog which greatly reduced visibility. Captain Gibbs was becoming anxious as there was no sign of land or the Cape Otway lighthouse. At 4am the fog lifted. A man aloft announced that he could see breakers. The sheer cliffs of Victoria's west coast came into view, and Captain Gibbs realised that the ship was much closer to them than expected. He ordered as much sail to be set as time would permit and then attempted to steer the vessel out to sea. On coming head on into the wind, the ship lost momentum, the sails fell limp and LOCH ARD's bow swung back. Gibbs then ordered the anchors to be released in an attempt to hold its position. The anchors sank some 50 fathoms - but did not hold. By this time LOCH ARD was among the breakers and the tall cliffs of Mutton Bird Island rose behind the ship. Just half a mile from the coast, the ship's bow was suddenly pulled around by the anchor. The captain tried to tack out to sea, but the ship struck a reef at the base of Mutton Bird Island, near Port Campbell. Waves broke over the ship and the top deck was loosened from the hull. The masts and rigging came crashing down knocking passengers and crew overboard. When a lifeboat was finally launched, it crashed into the side of LOCH ARD and capsized. Tom Pearce, who had launched the boat, managed to cling to its overturned hull and shelter beneath it. He drifted out to sea and then on the flood tide came into what is now known as LOCH ARD Gorge. He swam to shore, bruised and dazed, and found a cave in which to shelter. Some of the crew stayed below deck to shelter from the falling rigging but drowned when the ship slipped off the reef into deeper water. Eva Carmichael had raced onto deck to find out what was happening only to be confronted by towering cliffs looming above the stricken ship. In all the chaos, Captain Gibbs grabbed Eva and said, "If you are saved Eva, let my dear wife know that I died like a sailor". That was the last Eva Carmichael saw of the captain. She was swept off the ship by a huge wave. Eva saw Tom Pearce on a small rocky beach and yelled to attract his attention. He dived in and swam to the exhausted woman and dragged her to shore. He took her to the cave and broke open case of brandy which had washed up on the beach. He opened a bottle to revive the unconscious woman. A few hours later Tom scaled a cliff in search of help. He followed hoof prints and came by chance upon two men from nearby Glenample Station three and a half miles away. In a state of exhaustion, he told the men of the tragedy. Tom returned to the gorge while the two men rode back to the station to get help. By the time they reached LOCH ARD Gorge, it was cold and dark. The two shipwreck survivors were taken to Glenample Station to recover. Eva stayed at the station for six weeks before returning to Ireland, this time by steamship. In Melbourne, Tom Pearce received a hero's welcome. He was presented with the first gold medal of the Royal Humane Society of Victoria and a £1000 cheque from the Victorian Government. Concerts were performed to honour the young man's bravery and to raise money for those who lost family in the LOCH ARD disaster. Of the 54 crew members and passengers on board, only two survived: the apprentice, Tom Pearce and the young woman passenger, Eva Carmichael, who lost all of her family in the tragedy. Ten days after the LOCH ARD tragedy, salvage rights to the wreck were sold at auction for £2,120. Cargo valued at £3,000 was salvaged and placed on the beach, but most washed back into the sea when another storm developed. The wreck of LOCH ARD still lies at the base of Mutton Bird Island. Much of the cargo has now been salvaged and some was washed up into what is now known as LOCH ARD Gorge. Cargo and artefacts have also been illegally salvaged over many years before protective legislation was introduced. One of the most unlikely pieces of cargo to have survived the shipwreck was a Minton porcelain peacock - one of only seven in the world. The peacock was destined for the Melbourne International Exhibition in 1880. It had been well packed, which gave it adequate protection during the violent storm. Today, the Minton peacock can be seen at the Flagstaff Hill Maritime Museum in Warrnambool. From Australia's most dramatic shipwreck it has now become Australia's shipwreck artefact and is one of very few 'objects' on the Victorian State Heritage Register most valuable. The LOCH ARD shipwreck is of State significance – Victorian Heritage Register S 417 Flagstaff Hill’s collection of artefacts from LOCH ARD is significant for being one of the largest collections of artefacts from this shipwreck in Victoria. It is significant for its association with the shipwreck, which is on the Victorian Heritage Register (VHR S417). The collection is significant because of the relationship between the objects, as together they have a high potential to interpret the story of the LOCH ARD. The LOCH ARD collection is archaeologically significant as the remains of a large international passenger and cargo ship. The LOCH ARD collection is historically significant for representing aspects of Victoria’s shipping history and its potential to interpret sub-theme 1.5 of Victoria’s Framework of Historical Themes (living with natural processes). The collection is also historically significant for its association with the LOCH ARD, which was one of the worst and best known shipwrecks in Victoria’s history. Silver plated copper alloy table fork from the wreck of the Loch Ard. Some very little verdigris but silver oxide present. Large amount of encrustation covers the fork tines.flagstaff hill, warrnambool, shipwrecked coast, flagstaff hill maritime museum, maritime museum, shipwreck coast, flagstaff hill maritime village, great ocean road, loch line, loch ard, captain gibbs, eva carmichael, tom pearce, glenample station, mutton bird island, loch ard gorge, fork -
 Mission to Seafarers Victoria
Certificate - Certificate of discharge, photocopy, Ministry of War Transport: continuous certificate of discharge: George Winfield Duncan, 1943
This card together with a log book was a vital record of service for any seaman serving on a Merchant vessel that had been commandeered for War transport work and needed to be validated to ensure eligibility to be taken on as qualified member of the crew. G.W. Duncan appears to have specialised in engine room and mechanical maintenance. He appears to have served aboard a number of vessels including merchant vessels commissioned into wartime service in WW2.Mariner Duncan had a particular regard for the Mission to Seafarers. This plate for display on a commissioned new table at the MTSV chapel acknowledges his bequest and the material donated. Collectively the G W Duncan material includes: photographs, professional data memorabilia and written and commercially printed resources. The memorabilia relates to his career at sea and in particular the role of an engineer, including a handwritten manual of notes and references relating to the mechanical and engineering aspects and areas of responsibility for maintenance. small grey blue printed single fold seaman's photo identity card with printed guidelines and conditions of association / membership.stamped on front cover oval ribbon insignia surrounding roses and surmounted by crown with lettering : Ministry of War Transport Printed at lwr edge: Continuous / certificate of discharge. Inside left cover: seaman photo, name reg number and official stamp with date Inside right page: notes and information.war transport, ww2, merchant navy, merchant seamen, george winfield duncan (1922-2017), g.w. duncan -
 Mission to Seafarers Victoria
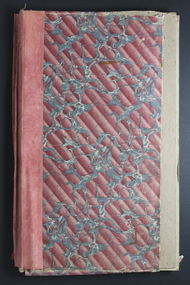
Book - Login, George Winfield Duncan: Mariner's Engine Manual, Early - mid 20th century
This detailed handwritten documentation was made by the owner Mariner, G W Duncan for use in his role as a member of the engineer crew.Mariner Duncan had a particular regard for the Mission to Seafarers. This plate for display on a commissioned new table at the MTSV chapel acknowledges his bequest and the material donated. Collectively the G W Duncan material includes: photographs, professional data memorabilia and written and commercially printed resources. The memorabilia relates to his career at sea and in particular the role of an engineer, including a handwritten manual of notes and references relating to the mechanical and engineering aspects and areas of responsibility for maintenance. Commercially printed ledger book with marbled board covers originally spine bound with red cloth ribbon tape (now detached see condition report). The book is designed to be used as a handwritten detailed reference and manual for use by engine room and maintenance supervisor (see image 2) Handwritten content in blue ink. mariner manuals, ship engines, ship maintenance, george winfield duncan (1922-2017), ship engineer, s.s. athenic -
 Mission to Seafarers Victoria
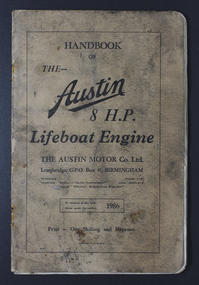
Manual - Handbook, Austin Lifeboat Engine, 1986
The website: austinmemories.com provides a list of extracts from the Austin Motor company archive and makes mention that in WW2 some 3,500 lifeboats were provided for ships. In the link above there is also reference to airborne lifeboats. It seems that the Austin 8HP so-called lifeboat motor was very often re-used by boating enthusiasts which would account for the publication or e-issue? of this manual in 1986. It seems likely that this temperamental engine was still of interest to people like ship's engineers.Mariner Duncan had a particular regard for the Mission to Seafarers. This plate for display on a commissioned new table at the MTSV chapel acknowledges his bequest and the material donated. Collectively the G W Duncan material includes: photographs, professional data memorabilia and written and commercially printed resources. The memorabilia relates to his career at sea and in particular the role of an engineer, including a handwritten manual of notes and references relating to the mechanical and engineering aspects and areas of responsibility for maintenance. Commercially printed well handled small handbook or manual with rounded corners; for an Austin 8 HP engine for a lifeboat.see image for front cover mariner manuals, lifeboats, manual, motors, austin, george winfield duncan (1922-2017), ship engineer, s.s. athenic -
 Mission to Seafarers Victoria
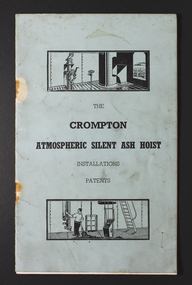
Manual, Crompton Atmospheric Silent Ash Hoist Installation Patents
Relates to management by engine room firemen of Ash and soot and clinker in the engine room of a steam ship. Hoists were used to discharge accumulated ash at the end of shifts. Mariner Duncan had a particular regard for the Mission to Seafarers. This plate for display on a commissioned new table at the MTSV chapel acknowledges his bequest and the material donated. Collectively the G W Duncan material includes: photographs, professional data memorabilia and written and commercially printed resources. The memorabilia relates to his career at sea and in particular the role of an engineer, including a handwritten manual of notes and references relating to the mechanical and engineering aspects and areas of responsibility for maintenance. Pale blue soft cover commercially printed manual or handbook relating to patents for Crompton Atmospheric Silent Ash Hoists. Features small diagram of figure pulling on a chain and view of ship silhouette on horizon seen through a porthole.see attached imageship engines, ship maintenance, ash hoists, coal, clinker, george winfield duncan (1922-2017), ship engineer, s.s. athenic -
 Mission to Seafarers Victoria
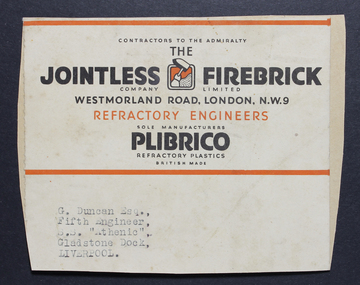
Card - Brochure, The Jointless firebrick Company: PLIBRICO, mid 20th
Found in the G. W. Duncan collection donated to the Mission to Seafarers in 2017 see also comments on manufacturing history. This particular company was associated with the use of asbestos.Mariner Duncan had a particular regard for the Mission to Seafarers. A plate for display on a commissioned new table at the MTSV chapel acknowledges his bequest and the material donated. Collectively the G W Duncan material includes: photographs, professional data memorabilia and written and commercially printed resources. The memorabilia relates to his career at sea and in particular the role of an engineer, including a handwritten manual of notes and references relating to the mechanical and engineering aspects and areas of responsibility for maintenance. White cover multipage commercially printed promotional brochure or booklet with ochre line graphic and black printing on white ground. Features small logo integrated with lettering between Jointless and Firebrick. There is a typed name and address of recipient / owner in lower left corner.Typed address: G.W. Duncan esq / Fifth Mechanical Engineer / ...Docks / Liverpoolplibrico, firebricks, coal fired engines, george winfield duncan (1922-2017), ship engineer, s.s. athenic, liverpool -
 Mission to Seafarers Victoria
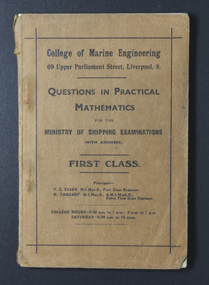
Education kit - Text Book, Questions in Practical Mathematics for Ministry of Shipping Examinations with Answers, early to mid 20th Century
As the previous owner, a marine engineer and donor of this textbook was based in Liverpool for some years it is possible that he may have studied for the Ministry of shipping exam at the former College of Marine Engineers, Liverpool in the early - mid 20th C. Mariner Duncan had a particular regard for the Mission to Seafarers. A plate for display on a commissioned new table at the MTSV chapel acknowledges his bequest and the material donated. Collectively the G W Duncan material includes: photographs, professional data memorabilia and written and commercially printed resources. The memorabilia relates to his career at sea and in particular the role of an engineer, including a handwritten manual of notes and references relating to the mechanical and engineering aspects and areas of responsibility for maintenance. Text book with dull grey brown cover with black printing and simple line border.See image attachedmarine engineer training, engineers, mathematics, ministry of shipping, liverpool, exams, mariners, george winfield duncan (1922-2017), ship engineer, s.s. athenic -
 Mission to Seafarers Victoria
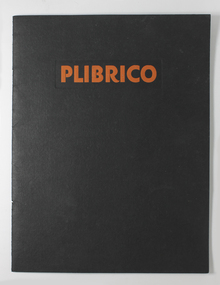
Manual - Manual, Ship engineering, PLIBRICO, Plibrico Modern Boiler Settings, 1960s
Mariner Duncan had a particular regard for the Mission to Seafarers. A plate for display on a commissioned new table at the MTSV acknowledges his bequest and the material donated. Collectively the G W Duncan material includes: photographs, professional data memorabilia and written and commercially printed resources. The memorabilia relates to his career at sea and in particular the role of an engineer, including a handwritten manual of notes and references relating to the mechanical and engineering aspects and areas of responsibility for maintenance. A stapled book with black cover and the word PLIBRICO in ochre printed at top centre.mariner manuals, manual, boilers, maintenance, engineers, engine rooms, george winfield duncan (1922-2017), ship engineer, s.s. athenic -
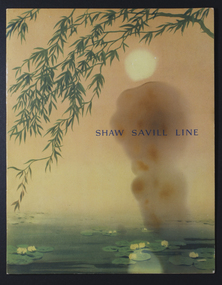 Mission to Seafarers Victoria
Souvenir - Menu, Shaw Savill Line, Shaw Savill Line SS Athenic, Maiden Voyage, 30/8/1947
This menu appears to have been produced for the 1947 Maiden Voyage of the S.S. Athenic travelling between London and New Zealand via Curacao and Panama. This was possibly the first voyage on this vessel early in his career for engineer G. W. Duncan and therefore a souvenir. The commander of the vessel was D. Aitchinson. Also of interest given that the UK was still very much governed by post WW2 rationing, is the range of food available for the farewell dinner listed.Mariner Duncan had a particular regard for the Mission to Seafarers. This plate for display on a commissioned new table at the MTSV chapel acknowledges his bequest and the material donated. Collectively the G W Duncan material includes: photographs, professional data memorabilia and written and commercially printed resources. The memorabilia relates to his career at sea and in particular the role of an engineer, including a handwritten manual of notes and references relating to the mechanical and engineering aspects and areas of responsibility for maintenance. Single fold card menu cover with typed paper menu listing adhered to inside cover. The cover features an imaginary asian design featuring water lilies , willow leaves and a misty sun, colours are gold green pink.see images 1 and 2 attachedmenu, ss athenic, shaw savill line, george winfield duncan (1922-2017), sailors, seafarers, passenger ships, ship engineer -
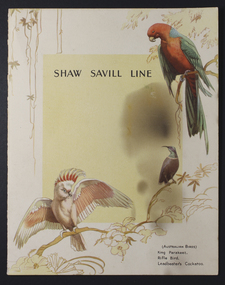 Mission to Seafarers Victoria
Souvenir - Menu, Shaw Savill Line SS Athenic, Christmas 1948, 25/12/1948
Included in the G W Duncan collection this item of memorabilia from 1948 may have been acquired quite early in the donor's career as a ship's engineer. The menu provides a glimpse of shipboard diet and especially celebratory food.Mariner Duncan had a particular regard for the Mission to Seafarers. This plate for display on a commissioned new table at the MTSV chapel acknowledges his bequest and the material donated. Collectively the G W Duncan material includes: photographs, professional data memorabilia and written and commercially printed resources. The memorabilia relates to his career at sea and in particular the role of an engineer, including a handwritten manual of notes and references relating to the mechanical and engineering aspects and areas of responsibility for maintenance. Single fold heavy card menu with colour cover featuring birds of Australia: King parrot, Rifle bird, Leadbetter's cockatoo. Inside cover typed sheet of paper with menu listing adhered to card.see imagesmenu, birds, australian, christmas, ss athenic, shaw savill line, george winfield duncan (1922-2017), ship engineer -
 Mission to Seafarers Victoria
Photograph - Photograph, Black and white, Reverend John Reginald Weller, The Chaplain's Quarters: Dining Room, c. 1926
This photograph depicts the interior of the dining room of the Manse with the 6 chairs and table decorated with flowers. Behind the table is the arched cast iron fireplace (lost) with mantelpiece with a clock and candelabras. On the left side we can see the corner of the oak console and on the right another cupboard and a framed painting. The photograph also shows the wooden floor covered with rugs. Unfortunately it has been carpeted in the late 20th century.This photograph is a rare view of the Manse and the private life of a chaplain. It also depicts the original and now heritage listed arts and crafts furniture dating from around 1909.Black and white interior photograph of the dining table and chairs taken in the Manse room. Chaplain's quarter: dining roomreverend john reginald weller (1880-1969), manse, table, chairs, mantelpiece, fireplace, weller album, dining suite -
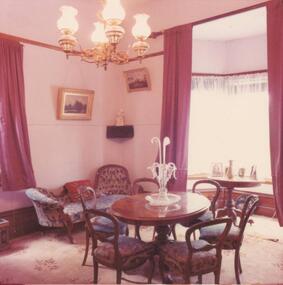 Phillip Island and District Historical Society Inc.
Photograph, 1978/9
Woolamai House was built in approx 1869 on part of Capt Cleeland's property which covered most of the eastern end of Phillip Island. He maintained the Beacon Light on Woolamai Point close to his house. Owned and occupied by family since 1869.Coloured photograph. The parlor in Woolamai House. Round table with glass centrepiece. 6 Victorian Balloon chairs. Sideboard and Whatnot.local history, photographs, buildings - historical, coloured photograph, john cook, woolamai house, cleeland family history -
 Phillip Island and District Historical Society Inc.
Photograph, 1978/9
Woolamai House was built in approx 1869 on part of Capt Cleeland's property which covered most of the eastern end of Phillip Island. He maintained the Beacon Light on Woolamai Point close to his house. Owned and occupied by family since 1869.Coloured photograph showing the parlor in Woolamai House with round table and 6 Victorian Balloon chairs - lounge in background.local history, photographs, buildings - historical, coloured photograph, john cook, woolamai house, cleeland family history -
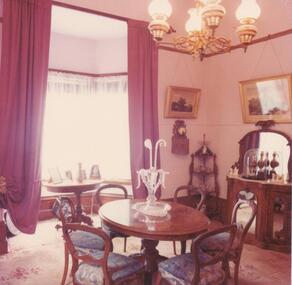
 Phillip Island and District Historical Society Inc.
Photograph, 1978/9
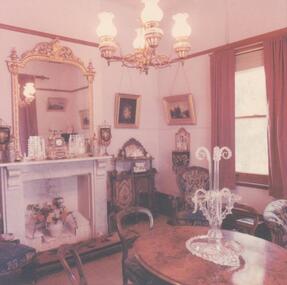
Woolamai House was built in approx 1869 on part of Capt Cleeland's property which covered most of the eastern end of Phillip Island. He maintained the Beacon Light on Woolamai Point close to his house. Owned and occupied by family since 1869.Coloured photograph showing the Parlor in Woolamai House - mirror above marble mantle piece. Table, chairs and whatnot.local history, photographs, buildings - historical, coloured photograph, john cook, woolamai house, cleeland family history -
 Phillip Island and District Historical Society Inc.
Photograph, 1978/9
Woolamai House was built in approx 1869 on part of Capt Cleeland's property which covered most of the eastern end of Phillip Island. He maintained the Beacon Light on Woolamai Point close to his house. Owned and occupied by family since 1869.Coloured photograph showing the Parlor - mirror above marble mantle piece. Table with centrepiece on it. Chairs - Whatnot in corner. Harry Cleeland standing nearby.local history, photographs, buildings - historical, coloured photograph, john cook, woolamai house, cleeland family history -
 Phillip Island and District Historical Society Inc.
Photograph, 1978/9
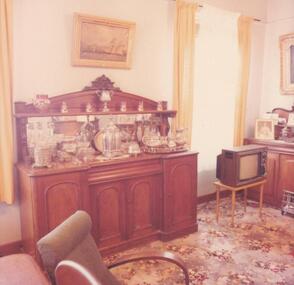
Woolamai House was built in approx 1869 on part of Capt Cleeland's property which covered most of the eastern end of Phillip Island. He maintained the Beacon Light on Woolamai Point close to his house. Owned and occupied by family since 1869.Coloured photograph showing section of the Dining room - Sideboard in particular with the original silver and glassware brought out to Australia by Capt. Cleeland. Also Trophies and Ruby Glass drinking set from the London Exhibition. Television on small table.local history, photographs, buildings - historical, coloured photograph, john cook, woolamai house, cleeland family history -
 Mission to Seafarers Victoria
Book - Manual, James Gordon, AM, New Lunar and Time Tables, 1849
Large book with green cloth cover ;222 pagesnon-fictionanne rennie collection, wal harbord, merchant navy, seamen, seafarers, ww2, battle of the atlantic, walter harbord, navigation -
 Mission to Seafarers Victoria
Flyer - List, Gifts, Chapel of St Peter, 1917
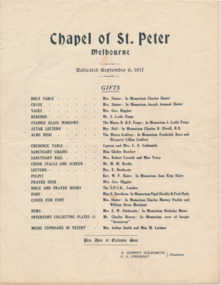
The St Peter chapel was furnished thanks to donations of supporters of the Mission. Some were donated for the previous temporary chapel at the Sidney Street site and some are lost. - Holy Table (altar): donated by Mrs Shuter, in Memoriam of Charles Shuter - Cross: - Vases (lost) - Stained Glass Windows: donated by Misses Edith and Ruby Forge, in Memoriam J. Leslie Forge - Altar Lectern - Alms Dish: donated by the Godfrey sisters in Memoriam of their parents - Credence Table: donated by - Sanctuary Chairs: donated by Miss Gladys Hawkey - Sanctuary Rail - Choir Stalls and Chancel Screen - Lectern (donated in 1909) - Pulpit (donated in 1907) - Prayer Desk (a plaque to Goldsmith) - Bible and Prayer Books - Font - Cover for Font - Pews - Offertory Collection Plates (lost) - Music Cupboard in Vestry (lost) The document lists all the gifts donated by generous supporters of the Mission in 1917. The chapel was built during World War 1 as. memorial to the merchant seamen lost during the war. These items are still in the chapel today.A4 document on cream colour paper, wording in black ink.gifts, chapel of st peter, flinders street, mission to seafarers, mission to seamen, gladys amy hawkey (1886-1974), reverend alfred gurney goldsmith, gifts-1917, amelia shuter nee lord, beatrice elizabeth higgins (nee shuter), charles shuter -
 Mission to Seafarers Victoria
Photograph - Digital copy, Black and white, Melbourne Harbour Trust, 1959
Photograph taken in the Celia Little Room at Mission to Seafarers Melbourne. The Celia Little Room was named in honour of the aunt of one of the serving (and resident) chaplains. The room is a multi-function room, being used at times for banquets or, as the photograph shows, for relaxation, by visiting seafarers. The magazine read by the man on the right is the International version of the Life magazine published dated from 24 November 1958, with actress Kim Novak holding a black cat on cover. This photograph was published in the Port of Melbourne Quarterly (July-September 1959) held in the Mission's archives. It was probably donated by the trust to Padre Oliver.Photograph displays the way in which the Celia Little Room, and by extension the Mission to Seafarers, was used by those who utilised the facility during this period.Black and white photograph of three men sitting in Celia Little Room at Mission to Seafarers. Man on left is in a suit, sitting on the arm of a chair, reading a newspaper. There is a coffee table with flowers separating him from the second man, also sitting reading a newspaper. The third man is seated in an armchair reading a copy of Life International magazine, with an ashtray resting on the arm of the chair.armchairs, reading, newspapers, wainscoting, ashtray, robin kent, life magazine, mission to seafarers, mission to seamen, celia little room, coffee table, bell, moreton bay, flowers, seamen, sailors, memorial plaque -
 Mission to Seafarers Victoria
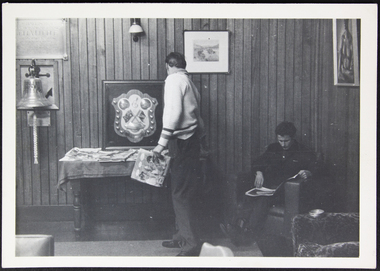
Photograph - Photograph, Black and white, 1950s
The image portrays how the Celia Little room (Celia Little plaque on the wall) was used mid 20th C. and date of similar image (see record 0221) The inclusion of the bell from the 'Moreton Bay' vessel dates the image to post 1957 when the bell was presented to the Mission. Used as a sitting room or lounge area at the Mission to Seafarers Melbourne. The image also shows the style of dress and style of magazine covers of the time. On the table stands the shield for the annual competition by crew of merchant ships presented by Wally Nancarrow, Sydney. (see item 0608)The photograph is significant in that it captures the essence of the Mission to Seafarers mid-20th century. It identifies the main use of the Celia Little room as a reading area. It also helps date and track locations of other objects in the heritage collection. A black and white photograph of two men in the Celia Little room at the Mission to Seafarers Melbourne. The top left of the photograph is a bell fixed to the wall that has a bell pull with a long piece of decorative knot-work attached to the clapper. The room is set up as a lounge area with at table left of the centre against the wall. The table is laden with magazines and papers on top of a tablecloth. A picture frame is sitting on the table and leaning against the wall that has a 'shield' or 'coat of arms' displayed. (see also VC records 221 and 0608) One of the men is standing central in the photograph, in a white jumper holding a magazine and half turned towards the wall.The second man is sitting in a chair in the bottom right side of the photograph and appears to be reading. A few tops of chairs are seen at the very bottom of the photo and on the wall are a plaque to the left, a framed picture to the right of the first man's head and another in the far right top corner. The room appears to be lit from the left.melbourne, bell, men, magazine, chairs, wains coting, papers, mission-to-seafarers, celia-little-room, bell-pull, picture-frame, 1940s, celia little, plaque, shield, soccer, football -
 Greensborough Historical Society
Book, Government Printer, Arithmetic for Grade VI, 1941_
... cover. Hardback, 172 p., tables, illus.(some col.) Arithmetic ...This book was the standard sixth grade text in Victorian government primary schools for many yearsHardback, 172 p., tables, illus.(some col.)"Teddy Chambers" inside front cover.school textbook, arithmetic -
 Glenelg Shire Council Cultural Collection
Functional object - Decimal Conversion Tables, c. 1966
Comprehensive decimal conversion tables. White card, green print. In light card folder with black and gold cover, white square in centre, purple 'C DAY' in square. Inside folder, white with black and purple print information re conversion of money to decimal system, 14 February 1966. -
Glenelg Shire Council Cultural Collection
Administrative record - Menu Card - National resources Development Train, 25/04/1939
Menu card for National Resources Development Train, April 18 to May 1 1939. Front cover same as 7936, 7937, 7938. Inside card, menu for dinner, Tues Apr. 25 1939, plus table of Victoria's prowess in industry and productionFront: 'B. VIVIAN' - handwritten -
Glenelg Shire Council Cultural Collection
Pamphlet - Pamphlet - Menu Card for National resources Development Train, 25/04/1939
Menu card for National Resources Development Train, April 18 - May 1 1939. Front cover same as 7936, 7937. Inside card, menu for luncheon, Tues. April 25 1939 plus table of Victoria's prowess in industry and production