Showing 245 items matching "vr photos"
-
 Melbourne Tram Museum
Newspaper, The Age, "Shake, rattle and roll, it'll be a fine tram party", 23/08/2000 12:00:00 AM
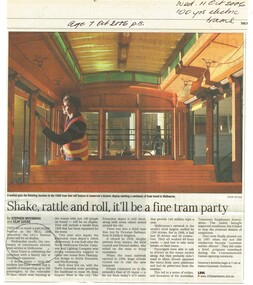
Newspaper clipping - titled "Shake, rattle and roll, it'll be a fine tram party", The Age 7/10/2006 about the family day to be celebrated by Yarra Trams the following day. Has a photo of a car painter painting the interior of NMETL 13. Written by Stephen Moynihan and Clay Lucas with photo cy Pat Scala. Notes the centenary of the VR Trams and NMETL.Handwritten note "Age 7 Oct. 2006 p8" and "Wed 11 Oct 2006, 100 yrs electric trams"trams, tramways, events, yarra trams, preston workshops, nmetl, centenary, 100 years of electric trams, essendon depot, vr trams -
 Melbourne Tram Museum
Newspaper, The Age, "Journey among equals", 15/04/2000 12:00:00 AM
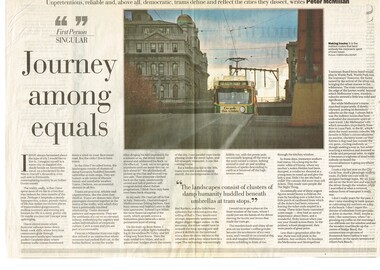
Newspaper clipping - from The Age, 15/4/2000 with an article on using Melbourne's trams, being a passenger, living and using trams in other world cities, observations, trolley poles, drivers, connies, MMTB and being a passenger in general. Written by Peter McMillan, with a photo of 2057 southbound across Spencer St bridge with the former VR offices in the background. Photo by Eamon Gallagher.trams, tramways, trams, melbourne, mmtb, passengers, spencer st, tram 2057 -
 Melbourne Tram Museum
Album - Photo Album, Michael Schrader, "Tram Pix ex Slides", 1960's
Manilla file folder, Railways of Australia Committee with a blue tape on the left hand side, preprinted file containing six sets of photograph sleeves with a sheet of white paper between, marked "Tram Pix ex Slides". Clipped into the folder with brass foldback clips. Sheet 1 front: MMTB Christmas Tram - 16W - Swanston St - 1963 T181 at Footscray Depot c1960 Brisbane Dreadnought 178 Sheet 1 rear VR 6 on an AETA Tour Brighton line Brisbane 358 and baby dreadnought and a group of 4 people Ballarat 35 and three other trams in City Loop - pre 1960 Sheet 2 front Ballarat 30 in bound in Albert St Sebastopol pre 1960 Bendigo 12 leaving depot, pre 1960 Bendigo 26 at Eaglehawk pre 1960 Sheet 2 rear Bendigo 29 pre 1960 Bendigo 28 with a group of enthusiasts standing in front - mid to late 1960's Sydney - coupled set of crossbench cars at a beach terminus Sheet 3 front Sydney - with Mark Foys in background Sydney - 2057 Sydney - trams being scrapped c1960 Sheet 3 rear Sydney - trams being burnt VR 30 at St Kilda Station Sheet 4 front VR36 and 6 on the Brighton line VR53 at St Kilda Station Sheet 4 rear VR 51 at Sandringham VR 51 on Sandringham Black Rock line VR 50 at Black Rock terminus Sheet 5 - not used Sheet 6 - front - photograph of a steam tram locomotive???trams, tramways, swanston st, myer, christmas trams, footscray depot, brisbane, st kilda brighton, ballarat, bendigo, sydney, scrapped trams, st kilda railway station, sandringham, black rock, tram 16w, tram 181, tram 178, tram 6, tram 358, tram 35, tram 30, tram 12, tram 26, tram 29, tram 28, tram 2057, tram 30, tram 36, tram 53, tram 51, tram 50 -
 Melbourne Tram Museum
Document - Report, David Frost, "A short history of the Black Rock Trams", Dec. 2003
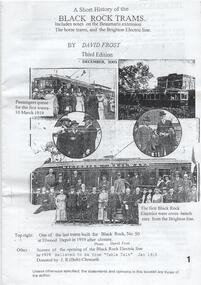
Report or Research Report - 10 A4 pages, printed from 5 A3 sheets folded, titled "A short history of the Black Rock Trams", written by David Frost, 3rd Edition Dec. 2003. Includes notes on the Beaumaris extension, the horse trams and the Brighton Electric line. Photocopied from an original document. Includes a list of tram stops, map including the St Kilda Brighton Electric Street Railway, drawing of tram 36 and tickets, the tramcar fleet and a photo of the author on the rear page.trams, tramways, vr, beaumaris, black rock, st kilda brighton, horse trams, map -
 Melbourne Tram Museum
Photograph - Colour Print, c1956
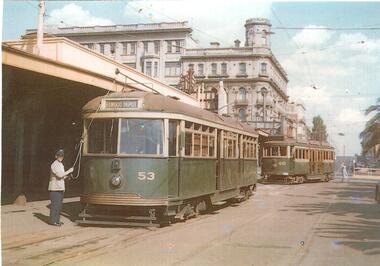
Colour print of VR 53 at St Kilda railway station with the driver or conductor reversing the pole. In the background is VR 40 arriving at the station. No. 53 has the destination of Elwood Depot. Photo used in Reg Item 1171 - Yarra Trams photo competition, credited to the donor. In the background is the St Kilda Railway Station and The George Hotel in the background. Printed on Kodak paper.trams, tramways, vr trams, st kilda railway station, conductors, drivers, elwood, tram 53 -
 Melbourne Tram Museum
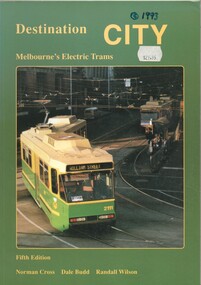
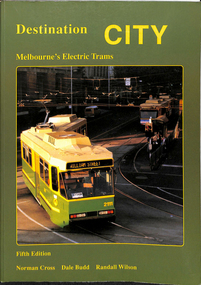
Book, Norm Cross, Dale Budd, Randall Wilson, Ian Hammond, "Destination City", 1993
Book - "Destination City" with subtitle "Melbourne's Electric Trams" - 128 A4 pages + card , printed on gloss paper - 7 sections, perfect bound, describes Melbourne's tram car fleet. Includes brief description of each type, photographs and a summary history, including the Victorian Railway's trams. Has many photographs of the various tramcars associated with relevant text. On front cover is a photo of Z3 at the Burwood terminus. Written by Norm Cross, Dale Budd and Randall Wilson as editors, published by Transit Australia Publishing. Has two maps, north and south of Melbourne, printed on the inside card covers. Photo of B2 2111 at corner of Spencer and Bourke Streets. See Reg Item 1986 for notes on the VR trams by Lloyd Rogers.trams, tramways, melbourne, tramcars, mmtb, vr trams -
 Melbourne Tram Museum
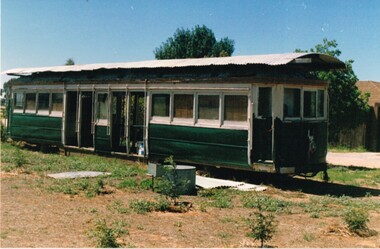
Photograph - Set of 4 Colour Print/s, Norm Cross, 1/01/1994 12:00:00 AM
Set of four colour prints of an Ex Victorian Railways bogie tram body at Sloan NSW. Photo by Norm Cross, printed on AGFA paper. Photo dated 1/1/1994. Advised by Tony Smith - 29/3/2017 "The tram in question is VR 39. It was one of the last 4 trams disposed of from Elwood depot in 1959 after the system closed. They were purchased complete by Upton's machinery dealers of Corowa. The other cars were 29, 33 & 37. He then stripped them and sold the bodies. When we obtained VR 41 in 1977 we immediately went searching for other bodies that might yield parts to help in rebuilding 41. We located 37 on the outskirts of Wangaratta and it yielded many body items including a complete drivers bulkhead that was used to replace the one in VR 41 that had been cut out with an axle by the previous owner. You may also recall that we obtained 3 complete broad gauge 77e trucks from Upton's (they had cut up the other 5 bogies years previous). These 77E trucks are now under the Christchurch Brill tram with the 3rd as a spare as we were able to obtain standard gauge 77e's when we acquired L 105 for dismantling."Each photo has written in ink on the rear "Body of VR tram # @ Sloan NSW 1 Jan 1994, photo by Norm Cross".trams, tramways, vr trams, sale of trams, scrapped trams, tram 39 -
 Melbourne Tram Museum
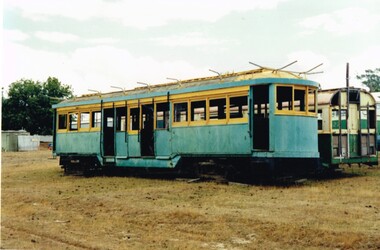
Photograph - Set of two Colour Prints, Lloyd Rogers, 8/02/1998 12:00:00 AM
Set of two colour prints of an Ex Victorian Railways bogie tram body of tram 35 at Bylands, 8/2/1998. Photo by Lloyd Rogers, printed on Kodak Paper. .1 - view of tram from the outside sitting on a set of bogie. .2 - Interior view of tram.Each photo has written in ink on the rear the details and date of the photograph and the negative number.trams, tramways, vr trams, sale of trams, scrapped trams, tmsv, bylands, tram 35 -
 Melbourne Tram Museum
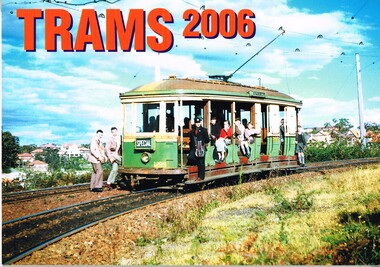
Ephemera - Calendar, Topmill Pty Ltd, "Trams - 2006", 2005
Wall Calendar - heavy card covers, 12 gloss art pages inside, titled "Trams - 2006" containing full colour photographs of Rockhampton, Ballarat, Fremantle, Grenoble France, Geelong, Sydney, Brisbane, VR Sandringham and Transporting Art Melbourne trams. Has a punched hole along the top edge to enable wall use. Provides dates for holidays, school holidays and Pension payment days and phases of the moon. Produced by Topmill Pty Ltd and distributed by Gordon & Gotch Pty Ltd. Photos by Archer Park, William Scott, A. W. Perry, Ben Parle, Maurice Kelly, Ken Smith,trams, tramways, rockhampton, ballarat, fremantle, geelong, sydney, brisbane, victorian railways, sandringham, brisbane, transporting art, tram 2107, tram 50, tram 384, tram 340, tram 497, tram 567 -
 Melbourne Tram Museum
Book, Norm Cross, Dale Budd, Randall Wilson, Ian Hammond, "Destination City", "Destination City - 1993 - Victorian Railways Trams", 1993
1986.1 - Book - "Destination City" with subtitle "Melbourne's Electric Trams" - 128 A4 pages + card , printed on gloss paper - 7 sections, perfect bound, describes Melbourne's tram car fleet. Includes brief description of each type, photographs and a summary history, including the Victorian Railway's trams. Has many photographs of the various tramcars associated with relevant text. On front cover is a photo of Z3 at the Burwood terminus. Written by Norm Cross, Dale Budd and Randall Wilson as editors, published by Transit Australia Publishing. Has two maps, north and south of Melbourne, printed on the inside card covers. Pages 92, 93, 96, 98 - 103 have been annotated by Lloyd Rogers - see htd1986i1.pdf - red and blue ink. - giving corrections and notes. 1986.2 - 8 pages of typed and handwritten notes - photocopied with "Comments by Lloyd Rogers Jan. 1 1994" on bottom of each sheet - giving page by page notes - see htd1986i2.pdf for a scan of these notes. Includes notes on the paint scheme for VR. 53 and a copy of a memo from the Rolling Stock Engineers Office, dated 22/6/1942 titled "Construction 3 - 45 feet tram cars" giving instructions re the paint colour schemes.trams, tramways, melbourne, tramcars, mmtb, vr trams -
 Melbourne Tram Museum
Photograph - Set of 2 Black & White Photograph/s, Lee A Ratten, late 1930s
Set of two black and white photographs of tramcar 815 in Collins St at Spencer St. Tram 815 was one of 24 W5 class trams built by MMTB at Preston Workshops in 1937. Entered service Saturday 13 November 1937. In April 1984 converted to SW5. Currently stored at Newport Workshops. Was relocated to the site of the former Glenhuntly Post Office in Glenhuntly Road Feb. 2020. Photo shows tram at corner with Specer St station parcels building and VR building in background. Also shows building on corner which was used by State Saving Bank of Victoria. Destination shown as "Kew Depot" route number 47.trams, tramways, w5 class, collins st, spencer st, route 47, tram 815 -
 Melbourne Tram Museum
Photograph - Albert Road and Clarendon St South Melbourne, Bill Kingsley, 13/10/1971
Set of four black and white photos by Bill Kingsley of trams in South Melbourne: 1 - SW6 895 (Sth Melbourne & St Kilda Beach, Route 12) outbound in Albert Road. Tram has advertisements for Robo 2 min auto car wash, and Norton makes Bear Tape. 2 - W2 639 (Sth Melbourne & St Kilda Beach, Route 12) outbound in Albert Road. Tram has advertisements for Tolleys Brandy. In the background is the former South Melbourne Football ground. 3 - W5 773 (City-Brunswick St, route 12), turning from Albert Road into Clarendon St. Tram has advertisements for Sprint soft drink and HMV sound systems. 4 - Photo of Bill KIngsley's well-known VR Combi van.Yields information about the Albert Road tram servicesSet of four black and white photographs and associated 35mm negatives.Location on the rear of each print.trams, tramways, bill kingsley., albert road, clarendon st, route 12, sw6 class, w5 class, w2 class, tram 895, tram 639, tram 773, vr combi, south melbourne, south melbourne football ground -
 Melbourne Tram Museum
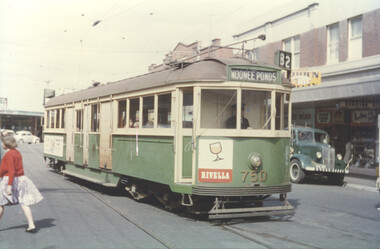
Photograph - Set of two photos - route 82 cars on the day of the closure of the Footscray local routes, 10/2/1962
Colour prints showing two of the service cars running route 82 on the day of the closure of the Footscray local routes 10-2-1962: 1 - W5 750 (Moonee Ponds, route 82) at the Footscray terminus in Leeds St. 2 - VR 52 (Moonee Ponds, route 82) turning from Ballarat Road into Gordon St.Yields information about route 82 service cars on the day of the closure of the Footscray local routes. Set of two Colour print on Kodak Royal paper.trams, tramways, ballarat road, leeds st, footscray, w5 class, vr class, tram 52, tram 750 -
 Melbourne Tram Museum
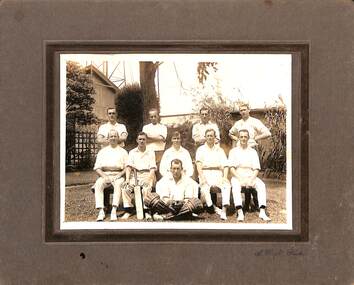
Photograph - Black and White photograph - mounted, A. Wright Photo, 1930s
Mounted black and white photograph - light grey card with a brown band within embossed surfaces of 10 cricket players of possibly the Elwood Depot cricket team. Has "A. Wright Photo." in bottom right hand corner. The detailing on the building matches that of the rear of the Elwood depot building.In pencil on the rear "VR Elwood Tram Depot?"trams, tramways, staff, personnel, vr, elwood depot, cricket -
 Melbourne Tram Museum
Album - Photo Album, Transit Australia Publishing, "TAP - Part C - W5 to W7 – VR & 980 – sheets C1 to C41 ", 1950's to 1990's
... Photo Album - titled " TAP - Part C - W5 to W7 – VR & 980... 888 tram 940 tram 891 tram 917 tram 1016 Photo Album - titled ...Photo Album - titled " TAP - Part C - W5 to W7 – VR & 980 – sheets C1 to C41 ", from Transit Australia Publishing. Photos used in the Destination City and other publications series. For a detailed list of photographs see htd4602i.pdf. For individual photo images see: \dbtext\hawthtramcoll\photo collections\htd4602-TAP-PartC, images TAP164 to TAP243. TAP164_52_RiverSt_KeithKings_2Apr1960.jpg TAP165_52_RiverSt.jpg TAP166_700_MooneePonds.jpg TAP167_736_HughWaldron.jpg TAP168_820_MooneePondsJunct_2Feb1972_AndrewFoy.jpg TAP169_821_VictoriaPde_Jan1993_RayMarsh.jpg TAP170_796_MaribyrnongRvrBridge_DuckettColln.jpg TAP171_899_VictoriaPde-at-GisborneSt_DuckettColln.jpg TAP172_910_QueensBridge.jpg TAP173_923_RAAF_SwanstonSt_NoellReed_19Jan1953.jpg TAP174_980_VictoriaPde.jpg TAP175_980_RoyalVisit_MalvernDepot_5Mar1954-KeithKings.jpg TAP176_980_VictoriaPde_3Feb1951.jpg TAP177_980_VictoriaPde_3Feb1951.jpg TAP178_980_BourkeSt_26Dec1969_GregKing.jpg TAP179_980_RoyalTram-MMTB.jpg TAP180_980_RoyalTram-StGeorgesRd_KeithKings_1Mar1954.jpg TAP181_980_Preston_HughBallment.jpg T AP182_980_AETA-tour.jpg TAP183_1003_HawthornRd_12April1955_KeithKings_1Mar1954.jpg TAP184_1031-1032_GlenferrieRd_NoelReed_17Feb1956.jpg TAP185_AETA_pre-opening tour_BourkeSt_25Jun1955.jpg TAP186_53_Footscray_18Jan1969_PaulNicholson.jpg TAP187_53_Preston_Feb1973_MMTB.jpg TAP188_684_Caulfield_WJohnWebster.jpg TAP189_685_Esplanade_RayPearson.jpg TAP190_721_Elsternwick_WJohnWebster.jpg TAP191_736_MMTB.jpg TAP192_740_WilliamSt_AndrewFoy_7Feb1972.jpg TAP194_736_VicMarket_RayPearson_13Apr1936.jpg TAP195_760_VicMarket_1986_MichaelMcLeod.jpg TAP196_787_FlemingtonRd_RogerPywell_16May1960.jpg TAP197_801_StKildaRd-trackwork_KSKings_18Mar1951.jpg TAP198_808_Esplanade_RayPearson.jpg TAP199_810_TruganiniRd_NoelReed.jpg TAP200_812_StKildaJunction.jpg TAP201_816_MalvernDepot_WJohnWebster.jpg TAP201_847_BatmanAve_WJohnWebster.jpg TAP202_816_FlindersSt_1986_MichaelMcLeod.jpg TAP203_844_MalvernDepot_AndrewFoy6Jan1973.jpg TAP205_856_BatmanAve_WJohnWebster.jpg TAP206_885_Carnegie_IanCooper.jpg TAP207_836_ElizabethSt_HughBallment.jpg TAP208_887_MalvernDepot_WJohnWebster.jpg TAP209_914_BatmanAve_GeoffGrant.jpg TAP210_914_BatmanAve_LindsayCrowe.jpg TAP211_923_RAAF_VictoriaSt_WJohnWebster.jpg TAP212_915_50thAnnivFederation_Preston_21May1951_KeithKings.jpg TAP213_958_Glenhuntly_AndrewFoy_9Jan1986.jpg TAP214_965_ChapelSt_AndrewFoy_9Jan1986.jpg TAP215_979_HighSt_MMTB.jpg TAP216_988-1003_TestRuns_NicholsonSt_GeoffGrant_19Jun1955.jpg TAP217_988_Nicholson-intoVictoria_GeoffGrant_19Jun1955.jpg TAP218_991_BourkeStOpening_GeoffGrant_24Jun1955.jpg TAP219_993_EastBrighton_DaleBudd_1989.jpg TAP220_993_NicholsonSt_PaulNicholson_10Sep1968.jpg TAP221_994_SmithSt_AndrewFoy_20May1976.jpg TAP222_999_SwanSt_AndrewFoy_19Jan1977.jpg TAP223_980_GlenferrieRd_NoelReed_.jpg TAP224_980_GlenferrieRd_WJohnWebster.jpg TAP225_980_VictoriaPde_AETAtour_KeithKings_3Feb1951.jpg TAP226_980_DandenongRd_MMTB.jpg TAP227_980_Preston_HughBallment.jpg TAP228_1002_SwanstonSt_AndrewFoy_3Jan1989.jpg TAP229_1003_EastPrestonDepot_MMTB.jpg TAP230_1010_HighSt_MMTB.jpg TAP231_1032_MMTB.jpg TAP232_1033_AETAtour_7Apr1956_GeoffGrant.jpg TAP233_1033_EastBrunswick_AETAtour_7Apr1956_GeoffGrant.jpg TAP234_52_DroopSt_JimSeletto.jpg TAP235a_761-961_DomainInterchenge_FrizVanDam_24Oct1988.jpg TAP235_750-759_VictoriaStShunt_FrizVanDam_31Oct1988.jpg TAP236_833-974_CarlisleSt_FrizVanDam_24Oct1988.jpg TAP237_888-999_DandenongRd-at-LansdowneSt_FrizVanDam_22Oct1988.jpg TAP238_940_EastPreston_marker-lights_Jun1970_MMTB.jpg TAP239_891-Kew_pantographtest_RayMarsh_21Nov1989.jpg TAP240_1032-917_VictoriaPde_FrizVanDam_28Oct1988.jpg TAP241_1024_EastBrighton_JimSeletto_1963.jpg TAP242_FrontEntranceSW6-drawing_MMTB_22Aug1955.jpg TAP243_FrontEntranceSW6-drawing_altered-as-1016.jpg Transit Australia Photos - W5 to W7 + VR + 980 sheets C1 to C41.pdf - this item stored in box 01-0 - as Reg Item 4620 foolscap size - larger than folder.trams, tramways, transit australia, destination city, tramcars, depots, w5 class, sw5 class, sw6 class, w7 class, w6 class, vr, tram 52, tram 700, tram 736, tram 820, tram 796, tram 899, tram 910, tram 923, tram 980, tram 1003, tram 1031, tram 1032, tram 53, tram 684, tram 685, tram 721, tram 736, tram 740, tram 746, tram 760, tram 787, tram 801, tram 808, tram 810, tram 812, tram 816, tram 844, tram 847, tram 856, tram 885, tram 836, tram 887, tram 914, tram 923, tram 915, tram 958, tram 965, tram 979, tram 988, tram 1003, tram 991, tram 993, tram 994, tram 999, tram 1002, tram 1003, tram 1010, tram 1032, tram 1033, tram 750, tram 759, tram 761, tram 961, tram 833, tram 974, tram 888, tram 940, tram 891, tram 917, tram 1016 -
 Melbourne Tram Museum
Album - Photo Album, Transit Australia Publishing, "TAP - Part E - VR Trams – Sheets E1 to E24 ", 1950's to 1990's
Photo Album - titled "TAP - Part E - VR Trams – Sheets E1 to E24 ", from Transit Australia Publishing. Photos used in the Destination City and other publications series. For a detailed list of photographs see htd4604i.pdf. For individual photo images see: \dbtext\hawthtramcoll\photo collections\TAP-Part D, images TAP269 to TAP315. TAP269_1-scrubber-OrmondRd_c1943_LeonMarcshallWood.jpg (Bob Lilburn notes in a letter to Keith Kings, photo dated 10/1942 - see 4064.1 in the same folder) TAP270_7_BrightonBeach_1954_HughBallment.jpg TAP271_17_ex-Sydney_LeonMarshallWoodCollection.jpg TAP272_23_ElwoodDepotTurntable.jpg TAP273_26_SandringhamDepot_LGPooleColln.jpg TAP274_40_BrightonBeach_1954_HughBallment.jpg TAP275_43_Sandringham_1943_LeonMarshallWood.jpg TAP276_43_ElwoodDepot_HughBallment.jpg TAP277_48_BlackRock_1954_HughBallment.jpg TAP278_51_ElwoodDepot_25Jan1957_LeonMarshallWood.jpg TAP279_ElwoodDepot_1918.jpg TAP280_6-ElwoodDepot.jpg TAP281_8-9trailer_LeonMarshallWoodCollection.jpg TAP282_3_ElwoodDepot_HughBallment.jpg TAP283_6_ElwoodDepot.jpg TAP284_6_ElwoodDepot_RayPearsonColln.jpg TAP285_trailer_ElwoodDepot_PTC.jpg TAP286_23_Sandringham_RayPearson.jpg TAP287_28-32_ElwoodDepot_PTC.jpg TAP288_32_StKilda_HughBallment.jpg TAP289_34_OrrmondRd_TMSV.jpg TAP291_37_ElwoodDepot_LindsayCrowe.jpg TAP292_36-39_VautierSt_JimSeletto.jpg TAP292_36-52_ElwoodDepot_1959_JimSeletto.jpg TAP293_40-33_ElwoodDepot_HughBallment.jpg TAP294_41_StKildaStation_1959_JimSeletto.jpg TAP295_43_StKildaStation_HughBallment.jpg TAP296_48_BlackRock_1954_HughBallment.jpg TAP297_51_Sandringham_LindsayCrowe.jpg TAP298_51_leaving-Sandringham_HughBallment.jpg TAP299_51_Sandringham_RayPearson.jpg TAP300_50_Sandringham_1955_GeoffGrant.jpg TAP301_LuxuryCar_Elwood_VictorianRailways.jpg TAP302_52_leaving-StKilda_HughBallment.jpg TAP303_53_ElwoodDepot_HughBallment.jpg TAP304_53-40_StKilda_NoelReed_19Jan1954.jpg TAP305_54_ElwoodDepot_NoelReed.jpg TAP306_Esplanade_MiddleBrighton_TMSV.jpg TAP307_BrightonBeach_TMSV.jpg TAP308_SandringhamStation_TMSV.jpg TAP309_34_ElwoodDepot_JimSeletto.jpg TAP310_34_Yarrambat_JimSeletto.jpg TAP312_34_Elwood_VictorianRailways.jpg TAP313_43_StKildaStation_HughBallment.jpg TAP314_43-894_StKildaStation.jpg TAP315_53_VautierSt_JimSeletto.jpgtrams, tramways, transit australia, destination city, tramcars, depots, vr, victorian railways, st kilda brighton, sandringham, tram 1, tram 7, tram 17, tram 23, tram 26, tram 40, tram 43, tram 46, tram 51, tram 6, tram 3, tram 13, tram 23, tram 28, tram 32, tram 34, tram 36, tram 39, tram 37, tram 52, tram 40, tram 43, tram 41, tram 48, tram 51, tram 50, tram 53, tram 4, tram 54, tram 42 -
 Melbourne Tram Museum
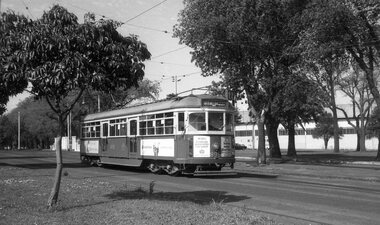
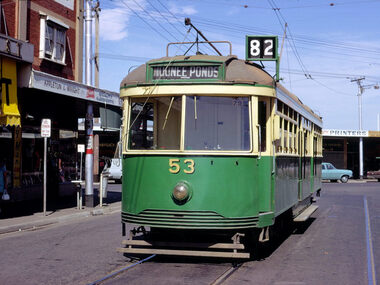
Photograph - Digital Image, Dick Jones, VR 53 at the Footscray terminus, Apr. 1970
Digital image of VR 53 at the Footscray terminus, April 1970. Tram showing route 82, Moonee Ponds. In the background is the Appleton and Wright quality garments shop and the tram stop signage. Photo by Dick Jones - reference - 53_Footscray_DickJones_7004M8b.15.145trams, tramways, vr class tramcars, footscray, moonee ponds, route 82, tram 53 -
 Melbourne Tram Museum
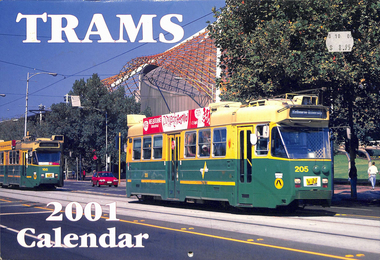
Ephemera - Calendar, Topmill Pty Ltd, "Trams - 2001", 2000
... museums of Australasia, Melbourne tram photos of: Z3 205 VR... photos of: Z3 205 VR 53 HTT 8 V 214 X 217 Z71 L 104 W5 ...Wall Calendar - heavy card covers, 12 gloss art pages inside, titled "Trams - 2001" containing full colour photographs of Brisbane, Bendigo, Sydney, Melbourne, Perth, Adelaide and Rockhampton. Centre pages has postcards of Brisbane, Ballarat, Adelaide, Sydney, Hobart and Kalgoorlie. Has a list of tramway museums of Australasia, Melbourne tram photos of: Z3 205 VR 53 HTT 8 V 214 X 217 Z71 L 104 W5 774 SW5 682 - Merrin Eirth Z111 - Koorie tram - see Reg Item 4749 for a postcard size photograph. A 246 - Energy Victoria W2 - 150 years of Victoria. TMSV horse card 256 B2 in then then new Yarra trams colour scheme. Has a punched hole along the top edge to enable wall use. Provides dates for holidays, school holidays and Pension payment days and phases of the moon. Produced by Topmill Pty Ltd and distributed by Gordon & Gotch Pty Ltd. Photos by Noel Reed, Arthur Perry, Ray Marsh, Tracy Hardy, C Deantrams, tramways, ballarat, bendigo, melbourne, adelaide, sydney, brisbane, auckland, hobart, kalgoorlie, z class, vr, htt, v class, x class, l class, w5 class, b class, transporting art, tram 205, tram 53, tram 8, tram 214, tram 71, tram 217, tram 104, tram 774, tram 256, tram 682, tram 246, tram 111 -
 Melbourne Tram Museum
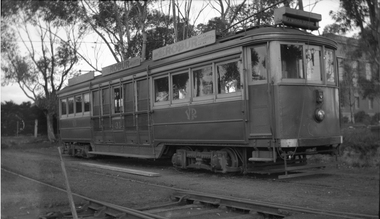
Photograph - Negative and Black & White Photograph/s, early 1950's
Negative (120) and contact print of VR tram No. 31 at the Elwood depot. Tram has three Robur Tea advertisements on the roof line, white bumpers and showing the destination of Elwood Depot. In the background is the VR Tram substation. Hi Res image filed in the dbtext/hawthtramcoll/Large Images/htd3625Large.jpgEnvelope containing negative and photo typed "Tram No. 31 VR Elwood" On the rear of the print "VR Tram - Elwood Car Barn, Substation in background"trams, tramways, victorian railways, vr, elwood depot, substation, tram 31 -
 Melbourne Tram Museum
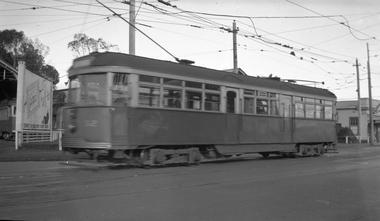
Photograph - Negative and Black & White Photograph/s, early 1950's
Negative (120) and contact print of VR tram No. 52 at the Elwood depot. In the background is the VR Tram Elwood Depot. Hi Res image filed in the dbtext/hawthtramcoll/Large Images/htd3626Large.jpgEnvelope containing negative and photo typed "Tram No. 52 VR" On the rear of the print "VR Tram - Depot in background"trams, tramways, victorian railways, vr, elwood depot, vr class tramcars, tram 52 -
 Melbourne Tram Museum
Photograph - Negative and Black & White Photograph/s, early 1950's
Negative (120) and contact print of VR tram No. 54 near the Elwood depot. Hi Res image filed in the dbtext/hawthtramcoll/Large Images/htd3627Large.jpgEnvelope containing negative and photo typed "Tram No. 52 VR" On the rear of the print "VR Tram - Elwood"trams, tramways, victorian railways, vr, elwood depot, vr class tramcars, tram 54 -
 Melbourne Tram Museum
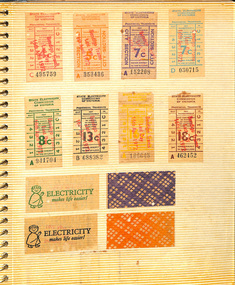
Document - Photo Album, Graeme Breydon, "Tickets and Postal Covers", c1970 to 1990
Photo Album - dark blue plastic covers with the letters "photo album" in raised letters, stippled finish containing 10 leaves ring bound with an adhesive surface with clear plastic sheet on each cover. Page 1 – set of 8 Last day tram tickets – 16/4/1972 and four SEC tickets rear. Page 2 – set of 10 SEC tickets and 2 backs Page 3 – 2 BTPS 10c tickets, MMTB 25c, 3 Brisbane City Council tickets, two Trittons furnishings, one WCC (Wellington?) cable car and two MMTB City Concession tickets Page 4 – Set of 9 MMTB tickets 4d, 7d city, 7d, 8d, 1/-, 1/ 4, 2/- or 20c, 2/6 and one Pensioner’s check ticket. Page 5 – Set of 9 MMTB tickets, 4c, 8c, 9c, 10c, 30c, Pensioner’s concession, two $1 City concession cards, city concession check ticket and two machine issued tickets 1c and 15c. Page 6 – set of 16 MMTB tickets that have been recovered from within trams, very dirty, check tickets, value tickets and advertising on the rear. Page 7 – various special train tickets – Stainless steel train, ARHS tours, TMSV, ARHS Farewell, ARHS SA Mile End, Ballarat trams x 2, Crich exhibition ticket and one MTT (Tas?) 30c. Page 8 – VR Windsor to Melbourne Quarterly 1940, 7 VR various country and suburban tickets and two VR Motor coach services tickets. Page 9 – two interstate reserved seat tickets, Brisbane suburban ticket and 8 various values QR Parcel tickets – very dirty. Page 10 – Two Puffing Billy guest passes, 10th anniversary ticket, 10 various card tickets for Puffing Billy and tours. Page 11 – 6 + others MTT Adelaide value tickets with adverts on rear and four AETM St Kilda Museum tickets. Page 12 – four Red Bus Rover London tickets, four Peak Tramways tickets, one toll bridge, 6 London machine issued tickets. Page 13 – One San Francisco Municipal Railway ticket, one LlafrairPG platform ticket and two MMTB Machine tickets. Page 14 – One $1 MMTB city concession card and one Parramatta Park tramway ticket issued for COTMA during 1976. Page 15 – One Emerald Park vehicle entry ticket and one PBPS opening day of the extension to Lakeside in 1975 with certificate. Page 16 – One PBPS Notice. Page 17 – not used. Page 18 – three commemorative envelopes – WA Railway Centenary, Standard Gauge to Melbourne, and Sydney to Perth. Page 19 – Brisbane tramways last day, two Last day envelopes for Ballarat and Bendigo. Page 20 – three different St Kilda Centenary – Adelaide. Contained within the album was loose tickets - see Reg Item 3970 and a pamphlet for the opening of the Transport Mural at Spencer St Station on 30 Jan. 1978.has a label on the side in punched letters on a green tape "Tickets and Postal Covers"trams, tramways, tickets, secv, mmtb, adelaide, brisbane, arhs, aetm, aeta, pbps, cotma, tmsv, victorian railways, vr, post office, envelopes, post office -
 Melbourne Tram Museum
Photograph - Black & White Photograph/s, Melbourne & Metropolitan Tramways Board (MMTB), 1926
Black and white photograph of MMTB No. 58 in Wellington St. St Kilda, about to enter St Kilda Junction and continue to St Kilda beach via Fitzroy St St Kilda, late 1925 or early 1926 - Wellington St electric line opened 27/12/1925. Note the sign on the left hand pole about travel to Malvern and St Kilda Beach, the workmen and that another tram has left heading outwards. On the right hand side is part of a sign advising people to catch cars to the Esplanade. Photo from the Collection of the Department of Infrastructure now with the Public Records Office - image number H102. Note: this photo is now out of copyright and was not an original VR photograph, but one copied from another source and collected as their Heritage series. See Image 3673i2 for a digital image of the card photograph at the PRO on 7/1/2019 that this photograph comes from. Further notes from Rod Atkins: Note the Electrical box at base of the pole on left hand side of the photo. No section insulators yet as power would have been stretched from Dandenong Road / Chapel Street right through to Fitzroy Street to run the first services. Great shot of the "H" car. Malvern bound is a another Californian combo car, but with original destination boxes and PPTT style "No" on the left side of the apron but cant make out the number.Has Department of Infrastructure copy right stamp on rear and number "H 102" in ink on rear and "2-3"trams, tramways, mmtb, st kilda junction, wellington st, trackwork, st kilda beach, tram 58 -
 Melbourne Tram Museum
Photograph - Black & White Photograph/s, c1926
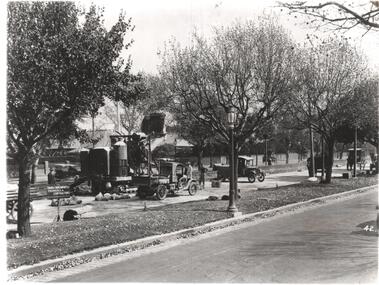
Black and white photograph of the construction of the tram track in St Kilda Road, during 1925 or 1926 by the Foundation Construction Ltd, with a concrete mixer tracked vehicle and two aggregate or crushed rock trucks. Photo from the Collection of the Department of Infrastructure now with the Public Records Office - image number H514. Note: this photo is now out of copyright and was not an original VR photograph, but one copied from another source and collected as their Heritage series. See Image 3674i2 and 3674i3 for a digital image of the card photograph at the PRO on 7/1/2019 that this photograph comes from. Further notes from Rod Atkins 11/7/2019: The cement mixer was state of the art machine at the time. "Buddy" in the USA were making them but this one is slightly different and may have been made by a company call AAC in Sheffield U.K. You can just make out the word " ….field" etc … on the water tank . The sign; now this is very interesting. "The Foundation Company" is the Australian company of the one in London.. from The Argus at the time. run by no less than by Herbert Del Cott Ply Ltd. (you can just make that out in the bottom line of the sign.) A rather interesting person in Melbourne society between the wars. His name pops up a lot in The Argus. was not short of a pound either.... Had his "Buick" stolen from Russell Street in 1920. Had some issues with wages on Wellington Street conversion. Looks to have run a electrical business before seeing opportunity with cable tram replacement coming up. In the 1930' lived in Stevenson Street, Kew. Travelled a lot to Europe. (Austria) …..Has Department of Infrastructure copy right stamp on rear and number "H 514" in ink on rear and "2-1"trams, tramways, st kilda rd, trackwork, construction, conversion -
 Melbourne Tram Museum
Photograph - Black & White Photograph/s, Melbourne Tramway & Omnibus Co. Limited, c1900?
Black and white photograph of on end of cable saloon trailer No. 1 with the "Richmond" destination prominent and other details of the end of the tramcar. Photo possibly taken after the repainting of the tram. Photo from the Collection of the Department of Infrastructure now with the Public Records Office - image number H552. Note: this photo is now out of copyright and was not an original VR photograph, but one copied from another source and collected as their Heritage series.Has Department of Infrastructure copy right stamp on rear and number "H 552" in ink on rear and "1-6"trams, tramways, cable trams, trailers, paint, tram 1 -
 Melbourne Tram Museum
Photograph - Black & White Photograph/s, Melbourne Tramway & Omnibus Co. Limited, c1900?
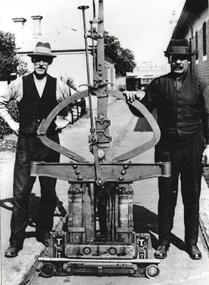
Black and white photograph of a cable tram grip mechanism showing the height of the item with two men alongside. Shows the detail and has a section of cable in the jaw of the grip. Photo from the Collection of the Department of Infrastructure now with the Public Records Office - image number H173. Note: this photo is now out of copyright and was not an original VR photograph, but one copied from another source and collected as their Heritage series.Has Department of Infrastructure copy right stamp on rear and number "H 173" in ink on rear and "1-16"trams, tramways, cable trams, grip tram, gripmen -
 Melbourne Tram Museum
Photograph - Black & White Photograph/s, Melbourne Tramway & Omnibus Co. Limited, c1885
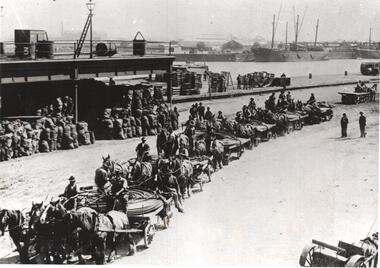
Black and white photograph of a six hose drawn carts with a length of cable for the cable tram network, photographed after unloading at North Wharf and before being delivered to a winding house. Note four horses per cart. Photo date now known, could be 1885. Photo from the Collection of the Department of Infrastructure now with the Public Records Office - image number H104. Note: this photo is now out of copyright and was not an original VR photograph, but one copied from another source and collected as their Heritage series. two prints heldHas Department of Infrastructure copy right stamp on rear and number "H 104" in ink on rear and "1-3"trams, tramways, cable trams, horse drawn vehicle, winding houses -
 Melbourne Tram Museum
Photograph - Black & White Photograph/s, Melbourne & Metropolitan Tramways Board (MMTB), Dec 1925 or Jan 1926
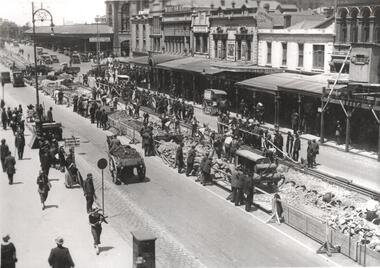
Black and white photograph of the conversion of the Flinders St end of Swanston Street from cable trams to electric trams. Note the signs advising passengers to go to Princes Bridge for buses, horse drawn vehicles with excavated spoil, air compressor, the cable tram slot rail supporting yokes. In the background is the Flinders St Station. Photo from the Collection of the Department of Infrastructure now with the Public Records Office - image number H101. Note: this photo is now out of copyright and was not an original VR photograph, but one copied from another source and collected as their Heritage series.Has Department of Infrastructure copy right stamp on rear and number "H243" in ink on rear and "2-4"trams, tramways, swanston st, cable trams, trackwork, new tramway, flinders st, conversion -
 Melbourne Tram Museum
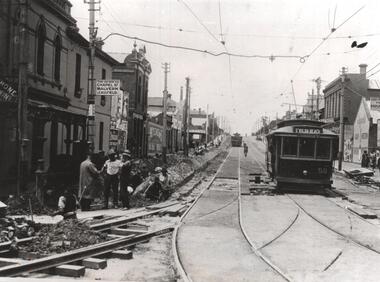
Photograph - Black & White Photograph/s, Melbourne & Metropolitan Tramways Board (MMTB), Jan. 1926
Black and white photograph of the conversion of the intersection of Domain Road, St Kilda Road, Domain Junction from cable tram to electric tram. Shows the Toorak Road Tram remaining trackwork, the temporary track for the electric trams with 276 inbound with the destination of North Coburg and another W class tram outbound to St Kilda Beach. Note the temporary platform and the temporary board crossing. Has "The Foundation Company Engineers and Contractors" sign in the view and the petrol? powered roller. Photo from the Collection of the Department of Infrastructure now with the Public Records Office - image number H101. Note: this photo is now out of copyright and was not an original VR photograph, but one copied from another source and collected as their Heritage series.Has Department of Infrastructure copy right stamp on rear and number "H513" in ink on rear and "2-5".trams, tramways, swanston st, cable trams, trackwork, new tramway, flinders st, conversion -
 Melbourne Tram Museum
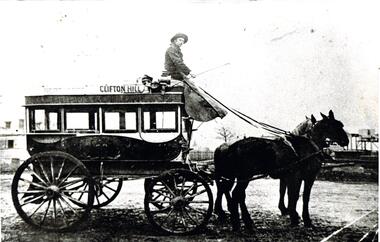
Photograph - Black & White Photograph/s, Melbourne Tramway & Omnibus Co. Limited, mid 1880's?
Black and white photograph of a horse drawn bus with the destination Northcote to Clifton Hill, with the driver on top of the vehicle, whip and his well covered legs. Has two horses harnessed. Appears to be a narrow gauge railway in front of the horses. See Reg Item 1784 for a newspaper clipping featuring the same photo - reported to be the last horse bus Clifton Hill to Collingwood. Photo from the Collection of the Department of Infrastructure now with the Public Records Office - image number H5. Note: this photo is now out of copyright and was not an original VR photograph, but one copied from another source and collected as their Heritage series.Has Department of Infrastructure copy right stamp on rear and number "H 5" in ink on rear and "5-2"trams, tramways, horse buses, clifton hill