Showing 401 items
matching white hills gardens
-
 Ballarat Heritage Services
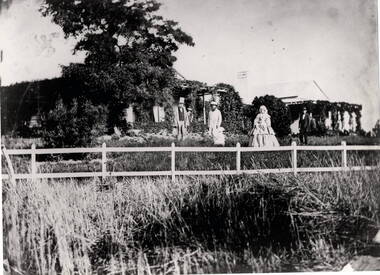
Image, Ballarat East Gardens, c1895, c1895
Black and white image of the a fountain in the Ballarat East Gardens. ballarat east, main road ballarat east, ballarat east gardens -
 Ballarat Heritage Services
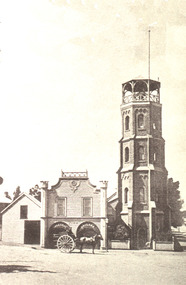
Photograph - Image, Ballarat Fire Brigade, c1895, c1895
Black and white image of the Ballarat Fire Brigade in Main Road Ballarat East.ballarat east, main road ballarat east, ballarat east gardens, fire brigade -
 Ballarat Heritage Services
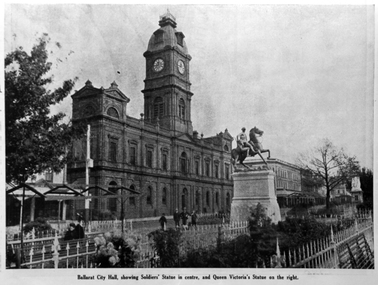
Photograph - Image, Ballarat Town Hall and Sturt Street Gardens, 1922, 1922
The Sturt Street Gardens run down the centre of Ballarat's main street. It boast many statues. In front of the depicted Ballarat Town Hall is the Boer War Memorial which commemorates soldiers who have taken part in the South African War. The scuplture is by James White, and it was proposed by Cr J.J. Brokenshire, and was approved at the Council meeting on 31 May 1900. The foundation stone was laid on May 1901 but was relocated to the present site and re-laid by the then Mayor Brokenshire. The stature was unvelied on 01 November 1906 by the Governor General Baron Northcote.Copy of a photograph showing Ballarat Town Hall, Sturt Street gardens, and the Boer War Monument. ballarat, ballarat town hall, boer war monument, sturt street gardens, boer war memorial, statues -
 Ballarat Heritage Services
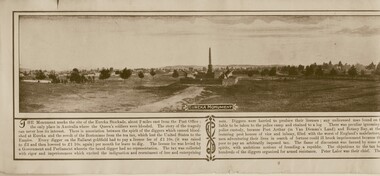
Image - Black and White, Eureka Stockade Monument, 1904, 1904
Black and white image of the Eureka Memorial Gardens and the Eureka Stockade Memorial.eureka stockade, eureka memorial, eureka stockade memorial gardens -
 Hume City Civic Collection
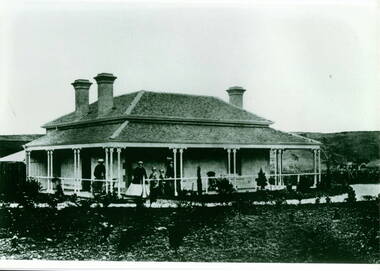
Photograph, Craiglee Homestead
The property is Craiglee, which was one of the first vineyards established in Sunbury in 1865 by Stuart Johnson. It is sited on the east bank of Jackson Creek and fronts onto Macedon Street. Goonawarra is another early vineyard on the opposite side of Macedon Street.A black and white photograph of a Victorian single storey homestead with a return verandah. Five people are standing on the porch. There are hills across the skyline and the garden surrounds the house.craiglee, johnson james stuart, vineyards, ] -
 Hume City Civic Collection
Photograph, Woodlands Homestead, c1858 - 59
The photograph is of the Woodland Homestead at Bulla which was sited along the Moonee Ponds Creek. William Pomroy Greene and his wife Anne, emigrated from Scotland and arrived in the Port Phillip area in December 1842.. He acquired the Crown land at Gellibrand Hill in 1843 and built the prefabricated homestead which became known as Woodlands. The people in the photograph, taken about 1859 - 60, are L- R: Possibly Sir Willian Stawell, ?, little Anne Catherine Greene at 2 years, Rawdon Greene, Mrs. Greene and Smith ( a butler).The Greene family were one of the early European settlers to acquire land in the Bulla Bulla district. The Woodlands property is now a national park and the significant Gellibrand Hill is within the park.A black and white photograph of 3 men, a lady and a child standing in a garden in front of a homestead. A wooden post and rail fence is in the foregroundwoodlands homestead, greene family -
 Ballarat Tramway Museum
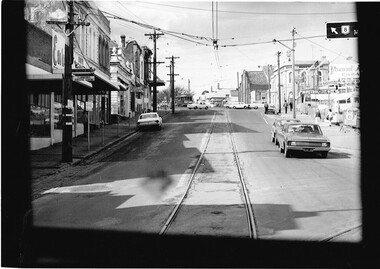
Photograph - Black & White Photograph/s, early 1950's
Black and white photograph of Bendigo 2 leaving the Eaglehawk terminus on its way to Quarry Hill, late 1960's or early 1970's. In the view is the Town Hall Hotel - Melbourne bitter, J Best's milk bar and fruit shop advertising Cohn's Lemonade, Peters Ice cream, a Holden station wagon with Craven A Filter cigarettes, and Ashman's dry cleaning shop.trams, tramways, bendigo, high st, eaglehawk, tram 2 -
 Ballarat Tramway Museum
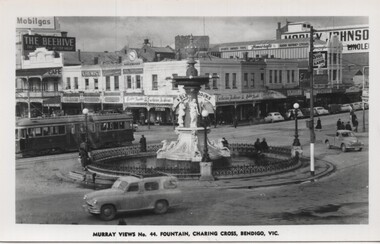
Postcard, Murray Views, "Murray Views No. 44 Fountain, Charing Cross Bendigo Vic", early 1950's
Postcard - most likely a reproduction of the original as it does not have a postcard back - titled "Murray Views No. 44 Fountain, Charing Cross Bendigo Vic". Shows an ex Hawthorn Bogie tram possibly on its way to Quarry Hill. In the background are the Beehive building, A G. Treloar Watchmaker, Melba Frocks, R. White, Edments, Hartleys, Astor Radio, Homecrafts store, and Morley Johnson building.On the rear in ink "Bendigo Charing Cross and Victoria Fountain" and the Keith Kings stamp.trams, tramways, bendigo, charing cross, bogie trams -
 Ballarat Tramway Museum
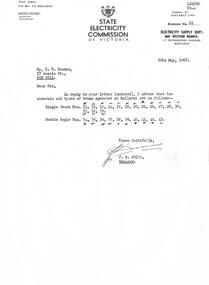
Document - Photocopy, State Electricity Commission of Victoria (SECV), tramcar fleets in Ballarat and Bendigo, 1967
Yields information about the tram car fleets in both Ballarat and Bendigo following a query by letter.Photocopy of two letters from the SEC to K. (Kevin) D Stanes of 17 Acacia St Box Hill, regarding the tramcar fleets in Ballarat and Bendigo. .1 - Letter from F. K. White Manager of Mid Western Branch dated 30/5/1967 listing the single truck and double bogie cars. .2 - ditto from A. C. Sandow, Manager of Northern Branch, dated 1/6/1967 listing bogies, single truck and Birney and note the cleaner scrubber tram.trams, tramways, sec, ballarat, bendigo, tramcars -
 Ballarat Tramway Museum
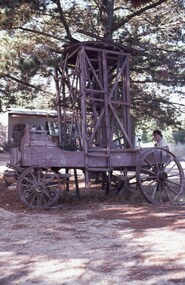
Slide - 35mm slide/s, David Verrier, View between 2 and 3 roads Ballarat Museum depot, 26/04/1975
Photo of the first horse drawn tower wagon at Sovereign Hill. This item was offered to the BTPS but declined as it did not have the storage space for it. Understood to have later been dismantled.Yields information about the appearance of the horse drawn tower wagon of ESCo.Agfa colour slide, white blue plastic mount. Photo by David Verrier.On back of slide in inktramways, trams, tower wagon, sovereign hill, cotma -
 Ballarat Tramway Museum
Photograph - Black & White Photograph/s, Charles Craig, Aug. 1971
Yields information about tram operations in Victoria St and the Bakery Hill precinct.Black and white photograph from the front of a tram about to climb Bakery Hill, Victoria St Ballarat, with another tram ahead. Has the Munster Arms Hotel, Viscount Caravans, Eureka Dry Cleaning and other buildings in the view. Photo by Charles Craig, at the time of the first closure of the Ballarat system, 23/8/1971 when the Victoria St line closed.trams, tramways, victoria st, bakery hill -
 Ballarat Tramway Museum
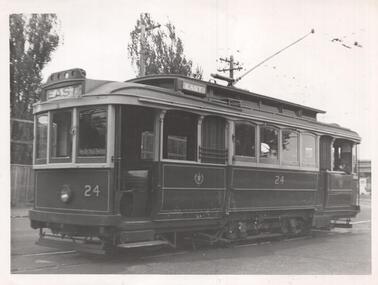
Photograph - Black & White Photograph/s, CLC, 1950
Yields information about Geelong trams in the late 1940's on the Chilwell - East - West lines.Black and White photograph of Geelong No. 24 at the West terminus. Tram has the destination of East. About 1954. Photo by CLC - General Manager of the Wombat Hill Railway,On the rear in pencil "With compliments by General Manager of the Wombat Hill Railway, Printed by the Public Relations Publicity Dept Wombat Hill railway, Geelong No. 24 West terminus about 1950." Has the Keith Kings number "CLC-8" in top right hand corner.trams, tramways, geelong, east, west, tram 24 -
 Ballarat Tramway Museum
Slide - 35mm slide/s, David Verrier, ESCo wooden Tower wagon, 26/04/1975
Photo of the first horse drawn tower wagon at Sovereign Hill. This item was offered to the BTPS but declined as it did not have the storage space for it. Understood to have later been dismantled.Yields information about the appearance of the horse drawn tower wagon of ESCo.Agfa colour slide, white blue plastic mount. Photograph Saturday 26/4/1975 at the time of the first COTMA conference. Photo by David Verrier. See also Reg Item 7689 for another photograph by Andrew Howlett.On back of slide in ink' "Saturday 26/4/75 Tower Wagon Sovereign Hill Ballarat"tramways, trams, tower wagon, sovereign hill, cotma -
 Ballarat Tramway Museum
Slide - 35mm slide/s - set of 8, David Verrier, BTM Operations, 4/09/1994
1 - Tram 33 running out with Darren Hutchesson holding the red flag. .2 - ditto .3 - at depot junction with the ice cream van pulling in. .4 - tram33 with the Sovereign Hill roof advertisement. .5 - at Carlton St .6 - ditto with Paul Mong swinging the pole. .7 - 33 being driven out of No 2 road by Len Millar. .8 - 33 on No. 2 road with Twin Lakes sign Photos by David Verrier on 4/9/1994.Yields information about Museum operations in 1994Series of seven Kodak white plastic mount slide of BTM No. 33 in use on the day. .On back of slide in ink' "Sun 4/9/94 DRV Ballarat BTPS 33"tramways, trams, btm, btps, wendouree parade, st aidans drive, gardens loop, carlton st, depot, tram 33 -
 Ballarat Tramway Museum
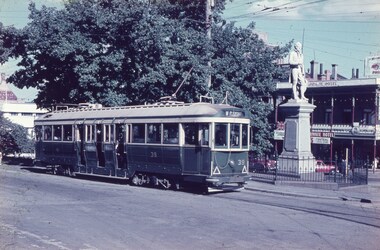
Slide - 35mm slide/s, Keith Caldwell, 8/03/1960 12:00:00 AM
Yields information about Sturt St and the Robert Burns Statue in 1960..Agfa colour slide, white cardboard mount, photo by Keith Caldwell on 8/3/1960 of: Tram 39 in Sturt St to the east of Lydiard St about to descend the hill to Grenville St. Tram has the destination of Mt Pleasant. In the background is the Robert Burns statue and the Cooks Private Hotel which is decorated with a British Flag.Stamped on bottom of slide "8 Mar 60".tramways, trams, sturt st, lydiard st, statues, tram 39 -
 Ballarat Tramway Museum
Slide - 35mm slide/s, Keith Caldwell, 12/03/1962 12:00:00 AM
Yields information about the nature of tram services and the Titanic bandstand in Sturt St.Agfa colour slide, white cardboard mount, photo by Keith Caldwell on 12/3/1962 of: Tram 18 descending the Sturt St hill to Grenville St, passing the Titanic bandstand. The tram has the destination of Mt Pleasant and roof advertisements for Whites Flower shop and a SEC Electric cooking.In ink "Ballarat 12.3.62"tramways, trams, sturt st, tram 18 -
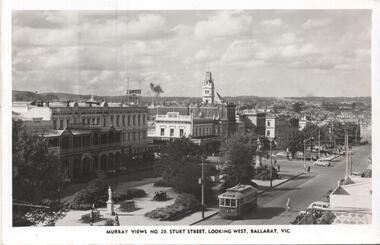 Ballarat Tramway Museum
Postcard, Murray Views, Murray Views No. 29 - Sturt Street Looking West, Ballarat Vic.", c1955
Postcard - black and white - titled Murray Views No. 29 - Sturt Street Looking West, Ballarat Vic.", actually looking east from Doveton St towards Black Hill and Grenville St. Has tram 32 westbound to Gardens via Drummond St North. Divided back postcard with details of the maker on the right hand side, MV symbol and a space for a stamp. In the view are Lester House, Tunbridges, Crockers and the Post Office Tower. A Plume sign is also visible.Yields information about the appearance of Sturt St in the early 1950's, tram operations, buildings and motor vehicles.Postcard - divided back, unused Murray Viewstrams, tramways, sturt st, doveton st, tram 30 -
 Ballarat Tramway Museum
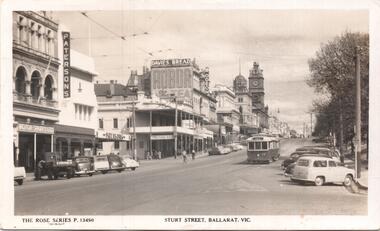
Postcard, Rose Stereograph Co, Sturt Street, Ballarat Vic.", c1955
Yields information about the appearance of Sturt St in the early 1950's, tram operations, buildings and motor vehicles.Postcard - black and white - titled The Rose Series P13490, Sturt St Ballarat Vic, looking west up the Sturt St Hill from Grenville St. Tram 30 is in the loop showing destination of City. A divided back postcard with the rose symbol, publisher details on the left side and that it is a real photograph. In the view are Patersons, the Carlyon's Hotel, The Mechanics Institute and the Odeon Theatre, Motor Spares Limited and other buildings through to the Town Hall.trams, tramways, sturt st, grenville st, tram 35 -
 Ballarat Tramway Museum
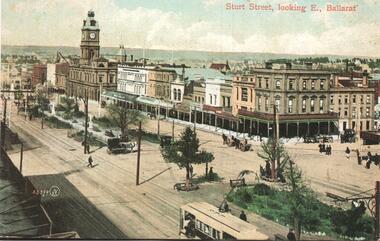
Postcard - copy, Sovereign Hill and Gold Museum, "Sturt St, looking E., Ballarat", c2000
Postcard Photo of Sturt St looking East from about Dawson St with the shops on the southern side and the Town Hall in the view. Has an ESCo tram in the bottom right hand corner. Card reproduced for Sovereign Hill Gold Mining Township by Rose Stereograph Co. of Glen Waverley c2000. Divided back type with caption, production and the Rose Co. symbol on the rear. See item 9005 for a small used black and white version with more detail of the tram.Yields information about the appearance of Sturt St following the introduction of electric trams in 1905 and has a strong association with the work of Sovereign Hill and Rose Stereograph Co.Postcard reproduction - full colour divided back unused.trams, tramways, sturt st, ballarat, esco, rose postcards -
 Ballarat Tramway Museum
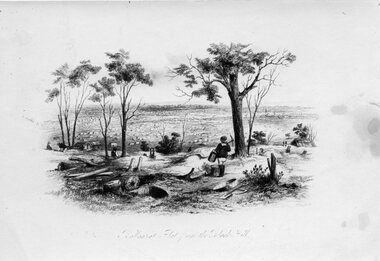
Photograph - Black & White Photograph/s
Black and white photographic copy print of a drawing showing the Ballarat district from Black Hill in the early mining days of the town. Titled "Ballaarat flat from the Black Hill". Has black mark in top right hand corner and a number of water stains on both sides of the print. Has ARHS Vic Div. photo no. stamp on rear, but this has been crossed out.In pencil in the middle of the photo "Dr Andrews" and "ARHS (Vic. Div.) Archives" photo stamp in the bottom right hand corner, in red ink.trams, tramways, ballarat, black hill, mining -
 Ballarat Tramway Museum
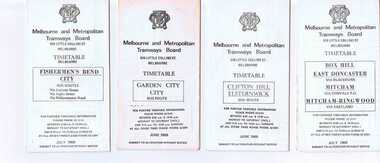
Ephemera - Timetable/s, Melbourne and Metropolitan Tramways Board (MMTB), Set of 14 MMTB Melbourne bus timetables, 1969
Set of 14 MMTB timetables for various bus routes, dated July 1969. Generally includes Sat and Suns, Good Friday and Christmas day as well as weekdays, unless noted otherwise. Also includes a map of the route, detailed time points, sections, connecting services, fares, and organisation address - 616 Little Collins St. Melbourne. Have been folded into eight or ten portions. All on white paper unless noted otherwise. Items shown with an # - have a sticker modifying timetable information details on the front page. Items shown with a % are larger size sheets of paper, folded into 10. 1155.1 - Clifton Hill - Elsternwick # .2 - Garden City - City # .3 - Fishermen's Bend - City .4 - Box Hill - East Doncaster via Blackburn, Mitcham via Donvale PO and Mitcham - Ringwood via Eastland .5 - Warrandyte via Templestowe, via East Doncaster, Donvale PO - City % .6 - Warrandyte, Park Orchards Ringwood .7 - Williamstown Rd., Footscray Railway Station, Ballarat Rd # .8 - Latrobe University, Northland, West Heidelberg - City # % .9 - Deer Park, Sunshine Park, Sunshine, Footscray - City # .10 - as above, but for Saturdays and Sundays on pink paper # .11 - Box Hill, Heidelberg, Templestowe .12 - Box Hill, North Blackburn .13 - East Kew, Box Hill, Doncaster .14 - Bullen, North Kew - City # % Images of a sample of documents added 16-11-2013. mmtb, timetables, melbourne -
 Ballarat Tramway Museum
Slide - 35mm slide/s - set of 17, Noel Simons, 20/11/1962 12:00:00 AM
Set of 17 transparencies taken on 20/11/1962 on Kodak mounts. 1187.1 - Bendigo No. 2 at the Quarry Hill terminus, showing destination of Quarry Hill. Has Cohns Drinks and Streets Ice Cream ads on dash panel, a SEC 'electric cooking' roof ad and another roof ad. Shows the Y terminus at this location, but tram standing just before it. Overhead in position. 1187.2 - as above, but closer up. 1187.3 - as above, but from the north side, showing cemetery in the background. 1187.4 - Bendigo No.3 at Eaglehawk terminus. Tram showing destination of Quarry Hill. Has the various buildings at Eaglehawk in the background including the Foodland store. Has Streets Ice cream and White Horse Whiskey ads on the dash panel. 1187.5 - Bendigo No. 18 at Garden Gully crossing loop, in bound, with destination of Eaglehawk. Passengers waiting for an Eaglehawk tram at the stop. Has a white horse whiskey ad on dash panel and SEC roof ads. Conductor standing in doorway looking out. 1187.6 - Bendigo No. 7 inbound in Nolan St. at cnr of McCrae St. showing destination of Golden Square. Has Streets Ice cream ad on dash panel and a Castrol Roof ad. 1187.7 - Bendigo No. 19 at the North Bendigo terminus with railway level crossing in background. Tram has a Cohns Drinks ad and an SEC 'Electric Cooking' roof ad. 1187.8 - Bendigo No. 2 at the Quarry Hill terminus, looking back into Bendigo, showing destination of Eaglehawk. 1187.9 - Bendigo No. 21 in McCrae St, near Nolan St outbound for North Bendigo. Photo taken after tram has passed photographer. 1187.10 - Bendigo Nos. 4 and 26 at Charing Cross in View St. with fountain alongside and the Beehive, Ezywalkin Buildings in the background. No. 26 has a Sandhurst Milk and SEC 'Electric Cooking' roof ad. 1187.11 - close up of 22E maximum traction truck and folded footstep. 1187.12 - Bendigo No. 19 at Charing Cross terminus, after tram has passed photographer, showing destination of North Bendigo, with the Beehive building in the background and passengers boarding tram. 1187.13 - Bendigo No. 11, turning from View St. into Pall Mall, showing Special with the conductor holding point bar. Has the Beehive and Ezywalkin Buildings in the background. 1187.14 - No. 7 at Charing Cross terminus, in Pall Mall, bound for Golden Square. Has the Beehive and Ezywalkin buildings in the background and passengers waiting at the tram stop. 1187.15 - No. 18 at the Charing Cross terminus, bound for Eaglehawk. Has the Beehive and Ezywalkin buildings in the background and passengers waiting at the tram stop. Also has the 'Safety Zone' sign in the photograph. 1187.16 - No. 2 at Quarry Hill terminus, night or dusk photo. Tram showing destination of Depot. 1187.17 - No. 26 at Charing Cross, night photo. Tram has destination of Quarry Hill, but is on the line for Eaglehawk. Photo looks along Mitchell St. Also shows Safety Zone sign. Information written on in black ink and date stamped on purple ink. 1187.1 - "No. 2 at Quarry Hill terminus Bendigo" 1187.2 - "No. 2 at Quarry Hill terminus Bendigo" 1187.3 - "No. 2 at Quarry Hill terminus Bendigo" 1187.4 - "No. 3 at Eaglehawk terminus" 1187.5 - "No. 18 in Mt Korong Road, Long Gully at cnr of Havilah Road (Eaglehawk Route)" 1187.6 - "No. 7 in Nolan St. Bendigo, at Cnr of McCrae St., near lake Weeroona, (North Bendigo Route)' 1187.7 - "No. 19 at North Bendigo terminus" 1187.8 - "No. 2 at Quarry Hill terminus" 1187.9 - "No. 21 in McCrae St. Bendigo, near Nolan St. (North Bendigo Route) 1187.10 - "4 and 26 at Alexandra Fountain, Charing Cross Bendigo" 1187.11 - "Truck of Bogie Car, Bendigo Tramways" 1187.12 - "No. 19 in Pall Mall at Charing Cross, Bendigo" 1187.13 - "Birney car No. 11 entering Pall Mall from View St. at Charing Cross Bendigo" 1187.14 - "No. 7 in Pall Mall at Charing Cross, Bendigo" 1187.15 - "No. 18 at Alexandra Fountain, Charing Cross, Bendigo" 1187.16 - "No. 2 at Quarry Hill terminus, Bendigo" 1187.17 - "No. 26 at Alexandra Fountain, Charing Cross, Bendigo" tramways, trams, bendigo, quarry hill, eaglehawk, north bendigo, maximum traction, night photo, tram 2, tram 3, tram 4, tram 7, tram 11, tram 18, tram 19, tram 21, tram 26 -
 Ballarat Tramway Museum
Slide - 35mm slide/s, Noel Simons, 21/11/1962 12:00:00 AM
Set of 17 transparencies taken on 21/11/1962 on Kodak mounts. 1188.1 - Bendigo No. 11 at Depot Junction McCrae and Arnold St. with driver/conductor changing points. 1188.2 - Bendigo No. 4 at Charing Cross, side on photo, with City Club Hotel and Alexandra Fountain in the background. Tram has Castrol and SEC 'Electric Cooking' ads. 1188.3 - Bendigo No. 4 climbing View St. after tram has passed photographer. Tram has Streets Ice Cream and Cohns Soft Drinks ad on rear dash panel. In the background are the buildings in View St., including the Princess Theatre. Tram has destination of Eaglehawk. 1188.4 - Trams 2 and 4 crossing at the California Gully or Thorpe St Loop. 1188.5 - Bendigo 4 in Mt Korong Road. Tram inbound with destination of Quarry Hill, just leaving Garden Gully Loop. 1188.6 - Bendigo 4 and 17 crossing at the Hayes St. or Iron Bark Gully Loop. No. 17 bound for Eaglehawk, No. 4, Quarry Hill. 17 has two SEC roof ads and a white horse whiskey ad. 1188.7 - No. 17 bound for Eaglehawk, soon after leaving California Gully. Has large mullock heap in background. 1188.8 - Bendigo 2 and 17 crossing at the Thorpe St. or California Gully Loop. Has butchers shop in background. 1188.9 - Bendigo 17 at the Eaglehawk terminus. Has destination of Quarry Hill. In background is the hotel and shops at the terminus, showing ads for "Melbourne Bitter". Tram has two SEC 'Electric Cooking' ads. Driver and conductor about to assist two lady passengers with a pram and baby. 1188.10 - No. 17 at Eaglehawk terminus, awaiting departure. Has Eaglehawk Town Hall and Post Office in background. Tram has a Whitehorse Whiskey ad on the front dash panel. 1188.11 - No. 3 in High St. Eaglehawk, with destination of Eaglehawk. Has the shops on the south side of High St. in the background, including the Eaglehawk fish shop. Tram has two roof ads, one an SEC roof ad, and Cohns Drinks and Streets Ice cream ads on front dash panel. 1188.12 - as above, but after tram has passed photographer. Note the centre of the road poles. 1188.13 - No. 2 outbound for Eaglehawk at the intersection of Mt. Korong Road and the Calder Highway. Photo taken after the tram has passed the photographer. Has an Ampol service station in the background. 1188.14 - No. 11 leaving the Bendigo depot, crossing the bridge, with the Scrubber car in the background. 1188.15 - No. 21 at the North Bendigo terminus. Tram has destination of Golden Square and Cohns drink ad on front dash and two roof ads on side. 1188.16 - No. 11 on Golden Square route, in High St. at intersection with Old High St. 1188.17 - No. 11 at the Golden Square terminus, conductor turning the pole. Hotel on the left side of the photo. Note the road works barrier and red flag behind the tram. Slide has an end of roll mark on the right hand side of the image.Information written on in black ink and date stamped on purple ink. 1188.1 - "Birney car No. 11 in McCrae St. at Cnr of Arnold about to run into depot, Bendigo" 1188.2 - "No. 4 at Alexandra Fountain, Charing Cross Bendigo" 1188.3 - "No. 4 climbing the View St. Hill from Charing Cross, Bendigo (Eaglehawk Route)" 1188.4 - "No. 4 and 2 at Thorpe St. Loop, California Gully" 1188.5 - "No. 4 in Mt Korong Rd., Long Gully, Near Havilah Rd. (Bendigo) (Eaglehawk Route)" 1188.6 - "Nos. 17 and 4 crossing on Hayes St. Loop, Ironbark, Bendigo" 1188.7 - "No. 17 soon after leaving California Gully (Eaglehawk Route)" 1188.8 - "No.2 and 17 crossing on Thorpe St. Loop, California Gully (Eaglehawk Route)" 1188.9 - "No. 17 at Eaglehawk terminus" 1188.10 - "No. 17 at Eaglehawk terminus" 1188.11 - "No. 3 in High St. Eaglehawk" 1188.12 - "No. 3 nearing Eaglehawk terminus" 1188.13 - "No. 2 in Mt. Korong Rd., Ironbark. Calder highway on left (Eaglehawk route) 1188.14 - "Birney car No. 11 leaving Bendigo depot. Scrubber car at rear" 1188.15 - "No. 21 at North Bendigo Terminus" 1188.16 - "Birney car No. 11 in High St. Bendigo at intersection with Old High Street (Golden Square Route)" 1188.17 - "Birney Car No. 11 at Golden Square terminus, High St., Bendigo". tramways, trams, bendigo, depot junction, charing cross, view st., eaglehawk, north bendigo, golden square, tram 2, tram 3, tram 4, tram 11, tram 17, tram 21, tram scrubber -
 Ballarat Tramway Museum
Slide - 35mm slide/s set of 7, Noel Simons, 1972
Set of 7 transparencies undated on PAKON mounts - appear to be early 1970's. 1212.1 - No. 18 about to enter the Long Gully loop with ESSO service station on the right hand side. 1212.2 - No. 6 in Mitchell Street bound for Charing Cross. Tram has destination of "Rly Station". Has buildings on the east side of Mitchell St. in the background. 1212.3 - No. 7 (North Bendigo) and 29 (Golden Square) crossing. Actual location? 1212.4 - "No 6 showing 'SPECIAL' at Eaglehawk terminus. Has the Foodland store and Fruit shop in the background. 1212.5 - No. 19 at Eaglehawk terminus, on the extension to the normal Eaglehawk terminus. Tram has showing 'Eaglehawk'. Tram has two SEC roof ads. 1212.6 - No. 25 and another Bogie car at Quarry Hill terminus on last day. 1212.7 - No. 18 and 29 at Quarry Hill terminus. No.. 18 showing 'Quarry Hill' - has two SEC roof ads 'Electric Cooking - Matchless' and 'Everything's fine in my all electric kitchen' and No. 29 has a briquettes roof ad.Information typed onto a white label stuck on the slide. 1212.1 - "No. 18 at Long Gully" 1212.2 - "No. 6 in Mitchell Street." 1212.3 - "7 and 29 Lake View Hotel" 1212.4 - "No. 6 at Eaglehawk" 1212.5 - "No. 19 at Eaglehawk Term." 1212.6 - "Last cars Quarry Hill." 1212.7 - "18 & 29 Quarry Hill"tramways, trams, bendigo, long gully, mitchell st., eaglehawk, quarry hill, last tram, tram 6, tram 7, tram 18, tram 19, tram 25, tram 29 -
 Ballarat Tramway Museum
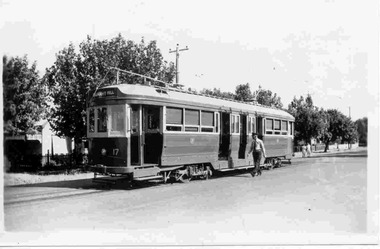
Photograph - Black & White Photograph/s - set of 2, Keith Kings, 9/01/1952 12:00:00 AM
Black and White photograph contained with Reg. Item 1902 - Photo Album from Keith Kings to Les Denmead 1970. Photograph of SEC Bendigo tram 17 at the Quarry Hill terminus. Date of photo 9/1/1952. Tram showing destination of Quarry Hill. Has driver walking alongside the tram. Keith Kings No. F(k)(3) Scanning: i - image file, p - presentation file, b - back of photograph. 1919.1 - Black and White print contained within the Wal Jack Bendigo and Geelong Album, see Reg Item 5003 for more details. Added 10/7/2013.Stamp in top left hand corner and handwritten number with "K.S. Kings No. F(k)(3) Copyright reserved". In blue ink "Bendigo / No.17 / Quarry Hill terminus / 9/1/52". .1 - has the additional words "ex Melbourne C-44"trams, tramways, bendigo, quarry hill, tram 17 -
 Ballarat Tramway Museum
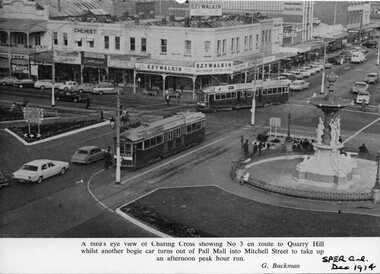
Photograph - Illustration/s, Bendigo Charing Cross
Black and white illustration from the South Pacific Electric Railway Co-op (Sydney Tramway Museum) - Dec.. 1974 calendar of Charing Cross Bendigo from an elevated viewpoint. Overlooks intersection has tram 3 waiting to proceed to Quarry Hill while another bogie tram turns from Pall Mall into Mitchell St. Photo undated, but most likely during the early 1970's. Photo by G. Buckman Has the EZYWALKIN store and other stores in the background.On bottom right hand corner "SPER Calendar Dec. 1974"trams, tramways, bendigo, charing cross, pall mall, mitchell st. -
 Ballarat Tramway Museum
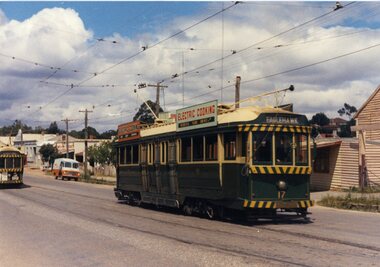
Photograph - Colour Photograph/s, 23/11/1962 12:00:00 AM
Colour postcard size print of SEC Bendigo trams 2 and 17 at the California or Thorne St. Loop on the Eaglehawk line. Photo dated 21.11.1962. Printed on AGFA paper. Both trams fitted with dash canopy lighting, but no large white strip under the driver's windows. 17 showing destination of "Eaglehawk", has two SEC ads on the side re Electric Cooking . Tram 2 showing destination of "Quarry Hill", has various ads. On rear top left hand corner "21.11.62" in very wavy handwriting typical of an aged person.bendigo, eaglehawk, tram 2, tram 17 -
 Ballarat Tramway Museum
Photograph - Colour Photograph/s, 21/11/1962 12:00:00 AM
Colour print of Bendigo SECV Bendigo tram 17 at Eaglehawk Terminus. On Kodacolor paper with a Kodak red ink stamp on rear. Tram has dash canopy lights, but no large white strip under the drivers windows. Photo not dated but appears to be at about the same time as 977, 21.11.1962. Has Eaglehawk Town Hall and Post office in background and war memorial. Tram showing destination of "Quarry Hill". Photo shows how tram line extended past the town hall with the white posts visible. Tram has White Horse Whiskey ad on front dash panel and two SEC "Electric Cooking" ads.On rear top left hand corner "17".eaglehawk, bendigo, town hall, post office, tram 17 -
 Ballarat Tramway Museum
Photograph - Black & White Photograph/s set of 19, Mar. 1972
Set of 19 black and white prints, all 89mm square of Bendigo trams, date machine printed on print is "Mar 1972". 981.1 - Tram 21 at North Bendigo terminus, with level crossing in background. Has destination "Golden Square" and two SEC roof ads. 981.2 - tram 2? at Eaglehawk, with destination "Depot", two SEC roof ads and "Leo A. Hughes Photographer" on side of building in background. 981.3 - tram 2? at Eaglehawk, side on view. 981.4 - tram 26 at Quarry Hill terminus looking back into city. 981.5 - tram 7 en route to North Bendigo at the site of the Bridge St. loop. Has a Peters Ice Cream truck and Sandhurst Fruit Juices truck on right side of photograph. 981.6 - tram 2 at Quarry Hill terminus. 981.7 - tram 2? at one of the loops on the Eaglehawk line, inbound? 981.8 - bogie tram at Charing Cross with fountain in background. Side on view looking south. 981.9 -trams 7 and 21 on Golden Square/North Bendigo line with bogie tram in background, at Charing Cross. Same as item 972. 981.10 - bogie tram at Charing Cross - has buildings in south west corner in background, including Colonial Mutual Life and an advertisement for the Herald newspaper. 981.11 - trams 25, 7 and two other trams at Charing Cross. 981.12 - trams 2 and 26 and three others at Charing Cross. 981.13 - tram 25 at Golden Square terminus, with Rodda's Golden Square Hotel in the background. Tram showing destination of "Nth Bendigo" 981.14 - tram 24, showing "Special" on depot access track. Has two Johnnie Walker roof ads on side. 981.15 - as above, but tram on bridge outside depot. 981.16 - trams 25 and 28 at depot 981.17 - tram 24 showing "Special" on depot access track with a single truck car in background. 981.18 - trams 2 and 26 at Charing Cross. Has advertisements for "Armstrong Tyre Service" and "Cohn's drinks" on buildings in background. 981.19 - Bendigo 2 at location?, about to enter a loop or double track section. Has hotel in background. On rear of each photo in the top left hand corner is a print number 1 to 19 in ink and location notes, generally "Bendigo"trams, tramways, charing cross, bendigo, golden square, quarry hill, tram 2, tram 21, tram 7, tram 24, tram 26 -
 Ballarat Tramway Museum
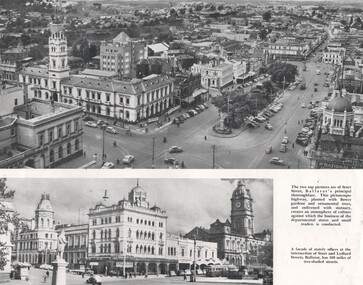
Photograph - Illustration/s, Ballarat Views, 1950's mid
Single sheet of printed paper, collected from a magazine (p59/60) with two black and white photos of Ballarat and one colour of Bendigo. Photo 1 - 260mm long x 122mm high, photo of north east Ballarat from Town Hall, looking out to Black Hill. Photo similar to Reg. No. 102, but buildings on corner of Grenville and Bridge St has a Plume sign instead of a Mobilgas Ad. This indicates early to mid 1950's. One tram in loop in one in Bridge St. Also has a "Neptune" sign in photograph. Photo 2 - 195mm long x 75mm high - from north east corner of Sturt and Lydiard Sts looking towards Town Hall and Craig's Hotel. Photo includes SEC bogie at tram stop and the front end of bus travelling east in Sturt St. Photo 3 - 230mm long x 156mm high - colour printed photo of Pall Mall, Bendigo from west side (by Post Office), looking towards the Shamrock Hotel. Photo includes signs for "COR Motor Spirit", "Tanox Paint" and the rear of a Bendigo to Huntly bus. See item Reg. No. 102trams, tramways, ballarat, bendigo, pall mall, oil companies