Showing 6738 items matching " negative"
-
 Bendigo Historical Society Inc.
Photograph - MRS HAVERFIELD: NEGATIVES
Mrs Haverfield (two negatives in Camera Centre folder) . Two 35mm negatives of seated woman, in envelope. Notation on front refers to Kingerlee C/- Collins Books and the note Negatives of Mrs Haverfield.John Lindsay's camera Centre, 267 Hargreaves Street, Bendigo.person, individual, mrs haverfield, mrs haverfield. -
 Ballarat Tramway Museum
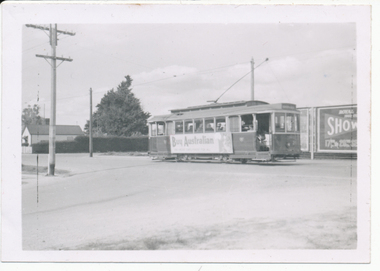
Photograph - Digital image, Wal Jack, Ballarat 21 with "Buy Australian" panels, 15/09/1953
Yields information about a Buy Australian campaign in the mid 1950's and how poster panels were affixed to tramcars.Digital image from the Wal Jack Ballarat Album of Ballarat 21 with "Buy Australian" panels on the side of the tramcar, 15-9-1953, in Barkly St, Ballarat East. Has a Ballarat Show advert board in the background. See also Reg Item 7869 for another photo of No. 21. See image i2 for rear of photograph. See image i2 for rear of photograph. See image i3 for hi res scan of print. See image i4 for hi res scan of negativeOn rear in ink "SEC Ballarat No. 21 with "Made in Australia" week posters, Barkly St, Ballarat East". In top right hand corner is Wal Jack stamp with negative number "T165" written in.trams, tramways, barkly st, decorated trams, buy australian, tram 21 -
 Bendigo Military Museum
Photograph - 4th Field Survey Squadron - Land Rover Perentie Light Vehicles, Keswick Barracks, Adelaide SA, 1987
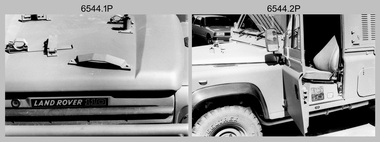
This is a set of 35 photographs featuring 4th Field Survey Squadron’s newly introduced Survey variant of the Land Rover Perentie light vehicle, at Keswick Barracks, Adelaide SA in 1987. The Land Rover Perentie is a nickname for the Land Rover 110 produced by JRA Limited for the Australian Army, and part manufactured and assembled in Moorebank, New South Wales, during the 1980s and 1990s The name Perentie originates from Land Rover's successful tender to Project Perentie, which was the official Australian Army trial to select new 1 and 2-tonne light vehicles to replace the ageing fleet of Series 2A and 3 Land Rovers. The major differences between the Land Rover Perentie and British Land Rovers were the relocation of the spare wheel to a position under the rear of the load area, a galvanised chassis and the Isuzu engine. The Land Rover Perenties were produced in 4x4 and 6x6 variants and powered by an Isuzu 3.9-litre four-cylinder 4BD1 diesel engine. The Truck, Panel, Lightweight, Survey, FFR, Winch, MC2 model was one of eight 4x4 variants built for the Australian Army. There were 35 vehicles built to satisfy the operational requirements of RA Svy’s units. Source – Wikipedia. See item 6545.9P for related photos of these vehicles.This is a set of 35 photographs featuring 4th Field Survey Squadron’s newly introduced Survey variant of the Land Rover Perentie light truck vehicle, at Keswick Barracks, Adelaide SA in 1987. The black & white photographs are on 35mm negative film and are part of the Army Survey Regiment’s Collection. The photographs were scanned at 96 dpi. .1) to .8) - Photo, black & white, 1987. Land Rover Perentie light truck vehicle features. .9) - Photo, colour, 1986. L to R: unidentified, RQMS - WO2 Peter Symmans, unidentified. .10) to .15) - Photo, black & white, 1987. Land Rover Perentie light truck vehicle features. .16) - Photo, black & white, 1987. Land Rover Perentie light truck vehicle. L to R: WO2 Russ Larsen, SSGT Barry Lutwyche, 2IC Terry Lord, SGT Mick Hogan, unidentified. .17) - Photo, black & white, 1987. Land Rover Perentie light truck vehicle features. .18) & .19) - Photo, black & white, 1987. Loading field trip stores into Land Rover Perentie light truck vehicle. .20) & .21) - Photo, black & white, 1987. L to R: SPR Steve Perks, SGT Mick Hogan loading field trip stores into Land Rover Perentie light truck vehicle. .22) to .25) - Photo, black & white, 1987. L to R: SPR Steve Perks loading field trip stores into Land Rover Perentie light truck vehicle. .26) - Photo, black & white, 1987. CAPT Danny Galbraith loading field trip stores into Land Rover Perentie light truck vehicle. .27) to .31) - Photo, black & white, 1987. Loading field trip stores into Land Rover Perentie light truck vehicle. .32) to .34) - Photo, black & white, 1987. Land Rover Perentie light truck vehicle – broken transfer case lever. .35) - Photo, black & white, 1987. Land Rover Perentie light truck vehicle’s Isuzu 3.9-litre four-cylinder 4BD1 diesel engine..1P to .35P – There are no personnel identified. ‘PERENTI MOTOR VEHICLES JUL 87’ annotated on negatives sleeve.royal australian survey corps, rasvy, 4 fd svy sqn -
 Upper Yarra Museum
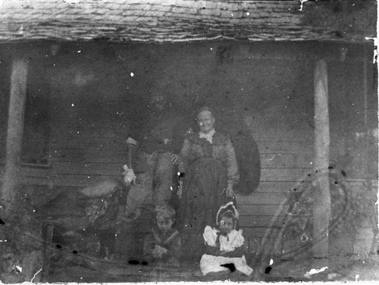
Negative Photographic Reproduction, Mr & Mrs Errey. First Settlers at Hazeldene
Black and White Negative of Mr & Mrs Errey from Hazeldene Negative Black white. Scanned at 600 dpi.first, settlers, house, errey, hazeldene, sandy ross -
 Bendigo Historical Society Inc.
Photograph - LA TROBE UNIVERSITY BENDIGO COLLECTION: SPECIMEN PRINTS
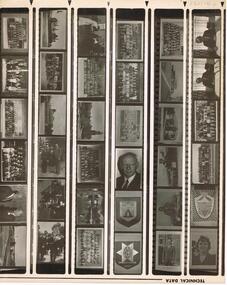
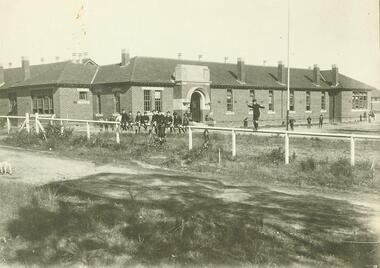
Three sheets of proofs relating to Bendigo Teachers' College. The negatives include negatives of staff, students and buildings and plaques.bendigo, education, bendigo teachers' college, la trobe university bendigo collection, collection, education, bendigo, bendigo teachers' college, specimen prints, proof, proofs, teacher training, tertiary education, photographs, photograph, photography, teacher training -
 Vision Australia
Photograph - Image, Braille Book of the Year and Narrator of the Year awards 1993, 1993
Introduced in 1974, the Braille Book of the Year was created to both acknowledge excellence in writing as well as raise the profile of Braille books. In 1993, the award was won by Ruth Park for her book 'A Fence Around a Cuckoo'. The award was accepted by her literary agent Tim Curnow. The Bathurst Award for Narrator of the Year award went to Irini Pappas for the audio version of 'Put Your Whole Self In', a story about the Northcote Self Group Hydrotherapy and Massage group, by Meme McDonald, which also won 'Audio Book of the Year'. Presentations were made by Arnold Zable, Lorna Hayter, Meme McDonald, James Wright and Jeremy Wurm. 25 colour photographs, 4 black and white, 1 single negative (behind P1540.13) and 7 strips of negativeawards, braille & talking book library, james wright, arnold zable, lorna hayter, meme mcdonald, jeffrey hodgson, paul karo, rose blustein, irini pappas, jeremy wurm, michael carman, eileen larkin, iris wileman, elsie warren, beryl grover, ida dolinko, estelle cother, peggy stenboig, marjorie oke, ada handyside, sheila baldwin, joyce spokes, stanley mcgeagh, maggie millar -
 Melbourne Legacy
Photograph - Widows function, Widows' Club Seminar 8 May 1995, 1995
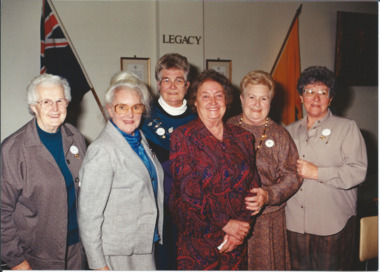
According to the article published in The Answer in August 1995 these ladies were meeting for a Widows' Club Seminar at Legacy House on 8th may 1995. The article says "On that day representative from Widows Clubs and groups from throughout Victoria are together for a seminar - guest speakers covered a wide-ranging agenda. Legatee John Sullivan said that it was most gratifying to the organisers and then presenters to have such a gathering of representatives keen to obtain information to pass on to their members."A record of a special event for the Widows' Clubs and how they shared experiences and information about what their clubs were doing.Colour photo x 11 of Widows' Club Seminar 1995Printed on back widows, answer, widows club -
 Bendigo Historical Society Inc.
Photograph - LA TROBE UNIVERSITY BENDIGO COLLECTION: COURTHOUSE
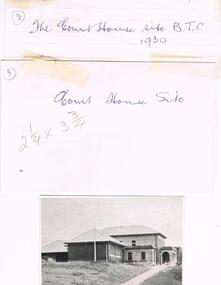
One black and white photo, one proof and one negative of the Court House in a white envelope. On the envelope is written 'The Court House site B.T.C. 1930.' On the top left hand side is the number 3.bendigo, education, old courthouse, la trobe university bendigo collection, collection, bendigo, education, tertiary education, court house, old court house, place, buildings, bendigo teachers' college, photograph, photo, negative, proof -
 Ballarat Tramway Museum
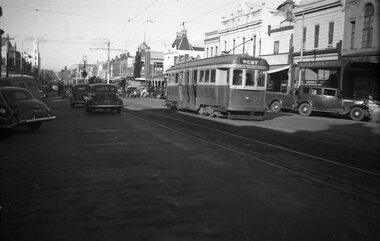
Negative, Wal Jack, mid to late 1940's
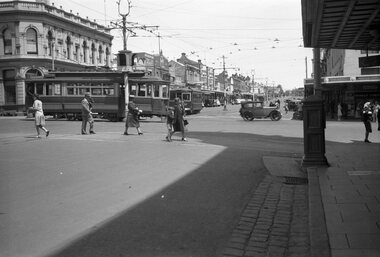
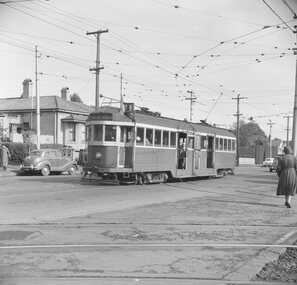
Negative and Digital images of the Wal Jack Geelong Negative file of two trams including No. 27 at the intersection of Ryrie and Moorabool streets, with shoppers and cars. No. 27 has the destination of West. In the background is Donald Chemist. Note the set of bar traffic lights at this location. Photo mid to late 1940's. trams, tramways, geelong, ryrie st, moorabool st, traffic lights, tram 27 -
 Ballarat Tramway Museum
Negative, Wal Jack, mid to late 1940's
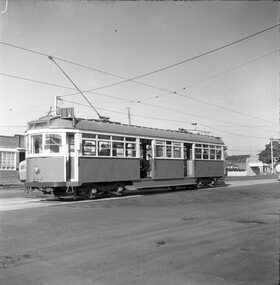
Negative and Digital images of the Wal Jack Geelong Negative file of Geelong 17 at West terminus in Pakington St. Note the shelter and phone box that appear in Reg Item 7829. On the left is the Telegraph Hotel building and in the background is a shop advertising Robur Tea. Photo mid to late 1940's. trams, tramways, geelong, west, pakington st, tram 17 -
 Ballarat Tramway Museum
Negative, Wal Jack, Late 1930's to mid 1940's
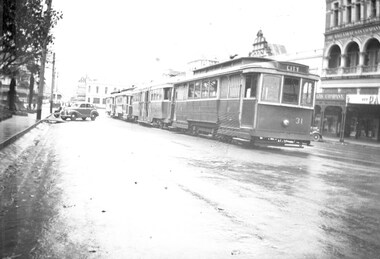
Yields information about the use of the City Loop during the late 1940s.Negative and Digital image of the Wal Jack Ballarat Negative file of a group of trams (3 single truckers and one bogie car) in City Loop late 1940's or early 1950s. Tram 31 (City) is at the head of the line up on a wet day. In the background is the Ballarat Gas Company building.trams, tramways, city loop, sturt st, tram 31 -
 Ballarat Tramway Museum
Negative, Geoff Grant, 7/05/1955 12:00:00 AM
Negative No. 295 and colour print made by colour laser printer (stored in folder ) of W2 434 out bound on route 71, past the Camberwell Depot access tracks on 7/5/1955. Photo by Geoff Grant. Hi res scan of negative and image updated 19/5/2020.trams, tramways, melbourne, camberwell depot, tram w2 434 -
 Ballarat Tramway Museum
Negative, Geoff Grant, 19/06/1955 12:00:00 AM
Negative No. N330 and black and white print made by a laser printer (stored in folder ) of a side on view of W6 988 at Clifton Hill, Queens Parade. Tram has doors open. Photo taken 19/6/1955. Negative scanned hi res and imaged updated 21/5/2020.trams, tramways, melbourne, w6 class, clifton hill, tram w6 988 -
 Bendigo Historical Society Inc.
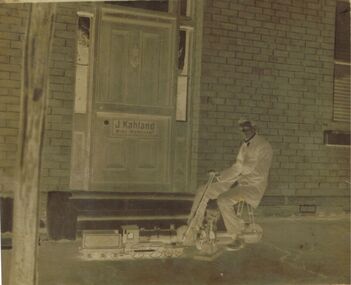
Negative - GERMAN HERITAGE SOCIETY COLLECTION: NEGATIVE OF A MAN
9.7 x 12.4 negative of a man sitting on a scooter with a small train engine and a small engine? In front of him. He is in front of a brick building with a sign on the door. The sign reads - J. Kahland Wine Merchant. Negative contained in a white envelope with - 'Man? J Kahland Wine Merchant' on Door.german heritage society collection - negative of a man -
 Ballarat Tramway Museum
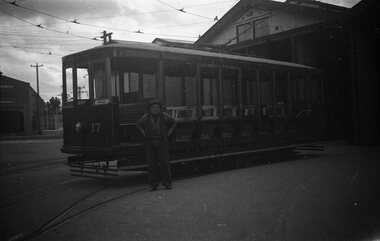
Negative, Wal Jack, Oct. 1939
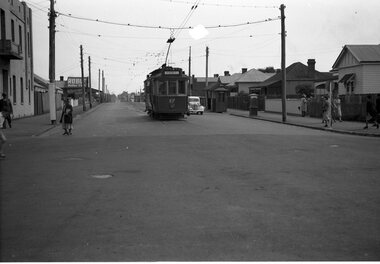
Negative and Digital images of the Wal Jack Bendigo Negative file of No. 17 outside the Bendigo depot with a worker standing at the front of the tram, October 1939. Tram has the "Depot" destination board on the front and a supplementary board "Special" on the camera side. See Reg Item 5753 for a similar image datedtrams, tramways, bendigo, esco, depot, tram 17 -
 Ballarat Tramway Museum
Negative, Wal Jack, c1950
Negative and Digital images of the Wal Jack Geelong Negative file of Geelong bogie 36 outbound to West after crossing Moolap St (the second set of bar lights). A four wheeler can be seen at the intersection. In the background is a Snooker / Billiard parlour and L. F. Weaver ? Agent. !950's. trams, tramways, geelong, ryrie st, tram 36 -
 Ballarat Tramway Museum
Negative, Wal Jack, late 1940s
Negative and Digital images of the Wal Jack Geelong Negative file of Geelong 18 and another car crossing at the Autumn St Loop\ in Pakington St West Geelong. Tram has the destination of West and the other car Station. In the background is Hambrook Milliner and a hotel. Photo possibly late 1940's. trams, tramways, geelong, pakington st, west, tram 18 -
 Ballarat Tramway Museum
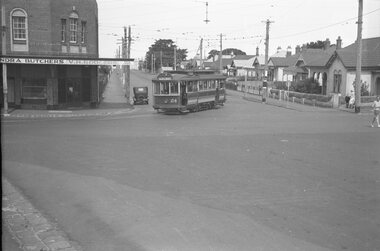
Negative, Wal Jack, mid 1940's
Negative and Digital images of the Wal Jack Geelong Negative file of Geelong No. 24 rounding the double track curve from Glenleith Ave Geelong into Melbourne Road. On the corner is V. H. Rodgers Butchers building remains in 2020. The tram has the destination of North Photo mid 1940's. trams, tramways, geelong, melbourne road, glenleith ave, north, tram 24 -
 Bendigo Military Museum
Photograph - 4th Field Survey Squadron ANZAC Day Parade. Adelaide, SA, 1994
This is a set of 32 photographs of 4th Field Survey Squadron personnel parading through the streets of the Adelaide CBD on ANZAC Day, on the 25th of April 1994. The march concluded at the Cross of Sacrifice in Pennington Gardens East followed by the ANZAC Day Service of Remembrance. See items 6566.14P and 6567.11P for more photos taken during ANZAC Day, 1994.This is a set of 32 photographs of 4th Field Survey Squadron personnel parading through the streets of the Adelaide CBD on ANZAC Day, on the 25th of April 1994. The colour photographs are on 35mm negative film and are part of the Army Survey Regiment’s Collection. The photographs were scanned at 96 dpi. .1) - Photo, colour, 1994. Preparation. Bayonets fixed on SLR rifles. .2) - Photo, colour, 1994. Eyes right as unit passes dignitaries on the dais. .3) - Photo, colour, 1994. Eyes right as unit passes dignitaries on the dais. CAPT Rob Gray, centre of photo, OC MAJ Peter Demaine on right. .4) to .7) - Photo, colour, 1994. Eyes right as unit passes dignitaries on the dais. .8) - Photo, colour, 1994. Unit marches along the parade route. .9) to .13) - Photo, colour, 1994. Eyes right as unit passes dignitaries. .14) - Photo, colour, 1994. Unit marches along the parade route. Right file L to R: WO2 Peter Hammer, unidentified, SGT Dave Longbottom, SGT Paul Baker, unidentified. .15) - Photo, colour, 1994. Unit marches along the parade route. Right file L to R: SGT Paul Baker, unidentified (x2), SPR Fran Calvert, SPR Greg Richards, SGT H. Evertz. Centre file: SGT Mark Donnelly, SPR Mark McInerney, unidentified (x2), SPR Matt Arnold. .16) - Photo, colour, 1994. Unit marking time. Right file L to R: SGT Paul Baker, unidentified (x2), SPR Fran Calvert, SPR Greg Richards, SGT H. Evertz, CPL Brett Parkin. Centre file L to R: SPR Matt Arnold, SPR Mark Linwood. Right file L to R: unidentified, SPR Mark Sinderberry. Officers L to R: unidentified (x2), CAPT Rob Gray, CAPT Tony Stephens. .17) - Photo, colour, 1994. Unit marking time. L to R: SGT Paul Baker, unidentified, SSGT John ‘Shep’ Shephard, SGT Dave Longbottom, SPR Daryl Miller, CPL Steve Wegener, unidentified (x2), CPL Jeremy Archer, WO2 Peter Hammer, unidentified Warrant Officers (x2). .18) - Photo, colour, 1994. Unit marking time. L to R: SPR Mark Linwood, SPR Greg Richards, SPR Matt Arnold, SPR Mark Sinderberry, unidentified (x5), SPR Chris Pearse, unidentified, CPL Dick Crawford, unidentified, SSGT John ‘Shep’ Shephard, CPL Steve Wegener, unidentified, CPL Jeremy Archer, unidentified Warrant Officer. .19) - Photo, colour, 1994. Unit marking time. Officers L to R: unidentified (x2), CAPT Tony Stephens. L to R: SPR Mark Linwood, SPR Greg Richards, SPR Matt Arnold, SPR Mark Sinderberry, remainder unidentified. .20) - Photo, colour, 1994. Unit marched along the parade route. L to R: CAPT Rob Gray, unidentified officer. .21) - Photo, colour, 1994. Unit marches along the parade route. OC MAJ Peter Demaine. .22) - Photo, colour, 1994. Unit marches along the parade route. L to R: CAPT Tony Stephens, SPR Mark Linwood, SPR Matt Arnold, SPR Mark Sinderberry, unidentified (x3), SPR Chris Pearse, unidentified, CPL Dick Crawford, unidentified, SGT Dave Longbottom, SSGT John ‘Shep’ Shephard, CPL Steve Wegener, CPL Jeremy Archer, unidentified Warrant Officers (x2). .23) - Photo, colour, 1994. Unit marches along the parade route. L to R: SSGT John ‘Shep’ Shephard, SPR Daryl Miller, CPL Steve Wegener, unidentified, CPL Jeremy Archer, unidentified Warrant Officers (x2). .24) - Photo, colour, 1994. Unit marches along the parade route. L to R: unidentified, CPL Dick Crawford, SGT Dave Longbottom, SSGT John ‘Shep’ Shephard, unidentified, CPL Steve Wegener, WO2 Peter Hammer, CPL Jeremy Archer, unidentified Warrant Officers (x2). .25) - Photo, colour, 1994. Unit marches along the parade route. L to R: unidentified (x3), SPR Fran Calvert, unidentified (x2), SPR Chris Pearse, unidentified, CPL Dick Crawford, SPR Daryl Miller, SSGT John ‘Shep’ Shephard. .26) - Photo, colour, 1994. Unit marches along the parade route. L to R: CAPT Tony Stephens, CPL Brett Parkin, SPR Mark Linwood, SGT H. Evertz, SPR Mark Sinderberry, unidentified (x2). .27) - Photo, colour, 1994. Unit marches along the parade route. L to R: CPL Brett Parkin, CAPT Tony Stephens, SPR Mark Linwood, SPR Greg Richards, SPR Matt Arnold, unidentified, SPR Mark Sinderberry, unidentified (x3), SPR Chris Pearse, unidentified, CPL Dick Crawford, unidentified, SGT SSGT John ‘Shep’ Shephard, CPL Steve Wegener, CPL Jeremy Archer, unidentified Warrant Officer. .28) - Photo, colour, 1994. Unit marches along the parade route. L to R: Officers - OC MAJ Peter Demaine, unidentified (x2), CAPT Rob Gray, CAPT Tony Stephens. L to R: CPL Brett Parkin, SGT H. Evertz, SPR Mark Linwood, SSGT Pat ‘Fuji’ Drover, SPR Mark Sinderberry, unidentified. .29) - Photo, colour, 1994. Unit preparing to halt. .30) to .32) - Photo, colour, 1994. Unit ‘stand easy’..1P to .32P – There are no personnel identified. ‘1994 ANZAC DAY’ annotated on negatives sleeve.royal australian survey corps, rasvy, 4 fd svy sqn -
 Ringwood and District Historical Society
Photograph, Ringwood State School early class photographs. 1898 to1977
Sepia photographs (25) with negatives."Written on back of photograph" Ringwood Primary School 1922 - Building in Greenwood Ave -
 Eltham District Historical Society Inc
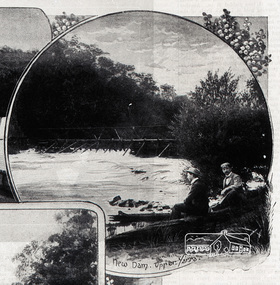
Photograph, The Leader, New Dam, Upper Yarra, 1897
Reproduced from 'The Leader' 14th August 1897 page 7This photo forms part of a collection of photographs gathered by the Shire of Eltham for their centenary project book,"Pioneers and Painters: 100 years of the Shire of Eltham" by Alan Marshall (1971). The collection of over 500 images is held in partnership between Eltham District Historical Society and Yarra Plenty Regional Library (Eltham Library) and is now formally known as the 'The Shire of Eltham Pioneers Photograph Collection.' It is significant in being the first community sourced collection representing the places and people of the Shire's first one hundred years.35mm B&W negativesepp, shire of eltham pioneers photograph collection, warrandyte -
 Ballarat Tramway Museum
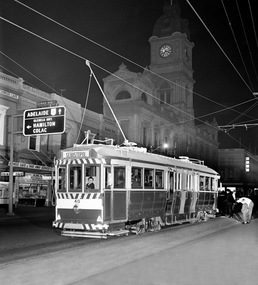
Photograph - Digital Image, Greg Triplett, Tram 40 waiting in Sturt St, 19-9-1971
Image of Ballarat tram 40 in Sturt St at the City centre, with the Town Hall in the background on the last day of tramway operation by the SECV in Ballarat 19-9-1971Yields information about the last day of operation of the Ballarat SEC tramways.Digital image - 120 negative tramways, tramcars, ballarat, last day, closure, tram 40, sturt st, town hall -
 Ballarat Tramway Museum
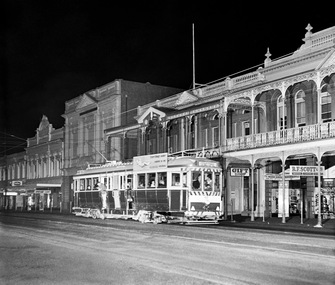
Photograph - Digital Image, Greg Triplett, Tram 42 in Lydiard St between Rly Station & Sturt St destination Sebastopol, 19-9-1971
Image of Ballarat tram 42 southbound in Lydiard St North nearing Sturt St with the Ballarat Art Gallery and the Ballarat Mining Exchange buildings in the background. Note the parking meters on the footpath. Taken on the last day of operation of the Ballarat tramway system - 19-9-1971Yields information about the last day of operation of the Ballarat SEC tramways.Digital image - 120 negative tramways, tramcars, ballarat, last day, closure, tram 42, lydiard st north, fine art gallery, mining exchange, parking meters -
 Ballarat Tramway Museum
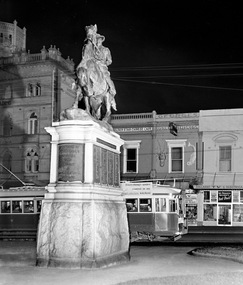
Photograph - Digital Image, Greg Triplett, Tram waiting in Sturt St by Boer War Memorial, 19-9-1971
Image of a Ballarat bogie car waiting at the City stop with the Boer War Memorial in front. Taken on the last day of operation of the SEC Ballarat tramway system - 19-9-1971. In the background is the National Mutual building, Golden Star Chinese Cafe, Georges Oyster / fish shop and Ballarat TV and Electrical store which looks a bit of wreck inside.Yields information about the last day of operation of the Ballarat SEC tramways.Digital image - 120 negative tramways, tramcars, ballarat, last day, closure, sturt st, boer war memorial -
 Ballarat Tramway Museum
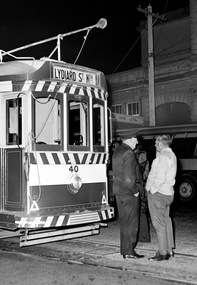
Photograph - Digital Image, Greg Triplett, No 40 in Sturt St waiting to turn into Lydiard St destination Lydiard St Nth, 19-9-1971
Image of Ballarat 40, Sturt St waiting to turn into Lydiard St destination Lydiard St Nth, with the driver chatting to person in front of the tram. Taken on the last day of operation of the SEC Ballarat tramway system - 19-9-1971. Yields information about the last day of operation of the Ballarat SEC tramways.Digital image - 120 negative tramways, tramcars, ballarat, last day, closure, sturt st, tram 40 -
 Ballarat Tramway Museum
Photograph - Digital Image, Greg Triplett, No 40 just arrived at Lydiard St Nth terminus, 19-9-1971
Image of Ballarat No 40 just arrived at Lydiard St Nth terminus. Tram has a full load of passengers traveling for the last time. Taken on the last day of operation of the SEC Ballarat tramway system - 19-9-1971. Yields information about the last day of operation of the Ballarat SEC tramways.Digital image - 120 negative tramways, tramcars, ballarat, last day, closure, tram 40, lydiard st north -
 Ballarat Tramway Museum
Photograph - Digital Image, Greg Triplett, No 40 ready to depart Lydiard St Nth destination Sebastopol. This was last tram ex Lydiard St Nth to Sebastopol, 19-9-1971
No 40 ready to depart Lydiard St Nth destination Sebastopol. This was last tram ex Lydiard St Nth to Sebastopol. Has conductor Lou Walker talking to the driver. Taken on the last day of operation of the SEC Ballarat tramway system - 19-9-1971. Yields information about the last day of operation of the Ballarat SEC tramways.Digital image - 120 negative tramways, tramcars, ballarat, last day, closure, tram 40, lydiard st north -
 Ballarat Tramway Museum
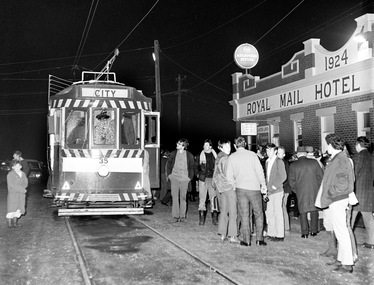
Photograph - Digital Image, Greg Triplett, No 35 waiting at Sebastopol - destination City, 19-9-1971
No 35 waiting at Sebastopol destination City with the Royal Mail Hotel in the background. Taken on the last day of operation of the SEC Ballarat tramway system - 19-9-1971. Yields information about the last day of operation of the Ballarat SEC tramways.Digital image - 120 negative tramways, tramcars, ballarat, last day, closure, tram 35, royal mail hotel, sebastopol -
 Ballarat Tramway Museum
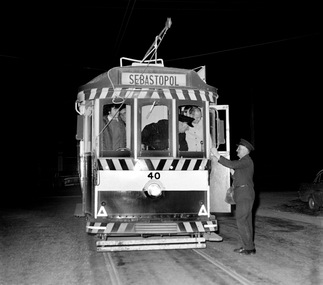
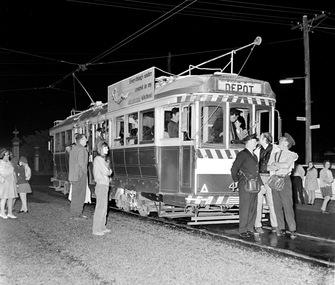
Photograph - Digital Image, Greg Triplett, No. 40 prior to departure from Lydiard St North, 19-9-1971
No. 40 prior to departure from Lydiard St North - Greg Triplett. The destination showing depot is incorrect - the tram ran through to Sebastopol. Two conductors are standing in the front of the tram, with many photos being taken at the time. Taken on the last day of operation of the SEC Ballarat tramway system - 19-9-1971. Yields information about the last day of operation of the Ballarat SEC tramways.Digital image - 120 negative tramways, tramcars, ballarat, last day, closure, lydiard st nth, tram 40 -
 Ballarat Tramway Museum
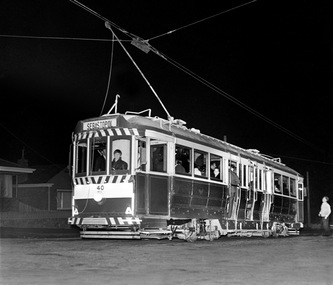
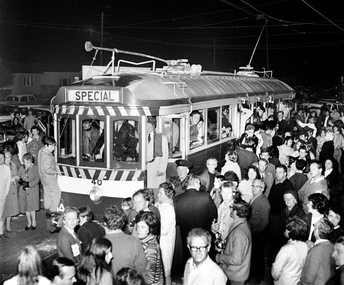
Photograph - Digital Image, Greg Triplett, No 40 at Sebastopol terminus surrounded by crowd. Destination Special. The very last tram, 19-9-1971
No 40 at Sebastopol terminus surrounded by crowd. Destination Special. The very last tram - Greg Triplett. The tram ran through to Hospital corner, where all the passenger had to get off and carried SEC staff through to the depot for the final northbound trip. Taken on the last day of operation of the SEC Ballarat tramway system - 19-9-1971. Yields information about the last day of operation of the Ballarat SEC tramways.Digital image - 120 negative tramways, tramcars, ballarat, last day, closure, tram 40, last tram, sebastopol