Showing 2116 items matching " bendigo south"
-
 Ballarat Tramway Museum
Slide - 35mm slide/s - set of 11, Eldon Hogan, mid 1960's to early 1970's
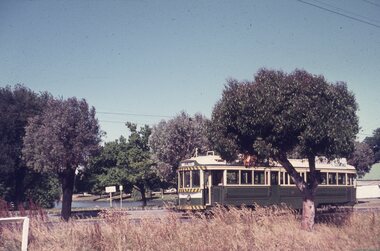
Set of 11 Agfa Plastic mounted slides - from the Eldon Hogan collection - possibly on an ARE Bendigo tours late 1960's or early 1970's with No. 18 Scanned on the Canon scanner at the depot 15/12/1971 at the time of the installation of the scanner. .1 - No 18 at Golden Square terminus with Billy Rodda's Golden Square Hotel in the background. .2 - ditto and the Victoria Bitter fence alongside the hotel. .3 - ditto and another single trucker. .4 - No. 18 at the Fire Station Loop, Golden Square line, with destination of Railway Station. .5 - No. 18 passing the Central Deborah mine, Violet St. Tram has a Briquette advertisement on the roof - the flaming briquettes. .6 - Another bogie tram at ditto. .7 - No. 18 and No. 6 crossing McCrae St loop near the depot junction? .8 - ditto .9 - No. 18 and a single trucker at the North Bendigo terminus. .10 - ditto .11 - with the single trucker leaving.tramways, trams, bendigo, golden square, central deborah, north bendigo, mccrae st, tram 18, tram 6 -
 Ballarat Tramway Museum
Slide - 35mm slide/s - set of 11, Eldon Hogan, mid 1960's to early 1970's
Set of 11 Agfa Plastic mounted slides - from the Eldon Hogan collection - possibly on an ARE Bendigo tours - mid 1960's (black destination rolls) and late 1960's or early 1970's. Scanned on the Canon scanner at the depot 15/12/1971 at the time of the installation of the scanner. .1 - No 18 with Lake Weeroona in the background - possibly at the same time as the tour with No. 18, though showing destination of Charing Cross. .2 - ditto .3 - No. 25 and two following trams on a special tour, note the white disc - Quarry Hill line? .4 - No. 29 on the Eaglehawk line at the Mt. Korong Road and the Calder Highway, with the Ampol Service station in the background. .5 - No. 29 passing Lake Weeroona with Destination of Nth Bendigo - has a Briquettes Roof Advertisement., .6 - No. 26 ditto - with two SEC Roof Advertisements. .7 - No. 24 leaving Charing Cross for Golden Square with The Beehive building, Ezywalkin, Coca Cola and the Fountain Shopping Centre in the background. .8 - No. 29 and a bogie tram at the Golden Square terminus with Golden Square Hotel and Victoria Bitter fence in the background. No. 29 has a SEC Briquettes roof advertisement. .9 - No. 29, with the Cathedral in background. Tram has a SEC Briquettes roof advertisement and destination of Golden Square. .10 - side view of a bogie tram on the Eaglehawk line? Tram has a Electric cooking roof advertisement. Photo has been over exposed. .11 - Single trucker, Violet St with the Central Deborah mine head in the background. Tram has two SEC Electric Cooking roof advertisements. tramways, trams, bendigo, lake weeroona, eaglehawk, golden square, charing cross, central deborah, tram 18, tram 25, tram 29, tram 24 -
 Ballarat Tramway Museum
Slide - 35mm slide/s - set of 10, Eldon Hogan, mid 1960's to early 1970's
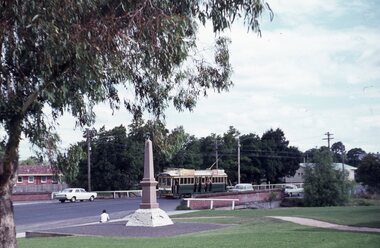
Set of 10 Agfa Plastic mounted slides - from the Eldon Hogan collection - possibly on an ARE Bendigo tours - mid 1960's (black destination rolls) and late 1960's or early 1970's. Scanned on the Canon scanner at the depot 15/12/1971 at the time of the installation of the scanner. .1 - No. 24 in bound along High St Bendigo with the discovery of gold monument in the foreground, Golden Sq route. .2 - ditto .3 - No. 26 outbound at the above location. .4 - No. 24 at the corner of Short St and High St, with the Technical college building? in the background. .5 - No. 26 at ditto, outbound for Golden Square. .6 - No. 24, High St Bendigo, with the Cathedral in the background. Tram has two Johnnie Walker Whiskey roof advertisements. .7 - Three trams, Pall Mall, Charing Cross, with the Beehive building in the background. Trams have SEC roof advertisement. .8 - ditto with Coca Cola ad on the Beehive building, turning around. .9 - No. 29 and a bogie tram at the Golden Square terminus with Billy Rodda's Golden Square Hotel in the background. Just past the tram is a large truck carrying boxes. .10 - Nos, 18, a bogie tram, 21 and 29 at the Quarry Hill terminus. tramways, trams, bendigo, tram 18, tram 24, tram 26, tram 21, tram 29 -
 Ballarat Tramway Museum
Slide - 35mm slide/s - set of 11, Eldon Hogan, mid 1960's to early 1970's
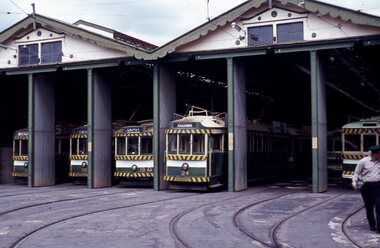
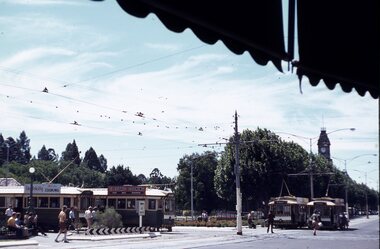
Set of 11 Agfa Plastic mounted slides - from the Eldon Hogan collection - possibly on an ARE Bendigo tours - mid 1960's (black destination rolls) and late 1960's or early 1970's. Scanned on the Canon scanner at the depot 15/12/1971 at the time of the installation of the scanner. .1 - front of depot -26, 19, 24, 29 and 28 amongst those present. .2 - ditto .3 - 24 departing depot .4 - 26 at Eaglehawk .5 - No. 5 turning from Pall Mall into Mitchell St with town hall in background. .6 - No. 5 using crossover in Mitchell St - with Maples, CBA Bank, Astor, Homecrafts, Roger David shops or signs in the background. .7 - ditto .8 - bogie car at Charing Cross with the Fountain Plaza shopping centre in the background. .9 - Charing Cross, with the fountain in the foreground, The Beehive and three trams in the view. .10 - No. 24 outbound, Golden Square line crossing the bridge over the creek, adjacent to the discovery of Gold Monument. .11 - ditto. tramways, trams, bendigo, eaglehawk, depot, charing cross, golden square, tram 26, tram 19, tram 24, tram 29, tram 28, tram 26, tram 5 -
 Ballarat Tramway Museum
Slide - 35mm slide/s - set of 11, Eldon Hogan, mid 1960's to early 1970's
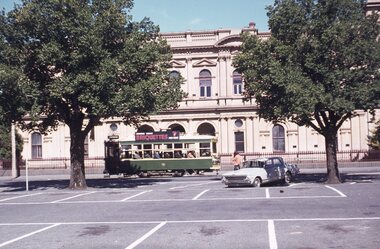
Set of 11 Agfa Plastic mounted slides - from the Eldon Hogan collection - featuring an ARE tour with Nos. 21, 29 and 25 to Bendigo, mid 1960's. Scanned on the Canon scanner at the depot 15/12/1971 at the time of the installation of the scanner. .1 - No. 29 passing the Institute of Technology building, McCrae St. .2 - ditto .3 - Nos. 21 and 29 Lake Weeroona .4 - Nos. 29, 21 and 25 at the Golden Square Terminus with the Golden Square Hotel, Victoria Bitter fence in the background. .5 - ditto with a service car? .6 - ditto .7 - No. 21 with the Central Deborah mine poppet head in the background, Violet St. .8 - ditto with 21 and 29 .9 - ditto with 29 .10 - ditto with 21 and 29 .11 - 21, 29 and 25? at depot junction. Trams have SEC roof advertisements. tramways, trams, bendigo, lake weeroona, golden square, central deborah, tram 21, tram 29, tram 25 -
 Ballarat Tramway Museum
Slide - 35mm slide/s - set of 11, Eldon Hogan, mid 1960's to early 1970's
Set of 11 Agfa Plastic mounted slides - from the Eldon Hogan collection - featuring an ARE tour with Nos. 21, 29 and 25 to Bendigo, mid 1960's. Scanned on the Canon scanner at the depot 15/12/1971 at the time of the installation of the scanner. .1 - four trams at Charing Cross - includes 19 and 25. .2 - 21 and 25 at the depot junction. .3 - 21 and 29 Quarry Hill route? .4 - 29 ditto .5 - 24 at Golden Square terminus - photo taken from the city side - note all the little shops and buildings on the left hand side of the photograph. .6 - 29, 21 and 25 at Eaglehawk .7 - 29 - side on view - Eaglehawk line? .8 - ditto with 21 .9 - 29 - North Bendigo line? - side on view .10 - 29 and 21 - vacant paddocks - Eaglehawk line .11 - 29 crossing the railway overbridge, Eaglehawk line, in bound. Trams have SEC roof advertisements. tramways, trams, bendigo, eaglehawk, charing cross, golden square, tram 21, tram 29, tram 25, tram 19 -
 Ballarat Tramway Museum
Photograph - Black & White Photograph/s, Ron Hann, Jan. 1963
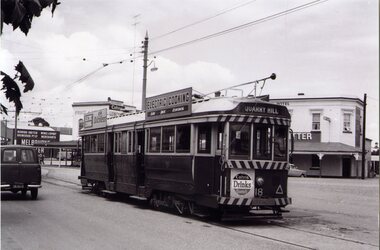
Yields information about the interior of Bendigo tram depot, is storage area and two Birney trams.Black and white print on laser print paper - of Bendigo 18 at the Eaglehawk terminus 1/1963. Photo by Ron Hann. Tram has a Cohn's Drink advertisement on the front dash panel, two SEC roof advertisements and the destination of Quarry Hill. In the background are a hotel and a liquor store, both advertising Melbourne Bitter. Printed on Fujifilm, Fujicolor Crystal Archive for Frontier"Has label "Reference 6/214/26 Photo by Ron Hann" and another label "Eaglehawk Bendigo 01.63"trams, tramways, eaglehawk, hotels, tram 18 -
 Ballarat Tramway Museum
Photograph - Black & White Photograph/s, Ron Hann, Jan. 1963
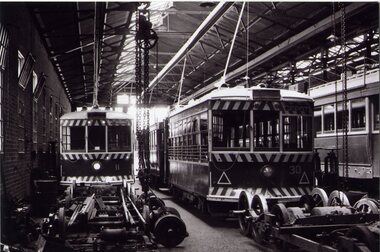
Yields information about View St Bendigo, the streetscape and the tram liveries in 1963.Black and white print on laser print paper - of Bendigo depot interior with Birney trams 11 and 30 with various wheels, trucks and parts in the foreground - 1/1963. Photo by Ron Hann. Printed on Fujifilm, Fujicolor Crystal Archive for Frontier"Has label "Reference 6/212/32 Photo by Ron Hann" and another label " Bendigo Depot 01.63"trams, tramways, bendigo, depot, birney, tram 11, tram 30 -
 Ballarat Tramway Museum
Photograph - Black & White Photograph/s - set of 3, Ron Hann, 26/12/1959 12:00:00 AM
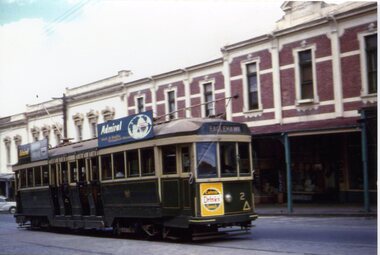
Yields information about the principal intersection following the opening of electric trams, with an electric tram in photo and prior to a parade.Colour prints on laser print paper - of Bendigo 2 climbing the hill in View St Bendigo, 26/12/1959 enroute to Eaglehawk. Show streetscape, centre poles and buildings. The tram has a Cohn's drink ad on the front panel and two roof advertisements for Admiral Televisions and the destination of Eaglehawk. Printed on Fujifilm, Fujicolor Crystal Archive for Frontier"Has labels "References T3116, T3117 and T3118 Photo by Ron Hann" and another label "Bendigo 26.12.59" on rear.trams, tramways, view st, bendigo, tram 2 -
 Ballarat Tramway Museum
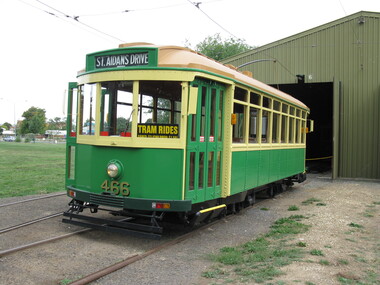
Photograph - Digital image set of 6, "466 last day in service", 27/03/2010 12:00:00 AM
Four digital images and two movie images on the last day of operation of tram 466 prior to return to Bendigo. Taken by Austin Brehaut. .1 - 466 at the depot prior to running out. .2 - 466 at Carlton St .3 - 466 at St Aidans Drive with Len Millar at the controls .4 - Looking through the rear view mirror at the inside of the tram. .5 - Movie image of 466 turning at Depot Junction onto the access track. .6 - Movie image of 466 running in onto 6 road at the depot. For movie images see directory c:/dbtext/AV images/Reg Item 4641-5 and 4641-6 trams, tramways, last day, btm, wendouree parade, depot, depot junction, tram 466 -
 Ballarat Tramway Museum
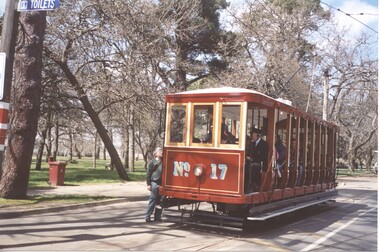
Photograph - Colour Print/s - set of 5, Earl Ewers, 25/09/2005 12:00:00 AM
Yields information about the centenary celebrations of electric trams in Ballarat in 2005 and some of the people involved.Set of 5 colour prints of Bendigo No. 17 in Wendouree Parade and St Aidans Drive during the celebrations for the centenary of electric trams in Ballarat - 25/9/2005. .1 - Depot Junction .2 - at St Aidans Drive - with Greg Rogers .3 - at St Aidans Drive .4 - at St Aidans Drive with Graeme Cleak and Darren Hutchesson .5 - ditto Printed on Kodak Royal Paper. Earl Ewers photograph. trams, tramways, bendigo, centenary, wendouree parade, btm, tram 17 -
 Ballarat Tramway Museum
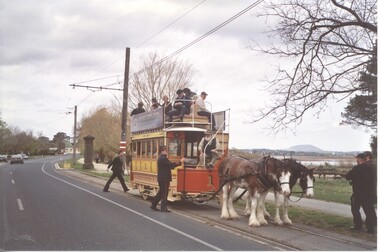
Photograph - Colour Print/s - set of 6, Earl Ewers, 25/09/2005 12:00:00 AM
Yields information about the centenary celebrations of electric trams in Ballarat in 2005 and some of the people involved.Set of 6 colour prints of Ballarat Horse Tram No. 1,Bendigo 17 in Wendouree Parade during the celebrations for the centenary of electric trams in Ballarat - 25/9/2005. .1 - No. 1 at St Aidans Drive .2 - 17 and 1 at Loop .3 - at St Aidans Drive with Lake Wendouree in background. .4 - at St Aidans Drive .5 - ditto .6 - ditto Printed on Kodak Royal Paper. Earl Ewers photograph. trams, tramways, bendigo, centenary, wendouree parade, btm, tram 17, tram 1 -
 Ballarat Tramway Museum
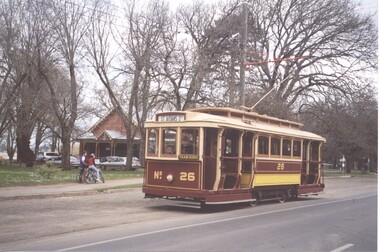
Photograph - Colour Print/s - set of 15, Earl Ewers, 25/09/2005 12:00:00 AM
Yields information about the centenary celebrations of electric trams in Ballarat in 2005 and some of the people involved.Set of 15 colour prints of Ballarat Horse Tram No. 1 and Bendigo 17 in Wendouree Parade and St Aidans Drive during the celebrations for the centenary of electric trams in Ballarat - 25/9/2005. .1 - No. 26 at the loop .2 - No. 1 at the loop .3 - 26 and 1 at loop .4 - 1, ? and 17 at loop with lots of people .5 - 1 leaving the loop .6 - 1, 17 and 28 at loop .7 - ditto .8 - 28 and 1 at loop - Roger Salen and Austin Brehaut .9 - 1 arriving at the loop from Depot Junction .10 - 1 at loop - side on view .11 - 1 at loop - Alan Bradley and friends. .12 - 1 at loop .13 - ditto .14 - 17 and 28 at loop .15 - 1 at loop - Alan Bradley and friends. Printed on Kodak Royal Paper. Earl Ewers photograph. trams, tramways, bendigo, centenary, wendouree parade, btm, tram 17, tram 1, tram 26, tram 28 -
 Ballarat Tramway Museum
Photograph - Colour Print/s - set of 7, Earl Ewers, 25/09/2005 12:00:00 AM
Yields information about the centenary celebrations of electric trams in Ballarat in 2005 and some of the people involved.Set of 7 colour prints of some of the people involved during the celebrations for the centenary of electric trams in Ballarat - 25/9/2005. .1 - Neil Lardner .2 - Neil Lardner, Lyle Drayton .3 - Alan Bradley .4 - Alan Bradley .5 - Frank Puls and Simon Green .6 - Darren Hutchesson and Carolyn Dean .7 - Earl Ewers Printed on Kodak Royal Paper. Earl Ewers photograph. trams, tramways, bendigo, centenary, wendouree parade, btm, tram 17, tram 1 -
 Ballarat Tramway Museum
Photograph - Black & White Photograph/s, Wal Jack, 7/03/1954 12:00:00 AM
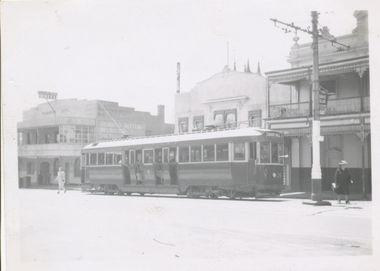
Black and White print contained within the Wal Jack Bendigo and Geelong Album, see Reg Item 5003 for more details. Photo of No. 21 in Mitchell St, near the Railway Station, 7-3-1954. Photo by Wal Jack. Printed on Ilford paper. See image i2 for rear of photograph. See image i3 for hi res scan of negative On the rear in blue ink "SEC Bendigo No 21 in Mitchell St near Rly Stn Sunday morning 7-3-54" with Wal Jack copyright stamp in the top right hand corner and the number "T67PC" written in.trams, tramways, bendigo, mitchell st, tram 21 -
 Ballarat Tramway Museum
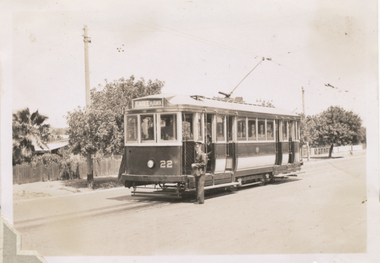
Photograph - Black & White Photograph/s, Wal Jack, 1/01/1941 12:00:00 AM
Black and White print contained within the Wal Jack Bendigo and Geelong Album, see Reg Item 5003 for more details. Photo of No. 22 at Quarry Hill 1-1-1941, has the conductor standing alongside the front of the tram. The tram has the destination of Eaglehawk. Photo by Wal Jack. Printed on Kodak Velox paper. i1 - scan of print in the album i2 - rear of image i3 - scan of negative at 3200dpi added 6/6/2020. On the rear in blue ink "T160, Bendigo Tramways, No. 22 at Quarry Hill 1-1-41" "W. Jack photo" in bottom right hand corner.trams, tramways, bendigo, quarry hill, conductors, tram 22 -
 Ballarat Tramway Museum
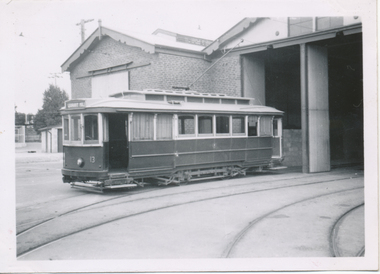
Photograph - Black & White Photograph/s, Wal Jack, 10/04/1950 12:00:00 AM
Black and White print contained within the Wal Jack Bendigo and Geelong Album, see Reg Item 5003 for more details. Photo of 13 outside the Bendigo tram depot. Photo by Wal Jack - 10-4-1950. i1 - scan of print in the album i2 - rear of image i3 - scan of negative at 3200dpi added 6/6/2020. On the rear in blue ink "SEC Bendigo No. 13 fitted with "Ballarat" type end doors. Bendigo Depot 10-4-50" "W. Jack copyright stamp in top right hand corner with the number "T212" written in.trams, tramways, bendigo, depot, tram 13 -
 Ballarat Tramway Museum
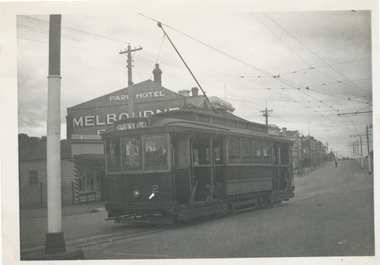
Photograph - Black & White Photograph/s, Wal Jack, 7/10/1939 12:00:00 AM
Black and White print contained within the Wal Jack Bendigo and Geelong Album, see Reg Item 5003 for more details. Photo of No. 2 at the Eaglehawk terminus, 7-10-1939, High St, with the Park Hotel in the background. Photo by Wal Jack. Tram has the destination of Quarry Hill. Printed on Ilford paper. i1 - scan of print in the album i2 - rear of image i3 - scan of negative at 3200dpi added 7/6/2020. On the rear in blue ink "SEC Bendigo No 2 (ex MMTB 115 M class) in High St Eaglehawk (terminus) 7th Oct. 1939." with Wal Jack copyright stamp in the top right hand corner and the number "T194" written in.trams, tramways, bendigo, high st, eaglehawk, tram 2 -
 Ballarat Tramway Museum
Photograph - Black & White Photograph/s, Wal Jack, 7/10/1939 12:00:00 AM
Black and White print contained within the Wal Jack Bendigo and Geelong Album, see Reg Item 5003 for more details. Photo of No. 3 at Quarry Hill 7-10-1939, has the driver sitting in the front of the tram. The tram has the destination of Quarry Hill. Photo by Wal Jack/ i1 - scan of print in the album i2 - rear of image i3 - scan of negative at 3200dpi added 6/6/2020. On the rear in blue ink "SEC Bendigo No 3 at Quarry Hill, Rly Picnic Day 7/10/39" with Wal Jack copyright stamp in the top right hand corner and the number "T193" written in.trams, tramways, bendigo, quarry hill, crews, tram 3 -
 Ballarat Tramway Museum
Photograph - Black & White Photograph/s - set of 2, Keith Kings, 14/07/1951 12:00:00 AM
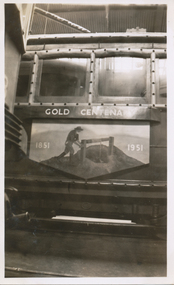
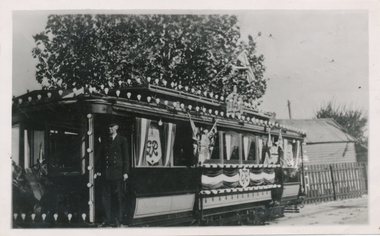
Black and White prints contained within the Wal Jack Bendigo and Geelong Album, see Reg Item 5003 for more details. Set of two photographs of Bendigo 22 decorated for the Centenary of the discovery of Gold Celebrations inside the depot on 14-7-1951 by Keith Kings. .1 - a side view of the tram in side the depot. .2 - an end view of the tram On the rear in blue ink .1 - "SEC Bendigo No. 22 decorated for "Gold" celebrations 1951, side view / 14.7.51" .2 - "SEC Bendigo No. 22 decorated for "Gold" celebrations 1951, end view / 14.7.51". Both have the K. S. Kings copyright stamp in the top right hand corner, and the numbers E(w)(vi) and E(w)(v) written in respectively.trams, tramways, bendigo, gold, gold centenary, gold tram, depot, tram 22 -
 Ballarat Tramway Museum
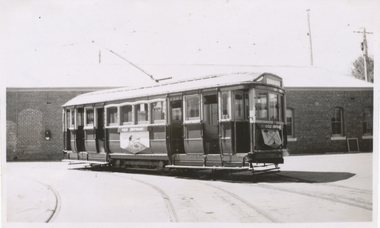
Photograph - Black & White Photograph/s, Keith Kings, 9/01/1952 12:00:00 AM
Black and White print contained within the Wal Jack Bendigo and Geelong Album, see Reg Item 5003 for more details. Photograph of Bendigo 22 decorated for the Centenary of the discovery of Gold Celebrations outside the depot by Keith Kings 9-1-1952. On the rear in blue ink - "SEC Bendigo No. 22 decorated and illuminated for "Discovery of Gold" celebrations 1951 / 9.1.52. Has the K. S. Kings copyright stamp in the top right hand corner, and the number F(k)(i) written in.trams, tramways, bendigo, gold, gold centenary, gold tram, depot, tram 22 -
 Ballarat Tramway Museum
Photograph - Black & White Photograph/s, May. 1937
Black and White print contained within the Wal Jack Bendigo and Geelong Album, see Reg Item 5003 for more details. Photograph of Bendigo 21 decorated for the coronation of George VI, May 1937 on the depot access track. Source unknown. Wal's album notes provides details of the photograph, the note on the back is incorrect. On the rear in ink "Bendigo Decorated car, decorated for centenary there".trams, tramways, bendigo, decorated trams, coronation, george vi, tram 21 -
 Ballarat Tramway Museum
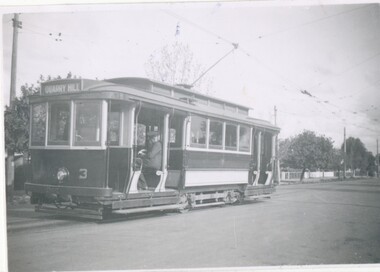
Photograph - Black & White Photograph/s - set of 2, Keith Kings, 11/04/1953 12:00:00 AM
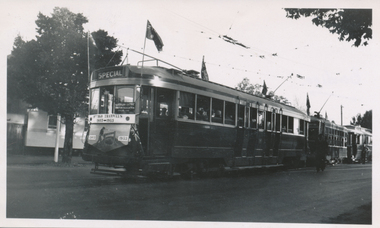
Black and White prints contained within the Wal Jack Bendigo and Geelong Album, see Reg Item 5003 for more details. Set of two photographs of the AETA Special trams Golden Jubilee Anniversary Saturday 11-4-1953, by Keith Kings. .1 - Bogie 23 and Birney 29 and service car 20 at Golden Square. .2 - Birney 29, Bogie 23 at Quarry Hill. On the rear in blue ink .1 - "Bendigo, AETA specials Bogie 23 & Birney 29 (also service car 20), at Golden Square, Saturday 11/4/53. /Golden Jubilee Celebrations. (Two flags broken off drop centre roof by centre pole notices!!!!)" .2 - "Bendigo, AETA specials Bogie 23 & Birney 29, at Quarry Hill, Saturday 11/4/53. /Golden Jubilee Celebrations." Both have the K. S. Kings copyright stamp in the top right hand corner, and the numbers H(f)(iii) and H(e)(ii) written in respectively.trams, tramways, bendigo, decorated trams, gold tram, quarry hill, golden square, aeta -
 Ballarat Tramway Museum
Photograph - Bendigo tram 22 decorated for Queens visit, Wal Jack, 7/03/1954
Photograph of No. 22 decorated for the Queen's visit (Royal visit) at the depot 7-3-1954. Photos by Wal Jack. Shows the decorations applied to the tram. The first has a depot worker standing in the drivers doorway. Single copy from the Ken Magor collection also held. Printed on Ilford paper. See Reg Item 7878 for a photo of the same tram on the depot access track. See image i2 for rear of photograph. See image i3 for hi res scan of negative Yields information about Bendigo tram 22 decorated for the 1954 visit of Queen Elizabeth IIBlack and White prints contained within the Wal Jack Bendigo and Geelong Album, see Reg Item 5003 for more details.On the rear in blue ink "SEC Bendigo No 22 decorated for Queen's visit, outside depot 7-3-54" with Wal Jack copyright stamp in the top right hand corner and the number "T74PC" written in.trams, tramways, bendigo, royal visit, decorated trams, depot, tram 22 -
 Ballarat Tramway Museum
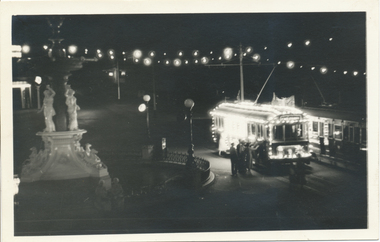
Postcard, Gevaert, Postcard photograph of No. 22 decorated for the Queen's visit (Royal visit) at the Charing Cross 1954
Black and White postcard contained within the Wal Jack Bendigo and Geelong Album, see Reg Item 5003 for more details. Postcard photograph of No. 22 decorated for the Queen's visit (Royal visit) at the Charing Cross 1954. Night photo, with the fountain and streets illuminated. The tram is very brightly illuminated. Next to the tram is an ex HTT bogie tram. Printed as a postcard with the name "Gevaert" in the centre along the bottom edge. No other details. trams, tramways, bendigo, royal visit, decorated trams, charing cross, tram 23 -
 Ballarat Tramway Museum
Photograph - Black & White Photograph/s, 1945
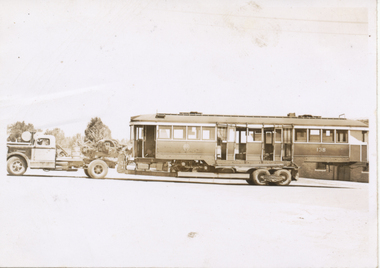
Black and White print contained within the Wal Jack Bendigo and Geelong Album, see Reg Item 5003 for more details. Photograph of MMTB 138 arriving at the Bendigo depot on a Yellow Transport truck, Sept 1945 - shows the transport arrangement from a side view. Tram became No. 24. No other details available. See Keith Kings "Bendigo Tramways" for the tram number. "29" on reartrams, tramways, bendigo, delivery of tramcars, mmtb, tram 138, tram 24 -
 Ballarat Tramway Museum
Photograph - Black & White Photograph/s, Keith Kings, 29/12/1947 12:00:00 AM
Black and White print contained within the Wal Jack Bendigo and Geelong Album, see Reg Item 5003 for more details. Photograph of No. 26 in Mitchell St Bendigo, outbound to Quarry Hill with the Terminus Hotel in the background. Wal's album notes date the photo as 29-12-1947. Photo by Leon Marshall Wood. In ink on rear "SEC of Victoria, Bendigo, Bogie drop centre car No.26 acquired from M&MTB 1947, ex MMTB "C" class, owned originally by Hawthorn Tramways Trust". In pencil, different hand writing "ex 135" and in bottom left hand corner, Leon Marshall Wood photo number "SEC 22" written in.trams, tramways, bendigo, bogie trams, quarry hill, mitchell st, tram 26 -
 Ballarat Tramway Museum
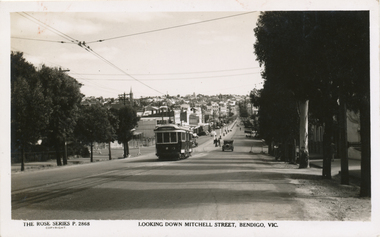
Postcard, Rose Stereograph Co, "Looking down Mitchel St Bendigo Vic"
Postcard contained within the Wal Jack Bendigo and Geelong Album, see Reg Item 5003 for more details. Rose Series Postcard No. 2868, titled "Looking down Mitchel St Bendigo Vic", from the railway overbridge. Has bogie tram No. 23 descending the hill, with the destination of Eaglehawk. Would appear the railway station entrance has been barriered off. Published by the Rose Stereograph Co. Armadale Vic, has the rose logo on the rear and a statement "A real photograph produced in Australia". No space for the stamp or address line. On rear in ink "Bogie 23" and in pencil "WJ"trams, tramways, bendigo, rose postcards, mitchell st, tram 28 -
 Ballarat Tramway Museum
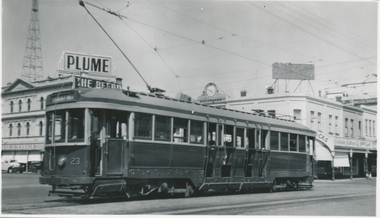
Photograph, Wal Jack, Bendigo No. 23 at Charing Cross, 3/01/1954
Photo of No. 23 at Charing Cross with the destination of Quarry Hill, photo by Wal Jack 3-1-1954. Has the Beehive in the background, a Plume petrol sign and the watchmaker's clock in the background. Printed on Ilford paper. Two prints held. See image i2 for rear of photograph. See image i3 for hi res scan of negative Yields information about Bendigo tram 23 in 1954 and Charing Cross.Black and White print contained within the Wal Jack Bendigo and Geelong Album, see Reg Item 5003 for more details. On the rear in blue ink "SEC Bendigo No 23 bogie to Quarry Hill at Fountain (Charing Cross) Bendigo 3-1-54" with Wal Jack copyright stamp in the top right hand corner and the number "T59PC" written in.trams, tramways, bendigo, charing cross, tram 23 -
 Ballarat Tramway Museum
Photograph - Black & White Photograph/s, Wal Jack, 10/04/1950 12:00:00 AM
Black and White print contained within the Wal Jack Bendigo and Geelong Album, see Reg Item 5003 for more details. Photo of No. 24 leaving Charing Cross in View St with the destination of Eaglehawk, photo by Wal Jack 10-4-1950. Has the Beehive in the background, a single trucker at Charing Cross, and other buildings. i1 - scan of print in the album i2 - rear of image i3 - scan of negative at 3200dpi added 6/6/2020. On the rear in blue ink "SEC Bendigo No 24 bogie in View St Bendigo 10-4-50" with Wal Jack copyright stamp in the top right hand corner and the number "T216" written in.trams, tramways, bendigo, charing cross, view st, tram 24