Showing 3175 items
matching destinations
-
 Ballarat Tramway Museum
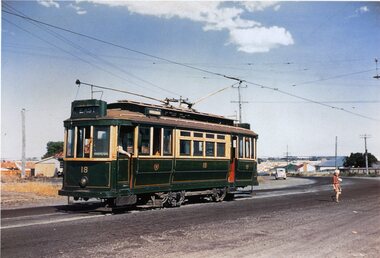
Photograph - Colour Photograph/s, 8/01/1956 12:00:00 AM
Yields information - Photo printed from a slide of Geelong No. 4 decorated for the last tram in Geelong.Colour print from a Agfachrome Professional plastic mount reproduction slide of a colour slide of Geelong No. 18 at East terminus on the last day of the first closures, 8.1.1956 Shows a young boy walking away from the tram and the driver closing the door. Tram has the destination of East. See also Reg Item 2676 for a the original slide of this photograph. Two copies held.On rear in ink on both copies: "Geelong Trmys SEC 4a) (crossed out) East terminus on last day of first closures 8.1.1956 - Ballarat Try Museum"trams, tramways, geelong, east, last tram, closure, tram 18 -
 Ballarat Tramway Museum
Photograph - Digital image, Wal Jack, 12/03/1954 12:00:00 AM
Yields information about the Ballarat's bogie trams, in particular No. 38 that was decorated for the Royal visit in 1954.Digital image from the Wal Jack Ballarat Album of Ballarat 38 decorated for the Royal Visit. Has the destination of "Mt Pleasant". Taken in Sturt St at Murray St, 12-3-1954 by Wal Jack. See image i2 for rear of photograph. See image i3 for hi res scan of print. See image i4 for hi res scan of negativeOn rear in ink "SEC Ballarat No. 38 decorated for Queen's visit, Sturt St at Murray St 12-3-54" In top right hand corner is Wal Jack stamp with negative number "T66PC" written in.trams, tramways, royal visit, decorated trams, sturt st, tram 38 -
 Ballarat Tramway Museum
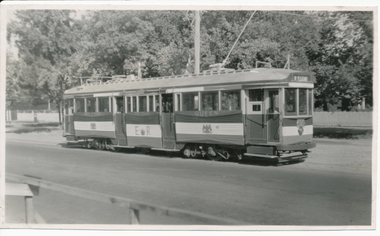
Photograph - Black & White, Bendigo 12 leaving Charing Cross, late 1950's
Black and White photograph, of Bendigo12 with destination of Golden Square, leaving Charing Cross in High St, during the mid to late 1950's. Tram has roof adverts for Jeffreys Bread, Alva Jams and a Cohn's Drink ad on the front drivers panel. In the background are the City Club Hotel and Start Building Society buildings. Printed on Fujichrome paper. Two copies held."TMSV Sales" stamp on rear. On rear of in ink 'HTT1 = MM107 = BED 19, Renumbered 12"trams, tramways, bendigo, charing cross, high st, tram 12 -
 Ballarat Tramway Museum
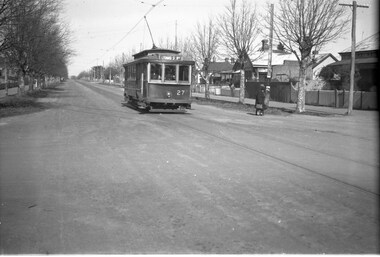
Photograph - Digital image, Wal Jack, 7/08/1944 12:00:00 AM
Digital image from the Wal Jack Ballarat Album of Ballarat No. 27 north bound in Drummond St South at Dana St Photo by Wal Jack 7-8-1944. Tram has the destination of Lydiard St North, a lady passenger is walking away from the tram. No other vehicles in the photograph. Wal's album notes that this was the site of two tram accidents - smashes. In ink on rear " SEC Ballarat Tramways No. 27 in Drummond St South at Dana St, showing the site of two tram smashes - dark lines on left (No. 24 smash 1-12-41 - light on right (No. 22 smash 27-8-44" with date stamp "7 Aug 1944" and W. Jack stamp and number "T375" written in.trams, tramways, drummond st sth, dana st, tram 27 -
 Ballarat Tramway Museum
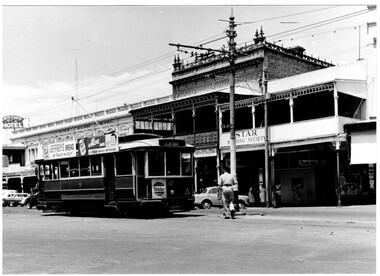
Photograph - Black & White Photograph/s, Ron Hann, Jan. 1963
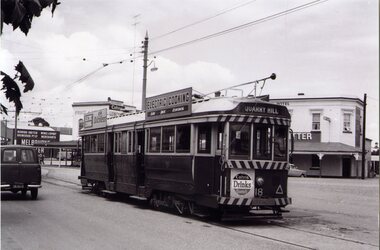
Yields information about the interior of Bendigo tram depot, is storage area and two Birney trams.Black and white print on laser print paper - of Bendigo 18 at the Eaglehawk terminus 1/1963. Photo by Ron Hann. Tram has a Cohn's Drink advertisement on the front dash panel, two SEC roof advertisements and the destination of Quarry Hill. In the background are a hotel and a liquor store, both advertising Melbourne Bitter. Printed on Fujifilm, Fujicolor Crystal Archive for Frontier"Has label "Reference 6/214/26 Photo by Ron Hann" and another label "Eaglehawk Bendigo 01.63"trams, tramways, eaglehawk, hotels, tram 18 -
 Ballarat Tramway Museum
Photograph - Black & White Photograph/s, Wal Jack, 12/04/1959 12:00:00 AM
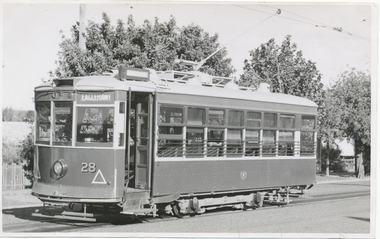
Black and White print contained within the Wal Jack Bendigo and Geelong Album, see Reg Item 5003 for more details. Photo of Bendigo Birney No.28 at Quarry Hill, Photo Wal Jack, with the destination of Eaglehawk - 12/4/1959. i1 - scan of print in the album i2 - rear of image i3 - scan of negative at 3200dpi added 6/6/2020. On the rear in black ink "SEC Bendigo #28 at Quarry Hill, about to leave for Eaglehawk, 4.00pm, Sun 12th April 1959", in bottom left hand corner "Wal Jack Photo"trams, tramways, bendigo, quarry hill, birney, tram 28 -
 Ballarat Tramway Museum
Photograph - Black & White Photograph/s, Leon Marshall Wood, 29/03/1948 12:00:00 AM
Black and White print contained within the Wal Jack Bendigo and Geelong Album, see Reg Item 5003 for more details. Photo of No. 24 in Aberdeen St, 29-3-1948. Wal's album notes that the tram is in the new colour (all green) scheme. Printed on Velox Paper. Tram has the destination of East. Note the "Pay as you enter" sign. Has on the rear in ink "Aberdeen St, Geelong 29-3-48" and the L. M. Wood copyright stamp.trams, tramways, geelong, aberdeen st, east, tram 24 -
 Ballarat Tramway Museum
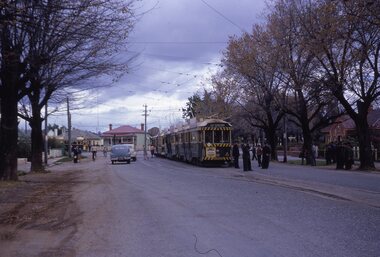
Slide - 27 mm sq slide/s - set of 2, Andrew Howlett, No. 34 and 37 crossing at the Duncan St loop in Drummond St North, Mar. 1969
Yields information about the Drummond St line and the Mills St loop area and a special tram tour using No. 37.Colour slide, Kodak white cardboard mount, developed Mar 1969 of No. 34 and 37 crossing at the Duncan St loop in Drummond St North. No. 34 has destination of Gardens via Drummond North, while No. 37 running a special service. .2 - No. 37 in the loop by itself. See Reg Items 7675, 7678, 7681, 7684, 7686, 7705 and 7713."Duncan St Loop Drummond St" in red ink.ballarat, tramways, trams, drummond st nth, mill st loop, tram 34, tram 37 -
 Ballarat Tramway Museum
Negative, Wal Jack, Mar. 1939
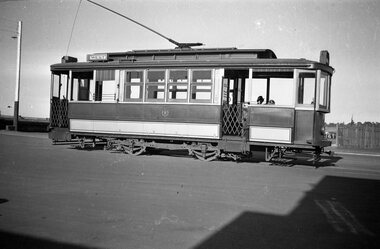
Negative and Digital images of the Wal Jack Geelong Negative file of Geelong car at the Wharf terminus. Tram has the destination of West. Has the waterfront in the background. Based on other photos possibly June 1939. See also Reg Item 7812 for a similar photograph. Maybe the same tram. See Reg Item 5830 for the print of the photograph and that it was No. 5, March 1939.trams, tramways, geelong, wharf, tram 5 -
 Ballarat Tramway Museum
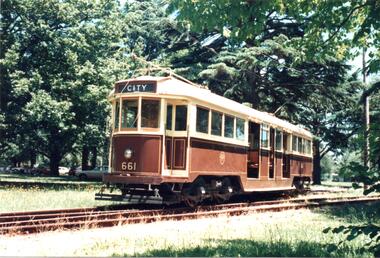
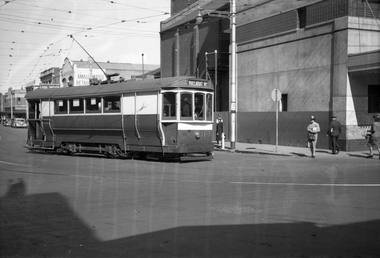
Functional Object - Tramcar, Melbourne and Metropolitan Tramways Board (MMTB), MMTB Tram No. 661, 1932
Equal wheel (4/ truck) bogie vehicle, drop centre tram car, 2 passenger saloons, with longitudinal seating, drop centre with 4 cross seats, 2 internal sliding doors, 6 passenger doors, 4 drivers doors- external. 2 trolley poles, air braked. Tram 661 Photo by W. F Scott See Destination Citytrams, tram 661 -
 Ballarat Tramway Museum
Slide - 35mm slide/s, Wal Jack, 22/03/1962 12:00:00 AM
Tram No. 40 crossing Lydiard St. Railway crossing, heading towards Sturt St., going away from photographer. Taken from western side of Lydiard St, looking south along street. Taken on 22-3-1962. Tram well loaded, Reid's Coffee Palace in background. Ads on side of tram are Eureka tiles and SEC. Has 'Sebastopol' in destination.'SEC Ballarat, No. 40 crossing railway, Lydiard St. north, 22-3-62' in blue ink.tramways, trams, railway crossing, lydiard st., tram 40 -
 Ballarat Tramway Museum
Slide - 35mm slide/s, Wal Jack, 5/01/1962 12:00:00 AM
Ballarat No. 31 covered on below windows with posters for Morton's Circus, ads for 'To-Nite'. Has Castrol and footrest shoes? roof ads. Tram travelling down Lydiard St, towards station, just left Seymour St. loop, following another bogie car. Both trams have dash canopy lights with small white strip. No. 31 showing 'SPECIAL' on destination.SEC Ballarat No. 31 with Morton's Circus Posters, Lydiard St. North, 5/1/62' in blue inktramways, trams, ballarat, morton's circus, lydiard st., seymour st. loop, tram 31 -
 Ballarat Tramway Museum
Slide - 35mm slide/s, Wal Jack, 10/09/1961 12:00:00 AM
Ballarat No. 21 at corner of Lydiard St and Sturt St, 10-9-1961. No. 21 has dash canopy lights, small white strip, ads for The Age and Mutual Homes on front panel and destination of Mt. Pleasant. Old Commonwealth bank building in background, National Mutual Life building, Odeon theatre sign, people on seats in centre median strip.'SEC Ballarat, No. 21 (ex MTTT 10), Sturt St 10-9-1961' in blue inktramways, trams, ballarat, sturt st, tramway centre, lydiard st, tram 21 -
 Ballarat Tramway Museum
Slide - 35mm slide/s, Keith Kings, 20/10/1962 12:00:00 AM
Bendigo trams, 18, 26, 29, 11 in Bridge St. Loop, with 5 in Nolan St waiting for a Bendigo tram? on 20-10-1962 as part of an ARHS tour to Bendigo. Note white convoy marker on front tram, Tram 18 showing 'RLY Station' destination. Tram 18 has 'Kohn Drinks' ad on front panel. Photo by Keith Kings.Stamped 'K.S.KIngs etc', and in blue ink 'K(k)(384), 1/250, f5.6, 20/10/62, ARHS, Convoy 'A' 5,11,29,26,18 on Bridge St.. Loop, Bendigo'tramways, trams, bendigo, north bendigo, bridge st loop, arhs, tram 18, tram 26, tram 29, tram 11, tram 5 -
 Melbourne Tram Museum
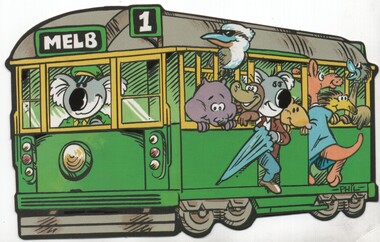
Postcard, Nu-color-Vue, novelty style, cut out around a Melbourne W class cartoon image, c1980
Postcard - novelty style, cut out around a Melbourne W class cartoon image of a tram being driven by a Koala with Australian animals as passengers. Destination of "MELB", route 1. Produced by Nu-color-Vue Divided back has the production company details on rear and stamp position with the numbers 11 ML318 and NCV 6064 inside it. Produced during the 1980's.trams, tramways, w class, cartoons, novelty postcards, melbourne, route 1 -
 Melbourne Tram Museum
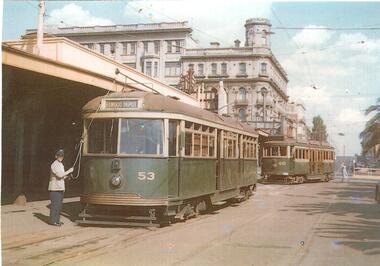
Photograph - Colour Print, c1956
Colour print of VR 53 at St Kilda railway station with the driver or conductor reversing the pole. In the background is VR 40 arriving at the station. No. 53 has the destination of Elwood Depot. Photo used in Reg Item 1171 - Yarra Trams photo competition, credited to the donor. In the background is the St Kilda Railway Station and The George Hotel in the background. Printed on Kodak paper.trams, tramways, vr trams, st kilda railway station, conductors, drivers, elwood, tram 53 -
 Melbourne Tram Museum
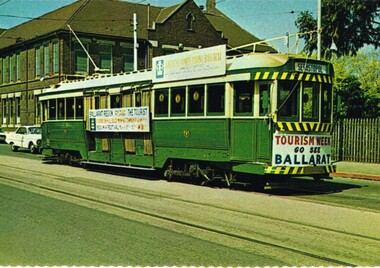
Postcard, Nu-color-Vue, Ballarat No. 36, 1971
Colour postcard with serrated edges of Ballarat No. 36, after closure of the Ballarat system, in Melbourne, Domain Road for Tourism Week, promoting Ballarat. Photo shows details of the banners and roof advertisements. Has destination of Sebastopol. Produced for the TMSV by Nucolorvue Productions Pty Ltd, NCV 740. On rear has details of the tram and its acquisition by the TMSV via the Hawthorn City Council.trams, tramways, melbourne, tourism, mmtb, tmsv, tram 36 -
 Melbourne Tram Museum
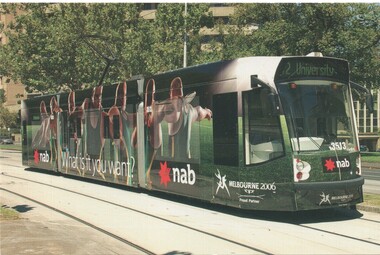
Postcard, Association of Railway Enthusiasts (ARE), Melbourne tram D 3513 advertising NAB, St Kilda Road, Mar. 2006
Colour postcard of Melbourne tram D 3513 advertising NAB, St Kilda Road, March 2006. Tram has the destination of University. Photo Ian Green. Postcard produced by Railcard for the Association of Railway Enthusiasts, ARE No. 5/06. Has ARE logo, shop details and hours, space for small message, address and stamp. 2nd copy added 22/7/2020.trams, tramways, melbourne, d class, decorated trams, advertising trams, st kilda rd, tram 3513 -
 Melbourne Tram Museum
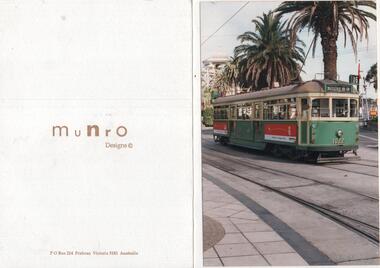
Ephemera - Greetings Card, Munro Designs, 1990's
Greeting Card printed on white card, folded featuring a Postcard - full colour of W7 1022 in the Esplanade St Kilda with the destination of Wattletree Road corner, route 15. Tram has external advertising for Qantas. The card has in ink on the bottom right hand corner "Rob Munro" - hold card at an angle. On the rear "Munro Designs" and the Postal address in Prahran.trams, tramways, the esplanade, st kilda, wattle tree rd, route 15, w7 class, tram 1022 -
 Melbourne Tram Museum
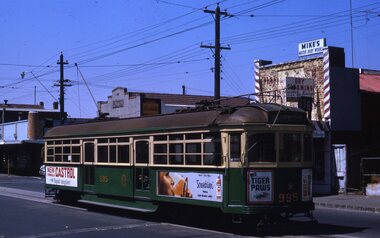
Slide, Keith Kings, 9/12/1967 12:00:00 AM
35mm Kodak white cardboard colour slide by Keith Kings of W6 995 in Nicholson St, at the East Brunswick terminus 9/12/1967. Tram has destination of City Spencer St, route 96, In the background is Mike Motor Body Works, Dry cleaning by Maundy and a sub-station. The tram has adverts for Castrol Oil, Vodka Screwdriver and Tiger PawsKeith Kings stamp and number "14-13", with details of exposure. in ink "MMTB W6 995 in Nicholson St cnr Blyth St at East Brunswick." Has a further unreadable note.trams, tramways, w6 class, nicholson st, blyth st, route 96, tram 995 -
 Melbourne Tram Museum
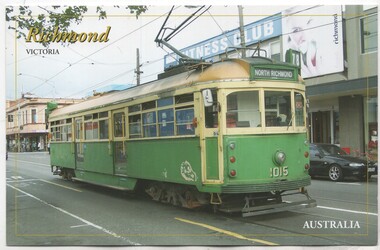
Postcard, Margiesphotos ,McKenzie Photography, "Richmond", c1990
Postcard - of W7 1015 in Church St Richmond at Swan St by McKenzie Photography titled "Richmond" and "Australia" Tram has the destination of North Richmond, route 78. Keith notes that he purchased the card 15/12/2011, the paintwork is in poor condition, its location and extensive notes checking the location. Has a copyright note by Margie photos and telephone number.trams, tramways, church st, swan st, richmond, north richmond, route 78, postcards, tram 1015 -
 Melbourne Tram Museum
Negative, Wal Jack, c1943
Black and white negative, by Wal Jack, of S169 from Leeds St Footscray in to Barkly St with the destination of Ballarat Road. Has the Amalgamated Cash Drapers store, the Hoyts Trocadero Theatre in the background. Note the tram stop alongside. Photo not dated in Wal Jack album, c1943 - though Could be the same date as Reg Item 5446 - 20-4-1945.trams, tramways, leeds st, footscray, s class, barkly st, ballarat rd, tram 169 -
 Melbourne Tram Museum
Negative, Wal Jack, 20-4-1945?
Black and white negative, by Wal Jack, of S 165 in Droop St at White St, with the Footscray Fire Station on the right of the photograph. S 165 has the "Special E" destination indicating it was on an Explosive factory working. In front of the tram is a X1 class. Photo not dated in Wal Jack album, c1943. Could be the same date as Reg Item 5446 - 20-4-1945.trams, tramways, droop st, footscray, world war 2, special e, s class, x1 class, tram 165 -
 Melbourne Tram Museum
Negative, Wal Jack, 13/10/1940 12:00:00 AM
Black and white negative, by Wal Jack, of a cable tram set at the Bourke St terminus. In the background is the Spencer St station buildings and W2 269? northbound in Spencer St. The cable tram has the destination of Nicholson St. See Reg item 5056 for a similar image. Note the street light stand built into the verandah of the hotel and possibly that of Spencer St station verandah.trams, tramways, cable trams, bourke st, spencer st, w2 class, tram 269 -
 Melbourne Tram Museum
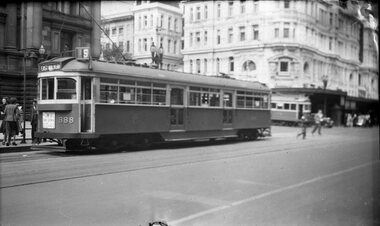
Negative, Wal Jack collection, c1950
Black and white negative, of SW6 888 at the corner of Swanston and Collins St with the Town Hall in the background. Has the destination of East Malvern, route 5, dash canopy lighting and a sign "For comfort travel between 9.30 & 4.0". A W2 is crossing in Collins St. Neg has been damaged in the top right hand corner. Photo not in Wal Jack Melbourne album.trams, tramways, sw6 class, dash canopy lights, swanston st, east malvern, route 5, tram 888 -
 Ballarat Tramway Museum
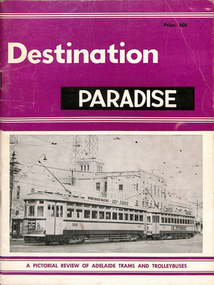
Book, Roger Wheaton, "Destination Paradise", 1968, 1975
8065.1 - Book - 36 pages + card coves, printed on gloss paper, centre stapled, with two colour covers (purple and black) titled "Destination Paradise", providing details of the Adelaide and Port Adelaide tramcars or rolling stock. Published by Traction Publications, in 1968, written by Roger Wheaton edited by Jack Richardson. Provides details on the trams that operated in the two cities. Has a list of tramway and railway books on the rear cover. 8065.2 - Book - 52 pages + card cover, printed on matt paper, centre stapled, with two colour covers (purple and black) titled "Destination Paradise", providing details of the Adelaide and Port Adelaide tramcars or rolling stock including tramcar builders Duncan and Fraser, Pengelley, Holden, J A Lawton and the MTT itself.. Published by Traction Publications, in 1975, compiled by Roger Wheaton. Provides details on the trams that operated in the two cities. .1 - Has "K.Stodden 15-10-68" and .2 "K Stodden 1-2-75" in ink on first page.trams, tramways, adelaide, mtt, port adelaide, depot, tramcars, tramcar construction -
 Ballarat Tramway Museum
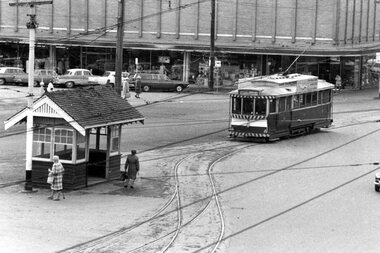
Photograph - Digital image Set of 5, George Coop, 1968 - 1970
Yields information about the tram operations at the intersection of Bridge and Grenville St and Sturt St.Five (5) Digital images taken by George Coop during the period 1968 - 1970, of SEC trams in the Grenville St area. .1 - Tram 31 crossing Grenville St to pick up passengers in Sturt St - the shelter in the foreground and the Woolworth's Big W store in the background. .2 - Tram 17 picking up a passenger at the Shelter, with the Dickins store in the background. Tram has a "Make Bliss not Love" roof advert and has a destination of Gardens via Sturt St West. .3 - Tram 13 - as for .1 .4 - ditto with 12 in the City Loop - in the background are the Magnet Bakery, Begonia City Butch and Gilbert and Jury shop. .5 - Tram 26, in Bridge St, with the points at Grenville St in the foreground. Tram has the destination of Gardens via Sturt St West. In the background are the shops for Faull's shoes and Suttons HMV. trams, tramways, grenville st, shelters, bridge st, sturt st, city loop, passengers, tram 31, tram 17, tram 13, tram 12, tram 26 -
 Ballarat Tramway Museum
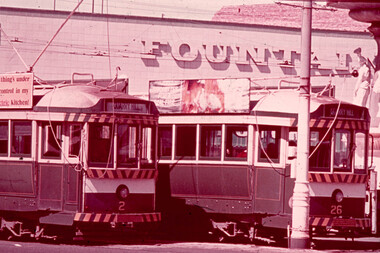
Slide - 35mm slide/s, Bob Wilson, May. 1972
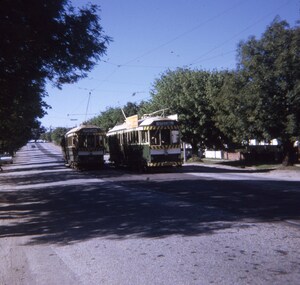
White cardboard mount, 35mm slide, from the Association of Railway Enthusiast's film strip titled "Provincial Tramway Film Strip" of Bendigo bogie tramcars Nos. 2 and 26 at Charing Cross, with the Fountain Plaza building in the background. Both trams have the destination of "Quarry Hill" No. 26 has the older type of destination roll and is fitted with a SEC Briquettes roof advertisement. The film strip notes (Reg. Item 2560), provided the following caption details: "The hub of the Bendigo system was at Charing Cross, where the "Quarry HILL" - "EAGLEHAWK "and "'GOLDEN SQUARE" - "NORTH BENDIGO" routes crossed at right angles. It was customary for trams for all four routes to meet at the CROSS. Here cars 2 & 26 (showing a wrong dest- -ination) meet by the fountain. -Mar '72 (Bob Wilson)" See image btm2580p.tif for high level scan of image. Stamped on base of slide "11789" and written in ink on top edge "No. 2 & 26 Charing Cross Bendigo"tramways, trams, are, film strip, charing cross, bendigo, tram 2, tram 26 -
 Ballarat Tramway Museum
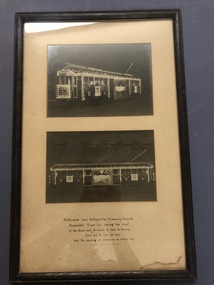
Photograph - Framed Photographs, 1927
Framed set of photographs of Melbourne W1 421decorated as an "illuminated" tramcar for the visit of the Duke and Duchess of York to Victoria April 21 to May 12, 1927 and the opening of Canberra on May 9, 1927. Tram identified in the 4th edition of Destination City. Note Tasmania is missing from the map on the side of the tram. Two photographs of the tram, a three quarter front on view and a side on view have been framed within a black wooden frame, protected by a glass sheet, with an off white cardboard sheet cut out for the photographs to frame them, cardboard backing sheets with an ink inscription under the two photographs. The rear backing sheet has been tacked onto the wooden frame. Images show the overall object, the two photographs, the text and the rear of the object. Images i2 and i3 updated for scan of the actual negs. Page 43 of Destination City 4th EditionIn Indian ink "Melbourne and Metropolitan Tramway Board's / illuminated Tram Car, during the visit / of the Duke and Duchess of York to Victoria, / April 21st to May 12th 1927 / and the opening of Canberra on May 9th 1927".trams, tramways, illuminated trams, decorated trams, royal visit, melbourne, duke of york, preston workshops, w1 class -
 Ballarat Tramway Museum
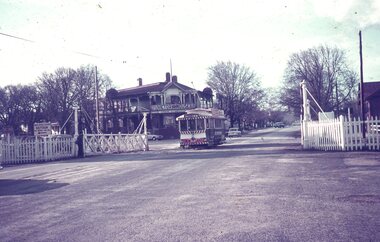
Slide - 35mm slide/s - set of 6, Dave Simpson, late 1960's early 1970's
Yields information about Railway Level crossing in Lydiard St North and some of the trains that used it.Set of six 35mm slides - Hanimex light grey white plastic mounts or AGFA dark blue / white plastic mounts of trams and trains crossing the level crossing at Lydiard St North Ballarat. .1 - tram 33 with destination of Lydiard St North, just after crossing the rail tracks - has a Twin Lakes sign with Victoria House in the background. .2 - tram 40 with destination of Lydiard St North, waiting at the level crossing with S303 entering the station. .3 - ditto, but with S304 in the photograph under the signal gantry. .4 - tram 17 crossing the crossing with the signal box and Victoria House in the background. .5 - ditto - tram has a Twin Lakes signs and a "Make Bliss No Love" roof advert for Bliss Bombs. .6 - ditto - with the S. F. Motors Pty Ltd Mercedes Benz dealership in the background.tramways, trams, railway station, lydiard st north, level crossings, victorian railways, tram 33, tram 40, tram 17