Showing 1719 items matching "geelong no. 2"
-
 Ballarat Tramway Museum
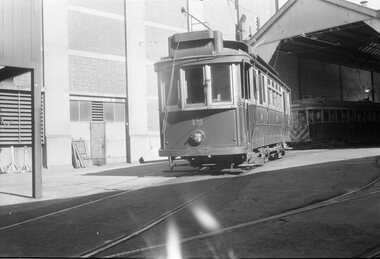
Negative - Tram 19 at Geelong Depot, Laurie Gallop, early 1956
Photo shows Tram 19 at Geelong Depot One of a set of photos was taken between 15/2/1956 and 3/3/1956 when services operated only between Belmont and North before the final closure of the Belmont route on 25/31956 and that bogie tram 31 is not shown on the board, having gone to Ballarat on 15/2/1956 - see item 5554. See item 8213 for an article on the Geelong system by Keith Kings. Yields information about the Geelong operations toward the closure of the tram system.Black and white Negative - 120 sizetramways, geelong, geelong depot, tram 19 -
 Ballarat Tramway Museum
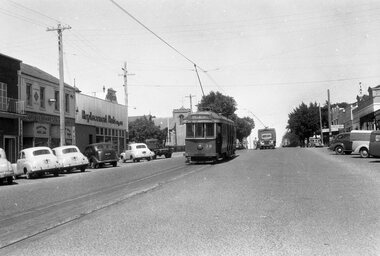
Negative - Geelong 38 and welding truck - Moorabool St, Laurie Gallop, early 1956
Photo shows Geelong 38 south bound to Belmont and welding truck - Moorabool St between Myers and McKillop Streets. The welding with the power supply from the overhead would most likely be repairing a broken joint. One of a set of photos was taken between 15/2/1956 and 3/3/1956 when services operated only between Belmont and North before the final closure of the Belmont route on 25/31956 and that bogie tram 31 is not shown on the board, having gone to Ballarat on 15/2/1956 - see item 5554. See item 8213 for an article on the Geelong system by Keith Kings. Yields information about the Geelong operations toward the closure of the tram system.Black and white Negative - 120 sizetramways, geelong, tram 38, moorabool st, welding truck, track repairs -
 Ballarat Tramway Museum
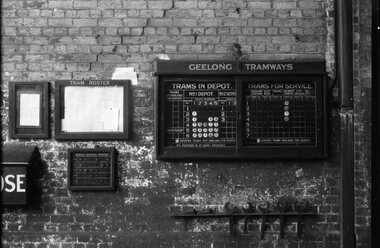
Negative - Tramcar allocation board - Geelong, Laurie Gallop, early 1956
Photo shows the Tramcar allocation board - in the Geelong depot. Shows the four bogie cars in operation or available on the day the photograph was taken. Shows that some of the Meadowbank-built trams and bogie trams had already left the depot. One of a set of photos was taken between 15/2/1956 and 3/3/1956 when services operated only between Belmont and North before the final closure of the Belmont route on 25/31956 and that bogie tram 31 is not shown on the board, having gone to Ballarat on 15/2/1956 - see item 5554. See item 8213 for an article on the Geelong system by Keith Kings. Yields information about the Geelong depot allocation board that showed the location and use of the tramcars on the day.Black and white Negative - 120 sizetramways, geelong, depot, depot allocation, tramcar allocation -
 Ballarat Tramway Museum
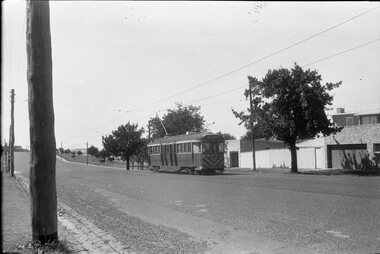
Negative - Geelong tram inbound Mercer Street, Laurie Gallop, early 1956
Photo shows a Geelong tram inbound in Mercer Street, near The Esplanade. Tram has the destination of Belmont. Based on the running board at item 8267, most likely No. 33. One of a set of photos was taken between 15/2/1956 and 3/3/1956 when services operated only between Belmont and North before the final closure of the Belmont route on 25/31956 and that bogie tram 31 is not shown on the board, having gone to Ballarat on 15/2/1956 - see item 5554. See item 8213 for an article on the Geelong system by Keith Kings. Yields information about tramway operations prior to closure of the Geelong system.Black and white Negative - 120 sizetram stops, tramways, geelong, mercer st, tram 33 -
 Ballarat Tramway Museum
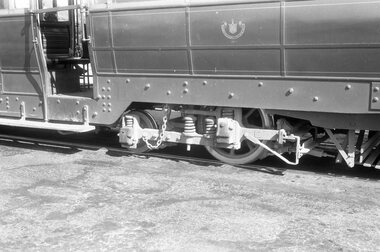
Negative - Brill 22E bogie or truck - Geelong tramcar, Laurie Gallop, early 1956
Photo shows Brill 22E Maximum Traction bogie or truck - Geelong tramcar, has the SEC logo on the side of the tramcar in the view. One of a set of photos was taken between 15/2/1956 and 3/3/1956 when services operated only between Belmont and North before the final closure of the Belmont route on 25/31956 and that bogie tram 31 is not shown on the board, having gone to Ballarat on 15/2/1956 - see item 5554. See item 8213 for an article on the Geelong system by Keith Kings. Yields information about the Geelong bogie trams.Black and white Negative - 120 sizetramways, geelong, brill 22e, maximum traction, bogie trams -
 Ballarat Tramway Museum
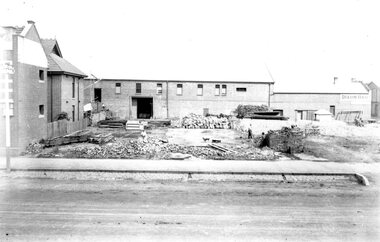
Photograph - Geelong Tram Depot, Melbourne Electric Supply Co. (MESCo), c.1910
Completed depot shed with trams being assembled from parts railed to Geelong from Duncan and Fraser, coachbuilders, Adelaide, and trucks supplied by the Brush Electrical Engineering Company of Loughborough, England. Chimney to the left is part of the Melbourne Electric Supply Company's coal-fired power station at the SW corner of Corio Tce. and Yarra St. 1911Yields information regarding the early development of tramway infrastructure in Geelong.Black and white print on paperPlate 3-2 Spare written in ink on the back of the photograph.geelong tramway depot shed, duncan and fraser, brush electrical engineering company, mesco power station -
 Ballarat Tramway Museum
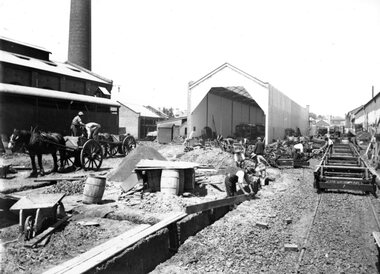
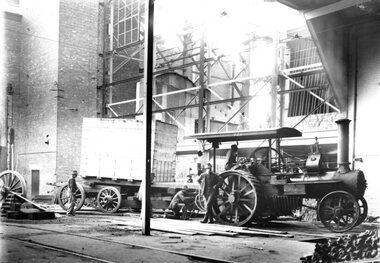
Photograph - Traction Engine, Melbourne Electric Supply Co. (MESCo), c 1919-20
Contractor's steam tractor bringing heavy equipment to be installed in the furnace room being built behind the tractor. 1919-1920.Yields information on the early development of the furnace room at Geelong Power StationBlack and white glass plate photograph.Plate 2-4 written in ink on the back of the photographsteam tractor, steam tractor and trailer, geelong power station, boiler room -
 Ballarat Tramway Museum
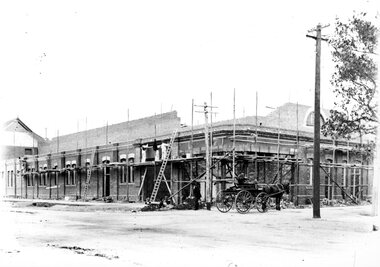
Photograph - Geelong MESCO office, Melbourne Electric Supply Co. (MESCo), c.1910-15
MESCo offices in the process of construction. Sewerage contractor's buggy passing by. SW corner of Yarra and Corio Sts., Geelong.Yields information on MESCo Geelong building under construction. Black and white print on paperPlate 2-6 written in ink on the back of the photographmesco geelong, building construction, sewerage buggy -
 Ballarat Tramway Museum
Photograph - Geelong MESCO offices, Melbourne Electric Supply Co. (MESCo), c.1900-10
... and Corio Sts. Geelong Plate 2-8 Spare written in ink on the back ...Site cleared for construction of MESCO offices on SW corner of Yarra and Corio Sts., Geelong.Yields information on early Geelong streetscape and constructionBlack and white print on paper.Plate 2-8 Spare written in ink on the back of the photograph.mesco geelong, corner yarra and corio sts. geelong -
 Ballarat Tramway Museum
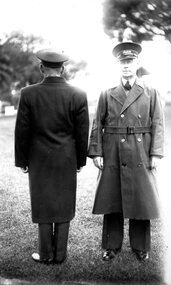
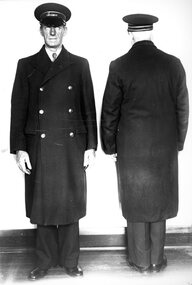
Photograph - Geelong Tramway Inspector in Standard Winter Uniform
Set of photographs taken together in the park near the tram depot, displaying Geelong tramway uniforms.Black and white photo on paper11/8 (2 in circle) written ink in on reverse. GRS710/11/1/8 written in pencil on reversegeelong tramway uniform, tramways uniform -
 Ballarat Tramway Museum
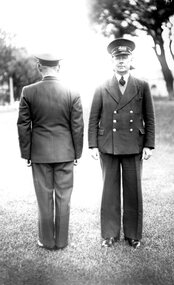
Photograph - Geelong Tramway Inspector in Standard Winter Uniform
Set of photographs taken together in the park near the tram depot, displaying Geelong tramway uniforms.Black and white print on paper11/9 and GRS710/11/1/9 written in pencil on reverse. No. 2 in a circle written in ink on reversegeelong tramway uniform, geelong tramway -
 Ballarat Tramway Museum
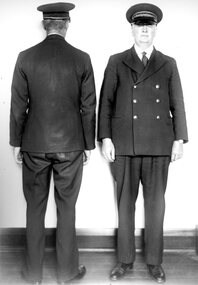
Photograph - Geelong Tramway Senior Traffic Inspector, Melbourne Electric Supply Co. (MESCo)
Senior Traffic Inspector.Black and white print on paper11/4 and No. 2 in a circle written on reverse in pen. GRS710/11/1/4 written on reverse in pencil.senior traffic inspector, tramway uniform, geelong tramway uniforms, mesco -
 Montmorency–Eltham RSL Sub Branch
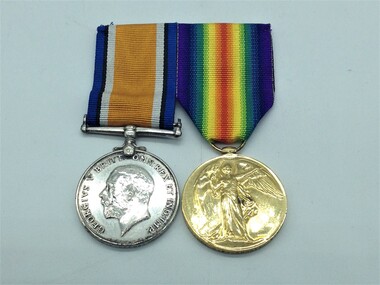
Medal - Medal Group, WW1, 2166 Lieutenant Reginald Frank Barratt
Information from "The AIF Project" Lieutenant Reginald Frank Barratt was born in 1879 in Withington, Manchester, Lancashire, England. Regimental number 2166. 3rd Field Artillery Brigade, Military District 3 and Military District 6. Arrived in Australia in 1903 aged 24. Address was Mount Street, Heidelberg, Victoria. Occupation - Farmer. Enlistment date was 17th August 1914. Served with the 68 Battery Royal Field Artillery during the South African War. Rank on enlistment was Sergeant. Embarkation details - Unit embarked from Melbourne, Victoria on board Transport A2 Geelong on 19th September 1914. Rank Lieutenant - Unit 1st Divisional Ammunition Column. Information from the Roll of Honour - Awarded Royal Human Society Medal for saving three lives from drowning in Orange River during South African War. Wounded at Zillebeke, near Ypres, Belgium. Died of wounds 22nd August 1917 at the age of 38. Buried at Bedford House Cemetery, Enclosure No 2, (Plot 1, R0w F, Grave 23), Zillebeke, Belgium. Panel number , Roll of Honour Australian War Memorial British War Medal - The medal was struck by the Royal Mint, is a silver disc 36mm in diameter with a straight clasp suspended without swivel. The obverse shows Sir Bertram Mackennal's bare headed effigy of King George V facing left with the legend 'GEORGIVS V BRITT:OMN:REX ET IND:IMD - "George V, King of all the British Isles & Emperor of India". The reverse, designed by William McMillan, shows St George, naked on horseback and armed with a short sword, an allegory of the physical & mental strength which achieved victory of Prussianism. The horse tramples on the Prussian eagle shield and the emblems of death, a skull and cross bones. In the background are ocean waves and just off centre near the right upper time is the risen sun of victory. The years 1914-1918 appear on the perimeter in the left and right fields respectively. The watered silk ribbon is 32mm wide with 3mm wide royal blue band, 2mm wide black band, 3mm wide white band repeated in reverse order and separated by 16mm wide orange band. Victory Medal - The medal is bronze disc 36mm in diameter with a winged figure of Victory on the obverse. The reverse has the words 'THE GREAT WAR FOR CIVILIZATION 1914-1918', all surrounded by a laurel leaf. The watered silk ribbon is 32mm wided has two rainbow design with the violet from each rainbow on the outside edges, moving through to a central red stripe where both rainbows meet.The recipients name, rank and unit are impressed on the bottom edge of the medals - Lieut F Barratt AIF -
 Ballarat Tramway Museum
Photograph - Geelong Tramway Inspector Winter Coat, Melbourne Electric Supply Co. (MESCo)
Geelong Tramway Inspector in winter long coat.Black and white print on paper.11/7 and GS 710/11/1/7 written in pencil on the reverse. No. 2 in a circle written in ink on the reverse.tramways inspector, geelong tramways, geelong tramways uniform, tramways uniform coat -
 Ballarat Tramway Museum
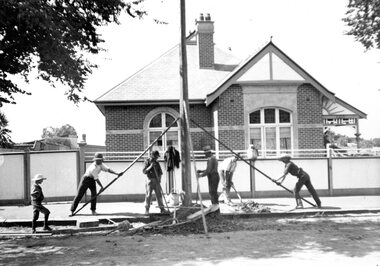
Photograph - Geelong Tramway Pole Raising
Supporting a pole, probably for the tram overhead with pykes (round poles with 2 spikes at the end) to make it vertical. Location and date unknown.Black and white print on paper.No. 2 inside a circle written in pen on the reverse. 18-4 and GRS710/18/1/4 written in pencil on the reverse.,installation of tramway overhead pole, pykes -
 Ballarat Tramway Museum
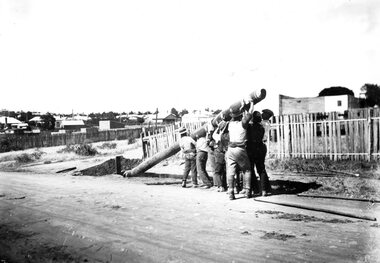
Photograph - Geelong Tramways Pole Raising
Geelong Tramways workers manually raising a pole. Location and date unknown. Black and white print on paper.No. 2 in a circle written in pen on the reverse. 15-11 and GRS710/15/1/11 written on the reverse in pencil.geelong tramways infrastructure, raising a powerpole manually. -
 Ballarat Tramway Museum
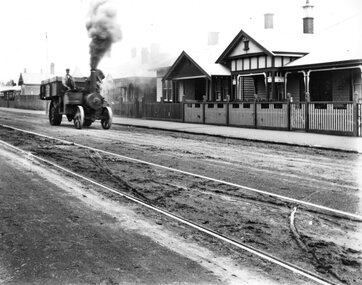
Photograph - Traction Engine
... Geelong with tramlines No. 2 in a circle written in ink on reverse ...Steam tractor in a Geelong suburban street with tramline. Location and date unknown.Black and white print on paper.No. 2 in a circle written in ink on reverse. 20-3 and GRS710/20/1/3 written in pencil on the reverse.steam tractor, traction engine, suburban geelong with tramlines -
 Ballarat Tramway Museum
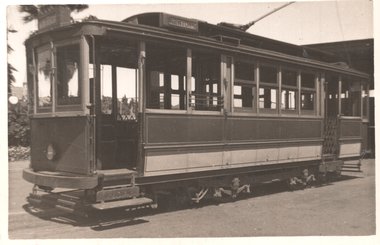
Photograph - Geelong 15 Moorabool St, Ken McCarthy, 4-2-1948
The photo shows Geelong tram No.15 in Moorabool St, before turning into Ryrie St with the destination of Eastern Park. A lady passenger is boarding. The tram has a Pay as you enter sign. In the background is the Bank of NSW. Photo by Ken McCarthy 4-2-1948Yields information about the Geelong tram 15Black and white photograph with stamped details on rear.Typed on rear "No. 15 Birney Safety car, SEC Geelong 4 Feb 1948, copyright K McCarthy, Photo No. 77". Ken Magor stamp as well" tramways, trams, geelong, tram 15, moorabool st -
 Ballarat Tramway Museum
Photograph - Geelong 3 at Railway Station, Ken McCarthy, 4-2-1948
The photo shows Geelong tram No. 3 at the railway station with the destination of Newtown. Photo by Ken McCarthy 4-2-1948Yields information about the Geelong railway station terminus and tram 3.Black and white photograph with stamped details on rear.Typed on rear "No. 3 car SEC Geelong 4 Feb 1948, copyright K McCarthy, Photo No. 76". Ken Magor stamp as well" tramways, trams, geelong, tram 3, railway, railway station -
 Ballarat Tramway Museum
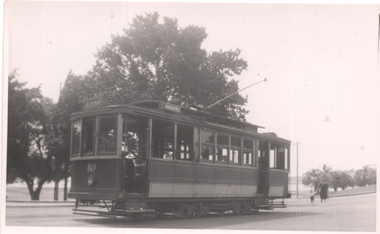
Photograph - Geelong tram 10 at Beach, 26/2/1948
The photo shows Geelong No. 10 at the Beach terminus. The tram has the return destination of West. A lady and a young child are walking across the road to the tram.Yields information about Geelong No.10 and the Beach terminus.Black and white photograph with some details on the rearIn pencil "1947, 26/2/48" and in the bottom left hand corner on rear, the camera settings.tramways, trams, geelong, tram 10, beach, passengers -
 Ballarat Tramway Museum
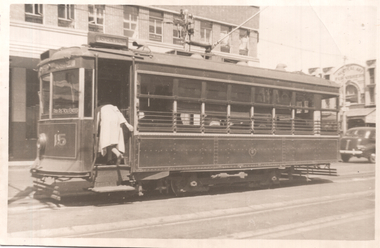
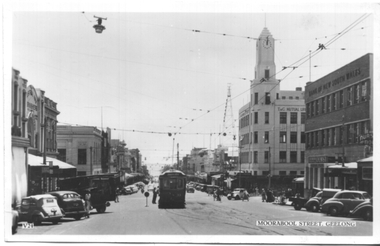
Postcard, Valentine & Sons Publishing Co, "Moorabool Street Geelong", early 1950s
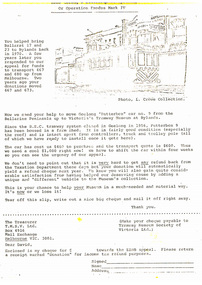
Postcard produced by the Valentine publishing company of Moorabool St looking north at the corner of Ryrie St. Tram No. 33 is picking up passengers at the safety zone at the intersection with Ryrie St where the front of another bogie tram can be seen. In the view are the T&G building, the Bank of NSW which has a chemist shop, and the Savoia cafe. The rear of the card notes it is a genuine photograph. The card number V24 is the same number used in item 9064, but a later version, the early 1950s. The note on the rear of the card gives details of Ken's Victorian trip during Jan 1954.Yields information about the view of Moorabool St at Ryrie St early 1950s.Black and white Postcard undivided back, unused. Card No. V24.Has a note written to Ken Magor from Ken Winney? dated 14-1-1954 - see image 2tramways, trams, geelong, moorabool st, tram 33 -
 Ballarat Tramway Museum
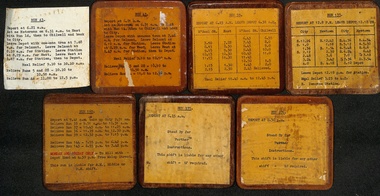
Document - Table Cards (Sheets), State Electricity Commission of Victoria (SECV), Geelong Trams Runs, 1950's
Table cards gives details for the Motorman and Conductor, starting times, meal times, relief and taken by details. Not known when made - 1950's? .1 - Run 43 - Chilwell, Belmont and West - includes a loose sheet of paper. .2 - Run 59 - Chilwell and East .3 - Run 135 - Newtown - city .4 - Run 169 - Relive various runs .5 - Run 175 - Standby shift commencing 6.15am .6 - Run 176 - Standby shift commencing 2.30pm See also Reg Item 3155, 6270 and 8134 for other examples and 8135 for a Bendigo example.Demonstrates the method of advising tram crew their shift work. Set of six Typed table card or run card, for Geelong Trams Runs glued and varnished onto a sheet of three ply timber - plywood boards and one typed paper sheet.trams, tramways, secv, forms, timetables, geelong, btm -
 Melbourne Tram Museum
Document - Report, Metlink, "Metlink 2007 in review", 2007 and 2008
.1 - Report - 24 pages + card cover, printed in full colour on gloss paper, centre stapled landscape format titled "Metlink 2007 in review" with table of contents, including message from CEO Bernie Carolan, provides details about the bodies activities, campaigns, events, fare evasion, the public transport challenge, celebrity Metcards, marketing and customer services. .2 - Report - 42 pages + card cover, printed in full colour on semi gloss paper, centre stapled, portrait format titled "Metlink Annual Review 2008" as above, but with details of Southern Cross station, website and Geelong stations - includes VLine.trams, tramways, metlink, annual reports, reports, melbourne, connex, yarra trams, buses, metcard, vline -
 Ballarat Tramway Museum
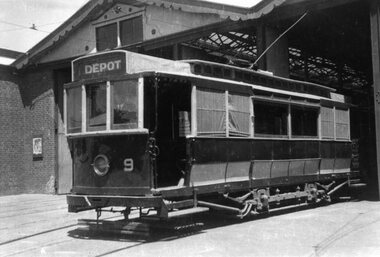
Photograph - ESCo Bendigo tram 9 - set of 2, Peter Duckett, c1945
Photograph of Bendigo ESCo No. 9, at the Depot, during the 1940's following "modernisation" scheme. Tram has the destination of "Depot". See page 28 of Destination Eaglehawk for the same photograph and page 30 for notes regarding the "modernisation", undertaken in 1945, but not liked by the Union and subsequently scrapped in 1947. See Reg Item 4341 and 9110 for photographs of the same tram before modernization Peter Duckett Collection. 4342.1 - Black and White print contained within the Wal Jack Bendigo and Geelong Album, see Reg Item 5003 for more details. Added 2/7/2013. See Destination Eaglehawk.Yields information about the appearance of Bendigo's ESCo bogie trams during the 1940's.Black and White photograph with notes on the rear.On the front, top left hand corner of the print "27" in ink within a circle. On rear, stamped in black ink "Photo supplied from P.W. Duckett Collection, All Rights Reserved, 69 Howitt Rd. Nth Caulfield 3161." In the bottom right hand corner, a "William F Scott" address label in the bottom left hand corner. 4342.1 - Bendigo - No. 9 as rebuilt @ bard. Mr. McNaught (Manager) at Master Controller.trams, tramways, bendigo, depot, secv, unions, esco, tram 9 -
 8th/13th Victorian Mounted Rifles Regimental Collection
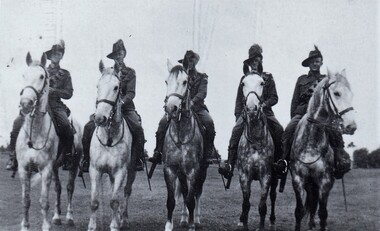
Photograph - Images from 2nd Div Camp 1940
Second Cavalry Division conducted camp of full time training at Torquay near Geelong Victoria from January to April 1940. One of the regiments attending was 8th Light Horse. This was one of the last large gathering of horsed cavalry in Victoria. The 8th Light Horse (Indi) Regiment had its headquarters at Benalla with sub-units throughout the Upper Murray and Northeast Victoria. In December 1941,the regiment converted from horse to mechanised, initially as 8th Reconnaissance Battalion then in July 1942 it became 8th Cavalry Regiment and served in Northern Territory. As Japanese threat to the mainland declined the regiment was disbanded.Images of citizen soldiers from North East Victoria at beginning of world War 2.Collection of six black and white photographs of 8th Light Horse in camp near Geelong, January to April 1940.Shows mounted horsemen,tents and horse lines.training, camp, torquay, cavalry, 8th light horse regiment -
 National Wool Museum
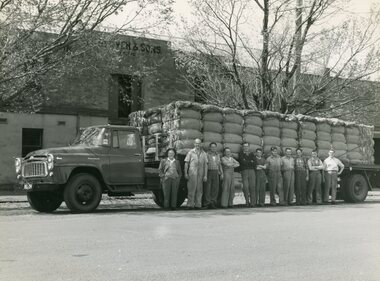
Photograph - C. Glover and Sons Pty. Ltd, 1890-1944
... . A SOETEKOUW / 52 GHERINGHAP ST., / GEELONG / PHONE X 2920 Image 2... 2920 Image 2 Wording. Typed black lettering. Geelong Buyers ...C. Glover and Sons Pty. Ltd. was founded on Brougham Street, Geelong c.1870. They operated as a wool and sheepskin storeroom situated on both sides of Brougham Street; where the current Elders building is located. The store was owned and operated by Joshua Glover with his brother Cyrus. A third brother Arthur also worked at the store. It was a very successful business and employed up to 40 men at its peak. Cyrus Glover died quite young, around 54, with his son Howard taking his place in the partnership at 23. During the Second World War the business was requisitioned by the Australian Government. Their wool was utilised to produce defence uniforms for Commonwealth personnel C. Glover and Sons was a very successful business which reluctantly closed its doors around 1975, as a result of the wool industry taking a downward turn Australia wide. It was decided by the family that this was the only option at the time. Howard Glover was Jan Glover’s (donor) father in law. Jan Glover donated these images to the National Wool Museum in 2021. Image 1 is a black and white image of a truck with 11 men standing in front. The truck is loaded with dumped bales of wool. The image is taken outside of the C. Glover and Sons' building. The reverse of the image is stamped. Image 2 is a black and white image of 2 rows of men. The first row of six men are sitting in their cricket whites. The second row of 10 men are standing in suits bar one-man 3rd from the right, who is also in his cricket whites. The image is taken on a cricket oval with the grandstand visible in the background. Image 3 is a black and white image of 12 men. The first 3 men are sitting on wool bales while the other 9 stand behind. The image shows the word 'record' spray painted on a piece of timber hanging behind the man. This is expressed in the men's faces with emotions of joy and celebration coming through. The men are standing in front of large machinery presumed to be used for wool pressing/dumping. Image 4 is a black and white image of 15 men and 5 horses in front of two large white sheds with triangular rooves. The men are all standing with the majority having their arms crossed. On the left is a cart carrying sheep skins. On the right are two smaller carts that appear to be carrying wool bales. Image 5 is a black and white image of a wool and hides storeroom. The ceiling is lined with multiple sheep skins while the floor has multiple wool bales neatly stored. In the background of the image, two men can be seen inspecting wool while sitting at a small white table. Behind this, 5 men are standing in a crowd while another man is seen to the left of the men at the table. This separate man is standing inspecting a wool bale. Image 6 is a black and white image of a wool storeroom. Numerous bales of wool can be seen open for inspection stacked semi-neatly one next to another. 6 men can be seen inspecting a bale of wool in a group. Another 5 men are present in the room performing separate duties.Image 1 Reverse. Black Stamp INTERNATION FOTO-NEWS / H. A SOETEKOUW / 52 GHERINGHAP ST., / GEELONG / PHONE X 2920 Image 2 Wording. Typed black lettering. Geelong Buyers and Brokers Cricket Team. Image 3 Wording. Blue handwriting RECORD OF PRESSING FOR ONE DAY / FORTY BALES / 1910 Image 4 Wording. Blue handwriting. 1890 Image 5 Wording. Typed black lettering. Messrs. Moss & R. Allan. / Government Sheepskin Appraisers. 1918. Image 6 Wording. Black Handwriting. C. GLOVER & SONS. APPRAISEMENT NO. 50 14/12/1944. / GOVERNMENT SHEEPSKIN APPRAISERS. MESSERS. R. BORLAND & H. V. McCALLUM / GEELONG REPRESENTATIVES. J. GLOVER & H. J. GLOVER. c. glover and sons pty. ltd, geelong 1870, brougham street, wool & sheepskin storeroom -
 Bendigo Historical Society Inc.
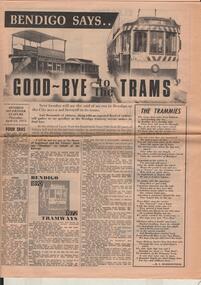
Document - BASIL MILLER COLLECTION: BENDIGO SAYS GOOD-BYE TO THE TRAMS, c1972
13 April 1972. Bendigo Says Good-bye to the Trams. A1 sheet - double sided. Tramway history 1890 - 1972, 2 copies. At the stroke of 5 pm from Eaglehawk Town Hall clock 82 years of history will end as the last tram makes its sentimental journey to the city, while at the Bendigo Cemetery - the Quarry Hill line terminus - another tram will be leaving for its last resting place. Other articles include: Four Eras, of trams. The Trammies, covering Ballarat, Geelong in the form of a poem. 1927 and all that, by Basil Miller, remembering his 45 years of service with the trams. How it all started, The twin communities of Sandhurst and Eaglehawk were relatively early in considering the possibility of operating street tramways within their boundaries. Cabs, Battery Cars, Construction, Strikes, Bendigo 1890 to 1972 - Tramways. Man and his Mates, continued from previous page, Explosion, Touchy Task, A Quickey, Horrors. Electric in 1903, There was excitement galore in the City during April, 1903 - and the Advertiser recorded the progress of the new-fangled electric machine. One man's Memories, Tough times, humour, tragedy and comradeship - they all came flooding back as former Bendigo tramway-man Tom Griffiths recently turned the clock back. Keb Sir Keb Sir? 'Keg sir? Tram off the line,' was the call of the cabbies when a train pulled in at the Bendigo railway station. Altered Shopping Trend, With advent of the electric tram in Bendigo came change in shopping habits.bendigo trams -
 Ballarat Tramway Museum
Document - letter and list, Bob Lilburn, "Scrapped Geelong Cars and "SEC Geelong Bogie Cars", Feb. 1971
Yields information about the disposition of Geelong trams following closure and those shipped to Ballarat or Bendigo along with dates.Handwritten letter from Bob Lilburn of West Essendon dated 7-2-1971 to Charles Craig forwarding him information of Geelong SEC bogie cars and Scrapped Geelong cars. Notes that his photo of Geelong 40 being loaded at the Geelong depot on 27-3-1956 was received in Ballarat the following day and that Pengelly 23 was the "workhorse" around the depot after closure. List of scrapped cars gives location as known by Bob at the time. The Geelong bogie car list gives the Melbourne number, Geelong number, dated received at Geelong, Transferred to (Ballarat or Bendigo), the number in that City, date received and any remarks. See 6748 for a the Ballarat Bogie list. trams, tramways, geelong, tramcars, ballarat, bendigo, transport -
 Melbourne Tram Museum
Pamphlet, Tramway Museum Society of Victoria (TMSV), "Operation Exodus", "Bring a Butterbox to Bylands", 1970's
Set of two pamphlets published by the TMSV seeking funds to transport tramcars during the 1970's to Bylands. .1 - A4 photocopied sheet, titled "Bring a Butterbox to Bylands" seeking donations for the transport of a Geelong Butterbox to Bylands. Refers to earlier fund raising ventures. .2 - Folded printed foolscap sheet printed on yellow paper titled "Operation Exodus", asking donations for the transport of Ballarat 17, scrubber (23), Bendigo 11, 5, 25 and scrubber. The Bendigo car acquisition did not occur - see Reg Item 3080.1 Has photos of the Bendigo scrubber, Ballarat 17 and Bylands Railway Station. Printed by Kemara Press Caulfield.trams, tramways, tmsv, donations, transport, ballarat, bendigo -
 Melbourne Tram Museum
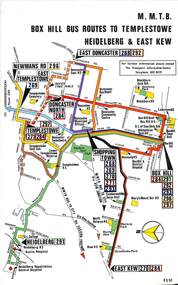
Map, Melbourne & Metropolitan Tramways Board (MMTB), Set of 8 bus route maps, 1977 to 1979
Series of colour route maps for various bus or groups of tram lines for the MMTB. Some have the Transport Information Centre telephone printed on them, others have a label stuck on. Some are finished with a plastic laminate finish on either one or both sides. Show the major cross streets, parks, schools, other tram routes, major stop numbers and railway lines. .1 - Box Hill bus routes to Templestowe - R38/82, Heidelberg and East Kew, includes Doncaster, Shoppingtown and Newmans Road. .2 - Clifton Hill - R2/79 - Elsternwick, Point Ormond and St Kilda Junction .3 - Footscray, Sunshine, Deer Park, Nth Altona, Fishermen's Bend, Highpoint and Williamstown Road - R2/79. .4 - Bulleen - City - Port Melbourne - Garden City Bus Route, including Kew, Collingwood - R6/78 .5 - City - Warrandyte and East Doncaster including Newmans Road, Templestowe, East Doncaster, Donvale, Shopping town, and Kew. R3/82. .6 - West Heidelberg, La Trobe University, Northland - R3/81 .7 - Box Hill, Ringwood to East Doncaster and Warrandyte, Park Orchards, North Blackburn R3/82. .8 - Geelong - Herne Hill, Rollins Road, Donnybrook Rd, North Shore and Corio Villagetrams, tramways, maps, route guide, route numbers, routes, buses, box hill, templestowe, doncaster, east kew, heidelberg, clifton hill, point ormond, elsternwick, footscray, sunshine, deer park, north altona, fishermen's bend, highpoint, williamstown rd, bulleen, kew, collingwood, port melbourne, garden city, warrandyte, donvale, la trobe university, northland, ringwood, park orchards, mitcham, blackburn, geelong