Showing 2025 items matching " samples"
-
 Flagstaff Hill Maritime Museum and Village
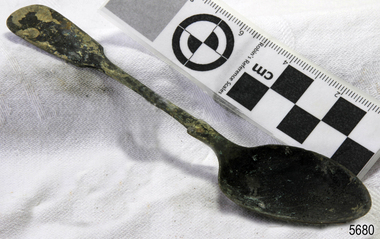
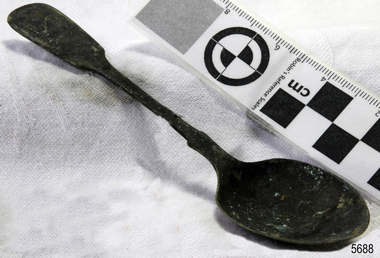
Spoon, circa 1878
This tea spoon is from the wreck of the LOCH ARD, a Loch Line ship of 1,693 tons which sailed from Gravesend, London, on 2 March 1878 with 17 passengers and a crew of 36 under Captain George Gibbs. “The intention was to discharge cargo in Melbourne, before returning to London via the Horn with wool and wheat”. Instead, on 1 June 1878, after 90 days at sea, she struck the sandstone cliffs of Mutton Bird Island on the south west coast of Victoria, and sank with the loss of 52 lives and all her cargo. The manifest of the LOCH ARD listed an array of manufactured goods and bulk metals being exported to the Colony of Victoria, with a declared value of £53,700. (202 bills of lading show an actual invoice value of £68, 456, with insurance underwriting to £30,000 of all cargo). Included in the manifest is the item of “Tin hardware & cutlery £7,530”. This teaspoon is one of 482 similar items of electro-plated cutlery from the LOCH ARD site, comprising spoons and forks of various sizes but all sharing the same general shape or design and metallic composition. 49 of these pieces display a legible makers’ mark — the initials “W” and “P” placed within a raised diamond outline, which is in turn contained within a sunken crown shape — identifying the manufacturer as William Page & Co of Birmingham. An electroplater’s makers’ marks, unlike sterling silver hallmarks, are not consistent identifiers of quality or date and place of manufacture. A similar line of five impressions was usually made to impress the consumer with an implication of industry standards, but what each one actually signified was not regulated and so they varied according to the whim of the individual foundry. In this case, the maker’s marks are often obscured by sedimentary accretion or removed by corrosion after a century of submersion in the ocean. However sufficient detail has survived to indicate that these samples of electro-plated cutlery probably originated from the same consignment in the LOCH ARD’s cargo. The following descriptions of maker’s marks are drawn from 255 tea spoons, 125 dessert spoons, and 99 table forks. These marks are clearly visible in 66 instances, while the same sequence of general outlines, or depression shapes, is discernible in another 166 examples. 1. A recessed Crown containing a raised Diamond outline and the initials “W” and “P” (the recognised trademark of William Page & Co) 2. An impressed Ellipse containing a raised, pivoted, Triangle in its lower part and bearing a Resurrection Cross on its upper section (a possible dissenting church symbol reflecting religious affiliation); OR a rounded Square impression containing a raised, ‘lazy’, letter “B” (possibly mimicking sterling silver hallmark signifying city of manufacture i.e. Birmingham) 3. An impressed rounded Square filled with a raised Maltese Cross (the base metal composite of nickel silver was also known as ‘German silver’ after its Berlin inventors in 1823) 4. A recessed Circle containing a Crab or Scarab Beetle image; OR a recessed Circle containing a rotated ‘fleur de lys’ or ‘fasces’ design 5. A depressed Diamond shape enclosing a large raised letter “R” and a small raised letter “D” (mimicking the U.K. Patent Office stamp which abbreviated the term ‘registered’ to “RD”, but also included date and class of patent) Suggested trade names for William Page & Co’s particular blend of brass plating are ‘roman silver’ or ‘silverite’. This copper alloy polishes to a lustrous gold when new, discolouring to a murky grey with greenish hue when neglected. HISTORY OF THE LOCH ARD The LOCH ARD belonged to the famous Loch Line which sailed many ships from England to Australia. Built in Glasgow by Barclay, Curdle and Co. in 1873, the LOCH ARD was a three-masted square rigged iron sailing ship. The ship measured 262ft 7" (79.87m) in length, 38ft (11.58m) in width, 23ft (7m) in depth and had a gross tonnage of 1693 tons. The LOCH ARD's main mast measured a massive 150ft (45.7m) in height. LOCH ARD made three trips to Australia and one trip to Calcutta before its final voyage. LOCH ARD left England on March 2, 1878, under the command of Captain Gibbs, a newly married, 29 year old. She was bound for Melbourne with a crew of 37, plus 17 passengers and a load of cargo. The general cargo reflected the affluence of Melbourne at the time. On board were straw hats, umbrella, perfumes, clay pipes, pianos, clocks, confectionary, linen and candles, as well as a heavier load of railway irons, cement, lead and copper. There were items included that intended for display in the Melbourne International Exhibition in 1880. The voyage to Port Phillip was long but uneventful. At 3am on June 1, 1878, Captain Gibbs was expecting to see land and the passengers were becoming excited as they prepared to view their new homeland in the early morning. But LOCH ARD was running into a fog which greatly reduced visibility. Captain Gibbs was becoming anxious as there was no sign of land or the Cape Otway lighthouse. At 4am the fog lifted. A man aloft announced that he could see breakers. The sheer cliffs of Victoria's west coast came into view, and Captain Gibbs realised that the ship was much closer to them than expected. He ordered as much sail to be set as time would permit and then attempted to steer the vessel out to sea. On coming head on into the wind, the ship lost momentum, the sails fell limp and LOCH ARD's bow swung back. Gibbs then ordered the anchors to be released in an attempt to hold its position. The anchors sank some 50 fathoms - but did not hold. By this time LOCH ARD was among the breakers and the tall cliffs of Mutton Bird Island rose behind the ship. Just half a mile from the coast, the ship's bow was suddenly pulled around by the anchor. The captain tried to tack out to sea, but the ship struck a reef at the base of Mutton Bird Island, near Port Campbell. Waves broke over the ship and the top deck was loosened from the hull. The masts and rigging came crashing down knocking passengers and crew overboard. When a lifeboat was finally launched, it crashed into the side of LOCH ARD and capsized. Tom Pearce, who had launched the boat, managed to cling to its overturned hull and shelter beneath it. He drifted out to sea and then on the flood tide came into what is now known as LOCH ARD Gorge. He swam to shore, bruised and dazed, and found a cave in which to shelter. Some of the crew stayed below deck to shelter from the falling rigging but drowned when the ship slipped off the reef into deeper water. Eva Carmichael had raced onto deck to find out what was happening only to be confronted by towering cliffs looming above the stricken ship. In all the chaos, Captain Gibbs grabbed Eva and said, "If you are saved Eva, let my dear wife know that I died like a sailor". That was the last Eva Carmichael saw of the captain. She was swept off the ship by a huge wave. Eva saw Tom Pearce on a small rocky beach and yelled to attract his attention. He dived in and swam to the exhausted woman and dragged her to shore. He took her to the cave and broke open case of brandy which had washed up on the beach. He opened a bottle to revive the unconscious woman. A few hours later Tom scaled a cliff in search of help. He followed hoof prints and came by chance upon two men from nearby Glenample Station three and a half miles away. In a state of exhaustion, he told the men of the tragedy. Tom returned to the gorge while the two men rode back to the station to get help. By the time they reached LOCH ARD Gorge, it was cold and dark. The two shipwreck survivors were taken to Glenample Station to recover. Eva stayed at the station for six weeks before returning to Ireland, this time by steamship. In Melbourne, Tom Pearce received a hero's welcome. He was presented with the first gold medal of the Royal Humane Society of Victoria and a £1000 cheque from the Victorian Government. Concerts were performed to honour the young man's bravery and to raise money for those who lost family in the LOCH ARD disaster. Of the 54 crew members and passengers on board, only two survived: the apprentice, Tom Pearce and the young woman passenger, Eva Carmichael, who lost all of her family in the tragedy. Ten days after the LOCH ARD tragedy, salvage rights to the wreck were sold at auction for £2,120. Cargo valued at £3,000 was salvaged and placed on the beach, but most washed back into the sea when another storm developed. The wreck of LOCH ARD still lies at the base of Mutton Bird Island. Much of the cargo has now been salvaged and some was washed up into what is now known as LOCH ARD Gorge. Cargo and artefacts have also been illegally salvaged over many years before protective legislation was introduced. One of the most unlikely pieces of cargo to have survived the shipwreck was a Minton porcelain peacock - one of only seven in the world. The peacock was destined for the Melbourne International Exhibition in 1880. It had been well packed, which gave it adequate protection during the violent storm. Today, the Minton peacock can be seen at the Flagstaff Hill Maritime Museum in Warrnambool. From Australia's most dramatic shipwreck it has now become Australia's most valuable shipwreck artefact and is one of very few 'objects' on the Victorian State Heritage Register. The LOCH ARD shipwreck is of State significance – Victorian Heritage Register S 417. Flagstaff Hill’s collection of artefacts from LOCH ARD is significant for being one of the largest collections of artefacts from this shipwreck in Victoria. It is significant for its association with the shipwreck, which is on the Victorian Heritage Register (VHR S417). The collection is significant because of the relationship between the objects, as together they have a high potential to interpret the story of the LOCH ARD. The LOCH ARD collection is archaeologically significant as the remains of a large international passenger and cargo ship. The LOCH ARD collection is historically significant for representing aspects of Victoria’s shipping history and its potential to interpret sub-theme 1.5 of Victoria’s Framework of Historical Themes (living with natural processes). The collection is also historically significant for its association with the LOCH ARD, which was one of the worst and best known shipwrecks in Victoria’s history. Unrestored tea spoon from the wreck of the LOCH ARD. The spoon design has a flattened fiddle-back handle, with a thin stem or shank, flared collar, and elongated bowl. The spoons metallic composition is a thin layer of brass alloy which has partially corroded back to a nickel-silver base metal. Traces of original electroplating remain with some verdigris. Outlines of three makers marks are visible on lower rear of handle.flagstaff hill, warrnambool, shipwrecked coast, flagstaff hill maritime museum, maritime museum, shipwreck coast, flagstaff hill maritime village, great ocean road, loch line, loch ard, captain gibbs, eva carmichael, tom pearce, glenample station, mutton bird island, loch ard gorge, electroplated cutlery, loch ard shipwreck, nickel silver, william page & co, birmingham, brass plating, makers marks -
 Flagstaff Hill Maritime Museum and Village
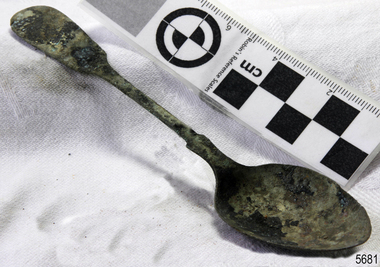
Spoon, circa 1878
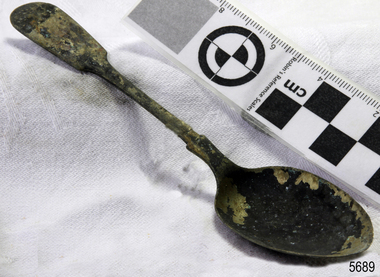
This tea spoon is from the wreck of the LOCH ARD, a Loch Line ship of 1,693 tons which sailed from Gravesend, London, on 2 March 1878 with 17 passengers and a crew of 36 under Captain George Gibbs. “The intention was to discharge cargo in Melbourne, before returning to London via the Horn with wool and wheat”. Instead, on 1 June 1878, after 90 days at sea, she struck the sandstone cliffs of Mutton Bird Island on the south west coast of Victoria, and sank with the loss of 52 lives and all her cargo. The manifest of the LOCH ARD listed an array of manufactured goods and bulk metals being exported to the Colony of Victoria, with a declared value of £53,700. (202 bills of lading show an actual invoice value of £68, 456, with insurance underwriting to £30,000 of all cargo). Included in the manifest is the item of “Tin hardware & cutlery £7,530”. This teaspoon is one of 482 similar items of electro-plated cutlery from the LOCH ARD site, comprising spoons and forks of various sizes but all sharing the same general shape or design and metallic composition. 49 of these pieces display a legible makers’ mark — the initials “W” and “P” placed within a raised diamond outline, which is in turn contained within a sunken crown shape — identifying the manufacturer as William Page & Co of Birmingham. An electroplater’s makers’ marks, unlike sterling silver hallmarks, are not consistent identifiers of quality or date and place of manufacture. A similar line of five impressions was usually made to impress the consumer with an implication of industry standards, but what each one actually signified was not regulated and so they varied according to the whim of the individual foundry. In this case, the maker’s marks are often obscured by sedimentary accretion or removed by corrosion after a century of submersion in the ocean. However sufficient detail has survived to indicate that these samples of electro-plated cutlery probably originated from the same consignment in the LOCH ARD’s cargo. The following descriptions of maker’s marks are drawn from 255 tea spoons, 125 dessert spoons, and 99 table forks. These marks are clearly visible in 66 instances, while the same sequence of general outlines, or depression shapes, is discernible in another 166 examples. 1. A recessed Crown containing a raised Diamond outline and the initials “W” and “P” (the recognised trademark of William Page & Co) 2. An impressed Ellipse containing a raised, pivoted, Triangle in its lower part and bearing a Resurrection Cross on its upper section (a possible dissenting church symbol reflecting religious affiliation); OR a rounded Square impression containing a raised, ‘lazy’, letter “B” (possibly mimicking sterling silver hallmark signifying city of manufacture i.e. Birmingham) 3. An impressed rounded Square filled with a raised Maltese Cross (the base metal composite of nickel silver was also known as ‘German silver’ after its Berlin inventors in 1823) 4. A recessed Circle containing a Crab or Scarab Beetle image; OR a recessed Circle containing a rotated ‘fleur de lys’ or ‘fasces’ design 5. A depressed Diamond shape enclosing a large raised letter “R” and a small raised letter “D” (mimicking the U.K. Patent Office stamp which abbreviated the term ‘registered’ to “RD”, but also included date and class of patent) Suggested trade names for William Page & Co’s particular blend of brass plating are ‘roman silver’ or ‘silverite’. This copper alloy polishes to a lustrous gold when new, discolouring to a murky grey with greenish hue when neglected. HISTORY OF THE LOCH ARD The LOCH ARD belonged to the famous Loch Line which sailed many ships from England to Australia. Built in Glasgow by Barclay, Curdle and Co. in 1873, the LOCH ARD was a three-masted square rigged iron sailing ship. The ship measured 262ft 7" (79.87m) in length, 38ft (11.58m) in width, 23ft (7m) in depth and had a gross tonnage of 1693 tons. The LOCH ARD's main mast measured a massive 150ft (45.7m) in height. LOCH ARD made three trips to Australia and one trip to Calcutta before its final voyage. LOCH ARD left England on March 2, 1878, under the command of Captain Gibbs, a newly married, 29 year old. She was bound for Melbourne with a crew of 37, plus 17 passengers and a load of cargo. The general cargo reflected the affluence of Melbourne at the time. On board were straw hats, umbrella, perfumes, clay pipes, pianos, clocks, confectionary, linen and candles, as well as a heavier load of railway irons, cement, lead and copper. There were items included that intended for display in the Melbourne International Exhibition in 1880. The voyage to Port Phillip was long but uneventful. At 3am on June 1, 1878, Captain Gibbs was expecting to see land and the passengers were becoming excited as they prepared to view their new homeland in the early morning. But LOCH ARD was running into a fog which greatly reduced visibility. Captain Gibbs was becoming anxious as there was no sign of land or the Cape Otway lighthouse. At 4am the fog lifted. A man aloft announced that he could see breakers. The sheer cliffs of Victoria's west coast came into view, and Captain Gibbs realised that the ship was much closer to them than expected. He ordered as much sail to be set as time would permit and then attempted to steer the vessel out to sea. On coming head on into the wind, the ship lost momentum, the sails fell limp and LOCH ARD's bow swung back. Gibbs then ordered the anchors to be released in an attempt to hold its position. The anchors sank some 50 fathoms - but did not hold. By this time LOCH ARD was among the breakers and the tall cliffs of Mutton Bird Island rose behind the ship. Just half a mile from the coast, the ship's bow was suddenly pulled around by the anchor. The captain tried to tack out to sea, but the ship struck a reef at the base of Mutton Bird Island, near Port Campbell. Waves broke over the ship and the top deck was loosened from the hull. The masts and rigging came crashing down knocking passengers and crew overboard. When a lifeboat was finally launched, it crashed into the side of LOCH ARD and capsized. Tom Pearce, who had launched the boat, managed to cling to its overturned hull and shelter beneath it. He drifted out to sea and then on the flood tide came into what is now known as LOCH ARD Gorge. He swam to shore, bruised and dazed, and found a cave in which to shelter. Some of the crew stayed below deck to shelter from the falling rigging but drowned when the ship slipped off the reef into deeper water. Eva Carmichael had raced onto deck to find out what was happening only to be confronted by towering cliffs looming above the stricken ship. In all the chaos, Captain Gibbs grabbed Eva and said, "If you are saved Eva, let my dear wife know that I died like a sailor". That was the last Eva Carmichael saw of the captain. She was swept off the ship by a huge wave. Eva saw Tom Pearce on a small rocky beach and yelled to attract his attention. He dived in and swam to the exhausted woman and dragged her to shore. He took her to the cave and broke open case of brandy which had washed up on the beach. He opened a bottle to revive the unconscious woman. A few hours later Tom scaled a cliff in search of help. He followed hoof prints and came by chance upon two men from nearby Glenample Station three and a half miles away. In a state of exhaustion, he told the men of the tragedy. Tom returned to the gorge while the two men rode back to the station to get help. By the time they reached LOCH ARD Gorge, it was cold and dark. The two shipwreck survivors were taken to Glenample Station to recover. Eva stayed at the station for six weeks before returning to Ireland, this time by steamship. In Melbourne, Tom Pearce received a hero's welcome. He was presented with the first gold medal of the Royal Humane Society of Victoria and a £1000 cheque from the Victorian Government. Concerts were performed to honour the young man's bravery and to raise money for those who lost family in the LOCH ARD disaster. Of the 54 crew members and passengers on board, only two survived: the apprentice, Tom Pearce and the young woman passenger, Eva Carmichael, who lost all of her family in the tragedy. Ten days after the LOCH ARD tragedy, salvage rights to the wreck were sold at auction for £2,120. Cargo valued at £3,000 was salvaged and placed on the beach, but most washed back into the sea when another storm developed. The wreck of LOCH ARD still lies at the base of Mutton Bird Island. Much of the cargo has now been salvaged and some was washed up into what is now known as LOCH ARD Gorge. Cargo and artefacts have also been illegally salvaged over many years before protective legislation was introduced. One of the most unlikely pieces of cargo to have survived the shipwreck was a Minton porcelain peacock - one of only seven in the world. The peacock was destined for the Melbourne International Exhibition in 1880. It had been well packed, which gave it adequate protection during the violent storm. Today, the Minton peacock can be seen at the Flagstaff Hill Maritime Museum in Warrnambool. From Australia's most dramatic shipwreck it has now become Australia's most valuable shipwreck artefact and is one of very few 'objects' on the Victorian State Heritage Register. The LOCH ARD shipwreck is of State significance – Victorian Heritage Register S 417. Flagstaff Hill’s collection of artefacts from LOCH ARD is significant for being one of the largest collections of artefacts from this shipwreck in Victoria. It is significant for its association with the shipwreck, which is on the Victorian Heritage Register (VHR S417). The collection is significant because of the relationship between the objects, as together they have a high potential to interpret the story of the LOCH ARD. The LOCH ARD collection is archaeologically significant as the remains of a large international passenger and cargo ship. The LOCH ARD collection is historically significant for representing aspects of Victoria’s shipping history and its potential to interpret sub-theme 1.5 of Victoria’s Framework of Historical Themes (living with natural processes). The collection is also historically significant for its association with the LOCH ARD, which was one of the worst and best known shipwrecks in Victoria’s history. Unrestored tea spoon from the wreck of the LOCH ARD. The spoon design has a flattened fiddle-back handle, with a thin stem or shank, flared collar, and elongated bowl. The spoons metallic composition is a thin layer of brass alloy which has partially corroded back to a nickel-silver base metal. Approximately 40% of original electroplating remains with some verdigris. Bowl edges are damaged. Three outlines of makers marks are visible on lower rear of handle.flagstaff hill, warrnambool, shipwrecked coast, flagstaff hill maritime museum, maritime museum, shipwreck coast, flagstaff hill maritime village, great ocean road, loch line, loch ard, captain gibbs, eva carmichael, tom pearce, glenample station, mutton bird island, loch ard gorge, electroplated cutlery, loch ard shipwreck, nickel silver, william page & co, birmingham, brass plating, makers marks -
 Flagstaff Hill Maritime Museum and Village
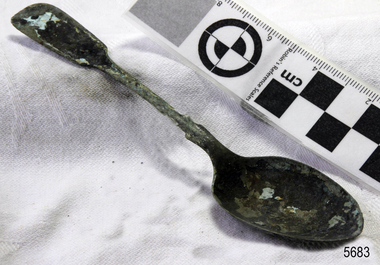
Spoon, circa 1878
This tea spoon is from the wreck of the LOCH ARD, a Loch Line ship of 1,693 tons which sailed from Gravesend, London, on 2 March 1878 with 17 passengers and a crew of 36 under Captain George Gibbs. “The intention was to discharge cargo in Melbourne, before returning to London via the Horn with wool and wheat”. Instead, on 1 June 1878, after 90 days at sea, she struck the sandstone cliffs of Mutton Bird Island on the south west coast of Victoria, and sank with the loss of 52 lives and all her cargo. The manifest of the LOCH ARD listed an array of manufactured goods and bulk metals being exported to the Colony of Victoria, with a declared value of £53,700. (202 bills of lading show an actual invoice value of £68, 456, with insurance underwriting to £30,000 of all cargo). Included in the manifest is the item of “Tin hardware & cutlery £7,530”. This teaspoon is one of 482 similar items of electro-plated cutlery from the LOCH ARD site, comprising spoons and forks of various sizes but all sharing the same general shape or design and metallic composition. 49 of these pieces display a legible makers’ mark — the initials “W” and “P” placed within a raised diamond outline, which is in turn contained within a sunken crown shape — identifying the manufacturer as William Page & Co of Birmingham. An electroplater’s makers’ marks, unlike sterling silver hallmarks, are not consistent identifiers of quality or date and place of manufacture. A similar line of five impressions was usually made to impress the consumer with an implication of industry standards, but what each one actually signified was not regulated and so they varied according to the whim of the individual foundry. In this case, the maker’s marks are often obscured by sedimentary accretion or removed by corrosion after a century of submersion in the ocean. However sufficient detail has survived to indicate that these samples of electro-plated cutlery probably originated from the same consignment in the LOCH ARD’s cargo. The following descriptions of maker’s marks are drawn from 255 tea spoons, 125 dessert spoons, and 99 table forks. These marks are clearly visible in 66 instances, while the same sequence of general outlines, or depression shapes, is discernible in another 166 examples. 1. A recessed Crown containing a raised Diamond outline and the initials “W” and “P” (the recognised trademark of William Page & Co) 2. An impressed Ellipse containing a raised, pivoted, Triangle in its lower part and bearing a Resurrection Cross on its upper section (a possible dissenting church symbol reflecting religious affiliation); OR a rounded Square impression containing a raised, ‘lazy’, letter “B” (possibly mimicking sterling silver hallmark signifying city of manufacture i.e. Birmingham) 3. An impressed rounded Square filled with a raised Maltese Cross (the base metal composite of nickel silver was also known as ‘German silver’ after its Berlin inventors in 1823) 4. A recessed Circle containing a Crab or Scarab Beetle image; OR a recessed Circle containing a rotated ‘fleur de lys’ or ‘fasces’ design 5. A depressed Diamond shape enclosing a large raised letter “R” and a small raised letter “D” (mimicking the U.K. Patent Office stamp which abbreviated the term ‘registered’ to “RD”, but also included date and class of patent) Suggested trade names for William Page & Co’s particular blend of brass plating are ‘roman silver’ or ‘silverite’. This copper alloy polishes to a lustrous gold when new, discolouring to a murky grey with greenish hue when neglected. HISTORY OF THE LOCH ARD The LOCH ARD belonged to the famous Loch Line which sailed many ships from England to Australia. Built in Glasgow by Barclay, Curdle and Co. in 1873, the LOCH ARD was a three-masted square rigged iron sailing ship. The ship measured 262ft 7" (79.87m) in length, 38ft (11.58m) in width, 23ft (7m) in depth and had a gross tonnage of 1693 tons. The LOCH ARD's main mast measured a massive 150ft (45.7m) in height. LOCH ARD made three trips to Australia and one trip to Calcutta before its final voyage. LOCH ARD left England on March 2, 1878, under the command of Captain Gibbs, a newly married, 29 year old. She was bound for Melbourne with a crew of 37, plus 17 passengers and a load of cargo. The general cargo reflected the affluence of Melbourne at the time. On board were straw hats, umbrella, perfumes, clay pipes, pianos, clocks, confectionary, linen and candles, as well as a heavier load of railway irons, cement, lead and copper. There were items included that intended for display in the Melbourne International Exhibition in 1880. The voyage to Port Phillip was long but uneventful. At 3am on June 1, 1878, Captain Gibbs was expecting to see land and the passengers were becoming excited as they prepared to view their new homeland in the early morning. But LOCH ARD was running into a fog which greatly reduced visibility. Captain Gibbs was becoming anxious as there was no sign of land or the Cape Otway lighthouse. At 4am the fog lifted. A man aloft announced that he could see breakers. The sheer cliffs of Victoria's west coast came into view, and Captain Gibbs realised that the ship was much closer to them than expected. He ordered as much sail to be set as time would permit and then attempted to steer the vessel out to sea. On coming head on into the wind, the ship lost momentum, the sails fell limp and LOCH ARD's bow swung back. Gibbs then ordered the anchors to be released in an attempt to hold its position. The anchors sank some 50 fathoms - but did not hold. By this time LOCH ARD was among the breakers and the tall cliffs of Mutton Bird Island rose behind the ship. Just half a mile from the coast, the ship's bow was suddenly pulled around by the anchor. The captain tried to tack out to sea, but the ship struck a reef at the base of Mutton Bird Island, near Port Campbell. Waves broke over the ship and the top deck was loosened from the hull. The masts and rigging came crashing down knocking passengers and crew overboard. When a lifeboat was finally launched, it crashed into the side of LOCH ARD and capsized. Tom Pearce, who had launched the boat, managed to cling to its overturned hull and shelter beneath it. He drifted out to sea and then on the flood tide came into what is now known as LOCH ARD Gorge. He swam to shore, bruised and dazed, and found a cave in which to shelter. Some of the crew stayed below deck to shelter from the falling rigging but drowned when the ship slipped off the reef into deeper water. Eva Carmichael had raced onto deck to find out what was happening only to be confronted by towering cliffs looming above the stricken ship. In all the chaos, Captain Gibbs grabbed Eva and said, "If you are saved Eva, let my dear wife know that I died like a sailor". That was the last Eva Carmichael saw of the captain. She was swept off the ship by a huge wave. Eva saw Tom Pearce on a small rocky beach and yelled to attract his attention. He dived in and swam to the exhausted woman and dragged her to shore. He took her to the cave and broke open case of brandy which had washed up on the beach. He opened a bottle to revive the unconscious woman. A few hours later Tom scaled a cliff in search of help. He followed hoof prints and came by chance upon two men from nearby Glenample Station three and a half miles away. In a state of exhaustion, he told the men of the tragedy. Tom returned to the gorge while the two men rode back to the station to get help. By the time they reached LOCH ARD Gorge, it was cold and dark. The two shipwreck survivors were taken to Glenample Station to recover. Eva stayed at the station for six weeks before returning to Ireland, this time by steamship. In Melbourne, Tom Pearce received a hero's welcome. He was presented with the first gold medal of the Royal Humane Society of Victoria and a £1000 cheque from the Victorian Government. Concerts were performed to honour the young man's bravery and to raise money for those who lost family in the LOCH ARD disaster. Of the 54 crew members and passengers on board, only two survived: the apprentice, Tom Pearce and the young woman passenger, Eva Carmichael, who lost all of her family in the tragedy. Ten days after the LOCH ARD tragedy, salvage rights to the wreck were sold at auction for £2,120. Cargo valued at £3,000 was salvaged and placed on the beach, but most washed back into the sea when another storm developed. The wreck of LOCH ARD still lies at the base of Mutton Bird Island. Much of the cargo has now been salvaged and some was washed up into what is now known as LOCH ARD Gorge. Cargo and artefacts have also been illegally salvaged over many years before protective legislation was introduced. One of the most unlikely pieces of cargo to have survived the shipwreck was a Minton porcelain peacock - one of only seven in the world. The peacock was destined for the Melbourne International Exhibition in 1880. It had been well packed, which gave it adequate protection during the violent storm. Today, the Minton peacock can be seen at the Flagstaff Hill Maritime Museum in Warrnambool. From Australia's most dramatic shipwreck it has now become Australia's most valuable shipwreck artefact and is one of very few 'objects' on the Victorian State Heritage Register. The LOCH ARD shipwreck is of State significance – Victorian Heritage Register S 417. Flagstaff Hill’s collection of artefacts from LOCH ARD is significant for being one of the largest collections of artefacts from this shipwreck in Victoria. It is significant for its association with the shipwreck, which is on the Victorian Heritage Register (VHR S417). The collection is significant because of the relationship between the objects, as together they have a high potential to interpret the story of the LOCH ARD. The LOCH ARD collection is archaeologically significant as the remains of a large international passenger and cargo ship. The LOCH ARD collection is historically significant for representing aspects of Victoria’s shipping history and its potential to interpret sub-theme 1.5 of Victoria’s Framework of Historical Themes (living with natural processes). The collection is also historically significant for its association with the LOCH ARD, which was one of the worst and best known shipwrecks in Victoria’s history. Unrestored tea spoon from the wreck of the LOCH ARD. The spoon design has a flattened fiddle-back handle, with a thin stem or shank, flared collar, and elongated bowl. The spoons metallic composition is a thin layer of brass alloy which has partially corroded back to a nickel-silver base metal. Only 30% of original electroplating remains with some verdigris. Outlines of five makers marks are visible on lower rear of handle.flagstaff hill, warrnambool, shipwrecked coast, flagstaff hill maritime museum, maritime museum, shipwreck coast, flagstaff hill maritime village, great ocean road, loch line, loch ard, captain gibbs, eva carmichael, tom pearce, glenample station, mutton bird island, loch ard gorge, electroplated cutlery, loch ard shipwreck, nickel silver, william page & co, birmingham, brass plating, makers marks -
 Flagstaff Hill Maritime Museum and Village
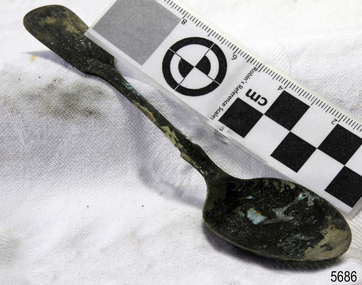
Spoon, circa 1878
This tea spoon is from the wreck of the LOCH ARD, a Loch Line ship of 1,693 tons which sailed from Gravesend, London, on 2 March 1878 with 17 passengers and a crew of 36 under Captain George Gibbs. “The intention was to discharge cargo in Melbourne, before returning to London via the Horn with wool and wheat”. Instead, on 1 June 1878, after 90 days at sea, she struck the sandstone cliffs of Mutton Bird Island on the south west coast of Victoria, and sank with the loss of 52 lives and all her cargo. The manifest of the LOCH ARD listed an array of manufactured goods and bulk metals being exported to the Colony of Victoria, with a declared value of £53,700. (202 bills of lading show an actual invoice value of £68, 456, with insurance underwriting to £30,000 of all cargo). Included in the manifest is the item of “Tin hardware & cutlery £7,530”. This teaspoon is one of 482 similar items of electro-plated cutlery from the LOCH ARD site, comprising spoons and forks of various sizes but all sharing the same general shape or design and metallic composition. 49 of these pieces display a legible makers’ mark — the initials “W” and “P” placed within a raised diamond outline, which is in turn contained within a sunken crown shape — identifying the manufacturer as William Page & Co of Birmingham. An electroplater’s makers’ marks, unlike sterling silver hallmarks, are not consistent identifiers of quality or date and place of manufacture. A similar line of five impressions was usually made to impress the consumer with an implication of industry standards, but what each one actually signified was not regulated and so they varied according to the whim of the individual foundry. In this case, the maker’s marks are often obscured by sedimentary accretion or removed by corrosion after a century of submersion in the ocean. However sufficient detail has survived to indicate that these samples of electro-plated cutlery probably originated from the same consignment in the LOCH ARD’s cargo. The following descriptions of maker’s marks are drawn from 255 tea spoons, 125 dessert spoons, and 99 table forks. These marks are clearly visible in 66 instances, while the same sequence of general outlines, or depression shapes, is discernible in another 166 examples. 1. A recessed Crown containing a raised Diamond outline and the initials “W” and “P” (the recognised trademark of William Page & Co) 2. An impressed Ellipse containing a raised, pivoted, Triangle in its lower part and bearing a Resurrection Cross on its upper section (a possible dissenting church symbol reflecting religious affiliation); OR a rounded Square impression containing a raised, ‘lazy’, letter “B” (possibly mimicking sterling silver hallmark signifying city of manufacture i.e. Birmingham) 3. An impressed rounded Square filled with a raised Maltese Cross (the base metal composite of nickel silver was also known as ‘German silver’ after its Berlin inventors in 1823) 4. A recessed Circle containing a Crab or Scarab Beetle image; OR a recessed Circle containing a rotated ‘fleur de lys’ or ‘fasces’ design 5. A depressed Diamond shape enclosing a large raised letter “R” and a small raised letter “D” (mimicking the U.K. Patent Office stamp which abbreviated the term ‘registered’ to “RD”, but also included date and class of patent) Suggested trade names for William Page & Co’s particular blend of brass plating are ‘roman silver’ or ‘silverite’. This copper alloy polishes to a lustrous gold when new, discolouring to a murky grey with greenish hue when neglected. HISTORY OF THE LOCH ARD The LOCH ARD belonged to the famous Loch Line which sailed many ships from England to Australia. Built in Glasgow by Barclay, Curdle and Co. in 1873, the LOCH ARD was a three-masted square rigged iron sailing ship. The ship measured 262ft 7" (79.87m) in length, 38ft (11.58m) in width, 23ft (7m) in depth and had a gross tonnage of 1693 tons. The LOCH ARD's main mast measured a massive 150ft (45.7m) in height. LOCH ARD made three trips to Australia and one trip to Calcutta before its final voyage. LOCH ARD left England on March 2, 1878, under the command of Captain Gibbs, a newly married, 29 year old. She was bound for Melbourne with a crew of 37, plus 17 passengers and a load of cargo. The general cargo reflected the affluence of Melbourne at the time. On board were straw hats, umbrella, perfumes, clay pipes, pianos, clocks, confectionary, linen and candles, as well as a heavier load of railway irons, cement, lead and copper. There were items included that intended for display in the Melbourne International Exhibition in 1880. The voyage to Port Phillip was long but uneventful. At 3am on June 1, 1878, Captain Gibbs was expecting to see land and the passengers were becoming excited as they prepared to view their new homeland in the early morning. But LOCH ARD was running into a fog which greatly reduced visibility. Captain Gibbs was becoming anxious as there was no sign of land or the Cape Otway lighthouse. At 4am the fog lifted. A man aloft announced that he could see breakers. The sheer cliffs of Victoria's west coast came into view, and Captain Gibbs realised that the ship was much closer to them than expected. He ordered as much sail to be set as time would permit and then attempted to steer the vessel out to sea. On coming head on into the wind, the ship lost momentum, the sails fell limp and LOCH ARD's bow swung back. Gibbs then ordered the anchors to be released in an attempt to hold its position. The anchors sank some 50 fathoms - but did not hold. By this time LOCH ARD was among the breakers and the tall cliffs of Mutton Bird Island rose behind the ship. Just half a mile from the coast, the ship's bow was suddenly pulled around by the anchor. The captain tried to tack out to sea, but the ship struck a reef at the base of Mutton Bird Island, near Port Campbell. Waves broke over the ship and the top deck was loosened from the hull. The masts and rigging came crashing down knocking passengers and crew overboard. When a lifeboat was finally launched, it crashed into the side of LOCH ARD and capsized. Tom Pearce, who had launched the boat, managed to cling to its overturned hull and shelter beneath it. He drifted out to sea and then on the flood tide came into what is now known as LOCH ARD Gorge. He swam to shore, bruised and dazed, and found a cave in which to shelter. Some of the crew stayed below deck to shelter from the falling rigging but drowned when the ship slipped off the reef into deeper water. Eva Carmichael had raced onto deck to find out what was happening only to be confronted by towering cliffs looming above the stricken ship. In all the chaos, Captain Gibbs grabbed Eva and said, "If you are saved Eva, let my dear wife know that I died like a sailor". That was the last Eva Carmichael saw of the captain. She was swept off the ship by a huge wave. Eva saw Tom Pearce on a small rocky beach and yelled to attract his attention. He dived in and swam to the exhausted woman and dragged her to shore. He took her to the cave and broke open case of brandy which had washed up on the beach. He opened a bottle to revive the unconscious woman. A few hours later Tom scaled a cliff in search of help. He followed hoof prints and came by chance upon two men from nearby Glenample Station three and a half miles away. In a state of exhaustion, he told the men of the tragedy. Tom returned to the gorge while the two men rode back to the station to get help. By the time they reached LOCH ARD Gorge, it was cold and dark. The two shipwreck survivors were taken to Glenample Station to recover. Eva stayed at the station for six weeks before returning to Ireland, this time by steamship. In Melbourne, Tom Pearce received a hero's welcome. He was presented with the first gold medal of the Royal Humane Society of Victoria and a £1000 cheque from the Victorian Government. Concerts were performed to honour the young man's bravery and to raise money for those who lost family in the LOCH ARD disaster. Of the 54 crew members and passengers on board, only two survived: the apprentice, Tom Pearce and the young woman passenger, Eva Carmichael, who lost all of her family in the tragedy. Ten days after the LOCH ARD tragedy, salvage rights to the wreck were sold at auction for £2,120. Cargo valued at £3,000 was salvaged and placed on the beach, but most washed back into the sea when another storm developed. The wreck of LOCH ARD still lies at the base of Mutton Bird Island. Much of the cargo has now been salvaged and some was washed up into what is now known as LOCH ARD Gorge. Cargo and artefacts have also been illegally salvaged over many years before protective legislation was introduced. One of the most unlikely pieces of cargo to have survived the shipwreck was a Minton porcelain peacock - one of only seven in the world. The peacock was destined for the Melbourne International Exhibition in 1880. It had been well packed, which gave it adequate protection during the violent storm. Today, the Minton peacock can be seen at the Flagstaff Hill Maritime Museum in Warrnambool. From Australia's most dramatic shipwreck it has now become Australia's most valuable shipwreck artefact and is one of very few 'objects' on the Victorian State Heritage Register. The LOCH ARD shipwreck is of State significance – Victorian Heritage Register S 417. Flagstaff Hill’s collection of artefacts from LOCH ARD is significant for being one of the largest collections of artefacts from this shipwreck in Victoria. It is significant for its association with the shipwreck, which is on the Victorian Heritage Register (VHR S417). The collection is significant because of the relationship between the objects, as together they have a high potential to interpret the story of the LOCH ARD. The LOCH ARD collection is archaeologically significant as the remains of a large international passenger and cargo ship. The LOCH ARD collection is historically significant for representing aspects of Victoria’s shipping history and its potential to interpret sub-theme 1.5 of Victoria’s Framework of Historical Themes (living with natural processes). The collection is also historically significant for its association with the LOCH ARD, which was one of the worst and best known shipwrecks in Victoria’s history. Unrestored tea spoon from the wreck of the LOCH ARD. The spoon design has a flattened fiddle-back handle, with a thin stem or shank, flared collar, and elongated bowl. The spoons metallic composition is a thin layer of brass alloy which has partially corroded back to a nickel-silver base metal. Traces of original electroplating remain (15%) with some verdigris (15%). Spoon has worn edges.flagstaff hill, warrnambool, shipwrecked coast, flagstaff hill maritime museum, maritime museum, shipwreck coast, flagstaff hill maritime village, great ocean road, loch line, loch ard, captain gibbs, eva carmichael, tom pearce, glenample station, mutton bird island, loch ard gorge, electroplated cutlery, loch ard shipwreck, nickel silver, william page & co, birmingham, brass plating, makers marks -
 Flagstaff Hill Maritime Museum and Village
Spoon, circa 1878
This tea spoon is from the wreck of the LOCH ARD, a Loch Line ship of 1,693 tons which sailed from Gravesend, London, on 2 March 1878 with 17 passengers and a crew of 36 under Captain George Gibbs. “The intention was to discharge cargo in Melbourne, before returning to London via the Horn with wool and wheat”. Instead, on 1 June 1878, after 90 days at sea, she struck the sandstone cliffs of Mutton Bird Island on the south west coast of Victoria, and sank with the loss of 52 lives and all her cargo. The manifest of the LOCH ARD listed an array of manufactured goods and bulk metals being exported to the Colony of Victoria, with a declared value of £53,700. (202 bills of lading show an actual invoice value of £68, 456, with insurance underwriting to £30,000 of all cargo). Included in the manifest is the item of “Tin hardware & cutlery £7,530”. This teaspoon is one of 482 similar items of electro-plated cutlery from the LOCH ARD site, comprising spoons and forks of various sizes but all sharing the same general shape or design and metallic composition. 49 of these pieces display a legible makers’ mark — the initials “W” and “P” placed within a raised diamond outline, which is in turn contained within a sunken crown shape — identifying the manufacturer as William Page & Co of Birmingham. An electroplater’s makers’ marks, unlike sterling silver hallmarks, are not consistent identifiers of quality or date and place of manufacture. A similar line of five impressions was usually made to impress the consumer with an implication of industry standards, but what each one actually signified was not regulated and so they varied according to the whim of the individual foundry. In this case, the maker’s marks are often obscured by sedimentary accretion or removed by corrosion after a century of submersion in the ocean. However sufficient detail has survived to indicate that these samples of electro-plated cutlery probably originated from the same consignment in the LOCH ARD’s cargo. The following descriptions of maker’s marks are drawn from 255 tea spoons, 125 dessert spoons, and 99 table forks. These marks are clearly visible in 66 instances, while the same sequence of general outlines, or depression shapes, is discernible in another 166 examples. 1. A recessed Crown containing a raised Diamond outline and the initials “W” and “P” (the recognised trademark of William Page & Co) 2. An impressed Ellipse containing a raised, pivoted, Triangle in its lower part and bearing a Resurrection Cross on its upper section (a possible dissenting church symbol reflecting religious affiliation); OR a rounded Square impression containing a raised, ‘lazy’, letter “B” (possibly mimicking sterling silver hallmark signifying city of manufacture i.e. Birmingham) 3. An impressed rounded Square filled with a raised Maltese Cross (the base metal composite of nickel silver was also known as ‘German silver’ after its Berlin inventors in 1823) 4. A recessed Circle containing a Crab or Scarab Beetle image; OR a recessed Circle containing a rotated ‘fleur de lys’ or ‘fasces’ design 5. A depressed Diamond shape enclosing a large raised letter “R” and a small raised letter “D” (mimicking the U.K. Patent Office stamp which abbreviated the term ‘registered’ to “RD”, but also included date and class of patent) Suggested trade names for William Page & Co’s particular blend of brass plating are ‘roman silver’ or ‘silverite’. This copper alloy polishes to a lustrous gold when new, discolouring to a murky grey with greenish hue when neglected. HISTORY OF THE LOCH ARD The LOCH ARD belonged to the famous Loch Line which sailed many ships from England to Australia. Built in Glasgow by Barclay, Curdle and Co. in 1873, the LOCH ARD was a three-masted square rigged iron sailing ship. The ship measured 262ft 7" (79.87m) in length, 38ft (11.58m) in width, 23ft (7m) in depth and had a gross tonnage of 1693 tons. The LOCH ARD's main mast measured a massive 150ft (45.7m) in height. LOCH ARD made three trips to Australia and one trip to Calcutta before its final voyage. LOCH ARD left England on March 2, 1878, under the command of Captain Gibbs, a newly married, 29 year old. She was bound for Melbourne with a crew of 37, plus 17 passengers and a load of cargo. The general cargo reflected the affluence of Melbourne at the time. On board were straw hats, umbrella, perfumes, clay pipes, pianos, clocks, confectionary, linen and candles, as well as a heavier load of railway irons, cement, lead and copper. There were items included that intended for display in the Melbourne International Exhibition in 1880. The voyage to Port Phillip was long but uneventful. At 3am on June 1, 1878, Captain Gibbs was expecting to see land and the passengers were becoming excited as they prepared to view their new homeland in the early morning. But LOCH ARD was running into a fog which greatly reduced visibility. Captain Gibbs was becoming anxious as there was no sign of land or the Cape Otway lighthouse. At 4am the fog lifted. A man aloft announced that he could see breakers. The sheer cliffs of Victoria's west coast came into view, and Captain Gibbs realised that the ship was much closer to them than expected. He ordered as much sail to be set as time would permit and then attempted to steer the vessel out to sea. On coming head on into the wind, the ship lost momentum, the sails fell limp and LOCH ARD's bow swung back. Gibbs then ordered the anchors to be released in an attempt to hold its position. The anchors sank some 50 fathoms - but did not hold. By this time LOCH ARD was among the breakers and the tall cliffs of Mutton Bird Island rose behind the ship. Just half a mile from the coast, the ship's bow was suddenly pulled around by the anchor. The captain tried to tack out to sea, but the ship struck a reef at the base of Mutton Bird Island, near Port Campbell. Waves broke over the ship and the top deck was loosened from the hull. The masts and rigging came crashing down knocking passengers and crew overboard. When a lifeboat was finally launched, it crashed into the side of LOCH ARD and capsized. Tom Pearce, who had launched the boat, managed to cling to its overturned hull and shelter beneath it. He drifted out to sea and then on the flood tide came into what is now known as LOCH ARD Gorge. He swam to shore, bruised and dazed, and found a cave in which to shelter. Some of the crew stayed below deck to shelter from the falling rigging but drowned when the ship slipped off the reef into deeper water. Eva Carmichael had raced onto deck to find out what was happening only to be confronted by towering cliffs looming above the stricken ship. In all the chaos, Captain Gibbs grabbed Eva and said, "If you are saved Eva, let my dear wife know that I died like a sailor". That was the last Eva Carmichael saw of the captain. She was swept off the ship by a huge wave. Eva saw Tom Pearce on a small rocky beach and yelled to attract his attention. He dived in and swam to the exhausted woman and dragged her to shore. He took her to the cave and broke open case of brandy which had washed up on the beach. He opened a bottle to revive the unconscious woman. A few hours later Tom scaled a cliff in search of help. He followed hoof prints and came by chance upon two men from nearby Glenample Station three and a half miles away. In a state of exhaustion, he told the men of the tragedy. Tom returned to the gorge while the two men rode back to the station to get help. By the time they reached LOCH ARD Gorge, it was cold and dark. The two shipwreck survivors were taken to Glenample Station to recover. Eva stayed at the station for six weeks before returning to Ireland, this time by steamship. In Melbourne, Tom Pearce received a hero's welcome. He was presented with the first gold medal of the Royal Humane Society of Victoria and a £1000 cheque from the Victorian Government. Concerts were performed to honour the young man's bravery and to raise money for those who lost family in the LOCH ARD disaster. Of the 54 crew members and passengers on board, only two survived: the apprentice, Tom Pearce and the young woman passenger, Eva Carmichael, who lost all of her family in the tragedy. Ten days after the LOCH ARD tragedy, salvage rights to the wreck were sold at auction for £2,120. Cargo valued at £3,000 was salvaged and placed on the beach, but most washed back into the sea when another storm developed. The wreck of LOCH ARD still lies at the base of Mutton Bird Island. Much of the cargo has now been salvaged and some was washed up into what is now known as LOCH ARD Gorge. Cargo and artefacts have also been illegally salvaged over many years before protective legislation was introduced. One of the most unlikely pieces of cargo to have survived the shipwreck was a Minton porcelain peacock - one of only seven in the world. The peacock was destined for the Melbourne International Exhibition in 1880. It had been well packed, which gave it adequate protection during the violent storm. Today, the Minton peacock can be seen at the Flagstaff Hill Maritime Museum in Warrnambool. From Australia's most dramatic shipwreck it has now become Australia's most valuable shipwreck artefact and is one of very few 'objects' on the Victorian State Heritage Register. The LOCH ARD shipwreck is of State significance – Victorian Heritage Register S 417. Flagstaff Hill’s collection of artefacts from LOCH ARD is significant for being one of the largest collections of artefacts from this shipwreck in Victoria. It is significant for its association with the shipwreck, which is on the Victorian Heritage Register (VHR S417). The collection is significant because of the relationship between the objects, as together they have a high potential to interpret the story of the LOCH ARD. The LOCH ARD collection is archaeologically significant as the remains of a large international passenger and cargo ship. The LOCH ARD collection is historically significant for representing aspects of Victoria’s shipping history and its potential to interpret sub-theme 1.5 of Victoria’s Framework of Historical Themes (living with natural processes). The collection is also historically significant for its association with the LOCH ARD, which was one of the worst and best known shipwrecks in Victoria’s history. Unrestored tea spoon from the wreck of the LOCH ARD. The spoon design has a flattened fiddle-back handle, with a thin stem or shank, flared collar, and elongated bowl. The spoons metallic composition is a thin layer of brass alloy which has partially corroded back to a nickel-silver base metal. Only 15% of original electroplating remains with bright vertigris on 5% of spoon surface.flagstaff hill, warrnambool, shipwrecked coast, flagstaff hill maritime museum, maritime museum, shipwreck coast, flagstaff hill maritime village, great ocean road, loch line, loch ard, captain gibbs, eva carmichael, tom pearce, glenample station, mutton bird island, loch ard gorge, electroplated cutlery, loch ard shipwreck, nickel silver, william page & co, birmingham, brass plating, makers marks -
 Flagstaff Hill Maritime Museum and Village
Domestic object - Spoon, circa 1878
This tea spoon is from the wreck of the LOCH ARD, a Loch Line ship of 1,693 tons which sailed from Gravesend, London, on 2 March 1878 with 17 passengers and a crew of 36 under Captain George Gibbs. “The intention was to discharge cargo in Melbourne, before returning to London via the Horn with wool and wheat”. Instead, on 1 June 1878, after 90 days at sea, she struck the sandstone cliffs of Mutton Bird Island on the south west coast of Victoria, and sank with the loss of 52 lives and all her cargo. The manifest of the LOCH ARD listed an array of manufactured goods and bulk metals being exported to the Colony of Victoria, with a declared value of £53,700. (202 bills of lading show an actual invoice value of £68, 456, with insurance underwriting to £30,000 of all cargo). Included in the manifest is the item of “Tin hardware & cutlery £7,530”. This teaspoon is one of 482 similar items of electro-plated cutlery from the LOCH ARD site, comprising spoons and forks of various sizes but all sharing the same general shape or design and metallic composition. 49 of these pieces display a legible makers’ mark — the initials “W” and “P” placed within a raised diamond outline, which is in turn contained within a sunken crown shape — identifying the manufacturer as William Page & Co of Birmingham. An electroplater’s makers’ marks, unlike sterling silver hallmarks, are not consistent identifiers of quality or date and place of manufacture. A similar line of five impressions was usually made to impress the consumer with an implication of industry standards, but what each one actually signified was not regulated and so they varied according to the whim of the individual foundry. In this case, the maker’s marks are often obscured by sedimentary accretion or removed by corrosion after a century of submersion in the ocean. However sufficient detail has survived to indicate that these samples of electro-plated cutlery probably originated from the same consignment in the LOCH ARD’s cargo. The following descriptions of maker’s marks are drawn from 255 tea spoons, 125 dessert spoons, and 99 table forks. These marks are clearly visible in 66 instances, while the same sequence of general outlines, or depression shapes, is discernible in another 166 examples. 1. A recessed Crown containing a raised Diamond outline and the initials “W” and “P” (the recognised trademark of William Page & Co) 2. An impressed Ellipse containing a raised, pivoted, Triangle in its lower part and bearing a Resurrection Cross on its upper section (a possible dissenting church symbol reflecting religious affiliation); OR a rounded Square impression containing a raised, ‘lazy’, letter “B” (possibly mimicking sterling silver hallmark signifying city of manufacture i.e. Birmingham) 3. An impressed rounded Square filled with a raised Maltese Cross (the base metal composite of nickel silver was also known as ‘German silver’ after its Berlin inventors in 1823) 4. A recessed Circle containing a Crab or Scarab Beetle image; OR a recessed Circle containing a rotated ‘fleur de lys’ or ‘fasces’ design 5. A depressed Diamond shape enclosing a large raised letter “R” and a small raised letter “D” (mimicking the U.K. Patent Office stamp which abbreviated the term ‘registered’ to “RD”, but also included date and class of patent) Suggested trade names for William Page & Co’s particular blend of brass plating are ‘roman silver’ or ‘silverite’. This copper alloy polishes to a lustrous gold when new, discolouring to a murky grey with greenish hue when neglected. HISTORY OF THE LOCH ARD The LOCH ARD belonged to the famous Loch Line which sailed many ships from England to Australia. Built in Glasgow by Barclay, Curdle and Co. in 1873, the LOCH ARD was a three-masted square rigged iron sailing ship. The ship measured 262ft 7" (79.87m) in length, 38ft (11.58m) in width, 23ft (7m) in depth and had a gross tonnage of 1693 tons. The LOCH ARD's main mast measured a massive 150ft (45.7m) in height. LOCH ARD made three trips to Australia and one trip to Calcutta before its final voyage. LOCH ARD left England on March 2, 1878, under the command of Captain Gibbs, a newly married, 29 year old. She was bound for Melbourne with a crew of 37, plus 17 passengers and a load of cargo. The general cargo reflected the affluence of Melbourne at the time. On board were straw hats, umbrella, perfumes, clay pipes, pianos, clocks, confectionary, linen and candles, as well as a heavier load of railway irons, cement, lead and copper. There were items included that intended for display in the Melbourne International Exhibition in 1880. The voyage to Port Phillip was long but uneventful. At 3am on June 1, 1878, Captain Gibbs was expecting to see land and the passengers were becoming excited as they prepared to view their new homeland in the early morning. But LOCH ARD was running into a fog which greatly reduced visibility. Captain Gibbs was becoming anxious as there was no sign of land or the Cape Otway lighthouse. At 4am the fog lifted. A man aloft announced that he could see breakers. The sheer cliffs of Victoria's west coast came into view, and Captain Gibbs realised that the ship was much closer to them than expected. He ordered as much sail to be set as time would permit and then attempted to steer the vessel out to sea. On coming head on into the wind, the ship lost momentum, the sails fell limp and LOCH ARD's bow swung back. Gibbs then ordered the anchors to be released in an attempt to hold its position. The anchors sank some 50 fathoms - but did not hold. By this time LOCH ARD was among the breakers and the tall cliffs of Mutton Bird Island rose behind the ship. Just half a mile from the coast, the ship's bow was suddenly pulled around by the anchor. The captain tried to tack out to sea, but the ship struck a reef at the base of Mutton Bird Island, near Port Campbell. Waves broke over the ship and the top deck was loosened from the hull. The masts and rigging came crashing down knocking passengers and crew overboard. When a lifeboat was finally launched, it crashed into the side of LOCH ARD and capsized. Tom Pearce, who had launched the boat, managed to cling to its overturned hull and shelter beneath it. He drifted out to sea and then on the flood tide came into what is now known as LOCH ARD Gorge. He swam to shore, bruised and dazed, and found a cave in which to shelter. Some of the crew stayed below deck to shelter from the falling rigging but drowned when the ship slipped off the reef into deeper water. Eva Carmichael had raced onto deck to find out what was happening only to be confronted by towering cliffs looming above the stricken ship. In all the chaos, Captain Gibbs grabbed Eva and said, "If you are saved Eva, let my dear wife know that I died like a sailor". That was the last Eva Carmichael saw of the captain. She was swept off the ship by a huge wave. Eva saw Tom Pearce on a small rocky beach and yelled to attract his attention. He dived in and swam to the exhausted woman and dragged her to shore. He took her to the cave and broke open case of brandy which had washed up on the beach. He opened a bottle to revive the unconscious woman. A few hours later Tom scaled a cliff in search of help. He followed hoof prints and came by chance upon two men from nearby Glenample Station three and a half miles away. In a state of exhaustion, he told the men of the tragedy. Tom returned to the gorge while the two men rode back to the station to get help. By the time they reached LOCH ARD Gorge, it was cold and dark. The two shipwreck survivors were taken to Glenample Station to recover. Eva stayed at the station for six weeks before returning to Ireland, this time by steamship. In Melbourne, Tom Pearce received a hero's welcome. He was presented with the first gold medal of the Royal Humane Society of Victoria and a £1000 cheque from the Victorian Government. Concerts were performed to honour the young man's bravery and to raise money for those who lost family in the LOCH ARD disaster. Of the 54 crew members and passengers on board, only two survived: the apprentice, Tom Pearce and the young woman passenger, Eva Carmichael, who lost all of her family in the tragedy. Ten days after the LOCH ARD tragedy, salvage rights to the wreck were sold at auction for £2,120. Cargo valued at £3,000 was salvaged and placed on the beach, but most washed back into the sea when another storm developed. The wreck of LOCH ARD still lies at the base of Mutton Bird Island. Much of the cargo has now been salvaged and some was washed up into what is now known as LOCH ARD Gorge. Cargo and artefacts have also been illegally salvaged over many years before protective legislation was introduced. One of the most unlikely pieces of cargo to have survived the shipwreck was a Minton porcelain peacock - one of only seven in the world. The peacock was destined for the Melbourne International Exhibition in 1880. It had been well packed, which gave it adequate protection during the violent storm. Today, the Minton peacock can be seen at the Flagstaff Hill Maritime Museum in Warrnambool. From Australia's most dramatic shipwreck it has now become Australia's most valuable shipwreck artefact and is one of very few 'objects' on the Victorian State Heritage Register. The LOCH ARD shipwreck is of State significance – Victorian Heritage Register S 417. Flagstaff Hill’s collection of artefacts from LOCH ARD is significant for being one of the largest collections of artefacts from this shipwreck in Victoria. It is significant for its association with the shipwreck, which is on the Victorian Heritage Register (VHR S417). The collection is significant because of the relationship between the objects, as together they have a high potential to interpret the story of the LOCH ARD. The LOCH ARD collection is archaeologically significant as the remains of a large international passenger and cargo ship. The LOCH ARD collection is historically significant for representing aspects of Victoria’s shipping history and its potential to interpret sub-theme 1.5 of Victoria’s Framework of Historical Themes (living with natural processes). The collection is also historically significant for its association with the LOCH ARD, which was one of the worst and best known shipwrecks in Victoria’s history. Unrestored tea spoon from the wreck of the LOCH ARD. The spoon design has a flattened fiddle-back handle, with a thin stem or shank, flared collar, and elongated bowl. The spoons metallic composition is a thin layer of brass alloy which has partially corroded back to a nickel-silver base metal. Only 15% of original electroplating remains with verdigris on 5% of spoon surface. Outlines of five makers marks are visible but details are obscured.flagstaff hill maritime museum, shipwreck coast, great ocean road, loch line, loch ard, mutton bird island, loch ard gorge, electroplated cutlery, loch ard shipwreck, nickel silver, william page & co, birmingham, brass plating, makers marks -
 Flagstaff Hill Maritime Museum and Village
Spoon, circa 1878
This tea spoon is from the wreck of the LOCH ARD, a Loch Line ship of 1,693 tons which sailed from Gravesend, London, on 2 March 1878 with 17 passengers and a crew of 36 under Captain George Gibbs. “The intention was to discharge cargo in Melbourne, before returning to London via the Horn with wool and wheat”. Instead, on 1 June 1878, after 90 days at sea, she struck the sandstone cliffs of Mutton Bird Island on the south west coast of Victoria, and sank with the loss of 52 lives and all her cargo. The manifest of the LOCH ARD listed an array of manufactured goods and bulk metals being exported to the Colony of Victoria, with a declared value of £53,700. (202 bills of lading show an actual invoice value of £68, 456, with insurance underwriting to £30,000 of all cargo). Included in the manifest is the item of “Tin hardware & cutlery £7,530”. This teaspoon is one of 482 similar items of electro-plated cutlery from the LOCH ARD site, comprising spoons and forks of various sizes but all sharing the same general shape or design and metallic composition. 49 of these pieces display a legible makers’ mark — the initials “W” and “P” placed within a raised diamond outline, which is in turn contained within a sunken crown shape — identifying the manufacturer as William Page & Co of Birmingham. An electroplater’s makers’ marks, unlike sterling silver hallmarks, are not consistent identifiers of quality or date and place of manufacture. A similar line of five impressions was usually made to impress the consumer with an implication of industry standards, but what each one actually signified was not regulated and so they varied according to the whim of the individual foundry. In this case, the maker’s marks are often obscured by sedimentary accretion or removed by corrosion after a century of submersion in the ocean. However sufficient detail has survived to indicate that these samples of electro-plated cutlery probably originated from the same consignment in the LOCH ARD’s cargo. The following descriptions of maker’s marks are drawn from 255 tea spoons, 125 dessert spoons, and 99 table forks. These marks are clearly visible in 66 instances, while the same sequence of general outlines, or depression shapes, is discernible in another 166 examples. 1. A recessed Crown containing a raised Diamond outline and the initials “W” and “P” (the recognised trademark of William Page & Co) 2. An impressed Ellipse containing a raised, pivoted, Triangle in its lower part and bearing a Resurrection Cross on its upper section (a possible dissenting church symbol reflecting religious affiliation); OR a rounded Square impression containing a raised, ‘lazy’, letter “B” (possibly mimicking sterling silver hallmark signifying city of manufacture i.e. Birmingham) 3. An impressed rounded Square filled with a raised Maltese Cross (the base metal composite of nickel silver was also known as ‘German silver’ after its Berlin inventors in 1823) 4. A recessed Circle containing a Crab or Scarab Beetle image; OR a recessed Circle containing a rotated ‘fleur de lys’ or ‘fasces’ design 5. A depressed Diamond shape enclosing a large raised letter “R” and a small raised letter “D” (mimicking the U.K. Patent Office stamp which abbreviated the term ‘registered’ to “RD”, but also included date and class of patent) Suggested trade names for William Page & Co’s particular blend of brass plating are ‘roman silver’ or ‘silverite’. This copper alloy polishes to a lustrous gold when new, discolouring to a murky grey with greenish hue when neglected. HISTORY OF THE LOCH ARD The LOCH ARD belonged to the famous Loch Line which sailed many ships from England to Australia. Built in Glasgow by Barclay, Curdle and Co. in 1873, the LOCH ARD was a three-masted square rigged iron sailing ship. The ship measured 262ft 7" (79.87m) in length, 38ft (11.58m) in width, 23ft (7m) in depth and had a gross tonnage of 1693 tons. The LOCH ARD's main mast measured a massive 150ft (45.7m) in height. LOCH ARD made three trips to Australia and one trip to Calcutta before its final voyage. LOCH ARD left England on March 2, 1878, under the command of Captain Gibbs, a newly married, 29 year old. She was bound for Melbourne with a crew of 37, plus 17 passengers and a load of cargo. The general cargo reflected the affluence of Melbourne at the time. On board were straw hats, umbrella, perfumes, clay pipes, pianos, clocks, confectionary, linen and candles, as well as a heavier load of railway irons, cement, lead and copper. There were items included that intended for display in the Melbourne International Exhibition in 1880. The voyage to Port Phillip was long but uneventful. At 3am on June 1, 1878, Captain Gibbs was expecting to see land and the passengers were becoming excited as they prepared to view their new homeland in the early morning. But LOCH ARD was running into a fog which greatly reduced visibility. Captain Gibbs was becoming anxious as there was no sign of land or the Cape Otway lighthouse. At 4am the fog lifted. A man aloft announced that he could see breakers. The sheer cliffs of Victoria's west coast came into view, and Captain Gibbs realised that the ship was much closer to them than expected. He ordered as much sail to be set as time would permit and then attempted to steer the vessel out to sea. On coming head on into the wind, the ship lost momentum, the sails fell limp and LOCH ARD's bow swung back. Gibbs then ordered the anchors to be released in an attempt to hold its position. The anchors sank some 50 fathoms - but did not hold. By this time LOCH ARD was among the breakers and the tall cliffs of Mutton Bird Island rose behind the ship. Just half a mile from the coast, the ship's bow was suddenly pulled around by the anchor. The captain tried to tack out to sea, but the ship struck a reef at the base of Mutton Bird Island, near Port Campbell. Waves broke over the ship and the top deck was loosened from the hull. The masts and rigging came crashing down knocking passengers and crew overboard. When a lifeboat was finally launched, it crashed into the side of LOCH ARD and capsized. Tom Pearce, who had launched the boat, managed to cling to its overturned hull and shelter beneath it. He drifted out to sea and then on the flood tide came into what is now known as LOCH ARD Gorge. He swam to shore, bruised and dazed, and found a cave in which to shelter. Some of the crew stayed below deck to shelter from the falling rigging but drowned when the ship slipped off the reef into deeper water. Eva Carmichael had raced onto deck to find out what was happening only to be confronted by towering cliffs looming above the stricken ship. In all the chaos, Captain Gibbs grabbed Eva and said, "If you are saved Eva, let my dear wife know that I died like a sailor". That was the last Eva Carmichael saw of the captain. She was swept off the ship by a huge wave. Eva saw Tom Pearce on a small rocky beach and yelled to attract his attention. He dived in and swam to the exhausted woman and dragged her to shore. He took her to the cave and broke open case of brandy which had washed up on the beach. He opened a bottle to revive the unconscious woman. A few hours later Tom scaled a cliff in search of help. He followed hoof prints and came by chance upon two men from nearby Glenample Station three and a half miles away. In a state of exhaustion, he told the men of the tragedy. Tom returned to the gorge while the two men rode back to the station to get help. By the time they reached LOCH ARD Gorge, it was cold and dark. The two shipwreck survivors were taken to Glenample Station to recover. Eva stayed at the station for six weeks before returning to Ireland, this time by steamship. In Melbourne, Tom Pearce received a hero's welcome. He was presented with the first gold medal of the Royal Humane Society of Victoria and a £1000 cheque from the Victorian Government. Concerts were performed to honour the young man's bravery and to raise money for those who lost family in the LOCH ARD disaster. Of the 54 crew members and passengers on board, only two survived: the apprentice, Tom Pearce and the young woman passenger, Eva Carmichael, who lost all of her family in the tragedy. Ten days after the LOCH ARD tragedy, salvage rights to the wreck were sold at auction for £2,120. Cargo valued at £3,000 was salvaged and placed on the beach, but most washed back into the sea when another storm developed. The wreck of LOCH ARD still lies at the base of Mutton Bird Island. Much of the cargo has now been salvaged and some was washed up into what is now known as LOCH ARD Gorge. Cargo and artefacts have also been illegally salvaged over many years before protective legislation was introduced. One of the most unlikely pieces of cargo to have survived the shipwreck was a Minton porcelain peacock - one of only seven in the world. The peacock was destined for the Melbourne International Exhibition in 1880. It had been well packed, which gave it adequate protection during the violent storm. Today, the Minton peacock can be seen at the Flagstaff Hill Maritime Museum in Warrnambool. From Australia's most dramatic shipwreck it has now become Australia's most valuable shipwreck artefact and is one of very few 'objects' on the Victorian State Heritage Register. The LOCH ARD shipwreck is of State significance – Victorian Heritage Register S 417. Flagstaff Hill’s collection of artefacts from LOCH ARD is significant for being one of the largest collections of artefacts from this shipwreck in Victoria. It is significant for its association with the shipwreck, which is on the Victorian Heritage Register (VHR S417). The collection is significant because of the relationship between the objects, as together they have a high potential to interpret the story of the LOCH ARD. The LOCH ARD collection is archaeologically significant as the remains of a large international passenger and cargo ship. The LOCH ARD collection is historically significant for representing aspects of Victoria’s shipping history and its potential to interpret sub-theme 1.5 of Victoria’s Framework of Historical Themes (living with natural processes). The collection is also historically significant for its association with the LOCH ARD, which was one of the worst and best known shipwrecks in Victoria’s history. Unrestored tea spoon from the wreck of the LOCH ARD. The spoon design has a flattened fiddle-back handle, with a thin stem or shank, flared collar, and elongated bowl. The spoons metallic composition is a thin layer of brass alloy which has partially corroded back to a nickel-silver base metal. Only 10% of original electroplating remains as a dull bronze colour. Outlines of five makers marks are visible.flagstaff hill, warrnambool, shipwrecked coast, flagstaff hill maritime museum, maritime museum, shipwreck coast, flagstaff hill maritime village, great ocean road, loch line, loch ard, captain gibbs, eva carmichael, tom pearce, glenample station, mutton bird island, electroplated cutlery, loch ard shipwreck, nickel silver, william page & co, birmingham, brass plating, makers marks -
 Flagstaff Hill Maritime Museum and Village
Spoon, circa 1878
This tea spoon is from the wreck of the LOCH ARD, a Loch Line ship of 1,693 tons which sailed from Gravesend, London, on 2 March 1878 with 17 passengers and a crew of 36 under Captain George Gibbs. “The intention was to discharge cargo in Melbourne, before returning to London via the Horn with wool and wheat”. Instead, on 1 June 1878, after 90 days at sea, she struck the sandstone cliffs of Mutton Bird Island on the south west coast of Victoria, and sank with the loss of 52 lives and all her cargo. The manifest of the LOCH ARD listed an array of manufactured goods and bulk metals being exported to the Colony of Victoria, with a declared value of £53,700. (202 bills of lading show an actual invoice value of £68, 456, with insurance underwriting to £30,000 of all cargo). Included in the manifest is the item of “Tin hardware & cutlery £7,530”. This teaspoon is one of 482 similar items of electro-plated cutlery from the LOCH ARD site, comprising spoons and forks of various sizes but all sharing the same general shape or design and metallic composition. 49 of these pieces display a legible makers’ mark — the initials “W” and “P” placed within a raised diamond outline, which is in turn contained within a sunken crown shape — identifying the manufacturer as William Page & Co of Birmingham. An electroplater’s makers’ marks, unlike sterling silver hallmarks, are not consistent identifiers of quality or date and place of manufacture. A similar line of five impressions was usually made to impress the consumer with an implication of industry standards, but what each one actually signified was not regulated and so they varied according to the whim of the individual foundry. In this case, the maker’s marks are often obscured by sedimentary accretion or removed by corrosion after a century of submersion in the ocean. However sufficient detail has survived to indicate that these samples of electro-plated cutlery probably originated from the same consignment in the LOCH ARD’s cargo. The following descriptions of maker’s marks are drawn from 255 tea spoons, 125 dessert spoons, and 99 table forks. These marks are clearly visible in 66 instances, while the same sequence of general outlines, or depression shapes, is discernible in another 166 examples. 1. A recessed Crown containing a raised Diamond outline and the initials “W” and “P” (the recognised trademark of William Page & Co) 2. An impressed Ellipse containing a raised, pivoted, Triangle in its lower part and bearing a Resurrection Cross on its upper section (a possible dissenting church symbol reflecting religious affiliation); OR a rounded Square impression containing a raised, ‘lazy’, letter “B” (possibly mimicking sterling silver hallmark signifying city of manufacture i.e. Birmingham) 3. An impressed rounded Square filled with a raised Maltese Cross (the base metal composite of nickel silver was also known as ‘German silver’ after its Berlin inventors in 1823) 4. A recessed Circle containing a Crab or Scarab Beetle image; OR a recessed Circle containing a rotated ‘fleur de lys’ or ‘fasces’ design 5. A depressed Diamond shape enclosing a large raised letter “R” and a small raised letter “D” (mimicking the U.K. Patent Office stamp which abbreviated the term ‘registered’ to “RD”, but also included date and class of patent) Suggested trade names for William Page & Co’s particular blend of brass plating are ‘roman silver’ or ‘silverite’. This copper alloy polishes to a lustrous gold when new, discolouring to a murky grey with greenish hue when neglected. HISTORY OF THE LOCH ARD The LOCH ARD belonged to the famous Loch Line which sailed many ships from England to Australia. Built in Glasgow by Barclay, Curdle and Co. in 1873, the LOCH ARD was a three-masted square rigged iron sailing ship. The ship measured 262ft 7" (79.87m) in length, 38ft (11.58m) in width, 23ft (7m) in depth and had a gross tonnage of 1693 tons. The LOCH ARD's main mast measured a massive 150ft (45.7m) in height. LOCH ARD made three trips to Australia and one trip to Calcutta before its final voyage. LOCH ARD left England on March 2, 1878, under the command of Captain Gibbs, a newly married, 29 year old. She was bound for Melbourne with a crew of 37, plus 17 passengers and a load of cargo. The general cargo reflected the affluence of Melbourne at the time. On board were straw hats, umbrella, perfumes, clay pipes, pianos, clocks, confectionary, linen and candles, as well as a heavier load of railway irons, cement, lead and copper. There were items included that intended for display in the Melbourne International Exhibition in 1880. The voyage to Port Phillip was long but uneventful. At 3am on June 1, 1878, Captain Gibbs was expecting to see land and the passengers were becoming excited as they prepared to view their new homeland in the early morning. But LOCH ARD was running into a fog which greatly reduced visibility. Captain Gibbs was becoming anxious as there was no sign of land or the Cape Otway lighthouse. At 4am the fog lifted. A man aloft announced that he could see breakers. The sheer cliffs of Victoria's west coast came into view, and Captain Gibbs realised that the ship was much closer to them than expected. He ordered as much sail to be set as time would permit and then attempted to steer the vessel out to sea. On coming head on into the wind, the ship lost momentum, the sails fell limp and LOCH ARD's bow swung back. Gibbs then ordered the anchors to be released in an attempt to hold its position. The anchors sank some 50 fathoms - but did not hold. By this time LOCH ARD was among the breakers and the tall cliffs of Mutton Bird Island rose behind the ship. Just half a mile from the coast, the ship's bow was suddenly pulled around by the anchor. The captain tried to tack out to sea, but the ship struck a reef at the base of Mutton Bird Island, near Port Campbell. Waves broke over the ship and the top deck was loosened from the hull. The masts and rigging came crashing down knocking passengers and crew overboard. When a lifeboat was finally launched, it crashed into the side of LOCH ARD and capsized. Tom Pearce, who had launched the boat, managed to cling to its overturned hull and shelter beneath it. He drifted out to sea and then on the flood tide came into what is now known as LOCH ARD Gorge. He swam to shore, bruised and dazed, and found a cave in which to shelter. Some of the crew stayed below deck to shelter from the falling rigging but drowned when the ship slipped off the reef into deeper water. Eva Carmichael had raced onto deck to find out what was happening only to be confronted by towering cliffs looming above the stricken ship. In all the chaos, Captain Gibbs grabbed Eva and said, "If you are saved Eva, let my dear wife know that I died like a sailor". That was the last Eva Carmichael saw of the captain. She was swept off the ship by a huge wave. Eva saw Tom Pearce on a small rocky beach and yelled to attract his attention. He dived in and swam to the exhausted woman and dragged her to shore. He took her to the cave and broke open case of brandy which had washed up on the beach. He opened a bottle to revive the unconscious woman. A few hours later Tom scaled a cliff in search of help. He followed hoof prints and came by chance upon two men from nearby Glenample Station three and a half miles away. In a state of exhaustion, he told the men of the tragedy. Tom returned to the gorge while the two men rode back to the station to get help. By the time they reached LOCH ARD Gorge, it was cold and dark. The two shipwreck survivors were taken to Glenample Station to recover. Eva stayed at the station for six weeks before returning to Ireland, this time by steamship. In Melbourne, Tom Pearce received a hero's welcome. He was presented with the first gold medal of the Royal Humane Society of Victoria and a £1000 cheque from the Victorian Government. Concerts were performed to honour the young man's bravery and to raise money for those who lost family in the LOCH ARD disaster. Of the 54 crew members and passengers on board, only two survived: the apprentice, Tom Pearce and the young woman passenger, Eva Carmichael, who lost all of her family in the tragedy. Ten days after the LOCH ARD tragedy, salvage rights to the wreck were sold at auction for £2,120. Cargo valued at £3,000 was salvaged and placed on the beach, but most washed back into the sea when another storm developed. The wreck of LOCH ARD still lies at the base of Mutton Bird Island. Much of the cargo has now been salvaged and some was washed up into what is now known as LOCH ARD Gorge. Cargo and artefacts have also been illegally salvaged over many years before protective legislation was introduced. One of the most unlikely pieces of cargo to have survived the shipwreck was a Minton porcelain peacock - one of only seven in the world. The peacock was destined for the Melbourne International Exhibition in 1880. It had been well packed, which gave it adequate protection during the violent storm. Today, the Minton peacock can be seen at the Flagstaff Hill Maritime Museum in Warrnambool. From Australia's most dramatic shipwreck it has now become Australia's most valuable shipwreck artefact and is one of very few 'objects' on the Victorian State Heritage Register. The LOCH ARD shipwreck is of State significance – Victorian Heritage Register S 417. Flagstaff Hill’s collection of artefacts from LOCH ARD is significant for being one of the largest collections of artefacts from this shipwreck in Victoria. It is significant for its association with the shipwreck, which is on the Victorian Heritage Register (VHR S417). The collection is significant because of the relationship between the objects, as together they have a high potential to interpret the story of the LOCH ARD. The LOCH ARD collection is archaeologically significant as the remains of a large international passenger and cargo ship. The LOCH ARD collection is historically significant for representing aspects of Victoria’s shipping history and its potential to interpret sub-theme 1.5 of Victoria’s Framework of Historical Themes (living with natural processes). The collection is also historically significant for its association with the LOCH ARD, which was one of the worst and best known shipwrecks in Victoria’s history. Unrestored tea spoon from the wreck of the LOCH ARD. The spoon design has a flattened fiddle-back handle, with a thin stem or shank, flared collar, and elongated bowl. The spoons metallic composition is a thin layer of brass alloy which has partially corroded back to a nickel-silver base metal. 50% of original electroplating remains. Two of five makers marks are legible: (1) Trade Mark (4) Crab Designflagstaff hill, warrnambool, shipwrecked coast, flagstaff hill maritime museum, maritime museum, shipwreck coast, flagstaff hill maritime village, great ocean road, loch line, loch ard, captain gibbs, eva carmichael, tom pearce, glenample station, mutton bird island, loch ard gorge, electroplated cutlery, loch ard shipwreck, nickel silver, william page & co, birmingham, brass plating, makers marks -
 Flagstaff Hill Maritime Museum and Village
Bottle, circa 1885 - 1891
This bottle was one of the items salvaged from the wreck of the Fiji in 1891. Joseph Bosisto began manufacturing Eucalyptus Oil in Australia from 1854. This bottle is marked ‘J. BOSISTO”, which probably dates it from 1885 when the company J. Bosisto & Co. was formed. The marking on the bottom of the bottle “GERMAN/B_ _ E” could mean that the bottle was imported by J. Bosisto from Germany. In the early years bottles were imported from overseas countries including England and Germany. In 1872 the Melbourne Bottle Works was established to supply the bottles locally and more cheaply but had difficulty keeping up with the supply. From 1865 Australian-made Bosisto’s Eucalyptus Oil began to be exported to England then later to Germany and other countries. Bosisto’s Eucalyptus Oil won many prizes at exhibitions between 1854 – 1891. The three-masted iron barque Fiji had been built in Belfast, Ireland, in 1875 by Harland and Wolfe for a Liverpool based shipping company. The ship departed Hamburg on 22nd May 1891 bound for Melbourne, under the command of Captain William Vickers with a crew of 25. The ship’s manifest shows that she was loaded with a cargo of 260 cases of dynamite, pig iron, steel goods, spirits (whisky, schnapps, gin, brandy), sailcloth, tobacco, coiled fencing wire, concrete, 400 German pianos (Sweet Hapsburg), concertinas and other musical instruments, artists supplies including brushes, porcelain, furniture, china, and general cargo including candles. There were also toys in anticipation for Christmas, including wooden rocking horses, miniature ships, dolls with china limbs and rubber balls. On September 5th, one hundred days out from Hamburg in squally and boisterous south west winds the Cape Otway light was sighted on a bearing differing from Captain Vickers’ calculation of his position. At about 2:30am, Sunday 6th September 1891 land was reported 4-5 miles off the port bow. The captain tried to put the ship on the other tack, but she would not respond. He then tried to turn her the other way but just as the manoeuvre was being completed the Fiji struck rock only 300 yards (274 metres) from shore. The place is known as Wreck Bay, Moonlight Head. Blue lights were burned and rockets fired whilst an effort was made to lower boats but all capsized or swamped and smashed to pieces. Two of the younger crewmen volunteered to swim for the shore, taking a line. One, a Russian named Daniel Carkland, drowned after he was swept away when the line broke. The other, 17 year old able seaman Julius Gebauhr, a German, reached shore safely on his second attempt but without the line, which he had cut lose with his sheath-knife when it become tangled in kelp. He rested on the beach a while then climbed the steep cliffs in search of help. At about 10am on the Sunday morning a party of land selectors - including F. J. Stansmore, Leslie Dickson (or Dixon) and Mott - found Gebauhr. They were near Ryans Den, on their travels on horseback from Princetown towards Moonlight Head, and about 5km from the wreck. Gebauhr was lying in the scrub in a poor state, bleeding and dressed only in singlet, socks and a belt with his sheath-knife, ready for all emergencies. At first they were concerned about his wild and shaggy looking state and what seemed to be gibberish speech, taking him to be an escaped lunatic. They were reassured after he threw his knife away and realised that he was speaking half-English, half-German. They gave him food and brandy and some clothing and were then able to gain information about the wreck. Some of the men took him to Rivernook, a nearby guest house owned by John Evans, where he was cared for. Stansmore and Dickson rode off to try and summon help. Others went down to the site of the wreck. Messages for rescuing the rest of the crew were sent both to Port Campbell for the rocket rescue crew and to Warrnambool for the lifeboat. The S.S. Casino sailed from Portland towards the scene. After travelling the 25 miles to the scene, half of the Port Campbell rocket crew and equipment arrived and set up the rocket tripod on the beach below the cliffs. By this time the crew of the Fiji had been clinging to the jib-boom for almost 15 hours, calling frantically for help. Mr Tregear from the Rocket Crew fired the line. The light line broke and the rocket was carried away. A second line was successfully fired across the ship and made fast. The anxious sailors then attempted to come ashore along the line but, with as many as five at a time, the line sagged considerably and some were washed off. Others, nearly exhausted, had to then make their way through masses of seaweed and were often smothered by waves. Only 14 of the 24 who had remained on the ship made it to shore. Many onlookers on the beach took it in turns to go into the surf and drag half-drowned seamen to safety. These rescuers included Bill (William James) Robe, Edwin Vinge, Hugh Cameron, Fenelon Mott, Arthur Wilkinson and Peter Carmody. (Peter Carmody was also involved in the rescue of men from the Newfield.) Arthur Wilkinson, a 29 year old land selector, swam out to the aid of one of the ship’s crewmen, a carpenter named John Plunken. Plunken was attempting to swim from the Fiji to the shore. Two or three times both men almost reached the shore but were washed back to the wreck. A line was thrown to them and they were both hauled aboard. It was thought that Wilkinson struck his head on the anchor before s they were brought up. He remained unconscious. The carpenter survived this ordeal but Wilkinson later died and his body was washed up the next day. It was 26 year old Bill Robe who hauled out the last man, the captain, who had become tangled in the kelp. The wreck of the Fiji was smashed apart within 20 minutes of the last man being brought ashore, and it settled in about 6m of water. Of the 26 men on the Fiji, 11 in total lost their lives. The remains of 7 bodies were washed onto the beach and their coffins were made from timbers from the wrecked Fiji. They were buried on the cliff top above the wreck. The survivors were warmed by fires on the beach then taken to Rivernook and cared for over the next few days. Funds were raised by local communities soon after the wreck in aid of the sufferers of the Fiji disaster. Captain Vickers was severely reprimanded for his mishandling of the ship. His Masters Certificate was suspended for 12 months. At the time there was also a great deal of public criticism at the slow and disorganised rescue attempt to save those on board. The important canvas ‘breech buoy’ or ‘bucket chair’ and the heavy line from the Rocket Rescue was in the half of the rocket outfit that didn’t make it in time for the rescue: they had been delayed at the Gellibrand River ferry. Communications to Warrnambool were down so the call for help didn’t get through on time and the two or three boats that had been notified of the wreck failed to reach it in time. Much looting occurred of the cargo that washed up on the shore, with nearly every visitor leaving the beach with bulky pockets. One looter was caught with a small load of red and white rubber balls, which were duly confiscated and he was ‘detained’ for 14 days. Essence of peppermint mysteriously turned up in many settlers homes. Sailcloth was salvaged and used for horse rugs and tent flies. Soon after the wreck “Fiji tobacco” was being advertised around Victoria. A Customs officer, trying to prevent some of the looting, was assaulted by looters and thrown over a steep cliff. He managed to cling to a bush lower down until rescued. In 1894 some coiled fencing wire was salvaged from the wreck. Hundreds of coils are still strewn over the site of the wreck, encrusted and solidified. The hull is broken but the vessel’s iron ribs can be seen along with some of the cargo of concrete and pig iron. Captain Vickers presented Bill Robe with his silver-cased pocket watch, the only possession that he still had, as a token for having saved his life and the lives of some of the crew. (The pocket watch came with 2 winding keys, one to wind it and one to change the hands.) Years later Bill passed the watch to his brother-in-law Gib (Gilbert) Hulands as payment of a debt and it has been passed down the family to Gilbert Hulands’ grandson, John Hulands. Seaman Julius Gebauhr later gave his knife, in its hand crafted leather sheath, to F. J. Stansmore for caring for him when he came ashore. The knife handle had a personal inscription on it. A marble headstone on the 200m high cliffs overlooking Wreck Beach, west of Moonlight Head, paying tribute to the men who lost their lives when Fiji ran aground. The scene of the wreck is marked by the anchor from the Fiji, erected by Warrnambool skin divers in 1967. Amongst the artefacts salvaged from the Fiji are china miniature animals, limbs from small china dolls, rubber balls, this glass bottle, sample of rope from the distress rocket and a candlestick holder. These items are now part of the Fiji collection at Flagstaff Hill Maritime Museum, along with Captain Vickers’ pocket watch and Julius Gebauhr’s sheath knife. The glass bottle is registered as “Artefact Reg No Fiji/1”. Flagstaff Hill’s Fiji collection is of historical significance at a State level because of its association with the wreck Fiji, which is on the Victorian Heritage Register VHR S259. It also represents aspects of Victoria’s shipping history and its potential to interpret sub-theme 1.5 of Victoria’s Framework of Historical Themes (living with natural processes). The Fiji collection meets the following criteria for assessment: Criterion A: Importance to the course, or pattern, of Victoria’s cultural history. Criterion B: Possession of uncommon, rare or endangered aspects of Victoria’s cultural history Criterion C: Potential to yield information that will contribute to an understanding of Victoria’s cultural history. Clear glass oval medical bottle with rounded corners and flattened sides on front and back surfaces. Opening of bottle has a lip around it and could have been sealed with a stopper. There is a chip in the lip. One face of the bottle has a rectangular border with a name embossed vertically on it, “J. BOSISTO / RICHMOND”. The oval base of the bottle also has letters embossed on it “GE_ _AN” “B _ _ _ _ _”. There is also a large chip out of the base. The sides of the bottle have a vertical joining line. The bottle was recovered from the wreck of the Fiji.Flat side of bottle has rectangular border with “J BOSISTO / RICHMOND” embossed in the centre. The base of the bottle has “G E . . A N/B . . . . . .” embossed on it. Other letters have been removed with the chip. (probable wording was ‘GERMAN/BOTTLE)warrnambool, shipwrecked coast, flagstaff hill, flagstaff hill maritime museum, maritime museum, shipwreck coast, flagstaff hill maritime village, shipwrecked artefact, fiji, 1891, glass bottle, medicine bottle, bosistos, j bosistos, german bottle -
 Eltham District Historical Society Inc
Document - Archive Box, 1570 Main Road, Research (Research Primary School)
Contents: 1. Andrew Lemon's Working File of Return to Research Andrew Lemon's Working File for his 1989 book, “Return to Research: A Centenary History of Research Primary School" (EDHS_00867). Includes a disassembled copy of the book. (All other documentation and photos passed to Research Primary School 3 September 2013) 1.1. EDHS_05004 - Cassette Tape of "Afternoon Tea with Senior Residents Nov 1st 1984" Reminiscences, chit chat and banter between group of senior citizens at an afternoon tea held for them at Research Primary School. 1.2. School Register 1935-1994 (Box 1) Photocopy of Research Primary School register from 1935 to 1994 (originals held at school) From 1994 onwards registrations were made online via the Education Department CASES system. 1.3. School Register A-Z 1935-1987 (Box 2) Computer print-out of alphabetized register 1935-87 (Research Primary School) (Done by David and Sue Grigg in 1987 from the register) Contains some extra details/corrections/current addresses Plus disks containing this data (not housed in box – there is a separate floppy disc box containing several 5 ¾” and 3 ½” floppy disks which are not readable as no hardware/software to support) 1.4. Research Locality History (Yellow Folder 1) Research Locality History Newspaper cuttings, Photocopies etc Collection for Research Primary School History 1989 Contents • 3 x photocopies (A3) regarding sale of Raglan Estate, Research [2 x A3 and 1 x composite A3 colour photocopy] • Souvenir Map of area with pictures of historical items and wild life - A Visitor's Guide Map; ELTHAM, WARRANDYTE and Environs (see also EDHS_01633-1) • EO article 26 Mar 1897 "Research State School picnic expedition to Mordialloc" • TA article 25 Jul 30" Research Affairs" plus an add for J Ingram's Research Bakery • DVN articles 14 Jan 69 (2 pages) "Research Fire Victim (Bill Pelling) still in hospital" • DVN 14 Jan 69 Page of Deaths, In Memories, Obituaries, Church Notices, Public Notices and Notices • Age article 24 Jan 84 "Eltham before the Mud Bricks" • DVN article 21 Oct 86 "Facing Good and Bad Times with enthusiasm - Keith Maxwell" • DVN article 29 Aug 87 "Eltham - the historic haven" • DVN article 25 Aug 87 "Eltham - a piece of living history, (the historic haven cont…)" • DVN article 20 Oct 87 "When push bikes were made for touring - Sam Howard" • 6 x pages of what appear to be various student's workbooks/ projects from 1944/45 era • ''They lost their homes- Historical places go at Research" plus other articles on fires 8 Jan 69 [Located in Folder 2] • DVN articles 23 Oct 84 "Centenary Plans" & Folklore surrounds Research township" [Located in Folder 2] • DVN article 23 Sep 86 "The teacher who had cut cane but never used one" Frank Sheehan (3 copies) [Located in Folder 2] • 2 x copies of booklet "Memories of Eltham" [Located in Folder 3] • Photocopy of subdivision Parish of Nillumbik [Located in Folder 4] DVN = Diamond Valley News, EO = Evelyn Observer TA= The Advertiser 1.5. Copies of items held by Public Records Office Victoria (Yellow Folder 2) Copies of items held by Public Records Office Photos and display items from Research Primary School Centenary August 19, 1989 • Laminated photocopy: “State School No. 2959, Copy of the above school property,” signed Henry L. Cole 18.6.91 • Photocopy: Petition for a school at Research, 13/11/1888; Public Record Office Victoria School Building File – School 2959 CUPRS 795/1717 • Photocopy: Negotiation to buy school site – part of Allotment 2, owned by the West family (copy attached to letter) 15/1/1890; Public Record Office Victoria School Building File – School 2959 CUPRS 795/1717 • Photocopy: Frank Scott, Head Teacher Research 1904-1907, letter of explanation (first page) to Department re poor results by pupils at the school, 24/8/1907; Public Record Office Victoria School Building File – 640 / School 2959 • Photocopy: Anton Brinkkotter’s Certificate for Regular Attendance 1908 (This was ‘traded in’ in 1911 for a certificate to mark six years without missing a day of school; Public Record Office Victoria School Building File – 640 / School 2959 for 1911 • Photocopy: Education Department Memorandum 1949 re need for extensions and improvements; Public Record Office Victoria School Building File – 795 / School 2959 • Photocopy: Looking to the future about expanding site for additional land for play space, 1950, Education Department Inspector to Department; Public Record Office Victoria School Building File – 795 / School 2959 • Photocopy (laminated, 2 sheets) First School Fire -1953 copy of Police Report. The old school building was badly damaged but repaired. It burnt down in 1976; Public Record Office Victoria School Building File – 795 / School 2959 • Photocopy: The Argus (28 July 1953) & the (Sun 28 July 1953) Two newspaper cuttings and notes re school fire 1953; Public Record Office Victoria School Building File – / School 2959 • Photocopy: Head Teacher Reg Jackman expresses concern to Education Department about conditions as he takes charge of Research State School, 1957; Public Record Office Victoria School Building File – 640 / School 2959 • Photo print (x2) of Education Department Qualifications and Certificates, Lyla Dickson, State School. (1) Print missing (2) Education department Victoria, Merit Certificate, This is to certify that Lyla Dickson has completed satisfactorily the Course of Study presented for the Eight Grade in Elementary Schools, dated at research Elementary School, this 20th day of November A.D. 1923 • Copy of original photo owned by Nell Howard “Fancy dress night in the school house – 1920s”, black and white print, 10.5 x 18 cm, attached to A4 photocopy of photo with names inscribed10.5 x 18 cm • Copy of original photo (stamped Reynolds Collection), black and white print, 24.5 x 16 cm, attached to paper sheet 37.6 x 25.5 cm, inscribed “Miss Doney” and “Elizabeth Doney and her family owned and ran Research’s Store and Post Office for many years after buying the property from the wests. This land surrounded the school site and includes today’s [1989] Kanandah Ct, Raglan St and shops” • Black and white photo print, 20 x 25 cm, Reconstruction of Main Road in front of Research Primary School, August 1989 • Black and white photo print, 20 x 25 cm, Eastern end of old oval, Research Primary School, 1989 • Black and white photo print, 20 x 25 cm, Portable Buildings, Research Primary School, 1989 • Black and white photo print, 20 x 25 cm, Gymnasium, Research Primary School, 1989 • Black and white photo print, 20 x 25 cm, Administrative Art Building, Research Primary School, c.1989 • Black and white photo print, 20 x 25 cm, Betty Kicker, Cleaner at Research Primary School, c.1989. Betty worked at the school from early 1970s to 1990s 1.6. ‘Memories of Research 1951-1968’ (Yellow Folder 3) Interview by Sue Grigg of Florence Egglestone for publication in Return to Research. Original handwritten notes, ‘Memories of Research 1951-1968’ 1.7. Centenary Committee Minutes & Newsletters (Yellow Folder 4) Centenary Committee Minutes and Newsletters Information regarding attendance of 100th anniversary including lists of staff contact details 1983-1986 Request (1985) to Shire of Eltham Historical Society for information and memorabilia • Letter: Ann Bouchier, Convenor – Centenary Committee, Research Primary School to R. Yeoman, Shire of Eltham Historical Society, 15 October 1985; enquiring about memorabilia etc that could be used in a proposed compilation on the “History of the School.” • Minutes of Meeting, Centenary Sub-Committee, Research Primary School Council o 17 June 1985. Also includes a list of general aim, specific aims and methods for the research Primary School Centenary - 1989 o 15 October 1985. o 17 September 1986. o 20 August 1987. o 2 May 1988. o 9 June 1988. o 22 August 1988. o 12 October 1988. o 24 November 1988. o 17 April 1989. o 24 July 1989. • Outline of Historical Events 1884-1954 (3 pages) • Centenary Newsletters o Number 1 (1989) o Number 2 (1989) o Number 3 (1989) o Newsletter (c. Aug. 1989) • Information re attendance of 100th Anniversary, Research Primary School, 19 August 1989 o Research Primary School – Staff 1984 (includes Name, Address, Telephone) o Research Primary School – Staff 1985 (includes Name, Address, Telephone) o Research Primary School – Staff 1986 (includes Name, Address, Telephone) o Emergency Teacher List 1983 o Emergency Teacher List 1986 o Previous teachers 1984 on • Quotation No. 733, Major Graphics for Engraved Brass Commemorative Plaque for opening of School Gymnasium • Centenary Invitation; Program and Souvenir and Chicken & Champagne Supper order forms • Various Centenary Invitation lists with notations, and various returned RSVPs • Centenary Program and map • Photocopy: 11 pages typed with hand corrections, draft manuscript for Andrew Lemon’s book, Return to Research (pages 13-24) • Bulletin: “I’m an Aussie” Week – 15th-19th April 10/4/85 • Bulletin: Research Centenary 26/4/88 • Bulletin: Official Centenary Logo For Research Primary School 15/12/88 • Bulletin: Centenary School Activity – “Colonial School” 23/5/89 • Bulletin: Centenary Activity Days – Monday, 14th August, Tuesday, 15th August 7/8/89 • Advertisement: A3 photocopy, Centenary Bush Dance, Sat. 4th March featuring “Paradiddle” Bush Band • Photocopy Master: Invitation (blank) to attend “Return to Research” celebration and Official Opening of the School Gymnasium on Saturday, August 19th from 1.00p.m. to 5.00p.m. and attached RSVP (also includes yellow paper sample -blank) • Photocopy Master: Tickets for Centenary Chicken & Champagne Supper, Friday, 18th August 1989, 7.30p.m., $5.00 per head (2 yellow paper samples marked on reverse ‘13’ and ‘55’) • Photocopy Master: Centenary Gift Donated by slips including multiple blank samples • Promotional Notices o Letter, Robert Wenn, Principal, 29 November 1988 for placement of “HELP WANTED” in Public Notices of The Age o Information provided to Ian Reid Real Estate Agent for Board to promote Centenary Bush Dance Paradiddle Band, Saturday 4 March 1989 o Notice Board promoting ‘Old Time’ Gala Fete Saturday 17 June 1989 o Letter, Robert Wenn, Principal, 24 August 1989 to Ian Reid Real Estate thanking for support of Centenary celebration and successful book launch and seeking further support for next event being school musical production “Spirit of Research” written by Andrew Lemon to be performed December 7th. 1.8. 1989 Research Primary School Centenary Visitors Register and Sue Grigg Correspondence (Red Folder) Sue Grigg’s Folder of Visitors to 1989 Centenary Celebrations and correspondence to Sue Grigg as organiser of Centenary Celebrations • 22 A3 Sheets of 1989 Research Primary School Centenary Visitors Register (approx. 238 entries) • Correspondence to Sue Grigg as Organizer of Centenary Celebrations o Trace B? – Ingram, Dunolly, 30 January 1990 re photo of Ingrams Road. Includes hand drawn map of various buildings on Ingrams Road. Also black and white print copy (12.5 x 17.5 cm) of photo of Ingrams and Main Road (possibly one sent to her) – see SEPP_0511 o Barbara Booth (nee Coles); thanks for wonderful celebration o Len and Marlene Parsons, 21 August 1989 o Mrs R. Towers, n.d. thanks for school photo ordered o Winifred L. Lade, 7 August 1989, gg grandparents William and Mary Crozier, daughter Sarah married Thomas Baillie (her g grandparents). Thomas Baillie was one of the petitioners for the school o Winifred L. Lade, n.d., thanks for photo and map o Carol Mathews, thanks for celebrations and payments for photos. Written on reverse of Sue Grigg’s letter to her of 19 September 1989 o Kenneth Ingram, Monday 14th, thanks for invitation but unable to attend • Photo of Ingrams and Main Road 1.9. Student Photos c.1970s (Buff Folder 1) [Not in Archive Box] Quantity of photos of students taken by Mrs Avril Baker (Staff Member) In 1970s 1.10. 1989 Centenary Questionnaires (Buff Folder 2) Research Primary School, 1989 Centenary Questionnaires from school families (approx. 190 responses) 1.11. Archive and Class Photos 1890s-1961 (Buff Folder 3) • Archive photographs of Research and District; 10 x 15 cm prints and digital files on thumb drive (copied to Collection catalogue) o RPS 1- Henry Cole Head Teacher 1891 to 1903. Photo from Mrs E. Williams o RPS 2 - Mary Jane Cole with eldest daughter Doris c 1905 o RPS 3 - Wedding Photo Mary Jane Rodda and Henry Cole o RPS 4 - Joseph Rodda of Chun Grove, Research o RPS 5 - Walter Rodda 1917 son of Joseph Rodda o RPS 6- Henry Cole and Pupils 1897 (Reynolds Collection) o RPS 7 - Elizabeth Doney (Reynolds Collections) o RPS 8 - Doney's Store early 1960's o RPS 9 - Main Road Research to Left, lngrams Road to Right o RPS 10- Main Road Eltham from Griggs family o RPS 11- Eltham near Station from Griggs family o RPS 12 - The Main Street Eltham from Griggs family (Rose Series 4344) o RPS 13 - The Rev and Mrs Thomas Cole. Parents of Henry Cole o RPS 14- Henry Cole as a boy with older brother Tom. From Mrs E. Williams. o RPS 15- Mary Jane Rodda as Mrs Henry Cole, Sewing Mistress Research State School 1891 to 1897 o RPS 16 - Etta Rodda Sewing Mistress Research State School 1897 -1904 o RPS 17 - Frederick Rodda son of Joseph Rodda o RPS 18- Bush Fires 1963 o RPS 19 - The view to the northeast from the top of the School Grounds 1989 o RPS 20- Edwin Rodda son of Joseph Rodda • Class and Staff photos, some with lists and names for identification [see separate folder of digital files – no hard copies in folder] Decade Years Represented 1890-1899 1897 1900-1909 1900, 1904 1910-1919 1910 1920-1929 1922, 1925 1930-1939 1930, 1932, 1937 1940-1949 1940, 1942 1950-1959 1950, 1951, 1952, 1953, 1954, 1955, 1956, 1957, 1958 1960-1969 1960, 1961, 1969 1970-1979 1970, 1971, 1972, 1973, 1975, 1976, 1977, 1978, 1979 Staff: 1971, 1976, 1978, 1979 1980-1989 1980, 1981, 1982, 1983, 1984, 1985, 1986, 1987, 1988, 1989 Staff: 1981, 1982, 1985, 1986, 1987, 1988, 1989 1990-1999 1990, 1991, 1994, 1995, 1996, 1997, 1998, 1999 Staff: 1990, 1994, 1995, 1996, 1998, 1999 2000-2009 2000, 2001, 2002, 2003, 2004, 2005, 2006, 2007, 2008, 2009 Staff: 2000, 2002, 2003, 2004, 2005, 2006, 2007, 2008, 2009 2010-2019 2010, 2011, 2012, 2013, 2014 Staff: 2010, 2011, 2012, 2013, 2014 • Class names; 4 pages handwritten and 2 numbered diagrams of Class names: o 1942 whole school o 1975 Grade 1 o 1976 Grade 2-3 o 1977 Grade 3 o 1978 Grade 4 o 1979 Grade 5 o 1980 Grade 6 • Negatives of photographs, 1 x roll of 36 and contact prints, copied at or for the Centenary 1989 o Neg. S – same as Neg. 27 o Neg. 1 – 1961 2/3 o Neg. 2 – 1960 5/6 o Neg. 3 – 1960 2/3 o Neg. 4 – 1960 Prep o Neg. 5 – 1957 Gr 2 o Neg. 6 – 1956 1A & II o Neg. 7 – Prep & I o Neg. 8 - 1955 o Neg. 9 – 1955 I & II o Neg. 10 – 1958 Gr II o Neg. 11 - 1960 3A & 4 o Neg. 12 – 1961 4 & 5 o Neg. 13 – same as Neg. 17 o Neg. 14 - 1925 o Neg. 15 - 1930 o Neg. 16 - 1942 o Neg. 17 – 1927 whole school o Neg. 18 - 1937 o Neg. 19 - 1932 o Neg. 20 - 1953 o Neg. 21 – 1951 Prep - 3 o Neg. 22 - 1954 o Neg. 23 - 1952 o Neg. 24 – Gr 4-7 o Neg. 25 – 1956 V & VI o Neg. 26 - 1940 o Neg. 27 – 1961 Gr 1 & 2 o Neg. 28 – SEPP_0610 (and 12.5 x 17.5 cm black and white print) o Neg. 29 – SEPP_0611 (and 12.5 x 17.5 cm black and white print) o Neg. 30 – SEPP_0612 o Neg. 31 – SEPP_0516 o Neg. 32 – SEPP_0509 (and 12.5 x 17.5 cm black and white print) o Neg. 33 – SEPP_0510 o Neg. 34 – SEPP_0511 o Neg. 35 – SEPP_0513 • Requests for copies of photos including explanation from Andrew Lemon that copies were made by camera of original photos provided by their owners • Colour photo print (copy of original), 12.5 x 17.5 cm, Doney’s Store, Main Road, Research, early 1960s including black and white photocopy of original print showing slightly wider field of view • Colour photo print, 10 x 15 cm, marked on reverse “19A” and “1 copy”, Aerial view of Research Primary School, c.1989 • Black and white print, 9 x 9 cm, Burnt out houses Ingrams Road Research near Cassell's Road after 1963 bushfire • Black and white print, 9 x 9 cm, Sight see-ers Ingrams Road Research near Cassell's Road after 1963 bushfire • Black and white photo print (copy of original), 20 x 25 cm, A memento of the Eltham Higher Elementary School Past Pupils Association Ball, Research Hall, 9 October 1966; inscribed and stamped on reverse “Reynolds Collection” • Colour photo print (copy of original), Kodak A4 photo paper, Pittaways cnr Main Road and Parsons Road c.1968 • Colour photo print (copy of original), Kodak A4 photo paper, Pittaways cnr Main Road and Parsons Road, my dad’s boat, c.1970, • Black and white photocopies of photos from Reynolds Collection o EDHS_00799-20 - The Research Hotel o EDHS_00799-22 - General Store, Research o EDHS_00799-27 – Plumtree Creek, Blashik family home, Ingrams Road o EDHS_00799-30 - Research o EDHS_00799-34 - Research Gully Bridge, Research Gully Road, c.1895 o EDHS_00799-35 - Research o EDHS_00799-37 - Waiting for the taxi-bus, Main Road, Research o SEPP_0524 - A Bush Home - Research, Vic.. 1.12. Research Primary School Centenary 1989 Display Photos (Buff Folder 4) 7 display pages, 37.8 x 25.5 cm, with 10 x 15 cm sepia coloured reproduction photographs attached and handwritten notations [some have come loose or missing] • Henry Cole, Head Teacher, Research, 1891-1903 o RPS-14 Henry Cole as a boy with his older brother Tom o 2 photos as a young man (missing) • Rodda Family, Jospeh B Rodda and two of his daughters o RPS-4 Joseph Rodda of Chun Grove Research o RPS-15 Mary Jane Rodda as Mrs Henry Cole, Sewing Mistress, Research State School, 1891-1897 o RPS-16 Ettie Rodda, Sewing Mistress, Research State School, 1897-1904 • Cole Family o Henry Cole, Head Teacher, 1891-1903 o RPS-3 Wedding photo 1894, Mary Jane Rodda and Henry Cole (missing) o RPS-2 Mary Jane Cole with eldest daughter, Doris, c.1905 (missing) • Cole Family; The Rev. and Mrs Thomas Cole, parents of Henry Cole o Rev. Thomas Cole o Mrs Thomas Cole o RPS-13 The Rev & Mrs Thomas Cole parents of Henry Cole • Cole Family o Reg Cole, O.B.E., as Town Clerk of Hobart meeting Queen Elizabeth and Prince Phillip, 1954. HJR (Reg) Cole was the eldest child of Henry and Mary Jane Cole, and was a pupil at Research State School c.1900-1903 • Sons of Joseph B. Rodda of ‘Chune Grove’, Research o RPS-17 Frederick Rodda o RPS-20 Edwin Rodda o RPS-5 Walter Rodda, 1917 • The Aqueduct (20 x 25 cm black and white reproduction print); built for opening in 1891 to take water from Maroondah to Reservoir (Reynolds Collection) 1.13. Class Photos (photocopies) - with names identified at Centenary 1989 (Buff Folder 5) [Not in Archive Box] Research Primary School- Class Photos (photocopies) -with names identified at Centenary 1989 1964 - 1984 1.14. News Paper Cuttings (Folder 2) News Paper Cuttings • Diamond Valley News - 23 Oct 1984-Centenary Plans - Folklore surrounding Research Township • Diamond Valley News 23 September 1986 - The Teacher who had cut can but never used one (4 copies) • Diamond Valley News- 20 October 1987 - When push bikes were made for touring (2 copies) • Diamond Valley News-14 January 1969 - They lost their homes (Historical places go at Research) • Diamond Valley News- 14 January 1969 - Bush Havoc ( 10 houses burnt at Warrandyte) • The Age - 24 January 1984- Eltham before the Mud Brick • Diamond Valley News - 14 January 1969- First Fire Call came at 10:25 am • Diamond Valley News - 14 January 1969 - Black Wednesday • The Advertiser- 25 July 1930- Research Affairs and add Research Bakery • Evelyn Observer - 26 March 1897 - Research State School part of a district schools expedition to Mordialloc (2 copies) • Diamond Valley News- 21 October 1986- Facing good and bad times with enthusiasm • Diamond Valley News- 14 January 1969 -Obituary David Leslie Mitchener • Diamond Valley News- 25 August 1987 - Eltham - the historic haven (2 copies) • Diamond Valley News-14 January 1969 - Research fire victim still in hospital 1.15. Reminiscences (Folder 3) • Memories of Eltham (Multiple authors) (2 copies) • List of names of children who attended Research Primary School as recalled by Kenneth Ingram (b.1907) provided in 1987 by his niece Grace Burrows (nee Ingram) including names of students and teachers she recalled from her time at school 1936-1941 • Photocopy of Interview by Sue Grigg of Florence Egglestone for publication in Return to Research, ‘Memories of Research 1951-1968’. [Original handwritten version in Yellow Folder 3.] 1.16. School Site and Buildings (Folder 4) • 3 x photocopies of photos of early school building • Raglan Estate Research • Plan of subdivisions Research 1920s • 1981 Education Department Building Operation process to be followed in the event of criminal damage 1.17. School Historical Documents (Folder 5) School Historical Documents • Certificate of Merit Ernest Reynolds • Inventory of Books and Equipment 1891 • Letter from Teacher Frank Scott explain poor results • Letter from Henry Cole recommending appointment of Mary Jane Rodda as Sewing Mistress • Special Certificate for Regular Attendance Anton Brinkkotter (2 copies • Certificate of Merit Anton Brinkkotter 1911 • Merit Certificate Lyla Dickson 1922 • Special Certificate for Regular Attendance Margery Palmer 1927 • Letter from Head teacher Reg Jackman 1957 • Petition to Education Dept 1884 from Research Gully to open a school • Joseph Mankey's complaints about temporary classroom 1890 • Research 1890 - Plan of one acre site to be purchased by education Dept for permanent school • List of buildings and dates • Need for extensions and improvements 1949 • Looking to the Future 1950 • Negotiations to buy school site 1890 2. Magenta Folio 1. USB drive containing • Class photos 1897-2014 • Class photo names • List of head teachers/Principals 1989-2014 • List of Infant Productions 2001-2010 • School photo names typed up identified at centenary reunion 1925-1984 • List of school camps 1964-2014 • List of Senior Productions 1986-2014 • Staff list 1989-2014 • List of grades by year taught by Mrs Avril Baker 1976-2010 2. CD of School and Class Photos 2013-2014 including laminated print of school photo 2014 3. 2 x CD of photos of Research Remembered. CD 1 containing 20 images of various activities from Centenary Celebrations and CD 2 containing 12 images of various student activities (1990s) 3. Clear Folio 1. Additional RPS Material • History of Research State School No. 2959; F.P. Sheehan (Principal) and Mrs M. Allwood (Historian) – duplicate copy of EDHS_03095-1570 held in Main Road property file. • Invitation; The Official Opening of 4 New Classrooms & Library Extension • Program; The Official Opening of 4 New Classrooms & Library Extension, 27 April 1996 • News clipping; Remember Sleepy Swipers Gully? Diamond Valley News, July 22, 1980, pp28-29 • Site plan of building layouts • Colour photo paper print of Rob Wenn’s retirement, June 1999 • Email from former teacher Brett Barnett sent March 2008 (teacher 1967-1980) with references to pet python that students would look after, and which perished when original school building used as a library burnt down • 2 letters (2009) from Peta McGinley offering some papers and photos for school archives. Her father, Rix McGinley was Principal for 1984 till his retirement in 1987. She was also a casual Relief Teacher in her first year of teaching in 1984. • List of 60 names associated with engraved bricks 2. 100th Anniversary 1989 • News clipping; Celebrations and nostalgia at school, Diamond Valley News, Tuesday, August 29, 1989, p28 3. 120th Anniversary 2009 • Notes of contact details of some former students who expressed interest in a reunion 4. 125th Anniversary 24 August 2014 • 3 pages handwritten of reminiscences of a group of mums whose children attended RPS during the 1980s. • 2 pages dated 29 March 2014 typed by Janet Page (nee Zambra) of reminiscences of her years at school (1948-1954) in support of 125th Anniversary Reunion (24 August 2014) sent to Joy Pagan with some queries noted by Maggie Sakko • Reminisces (single sheet double sided handwritten) of teacher Mrs Jacqui Edwards 1989-2001 retired and Casual Relief Teacher 2001-2014 sent to Maggie Sakko in support for 125th Anniversary book and follow up queries from Maggie Sakko (18 July 2014) • List of regular Casual Relief Teachers established by Brooke and Maria for Maggie Sakko • Two pages of working notes • News clipping: Ring in the years, Diamond Valley Leader, Wednesday, August 27, 2014, p1 – Illustrated – “Koray, Aidan and Lasenya helped ring in the 125th anniversary of Research Primary School. A huge reunion brought together past and present students and staff who reminisced about their school days. Report Page 14” • News clipping: School back to the past, Diamond Valley Leader, Wednesday, August 27, 2014, p14 – Illustrated (2 copies) • Poster: Arbor Week June 23-29 (2008) – Arbor Week is the same age as Research Primary School – note written on poster to possibly include tree planting as part of 125th celebrations 5. Centenary of Federation Medal presented to students of Research Primary School (2001) by former student, Miss Ivy Reynolds • Letter: Ivy Reynolds to staff and children, May 22, 2001, letter of thanks for privilege of sharing the celebrations with her • 9 x laminated paper colour prints of students with medals and Ivy Reynolds 6. Newspaper and Magazine Articles • Newspaper Article: Grand designs at Research Primary School by James Poyner; Manningham and Nillumbik Bulletin, February 2022, p8 • Newspaper Article: School’s reconciliation in action by Fiona Vale; Manningham and Nillumbik Bulletin, September 2022main road, property, research (vic.), research state school no. 2959, caledonian gold field, swiper's gully, wallaby town, research gully, discovery gold plenty ranges, fountain of friendship hotel, ray morris, alice russell, norma family, bettison family, reynolds family, william west, joseph m makey, henry james cole, mary jane rodda, florissa milton, f p sheehan, m allwood, research hotel -
 Flagstaff Hill Maritime Museum and Village
Photograph - Vessels Speculant and S. S. Flinders, Between 1902 and 1907
This photograph was one of ten photographs donated to Flagstaff Hill Maritime Museum and Village by Fred Trewartha. Frederick John Fox Trewartha (Fred) was a well-known Warrnambool businessman. He was born in Beeac near Geelong in 1920 and came to Warrnambool with his family as a very young child. He was apprenticed to his father John, as a saddler and later opened his own shop on Raglan Parade. He then moved into working with tarpaulins and canvases for the trucking industry. Fred was keenly interested in photography (and was a member of the Warrnambool Cine Club), yachting and boat building. He kept his yacht moored at Port Fairy for many years and participated in sailing events locally and interstate. He also built boats with his sons. He had the opportunity to meet many older sailors and it's thought this photo (and others in the set) may have been given to him by one of these men. Fred Trewartha died in 2016 in Warrnambool. The two identifiable ships in this picture are the "Speculant" and the "S. S. Flinders" - both coastal trading vessels that regularly came and went from Warrnambool. The third steamer on the left hasn't been identified The barquentine SPECULANT was a steel, three-masted sailing ship built in 1895 in Inverkeithing, Scotland, registered in Warrnambool, Victoria and wrecked at Cape Paton, Victoria, 10th February 1911. The SPECULANT had been involved in the timber trade between the United Kingdom and Russia, until sold to its Warrnambool owners and timber merchants Messrs. P.J. McGennan & Co. (Peter John McGennan) in 1902 for 3000 pounds and had her sailed to Warrnambool as her new port. Peter John McGennan was born in 1844 and worked as a builder and cooper in Holyhead, Anglesea, Wales. He immigrated to Australia in 1869 as a free settler and arrived in Warrnambool in 1871 and undertook management of a property in Grassmere for Mr. Palmer. Peter met his wife Emily in South Melbourne and they married in 1873. They had ten children including Harry who lived to 1965, and Andrew who lived until 1958. (The other children were their four brothers - John who was killed in the Dardenalles aged 35, Frederick who died aged 8, Peter who died aged 28, Frank who died aged 5 weeks - and four sisters - Beatrice who died age 89, Edith who died aged 49, Blanche who died aged 89 and Eveline who died aged 48.) In 1874 Peter starting a boating establishment on the Hopkins River. In 1875 he opened up a Coopers business in Kepler Street next to what was Bateman, Smith and Co., moving to Liebig Street, next to the Victoria Hotel, in 1877. In 1882 he then moved to Lava Street (which in later years was the site of Chandlers Hardware Store). He was associated with the establishment of the Butter Factory at Allansford. He started making Butter Boxes to his own design and cheese batts for the Butter Factory. In 1896 established a Box Factory in Davis Street Merrivale, employing 24 people at its peak, (it was burnt down in 1923); and in Pertobe Road from 1912 (now the Army Barracks building). Peter was a Borough Councillor for Albert Ward from 1885 to 1891, he commenced the Foreshore Trust (including the camping grounds along Pertobe Road), and he was an inaugural Director of the Woollen Mill in Harris Street, buying an extensive share-holding in 1908 from the share trader Edward Vidler. They lobbied the Town Hall to have a formal ‘Cutting’ for the waters of the Merri River to be redirected from its natural opening south of Dennington, to its existing opening near Viaduct Road, in order to have the scourings from the wool at the Woollen Mill discharged into the sea. He sold Butter Boxes around the state, and had to ship them to Melbourne by rail. Peter’s purchase of the SPECULANT in 1902 enabled him to back-load white pine from Kaipara, New Zealand to Warrnambool to make his butter boxes then, to gain profitability, buy and ship potatoes and other primary produce bound to Melbourne. (McGennan & Co. had also owned the LA BELLA, which had traded in timber as well, until she was tragically wrecked with the loss of seven lives, after missing the entrance channel to Warrnambool harbour in 1905. It appears that the SPECULANT was bought to replace the LA BELLA.) In 1911 the SPECULANT had been attempting to depart Warrnambool for almost the entire month of January to undergo docking and overhaul in Melbourne. A month of east and south-easterly winds had forced her to remain sheltered in Lady Bay, Warrnambool apart from one morning of northerlies, when an attempt was made to round Cape Otway; she had to return to shelter in Portland after failing to make any headway. With only 140 tons of sand ballast aboard, the ship would not have been easy to handle. Captain Jacobsen and his crew of nine, mainly Swedes, decided to make for Melbourne, leaving Portland Harbour on 5th February 1911. By the 9th they had reached Cape Otway, where they encountered a moonless night, constant heavy rain, and a heavy sea with a south-easterly wind blowing. After safely rounding Cape Otway the course was changed to east, then north-east to take the vessel to a point six miles off Cape Patton, following the orders of Captain Jacobsen, who told the crew to be very careful with the steering, as the wind and sea was running to leeward. The patent log (used to measure speed) had been out of order for the last four months as no-one in Warrnambool was able to fix it: it was intended to have it repaired in Melbourne. In the meantime the crew measured the vessel's speed by looking over the side and estimating wind strength. This compounded the difficulties of imprecise positioning, as the strong cross wind and sea were acting on the lightly laden vessel to steadily drive it towards the shore. At 3.30am on Friday 10 February 1911 Captain Jacobsen and the first mate were looking over the side of the vessel when they heard the sound of breakers and suddenly struck the rocks. The crew immediately knew they had no chance of getting the SPECULANT off, and attempted to rescue themselves by launching the lifeboat, which was instantly smashed to pieces. One of the crew then volunteered to take a line ashore, and the rest of the crew were all able to drag themselves to shore, some suffering hand lacerations from the rocks. Once ashore they began to walk along the coast towards Lorne, believing it was the nearest settlement. Realising their mistake as dawn broke they returned westwards to Cape Patton, and found a farm belonging to Mr C. Ramsden, who took them in and gave them a change of clothes and food. After resting for a day and returning to the wreck to salvage some of their personal possessions, at 10am on Saturday they set out for Apollo Bay, a voyage that took six hours, sometimes wading through flooded creeks up to their necks. The Age described the wreck as "listed to starboard. All the cabin is gutted and the ballast gone. There is a big rock right through the bottom of her, and there is not the slightest hope of getting her off". A Board of Marine inquiry found that Captain Jacobson was guilty of careless navigation by not taking steps to accurately verify the position of the vessel with respect to Cape Otway when the light was visible and by not setting a safe and proper course with respect to the wind and sea. It suspended his certificate for 6 months and ordered him to pay costs. The location of the wreck site was marked for a long time by two anchors on the shoreline, until in 1970 the larger of the two anchors was recovered by the Underwater Explorers' Club and mounted on the foreshore at Apollo Bay. The bell from the wreck was also donated to the Apollo Bay Surf Lifesaving Club but is recorded to have been stolen. Rusting remains of the wreck can still be found on the shoreline on the southern side of, and directly below Cape Patton. Parts of the SPECULANT site have been buried by rubble from construction and maintenance works to the Great Ocean Road, as well as by naturally occurring landslides. Peter J McGennan passed away in 1920. The Gates in the western wall of the Anglican Church in Henna Street/Koroit St are dedicated to him for his time of community work, which is matched with other prominent Warrnambool citizens; Fletcher Jones, John Younger, J.D.E (Tag) Walter, and Edward Vidler. After Peter J McGennan's death Harry, Andrew and Edith continued to operate the family business until July 11th 1923 when the company was wound up. (Andrew lived in Ryot Street Warrnambool, near Lava Street.) Harry McGennan (Peter and Emily’s son) owned the Criterion Hotel in Kepler Street Warrnambool (now demolished). His son Sid and wife Dot lived in 28 Howard Street (corner of Nelson Street) and Sid managed the Criterion until it was decided by the family to sell, and for he remained Manager for the new owners until he retired. Harry commenced the Foreshore Trust in Warrnambool around 1950. The McGennan Carpark in Pertobe Road is named after Harry and there are Memorial-Stone Gates in his memory. (The Gates were once the original entrance to the carpark but are now the exit.). The Patent Log (also called a Taffrail log) from the SPECULANT, mentioned above, and a number of photographs, are now part of the Collection at Flagstaff Hill Maritime Village.. The S. S. Flinders was built by A. J. Inglis, Ltd, Pointhouse, Glasgow in 1878 for the "Tasmanian Steam Navigation Company', Hobart which merged with the "Union Steamship Company" of New Zealand and it was later sold to the firm "McIlwraith, McEacham and Company". It was built of iron and was 1000 tons and 227 feet, 1 inch long. It was described as "splendidly fitted up for the carriage of passengers and her cargo space was also very large". In the saloon about 130 passengers could be accommodated while the second class had sufficient room for one hundred passengers. In 1890, the S. S. Flinders would leave Melbourne on Mondays and Thursdays at 5 pm and reach Warrnambool the following morning at 8 am. On the return it would leave Warrnambool on Wednesdays and Saturdays at 5 pm and reach Melbourne the following morning. In 1896, the Weekly Times described the "steamer Flinders (otherwise known as "the Warrnambool mailboat") as "as good a sample of a seagoing steamer as there is trading on the Victorian Coast at the present time". In April 1896 newspaper reports noted the S. S. Flinders took 2915 bags of potatoes from Warrnambool to Melbourne (the largest shipment of that season) as well as 50 tons of tinned rabbits from the Hamilton Preserving Factory. It was also noted that particularly during the Christmas period, there were excessive demands for berths from holiday makers wanting to enjoy a holiday in Warrnambool. In May 1903, the S. S. Flinders narrowly escaped destruction when an explosion and subsequent fire occurred during the passage from Melbourne to Warrnambool. A drum (which apparently contained carbide of calcium) exploded and blew off a hatch cover. As the steamer got to within a mile or two of Warrnambool, smoke was seen coming out of the hold and (unknown to the passengers) flames had taken hold. The crew quickly got to work - closing down all the hatches and pumping water into the hold through a hole in the saloon floor. There were 30 or 40 cases of kerosene on board. The Flinders continued on to Warrnambool and berthed at the Breakwater. The passengers all went ashore - many unaware of the danger they had been in. A telephone message was sent to the local Fire Brigade Station however the fire was extinguished before the firemen and their equipment arrived. After the hold was checked, the Flinders was certified as seaworthy and left for Portland. The Flinders continued to transport Western District produce as well as passengers from Warrnambool to Melbourne until 1906 when (due to a decrease in shipping trade during the Winter and the availability of train services) the Flinders was replaced by the smaller steamer "Dawn" and in 1907 when it was sold to the "Adelaide Steamship Company" for use in the Western Australia coastal trade, it was replaced by the "S. S. Barrabool".This photograph is a significant record of two of the well known coastal traders (the "Speculant" and the "Flinders") that sailed along the south west coast of Victoria for many years - transporting goods and passengers between Melbourne and Warrnambool.Black and white photograph of the Breakwater in Warrnambool with two ships docked and another in the bay. On the front boat (the Speculant), men can be seen at the wheel, on the deck and on the bottom two booms where they appear to be furling the sails. The sails of the top booms are already furled. A small boy can be seen on the deck and a young girl, two women and a dog are on the Breakwater. There is a steam ship (the S. S. Flinders) tied up behind the "Speculant" and an unidentified steam ship (with smoke coming from its smokestack) in the bay. There is a blue and black handwritten label on the back of the photo - naming the ships and the owner of the photo.Speculant and Flinders / Passenger ship in / Lady Bay / name of donor and phone numberflagstaff hill maritime museum and village, warrnambool, great ocean road, shipwreck coast, speculant, barque speculant, flinders, s. s. finders, steamship flinders, coastal trader, passenger ship, goods, steamer, breakwater, lady bay, warrnambool mailboat, p. j. mcgennan, peter john mcgennan, butter boxes, captain jacobsen, cape patton, tasmanian steam navigation company -
 Southern Sherbrooke Historical Society Inc.
Textile - Helen Gibson collection - material, cottons, etc
-
 Ballarat Tramway Museum
Book, H.P. James, "Out of the Past", 1940
ESCo Employee Hours Work Record book that has been used by an ESCo/SEC inspector, H. P. James as a record / note book for his personal collection or papers or journal titled "Out of the Past". Book sewn with string in 36 page sections, blank end papers, board covers with stipple paper out sides and Rexene cloth binding. Comprising plain paper end papers and 104 printed pages (52 leaves), with each sheet printed in black on feint ruled paper for recording the hours worked and other details of drivers and conductors employed by ESCo. Printed for daily use, with Day and date page headings - made out for the 1930's. Images: Book - i1 Inside front cover - i2 Members Certificate - i3 Has been used to gather mementos such as photos, articles, newspaper clippings, letters and other miscellaneous documents on Ballarat local history. Newspaper cuttings etc often have side notes written by Mr. James. Inside front cover has certificate recording Mr. James membership to the Ballarat Historical Society for 1940. Receipt signed by Edward Crimmins. Also a newspaper cutting on the cost of pensions to Lord Nelson's family. On facing page a photo of Queen Elizabeth, a printer colour cover or sheet about Walt Disney's "Pinocchio", a newspaper cutting regarding Father's Day and a black and white photograph of a young girl in a hospital carriage being pushed by a man. Pages numbered odd numbers only in the top right hand corner in pencil. Primary items are: 1 - Coloured cover to a writing tablet, titled "Australian Birds". Underlying this on the back of the writing tablet is two newspaper cuttings: the Ballarat Historical Society - reports on the 6th Annual meeting of the Society. 3 - Photo of the pattern Ballaarat Horse Tram company tram outside the Duncan and Fraser's Carriage Works in Adelaide with hand written notes underneath, including a sketch of a horse tram drivers seat - see Reg. Item 2527. 4, 6 - Group of nine black and white printed cards (15 illustrations) of early Ballarat pasted onto the sheet - see Reg. Item 2528. 5, 7 & 9 - Printed notes titled "Valedictory to Bob Haines" - see Reg. Item 2529. On page 9 in the left hand margin, a printed list of Church Officers; Church of England. 8 - Newspaper cuttings titled "The Heralds Man's Quiz" and the answers adjacent. City of Ballaarat - Public Inoculation Depot - Influenza form for HP James of ESCo - See Reg. Item 2530. Page Numbering from this point changes - even numbers in top right hand corner of folios instead of odd numbers. 9A - Newspaper cuttings about a Theatre Show, 54 years service of Mr. E. R. Bodycomb (Ballarat Gas) and planting of trees in the Avenue of Honour - with a red line around H. P. James names and a reproduction of the opening photograph of ESCo Electric Trams - noting 30 years ago - See Reg. Item 310.2. ESCo 4d Ticket - Purple - Grenville St to Sebastopol Terminus - See Reg Item 2531. ESCo 3d Adult Transfer Ticket - See Reg. Item 2532. Illustration - cartoon - H.P. James - See Reg. Item 2533. 10 - Newspaper cutting "From Horse Tram to Trolley Bus" - See Reg Item 2534. Newspaper cutting "Melbourne's First Tramcars" - See Reg Item 2535. An inscription or written note from T. Thomas etc. on lower edge of the sheet. 11,12 - Newspaper cuttings about the Passing of Melbourne's Cable Trams, including a photo of cable trailer No. 1 - See Reg. Item 2536. Other cuttings about early residents of the Ballarat district. 13 - Newspaper cutting dated 2/5/1936 about the donation from the CTA to the Ballarat Hospital. 14 - Newspaper cuttings - Photo of Ballarat Bicycle and Tricycle Club in the Gardens, the issue of a stamp to commemorate the Centenary of Ballarat, radio stations in Sydney, Ballarat Choirs and fire brigade demonstrations trophies. 16 - Copy of the "City of Ballaarat Regulation No. 13" concerning Hackney and Stage coaches working within the City - See Reg. item 2537. 18, 20 - Newspaper cutting - "The Working Classes in Early Ballarat" - Nathan Spielvogel 21 - handwritten note on "Doctor" Thomas Blackett who died during 1940. 22 - Miscellaneous cuttings from the Melbourne Sun. 23 - Newspaper cuttings "Story of South Street", Show Grounds, and "The Alfred" Hall and a photograph of the 1938 Floral Carpet at Alfred Hall. 24 - Newspaper cutting - obituary and hand written note on Ballarat identity Mr. J. P. Bourke. 25 - Newspaper cutting - cartoon "Tiddley" Winks and Wally - Stan Cross (later "Wally and the Major" 26 - Newspaper cutting - "Ballarat in the sixties" - General R.E. Williams and "Early Recollections" - Arthur Reid. 27 - Handwritten note re Mrs. Bill Danks, dated Jan. 1941 - Tobacconist in Bridge St. 28 - Newspaper cutting - "First Town Hall" and note on "City Hall". 30 - Newspaper cuttings - "Good Friday, Now and Then - T.P. Long, Mont Albert and "On Fashions" James R. Pound. 32 - Newspaper cutting "School and School life in old Ballarat" - Nathan F. Spielvogel. 34 - Newspaper cutting continued from page 32 and Obituary - Mr. Archie Dawson and Tom Blackett. 35 - Newspaper cutting of Ballarat - 4 photos - include Bridge St. with a tram. 36 - Newspaper cutting - "Ballarat - Pastoral and Industrial Resources" from a Melbourne paper, 17/2/1940. 38 - Newspaper cuttings - obituaries - Mr. R. E. Tunbridge, Graeme Dowling and Thomas Crosthwaite. 39 - Illustration - black and white - Late Mr. P. J. Pringle - See Reg. Item 2538. 40 - Handwritten notes on Ballarat Trams and the power station staff - See Reg. Item 2539. 41 - Handwritten notes on Ballarat Pie Stalls 42 - Newspaper cuttings - cartoon "Professor Nimbus", photo of the Norwegian town of Hell (Railway station); bicycles on a Copenhagen bridge following German occupation and dragon flies in Melbourne. 43 - Newspaper cutting on the official opening of the Ballarat Historical Society's Museum. 44 - Newspaper cuttings and associated handwritten notes on a fire in Ballarat, poultry fanciers, historical dates for August. 46 - Newspaper cuttings - "Victoria's first profitable goldfield" - Ballarat and the unveiling of the Sovereign Hill direction pillar. 48 - Newspaper cutting - "Worked 27 years without holiday" - See Reg. Item. 2540. - Other newspaper cuttings - thoughts of a visitor to Ballarat from Sydney and H.P. James - Liquor control in Ballarat and "This Week at the Zoo". 50 - Handwritten notes on clothing. 51 - Handwritten note on a visit to W. H. Middleton 52 - Newspaper cuttings "The Kings Empire", "Ballarat Birthdays" for Sept and Oct and an obituary on Mr. W. H. Middleton. 54 - Newspaper cuttings "Richmond has Links With Early Goldfields" - Malcolm McCullum and "England's Greatest Battle" 55, 56 - Newspaper cuttings - "Ballarat Birthdays" for November and December, a photograph of Nick Oliver - former Ballarat fireman and "Railway Birthday" - birth of the VR. 57, 58 - Handwritten notes on Ballarat tram timetables, weekly tickets, motorman's record cards, tourist tickets and sample tickets or cards, See Reg. Item 2541. Lunch Hour Weekly Ticket - Reg. Item 2542 Morning and Evening Weekly Ticket - Reg. Item 2543 Motorman's Record - Reg. Item 2544 Tourist Ticket - 1/- - Reg. Item 2545. 60 - Newspaper cuttings - parts 1 and 2 - "The Two Ballarat" by Nathan Spielvogel. 62 - Newspaper cuttings - continued from page 60, the death of comedians Sam Mayo and Gus Bluett and some handwritten notes on comedians. 64 - Newspaper cuttings on cricket, choir rules, a Methodist ladies function at the home of H.P. James, Footballer Percy Beames and entertaining air force recruits at the showgrounds. 66 - Newspaper cuttings - "The Anvil Chorus" - Hitler and Mussolini and "Strength against Nazi Threat". 68 - Newspaper cuttings - 50 years ago in Ballarat, Social function at H.P. James house, coldest morning in Ballarat and the death of Col. A. W. Bennett. 70 - Newspaper cuttings - about the sale of spirits in early Ballarat, the first motorcars in Ballarat and handwritten note about Mr. Jago. 72 - Newspaper cuttings - misc. about horse racing, trainers and racing. 73 - Newspaper cuttings and handwritten notes about Ballarat Schools. 74 - Newspaper cuttings - Bruno Hauptmann (Charles Lindbergh) and the death of actor Darcy Kelway. 75, 76 - Newspaper cuttings - Rail services to and from Ballarat, effects of the war and Ballarat 70 years ago, the invasions of Britain and "A stroll down Memory Lane" - T.P. Long of Mont Albert. 77,78 - Newspaper cuttings - Lake Wendouree - Nathan Spielvogel, the opening of the new Ballarat Historical Society's Museum and farewell function of Mr. James Shannon. 79 - Newspaper cuttings - about boats on lake Wendouree. 99 - Obituary and hand written note re Mr. Arthur M. David. 100 - Newspaper cuttings - cartoon "Wally and the Major", Dr William Maloney, Gus Bluett and "Old Rowley" - in connection with the Melbourne Cup of 1940. 101 - Cartoon advertisement for Kolynos Dental Cream Inside rear cover - Programme for the Centenary of Thanksgiving Service - Back to Ballarat 1934, dated 4/11/1934 (has been affected by other sheets of paper due to their acidic nature), printed notes titled "A ramble on stilts with Freddie" written by Baker James. Many in pencil and inktrams, tramways, h.p. james, esco, horse trams, ballarat, civic history -
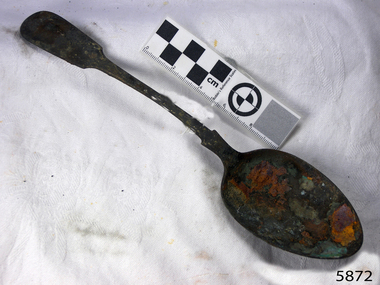 Flagstaff Hill Maritime Museum and Village
Domestic object - Spoon, circa 1878
This table spoon is from the wreck of the LOCH ARD, a Loch Line ship of 1,693 tons which sailed from Gravesend, London, on 2 March 1878 with 17 passengers and a crew of 36 under Captain George Gibbs. “The intention was to discharge cargo in Melbourne, before returning to London via the Horn with wool and wheat”. Instead, on 1 June 1878, after 90 days at sea, she struck the sandstone cliffs of Mutton Bird Island on the south west coast of Victoria, and sank with the loss of 52 lives and all her cargo. The manifest of the LOCH ARD listed an array of manufactured goods and bulk metals being exported to the Colony of Victoria, with a declared value of £53,700. (202 bills of lading show an actual invoice value of £68, 456, with insurance underwriting to £30,000 of all cargo). Included in the manifest is the item of “Tin hardware & cutlery £7,530”. This table spoon is one of 482 similar items of electro-plated cutlery from the LOCH ARD site, comprising spoons and forks of various sizes but all sharing the same general shape or design and metallic composition. 49 of these pieces display a legible makers’ mark — the initials “W” and “P” placed within a raised diamond outline, which is in turn contained within a sunken crown shape — identifying the manufacturer as William Page & Co of Birmingham. An electroplater’s makers’ marks, unlike sterling silver hallmarks, are not consistent identifiers of quality or date and place of manufacture. A similar line of five impressions was usually made to impress the consumer with an implication of industry standards, but what each one actually signified was not regulated and so they varied according to the whim of the individual foundry. In this case, the maker’s marks are often obscured by sedimentary accretion or removed by corrosion after a century of submersion in the ocean. However sufficient detail has survived to indicate that these samples of electro-plated cutlery probably originated from the same consignment in the LOCH ARD’s cargo. The generally common range of marks are drawn from 255 tea spoons, 125 dessert spoons, and 99 table forks. These marks are clearly visible in 66 instances, while the same sequence of general outlines, or depression shapes, is discernible in another 166 examples. Suggested trade names for William Page & Co’s particular blend of brass plating are ‘roman silver’ or ‘silverite’. This copper alloy polishes to a lustrous gold when new, discolouring to a murky grey with greenish hue when neglected. HISTORY OF THE LOCH ARD The LOCH ARD belonged to the famous Loch Line which sailed many ships from England to Australia. Built in Glasgow by Barclay, Curdle and Co. in 1873, the LOCH ARD was a three-masted square rigged iron sailing ship. The ship measured 262ft 7" (79.87m) in length, 38ft (11.58m) in width, 23ft (7m) in depth and had a gross tonnage of 1693 tons. The LOCH ARD's main mast measured a massive 150ft (45.7m) in height. LOCH ARD made three trips to Australia and one trip to Calcutta before its final voyage. LOCH ARD left England on March 2, 1878, under the command of Captain Gibbs, a newly married, 29 year old. She was bound for Melbourne with a crew of 37, plus 17 passengers and a load of cargo. The general cargo reflected the affluence of Melbourne at the time. On board were straw hats, umbrella, perfumes, clay pipes, pianos, clocks, confectionary, linen and candles, as well as a heavier load of railway irons, cement, lead and copper. There were items included that intended for display in the Melbourne International Exhibition in 1880. The voyage to Port Phillip was long but uneventful. At 3am on June 1, 1878, Captain Gibbs was expecting to see land and the passengers were becoming excited as they prepared to view their new homeland in the early morning. But LOCH ARD was running into a fog which greatly reduced visibility. Captain Gibbs was becoming anxious as there was no sign of land or the Cape Otway lighthouse. At 4am the fog lifted. A man aloft announced that he could see breakers. The sheer cliffs of Victoria's west coast came into view, and Captain Gibbs realised that the ship was much closer to them than expected. He ordered as much sail to be set as time would permit and then attempted to steer the vessel out to sea. On coming head on into the wind, the ship lost momentum, the sails fell limp and LOCH ARD's bow swung back. Gibbs then ordered the anchors to be released in an attempt to hold its position. The anchors sank some 50 fathoms - but did not hold. By this time LOCH ARD was among the breakers and the tall cliffs of Mutton Bird Island rose behind the ship. Just half a mile from the coast, the ship's bow was suddenly pulled around by the anchor. The captain tried to tack out to sea, but the ship struck a reef at the base of Mutton Bird Island, near Port Campbell. Waves broke over the ship and the top deck was loosened from the hull. The masts and rigging came crashing down knocking passengers and crew overboard. When a lifeboat was finally launched, it crashed into the side of LOCH ARD and capsized. Tom Pearce, who had launched the boat, managed to cling to its overturned hull and shelter beneath it. He drifted out to sea and then on the flood tide came into what is now known as LOCH ARD Gorge. He swam to shore, bruised and dazed, and found a cave in which to shelter. Some of the crew stayed below deck to shelter from the falling rigging but drowned when the ship slipped off the reef into deeper water. Eva Carmichael had raced onto deck to find out what was happening only to be confronted by towering cliffs looming above the stricken ship. In all the chaos, Captain Gibbs grabbed Eva and said, "If you are saved Eva, let my dear wife know that I died like a sailor". That was the last Eva Carmichael saw of the captain. She was swept off the ship by a huge wave. Eva saw Tom Pearce on a small rocky beach and yelled to attract his attention. He dived in and swam to the exhausted woman and dragged her to shore. He took her to the cave and broke open case of brandy which had washed up on the beach. He opened a bottle to revive the unconscious woman. A few hours later Tom scaled a cliff in search of help. He followed hoof prints and came by chance upon two men from nearby Glenample Station three and a half miles away. In a state of exhaustion, he told the men of the tragedy. Tom returned to the gorge while the two men rode back to the station to get help. By the time they reached LOCH ARD Gorge, it was cold and dark. The two shipwreck survivors were taken to Glenample Station to recover. Eva stayed at the station for six weeks before returning to Ireland, this time by steamship. In Melbourne, Tom Pearce received a hero's welcome. He was presented with the first gold medal of the Royal Humane Society of Victoria and a £1000 cheque from the Victorian Government. Concerts were performed to honour the young man's bravery and to raise money for those who lost family in the LOCH ARD disaster. Of the 54 crew members and passengers on board, only two survived: the apprentice, Tom Pearce and the young woman passenger, Eva Carmichael, who lost all of her family in the tragedy. Ten days after the LOCH ARD tragedy, salvage rights to the wreck were sold at auction for £2,120. Cargo valued at £3,000 was salvaged and placed on the beach, but most washed back into the sea when another storm developed. The wreck of LOCH ARD still lies at the base of Mutton Bird Island. Much of the cargo has now been salvaged and some was washed up into what is now known as LOCH ARD Gorge. Cargo and artefacts have also been illegally salvaged over many years before protective legislation was introduced. One of the most unlikely pieces of cargo to have survived the shipwreck was a Minton porcelain peacock - one of only seven in the world. The peacock was destined for the Melbourne International Exhibition in 1880. It had been well packed, which gave it adequate protection during the violent storm. Today, the Minton peacock can be seen at the Flagstaff Hill Maritime Museum in Warrnambool. From Australia's most dramatic shipwreck it has now become Australia's shipwreck artefact and is one of very few 'objects' on the Victorian State Heritage Register most valuable. HISTORY OF THE LOCH ARD The LOCH ARD belonged to the famous Loch Line which sailed many ships from England to Australia. Built in Glasgow by Barclay, Curdle and Co. in 1873, the LOCH ARD was a three-masted square rigged iron sailing ship. The ship measured 262ft 7" (79.87m) in length, 38ft (11.58m) in width, 23ft (7m) in depth and had a gross tonnage of 1693 tons. The LOCH ARD's main mast measured a massive 150ft (45.7m) in height. LOCH ARD made three trips to Australia and one trip to Calcutta before its final voyage. LOCH ARD left England on March 2, 1878, under the command of Captain Gibbs, a newly married, 29 year old. She was bound for Melbourne with a crew of 37, plus 17 passengers and a load of cargo. The general cargo reflected the affluence of Melbourne at the time. On board were straw hats, umbrella, perfumes, clay pipes, pianos, clocks, confectionary, linen and candles, as well as a heavier load of railway irons, cement, lead and copper. There were items included that intended for display in the Melbourne International Exhibition in 1880. The voyage to Port Phillip was long but uneventful. At 3am on June 1, 1878, Captain Gibbs was expecting to see land and the passengers were becoming excited as they prepared to view their new homeland in the early morning. But LOCH ARD was running into a fog which greatly reduced visibility. Captain Gibbs was becoming anxious as there was no sign of land or the Cape Otway lighthouse. At 4am the fog lifted. A man aloft announced that he could see breakers. The sheer cliffs of Victoria's west coast came into view, and Captain Gibbs realised that the ship was much closer to them than expected. He ordered as much sail to be set as time would permit and then attempted to steer the vessel out to sea. On coming head on into the wind, the ship lost momentum, the sails fell limp and LOCH ARD's bow swung back. Gibbs then ordered the anchors to be released in an attempt to hold its position. The anchors sank some 50 fathoms - but did not hold. By this time LOCH ARD was among the breakers and the tall cliffs of Mutton Bird Island rose behind the ship. Just half a mile from the coast, the ship's bow was suddenly pulled around by the anchor. The captain tried to tack out to sea, but the ship struck a reef at the base of Mutton Bird Island, near Port Campbell. Waves broke over the ship and the top deck was loosened from the hull. The masts and rigging came crashing down knocking passengers and crew overboard. When a lifeboat was finally launched, it crashed into the side of LOCH ARD and capsized. Tom Pearce, who had launched the boat, managed to cling to its overturned hull and shelter beneath it. He drifted out to sea and then on the flood tide came into what is now known as LOCH ARD Gorge. He swam to shore, bruised and dazed, and found a cave in which to shelter. Some of the crew stayed below deck to shelter from the falling rigging but drowned when the ship slipped off the reef into deeper water. Eva Carmichael had raced onto deck to find out what was happening only to be confronted by towering cliffs looming above the stricken ship. In all the chaos, Captain Gibbs grabbed Eva and said, "If you are saved Eva, let my dear wife know that I died like a sailor". That was the last Eva Carmichael saw of the captain. She was swept off the ship by a huge wave. Eva saw Tom Pearce on a small rocky beach and yelled to attract his attention. He dived in and swam to the exhausted woman and dragged her to shore. He took her to the cave and broke open case of brandy which had washed up on the beach. He opened a bottle to revive the unconscious woman. A few hours later Tom scaled a cliff in search of help. He followed hoof prints and came by chance upon two men from nearby Glenample Station three and a half miles away. In a state of exhaustion, he told the men of the tragedy. Tom returned to the gorge while the two men rode back to the station to get help. By the time they reached LOCH ARD Gorge, it was cold and dark. The two shipwreck survivors were taken to Glenample Station to recover. Eva stayed at the station for six weeks before returning to Ireland, this time by steamship. In Melbourne, Tom Pearce received a hero's welcome. He was presented with the first gold medal of the Royal Humane Society of Victoria and a £1000 cheque from the Victorian Government. Concerts were performed to honour the young man's bravery and to raise money for those who lost family in the LOCH ARD disaster. Of the 54 crew members and passengers on board, only two survived: the apprentice, Tom Pearce and the young woman passenger, Eva Carmichael, who lost all of her family in the tragedy. Ten days after the LOCH ARD tragedy, salvage rights to the wreck were sold at auction for £2,120. Cargo valued at £3,000 was salvaged and placed on the beach, but most washed back into the sea when another storm developed. The wreck of LOCH ARD still lies at the base of Mutton Bird Island. Much of the cargo has now been salvaged and some was washed up into what is now known as LOCH ARD Gorge. Cargo and artefacts have also been illegally salvaged over many years before protective legislation was introduced. One of the most unlikely pieces of cargo to have survived the shipwreck was a Minton porcelain peacock - one of only seven in the world. The peacock was destined for the Melbourne International Exhibition in 1880. It had been well packed, which gave it adequate protection during the violent storm. Today, the Minton peacock can be seen at the Flagstaff Hill Maritime Museum in Warrnambool. From Australia's most dramatic shipwreck it has now become Australia's shipwreck artefact and is one of very few 'objects' on the Victorian State Heritage Register most valuable. The LOCH ARD shipwreck is of State significance – Victorian Heritage Register S 417. Flagstaff Hill’s collection of artefacts from LOCH ARD is significant for being one of the largest collections of artefacts from this shipwreck in Victoria. It is significant for its association with the shipwreck, which is on the Victorian Heritage Register (VHR S417). The collection is significant because of the relationship between the objects, as together they have a high potential to interpret the story of the LOCH ARD. The LOCH ARD collection is archaeologically significant as the remains of a large international passenger and cargo ship. The LOCH ARD collection is historically significant for representing aspects of Victoria’s shipping history and its potential to interpret sub-theme 1.5 of Victoria’s Framework of Historical Themes (living with natural processes). The collection is also historically significant for its association with the LOCH ARD, which was one of the worst and best known shipwrecks in Victoria’s history. Unrestored table spoon from the wreck of the LOCH ARD. The spoon design has a flattened fiddle-back handle, with a thin stem or shank, flared collar, and a shallow rounded bowl. The spoons metallic composition is a thin layer of brass alloy which has partially corroded back to a nickel-silver base metal. Minimal original plate remains. Some verdigris (15%) and concretion (40%) on front and back of spoon. Spoon is bent and balance is covered in Silver Oxide.flagstaff hill maritime museum, shipwreck coast, great ocean road, loch line, loch ard, mutton bird island, loch ard gorge, electroplated cutlery, loch ard shipwreck, william page and co, birmingham brass plating, table spoons -
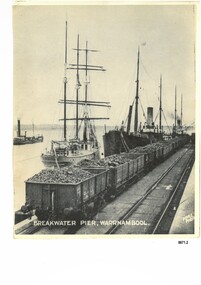 Flagstaff Hill Maritime Museum and Village
Photograph - Vessels at Breakwater Pier, Warrnambool, Foyle Photographic Studio, circa 1906
This photograph was one of ten photographs donated to Flagstaff Hill Maritime Museum and Village by Fred Trewartha. Frederick John Fox Trewartha (Fred) was a well-known Warrnambool businessman. He was born in Beeac near Geelong in 1920 and came to Warrnambool with his family as a very young child. He was apprenticed to his father John, as a saddler and later opened his own shop on Raglan Parade. He then moved into working with tarpaulins and canvases for the trucking industry. Fred was keenly interested in photography (and was a member of the Warrnambool Cine Club), yachting and boat building. He kept his yacht moored at Port Fairy for many years and participated in sailing events locally and interstate. He also built boats with his sons. He had the opportunity to meet many older sailors and it's thought this photo (and others in the set) may have been given to him by one of these men. Fred Trewartha died in 2016 in Warrnambool. The three identifiable ships in this picture are the "Speculant", the "S. S. Barrabool" and the "S. S. Flinders" - coastal trading vessels that regularly came and went from Warrnambool. The steamer on the left hasn't been identified. The barquentine SPECULANT was a steel, three-masted sailing ship built in 1895 in Inverkeithing, Scotland, registered in Warrnambool, Victoria and wrecked at Cape Paton, Victoria, 10th February 1911. The SPECULANT had been involved in the timber trade between the United Kingdom and Russia, until sold to its Warrnambool owners and timber merchants Messrs. P.J. McGennan & Co. (Peter John McGennan) in 1902 for 3000 pounds and had her sailed to Warrnambool as her new port. Peter John McGennan was born in 1844 and worked as a builder and cooper in Holyhead, Anglesea, Wales. He immigrated to Australia in 1869 as a free settler and arrived in Warrnambool in 1871 and undertook management of a property in Grassmere for Mr. Palmer. Peter met his wife Emily in South Melbourne and they married in 1873. They had ten children including Harry who lived to 1965, and Andrew who lived until 1958. (The other children were their four brothers - John who was killed in the Dardenalles aged 35, Frederick who died aged 8, Peter who died aged 28, Frank who died aged 5 weeks - and four sisters - Beatrice who died age 89, Edith who died aged 49, Blanche who died aged 89 and Eveline who died aged 48.) In 1874 Peter starting a boating establishment on the Hopkins River. In 1875 he opened up a Coopers business in Kepler Street next to what was Bateman, Smith and Co., moving to Liebig Street, next to the Victoria Hotel, in 1877. In 1882 he then moved to Lava Street (which in later years was the site of Chandlers Hardware Store). He was associated with the establishment of the Butter Factory at Allansford. He started making Butter Boxes to his own design and cheese batts for the Butter Factory. In 1896 established a Box Factory in Davis Street Merrivale, employing 24 people at its peak, (it was burnt down in 1923); and in Pertobe Road from 1912 (now the Army Barracks building). Peter was a Borough Councillor for Albert Ward from 1885 to 1891, he commenced the Foreshore Trust (including the camping grounds along Pertobe Road), and he was an inaugural Director of the Woollen Mill in Harris Street, buying an extensive share-holding in 1908 from the share trader Edward Vidler. They lobbied the Town Hall to have a formal ‘Cutting’ for the waters of the Merri River to be redirected from its natural opening south of Dennington, to its existing opening near Viaduct Road, in order to have the scourings from the wool at the Woollen Mill discharged into the sea. He sold Butter Boxes around the state, and had to ship them to Melbourne by rail. Peter’s purchase of the SPECULANT in 1902 enabled him to back-load white pine from Kaipara, New Zealand to Warrnambool to make his butter boxes then, to gain profitability, buy and ship potatoes and other primary produce bound to Melbourne. (McGennan & Co. had also owned the LA BELLA, which had traded in timber as well, until she was tragically wrecked with the loss of seven lives, after missing the entrance channel to Warrnambool harbour in 1905. It appears that the SPECULANT was bought to replace the LA BELLA.) In 1911 the SPECULANT had been attempting to depart Warrnambool for almost the entire month of January to undergo docking and overhaul in Melbourne. A month of east and south-easterly winds had forced her to remain sheltered in Lady Bay, Warrnambool apart from one morning of northerlies, when an attempt was made to round Cape Otway; she had to return to shelter in Portland after failing to make any headway. With only 140 tons of sand ballast aboard, the ship would not have been easy to handle. Captain Jacobsen and his crew of nine, mainly Swedes, decided to make for Melbourne, leaving Portland Harbour on 5th February 1911. By the 9th they had reached Cape Otway, where they encountered a moonless night, constant heavy rain, and a heavy sea with a south-easterly wind blowing. After safely rounding Cape Otway the course was changed to east, then north-east to take the vessel to a point six miles off Cape Patton, following the orders of Captain Jacobsen, who told the crew to be very careful with the steering, as the wind and sea was running to leeward. The patent log (used to measure speed) had been out of order for the last four months as no-one in Warrnambool was able to fix it: it was intended to have it repaired in Melbourne. In the meantime the crew measured the vessel's speed by looking over the side and estimating wind strength. This compounded the difficulties of imprecise positioning, as the strong cross wind and sea were acting on the lightly laden vessel to steadily drive it towards the shore. At 3.30am on Friday 10 February 1911 Captain Jacobsen and the first mate were looking over the side of the vessel when they heard the sound of breakers and suddenly struck the rocks. The crew immediately knew they had no chance of getting the SPECULANT off, and attempted to rescue themselves by launching the lifeboat, which was instantly smashed to pieces. One of the crew then volunteered to take a line ashore, and the rest of the crew were all able to drag themselves to shore, some suffering hand lacerations from the rocks. Once ashore they began to walk along the coast towards Lorne, believing it was the nearest settlement. Realising their mistake as dawn broke they returned westwards to Cape Patton, and found a farm belonging to Mr C. Ramsden, who took them in and gave them a change of clothes and food. After resting for a day and returning to the wreck to salvage some of their personal possessions, at 10am on Saturday they set out for Apollo Bay, a voyage that took six hours, sometimes wading through flooded creeks up to their necks. The Age described the wreck as "listed to starboard. All the cabin is gutted and the ballast gone. There is a big rock right through the bottom of her, and there is not the slightest hope of getting her off". A Board of Marine inquiry found that Captain Jacobson was guilty of careless navigation by not taking steps to accurately verify the position of the vessel with respect to Cape Otway when the light was visible and by not setting a safe and proper course with respect to the wind and sea. It suspended his certificate for 6 months and ordered him to pay costs. The location of the wreck site was marked for a long time by two anchors on the shoreline, until in 1970 the larger of the two anchors was recovered by the Underwater Explorers' Club and mounted on the foreshore at Apollo Bay. The bell from the wreck was also donated to the Apollo Bay Surf Lifesaving Club but is recorded to have been stolen. Rusting remains of the wreck can still be found on the shoreline on the southern side of, and directly below Cape Patton. Parts of the SPECULANT site have been buried by rubble from construction and maintenance works to the Great Ocean Road, as well as by naturally occurring landslides. Peter J McGennan passed away in 1920. The Gates in the western wall of the Anglican Church in Henna Street/Koroit St are dedicated to him for his time of community work, which is matched with other prominent Warrnambool citizens; Fletcher Jones, John Younger, J.D.E (Tag) Walter, and Edward Vidler. After Peter J McGennan's death Harry, Andrew and Edith continued to operate the family business until July 11th 1923 when the company was wound up. (Andrew lived in Ryot Street Warrnambool, near Lava Street.) Harry McGennan (Peter and Emily’s son) owned the Criterion Hotel in Kepler Street Warrnambool (now demolished). His son Sid and wife Dot lived in 28 Howard Street (corner of Nelson Street) and Sid managed the Criterion until it was decided by the family to sell, and for he remained Manager for the new owners until he retired. Harry commenced the Foreshore Trust in Warrnambool around 1950. The McGennan Carpark in Pertobe Road is named after Harry and there are Memorial-Stone Gates in his memory. (The Gates were once the original entrance to the carpark but are now the exit.). The Patent Log (also called a Taffrail log) from the SPECULANT, mentioned above, and a number of photographs, are now part of the Collection at Flagstaff Hill Maritime Village.. The S. S. Flinders was built by A. J. Inglis, Ltd, Pointhouse, Glasgow in 1878 for the "Tasmanian Steam Navigation Company', Hobart which merged with the "Union Steamship Company" of New Zealand and it was later sold to the firm "McIlwraith, McEacham and Company". It was built of iron and was 1000 tons and 227 feet, 1 inch long. It was described as "splendidly fitted up for the carriage of passengers and her cargo space was also very large". In the saloon about 130 passengers could be accommodated while the second class had sufficient room for one hundred passengers. In 1890, the S. S. Flinders would leave Melbourne on Mondays and Thursdays at 5 pm and reach Warrnambool the following morning at 8 am. On the return it would leave Warrnambool on Wednesdays and Saturdays at 5 pm and reach Melbourne the following morning. In 1896, the Weekly Times described the "steamer Flinders (otherwise known as "the Warrnambool mailboat") as "as good a sample of a seagoing steamer as there is trading on the Victorian Coast at the present time". In April 1896 newspaper reports noted the S. S. Flinders took 2915 bags of potatoes from Warrnambool to Melbourne (the largest shipment of that season) as well as 50 tons of tinned rabbits from the Hamilton Preserving Factory. It was also noted that particularly during the Christmas period, there were excessive demands for berths from holiday makers wanting to enjoy a holiday in Warrnambool. In May 1903, the S. S. Flinders narrowly escaped destruction when an explosion and subsequent fire occurred during the passage from Melbourne to Warrnambool. A drum (which apparently contained carbide of calcium) exploded and blew off a hatch cover. As the steamer got to within a mile or two of Warrnambool, smoke was seen coming out of the hold and (unknown to the passengers) flames had taken hold. The crew quickly got to work - closing down all the hatches and pumping water into the hold through a hole in the saloon floor. There were 30 or 40 cases of kerosene on board. The Flinders continued on to Warrnambool and berthed at the Breakwater. The passengers all went ashore - many unaware of the danger they had been in. A telephone message was sent to the local Fire Brigade Station however the fire was extinguished before the firemen and their equipment arrived. After the hold was checked, the Flinders was certified as seaworthy and left for Portland. The Flinders continued to transport Western District produce as well as passengers from Warrnambool to Melbourne until 1906 when (due to a decrease in shipping trade during the Winter and the availability of train services) the Flinders was replaced by the smaller steamer "Dawn" and in 1907 when it was sold to the "Adelaide Steamship Company" for use in the Western Australia coastal trade, it was replaced by the "S. S. Barrabool". The S. S. Barrabool was a coastal steamer built by "Palmer Shipbuilding and Iron Company Limited" in Jarrow, Durham in 1874. It was bought by "Howard Smith Ltd" who was a pioneer in the coal trade between Melbourne and Newcastle. Howards Smith's early fleet contained ships named after local hills and mountains -"You Yangs", "Macedon", "Dandenongs" and "Barrabool". Later they extended their fleet to include ships that were well known in Warrnambool including the "Dawn" and the "Edina". The S. S. Barrabool had a chequered start and was nicknamed the "Great Australian Ram" because of the numerous accidents it was involved in. Between 1875 and 1883 it collided with three other vessels - sinking the "Queensland" on August 3rd, 1876, near Wilson's Promontory and sinking the "Bonnie Dundee" on 10th March 1879 off Lake Macquarie, New South Wales (with the loss of five lives). In August 1884 the Barrabool collided with the steamer "Birksgate" in Port Jackson causing considerable damage to "Birksgate". However in a newspaper article published in the "Truth" in March 1899 the S. S. Barrabool was described as "one of the fine old type of vessels" and "still a stout a craft as ever". The article was describing the practice of a "two-mate" system on board many ships (the Barrabool being one) whereby the company only employs two men (a first and second mate who must alternate watches of four hours each) rather than three mates who work four hours on and eight hours off. It was suggested that ships employing the "two-mate" system may find their insurance policies "null and void" should an accident occur. However the writer did note that the Barrabool was "officered by a captain and first and second mates .. whom it would be impossible to find more capable officers amongst the maritime fleet of the colonies". Between 1900 and 1909 the Barrabool was making regular trips along the east coast of Australia, carrying coal to Hobsons Bay (Melbourne) from Newcastle, Bellambi and Sydney. In 1907 it was brought in as a temporary replacement on the Melbourne to Warrnambool route for the S.S. Flinders. In 1912 the S. S. Barrabool ran aground off the Fitzroy River in Queensland and was found to be uneconomic to repair. It was brought back to Sydney and converted into a hulk. In August 1952 it was towed 17 miles off Sydney and scuttled. “Foyle” written on the photograph is the name of Foyle’s Photographic studio - originally owned by James Charles Foyle. He owned “Foyle’s Photo Card Studios” in Liebig St, Warrnambool, which operated between 1889 – 1919 At the time of the photograph the studio was owned by both Charles and Lilian Foyle (sometimes known as Lillian or Lily), either of whom could have taken this photograph. They also worked together at a later date on the photographs, sketches and paintings of the famous and historical Pioneers’ Honour Board.This photograph is a significant record of three of the well-known coastal traders (the "Speculant", the "S. S. Barrabool" and the "S. S. Flinders") that sailed along the southwest coast of Victoria for many years - transporting goods and passengers between Melbourne and Warrnambool.A black and white photograph titled "Breakwater Pier, Warrnambool". A line of coal trucks on rails are on the Breakwater. There are three ships (one sailing ship and two steamers) moored at the pier. In the left side of the picture is another ship. The name of the photographer is printed in the lower right corner. On the back of the photograph are the handwritten names of the moored ships written in blue pen. It also has the handwritten name, town and telephone number of the donor. In the bottom right hand corner is an upside down stamped number in black ink.Front of photograph - "BREAKWATER PIER, WARRNAMBOOL." "FOYLE PHOTO" Back of photograph - "Sailing Ship" "Speculant sail ship" "Barrabool coal ship" "Flinders Passenger ship" Name of donor W'Bool (and telephone number) "K-7148 M" (stamped upside down)flagstaff hill maritime museum and village, warrnambool, great ocean road, shipwreck coast, speculant, barque speculant, p. j. mcgennan, peter john mcgennan, speculant wreck, captain jacobsen, s. s. flinders, steamer flinders, a. j. inglis ltd, tasmanian steam navigation company, mcilwraith mceacham and company, warrnambool mailboat, coastal steamer, s. s. barrabool, howard smith ltd, two-mate system, coal ship, dawn, edina, lady bay, breakwater, warrnambool breakwater, foyle, foyle photographic studio warrnambool -
 Federation University Historical Collection
Letter - Correspondence, Walter M. Hitchcock, Letters from Walter M. Hitchcock concerning a model of a Ballarat tent (and more), 1911, 1911 (exact)
The tent model mentioned in the letters was displayed in the Ballarat School of Mines Museum. During the 1960s it was transferred to the Ballarat Historical Society. Two handwritten letters on paper with black mourning edge written by Walter M. Hitchcock to the Ballarat School of Mines, and another written by Walter's brother George M. Hitchcock.Letter transcription follow: Letter from Walter M. Hitchcock regarding the death of James Oddie and early gold mining at Ballarat, 1910 and 1911 48 The Memorial Hall Farringdon St London Dec1/10 The Secretary Ballarat Museum Dear Sir, I am just now sending you this line, i anticipation of further correspondence later on, simply to forward you a Post Card of the 1st mining tent erected 1851 on the site of he then newly proclaimed Township of Ballarat, which, as the sole survivor of the party who built the original, I have had the pleasure in making, and have decided to present it to your museum, Sir Jno Lasenor out Agent General for Victoria came to a Bazaar recently held in London. where I had it on view in the museum from 3 days, - and desired I would allow its [ ? ] exhibited in the first large window of the beautiful new building of the Victoria Agency situate in the Strand. It is there for the past few days and he may wish it to remain a week or two longer, I know of no other exhibition of it to delay it being packed and shipped to my relatives in Geelong (Mr [?] Bright of Hitchock's Firm) who may wish to show it in one of their windows before forwarding it to your museum - I have had an itemised pane glass case made for it with drop down end and [?} it stands on a plateau of moss, to represent grass 32 x 13 x 13 high and chimney 14 1/2 - the case is made 34 x 26 x 20 high inside - I shall have it very carefully packed - tent emptied tools, beds, &c &c in separate packing and insured for 50 pounds - I will send you full details later on. I hope and believe your President will accept it in due time Meantime believe me to be very truly Cat Walter Hitchcock G.F.B. 48 The Memorial Hall Farringdon St London March 15th 1911 The Secretary Ballarat School of Mines Dear Sir, Thanks for your letter received last week – I have unaccountably mislaid it, so cannot address you personally, shall no doubt find it among office papers. The model is being fetched today from Victorian Agent General’s (Sir John [Lavernor?] office window in the Strand where many thousands, he tells me, have stopped in passing to see it (their first peep of Ballaarat). It will be on view at Blackheath (Kent) for a week, then packed and shipped without further delay. I shall enclose in the glass case (which is 26 x 34 x 16 in high) some spare minced moss and gas (smoke) in case in transit the plateau suffers by shaking (though it is well glued down). All the tools, mining appliances, cradle, windlass, &c will be separately packed enclosed – which you can easily place in respective positions. HRH Prince of Wales has graciously accepted a photo of it – and in my letter to him when sending it for his acceptance I said – as he would probably ere long visit Australia as did his grandfather and father, which ought to (and certainly will) include at least a day or two in seeing your beautiful City, and also something of your mines &c instead of the hurried visit of his father (2 hours) when he, as Duke of York, unveiled a statue to the memory of those slain in the sad Boer War, which now is admitted by almost everybody to have been a big political mistake, - though in the future with England’s present wise policy towards that country it will prove for Africa’s welfare. It may interest you to know that when I ascertained that Geelong was not to be visited by the Royal Pair – I went up to St James’s Palace by appointed time the Duke’s private Secy Sir Arthur Bigge – taking with me a specially illustrated paper issued in Melb. showing many pictures of the beauties and industries of Geelong – Sir Arthur was impressed but said all the arrangements for the Royal stay in Victoria (10 days) were made locally, by Lord Hopetoun and collegues and committee, and were practically closed – which meant that only a brief trip to Ballarat to uncover the memorial was intended outside Melbourne. Perhaps if we were Melbourne residents we should have succumbed to the prevailing spirit of selfishness – forgetting (or trying to forget) that there are many beauty spots in Victoria and centres of great interest - Ballarat, Geelong, Bendigo, &c that ought to have been visited instead of Melbourne only. Finding Sir Arthur favorably impressed about Geelong I thanked him and returned to City work again. I at once called to Geelong whose mayor and friends had been twice unsuccessful in trying for the Melbourne functions programme being altered to include a visit to Geelong and lovely spots in the Western District, reporting my interview with Sir A B and his favourable reception of my representations, but that any alteration to the programme of engagements during the Royal visit must be made locally and by the local authorities. This had the desired success for on receipt of my message the Geelong mayor and colleagues again reopened the question and went to Melbourne, resulting in a concession (but what an altogether inadequate one) and they graciously ? consented to the train, on its way with the Duke and Duchess to your city, to stop at the Geelong stn (15 minutes) and so it came about that by a hasty local effort, 3,000 school children, and not a few of the leading people including the Mayor &c were gathered to welcome them in Geelong. The National anthem being sung, an Address read and presented and kindly replied to. Now Ballarat should doubtless has influence. See to it when our P. Of Wales visits Victoria – an unselfish ¬ programme is fixed up – and HRH afforded ample opportunity of visiting leisurely your city, Geelong, Bendigo and other centres of beauty and importance. The Prince himself will be the gainer by such an equitable and enlightened programme, - and come back with all the more favourable views of the marvellous development ever since our family first settled in Geelong in 1850. A far preferable result of such a visit than night after night having Melbourne Banquets and the visiting of its undoubted attractions - whilst all the rest of the State remained unvisited. Such an official mistake must not be made again. I will write you again, stating name of steamer of which the model is shipped and date of departure – it is firmly built on a backing of 3/8 in oak tall uprights so through the 7/8 in plateau and am entrusting the packing be very careful. I expressed firm – so that except possibly any breakage in glass case – it should reach you in due time all right. The top of case will be screwed so that it can be readily removed temporarily to enable my [ ? ] firm to show it in one of their windows. Believe me Yours very truly Captn Walter M. Hitchcock My brother will deliver it on my a/c – all carriage paid. Mt very kind regards to my friend since 1850 Jas Oddie. University of Ballarat Historical Collection Cat. No. 8133.3 & .4 Letter from Walter M. Hitchcock regarding the death of James Oddie and early gold mining at Ballarat, 1911 48 The Memorial Hall Farringdon St London April 20th 1911 My Dear Sir, It is with no ordinary feeling of regret that I received the tidings of the death of my good friend, your fellow citizen for many years, Mr James Oddie. Living at Geelong from March 1850 I came to know him there as carrying on a foundry business in Ashby. With the discovery of gold at Ballarat started off almost of the working people, as well as of all other classes of the male population. Mr Oddie arrived in Ballarat I believe on or about September 1st 1851. My three comrades and I arrived October 1st 1851 – among the many thousands soon gathered within a mile or so of Golden Point – my friend Oddie and I often met. I returning to Geelong after a year mining – my friend on the other hand remaining at Ballarat ever since – a marvellous record, and I am sure his life has been one of unique value to your City in many ways, - his age (87) naturally prepared me for his call home – and only two mails before the news came I received from him on of his kindly chatty letters in which amongst other things – he referred with pleasure to having received from me two 10 x 12 photos – one being of my model and that he was arranging to have it placed in a shop window in your city. I am interested in the fact of your having known each of my three comrades of 1851/52. It was J.M. Garrett and I who got permission to conduct public Sunday morning service in their large Marquee – used all the week for issue of Licenses in the absence of any church buildings, and it being on wet Sundays impossible to have services as usual under the trees – Ballarat then was more like a Gentleman’s Park – than bush country – but the axe soon did its work – and all were felled for our cooking, and hencewith to make our kindling etc. Shafting of holes not being at first done because too shallow – our deepest (at Eureka) was only 115 ft. Bendigo I hear had now mines of 4,000 ft in depth (deeper than our tin or coal mines here). I fortunately have, in excellent state of preservation, my last of 12 licenses dated October 1 1852 and have recently purchased here a Miner’s Right dated 1864, to that when explaining on matters re Gold Licensing I can show sample of each. With kind regards Believe me Yours sincerely Walter M. Hitchcock Geelong June 20/11 Dear Sir, By rail to day through Messrs Bannister I send the model of miner’s tent packed in a case 50 donated by my brother Captain Walter M. Hitchcock of London. This model was made by my brother and represents the tent he worked in on the Ballarat Gold Fields in the year 1851 or 2. In a separate parcel a few extras omitted from the case. Please send me receipts in duplicate, one for my brother, the other for the Customs, Geelong, as being donated to your institution, after some little correspondence it was admitted [??] any payment for duty. You probably have my brother’s address and would like to acknowledge its arrival, direct. I hope it is in good order. I did not open it for show in Geelong, as there would be less risk of breakage on repacking. With kind remembrances. I am Yours Faithfully Geo. M. Hitchcock. A Mr G. F. B. Sharick who is living near my home called in to see my model – he said he knew FM [Fred Martell] and was lately at Ballaratballarat school of mines, frederick martell, fred martell, james oddie, walter m hitchcock, walter hitchcock, f m garratt, george hitchcock, hitchcock, golden point, gold discovery, j m garrett, gold license, j.m. garrett, t.m. hall, george m. hitchcock, f.m. garratt, walter m. hitchcock -
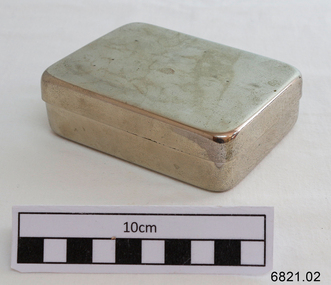 Flagstaff Hill Maritime Museum and Village
Container - Medical container, Late 19th century or early 20th century
THE DISCOVERY OF STAINLESS STEEL Harry Brearley Since the dawn of man colonies have raced against each other to uncover new technologies, to be the first to stamp their names on a discovery, and although we’ve evolved over millions of years, the urge to be the first remains at the very core of our nature. This sense of passion and pride can lead some of the more unscrupulous humans to claim others discoveries as their own. Of course many breakthroughs are genuinely made in tandem, or are simultaneously occurring, but unless you can categorically prove that you were the pioneer of these incredible findings, then the other party involved will always dispute the fact. And so we come to stainless steel. The first point to note is that ‘inventor’ is a very ambiguous term. Is this the first person to think, to document, to patent, or to produce? The second point is that stainless steel wasn’t truly defined until 1911, so are we to cast aside those chromium-iron alloys that don’t quite meet the minimum requirement of 10.5% chromium? It seems like anyone and everyone has a different claim to being labelled the ‘inventor’ of stainless steel; from Britain, Germany, France, Poland, the U.S.A., and even Sweden. The cogs were set in motion by Englishmen Stoddart and Faraday circa 1820 and Frenchman Pierre Berthier in 1821. These scientists, among others, noted that iron-chromium alloys were more resistant to attack by certain acids, but tests were only carried out on low chromium content alloys. Attempts to produce higher chromium alloys failed primarily because of scientists not understanding the importance of low carbon content. In 1872 another pair of Englishmen, Woods and Clark, filed for patent of an acid and weather resistant iron alloy containing 30-35% chromium and 2% tungsten, effectively the first ever patent on what would now be considered a stainless steel. However, the real development came in 1875 when a Frenchman named Brustlein detailed the importance of low carbon content in successfully making stainless steel. Brustlein pointed out that in order to create an alloy with a high percentage of chromium, the carbon content must remain below around 0.15%. Thus ensued two decades of stagnation for the development of stainless steel, and while many scientists attempted to create a low carbon stainless steel, none succeeded. Hans Goldschmidt It wasn’t until 1895, when Hans Goldschmidt of Germany developed the aluminothermic reduction process for producing carbon-free chromium, that development of stainless steels became a reality. In 1904 French Scientist Leon Guillet undertook extensive research on many iron-chromium alloys. Guillet’s work included studies on the composition of what would now be known as 410, 420, 442, 446 and 440-C. In 1906 Guillet went on to analyse iron-nickel-chrome alloys, which would now be considered the basics of the 300 series. However, while noting the chemical composition of his alloys, Guillet failed to acknowledge the potential corrosion resistance of his materials. Albert Portevin In 1909 Englishman Giesen published an in-depth work regarding chromium-nickel steels, while the French national, Portevin, studied what is now regarded as 430 stainless steel. However, it wasn’t until 1911 that the importance of a minimum chromium content was discovered by Germans P. Monnartz and W. Borchers. Monnartz and Borchers discovered the correlation between chromium content and corrosion resistance, stating that there was a significant boost in corrosion resistance when at least 10.5% chromium was present. The pair also published detailed works on the effects of molybdenum on corrosion resistance. It is at this point we introduce Harry Brearley, born in Sheffield, England in 1871, he was appointed lead researcher at Brown Firth Laboratories in 1908. In 1912 Brearley was given a task by a small arms manufacturer who wished to prolong the life of their gun barrels which were eroding away too quickly. Brearley set out to create an erosion resistant steel, not a corrosion resistant one, and began experimenting with steel alloys containing chromium. During these experiments Brearley made several variations of his alloys, ranging from 6% to 15% chromium with differing levels of carbon. On the 13th August 1913 Brearley created a steel with 12.8% chromium and 0.24% carbon, argued to be the first ever stainless steel. The circumstances in which Brearley discovered stainless steel are covered in myth; some enchanted tales of Brearley recite him tossing his steel into the rubbish, only to notice later that the steel hadn’t rusted to the extent of its counterparts, much like Alexander Fleming’s experience 15 years later. Other more plausible, (but less attractive), accounts claim it was necessary for Brearley to etch his steels with nitric acid and examine them under a microscope in order to analyse their potential resistance to chemical attack. Brearley found that his new steel resisted these chemical attacks and proceeded to test the sample with other agents, including lemon juice and vinegar. Brearley was astounded to find that his alloys were still highly resistant, and immediately recognised the potential for his steel within the cutlery industry. The Half Moon Brearley struggled to win the support of his employers, instead choosing to produce his new steel at local cutler R. F. Mosley. He found difficulty producing knife blades in the new steel that did not rust or stain and turned to his old school friend, Ernest Stuart, Cutlery Manager at Mosley’s Portland Works, for help. Within 3 weeks, Stuart had perfected the hardening process for knives. Brearley had initially decided to name his invention ‘Rustless Steel’, but Stuart, dubbed it ‘Stainless Steel’ after testing the material in a vinegar solution, and the name stuck. And that’s how Harry Brearley discovered stainless steel…. well, not quite… During the 5 year period between 1908 and Brearley’s discovery in 1913 many other scientists and metallurgists have potential claims to Brearley’s title. In 1908 the Germans entered the fray, the Krupp Iron Works in Germany produced a chrome-nickel steel for the hull of the Germania yacht. The Half Moon, as the yacht is now known, has a rich history and currently lies on the seabed off the east coast of Florida. Whether the steel contains the minimum 10.5% chromium content remains inconclusive. Employees of the Krupp works, Eduard Maurer and Benno Strauss, also worked from 1912-1914 on developing austenitic steels using <1% carbon, <20% nickel and 15-40% chromium. Not happy with Europe hogging the glory, the USA got in on the act. Firstly, Elwood Haynes, after becoming disenchanted at his rusty razor, set out to create a corrosion resistant steel, which he supposedly succeeded in doing during 1911. Two other Americans, Becket and Dantsizen, worked on ferritic stainless steels, containing 14-16% chromium and 0.07-0.15% carbon, in the years 1911-1914. Elwood Haynes During 1912 Max Mauermann of Poland is rumoured to have created the first stainless steel, which he later presented to the public during the Adria exhibition in Vienna, 1913. Finally, a recently discovered article, which was published in a Swedish hunting and fishing magazine in 1913, discusses a steel used for gun barrels, (sound familiar?), which seems to resemble stainless steel. Although this is purely speculation, the Swedes have still made an audacious claim that they were in fact responsible for the first practical application for stainless steel. That concludes the shambolic discovery of stainless steel! Although there is much mystery and speculation behind the discovery of this wonderful material, there is no question that without the combined effort of all the above scientists and metallurgists, (and all the many more that were not mentioned), we would not have such a rich and versatile metal at our fingertips. https://bssa.org.uk/bssa_articles/the-discovery-of-stainless-steel/#:~:text=On%20the%2013th%20August%201913,the%20first%20ever%20stainless%20steel. This stainless steel container was donated to Flagstaff Hill Maritime Village by the family of Doctor William Roy Angus, Surgeon and Oculist. It is part of the “W.R. Angus Collection” that includes historical medical equipment, surgical instruments and material once belonging to Dr Edward Ryan and Dr Thomas Francis Ryan, (both of Nhill, Victoria) as well as Dr Angus’ own belongings. The Collection’s history spans the medical practices of the two Doctors Ryan, from 1885-1926 plus that of Dr Angus, up until 1969. ABOUT THE “W.R.ANGUS COLLECTION” Doctor William Roy Angus M.B., B.S., Adel., 1923, F.R.C.S. Edin.,1928 (also known as Dr Roy Angus) was born in Murrumbeena, Victoria in 1901 and lived until 1970. He qualified as a doctor in 1923 at University of Adelaide, was Resident Medical Officer at the Royal Adelaide Hospital in 1924 and for a period was house surgeon to Sir (then Mr.) Henry Simpson Newland. Dr Angus was briefly an Assistant to Dr Riddell of Kapunda, then commenced private practice at Curramulka, Yorke Peninsula, SA, where he was physician, surgeon and chemist. In 1926, he was appointed as new Medical Assistant to Dr Thomas Francis Ryan (T.F. Ryan, or Tom), in Nhill, Victoria, where his experiences included radiology and pharmacy. In 1927 he was Acting House Surgeon in Dr Tom Ryan’s absence. Dr Angus had become engaged to Gladys Forsyth and they decided he would take time to further his studies overseas in the UK in 1927. He studied at London University College Hospital and at Edinburgh Royal Infirmary and in 1928, was awarded FRCS (Fellow from the Royal College of Surgeons), Edinburgh. He worked his passage back to Australia as a Ship’s Surgeon on the on the Australian Commonwealth Line’s T.S.S. Largs Bay. Dr Angus married Gladys in 1929, in Ballarat. (They went on to have one son (Graham 1932, born in SA) and two daughters (Helen (died 12/07/1996) and Berenice (Berry), both born at Mira, Nhill ) Dr Angus was a ‘flying doctor’ for the A.I.M. (Australian Inland Ministry) Aerial Medical Service in 1928 . The organisation began in South Australia through the Presbyterian Church in that year, with its first station being in the remote town of Oodnadatta, where Dr Angus was stationed. He was locum tenens there on North-South Railway at 21 Mile Camp. He took up this ‘flying doctor’ position in response to a call from Dr John Flynn; the organisation was later known as the Flying Doctor Service, then the Royal Flying Doctor Service. A lot of his work during this time involved dental surgery also. Between 1928-1932 he was surgeon at the Curramulka Hospital, Yorke Peninsula, South Australia. In 1933 Dr Angus returned to Nhill where he’d previously worked as Medical Assistant and purchased a share of the Nelson Street practice and Mira hospital from Dr Les Middleton one of the Middleton Brothers, the current owners of what was once Dr Tom Ryan’s practice. Dr L Middleton was House Surgeon to the Nhill Hospital 1926-1933, when he resigned. [Dr Tom Ryan’s practice had originally belonged to his older brother Dr Edward Ryan, who came to Nhill in 1885. Dr Edward saw patients at his rooms, firstly in Victoria Street and in 1886 in Nelson Street, until 1901. The Nelson Street practice also had a 2 bed ward, called Mira Private Hospital ). Dr Edward Ryan was House Surgeon at the Nhill Hospital 1884-1902 . He also had occasions where he successfully performed veterinary surgery for the local farmers too. Dr Tom Ryan then purchased the practice from his brother in 1901. Both Dr Edward and Dr Tom Ryan work as surgeons included eye surgery. Dr Tom Ryan performed many of his operations in the Mira private hospital on his premises. He too was House Surgeon at the Nhill Hospital 1902-1926. Dr Tom Ryan had one of the only two pieces of radiology equipment in Victoria during his practicing years – The Royal Melbourne Hospital had the other one. Over the years Dr Tom Ryan gradually set up what was effectively a training school for country general-practitioner-surgeons. Each patient was carefully examined, including using the X-ray machine, and any surgery was discussed and planned with Dr Ryan’s assistants several days in advance. Dr Angus gained experience in using the X-ray machine there during his time as assistant to Dr Ryan. Dr Tom Ryan moved from Nhill in 1926. He became a Fellow of the Royal Australasian College of Surgeons in 1927, soon after its formation, a rare accolade for a doctor outside any of the major cities. He remained a bachelor and died suddenly on 7th Dec 1955, aged 91, at his home in Ararat. Scholarships and prizes are still awarded to medical students in the honour of Dr T.F. Ryan and his father, Dr Michael Ryan, and brother, John Patrick Ryan. ] When Dr Angus bought into the Nelson Street premises in Nhill he was also appointed as the Nhill Hospital’s Honorary House Surgeon 1933-1938. His practitioner’s plate from his Nhill surgery states “HOURS Daily, except Tuesdays, Fridays and Saturday afternoons, 9-10am, 2-4pm, 7-8pm. Sundays by appointment”. This plate is now mounted on the doorway to the Port Medical Office at Flagstaff Hill Maritime Village, Warrnambool. Dr Edward Ryan and Dr Tom Ryan had an extensive collection of historical medical equipment and materials spanning 1884-1926 and when Dr Angus took up practice in their old premises he obtained this collection, a large part of which is now on display at the Port Medical Office at Flagstaff Hill Maritime Village in Warrnambool. During his time in Nhill Dr Angus was involved in the merging of the Mira Hospital and Nhill Public Hospital into one public hospital and the property titles passed on to Nhill Hospital in 1939. In 1939 Dr Angus and his family moved to Warrnambool where he purchased “Birchwood,” the 1852 home and medical practice of Dr John Hunter Henderson, at 214 Koroit Street. (This property was sold in1965 to the State Government and is now the site of the Warrnambool Police Station. ). The Angus family was able to afford gardeners, cooks and maids; their home was a popular place for visiting dignitaries to stay whilst visiting Warrnambool. Dr Angus had his own silk worm farm at home in a Mulberry tree. His young daughter used his centrifuge for spinning the silk. Dr Angus was appointed on a part-time basis as Port Medical Officer (Health Officer) in Warrnambool and held this position until the 1940’s when the government no longer required the service of a Port Medical Officer in Warrnambool; he was thus Warrnambool’s last serving Port Medical Officer. (The duties of a Port Medical Officer were outlined by the Colonial Secretary on 21st June, 1839 under the terms of the Quarantine Act. Masters of immigrant ships arriving in port reported incidents of diseases, illness and death and the Port Medical Officer made a decision on whether the ship required Quarantine and for how long, in this way preventing contagious illness from spreading from new immigrants to the residents already in the colony.) Dr Angus was a member of the Australian Medical Association, for 35 years and surgeon at the Warrnambool Base Hospital 1939-1942, He served as a Surgeon Captain during WWII1942-45, in Ballarat, Victoria, and in Bonegilla, N.S.W., completing his service just before the end of the war due to suffering from a heart attack. During his convalescence he carved an intricate and ‘most artistic’ chess set from the material that dentures were made from. He then studied ophthalmology at the Royal Melbourne Eye and Ear Hospital and created cosmetically superior artificial eyes by pioneering using the intrascleral cartilage. Angus received accolades from the Ophthalmological Society of Australasia for this work. He returned to Warrnambool to commence practice as an ophthalmologist, pioneering in artificial eye improvements. He was Honorary Consultant Ophthalmologist to Warrnambool Base Hospital for 31 years. He made monthly visits to Portland as a visiting surgeon, to perform eye surgery. He represented the Victorian South-West subdivision of the Australian Medical Association as its secretary between 1949 and 1956 and as chairman from 1956 to 1958. In 1968 Dr Angus was elected member of Spain’s Barraquer Institute of Barcelona after his research work in Intrasclearal cartilage grafting, becoming one of the few Australian ophthalmologists to receive this honour, and in the following year presented his final paper on Living Intrasclearal Cartilage Implants at the Inaugural Meeting of the Australian College of Ophthalmologists in Melbourne In his personal life Dr Angus was a Presbyterian and treated Sunday as a Sabbath, a day of rest. He would visit 3 or 4 country patients on a Sunday, taking his children along ‘for the ride’ and to visit with him. Sunday evenings he would play the pianola and sing Scottish songs to his family. One of Dr Angus’ patients was Margaret MacKenzie, author of a book on local shipwrecks that she’d seen as an eye witness from the late 1880’s in Peterborough, Victoria. In the early 1950’s Dr Angus, painted a picture of a shipwreck for the cover jacket of Margaret’s book, Shipwrecks and More Shipwrecks. She was blind in later life and her daughter wrote the actual book for her. Dr Angus and his wife Gladys were very involved in Warrnambool’s society with a strong interest in civic affairs. Their interests included organisations such as Red Cross, Rostrum, Warrnambool and District Historical Society (founding members), Wine and Food Society, Steering Committee for Tertiary Education in Warrnambool, Local National Trust, Good Neighbour Council, Housing Commission Advisory Board, United Services Institute, Legion of Ex-Servicemen, Olympic Pool Committee, Food for Britain Organisation, Warrnambool Hospital, Anti-Cancer Council, Boys’ Club, Charitable Council, National Fitness Council and Air Raid Precautions Group. He was also a member of the Steam Preservation Society and derived much pleasure from a steam traction engine on his farm. He had an interest in people and the community He and his wife Gladys were both involved in the creation of Flagstaff Hill, including the layout of the gardens. After his death (28th March 1970) his family requested his practitioner’s plate, medical instruments and some personal belongings be displayed in the Port Medical Office surgery at Flagstaff Hill Maritime Village, and be called the “W. R. Angus Collection”. The W.R. Angus Collection is significant for still being located at the site it is connected with, Doctor Angus being the last Port Medical Officer in Warrnambool. The collection of medical instruments and other equipment is culturally significant, being an historical example of medicine from late 19th to mid-20th century. Dr Angus assisted Dr Tom Ryan, a pioneer in the use of X-rays and in ocular surgery. Medical box; rectangular stainless steel base and separate lid, from the W.R. Angus Collection.warrnambool, flagstaff hill maritime museum, great ocean road, dr w r angus, dr ryan, surgical instrument, t.s.s. largs bay, warrnambool base hospital, nhill base hospital, mira hospital, flying doctor, medical treatment, stainless steel medical container, medical container, stainless steel -
 The Beechworth Burke Museum
Geological specimen - Black Coal
This specimen was recovered from Wonthaggi in Victoria. Coal is a sedimentary rock which is composed of peat after it has been exposed over millions of years. This is an example of Australian black coal which is used as either thermal or coking coal for electricity generation or manufacturing processes. It is predominantly composed of Carbon which is 'C' on the periodic table of elements. This early example of a coal sample, shows the important role that coal played/plays in Australia's energy generation and manufacturing processes. This specimen is part of a larger collection of geological and mineral specimens collected from around Australia (and some parts of the world) and donated to the Burke Museum between 1868-1880. A large percentage of these specimens were collected in Victoria as part of the Geological Survey of Victoria that begun in 1852 (in response to the Gold Rush) to study and map the geology of Victoria. Collecting geological specimens was an important part of mapping and understanding the scientific makeup of the earth. Many of these specimens were sent to research and collecting organisations across Australia, including the Burke Museum, to educate and encourage further study.Small piece of black coal with museum original labelGeological survey / R..... S...../ Locality Cape Patterson coal specimen, burke museum, geological survey of victoria, geological specimen, geology -
 The Beechworth Burke Museum
Geological specimen - Rhodonite with Galena and Sphalerite
This specimen is from Broken Hill, NSW. Galena is a natural mineral form of lead sulphide and is often found associated with sphalerite, calcite, and fluorite. Galena is an important lead ore mineral, and, in some regions, it is also an important mineral associated with silver ore. Sphalerite is a sulphide mineral that is the main ore of zinc. Rhodonite is an uncommon mineral once used as an ore of manganese in India, however today the scarcity and fragility of the crystals mean it is primarily used as lapidary materials or mineral specimens. In 1883, Charles Rasp who was a boundary rider at the time, discovered what he thought were deposits of tin but were in fact samples of silver and lead. He and six others went on to set up the first mining company in Broken Hill (BHP). The ore body became the largest and richest of its kind in the world mining ore worth more than 42,000 pounds in its first year. Many of these specimens were sent to research and collecting organisations across Australia, including the Burke Museum, to educate and encourage further study. Galena contains lead and silver, Sphalerite contains zinc. This specimen is part of a larger collection of geological and mineral specimens collected from around Australia (and some parts of the world) and donated to the Burke Museum between 1868-1880. A large percentage of these specimens were collected in Victoria as part of the Geological Survey of Victoria that begun in 1852 (in response to the Gold Rush) to study and map the geology of Victoria. Collecting geological specimens was an important part of mapping and understanding the scientific makeup of the earth. Many of these specimens were sent to research and collecting organisations across Australia, including the Burke Museum, to educate and encourage further study.A hand-sized piece of Sphalerite and Galena with Rhodonite crystalsburke museum, beechworth, geological, geological specimen, galena, rhodonite, sphalerite, silver ore, manganese, lead sulphide, lead ore, zinc ore, lapidary, mineral specimen, broken hill, nsw -
 The Beechworth Burke Museum
Geological specimen - Montmorillonite
Montmorillonite is a type of clay composed of aluminium silicate that forms very small particles that are not well-bonded to one another. This is why it is so soft. When in the presence of water, all types of clay swell. Montmorillonite swells even more than most types of clay, which is why it is often chosen over other types of clay in its practical uses. Montmorillonite has many different practical uses, including in the mining industry, as a soil additive, as a sealant, as a desiccant to draw water out of the air, to clean ponds, to make kitty litter and in cosmetics. Montmorillonite is a common mineral and, despite being named after Montmorillon, France, can be found all over the world, including many deposits in Australia. It is not known where this particular specimen originates from. Montmorillonite is an economically and socially significant material with a wide variety of uses. Having samples of common and important minerals allows collections, like the Burke Museum, to have a more complete view of the land on which they are located, and therefore a more complete view of heritage. This specimen is part of a larger collection of geological and mineral specimens collected from around Australia (and some parts of the world) and donated to the Burke Museum between 1868-1880. A large percentage of these specimens were collected in Victoria as part of the Geological Survey of Victoria that begun in 1852 (in response to the Gold Rush) to study and map the geology of Victoria. Collecting geological specimens was an important part of mapping and understanding the scientific makeup of the earth. Many of these specimens were sent to research and collecting organisations across Australia, including the Burke Museum, to educate and encourage further study.A solid tennis-ball sized chunk of aluminium silicate clay. It is primarily white, accented with orange and brown.burke museum, beechworth, geological, geological specimen, clay, montmorillonite -
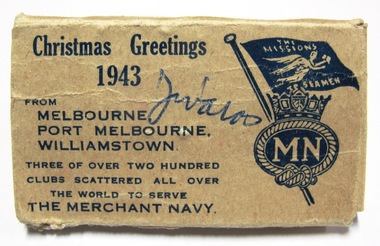 Mission to Seafarers Victoria
Container - Box, The Missions to Seamen Christmas Greetings 1943, 1943
The box was presumably made in Australia to be used as a gift container for Christmas gifts or greetings by people associated with the Mission or their acquaintances or family members. The box is dated and has the Mission to Seamen logo and description as a promotional way to describe and inform people of the Mission's purpose. The gift was sent by Mariner Merrylees to sister Marjorie in Manitoulin Island, CanadaThis everyday practical object represents in its function an acknowledgement by the Mission to Seamen organisation of the need for sailors and seafarers to stay in touch with friends and family at Christmas time and this sample box of a wartime Christmas marks a particularly difficult time in history for seafarers to stay in touch and connected with loved ones.Cardboard beige rectangular box in a small size, with blue stamped inscriptions on it detailing promotional information about The Missions To Seamen. The object also has a blue hand written inscription on it on the top side and also another hand written inscription at the back side detailing the recipient’s name "Marjorie". This object was sent to recipient with a coin bracelet inside (Reference: 600.2). Top side of the box, Christmas Greetings/1943/FROM/MELBOURNE/PORT MELBOURNE/WILLIAMSTOWN/THREE OF OVER TWO HUNDRED/CLUBS SCATTERED ALL OVER/THE WORLD TO SERVE/THE MERCHANT NAVY. Top right side of the box a flag crown and attached cord logo image, THE MISSIONS TO SEAMEN/MN Hand written inscription top side of the box, Jivaros Hand written underlined inscription back side of the box, for Marjoriecardboard box, christmas gift, mission to seamen, bracelet, canada, manatoulin island, seamen's mission, mission to seafarers, 1943, ww2, christmas, siblings, melbourne, port melbourne, williamstown, coins, robert leighton, marjorie merrylees, mn, merchant navy -
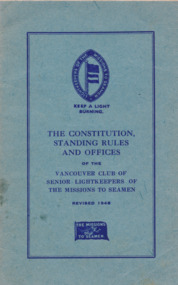 Mission to Seafarers Victoria
Booklet, The Constitution, Standing Rules & Offices of the Vancouver Club of Senior Lightkeepers of the Missions to Seamen, c.1948
Original owner Nora O’Connor the donor’s adopted aunt migrated to Canada during WW2 and also worked as volunteer at the Vancouver Mission to Seamen where she met her husband Edward O’Connor who later migrated to Australia.This object is part of a sample materials that are associated to the wooden platter (Reg:601) and are about another branch of the international networks of the Mission to Seamen. This document states the rules and regulations about the institution. The 1943 Williamstown Mission was helped by the Lightkeepers.Light blue booklet outlining rules and offices of the 'Vancouver Club of Senior Lightkeepers of the Missions to Seamen'.As described in photos attachedbooklet, lightkeepers' auxiliary, vancouver, canada, british columbia, missions to seamen, constitution, rules, overseas missions -
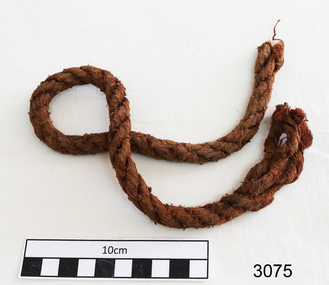 Flagstaff Hill Maritime Museum and Village
Souvenir - Rope Sample, before September 1891
The rope was part of the distress rocket used during the time that the sailing ship Fiji was in distress, before it became a wreck. The three-masted iron barque Fiji had been built in Belfast, Ireland, in 1875 by Harland and Wolfe for a Liverpool based shipping company. The ship departed Hamburg on 22nd May 1891 bound for Melbourne, under the command of Captain William Vickers with a crew of 25. The ship’s manifest shows that she was loaded with a cargo of 260 cases of dynamite, pig iron, steel goods, spirits (whisky, schnapps, gin, brandy), sailcloth, tobacco, coiled fencing wire, concrete, 400 German pianos (Sweet Hapsburg), concertinas and other musical instruments, artists supplies including brushes, porcelain, furniture, china, and general cargo including candles. There were also toys in anticipation for Christmas, including wooden rocking horses, miniature ships, dolls with china limbs and rubber balls. On September 5th, one hundred days out from Hamburg in squally and boisterous south west winds the Cape Otway light was sighted on a bearing differing from Captain Vickers’ calculation of his position. At about 2:30am, Sunday 6th September 1891 land was reported 4-5 miles off the port bow. The captain tried to put the ship on the other tack, but she would not respond. He then tried to turn her the other way but just as the manoeuvre was being completed the Fiji struck rock only 300 yards (274 metres) from shore. The place is known as Wreck Bay, Moonlight Head. Blue lights were burned and distress rockets fired whilst an effort was made to lower boats but all capsized or swamped and smashed to pieces. Two of the younger crewmen volunteered to swim for the shore, taking a line. One, a Russian named Daniel Cartland, drowned after he was swept away when the line broke. The other, 17 year old able seaman Julius Gebauhr, a German, reached shore safely on his second attempt but without the line, which he had cut lose with his sheath-knife when it become tangled in kelp. He rested on the beach a while then climbed the steep cliffs in search of help. At about 10am on the Sunday morning a party of land selectors - including F. J. Stansmore, Leslie Dickson (or Dixon) and Mott - found Gebauhr. They were near Ryan's Den, on their travels on horseback from Princetown towards Moonlight Head, and about 5km from the wreck. Gebauhr was lying in the scrub in a poor state, bleeding and dressed only in singlet, socks and a belt with his sheath-knife, ready for all emergencies. At first they were concerned about his wild and shaggy looking state and what seemed to be gibberish speech, taking him to be an escaped lunatic. They were reassured after he threw his knife away and realised that he was speaking half-English, half-German. They gave him food and brandy and some clothing and were then able to gain information about the wreck. Some of the men took him to River nook, a nearby guest house owned by John Evans, where he was cared for. Stansmore and Dickson rode off to try and summon help. Others went down to the site of the wreck. Messages for rescuing the rest of the crew were sent both to Port Campbell for the rocket rescue crew and to Warrnambool for the lifeboat. The S.S. Casino sailed from Portland towards the scene. After travelling the 25 miles to the scene, half of the Port Campbell rocket crew and equipment arrived and set up the rocket tripod on the beach below the cliffs. By this time the crew of the Fiji had been clinging to the jib-boom for almost 15 hours, calling frantically for help. Mr Tregear from the Rocket Crew fired the line. The light line broke and the rocket was carried away. A second line was successfully fired across the ship and made fast. The anxious sailors then attempted to come ashore along the line but, with as many as five at a time, the line sagged considerably and some were washed off. Others, nearly exhausted, had to then make their way through masses of seaweed and were often smothered by waves. Only 14 of the 24 who had remained on the ship made it to shore. Many onlookers on the beach took it in turns to go into the surf and drag half-drowned seamen to safety. These rescuers included Bill (William James) Robe, Edwin Vinge, Hugh Cameron, Fenelon Mott, Arthur Wilkinson and Peter Carmody. (Peter Carmody was also involved in the rescue of men from the Newfield.) Arthur Wilkinson, a 29 year old land selector, swam out to the aid of one of the ship’s crewmen, a carpenter named John Plunken. Plunken was attempting to swim from the Fiji to the shore. Two or three times both men almost reached the shore but were washed back to the wreck. A line was thrown to them and they were both hauled aboard. It was thought that Wilkinson struck his head on the anchor before s they were brought up. He remained unconscious. The carpenter survived this ordeal but Wilkinson later died and his body was washed up the next day. It was 26 year old Bill Robe who hauled out the last man, the captain, who had become tangled in the kelp. The wreck of the Fiji was smashed apart within 20 minutes of the last man being brought ashore, and it settled in about 6m of water. Of the 26 men on the Fiji, 11 in total lost their lives. The remains of 7 bodies were washed onto the beach and their coffins were made from timbers from the wrecked Fiji. They were buried on the cliff top above the wreck. The survivors were warmed by fires on the beach then taken to River nook and cared for over the next few days. Funds were raised by local communities soon after the wreck in aid of the sufferers of the Fiji disaster. Captain Vickers was severely reprimanded for his mishandling of the ship. His Masters Certificate was suspended for 12 months. At the time there was also a great deal of public criticism at the slow and disorganised rescue attempt to save those on board. The important canvas ‘breech buoy’ or ‘bucket chair’ and the heavy line from the Rocket Rescue was in the half of the rocket outfit that didn’t make it in time for the rescue: they had been delayed at the Gellibrand River ferry. Communications to Warrnambool were down so the call for help didn’t get through on time and the two or three boats that had been notified of the wreck failed to reach it in time. Much looting occurred of the cargo that washed up on the shore, with nearly every visitor leaving the beach with bulky pockets. One looter was caught with a small load of red and white rubber balls, which were duly confiscated and he was ‘detained’ for 14 days. Essence of peppermint mysteriously turned up in many settlers homes. Sailcloth was salvaged and used for horse rugs and tent flies. Soon after the wreck “Fiji tobacco” was being advertised around Victoria. A Customs officer, trying to prevent some of the looting, was assaulted by looters and thrown over a steep cliff. He managed to cling to a bush lower down until rescued. In 1894 some coiled fencing wire was salvaged from the wreck. Hundreds of coils are still strewn over the site of the wreck, encrusted and solidified. The hull is broken but the vessel’s iron ribs can be seen along with some of the cargo of concrete and pig iron. Captain Vickers presented Bill Robe with his silver-cased pocket watch, the only possession that he still had, as a token for having saved his life and the lives of some of the crew. (The pocket watch came with 2 winding keys, one to wind it and one to change the hands.) Years later Bill passed the watch to his brother-in-law Gib (Gilbert) Hulands as payment of a debt and it has been passed down the family to Gilbert Hulands’ grandson, John Hulands. Seaman Julius Gebauhr later gave his knife, in its hand crafted leather sheath, to F. J. Stansmore for caring for him when he came ashore. The knife handle had a personal inscription on it. A marble headstone on the 200m high cliffs overlooking Wreck Beach, west of Moonlight Head, paying tribute to the men who lost their lives when Fiji ran aground. The scene of the wreck is marked by the anchor from the Fiji, erected by Warrnambool skin divers in 1967.This rope is part of the collection of artefacts from the wreck of the Fiji. Flagstaff Hill’s Fiji collection is of historical significance at a State level because of its association with the wreck Fiji, which is on the Victorian Heritage Register VHR S259. The Fiji is archaeologically significant as the wreck of a typical 19th century international sailing ship with cargo. It is educationally and recreationally significant as one of Victoria's most spectacular historic shipwreck dive sites with structural features and remains of the cargo evident. It also represents aspects of Victoria’s shipping history and its potential to interpret sub-theme 1.5 of Victoria’s Framework of Historical Themes (living with natural processes).Rope, plaited, brown in colour, cut straight at one end, and the other end is separated into 3 pieces, from distress rockets used during the wreck of the sailing ship Fiji. Rope was in envelope printed with an address, and a description, and there was a display card with further details on it. Printed on the envelope: "Shire of Hampden / PO Box 84, Camperdown 3260" Hand written "rope of wreck of Fiji / 7cm / Mr Wm "Boyce" Display card with rope includes words "Piece of Rope from the Fiji distress rockets and was donated to Flagstaff Hill by a private donor in 1989"flagstaff hill, warrnambool, shipwrecked coast, flagstaff hill maritime museum, maritime museum, shipwreck coast, flagstaff hill maritime village, great ocean road, rope, the fiji, william boyce, distress signal, rocket rescue, life saving equipment -
Ringwood and District Historical Society
Rock, Stibnite rock sample from a Ringwood antimony mine
Owned by Russ Haines since 1966. Antimony was mined in Ringwood during the 19th and early 20th centuries. The ore known as Stibnite is a sulphide of Antimony. The metal is alloyed with lead in the manufacture of lead-acid batteries and in typesetting. Stibnite has been used for centuries as a cosmetic (marking eyebrows). The antimony ore may also contain gold.Lump of antimony rock (Stibnite) from the mine in Ringwood. See also History of Object. -
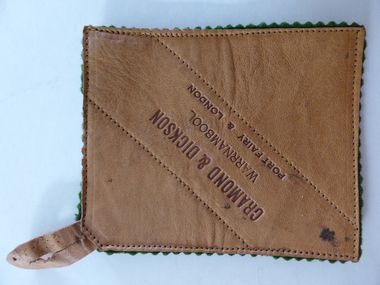 Warrnambool and District Historical Society Inc.
Souvenir, Oven Mitt, Early 20th century
This is a product that was sold in the general store of Cramond and Dickson in Warrnambool early in the 20th century and produced for this store at the time. It may also have been given to customers as an advertising feature. John Glass Cramond and James Dickson established a drapery store in Warrnambool in 1855, firstly in Timor Street and then in Liebig Street. It specialized in men’s and women’s clothing and drapery and had a tailoring and millinery business. The store opened branches in several towns in the vicinity of Warrnambool, including Port Fairy. It also opened a branch store in London, enabling it to import materials and other items direct from London. The Cramond and Dickson store in Warrnambool closed in 1973. This mitt is of considerable interest as it is a sample of the wares and advertising articles coming from the general store of Cramond and Dickson of Warrnambool. This store was of great importance in Warrnambool as a dominant business in the town/city for over 100 years. This is a rectangular-shaped oven mitt with light brown leather on one side and a green-coloured felt-like material with a fluted edge on the other side. The mitt has machine stitching diagonally across both sides and machine stitching around the edges. A leather looped tag is attached at one corner so that the mitt can be hung up. The reddish-brown printing on the leather side of the mitt is stamped into the leather. The leather side is a little stained. ‘Cramond & Dickson. Warrnambool, Port Fairy & London’ cramond & dickson stores, warrnambool, port fairy, london, history of warrnambool, john glass cramond, james dickson -
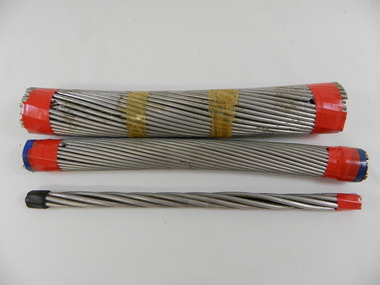 Kiewa Valley Historical Society
S.E.C.V. Transmission Cables x3
The State Electricity Commission of Victoria constructed the Kiewa Hydro Electric scheme from the 1930's to 1960's during which time power cables were made to carry power from the Power stations to the switch yards and beyond to the towns and houses.These sample power cables indicate the types of power lines used in the Kiewa Hydro Electric Scheme and the amount of voltage that they carry.3 transmission cables of different width used for transmitting different amounts of power on different size power lines.The thinnest cable consists of a centre piece of wire covered by a layer of twisted wires. The middle sized cable has 4 layers of twisted wires around the centre piece and the thickest cable has 5 layers of twisted wires around the centre piece.The thickest cable has a plastic strip with 330.000 Volt Cable inscribed on it.state electricity commission of victoria. power lines. cables. kiewa hydro electric scheme. electricity. -
 Warrnambool and District Historical Society Inc.
Wedding Horeshoe, 1942
This horseshoe was carried by Ena Todd when she married Jack Heazlewood in Warrnambool in 1942. A horseshoe ornament was often carried by brides in the 20th century (and also still are today) as horseshoes are traditionally a symbol of good luck. They were usually home-made by family members and other well-wishers. Mary Josephine (Ena) Todd was born in Warrnambool in 1920 and was a hairdresser at the Josephine’s Salon in Warrnambool. When she married Jack Heazlewood he was a stoker on the H.M.A.S. Sydney. They later lived on Sydney.This horseshoe is of interest, firstly as a sample of the type of good luck ornament often carried by brides in the 20th century, and secondly as a memento of the wedding day of Ena Todd, a resident of Warrnambool in the mid 20th century. This is a wooden horseshoe, painted silver and decorated with raised white flowers and green tracery. Attached to the horseshoe is a white ribbon tied with a bow at the end. The ribbon is creased and dirty.Good Lucktodd & heazlewood families, warrnambool, history of warrnambool -
Warrnambool and District Historical Society Inc.
Document - Poll Book, Mid 20th century
The format of this Poll Book indicates that it could be used in any polling in any electoral district in Australia, either State or Federal. Similar booklets may have been used in the Warrnambool area.This booklet is of minor interest as a sample of a Poll Book that was used in elections (perhaps in the Warrnambool area) in the mid 20th century. It can be used for display.This is a booklet of ten pages. It has a cover with black printing. The cover, once coloured pink but now faded, is completely detached. The pages are ruled with red lines but there are no entries.Poll Bookhistory of warrnambool, poll book, warrnambool -
 Lara RSL Sub Branch
Laminated diagram Vietnam Tunnel System, Diagram of Vietnam Cong/NVA Underground tunnel System
A sample of the lengths that the Viet Cong went to to out stay their adversary.Laminated diagram of a "Viet" Cong/NVA tunnel system shows the ingenuity and use of the local terrain.Notations of areas of the tunnel systems and on the lower left of the laminated picture is a note that states "The diagram shows a typical tunnel complex used by the Viet Cong during the 1960's." -
Federation University Historical Collection
Costume - Button, Button Sample Board
Used at Lamb's KnittingA card with 22 buttons attached to it. 14 are missing.buttons, lambs