Showing 4780 items matching " tables"
-
 Greensborough Historical Society
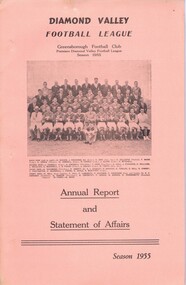
Book - Annual Report, Diamond Valley Football League, Diamond Valley Football League. Annual Report and Statement of Affairs. Season 1955, 03/03/1953
A complete record of the DVFL season 1955, includes financial report, description of events, membership, teams, scores from the seasons games and winners of best and fairest awards for all divisions and age groups. In 1955 the Division 1 Premiers were Greensborough Football Club.This annual report covers many teams from within the Diamond Valley area. Includes junior and senior teams.Foolscap size book. 19 pages, printed on single sides of page . Larger buff cover with black text. Includes typed tables. Photo of premiership teamaustralian rules football, greensborough football club, diamond valley football league, dvfl, northern football league, nfl, northern football netball league, nfnl -
 Greensborough Historical Society
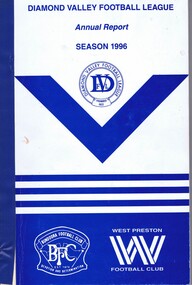
Book - Annual Report, Diamond Valley Football League, Diamond Valley Football League. Annual Report. Season 1996, 1996
A complete record of the DVFL season 1996, includes financial report, description of events, membership, teams, scores from the seasons games and winners of best and fairest awards for all divisions and age groups. including black and white photos. In 1996 the Division 1 Premiers were Bundoora Football Club.This annual report covers many teams from within the Diamond Valley area. Includes junior and senior teams.Foolscap size book. 211 pages, printed on double sides of pages. Blue and White cover with black text and includes typed tables and black and white photosaustralian rules football, greensborough football club, diamond valley football league, dvfl, northern football league, nfl, northern football netball league, nfnl, bundoora football club -
 Whitehorse Historical Society Inc.
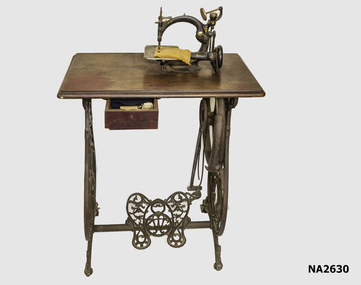
Machine - Sewing Machine, c1860s
Willcox and Gibbs: Serial No. 158679.|The Willcox& Gibbs Sewing Machine Company was founded in 1857 by James E. A. Gibbs and James Willcox and opened its London Office in 1859 at 135 Regent Street . By 1871 the Company's Chief Office for Europe was at 150 Cheapside, London, this office was later moved (post 1885) to 94 - 96 Wigmore Street, then 37 & 39 Moorgate Street (by 1891 to post 1907) and later 20 Fore Street, London .Right from the initial production the manufacturing of the Company's single thread, chain stitch machine was undertaken by Brown & Sharpe, Rhode Island and this continued up until 1948.|A special hand crank mechanism was produced in England for the European market, but the general design of the Willcox& Gibbs remained essentially the same throughout its production. The only major improvement was in 1875 when the glass tension discs were replaced with an automatic tension device which ensured the machine could not get out of adjustment.|In addition to the domestic hand and treadle machines the company produced a wide range of industrial models.|The Company finally closed in 1973.|This Willcox& Gibbs came complete with its wooden carry case. The machine was made in America in the late 1860's but it has the ornate hand crank produced at Coalbrookdale near Telford, England which was, in Victorian times, renown for producing high quality ornate iron castings. This machine has the glass tension discs which were used on domestic models until 1875. The Willcox& Gibbs badge is located on the rear of the base casting and it also has a deep wooden base.|The cloth plate has various American patent dates, four dating between 1857 & 1860 relating to J. E. A. Gibbs, three dating between 1860 & 1864 relating to Chas H. Willcox (son of James Willcox), the machine was also licensed under five other patents including the infamous Elias Howe patent of 1846.|There are only two English patents one for J. E. A Gibbs and the other for James Willcox.Upright sewing machine. Machine is quite small and set on wooden table. Ornate metal sides and treadle feet. One drawer. Brass name medallion on back.Willcox & Gibb Sewing Machine co, New York.|Other inscriptions are :-|London, Paris|Measures|Thread type|Needle 12 stitches to inch|Brevettees G.D.G.|En France|Eten Delgique|Under Royal Letters|Patent|James Willcox|July 4 - 71 [1871]handcrafts, equipment -
 Lakes Entrance Historical Society
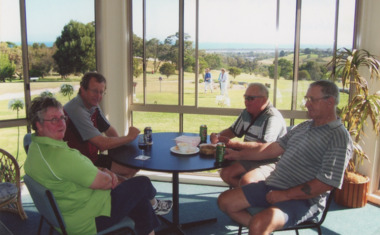
Photograph - Golf Club, Lakes Post Newspaper, 2005
number in album 03601.02Colour photograph Sue and Jeff Wilson, Peter Rhodes and Archie Milligan sitting at table overlooking greens at Golf Club,on Opening Day. Lakes Entrance Victoriagolf club, function -
 Lakes Entrance Historical Society
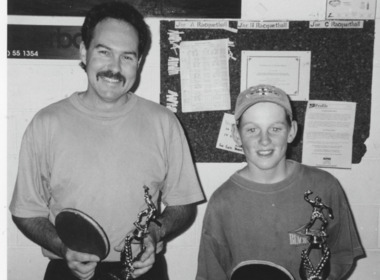
Photograph - Table tennis, Chris Furmeister, 1/12/1996 12:00:00 AM
Black and white photograph of Table Tennis team Team Four Wayne Stewart and Ben Johnson, winners of series played at squash court Lakes Entrance Victoriasports, table tennis -
 Ithacan Historical Society
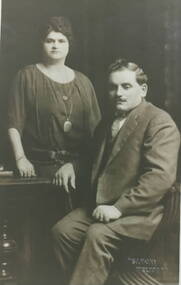
Photograph, 1921
Athina (nee Lekasta) and Christos Deftereos.A studio photograph of a lady and man. The lady is standing beside a small table while the man is sitting on a chair. The photograph has been photographed from another print. -
 Royal District Nursing Service (now known as Bolton Clarke)
Photograph - Photograph, black and white, Barry Sutton, 14.09.1972
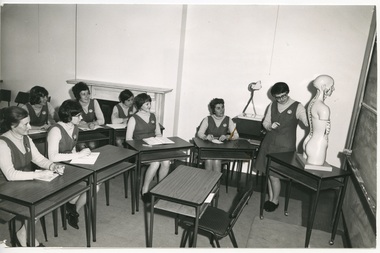
This black and white photograph shows a group of RDNS Sisters who are part of the Post Basic Community Nursing Course. They are receiving education from Sr. Pat (Paddy) Rowley, RDNS Principal Nurse Educator. The session is being held in the Education Department at the Royal District Nursing Service Headquarters, 452 St. Kilda Rd, Melbourne.The RDNS winter uniform worn is a blue/grey skivvie under a blue/grey V neck tunic style herringbone winter material frock.Melbourne District Nursing Service ran its first Post-Basic Course for community nurses in 1962. Sisters attended the course for 12 weeks. The course ran annually until the mid 1990s. Education was an integral part of Melbourne District Nursing Society (MDNS), from its inception in 1885, later, in 1966, called Royal District Nursing Service, (RDNS). From 1885, only Trained nurses (Nurses) through the Hospital training system, were employed by the Society, and on visits to patients they taught the necessity of hygiene and cleanliness, as well as the need for a good diet, to bring about good health. Doctor’s lectures were later given at the MDNS home to instruct patients and their families on prevention of disease. Education to patients continued throughout the years regarding health care and the use of equipment in the home. In 1961, Education programs commenced at MDNS with their Trained nurses (Sisters) receiving In-service education. Sr. Pat (Paddy) Rowley was a leader in In-service Education and established the RDNS Department of Community Nursing Education in 1962. Staff could also apply for scholarships to further their education outside of RDNS. Many of their senior Sisters received Postgraduate diplomas from the College of Nursing in Community Health Nursing, Education, and Administration, and several travelled overseas visiting nursing organizations viewing their public health and District nursing systems. At RDNS many programs were run, including: a Post Basic Course, Cardiac Rehabilitation Nursing, Haematology/Oncology Nursing, Palliative Care program, Diabetic Stabilization Program, Leg Ulcer Management Program, Wound Care Specialist Program, HIV/AIDS Nursing Care, Cystic Fibrosis Home Support, Veterans Home Care Program, Breast Cancer Support Program, Continence Management Program, Stomal Therapy Program, In-Home Lactation Support Program and the Homeless Persons Program. RDNS staff attended several hospitals to observe and learn special care needed to some patients, e.g. to the Austin Hospital to learn the care required for paraplegic and quadriplegic patients at home, and to Mount Royal Hospital to observe the care of patients in the Rehabilitation ward. A Community Nursing Education Program was extended to student nurses from hospitals and to other nursing organizations. These Education programs kept the RDNS Sisters abreast of new techniques, such as changes in technology for e.g. new testing methods in detecting glucose levels in Diabetic patients. Sr. Nan Deakin obtained a Post Basic Certificate in Psychiatric Nursing and included this area in her Education lectures. Sr. Daphne Geldard specialized in the area of Alzheimer’s disease and Dementia. These Sisters visited patients in District areas with the regular RDNS Sister when required. Every member of staff, both professional and non professional staff, received regular education in the Education Department. In 1980, a Home Health Aide pilot study, funded by the Federal Government, the Brotherhood of St. Laurence and RDNS, with the program written and taught by Sr. Rowley, was evaluated as successful, and Home Health Aides were employed and worked in RDNS Centres under the supervision of RDNS Sisters. This black and white photograph is of a group of seven Royal District Nursing Service (RDNS) Sisters sitting in a semi-circle in two rows at single small two shelf tables. There are open white paged books or papers on each table and some of the Sisters have pens in their hands. The Sister sitting in the front far right is Sr. Affleck, who has dark short curly hair. The other Sisters have dark short hair in various styles. Further right in the photograph stands Sr. Rowley, who has dark short hair and is wearing glasses. She has her left hand supporting a torso of an anatomical model which is sitting on a table slightly to her left. She and the Sisters are looking at the vertebrae down the spine of the model. Another empty table is in front of the semi-circle and it sits in the centre foreground of the photograph. In the rear between Sr. Affleck and Sr. Rowley, a piece of equipment stands on a table. To the right of the photograph part of a large blackboard can be seen. The Sisters are wearing light grey skivvies under a darker V neck tunic style frock with the RDNS insignia on its upper left.Photographers stamp. Quote No. LD 8rdns education, rdns uniform, royal district nursing service, sister pat (paddy) rowley, sister margaret affleck -
 Eltham District Historical Society Inc
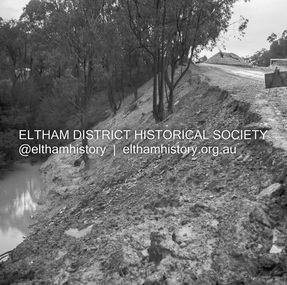
Negative - Photograph, J.A. McDonald, Heidelberg-Kinglake Road, Sep 1959
Job 56M430 Contractor Hone Wash over road due to blocked table drain caused this wash out on embankmentRecord of various Shire of Eltham infrastructure works undertaken during the period of 1952-1962 involving bridge and road reconstruction projects, sometimes with Eltham Shire Council Project Reference numbers quoted. It was during this period that a number of significant improvements were made to roads and new bridges constructed within the shire that remain in place as of present day (2022). In many situations, the photos provide a tangible visible record of infrastructure that existed throughout the early days of the Shire. The album was put together by or under the direction of the Shire Engineer, J.A. McDonald.infrastructure, shire of eltham, bridge construction, 1959-09, heidelberg-kinglake road, road construction -
 National Wool Museum
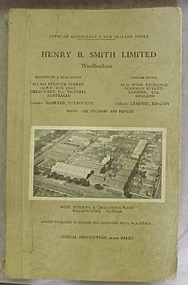
Book, Types of Australian & New Zealand Wools
Book listing types of Australian & New Zealand wools, mostly in table format. Produced by Henry B. Smith Limited.Book listing types of Australian & New Zealand wools.wool growing wool brokering, henry b. smith limited, smith, mr henry b. watson, mr alex w - watswool pty ltd, wool growing, wool brokering -
 Bialik College
Photograph (item) - Years 9 and 10 Boys Table Tennis Team, 1996, 1996
Years 9 and 10 Boys Table Tennis Team, 1996. Please contact [email protected] to request access to this record.hawthorn east campus, sport, table tennis, 1990s -
Bialik College
Photograph (item) - Years 7 and 8 Girls Table Tennis Team, 1997, 1997
Years 7 and 8 Girls Table Tennis Team, 1997. Please contact [email protected] to request access to this record.sport, 1990s -
Bialik College
Photograph (item) - Years 9 and 10 Boys Table Tennis Team, 1997, 1997
Years 9 and 10 Boys Table Tennis Team, 1997. Please contact [email protected] to request access to this record.sport, 1990s -
 Heidelberg Golf Club
Photograph, Heidelberg Golf Club: Clubhouse renovations 1997-98 - Spike Bar, 1997
Heidelberg Golf Club: Clubhouse renovations 1997-98 - Spike Bar - looking to billiard table from bar 1997Colour photograph and captionclubhouse redevelopment 1998, hgc old clubhouse, hgc clubhouse 1997, spike bar -
 Lakes Entrance Historical Society
Photograph - Broomes Maranui , Police Station Esplanade Lakes Entrance Victoria, 1938 c
In foreground is the stone wall beside the lake, concrete path and picnic table beside the Esplanade Lakes Entrance Victoria. c1938 Black and white photograph of a postcard showing Broomes Maranui Guesthouse with Police Station on the western side and the picture theatre on the eastern side.accommodation, transport -
 Wodonga & District Historical Society Inc
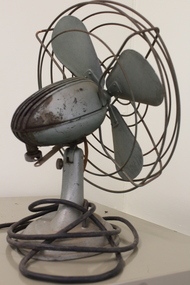
Functional object - Early Electric Table Top Fan, Elcon Australia, 1920s to 1950s
This desk or table-top electric fan marked is typical of the fans popular in the 1930s through to the 1950s. The fans were made for use in the home, office or factory and were produced in a variety of sizes. They were available in both fixed and oscillating models with different speeds. The fans cost several weeks of a man's average wage at the time and were promoted not only as improving comfort in the home but also increasing efficiency at work. With the development of air-conditioning from the 1960s and its increasing use in the workplace and then into the home, fans declined in popularity. This fan was manufactured by the Engineering & Construction Company (ELCON) an Australian owned and patented company originally based in Melbourne, Victoria in the late 1920s. The company became a subsidiary of the Electricity Meter & Allied Industries Ltd (EMAIL) in 1939. Then in 1946 they were decentralised to Orange, New South Wales. EMAIL brands included Email, Emailair, Westinghouse, Carmichael, Elcon, Metters and Weatherall. Electrolux purchased the major appliance division of Email in 2001.This item is representative of early electric fans manufactured in Australia in the early to mid 20th century. They were widely used throughout Australian homes and workplaces prrior to the development of airconditioning.This early electric table fan has four metal blades attached to an egg shaped enclosed motor. Each blade is attached with three rivets. The fan has a wire safety guard surrounding the blades. This is attached to a circular metal base.There is a switch in the centre of the base to adjust speed. A knob at the back of the fan enables its position to be adjusted. There is no longer any branding visible on the fan but it has been identified as an ELCON fan manufacured in Australia. The electrical cord is not the original which has been replaced.electric fans, home appliances, elcon fans -
 Bendigo Military Museum
Photograph - AUTOMAP 1 Production – Army Survey Regiment, Fortuna, Bendigo, c1978-1980
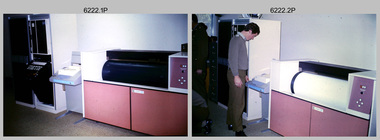
This collection of 17 photos was most likely taken in c1978-1980. The AUTOMAP 1 computer assisted cartography and mapping system was introduced in 1975. The components of AUTOMAP 1 were the Input Sub-System of four Wild B8s stereoplotters and three Gradicon digitising tables, the Optical Line Following Sub-System – Gerber OLF, the Verification Sub-System – Gerber 1442 drum plotter, the General Purpose Sub-system – HP21MX computer and the Output Sub-System – Gerber 1232 flatbed plotter). The first map was published in 1978 (Strickland 3665-3, 1:50,000). AUTOMAP 1 was the first computer assisted cartography and mapping system utilised by the Survey Corps and was the first system used by Australian mapping organisations. The history of the AUTOMAP 1 system is covered in more detail with additional historic photographs, in pages 116-118 of Valerie Lovejoy’s book 'Mapmakers of Fortuna – A history of the Army Survey Regiment’ ISBN: 0-646-42120-4. See items 6122.20P, 6410.24P, 6183.19P, 6184.20P, and 6200.5P for additional photographs of the AUTOMAP 1 system.This is a set of 17 photographs of Air Survey Squadron military and civilian personnel operating AUTOMAP 1 equipment at the Army Survey Regiment at Fortuna, Bendigo, c1978-1980. The photographs were on 35mm colour slides and were scanned at 96 dpi. They are part of the Army Survey Regiment’s Collection. .1) - Photo, colour, c1978-1980, Gerber 1442 verification drum plotter. .2) - Photo, colour, c1978-1980, Gerber 1442 verification drum plotter, SPR Garry Ames. In background - Hewlett Packard (HP) 2100A Minicomputer Input Subsystem controlling Wild B8 Aviograph stereo plotters. .3) - Photo, colour, c1978-1980, Gerber 1442 verification drum plotter. .4) - Photo, colour, c1978-1980, digitising topographic features with a Wild B8 Aviograph stereo plotter, CPL Adrian Rynberk. .5) to .6) - Photo, colour, c1978-1980, Wild PEB8 stereo profiler. .7) - Photo, colour, c1980, HP 9640A Programming System. .8) - Photo, colour, c1980, HP 9640A Programming System, L to R: unidentified, SGT Alan Toogood. .9) - Photo, colour, c1978-1980, Gerber Optical Line Follow (OLF), CAPT Rob Bridge. .10) - Photo, colour, c1978-1980, Gerber OLF. .11.) to .12) - Photo, colour, c1978-1980, Gerber OLF, SPR Gerry Gunn. .13) - Photo, colour, c1978-1980, Gerber OLF. .14) - Photo, colour, c1979, Gradicon edit table. .15) to .16) - Photo, colour, c1981, Gradicon edit table, SPR Chris Gordon. .17) - Photo, colour, c1981, Gradicon edit table, L to R: SPR Chris Brown, unidentified..1P to .17P - Some of the equipment is annotated on the frame of the 35mm slides.royal australian survey corps, rasvy, army survey regiment, army svy regt, fortuna, asr, automap 1 -
 Bendigo Military Museum
Photograph - AUTOMAP 1 Production – Army Survey Regiment, Fortuna, Bendigo, c1979
This collection of 19 photos was most likely taken in 1980. The AUTOMAP 1 computer assisted cartography and mapping system was introduced in 1975. The components of AUTOMAP 1 were the Input Sub-System of four Wild B8s stereoplotters and three Gradicon digitising tables, the Optical Line Following Sub-System – Gerber OLF, the Verification Sub-System – Gerber 1442 drum plotter, the General Purpose Sub-system – HP21MX computer and the Output Sub-System – Gerber 1232 flatbed plotter). The first map was published in 1978 (Strickland 3665-3, 1:50,000). AUTOMAP 1 was the first computer assisted cartography and mapping system utilised by the Survey Corps and was the first system used by Australian mapping organisations. The history of the AUTOMAP 1 system is covered in more detail with additional historic photographs, in pages 116-118 of Valerie Lovejoy’s book 'Mapmakers of Fortuna – A history of the Army Survey Regiment’ ISBN: 0-646-42120-4. See items 6122.20P, 6410.24P, 6184.20P, 6200.5P, and 6222.17P for additional photographs of the AUTOMAP 1 system.This is a set of 19 photographs of Air Survey Squadron military and civilian personnel operating AUTOMAP 1 equipment at the Army Survey Regiment at Fortuna, Bendigo, c1979. The photographs were on 35mm negative film and were scanned at 96 dpi. They are part of the Army Survey Regiment’s Collection. .1) - Photo, colour, c1979, Gradicon edit table, SSGT John Bennett. .2) - Photo, colour, c1979, Gradicon edit table. .3) - Photo, colour, c1979, HP21MX computer General Purpose Sub-system. .4) - Photo, colour, c1979, HP21MX computer General Purpose Sub-system. L to R: CAPT Graham Baker, SPR Ian Belmont. .5) - Photo, colour, c1979, Gerber verification drum plotter. 1130 System administration, unidentified. .6) - Photo, colour, c1979, Gerber Optical Line Follower (OLF). .7) - Photo, colour, c1979, Gerber OLF .8) - Photo, black & white, c1979, Programming and system administration, L to R: WO1 Don Taylor, Robert Cox, Tony Spurling, SSGT John Bennett, SGT Alan Toogood. .9) to .14) - Photo, black & white, c1979, .15) - Photo, black & white, c1979, Gerber OLF, unidentified. .16) - Photo, black & white, c1979, Gerber verification drum plotter, unidentified using Gradicon edit table. .17) to .18) - Photo, black & white, c1979, - Photo, black & white, c1979, Programming and system administration, SSGT John Bennett. .19)- Photo, black & white, c1979, - Photo, black & white, c1979, HP21MX computer General Purpose Sub-system..1P to .19P No personnel are identified.royal australian survey corps, rasvy, army survey regiment, army svy regt, fortuna, asr, automap 1 -
 University of Melbourne, Burnley Campus Archives
Document - Documents, Registers, Correspondence and Photographs, College Records, Livestock Records, 1919-1951
(1) 2 copies and handwritten notes, School of Primary Agriculture and Horticulture Burnley Gardens "Victoria" Jersey Herd Table No 1, Pedigree then Table: No., Name, Sex, Sire, Dam, Dropped, 24 January 1919 -8 August 1947. (2) 3 copies and handwriten notes, "Victoria" Jersey Herd Milk Fat and Butter Records of cows on hand at 8 August 1947 Table 2: Name, Born, Milk Test, Butter Fat, Class, Calved. (3) 3 copies and handwritten notes, "Victoria" Jersey Herd Milk Fat and Butter Records of cows of 1st, 2nd, 3rd, 4th and 5th generations Table No 3. (4) 2 copies Table No 4: Pedigree.(5) 2 copies Table No 5: Sires used Table: Name, For Pedigree see -. (6) Book of Standard Pedigree Certificates, some stubs with a name on them, V. Starbright's Flirt, V. Elizabeth Anne handwritten on outside. Second book unused. (7) File: "Stock Breeding Cattle Herd Book (Jerseys)" dated 27 May 1936 to 13 September 1950 includes Correspondence, Notices, Jersey Herd Society, AGM of The Australian Jersey Herd Society (Victorian Branch). (8) File: Stock Breeding Cattle Burnley 1943, dated 4 February 1943-8 August 1951, Livestock returns, Memoranda, sale notices. (9) File: Completed Correspondence Cattle dating from 2 December 1926, drawing of cow with markings of calf to be filled in, photographs of calves, correspondence re purchases and sales of cattle, Pedigrees.school of primary agriculture and horticulture, burnley gardens, victoria, jersey herd, milk, butter, records, cows, dairy, pedigree, pedigree certificates, stubs, v. starbright's flirt, v. elizabeth anne, stock breeding, cattle, australian jersey herd society, livestock, correspondence, friesian, holstein friesian, wedding bell, patti bell, tinkee bell, pattidale, carroway, oakhall, calf -
 Mission to Seafarers Victoria
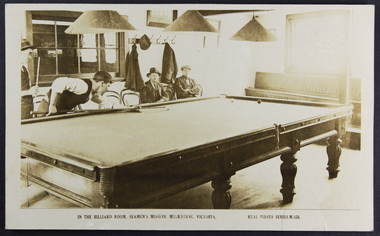
Postcard - Postcard, Sepia, Valentine & Sons Publishing Co. Ltd, In the Billiard Room, Seamen's Mission, Melbourne, Victoria, c. 1920
The photograph on the front of the postcard depicts a game of billiards being played in the Billiard Room of the Mission to Seafarers Melbourne. The Flinders Street extension building opened for use in 1917 after relocating from Australia Wharf. The billiard pool was likely made by the Alcock company.The scene on the postcard shows the typical use of the Billiard Room at the Mission to Seafarers Melbourne as well as what is presumably the original layout of the room and gives an insight into men's fashion of the time.Sepia toned postcard with photograph of a man in shirt sleeves taking a shot on the billiard table with a second man standing to the left and rear wearing a hat and watching the shot. There are two seated men to the right of the photograph. The man on the left is wearing a suit including hat, the man on the right is wearing a cap and sitting with his arms crossed. There are three pendant lights above the billiard table and bench seating in front of the window.Printed on the bottom of the front of the postcard: "IN THE BILLIARD ROOM. SEAMEN'S MISSION. MELBOURNE, VICTORIA. REAL PHOTO SERIES M.826" Printer's logo on rear of postcard: "VALENTINES/REAL PHOTO SERIES POSTCARD" Printed sideways on left hand rear of postcard: "Published by the Valentine & Sons Publishing Co. Ltd/Melbourne, Sydney & Brisbane" Printed in right hand corner rear of postcard: "BRANCHES/SYDNEY/LONDON/DUNDEE/DUBLIN/CAPETOWN/MONTREAL/TORONTO" postcard, windows, floorboards, valentine-and-sons-publishing-co-ltd, billiard room, pool table, billiard table, billiard cue, seamen's mission, mission to seafarers, melbourne, flinders street, bench seat, pendant lighting, bentwood chairs, coat rack, valentines postcards, real series postcards, real photo series, m.826, vienna chairs -
 Melbourne Tram Museum
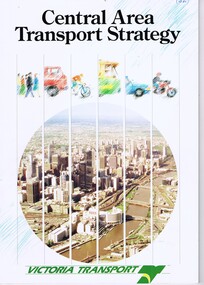
Document - Report, Victoria Transport, "Central Area Transport Study", Mar. 1991
Report - 28 pages + card cover, centre stapled, titled "Central Area Transport Study", produced by Victoria Transport as part of the Central Area Transport Strategy (CATS), with a forward by the Minister for Transport, has a table of contents, figures and tables. Provides a set of Action Plans, looks at future, implementation, options, roads, tram and rail lines, cycle and pedestrians. See Reg Item 471 for a 1988 draft.In ink on top right hand corner "(1991)",trams, tramways, public transport, melbourne, road transport, the met, minister for transport -
 Melbourne Tram Museum
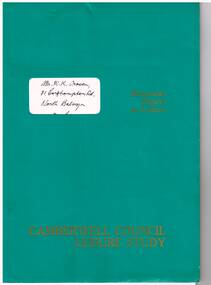
Document - Report, City of Camberwell, "City of Camberwell - Community Transport Services Discussion Paper", May. 1980
Report - 60 pages clip bound with green card covers, titled "City of Camberwell - Community Transport Services Discussion Paper" with a covering letter to Ken Craven dated 30/5/1980 and a covering note back from a friend after reading the report. Report looks at transport in the City area, the problems, users, community use, alternatives, accessibility. Has maps, tables, table of contents and appendices.trams, tramways, public transport, camberwell, bus services, community -
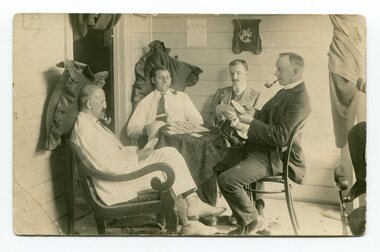 Orbost & District Historical Society
black and white photograph, early 20th century - 1910?
From L-R : Nathan Spielvogel, Hector Young, Percy Watt and George Holden. . Taken on the front porch at Illfracombe in 1908 after the four men had enjoyed a weekend fishing There appears to be a photo hanging on the wall in the background which looks like it could be of a young Marion Watt and the family's dog, a golden retriever In "The Gum Sucker at Home: Bound for Croajingolong 1908" by Nathan Spielvogel, published in Mary Gilbert's Personalities and Stories of the Early Orbost District, 3rd edition, p. 107-116, Spielvogel talks of his trip to Orbost, and fishing with Watt, Bruce and Young aboard Percy Watt's boat, the Maris Stella. Spielvogel's story says Young was the secretary at James & Birds auctioneers and "was one of the builders of the first foot bridge over the Backwater". It says George Holden was a Bank Manager at the Bank of Victoria. (info. from Campbell Watt) This photograph shows Mr Nathan Spielvogel on the left. He was a school teacher at the Orbost State School following Mr Rowe. Nathan Frederick Spielvogel (1874-1956), teacher, writer and historian, was born on 10 May 1874 at Ballarat, Victoria, son of Newman Frederick Spielvogel, pawnbroker, and his wife Hannah, née Cohen. As well as his stories he published a number of books about the history of Ballarat. Spielvogel taught at Orbost for at least a year Nathan Frederick Spielvogel (1874–1956) was a teacher, writer and historian. As a country schoolteacher, he traveled widely in the eastern Australian outback and also made a journey to London. Spielvogel gained distinction as one of the only Australian Jewish writers of his time. Many of his early books were best-sellers. He has an association with the history of Orbost having spent a year as a teacher at Orbost. The Watt family were early Marlo settlers.A black / white photograph / postcard of four men sitting around a small table playing cards. Two of the men have pillows behind their heads. Three are smoking pipes.on back - "On R - N. Spielvogel"spielvogel-nathan-orbost -
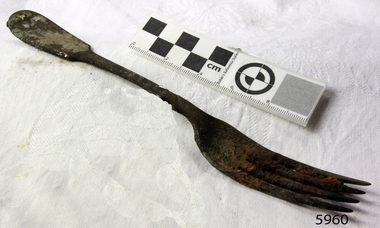
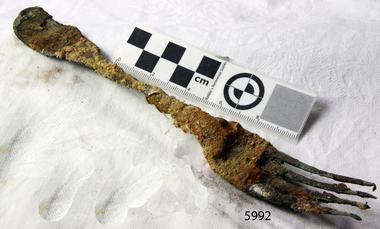
 Flagstaff Hill Maritime Museum and Village
Fork
HISTORY OF THE LOCH ARD The LOCH ARD belonged to the famous Loch Line which sailed many ships from England to Australia. Built in Glasgow by Barclay, Curdle and Co. in 1873, the LOCH ARD was a three-masted square rigged iron sailing ship. The ship measured 262ft 7" (79.87m) in length, 38ft (11.58m) in width, 23ft (7m) in depth and had a gross tonnage of 1693 tons. The LOCH ARD's main mast measured a massive 150ft (45.7m) in height. LOCH ARD made three trips to Australia and one trip to Calcutta before its final voyage. LOCH ARD left England on March 2, 1878, under the command of Captain Gibbs, a newly married, 29 year old. She was bound for Melbourne with a crew of 37, plus 17 passengers and a load of cargo. The general cargo reflected the affluence of Melbourne at the time. On board were straw hats, umbrella, perfumes, clay pipes, pianos, clocks, confectionary, linen and candles, as well as a heavier load of railway irons, cement, lead and copper. There were items included that intended for display in the Melbourne International Exhibition in 1880. The voyage to Port Phillip was long but uneventful. At 3am on June 1, 1878, Captain Gibbs was expecting to see land and the passengers were becoming excited as they prepared to view their new homeland in the early morning. But LOCH ARD was running into a fog which greatly reduced visibility. Captain Gibbs was becoming anxious as there was no sign of land or the Cape Otway lighthouse. At 4am the fog lifted. A man aloft announced that he could see breakers. The sheer cliffs of Victoria's west coast came into view, and Captain Gibbs realised that the ship was much closer to them than expected. He ordered as much sail to be set as time would permit and then attempted to steer the vessel out to sea. On coming head on into the wind, the ship lost momentum, the sails fell limp and LOCH ARD's bow swung back. Gibbs then ordered the anchors to be released in an attempt to hold its position. The anchors sank some 50 fathoms - but did not hold. By this time LOCH ARD was among the breakers and the tall cliffs of Mutton Bird Island rose behind the ship. Just half a mile from the coast, the ship's bow was suddenly pulled around by the anchor. The captain tried to tack out to sea, but the ship struck a reef at the base of Mutton Bird Island, near Port Campbell. Waves broke over the ship and the top deck was loosened from the hull. The masts and rigging came crashing down knocking passengers and crew overboard. When a lifeboat was finally launched, it crashed into the side of LOCH ARD and capsized. Tom Pearce, who had launched the boat, managed to cling to its overturned hull and shelter beneath it. He drifted out to sea and then on the flood tide came into what is now known as LOCH ARD Gorge. He swam to shore, bruised and dazed, and found a cave in which to shelter. Some of the crew stayed below deck to shelter from the falling rigging but drowned when the ship slipped off the reef into deeper water. Eva Carmichael had raced onto deck to find out what was happening only to be confronted by towering cliffs looming above the stricken ship. In all the chaos, Captain Gibbs grabbed Eva and said, "If you are saved Eva, let my dear wife know that I died like a sailor". That was the last Eva Carmichael saw of the captain. She was swept off the ship by a huge wave. Eva saw Tom Pearce on a small rocky beach and yelled to attract his attention. He dived in and swam to the exhausted woman and dragged her to shore. He took her to the cave and broke open case of brandy which had washed up on the beach. He opened a bottle to revive the unconscious woman. A few hours later Tom scaled a cliff in search of help. He followed hoof prints and came by chance upon two men from nearby Glenample Station three and a half miles away. In a state of exhaustion, he told the men of the tragedy. Tom returned to the gorge while the two men rode back to the station to get help. By the time they reached LOCH ARD Gorge, it was cold and dark. The two shipwreck survivors were taken to Glenample Station to recover. Eva stayed at the station for six weeks before returning to Ireland, this time by steamship. In Melbourne, Tom Pearce received a hero's welcome. He was presented with the first gold medal of the Royal Humane Society of Victoria and a £1000 cheque from the Victorian Government. Concerts were performed to honour the young man's bravery and to raise money for those who lost family in the LOCH ARD disaster. Of the 54 crew members and passengers on board, only two survived: the apprentice, Tom Pearce and the young woman passenger, Eva Carmichael, who lost all of her family in the tragedy. Ten days after the LOCH ARD tragedy, salvage rights to the wreck were sold at auction for £2,120. Cargo valued at £3,000 was salvaged and placed on the beach, but most washed back into the sea when another storm developed. The wreck of LOCH ARD still lies at the base of Mutton Bird Island. Much of the cargo has now been salvaged and some was washed up into what is now known as LOCH ARD Gorge. Cargo and artefacts have also been illegally salvaged over many years before protective legislation was introduced. One of the most unlikely pieces of cargo to have survived the shipwreck was a Minton porcelain peacock - one of only seven in the world. The peacock was destined for the Melbourne International Exhibition in 1880. It had been well packed, which gave it adequate protection during the violent storm. Today, the Minton peacock can be seen at the Flagstaff Hill Maritime Museum in Warrnambool. From Australia's most dramatic shipwreck it has now become Australia's shipwreck artefact and is one of very few 'objects' on the Victorian State Heritage Register most valuable. The LOCH ARD shipwreck is of State significance – Victorian Heritage Register S 417 Flagstaff Hill’s collection of artefacts from LOCH ARD is significant for being one of the largest collections of artefacts from this shipwreck in Victoria. It is significant for its association with the shipwreck, which is on the Victorian Heritage Register (VHR S417). The collection is significant because of the relationship between the objects, as together they have a high potential to interpret the story of the LOCH ARD. The LOCH ARD collection is archaeologically significant as the remains of a large international passenger and cargo ship. The LOCH ARD collection is historically significant for representing aspects of Victoria’s shipping history and its potential to interpret sub-theme 1.5 of Victoria’s Framework of Historical Themes (living with natural processes). The collection is also historically significant for its association with the LOCH ARD, which was one of the worst and best known shipwrecks in Victoria’s history. Silver plated copper alloy table fork from the wreck of the Loch Ard. Some verdigris and silver oxide. Large amount of encrustation covering fork tines and handle. electroplated cutlery, fork, flagstaff hill, warrnambool, shipwrecked coast, flagstaff hill maritime museum, maritime museum, shipwreck coast, flagstaff hill maritime village, great ocean road, loch line, loch ard, captain gibbs, eva carmichael, tom pearce, glenample station, mutton bird island, loch ard gorge -
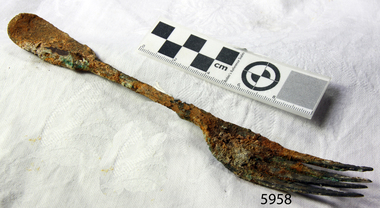
 Flagstaff Hill Maritime Museum and Village
Fork
HISTORY OF THE LOCH ARD The LOCH ARD belonged to the famous Loch Line which sailed many ships from England to Australia. Built in Glasgow by Barclay, Curdle and Co. in 1873, the LOCH ARD was a three-masted square rigged iron sailing ship. The ship measured 262ft 7" (79.87m) in length, 38ft (11.58m) in width, 23ft (7m) in depth and had a gross tonnage of 1693 tons. The LOCH ARD's main mast measured a massive 150ft (45.7m) in height. LOCH ARD made three trips to Australia and one trip to Calcutta before its final voyage. LOCH ARD left England on March 2, 1878, under the command of Captain Gibbs, a newly married, 29 year old. She was bound for Melbourne with a crew of 37, plus 17 passengers and a load of cargo. The general cargo reflected the affluence of Melbourne at the time. On board were straw hats, umbrella, perfumes, clay pipes, pianos, clocks, confectionary, linen and candles, as well as a heavier load of railway irons, cement, lead and copper. There were items included that intended for display in the Melbourne International Exhibition in 1880. The voyage to Port Phillip was long but uneventful. At 3am on June 1, 1878, Captain Gibbs was expecting to see land and the passengers were becoming excited as they prepared to view their new homeland in the early morning. But LOCH ARD was running into a fog which greatly reduced visibility. Captain Gibbs was becoming anxious as there was no sign of land or the Cape Otway lighthouse. At 4am the fog lifted. A man aloft announced that he could see breakers. The sheer cliffs of Victoria's west coast came into view, and Captain Gibbs realised that the ship was much closer to them than expected. He ordered as much sail to be set as time would permit and then attempted to steer the vessel out to sea. On coming head on into the wind, the ship lost momentum, the sails fell limp and LOCH ARD's bow swung back. Gibbs then ordered the anchors to be released in an attempt to hold its position. The anchors sank some 50 fathoms - but did not hold. By this time LOCH ARD was among the breakers and the tall cliffs of Mutton Bird Island rose behind the ship. Just half a mile from the coast, the ship's bow was suddenly pulled around by the anchor. The captain tried to tack out to sea, but the ship struck a reef at the base of Mutton Bird Island, near Port Campbell. Waves broke over the ship and the top deck was loosened from the hull. The masts and rigging came crashing down knocking passengers and crew overboard. When a lifeboat was finally launched, it crashed into the side of LOCH ARD and capsized. Tom Pearce, who had launched the boat, managed to cling to its overturned hull and shelter beneath it. He drifted out to sea and then on the flood tide came into what is now known as LOCH ARD Gorge. He swam to shore, bruised and dazed, and found a cave in which to shelter. Some of the crew stayed below deck to shelter from the falling rigging but drowned when the ship slipped off the reef into deeper water. Eva Carmichael had raced onto deck to find out what was happening only to be confronted by towering cliffs looming above the stricken ship. In all the chaos, Captain Gibbs grabbed Eva and said, "If you are saved Eva, let my dear wife know that I died like a sailor". That was the last Eva Carmichael saw of the captain. She was swept off the ship by a huge wave. Eva saw Tom Pearce on a small rocky beach and yelled to attract his attention. He dived in and swam to the exhausted woman and dragged her to shore. He took her to the cave and broke open case of brandy which had washed up on the beach. He opened a bottle to revive the unconscious woman. A few hours later Tom scaled a cliff in search of help. He followed hoof prints and came by chance upon two men from nearby Glenample Station three and a half miles away. In a state of exhaustion, he told the men of the tragedy. Tom returned to the gorge while the two men rode back to the station to get help. By the time they reached LOCH ARD Gorge, it was cold and dark. The two shipwreck survivors were taken to Glenample Station to recover. Eva stayed at the station for six weeks before returning to Ireland, this time by steamship. In Melbourne, Tom Pearce received a hero's welcome. He was presented with the first gold medal of the Royal Humane Society of Victoria and a £1000 cheque from the Victorian Government. Concerts were performed to honour the young man's bravery and to raise money for those who lost family in the LOCH ARD disaster. Of the 54 crew members and passengers on board, only two survived: the apprentice, Tom Pearce and the young woman passenger, Eva Carmichael, who lost all of her family in the tragedy. Ten days after the LOCH ARD tragedy, salvage rights to the wreck were sold at auction for £2,120. Cargo valued at £3,000 was salvaged and placed on the beach, but most washed back into the sea when another storm developed. The wreck of LOCH ARD still lies at the base of Mutton Bird Island. Much of the cargo has now been salvaged and some was washed up into what is now known as LOCH ARD Gorge. Cargo and artefacts have also been illegally salvaged over many years before protective legislation was introduced. One of the most unlikely pieces of cargo to have survived the shipwreck was a Minton porcelain peacock - one of only seven in the world. The peacock was destined for the Melbourne International Exhibition in 1880. It had been well packed, which gave it adequate protection during the violent storm. Today, the Minton peacock can be seen at the Flagstaff Hill Maritime Museum in Warrnambool. From Australia's most dramatic shipwreck it has now become Australia's shipwreck artefact and is one of very few 'objects' on the Victorian State Heritage Register most valuable. The LOCH ARD shipwreck is of State significance – Victorian Heritage Register S 417 Flagstaff Hill’s collection of artefacts from LOCH ARD is significant for being one of the largest collections of artefacts from this shipwreck in Victoria. It is significant for its association with the shipwreck, which is on the Victorian Heritage Register (VHR S417). The collection is significant because of the relationship between the objects, as together they have a high potential to interpret the story of the LOCH ARD. The LOCH ARD collection is archaeologically significant as the remains of a large international passenger and cargo ship. The LOCH ARD collection is historically significant for representing aspects of Victoria’s shipping history and its potential to interpret sub-theme 1.5 of Victoria’s Framework of Historical Themes (living with natural processes). The collection is also historically significant for its association with the LOCH ARD, which was one of the worst and best known shipwrecks in Victoria’s history. Silver plated copper alloy table fork from the wreck of the Loch Ard. Some little verdigri Silver oxide is present. Encrustation visible on fork tines and handle. flagstaff hill, warrnambool, shipwrecked coast, flagstaff hill maritime museum, maritime museum, shipwreck coast, flagstaff hill maritime village, great ocean road, loch line, loch ard, captain gibbs, eva carmichael, tom pearce, glenample station, mutton bird island, loch ard gorge, electroplated cutlery, fork -
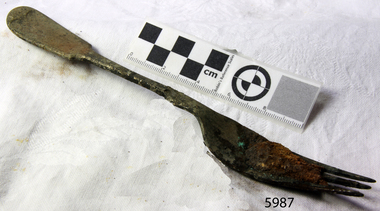
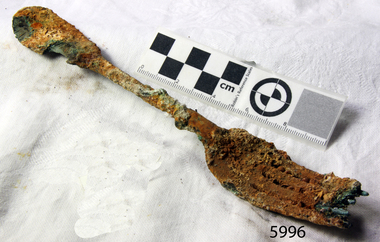
 Flagstaff Hill Maritime Museum and Village
Fork
HISTORY OF THE LOCH ARD The LOCH ARD belonged to the famous Loch Line which sailed many ships from England to Australia. Built in Glasgow by Barclay, Curdle and Co. in 1873, the LOCH ARD was a three-masted square rigged iron sailing ship. The ship measured 262ft 7" (79.87m) in length, 38ft (11.58m) in width, 23ft (7m) in depth and had a gross tonnage of 1693 tons. The LOCH ARD's main mast measured a massive 150ft (45.7m) in height. LOCH ARD made three trips to Australia and one trip to Calcutta before its final voyage. LOCH ARD left England on March 2, 1878, under the command of Captain Gibbs, a newly married, 29 year old. She was bound for Melbourne with a crew of 37, plus 17 passengers and a load of cargo. The general cargo reflected the affluence of Melbourne at the time. On board were straw hats, umbrella, perfumes, clay pipes, pianos, clocks, confectionary, linen and candles, as well as a heavier load of railway irons, cement, lead and copper. There were items included that intended for display in the Melbourne International Exhibition in 1880. The voyage to Port Phillip was long but uneventful. At 3am on June 1, 1878, Captain Gibbs was expecting to see land and the passengers were becoming excited as they prepared to view their new homeland in the early morning. But LOCH ARD was running into a fog which greatly reduced visibility. Captain Gibbs was becoming anxious as there was no sign of land or the Cape Otway lighthouse. At 4am the fog lifted. A man aloft announced that he could see breakers. The sheer cliffs of Victoria's west coast came into view, and Captain Gibbs realised that the ship was much closer to them than expected. He ordered as much sail to be set as time would permit and then attempted to steer the vessel out to sea. On coming head on into the wind, the ship lost momentum, the sails fell limp and LOCH ARD's bow swung back. Gibbs then ordered the anchors to be released in an attempt to hold its position. The anchors sank some 50 fathoms - but did not hold. By this time LOCH ARD was among the breakers and the tall cliffs of Mutton Bird Island rose behind the ship. Just half a mile from the coast, the ship's bow was suddenly pulled around by the anchor. The captain tried to tack out to sea, but the ship struck a reef at the base of Mutton Bird Island, near Port Campbell. Waves broke over the ship and the top deck was loosened from the hull. The masts and rigging came crashing down knocking passengers and crew overboard. When a lifeboat was finally launched, it crashed into the side of LOCH ARD and capsized. Tom Pearce, who had launched the boat, managed to cling to its overturned hull and shelter beneath it. He drifted out to sea and then on the flood tide came into what is now known as LOCH ARD Gorge. He swam to shore, bruised and dazed, and found a cave in which to shelter. Some of the crew stayed below deck to shelter from the falling rigging but drowned when the ship slipped off the reef into deeper water. Eva Carmichael had raced onto deck to find out what was happening only to be confronted by towering cliffs looming above the stricken ship. In all the chaos, Captain Gibbs grabbed Eva and said, "If you are saved Eva, let my dear wife know that I died like a sailor". That was the last Eva Carmichael saw of the captain. She was swept off the ship by a huge wave. Eva saw Tom Pearce on a small rocky beach and yelled to attract his attention. He dived in and swam to the exhausted woman and dragged her to shore. He took her to the cave and broke open case of brandy which had washed up on the beach. He opened a bottle to revive the unconscious woman. A few hours later Tom scaled a cliff in search of help. He followed hoof prints and came by chance upon two men from nearby Glenample Station three and a half miles away. In a state of exhaustion, he told the men of the tragedy. Tom returned to the gorge while the two men rode back to the station to get help. By the time they reached LOCH ARD Gorge, it was cold and dark. The two shipwreck survivors were taken to Glenample Station to recover. Eva stayed at the station for six weeks before returning to Ireland, this time by steamship. In Melbourne, Tom Pearce received a hero's welcome. He was presented with the first gold medal of the Royal Humane Society of Victoria and a £1000 cheque from the Victorian Government. Concerts were performed to honour the young man's bravery and to raise money for those who lost family in the LOCH ARD disaster. Of the 54 crew members and passengers on board, only two survived: the apprentice, Tom Pearce and the young woman passenger, Eva Carmichael, who lost all of her family in the tragedy. Ten days after the LOCH ARD tragedy, salvage rights to the wreck were sold at auction for £2,120. Cargo valued at £3,000 was salvaged and placed on the beach, but most washed back into the sea when another storm developed. The wreck of LOCH ARD still lies at the base of Mutton Bird Island. Much of the cargo has now been salvaged and some was washed up into what is now known as LOCH ARD Gorge. Cargo and artefacts have also been illegally salvaged over many years before protective legislation was introduced. One of the most unlikely pieces of cargo to have survived the shipwreck was a Minton porcelain peacock - one of only seven in the world. The peacock was destined for the Melbourne International Exhibition in 1880. It had been well packed, which gave it adequate protection during the violent storm. Today, the Minton peacock can be seen at the Flagstaff Hill Maritime Museum in Warrnambool. From Australia's most dramatic shipwreck it has now become Australia's shipwreck artefact and is one of very few 'objects' on the Victorian State Heritage Register most valuable. The LOCH ARD shipwreck is of State significance – Victorian Heritage Register S 417 Flagstaff Hill’s collection of artefacts from LOCH ARD is significant for being one of the largest collections of artefacts from this shipwreck in Victoria. It is significant for its association with the shipwreck, which is on the Victorian Heritage Register (VHR S417). The collection is significant because of the relationship between the objects, as together they have a high potential to interpret the story of the LOCH ARD. The LOCH ARD collection is archaeologically significant as the remains of a large international passenger and cargo ship. The LOCH ARD collection is historically significant for representing aspects of Victoria’s shipping history and its potential to interpret sub-theme 1.5 of Victoria’s Framework of Historical Themes (living with natural processes). The collection is also historically significant for its association with the LOCH ARD, which was one of the worst and best known shipwrecks in Victoria’s history. Silver plated copper alloy table fork from the wreck of the Loch Ard. Some verdigris and very little encrustation on fork. Some silver oxide. Hallmark is visible.flagstaff hill, warrnambool, shipwrecked coast, flagstaff hill maritime museum, maritime museum, shipwreck coast, flagstaff hill maritime village, great ocean road, loch line, loch ard, captain gibbs, eva carmichael, tom pearce, glenample station, mutton bird island, loch ard gorge, electroplated cutlery, fork -
 Flagstaff Hill Maritime Museum and Village
Fork
HISTORY OF THE LOCH ARD The LOCH ARD belonged to the famous Loch Line which sailed many ships from England to Australia. Built in Glasgow by Barclay, Curdle and Co. in 1873, the LOCH ARD was a three-masted square rigged iron sailing ship. The ship measured 262ft 7" (79.87m) in length, 38ft (11.58m) in width, 23ft (7m) in depth and had a gross tonnage of 1693 tons. The LOCH ARD's main mast measured a massive 150ft (45.7m) in height. LOCH ARD made three trips to Australia and one trip to Calcutta before its final voyage. LOCH ARD left England on March 2, 1878, under the command of Captain Gibbs, a newly married, 29 year old. She was bound for Melbourne with a crew of 37, plus 17 passengers and a load of cargo. The general cargo reflected the affluence of Melbourne at the time. On board were straw hats, umbrella, perfumes, clay pipes, pianos, clocks, confectionary, linen and candles, as well as a heavier load of railway irons, cement, lead and copper. There were items included that intended for display in the Melbourne International Exhibition in 1880. The voyage to Port Phillip was long but uneventful. At 3am on June 1, 1878, Captain Gibbs was expecting to see land and the passengers were becoming excited as they prepared to view their new homeland in the early morning. But LOCH ARD was running into a fog which greatly reduced visibility. Captain Gibbs was becoming anxious as there was no sign of land or the Cape Otway lighthouse. At 4am the fog lifted. A man aloft announced that he could see breakers. The sheer cliffs of Victoria's west coast came into view, and Captain Gibbs realised that the ship was much closer to them than expected. He ordered as much sail to be set as time would permit and then attempted to steer the vessel out to sea. On coming head on into the wind, the ship lost momentum, the sails fell limp and LOCH ARD's bow swung back. Gibbs then ordered the anchors to be released in an attempt to hold its position. The anchors sank some 50 fathoms - but did not hold. By this time LOCH ARD was among the breakers and the tall cliffs of Mutton Bird Island rose behind the ship. Just half a mile from the coast, the ship's bow was suddenly pulled around by the anchor. The captain tried to tack out to sea, but the ship struck a reef at the base of Mutton Bird Island, near Port Campbell. Waves broke over the ship and the top deck was loosened from the hull. The masts and rigging came crashing down knocking passengers and crew overboard. When a lifeboat was finally launched, it crashed into the side of LOCH ARD and capsized. Tom Pearce, who had launched the boat, managed to cling to its overturned hull and shelter beneath it. He drifted out to sea and then on the flood tide came into what is now known as LOCH ARD Gorge. He swam to shore, bruised and dazed, and found a cave in which to shelter. Some of the crew stayed below deck to shelter from the falling rigging but drowned when the ship slipped off the reef into deeper water. Eva Carmichael had raced onto deck to find out what was happening only to be confronted by towering cliffs looming above the stricken ship. In all the chaos, Captain Gibbs grabbed Eva and said, "If you are saved Eva, let my dear wife know that I died like a sailor". That was the last Eva Carmichael saw of the captain. She was swept off the ship by a huge wave. Eva saw Tom Pearce on a small rocky beach and yelled to attract his attention. He dived in and swam to the exhausted woman and dragged her to shore. He took her to the cave and broke open case of brandy which had washed up on the beach. He opened a bottle to revive the unconscious woman. A few hours later Tom scaled a cliff in search of help. He followed hoof prints and came by chance upon two men from nearby Glenample Station three and a half miles away. In a state of exhaustion, he told the men of the tragedy. Tom returned to the gorge while the two men rode back to the station to get help. By the time they reached LOCH ARD Gorge, it was cold and dark. The two shipwreck survivors were taken to Glenample Station to recover. Eva stayed at the station for six weeks before returning to Ireland, this time by steamship. In Melbourne, Tom Pearce received a hero's welcome. He was presented with the first gold medal of the Royal Humane Society of Victoria and a £1000 cheque from the Victorian Government. Concerts were performed to honour the young man's bravery and to raise money for those who lost family in the LOCH ARD disaster. Of the 54 crew members and passengers on board, only two survived: the apprentice, Tom Pearce and the young woman passenger, Eva Carmichael, who lost all of her family in the tragedy. Ten days after the LOCH ARD tragedy, salvage rights to the wreck were sold at auction for £2,120. Cargo valued at £3,000 was salvaged and placed on the beach, but most washed back into the sea when another storm developed. The wreck of LOCH ARD still lies at the base of Mutton Bird Island. Much of the cargo has now been salvaged and some was washed up into what is now known as LOCH ARD Gorge. Cargo and artefacts have also been illegally salvaged over many years before protective legislation was introduced. One of the most unlikely pieces of cargo to have survived the shipwreck was a Minton porcelain peacock - one of only seven in the world. The peacock was destined for the Melbourne International Exhibition in 1880. It had been well packed, which gave it adequate protection during the violent storm. Today, the Minton peacock can be seen at the Flagstaff Hill Maritime Museum in Warrnambool. From Australia's most dramatic shipwreck it has now become Australia's shipwreck artefact and is one of very few 'objects' on the Victorian State Heritage Register most valuable. The LOCH ARD shipwreck is of State significance – Victorian Heritage Register S 417 Flagstaff Hill’s collection of artefacts from LOCH ARD is significant for being one of the largest collections of artefacts from this shipwreck in Victoria. It is significant for its association with the shipwreck, which is on the Victorian Heritage Register (VHR S417). The collection is significant because of the relationship between the objects, as together they have a high potential to interpret the story of the LOCH ARD. The LOCH ARD collection is archaeologically significant as the remains of a large international passenger and cargo ship. The LOCH ARD collection is historically significant for representing aspects of Victoria’s shipping history and its potential to interpret sub-theme 1.5 of Victoria’s Framework of Historical Themes (living with natural processes). The collection is also historically significant for its association with the LOCH ARD, which was one of the worst and best known shipwrecks in Victoria’s history. Silver plated copper alloy table fork from the wreck of the Loch Ard. Some a little verdigris and some silver oxide. Large area of encrustation on fork tines.flagstaff hill, warrnambool, shipwrecked coast, flagstaff hill maritime museum, maritime museum, shipwreck coast, flagstaff hill maritime village, great ocean road, loch line, loch ard, captain gibbs, eva carmichael, tom pearce, glenample station, mutton bird island, loch ard gorge, electroplated cutlery, fork -
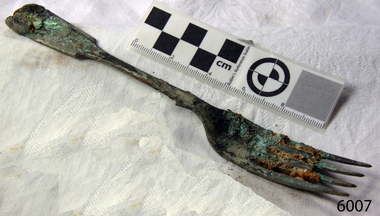
 Flagstaff Hill Maritime Museum and Village
Fork
HISTORY OF THE LOCH ARD The LOCH ARD belonged to the famous Loch Line which sailed many ships from England to Australia. Built in Glasgow by Barclay, Curdle and Co. in 1873, the LOCH ARD was a three-masted square rigged iron sailing ship. The ship measured 262ft 7" (79.87m) in length, 38ft (11.58m) in width, 23ft (7m) in depth and had a gross tonnage of 1693 tons. The LOCH ARD's main mast measured a massive 150ft (45.7m) in height. LOCH ARD made three trips to Australia and one trip to Calcutta before its final voyage. LOCH ARD left England on March 2, 1878, under the command of Captain Gibbs, a newly married, 29 year old. She was bound for Melbourne with a crew of 37, plus 17 passengers and a load of cargo. The general cargo reflected the affluence of Melbourne at the time. On board were straw hats, umbrella, perfumes, clay pipes, pianos, clocks, confectionary, linen and candles, as well as a heavier load of railway irons, cement, lead and copper. There were items included that intended for display in the Melbourne International Exhibition in 1880. The voyage to Port Phillip was long but uneventful. At 3am on June 1, 1878, Captain Gibbs was expecting to see land and the passengers were becoming excited as they prepared to view their new homeland in the early morning. But LOCH ARD was running into a fog which greatly reduced visibility. Captain Gibbs was becoming anxious as there was no sign of land or the Cape Otway lighthouse. At 4am the fog lifted. A man aloft announced that he could see breakers. The sheer cliffs of Victoria's west coast came into view, and Captain Gibbs realised that the ship was much closer to them than expected. He ordered as much sail to be set as time would permit and then attempted to steer the vessel out to sea. On coming head on into the wind, the ship lost momentum, the sails fell limp and LOCH ARD's bow swung back. Gibbs then ordered the anchors to be released in an attempt to hold its position. The anchors sank some 50 fathoms - but did not hold. By this time LOCH ARD was among the breakers and the tall cliffs of Mutton Bird Island rose behind the ship. Just half a mile from the coast, the ship's bow was suddenly pulled around by the anchor. The captain tried to tack out to sea, but the ship struck a reef at the base of Mutton Bird Island, near Port Campbell. Waves broke over the ship and the top deck was loosened from the hull. The masts and rigging came crashing down knocking passengers and crew overboard. When a lifeboat was finally launched, it crashed into the side of LOCH ARD and capsized. Tom Pearce, who had launched the boat, managed to cling to its overturned hull and shelter beneath it. He drifted out to sea and then on the flood tide came into what is now known as LOCH ARD Gorge. He swam to shore, bruised and dazed, and found a cave in which to shelter. Some of the crew stayed below deck to shelter from the falling rigging but drowned when the ship slipped off the reef into deeper water. Eva Carmichael had raced onto deck to find out what was happening only to be confronted by towering cliffs looming above the stricken ship. In all the chaos, Captain Gibbs grabbed Eva and said, "If you are saved Eva, let my dear wife know that I died like a sailor". That was the last Eva Carmichael saw of the captain. She was swept off the ship by a huge wave. Eva saw Tom Pearce on a small rocky beach and yelled to attract his attention. He dived in and swam to the exhausted woman and dragged her to shore. He took her to the cave and broke open case of brandy which had washed up on the beach. He opened a bottle to revive the unconscious woman. A few hours later Tom scaled a cliff in search of help. He followed hoof prints and came by chance upon two men from nearby Glenample Station three and a half miles away. In a state of exhaustion, he told the men of the tragedy. Tom returned to the gorge while the two men rode back to the station to get help. By the time they reached LOCH ARD Gorge, it was cold and dark. The two shipwreck survivors were taken to Glenample Station to recover. Eva stayed at the station for six weeks before returning to Ireland, this time by steamship. In Melbourne, Tom Pearce received a hero's welcome. He was presented with the first gold medal of the Royal Humane Society of Victoria and a £1000 cheque from the Victorian Government. Concerts were performed to honour the young man's bravery and to raise money for those who lost family in the LOCH ARD disaster. Of the 54 crew members and passengers on board, only two survived: the apprentice, Tom Pearce and the young woman passenger, Eva Carmichael, who lost all of her family in the tragedy. Ten days after the LOCH ARD tragedy, salvage rights to the wreck were sold at auction for £2,120. Cargo valued at £3,000 was salvaged and placed on the beach, but most washed back into the sea when another storm developed. The wreck of LOCH ARD still lies at the base of Mutton Bird Island. Much of the cargo has now been salvaged and some was washed up into what is now known as LOCH ARD Gorge. Cargo and artefacts have also been illegally salvaged over many years before protective legislation was introduced. One of the most unlikely pieces of cargo to have survived the shipwreck was a Minton porcelain peacock - one of only seven in the world. The peacock was destined for the Melbourne International Exhibition in 1880. It had been well packed, which gave it adequate protection during the violent storm. Today, the Minton peacock can be seen at the Flagstaff Hill Maritime Museum in Warrnambool. From Australia's most dramatic shipwreck it has now become Australia's shipwreck artefact and is one of very few 'objects' on the Victorian State Heritage Register most valuable. The LOCH ARD shipwreck is of State significance – Victorian Heritage Register S 417 Flagstaff Hill’s collection of artefacts from LOCH ARD is significant for being one of the largest collections of artefacts from this shipwreck in Victoria. It is significant for its association with the shipwreck, which is on the Victorian Heritage Register (VHR S417). The collection is significant because of the relationship between the objects, as together they have a high potential to interpret the story of the LOCH ARD. The LOCH ARD collection is archaeologically significant as the remains of a large international passenger and cargo ship. The LOCH ARD collection is historically significant for representing aspects of Victoria’s shipping history and its potential to interpret sub-theme 1.5 of Victoria’s Framework of Historical Themes (living with natural processes). The collection is also historically significant for its association with the LOCH ARD, which was one of the worst and best known shipwrecks in Victoria’s history. Silver plated copper alloy table fork from the wreck of the Loch Ard. Some verdigris and a little silver oxide. Fork has a heavy encrustation. Tines bent.flagstaff hill, warrnambool, shipwrecked coast, flagstaff hill maritime museum, maritime museum, shipwreck coast, flagstaff hill maritime village, great ocean road, loch line, loch ard, captain gibbs, eva carmichael, tom pearce, glenample station, mutton bird island, loch ard gorge, electroplated cutlery, fork -
 Flagstaff Hill Maritime Museum and Village
Fork
HISTORY OF THE LOCH ARD The LOCH ARD belonged to the famous Loch Line which sailed many ships from England to Australia. Built in Glasgow by Barclay, Curdle and Co. in 1873, the LOCH ARD was a three-masted square rigged iron sailing ship. The ship measured 262ft 7" (79.87m) in length, 38ft (11.58m) in width, 23ft (7m) in depth and had a gross tonnage of 1693 tons. The LOCH ARD's main mast measured a massive 150ft (45.7m) in height. LOCH ARD made three trips to Australia and one trip to Calcutta before its final voyage. LOCH ARD left England on March 2, 1878, under the command of Captain Gibbs, a newly married, 29 year old. She was bound for Melbourne with a crew of 37, plus 17 passengers and a load of cargo. The general cargo reflected the affluence of Melbourne at the time. On board were straw hats, umbrella, perfumes, clay pipes, pianos, clocks, confectionary, linen and candles, as well as a heavier load of railway irons, cement, lead and copper. There were items included that intended for display in the Melbourne International Exhibition in 1880. The voyage to Port Phillip was long but uneventful. At 3am on June 1, 1878, Captain Gibbs was expecting to see land and the passengers were becoming excited as they prepared to view their new homeland in the early morning. But LOCH ARD was running into a fog which greatly reduced visibility. Captain Gibbs was becoming anxious as there was no sign of land or the Cape Otway lighthouse. At 4am the fog lifted. A man aloft announced that he could see breakers. The sheer cliffs of Victoria's west coast came into view, and Captain Gibbs realised that the ship was much closer to them than expected. He ordered as much sail to be set as time would permit and then attempted to steer the vessel out to sea. On coming head on into the wind, the ship lost momentum, the sails fell limp and LOCH ARD's bow swung back. Gibbs then ordered the anchors to be released in an attempt to hold its position. The anchors sank some 50 fathoms - but did not hold. By this time LOCH ARD was among the breakers and the tall cliffs of Mutton Bird Island rose behind the ship. Just half a mile from the coast, the ship's bow was suddenly pulled around by the anchor. The captain tried to tack out to sea, but the ship struck a reef at the base of Mutton Bird Island, near Port Campbell. Waves broke over the ship and the top deck was loosened from the hull. The masts and rigging came crashing down knocking passengers and crew overboard. When a lifeboat was finally launched, it crashed into the side of LOCH ARD and capsized. Tom Pearce, who had launched the boat, managed to cling to its overturned hull and shelter beneath it. He drifted out to sea and then on the flood tide came into what is now known as LOCH ARD Gorge. He swam to shore, bruised and dazed, and found a cave in which to shelter. Some of the crew stayed below deck to shelter from the falling rigging but drowned when the ship slipped off the reef into deeper water. Eva Carmichael had raced onto deck to find out what was happening only to be confronted by towering cliffs looming above the stricken ship. In all the chaos, Captain Gibbs grabbed Eva and said, "If you are saved Eva, let my dear wife know that I died like a sailor". That was the last Eva Carmichael saw of the captain. She was swept off the ship by a huge wave. Eva saw Tom Pearce on a small rocky beach and yelled to attract his attention. He dived in and swam to the exhausted woman and dragged her to shore. He took her to the cave and broke open case of brandy which had washed up on the beach. He opened a bottle to revive the unconscious woman. A few hours later Tom scaled a cliff in search of help. He followed hoof prints and came by chance upon two men from nearby Glenample Station three and a half miles away. In a state of exhaustion, he told the men of the tragedy. Tom returned to the gorge while the two men rode back to the station to get help. By the time they reached LOCH ARD Gorge, it was cold and dark. The two shipwreck survivors were taken to Glenample Station to recover. Eva stayed at the station for six weeks before returning to Ireland, this time by steamship. In Melbourne, Tom Pearce received a hero's welcome. He was presented with the first gold medal of the Royal Humane Society of Victoria and a £1000 cheque from the Victorian Government. Concerts were performed to honour the young man's bravery and to raise money for those who lost family in the LOCH ARD disaster. Of the 54 crew members and passengers on board, only two survived: the apprentice, Tom Pearce and the young woman passenger, Eva Carmichael, who lost all of her family in the tragedy. Ten days after the LOCH ARD tragedy, salvage rights to the wreck were sold at auction for £2,120. Cargo valued at £3,000 was salvaged and placed on the beach, but most washed back into the sea when another storm developed. The wreck of LOCH ARD still lies at the base of Mutton Bird Island. Much of the cargo has now been salvaged and some was washed up into what is now known as LOCH ARD Gorge. Cargo and artefacts have also been illegally salvaged over many years before protective legislation was introduced. One of the most unlikely pieces of cargo to have survived the shipwreck was a Minton porcelain peacock - one of only seven in the world. The peacock was destined for the Melbourne International Exhibition in 1880. It had been well packed, which gave it adequate protection during the violent storm. Today, the Minton peacock can be seen at the Flagstaff Hill Maritime Museum in Warrnambool. From Australia's most dramatic shipwreck it has now become Australia's shipwreck artefact and is one of very few 'objects' on the Victorian State Heritage Register most valuable. The LOCH ARD shipwreck is of State significance – Victorian Heritage Register S 417 Flagstaff Hill’s collection of artefacts from LOCH ARD is significant for being one of the largest collections of artefacts from this shipwreck in Victoria. It is significant for its association with the shipwreck, which is on the Victorian Heritage Register (VHR S417). The collection is significant because of the relationship between the objects, as together they have a high potential to interpret the story of the LOCH ARD. The LOCH ARD collection is archaeologically significant as the remains of a large international passenger and cargo ship. The LOCH ARD collection is historically significant for representing aspects of Victoria’s shipping history and its potential to interpret sub-theme 1.5 of Victoria’s Framework of Historical Themes (living with natural processes). The collection is also historically significant for its association with the LOCH ARD, which was one of the worst and best known shipwrecks in Victoria’s history. Silver plated copper alloy table fork from the wreck of the Loch Ard. Some verdigris. Fork has a heavy encrustation all over. Fork handle is cracked.flagstaff hill, warrnambool, shipwrecked coast, flagstaff hill maritime museum, maritime museum, shipwreck coast, flagstaff hill maritime village, great ocean road, loch line, loch ard, captain gibbs, eva carmichael, tom pearce, glenample station, mutton bird island, loch ard gorge, electroplated cutlery, fork -
 Flagstaff Hill Maritime Museum and Village
Fork
HISTORY OF THE LOCH ARD The LOCH ARD belonged to the famous Loch Line which sailed many ships from England to Australia. Built in Glasgow by Barclay, Curdle and Co. in 1873, the LOCH ARD was a three-masted square rigged iron sailing ship. The ship measured 262ft 7" (79.87m) in length, 38ft (11.58m) in width, 23ft (7m) in depth and had a gross tonnage of 1693 tons. The LOCH ARD's main mast measured a massive 150ft (45.7m) in height. LOCH ARD made three trips to Australia and one trip to Calcutta before its final voyage. LOCH ARD left England on March 2, 1878, under the command of Captain Gibbs, a newly married, 29 year old. She was bound for Melbourne with a crew of 37, plus 17 passengers and a load of cargo. The general cargo reflected the affluence of Melbourne at the time. On board were straw hats, umbrella, perfumes, clay pipes, pianos, clocks, confectionary, linen and candles, as well as a heavier load of railway irons, cement, lead and copper. There were items included that intended for display in the Melbourne International Exhibition in 1880. The voyage to Port Phillip was long but uneventful. At 3am on June 1, 1878, Captain Gibbs was expecting to see land and the passengers were becoming excited as they prepared to view their new homeland in the early morning. But LOCH ARD was running into a fog which greatly reduced visibility. Captain Gibbs was becoming anxious as there was no sign of land or the Cape Otway lighthouse. At 4am the fog lifted. A man aloft announced that he could see breakers. The sheer cliffs of Victoria's west coast came into view, and Captain Gibbs realised that the ship was much closer to them than expected. He ordered as much sail to be set as time would permit and then attempted to steer the vessel out to sea. On coming head on into the wind, the ship lost momentum, the sails fell limp and LOCH ARD's bow swung back. Gibbs then ordered the anchors to be released in an attempt to hold its position. The anchors sank some 50 fathoms - but did not hold. By this time LOCH ARD was among the breakers and the tall cliffs of Mutton Bird Island rose behind the ship. Just half a mile from the coast, the ship's bow was suddenly pulled around by the anchor. The captain tried to tack out to sea, but the ship struck a reef at the base of Mutton Bird Island, near Port Campbell. Waves broke over the ship and the top deck was loosened from the hull. The masts and rigging came crashing down knocking passengers and crew overboard. When a lifeboat was finally launched, it crashed into the side of LOCH ARD and capsized. Tom Pearce, who had launched the boat, managed to cling to its overturned hull and shelter beneath it. He drifted out to sea and then on the flood tide came into what is now known as LOCH ARD Gorge. He swam to shore, bruised and dazed, and found a cave in which to shelter. Some of the crew stayed below deck to shelter from the falling rigging but drowned when the ship slipped off the reef into deeper water. Eva Carmichael had raced onto deck to find out what was happening only to be confronted by towering cliffs looming above the stricken ship. In all the chaos, Captain Gibbs grabbed Eva and said, "If you are saved Eva, let my dear wife know that I died like a sailor". That was the last Eva Carmichael saw of the captain. She was swept off the ship by a huge wave. Eva saw Tom Pearce on a small rocky beach and yelled to attract his attention. He dived in and swam to the exhausted woman and dragged her to shore. He took her to the cave and broke open case of brandy which had washed up on the beach. He opened a bottle to revive the unconscious woman. A few hours later Tom scaled a cliff in search of help. He followed hoof prints and came by chance upon two men from nearby Glenample Station three and a half miles away. In a state of exhaustion, he told the men of the tragedy. Tom returned to the gorge while the two men rode back to the station to get help. By the time they reached LOCH ARD Gorge, it was cold and dark. The two shipwreck survivors were taken to Glenample Station to recover. Eva stayed at the station for six weeks before returning to Ireland, this time by steamship. In Melbourne, Tom Pearce received a hero's welcome. He was presented with the first gold medal of the Royal Humane Society of Victoria and a £1000 cheque from the Victorian Government. Concerts were performed to honour the young man's bravery and to raise money for those who lost family in the LOCH ARD disaster. Of the 54 crew members and passengers on board, only two survived: the apprentice, Tom Pearce and the young woman passenger, Eva Carmichael, who lost all of her family in the tragedy. Ten days after the LOCH ARD tragedy, salvage rights to the wreck were sold at auction for £2,120. Cargo valued at £3,000 was salvaged and placed on the beach, but most washed back into the sea when another storm developed. The wreck of LOCH ARD still lies at the base of Mutton Bird Island. Much of the cargo has now been salvaged and some was washed up into what is now known as LOCH ARD Gorge. Cargo and artefacts have also been illegally salvaged over many years before protective legislation was introduced. One of the most unlikely pieces of cargo to have survived the shipwreck was a Minton porcelain peacock - one of only seven in the world. The peacock was destined for the Melbourne International Exhibition in 1880. It had been well packed, which gave it adequate protection during the violent storm. Today, the Minton peacock can be seen at the Flagstaff Hill Maritime Museum in Warrnambool. From Australia's most dramatic shipwreck it has now become Australia's shipwreck artefact and is one of very few 'objects' on the Victorian State Heritage Register most valuable. The LOCH ARD shipwreck is of State significance – Victorian Heritage Register S 417 Flagstaff Hill’s collection of artefacts from LOCH ARD is significant for being one of the largest collections of artefacts from this shipwreck in Victoria. It is significant for its association with the shipwreck, which is on the Victorian Heritage Register (VHR S417). The collection is significant because of the relationship between the objects, as together they have a high potential to interpret the story of the LOCH ARD. The LOCH ARD collection is archaeologically significant as the remains of a large international passenger and cargo ship. The LOCH ARD collection is historically significant for representing aspects of Victoria’s shipping history and its potential to interpret sub-theme 1.5 of Victoria’s Framework of Historical Themes (living with natural processes). The collection is also historically significant for its association with the LOCH ARD, which was one of the worst and best known shipwrecks in Victoria’s history. Silver plated copper alloy table forks - entrée from the wreck of the Loch Ard. Some verdigris and silver oxide. Encrustation on tines and handle. Hallmark partly visible.flagstaff hill, warrnambool, shipwrecked coast, flagstaff hill maritime museum, maritime museum, shipwreck coast, flagstaff hill maritime village, great ocean road, loch line, loch ard, captain gibbs, eva carmichael, tom pearce, glenample station, mutton bird island, loch ard gorge, electroplated cutlery, fork -
 Flagstaff Hill Maritime Museum and Village
Fork
HISTORY OF THE LOCH ARD The LOCH ARD belonged to the famous Loch Line which sailed many ships from England to Australia. Built in Glasgow by Barclay, Curdle and Co. in 1873, the LOCH ARD was a three-masted square rigged iron sailing ship. The ship measured 262ft 7" (79.87m) in length, 38ft (11.58m) in width, 23ft (7m) in depth and had a gross tonnage of 1693 tons. The LOCH ARD's main mast measured a massive 150ft (45.7m) in height. LOCH ARD made three trips to Australia and one trip to Calcutta before its final voyage. LOCH ARD left England on March 2, 1878, under the command of Captain Gibbs, a newly married, 29 year old. She was bound for Melbourne with a crew of 37, plus 17 passengers and a load of cargo. The general cargo reflected the affluence of Melbourne at the time. On board were straw hats, umbrella, perfumes, clay pipes, pianos, clocks, confectionary, linen and candles, as well as a heavier load of railway irons, cement, lead and copper. There were items included that intended for display in the Melbourne International Exhibition in 1880. The voyage to Port Phillip was long but uneventful. At 3am on June 1, 1878, Captain Gibbs was expecting to see land and the passengers were becoming excited as they prepared to view their new homeland in the early morning. But LOCH ARD was running into a fog which greatly reduced visibility. Captain Gibbs was becoming anxious as there was no sign of land or the Cape Otway lighthouse. At 4am the fog lifted. A man aloft announced that he could see breakers. The sheer cliffs of Victoria's west coast came into view, and Captain Gibbs realised that the ship was much closer to them than expected. He ordered as much sail to be set as time would permit and then attempted to steer the vessel out to sea. On coming head on into the wind, the ship lost momentum, the sails fell limp and LOCH ARD's bow swung back. Gibbs then ordered the anchors to be released in an attempt to hold its position. The anchors sank some 50 fathoms - but did not hold. By this time LOCH ARD was among the breakers and the tall cliffs of Mutton Bird Island rose behind the ship. Just half a mile from the coast, the ship's bow was suddenly pulled around by the anchor. The captain tried to tack out to sea, but the ship struck a reef at the base of Mutton Bird Island, near Port Campbell. Waves broke over the ship and the top deck was loosened from the hull. The masts and rigging came crashing down knocking passengers and crew overboard. When a lifeboat was finally launched, it crashed into the side of LOCH ARD and capsized. Tom Pearce, who had launched the boat, managed to cling to its overturned hull and shelter beneath it. He drifted out to sea and then on the flood tide came into what is now known as LOCH ARD Gorge. He swam to shore, bruised and dazed, and found a cave in which to shelter. Some of the crew stayed below deck to shelter from the falling rigging but drowned when the ship slipped off the reef into deeper water. Eva Carmichael had raced onto deck to find out what was happening only to be confronted by towering cliffs looming above the stricken ship. In all the chaos, Captain Gibbs grabbed Eva and said, "If you are saved Eva, let my dear wife know that I died like a sailor". That was the last Eva Carmichael saw of the captain. She was swept off the ship by a huge wave. Eva saw Tom Pearce on a small rocky beach and yelled to attract his attention. He dived in and swam to the exhausted woman and dragged her to shore. He took her to the cave and broke open case of brandy which had washed up on the beach. He opened a bottle to revive the unconscious woman. A few hours later Tom scaled a cliff in search of help. He followed hoof prints and came by chance upon two men from nearby Glenample Station three and a half miles away. In a state of exhaustion, he told the men of the tragedy. Tom returned to the gorge while the two men rode back to the station to get help. By the time they reached LOCH ARD Gorge, it was cold and dark. The two shipwreck survivors were taken to Glenample Station to recover. Eva stayed at the station for six weeks before returning to Ireland, this time by steamship. In Melbourne, Tom Pearce received a hero's welcome. He was presented with the first gold medal of the Royal Humane Society of Victoria and a £1000 cheque from the Victorian Government. Concerts were performed to honour the young man's bravery and to raise money for those who lost family in the LOCH ARD disaster. Of the 54 crew members and passengers on board, only two survived: the apprentice, Tom Pearce and the young woman passenger, Eva Carmichael, who lost all of her family in the tragedy. Ten days after the LOCH ARD tragedy, salvage rights to the wreck were sold at auction for £2,120. Cargo valued at £3,000 was salvaged and placed on the beach, but most washed back into the sea when another storm developed. The wreck of LOCH ARD still lies at the base of Mutton Bird Island. Much of the cargo has now been salvaged and some was washed up into what is now known as LOCH ARD Gorge. Cargo and artefacts have also been illegally salvaged over many years before protective legislation was introduced. One of the most unlikely pieces of cargo to have survived the shipwreck was a Minton porcelain peacock - one of only seven in the world. The peacock was destined for the Melbourne International Exhibition in 1880. It had been well packed, which gave it adequate protection during the violent storm. Today, the Minton peacock can be seen at the Flagstaff Hill Maritime Museum in Warrnambool. From Australia's most dramatic shipwreck it has now become Australia's shipwreck artefact and is one of very few 'objects' on the Victorian State Heritage Register most valuable. The LOCH ARD shipwreck is of State significance – Victorian Heritage Register S 417 Flagstaff Hill’s collection of artefacts from LOCH ARD is significant for being one of the largest collections of artefacts from this shipwreck in Victoria. It is significant for its association with the shipwreck, which is on the Victorian Heritage Register (VHR S417). The collection is significant because of the relationship between the objects, as together they have a high potential to interpret the story of the LOCH ARD. The LOCH ARD collection is archaeologically significant as the remains of a large international passenger and cargo ship. The LOCH ARD collection is historically significant for representing aspects of Victoria’s shipping history and its potential to interpret sub-theme 1.5 of Victoria’s Framework of Historical Themes (living with natural processes). The collection is also historically significant for its association with the LOCH ARD, which was one of the worst and best known shipwrecks in Victoria’s history. Silver plated copper alloy table forks - entrée from the wreck of the Loch Ard. Some verdigris and silver oxide. Encrustation on tines and handle. Hallmark partly visible.flagstaff hill, warrnambool, shipwrecked coast, flagstaff hill maritime museum, maritime museum, shipwreck coast, flagstaff hill maritime village, great ocean road, loch line, loch ard, captain gibbs, eva carmichael, tom pearce, glenample station, mutton bird island, loch ard gorge, electroplated cutlery, fork