Showing 318 items
matching garden st bridge
-
 Ballarat Tramway Museum
Literary work - Manuscript, Alan Bradley, "Santa Trams in Ballarat", Dec. 2008
Yields information about the decorated trams in Ballarat in the last few years of the system, Myers Santa trams etc.A4 manuscript, titled "Santa Trams in Ballarat" written by Alan Bradley Dec 2008 for Dec. 2008 issue of Fares Please! Provides information about the Myers Christmas trams, the tramcars and Bridge St traders in 1968. Was related to colour photos received from Sydney of two of the trams. trams, tramways, christmas trams, myers, bridge st traders, santa tram -
 Ballarat Tramway Museum
Photograph - Black & White Photograph/s, Chris Wurr, c1970
... Black and White photograph of No. 26 inbound in Bridge St... photograph of No. 26 inbound in Bridge St to the Gardens via Sturt St ...Yields information about the streetscape and the trams in Bridge St and the high level of traffic.Black and White photograph of No. 26 inbound in Bridge St to the Gardens via Sturt St West, with heavy motor vehicle traffic. Has the Robert Ritchie (SSW) Food store in the background along with other shops.Stamped on rear in black ink "Donated to BTPS by and Photo By" / "Chris Wurr 12 Truscott Street, Ararat 3377 (053) 52 3403.tramways, trams, bridge st, robert ritchie, tram 26 -
 Ballarat Tramway Museum
Photograph - Black & White Photograph/s, Chris Wurr, late 1960's early 1970's
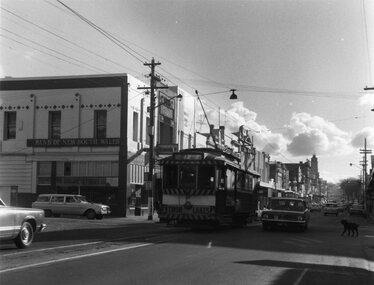
Yields information about tram operation in Bridge St at the intersection of Peel St and the streetscape at the time.Black and White photograph of Ballarat 27, inbound in Bridge St Ballarat, and the intersection of Peel St, passing the Bank of New South Wales building, while other traffic including a dog are in the image. Note the motor car has a "P" plate. The tram has a "Twin Lakes" dash panel advertisement.Stamped on rear in black ink "Donated to BTPS by and Photo By" / "Chris Wurr 12 Truscott Street, Ararat 3377 (053) 52 3403.tramways, trams, bridge st, tram 27 -
 Ballarat Tramway Museum
Photograph - Black & White Photograph/s, c1907
Yields information the operation of horse trams in Sebastopol, the condition of the streets at the time, the nature of the buildings and streetscape.Black and White photograph of a north bound tram in Albert St Sebastopol. The tram has just crossed Albert St and is approaching Bridge St. Note the streetscape, the open drains and shopping strip. The tram has a roof advertisement for Havelock tobacco as does the Grocer shop in the background. See Reg Item 1090 for another copy of this photograph, with Christmas Greetings along the top edge. Used in "The Golden City and its Tramways", page 32, credited to Harris House of Photography. Hi Res image added 16-12-2015. See The Golden City and its Tramwaystramways, trams, albert st, horse trams, sebastopol -
 Ballarat Tramway Museum
Photograph - Black & White Photograph/s, 1913
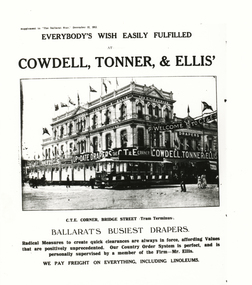
Yields information the shop on the corner on Bridge and Grenville St, Cowdell, Tonner and Ellis, the CT&E corner and a one of the cross bench trams, and information about the store itself. Also the puffery of the drapers advertisement.Black and White copy photograph of an advertisement in The Ballarat Star newspaper, dated Dec. 12, 1913 featuring the Cowdell Tonner and Ellis drapers store on the corner of Bridge and Grenville St, Ballarat, also known as the "The CT&E Corner". Features a cross bench tramcar, 19 or 20, passing the front of the store with its blinds drawn, and many flags, advertisements and banners, including the Australian flag. The caption to the photograph is "C.T.E. corner, Bridge Street, Tram Terminus", Ballarat's Busiest Drapers. The advertisement for CT&E has great "puffery". tramways, trams, sturt st, grenville st, bridge st, cowdell tonner & ellis, ct&e corner, esco, tram 19, tram 20 -
 Ballarat Tramway Museum
Photograph - Black & White Photograph/s, 1913
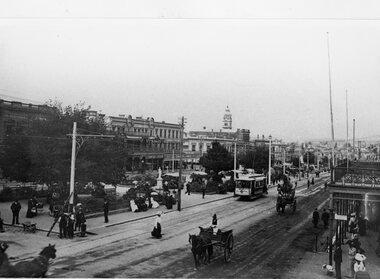
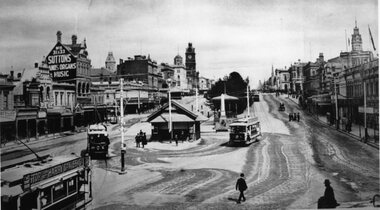
Yields information the streetscape at the bottom of Sturt St, near Grenville St, the ESCo shelter and how the trams used the track, though in this case, the same tram appears three times.Black and White copy photograph of a photograph of the Grenville tram terminus, in Sturt St, featuring the buildings on either side of Sturt St. Has the ESCo shelter at the bottom of the street, which dates from 1907 (Page 49 of "The Golden City and its tramways"). Note that a weighing machine appears to be on the north side of the shelter. The photograph features three trams, that appear to be the same tram, No. 5. It has a "Stop tram at Harry Davies" roof advertisement sign. Also features the "Sutton Pianos organs and music" sign. Also a number of people crossing the street.tramways, trams, sturt st, grenville st, bridge st, esco, tram 5 -
 Ballarat Tramway Museum
Postcard - Folder set, Valentine & Sons Publishing Co, "Ballarat Photographic Booklet", 1940's
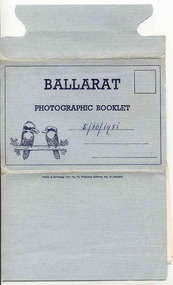
Shows views of the Ballarat CBD and nearby features in the 1930's and 1940's of views of Ballarat, including some trams in the photographs. Demonstrates production of souvenirs of the era - folded postcards. The photos could also be used for individual postcards.Set of 9 black and white views of Ballarat printed on a folded strip, glued within a blue colour light weight cardboard folder, titled "Ballarat Photographic Booklet". Booklet printed with an address area with title and kookaburras. Produced by The Valentine Publishing Co. Pty Ltd Melbourne & Sydney The rear has a slit on the rear cover that allowed the folder to be secured. Pictures are: 1. Panorama from Sturt Street, looking up Bridge St 2. City Hall 3. The Avenue of Honour (14 Miles Long) 4. Lake Wendouree 5. King George V. Memorial 6. The Pergola, Botanical Gardens 7. Eureka Stockade 8. Lydiard Street, showing Craig's Hotel 9. Sturt Street, Ballarat. Made during 1940, with photographs of the 1930's as well given motor cars in the photo. Has a date of "5/10/1951" on the front cover in ink. Has a date of "5/10/1951" on the front cover in ink.trams, tramways, sturt st, town hall, lake wendouree, memorial arch avenue of honour, memorial, gardens, lydiard st, eureka -
 Ballarat Tramway Museum
Book, Baxter & Stubbs, "Ballarat Views", 1920's
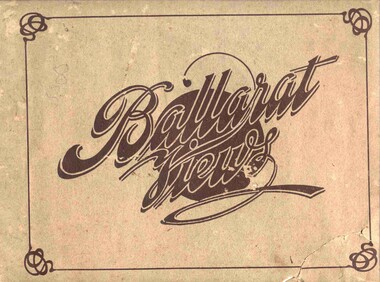
Yields information about Ballarat through pictures of the 1910-1920's various locations, institutions and street scenes, including tramways and railways.Twenty four page book within light brown covers, titled "Ballarat Views". Sheets, other than covers have been individually printed both sides, stapled within the covers. Cover - gives title, rear cover has printer details - Baxter and Stubbs. Pages 1 - Tonner Memorial , Fountain Lake Wendouree, Ballarat District Hospital, Sturt St south side at Grenville St with tram in distance and Sturt St North Side showing shops (image btm3900i2.jpg). 2 - Ballarat Street Scenes - Sturt Streets, Lydiard St with ESCo 18 in view, and Railway station with R193 in platform on passenger train. (image btm3900i3.jpg). 3 - Lake Wendouree views. 4 - Lake Wendouree, fish hatchery, Gardens and Sturt St at Dawson St (image btm3900i4.jpg). 5 - Art Gallery Ballarat 6 - Botanical Gardens 7 - Public Institution s- Benevolent asylum, Orphanage, Nazareth House, St Joseph Home, Hospital 8 & 9 - Statues, the Flight from Pompeii and others. 10 & 11 - Churches of Ballarat 12 - The Arch at The Avenue of Honour 13 - McDonald Pergola at the Gardens 14 - Zoological Gardens Ballarat 15 - Gardens aerial view and gates at the South End with tram in the distance (image btm3900i5.jpg). 16 - Some views in Ballarat East - Eureka Stockade, Ballarat East Bowling Green, Bridge St looking east and the lake at the Eureka Gardens (image btm3900i6.jpg). 17 - Snow Scene at Botanical Gardens, Begonia House 18 & 19 - Ballarat Water supply reservoirs 20 - Ballarat State Schools 21 - Ballarat East Views, includes view of track in Victoria St looking east (image btm3900i7.jpg). 22 - Views of the Water Reserves 23 - Views about the City - includes City fire station , agricultural High School, City Baths and View Point. 24 - Views at Lake Wendouree. \ Pdf copy of full book added 8/5/2019 - see btm3900i9.pdf trams, tramways, ballarat, lydiard st, sturt st, gardens, railway station, hospital, lake wendouree, wendouree parade, carlton st, esco -
 Ballarat Tramway Museum
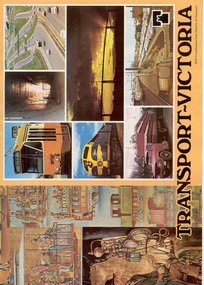
Book, Ministry of Transport, "Transport - Victoria", c1980
Sixteen page, full cover book titled "Transport - Victoria", published by the Ministry of Transport c1980 - Robert Maclellan as Minister soon after the establishment of the Ministry, combining VicRail, MMTB, TRB, CRB, MURLA, Westgate Bridge Authority, and the Railway Construction Board. Gives details of each of the component authorities, maps, their work, with the part of the Spencer St Station History of Transport Mural on the front cover.trams, tramways, mmtb, vr, vicrail, crb, transport regulation board, map -
 Ballarat Tramway Museum
Photograph - Black & White Photograph/s and Black and White photograph/s - mounted, John Phillips, 1968
Yields information about the use of the trams in Bridge St - the major shopping strip at the time in Ballarat, shows the nature of the strip, the passengers (all ladies) and the motor cars in use at the time.Black and white print of No. 28, picking up four lady passengers at the junction in Bridge St, Stones Corner. Tram has the destination of Victoria St. Photo taken late 1960's, early 1970's. In the photo are the Bank of NSW buildings, Gear Chemist and Hotel on the Corner of Peel and Bridge Sts. Print and photo by John Phillips. Second copy added 13/4/2009 - see history .1 - Black and White photograph mounted on heavy cardboard backing, used for display purposes. On rear of second print - "Copyright John Phillips 1968 Bridge St" and in bottom right hand corner "William Scott" and address label.tramways, trams, bridge st, stones corner, passengers, tram 28 -
 Ballarat Tramway Museum
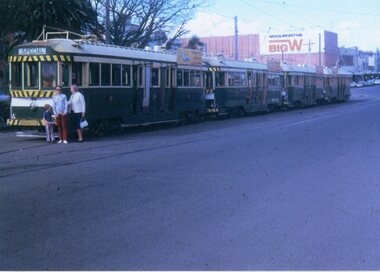
Photograph - Colour Photograph/s - set of 2, Theo Dunstan, Aug. 1971
Set of two colour prints from a scanned slide image, loaned by donor and some black and white prints 3246.1 - No. 34 and three other bogie trams parked in the City Loop. No. 34 showing "Special". Has Big W and Bridge St. in the background. A small family group standing by the front of No. 34. 3246.2 - ditto but without the family group. Colour Prints made by commercial machine printer direct from images on Kodak Xtralife Paper. Taken 23/8/1971 - the last Sunday of full operations? For high resolution image see btm3246i1h and 3246i2h. sturt st, city loop, bridge st, tram 34 -
 Ballarat Tramway Museum
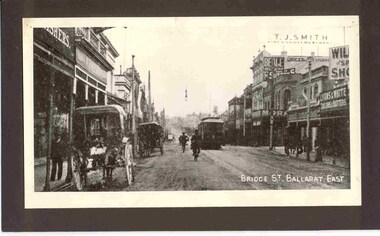
Photograph - Black and White photograph/s - mounted, 1906
Black and white photograph mounted onto black cardboard backing (blue back cardboard) of an ESCo tram in Bridge St Ballarat, looking east. Photograph of a postcard, has title "Bridge St. Ballarat East" in the bottom right hand corner. Original photograph taken soon after opening of the tramway in Bridge St., no windows and no destination box on the roof of the tram. Shows two horse drawn wagons on the left hand side of the photograph. Has shops or advertising signs of Lyons & White Tailors and Hatters, T. J. Smith, Suttons and Beale Australian ?.trams, tramways, bridge st, esco, postcards -
 Ballarat Tramway Museum
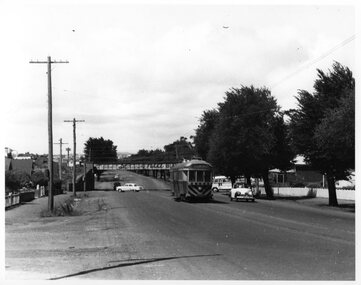
Photograph - Black & White Photograph/s, 1955 or 1956
Black and white photograph of a Geelong bogie tram outbound to the Belmont terminus in Moorabool St with the Geelong - South Geelong railway bridge in the background. The tram is yet to pass under the bridge. Photo taken 1955 or 1956. A bus is entering Moorabool St from Carr St. The railway bridge has an Laconia Blankets advertisement painted on it. See Melway map 228.tramways, trams, geelong, belmont, railway bridge -
 Ballarat Tramway Museum
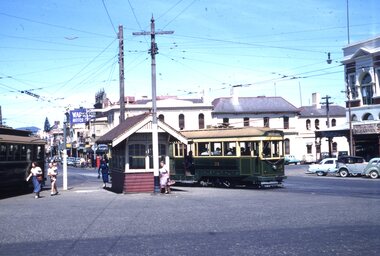
Slide - 35mm slide/s, Ben Parle, Jan. 1954
Kodachrome Transparency - 35mm slide - cardboard mount, with one side with red border and words "Kodachrome Transparency" top and bottom. On the other side is "Made in England" and "View from this side". Photo taken by Ben Parle 1/1954. Photo of Ballarat No. 39, and possibly No. 21 at the intersection of Sturt St and Grenville St., showing the tramway stop shelter at this location. Has the Bucks Head Hotel and the Maypole Delicatessen in the background and shows a number of passengers on the inbound tram and at the tram stop. For high resolution scan see btm2816h.tif "Sturt St Ballarat" "1/54"tramways, trams, bridge st, sturt st, grenville st, bucks head hotel, tram 39, tram 21 -
 Ballarat Tramway Museum
Slide - 35mm slide/s, Ben Parle, Jan. 1954
Kodachrome Transparency - 35mm slide - cardboard mount, with one side with red border and words "Kodachrome Transparency" top and bottom. On the other side is "Made in England" and "View from this side". Photo taken by Ben Parle 1/1954. Photo of Ballarat No. 21 at the intersection of Bridge, Victoria St and Main St, turning into Main Rd from Bridge St. Tram has the destination of Mt. Pleasant. Buildings in the background are Stones stores, Rickson's Paint (?). Advertising for ANZ bank, Kodak film. For high resolution scan see btm2817h.tif "Sturt St Ballarat" "1/54"tramways, trams, bridge st, main st, stones corner, victoria st, tram 21 -
 Ballarat Tramway Museum
Slide - 35mm slide/s, Ben Parle, 8/04/1958 12:00:00 AM
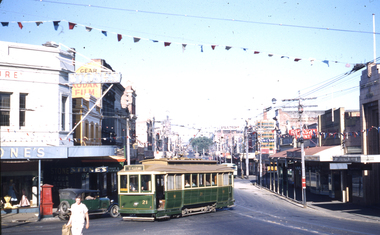
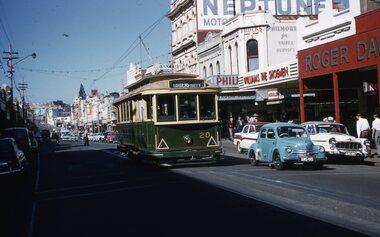
Kodachrome Transparency - 35mm slide - cardboard mount, with one side with red border and words "Kodachrome Transparency / Processed by Kodak" top and bottom. Photo taken by Ben Parle 8/4/1958, date stamped onto slide. Has slide No. "4" stamped in red in top corner. Photo of Ballarat 20, city bound, Bridge St. Tram has the destination of Gardens via Sturt St. West. Buildings in the background are Roger David, Williams the Schoeman, Philmore Frocks and an advertisement for Neptune petrol For high resolution scan see btm2876.tif"Sturt St Ballarat" / "8-4-58"tramways, trams, bridge st, roger david, neptune, tram 20 -
 Ballarat Tramway Museum
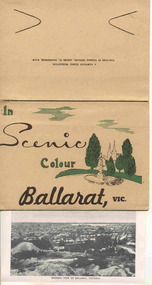
Postcard - Folder set, Viewpoint Scenic Production, "In Scenic Colour Ballarat, Vic", early 1950's
... Postcards Sturt St Bridge St Gardens Set of 12 views of Ballarat ...Set of 12 views of Ballarat printed with six colour photos on one side and six black and white photos on the other side, printed onto a folded strip of paper glued within an embossed paper folder. On rear cover has publisher details "A Viewpoint Scenic Production"., titled "In Scenic Colour Ballarat, Vic". Front cover has title and small sketch showing a fountain, trees and church in the background. Would appear to be a generic cover for other cities as well. The rear cover has two sets of cut slits with black lines around the cuts to enable the folder to be closed. Pictures are: Black and White 1. Sturt St Ballarat. (Well known photo taken from Grenville St. - see btm675i - 1940's) 2. General View of Ballarat, Victoria 3. Bridge Street Ballarat 4. Mt Warrenheip from Buninyong (note wrong spelling of Warrenheip) 5. View from Mt. Buninyong 6. Ballarat Gardens showing Wallace Memorial Colour photos - generally out of register. 7. The Town Hall, Ballarat Victoria - with tram in foreground (see image i8 for a hi res version) 8. Sturt and Bridge Streets, Ballarat - with tram in view 9. The Gardens, Ballarat Victoria 10. The Eureka Stockade Memorial, Ballarat 11. Lake Wendouree, Ballarat Victoria 12. The of Victory, Ballarat Vic. trams, tramways, ballarat, postcards, sturt st, bridge st, gardens -
 Ballarat Tramway Museum
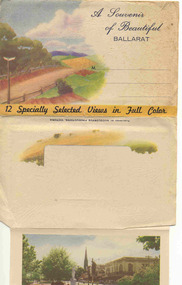
Postcard - Folder set, Nu-color-vue or Nucolorvue Productions, "A Souvenir of Beautiful Ballarat", late 1940's
... Postcards Sturt St Bridge St Gardens On front cover in pencil ...Set of 12 coloured views of Ballarat printed with six photos on either side of a folded strip of paper glued within an embossed paper folder. Published by Nucolorvue Productions Vic., titled "A Souvenir of Beautiful Ballarat". Front cover has a colour rural scene, title, address area and on base of cover "12 Specially Selected Views in Full Colour". Rear of Cover has a part of a colour scene as well and a slit for the envelope to be closed over and sealed. On the inside of the front cover are notes on the City of Ballarat and that it has just embarked upon its second century. 1. Another section of Ballarat's Fine Botanical Gardens 2. Overlooking Ballarat City 3. Botanical Gardens showing statues of Australian Prime Ministers 4. Sturt Street showing City Hall and Fine Statues 5. Lake Wendouree Ballarat 6. Lovely Trees and Statuary Botanical Gardens 7. Botanical Gardens showing Wallace's Statue 8. Lovely Sturt St looking West 9. Overlooking Sturt St towards Mt Warrenheip (has single truck tram in photo) - see image i9 for a hi res version. 10. Ballarat's Famous Art Gallery 11. One of Ballarat's many fine Reservoirs 12. Eureka Stockade Monument, Ballarat. On front cover in pencil in stamp area "1/-"trams, tramways, ballarat, postcards, sturt st, bridge st, gardens -
 Ballarat Tramway Museum
Slide - 35mm slide/s, Dave Macartney, Apr. 1967
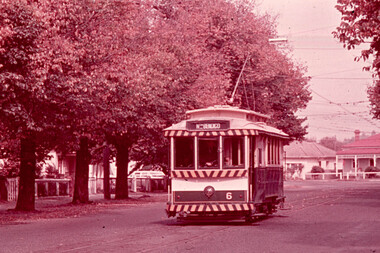
White cardboard mount, 35mm slide, from the Association of Railway Enthusiast's film strip titled "Provincial Tramway Film Strip" of Bendigo No. 6, passing the disused Bridge St. Loop, Bridge St., North Bendigo. Tram has the destination of North Bendigo. The film strip notes (Reg. Item 2560), provided the following caption details: "No. 6 heads past the disused Bridge St. loop toward "NORTH BENDIGO" on a windy autumn day. - Apr. '67 (Dave Macartney)" See image btm2589p.tif for high level scan of image. Stamped on base of slide "11799" and written in ink on top edge "No. 6 Bridge St. Bendigo"tramways, trams, are, film strip, bridge st, bendigo, tram 6 -
 Ballarat Tramway Museum
Slide - 35mm slide/s, Travis Jeffrey, c1962
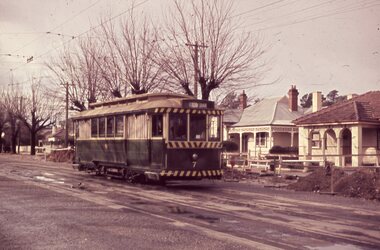
Agfa plastic mount (blue base, white cover) with a photo of Bendigo 7, at the north end of the Bridge St. Loop. Photo taken c1962. Note the road works in the background with the kerosene warning lamps and wooden protection barriers. House opposite tram is 122 Bridge St., which is part of a butchers shop (noted during 8/2004 visit)"BES 11" in penciltramways, trams, bendigo, north bendigo, mccrae st, road works, tram 7 -
 Ballarat Tramway Museum
Slide - 35mm slide/s, Travis Jeffrey, c1962
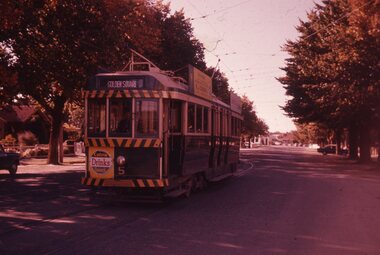
Agfa plastic mount (blue base, white cover) with a photo of Bendigo 5 passing through the Bridge St Loop. Tram has the destination of Golden Square, a Cohns Soft drink ad on the dash panel and a "R.J. Conroy" roof advertisement. Photo taken c1962."BES 31" in penciltramways, trams, bendigo, north bendigo, bridge st, tram 5 -
 Ballarat Tramway Museum
Negative, Travis Jeffrey, 17/06/1962 12:00:00 AM
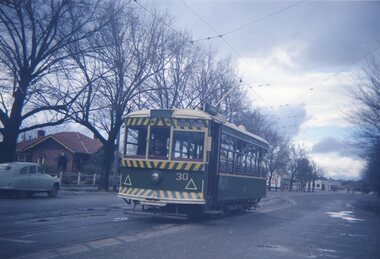
Colour Negative No. N396, of Bendigo Birney No. 30 on the North Bendigo line at the Bridge St. loop. Tram has the destination of Golden Square. Photo possibly 17/6/1962. Colour laser printed copy of image stored in box 73. Image scanned at hi res 27/5/2020 and image updated.In red pen on folder that contained negative, "NR69B" and "17 Jun 62". trams, tramways, bendigo, bridge st, north bendigo, tram 30 -
 Ballarat Tramway Museum
Negative, Travis Jeffrey, 5/08/1962 12:00:00 AM
Colour Negative No. N406, of the Bendigo No. 7, showing Quarry Hill, crossing over the railway bridge, in Mitchell St with the railway bridge structure in the background. Tram has a Castrol Oil roof advertisement. Photo taken possibly on 5/8/1962. Colour laser printed copy of image stored in box 73. Original negative hires scan and image updated 28/5/2020.In red pen on folder that contained negative, "NR96B" and "5 Aug 62". trams, tramways, bendigo, railway station, mitchell st, tram 7 -
 Ballarat Tramway Museum
Negative, Travis Jeffrey, 5/08/1962 12:00:00 AM
Colour Negative No. N407, of the Bendigo No 11 on the North Bendigo line at the Bridge St. loop. Tram has the destination of Golden Square. Photo taken possibly on 5/8/1962. Colour laser printed copy of image stored in box 73. Original negative hires scan and image updated 28/5/2020.In red pen on folder that contained negative, "NR95B" and "5 Aug 62". trams, tramways, bendigo, north bendigo, bridge st, tram 11 -
 Ballarat Tramway Museum
Film - Movie Film & Box, Kodak, 1960 to 1971
Yields information in movie film format of Ballarat trams in 1960 through to 1971, how the system operated and was used by people, including special trams., Yields information in movie film format of Ballarat trams in 1960 through to 1971, how the system operated and was used by people, including special trams.Movie film - 8mm, approx. 15 mins, without leader strip on a plastic reel, within a clear plastic case - Standard 8, titled "Ballarat Trams". See Reg Item 4957 for DVD and Mini DVD. Has been transferred to DVD - see Reg item 4957 Made by Arthur Hill. Also transferred to DVD by Rod Cook Oct. 2015, via Roger Greenwood for use in his DVD, "The City of Ballarat Trams, Gardens & Gold" of 2016. See Reg Item 6883. In Arthur's letter - on file - Made between 1960 and August 1971. Synopsis: based on time. Between 1960 and 1968 0:00 Trams Ahead sign before the Victoria St terminus with 20 at terminus 0.14 - No. 20 leaving Victoria St terminus and being followed along Victoria St by car and then passengers jointing the tram at a tram stop. 00.40 - No. 12 (c1960) in bound along Lydiard St North and arriving in the Gregory St loop. 00.56 - No. 12 and 14 crossing at Gregory St. 01.20 - No. 33 and a bogie car crossing at depot loop. 01.31 - No. 18 travelling along Wendouree Parade with the Lake in the background. 01.42 - No 41 at depot junction and running into the depot No. 2 road with a short sequence of a tramway signal. 02.17 - SEC Sign at the depot gate, shot of 41 in No. 2 road, with the lights other way around, Caution beware of trams sign and a red signal. 02.31- Timetable sign at Gardens Loop 02.36 - No. 30 arriving at Loop and view of a signal with no lights showing. 02.48 - Destination roll being changed through a number of destinations. 03.26 - No. 20 arriving at Carlton St loop with the Olympic monument in the background and the red signal light going out. 03.31 - a lady standing at the front of No. 20, with an ice cream in hand, and No. 17 arriving at the Carlton St loop with a short sped up sequence and No. 20 departing from the loop, followed by No. 17 leaving the loop, heading into the city. 03.41 - No. 13 inbound from Sebastopol crossing Albert St and heading into the city. 04.12 - view of signal and contactor, the light going green and the tram passing underneath. 04.24 - No. 12 at the Sebastopol terminus and departing. 04.51 - No. 12 crossing Albert St Sebastopol. 05.16 - Following No. 12 along Albert St, with Borough Offices in background initially. 05.28 - No. 12 arriving at the Grey St loop with No. 14 arriving at the loop from the city and both trams departing. March 1971 05.58 - No. 30 being followed along Barkly St, Mt Pleasant and the pole being turned at the terminus 06.32 - No. 30 picking up a lady passenger. 06.38 - view from the front of a tram, with the drivers hand and a cigarette, view from the back of the tram, along the Mt Pleasant route and running through the loop and then turning into Main St - has the Ballarat (East) fire station in one sequence, and finally running along Main St. 07.35 - view from tram, with car turning into Bridge St. and then running into Sturt St passed the Parking Loop, and along Sturt St. 08.32 - Points at Drummond St North being changed, doors changed over and the tram running along Drummond St. North, through the Mill St loop and into Macarthur St and in Wendouree Parade, with the Lake Wendouree in view and crossing No. 12 at the Depot Loop, with crews chatting, past the depot, a lady passenger getting off the tram near Forest St., and arriving at Gardens Loop with the same lady passenger who got on in Barkly St, getting off the tram. 11.09 - view of No. 30 at Gardens Loop, departing the loop. August 1971 11.30 - R761 crossing Melton (Exford Wier) on the special train to Ballarat and then the bridge between Ballan and Gordon Stations. 12.16 - View from the front of a tram, following No. 26 along Lydiard St North, crossing at Gregory St and returning to the City. 12.39 - No. 14 and one other tram running along Albert St to Sebastopol, crossing No. 21 at Grey St and then to Sebastopol terminus, crossing Albert St and return and running along Albert St. 13.36 - No. 26, 39 crossing 13 at Gardens Loop. 14.00 - view looking across Lake Wendouree. 14.07 - 26 arriving at Victoria St, running part of Destination roll, passengers getting off with hotel in the background, trolley pole being turned and then with 39 following tram along Victoria St, crossing at the King St Loop. 15.07 - view of a trolley pole tracking through the overhead at curve 15.10 - end. Written labels giving title information on reel.trams, tramways, ballarat, sebastopol, lydiard st north, victoria st, mt pleasant, lake wendouree, depot, tram 12, tram 13, tram 14, tram 17, tram 18, tram 21, tram 26, tram 33, tram 39, tram 41 -
 Ballarat Tramway Museum
Photograph - Digital image Set of 11, Stuart Loddington, 10 images of Ballarat trams prior to closure, 1971
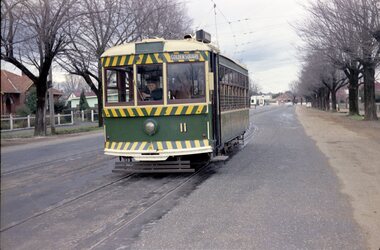
... Parade, near Gardens Loop .5 - Single truck tram at Victoria St... over the Buninyong rail line bridge, with Gardens via Sturt St ...Yields information about Ballarat Tramways and trams prior to the closure of the tramway system.Set of 11 digital images, comprising 1 donation text image and 10 images of Ballarat trams prior to closure, scanned from original slides by Stuart Lodington, 1971 prior to closure of the system. .1 - Donation text slide. .2 - No. 26 southbound in Lydiard St North, with the Ballarat Railway Station level crossing gates in the background. .3 - No. 27 and 30 crossing at Bell St Loop, Skipton St. (see also btm4976i4) .4 - No. 17 Wendouree Parade, near Gardens Loop .5 - Single truck tram at Victoria St terminus, taken from the west side of the Buninyong Rail line bridge, with CRB Roadwork sign, Eureka Caravan Park and Meagher Hotel in the background, possibly No. 11, see entry for .10 .6 - No. 12 and 30 crossing at the Urquhart St Loop, Drummond St South. .7 - No. 12 westbound in Sturt St, with Grenville St in the background. .8 - No. 17 at Gardens Loop with the Trolley pole being reversed. .9 - No. 30, Lydiard St North with Reid's Palace building in the background. .10 - No. 11 passing over the Buninyong rail line bridge, with Gardens via Sturt St West and a Twin Lakes sign. Has a number of children alongside the driver. .11 - No. 21 heading northbound in Wendouree Parade, Gardens, just to the north of the now BTM depot junction.trams, tramways, ballarat, level crossings, buninyong railway, lydiard st north, bell st, victoria st, wendouree parade, gardens, drummond st, sturt st, tram 26, tram 27, tram 30, tram 17, tram 12, tram 21, tram 11 -
 Ballarat Tramway Museum
Photograph - Digital image Set of 20, 1971-72
Set of 20 digital images of Bendigo Tramways, 1972 at or before closure while on a tram tour by Stuart Lodington. .1 - No. 7 at Golden Square terminus .2 - ditto .3 - No. 26 in bound on the Eaglehawk line with a crossing loop behind. .4 - Birney crossing the bridge by the tram depot. .5 - No. 29 running a special on the Eaglehawk line with a HBA billboard in the background. .6 - No. 29 with a driver walking in front of the tram at the above location. .7 - No. 29 on the Eaglehawk line .8 - ditto waiting for a tram at Manchester Loop with poppet head in the background. .9 - No. 29 on the Eaglehawk line .10 - Eaglehawk Town Hall at night. .11 - No. 7 at the depot junction in McCrae St, with Golden Square destination. .12 - No. 29 with the Camp Hotel Eaglehawk in the background. Also a Newsagent with The Sun, The Bendigo Advertiser and The Age signs on the building, High St .13 - No. 29 Mt Korong Rd, with the railway overbridge in the background. .14 - interior photo of Birney tram roof .15 - interior view of controls of Birney at Eaglehawk .16 - No. 29 outbound at the Depot Junction McCrae St. .17 - No. 18 at the Eaglehawk terminus .18 - close up view of No. 29 front. .19 - No. 29 in Nolan St, crossing the bridge, outbound. .20 - No. 18 at the Eaglehawk terminus with the Eaglehawk Town Hall, Post Office in the background. Has a circus banner on the side.trams, tramways, bendigo, eaglehawk, quarry hill, golden square, depot, mccrae st, nolan st, tram 7, tram 26, tram 29, tram 18 -
 Ballarat Tramway Museum
Photograph - Digital image Set of 20, 16/04/1972 12:00:00 AM
Set of 20 digital images of Bendigo Tramways, of the last running day of the Eaglehawk to Quarry Hill line 16 April 1972, .1 - No. 24 outbound to Eaglehawk .2 - No. 3? at Manchester Loop .3 - No. 24 outbound to Eaglehawk .4 - bogie tram crossing the rail over bridge from Eaglehawk .5 - No. 18 in View St .6 - No. 24 outbound to Eaglehawk .7 - No 18 at Eaglehawk with destination roll being changed, and shopping centre in the background. .8 - No. 24 crossing the railway overbridge, going to Eaglehawk .9 - No. 3 outbound to Eaglehawk .10 - No. 24 crossing the railway overbridge, going to Eaglehawk .11 - No. 3 and 24 crossing at Long Gully .12 - No. 18 at Eaglehawk with Leo A Hughes photographer building in the background and a CFA truck passing the tram. Tram SEC roof advertisement and a banner for "German -?- Circus" at Eaglehawk and dates. .13 - No. 3 inbound on the Eaglehawk line. .14 - No. 18 outbound to Eaglehawk .15 - ditto .16 - No. 18 at Eaglehawk terminus with the Mechanics Institute in the background. .17 - No. 24 at the Eaglehawk terminus .18 - No 24 at the intersection with Taylor St .19 - No. 24 at the Eaglehawk terminus .20 - dittotrams, tramways, bendigo, eaglehawk, long gully, manchester loop, tram 24, tram 18, tram 3 -
 Ballarat Tramway Museum
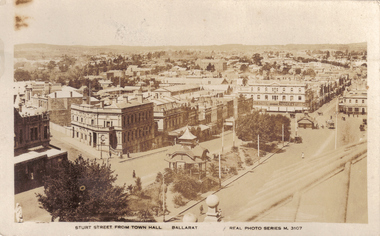
Photograph - Digital image, c1916
Shows the details of buildings in the east end of Sturt St, c1916.Digital image from a postcard from the collection of David Critchley, of Ballarat, Sturt St c1916. This 'birds eye' view of Sturt St reveals on of the early fleet standing at the city terminus probably during the Great War. Note the absence of motor cars and women's skirts are somewhat shorter - an economy concession with the shortage of cloth during the war years. A Valentines photo postcard. David scanned this pic at a higher resolution than normal, so you should be able to zoom in on the tram, which has been fitted with windshields and looks typically well used and unloved as did most of the original Ballarat fleet in their latter years. Image supplied by email 30/8/2011 - not to be published without David's authority.trams, tramways, sturt st, bridge st, esco -
 Ballarat Tramway Museum
Photograph - Digital image, c1971
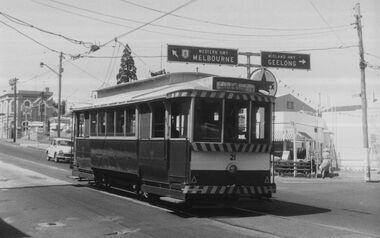
Yields information about Ballarat streetscape and its trams in the closing days of the SEC tramway system.Digital image from a black and white print of tram 21 at the intersection of Bridge, Victoria Streets and Main Road, inbound to the Gardens via Sturt St West. Has the Caltex service station, the Munster Arms Hotel in the background. CRB Road signage for Melbourne and Geelong over the tram. At Stones Corner. Photo by Marc Dahlstrom c1971. On rear is the Marc Dahlstrom stamp.trams, tramways, bridge st, victoria st, main st, stones corner, tram 21