Showing 190 items
matching north richmond
-
 Melbourne Tram Museum
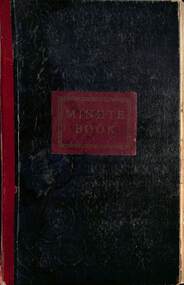
Document - Minute book - Cable tram operational history notes and records, Melbourne & Metropolitan Tramways Board (MMTB), up to 1930
Compiled by an unknown person as a record book of cable tram operational tickets or fare history for each location with general notes and some notes on electric trams. Pages 1 to 23 and pages 123 and 124 - General history of cable and electric trams with notes on tickets, trams, buses, events, and operational management. Compiled through to 26/10/1930, with some loose notes about the final closure of the cable tram system. For each cable tram car house (depot), Power House or Winding house, or route, notes on tickets, dates, rope speed, fares, replacement electric services or buses. Richmond Fitzroy Fitzroy and South Melbourne line Victoria St Clifton Hill Nicholson St Exhibition (route or line) Brunswick Royal Park Carlton Prahran Toorak' Queensberry St North Carlton Esplanade with details on bus services Windsor St Kilda (Brighton Road) North Melbourne West Melbourne' South Melbourne Port Melbourne' Northcote Kew (horse) Elsternwick (electric) At rear of book is four page document that gives information on the electric tram system, routes, cable. fares and first and last services for each line. Mid 1920s as the West Coburg service noted. Yields information Melbourne cable tram fares, ticket issuing and general history of the MMTB.Book - heavy card covers with paper imitation leather finish with red tape on left hand side and labelled "Minute Book", bound with 8 sewn sections, approx 200 foolscap pages, ruled sheets, numbered in pencil from 1 to 124 used to record information in ink.tramways, cable trams, fares, tickets, electric trams, melbourne, mmtb -
 Melbourne Tram Museum
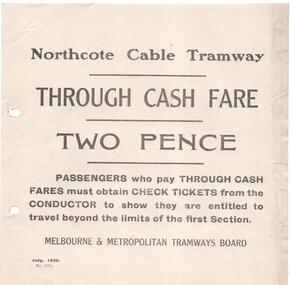
Document - Notice, Melbourne & Metropolitan Tramways Board (MMTB), "Northcote Cable Tramway Through Cash Fare Two Pence", "North Melbourne Cable Tramway - Suburban Penny Section", "Carlton & Prahran Cable Tramways", "Suburban Terminal Penny Sections", Jun; 1920
... Trams tramways MMTB Fares Cable Trams Northcote North Melbourne ...Set of five printed notices regarding fares paid in cash on the cable tram system relating to the issuing of tickets when passing the limits of the first section - dated July 1920. .1 - "Northcote Cable Tramway Through Cash Fare Two Pence" - print number 1174. .2 - "North Melbourne Cable Tramway - Suburban Penny Section" - details the locations - print number 1087 - two copies held. .3 - "Carlton & Prahran Cable Tramways" - as for .2 - 1 copy only. .4 - "Richmond Cable Tramway" - as for .2 .5 - Notice to employees advising of a delay in the introduction of these sections - from above delayed to July 1920. Notice D494, dated 13/2/1920. See also Reg Item 3957 for a notice prior to the introduction.trams, tramways, mmtb, fares, cable trams, northcote, north melbourne, carlton, prahran, richmond, hawthorn bridge -
 Melbourne Tram Museum
Photograph - set of 9 Black & White Photograph/s, Melbourne & Metropolitan Tramways Board (MMTB), 1966
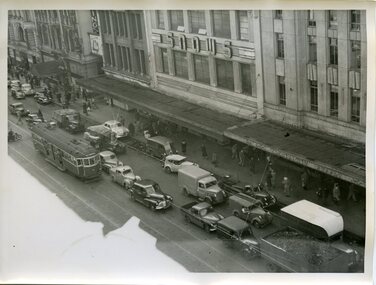
Series of 9 black and white photographs of the traffic congestion in the CBD during 1951. .1 - view looking south along Spencer St from Collins St showing the VR Head office, and the railway viaduct with a Berger Paint advertisement, Has one wide body tram with dash canopy lighting and three W2's. Also one small bus. Has "G3" in pencil on rear. .2 - similar view but with a different vehicle mix - W2 317 (Richmond Route 28), an SW6 route 27 and another W2 (route 41). Includes one large truck carrying Land Rover boxes. Typed on rear "Enlargement of No. 72 - Sheet No. 26 (Report P25/1/8) and in ink initials and "For Testing Engs 1/11/51". .3 - View looking north along Swanston St Princes Bridge with a route 6 tram and Princes Bridge Station and St Pauls Cathedral. On rear in pencil "11/2" .4 - Spencer St - trams crossing Spencer St bridge - W5 781 (Route 10) and a W2 649, route 9, South Melbourne Beach. .5 - Queensbridge under bridge - showing many cars jammed and the railway viaduct. .6 - ?? - Collins St - National Mutual and Shaw Savill Line offices - has a Safety Zone stand. .7 - Collins St looking east from Market St - with many trams in the view and many cars. .8 - Collins at Market St with a SW6 with dash canopy lighting - route 45, followed by a route 9A .9 - same location - total chaos. See also Reg 4520 for another 7 photos of the same series.trams, tramways, traffic control, congestion, spencer st, route 27, route 28, route 41, route 6, princes bridge, swanston st, w2 class, sw6 class, route 10, route 9, spencer st bridge, market st, collins st, route 45, route 9a, tram 317, tram 781, tram 649 -
 Melbourne Tram Museum
Photograph - Set of 7 Black & White Photograph/s, Melbourne & Metropolitan Tramways Board (MMTB), 1966
Series of 7 black and white photographs of the traffic congestion in the CBD during 1951. .1 - Flinders St from Flinders St Station office looking northwest with a W2 317 Richmond route 28 and many cars. Has "32" on rear in pencil. Has Snows and the SEC building in the view. .2 - Spencer St bridge, looking north with Fish Market/Cool Stores and the VR Head Office in the view. Has Taylor and ? General Carriers and Nestle's truck in the view. .3 - William St? with passengers waiting at a safety zone - has the Dennys Lascelles building in the background. .4 - Flinders St looking north east with Snows, the SEC, a Hotel and Hearnes sign showing. Has a W2 436? route 27 Hawthorn eastbound. Typed on rear "Enlargement of No. 76, Sheet No. 28 (report P25/1/8), "Spare" written in pencil and "For Testing Engrs 1/11/51" in ink. .5 - looking north with a horse drawn cart and a SW6 (East Kew) with dash canopy lighting. .6 - looking north - with Hearnes Provisions, Olympia Inn and Coffee Lounge and Young & Jacksons Hotel. Has a W2 partly in the photo about to enter the Safety Zone. ..7 - similar to .1 - with Snows, W2 route 48 North Balwyn and a Pattons Dry Cleaning van. See also Reg 4519 for another 7 photos of the same series.trams, tramways, traffic control, congestion, flinders st, spencer st, route 27, route 28, east kew, richmond, route 48, william st, safety zone, hawthorn, tram 317, tram 436 -
 Melbourne Tram Museum
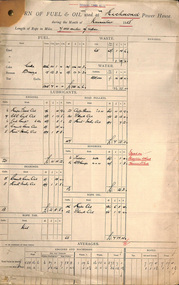
Document - Report, Tramway Board, "Return of fuel & Oil used at ...... Power House during the Month of November 1918", Nov. 1918
Set of reports for the "Return of fuel & Oil used at ...... Power House during the Month of November 1918", listing the amount and value of fuels, lubricants, bearing oil, road pulley lubricants, rope oil and rope tar for various cars houses. Prepared on a pre-printed form. Also lists the length of ropes and the average amounts per mile of rope. Form No.374, 7/17 Gives details for the following Power houses. Richmond Fitzroy Brunswick Johnston St North Carlton St Kilda Esplanade Prahran North Melbourne South Melbournetrams, tramways, cable trams, reports, winding houses, power house, richmond, fitzroy, brunswick, johnston st, north carlton, st kilda, esplanade, prahran, north melbourne, south melbourne -
 Melbourne Tram Museum
Photograph - Digital Image, Kevin O'Reilly, series of three images of the Hawthorn Bridge over the Yarra, c1930, c1930's
Image from CD (Compact Diskette for use in computers) - see Reg Item 135. A series of three images of the Hawthorn Bridge over the Yarra, c1930, during the era with problems with the bridge. See separate article for more details. Richmond 6, Richmond, Richmond 3 on the CD as original files. .1 - Looking from the south west, at the Hawthorn bridge with the temporary wooden bridge being constructed on the south side. Has the cable tram depot in the photo and part of the Burnley racing course. Temporary track on the north side of the steel bridge and crossings can be seen. .2 - Looking along Bridge Road to the east with Hawthorn Bridge in the middle of the photograph. Shows the industrial and residential areas, Hawthorn Railway Station and part of the Burnley Race course, the cable tram depot building. W class tram in Church St Hawthorn and W class tram crossing the bridge on the north side temporary track. Note the cable tram used as a shelter on the north east corner of the bridge. .3 - Looking south along River St towards Bridge Road, with the Yarra River and Hawthorn Bridge on the left side of the photograph. Shows the industry in the area at the time, wool and skin Merchants, north side of the cable depot, housing and the outlook to the river!trams, tramways, hawthorn, yarra river, burnley, richmond, hawthorn bridge -
 Melbourne Tram Museum
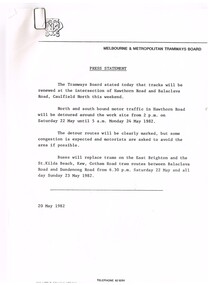
Document - Press Release, Melbourne & Metropolitan Tramways Board (MMTB), "Press Statement", Jun. 1982
Set of four MMTB Press Statements or Press Releases with MMTB letterhead. Photocopied onto A4 paper. 1. Renewal of tracks - Caulfield North - 20/5/1982. 2. Maintenance of railway crossing - Riversdale Road - 15/6/1982. 3. Maintenance of Bridge Rd and Church St Richmond - 1/6/1982 4. Maintenance work in Pascoe Vale Road, Moonee Ponds - 16/6/1982Item 4 has a handwritten note in ink "NB now half a "Grand Union" at Sydney Road & Moreland Rd"trams, tramways, mmtb, trackwork, road works, news broadcasts -
 Bendigo Military Museum
Photograph - Royal Australian Survey Corps Surveyors in the Field – North Queensland, 1958
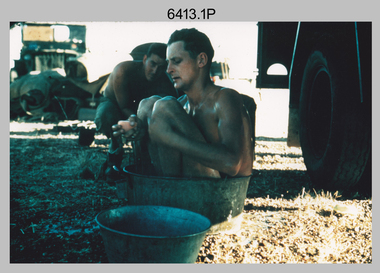
This is a set of seven photographs of surveyors and support staff in the field undertaking duties in North Queensland in 1958. The surveyors were employed in the establishment of mapping and geodetic control. In this era surveyors used theodolites to observe horizontal and vertical angles and chains to measure base line distances between survey stations. Bob Skitch shown in photos .4P to .6P was in the 2nd year of his career in the Australian Army. He achieved the rank of Lieutenant Colonel and his last appointment was the CO of the Army Survey Regiment from 1976 to 1980. The annotation on the back of photo .5P ‘Black foreground is where Bob Skitch boiled billy and started a grass fire’.This is a set of seven photographs of surveyors and support staff in the field undertaking duties in North Queensland in 1958. The photographs were printed on photographic paper and are part of the Army Survey Regiment’s Collection. The photographs were scanned at 300 dpi. .1) - Photo, colour, 1958. Surveyor in Nth QLD enjoying a bath. L to R: Don Cocker, Bob Thompson. .2) - Photo, colour, 1958. Don Cocker surveyor in Nth QLD, enjoying a bath. .3) - Photo, colour, 1958. Surveyors Nth QLD undertaking survey observations, using MRA1 tellurometer to measure base-line distances. L to R: Len Davies, Lou Sommer, John Van De Graff. MRA1 was covered to stop overheating. .4) - Photo, colour, 1958. Surveyors south of Richmond, QLD digging holes for the erection of a Bilby observation tower. L to R: John Van De Graff, Bob Skitch, Kev Moody, Mal Hayes, Don Gray .5) - Photo, colour, 1958. Surveyors south of Richmond, QLD erecting a Bilby observation tower. L to R: Tom Royle, Bob Skitch (on ground level), Mal Hayes. .6) - Photo, colour, 1958. Surveyors south of Richmond, QLD erecting a Bilby observation tower. L to R: Tom Royle, Bob Skitch, Mal Hayes, Jim McGill (on ground level). .7) - Photo, colour, 1958. Surveyors south of Richmond, QLD undertaking survey measurements from a Bilby observation tower..1P to .7P annotated on back – personnel names, the year and the location. Annotated on back of .5P ‘Black foreground is where Bob Skitch boiled billy and started a grass fire’.royal australian survey corps, rasvy, army survey regiment, asr, army svy regt, fortuna, surveying -
 Ballarat Tramway Museum
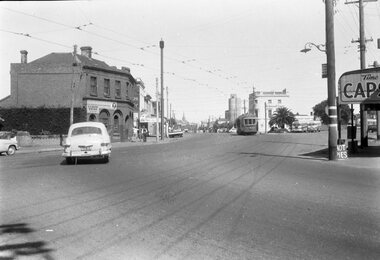
Negative - Geelong tram 36 Mercer St, Laurie Gallop, early 1956
Photo shows Geelong tram 36 outbound to North in Mercer St at Ginn St. In the background is a shop selling Franklins Lemon Swish, a four & Twenty Pie shop, Toppa Ice cream, a Coca Cola truck, a Hotel advertising Richmond Lager, three parked buses and a shop advertising hot pies. On the pole is a tram stop with a metal "CARS STOP HERE" sign. On the left-hand side of the photograph a surveyor can be seen at work.Yields information about the Geelong operations toward the closure of the tram system.Black and white Negative - 120 sizetramways, geelong, mercer st, tram 36, tram stops -
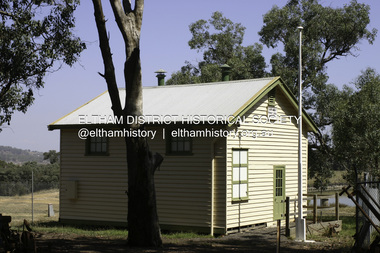 Eltham District Historical Society Inc
Photograph - Digital Photograph, Alan King, Yarrambat Heritage Museum, 23 January 2008
Original Yarrambat Primary School building at the Yarrambat Heritage Museum, Yarrambat Park. At the museum, visitors can gain an insight into Yarrambat’s past since non-Aboriginal settlement. The museum includes the original Yarrambat Primary School, which was moved to the site in 2000 and now serves as the Yarrambat Historical Society headquarters.The museum also includes a fully operational battery (gold-bearing ore crusher) driven by a McDonald 30HP diesel engine built in Richmond in 1938. The battery was relocated from the Golden King Mine in North Oatlands Road, Yarrambat, where it operated until 1984.1 Other exhibits include farming implements and machinery from the Yarrambat district. Published: Nillumbik Now and Then / Marguerite Marshall 2008; photographs Alan King with Marguerite Marshall.; p25This collection of almost 130 photos about places and people within the Shire of Nillumbik, an urban and rural municipality in Melbourne's north, contributes to an understanding of the history of the Shire. Published in 2008 immediately prior to the Black Saturday bushfires of February 7, 2009, it documents sites that were impacted, and in some cases destroyed by the fires. It includes photographs taken especially for the publication, creating a unique time capsule representing the Shire in the early 21st century. It remains the most recent comprehenesive publication devoted to the Shire's history connecting local residents to the past. nillumbik now and then (marshall-king) collection, yarrambat heritage museum, yarrambat historical society, yarrambat primary school