Showing 211 items
matching t class
-
 Bendigo Historical Society Inc.
Newspaper - JENNY FOLEY COLLECTION: SMILES
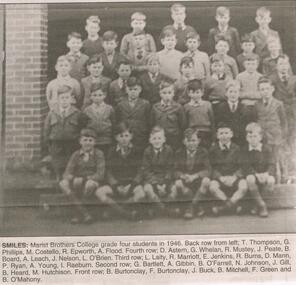
The Marist Brothers arrived in Bendigo in 1893 and began classes for boys in makeshift classrooms at St Killians. By the next year they had moved to a permanent school in McCrae Street. In 1983 Marist amalgamated with St Mary's to form a co-educational school, "Catholic College.Bendigo Advertiser ''The way we were'' from 2003. Smiles: Marist Brothers College grade four students in 1946. Back row from left: T. Thompson, G. Phillips, M. Costello, R. Epworth, A. Flood. Fourth row: D. Astern, G. Whelan, R. Mustey, J. Peate, B. Board, A. Leach, J. Nelson, L. O'Brien. Third row: L. Laity, R. Marriott, E. Jenkins, R. Burns, D. Mann, P. Ryan, A. Young, I. Raeburn. Second row: G. Bartlett, A. Gibbin, B. O'Farrell, N. Johnson, J. Gill, B. Heard, M. Hutchinson. Front row: B. Burtonclay, F Burtonclay, J. Buck, B. Mitchell, F. Green and B. O'Mahony. The clip is in a folder.newspaper, bendigo advertiser, the way we were -
 Melbourne Tram Museum
Postcard - St Kilda Road, with W class trams and the Shrine of Remembrance, National View by Murfett Publishing, 1970s
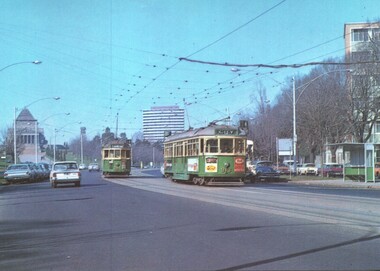
Postcard - St Kilda Road, view looking south at the Shrine of Remberance, BP House and on the far right part of the now demolished Prince Henry's Hospital. Trams in the view are W2 345 (Carnegie Route 4) and SW6 913 (City, Route 4). Tram 813 has adverts for Coffey Ford and T&G insurance along with others. The driver of 913 has his cap on an angle.Yields information about St Kilda Road around the Shrine, c1970 and tram services.Postcard colour - St Kilda Road, with W class trams and the Shrine of Remembrance - National View - Murfett publishingtrams, tramways, st kilda road, w2 class tram, sw6 class tram, tram 913, tram 345, shrine of remembrance -
 Melbourne Tram Museum
Album - Ron Scholten Slide Collection, Ron Scholten
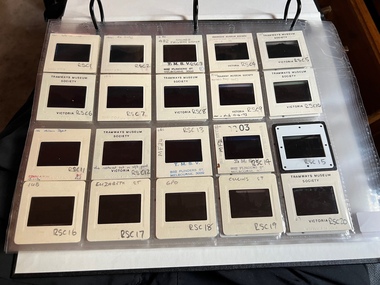
Photo - see pdf file for further information. Number Brief Description RSC1 PCC 1041 at the gates of Preston Workshops on a test run without it’s trolley retriever RSC2 PCC 1041 in Glenhuntly Road on Route 67 en route to Carnegie crossing the Railway Gates at Glenhuntly Station RSC3 W2 482 stored at Malvern Depot with Olympic Park on the Destination RSC4 Cable Car Set 64 in Swanston St outside Princess Bridge Station in Bound with open top Double Deck Bus, Trak Motors ? Departing from Flinders St Station RSC5 W3 669 in St George Rd at Sumner St en route to Preston Workshops for scrapping RSC6 Cable Car in Lygon St en route to Carlton RSC7 PCC 1041 turning from St Georges Rd into Miller St to enter Preston Workshops RSC8 Flinders St Station with cable cars RSC9 PCC 1041 in strife on it’s maiden day in service. Trams on route 88 delayed in Queens Parade Clifton Hill RSC10 Flinders St at William St with Cable Cars RSC11 L 104 on the fan of the new shed at Malvern Depot on a TMSV tour RSC12 Cable Set 1 after it’s restoration at Preston Workshops on the fan near the front gate RSC13 X1 466 at a suburban terminus of the Footscray System RSC14 X2 680 at Point Ormond Terminus RSC15 An ex Launceston Tram at the outside terminus of the Penny Royal Complex Tramway in Launceston RSC16 Q 148 at Preston Workshops awaiting disposal RSC17 Elizabeth St with Cable Cars RSC18 Elizabeth and Bourke St corner outside the GPO with cable cars RSC19 Collins St with Cable Cars RSC20 A photo taken from the observation deck of the ICI building showing a view of Parliament house with a w class tram in Nicholson St RSC21 Auburn Horse car with a posed photo of all the tramwaymen employed RSC22 Cheltenham Double Deck Horsecar with a full load of passengers RSC23 City of Northcote cable trailer 3 at a terminus RSC24 City of Northcote Cable cars passing in High St Northcote RSC25 St Kilda Rd at Princes Bridge with Cable Cars RSC26 Flinders St with Cable Cars RSC27 Cable Cars RSC28 Bourke St looking towards Elizabeth St from Queen St RSC29 Cable cars in Bourke St at Elizabeth St looking East RSC30 Cable cars in Elizabeth St at the terminus at Flinders St RSC31 Cable cars in Bourke St at Swanston St looking west RSC32 Cable cars in Swanston St at Flinders St looking North RSC33 Cable cars in Collins St near Russell St RSC34 Cable cars in Elizabeth St at Bourke St RSC35 Cable cars in Collins St at Elizabeth St RSC36 Cable Cars in Swanston St at Flinders St RSC37 Cable cars in Collins St RSC38 Cable Cars RSC39 Cable cars in St Kilda Rd near Princes Bridge RSC40 Cable cars in Collins St East of Swanston St RSC41 Cable cars in Spring St outside Parliament house RSC42 K 92 in M&MTB Chocolate and cream livery but with a P&MTT Destination box on Route 14 RSC43 Thornbury depot viewed from Miller St and St Georges rd. Two W2 class cars are laying over between the peaks RSC44 Z3 201 in Met Livery passes D1 3510 in new M Tram livery. A Staff member in uniform stands in the doorway. Dandenong Rd RSC45 D1 3530 advertising Heinekin Super Golf on Route 55 in Royal Park RSC46 D1 3504 in M Tram livery on the reserved track in Matthews Ave near Essendon Airport showing Route 81 Travancore . I suspect it is a private enthusiasts charter due to the Malvern W class run number in the rear windscreen RSC47 D1 3504 on Route 64 in Dandenong Rd in M Tram Livery RSC48 D1 3504 in M Tram Livery at Airport West Terminus RSC49 D1 3504 in M Tram Livery in Union Rd outside the Showgrounds RSC50 D1 3504 at West Maribyrnong Terminus in M Tram Livery RSC51 D1 3503 in M Tram Livery in Malvern Depot RSC52 SW6 960 and VR 53 in Harbour Esplanade for the NMEL&T Co Centenary RSC53 Hawthorn Tramways Trust 32 in Harbour Esplanade for the NMEL&T Co Centenary RSC54 VR 53 & B 2042 in Harbour Esplanade for the NMEL&T Co Centenary RSC55 VR 53 & C 3016 in Harbour Esplanade for the NMEL&T Co Centenary RSC56 NMEL&T Co 13 usually V214 in Harbour Esplanade for the NMEL&T Co Centenary RSC57 NMEL&T Co 13 usually V214 at Preston Workshops for the NMEL&T Co Centenary RSC58 Hawthorn Tramways Trust Lettering on HTT 32 in Harbour Esplanade for the NMEL&T Co Centenary RSC59 Hawthorn Tramways Trust 32 in Harbour Esplanade for the NMEL&T Co Centenary RSC60 Hawthorn Tramways Trust 32in Harbour Esplanade for the NMEL&T Co Centenary RSC61 Hawthorn Tramways Trust 32 in Harbour Esplanade for the NMEL&T Co Centenary RSC62 NMEL&T Co 13 usually V214 at Preston Workshops for the NMEL&T Co Centenary RSC63 W2 516 and another on route 59 wait to shunt at Essendon Airdrome Terminus as W2 571 on route 49 departs. This was the last day of operation. RSC64 Australia’s First Electric Tram at Box Hill with Tramwaymen including H J Hilton who is in the centre RSC65 W2 484 en route to St Kilda Junction and another wait for passengers after a race meeting at Caulfield Racecourse RSC66 X1 463 on the Footscray system en route to Russell St RSC67 Geelong 35 on Chilwell Route, Formerly HTT 13, M&MTB 119, then Bendigo 1 and Ballarat 37 RSC68 P&MTT 4 on Opening Day of the system in Glenferrie Rd RSC69 Bendigo 6 in McCrae St near the Depot end route to North Bendigo RSC70 P&MTT 4 in Glenferrie on opening day of the System RSC71 Scrubber 3 stripped and awaiting scrapping at Preston Workshops RSC72 Scrubber 4 at South Melbourne Depot RSC73 Q 191 & 139 at Preston Workshops awaiting scrapping RSC74 Rail Grinder 3 at Preston Workshops as purchased from Sydney RSC75 Y 469 waits to shunt at Wattle Park Terminus as Y1 613 departs on driver training duties RSC76 VR 53 on the outside roads at Essendon Depot RSC77 W5 796 with three doors and square windows running out of Brunswick Depot in Cameron St, with a supplementary destination board showing “City via Swanston St” RSC78 W2 258 on the wheel grinder road at Brunswick depot RSC79 X2 676 on a TMSV tour, W5 817 & 836 & VR 53 on the open roads at Essendon Depot RSC80 PCC 1041 on test, passes W71035 in High St Preston RSC81 D1 class production number 7 as delivered on test in Matthews Ave RSC82 W2 383 on route 5 turning from the reserved track in Dandenong Rd into St Kilda Rd at St Kilda Junction RSC83 Z3 204 as advertising tram for Vodaphone Grand Prix running into Malvern Depot new shed RSC84 Z1 4 on test in St Georges Rd RSC85 PCC 1041 on Route 96 in Burke St near Exhibition St RSC86 Z1 3 without numbers on test turning from Miller St in St Georges Rd RSC87 Track components stored in Coldblo Rd at Malvern Depot with Z class cars adjacent RSC88 D1 3501 in M Tram Livery on Route 55 in Peel St at Franklin St RSC89 C 3001 in Yarra Trams Livery Porto 018 & D13502 in M Tram Livery on Display in Harbourside Esplanade RSC90 D1 class tram production number 7, in as delivered condition on test in Matthews Ave RSC91 D1 3503 inside Malvern Depot RSC92 SW6 955 and W6 974 in St Kilda at City Rd at Dusk RSC93 Freight Car 19 at Preston Workshops in green Livery RSC94 Rail Grinder 3 in green Livery at South Melb Per Way Yard RSC95 A SW6 class car on route 50 shunting at Elizabeth St Terminus at night, taken from Flinders St Station RSC96 W2 588 & 435 in St Kilda Rd at Batman Ave RSC97 Y1 613 in service at Wattle Park Terminus RSC98 W2 588 in Wellington Parade en-route to the City with a Grand Final Load of passengers followed closely by 384 RSC99 W2 558 on a MCG Footy Special entering the Simpson St sidings RSC100 W3 657 & an L Class in the new shed at Malvern Depot RSC101 Y1 613 in St Kilda Rd on an enthusiasts tour in St Kilda Rd south of St Kilda jun RSC102 Y1 613 on an enthusiasts tour in Clarendon St with the two extra tracks on the Viaduct under construction RSC103 W6 976 on the fan of the new shed at Malvern Depot RSC104 W7 1024 as an advertising car for Bank of NSW at the route 1 terminus at South Melb Beach RSC105 PCC 980 on route 96 in Nicholson St near North Fitzroy Depot RSC106 SW6 890 with dash canopy lighting in Market St on the opening day of William St Services RSC107 W2 444 with big numbers heads a line of footy specials in Simpson St Sidings RSC108 Cable Cars in Elizabeth St RSC109 NMEL&T co 2 with a trailer outside the power station in Mount Alexander Rd RSC110 Alf Twentyman’s cable car set in his Northcote backyard RSC111 Cable Cars in Queens Parade Clifton Hill RSC112 Cable cars in Collins St outside the Townhall RSC113 PCC 1041 at Carnegie terminus RSC114 Cable cars in Elizabeth St RSC115 Cable cars in Collins St near Swanston St RSC116 HTT 19 turns from Riversdale Rd into Camberwell Rd at Camberwell Junction RSC117 W1 419 official builders photo of first car of the class RSC118 Cable car with a full load of passengers RSC119 W1 422 illuminated for the visit of T.R.H. The Duke and Duchess of York RSC120 PCC 1041 in strife on it’s maiden day in service. Trams on route 88 delayed in Queens Parade Clifton Hill RSC121 Bendigo birney in Finn St near North Bendigo terminus RSC122 SW6 in St Kilda Rd at Domain Rd at night RSC123 All 3 of Alf Twentyman’s cable cars in his Northcote backyard RSC124 Cable trailer 256 being unloaded into the shed at Bylands RSC125 Cable grip car 1 being removed from the Melbourne Museum RSC126 Alf Twentyman's cable cars in his Northcote Backyard RSC127 Alf Twentyman's cable cars in his Northcote Backyard RSC128 Alf Twentyman's cable cars in his Northcote Backyard RSC129 Alf Twentyman's cable cars in his Northcote Backyard RSC130 W class car in Swanston St at Collins St RSC131 Y1 469, L & W3 on the run out of Glenhuntly Depot on a tour RSC132 W7 1024 as an advertising tram for Bank of NSW at Clifton Hill RSC133 W2 496 on a footy special in Simpson St Sidings RSC134 W2 as originally converted to a test car at Preston Workshops RSC135 W3 667 in Brunswick Depot with Ellen Butland at the controls RSC136 W3 669 on it’s final run at Victoria Prd & Brunswick St RSC137 W2 571 in Wellington Prd at Clarendon St with a Footy Final load of Passengers RSC138 Y1 613 shunts at Spencer St Terminus as X217 waits on Australia Day Pageant RSC139 PCC 1041 on Rt 96 in Burke St outside the Southern Cross Hotel RSC140 890 with accident damage on the outside roads at Preston Workshops c1978 RSC141 535 on Rt 4 at the old St Kilda Jun c1967 RSC142 1041 on Rt 88 turns from Bourke St into Spring St 1973 RSC143 102 on a tour at Albert Park Beach Terminus Feb 1972 RSC144 833, 835 & 834 in the shed at Malvern Depot c1976 RSC145 281 in Wellington Parade on a football very crowded special c1974 RSC146 464 Ballarat Rd 1960 RSC147 181 Explosives Fty - at Footscray Station - July 1960 RSC148 181 Williamstown Road 1960 RSC149 Cable car set at Alf Twentyman’s c1970 RSC150 X 217 at Malvern Depot c1970 RSC151 X1 465 and T181 Footscray Football ground in Barkly St. c1960 RSC152 Scrubber 5 at South Melbourne depot c1960 RSC153 X1 465 Footscray to Russell St, c1960 RSC154 X1 467 Leeds St Footscray 1960 RSC155 PMTT 4 Glenferrie Road, 1910 RSC156 S 164 at Malvern Depot c1970 RSC157 T178 Footscray c1960 RSC158 Cleaner No. 7 at South Melbourne depot c1960 RSC159 Two Y classes at Princes Bridge / Batman Ave mid 1950s RSC160 Swanston St – Nu color vue slide – M142 Demonstrates the work of Ron Scholten in photography, collection and/or production of duplicate slidesAssembled album in a black presentation folder of 160 colour slides, 8 slide sleeves, collected or produced by Ron Scholten. Many are TMSV or Windsor Publications slides. All photographs have been scanned and placed on the Museum's G drive. A list of all photographs with details has been compiled. melbourne, tramways, trams, cable trams -
 Federation University Historical Collection
Magazine - Booklet, Ballarat School of Mines Students' Magazine, 1916, 1916
School Council, Members of Staff, Editorial, Fumes from the Lab, Ancient Craft Classes and the Apprenticeship Question, Magazine Editorial Staff, The Trip to Bradshaw's Creek, Arts & Crafts Gossip, In Memoriam - E. J. Cannon, Echoes of the Past, The Haunted Tram Car, Old Boys', Sport, Shun!! Military Notes, The Junior TechsBlue soft covered magazine of 62 pages. Former students mentioned are John Walter Sutherland, Basil Sawyer, Charles Burbury, Herbert Sleeman, Eustace M. Watson. Oliver E. Jaeger, Oliver e. Jager, Godfrey Stephen Hart, Lionel J. Lambert, Charles G. Fraser, L.W.G. Buchner-Malcolm, James A. Reid, Richard G. Walker, Leslie J. Coulter, Herbert E. Hawkesworth, Leslie de Jersey Grut, Frederick G. Brisnden, Reginald Callister, Lewis J. Westcott, Angus D. Gibson, Henry Whittingham, Virgil Tucker, Norman C. Tinworth, Charles E. Finnis, Benjamin H. Bennett, Valentine G. Anderson, Ernest S. Anderson, Ralph I. Moore, John A. Grant, William Geldard, Francis C. Hall, Harold G. Cornell, Robert H. Lamb, Sydney Radcliff, George A. Denny. Frederick P. Paul, H. Lipson Hancock, Edgar C. Hurdsfield, David W. Bonar. Wilfred L. Allen, William J. Lakeland, Frederick A. Marriott, Eric Byron Moore, NOrman Stuckey, PErcy H. Osborne, John F. Spornballarat school of mines, magazine, f. maxwell, n. turnbull, g. procter, e. seimering, l. tonkin, w. carrol, h. smith, r. cox, j. a. greenshields, jnr, r. o. buchanan, l. vernon, a. bowman, w. h. steane, n. henry, r. dale, e. j. cannon, ted cannon, lance-corporal e. j. cannon, charles w. whyte, patrick s. anderson, william t. sayer, william f. m. johnson, robert m. sergeant, harold t. w. dixon, harrie wilson, ernest s. morsehead, carl jensen, corpl. r. sergeant, sergt. h. dixon, q.m.s. t. wilkins, captain james fairbairn fairley, sergt. e. morshead, sergt. hy. wilson, lieut. l. c. blick, f. g. procter, f. g. davies, gladstone procter, bradshaw's creek, edwin cannon, art library -
Federation University Historical Collection
Letter, Ballarat School of Mines Correspondence, 1910, 1910
Correspondence of the Ballarat SChool of Mines * Yarraville Chlorination and Ores Reduction Works * Gordon Technical College letterhead * Jennings Tin Mining Co Letterhead * Ballarat City Board of Advice * Scot's Hotel Steiglitz from G. Straight * Jubilee Mine, Italians from Elsie Alcock * State Parliament House LEgislative Assembly * State Forests Department 0 Creswick Forestry School - Classes taught by Ballarat School of Mines lecturers; yarraville chlorination and ores reduction works, jaques fisher, ponsonby carew smyth, telegram, a. anderson, a.h. walsh, j.m. edgar, charles w. frost, gordon technical college, ballarat city board of advice, w. coulthard, stephen chambers, s. radcliff, photography, d.c. newman, john wilsmith, j. worthington, elaine post office, j. laughman, meredith police station, h.h. smtih, incorporated institute of accountants, w. nixon, electric supply company of victoria, h.c. spencer, david melvin, walter t. ingpen, canadian finanace securities, scott's hotel steiglitz, g. straight, jubilee mines italians, elsie alcock, w.a.t. davies, morgan's gold mining company, h.g. taylor, myles b. webster, mourning letterhead, s.s> antill -
 Bendigo Historical Society Inc.
Photograph - BAGGALEY COLLECTION: PHOTOGRAPH - CAMP HILL STATE SCHOOL , GRADE 4B
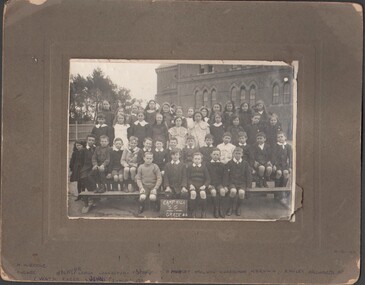
B&W photograph Grade 4B, Camp Hill State School Four rows of students taken in school ground Mixed class, some nominated student names: N. Weddle T. Bodner (!), N. Player, F. Leach, Cannaton (!), Stadler, B. Murley, Neilson, R. Hardman, K. Brown, N. Wiley, A. Richardson, D. Quinn C. Watts, F. Kerr, C. Johns, P. Leachphotograph -
 Melbourne Tram Museum
Document, Marilynn Fahey, "A few Memories of "W" class tram by Marilynn Fahey", 2015
Two page article or manuscript titled "A few Memories of "W" class tram by Marilynn Fahey". Article used in a City of Port Phillip book during the 2015 Seniors Festival and in an exhibition during 2016. Describes the writers view of the demise of W class trams in Chapel St, the tramcars themselves, their ambiance, that one went to Denmark, conductors, use, operations, operation of the trams on route 78. The Museum provided a number of photographs to the City - see emails with Anne Scambary for use in a digital story exhibition. Item as a word document provided by Anne as the basis of the photo request. The first date for the Speaking stories: Digital histories 2016 is at the St Kilda Town Hall Foyer, 10 October - 17 October, 8.30AM- 5PM. Kind regards Anne Scambary Art & Heritage Programs , Vibrant & Creative City T: 9209 6416 , W: www.portphillip.vic.gov.au Private Bag 3, St Kilda, VIC 3182trams, tramways, route 78, w class, articles, stories, chapel st, conductors -
 Melbourne Tram Museum
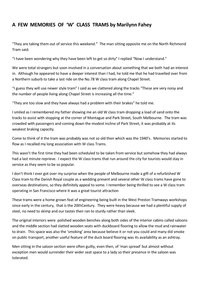
Drawing, W. E. Green, "Tram It", c1975?
... Trams tramways Z class Cartoons T Shirts MMTB Drawing - Decal ...Drawing - Decal - Iron On transfer - of a cartoon by W. E. Green, WEG featuring a Z class tram, route 96, destination MMTB, and title "Tram It" in reverse. Has instructions for application to a Tee or T shirt or cloth.trams, tramways, z class, cartoons, t shirts, mmtb -
 Melbourne Tram Museum
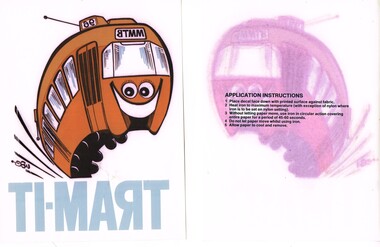
Photograph - Black & White Photograph/s, Lee A Ratten, c1948
Black and white photograph of 2 trams at Preston Workshops c1948 First tram 500 is a W2 class tram built by MMTB at Preston Workshops in 1928. It entered service 27/4/1928 and was withdrawn from service and sold in 1981. The tram's destination is shown as "Special". The tram has been fitted "T" lettered taillights. The second tram, 198, is a Q1 class single truck straight-sill combination tram built by the MMTB at Holden St Workshops. It entered service in 1923 and was reclassified as a Q class tram. It was converted to all night service in 1937 and operated until 1957. It was reclassified as a freight car and renumbered as W15 in 1958, before it was withdrawn from service in 1986.trams, tramways, w2 class, q class, preston workshops, lights, tram 500, tram 198 -
 Melbourne Tram Museum
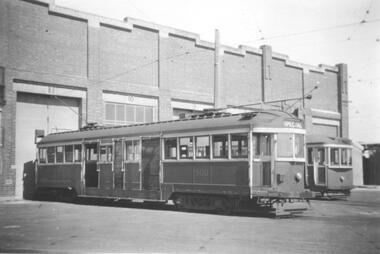
Magazine, "Melbourne", 1970
Book/ Magazine - A4 - 24 pages plus light card covers, full colour, centre stapled titled "Melbourne", published by the Offset Printing Coy. Pty. Ltd. Front and back covers contains image with tram No 409, Route 44 with destination Balwyn in Collins St at Russell St with the T&G building in the view.trams, tramways, w2 class, route 44, collins st, russell st, tram 409 -
 Melbourne Tram Museum
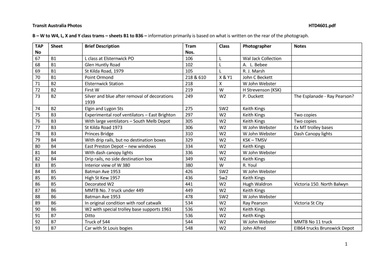
Album - Photo Album, Transit Australia Publishing, "TAP - Part B - W to W4, L, X and Y class trams – sheets B1 to B36", 1950's to 1990's
Photo Album - titled "TAP - Part B - W to W4, L, X and Y class trams – sheets B1 to B36", from Transit Australia Publishing. Photos used in the Destination City and other publications series. For a detailed list of photographs see htd4601i.pdf. For individual photo images see: \dbtext\hawthtramcoll\photo collections\htd4601-TAP-ParB, images TAP67 to TAP160. TAP67_106_ElsternwickPO_WalJack.jpg TAP68_102_GlenhuntlyRd_ALBebeek.jpg TAP69_105_StKildaRd_Jun1979_RayMarsh.jpg TAP70_218-610_PointOrmond_JohnBeckett.jpg TAP71_218_ElsternwickStation_25Sep1953_WJohnWebster.jpg TAP72_219_Dec1923_JohnStevenson_KSKcollection.jpg TAP73_249_Esplanade_decorations-gone_1939_PWDuckett.jpg TAP74_275_ElginSt_24Mar1956_KeithKings.jpg TAP75_297_EastBrighton_14May1961_KeithKings.jpg TAP76_305_SouthMelbourne_14May1961_KeithKings.jpg TAP77_306_StKildaRd_25Sep1953_WJohnWebster.jpg TAP78_310_PrincesBridge_WJohnWebster.jpg TAP79_329_GlenhuntlyDepot_Jul1929.jpg TAP80_334_EastPrestonDepot_7April1969_KeithKings.jpg TAP81_3326_ColinsSt_WJohnWebster.jpg TAP82_348_BalaclavaJunction_13Jan1962_KeithKings.jpg TAP83_380-dropcentreSeats_RYoul.jpg TAP84_426_BatmanAve_23Sep1953_WJohnWebster.jpg TAP85_436_HighSt-at-BennettsRd_16Feb1957_KeithKings.jpg TAP86_441_Victoria150_NorthBalwyn.jpg TAP87_No7-truck_449_KIngsway_KeithKings_9Sep1961n.jpg TAP88_478_BatmanAve_23Sep1953_WJohnWebster.jpg TAP89_534_VictoriaSt_RayPearson.jpg TAP90_536_HighSt_Kew_KeithKings_28Sep1961.jpg TAP91_536_HighSt_Kew_KeithKings_28Sep1961.jpg TAP92_No7-truck_544_WJohnWebster_29Sep1953.jpg TAP93_548_StLouis.EIB64.Trucks_BrunswickDepot_JohnAlfred_28Jan1957.jpg TAP94_548_StLouis.EIB64.Trucks_StKildaRd_KeithKings_19Mar1955.jpg TAP95_573_PointOrmond_LindsayCrow.jpg TAP96_574_CollinsSt_WJohnWebster_28Sep1953.jpg TAP97_646-113_1987_Bundoora.jpg TAP98_654_RoyalPde_BobLilburn_1949.jpg TAP99_658_ElizabethSt_WJohnWebster_28Sep1953.jpg TAP100_665_CollinsSt_WJohnWebster_28Sep1953.jpg TAP101_665_MacarthurSt_WJohnWebster_28Sep1953.jpg TAP102_459_BallaratRd_Footscray_ALBebee.jpg TAP103_459_BallaratRd_Footscray_ALBebee.jpg TAP104_460_NicholsonSt-into-BuckleySt_Footscray_WJohnWebster_28Sep1953.jpg TAP105_467_GordonSt.jpg TAP106_X1_WilliamstownRd.jpg T AP107_X1_interior.jpg TAP108_678_WilliamstownRd_KeithKings_13Jan1962.jpg TAP109_679_BuckleySt-depot.jpg TAP110_680_FootscrayStation_RayPearson.jpg TAP111_469_BatmanAve_25Sep1953_WJohnWebster.jpg TAP112_469_CamberwellDepot_KeithKings_25April1950.jpg TAP113_469_RiversdaleRd_NedMackintosh_1972.jpg TAP114_610_PointOrmond_JohnBeckett.jpg TAP115_611_CamberwellDepot_BobLilburn.jpg TAP116_613_BatmanAve_WJohnWebster_23Sep1953.jpg TAP117_104_JohnBeckett.jpg TAP118_105_MMTB.jpg TAP119_103-1024_StKildaRd_6Jan1973_AndrewFoy.jpg TAP120_106_GlenhuntlyRd.jpg TAP121_217_MalvernDepot_MMTB.jpg TAP122_217_MalvernDepot_DaveMacartney_12Sep1971.jpg TAP123_218_PointOrmond_LCrow.jpg TAP124_218_Elsternwick_WJohnWebster_c1953.jpg TAP125_218_GlenhuntlyRd_Broadway.jpg TAP126_W-body_MMTB.jpg TAP127_275_MalvernDepot.jpg TAP128_275_SwanstonSt.jpg TAP129_280_StKilda_WJohnWebster_c1953.jpg TAP130_308_KewDepot_c1925_MMTBAnnualReport.jpg TAP131_310-681_BatmanAve_RayPearson_1930s.jpg TAP132_317_Traverser_Preston_MMTB.jpg TAP133_340_HighSt_MMTB.jpg TAP134_364_Preston_MMTB.jpg TAP135_390_WellingtonPde.jpg TAP136_422_SwanstonSt_WJohnWebster_c1953.jpg TAP137_426_BatmanAve_LCrow.jpg TAP138_426_BatmanAve_WJohnWebster.jpg TAP139_426_CamberwellDepot_GeoffGrant_7May1955.jpg TAP140_436_SpencerSt_BobLilburn_1948.jpg TAP141_511_CamberwellDepot_GeoffGrant_7May1955.jpg TAP142_514_StKildaRd_WJohnWebster.jpg TAP143_544_StKilda_WJohnWebster.jpg TAP144_568_Decorated_RayPearson.jpg TAP145_660_GlenhuntlyDepot_LCrow.jpg TAP146_658_SwanstonSt_PaulNicholson_23Dec1967.jpg TAP145 - copy of TAP 145 TAP148_665_MacarthurSt_WJohnWebster_28Sep1953.jpg TAP149_671_Preston_MMTB.jpg TAP150_673_decorated_Preston_MMTB.jpg TAP151_674_PeelSt_DaleBudd_1965.jpg TAP152_674_WJohnWebster_c1953.jpg TAP153_456_PointOrmond_WJohnWebster_c1953.jpg TAP154_679_BuckleySt_LCrow_mid1950s.jpg TAP155_610_MorelandRd_PaulNicholson_22Sep1968.jpg TAP156_610_Preston_MMTB_1930.jpg TAP157_611_Preston_MMTB.jpg TAP158_613_BatmanAve_25Sep1953_WJohnWebster.jpg TAP159_419_Preston_MMTB.jpg TAP160_510_WellingtonPde_PTC_1989.jpgtrams, tramways, transit australia, destination city, tramcars, depots, w class, w1 class, w2 class, w3 class, w4 class, l class, x class, y class, tram 106, tram 102, tram 105, tram 218, tram 610, tram 219, tram 249, tram 275, tram 297, tram 305, tram 306, tram 210, tram 334, tram 336, tram 349, tram 380, tram 426, tram 436, tram 441, tram 449, tram 478, tram 534, tram 536, tram 544, tram 548, tram 573, tram 574, tram 646, tram 658, tram 665, tram 459, tram 460, tram 467, tram 678, tram 679, tram 680, tram 469, tram 610, tram 611, tram 613, tram 104, tram 1024, tram 217, tram 218, tram 280, tram 308, tram 210, tram 681, tram 317, tram 340, tram 364, tram 390, tram 422, tram 426, tram 436, tram 511, tram 514, tram 544, tram 568, tram 660, tram 658, tram 660, tram 665, tram 671, tram 673, tram 674, tram 459, tram 679, tram 610, tram 611, tram 613, tram 419, tram 510 -
 Melbourne Tram Museum
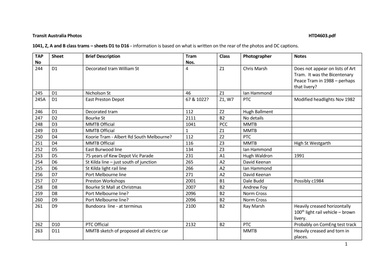
Album - Photo Album, Transit Australia Publishing, "TAP - Part D - 1041, Z, A and B class trams – sheets D1 to D16", 1950's to 1990's
Photo Album - titled "TAP - Part D - 1041, Z, A and B class trams – sheets D1 to D16 ", from Transit Australia Publishing. Photos used in the Destination City and other publications series. For a detailed list of photographs see htd4603i.pdf. For individual photo images see: \dbtext\hawthtramcoll\photo collections\TAP-Part D, images TAP244 to TAP268. TAP244_4-DecoratedTram_WilliamSt_ChrisMarsh_11Feb1989.jpg TAP245a_67-1022_EastPreston_Nov1982_PTC.jpg TAP245_46_NicholsonSt_IanHammond.jpg TAP246_112_BourkeSt_HughBallment_Jan1993.jpg TAP247_2111_BourkeSt.jpg TAP248_1041_MMTB.jpg TAP249_1_MacarthurSt_MMTB.jpg TAP250_112_KooriHeitage_PTC.jpg TAP251_116_HighSt_MMTB.jpg TAP252_134_BurwoodHwy_IanHammond.jpg TAP253_231_VictoriaPde_c1991_HughWaldron.jpg TAP254_265_StKilda-light-rail_DavidKeenan.jpg TAP255_266_StKilda_light-rail_IanHammond.jpg TAP256_271_PortMelbourne_light-rail_DavidKeenan.jpg TAP257_2001_PrestonWorkshops_DaleBudd.jpg TAP258_2007_BourkeSt_AndrewFoy_3Jan1989.jpg TAP259_2096_NormCross.jpg TAP260_2096_NormCross.jpg T AP261_2100_PlentyRd_RayMarsh.jpg TAP262_2132_ComEng_PTC.jpg TAP263_Sketch-all-electric-car-1041_MMTB.jpg TAP264_25_BurwoodHwy.jpg TAP265_233_PrestonWorkshops_PTC.jpg TAP266_267_PortMelbourne_30Oct1988_IanCooperCollection.jpg TAP267_2003_Bundoora_DaleBudd.jpg TAP268_2007_SouthMelbourne_31Oct1988_FritzVanDam.jpgtrams, tramways, transit australia, destination city, tramcars, depots, pcc, z class, a class, b class, tram 4, tram 46, tram 67, tram 1022, tram 112, tram 2111, tram 1041, tram 1, tram 116, tram 134, tram 231, tram 265, tram 266, tram 271, tram 2001, tram 2007, tram 2096, tram 2100, tram 25, tram 233, tram 2003, tram 2007 -
 Melbourne Tram Museum
Negative - Set of 2, Ellis Collection, c1940
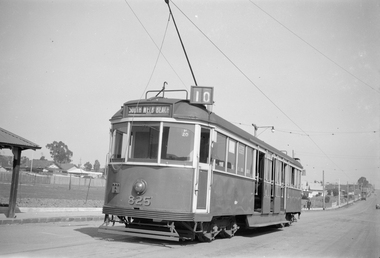
Set of two Negatives (120) of W5 825 at the West Preston Terminus, Gilbert Road, before Regent St. c1940. Note the "T" shaped lights on the tram - these were a red reflector - see page 104 of Destination City 5. Tram has the destination of South Melbourne Beach, route 10 and has a run number of P20 showing. Hi Res image filed in the dbtext/hawthtramcoll/Large Images/htd3606i1 and i2Large.jpgtrams, tramways, west preston, gilbert rd, w5 class, gilbert rd, route 10, tram 825 -
 Melbourne Tram Museum
Negative, Ellis Collection, c1950?
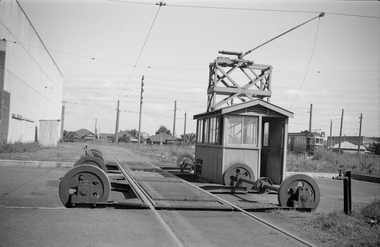
Negative (120) of the traverser that ran between the body shop and paint shop at Preston Workshops. Shows the detail of the cabin and wheel arrangements. In the background is a W2 fitted with a reflective red T lamp. The tram is showing route 9A, Thornbury. Date 1950?trams, tramways, preston workshops, traverser, w2 class -
 Melbourne Tram Museum
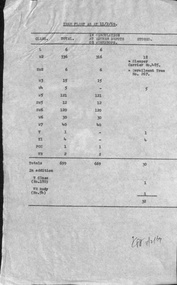
Document - Report, Melbourne & Metropolitan Tramways Board (MMTB), "Tram Fleet as at 11/2/69", 11/02/1969 12:00:00 AM
Single foolscap carbon copy titled "Tram Fleet as at 11/2/69", listing the class, total, in circulation at either depots or workshops and stored. Also lists the body of VR54. At the time 699 cars total, 669 in use 30 stored. Initialled K. T. Hall as Works Manager 11/2/69Various hand written notations by the applicant. stamped "86009" in the top right hand corner.trams, tramways, tramcars, mmtb, lists, stored trams -
 Melbourne Tram Museum
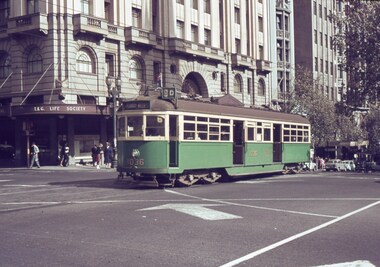
Slide, Keith Caldwell, 25/04/1964 12:00:00 AM
Agfa colour slide, blue / white plastic mount, photo by Keith Caldwell of W7 tram 1036, to Thornbury Miller St, route 9D with the T&G Building in the background. 25/4/1964In ink "SW car 25.4.64 Collins St"trams, tramways, collins st, thornbury, route 9d, w7 class, tram 1036 -
 Melbourne Tram Museum
Slide, Keith Caldwell, 10/03/1966 12:00:00 AM
Agfa colour blue white plastic mount, photo by Keith Caldwell of SW6 861 in Royal Parade Brunswick, about to cross into Sydney Road at Brunswick Road. Tram running a route 19, North Coburg. Has adverts for T&G insurance and Stillwells Ford. In the view are the Bundy clock, with tram stop signage, a steel shelter, a drinking fountain and a statue on the plantation. 10/3/1966In ink "10 iii 66"trams, tramways, sw6 class, north coburg, route 19, sydney rd, brunswick rd, royal parade, bundy clock, shelters, tram 861 -
 Melbourne Tram Museum
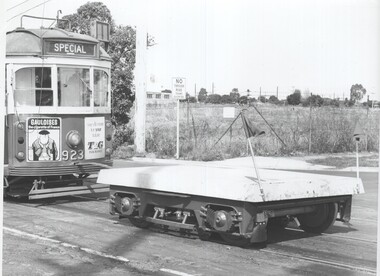
Photograph - Black & White Photograph/s, c1975
Black and White photograph of SW6 923 towing a Z class truck into Miller St tracks alongside Preston Depot - c1975. The truck has a cover over it and has been fitted with two red flags, one of which is bent. The tow bar itself also has a severe bend in it. The tram has adverts for Gauloises cigarettes and T& G Life insurance.trams, tramways, preston workshops, sw6 class, z class, testing, tram 923 -
 Melbourne Tram Museum
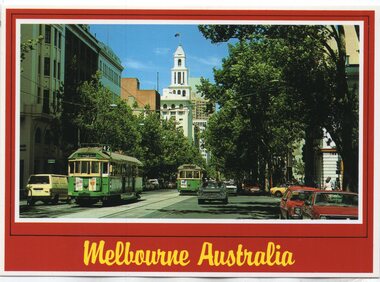
Postcard, Nu-color-Vue, Collins St from Spring St with W2 44, c1980
Colour postcard divided back, red border, - Nu-Color-Vue, looking along Collins St from Spring St with W2 442, route 42 City and SW6 886? route 47 in the view. Has the T&G building in the view. Back has space for name and address, stamp and a message and details of the postcard. Produced by Nu-Color-Vue, early 1980's? - card number 11ML 150 and NCV 937. Has "Melbourne Australia" along the bottom edge.trams, tramways, collins st, w2 class, route 42, route 47, tram 442 -
 Melbourne Tram Museum
Document - Instruction, Public Transport Corporation (PTC), "Operational Guide to Tram Stud Markings", Jul. 1990
Set of two documents involved with stud markings in the roadways for Melbourne tramway operations. .1 - A5 size centre stapled document, 16 pages on white paper plus colour, printed yellow with sketches of a B, W and Z class trams, titled "Operational Guide to Tram Stud Markings". Published by the PTC July 1990. Gives information to drivers on types of studs at facing points, cross overs, shunts, clearance markings, section insulations, H crossings, T light, depot yards, compulsory stops. Has diagrams, and provides details for various classes of trams. 2nd copy added 6-1-2018. .2 - folded A4 sheet printed on gloss white paper, with the same sketch of trams on the top, titled "Summary of Changes and additions to stud markings", published by the PTC.trams, tramways, ptc, tramways, stud marking, drivers, instructions -
 Melbourne Tram Museum
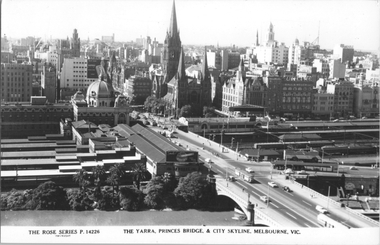
Postcard, Rose Stereograph Co, "The Yarra, Princes Bridge & City Skyline, Melbourne", early 1950s
Rose Series postcard No. P 14226 titled "The Yarra, Princes Bridge & City Skyline, Melbourne", with the Flinders St Station main concourse buildings in the view along with Princes Bridge Station, Batman Ave. Tram terminus, St Paul's Cathedral, Gas and Fuel and Ball and Welch buildings in Flinders Street. There are some 8 trams in the view including several W2 class. There is a Craven A cigarette advertisement on the south end of the station buildings. See also item 8059 for a similar photo. The 1959 extension to the T&G building in Collins Street is well in hand. Yields information about Flinders Railways Station and the Melbourne skyline, late 1950s.Postcard - printed real photograph with Rose Stereograph Co. name on the rear.trams, flinders st station, princes bridge station, st kilda road, swanston st, tramways, w2 class, batman ave, princes bridge -
 Melbourne Tram Museum
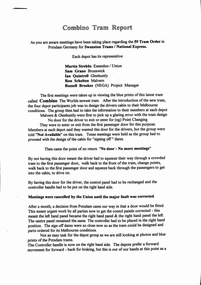
Document - Report, "Combino Tram Report", 2000
Report - two A4 sheets, stapled in the top left hand corner, titled "Combino Tram Report" reporting on the design of the control panel for the Siemens Combino trams and the provision of a front door in the tram and the work involved. Lists those participants involved and their depots.trams, tramways, combino, d class, new trams, siemens -
 Melbourne Tram Museum
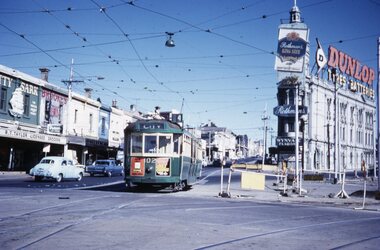
Slide - L 102 St Kilda Junction, Tramway Museum Society of Victoria (TMSV), mid 1960s
Colour slide of L 102, northbound, leaving High Street St Kilda at St Kilda Junction, running a route 4 service. The tram has adverts for Dutor valves and Booses engine oil additive. In the background are R T Taylor licensed grocer, Brookes Bros, the Junction Hotel advertising Rothmans, Dunlop tyres, and Wynvale Flagons. Some roadworks are taking place on the right-hand side.Yields information about St Kilda Junction and tram 102Kodachrome colour slides, cardboard mount, duplicate.Has "MP102" in pencil and stamped "Tramways Museum Society Victoria" on rear.tramways, l class, tram 102, st kilda junction, trams, route 4 -
 Melbourne Tram Museum
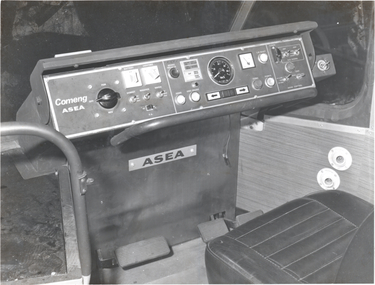
Photograph - Z class tram ASEA controller - set of 3, Melbourne & Metropolitan Tramways Board (MMTB), 1975
Photographs show the ASEA built control equipment of a Z class tram. 1 - Drivers control stand showing the foot pedals and switches with the ASEA and Comeng names on the panel. 2 - the driver's controller with the cover removed showing the various parts and linkages - photographed at the factory. 3 - Tramiac control cabinet with a technician showing one of the components or cards - see item 6140 for more details.Provides information and detail about the Z class driver's control equipment.Set of three black and white photographsHas MMTB stamp and stamp of R T Grigg of NZ. on rear.trams, tramways, new trams, comeng, z class, asea, controllers, mmtb -
 Melbourne Tram Museum
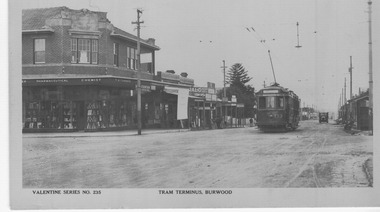
Photograph - Digital Image, Cheryl Grant, MMTB No. 133 at the Burwood terminus, Toorak Road, 2012
Digital image of MMTB No. 133 at the Burwood terminus, Toorak Road (was Norwood Road), mid to late 1930's. Tram has the destination of "Melbourne" On the corner is T. E. Turner Chemist shop. Also a shop advertising the Melbourne Herald. It would appear from the insulators in the overhead, that the line has been duplicated to the terminus (1934 - Melbourne Timeline history book). Image scanned from Valentine Series postcard No. 235, titled "Tram Terminus Burwood" See also Reg Item 42 for a similar photograph and Reg Item 1751 for the use of this photo in an reproduction of a 1938 letter.trams, tramways, burwood, toorak rd, tram 133, p class, mmtb -
 Melbourne Tram Museum
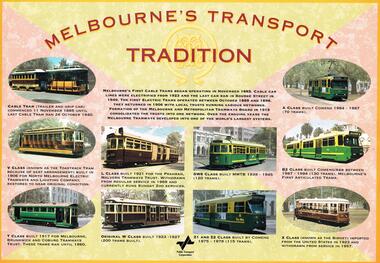
Poster, Public Transport Corporation (PTC), "Melbourne's Transport Tradition", mid 1990s
Poster titled "Melbourne's Transport Tradition" 10 different classes of trams, mid 1990's. Has a short history of Melbourne's tramway system, and notes on each of the tram classes. Printed in colour with the MMTB logo part of the background on the top of the image and the Public Transport Corporation logo in the base of the print. Features cable tram set 1, V2314, T 180, L104, W380, SW6 928, Z15, A254, B2 2112 and X 217. 2nd copy added 28/7/2019 from donation of Bob Wilson - laminated. Copy 1 replaced by a better copy ex Hugh Waldron 3/11/2019. First copy to sales - unlaminated.trams, tramways, posters, melbourne, mmtb, ptc, tram 1 tram 214 tram 104 tram 380 tram 928 tram 15 tram 254 tram 2112 tram 217 tram 180 -
 Melbourne Tram Museum
Photograph - Tram 510? in Collins St, The Age Newspaper, 16-10-1954
Black and white photograph showing possibly W2 class tram No. 510 (Kew Depot, route 47) east bound in Collins St at Exhibition St. Has the T&G building in the background. The photo appeared in The Age centenary supplement on page 22. Yields information about Collins St and tram 510.Photograph with hand written notes on rear.Page 22 in pencil and "Collins Street East 16-10-54, The Age Centenary paper"trams, tramways, tram 510, collins st, w2 class -
 Bacchus Marsh & District Historical Society
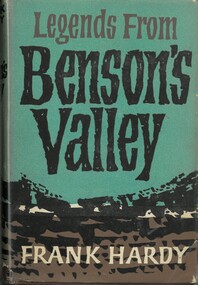
Book, Legends from Bensons Valley
The writer and novelist Frank Hardy spent most of his childhood and early adulthood in Bacchus Marsh. This collection of short stories is inspired by his early years in the town of Bacchus Marsh in the 1930s. The collection contains 13 stories. Many of the these stories depict the poverty and struggles of working class people during the great economic depression of the 1930s. The setting is fictionalized as 'Benson's Valley' but to anyone familiar with the town Bacchus Marsh this location is clearly the setting for these stories and some of the characters are based upon Bacchus Marsh people Hardy knew at the time.Printed book. Hardback. 248 pages. Citation: Hardy, Frank, London, T. Werner Laurie, 1963. BDMHS Location: AR/SU62/SafefictionThe writer and novelist Frank Hardy spent most of his childhood and early adulthood in Bacchus Marsh. This collection of short stories is inspired by his early years in the town of Bacchus Marsh in the 1930s. The collection contains 13 stories. Many of the these stories depict the poverty and struggles of working class people during the great economic depression of the 1930s. The setting is fictionalized as 'Benson's Valley' but to anyone familiar with the town Bacchus Marsh this location is clearly the setting for these stories and some of the characters are based upon Bacchus Marsh people Hardy knew at the time.frank hardy 1917-1994, bacchus marsh writers -
 National Vietnam Veterans Museum (NVVM)
Certificate - Certificate of Recognition
Part of the estate collection of Vietnam veteran Sgt T J Nicholson, Service no: 4410261, who served in 1st Armoured Regiment Vietnam 1969-70.Wooden framed certificate of recognition from the Royal Australian Armoured CorpsRoyal Australian Armoured Corps and insignia certificate of recognition presented to/ Warrant Officer Class two TJB Nicholson/ in recognition of 35 years/ Loyal and Dedicated Service to/ The Royal Australian Armoured Corps/ and the/ Defence Force of Australia/ 4th Nov 1995 number 421.tjb nicholson, royal australian armoured corps, certificate of recognition, nicholson, 1st armoured, t nicholson, trevor nicholson, 4410261 -
 Broadmeadows Historical Society & Museum
Photograph - School Photograph, Jacana Primary School, Jacana Primary School, Broadmeadows, 1984, Grade 2 & 3, 1984
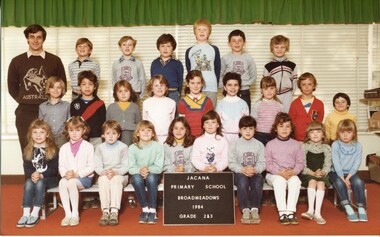
This 1984 photo shows Grades 2 and 3 at Jacana Primary School, once located in Melbourne’s northern suburbs. The school, now closed and demolished, served the local community for decades. This image offers a nostalgic glimpse into a bygone era of local education and childhood in Jacana.This 1984 photograph of Grades 2 and 3 at Jacana Primary School captures a moment in the educational and social history of Melbourne’s northern suburbs. As the school no longer exists, the image holds historical value, preserving the memory of a once-vital community institution and its students.Colour photograph on matte paper.White Label: PH-4471 Blue Label: PH-5189 Brown Label: See attached Sheet 1jacana primary school, education, class photograph, 1984, d. stanton, s. phillips, h. nagten, a. gough, c. hennessy, r. perceval, t. gray, l. ziervogel, s. gibbon, l. bailey, t. narman, b. wehbe, l. manson, d. scarffe, m. tiernan, m. miller, a. andre-janz, t. blythe, t. ponicwaz, i. szuhai, h. alderman, k. muscat, j. cilia, n. urlich, s. paniewaz, grade 2 & 3