Showing 300 items
matching mitchell building
-
 Koorie Heritage Trust
Book, Back to Ravenswood Committee, A Ravenswood Muster, 1972
The story of Ravenswood District has been published to commemorate the centenary of S.S.1113, Ravenswood and to coincide with the Back-to-Ravenswood Celebrations held during May 1972 to mark the occasion. Includes a brief mention of the First People in the beginning of the book. Ravenswood Area, History. Jajaworung, Major Mitchell,[50] p. : ill., map, ports. ; 22 cm.The story of Ravenswood District has been published to commemorate the centenary of S.S.1113, Ravenswood and to coincide with the Back-to-Ravenswood Celebrations held during May 1972 to mark the occasion. Includes a brief mention of the First People in the beginning of the book. Ravenswood Area, History. Jajaworung, Major Mitchell,ravenswood (vic.) -- history. | settlment and contacts - settlers | settlement and contacts - colonisation - 1851 - | djadja wurrung / dyadyawurung / dja dja wrung people (s31/1) (vic sj54-04) -
Koorie Heritage Trust
Book, Berzins, Baiba, The coming of the strangers : life in Australia 1788-1822, 1988
Contents: The coming of The Strangers; The environment & its shapers; The Governors & Their Circle; Staying & leaving ; The Lot of Women; Australia & the World; Australia in 1822. Blurb: The Coming of The Strangers challenges our ideas about the European settlement of Australia. Through a selection of the many document, painting and engravings held in the Mitchell and Dixon collections of the State Library of New South Wales, a picture of life in Australia is reconstructed - spanning the arrival of the First Fleet in 1788 to 1822 when the first generation of white Australians had accepted the continent as their home. Those who left no written records: the Aboriginal people; white women and convicts, have been brought to the foreground to give a balanced perspective of history during the earliest decades of European habitation in Australia. The Coming of The Strangers accompanies a major exhibition being held at the State Library of New South Wales during 1988. In co-ordinating both this book and the exhibition, the Mitchell Librarian, Baiba Berzins brings to public view many letters, journals and works of art that have not been published or displayed for over a century.144 p. : ill. (some col.), facsims., ports. ; 27 cm.Contents: The coming of The Strangers; The environment & its shapers; The Governors & Their Circle; Staying & leaving ; The Lot of Women; Australia & the World; Australia in 1822. Blurb: The Coming of The Strangers challenges our ideas about the European settlement of Australia. Through a selection of the many document, painting and engravings held in the Mitchell and Dixon collections of the State Library of New South Wales, a picture of life in Australia is reconstructed - spanning the arrival of the First Fleet in 1788 to 1822 when the first generation of white Australians had accepted the continent as their home. Those who left no written records: the Aboriginal people; white women and convicts, have been brought to the foreground to give a balanced perspective of history during the earliest decades of European habitation in Australia. The Coming of The Strangers accompanies a major exhibition being held at the State Library of New South Wales during 1988. In co-ordinating both this book and the exhibition, the Mitchell Librarian, Baiba Berzins brings to public view many letters, journals and works of art that have not been published or displayed for over a century.australia -- history -- 1788-1851 -
 Rutherglen Historical Society
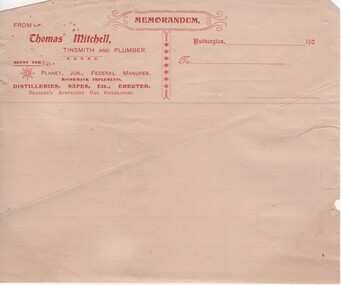
Work on paper - Documents, Memorandum from Thomas Mitchell, Tinsmith and Plumber, 1913 (Approximate)
Part of a collection of business documents found under the floor of a building in Main Street when it was being renovated. At that time the owner was Don Chambers, and the premises was occupied as the Chambers Riteway Supermarket. The location (134 Main Street) is currently (2022) occupied by Miegel’s Pharmacy Rutherglen. Sheet of Thomas Mitchell Tin Smith Headed note paperbusiness documents, thomas mitchell, tinsmith, plumber, 134 main street, chambers riteway supermarket -
 Rutherglen Historical Society
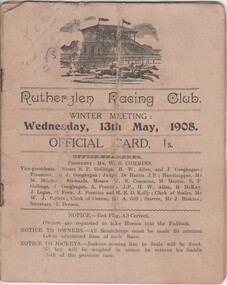
Pamphlet - Offical Race Meeting Card, Thomas Drenen, Rutherglen Racing Club. Winter Meeting: Wednesday, 13th May, 1908, May 1908 (Exact)
Office bearers of the Rutherglen Racing Club: President--Mr W R Commins; Vice-presidents--Messrs S P Gollings, H W Allen and J Geoghegan; Treasurer--Mr J Geoghegan; Judge--Dr Harris J.P.; Handicapper--Mr M Mitchell; Stewards--Messrs W R Commins, M Martin, S P Gollings, J Geoghegan, A Prentice J.P.;H W Allen, H McKay, J Logan, D Frew, J Prentice and H E D Kelly; Clerk of Scales--Mr W J Parlett; Clerk of Course--Mr A Gill; Starter--Mr J Hiskins; Secretary--T Drenen Part of a collection of business documents found under the floor of a building in Main Street when it was being renovated. At that time the owner was Don Chambers, and the premises was occupied as the Chambers Riteway Supermarket. The location (134 Main Street) is currently (2022) occupied by Miegel’s Pharmacy Rutherglen. Horse racing meeting information printed on card.Pencil marks beside some runnersgollings, allen, geoghegan, harris, mitchell, martin, prentice, mckay, logan, frew, kelly, parlett, gill, hiskins, drenen, horse racing, racing, rutherglen racing club, 134 main street, chambers riteway supermarket -
 Ballarat Heritage Services
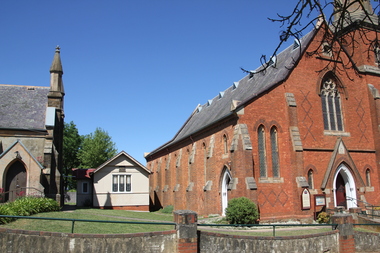
Photograph, Clare Gervasoni, Daylesford Uniting Church, 18/10/2015
A red brick church on stone foundation in Daylesford, a hall, and a former church. The small building at the centre is the John Mitchell Memorial Hall named after a teacher and superintendent from September 1861 to 1921. It was still in existence in August 2024. daylesford uniting church, daylesford methodist church, daylesford -
 Ballarat Heritage Services
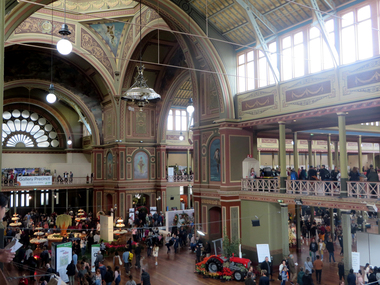
Photograph - Photograph -Colour, Clare Gervasoni, Interior of the Melbourne Exhibition Building, 2019, 31/03/2019
A competition was announced to design a suitable building for the proposed Melbourne International Exhibition in December 1877. Eighteen entries were received. The winner of 300 pounds was Joseph Reed of the architectual firm Reed and Barnes. The foundation stone was laid by Governor Sir George Bowen on 19 February 1879. Prominent Melbounre builder David Mitchell, father of Dame Nellie Melba, won the tender to construct the main building. Exhibitors were able to move in by May 1880. On 01 October 1880 the Melbourne International Exhibition opened, when over 6000 people entered the main hall to see the Governor, the Marquess of Normanby open the show. Thirty three nations participated and ofver 32,000 exhibits were displayed. At the close of the exhibition on 30 April 1881 over 1.3 million people had visited the exhibition. In 1881 Victoria's population was just over 250,000. The management of the Exhibition Building and eight hectares of the Carlton Gardens was handed to the Exhibition Trustees by the Melbourne International Exhibition Commissioners on 01 OCtober 1881. The Trustees maintained the building for 'future public exhibitions and ... general public instruction and recreation' until 1996 when management of the building was transferred to Museum Victoria. In 1901 when the Australian colonies federated there was no capital and no federal parliament building. The Federal Parliament moved into the Victorian State Parliament building, and the State Parliament moved into the Western Annexe of the Exhibition Building for 26 years. After World War One, on 04 February 1919, the exhibition Building was turned into a hospital to treat Melbournians struck down with the Spanis 'Flu'. Initially housing 500 beds, the hospital grew to accomodate 2000 patients. Femals were located between the concert platform in the western nave and the done; male patients occupied the spaces beyond. The basement was used a a morgue. With the departure of the State Parliament in 1927 the western annexe became home to the Country Roads Board. In 1932 it was joined by the MOtor Registration Branch, and the Transport Regulation Board in 1934. They co-existedin cramped offices until the 1960s. In 1949 the oval at the rear of the ExhibitionBuilding was leased to the Commonealth Government for the establishment of the Migrant Reception Centre. When it closed in 1961-62, the centre comrised 29 bungalows over 1.4 hectare. The centre provided temporary accomodation for thousands of new arrivals from Britain. On 01 July 2004 the Royal Exhibition Building and Carlton Gardens were inscribed on the World Heritage List. It is the only 19th century Great Hall to survive largely intact, still in its original landscape setting, and still used as a palace of industry. The Melbourne International Flower and Garden Show is a flower show held annually since 1995 in early April each year, in Melbourne, Australia. It is located in the World Heritage Site of Carlton Gardens and the Royal Exhibition Building.[1] It is the largest horticultural event in the southern hemisphere, attracting over 100,000 visitors. It is rated among the top five flower and garden shows in the world. (Wikipedia)Colour photograph of the interior of the Melbourne Exhibition Buildings during the 2019 Melbourne Flower and Garden Show.melbourne international flower and garden show, carlton gardens, melbourne exhibition building, royal exhibition buildings -
 Ballarat Heritage Services
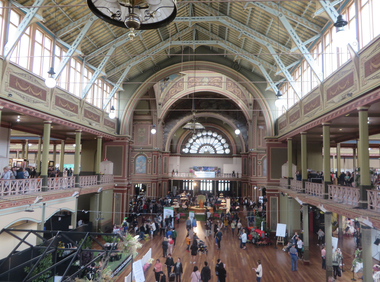
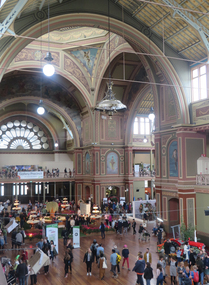
Photograph -Colour, Clare Gervasoni, Interior of the Melbourne Exhibition Building, 2019, 31/03/2019
A competition was announced to design a suitable building for the proposed Melbourne International Exhibition in December 1877. Eighteen entries were received. The winner of 300 pounds was Joseph Reed of the architectual firm Reed and Barnes. The foundation stone was laid by Governor Sir George Bowen on 19 February 1879. Prominent Melbounre builder David Mitchell, father of Dame Nellie Melba, won the tender to construct the main building. Exhibitors were able to move in by May 1880. On 01 October 1880 the Melbourne International Exhibition opened, when over 6000 people entered the main hall to see the Governor, the Marquess of Normanby open the show. Thirty three nations participated and ofver 32,000 exhibits were displayed. At the close of the exhibition on 30 April 1881 over 1.3 million people had visited the exhibition. In 1881 Victoria's population was just over 250,000. The management of the Exhibition Building and eight hectares of the Carlton Gardens was handed to the Exhibition Trustees by the Melbourne International Exhibition Commissioners on 01 OCtober 1881. The Trustees maintained the building for 'future public exhibitions and ... general public instruction and recreation' until 1996 when management of the building was transferred to Museum Victoria. In 1901 when the Australian colonies federated there was no capital and no federal parliament building. The Federal Parliament moved into the Victorian State Parliament building, and the State Parliament moved into the Western Annexe of the Exhibition Building for 26 years. After World War One, on 04 February 1919, the exhibition Building was turned into a hospital to treat Melbournians struck down with the Spanis 'Flu'. Initially housing 500 beds, the hospital grew to accomodate 2000 patients. Femals were located between the concert platform in the western nave and the done; male patients occupied the spaces beyond. The basement was used a a morgue. With the departure of the State Parliament in 1927 the western annexe became home to the Country Roads Board. In 1932 it was joined by the MOtor Registration Branch, and the Transport Regulation Board in 1934. They co-existedin cramped offices until the 1960s. In 1949 the oval at the rear of the ExhibitionBuilding was leased to the Commonealth Government for the establishment of the Migrant Reception Centre. When it closed in 1961-62, the centre comrised 29 bungalows over 1.4 hectare. The centre provided temporary accomodation for thousands of new arrivals from Britain. On 01 July 2004 the Royal Exhibition Building and Carlton Gardens were inscribed on the World Heritage List. It is the only 19th century Great Hall to survive largely intact, still in its original landscape setting, and still used as a palace of industry. The Melbourne International Flower and Garden Show is a flower show held annually since 1995 in early April each year, in Melbourne, Australia. It is located in the World Heritage Site of Carlton Gardens and the Royal Exhibition Building.[1] It is the largest horticultural event in the southern hemisphere, attracting over 100,000 visitors. It is rated among the top five flower and garden shows in the world. (Wikipedia)Colour photograph of the interior of the Melbourne Exhibition Buildings during the 2019 Melbourne Flower and Garden Show. Four mottoes are painted under teh windows of the dome: Dei Grecia (By the grace of God), Carpe diem (Make the most of the day), Aude sapere (Dare to be wise) and Benigno numine (With benighn power)melbourne international flower and garden show, carlton gardens, melbourne exhibition building, royal exhibition buildings -
 Ballarat Heritage Services
Photograph - Photograph -Colour, Clare Gervasoni, Interior of the Melbourne Exhibition Building, 2019, 31/03/2019
A competition was announced to design a suitable building for the proposed Melbourne International Exhibition in December 1877. Eighteen entries were received. The winner of 300 pounds was Joseph Reed of the architectual firm Reed and Barnes. The foundation stone was laid by Governor Sir George Bowen on 19 February 1879. Prominent Melbounre builder David Mitchell, father of Dame Nellie Melba, won the tender to construct the main building. Exhibitors were able to move in by May 1880. On 01 October 1880 the Melbourne International Exhibition opened, when over 6000 people entered the main hall to see the Governor, the Marquess of Normanby open the show. Thirty three nations participated and ofver 32,000 exhibits were displayed. At the close of the exhibition on 30 April 1881 over 1.3 million people had visited the exhibition. In 1881 Victoria's population was just over 250,000. The management of the Exhibition Building and eight hectares of the Carlton Gardens was handed to the Exhibition Trustees by the Melbourne International Exhibition Commissioners on 01 OCtober 1881. The Trustees maintained the building for 'future public exhibitions and ... general public instruction and recreation' until 1996 when management of the building was transferred to Museum Victoria. In 1901 when the Australian colonies federated there was no capital and no federal parliament building. The Federal Parliament moved into the Victorian State Parliament building, and the State Parliament moved into the Western Annexe of the Exhibition Building for 26 years. After World War One, on 04 February 1919, the exhibition Building was turned into a hospital to treat Melbournians struck down with the Spanis 'Flu'. Initially housing 500 beds, the hospital grew to accomodate 2000 patients. Femals were located between the concert platform in the western nave and the done; male patients occupied the spaces beyond. The basement was used a a morgue. With the departure of the State Parliament in 1927 the western annexe became home to the Country Roads Board. In 1932 it was joined by the MOtor Registration Branch, and the Transport Regulation Board in 1934. They co-existedin cramped offices until the 1960s. In 1949 the oval at the rear of the ExhibitionBuilding was leased to the Commonealth Government for the establishment of the Migrant Reception Centre. When it closed in 1961-62, the centre comrised 29 bungalows over 1.4 hectare. The centre provided temporary accomodation for thousands of new arrivals from Britain. On 01 July 2004 the Royal Exhibition Building and Carlton Gardens were inscribed on the World Heritage List. It is the only 19th century Great Hall to survive largely intact, still in its original landscape setting, and still used as a palace of industry. The Melbourne International Flower and Garden Show is a flower show held annually since 1995 in early April each year, in Melbourne, Australia. It is located in the World Heritage Site of Carlton Gardens and the Royal Exhibition Building.[1] It is the largest horticultural event in the southern hemisphere, attracting over 100,000 visitors. It is rated among the top five flower and garden shows in the world. (Wikipedia)Colour photograph of the interior of the Melbourne Exhibition Buildings during the 2019 Melbourne Flower and Garden Show. Four mottoes are painted under teh windows of the dome: Dei Grecia (By the grace of God), Carpe diem (Make the most of the day), Aude sapere (Dare to be wise) and Benigno numine (With benighn power)melbourne international flower and garden show, carlton gardens, melbourne exhibition building, royal exhibition buildings -
 City of Ballarat Libraries
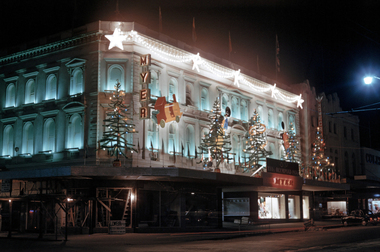
35mm Slide, Christmas Decorations, Myer Store, corner Sturt Street and Armstrong St Ballarat circa 1956
The Myer store, at the south west corner of Armstrong and Sturt Streets, with the 'new' cantilevered verandah (and evidently still some building renovations happening). This building has had many tenants and occupiers, but has always been a department store, originally constructed 1869-71 for R.J. Mitchell. The architect was noted Ballarat architect H.R.Caselli. A replica of the 1901 verandah was built in the late 1980s. Mrs Bon Strange and her husband Bert were well known Ballarat residents. When Mrs Strange died some years ago, her extensive slide collection was sorted through and those relevant to Ballarat were gifted to the Ballarat Library. sturt street, myer store, christmas lights, christmas decorations, verandahs, ballarat, olympic games -
 RMIT Design Archives
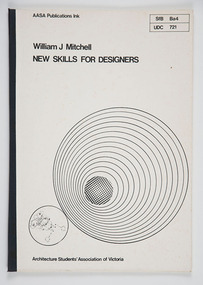
Books, New Skills for Designers
Book was produced for the seminar "New Skills for Designers", October 4 1968, in Melbourne, Australia. First published by William J. Mitchell as honours thesis for B.Arch (Hons) Melbourne University.ink, paper -
 Numurkah & District Historical Society
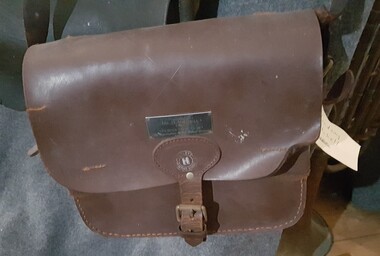
Various items from Mitchell family (see list)
This ammunition bag was used by Harry Mitchell (son of Lindsay Mitchell) at the Bendigo Rifle Club in 1959, the bag was designed to hold 303 riffle bullets used in target shooting or could hold 7 cartridges for a shotgun. The Gladstone bag was very popular in the 1940/50 era, it fitted on the handlebars of a bicycle and it was used by footballers and sportsmen. A couple bottles of beer would fit comfortably in the bag and was.used to take beer home after the hotels closed at 6pm. These two articles were donated by Lindsay Mitchell to the Numurkah Historical Society. The Sunbeam Mixmaster belonged by Marjory Welch, Nana of Margaret Mitchell and would have been used in late 1930 and during 1940's. It was painted and used by Linda Mitchell, (great great grand daughter) when at universitv in 1987 White Sunbeam Mixmaster was purchased by Margaret Mitchell 1965. lt was her first mixmaster after she was married in 1964 The bread bins. The green and white belonged to Mary Mitchell (Lindsay Mitchell's Mother) The colourful bread bin belonged to Lorna Welch (Margaret Mitchell's Mother) 1 x Ammunition bag, (1950's), 1 x Gladstone bag (1950's), 2 x tin bread bins, 1 x White Coloured Sunbeam Mixmaster (1965) , 1 x Cream-coloured Sunbeam Mixmaster (1940's), 1 x Red Fly-spray can (1950's)mitchell family, gladstone bag, mixmaster, school bag, bread bin, kitchen, ammunition bag, sunbeam, flysprayer -
 Numurkah & District Historical Society
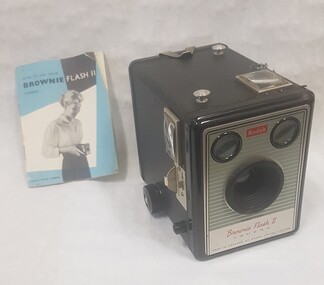
Equipment - Box Camera
Owned by local, Margaret MitchellKodak Brownie Flash II Camera - box shape, black vinyl covering, with silver, grey front. Front has glass lens & 2 viewfinders. Back is hinged. Instruction Booklet includedFront of Camera: Kodak, Kodet Lens, Brownie Flash II Camera, Made in England by Kodak Ltd London photography, camera, box camera, brownie, kodak -
 Ballarat Tramway Museum
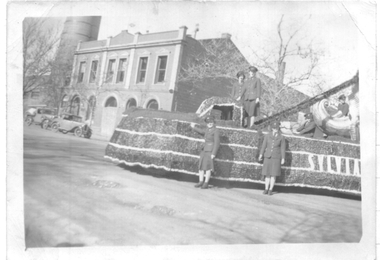
Photograph - Black & white - SEC Procession float, 1944
Photo of the decorated or motorised float used in a fund raising event for Mrs Sylvia Mitchel. Has a number of the conductresses standing alongside or atop the float. In the background is the SEC Ballarat Office building. Has the word "Sylvia" on one side of the float.Yields information about the SEC fund raising float for Sylvia Mitchell.Black and white printed photo with ruled or lined paper on rear.Old SEC building corner of Ripon St and Wendouree Pde.most popular conductress, sylvia mitchell, conductor, conductress, tramways, sec, red cross -
 Ballarat Tramway Museum
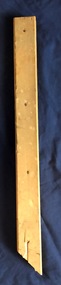
Functional Object - Electrical conduit, 21/01/2018 12:00:00 AM
... . See Early Electrical wiring systems in American buildings - L... in American buildings - L. D. Mitchell Functional Object Electrical ...Yields information about the materials and the methods of installing electrical domestic cables in Ballarat houses during the 1920's.Section of timber or wooden electrical conduit used in houses c1920, to contain wires for electrical lamps and fittings. Consists of a timber base (very light softwood - ??) with two slots that was nailed to a wall and after the cable installed a cover strip applied. Has one end mitred or cut at 45 degrees. See Early Electrical wiring systems in American buildings - L. D. Mitchelltrams, tramways, esco, electrical equipment, house extensions, houses, electricity -
 Ballarat Tramway Museum
Photograph - Black & White Photograph/s, Lee A Ratten, late 1940's to early to mid 1950's
Black and white photograph of Bendigo 12 in possibly Mitchell St. Photograph, late 1940's to early to mid 1950's, Destination not able to be read. Has a building with the word "Gas" in the background. Photo possibly Lee A Ratten - see related document and Reg Item 7185.trams, tramways, bendigo, mitchell st, tram 12 -
 Ballarat Tramway Museum
Photograph - Black & White Photograph/s, Lee A Ratten, 6/06/1928 12:00:00 AM
Black and white photograph of Bendigo No. 9 Pall Mall 6/6/1928 at the intersection with Mitchell St, Charing Cross with the City Club Hotel in the background. Behind No. 9 is No. 12 or 18? No. 9 has a roof advertisement for Lyric Lightning. On the left hand side is a horse drawn cart and shows a verandah on the building on the North East corner of the intersection. On the rear of copy 1 has the photo stamp of Lee A Ratten of 51 Cotham Road Kew. On the second print is a hand written note which matches the writing of Lee Ratten. trams, tramways, bendigo, pall mall, charing cross, tram 9 -
 Ballarat Tramway Museum
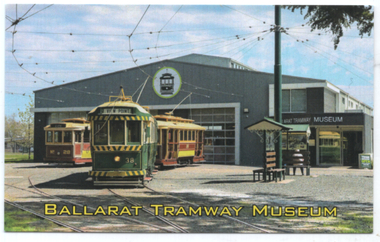
Ephemera - Membership Card/s, Ballarat Tramway Museum (BTM), Oct. 2023
Membership cards are issued to members and feature either a historic or current photo of the Museum's activities. The 2023-24 one features a photo of three trams on the depot fan outside the New Museum building led by tram 38 with trams 26 and 28. On the rear along the bottom edge of the rear, has the words "Photo Benjamin Boehle-Mitchell"Demonstrates the method of issuing Ballarat Tramway Museum membership cards.Colour photograph printed onto white card as a BTM Membership card for 2023-24trams, tramways, membership cards, buildings, museum, btm, new depot, tram 38, tram 28, tram 26 -
 Ballarat Tramway Museum
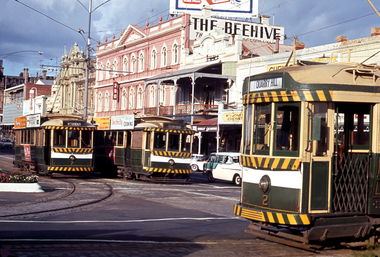
Photograph - Digital image, John Ward, 22/03/1970 12:00:00 AM
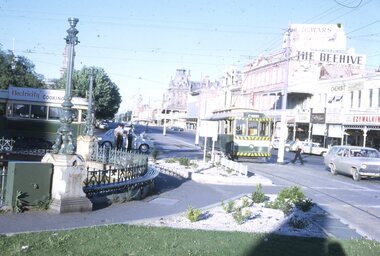
Digital image of three Bendigo trams at Charing Cross. Trams 7 (North Bendigo), 21 (Golden Square) and 2 (Quarry Hill). Has the Beehive building in the background, along with sings for 3BO, Myer, Amor gowns and Wm I Jones Chemist. The trams have some SEC Roof adverts. Photo by John Ward 22 March 1970. Slide title "00757 220370 SEC single truck trams 7 & 21 Pall Mall bogie tram 2 Mitchell St Charing Cross Bendigo Vic"trams, tramways, bendigo, charing cross, pall mall, mitchell st, tram 7, tram 21, tram 2 -
 Ballarat Tramway Museum
Slide - 35mm slide/s - set of 5, Noel Simons, 19/11/1962 12:00:00 AM
Set of 5 transparencies taken on 19/11/1962 on Kodak mounts. 1186.1 - Bendigo 21 bound for Golden Square at Charing Cross with The Beehive buildings and shops in Pall Mall in the background. Trams has an ad for Cohns drinks on front bumper, SEC Best for Cooking roof ad. and Mamouney's furniture roof ad. Two women passengers boarding. 1186.2 - Bendigo 26 crossing Pall Mall from Mitchell St. bound for Eaglehawk with "Ezywalkin" shop in background. Tram has an SEC 'Electric Cooking' roof ad and a 'Streets Ice cream' ad on front dash. 1186.3 - Bendigo 7 arriving at the Charing Cross stop, bound for North Bendigo. Has a Huttons dash panel ad, a Castrol roof ad. Buildings as for 1186.1. Passengers waiting at the stop. 1186.4 - Bendigo 19 leaving Charing Cross for Golden Square with City Club Hotel alongside and other buildings as for 1186.1 in the background. Tram has Briquettes ad on front dash and SEC 'Electric Cooking' roof ad. 1186.5 - Bendigo 21in High St. at corner of Short St. heading for Charing Cross. Destination half way between Depot and Railway Station. Tram has ads for Cohns Drinks on dash panel, SEC 'Cook with Electricity' and a Sandhurst Milk roof ads.Information written on in black ink and date stamped in purple ink. 1186.1 - "No. 21 in Pall Mall at Charing Cross, Bendigo" 1186.2 - "No. 26 arriving at Alexandra Fountain, Charing Cross, Bendigo" 1186.3 - "No. 7 in Pall Mall at Charing Cross, Bendigo" 1186.4 - "No. 19 in High St., Bendigo, leaving Charing Cross for Golden Square" 1186.5 - "No. 21 in High St. Bendigo, at corner of Short St." tramways, trams, bendigo, charing cross, pall mall, high st., tram 7, tram 19, tram 21, tram 26 -
 Ballarat Tramway Museum
Slide - 35mm slide/s - set of 17, Noel Simons, 20/11/1962 12:00:00 AM
Set of 17 transparencies taken on 20/11/1962 on Kodak mounts. 1187.1 - Bendigo No. 2 at the Quarry Hill terminus, showing destination of Quarry Hill. Has Cohns Drinks and Streets Ice Cream ads on dash panel, a SEC 'electric cooking' roof ad and another roof ad. Shows the Y terminus at this location, but tram standing just before it. Overhead in position. 1187.2 - as above, but closer up. 1187.3 - as above, but from the north side, showing cemetery in the background. 1187.4 - Bendigo No.3 at Eaglehawk terminus. Tram showing destination of Quarry Hill. Has the various buildings at Eaglehawk in the background including the Foodland store. Has Streets Ice cream and White Horse Whiskey ads on the dash panel. 1187.5 - Bendigo No. 18 at Garden Gully crossing loop, in bound, with destination of Eaglehawk. Passengers waiting for an Eaglehawk tram at the stop. Has a white horse whiskey ad on dash panel and SEC roof ads. Conductor standing in doorway looking out. 1187.6 - Bendigo No. 7 inbound in Nolan St. at cnr of McCrae St. showing destination of Golden Square. Has Streets Ice cream ad on dash panel and a Castrol Roof ad. 1187.7 - Bendigo No. 19 at the North Bendigo terminus with railway level crossing in background. Tram has a Cohns Drinks ad and an SEC 'Electric Cooking' roof ad. 1187.8 - Bendigo No. 2 at the Quarry Hill terminus, looking back into Bendigo, showing destination of Eaglehawk. 1187.9 - Bendigo No. 21 in McCrae St, near Nolan St outbound for North Bendigo. Photo taken after tram has passed photographer. 1187.10 - Bendigo Nos. 4 and 26 at Charing Cross in View St. with fountain alongside and the Beehive, Ezywalkin Buildings in the background. No. 26 has a Sandhurst Milk and SEC 'Electric Cooking' roof ad. 1187.11 - close up of 22E maximum traction truck and folded footstep. 1187.12 - Bendigo No. 19 at Charing Cross terminus, after tram has passed photographer, showing destination of North Bendigo, with the Beehive building in the background and passengers boarding tram. 1187.13 - Bendigo No. 11, turning from View St. into Pall Mall, showing Special with the conductor holding point bar. Has the Beehive and Ezywalkin Buildings in the background. 1187.14 - No. 7 at Charing Cross terminus, in Pall Mall, bound for Golden Square. Has the Beehive and Ezywalkin buildings in the background and passengers waiting at the tram stop. 1187.15 - No. 18 at the Charing Cross terminus, bound for Eaglehawk. Has the Beehive and Ezywalkin buildings in the background and passengers waiting at the tram stop. Also has the 'Safety Zone' sign in the photograph. 1187.16 - No. 2 at Quarry Hill terminus, night or dusk photo. Tram showing destination of Depot. 1187.17 - No. 26 at Charing Cross, night photo. Tram has destination of Quarry Hill, but is on the line for Eaglehawk. Photo looks along Mitchell St. Also shows Safety Zone sign. Information written on in black ink and date stamped on purple ink. 1187.1 - "No. 2 at Quarry Hill terminus Bendigo" 1187.2 - "No. 2 at Quarry Hill terminus Bendigo" 1187.3 - "No. 2 at Quarry Hill terminus Bendigo" 1187.4 - "No. 3 at Eaglehawk terminus" 1187.5 - "No. 18 in Mt Korong Road, Long Gully at cnr of Havilah Road (Eaglehawk Route)" 1187.6 - "No. 7 in Nolan St. Bendigo, at Cnr of McCrae St., near lake Weeroona, (North Bendigo Route)' 1187.7 - "No. 19 at North Bendigo terminus" 1187.8 - "No. 2 at Quarry Hill terminus" 1187.9 - "No. 21 in McCrae St. Bendigo, near Nolan St. (North Bendigo Route) 1187.10 - "4 and 26 at Alexandra Fountain, Charing Cross Bendigo" 1187.11 - "Truck of Bogie Car, Bendigo Tramways" 1187.12 - "No. 19 in Pall Mall at Charing Cross, Bendigo" 1187.13 - "Birney car No. 11 entering Pall Mall from View St. at Charing Cross Bendigo" 1187.14 - "No. 7 in Pall Mall at Charing Cross, Bendigo" 1187.15 - "No. 18 at Alexandra Fountain, Charing Cross, Bendigo" 1187.16 - "No. 2 at Quarry Hill terminus, Bendigo" 1187.17 - "No. 26 at Alexandra Fountain, Charing Cross, Bendigo" tramways, trams, bendigo, quarry hill, eaglehawk, north bendigo, maximum traction, night photo, tram 2, tram 3, tram 4, tram 7, tram 11, tram 18, tram 19, tram 21, tram 26 -
 Ballarat Tramway Museum
Slide - 35mm slide/s, Noel Simons, 21/11/1962 12:00:00 AM
Set of 6 transparencies taken on 21/11/1962 on Kodak mounts. 1189.1 - Bendigo No.11 at Quarry Hill terminus. Photo taken looking in along the route. Tram has destination of North Bendigo. 1189.2 - No. 21 in Pall Mall bound for North Bendigo. Tram has roof ads for Mamouney's furniture and SEC. In the background are the National Bank building, Dad and Dave's Cafe and the Beehive Buildings and the London Pharmacy. 1189.3 - No. 2 in Mitchell St, just after crossing over railway bridge. Photo taken after tram has passed photographer. Has what appears to be an SEC road works crew in the background. Has destination of Quarry Hill. 1189.4 - No. 17 climbing Mitchell St. on the start of the single track section, just before crossing the railway bridge. Has destination of Quarry Hill and the large Maples building sign in the background. 1189.5 - as for 1189.4 but after tram has passed photographer. Has an Ilford film roof ad and an SEC roof ad. Railway bridge in the background. 1189.6 - No. 21 at Charing Cross with passengers boarding. Tram has destination of North Bendigo and roof ads for SEC 'Electric Cooking' and Sandhurst Milk. In background are the buildings on the south side of High St. Also has a SEC worker in white overalls sweeping the track.Information written on in black ink and date stamped on purple ink. 1189.1 - "Birney car No. 11 in High St. Bendigo at Golden Square terminus" 1189.2 - "No. 21 in Pall Mall Bendigo near Charing Cross" 1189.3 - "No. 2 in Mitchell St. Bendigo, just after crossing bridge over railway line (Quarry Hill route)" 1189.4 - "No. 17 in Mitchell St. Bendigo, climbing the hill the bridge over the railway line. (Quarry Hill route)" 1189.5 - "No. 17 in Mitchell St., Bendigo approaching bridge over Railway line (Quarry Hill route)" 1189.6 - "No. 21 at Charing Cross, Bendigo"tramways, trams, bendigo, golden square, pall mall, mitchell st., quarry hill, tram 2, tram 11, tram 17, tram 21 -
 Ballarat Tramway Museum
Slide - 35mm slide/s - set of 8, Noel Simons, 25/02/1972 12:00:00 AM
Set of 8 transparencies taken on 25/02/72 on Kodak mounts. 1202.1 - Night photo of Bendigo 5 at Charing Cross, waiting to depart to Quarry Hill. Tram has two SEC roof ads. Has Ezywalkin and the Beehive buildings in the background. 1202.2 - as for 1202.1 1202.3 - as for 1202.1 but further back and 7 and 21 waiting for their runs as well in Pall Mall. 1202.4 - 5 and 2 at Charing Cross, night photo, looking along Mitchell St. with Fountain Plaza on right of photo and Ezywalkin store. 1202.5 - No. 2 at Charing cross, bound for Eaglehawk. Tram has two SEC ads. 1202.6 - No. 26 at Quarry Hill terminus with the cemetery in the background. Tram has two SEC roof ads. 1202.7 - No. 26 in Mitchell St. bound for Eaglehawk, at Wills St. with the Hopetoun Hotel in the background. 1202.8 - as for 1202.6Information written on in blue ink and date stamped on purple ink. 1202.1 - "No. 5 at Charing Cross" 1202.2 - "No 5. at Charing Cross" 1202.3 - "Nos. 7, 21 and 5 at Charing Cross" 1202.4 - "Nos. 5 and 2 at Charing Cross" 1202.5 - "No. 2 at Charing Cross" 1202.6 - "No. 26 at Quarry Hill" 1202.7 - "No. 26 in Mitchell St. opposite Wills St." 1202.8 - "No. 26 at Quarry Hill" tramways, trams, bendigo, night photo, charing cross, quarry hill, mitchell st., tram 2, tram 5, tram 7, tram 21, tram 26 -
 Ballarat Tramway Museum
Slide - 35mm slide/s - set of 23, Noel Simons, 26/02/1972 12:00:00 AM
Set of 23 transparencies taken on 26/2/1972 on Kodak mounts. 1205.1 - Bendigo No. 25 on a special tour at Fire Station Loop, en route to Golden Square. 1205.2 - No. 21 and 25 crossing at Fire Station Loop, note photographers on the ground. No. 21 bound for North Bendigo. 1205.3 - as for 1205.3, but with trams departing loop and fire station in the background. 1205.4 - No. 25 at Golden Square Hotel with 'Rodda's Golden Square Hotel' in the background. Tram on a special tour, but showing destination of North Bendigo. 1205.5 - as for 1205.4 - but showing special. Has the end of the track in the photograph. 1205.6 - Nos. 7 and 25 (on a special tour) crossing at Myrtle St. Loop. 1205.7 - No. 7 leaving Myrtle St. loop with the mine poppet head in the background. Photo taken after tram has passed photographer. (Print made of this slide 10/2001 for use in the Gold Gold Gold exhibition of 10/2001 - See Reg. item 1979. 1205.8 - No. 25 entering depot. Tram showing 'special'. Tennis court on right has players. Photo taken after tram has passed photographer. 1205.9 - No. 24 (showing 'special') and No. 20 (showing 'Long Gully') at Bendigo Depot. 1205.10 - No. 24 on a special charter, leaving Bendigo depot. Tram has two 'Johnnie Walker' roof ads. 1205.11 - Bendigo depot with 29, 25 and a bogie car inside the depot doors. 1205.12 - As for 1205.11, but with 28 and 29. 1205.13 - No. 24 standing at front entrance of Bendigo depot with No. 20 in the background. 1205.14 - No. 24 running out into McCrae St showing special, with conductor on front step. 1205.15 - No. 24 in Caledonia St. at corner of Thunder St with the Gasworks in the background. 1205.16 - No. 5 en route for Quarry Hill at Charing cross with No. 26 (en route for Eaglehawk) about to arrive. Has former crossover at this location in the foreground. Has the Ezywalkin building in the background. 1205.17 - No. 5 and 26 at Charing Cross, with the Alexandra Fountain in the foreground and the Beehive and Ezywalkin buildings in the background. No.26 has two SEC roof ads. 1205.18 - Charing Cross looking along Pall Mall with trams 7 and 21 and 26 in the picture. 1205.19 - Charing Cross, with 21 departing for Golden Square and No. 5 heading for Quarry Hill. Has the Ezywalkin and the Beehive buildings in the background. 1205.20 - as for 1205.19, but a few moments later. Adjacent pole has a "NO ROAD" letter in reflectors vertically. 1205.21 - Charing Cross with Nos. 25, 21, 26 and 7, looking south from Pall Mall end. 1205.22 - No. 24 crossing Mitchell St. en route for Golden Square, showing 'special' with the Beehive and Ezywalkin buildings in the background. 1205.23 - Charing Cross with Nos. 24, 21 and 7 in the photo and Fountain Plaza in the background. Print of 1205.7 - stored in box D1.Information written on in blue ink and date stamped on purple ink. 1205.1 - "No. 25 at Fire Station Loop High Street, Golden Square." 1205.2 - "Nos. 25 and 21 crossing at Fire Station Loop, near Golden Square." 1205.3 - "Nos. 25 and 21 crossing at Fire Station Loop, near Golden Square." 1205.4 - "No. 25 at Golden Square terminus." 1205.5 - "No. 25 at Golden Square terminus." 1205.6 - "Nos. 7 and 25 crossing at Myrtle St. Loop." 1205.7 - "No. 7 leaving Myrtle St. Loop." 1205.8 - "No 25, entering Bendigo Depot." 1205.9 - "Nos. 20 and 24 at Bendigo Depot." 1205.10 - "No. 24 at Bendigo Depot." 1205.11 - "Nos. 25 and 29 at Bendigo Depot." 1205.12 - "Birney cars 29 and 28 at Bendigo Depot." 1205.13 - "No. 24 (with 20 beyond) at Bendigo Depot." 1205.14 - "No. 24 entering McCrae St. from Arnold St." 1204.15 - "No. 24 in Caledonia St. at cnr of Thunder St." 1204.16 - "No. 5 waits at Charing Cross as No. 26 arrives from Quarry Hill. Note remains of crossover abandoned on relocation in 1965." 1204.17 - "Nos. 5 and 26 at Charing Cross." 1204.18 - "Nos. 26, 7 and 21 at Charing Cross (No. 5 just visible behind No. 26)." 1204.19 - "No. 21 leaves Charing Cross for Golden Square as No. 5 starts off for Quarry Hill." 1204.20 - "No. 21 swings onto the single track Golden Square line as No. 5 heads into Mitchell St. towards Quarry Hill." 1204.21 - "Nos. 25, 21 and 26 watch No. 7 arrive at Charing Cross from Golden Square." 1204.22 - "No. 24 at Charing Cross crossing Mitchell St." 1204.23 - "Nos. 24, 21 and 7 at Charing Cross."tramways, trams, bendigo, golden square, myrtle st., fire station, depot, charing cross, tram 5, tram 7, tram 20, tram 21, tram 24, tram 25, tram 28, tram 29 -
 Ballarat Tramway Museum
Slide - 35mm slide/s - set of 12, Noel Simons, 28 Feb. 1972
Set of 12 transparencies taken on 28/2/1972 on Kodak mounts. 1207.1 - Bendigo 26 and 2 at Charing Cross. 26 en route for Eaglehawk, 2 for Quarry Hill. Has the Colonial Mutual Life, Armstrong Tyre Service, and Australian Mutual Provident Society buildings and a Cohns Drinks ad. in the background. 1207.2 - as for 1207.1 but with Alexandra fountain in the foreground. 1207.3 - No. 2 in Mitchell St. heading for Quarry Hill. Photo taken after tram has passed photographer. Has buildings on either side of Mitchell St. in the background, including the Plaza Theatre. 1207.4 - No. 6 en route for Golden Square departing Charing Cross. Has the RACV and ANZ bank in the background. 1207.5 - No. 2 crossing Pall Mall to enter Charing Cross ex Quarry Hill, with the Fountain Plaza in the background. 1207.6 - No. 6 arriving Charing Cross ex Golden Square with No. 21 alongside. No. 21 has the SEC ad. 'Everything's fine in my all electric kitchen.' Has the City Family Hotel and the Fountain Plaza shopping centre in the background. 1207.7 - No. 5 at Charing Cross en route for Quarry Hill with No. 2 behind. No. 2 has two SEC roof ads, 'Everything s fine in my all electric kitchen' and 'Electricity best for cooking'. RACV building in the background. Tram crews are discussing the day in the front of the tram. 1207. 8 - No. 21 in High St. Bendigo with the Cathedral in the background. No. 21 has two SEC roof ads, 'Everything's fine in my all electric kitchen' and 'Electricity best for cooking'. 1207.9 - No. 6 in High St. Bendigo with the Cathedral in the background. 1207.10 - No. 6 in High St. Bendigo, just past Wattle St. Photo taken after the tram has passed the photographer from within the Highway Car Sales yard. 1207.11 - No. 26 bound for Eaglehawk at the end of the double track in View St., note signal contactors, tram stop and section signs mounted on pole. 1207.12 - No. 26 turning from View St. into Barnard St.Information written on in blue ink and date stamped on purple ink. 1207. 1- "Nos. 26 and 2 at Charing Cross." 1207.2 - "Nos. 26 and 2 at Charing Cross." 1207.3 - "No. 2 in Mitchell St. just after leaving Charing Cross." 1207.4 - "No.6 leaving Charing Cross for Golden Square." 1207.5 - "No. 2 arriving at Charing Cross from Quarry Hill." 1207.6 - "No. 21 waits at Charing Cross as No. 6 arrives from Golden Square." 1207.7 - "No 5 at Charing Cross with No. 2 lurking behind." 1207.8 - "No. 21 in High St. at cnr of Wattle St." 1207.9 - "No. 6 in High St. at cnr of Wattle St." 1207.10 - "No. 6 in High St. between Wattle and Vine Sts." 1207.11 - "No. 26 at end of double track in View St. near Barnard. St. 1207.12 - "No. 26 seen at dusk turning from View St. into Barnard St."tramways, trams, bendigo, charing cross, high st, view st., tram 2, tram 5, tram 6, tram 21, tram 26 -
 Ballarat Tramway Museum
Slide - 35mm slide/s set of 7, Noel Simons, 1972
Set of 7 transparencies undated on PAKON mounts - appear to be early 1970's. 1212.1 - No. 18 about to enter the Long Gully loop with ESSO service station on the right hand side. 1212.2 - No. 6 in Mitchell Street bound for Charing Cross. Tram has destination of "Rly Station". Has buildings on the east side of Mitchell St. in the background. 1212.3 - No. 7 (North Bendigo) and 29 (Golden Square) crossing. Actual location? 1212.4 - "No 6 showing 'SPECIAL' at Eaglehawk terminus. Has the Foodland store and Fruit shop in the background. 1212.5 - No. 19 at Eaglehawk terminus, on the extension to the normal Eaglehawk terminus. Tram has showing 'Eaglehawk'. Tram has two SEC roof ads. 1212.6 - No. 25 and another Bogie car at Quarry Hill terminus on last day. 1212.7 - No. 18 and 29 at Quarry Hill terminus. No.. 18 showing 'Quarry Hill' - has two SEC roof ads 'Electric Cooking - Matchless' and 'Everything's fine in my all electric kitchen' and No. 29 has a briquettes roof ad.Information typed onto a white label stuck on the slide. 1212.1 - "No. 18 at Long Gully" 1212.2 - "No. 6 in Mitchell Street." 1212.3 - "7 and 29 Lake View Hotel" 1212.4 - "No. 6 at Eaglehawk" 1212.5 - "No. 19 at Eaglehawk Term." 1212.6 - "Last cars Quarry Hill." 1212.7 - "18 & 29 Quarry Hill"tramways, trams, bendigo, long gully, mitchell st., eaglehawk, quarry hill, last tram, tram 6, tram 7, tram 18, tram 19, tram 25, tram 29 -
 Ballarat Tramway Museum
Photograph - Colour Photograph/s, 23/11/1962 12:00:00 AM
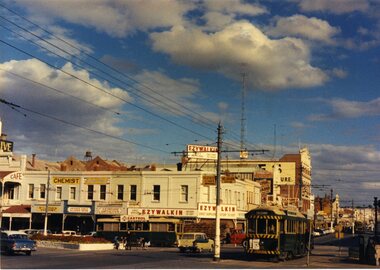
Colour postcard size print of SEC Bendigo trams 26 and a single trucker at Charing Cross with Mitchell St. in the background. Photo dated 21.11.1962. Printed on AGFA paper. Both trams fitted with dash canopy lighting, but no large white strip under the driver's windows. 26 showing destination of "Eaglehawk" with two SEC ads and another ad on the front dash panel. Single trucker has a Castrol ad on the roof. In the background are various buildings along the east side of Pall Mall and along Mitchell St. Pole by the front of 26 has directional signs "Melbourne" and "Heathcote / Echuca". On rear top left hand corner "21.11.62" in very wavy handwriting typical of an aged person.bendigo, pall mall, charing cross, tram 26 -
 Ballarat Tramway Museum
Photograph - Colour Photograph/s, 1960's
Colour postcard size print of an SEC Bendigo trams 7 and 21 at Charing Cross. Printed on AGFA paper. Photo taken during last years of Bendigo. Trams have dash canopy lighting and large white strip under the driver's windows. Tram 21 showing "North Bendigo" and 7 showing "Golden Square" destinations. Photo has Cenotaph, fountain and buildings on the south east corner of Mitchell St and Pall Mall in background.bendigo, pall mall, charing cross, tram 7, tram 21 -
 Ballarat Tramway Museum
Photograph - Colour Photograph/s, 21/11/1962 12:00:00 AM
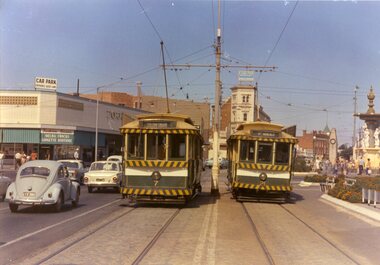
Colour print of Bendigo SECV Bendigo trams 2 and 4 at Charing Cross. On Kodacolor paper with a Kodak red ink stamp on rear. Trams have dash canopy lights, but no large white strip under the drivers windows. Photo dated 21.11.1962. Buildings on corner of Pall Mall and Mitchell St in background. Both trams fitted with roof ads and dash canopy ads - White Horse Whiskey. Shows "safety zone" arrangements. No. 2 has destination of "Quarry Hill" while 4 has destination of "Eaglehawk". Has a number of passengers boarding trams. Note "PYE" name on radio tower mast.On rear top left hand corner "2 and 4 / 21.11.62" in very wavy handwriting, typical of an aged person.charing cross, bendigo, mitchell st., safety zone, tram 2, tram 4 -
 Ballarat Tramway Museum
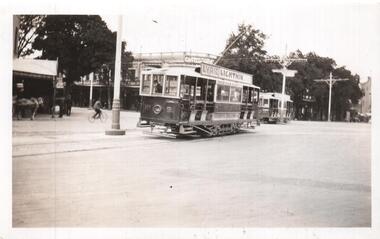
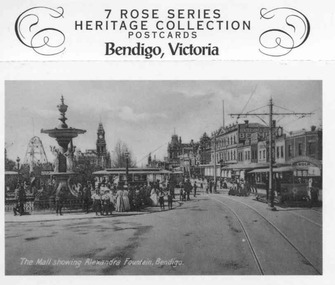
Postcard - Folder set, Rose Stereograph Co, "7 Rose Series Heritage Collection Postcards - Bendigo Victoria", c1990
Set of seven Rose Series Heritage postcards in a strip production featuring Bendigo Victoria. Each black and white postcard features an historic view of Bendigo from older Rose Series or Valentine's postcards and are perforated on the top and bottom so they can be separately used. On the rear of each card are areas for address, stamps, title, Rose logo and copyright note. Each card has been given a new Rose Series Number. On the top of the set of cards is a short history profile on the Rose Stereograph Co. 1. Photo of the Mall showing two ESCo trams, and the Alexandra Fountain with a third tram in the background c1908. Rose series Number 2764. Photo supplied by Rod Aikman - see image btm1662i1. 2. Photo of mining operations , c1900. Rose series Number 2765. Photo supplied by Rod Aikman 3. Image of Pall Mall, Law courts and Post office building. Rose series Number 2766. Photo supplied by Rod Aikman. Was Rose Series P3213. 4. Photo of Mitchell St. looking west from Pall Mall with fountain on right and two ESCo trams c1906.Rose series Number 2767. Photo supplied by Rod Aikman - see image btm1662i2. 5. Photo of Alexandra Fountain - was Valentine Series No. 1393 c1920's. - now Rose Series 2768. 6. Photo of Chinese Dragon "Loong", now Rose Series 2769 c1950 - was P2846. 7. Photo of Williamson Street Bendigo, showing Shamrock Hotel c1920- now Rose Series 2770 - was Valentine's M5710. trams, tramways, bendigo, pall mall, esco, mitchell st. -
 Ballarat Tramway Museum
Slide - 35mm slide/s, Peter Moses, Jan. 1969
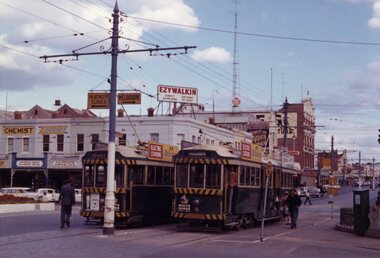
Photo of SEC Bendigo No. 6 crossing Mitchell St, north bound for North Bendigo, while a bogie tram waits to depart Charing Cross, east bound for Quarry Hill. Three SEC crew members standing by the front of the bogie tram and an inspector crossing the road near No. 6. Has part of the fountain in the view. Also in the photo are The Beehive building, and advertisement for Dewars whiskey and a shop front for "Ezywalkin" shoes. The bogie tram has a SEC roof advertisement "Electricity Best for cooking". Kodak cardboard mount slide, taken by Peter Moses, Jan. 1969.On the rear of the slide "Jan. 1969 Bendigo:" in blue ink, "P. Moses" in black ink and other side of the slide in red ink “22”.tramways, trams, bendigo, charing cross, tram 6