Showing 316 items
matching north geelong
-
 Ballarat Tramway Museum
Photograph - Black & White Photograph/s, 1954
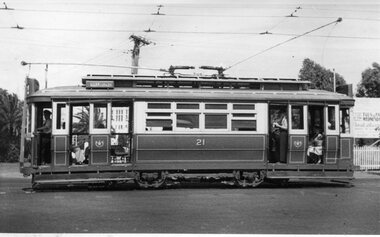
Yields information about the appearance of Geelong 21 and the crews operating it on a hot summers day.Black and white photograph of Geelong No. 21, side on view, inbound to the city area with the destination of Belmont. Shows the crews in shirt sleeves, the blinds drawn and the length of the tram with its two trolley poles. Photo by an unknown photographer, 1954. Dave O'Neil confirmed June 30/2009, the tram is travelling from North to Belmont, lost likely at Mercer and Railway Terrace. Entrance to the goods yard is at the rear of the tram, and Gordon institute can been seen through the front entrance. See Related documents.In pencil on the rear 1954.tramways, trams, geelong, crews, railway station, tram 21 -
 Ballarat Tramway Museum
Photograph - B&W print of donated negative, John Webster, mid 1950's
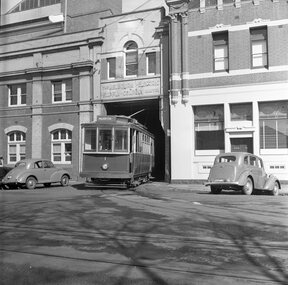
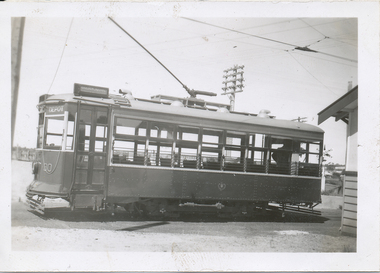
Yields information about Geelong Depot and tramcar No. 1, Yields information about Geelong Depot and tramcar No. 1Black and white digital print from scan of a donated negative showing Geelong No. 1 leaving the Geelong depot entrance with a number of motors cars on either side with the Melbourne Electric Supply Company logo above the doorway. The tram has the destination of North. Photographed by John Webster given the markings on the side of the negative, early 1950's. Black and White print made from scan of negative. Original Negative stored with Negatives. Negative scanned at hi res 2/6/2020 and image updated.On left hand side of the negative in ink is "EH35".tramways, trams, geelong, depot, tram 1 -
 Ballarat Tramway Museum
Photograph - Black & White Photograph/s, 1955 or 1956
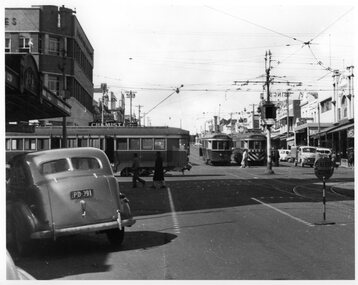
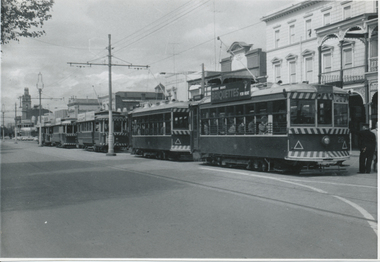
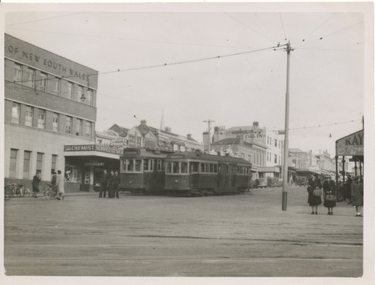
Black and white photograph of three Geelong bogie trams at the intersection of Moorabool and Ryrie Streets. Tram No. 33 in Moorabool St. has the destination of Belmont, while the adjacent tram has the destination of North. The third tram is eastbound in Ryrie St. Note Safety zone signs, the bar traffic lights. See also Reg. item 2799 for a subsequent photograph. In the background is the Bank of New South Wales building. Two copies held.tramways, trams, geelong, moorabool st, ryrie st, traffic lights, safety zone, tram 33 -
 Ballarat Tramway Museum
Photograph - Black & White Photograph/s, 1955 or 1956
Black and white photograph of two Geelong bogie trams at the intersection of Moorabool and Ryrie Streets and Pengelly tram No. 17 turning into Moorabool St. See Reg. Item 2798 for a photograph just taken prior to this one. Tram No. 33 in Moorabool St. has the destination of Belmont, while the adjacent tram has the destination of North. The third tram is eastbound in Ryrie St. Note Safety zone signs, the bar traffic lights. In the background is Kays bakery. tramways, trams, geelong, moorabool st, ryrie st, traffic lights, safety zone, tram 33, tram 17 -
 Ballarat Tramway Museum
Photograph - Black & White Photograph/s - set of 2, late 1920's, early 1930's
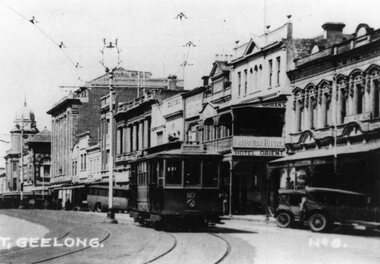
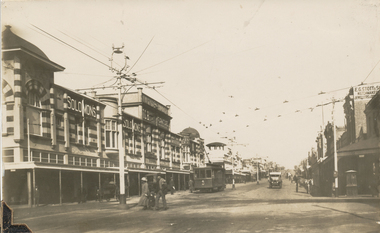
Yields information about the appearance of Geelong's Birney trams during the 1940's.Black and White Photograph of Geelong No. 10, Malop St, travelling north west to the railway station, during the late 1920s, between Gheringhap and Moorabool St. Tram has the destination of "Station", with the National Mutual, Moran's Hotel Orient in the background. Melbourne Bitter advertisement on the hotel. A number of soft top cars parked in the street. Photo probably from a postcard, has the words "T. Geelong. No. 8" along part of the bottom edge. Photo from the Peter Duckett Collection. For a close up of the tram itself see Reg Item 5822. 4335.1 - Black and White print contained within the Wal Jack Bendigo and Geelong Album, see Reg Item 5003 for more details. Added 7/8/2013. This item is the larger image of the two.On rear, stamped in black ink "Photo supplied from P.W. Duckett Collection, All Rights Reserved, 69 Howitt Rd. Nth Caulfield 3161." In hand writing on the rear "47)" in top left hand corner. In the body of the photograph "Malop St travelling NW to Station, between Gheringhap and Moorabool Sts." 4335.1 - in ink on rear. "Geelong No. 10 Original Condition, photo about 1930" and "Please Return"trams, tramways, geelong, malop st, mesco, tram 10 -
 Ballarat Tramway Museum
Newspaper, The Courier Ballarat, Ballarat Tramways run at a loss, 1940's to 1950's
Yields information about the Ballarat Tramway losses during the 1940's and for 1954.Page of five newspaper clippings from The Courier, pasted to a single foolscap lined page. 1 - "Ballarat Tramways Run at Loss" - reporting on the SEC Annual Report in 1954, and the loss on the operation of the Ballarat Tramways. 2 - "Tramway Revenue Up" - 1941 - 1842 - reporting on the SEC report to Parliament the previous day - losses in all three systems and track extension in Bendigo to North Bendigo. 3 - "Provincial Tramway Losses Higher" - 1948-1949 - reporting on the SEC losses on the tramways and electricity customer numbers in the Ballarat area. 4 -"SEC Tramways Losses L16,406", undated. 5 - "Ballarat Trams return small surplus" - Geelong and Bendigo lost money, tramway capital now virtually written off. Contained within Reg Item 5507 - Foolscap binder with green covers, black binding edge and metal clips. sec, funding, annual reports -
 Ballarat Tramway Museum
Photograph - Black & White Photograph/s, mid 1950's
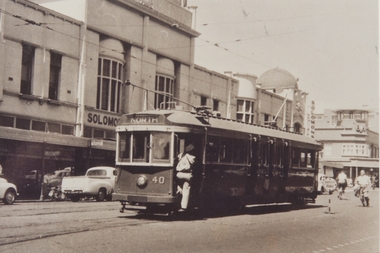
Black and white print of Geelong No. 40, in Moorabool St, just south of Malop St. with the destination of North. Appears the driver is board the tram. Has the Solomons building in the background and a small safety zone stop portable sign alongside the tram. Photo mid 1950's. Printed on AGFA paper.On rear in ink PMTT=MMTB E40 = Geelong 40 = Ball 43"trams, tramways, geelong, moorabool st, tram 40 -
 Ballarat Tramway Museum
Postcard, Rose Stereograph Co, The Rose Series, P10423 - Bendigo
Black and White postcard contained within the Wal Jack Bendigo and Geelong Album, see Reg Item 5003 for more details. The Rose Series, P10423, pasted into the album, of the Mall Bendigo, looking north, titled "The Mall Bendigo", has an ESCo tram in the photos. c1940's? Has the Shamrock hotel in the background. trams, tramways, bendigo, esco, mall, tram 16, tram 13 -
 Ballarat Tramway Museum
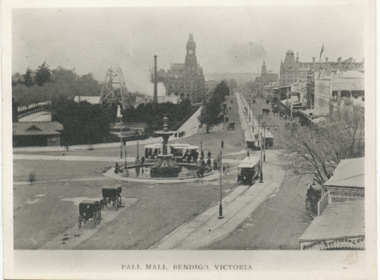
Photograph - Black & White Photograph/s, Pall Mall Bendigo Victoria, c1905
Copy print of a postcard, of Charing Cross looking north along the Pall Mall, with three electric trams at the cross and possibly one small trailer. Titled "Pall Mall Bendigo Victoria". Probably made soon after the tramway opened given the street colours. Photograph contained within the Wal Jack Bendigo and Geelong Album, see Reg Item 5003 for more details and loose copy.Black and White copy print and printed card - cigarette card size.trams, tramways, bendigo, esco, charing cross -
 Ballarat Tramway Museum
Photograph - Black & White Photograph/s, Wal Jack, 10/04/1950 12:00:00 AM
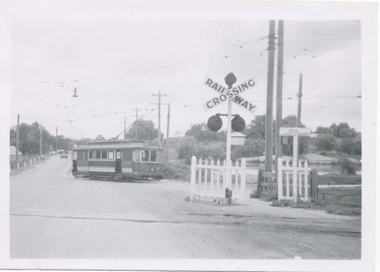
Black and White print contained within the Wal Jack Bendigo and Geelong Album, see Reg Item 5003 for more details. Photo of No. 21 departing from the North Bendigo terminus, 10-4-1950, turning in to Thunder St. Has the level crossing flashing lights in the foreground. i1 - scan of print in the album i2 - rear of image i3 - scan of negative at 3200dpi added 6/6/2020. On rear in ink "No. 21 at North Bendigo, Thunder St, level crossing 10-4-50" and in bottom right hand corner "W. Jack".trams, tramways, bendigo, north bendigo, thunder st, level crossings, tram 21 -
 Ballarat Tramway Museum
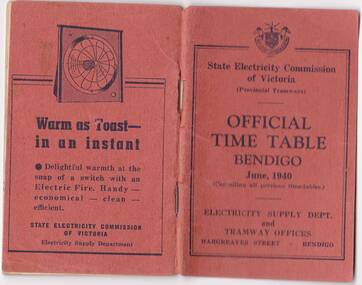
Photograph - Digital image, State Electricity Commission of Victoria (SECV), "Official Timetable Bendigo June 1940"
Yields information about the Bendigo Tram services.Digital image or copy of the SEC "Official Timetable Bendigo June 1940", 22 image files - 44 pages, giving details of the fares, transfers, luggage or parcels, lost property, times of each tram on the Quarry Hill, Eaglehawk, Lake Weeroona and Golden Square for both directions and Monday to Thursday, Friday, Saturday and Sunday. Has a number of advertisements for SEC home equipment, cookers, toasters, refrigerator, electric radiators and hot water. In the middle page is a map of the Tramway Routes, which has been hand drawn to shown North Bendigo and the depot location. Inside the rear cover, on a sheet headed "Memorandum" is a photograph, taped in of a conductor loading a pram onto a Birney tram. Under the photograph is in ink "Len Smith (Geelong)" See item3127 for an original copy and pdf scan. trams, tramways, bendigo, timetables -
 Ballarat Tramway Museum
Photograph - Digital image, Wal Jack, ESCo 6 in Macarthur St, 1930's?
Photograph of ESCo No. 6 at the Drummond St North terminus in Macarthur St. Has a shop for H.J. Symons in the background. Tram has advertisements for Suttons, Ballarat, Melbourne, Bendigo, Geelong and Sydney and an ad for "DAD" on the front dash panel. Original Printed on matt paper.Yields information about ESCo trams in the 1920's or 1930's and Macarthur St. area.Digital image from the Wal Jack Ballarat Album.trams, tramways, esco, drummond st nth, macarthur st, tram 6 -
 Ballarat Tramway Museum
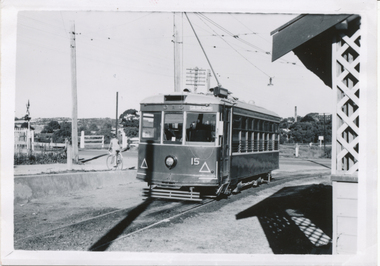
Photograph - Black & White Photograph/s, Wal Jack, 12/04/1950 12:00:00 AM
Black and White print contained within the Wal Jack Bendigo and Geelong Album, see Reg Item 5003 for more details. Photo of Bendigo Birney No.15 at North Bendigo, Photo Wal Jack, with the destination of Golden Square - 12-4-1959. Has the level crossing and rail line in the background and part of the tram stop shelter. i1 - scan of print in the album i2 - rear of image i3 - scan of negative at 3200dpi added 6/6/2020. On the rear in black ink "SEC Bendigo, No. 15 at Nth Bendigo 12-4-1959. Has the Wal Jack copyright stamp in the top right corner with the number "T219" written in.trams, tramways, bendigo, north bendigo, level crossings, birney, tram 15 -
 Ballarat Tramway Museum
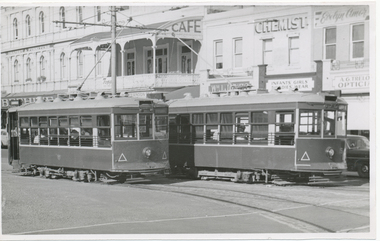
Photograph - Black & White Photograph/s, Wal Jack, 12/04/1959 12:00:00 AM
Black and White print contained within the Wal Jack Bendigo and Geelong Album, see Reg Item 5003 for more details. Photo of Bendigo Birney No. 29 and 15 in Pall Mall, near Charing Cross, 12-4-1959, Photo by Wal Jack. Has in the background, The Beehive buildings, Jopp? Cafe, Wm Jones building, Chemist, and A.G. Trello? Opticians. i1 - scan of print in the album i2 - rear of image i3 - scan of negative at 3200dpi added 6/6/2020. On the rear in black ink "SEC Bendigo #29 (left) for North Bendigo, and 15 (right) for Golden Square, photographed from #28, at Pall Mall 3.40pm, Sun 12th April 1959", in bottom left hand corner "Wal Jack Photo"trams, tramways, bendigo, pall mall, charing cross, birney, tram 15, tram 29 -
 Ballarat Tramway Museum
Photograph - Black & White Photograph/s, Leon Marshall Wood, 29/12/1947 12:00:00 AM
Black and White print contained within the Wal Jack Bendigo and Geelong Album, see Reg Item 5003 for more details. Photo of Bendigo Birney No.30 at North Bendigo, Photo Leon Marshall Wood, with the destination of Golden Square - 29-12-1947. Has the level crossing and rail line in the background and part of the tram stop shelter. On the rear in black ink "SEC of Victoria Bendigo, ex Geelong "Birney" car No. 30 Nth Bendigo terminus. In the bottom left hand corner "29.12.1947" The Leon Marshall Wood stamp in green ink and the number "SEC 15" written in.trams, tramways, bendigo, north bendigo, level crossings, birney, tram 30 -
 Ballarat Tramway Museum
Photograph - Black & White Photograph/s, c1950
Black and White print contained within the Wal Jack Bendigo and Geelong Album, see Reg Item 5003 for more details. Photo of Bendigo Birney No. 30 leaving North Bendigo terminus, crossing Thunder St with the level crossing in the foreground. Photo c1950. On rear in ink "SEC B"trams, tramways, bendigo, birney, north bendigo, level crossings, tram 30 -
 Ballarat Tramway Museum
Photograph - Black & White Photograph/s, Wal Jack, 3/01/1954 12:00:00 AM
Black and White print contained within the Wal Jack Bendigo and Geelong Album, see Reg Item 5003 for more details. Photo of Bendigo Birney No. 28 in Pall Mall opposite near Post Office, Photo by Wal Jack, 3-1-54. In the background are shops for: Suttons Furniture, McKenna's, Hume & Iser Dispensary, and Gestetner Sales and Service. On the rear in blue ink "SEC Bendigo Birney No. 28 Birney ex North opposite Post Office 3-1-54" with Wal Jack copyright stamp in the top right hand corner and the number "T214" written in.trams, tramways, bendigo, pall mall, birney, tram 28 -
 Ballarat Tramway Museum
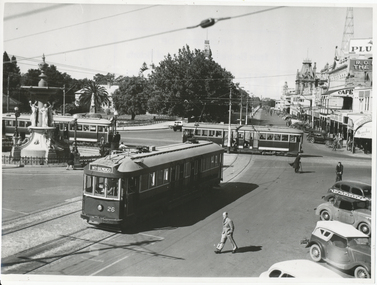
Photograph - Black & White Photograph/s, State Electricity Commission of Victoria (SECV), late 1940's
Black and White print contained within the Wal Jack Bendigo and Geelong Album, see Reg Item 5003 for more details. Photo of the Charing Cross with three bogie trams at the intersection, SEC publicity photo c1950. Two of the bogies crossing on the Eaglehawk - Quarry Hill line have white or cream strips on the lower edge of the body. No 26 has the destination of North Bendigo, though it is on Golden Square line with the driver standing just inside the doorway. In the background is the fountain, the Gardens and Pall Mall. SEC Publicity Photo, see Inscriptions for notes re photo. On the rear is the SEC Publicity Photo stamp, with negative number 21.1 written in, "Yallourn" in pencil and a typed piece of paper taped to the rear of the photo noting the Provincial tramways owned by the SEC, but that it is loss making.trams, tramways, bendigo, charing cross, secv, pall mall, tram 26 -
 Ballarat Tramway Museum
Photograph - Black & White Photograph/s - set of 7, Keith Kings, 20/10/1962 12:00:00 AM
Black and White print contained within the Wal Jack Bendigo and Geelong Album, see Reg Item 5003 for more details. Set of seven images of the ARHS Special tour of Bendigo on 20-10-1962. .1 - Trams 28, 30, 21, 7 and 19 in Pall Mall .2 - 18, 26, 29, 11 and 5 at the Bridge St loop on the North Bendigo line. .3 - 28, 30, 21, 7, 19 on "down" line and 18, 26, 29, 11, 5 and service car 3 on "up" line, View St Opposite Oval .4 - 28, 30, 21, 7, and 19 at Eaglehawk .5 - 28, 30, 21 in North Bendigo siding and 7 and 9 in Thunder St - photo taken in Thunder St. .6 - ditto photo taking from vacant land on the south side of the terminus, along with No. 6 the service tram. .7 - 28, 30, 21, 7, 19 in View St with Goodyear and Caltex signs in the photo and the Commercial Banking Company of Australia building in the background. Most printed on Ilford paper.On rear in ink. .1 - "28, 30, 21, 7, 19 Pall Mall 20-10-62" .2 - "Bendigo ARHS Convoy "A" on Bridge St loop, Nos. 18, 26, 29, 11, 5 20/10/62" with Keith Kings copy right stamp printed in top right hand corner and number "N(y)(12)" written in. .3 - "18, 26, 29, 11, 5 and service car 3 on "up" line, 28, 30, 21, 7, 19 on "down" View St 20-8-62" .4 - "28, 30, 21, 7, and 19 Eaglehawk 20-10-62" .5 - "19, 7 in, 28, 30, 21 in spur siding Nth Bendigo 20/10/62" .6 - "28, 30, 21, 7, 19 plus No. 6 service car Nth B/go 20/10/62" .7 - "Bendigo ARHS Convoy "B" - 28, 30, 21, 7, 19 Charing Cross, 20/10/62" with Keith Kings copy right stamp printed in top right hand corner and number "N(y)(14)" written in.trams, tramways, bendigo, arhs, tours, eaglehawk, north bendigo, view st, tram 28, tram 30, tram 21, tram 7, tram 19, tram 6, tram 18, tram 26, tram 29, tram 11, tram 3 -
 Ballarat Tramway Museum
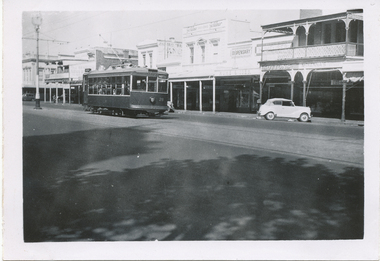
Photograph - Black & White Photograph/s, c1928
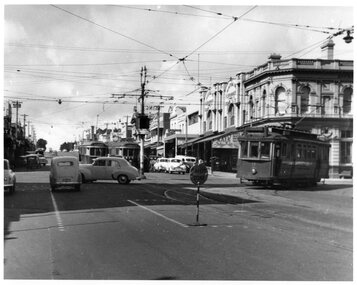
Black and White copy print contained within the Wal Jack Bendigo and Geelong Album, see Reg Item 5003 for more details. View of the intersection of Moorabool St and Malop St, photo from the North East corner. No. 4 MESCo, about 1928, heading south. Tram has the destination of Newtown. Solomons and E.G. Stott Jewellers and watchmakers buildings in the photo. Note the fire alarm, and letter box on the corner (right hand side of photo) Not known who made print. on rear in pencil "Newtown destination"trams, tramways, geelong, mesco, malop st, moorabool st, tram 4 -
 Ballarat Tramway Museum
Photograph - Black & White Photograph/s, Keith Kings, 31/07/1955 12:00:00 AM
Black and White print contained within the Wal Jack Bendigo and Geelong Album, see Reg Item 5003 for more details. Photo of Geelong No. 4 painted with zebra stripes north bound in Moorabool St. Keith notes it has been fitted with dash canopy lights. 31/7/1955. Photo by Keith Kings. On rear in ink - in top right hand corner, the Keith Kings copyright stamp with number P(b)(2) written in. "Geelong No. 4 "Zebra" painted ends, with canopy. On single truck car thus. 31/7/55".trams, tramways, geelong, moorabool st, tram 4 -
 Ballarat Tramway Museum
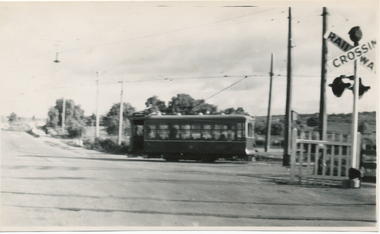
Photograph - Black & White Photograph/s, Wal Jack, 29/07/1943 12:00:00 AM
Black and White print contained within the Wal Jack Bendigo and Geelong Album, see Reg Item 5003 for more details. Photo of No. 18 at the Belmont terminus 29 July 1943. Tram has the destination of North. i1 - scan of print in the album i2 - rear of image i3 - scan of negative at 3200dpi added 18/6/2020. Has written in ink on the rear "SEC Geelong Tramways, No. 18. Belmont terminus 29-7-1943"trams, tramways, geelong, belmont, tram 18 -
 Ballarat Tramway Museum
Photograph - Black & White Photograph/s, Wal Jack, c1940
Black and White print contained within the Wal Jack Bendigo and Geelong Album, see Reg Item 5003 for more details. Photo of 26 in Moorabool St, Geelong. Tram has the destination of North. Printed on Kodak Velox paper. No date given, but c1940. In the background is building for W. T. Wiggs Pty Ltd sports store, F. G. H Ritchie Queensland Insurance and Berger's Paints On rear in ink "Geelong Tramways No. 26, Ex M&MTB made into 1 man car, 3 in service 24, 25, 26"trams, tramways, geelong, moorabool st, tram 26 -
 Ballarat Tramway Museum
Photograph - Black & White Photograph/s, Wal Jack, May. 1949
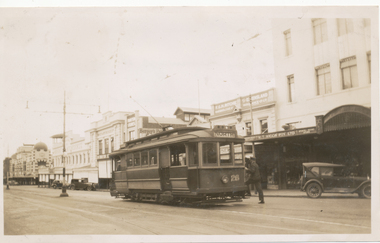
Black and White print contained within the Wal Jack Bendigo and Geelong Album, see Reg Item 5003 for more details. Photo of Car No. 32 and single trucker 22, Moorabool St. No. 32 has the destination of North, No. 22 Belmont. In the background is the Bank of New South Wales, Geelong Nursery Nook, McGills, Hotel Cullen. Photo May 1949. No details on photographer though there is an initial on the photograph. i1 - scan of print in the album i2 - rear of image i3 - scan of negative at 3200dpi added 27/6/2020.On rear in pencil "Geelong May 1949, 32 and 22 new and old, 8 wheeler and 4 wheeler, North & Belmont, Coming and Going / Moorabool St / Ryrie St in the foreground."trams, tramways, geelong, ryrie st, moorabool st, bogie trams, tram 32, tram 22 -
 Ballarat Tramway Museum
Photograph - Black & White Photograph/s - set of 6, Keith Kings, 8/01/1956 12:00:00 AM
... - Geelong - 6 - last tram at North terminus, Sun 4/3/56 - T(b)(6 ...Black and White print contained within the Wal Jack Bendigo and Geelong Album, see Reg Item 5003 for more details. Set of six black and white photographs from Keith Kings of the staged closures of the Geelong tramways. Note some of these photographs are very similar to those of Geoff Grant - See Reg Item 485 and 476i7. .1 - No. 18 last tram to East, leaving city - 8/1/1956 - KSK Photo Q(x)(6) .2 - No. 7, last tram at West at terminus - 8/1/1956 - KSK Photo Q(x)(7) - has a group of people standing in front of the tramcar. .3 - No. 6 - last tram at North terminus, with a very large group of people in front of tram. Tram has the destination of North. 4/3/1956 - KSK Photo T(b)(6). .4 - No. 18 - last tram at Newtown terminus, with a very large group of people in front of tram. Tram has the destination of Newtown. 22/1/1956 - KSK Photo R(y)(3). .5 - No. 19, last tram to Eastern Park, at terminus on second last trip, with conductor on front step. 22/1/56, KSK Photo R(y)(2). Tram has the destination of Eastern Park. .6 - No. 1 - last regular tram from Beach to Chilwell, leaving Beach terminus - KSK Photo Q(x)(5).On the rear in ink and with the Keith Kings Copyright stamp: .1 - Geelong - 18 last tam to East leaving city, Sun 8/1/56 - Q(x)(6) .2 - Geelong - 7 - last tram at West at terminus, Sun 8/1/56 - Q(x)(7) .3 - Geelong - 6 - last tram at North terminus, Sun 4/3/56 - T(b)(6) .4 - Geelong - 18 - last tram at Newtown terminus, Sun 22/1/56 - R(y)(3) .5 - Geelong - 19 - last tram to Eastern Park, at terminus on second last trip - Sun 22/1/56 - R(y)(2) .6 - 1 - last regular tram from Beach to Chilwell, leaving Beach terminus, Sun 8/1/56 - Q(x)(5)trams, tramways, geelong, closure, east, north, chilwell, beach, newtown, eastern park, last tram, tram 18, tram 7, tram 6, tram 19, tram 1 -
 Queenscliffe Maritime Museum
Leisure object - Model SS Time, Jim Sutherland
10.00AM - Received call to prepare and proceed to S. S. Time aground on Corsair Rock with other members of salvage party. Took taxi home to pick up warm clothing and gear returning at once to Fleet Forge works. Arrangements made to board tug Eagle at 5 North Wharf at 1.30PM with diving gear and salvage pumps.Scale model of SS timess time, wrecks, port phillip, corsair rock, model ship -
Queenscliffe Maritime Museum
Leisure object - Model Blue Nose I, Clive Barnard, 1982
Bluenose I was a fishing and racing gaff rig schooner built in 1921 in Nova Scotia, Canada. A celebrated racing ship and fishing vessel, Bluenose under the command of Angus Walters, became a provincial icon for Nova Scotia and an important Canadian symbol in the 1930s, serving as a working vessel until she was wrecked in 1946. Nicknamed the "Queen of the North Atlantic", she was later commemorated by a replica, Bluenose II, built in 1963. The name Bluenose originated as a nickname for Nova Scotians from as early as the late 18th century.Scale model of Bluenose Imodel, schooner, blue nose i, nova scotia, canada -
 Queenscliffe Maritime Museum
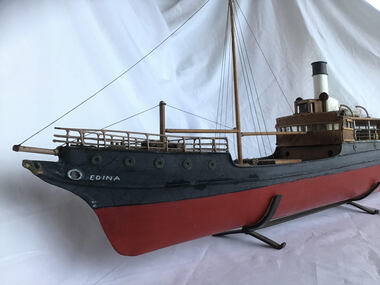
Leisure object - Model SS Edina, Les Hess
The SS ‘Edina’ is one of the most remembered vessels that plied the waters of Victoria’s Port Phillip Bay. Often referred to as the ‘Old Lady of Port Phillip’. Her active service included the North Sea trade, ‘Crimean War’, ‘American Civil War’, Victoria’s west coast run, New Zealand to Melbourne trade, Queensland coastal trade, and of course, the Port Phillip Bay runs between the years 1880 to 1938. ‘SS’ being an abbreviation for ‘Screw Steamer’ signifying that she was propelled by a steam engine rotating a single propeller, or ‘screw’ as it was know at the time.Model of a well known bay steamer operating in Port Phillip between 1880 and 1938.Model of SS Edinamodel, ss edina, screw steamers, port phillip, bay steamers -
 Otway Districts Historical Society
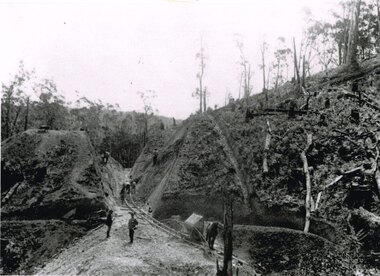
Photograph, Brucker, Powneys Cutting being excavated, c.1902, c.1902
Because of the vast quantity of piles for harbour works Pettit Bros. of Geelong arranged for an addition siding to be installed at Ferguson on the north side of the station in 1913. They then laid a tramway in a northerly direction along the original alignment of Charley's Creek road to the top of Powneys Cutting, 1.8 km from Ferguson, where a log winch was sited. This powerful winch hauled carefully selected piles from the north-west. Jim Facey and Jim, Ted and Tom Cashin formed a partnership to log an area along the Charley's Creek Road six kilometres from Ferguson, operating full-time from 1934. After leasing three Crown sites and cutting them out the partners shifted logging operations to Powneys farm, which they had purchased, and laid a log trail into the farm. The old road reserve was also purchased, and the log tram continued along the road reserve for one kilometre to Powneys Cutting. Logs were winched up to the tramline and despatched to the mill along the falling grade of the road.B/W. 201mm x 268mm. Powneys Cutting being excavated by four men, two men on either side of the slope, and a horse at the end of the line, in c.1902.ferguson; powneys cutting; tramways; powneys farm; pettit; jim facey; jim cashin; ted cashin; tom cashin; charley's creek road; -
 Otway Districts Historical Society
Family History, Colin & Margaret McKenzie, McKenzie, c.2007
Hector McKenzie and Abigail (nee McLean), his wife, lived at Ullapool on the shores of Lochbroom in the far north-west of Scotland. They were married on 8 March, 1821, and had several children. Three of the children, Murdoch and his two sisters, Isabella and Lexcy, emigrated to Australia from Liverpool on the ship "Hornet" on 29 July, 1854, along with 434 other assisted passengers. They arrived at Geelong on 23 October, 1854. Later, Murdoch married a like-named Margaret McKenzie on 23 May, 1861, and had eight children. At the time as the children were thinking about branching out on their own the Otway forest was surveyed and opened for selection. In 1890/91 Murdoch, a son, Duncan, and a daughter, Abigail, selected blocks at Weeaproinah. McKenzie. Colin and Margaret McKenzie. Self published; Weeaproinah (Vic); 2007(?). 54 p.; Illus; maps. Soft cover. Loose-leaf A4.